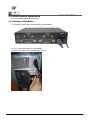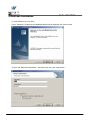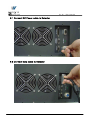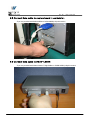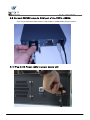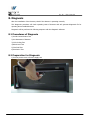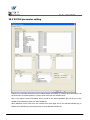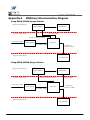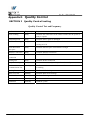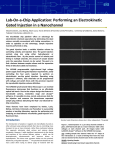
1
Page 1 of 108
Date 05/16/2008
Doc No : RA21-085-003
Digital Radiography
System
MAXXray
User Manual
(for veterinary use)
Rev 0.0
Vieworks Co., Ltd.
2008/05/16
Manufacturer; vieworks Co., Ltd.
#604, SuntechcityⅡ, 307-2, Sangdaewon-dong Jungwon-gu
Seongnam-city Gyeonggi-do, 462-806, South Korea
TEL : +82-70-7011-6161 FAX : +82-31-737-4954
www.vieworks.com
MAXXray User Manual
RQP-501-1r0
Page 2 of 108
Date 05/16/2008
Doc No : RA21-085-003
Revision History
Rev 0.0
16 May. 2008
MAXXray User Manual
First release
RQP-501-1r0
Page 3 of 108
Date 05/16/2008
Doc No : RA21-085-003
Accident Reporting
The CE Council Directive 93/42/EEC concerning Medial Devices require that
“the manufacturer of medical devices submit a report to Local competent
authorities whenever he becomes aware of information that reasonably
suggests that one of his installed devices:
● may have caused or contributed to a death or serious injury, or
● has malfunctioned and, if the malfunction recurs, is likely to cause or
contribute to a death or serious injury.
In order for Vieworks to comply with these requirements, all users of this
equipment, operators and service technicians, are required to provide the
Quality Assurance Manager at Vieworks with the following information
regarding all reportable events as soon as possible:
1) Identification of the model and serial number.
2) Description of the event. Including whether any serious injury or death has been occurred.
3) Identification of the person who is submitting the information including phone number
and fax number if available.
Reference to standards
EN60601-1
Medical electrical equipment
EN60601-1-1
Medical electrical equipment
EN60601-1-2
Part 1: general requirements for safety
Part 1: General requirement for the safety Collateral
standard : Safety requirement for medical electrical
systems
Medical electrical equipment
Part 2: electromagnetic compatibility–requirements
and tests
Authorized representatives
If you have any accident, please contact the authorized representatives
MAXXray User Manual
RQP-501-1r0
Page 4 of 108
Date 05/16/2008
Doc No : RA21-085-003
Table of Contents
Revision History ................................................................................................................................... 2
Accident Reporting.............................................................................................................................. 3
Reference to standards ..................................................................................................................... 3
Authorized representatives.............................................................................................................. 3
Table of Contents................................................................................................................................. 4
1. Safety .................................................................................................................................................. 7
1.1 Safety Guidelines.......................................................................................................................... 7
1.2 General Hazards............................................................................................................................ 7
1.2.1 Radiation hazards............................................................................................................. 7
1.2.2 Electric shock hazard ...................................................................................................... 8
1.2.3 Explosion Hazard .............................................................................................................. 8
1.2.4 Implosion Hazard ............................................................................................................. 8
1.3 Owner’s Responsibility............................................................................................................... 8
1.4 System Diagnostic........................................................................................................................ 8
1.5 Calibration ...................................................................................................................................... 8
1.6 Distances measurements .......................................................................................................... 9
1.7 Left/Right Marker ........................................................................................................................ 9
1.8 Images Back-up............................................................................................................................ 9
1.9 User Limitations............................................................................................................................ 9
1.10 Cleaning the system ................................................................................................................. 9
1.11 Overheating ................................................................................................................................. 9
1.12 Electrical fire.............................................................................................................................. 10
1.13 EMI/EMC Precaution .............................................................................................................. 10
1.16 Disposal ....................................................................................................................................... 15
1.17 Changing Fuse........................................................................................................................... 15
1.18 Others .......................................................................................................................................... 15
1.19 Appropriation ............................................................................................................................ 15
1.20 Using together with other equipment.............................................................................. 15
1.21 Classification ............................................................................................................................. 15
1.22 Installation and Maintenance ............................................................................................. 15
2. System Description ...................................................................................................................... 15
2.1 Intended use ................................................................................................................................ 15
2.2 System components .................................................................................................................. 15
2.3 Component description ............................................................................................................ 15
3. System Specification ................................................................................................................... 15
3.1 CCD .................................................................................................................................................. 15
3.2 Area of Image .............................................................................................................................. 15
3.3 Scintillator..................................................................................................................................... 15
3.4 Time of Image Capture and Transmission ........................................................................ 15
3.5 Time of Image Capture and Image Processing ............................................................... 15
3.5 CCD Cooling System .................................................................................................................. 15
3.6 Image Specification................................................................................................................... 15
3.7 Black Level .................................................................................................................................... 15
3.8 Resolution ..................................................................................................................................... 15
3.9 Measurement ............................................................................................................................... 15
3.10 Operation Environmental Condition ................................................................................. 15
MAXXray User Manual
RQP-501-1r0
Page 5 of 108
Date 05/16/2008
Doc No : RA21-085-003
3.11 Transport and Storage Environmental Condition......................................................... 15
3.12 Electrical Specification........................................................................................................... 15
3.12.1 AC Power Input(PSU) ................................................................................................. 15
3.12.2 Power Consumption .................................................................................................... 15
3.13 Interface ..................................................................................................................................... 15
4. System Installation ...................................................................................................................... 15
4.1 Matrox Meter II Digital Image Grabber Installation .................................................... 15
4.1.1 Install Matrox Meter II Digital .................................................................................. 15
4.1.2 Install Matrox Meter II Digital Driver..................................................................... 15
4.2 RXDN-USB2N Installation ....................................................................................................... 15
4.2.1 Hardware Installation................................................................................................... 15
4.2.2 Software Installation .................................................................................................... 15
4.3 RXDN-USB2M Installation ...................................................................................................... 15
4.3.1 Hardware Installation................................................................................................... 15
4.3.2 Software Installation .................................................................................................... 15
5 MAXXvue Installation ................................................................................................................... 15
6. Hardware Installation ................................................................................................................. 15
6.1 Connect DC Power cable to Detector .................................................................................. 15
6.2 Connect Data cable to Detector ............................................................................................ 15
6.3 Connect RS232C cable to Detector ...................................................................................... 15
6.4 Connect DC Power cable to Power Supply Unit .............................................................. 15
6.5 Connect Data cable to capture board in workstation ................................................... 15
6.6 Connect Data cable to RXDN-USB2N .................................................................................. 15
6.7 Connect Data cable to RXDN-USB2M.................................................................................. 15
6.8 Connect RS232C cable to COM port of the workstation .............................................. 15
6.9 Connect RS232C cable to COM port of the RXDN-USB2M........................................... 15
6.10 Plug in AC Power cable to power supply unit................................................................ 15
7. Preparation for operating MAXXray system........................................................................ 15
7.1 Select USB Image Grabber and Detector .......................................................................... 15
7.2 Calibration .................................................................................................................................... 15
7.3 Configuration of MAXXvue...................................................................................................... 15
8. Diagnosis.......................................................................................................................................... 15
8.1 Procedures of Diagnosis .......................................................................................................... 15
8.2 Preparation for Diagnosis........................................................................................................ 15
8.3 Password Input........................................................................................................................... 15
8.4 Serial Communication Test ..................................................................................................... 15
8.5 Set parameter of Detector ...................................................................................................... 15
8.6 CCD Cooling Test ........................................................................................................................ 15
8.7 Black Level Test .......................................................................................................................... 15
8.8 Flat Field Test .............................................................................................................................. 15
6.9 Resolution Test ........................................................................................................................... 15
8.10 Save Result of Diagnosis....................................................................................................... 15
9. Calibration ....................................................................................................................................... 15
9.1 Preparation for Calibration ..................................................................................................... 15
9.2 Acquire Black image .................................................................................................................. 15
9.3 Acquire 20% flat field image ................................................................................................. 15
9.4 Acquire 40% flat field image ................................................................................................. 15
9.5 Acquire 60% flat field image ................................................................................................. 15
MAXXray User Manual
RQP-501-1r0
Page 6 of 108
Date 05/16/2008
Doc No : RA21-085-003
9.6 Distortion Correction ................................................................................................................ 15
9.7 Adjust FOV(Field of view) ....................................................................................................... 15
9.8 Generate Calibration Data ...................................................................................................... 15
9.9 Test Calibration Data ................................................................................................................ 15
10.1 What is Configuration ............................................................................................................ 15
10.2 General parameter setting ................................................................................................... 15
10.2.1 Hospital information ................................................................................................... 15
10.2.2 Image Grabber Selection .......................................................................................... 15
10.2.3 Hardware direction compensation......................................................................... 15
10.2.4 Thumbnail tab information....................................................................................... 15
10.2.5 Expansion setting......................................................................................................... 15
10.2.6 Dicom header info........................................................................................................ 15
10.2.7 Device Name .................................................................................................................. 15
10.2.8 Dummy fields display name ..................................................................................... 15
10.2.9 Patient comparison condition.................................................................................. 15
10.2.10 File-worklist location................................................................................................ 15
10.3 DICOM parameter setting..................................................................................................... 15
10.3.1 Worklist ........................................................................................................................... 15
10.3.2 File-worklist ................................................................................................................... 15
11. Trouble Shooting ........................................................................................................................ 15
11.1 Failure Mode .............................................................................................................................. 15
11.2 Repairing Power Failure........................................................................................................ 15
11.3 Repairing Serial communication Failure ......................................................................... 15
11.4 CCD Cooling Test Failure....................................................................................................... 15
11.5 Black Level Test Failure ......................................................................................................... 15
11.6 Flat Field Test Failure ............................................................................................................. 15
11.7 Resolution Test Failure .......................................................................................................... 15
12. WARRANTY ................................................................................................................................... 15
Appendix A MAXXray Interconnection Diagram ................................................................ 15
Appendix B Symbols..................................................................................................................... 15
Appendix C How to use line trigger........................................................................................ 15
Appendix D Quality Control ..................................................................................................... 15
MAXXray User Manual
RQP-501-1r0
Page 7 of 108
Date 05/16/2008
Doc No : RA21-085-003
1. Safety
1.1 Safety Guidelines
Caution
Always be alert when operating this equipment. If a malfunction occurs, do not use this
equipment until qualified personnel correct the problem.
This Product was designed and manufactured to ensure maximum safety of operation and to
meet all the safety requirements applicable to electronic medical equipment. However, anyone
attempting to operate the system must be fully aware of potential safety hazards. It should be
operated and maintained in strict compliance with the following safety precautions and
operating instruments contained herein:
1) The product should be installed, maintained and serviced according to Vieworks
maintenance procedures and by Vieworks personnel or other qualified maintenance personnel
approved in writing by Vieworks. Operation and maintenance should be done in strict
compliance with the operation instructions contained in the manuals.
2) The system, in whole or in part, cannot be modified in any way without written approval
from Vieworks.
3) Before authorizing any person to operate the system, verify that the person has read and
fully understand the Service Manual. The owner should make certain that only properly
trained and fully qualified personnel are authorized to operate the equipment. An authorized
operators list should be maintained.
4) Prevent unauthorized personnel from access to the system.
5) It is important that this Service Manual be kept at hand, studied carefully and reviewed
periodically by the authorized operators.
6) The owner should ensure continuous power supply to the system, with voltage and current
according to the product specifications. If power failures are not infrequent, a
UPS(Uninterrupted Power Supply) should be installed to avoid loss of data.
7) If the product does not operate properly or if it fails to respond to the controls described in
this manual, the operator should immediately contact Vieworks field service representative,
report the incident and await further instructions.
8) The images and calculations provided by this system are intended to be used as tools for
the competent user. They are explicitly not to be regarded as a sole incontrovertible basis for
clinical diagnosis. Users are encouraged to study the literature and reach their own professional
conclusions regarding the clinical utility of the system.
9). The user should be aware of the product specifications and of the system’s accuracy and
stability limitations. These limitations must be considered before making any decision based on
quantitative values, in case of doubt, please consult a Vieworks representative.
1.2 General Hazards
1.2.1 Radiation hazards
This system can be interfaced to x-ray generating equipment. Be certain to follow the safety
instructions and specifications for wearing proper lead shielding when in the presence of x-ray
generating equipment.
All personnel must wear dosimeters during all phases of installation, operation and
maintenance of the system and the equipment to which it is interfaced.
MAXXray User Manual
RQP-501-1r0
Page 8 of 108
Date 05/16/2008
Doc No : RA21-085-003
1.2.2 Electric shock hazard
A three conductor AC power is supplied with this system to provide the proper electrical
grounding. To minimize the shock hazard, the power cable must be plugged into a UL-approved
three-contact electrical outlet.
Do not remove or open system covers or plugs. The internal circuits of the system use high
voltages that can cause serious injury or death from electrical shock. The operator should
never be allowed to open the panels of the system.
1.2.3 Explosion Hazard
Do not operate the equipment in the presence of flammable or explosive liquids, vapors or
gases. Do not plug in or turn on the system in hazardous substances are detected in the
environment.
If flammable substances are detected after the system as been turned on, do not attempt to
turn off the system or unplug it. Evacuate and ventilate the area before turning the system off.
1.2.4 Implosion Hazard
Do not subject the system to serious mechanical shocks, as the cathode ray tube(CRT) can
explode if struck or jarred. This may result in flying pieces of glass and coating that can cause
serious injury.
1.3 Owner’s Responsibility
Caution
Do not use the system if unsafe conditions are known to exist. In case of a hardware failure
that could cause hazardous conditions(smoke, fire and etc), turn the power OFF and unplug
the power cords of all subsystems.
The owner is responsible for ensuring that any one using the system reads and understand the
Service Manual and other relevant literature, and fully understands them. Vieworks makes no
representation, however, that the act of reading this manual renders the reader qualified to
operate, test and calibrate the system.
1.4 System Diagnostic
The MAXXrayCalibration software runs a system diagnostic. Run MAXXrayCalibration software
when install system or every 1 year after installation.
If an error is detected, report detailed error to Vieworks field service representative.
Caution
The owner is responsible for ensuring that diagnostic of system is performed every year.
Do not try to use the system if system diagnostic is fail.
1.5 Calibration
To ensure the optimal performances of the system it is important to verify that system is
calibrated.
MAXXray User Manual
RQP-501-1r0
Page 9 of 108
Date 05/16/2008
Doc No : RA21-085-003
Caution
The owner is responsible for ensuring that the system calibration is performed at installation
time or if the system is repaired. Do not try to use the system if system calibration is not
performed.
1.6 Distances measurements
Distances measurements in millimeters are possible only after distance calibration has been
performed using a reference object
Caution
The operator is responsible for performing distance calibration with a reference object and
verifying the results of the distance calibration before taking any distance measurements
on an image.
1.7 Left/Right Marker
The operator is responsible for the correct and clear marking on the left or right side of the
image to eliminate possible errors.
The software includes an option to mark the image with L (left) or R (right) indicator from
acquisition phase through printing and archiving. If the operator chose, for any reason, not to
use L/R markers, he must use an alternative way to eliminate any possible mistake.
1.8 Images Back-up
To avoid the possibility of loosing images, which might result in patient being exposed to
additional doses of radiation, it is important to back-up the images by filming or by using the
CD or DVD option. This should be done as a routine operation for every patient.
If the hard disk of workstation is about to full, the operator should back-up images and delete
the images to make room on hard disk for new patient.
Caution
The operator is responsible for backing-up images of each patient. Do not accumulate
images in the system without having a back-up.
1.9 User Limitations
The MAXXvue software has the technician mode, this mode could only be operated with the
inputting PASSWORD. The technician mode should be operated by the personnel who is
qualified by Vieworks.
1.10 Cleaning the system
Use only isopropyl alcohol to clean surfaces of the system. Do not use detergents or organic
solvents to clean the system. Strong detergent, and organic cleaners may damage the finish
and cause structural weakening. Do not clean the system with turning the power on.
1.11 Overheating
Do not block the ventilation ports of the detector to prevent overheating of the detector.
Overheating can cause system malfunction and damages.
MAXXray User Manual
RQP-501-1r0
Page 10 of 108
Date 05/16/2008
Doc No : RA21-085-003
1.12 Electrical fire
● This equipment is not suitable for use in the presence of a flammable an aesthetic mixture
with air or with oxygen or nitrous oxide.
● Conductive fluids that drain into the active circuit components of the system may cause short
circuits that can result in electrical fire. Therefore, do not place fluids or food on any part of
the system.
● To avoid electric shocks and burns caused by use of the wrong type of fire extinguisher,
make sure that the fire extinguisher at the site has been approved for use on electrical fires.
1.13 EMI/EMC Precaution
During installation of the system, care must be taken to prevent the potential risk of
electromagnetic interference between this equipment and other devices. The device has been
tested for EMI/EMC compliance, but interference can still occur in an electromagnetically noisy
environment.
Attempt to maintain a suitable distance between electrical devices to prevent crossinterference.
1.14 EMC Information
1.14.1 Guidance and manufacturer’s declaration - electromagnetic emissions
The EUT is intended for use in the electromagnetic environment specified below.
The customer or the user of the EUT should assure that it is used in such an
environment.
Immunity test
RF Emissions
CISPR 11
Compliance
Group 1
RF Emissions
CISPR 11
Class B
Harmonic
emissions
IEC 61000-3-2
Voltage
fluctuations/
Flicker emissions
Class A
Electromagnetic environment -guidance
The EUT uses RF energy only for its internal
function. Therefore, its RF emissions are very
low and are not likely to cause any interference
in nearby electronic equipment
The EUT is suitable for use in ail establishments,
including domestic establishments and those
directly connected to the public low-voltage
power supply network that supplies buildings
used for domestic purposes
Complies
IEC 61000-3-3
MAXXray User Manual
RQP-501-1r0
Page 11 of 108
Date 05/16/2008
Doc No : RA21-085-003
1.14.2 Guidance and manufacturer’s declaration - electromagnetic immunity
The EUT is intended for use in the electromagnetic environment specified below.
The customer or the user of the EUT should assure that it is used in such an
environment.
Immunity test
IEC 60601
Compliance level
Electromagnetic
Test level
environment -guidance
Electrostatic
±6kV Contact
±6kV Contact
Floors should be wood,
discharge
±8kV air
±8kV air
concrete or ceramic tile. If
(ESD)
floors are covered with
IEC 61000-4-2
synthetic material, the
relative humidity should be
at least 30%.
±2kV for power
Mains power quality should
Electrical fast
±2kV for power
supply lines
be that of a typical
transient/burst
supply lines
± 1kV for
commercial or hospital
IEC 61000-4-4
± 1kV for
input/output lines environment.
input/output
lines
Mains power quality should
Surge
±1kV differential ±1kV differential
be that of a typical
mode
IEC 61000-4-5
mode
commercial or hospital
±2kV common
±2kV common
environment.
mode
mode
Voltage dips,
short
interruptions
and
voltage
variations
on power
supply
input lines
IEC 61000-4-11
Power
frequency
(50/60Hz)
magnetic field
IEC 61000-4-8
<5% Uт
(>95% dip in
Uт)
for 0.5cycle
40% Uт
(60% dip in Uт )
for 5 cycle
70% Uт
(30% dip in Uт)
for 25 cycle
<5% Uт
(<95% dip in
Uт )
for 5 s
3 A/m
<5% Uт
(>95% dip in Uт)
for 0.5cycle
40% Uт
(60% dip in Uт )
for 5 cycle
70% Uт
(30% dip in Uт)
for 25 cycle
<5% Uт
(<95% dip in Uт )
for 5 s
Mains power quality should
be that of a typical
commercial or hospital
environment. If the user of
the EUT image intensifier
requires continued
operation during power
mains interruptions,
it is recommended that the
EUT image intensifier be
powered from an
uninterruptible power supply
or a battery.
3 A/m
Power frequency magnetic
fields should be at levels
characteristic of a typical
location in a typical
commercial or hospital
environment.
NOTE Uт is the a.c. mains voltage prior to application of the test level.
MAXXray User Manual
RQP-501-1r0
Page 12 of 108
Date 05/16/2008
Doc No : RA21-085-003
1.14.3 Guidance and manufacturer’s declaration - electromagnetic
immunity
The EUT is intended for use in the electromagnetic environment specified below.
The customer or the user of the EUT should assure that it is used in such an environment.
Immunity test
IEC 60601
Compliance
Electromagnetic environment - guidance
test level
level
Conducted RF
IEC 61000-46
Radiated RF
IEC 61000-43
3 Vrms
150 kHz to
80MHz
3 Vrms
150 kHz to
80MHz
Portable and mobile RF communications
equipment should be used no closer to
any part of the EUT, including cables, than
the recommended separation distance
calculated from the equation applicable to
the frequency of the transmitter.
3 V/m
80 MHz to
2.5GHz
3 V/m
80MHz to
2.5GHz
Recommended separation distance
where P is the maximum output power
rating of the transmitter in watts (W)
according to the transmitter manufacturer
and d is the recommended separation
distance in meters (m).
Field strengths from fixed RF transmitters,
as deter-mined by an electromagnetic site
a
survey,
should be less than the compliance level
b
in each frequency range.
Interference may occur in the vicinity of
equipment marked with the following
symbol :
MAXXray User Manual
RQP-501-1r0
Page 13 of 108
Date 05/16/2008
Doc No : RA21-085-003
NOTE 1) At 80MHz and 800MHz, the higher frequency range applies.
NOTE 2) These guidelines may not apply in all situations. Electromagnetic propagation is
affected by absorption and reflection from structures, objects and people.
a
Field strengths from fixed transmitters, such as base stations for radio
(cellular/cordless) telephones and land mobile radios, amateur radio, AM and FM radio
broadcast and TV broadcast cannot be predicted theoretically with accuracy. To assess
the electromagnetic environment due to fixed RF transmitters, an
electromagnetic site survey should be considered. If the measured field strength in the
location in which the EUT is used exceeds the applicable RF compliance level above, the
EUT should be observed to verify normal operation. If abnormal performance is
observed, additional measures may be necessary, such as re-orienting or relocating the
EUT.
b
Over the frequency range 150kHz to 80MHz, field strengths should be less than [V1]
V/m.
MAXXray User Manual
RQP-501-1r0
Page 14 of 108
Date 05/16/2008
Doc No : RA21-085-003
1.14.4 Recommended separation distances between portable and mobile
RF communications equipment and the EUT
The is intended for use in an electromagnetic environment in which radiated
RF disturbances are controlled. The customer or the user of the EUT can help
Prevent electromagnetic interference by maintaining a minimum distance between
portable and mobile RF communications equipment (transmitters) and the EUT as
recommended below, according to the maximum output power of the communications
equipment.
Separation distance according to frequency of transmitter
Rated
maximum
[m]
output power
800MHz to
150kHz to
80MHz to
of transmitter
2.5GHz
80MHz
800MHz
[W]
V1=3Vrms
E1=3V/m
E1=3V/m
0.2333
0.7378
2.3333
7.3785
23.333
0.01
0.116
0.1166
0.1
0.368
0.3687
1
1.166
1.1660
10
3.687
3.6872
100
11.660
11.6600
For transmitters rated at a maximum output power not listed above, the
recommended separation distance d in metres (m) can be estimated using the
equation applicable to the frequency of the transmitter, where p is the maximum
output power rating of the transmitter in watts (W) according to the transmitter
manufacturer.
NOTE 1) At 80MHz and 800MHz, the separation distance for the higher frequency
range applies.
NOTE 2) These guidelines may not apply in all situations. Electromagnetic
propagation is affected by absorption and reflection from structures, objects
and people.
MAXXray User Manual
RQP-501-1r0
Page 15 of 108
Date 05/16/2008
Doc No : RA21-085-003
1.14.5 Immunity and Compliance Level
Immunity test
IEC 60601 Test
Level
Actual Immunity
Level
Compliance Level
Conducted RF
IEC 61000-4-6
3Vrms
150kHz to 80MHz
3Vrms
3Vrms
Radiated RF
IEC 61000-4-3
3Vrms
80MHz to 2.5GHz
3V/m
3V/m
1.14.6 Guidance and manufacturer’s declaration - electromagnetic
immunity
The EUT is intended for use in the electromagnetic environment specified below.
The customer or the user of the EUT should assure that it is used in such an
electromagnetic environment.
Immunity test
IEC 60601
test level
Compliance
level
Electromagnetic environment - guidance
3 Vrms
Conducted
150 kHz to
RF
IEC 61000-4- 80MHz
6
3 Vrms
150 kHz to
80MHz
The EUT must be used only in a shielded
location with a minimum RF shielding
effectiveness and, for each cable that
enters the shielded location with a
minimum RF shielding effectiveness and,
for each cable that enters the shielded
location
3 V/m
Radiated RF
IEC 61000-4- 80 MHz to
2.5GHz
3
3 V/m
80MHz to
2.5GHz
Field strengths outside the shielded
location from fixed RF transmitters, as
determined by an
electromagnetic site survey, should be
a
less than 3V/m.
Interference may occur in the vicinity of
equipment marked with the following
symbol:
MAXXray User Manual
RQP-501-1r0
Page 16 of 108
Date 05/16/2008
Doc No : RA21-085-003
NOTE 1) These guidelines may not apply in all situations. Electromagnetic
propagation is affected by absorption and reflection from structures, objects and
people.
NOTE 2) It is essential that the actual shielding effectiveness and filter attenuation
of the shielded location be verified to assure that they meet the minimum
specification.
a
Field strengths from fixed transmitters, such as base stations for radio
(cellular/cordless) telephones and land mobile radios, amateur radio, AM and FM
radio broadcast and TV broadcast cannot be predicted theoretically with accuracy.
To assess the electromagnetic environment due to fixed RF transmitters, an
electromagnetic site survey should be considered. If the measured field strength
outside the shielded location in which the EUT is used exceeds 3V/m, the EUT
should be observed to verify normal operation.
If abnormal performance is observed, additional measures may be necessary, such
as relocating the EUT or using a shielded location with a higher RF shielding
effectiveness and filter attenuation.
1.15 Maintenance precautions
Do not open enclosures, disconnect or connect any cables or accessories. Only qualified personnel by
Vieworks can do the maintenance.
1.16 Disposal
This product contains harmful materials such as lead. Improper disposal of this product may result in
environmental contamination.
When disposing of this equipment, contact Vieworks representative. Do not dispose of any part of this
equipment without consulting a Vieworks representative first.
Vieworks does not assume any responsibility for damage resulting from disposal of this equipment
without consulting Vieworks.
1.17 Changing Fuse
Caution
For Continued Protection Against Risk of Fire, Replace Only with Same Type and rating of
Fuse. Disconnect Power Before Changing Fuse.
Use only fuse to meet the specification of the system when you replace fuse with another one.
MAXXray User Manual
Page 17 of 108
Date 05/16/2008
Doc No : RA21-085-003
1.18 Others
Caution
No User- Serviceable Parts Inside.
1.19 Appropriation
Caution
Don’t make operation except for the intended purpose
The system, in whole or in part, cannot be modified in any way without written approval from
Vieworks.
1.20 Using together with other equipment
Warning: When the unit is used together with other equipment in the patient area, the equipment
shall be connected according to Standard UL 60601-1 and IEC 60601-1.
1.21 Classification
1) CLASS I EQUIPMENT
2) BF Type
3) NO protection against ingress of water
4) NOT suitable for use in the presence of a flammable an aesthetic mixture with air or with Qxide
5) Continuous operation
1.22 Installation and Maintenance
Caution
Only qualified service personnel, who have received training from Vieworks should
perform this installation and troubling shooting.
Only qualified service personnel, who have received training from Vieworks should perform this
installation and trouble shooting. Calibration procedures should be performed at the system installation
time or if the x-ray generator is changed otherwise the system quality is decreased.
MAXXray User Manual
Page 18 of 108
Date 05/16/2008
Doc No : RA21-085-003
2. System Description
2.1 Intended use
MAXXray system is indicated for digital imaging solution designed for general radiographic system for
human use. It is intended to replace film or screen based radiographic systems in all general purpose
diagnostic procedures.
It controls x-ray exposure and x-ray dosage by means of interfacing with x-ray generator.
Various features of this system enable the operator to diagnose easier and faster than conventional nondigital techniques.
Computerized window, image inversion, image processing, zooming, panning, window level adjustment,
contrast adjustment, and various features enable the operator to view diagnostic details difficult to see
using conventional non-digital techniques.
2.2 System components
MAXXray system consists of detector, image transfer device, power supply unit, software and its
accessories.
And there are two kind of detectors
MAXXray system components
Detector
RXDN-6000D,RXDN-6500D
Power Supply Unit
RXDN-6000P-15
Software
Viewer
MAXXvue
Configuration
MAXXvueConfigure
Calibration and Diagnostic
MAXXrayCalibration
Accessories
Camera Interface Cable (P/N : 1110-3517-01A)
DC Power Cable (1200-43407-01A)
Generator Interface Cable (P/N : 1170-3417-01A)
RS232 Cable (P/N : 1170-3414-01A)
AC Power Cable (P/N : 1190-6203-01A)
Image Grabber : Recommended, not part of MAXXRAY
Matrox Meter II dig
RXDN-USB2N
RXDN-USB2M
MAXXray User Manual
Page 19 of 108
Date 05/16/2008
Doc No : RA21-085-003
Workstation : Recommended, not part of MAXXray
OS
Windows XP professional
CPU
Minimum Pentinum 4, 3.0 GHz
Memory
Minimum 2G Byte
Hard Disk
Minimum 80G Byte
Ethernet
Minimum 100 Mbit/s
Monitor
1600x1200, Color
CD Rom
CD or DVD R/W
2.3 Component description
1) Detector
Create X-ray image by using CCD camera and output the result in RS-644 format.
2) Power supply unit
Supply DC-power to detector.
3) MAXXvue
Software to view X-ray image. Get image from detector, process it to ease the diagnostic, save it in
database and manage it.
4) MAXXrayCalibration
Diagnose detector and report the result. Calibrate the system.
5) MAXXvueConfigure
Configure parameters for MAXXray Digital Imaging System
MAXXray User Manual
Page 20 of 108
Date 05/16/2008
Doc No : RA21-085-003
3. System Specification
3.1 CCD
CCD
FFT(Full Frame Transfer) CCD
Effective Pixel Number
2040 × 2478 (RXDN-6000D)
2040 X 2780 (RXDN-6500D)
Cell pitch
9 ㎛ ×9 ㎛
Fill factor
100%
3.2 Area of Image
14" X 17" (RXDN-6000D)
12” X 16” (RXDN-6500D)
3.3 Scintillator
Gadolium or CsI
3.4 Time of Image Capture and Transmission
Shorter than 3.5 second
3.5 Time of Image Capture and Image Processing
Shorter than 10 second
3.5 CCD Cooling System
CCD cooling system cools CCD to reduce thermal noise of the image.
1) Cooling Element
Thermoelectric Cooler(TEC)
2) Operation Temperature(CCD)
Maintain -5±1℃ at 25℃ of surrounding temperature.
3) Cooling Speed(CCD)
To be kept -5±1℃within 15 minutes after power on at 25℃ of surrounding temperature.
3.6 Image Specification
1) Image Format
2040 X 2478 (RXDN-6000D)
2040 X 2780 (RXDN-6500D)
2) Field of View
Captured image should reflect 100±2% of scintillator size
MAXXray User Manual
Page 21 of 108
Date 05/16/2008
Scintillator size : 14” X 17” (RXDN-6000D),
Doc No : RA21-085-003
12” X 16” (RXDN-6500D),
3.7 Black Level
1) Definition
It is the average pixel value of the pixels located within diameter of 20 pixels from the center of the
dark image. Dark image should be captured using MAXXrayCalibration software after cooling CCD
enough.
2) Specification
It should be 2500 +/- 1500
3.8 Resolution
It should be more than 2.8 lp/mm(RXDN-6000D), 3.3 lp/mm(RXDN-6500D)
at the center of the
detector screen.
The measure resolution, follow the below procedure.
- Locate resolution chart (Nuclear Associates Model :07-523 or the equivalent) at the center of the
detector screen with the diagonal position.
- Line pairs that could be separated by adjusting window level is the resolution.
3.9 Measurement
Distance : +/- 1%
Angle : +/- 1%
3.10 Operation Environmental Condition
Temperature : 10℃ - 30℃
Humidity : 10 – 70%
Atmospheric Pressure : 500 – 1060 hpa
3.11 Transport and Storage Environmental Condition
Temperature : -30℃ - 70℃
Humidity : 10 – 90%
Atmospheric Pressure : 500 – 1060 hpa
3.12 Electrical Specification
3.12.1 AC Power Input(PSU)
100 - 240VAC +/- 10%, 50/60Hz
MAXXray User Manual
Page 22 of 108
Date 05/16/2008
Doc No : RA21-085-003
3.12.2 Power Consumption
Less than 95W (Detector itself)
3.13 Interface
1) Image data
RS-644
2) System Control
RS-232C
3) RS-232
Baud rate : 19,200 bps
Parity bit : Even
Data bit : 8 bit
Stop bit : 1 bit
MAXXray User Manual
Page 23 of 108
Date 05/16/2008
Doc No : RA21-085-003
4. System Installation
MAXXray system use Matrox Meter II Digital frame grabber, RXDN-USB2N, RXDN-USB2M as an
image grabber
- Refer to 4.1 for Matrox Meter II Digital Image grabber Installation
- Refer to 4.2 for RXDN-USB2N
- Refer to 4.3 for RXDN-USB2M
Caution
The product should be installed by qualified maintenance personnel approved by
Vieworks.
4.1 Matrox Meter II Digital Image Grabber Installation
4.1.1 Install Matrox Meter II Digital
1) Install ‘Image grabber board(Meteor II Digital-4L)’ into one of the PCI slots
4.1.2 Install Matrox Meter II Digital Driver
1) Insert the MilLite 7.5 CD into the CD-ROM drive
2) Select ‘Matrox Imaging Library’ and ‘Intellicam’. Then Click Continue
MAXXray User Manual
Page 24 of 108
Date 05/16/2008
Doc No : RA21-085-003
Caution
If autorun is not enabled in your computer, browse the contents of the
MilLite 7.5 and double click the Setup.exe file to run the CD
3) Click “Next” button
4) Click “I Agree” button
MAXXray User Manual
Page 25 of 108
Date 05/16/2008
5) Click “Next” button
MAXXray User Manual
Doc No : RA21-085-003
Page 26 of 108
Date 05/16/2008
6) Click “Next” button
7) Click “No” button to continue
MAXXray User Manual
Doc No : RA21-085-003
Page 27 of 108
Date 05/16/2008
8) Check “Meteor-II/Digital” and “VGA”, then click “Next” button
9) Click “No” button
MAXXray User Manual
Doc No : RA21-085-003
Page 28 of 108
Date 05/16/2008
10) Click “OK” button
11) Click “Yes” button
MAXXray User Manual
Doc No : RA21-085-003
Page 29 of 108
Date 05/16/2008
12) Click “Next” button
13) Click “Next” button
MAXXray User Manual
Doc No : RA21-085-003
Page 30 of 108
Date 05/16/2008
Doc No : RA21-085-003
14) Click “Next” button
15) Select “Custom’” and input ”128” into the edit box and Click “Next” button
MAXXray User Manual
Page 31 of 108
Date 05/16/2008
16) Click “Next” button
17) Click “Finish” button
MAXXray User Manual
Doc No : RA21-085-003
Page 32 of 108
Date 05/16/2008
18) Click “Next” button
19) Click “Next” button
MAXXray User Manual
Doc No : RA21-085-003
Page 33 of 108
Date 05/16/2008
20) Click “Ok” button
21) Click “Ok” button
MAXXray User Manual
Doc No : RA21-085-003
Page 34 of 108
Date 05/16/2008
Doc No : RA21-085-003
22) Click “Ok” button
23) Check “ Yes, I want restart my computer now” and click “Finish” button
Then the computer will restart automatically.
MAXXray User Manual
Page 35 of 108
Date 05/16/2008
Doc No : RA21-085-003
24) Run the ‘Start->Program->Matrox Imaging Products->Intellicam->Intellicam’. When the
following window display, click the ‘Close’ Button
25) When the following window display, confirm that ‘Meteor_II_Dig Device 0’ is activated (It
means that Meteor II Digital has been successfully installed)
Note) If you can not see the window, you can open it running ‘Options->System Selection’
Click “Close” button
Now the installation of the frame grabber driver is finished
MAXXray User Manual
Page 36 of 108
Date 05/16/2008
Doc No : RA21-085-003
4.2 RXDN-USB2N Installation
※ If you have RXDN-USB2N, skip this section
4.2.1 Hardware Installation
1) Connect the power-cable and USB-cable to RXDN-USB2N Grabber
2) Turn the RXDN-USB2N power on
3) Connect the USB-cable to the PC
4.2.2 Software Installation
If USB cable is connected with the RXDN-USB2N powered on, the following installation wizard will be
MAXXray User Manual
Page 37 of 108
Date 05/16/2008
executed automatically.
Doc No : RA21-085-003
The Driver of the USB Image Driver is provided in the S/W Package CD by vieworks co, Ltd
1) Select “Install from a list or specific location (Advanced)” then click “Next” button
2) Select “Search for the best driver in these location” and check “Include this location in the search”
and click “Browse” button.
MAXXray User Manual
Page 38 of 108
Date 05/16/2008
Doc No : RA21-085-003
3) Select folder in which driver file USB2.0 Grabber is located, then click “OK” button.
Note : The drive name can be different from above, it is shown for example
Then following window will be displayed.
Click “Next” Button.
Note : The drive name can be different from above, it is shown for example
MAXXray User Manual
Page 39 of 108
Date 05/16/2008
4) Click “Continue Anyway” button
4) Click “Finish” button
MAXXray User Manual
Doc No : RA21-085-003
Page 40 of 108
Date 05/16/2008
4.3 RXDN-USB2M Installation
※ If you have RXDN-USB2N, skip this section
4.3.1 Hardware Installation
1) Connect the power-cable and USB-cable to RXDN-USB2M
2) Turn on the power switch of RXDN-USB2M
3) Connect the other end of the USB-cable to the PC
MAXXray User Manual
Doc No : RA21-085-003
Page 41 of 108
Date 05/16/2008
Doc No : RA21-085-003
4.3.2 Software Installation
If you connect the USB cable with RXDN-USB2M powered on, the following installation wizard will
be executed automatically.
1) Select “Install from a list or specific location (Advanced)” then click “Next” button.
2) Select “Search for the best driver in these location” and check “Include this location in the
search” and click “Browse” button.
MAXXray User Manual
Page 42 of 108
Date 05/16/2008
Doc No : RA21-085-003
3) Select folder in which driver file of RXDN-USB2M is located, then click “OK” button.
Note : The drive name can be different from above, it is shown for example
If the following window will be displayed, click “Next” Button.
Note : The drive name can be different from above, it is shown for example
MAXXray User Manual
Page 43 of 108
Date 05/16/2008
4) Click “Continue Anyway” button
4) Click “Finish” button
MAXXray User Manual
Doc No : RA21-085-003
Page 44 of 108
Date 05/16/2008
Doc No : RA21-085-003
5 MAXXvue Installation
1) Insert MAXXvue CD in CD Drive
2) Run “Setup.exe” program then InstallShield Wizard will be displayed, click “Next” button
3) Input User Name and Organization , and select user, then click “Next” button
MAXXray User Manual
Page 45 of 108
Date 05/16/2008
Doc No : RA21-085-003
4) Select setup type as Complete then click “Next” button
5) “Ready to Install the Program” window will be displayed, press “Install” Button
MAXXray User Manual
Page 46 of 108
Date 05/16/2008
Doc No : RA21-085-003
6) “Installing MAXXvue” will be displayed, Now the InstallShield is installing MAXXvue.
7) After finishing installation of MAXXvue, “InstallShield Wizard Completed” window will be displayed,
Then press “Finish” button.
MAXXray User Manual
Page 47 of 108
Date 05/16/2008
Doc No : RA21-085-003
8) The following message box will be displayed, press “Yes” button to restart computer.
Now the MAXXvue software is successfully installed to the following directory.
Software
c:\program files\MAXXvue
Data
d:\MAXXvueData
Executable File List
MAXXvue.exe
Viewer program
MAXXrayCalibration.exe
Diagnosis and Calibration program
MAXXvueConfigure
Configure program
MAXXray User Manual
Page 48 of 108
Date 05/16/2008
Doc No : RA21-085-003
6. Hardware Installation
Keep the following step to connect cables between Detector and PC, If the system is used with
High Frequency x-ray generator, the interface between x-ray generator and Detector is not needed,
but this system is used with single phase x-ray generator x-ray generator should be interfaced with
the detector.
If this system is used with single phase x-ray generator, after finishing procedure mentioned in
chapter 4, do the additional installation procedure following Appendix C
F/W Upgrade Connector
Data Connector
DC Power Connector
Control Connector
<Connector Layout>
MAXXray User Manual
RS232 Connector
Page 49 of 108
Date 05/16/2008
6.1 Connect DC Power cable to Detector
6.2 Connect Data cable to Detector
MAXXray User Manual
Doc No : RA21-085-003
Page 50 of 108
Date 05/16/2008
Doc No : RA21-085-003
6.3 Connect RS232C cable to Detector
6.4 Connect DC Power cable to Power Supply Unit
MAXXray User Manual
Page 51 of 108
Date 05/16/2008
Doc No : RA21-085-003
6.5 Connect Data cable to capture board in workstation
※ If you are provided with RXDN-USB2N or RXDN-USB2M, skip this section
6.6 Connect Data cable to RXDN-USB2N
※ If you are provided with Matrox Meteor II dig Grabber or RXDN-USB2M, skip this section
MAXXray User Manual
Page 52 of 108
Date 05/16/2008
Doc No : RA21-085-003
6.7 Connect Data cable to RXDN-USB2M
※ If you are provided with Matrox Meteor II dig Grabber or RXDN-USB2N, skip this section
6.8 Connect RS232C cable to COM port of the workstation
※ If you are provided with RXDN-USB2M, skip this section
MAXXray User Manual
Page 53 of 108
Date 05/16/2008
Doc No : RA21-085-003
6.9 Connect RS232C cable to COM port of the RXDN-USB2M.
※ If you are provided with Matrox Meteor II dig Grabber or RXDN-USB2N, skip this section
6.10 Plug in AC Power cable to power supply unit
MAXXray User Manual
Page 54 of 108
Date 05/16/2008
Doc No : RA21-085-003
7. Preparation for operating MAXXray system
To operate MAXXRAY system, following step should be executed
1) Select USB Image Grabber and detector
2) Diagnostics and calibration
3) Configuration of MAXXvue
7.1 Select USB Image Grabber and Detector
1) Run MAXXvueConfigure in “C:\program files\MAXXvue” folder
2) Select Image Grabber
MAXXray User Manual
Page 55 of 108
Date 05/16/2008
7.2 Calibration
Refer to clause 9
7.3 Configuration of MAXXvue
Refer to clause 10
MAXXray User Manual
Doc No : RA21-085-003
Page 56 of 108
Date 05/16/2008
Doc No : RA21-085-003
8. Diagnosis
After the installation of the Detector, check if the detector is operating normally.
This diagnostic procedure will check operating state of detector and will generate diagnostic file for
reporting about installed detector.
Diagnostic will be performed in following sequence with the diagnostic software.
8.1 Procedures of Diagnosis
1) Serial Communication Test
2) Set Parameter of Detector
3) CCD Cooling Test
4) Black Level Test
5) Flat Field Test
6) Resolution Test
8.2 Preparation for Diagnosis
1) Pull out protect cover of Power Supply Unit
MAXXray User Manual
Page 57 of 108
Date 05/16/2008
2) Turn on the power of power supply unit
3) Close protect cover of Power Supply Unit
4) Run MAXXrayCalibration Software
MAXXray User Manual
Doc No : RA21-085-003
Page 58 of 108
Date 05/16/2008
Doc No : RA21-085-003
8.3 Password Input
Input Password, only after inputting password this software will operate.
The default password is “vieworks”.
Caution
The password of the following program is same and if you change the password in
the one of those program, the password of those program will be changed
simultaneously
MAXXvue.exe
MAXXrayCalibration.exe
MAXXvueConfigure..exe
8.4 Serial Communication Test
Select a communication port and click “Port Open” button to establish RS232C connection.
The selection of a communication port varies depending on the selection of Image Grabber.
1) If you chose “RXDN-USB2M”
2) If you choose “RXDN-USB2N”
Select an appropriate port and device and click “Serial Communication Test” button.
Then the test result will be displayed on the text box
MAXXray User Manual
Page 59 of 108
Date 05/16/2008
Doc No : RA21-085-003
8.5 Set parameter of Detector
Select “System Parameter” tab.
Click “Refresh System Control Value” button to get parameter of detector, then the parameters of
detector will be displayed on the parameter field
Select “Line Trigger Polarity” and “Target Temperature” for proper one.
Current temperature field display temperature of CCD and the ambient temperature
8.6 CCD Cooling Test
Wait for 15 minutes after turning on power because CCD cooling requires some time to reach the set
temperature.
Select “Cooling monitor” tab.
Click “Start Temp Monitor” button then the temperature of CCD and ambient temperature will be
displayed every 5 second.
Click “Stop Temp Monitor”, if the CCD temperature is under –4 degree
MAXXray User Manual
Page 60 of 108
Date 05/16/2008
Doc No : RA21-085-003
If the elapsed time is over 15 minutes and CCD temperature is over –4 degree, then the CCD cooling
is abnormal.
8.7 Black Level Test
Select “Pre-resolution Test” tab.
Click “Get Test Dark Frame” button then dark frame image and the center dark level will be displayed.
If center dark level is not within 0 to 1000, then the detector is abnormal
By clicking the “Save Current Image” button, save current image as “Dark.raw”.
MAXXray User Manual
Page 61 of 108
Date 05/16/2008
Doc No : RA21-085-003
8.8 Flat Field Test
Set SID is 1m, then set x-ray generator to 60KV 5mas
Make an x-ray expose without any target, then the flat field frame image and the center flat level will be
displayed.
If the center flat level is not within 500 - 16000, then the detector is abnormal.
By clicking the “Save Current Image” button, save current image as “Flat.raw”.
6.9 Resolution Test
Attach resolution chart (Maker : Nuclear Associate, model 07-523-2) on the center of detector in
diagonal direction
Set x-ray generator to 60KV 10mas and SID to 1m
Make an x-ray expose, then the resolution chart image will be displayed on the image window
Check the best resolution with adjusting “Zoom”, “W/L” and “PAN”.
MAXXray User Manual
Page 62 of 108
Date 05/16/2008
Doc No : RA21-085-003
By clicking the “Save Current Image” button, save current image as “Pre_resolution.raw”.
8.10 Save Result of Diagnosis
By clicking the “Save Diag Result” button, save diagnostic result as “Diag_result.txt”.
MAXXray User Manual
Page 63 of 108
Date 05/16/2008
Doc No : RA21-085-003
9. Calibration
Calibration procedure compensates defect pixels and calibrates pixel gain using the installed x-ray
generator and x-ray tube.
The calibration should be performed on the following case
Detector installation
X-ray generator replacement
X-ray tube replacement
Procedure of Calibration
1) Acquire Black image
2) Acquire 20% flat filed image
3) Acquire 40% flat filed image
4) Acquire 60% flat filed image
5) Distortion correction
6) Adjust FOV
7) Generate calibration data
8) Test calibration data
9.1 Preparation for Calibration
- Run Calibration software
- Input password
- Establish RS232 connection by clicking “Open Port” button
- Click the “Serial Communication Test” button
MAXXray User Manual
Page 64 of 108
Date 05/16/2008
Doc No : RA21-085-003
- Select “Cooling monitor” tab
- Read CCD temperature by clicking “Start Temp. Monitor” button and wait until CCD temperature is
under –4 degree, then click “Stop temp. Monitor” button.
- Set SID to 1.8m or 1m.
9.2 Acquire Black image
Select “Dark Frame Acquisition” tab.
MAXXray User Manual
Page 65 of 108
Date 05/16/2008
Doc No : RA21-085-003
Click “Test Shot” button in Dark Data Acquisition area to get black image and make sure black center
value is 500 +/- 500
Input Dark Accumulation Time data, the data means the number of dark frames used in calibration. The
recommended data is 20.
Click “Get Dark” button to get dark frame data automatically, then the calibration software will get dark
frame data automatically.
During the test of the Calibration, you can control the Window/Level by dragging the mouse. And you
can change the level rapidly by dragging and pressing the SHIFT key at the same time.
9.3 Acquire 20% flat field image
Set x-ray generator to 60KV, 5mas
Select “20% Saturation Flat Image Acquisition” tab.
Click “Test Shot” button and make an x-ray exposure to get a flat field image and then, you can see
center value in the “flat Average value” text box
MAXXray User Manual
Page 66 of 108
Date 05/16/2008
Doc No : RA21-085-003
Make sure the value in “flat Average value” text box should exist within the difference of 10% of the
value in “Flat Average Target value” text box, if not, adjust the x-ray dose and repeat getting a flat field
image until you get the flat level of the flat field image within the recommended level.
Input Flat Accumulation Time data, the data means the number of flat field images used in calibration.
The recommended data is 20.
Wait until Ready of Nth expose message box appear, then make an x-ray exposure to get another flat
field image.
Repeat getting the number of flat field image you selected
9.4 Acquire 40% flat field image
Select “40% Saturation Flat Image Acquisition” tab.
Adjust x-ray generator dose
Click “Test Shot” button and make an x-ray exposure to get a flat field image and then, you can see
center value in the “flat Average value” text box
MAXXray User Manual
Page 67 of 108
Date 05/16/2008
Doc No : RA21-085-003
Make sure the value in “flat Average value” text box should exist within the difference of 10% of the
value in “Flat Average Target value” text box, if not, adjust the x-ray dose and repeat getting a flat field
image until you get the flat level of the flat field image within the recommended level.
Input Flat Accumulation Time data, the data means the number of flat field images used in calibration.
The recommended data is 20.
Click “Get 40% Flat” button to get flat field images then Ready of Nth expose message box will appear
and then make an x-ray exposure, then calibration software will get a flat field image and will display
Nth expose made.
Wait until Ready of Nth expose message box appear, then make an x-ray exposure to get another flat
field image.
Repeat getting the number of flat field image you selected
9.5 Acquire 60% flat field image
Select “60% Saturation Flat Image Acquisition” menu.
Adjust x-ray generator dose
Click “Test Shot” button and make an x-ray exposure to get a flat field image and then, you can see
center value in the “flat Average value” text box
MAXXray User Manual
Page 68 of 108
Date 05/16/2008
Doc No : RA21-085-003
Make sure the value in “flat Average value” text box should exist within the difference of 10% of the
value in “Flat Average Target value” text box, if not, adjust the x-ray dose and repeat getting the flat
field image until you get the flat level of the flat field image within the recommended level.
Input Flat Accumulation Time data, the data means the number of flat field images used in calibration.
The recommended data is 20.
Click “Get 40% Flat” button to get flat field images then Ready of Nth expose message box will appear
and then make an x-ray exposure, then calibration software will get a flat field image and will display
Nth expose made.
Wait until Ready of Nth expose message box appear, then make an x-ray exposure to get another flat
field image.
Repeat getting the number of flat field image you selected
MAXXray User Manual
Page 69 of 108
Date 05/16/2008
Doc No : RA21-085-003
9.6 Distortion Correction
Select “Distotion correction” tab
Put object that is straight on the sides, and expose x-ray
Distortion corrected image will be displayed
If the distortion is not corrected then change “Lens Type” and click “Correct Distortion” button, then
distortion corrected image will be displayed.
If disable “Enable Distortion Correction”, then distortion will not be corrected.
MAXXray User Manual
Page 70 of 108
Date 05/16/2008
Doc No : RA21-085-003
9.7 Adjust FOV(Field of view)
Select “FOV Adjust” tab
Adjust Window/Level to see image clearly.
Adjust right or left line of the red square to locate vertical red line just inside of the white part of the
image by dragging the mouse.
Adjust top or bottom line of the red square to locate horizontal red line just inside of the white part of
the image by dragging the mouse.
MAXXray User Manual
Page 71 of 108
Date 05/16/2008
Doc No : RA21-085-003
9.8 Generate Calibration Data
Select “Gain generation” tab
Click “Save calibration information” button, then calibration software will generate calibration data file,
and then will display the following message box
Click “OK” button to finish calibration.
If click “Dark_Labeled”, then detected defect pixel and defect line will be indicated with ▶◀ marker in
dark image.
If click “flat20_Labeled”, then detected defect pixel and defect line will be indicated with ▶◀ marker in
MAXXray User Manual
Page 72 of 108
Date 05/16/2008
Doc No : RA21-085-003
Flat20% image
If click “flat40_Labeled”, then detected defect pixel and defect line will be indicated with ▶◀ marker in
Flat40% image
If click “flat60_Labeled”, then detected defect pixel and defect line will be indicated with ▶◀ marker in
Flat60% image
MAXXray User Manual
Page 73 of 108
Date 05/16/2008
Doc No : RA21-085-003
9.9 Test Calibration Data
Select “Post-resolution test” tab.
Check “Apply dead data” and “Apply gain data”.
If you make an x-ray exposure, image will be displayed after being applied calibration data.
“Apply dead data” is an option applying dead pixel compensation.
“Apply gain data” is an option applying CCD pixel gain compensation.
“Apply Distortion correction” is an option applying distortion correction.
After changing options, click “Reprocess” button then you will get image processed with selected
options.
By clicking the “Save Current Image” button, you can save current image.
MAXXray User Manual
Page 74 of 108
Date 05/16/2008
Doc No : RA21-085-003
10. MAXXvue Configuration
10.1 What is Configuration
Using configuration software we can set the various parameters that is used in the MAXXvue, so the
proper setting of parameter is important.
Configuration of MAXXvue is needed when the MAXXray is installed, and this job should be performed
before using MAXXvue.
Configuration of MAXXvue is consist of two parts
General parameter setting : Basic information used by MAXXvue
Dicom parameter setting : Worklist related DICOM header setting
Mobile parameter setting : specific parameters for mobile application
The configuration software is located at “C:\program files\MAXXvue” folder
MAXXray User Manual
Page 75 of 108
Date 05/16/2008
Doc No : RA21-085-003
10.2 General parameter setting
10.2.1 Hospital information
- They are the name, address and telephone number of the hospital in which the
MAXXray system is installed.
- The values of the name field and address field is put into the ‘institution name’ tag and ‘institution
address’ tag respectively when creating DCM files.
MAXXray User Manual
Page 76 of 108
Date 05/16/2008
Doc No : RA21-085-003
10.2.2 Image Grabber Selection
. Matrox Meter II dig : If you installed Matrox Meter II dig for the image grabber device, choose this
one.
. RXDN-USB2N : If you installed RXDN-USB2N for the image grabber device, choose this one.
. RXDN-USB2M : If you installed RXDN-USB2M for the image grabber device, choose this one.
10.2.3 Hardware direction compensation
- This is used to set the image direction
- The image direction can be checked using “MAXXrayCalibration” program
- CW means rotate 90 degree clockwise
- CCW means rotate 90 degree counter clockwise
- H_MIRROR means horizontal mirroring
- V_MIRROR means vertical mirroring
10.2.4 Thumbnail tab information
- Select the item(s) to be displayed in the thumbnail tab.
- Patient ID and Patient name is default and the additional information can be displayed in the
thumbnail tab according to the setting
MAXXray User Manual
Page 77 of 108
Date 05/16/2008
Doc No : RA21-085-003
10.2.5 Expansion setting
If the “Minimize Button” check box is set, you will have the Minimize button above the ‘Exit’ button.
If the “Secondary Monitor” check box is set, the processed image will be displayed to secondary monitor.
10.2.6 Dicom header info
1) Detector Unique Number
- The 12-digit number unique for each detector which constitutes ‘Study Instance UID’, ‘Series
Instance UID’ and ‘SOP Instance UID’
- If you run MAXXrayCalibration, the field is automatically filled in.
2) TAG_STATION_NAME
- A string for ‘station name’ tag
- This is used to distinguish the detectors if two or more detectors are installed in the same hospital
10.2.7 Device Name
- If “Two detector” were selected, you can enter the names for each detector that will be displayed in
detector select buttons in MAXXvue.
10.2.8 Dummy fields display name
- Dummy field is used for the connection with the worklist server
- If the worklist server send some information that is not mentioned in the DICOM standard, then
MAXXvue can receive that information using dummy fields
- Dummy field will be displayed as set name in the order list
MAXXray User Manual
Page 78 of 108
Date 05/16/2008
Doc No : RA21-085-003
10.2.9 Patient comparison condition
- MAXXvue distinguishes among patients by comparing the selected fields of patients when inserting the
patients from the worklist server into the local patient list database
- When we query study order from the worklist server, if all selected patient comparison field data is
equal to already registered order, MAXXvue ignore that study order
- If none of comparison field is select, then Patient ID will be used as comparison field
- If any comparison field is selected than only the selected field will be used as comparison field
10.2.10 File-worklist location
- If worklist server is not available and the study ordering system is providing study order using text
file MAXXvue can receive patients list from that file
- MAXXvue check assigned folder and if there is new order file MAXXvue will load study order from that
file and after loading, MAXXvue will delete that file
MAXXray User Manual
Page 79 of 108
Date 05/16/2008
Doc No : RA21-085-003
10.3 DICOM parameter setting
MAXXvue use internally defined tag name related patient information for DICOM, these information will
be filled when we register patient or receive study order from the worklist server.
After x-ray exposure these information will be stored to the internal database and will be put to the
DICOM file as DICOM tag when we make DICOM file.
When MAXXvue receive order from the worklist server that might not be the standard DICOM tag, so
MAXXvue has DICOM tag converting function to make standard DICOM file.
MAXXray User Manual
Page 80 of 108
Date 05/16/2008
Doc No : RA21-085-003
10.3.1 Worklist
1) Definition
- Incoming : Receiving tag from the worklist server
- Internal : Internally defined field name of the patient information and study order in MAXXvue
- Outgoing : DICOM tag that will be stored to DICOM file
2) Worklist Matching
- Select internal field name then currently matched tag will be displayed in the items table.
- Select incoming tag from the list and register it by clicking “<<” button
- Select outgoing tag from the list and register it by clicking “>>” button
10.3.2 File-worklist
- The format of file worklist should be text file and the field should be separated by delimiter
- The delimiter is user-defined and should be registered in the “delimiter” table
- Internally defined fields for patient information and study order is listed in the “internal field” table
- Set the matching internal field name according to the text order in the worklist file
- Internal field will be translated to the DICOM tag set at 3.1.2
- The delimiter could be one or more characters.
- The date and time format used in worklist file can be selected, and all characters located in the place
of where star-closure(*) exists is ignored.
<Date format>
YYYY : Year represented by full four digits
MM : Month as digits with leading zero for single-digit months
DD : Day of month as digits with leading zero for single-digit days
<Time Format>
HH : Hours with leading zero for single-digit hours; 24-hour clock
MM : Minutes with leading zero for single-digit minutes
SS : Seconds with leading zero for single-digit seconds
MAXXray User Manual
Page 81 of 108
Date 05/16/2008
Doc No : RA21-085-003
11. Trouble Shooting
Note :
Trouble shooting must be performed by technician who is trained by the Vieworks Co., Ltd or an
organization certified by Vieworks Co., Ltd..
If an unqualified person performs troubleshooting on the system resulting in damaging the detector,
software or hardware, then the Vieworks Co. or its representative is not responsible for the detector
repair even if the warranty is not expired.
* Please refer to the warranty section 10 of this manual for more details.
11.1 Failure Mode
Failure Mode
Repairing Procedure
Power LED is not lit
Refer to 9.2
Serial Communication Test Failure
Refer to 9.3
CCD Cooling Test Failure
Refer to 9.4
Black Level Test Failure
Refer to 9.5
Flat Field Test Failure
Refer to 9,6
Resolution Test Failure
Refer to 9.7
11.2 Repairing Power Failure
Check AC cable of Power Supply Unit is plugged securely, if not plug securely
Check power switch in turned on, if not turn on power switch
If not repaired, then replace Power Supply Unit
MAXXray User Manual
Page 82 of 108
Date 05/16/2008
Doc No : RA21-085-003
11.3 Repairing Serial communication Failure
Check Control Cable is installed securely, if not secure screw of cable tightly
Run calibration program and perform Serial Communication Test procedure
If the failure is not repaired, Check RS232 port of workstation.
If RS232 port of workstation id OK, replace Control Cable
If still the failure is not repaired, replace main PCB.
If still the failure is not repaired, replace Detector.
11.4 CCD Cooling Test Failure
Check fan is operating.
if fan is not operating, check connector of fan is plugged correctly.
If still the failure is not repaired, Check connector of TEC fan is plugged correctly.
If still the failure is not repaired, , replace main PCB.
If still the failure is not repaired, replace Detector.
11.5 Black Level Test Failure
Check cable between main PCB and CCD Block, if not plug connector and lock screw tightly
If not repaired, replace main PCB.
If still the failure is not repaired, replace Detector.
11.6 Flat Field Test Failure
Check x-ray is exposed properly
If x-ray is exposed properly
Check Generator Interface Cable is connected properly
If not repaired, replace main PCB.
If not repaired, replace Detector.
11.7 Resolution Test Failure
If resolution is less than specification, then the detector cannot be repaired in the field, so in this case
please contact Vieworks Co., Ltd
MAXXray User Manual
Page 83 of 108
Date 05/16/2008
Doc No : RA21-085-003
12. WARRANTY
Vieworks Co. warrants that this product will be free from defects in materials and workmanship for a
period of twelve (12) months from the date of delivery. If any such product proves defective during this
warranty period, Vieworks Co., at it’s option, either will repair the defective product without charge for
parts and labor, or will provide a replacement in exchange for the defective product. In order to obtain
service under this warranty, Customer must notify Vieworks Co. of the defect before the expiration of
the warranty period and make suitable arrangements for the performance of service. Customer shall be
responsible for packaging and shipping the defective product to the service center designated by
Vieworks Co. with shipping charges prepaid. Vieworks Co. shall pay for the return of the product to
Customer if the shipment is to a location within the country in which the Vieworks Co. designated
service center is located. Customer shall be responsible for paying all shipping charges, duties, taxes,
and any other charges for products returned to any other locations.
This warranty shall not apply to any defect, failure, or damage caused by improper or inadequate
maintenance and care. Vieworks shall not be obligated to furnish service under this warranty to repair
damage resulting from attempts by personnel other than Vieworks Co.; or its representatives to install,
repair, or service this product, to repair damage resulting from improper use or connection to
incompatible equipment or power source; or to service a product that has been modified or integrated
with other products when the effect of such modification or integration increases the time or difficulty of
servicing the product.
THIS WARRANTY IS GIVEN BY VIEWORKS CO. WITH RESPECT TO THIS PRODUCT IN
LIEU OF ANY OTHER WARRANTIES, EXPRESS OR IMPLIED. VIEWORKS CO. AND ITS
VENDOR DISCLAIM ANY IMPLIED WARRANTIES OF MERCHANTABLILITY OR FITNESS
FOR A PARTICULAR PURPOSE. VIEWORKS CO. RESPONSIBILITY TO REPAIR OR
REPLACE DEFECTIVE PRODUCTS IS THE SOLE REMEDY PROVIDED TO THE
CUSTOMER FOR BREACH OF THIS WARRANTY. VIEWORKS AND ITS VENDORS WILL
NOT BE LIABLE FOR ANY INDIRECT, SPECIAL, INCIDENTAL, OR CONSEQUENTIAL
DAMAGES IRRESPECTIVE OF WHETHER VIEWORKS CO. OR THE VENDOR HAS
ADVANCE NOTICE OF THE POSSIBILITY OF SUCH DAMAGES.
There are no warranties which extend beyond the description mentioned in this document.
MAXXray User Manual
Page 84 of 108
Date 05/16/2008
Appendix A
Doc No : RA21-085-003
MAXXray Interconnection Diagram
Using RXDN-USB2M Image Grabber
Optional Component
Image Grabber
Workstation
RS-232 Cable
System Component
Camera Interface Cable
AC Power Cable
Power Supply
Detector
DC Power Cable
Generator
Interface Cable
Optional Component
X-ray Generator
Using RXDN-USB2N Image Grabber
Optional Component
Image Grabber
System Component
Workstation
Camera Interface Cable
AC Power Cable
Power Supply
Detector
DC Power Cable
RS232 Cable
Generator
Interface Cable
Optional Component
X-ray Generator
MAXXray User Manual
Page 85 of 108
Date 05/16/2008
Appendix B
Doc No : RA21-085-003
Symbols
DIRECT CURRENT
~
ALTERNATING CURRENT
PROTECTIVE EARTH (GROUND)
EQUIPOTENTIALITY
OFF (POWER : DISCONNECTION FROM THE MAINS)
ATTENTION, CONSULT ACCOMPANYING DOCUMENS
ON (POWER : CONNECTION FROM THE MAINS)
TYPE BF APPLIED PART
MAXXray User Manual
Page 86 of 108
Date 05/16/2008
Doc No : RA21-085-003
Appendix C
1.
How to use line trigger
Scope
This document explain how to operate QXR using external trigger.
To take a picture of patient the x-ray will be exposed to the patient and at the same time the CCD in
the QXR should be operated to receive the light from the screen.
For the CCD to receive light and generate an image of patient, QXR should know the starting time,
and the ending time of the x-ray exposure.
The external trigger function is used for the QXR to know the starting time, and the ending time of
the x-ray exposure.
2. Interface Circuit
3.3V
2.2K Ohm
Inside of Detector
Generator Interface
Cable
EXT-VCC
2.2K Ohm
Internal Trigger
TLP281
EXPOSE
Note : To activate trigger function, the current through LED of TLP281 should be in the range of
5.5mA to 16mA, so the voltage between VCC-EXT and Expose pin should be in the range of
12V to 36V .
MAXXray User Manual
Page 87 of 108
Date 05/16/2008
Doc No : RA21-085-003
3. Operation mode of trigger function
1) Active Low Mode
A.
Standby : x-ray is not exposing, so the detector is waiting x-ray exposure
- Do not flow current through the LED(TLP281).
- To make above condition, do not apply voltage between VCC_EXT and Expose
B. Exposure : X-ray is exposing
- Flow current through the LED(TLP281) while x-ray is exposing
- To make above condition, apply voltage between VCC_EXT and Expose while x-ray is exposing
2) Active High Mode
A. Standby : x-ray is not exposing, so the detector is waiting x-ray exposure
- Flow current through the LED(TLP281) while x-ray is exposing
- To make above condition, apply voltage between VCC_EXT and Expose while x-ray is exposing
B. Exposure : X-ray is exposing
- Do not flow current through the LED(TLP281).
- To make above condition, do not apply voltage between VCC_EXT and Expose
4. External trigger timing
<Fig. 5-1>
A. A should begin before or concurrently with B
concurrently with B’
5. Software setting
Run QXvueCalibration and select line trigger polarity.
MAXXray User Manual
and A’ should be terminated after or
Page 88 of 108
Date 05/16/2008
Doc No : RA21-085-003
Appendix D Quality Control
SECTION I Quality Control testing
Quality Control Test and Frequency
Test Item
Frequency
Purpose
Check Cabling
Daily
Confirms the connections of the cables to make sure the system is
ready to operate
Visual Inspection
Daily
Confirms that no parts are damaged
Fan Filter Cleaning
Daily
Confirms that the filter in front of ventilation fan is clean to ensure
cooling of CCD
Check Hard Disk
Daily
Confirms that free space of hard disk is enough
Worklist Connection
Daily
Confirms Worklist connection
PACS Server
Daily
Confirms PACS Server connection
Printing Test
Daily
Confirms Printer connection
Study Performing
Daily
Confirms that new study can be performed normally
Serial
Monthly
Confirms serial communication between Detector and workstation
free space
Connection
Communication Test
is working
Cooling Test
Monthly
Confirms CCD Cooling
Black Level test
Monthly
Confirms black level of image
Flat Field Test
Monthly
Confirms flat image
Resolution Test
Monthly
Confirms resolution
Calibration
Annually
Calibrate system
MAXXray User Manual
Page 89 of 108
Date 05/16/2008
Doc No : RA21-085-003
Check Cabling
Objective:
To confirm that the system is properly installed and the system is ready to use
Frequency:
Daily
Equipment:
Daily Report Form
Procedure:
1. Check AC Power Cable is connected firm
2. Check DC Power Cable is connected firm
3. Check Camera Interface Cable is connected firm.
4. Check Control Cable is connected firm
Performance and Corrective Action:
Connect cables firm and record result on the Daily Report Form
MAXXray User Manual
Page 90 of 108
Date 05/16/2008
Doc No : RA21-085-003
Visual Inspection
Objective:
To confirm that there is no defect or damages of the parts that is visible, and that the system is
ready to use.
Frequency:
Daily
Equipment:
Daily Report Form
Procedure:
1. Confirm that Detector is installed firm on the X-ray stand or table
2. Confirm that the skin of detector is not damaged
3. Confirm that the screen has no defect or has not damaged
Performance and Corrective Action:
Install detector firm
Record result on Daily Report Form
If some parts is damaged require service assistance
MAXXray User Manual
Page 91 of 108
Date 05/16/2008
Doc No : RA21-085-003
Fan Filter Cleaning
Objective:
To confirm that air ventilation for cooling CCD has no problem .
Frequency:
Daily
Equipment:
Vacuum cleaner
Daily Report Form
Procedure:
1. Confirm that fan filter is clean.
2. Clean fan filter using vacuum cleaner
Performance and Corrective Action:
Record result on Daily Report Form
MAXXray User Manual
Page 92 of 108
Date 05/16/2008
Doc No : RA21-085-003
Check Hard Disk Free Space
Objective:
To confirm that new study can be performed and stored to hard disk drive of workstation.
Frequency:
Daily
Equipment:
MAXXvue S/W
Daily Report Form
Procedure:
1. Turn on the power of system
2. Run MAXXvue
3. Check hard disk free space indication is not red light
Performance and Corrective Action:
If the hard disk free space indication is not red, new study can be performed.
If the hard disk free space indication is red, delete old study to make free hard disk space enough to
perform new study.
Record result on Daily Report Form
MAXXray User Manual
Page 93 of 108
Date 05/16/2008
Doc No : RA21-085-003
Worklist Connection
Objective:
To confirm that MAXXvue is connected normally with Worklist and can register study by
querying from Worklist server
Frequency:
Daily
Equipment:
MAXXvue S/W
Worklist Server
Daily Report Form
Procedure:
1. Turn on the power of system
2. Run MAXXvue
3. Select Exposure Mode
4. Select Registration Menu
5. Select Worklist Menu
6. Select Configure Menu
7. Select Worklist server
8. Click Test button
Performance and Corrective Action:
Check the connection status that is displayed in test result window.
If connection test failed, check Worklist server is operating and configuration of Worklist server
connection is correct.
If still Worklist connection fail, then require service assistance
Record result on Daily Report Form
MAXXray User Manual
Page 94 of 108
Date 05/16/2008
Doc No : RA21-085-003
PACS Server Connection
Objective:
To confirm that MAXXvue is connected normally with PACS Server and can send performed
study data to PACS server.
Frequency:
Daily
Equipment:
MAXXvue S/W
PACS Server
Daily Report Form
Procedure:
1. Turn on the power of system
2. Run MAXXvue
3. Select Database Mode
4. Select Dicom transfer Menu
5. Select Configure Menu
6. Select PACS Server
7. Click Test button
Performance and Corrective Action:
Check the connection status that is displayed in test result window.
If connection test failed, check PACS server is operating and configuration of PACS server connection is
correct.
If still PACS server connection fail, then require service assistance
Record result on Daily Report Form
MAXXray User Manual
Page 95 of 108
Date 05/16/2008
Doc No : RA21-085-003
Printing Test
Objective:
To confirm that MAXXvue is connected normally with Printer and can print images.
Frequency:
Daily
Equipment:
MAXXvue S/W
Dicom Printer or Paper Printer that is installed
Daily Report Form
Procedure:
1. Turn on the power of system
2. Run MAXXvue
3. Select Database Mode
4. Search database and open patient
5. Select Viewer mode
6. Select image and click Add to Document mode menu
7. Print image
Performance and Corrective Action:
Confirm that the image is printed normally.
If printing failed, check printer is operating and configuration of printer
If still printing fail, then require service assistance
Record result on Daily Report Form
MAXXray User Manual
Page 96 of 108
Date 05/16/2008
Doc No : RA21-085-003
Image Acquisition
Objective:
To confirm that MAXXvue is running normally and system is operating with no error.
Frequency:
Daily
Equipment:
MAXXvue S/W
Daily Report Form
Procedure:
1. Turn on the power of system
2. Run MAXXvue
3. Select Exposure Mode
4. Register patient
5. Expose X-ray with the condition of 50KV 5 mAs
8. Check flat Image is acquired and displayed on monitor
Performance and Corrective Action:
Confirm that system is operating normally.
If image acquisition failed, check the X-ray is exposed normally and the triggering with x-ray generator
is properly configured.
If still image acquisition fail, then require service assistance
Record result on Daily Report Form
MAXXray User Manual
Page 97 of 108
Date 05/16/2008
Doc No : RA21-085-003
Serial Communication Test
Objective:
To confirm that interface of serial communication between workstation and Detector is running
normally.
Frequency:
Monthly
Equipment:
MAXXrayCalibration S/W
Monthly Report Form
Procedure:
1. Turn on the power of system
2. Run MAXXrayCalibration
3. Click port open button
4. Select Communication Test menu
5. Click Serial communication test button
6. Check the result displayed is OK and the parameter of the system is displayed
Performance and Corrective Action:
Confirm that serial communoication between workstation and detect is operating normally.
If serial communication test failed, check the RS232 on workstation is operating and the control cable
connection.
If still serial communication test fail, then require service assistance
Record result on Monthly Report Form
MAXXray User Manual
Page 98 of 108
Date 05/16/2008
Doc No : RA21-085-003
Cooling Test
Objective:
To confirm that CCD cooling is operating normally
Frequency:
Monthly
Equipment:
MAXXrayCalibration S/W
Monthly Report Form
Procedure:
1. Turn on the power of system
2. Run MAXXrayCalibration
3. Click port open button
4. Select Cooling Monitor menu
5. Click Start temp monitor button
6. Check that CCD temperature is under -4℃ within 15 minutes
Performance and Corrective Action:
Confirm that CCD cooling is operating normally.
If CCD temperature is not under -4℃ even though 15 minutes passed, confirm that the fan filter
is clean and x-ray generator interface is correct.
If still CCD Cooling test fail, then require service assistance
Record result on Monthly Report Form
MAXXray User Manual
Page 99 of 108
Date 05/16/2008
Doc No : RA21-085-003
Black Level Test
Objective:
To confirm the dark level of image
Frequency:
Monthly
Equipment:
MAXXrayCalibration S/W
Monthly Report Form
Procedure:
1. Turn on the power of system
2. Run MAXXrayCalibration
3. Click port open button
4. Select Pre-resolution test menu
5. Click get test dark frame button
6. Confirm that dark image is captured and center level of avg value is between 0 - 1000
Performance and Corrective Action:
Confirm that dark image is captured and the center level is within . 0 - 1000
If dark image is not captured then confirm cable connection.
If still dark image is not captured or center level of dark image is not in the spec then, require service
assistance
Record result on Monthly Report Form
MAXXray User Manual
Page 100 of 108
Date 05/16/2008
Doc No : RA21-085-003
Flat Field Test
Objective:
To confirm the flat image is captured and the artifact is compensated
Frequency:
Monthly
Equipment:
MAXXrayCalibration S/W
Monthly Report Form
Procedure:
1. Turn on the power of system
2. Run MAXXrayCalibration
3. Click port open button
4. Select Post-resolution test menu
5. Expose X-ray with the condition of 60Kv, 5mAs
6. Confirm that flat image is captured and artifact is not appeared
Performance and Corrective Action:
Confirm that flat image is captured and artifact is compensated.
If flat image is not captured then confirm cable connection.
If still flat image is not captured, require service assistance
If artifact is appeared, then do calibration and test again
If still artifact is appeared, then require service assistance.
Record result on Monthly Report Form
MAXXray User Manual
Page 101 of 108
Date 05/16/2008
Doc No : RA21-085-003
Resolution Test
Objective:
To confirm the resolution of the detector
Frequency:
Monthly
Equipment:
MAXXrayCalibration S/W
Resolution Chart (Nuclear Associate, model 07-523-2)
Monthly Report Form
Procedure:
1. Turn on the power of system
2. Run MAXXrayCalibration
3. Click port open button
4. Select Post-resolution test menu
5. Attach resolution chart (Nuclear Associate, model 07-523-2) on the center of a detector in diagonal
direction Set x-ray generator to 60KV 10mas and SID to 1m
6. Expose X-ray
7. Confirm that the resolution is over 2.8lp/mm
Performance and Corrective Action:
Confirm that the resolution is over 2.8lp/mm.
If the resolution is under 2.8lp/mm, then test again with adjusting mAs from 5mAs to 20mAs.
If still resolution is under 2.8lp/mm, then require service assistance.
Record result on Monthly Report Form
MAXXray User Manual
Page 102 of 108
Date 05/16/2008
Doc No : RA21-085-003
Calibration
Objective:
To compensates defect pixels and calibrates pixel gain using the installed x-ray generator and x-ray tube.
Frequency:
Annually
When X-ray generator replaced
When X-ray tube rreplaced
Equipment:
MAXXrayCalibration S/W
Annual Report Form
Procedure:
1. Turn on the power of system
2. Run MAXXrayCalibration
3. Click port open button
4.
Acquire Black image
5.
Acquire 20% flat field image
6.
Acquire 40% flat field image
7.
Acquire 60% flat field image
8.
Generate calibration data
9.
Do flat field test
Performance and Corrective Action:
Confirm that calibration data is generated by testing flat field test
If flat field test after calibration failed , then require service assistance.
Record result on annual Report Form
MAXXray User Manual
Page 103 of 108
Date 05/16/2008
SECTION II
Doc No : RA21-085-003
The maintenance guides for USER and the
forms
MAINTENANCE
Contact VIEWORKS CO., LTD at the following number:
TEL: +82-70-7011-6161 / FAX: +82-31-737-4954
For optimal performance, VIEWORKS recommends that the working area be kept clean. There are no
specific cleaning requirements for the MAXXray beyond normal care and attention for aesthetic appearances.
Caution: Federal law restricts this device to sale by or on the order of a physician.
PRODUCT COMPLAINT
Any health care professional (e.g., customer or user of this system of products) who has any complaints or
has experienced any dissatisfaction in the quality, durability, reliability, safety, effectiveness, and/or
performance of this product should notify Vieworks. If the device malfunctions and may have caused or
contributed to a serious injury of a patient, Vieworks should be notified immediately by telephone, fax, or
written correspondence.
CARE and CLEANING
Wipe external surface with an approved cleaning liquid from the list below
Use a non-abrasive soft cloth.
Wipe the cleaned surface with a cloth lightly moistened with clean water to remove residual cleaner and dirt.
The outer surface and patient contact surfaces may be cleaned with the one of the following preferred
materials:
-
most alcohol and ammonia based cleaners
-
mild, non-abrasive cleaners
Note: Never use the following cleaning tools chemicals:
-
hard brushes or scrapers of any kind
-
strong acids or alkaloids
MAXXray User Manual
Page 104 of 108
Date 05/16/2008
Doc No : RA21-085-003
Daily Report Form
Installation Site Information :
Date :
Operator :
Check Cabling : Check and record result as OK/NG
AC Power cable :
DC power Cable :
Camera Interface Cable :
Control Cable :
Comment :
Visual Inspection : Check and record result as OK or describe the result and Activity done
Visual Inspection :
Activity Done :
Fan Filter Cleaning : Record Fan filter status and record activity done
Fan Filter Status :
Activity Done :
Hard Disk Free Space : Record Indication and record activity done
Indication :
Activity Done :
Worklist Connection : Record result and activity done
Result :
Activity Done :
PACS Server Connection : Record result and activity done
Result :
Activity Done :
Printing Test : Record result and activity done
Result :
Activity Done :
Study Performing Test : Record result and activity done
Result :
Activity Done :
MAXXray User Manual
Page 105 of 108
Date 05/16/2008
Doc No : RA21-085-003
Monthly Report Form
Installation Site Information :
Date :
Operator :
Serial Communication test : Record result and Activity Done
Result :
Error Message :
Activity Done :
Comment :
Cooling Test : Record result and Activity Done
CCD Temperature after 15 Minute :
Activity Done :
Comment :
Black Level Test : Record result and Activity Done
Dark Image Acquisition(OK/NG)
:
Black Level :
Activity Done :
Comment :
Flat Field Test : Record result and Activity Done
Flat Field Acquisition(OK/NG)
:
Flat Level :
Activity Done :
Comment :
Resolution Test : Record result and Activity Done
Resolution(lp/mm)
Activity Done :
Comment :
MAXXray User Manual
:
Page 106 of 108
Date 05/16/2008
Doc No : RA21-085-003
Annual Report Form
Installation Site Information :
Date :
Operator :
Calibtration : Record equipment,result and Activity Done
X-ray Generator :
X-ray Tube :
X-ray Exposing Data
20% Flat Image :
KV
mAs
40% Flat Image :
KV
mAs
60% Flat Image :
KV
mAs
Result :
Comment :
Flat Field Test after Calibration : Record result and Activity Done
Flat Field Acquisition(OK/NG)
Flat Level :
Activity Done :
Comment :
MAXXray User Manual
:
Page 107 of 108
Date 05/16/2008
Doc No : RA21-085-003
System Discrepancy Form
Installation Site Information :
Date :
Published by :
System Information
X-ray Generator :
X-ray Tube :
X-ray grid Information :
Model of Detector :
□ RXDN-6000D □ RXDN-6500D
Serial Number of Detector :
Serial Number of Power Supply Unit :
Version of MAXXvue :
Version of MAXXvueConfigure :
Version of MAXXrayCalibration :
Comment :
System Discrepancy
Date of finding
:
Operator :
How is it found :
Comment :
Contact Information
Address : Vieworks Co., Ltd
#604 Suntechcity II, 307-2 Sangdaewon-dong,
Jungwon-gu, Seongnam-city, Gyeonggi-do
462-806 South Korea
Phone : +82-70-7011-6161
Fax
: +82-31-737-4954
e-mail : [email protected]
MAXXray User Manual
Page 108 of 108
Date 05/16/2008
Doc No : RA21-085-003
Modification Request Form
Date :
Published by :
System Information
X-ray Generator :
X-ray Tube :
X-ray grid Information :
Model of Detector :
□ RXDN-6000D □ RXDN-6500D
Serial Number of Detector :
Serial Number of Power Supply Unit :
Version of MAXXvue :
Version of MAXXvueConfigure :
Version of MAXXrayCalibration :
Comment :
Modification Request
Software Name
:
Request
Comment :
Contact Information
Address : Vieworks Co., Ltd
#604 Suntechcity II, 307-2 Sangdaewon-dong,
Jungwon-gu, Seongnam-city, Gyeonggi-do
462-806 South Korea
Phone : +82-70-7011-6161
Fax
: +82-31-737-4954
e-mail : [email protected]
MAXXray User Manual