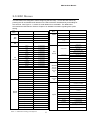
1
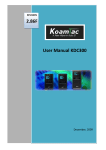
REEVISION 1 1.76 Use er Maanual KDC100 February, 20 009 KDC100 User Manual TABLE OF CONTENTS LISTING OF TABLES ........................................................................................................................ 4 LISTING OF FIGURES....................................................................................................................... 4 1. INTRODUCTION ............................................................................................................................ 6 2. INSTALLATION & OPERATION ................................................................................................... 7 2.1 KDC Package ............................................................................................................................... 7 2.2 Characteristics of KDC ................................................................................................................. 8 2.3 Installation..................................................................................................................................... 9 Verify System Requirements .......................................................................................................... 9 Affix Neck Strap to KDC ................................................................................................................. 9 Copy CD to PC ............................................................................................................................... 9 Connect KDC to PC...................................................................................................................... 10 Charge KDC Battery ..................................................................................................................... 10 Configure KDC ............................................................................................................................. 11 2.4 Basic Operation .......................................................................................................................... 12 Reading Barcodes ........................................................................................................................ 12 Upload Barcode Data to PC ......................................................................................................... 12 2.5 KDC Menus ................................................................................................................................ 13 KDC Mode Menu .......................................................................................................................... 14 View Data Menu ........................................................................................................................... 14 Set Barcodes Menu ...................................................................................................................... 14 Code Options Menu...................................................................................................................... 14 System Menu ................................................................................................................................ 17 2.6 LED Status.................................................................................................................................. 18 2.7 Empty Battery ............................................................................................................................. 18 2.8 Buffer Full ................................................................................................................................... 18 2.9 Reset .......................................................................................................................................... 19 2.10 Replace Battery ........................................................................................................................ 20 3. SYNCHRONIZATION ................................................................................................................... 21 3.1 Connect to KDC .......................................................................................................................... 22 3.2 Synchronization Settings ............................................................................................................ 23 Destination of Data ....................................................................................................................... 24 Synchronization Methods ............................................................................................................. 25 KDC Wedge Method..................................................................................................................... 26 Synchronization Options............................................................................................................... 27 3.3 Barcode & KDC Settings ............................................................................................................ 28 3.4 Confirmation Settings ................................................................................................................. 29 2 KDC100 User Manual 4. MASTER - SLAVE BARCODE COMPARE................................................................................. 30 5. TROUBLESHOOTING ................................................................................................................. 31 6. WARRANTY ................................................................................................................................. 32 7. CONTACT INFORMATION .......................................................................................................... 33 APPENDIX A - BARCODE & SCAN OPTIONS ............................................................................. 34 A.1 Symbologies ............................................................................................................................... 34 A.2 Code Options ............................................................................................................................. 36 Transmission of Start and Stop Characters ................................................................................. 36 Reverse Direction ......................................................................................................................... 36 Symbology Conversion................................................................................................................. 36 Verification of Optional “Check Digit” ........................................................................................... 37 Transmission of “Check Digit” ...................................................................................................... 37 Resolution of Inconsistencies ....................................................................................................... 38 A.3 Miscellaneous Barcode Information ........................................................................................... 39 APPENDIX B – FAQ ....................................................................................................................... 41 B.1 Symbology.................................................................................................................................. 41 B.2 Host Interface ............................................................................................................................. 42 B.3 Battery ........................................................................................................................................ 42 B.4 Memory ...................................................................................................................................... 43 B.5 Programming .............................................................................................................................. 43 APPENDIX C - SPECIAL BARCODES ........................................................................................... 44 C.1 Set Symbologies ........................................................................................................................ 44 C.2 Barcode Options ........................................................................................................................ 47 C.3 Delete Last Scanned Barcode ................................................................................................... 49 C.4 Scan Options.............................................................................................................................. 50 C.5 Scan Timeout ............................................................................................................................. 51 C.6 Minimum Barcode Length .......................................................................................................... 52 C.7 Security Level............................................................................................................................. 55 C.8 Data Process - Wedge/Store ..................................................................................................... 56 C.9 Data Process - Data Format - Handshake ................................................................................. 57 C.10 Data Process - Termination Character .................................................................................... 58 C.11 System ..................................................................................................................................... 59 C.12 Sleep Timeout .......................................................................................................................... 61 C.13 Function ................................................................................................................................... 62 C.14 Number .................................................................................................................................... 63 C.15 Lower Case Alphabet ............................................................................................................... 64 C.16 Upper Case Alphabet ............................................................................................................... 67 C.17 Control Character ..................................................................................................................... 70 C.18 Symbol Character .................................................................................................................... 71 INDEX ............................................................................................................................................... 75 3 KDC100 User Manual LISTING OF TABLES Table 1 - Features of KDC __________________________________________________________ 6 Table 2 - Amount of Time to Charge KDC Battery _______________________________________ 10 Table 3 - KDC Menu Settings and Options ____________________________________________ 13 Table 4 - KDC Factory Default Settings _______________________________________________ 17 Table 5 - Explanation of LEDs ______________________________________________________ 18 Table 6 - Troubleshooting Techniques _______________________________________________ 31 Table 7 - Symbologies Supported by KDC ____________________________________________ 34 Table 8 - Add-on for EAN-13 Symbology______________________________________________ 35 Table 9 - Add-on for EAN-8 Symbology_______________________________________________ 35 Table 10 - Symbology Conversion ___________________________________________________ 36 Table 11 - Verification of Optional "Check Digit" ________________________________________ 37 Table 12 - Transmission of "Check Digit" _____________________________________________ 37 Table 13 - Resolution of Inconsistencies ______________________________________________ 38 Table 14 - Symbologies Supported by KDC ___________________________________________ 41 LISTING OF FIGURES Figure 1 - Contents of KDC Package__________________________________________________ 7 Figure 3 - Characteristics of KDC200, KDC200P, and KDC300 _____________________________ 8 Figure 2 - Characteristics of KDC100 _________________________________________________ 8 Figure 4 - Location of Scroll Buttons _________________________________________________ 11 Figure 5 - KDC Display ___________________________________________________________ 12 Figure 6 - KDC200 / KDC200P / KDC300 Reset Function ________________________________ 19 Figure 7 - KDC100 Reset Function __________________________________________________ 19 Figure 8 - Replacing KDC Battery ___________________________________________________ 20 Figure 9 - KTSync® Synchronizer Menu ______________________________________________ 21 Figure 10 - KTSync® COM Port Selection _____________________________________________ 22 Figure 11 - KTSync® Synchronization Settings _________________________________________ 23 Figure 12 - KTSync® Barcode, Symbologies, and Scan Options ____________________________ 28 Figure 13 - KTSync® Confirmation Settings ____________________________________________ 29 Figure 14 - Master-Slave Barcode Compare Application __________________________________ 30 4 KDC100 User Manual COP PYRIG GHT, LICENS SE, AN ND WA ARNING PAG GE Copy yright© 2009 by KoamTacc, Inc. All rights reserved d. No pa art of this pu ublication ma ay be reprod duced or use ed in any form, or by an ny electrical or mechaniccal mean ns, without pe ermission in writing from KoamTac, In nc. The mate erial in this m manual is sub bject to change without notices. KoamTac K re eserves the right to make changes to any prod duct to imprrove reliabiliity, functiion, or desig gn. KoamTacc doesn’t asssume any prroduct liabilitty arising ou ut of, or in co onnection with, the application orr use of anyy product, cirrcuit, or app plication desccribed herein n. Follow all warnings and instru uctions marke ed on manua al and units. Use only the power sou urce specified d in this man nual or markked on the e units. TO PR REVENT FIRE E OR SHOCK K HAZARD, DO O NOT EXPO OSE THIS UNIT TO ANY TY YPE OF MOIS STURE. DO NO OT LOOK DIR RECTLY INTO O LASER or point the lase er into anoth her person’s e eyes. Exposu ure to the bea am MAY CAUSE C EYE DAMAGE. CAUT TION: Chan nges or modifications nott expressly approved a by the manufaccturer respon nsible for com mpliance cou uld void the t user’s au uthority to operate the equipment. WAR RNING: This device d comp plies with parrt 15 of the FCC F Rules. Operation O is subject to th he following two t condition ns: (1) This device may m not causse harmful interference, and (2) thiss device must accept an ny interferen nce receivved, including interferencce that may cause c undes sired operatio on. INFO ORMATION TO T USER: This equipment e h been tested and foun has nd to comply y with the lim mit of a Classs B digital de evice, pursua ant to Pa art 15 of the FCC F Rules. These limits are designe ed to provide e reasonable protection against a harm mful interfe erence in a residential r in nstallation. This equipment generatess uses and ccan radiate ra adio frequen ncy energ gy and, if nott installed an nd used in acccordance wiith the instructions, may cause harmfful interferen nce to rad dio communiications. How wever, there e is no guara antee that intterference w will not occur in a particular installation; if this equipment does cause harmful interference to radio r or televvision recepttion, which can be de etermined by b turning th he equipmen nt off and on, o the userr is encoura aged to try to correct the t interfe erence by on ne or more of o the followin ng measures s: 1. 2. 3. 4. Reorient / Relocate R the e receiving an ntenna. Increase th he separation n between th he equipmentt and receive er. Connect th he equipmen nt into an ou utlet on a circuit differen nce from that to o which the receiver r is co onnected. Consult the e dealer or an experienced radio/TV V technician for help. CAUTION N: RISK OF F EXPLOSIO ON IF BATTE ERY IS REPLACED BY AN A INCORR RECT TYPE. DIS SPOSE USED D BATTERIE ES ACCORD DING TO THE E INSTRUCT TIONS. 5 KDC100 User Manual 1. INTRODUCTION Congratulations on purchasing KoamTac’s revolutionary barcode scanner and data collector. Lightweight and compact, with a user-friendly design and superior functionality, KoamTac’s KDC works in a variety of portable applications. Use it independently or as an accessory to your PC, PDA, or smartphone. To find out more about KoamTac, Inc. and our family of products, visit us at www.koamtac.com. FEATURES KDC100 KDC200 KDC200P KDC300 2 1 1 1 YES YES YES YES Laser Laser Laser Imager AUTOMATIC DATA UPLOAD YES YES YES YES STORES 10,000+ BARCODES YES YES YES YES ® KTSYNC SOFTWARE YES YES YES YES YES YES YES YES YES YES YES YES NO YES YES YES USB CONNECTIONS RECHARGEABLE BATTERY SCAN ENGINE SDK FOR DEVELOPERS © SUPPORTS MICROSOFT XP, VISTA, MOBILE 5.0+ BLUETOOTH ENABLED Table 1 - Features of KDC 6 KDC100 User Manual 2. INS STALLATIION & OP PERA ATIO ON 2.1 1 KDC Packag P ge The standard s KDC C package contains: c 1. One KDC barcode b data a collector 2. One USB cable c 3. One neck strap s 4. One KDC Laser L Barcod de Data Colle ector CD con ntaining: KTSyn nc© for XP, Vista, V and Mo obile 5.0+ KDC device driver User Manual M NOTE E: Dependin ng on your re egion or area a, package co ontents may vary. Figure 1 - Contentts of KDC Pacckage 7 KDC100 User Manual 2.2 2 Chara acteris stics off KDC Beforre you use yo our KDC to scan, s store, and a upload barcode b data, please beccome familiarr with the physical characteristics of the KDC. For assistance, a please p refer to Figure 2 w which shows the t ement of buttons, display,, LEDs, and ports on you ur KDC. All KDC K models are similar except e place for the e KDC100 which w comes with an addiitional USB connector. c F Figure 3 - Charracteristics off KDC100 Figure 2 - Characteristiccs of KDC2000, KDC200P, and KDC300 8 KDC100 User Manual 2.3 Installation Verify System Requirements Prior to connecting the KDC to your computer, please verify that your system meets the minimum system requirements. Microsoft Windows XP or Vista 512 MB of free disk space on your system’s hard drive. Accessible USB port or serial port for connecting KDC to your computer 256 MB of memory or more Affix Neck Strap to KDC We strongly recommend attaching the neck strap to the KDC. Wear the KDC securely around your neck to prevent potential damage to the device if dropped. DO NOT swing the product with the neck strap. Contact with another object may damage the KDC causing it to malfunction. To install the neck strap, 1. Fit small thin cord of the strap around the pillar of the KDC. 2. Loop the thick cord of the strap through the thin loop. 3. Pull the strap tight. Copy CD to PC To copy the contents from the KDC Laser Barcode Data Collector CD, insert the CD into your PC’s disk drive. From the Windows taskbar, click the Start icon, My Computer icon, then the CD icon. A folder labeled KDC will display. Highlight the folder and click Copy this folder on the left sidebar menu. The Copy Items box pops up. Click on Make a New Folder. Rename folder to KTSync. With the KTSync folder highlighted, click Copy. The KTSync® program, User Manual, and KTReader.inf file will be copied into that folder. 9 KDC100 User Manual Connect KDC to PC The KDC is equipped with one ultra mini USB port. If you have the KDC100, it has two ports, Ultra Mini and standard Type A which swings out. See Figure 2 for more details. The USB port is used to upload barcode data and to charge the KDC battery. Prior to using the KDC, your PC must recognize the KDC. With the USB cable that came with the KDC, connect the KDC to your PC. Follow these directions for connecting the KDC to your PC. 1. 2. 3. 4. Connect the cable’s ultra mini USB connector to the KDC. Connect the cable’s Type A USB connector to your PC. Wait until your computer beeps and displays the message New Hardware Found. Follow the prompts to search for the KDC device driver. The device driver is located in the KDSync directory created when you copied the CD contents to your PC. 5. Select KDSync directory and KTReader.inf file. 6. Continue with the hardware installation procedure. Charge KDC Battery After installing the KDC, you must charge its battery. To charge the battery, follow these directions. 1. Connect the cable’s ultra mini USB connector to the KDC. 2. Connect the cable’s Type A USB connector to your computer. 3. If you don’t have a USB port on your computer, you can connect the KDC to the serial port on your computer. You will need to convert the USB connector to a serial connector. 4. Your KDC battery will begin charging. Two small LEDs on the front panel will illuminate orange. When the battery is fully charged, the LEDs will illuminate green. KDC100 KDC200 KDC200P KDC300 2 Hours 2 Hours 2 Hours 4 Hours Table 2 - Amount of Time to Charge KDC Battery 10 KDC100 User Manual Configure KDC The KDC is designed to meet the data collection requirements of many different industries in a variety of dynamic situations. To perform well in these diverse environments, the KDC is designed to be configured easily and quickly. For the KDC to perform at its maximum level, the KDC must be configured properly. Until you are familiar with configuring the KDC, it is recommended that you DO NOT modify the KDC. The KDC can be configured in three different methods which are explained in Section 2.5 – KDC Menus, Chapter 3 –Synchronization, and Appendix C – Special Barcodes. CONFIGURATION METHODS FOR THE KDC • KDC Menu • KTSync® Software • Special Barcodes – Currently only available for the KDC 100 / 200 / 200P only Press UP and DOWN Scroll Buttons simultaneously to access the KDC menu. Figure 4 - Location of Scroll Buttons 11 KDC100 User Manual 2.4 Basic Operation Reading Barcodes Reading a barcode is simply. Point the KDC at a barcode and press the scan button. Be sure to point the scan engine at the barcode, not at your face, making sure to position the light beam on the barcode. If the barcode is scanned successfully, you will hear one beep and the LEDs will illuminate in green. The scanned barcode data will display along with scan time and battery level. Depending on the configuration of your KDC, other information may also display. Figure 5 - KDC Display If the scan was unsuccessful, you will hear two beeps, the LEDs will illuminate in red, and the message Failed reading… will display. If you have problems scanning a barcode, try the following suggestions while pointing the KDC at the barcode and depressing the scan button. z Modify the angle of the KDC in relation to the barcode, making the angle bigger or smaller as needed. z Modify the distance between the barcode and the KDC, moving closer or further away as needed. z Check option settings defined in the KDC menu section and change options as needed. z Check that the barcode’s width does not exceed the light beam’s width and vice versa. Upload Barcode Data to PC Use the KTSync® synchronization program to upload barcode data from the KDC to your PC. Please refer to Chapter 3 for details on the Synchronization process. 12 KDC100 User Manual 2.5 KDC Menus The KDC Menus are designed to make configuring the KDC easy. Access the KDC menus by pressing the UP and DOWN scroll buttons on the side of the KDC simultaneously and holding for five seconds. See Figure 3 – Location of Scroll Buttons for more details. The table below summarizes the KDC Menus. Refer to Chapter 4 for detailed information regarding each option setting. Top Menu Sub Menu Note Normal Default Onetime KDC Mode View Data Top Menu Scan Options Sub Menu Note Scan Angle Narrow/Wide Filter Normal/High Onetime Compare Mode Time Out Continuous Continuous Compare Mode Collation Select Compare Digits View/Delete View/Delete Data Min. Barcode Length Security Level .5 seconds to 10 seconds 2 to 36 characters 1 to 4 level Wedge Only EAN13 Enable/Disable EAN8 Enable/Disable Wedge & Store Wedge / Store UPCA Enable/Disable UPCE Enable/Disable Store Only Wedge & Store if Sent CODE39 Enable/Disable ITF14 Enable/Disable CODE128 Enable/Disable I2of5 Enable/Disable Data Process Wedge & Store if Not Sent Data Format Barcode only Packet Data Set Barcodes CODABAR Enable/Disable EAN128 Enable/Disable CODE93 Enable/Disable Bluetooth CODE35 Enable/Disable KDC 200 KDC200P KDC300 only BooklandEAN Enable/Disable EAN13withAddon Enable/Disable EAN8withAddon Barcode Options Enable/Disable Terminator None, CR, LF, CR+LF, or Tab Power Enabled/Disabled Pairing Enter Pairing Mode Auto Connect Enabled/Disabled Auto Power On Enabled/Disabled Auto Power Off Enabled/Disabled Beep Warning Enabled/Disabled Power Off Time 1 to 30 minutes Enable/Disable UPCAwithAddon Enable/Disable UPCEwithAddon Enable/Disable CodaBar_NoStartStopChars Narrow/Wide UPCE_as_UPCA Narrow/Wide EAN8_as_EAN13 Handshake PDF417 KDC200P only Narrow/Wide Quality 1 to 4 Tilt 1 to 6 Start/Stop Enable/Disable Memory Status No. of Stored Barcodes & Free Memory Available UPCE_as_EAN13 Narrow/Wide Reset Memory Empties Data Memory ReturnCheckDigit Narrow/Wide Sleep Timeout Disabled to 10 minutes Date / Time YYYY:MM:DD or HH:MM:SS VerifyCheckDigit Narrow/Wide UPCA_as_EAN13 Narrow/Wide I2of5_VerifyCheckDigit Narrow/Wide Code39_VerifyCheckDigit Narrow/Wide I2of5_ReturnCheckDigit Narrow/Wide Code39_ReturnCheckDigit Narrow/Wide UPCE_ReturnCheckDigit Narrow/Wide UPCA_ReturnCheckDigit Narrow/Wide EAN8_ReturnCheckDigit Narrow/Wide EAN13_ReturnCheckDigit Narrow/Wide System Table 3 - KDC Menu Settings and Options 13 Battery % of Battery Charge Available Version Firmware Version & Serial No. Button Lock Enabled/Disabled Beep Sound Enabled/Disabled Auto Exit Enabled/Disabled Port Status Enabled/Disabled Display Format Time & Battery, Type & Time, or Type & Battery Factory Default Restores Default Settings KDC100 User Manual KDC Mode Menu The KDC Mode Menu has three options – Normal, Onetime, and Continuous modes. z Normal: This is the default mode which provides basic barcode scanning. In Normal mode barcode data can be manipulation directly through the KDC or using KTSync® during the synchronization process. z Onetime: This mode allows you to define a master barcode and then compare another barcode to the master barcode one time. z Continuous: This mode allows you to define a master barcode and then compare multiple barcodes to the master barcode continuously. z Collation: This mode works in conjunction with Onetime and Continuous modes, allowing you to define a string of characters within the master barcode and a string of characters within a slave barcode for comparison in Onetime or Continuous modes. View Data Menu This menu option allows you to view and/or delete barcodes stored in the KDC. Set Barcodes Menu This menu lists all the barcode symbologies supported by your KDC and allows you to select the barcode symbologies you will be scanning. For maximum scan performance, you should select only the symbologies you are scanning. Please refer to Appendix A.1 – Symbologies for a detailed listing of symbologies supported by your KDC. Code Options Menu Your KDC supports various Code Options including Transmission of Start and Stop Characters, Symbology Conversion, Verification of Optional Check Character, and Transmission of Check Digit. Please refer to Appendix A.2 – Code Options for a detailed explanation of each option. 14 KDC100 User Manual Scan Options Menu • Scan Angle: Allows you to configure the laser beam angle to the barcode. Wide is 54o and Narrow is 27o. The default is Wide. • Filter: Allows you to change the Filter mode from Normal to High for poor quality barcodes. The default is Normal. • Timeout: Allows you to set the length of time before the KDC will stop scanning a barcode from .5 second up to 10 seconds. The default is 2 seconds. • Minimum Barcode Length: Allows you to set a barcode length from 2 characters to 36 characters. It is strongly recommended that you maximize the minimum barcode length setting to prevent possible errors. The default is 4 characters. • Security Level: Allows you to ensure an accurate barcode reading by setting the number of times the KDC will read a barcode. Security Level is set from 1 up to 4. The higher security level means more reliable readings though some performance degradation is likely. For poor quality barcodes, we recommend increasing the security level. The default is 1. 15 KDC100 User Manual Data Process Menu Wedge/Store - The KDC provides five modes of data transmission in keyboard wedging mode. • Wedge Only: Barcode data is NOT stored in memory but transmitted to the host. • Wedge & Store Only: Barcode data is stored in memory and transmitted to the host. • Store Only: Barcode data is stored in memory but NOT transmitted to the host. • Wedge & Store if Sent: If data transmission is successful, barcode data is stored in memory. • Wedge & Store if Not Sent: If data transmission is NOT successful, barcode data is stored in memory. Data Format - The KDC provides two data formats, Barcode Only and Packet Data. z Barcode Only: KDC transmits scanned barcodes only. User may incorporate proper data transmission error detection and correction mechanism in this mode. KDC supports various termination characters for barcode only format. User can select <NONE>, <CR>, <LF>, <CR+LF> or <TAB> as the termination character. z Packet Data: KDC transmits packet data with checksum to minimize transmission errors. KTSync® operates in Packet Data mode ONLY. If you are using KTSync®, Data Format mode must be set to Packet Data. Handshake - KDC provides Handshake mode when Data Format is set to Packet Data. z Handshake Mode will increase the reliability of barcode data transmission. z The default mode for Handshake is Disabled. z Data transmission speed is slower when Handshake Mode is Enabled. Terminator – KDC supports various termination characters when the Data Format mode is set to Barcode Only. This option allows you to select <NONE>, <CR>, <LF>, <CR+LF>, or <TAB> as the termination character. The default terminator is <CR+LF>. 16 KDC100 User Manual System Menu • Memory Status: Checks the number of stored barcodes and memory usage. • Reset Memory: Resets KDC memory by erasing all stored barcodes. • Sleep Timeout: Sets amount of time KDC waits, when not being used, before going to sleep. • Date/Time: Sets the date and time of KDC which can also be set using KTSync® • Battery: Shows current status of battery power level. • Version: Shows KDC firmware version and serial number. • Button Lock: Locks or unlocks KDC scan and scroll buttons. • Beep Sound: Enables or disables KDC beep sound. • Port Status: Enable or disable KDC port messages. • Display Format: Selection of display format - Time & Battery, Type & Time, or Type & Battery • Factory Default: Resets certain KDC options to factory defaults. Factory defaults for all KDC models are listed below. Set Barcodes Scan Options Bluetooth - KDC200/200P/300 only EAN13 Scan Angle – Wide Power – Disabled EAN8 Filter – Normal Auto Connect – Disabled UPCAUPCE Timeout – 2 seconds Auto Power On –Disabled CODE39 Minimum Length – 4 Characters Auto Power Off- Enabled ITIF14 Security Level – 2 Level Beep Warning – Enabled Power Off Time – 5 minutes CODE128 I2of5 System CODABAR EAN128 Data Process Sleep Timeout – 5 seconds CODE93 Wedge/Store – Wedge & Store Always Button Lock – Disabled CODE35 Data Format – Barcode Only Beep Sound – Enabled Handshake- Disabled Auto Exit –Enabled Terminator - <CR> + <LF> Port Status –Enabled Code Options Display Format – Time & Battery UPCEreturnCheckDigit UPCAreturnCheckDigit EAN8returnCheckDigit EAN13returnCheckDigit Table 4 - KDC Factory Default Settings 17 KDC100 User Manual 2.6 LED Status LED Color Green Orange Red Status z z z z z z Successful Reading USB is connected and battery is fully charged Low battery USB is connected and battery is charging No reading Empty battery Table 5 - Explanation of LEDs 2.7 Empty Battery The KDC will display the message Empty Battery Connect USB when the battery is empty. Synchronize the KDC IMMEDIATELY to prevent loss of collected data. 2.8 Buffer Full The KDC will display the message Buffer Full when the size of collected data reaches 200KB or the number of collected barcodes is 10,240. To prevent the loss of data, you should synchronize the data then reset the memory when this message displays. 18 KDC100 User Manual 2.9 Reset The Reset feature lets you restart the KDC if necessary without losing any stored barcode data or option settings. To reset the KDC, follow these steps. 1. Connect the KDC to your PC. • KDC100 - Connect to your PC directly using the swing out, Type A USB connector. See Figure below. • KDC200 / KDC200P / KDC300 - Connect to your PC using the included cable, attaching the ultra mini USB connector to your KDC and the standard, Type A connector to your PC’s USB port. See Figure below. 2. Press DOWN scroll button and SCAN button simultaneously for 5 seconds. 3. When the LEDs illuminate yellow, release the buttons. 4. The KDC initial screen, KoamTac Data Collector KDC displays when reset is complete. Note: The KDC stores collected data into flash memory and will not lose data or the KDC settings during the reset process. Scan Button DOWN Scroll Button Figure 7 - KDC100 Reset Function DOWN Scroll Button Scan Button Figure 6 - KDC200 / KDC200P / KDC300 Reset Function 19 KDC100 User Manual 2.10 Replace Battery The KDC battery has a lifetime of at least 300 charges. However, when the battery is no longer chargeable, it needs to be replaced. You can purchase a replacement battery from your distributor. The steps for replacing the battery are as follows. 1. Disassemble the KDC back cover by unscrewing the middle screw. 2. Remove old battery and replace with new battery. 3. Reassemble the back cover. Figure 8 - Replacing KDC Battery 20 KDC100 User Manual 3. SYNCHRONIZATION When barcode data is collected, it must be uploaded to your application. KTSync® , which is bundled with the KDC, is software that allows barcode data to be uploaded to any PC, PDA, or smartphone running Windows XP, Vista, or Mobile 5.0+. It has two major functions Synchronization and Keyboard Emulation. • Synchronization - Provides data upload functionality to your applications. • Keyboard Emulator - Allows scanned data to upload directly into your application as if the data were being entered manually on a keyboard. • Additional functions include: Prefixes and suffixes add-on functions to scanned barcodes eliminating manual data entry Symbology and Scan Option selections Barcode Wedging options KTSync® was installed during the initial installation process. Before data can be uploaded to a host device, KTSync® must be launched on the host and configured to recognize the KDC. The following screen displays when KTSync® is launched. Figure 9 - KTSync® Synchronizer Menu File Menu z Connect: Select the KDC port assignment. This information can be found in Windows Device Manager. The port assignment is used by KTSync® when synchronizing data from the KDC. z Synchronize: This option tells the KDC to synchronize data with the host manually. Setting Menu z Synchronize: Select Synchronize options. z Barcode & KDC: Select Barcode and KDC options. z Confirmation: Select Auto Connection and/or Synchronization Confirmation options. About Menu - KTSync® - Version Information 21 KDC100 User Manual 3.1 Connect to KDC The KDC connects to a COM port automatically when connected to your PC’s USB port. After the port is assigned, you must manually assign the KDC to its assigned COM port in KTSync®. You can manually assign the KDC COM port using KTSync® Connection submenu under File menu if needed. Figure 10 - KTSync® COM Port Selection z z z The COM port assignment is found in the Windows Device Manager. KTSync® will not connect to the KDC if it is in KDC Mode Menus. You must EXIT the KDC from the Menus before KTSync® will connect to the KDC. If KTSync® fails to connect automatically to the KDC, please follow these directions. 1. 2. 3. 4. 5. Exit KTSync®. Check that you have connected the KDC to a USB port on your PC. Make sure to use the cable provided with the KDC. Check that the KDC is not in KDC Mode Menu. Restart KTSync®. 22 KDC100 User Manual 3.2 Synchronization Settings The KDC Menus provides several synchronization options for synchronizing host devices such as your PC, PDA, or smartphone. KTSync® is included with the KDC for synchronizing host devices running Windows XP, Vista, or Mobile 5.0+. You can also configure various Synchronization and Keyboard Emulation functions in the Synchronization Settings option. Figure 11 - KTSync® Synchronization Settings 23 KDC100 User Manual Destination of Data When barcode data is uploaded to the host device, you must assign a destination for the data. Destination of Data options include: z File - This option means data will be saved in the assigned filename. You can select a different target directory by clicking the New icon. C:\MyData is the default directory. If this directory is not created, you will be prompted to create it before data can be uploaded to a file. z Active Window - This option means scanned barcode data is sent directly to the active program running on your device as if the data was being entered directly from a keyboard. z Microsoft Excel - This option means barcode data is being imported directly into Microsoft’s Excel. Various parameters can be set when uploading data to Excel. z Select from Current Running Application – This option allows you to select a currently running application for data synchronization. Note: • Data synchronization begins immediately if Automatically After Connection is selected. If not selected, data synchronization is started manually by the user. • Users SHOULD NOT operate the PC during the synchronization process. It can interrupt the process causing unreliable results. 24 KDC100 User Manual Synchronization Methods Fast Synchronization in Burst Mode The KDC can synchronize data to a host device in Burst mode or Handshake mode. Burst mode provides the fastest synchronization process when the Destination of Data option is set to File. Clear KDC Memory after Synchronization The stored barcode data is cleared from the KDC memory after synchronization if this option is selected. The KDC can store a total of 10,240 barcodes or 200KB of barcode data. z It is important to clear the KDC memory periodically to prevent Buffer Full message which will prevent the KDC from storing additional data. z Stored barcode data can also be deleted using the Reset Memory feature on the KDC. Automatically Synchronize after Connection This option lets you automatically synchronize collected data to your PC immediately when the KDC is connected to the host. z IMPORTANT: Remember to configure all options properly before performing an automatic synchronization process. z Data synchronization can be done manually by clicking the synchronize icon if this option is not selected. Beep while Synchronization You can enable or disable the beep tone during the synchronization process. A beep is sounded each and every time barcode data is synchronized if this option is selected. The KDC beeps 5 times when the synchronization process is complete. 25 KDC100 User Manual KDC Wedge Method The KDC can be configured in one of five Wedge/Store modes z Wedge Only - Scanned data is transmitted to the host. The KDC does not store scanned data. z Wedge & Store - Scanned data is stored in the KDC and transmitted to the host. z Store Only - Scanned data is stored in the KDC but NOT transmitted to the host. z Wedge & Store if Sent - Scanned data is stored in the KDC ONLY if transmission to the host is successfully. z Wedge & Store if Not Sent - Scanned data is stored in the KDC ONLY if transmission to the host is unsuccessfully. Enable Wedge (Handheld scanner mode) z Marked if either Wedge only or Wedge & Store option are selected. Keep Scanned Data in KDC z Marked if either Store only or Wedge & Store option are selected. 26 KDC100 User Manual Synchronization Options Synchronize KDC Time with PC Time when Connected This option enables you to synchronize the KDC date and time with host device date and time. Synchronization of date and time occurs after the data is uploaded to the host device. Delays You can set transmission delays between barcodes and characters during the synchronization process. It is important to set proper delays to prevent errors during the transmission of collected barcodes. Some Windows applications such as Excel require longer delay times. Prefix and Suffix • Enter the characters you want appended to the front or back of the barcode in the prefix and/or suffix fields. • The character set is any combination of ASCII characters including alphanumeric, line feed (“\n”), and carriage return (“\r”). Order and Delimiter • Select Order of Data – Type, Data, and Timestamp • Select the Delimiter between Data – Tab, Space, Comma, and Semicolon • Select the Delimiter between Records – None, LF, CR, Tab, and <LF & CR> 27 KDC100 User Manual 3.3 Barcode & KDC Settings KTSync® allows you to configure the KDC Scan Options and Barcode Settings. The configurations options for the KDC using KTSync® are similar to the Set Barcodes, Code Options, and Scan Options on the KDC Menu. Please refer to Appendix A for proper barcode settings for your application. IMPORTANT: You must configure barcode options properly for the best performance. Figure 12 - KTSync® Barcode, Symbologies, and Scan Options 28 KDC100 User Manual 3.4 Confirmation Settings The Confirmation Settings window will display. If you want to confirm an Auto Connection or Auto Synchronization, this window will pop up. Figure 13 - KTSync® Confirmation Settings 29 KDC100 User Manual 4. Master - Slave Barcode Compare The KDC Mode Menu supports two applications for collecting data, Normal mode and Master-Slave Barcode Compare mode. In the Master-Slave mode, a master barcode is defined then compared to slave barcodes. The specific modes are described below. • Onetime mode - Define one master barcode and compare it with one slave barcode. • Continuous mode - Define one master barcode and compare it with multiple slave barcodes. • Collation mode Allows you to compare a substring within a barcode instead of comparing an entire barcode string. This mode uses a Start Character Position and Number of Characters to be Compared to define the substring. The following flow chart shows the data flow in this Master-Slave Compare application. Within this application, you can go back to KDC Mode Menu by pressing the UP and DOWN scroll buttons simultaneous during the Master-Slave Barcode Compare process. Figure 14 - Master-Slave Barcode Compare Application 30 KDC100 User Manual 5. Troubleshooting PROBLEM KDC not working CAUSE SOLUTION Dead battery Charge battery by connecting KDC to your PC using the included cable KDC not charging Hardware failure Contact distributor for technical support Bad battery Replace battery – Contact Local Distributor Poor USB port USB port doesn’t supply proper current Charge KDC using a different USB port on your PC Failed reading Damaged barcode Scan a different barcode Out of scan range Move the scanner closer or farther from the barcode Incorrect angle Change the angle until the scanner reads the barcode KDC reads wrong barcode Symbology not Contact KoamTac - www.koamtac.com for possibility supported of custom symbology support Scan options Check scan option settings Dirty scan window Clean scan window Damaged scan window Replace scan window Dirty scan window Clean scan window Damaged scan window Replace scan window Poor quality barcode Select only necessary barcodes Increase minimum barcode length Increase security level Can’t communicate USB cable is not Check cable connection between KDC and PC, with PC, PDA, or connected properly PDA, or smartphone Software is not working Reload the software smartphone properly LED blinks yellow COM configuration Check COM port configurations Low battery power Charge the battery by connecting KDC to PC. KDC will lose collected data if the battery is empty. Buffer Full Message Full Memory Clear the Memory using Synchronization program Empty Battery Empty battery Connect USB immediately. Synchronize the Message collected data and charge KDC Table 6 - Troubleshooting Techniques 31 KDC100 User Manual 6. Warranty LIMITED WARRANTY AND DISCLAIMERS BY OPENING THE PACKAGE OF THIS PRODUCT YOU AGREE TO BECOME BOUND BY THE LIABILITY AND WARRANTY CONDITIONS AS DESCRIBED BELOW. UNDER ALL CIRCUMSTANCES THIS MANUAL SHOULD BE READ ATTENTIVELY, BEFORE INSTALLING AND OR USNG THE PRODUCT. Serial Number A serial number appears on the KDC label. This official registration number is strictly related to the device purchased. Make sure that the serial number appearing on your KDC is not removed. Removing the serial number will affect the warranty conditions and liability disadvantageously, so please be strict at maintaining the label with serial number on the KDC. Units with the serial number label removed should not be operated. Warranty/Warranty Period/Liability KoamTac, Inc. (“KoamTac”) manufactures its hardware products in accordance with industrystandard practices. Unless otherwise agreed in a contract, KDC is warranted for a period of one year after purchase, covering defects in material and workmanship except rechargeable battery. KoamTac will repair or, at its opinion, replace products that prove to be defective in material or workmanship under proper use during the warranty period. KoamTac will not be liable in cases (i) in which the unit has been repaired or altered unless done or approved by KoamTac, (ii) in which the unit has not been maintained in accordance with any operating or handling instructions supplied by KoamTac, (iii) in which the unit has been subjected to unusual physical or electrical stress, misuse, abuse, power shortage, negligence or accident or (iv) in which the unit has been used other than in accordance with the product operating and handling instructions. Preventive maintenance is the responsibility of the customer and is not covered under this warranty. Under no circumstance will KoamTac be liable for any direct, indirect, consequential or incidental damages arising out of use or inability to use either the hardware or software, even if KoamTac has been informed about the possibility of such damages. Warranty Coverage and Procedure During the warranty period, KoamTac will repair or replace defective products returned to KoamTac warehouse. International customers should contact the local KoamTac office or support center. If warranty service is required, KoamTac will issue a Return Material Authorization Number. Products must be shipped in the original or comparable package, shipping and insurance charges prepaid. KoamTac will ship the repaired or replacement product freight and insurance prepaid. Customer accepts full responsibility for its software and data including the appropriate backup thereof. Repair or replacement of a product during warranty will not extend the original warranty term. WARNING CAUTION: Changes or modifications not expressly approved by the manufacturer responsible for compliance could void the user’s authority to operate the equipment. 32 KDC100 User Manual 7. CON NTAC CT IN NFOR RMA ATION N CORPOR RATE HEAD DQUARTER RS 116 Villag ge Boulevard d, Suite 200 Prin nceton, NJ 08540 0 PH H: 609-724--4335 FAX X: 609-228-4 437 email: admin@koa a mtac.com For more inforrmation, viisit our web bsite - www w.koamtac.com 33 KDC100 User Manual APPENDIX A - BARCODE & SCAN OPTIONS The process for scanning and reading barcodes is delicate and complicated. Your KDC, though equipped with a high performance scan engine, if configured incorrectly, may not perform at its peak performance level. To ensure its high performance, the KDC comes configured to optimize its scan engine technology. Unless you clearly understand the impact of your changes to the KDC settings, please do not change factory default settings. A.1 Symbologies KoamTac’s KDC products support most major barcode symbologies including 1D, 2D, Postal, and OCR-Fonts. Below is a list of the barcode symbologies supported by the KDC with respect to each models particular area of support. To ensure superior scan performance, remember to select only the required symbologies. 1D Barcodes 2D Barcodes KDC100 KDC200 KDC200P KDC300 EAN13, EAN8, UPCA, UPCE, Bookland EAN, EAN13 with Addon, EAN8 with Add-on, UPCA with Add-on, UPCE with Add-on, Interleave 2 of 5, ITF14, Code128, Codabar, EAN128, Code39, Code93, & Code35 EAN13, EAN8, UPCA, UPCE, Bookland EAN EAN13 with Add-on, EAN8 with Add-on, UPCA with Add-on, UPCE with Add-on, Interleave 2 of 5, ITF14, Code128, Codabar, EAN128, Code39, Code93, & Code35 EAN13, EAN8, UPCA, UPCE, Bookland EAN EAN13 with Add-on, EAN8 with Add-on, UPCA with Add-on, UPCE with Add-on, Interleave 2 of 5, ITF14, Code128, Codabar, EAN128, Code39, Code93, & Code35 Codabar, Code11, Code32, Code39, Code128, EAN8, EAN13, EANUCC, I2of5, MSI, Plessey, PosiCode, RSS-14, RSSLimit, RSSExpand, S2of5IA, S2of5ID, TLC39, Telepen, Trioptic, UPCA, & UPCE N/A N/A Postal Barcodes N/A N/A OCR Fonts N/A N/A PFD417 Table 7 - Symbologies Supported by KDC 34 AztecCode, AztecRunes, CodablockF,Code 16K, Code49, DataMatrix, MaxiCode, MicroPDF, PDF417, & QRCode N/A AusPost, CanadaPost, ChinaPost, JapanPost, KoreaPost, KixPost, Planet Code, Postnet (US), & UKPost N/A OCR-A, OCR-B, OCRUSCurrency, OCRMICRE13B, & OCRSEMIFONT KDC100 User Manual Bookland EAN vs. EAN-13 Bookland EAN which includes ISBN, ISSN, and ISMN, is supported by the KDC. This group of symbologies is essentially an EAN-13 barcode with fixed prefixes; 977 for ISSN, 978 for ISBN, and 979 for ISMN. If EAN-13 and Bookland EAN are both enabled, Bookland EAN takes precedence. Bookland EAN does not have any options. The Bookland EAN barcode does not contain any groupings – that is, there are no hyphens or separators. Thus, the ISBN 957-630-239-0 is transmitted as 9576302390. Add-on Symbologies By default, the 2 or 5 digit add-on symbols with a UPCE, UPCA, EAN-8, and EAN-13 barcode is neither decoded nor transmitted. Transmission for these specific symbologies is enabled by setting the appropriate withAddon options. There are 4 withAddon options, one for each symbology: UPCEwithAddon EAN8withAddon UPCAwithAddon EAN13withAddon The decoding of add-on symbols is typified by the following table, which explains the process for EAN-13 symbols. Mode Behavior Value of flags EAN13 EAN13withAddon Auto-discrimination If add-on symbol is present, then it is also decoded; otherwise only the EAN-13 symbol is decoded. true true With add-on Only EAN-13 barcodes with 2 or 5 add-on symbol are decoded. false true Without add-on The add-on symbol is ignored. true false Table 8 - Add-on for EAN-13 Symbology The add-on symbol is appended to the EAN-13 barcode. The process is similar for UPCE, UPCA, and EAN-8 barcodes. Note that all the UPCE, UPCA, EAN-8, and EAN-13 formatting and conversion options are in effect. The following table should help explain the effect of various options for EAN-8 barcode 12345670 + 12. Barcode EAN8_as_EAN13 1234567012 EAN8_ReturnCheckDigit EAN13_ReturnCheckDigit true false 123456712 N/A false 00000123456712 false True N/A 000001234567012 true Table 9 - Add-on for EAN-8 Symbology The add-on symbol neither contains check digit nor a terminating guard band. Every effort has been made to reduce the decoding error; however, it is likely to decode a partial scan of a 5-digit add-on symbol as a 2-digit add-on symbol. It is strongly recommended that the minimum security level is set at 2 while decoding add-on symbols. Since the decoder takes a conservative view on the add-on symbols, it is likely that the add-on symbol will be missed in the auto-discrimination mode. Auto-discrimination mode should then be avoided. 35 KDC100 User Manual A.2 Code Options The KDC supports the following barcode options: z z Transmission of start and stop characters z Symbology conversion z Verification of optional check character Reverse direction z Transmission of check digit Transmission of Start and Stop Characters For Codabar symbols you can choose not to transmit the start and stop symbols, the NOTIS Editing. By default, they are transmitted. Setting the field CodaBar_NoStartStopChars to true disables the transmission. Reverse Direction This option may be selected if direction oriented symbologies are selected such as Code35. Symbology Conversion By default the EAN-8, UPCE, and UPCA symbols are transmitted in their native format. It is possible to show them in a different format. You can choose to display UPCE symbols as either UPC-A or EAN-13 symbols, EAN-8 symbols as EAN-13 symbols, or UPC-A symbols as EAN-13 symbols. The following table shows the effect of setting various options. Option EAN-8 UPC-A UPC-E EAN8_as_EAN13 Converted to EAN-13 No effect No effect UPCA_as_EAN13 No effect Converted to EAN-13 No effect UPCE_as_EAN13 No effect No effect Converted to EAN-13 UPCE_as_UPCA No effect No effect Converted to UPC-A Table 10 - Symbology Conversion 36 All others No effect KDC100 User Manual Verification of Optional “Check Digit” Code39 and Interleave 2 of 5 have an optional check digit, which, by default, is not verified. Their verification can be enabled by selecting the option VerifyCheckDigit to true or you can enable the verification for individual symbologies. If the check digit verification fails then the barcode is not transmitted. Option Selected Verify Code39 check digit Verify I2of5 check digit VerifyCheckDigit Yes Yes Code39_VerifyCheckDigit Yes No effect I2of5_VerifyCheckDigit No effect Yes Table 11 - Verification of Optional "Check Digit" Transmission of “Check Digit” By default, the check digit – optional or mandatory – is not transmitted. Its transmission can be enabled for all symbologies by enabling ReturnCheckDigit option. Is the check digit returned? Option Selected EAN13 EAN8 UPCA UPCE Code39 I2of5 ReturnCheckDigit Yes Yes Yes Yes Yes Yes EAN13_ReturnCheckDigit Yes No effect No effect No effect No effect No effect EAN8_ReturnCheckDigit No effect Yes No effect No effect No effect No effect UPCA_ReturnCheckDigit No effect No effect Yes No effect No effect No effect UPCE_ReturnCheckDigit No effect No effect No effect Yes No effect No effect Code39_ReturnCheckDigit No effect No effect No effect No effect Yes No effect I2of5_ReturnCheckDigit No effect No effect No effect No effect No effect Yes Table 12 - Transmission of "Check Digit" 37 KDC100 User Manual Resolution of Inconsistencies Three types of inconsistencies could arise in the assignment of symbology options. The decoder has pre-defined strategies to resolve these inconsistencies: If UPCE_as_EAN13 is true, then UPCE_as_UPCA is ignored. If symbology conversion is selected but the target symbology is not enabled, then the decoder still outputs the symbol in the target symbology. For example, suppose UPC-E is enabled and UPCE_as_EAN13 is true but EAN-13 is disabled. All UPC-E symbols will be shown as EAN-13 and EAN-13 options (if specified) will be applied. For the two symbologies that have optional check digits, Code39 and Interleave 2 of 5, the decoder will always transmit the check digit if the verification is disabled. Verify Check Digit Return Check Digit Description Disabled Enabled or Disabled Check digit is not verified but is transmitted Enabled Disabled Check digit is verified but is not transmitted Enabled Enabled Check digit is verified and is transmitted Table 13 - Resolution of Inconsistencies 38 KDC100 User Manual A.3 Miscellaneous Barcode Information Height of a Linear Barcode Industry standards suggest a height of either 6.5mm or 15% of the symbol length, whichever is greater. Symbols of less than recommended heights may cause recognition problems. Check Characters Yes, we recommend the use of check-characters in barcodes. Operating without check-characters is not safe and will lead to errors that are costly to correct. Using check-characters positively affects data integrity especially when character density is at the limits and/or image quality is not at its best. Prevent Interleave 2 of 5 Partial Reading A partial scan of an Interleave 2 of 5 symbol may decode and cause incorrect data to be read. To prevent partial scans on long symbols, you should include bearer bars. These are bars that run along the top and bottom edges of the barcode in the scanning direction. If a partial scan of the barcode occurs, the scanning beam will hit the bearer bar and will not decode. The bearer bar must touch the top and bottom of all the bars and must be at least 3 times as wide. Another solution for the short scanning problem is to fix all Interleave 2 of 5 symbols to a set number of digits. Zeros can be used to pad the data to the set number of digits. The application program would then be set to only accept scans of the correct number of digits. Finally, a check digit may be used. The Interleave 2 of 5 symbology has an optional check character which uses a weighted Modulo 10 scheme. The check character is the last character in the symbol and should be checked by the decoder and then transmitted with the data. Since Interleave 2 of 5 must always have an even number of digits, the leftmost character may need to be a zero when the check character is added. The standard check digit is calculated by assigning alternating 3,1,3,1… weights to respective data digits. These weights are then multiplied by their respective data digits and the products are summed. The check digit is the digit needed to be added to the sum to make it an even multiple of 10. An example would be if the sum of the products was 37, then the check digit would be 3. 39 KDC100 User Manual Equation to Determining Potential Number of Stored Barcodes The number of barcodes that can be stored in the KDC memory depends on the size of the barcodes. Example: If only UPCA barcodes are scanned and the check digit is not transmitted, then each barcode takes up 11 (barcode data) + 2 (added bytes) + 2 (length and type) + 4 (time stamp) = 19 bytes. The maximum number of UPCA barcodes that can be saved is 204,800/19 =10,778. However, the maximum number of barcodes that can be stored is 10,240. Therefore, the KDC can store 10,240 UPCA barcodes. If different length barcodes are mixed, then you cannot compute the maximum number of barcodes that can be stored. Data Buffer Full When the data buffer is full, the KDC displays a message, Buffer Full, ignoring any command to scan barcodes. You must reset the data buffer to continue data collection. 40 KDC100 User Manual APPENDIX B – FAQ B.1 Symbology Q: What barcode symbologies are supported by the KDC100? A: KoamTac’s KDC100 supports most major 1D barcode symbologies. Below is a list of the barcode symbologies supported by each model of KDC. KDC100 / KDC 200 / KDC200P* KDC300 2D Barcodes 1D Barcodes AztecCode, AztecRunes, CodablockF, Code 16K, Code49, DataMatrix, MaxiCode, MicroPDF, PDF417, and QRCode EAN13 EAN8 UPCA UPCE Bookland EAN EAN13 with Add-on EAN8 with Add-on UPCA with Add-on UPCE with Add-on Interleave 2 of 5 ITF14 Code128 Codabar EAN128 Code39 Code93 Code35 1D Barcodes Codabar, Code11, Code32, Code39, Code128, EAN8, EAN13, EANUCC, I2of5, MSI, Plessey, PosiCode, RSS-14, RSSLimit, RSSExpand, S2of5IA, S2of5ID, TLC39, Telepen, Trioptic, UPCA, and UPCE Postal Barcodes AusPost, CanadaPost, ChinaPost, JapanPost, KoreaPost, KixPost, Planet Code, Postnet (US), and UKPost OCR Fonts 2D Barcodes OCR-A, OCR-B, OCRUSCurrency, OCRMICRE13B, and OCRSEMIFONT PFD417 - KDC200P only Table 14 - Symbologies Supported by KDC 41 KDC100 User Manual B.2 Host Interface Q: What interface ports are supported by the KDC100? A: All KDC barcode readers have one ultra mini USB port. The KDC100 has a second USB port, a standard Type A port that swings out. B.3 Battery Q: How long will the KDC100 battery last before it needs to be replaced? A: The battery on all KDC models can be charged at least 300 times before it needs to be replaced. Q: How long does it take to charge the KDC100? A: It takes 2 hours to fully charge the KDC100 from an empty battery status to a fully charged status. Q: How many barcodes can a fully charged KDC100 scan? A: The KDC100 can scan more than 10,000 barcodes when fully charged. Q: How long will the KDC100 battery lasts in the sleep mode? A: The KDC100 lasts more than two weeks in sleep mode. Q: Can I replace the KDC100 battery? A: Yes. The KDC100 has a separate compartment for the battery which can be opened easily with a screw driver. Contact your distributor for a replacement battery. 42 KDC100 User Manual B.4 Memory Q: Can I download stored barcodes or wedge barcodes to my application? A: Yes. KTSync® is synchronization and wedging software included with the KDC100 which supports host applications running on Microsoft® Windows XP, Vista, and Mobile5.0+. Q: Does the KDC100 support Blackberry®, Symbian®, Apple®, and Palm® devices? A: KTSync® supports devices running Microsoft® Windows XP, Vista, and Mobile5.0+. Applications for Blackberry, Symbian, Apple, Palm, and others can be developed using KoamTac’s software development kit. Contact KoamTac if you are interested in our SDK. B.5 Programming Q: Can the KDC100 be programmed by KoamTac’s Business Partner? A: Currently, the KDC doesn't support a programming environment for its partners. However, an application generator utility is scheduled for release in 2009. Q: Does KoamTac provide customization services for the KDC100? A: Yes. Custom applications or projects can be developed by KoamTac engineers. This service is provided for an additional fee to KoamTac. For more information regarding this service, please contact KoamTac. Q: Can a partner develop a PC or PDA application for the KDC100? A: Yes. A software development kit for devices or applications running Microsoft® Windows XP, Vista, and Mobile5.0+ is available to our partners. Partners can use DLL and our demo source code included in the SDK for custom applications. 43 KDC100 User Manual AP PPEN NDIX C - SPECIAL S B BARC CODE ES C.1 1 Set Symbol S logies Enable e EAN-13 Dissable EAN--13 Enab ble EAN-8 Dissable EAN--8 Enab ble UPCA Dissable UPCA A Enab ble UPCE Dissable UPCE E Enab ble Code39 9 Dissable Code e39 Enab ble ITF-14 Dissable ITF-14 44 KDC100 User Manual Enab ble Code12 28 e128 Dissable Code Enab ble Interlea ave 2 of 5 Dissable Interleave 2 of 5 ble Codaba ar Enab Dissable Coda abar ble EAN-12 28 Enab Dissable EAN--128 Enab ble Code93 3 Dissable Code e93 Enab ble Code35 5 Dissable Code e35 45 KDC100 User Manual Enab ble Bookland EAN Dissable Bookkland EAN Enab ble EAN-13 3 Supplem ments Dissable EAN--13 Supple ements ble EAN-8 Suppleme ents Enab Dissable EAN--8 Supplem ments ble UPCA Suppleme ents Enab Dissable UPCA A Supplem ments Enab ble UPCE Suppleme ents Dissable UPCE E Supplem ments 46 KDC100 User Manual C.2 2 Barco ode Op ptions abar - do NOT N transm mit start/sto op Coda Codab bar - transm mit start/sto op Convvert UPCE E to UPCA Do NO OT convert UPCE to UPCA U Convvert EAN8 to EAN13 3 Do NO OT convert EAN8 to EAN13 E Convvert UPCE E to EAN13 3 Do NO OT convert UPCE to EAN13 E Convvert UPCA A to EAN13 3 Do NO OT convert UPCA to EAN13 E Retu urnCheckD Digit Do NO OT ReturnC CheckDigit 47 KDC100 User Manual VeriffyCheckDig git Do NO OT VerifyCh heckDigit Veriffy check diigit for I2off5 v checkk digit for I2of5 Do NOT verify Veriffy check diigit for Cod de39 Do NOT verify v checkk digit for Code39 C Retu urn check digit d for I2o of5 Do NOT re eturn checck digit for I2of5 urn check digit d for Co ode39 Retu Do D NOT retturn checkk digit for Code39 C Do NOT re eturn checck digit for UPCE Retu urn check digit d for UP PCE 48 KDC100 User Manual Retu urn check digit d for UP PCA Do NOT return che eck digit forr UPCA Retu urn check digit d for EA AN8 Do NOT return che eck digit forr EAN8 Retu urn check digit d for EA AN13 Do NOT re eturn checck digit for EAN13 C.3 3 Delette Lastt Scann ned Ba arcode e 49 KDC100 User Manual C.4 4 Scan Options Reve ersed Scan n Norrmal Scan Wide e scan ang gle Narrrow scan angle High h filter mode Norrmal filter m mode 50 KDC100 User Manual C.5 5 Scan Timeo out Time eout = 500msec 2secc Timeout = 1sec Timeout = eout = 3secc Time 5secc Timeout = 4sec Timeout = Time eout = 6secc 8secc Timeout = 7sec Timeout = Time eout = 9secc Timeout = 10sec 51 KDC100 User Manual C.6 6 Minim mum Barcode e Length Minim mum Leng gth = 2 Minimu um Length = 3 Minimu um Length h=4 Minim mum Leng gth = 5 um Length = 6 Minimu um Length h=7 Minimu Minim mum Leng gth = 8 Minimu um Length = 9 Minimu um Length h = 10 Minim mum Leng gth = 11 Minimu um Length = 12 52 Minimum Length = 13 1 KDC100 User Manual Minim mum Leng gth = 14 Minimu um Length = 15 Minimum Length = 16 1 Minim mum Leng gth = 17 Minimu um Length = 18 Minimum Length = 19 1 Minim mum Leng gth = 20 Minimu um Length = 21 Minimum Length = 22 2 Minim mum Leng gth = 23 um Length = 24 Minimu Minimum Length = 25 2 Minim mum Leng gth = 26 um Length = 27 Minimu Minimum Length = 28 2 53 KDC100 User Manual Minim mum Leng gth = 29 Minimu um Length = 30 Minimum Length = 31 3 mum Leng gth = 32 Minim um Length = 33 Minimu 3 Minimum Length = 34 Minim mum Leng gth = 35 Minimu um Length = 36 54 KDC100 User Manual C.7 7 Security Le evel Se ecurity leve el = 1 Se ecurity leve el = 2 Se ecurity leve el = 3 Seecurity leveel = 4 55 KDC100 User Manual C.8 8 Data Process - We edge/S Store Wedge On nly W Wedge & Store S Store On nly Wedge & Store e if Sent Wedge e & Store iff Not Sent 56 KDC100 User Manual C.9 9 Data Process - Da ata Forrmat - Hands H hake Data fo ormat - Barrcode only Data fo ormat - Pa acket data Ena able Handshake Disable Hand dshake 57 KDC100 User Manual C.1 10 Data a Process - Termin T ation Charac C cter None CR LF CR+LF Tab 58 KDC100 User Manual C.1 11 Systtem Mem mory Statuss Reset Memory Data a/Time Batteryy Verssion Butto on Lock Button Un nlock 59 KDC100 User Manual ble Auto Menu M Exit Enab Disable Au uto Menu E Exit Enab ble Port Sttatus Disable Po ort Status e & Batteryy Time Type & Tim me e & Batteryy Type Facttory Defaullt 60 KDC100 User Manual C.12 Sleep Tim meout Disable 1sec 2sec 3sec 4sec 5sec 10sec 20sec 30sec 1min 2min 5min 10min 61 KDC100 User Manual C.1 13 Function F1 F2 F3 F4 F5 F6 F7 F8 F9 F10 F11 F12 62 KDC100 User Manual C.1 14 Num mber 0 1 2 3 4 5 6 7 8 9 63 KDC100 User Manual C.1 15 Low wer Cas se Alph habet a b c d e f g h i j 64 KDC100 User Manual k l m n o p q r s t 65 KDC100 User Manual u v w x y z 66 KDC100 User Manual C.1 16 Upp per Cas se Alph habet A B C D E F G H I J 67 KDC100 User Manual K L M N O P Q R S T 68 KDC100 User Manual U V W X Y Z 69 KDC100 User Manual C.1 17 Con ntrol Ch haracte er BS TAB LF VT CR ESC Space DEL 70 KDC100 User Manual C.1 18 Sym mbol Ch haracte er ! “ # $ % & ‘ ( ) * 71 KDC100 User Manual + , - . / : ; < = > 72 KDC100 User Manual ? @ [ \ ] ^ _ ` | 73 KDC100 User Manual } ~ S Start-String Stop-String N Note: • You can co ompose a sttring up to 16 1 characte ers. • A string wo ould be com mposed by scanning s the e “Start-String”, number/ r/alphabet/sp pecial chara racters, and “Stop-S String” speccial barcode es. • The KDC will w abort sttring composition if you u do not scan “Stop-String g” in one minute m after scanning s “S StartString” and d number/alp phabet/special charactters. 74 KDC100 User Manual INDEX Process, 13, 16 A Angle, 13, 15 H Program, 43 Handshake, 13, 16 B Reset, 13, 17, 19 I barcode scanner, 6 Battery, 10, 13, 17, 20, 60, 61 Beep, 13, 17, 25 R High, 13, 15 Resolution, 38 I2of5, 13, 37 S ITF14, 13, 34, 41 Button, 13, 17 Scan, 13, 15, 21, 26, 28, 31, 34 K C Serial, 13, 32 KDC Menus, 13 Clear, 25, 31 Sleep, 13, 17 KDSync, 10 CODABAR, 13 Special Barcodes, 11 Keyboard, 21, 23 CODE128, 13 KoamTac, 6, 19, 31, 32, 33, 34, CODE35, 13 41, 42, 43 CODE39, 13 ® KTSync , 12, 16, 17, 21, 22, 23, CODE93, 13 CONNECTIONS, 42 28, 42 data collector. See barcode scanner Store, 13, 16, 26 Suffix, 27 Symbology, 13, 21, 36, 41 27, 29, 31 T LED, 12, 18, 19, 31 Length, 13 Terminator, 13, 16 Level, 13, 15 Date, 13, 17 Status, 13, 17, 18 Synchronization, 12, 21, 23, 25, L D Security, 13, 15 Delay, 27 Time, 13, 15, 17, 27 M Delete, 13 Transmission, 36, 37 U Memory, 13, 17, 31, 42 Delimiter, 27 Menu, 13, 15, 16, 21, 22 E Minimum, 13, 15 EAN128, 13, 34, 41 EAN8, 13, 34, 35, 36, 37, 41 41 N EAN13, 13, 34, 35, 36, 37, 38, 41 UPCA, 13, 34, 35, 36, 37, 38, 40, UPCE, 13, 34, 35, 36, 37, 38, 41 USB, 18, 19, 22, 31 Narrow, 13, 15 V Normal, 13, 15 F O Factory Default, 17, 61 File, 21, 22, 24 Option, 13, 15, 21, 27, 34, 36, 37 Filter, 13, 15 Order, 27 Format, 13, 16 View, 14 W P Full, 18, 31 Version, 13, 17 PDA, 23, 31, 43 Website. See Koamtac Wedge, 13, 16, 26 Wide, 13, 15 Prefix, 21, 27 75