1
Series 5500 InfoNode
User’s Guide
®
WARNING
Death, serious injury, or fire hazard could result from improper
connection of this instrument. Read and understand this manual
before connecting this instrument. Follow all installation and
operating instructions while using this instrument.
Connection of this instrument must be performed in compliance
with the National Electrical Code (ANSI/NFPA 70-2002) of USA and
any additional safety requirements applicable to your installation.
Installation, operation, and maintenance of this instrument must
be performed by qualified personnel only. The National Electrical
Code defines a qualified person as “one who has the skills and
knowledge related to the construction and operation of the electrical equipment and installations, and who has received safety
training on the hazards involved.”
Qualified personnel who work on or near exposed energized electrical conductors must follow applicable safety related work practices and procedures including appropriate personal protective
equipment in compliance with the Standard for Electrical Safety
Requirements for Employee Workplaces (ANSI/NFPA 70E-2004) of
USA and any additional workplace safety requirements applicable
to your installation.
Dranetz-BMI • 1000 New Durham Road • Edison, New Jersey 08818-4019
Telephone 1-800-372-6832 or 732-287-3680
Fax 732-248-1834 • www.dranetz-bmi.com
Published by Dranetz-BMI
1000 New Durham Road
Edison, NJ 08818-4019 USA
Telephone: 1-800-372-6832 or 732-287-3680
Fax: 732-248-1834
Web site: www.dranetz-bmi.com
InfoNode, DataNode, Signature System and Node Center
are registered trademarks of Dranetz-BMI.
Answer Module is a registered trademark of Electrotek
Concepts.
Copyright© 1999, 2002, 2004 Dranetz-BMI
All rights reserved.
No part of this book may be reproduced, stored in a
retrieval system, or transcribed in any form or by any
means—electronic, mechanical, photocopying, recording,
or otherwise—without prior written permission from the
publisher, Dranetz-BMI, Edison, NJ 08818-4019.
Printed in the United States of America.
P/N UG-INODE5500 Rev. D
US Pat Nos. 4,694,402, 5,481,468,
5,574,654, 5,933,092, 5,862,391,
5,764,155, 5,696,501, 5,768,148
Safety Summary
ADVERTENCIA
Una conexión incorrecta de este instrumento puede producir la muerte, lesiones graves y riesgo de incendio. Lea y entienda este manual antes de conectar. Observe todas las instrucciones de instalación y
operación durante el uso de este instrumento.
La conexión de este instrumento debe ser hecha de acuerdo con las normas del Código Eléctrico Nacional
(ANSI/NFPA 70-2002) de EE. UU., además de cualquier otra norma de seguridad correspondiente a su
establecimiento.
La instalación, operación y mantenimiento de este instrumento debe ser realizada por personal calificado
solamente. El Código Eléctrico Nacional define a una persona calificada como “una que esté familiarizada
con la construcción y operación del equipo y con los riesgos involucrados.”
AVERTISSEMENT
Si l’instrument est mal connecté, la mort, des blessures graves, ou un danger d’incendie peuvent s’en suivre. Lisez attentivement ce manuel avant de connecter l’instrument. Lorsque vous utilisez l’instrument,
suivez toutes les instructions d’installation et de service.
Cet instrument doit être connecté conformément au National Electrical Code (ANSI/NFPA 70-2002) des
Etats-Unis et à toutes les exigences de sécurité applicables à votre installation.
Cet instrument doit être installé, utilisé et entretenu uniquement par un personnel qualifié. Selon le
National Electrical Code, une personne est qualifiée si “elle connaît bien la construction et l’utilisation de
l’équipement, ainsi que les dangers que cela implique.”
WARNUNG
Der falsche Anschluss dieses Gerätes kann Tod, schwere Verletzungen oder Feuer verursachen. Bevor Sie
dieses Instrument anschliessen, müssen Sie die Anleitung lesen und verstanden haben. Bei der
Verwendung dieses Instruments müssen alle Installation- und Betriebsanweisungen beachtet werden.
Der Anschluss dieses Instruments muss in Übereinstimmung mit den nationalen Bestimmungen für
Elektrizität (ANSI/NFPA 70-2002) der Vereinigten Staaten, sowie allen weiteren, in Ihrem Fall anwendbaren Sicherheitsbestimmungen, vorgenommen werden.
Installation, Betrieb und Wartung dieses Instruments dürfen nur von Fachpersonal durchgeführt werden.
In dem nationalen Bestimmungen für Elektrizität wird ein Fachmann als eine Person bezeichnet, welche
“mit der Bauweise und dem Betrieb des Gerätes sowie den dazugehörigen Gefahren vertraut ist.”
iii
Series 5500 User’s Guide
Safety Summary
Definitions
WARNING statements inform the user that certain conditions or practices could result in loss of life or physical harm.
CAUTION statements identify conditions or practices that could harm
the Series 5500, its data, other equipment, or property.
NOTE statements call attention to specific information.
Symbols
The following International Electrotechnical Commission (IEC) symbols are marked on the top and rear panel in the immediate vicinity of
the referenced terminal or device:
Caution, refer to accompanying documents
(this manual).
Alternating current (ac) operation of the
terminal or device.
Direct current (DC) operation of the
terminal or device.
Protective conductor terminal.
iv
Series 5500 User’s Guide
Safety Summary
Definiciones
Las ADVERTENCIAS informan al usuario de ciertas condiciones o
prácticas que podrían producir lesiones mortales o daño físico.
Las PRECAUCIONES identifican condiciones o prácticas que podrían
dañar la Series 5500, sus datos, otros equipos o propiedad.
Las NOTAS llaman la atención hacia la información específica.
Símbolos
Los siguientes símbolos de la Comisión Internacional Electrotécnica
(IEC) aparecen marcados en el panel superior y el posterior inmediatos
al terminal o dispositivo en referencia:
Precaución, consulte los documentos
adjuntos (este manual).
Operación de corriente alterna (ca) del
terminal o dispositivo.
Operación de corriente continua (CC) del
terminal o dispositivo.
Terminal de protección del
conductor.
v
Series 5500 User’s Guide
Safety Summary
Définitions
Les messages d’AVERTISSEMENT préviennent l’utilisateur que certaines conditions ou pratiques pourraient entraîner la mort ou des
lésions corporelles.
Les messages de MISE EN GARDE signalent des conditions ou pratiques susceptibles d’endommager “Series 5500”, ses données, d’autres
équipements ou biens matériels.
Les messages NOTA attirent l’attention sur certains renseignements spécifiques.
Symboles
Les symboles suivants de la Commission électrotechnique internationale
(CEI) figurent sur le panneau arrière supérieur situé à proximité du terminal ou de l’unité cité:
Mise en garde, consultez les documents
d’accompagnement (ce manual).
Fonctionnement du terminal ou du
dispositif sur le courant alternatif (c.a.).
Fonctionnement du terminal ou de
l’unitécourant continu (CC).
Borne conductrice de protection.
vi
Series 5500 User’s Guide
Safety Summary
Definitionen
WARNUNGEN informieren den Benutzer darüber, daá bestimmte
Bedingungen oder Vorgehensweisen körperliche oder tödliche
Verletzungen zur Folge haben können.
VORSICHTSHINWEISE kennzeichnen Bedingungen oder
Vorgehensweisen, die zu einer Beschädigung von Series 5500, seiner
Daten oder anderer Geräte bzw. von Eigentum führen können.
HINWEISE machen auf bestimmte Informationen aufmerksam.
Symbole
Die folgenden Symbole der Internationalen Elektrotechnischen
Kommission (International Electrotechnical Commission; IEC) befinden
sich auf der Abdeck- und Seitenplatte unmittelbar am betreffenden
Terminal oder Gerät.
Vorsichtshinweis, siehe
Begleitdokumente (dieses Handbuch).
Wechselstrombetrieb des
Terminals bzw. Geräts.
Gleichstrombetrieb im Terminal
oder Gerät.
Terminal-Schutzleiter.
vii
Series 5500 User’s Guide
Safety Summary
Safety Precautions
Mesures de Sécurité
The following safety precautions must be followed whenever any type of connection is being made to the instrument.
Les mesures de sécurité suivantes doivent être prises
chaque fois qu’un type de connexion quelconque est effectué sur l’instrument.
. Connect the green safety (earth) ground first, before
making any other connections.
. When connecting to electric circuits or pulse initiating
equipment, open their related breakers. DO NOT install
any connection of the instrument on live power lines.
. Connections must be made to the instrument first, then
connect to the circuit to be monitored.
. Wear proper personal protective equipment, including
safety glasses and insulated gloves when making connections to power circuits.
. Hands, shoes and floor must be dry when making any
connection to a power line.
. Make sure the unit is turned OFF before connecting
probes to the rear panel.
. Before each use, inspect all cables for breaks or cracks in
the insulation. Replace immediately if defective.
. Connecter d’abord la prise de terre de sécurité verte
(terre) avant d’effectuer toute autre connexion.
. Ouvrir les disjoncteurs correspondants lors d’une connexion à des circuits électriques ou à des équipement de
génération d’impulsions. NE PAS effectuer de connexion d’instrument sur des lignes électriques sous tension.
. Une fois toutes les connexions de l’instrument effectuées, connecter au circuit à contrôler.
. Porter des lunettes de protection et des gants isolants
pour effectuer des connexions aux circuits électriques.
. S’assurer que les mains, les chaussures et le sol soient
secs lors de connexions à une ligne électrique.
. S’assurer que l’unité est ÉTEINTE avant de connecter
les sondes au panneau arrière.
. Inspecter tous les câbles, avant chaque utilisation, pour
s’assurer que les isolants ne sont pas coupés ou fendus.
Remplacer immédiatement tous les équipements
défectueux.
Medidas de seguridad
Las medidas de seguridad siguientes deberán observarse
cuando se realice cualquier tipo de conexión al instrumento.
. Antes de hacer cualquier conexión, deberá enchufarse el
conector de seguridad verde a tierra.
. Cuando se haga conexiones a circuitos eléctricos o a
equipo de activación por pulso, deberá abrirse sus
respectivas cajas de seguridad. NO deberá hacerse
ninguna conexión del instrumento en líneas eléctricas
bajo tensión.
. Las conexiones deberán hacerse primero al instrumento
y, luego, al circuito a ser monitorizado.
. Al hacer conexiones a circuitos eléctricos, deberá utilizar
anteojos y guantes protectores.
. Sus manos, zapatos y el piso deberán estar secos en todo
momento en que se haga una conexión a un cable eléctrico.
. Verifique que la unidad esté DESACTIVADA antes de
conectar sondas en el panel posterior.
. Previo a cada uso, deberá verificarse que los cables no
estén rotos y que el material aislante no tenga rajaduras.
Reemplace de inmediato cualquier parte defectuosa.
Sicherheitsvorkehrungen
Die folgenden Sicherheitsvorkehrungen sind immer
dann zu befolgen, wenn eine Verbindung zum
Instrument hergestellt wird.
. Schließen Sie zuerst die grüne Sicherheits-/Erdleitung
an, bevor Sie eine andere Verbindung herstellen.
. Öffnen Sie beim Anschluß an elektrische Stromkreise
oder Impulsauslösungseinrichtungen die entsprechenden Unterbrecher. Es dürfen KEINE Anschlüsse an
das Instrument unter stromführenden
Spannungsleitungen montiert werden.
. Die Verbindungen müssen zuerst am Instrument und
danach an der zu überwachenden Schaltung
hergestellt werden.
. Tragen Sie Schutzbrillen und Isolierhandschuhe, wenn
Sie Anschlüsse an den Stromkreisen vornehmen.
. Hände, Schuhe und Fußboden müssen trocken sein,
wenn Sie Anschlüsse an den Stromkreisen durchführen.
. Stellen Sie sicher, daß das Gerät AUSgeschaltet ist,
bevor Sie an der rückwärtigen Konsole Meßfühler
anschließen.
. Prüfen Sie vor jedem Gebrauch alle Kabel auf
Bruchstellen und Risse in der Isolierung. Wechseln
Sie schadhafte Kabel sofort aus.
viii
Series 5500 User’s Guide
FCC Statement
This device has been tested and found to comply with
the limits for a Class A digital device, pursuant to Part 15
of the FCC Rules. These limits are designed to provide
reasonable protection against harmful interference when
the equipment is operated in a commercial environment.
This equipment generates, uses, and can radiate radio
frequency energy and, if not installed and used in accordance with the instruction manual, may cause harmful
interference to radio communications. Operation of this
equipment in a residential area is likely to cause harmful
interference in which case the user will be required to
correct the interference at his/her own expense.
ix
Series 5500 User’s Guide
Warranty
Dranetz-BMI warrants that the Series 5500 will be free from defects in workmanship and materials for a period of one
year from the date of purchase. Dranetz-BMI will, without charge, replace or repair, at its option, any warranted product returned to the Dranetz-BMI factory service department.
Dranetz-BMI shall not be held liable for any consequential damages, including without limitation, damages resulting
from loss of use, or damages resulting from the use or misuse of this product. Some states do not allow limitations of
incidental or consequential damages, so the above limitation or exclusion may not apply to you.
This warranty gives you specific rights and you may also have rights which vary from state to state.
Exclusions: This warranty does not apply in the event of misuse or abuse of the product or as a result of unauthorized
repairs or alterations.
Need Help?
How to Contact Dranetz-BMI
Regardless of your location, Dranetz-BMI sales and product support are within easy reach through an established
network of representatives and distributors worldwide.
For Sales, Technical Support, or the name of a Dranetz-BMI Sales Representative in your area, call:
1-800-372-6832 or 732-287-3680
Fax: 732-248-1834
Web site: www.dranetz-bmi.com
x
Series 5500 User’s Guide
Welcome to the Series 5500
Congratulations on your purchase of the Series 5500
InfoNode.
The InfoNode, the central component of the unique
Dranetz-BMI power quality and energy monitoring
system, can now be integrated into a computer’s
Windows® operating system. By providing a centralized
connection point for remote devices, the InfoNode acts
as the server for a user designed power monitoring network. The user interface is a conventional Internet
browser, with access restricted only to users with the correct password.
The optional DataNodes serve as the data and information gathering devices, connected to the InfoNode on PC
via RS-485/422/232 or Ethernet. By logging onto the
InfoNode service from any PC having Internet access (or
access to the network in which the system operates) or
via modem, users can obtain extensive monitoring data,
information and answers from all the connected
DataNodes.
More DataNodes can be added at any time, increasing
the size and capabilities of the monitoring network. The
individual capabilities and features of each different type
of DataNode are covered in their own separate user’s
guides.
Please read this and all user’s guides carefully to obtain
the greatest value from your power monitoring equipment and to avoid damage and injury that can occur from
misuse and improper connection.
xi
Series 5500 User’s Guide
Contents
Preface
Safety Summary...............................................................................................iv
FCC Statement.................................................................................................ix
Warranty...........................................................................................................x
Need Help?...................................................................................................... x
Welcome to the Series 5500............................................................................ xi
1 InfoNode on PC Overview
Signature System Setup...................................................................................1-1
InfoNode: The Central Component.................................................................1-2
Signature System InfoNode Graphical User Interface....................................1-2
InfoNode Access Levels..................................................................................1-3
Standard and Optional Accessories................................................................. 1-3
Series 5500 Front Panel.................................................................................. 1-4
Series 5500 Rear Panel....................................................................................1-5
2 Preparation for use
Initial Setup and Configuration....................................................................... 2-1
Getting Started (modem users)........................................................................2-1
Getting Started (ethernet users).......................................................................2-2
Changing the Modem IP Address................................................................... 2-3
Communicating with the InfoNode.................................................................2-4
Adding a User..................................................................................................2-5
3 Home Page
Log-in.............................................................................................................. 3-1
Home Page...................................................................................................... 3-1
InfoNode Status............................................................................................... 3-1
DataNode Information.................................................................................. 3-1
InfoNode Information....................................................................................3-3
Help................................................................................................................. 3-3
Introduction................................................................................................... 3-3
Index..............................................................................................................3-3
4 Views Page
General Procedures in Making Queries.......................................................... 4-1
Views Page...................................................................................................... 4-2
Timeline...........................................................................................................4-3
Timeline Graph..............................................................................................4-3
Event List/Detail........................................................................................... 4-5
Smart Views.....................................................................................................4-6
3D RMS Mag/Dur View................................................................................4-6
RMS Mag/Dur View..................................................................................... 4-7
Smart Trend................................................................................................... 4-8
Event Summary............................................................................................. 4-9
RMS Variations............................................................................................. 4-9
Snapshots.......................................................................................................4-10
Transients...................................................................................................... 4-10
xii
Series 5500 User’s Guide
Contents
Help................................................................................................................. 4-10
Views Topics................................................................................................. 4-10
Index..............................................................................................................4-10
5
Reports Page
Reports Page....................................................................................................5-1
Smart Reports.................................................................................................. 5-2
DataNode Summary...................................................................................... 5-2
QOS Compliance...........................................................................................5-2
Voltage Quality.............................................................................................. 5-2
Energy and Demand......................................................................................5-2
Event Summary............................................................................................. 5-2
Top 10 Events................................................................................................5-2
Standard Reports............................................................................................. 5-4
Event Summaries.......................................................................................... 5-4
Top 10 Events................................................................................................5-4
Event Statistics.............................................................................................. 5-4
RMS Variations........................................................................................... 5-4
Transients.................................................................................................... 5-4
Quality of Supply.......................................................................................... 5-5
Waveform Distortion.....................................................................................5-5
Energy and Demand......................................................................................5-5
InfoNode Summary....................................................................................... 5-5
Answer Module............................................................................................... 5-6
RMS Variation Indices.................................................................................. 5-6
Aggregated Energy Expense......................................................................... 5-8
Energy Expense.............................................................................................5-10
Energy Usage Comparison Report................................................................5-12
UPS Verification............................................................................................5-14
Fault Location............................................................................................... 5-17
RBM (Reliability Benchmarking Methodology).......................................... 5-17
RBM Aggregated RMS Event List............................................................... 5-18
Help................................................................................................................. 5-18
Report Topics................................................................................................ 5-18
Index..............................................................................................................5-18
6
Real-time Page
Real-time Page................................................................................................ 6-1
Views............................................................................................................... 6-1
Meter Dials....................................................................................................6-1
Meter Panel................................................................................................... 6-3
Scope Mode...................................................................................................6-3
Help................................................................................................................. 6-4
Real-time Topics........................................................................................... 6-4
Index............................................................................................................. 6-4
xiii
Series 5500 User’s Guide
Contents
7
Setup Page
Setup Page....................................................................................................... 7-1
InfoNode..........................................................................................................7-1
Users................................................................................................................ 7-1
Security Level: Guess, Viewer, Operator, Administrator..............................7-2
Proficiency Level: Novice or Expert............................................................ 7-3
Data............................................................................................................... 7-4
Storage...........................................................................................................7-4
Log.................................................................................................................7-4
Notifications.................................................................................................... 7-5
Recipients........................................................................................................ 7-5
Senders............................................................................................................ 7-7
Datanodes...................................................................................................... 7-7
Connection................................................................................................... 7-8
Data.............................................................................................................. 7-9
InfoNodes...................................................................................................... 7-11
Shutdown..................................................................................................... 7-11
Start-up........................................................................................................ 7-11
Communications..............................................................................................7-12
ADAM......................................................................................................... 7-12
WTI CAS-8 Code Activated Switch............................................................7-14
MMS............................................................................................................ 7-15
Network........................................................................................................7-16
Battery........................................................................................................... 7-17
Time...............................................................................................................7-17
Regional Settings.......................................................................................... 7-17
Answer Module............................................................................................... 7-18
Basic Characterizer........................................................................................7-18
RMS Disturbance Categories......................................................................7-19
Transient Disturbance Categories............................................................... 7-20
EN50160..........................................................................................................7-20
Energy Usage.................................................................................................. 7-21
Peak Time.................................................................................................... 7-21
DataNodes....................................................................................................7-22
Rate Structure.............................................................................................. 7-23
kvar Change Observer..................................................................................... 7-24
Radial Fault Location...................................................................................... 7-24
RBM (Reliability Benchmarking Methodology)............................................ 7-26
Aggregation Parameters.................................................................................7-26
UPS Verification............................................................................................7-27
DataNodes....................................................................................................... 7-28
General Guidelines in Setting Up DataNodes through the
InfoNode Setup Page.......................................................................................7-29
xiv
Series 5500 User’s Guide
Contents
8 5530/5520 DataNode Setup
DataNode Programmable Tabs........................................................................8-1
Where Data for Programmed Settings Appear................................................8-1
Programming the Tabs.................................................................................... 8-2
General tab.................................................................................................... 8-2
Basic tab........................................................................................................ 8-3
RMS Variations tab....................................................................................... 8-5
Transients tab................................................................................................ 8-7
Metering tab.................................................................................................. 8-9
Revenue tab................................................................................................... 8-11
Demand tab................................................................................................... 8-11
Advanced Energy tab.................................................................................... 8-14
Advanced Metering tab................................................................................. 8-16
Unbalance tab................................................................................................8-17
Harmonics tab............................................................................................... 8-18
Flicker tab......................................................................................................8-20
Advanced Harmonics tab.............................................................................. 8-21
Transducers tab............................................................................................. 8-22
Advanced tab................................................................................................ 8-24
Accumulator Resets tab.................................................................................8-26
Summary of EPQ DataNode Setup Parameters and
Tabs Where They Can Be Found ................................................................... 8-28
9 5540 Energy Management (EM) DataNode Setup
Recommended Setup before connecting to an InfoNode............................... 9-1
Specifications for 5540 EM DataNode........................................................... 9-1
General tab...................................................................................................... 9-2
Basic tab.......................................................................................................... 9-3
Advanced tab...................................................................................................9-5
10 5560 QOS
Introduction..................................................................................................... 10-1
Scope of EN50160 Standard........................................................................... 10-1
5560 DataNode QOS Functional Components............................................... 10-1
5560 DataNode Specifications........................................................................ 10-2
Home Page Reporting of QOS Compliance................................................... 10-3
QOS Status View............................................................................................. 10-4
QOS Status Query........................................................................................ 10-4
QOS Status Summary............................................................................... 10-5
Compliance Statistical Graph................................................................... 10-6
Harmonic Compliance Limit Values........................................................ 10-7
Compliance Limits in QOS Setup and Reports....................................... 10-8
Smart Views................................................................................................. 10-9
Smart Trend.............................................................................................. 10-9
Timeline Graphs for Smart Trends........................................................... 10-10
Series 5500 User’s Guide
xv
Contents
QOS Compliance Reports............................................................................... 10-11
Smart Reports.............................................................................................. 10-11
QOS Compliance Summary Table and Table of Contents.......................10-12
QOS Compliance Reports........................................................................ 10-13
Standard Reports..........................................................................................10-19
Quality of Supply..................................................................................... 10-19
Real-time Display of QOS Data......................................................................10-20
5560 DataNode System Setup.........................................................................10-21
EN50160 General Setup Tab....................................................................... 10-21
5560 DataNode Setup..................................................................................... 10-23
General Information................................................................................. 10-23
Where Data for Programmed Settings Appear......................................... 10-23
5560 DataNode.........................................................................................10-23
5560 DataNode Tabs....................................................................................10-24
General tab................................................................................................10-24
Basic tab................................................................................................... 10-25
RMS Variations tab...................................................................................10-27
Transients tab............................................................................................10-29
Metering tab..............................................................................................10-30
Revenue tab...............................................................................................10-32
Demand tab...............................................................................................10-33
Advanced Energy tab................................................................................10-35
Advanced Metering tab.............................................................................10-36
Unbalance tab........................................................................................... 10-38
Harmonics tab...........................................................................................10-39
Flicker tab.................................................................................................10-41
Advanced Harmonics tab..........................................................................10-42
Transducers tab.........................................................................................10-43
Advanced tab............................................................................................ 10-44
Accumulator Resets tab............................................................................ 10-46
EN50160 Compliance Default Trending Setup............................................. 10-48
11 5571 DataNode Setup
General tab.......................................................................................................11-1
Basic tab.......................................................................................................... 11-2
Memory tab..................................................................................................... 11-4
Thresholds tab................................................................................................. 11-5
Advanced tab...................................................................................................11-6
12 ADAM Handler Setup
ADAM Instrument Handler Setup.................................................................. 12-1
ADAM Module Connection Setup................................................................12-1
ADAM 4060 Contact Closure Module Setup............................................... 12-3
General tab.......................................................................................................12-5
Basic tab.......................................................................................................... 12-6
xvi
Series 5500 User’s Guide
Contents
Module tab.......................................................................................................12-7
Channel tab (for Thermocouple/General Analog Input Modules ADAM 4018, 5018)........................................................................................ 12-8
Channel tab (for General Digital Input Modules ADAM 4050/4052, 5050/5052)...................................................................... 12-9
Channel tab (for Counter Input Modules - ADAM 4080, 5080).................... 12-10
Advanced tab...................................................................................................12-11
13 Optional Equipment
Internal Options...............................................................................................13-1
Accessories...................................................................................................... 13-1
14 Specifications
InfoNode Specifications.................................................................................. 14-1
Theory of Operation and detailed hardware description.................................14-2
Compliance Information..................................................................................14-3
Maintenance and Service................................................................................ 14-4
Appendix A
Appendix B
Appendix C
Appendix D
Appendix E
Appendix F
Quantities Calculated from Periodic Voltage and Current Measurements
Summary of Power Quality Variations
System Parameters Affecting Power Quality and Diagnostic Evaluations
Protocols Supported for InfoNode and DataNodes
Signature System Network Capabilities
Glossary
xvii
Series 5500 User’s Guide
Series 5500 Overview
Signature System Setup
The Signature System is a new vision for distributed
electric power information systems.
It is based on a few simple premises: Capture all data.
Convert the data to information. Manage the information
while saving the data. Move the information to those who
need it, when they need it. Share the information. Provide
answers, not just data. Eliminate installed software. And
use the Internet.
A typical Signature System is built from several
DataNodes, plus one or more InfoNodes equipped with a
selection of Answer Modules. Large Signature Systems
may also include NodeLink or NodeCenter, a powerful
suite of server-based management analysis tools for
enterprise-wide systems.
DataNodes gather readings from circuits and processes.
Inexpensive, small and easy to install, DataNodes have
the intelligence to convert raw readings into useful data.
They communicate their data to InfoNodes through RS485 or Ethernet links.
1
InfoNodes gather DataNode data, convert the data to
information, manage and present the information. They
form the central component of the whole Signature
System. InfoNodes are equipped with Answer Modules
which convert information into application-specific
answers using patented and proprietary expertise
developed by Electrotek Concepts, Electric Power
Research Institute (EPRI) and Dranetz-BMI. These plugin application-specific answers will cover applications
from identifying power disturbance origins, to reporting
based on evolving standards, to predicting maintenance
schedules at substations.
Signature System Architecture: A Conceptual Illustration
1-1
Series 5500 User’s Guide
1
Series 5500 Overview
Signature System InfoNode Graphical User
Interface
The InfoNode user interface consists of a series of tab
pages. The pages are labelled as follows: Home, Views,
Reports, Real-time, and Setup.
The Series 5500 InfoNode
InfoNode: The Central Component
The InfoNode is the central component of the Signature
System, “the System that Learns from the Past, to Inform
You in the Present, and Prevents Problems in the
Future.” The Signature System consists of one or more
DataNodes (the data acquisition modules), connected to
an InfoNode (the data storage and analysis module).
Optionally, the data and information from multiple
InfoNodes can be combined at the enterprise level using
the NodeLink or NodeCenter software. InfoNodes can be
accessed through either LAN or modem connections. See
Chapter 14 Specifications for a detailed description of the
InfoNode hardware.
The InfoNode provides the user interface through a selfcontained web server. This frees the user from having to
load software onto the user's PC or laptop. Access is
possible from anywhere in the world, through the
Intranet, Internet, or via a modem, with only a standard
web browser (Microsoft® Internet Explorer V5.5 or
higher or Netscape® Navigator 6.x or higher running the
Sun Java Virtual Machine 1.3.x or higher (Sun Java VM
1.4.x is recommended)). Earlier versions of Netscape that
use the Netscape Java VM are no longer supported.
Access time is dependent primarily on the
communication media, with a direct network connection
being the fastest.
The InfoNode can also provide GPS time
synchronization to the DataNodes with the optional GPS
module.
1-2
Some of the most important options are the software
Answer Modules. These options can be part of the initial
purchase or easily added later. Data from one or more
DataNodes is analyzed to provide such answers as the
direction of the PF cap switching transient (upstream or
downstream), sag directivity, location of faults on radial
feeders, reliability-benchmark indices for power quality,
and different characterizations of data, such as QOS
(Quality of Supply), IEEE 1159, EPRI DPQ.
Each tab page has its own tree directory located in the left
window pane. The tree can be expanded or collapsed. Click
on the plus (+) sign to expand the tree and show more
options available. Click on the minus (-) sign to collapse
the tree one level backward.
All detailed tab page information is found in the right
window pane. The InfoNode system provides a direct, nofuss interface which displays information called out in tab,
hyperlink and button format. Each tab is provided with a
Help option to provide users with immediate, onscreen
assistance. Below is a sample screen showing the five main
tab pages of the Signature System InfoNode.
main menu tabs of the InfoNode System
The Home page provides basic status information about the
InfoNode and DataNodes connected, along with easy
access to the first, last, and most recent events in memory.
The Views page provides access to three interactive
sections: the QOS (Quality of Supply) Status, Timeline,
and Smart Views. The QOS module is designed to monitor
and report quality of supply compliance as specified by
European Standard EN50160. QOS Status will appear in
InfoNode systems that have QOS data acquisition modules
(5560 DataNode) in it. The Timeline is a two pane browser,
with the timeplot of selected parameters and channels in
the top pane, and the event list and details (waveshapes) in
the lower pane. The Smart Views include: 3D RMS
Mag/Dur (Magnitude/ Duration), RMS Mag/Dur, Smart
Trends, Event Summary, RMS Variations, Snapshots, and
Transients.
Series 5500 User’s Guide
Series 5500 Overview
The Reports page is used to generate reports formatted for
direct printing, through Smart Reports and Standard
Reports. Smart Reports have pre-selected output
formats and include: DataNode Summary, Voltage Quality,
Energy & Demand, Event Summary, and Top 10 Events.
Standard Reports have output formats that can be
customized by the user and include: Event Summaries, Top
10 Events, Event Statistics, Quality of Supply, Waveform
Distortion, Energy & Demand, and InfoNode Summary.
The Answer Module is a customized facility which enables
you to identify the source, cause and time of faults or
disturbances like sags and swells. The system is able to
record and document the source of the problem, whether
coming from inside your facility or in the supply from your
power supplier.
The Real-time page displays real time metered data in one
of three formats: Meter Panel, Meter Dial and Scope Mode.
Meter Panel shows a textual list of metered parameters for
the selected DataNode. Parameters displayed are those
configured for logging and trending. Meter Dial shows the
same information as Meter Panel but in an analog meter
dial format. Scope Mode shows real time waveforms for all
enabled channels in an oscilloscope type of display. Note
that Scope Mode is not available for all DataNode types.
The Setup page allows the user to configure both the
InfoNode and any DataNodes connected to it. Additional
users and their access permissions and passwords are
programmed on this page. Additional DataNodes connected
to the InfoNode are also set up on this page. Other
parameters which you can view and/or customize
(depending on your user access privilege) are:
Notifications, Communications, Answer Module,
DataNodes.
InfoNode Access Levels
1
The InfoNode firmware can function at different security
levels: Guest, Viewer, Operator and Administrator.
Guest: Can view data only. Cannot change any
settings or data.
Viewer: Can view data and change their own
password and display settings.
Operator: Can change DataNode settings
(e.g. instrument thresholds), upload and delete
measurements.
Administrator: Full access to all settings
(e.g. Network, Time, Locale, Users).
The Administrator mode is accessible to users with
administrative privileges. This mode is not normally
used except to initially configure the InfoNode, upload
new firmware, or run extensive diagnostic tests on the
system.
Standard and Optional Accessories
A power cord (P/N 900744) and this User’s Guide (P/N
UG-INODE5500) are included with the Series 5500
InfoNode as standard accessories. A variety of optional
equipment is available. See Chapter 13 Optional
Equipment for details.
1-3
Series 5500 User’s Guide
1
Series 5500 Overview
1
2
3
Series 5500 Front Panel
1
LINK - Indicator lamp will flash when the unit is responding to network requests.
2
DRIVE - Indicator lamp will flash when the unit’s database is being read or written to.
3
POWER - Indicator lamp will flash when the unit is operating normally.
NOTE: All three lamps will flash simultaneously when the unit is in Administrator mode.
1-4
Series 5500 User’s Guide
Series 5500 Overview
1
2
3
4
5
6
1
10
9
8
7
AC
or
AC/DC
Series 5500 Rear Panel
1
COM 1 - Serial communications port 1. Use for connection with DataNodes (7100 or 5540) or with PC serial port
for administrative tasks.
2
COM 2- Serial communications port 2. Use for connection with DataNodes (7100 or 5540).
3
Phone Line (RJ-11C) - Allows modem communication via telephone line.
4
GPS Antenna - Allows connection of GPS antenna.
5
10BaseT (RJ-45) - Allows connection to Ethernet.
NOTE: Normal factory unit setting is with the AUI port disabled.
Only one network connection media type may be active at a time.
Choosing to enable the AUI port results in disabling the 10BaseT port.
The AUI port may be enabled “Only by a Qualified Person” by installing a shunt jumper at location J35 pins 1-2. This
area is located adjacent to pin 30 of the boot ROM (U23) and near the 4 rectangular LED’s on the main CPU board.
6
AUI - Auxiliary Universal Interface. For use with fiber optic adapter or other Ethernet transceiver.
7
Cooling fan - Runs continuously while unit is on.
8
Line power
AC only power version - 90-250V ac, 47-63 Hz.
AC/DC power version - 90-250V ac, 47-63 Hz. and 105-125V dc, 35W max.
9
10
Fuses - Slow blow, 250V ac T 1.25A.
Power switch - Press to turn unit power on or off. Power indicator lamp on front panel will glow while unit is on.
NOTE: Power indicator lamp will glow for approximately 5 seconds after unit is powered off.
1-5
Series 5500 User’s Guide
1
Series 5500 Overview
This page intentionally left blank.
1-6
Series 5500 User’s Guide
Preparation for Use
Initial Setup and Configuration
NOTE: The following procedures are for first time set up
and configuration of an InfoNode. If the unit is already set
up and configured, proceed directly to the section entitled
Communicating with the InfoNode on page 2-4.
The Series 5500 InfoNode should be handled with care.
After unpacking the unit, verify that all items ordered have
been accounted for. Contact Dranetz-BMI if any items are
missing or damaged.
It is possible to communicate with the InfoNode using
either or both of the following methods: modem or Ethernet
(10BaseT). The InfoNode has an optional built-in modem.
Each communication method requires a specific
configuration procedure, detailed below. For initial setup,
follow the appropriate Getting Started section (modem or
Ethernet) for your installation.
Position the InfoNode on a dry, flat surface in the desired
mounting area. The unit is designed for use inside an
appropriate enclosure. Access to the appropriate power and
communication connections is necessary.
Refer to the illustration on page 1-5 of Chapter 1, Series
5500 Overview for location of the various connectors on the
rear panel of the unit.
Getting Started (modem users)
NOTE: If the default modem IP address will not be used or
to change the modem IP address, proceed directly to the
section entitled Changing the Modem IP Address on page
2-3. If using the default modem IP address, continue with
the following procedure.
1. Unpack the unit and set up on an appropriate indoor
surface. Allow the unit to reach ambient temperature before
use. This assures proper operation within design
specifications.
2. Connect the supplied AC power cord to the unit and to an
appropriate outlet. Observe the power ratings marked on the
rear panel. Do not turn the unit on until instructed to do so
by this procedure.
3. Connect the telephone communications cable (user
supplied) to the appropriate connector on the rear panel
of the InfoNode, labeled Phone Line (RJ-11C).
2
4. Turn the InfoNode on by pressing the Power button
on the rear panel. The Power light on the front panel
should illuminate. It takes approximately two minutes
for the unit to go through the initialization sequence.
5. To communicate with the InfoNode, use a computer
running Microsoft® Internet Explorer V5.5 or newer or
Netscape® Navigator V4.75 with Windows 95/NT or
higher.
6. From the desktop, double click on the My Computer
icon, then double click on Dial-up Networking.
NOTE: Some operating systems may require you to log
in as the local administrator to make these changes.
Consult your MIS Administrator for details.
7. Create a new connection site by double clicking on
the Make New Connection icon.
8. Follow the screen prompts in the dialog boxes and
enter the appropriate information for your location.
9. Once the new connection site has been created, the
new icon representing the information you have entered
will appear in the Dial-up Networking folder.
10. Click once on the new icon to highlight it. Select
File>Properties. A general dialog box will appear. In the
Connect using section, click on Server Type.
11. Enable only the following settings:
Type of Dial-Up Server:
•PPP: Windows 95, Windows NT, Internet...
Advanced options:
•Log on to network
•Enable software compression
Allowed Network protocols:
•TCP/IP
12. Click on TCP/IP Settings. Select Specify an IP
address. Enter the default IP address for your
computer’s modem interface in this connection profile:
192.168.1.5. Contact your MIS Administrator if you
need to use a different IP address.
2-1
Series 5500 User’s Guide
2
Preparation for Use
NOTE: The first three groups of numbers in the TCP/IP
address must be the same for dial-up networking and the
InfoNode’s internal modem. The default address is
192.168.1.X, where X is “5” for dial-up networking and
“10” for the InfoNode’s internal modem.
Enable the Server assigned name server addresses and
select Use IP header compression. Click on OK when
done. Click on OK on both the Server Types screen and
the General screen.
13. The web browser must also be configured for dial-up
networking. Disable the Proxy server in the Internet
Explorer or Navigator connection configuration. Contact
your MIS administrator for information if you are not
sure how to do this.
14. Double click on the new icon to launch the
connection to the InfoNode.
15. When the Connect to screen appears, enter the proper
user name and password.
Default user name: viewer
Default password: password
Press Enter or click on OK.
16. During the connection process, various screen
messages will appear indicating connection status.
Finally, the message “Connected at...” will be displayed.
17. Once connection has been established, launch
Internet Explorer or Navigator. This is typically done by
double clicking on The Internet icon located on the
desktop.
18. Proceed to the section entitled Communicating with
the InfoNode on page 2-4.
3. Connect the Ethernet communications cable (user
supplied) to the appropriate connector on the rear panel of
the InfoNode, labeled 10BaseT (RJ-45).
4. Connect the female end of a 9-pin null modem cable
(user supplied) to the connector labeled COM1 on the rear
panel of the InfoNode. Connect the other end of this cable
to the COM1 or COM2 port of the computer being used for
this installation.
5. Configuring the HyperTerminal. From the desktop,
click Start>Programs>Accessories>HyperTerminal.
6. Locate the file named “Hypertrm.exe” and double click
on this file to launch it.
7. The Connection Description screen will appear. Enter
the desired name for this connection and select the desired
icon for it. When done, click on OK.
8. The Phone Number screen will appear. Do not enter a
phone number. Go to the Connect Using section of this
screen. Use the scroll button to find the computer port
being used for connection with the InfoNode (e.g. Direct to
COM1). Select the correct port by clicking on it. The
screen should now display the proper information in the
Connect Using box. Click on OK. (Contact your MIS
Administrator if you are not sure how to configure the
HyperTerminal)
9. The Port Settings screen for the selected port will
appear. Enter or verify the following settings:
Bits per second: 9600
Data bits: 8
Parity: None
Stop bits: 1
Flow control: None
When done, click on OK.
Getting Started (ethernet users)
1. Unpack the unit and set up on an appropriate indoor
surface. Allow the unit to reach ambient temperature
before use. This assures proper operation within design
specifications.
2-2
2. Connect the supplied AC power cord to the unit and to
an appropriate outlet. Observe the power ratings marked
on the rear panel. Do not turn the unit on until instructed
to do so by this procedure.
10. Turn the InfoNode on by pressing the Power button on
the rear panel. The Power light on the front panel should
illuminate.
11. Wait approximately 30 seconds until the
HyperTerminal screen displays a connection message from
the InfoNode. Press the Enter key within 5 seconds of the
appearance of this message to place the unit into Console
mode (A countdown message will appear on the screen
during this period, i.e. 5..4..3..2..1..0). If the unit does not
Series 5500 User’s Guide
Preparation for Use
enter Console mode it will continue with the boot sequence.
Should this occur, turn the InfoNode off, wait 30 seconds
and return to Step 10.
boot. Exit the HyperTerminal screen and save the file for
future use (e.g. to configure other InfoNodes using the
same settings).
12. At the Login prompt, type admin
At the Password prompt, type password
Press Enter.
21. After the InfoNode has re-booted (approximately
two minutes) launch Internet Explorer or Navigator. This
is typically done by double clicking The Internet icon
located on the desktop.
13. The screen should now display the DMM> prompt. At
the prompt, type showip and press Enter. The current IP
parameters will be displayed. You may wish to make a note
of the current settings before making any changes.
2
22. Proceed to the section entitled Communicating with
the InfoNode on page 2-4.
Changing the Modem IP Address
NOTE: The unit will automatically exit Console mode if no
command is received after ten minutes. For a list of
commands, type help at the prompt and press Enter.
14. Configuring the The Ethernet IP address, Gateway
and DNS. These settings may need to be changed to allow
the InfoNode to operate on your network. Consult your
MIS Administrator if you are not sure of the correct
information. After you have determined the proper IP
address and settings, proceed as follows.
15. To set your Ethernet IP address: At the DMM>
prompt, type setipe your Ethernet IP address (e.g. setipe
192.168.0.10) and press Enter.
16. To set your Gateway: At the DMM> prompt, type
setgw your Gateway (e.g. setgw 192.168.0.1) and press Enter.
17. To set your DNS: At the DMM> prompt, type setdns
your DNS (e.g. setdns 192.168.0.16) and press Enter.
NOTE: The Ethernet Subnet Mask may also need to be
changed in some installations. Consult your MIS
Administrator for information.
18. To set your Ethernet Subnet Mask: At the DMM>
prompt, type setmaske your Ethernet Subnet Mask (e.g.
setmaske 255.255.255.0) and press Enter.
19. Verify if the desired information has been entered:
At the DMM> prompt, type showip and press Enter. The
current settings will be displayed. If changes are needed,
repeat steps 15-18.
20. When finished entering settings: At the DMM>
prompt, type reboot and press Enter. The InfoNode will re-
NOTE: The first three groups of numbers in the TCP/IP
address must be the same for dial-up networking and the
InfoNode’s internal modem. The default address is
192.168.1.X, where X is “5” for dial-up networking and
“10” for the InfoNode’s internal modem.
1. Unpack the unit and set up on an appropriate indoor
surface. Allow the unit to reach ambient temperature
before use. This assures proper operation within design
specifications.
2. Connect the supplied AC power cord to the unit and to
an appropriate outlet. Observe the power ratings marked
on the rear panel. Do not turn the unit on until instructed
to do so.
3. Connect the telephone communications cable (user
supplied) to the appropriate connector on the rear panel
of the InfoNode, labeled Phone Line (RJ-11C).
4. Connect the female end of a 9-pin null modem cable
(user supplied) to the connector labeled COM1 on the
rear panel of the InfoNode. Connect the other end of this
cable to the COM 1 or COM 2 port of the personal
computer being used for this installation.
5. Configuring the HyperTerminal. From the desktop,
click on Start>Programs>Accessories>HyperTerminal.
6. Locate the file named “Hypertrm.exe” and double
click on this file to launch it.
7. The Connection Description screen will appear. Enter
the desired name for this connection and select the
desired icon for it. When done, click on OK.
2-3
Series 5500 User’s Guide
2
Preparation for Use
8. The Phone Number screen will appear. Do not enter a
phone number. Go to the Connect Using section of this
screen. Use the scroll button to find the computer port
being used for connection with the InfoNode (e.g. Direct
to COM1). Select the correct port by clicking on it. The
screen should now display the proper information in the
Connect Using box. Click on OK. (Contact your MIS
Administrator if you are not sure how to configure the
HyperTerminal)
9. The Port Settings screen for the selected port will
appear. Enter or verify the following settings:
Bits per second: 9600
Data bits: 8
Parity: None
Stop bits: 1
Flow control: None
When done, click on OK.
10. Turn the InfoNode on by pressing the Power button
on the rear panel. The Power light on the front panel
should illuminate.
NOTE: The Modem Subnet Mask may also need to be
changed in some installations. Consult your MIS
Administrator for information.
15. To set your Modem Subnet Mask: At the DMM>
prompt, type setmaskm your Modem Subnet Mask (e.g.
setmaske 255.255.255.0) and specify the number of bits (e.g.
24), then press Enter.
16. Verify if the desired information has been entered:
At the DMM> prompt, type showip and press Enter. The
current settings will be displayed. If changes are needed,
repeat steps 14-15.
17. When finished entering settings: At the DMM>
prompt, type reboot and press Enter. The InfoNode will reboot. Exit the HyperTerminal screen and save the file for
future use (e.g. to configure other InfoNodes using the
same settings).
18. Continue with Getting Started (modem users), step 6.
Communicating with the InfoNode
11. Wait approximately 30 seconds until the
HyperTerminal screen displays a connection message
from the InfoNode. Press the Enter key within 5 seconds
of the appearance of this message to place the unit into
Console mode (A countdown message will appear on the
screen during this period, i.e. 5..4..3..2.. 1..0). If the unit
does not enter Console mode it will continue with the
boot sequence. Should this occur, turn the InfoNode off,
wait 30 seconds and return to Step 10.
2-4
NOTE: If you are using a modem, you must dial into the
InfoNode prior to the procedure below.
1. Enter the IP address for the InfoNode in the Internet
Explorer or Navigator Address box (Default address:
192.168.1.10). Press Enter.
12. At the Login prompt, type admin
At the Password prompt, type password
Press Enter.
2. The Enter Network Password dialog box will appear.
Enter the proper user name and password.
Default user name: admin
Default password: password
Press Enter or click on OK.
13. The screen should now display the DMM> prompt.
At the prompt, type showip and press Enter. The current
IP parameters will be displayed. You may wish to make
a note of the current settings before making any changes.
3. Connection with the InfoNode will now be established
and the Series 5500 InfoNode home page will appear on
screen. The following main menu tabs are available: Home,
Views, Reports, Real-Time, Setup.
NOTE: The unit will automatically exit Console mode if
no command is received after ten minutes. For a list of
commands, type help at the prompt and press Enter.
NOTE: Detailed information about the menu tab selections
is contained in the next Chapters of this manual and in the
on-screen Help. General information required to begin
operation is provided in the next section. Administrative
privilege is required to perform the operations described
next.
14. To set your Modem IP address: At the DMM>
prompt, type setipm your modem IP address (e.g. setipm
192.168.1.10) and press Enter.
Series 5500 User’s Guide
Home Page
This chapter explains how authorized users log in and
access the InfoNode system.
Log-in
Before gaining access to the Home page, the user must first
log-in using a proper user name and password. If the user
name or password is not correct, the Enter Network
Password dialog box shown below will re-appear. Setting
up the names, passwords, and privilege level require
administrative permission (see Chapter 7 Setup Page,
Users section).
Contact your InfoNode Administrator (someone with
Admin privileges) to set up your user account in order to
access the system. Only the Administrator can create
accounts for other people and change Security Levels. The
system is shipped with a default Admin account, which the
Administrator should customize with your own user name
and password.
In the left-hand frame of the page, you will see the
InfoNode Status and Help options. The InfoNode Status
displays general information on both the DataNode and
InfoNode (see sample screen display next page). Click on
one of the underscored links or hyperlinks on the righthand screen display to go directly to the event detail or
status information.
3
You may log out of the InfoNode at any time by closing
your browser.
Note that some pages may take longer than usual to
download when viewed for the first time, or after a
firmware revision has been uploaded to the InfoNode.
The standard home page can be modified or replaced
with a custom HTML page at extra cost. Please contact
the Dranetz-BMI Customer Service Department:
Phone: (732) 287-3680 or 1-800-DRANTEC
Web: http://www.dranetz-bmi.com
InfoNode Status
The InfoNode Status table provides general information
about the InfoNode and the data that it retrieved from the
connected DataNodes, including the following:
DataNode Information
DataNode health status is based on continual checks of
the communication links and internal processes.
Enter Network Password dialog box
NOTE: When you upgrade your operating InfoNode
firmware version, the Signature System Java Classes will
automatically be installed in your computer upon log-in.
The Java wizard program will install the setup files
necessary for your computer to support the Signature
System interactive controls. If you do not allow installation
of the Java program, then some InfoNode screens will not
be visible and you will not be able to take advantage of
some features of the Signature System. The setup program
will not change any system configuration. It just stores a
small number of Java files on your computer. Once
installation is done, the program will prompt you to click
on Finish to complete setup. You may have to restart your
web browser once setup is complete.
Home Page
The Home page provides basic system status information,
and links to events that occurred since you last logged on.
The Home page is automatically displayed after
successfully logging on, or by selecting the Home tab.
Series 5500 User’s Guide
Database usage shows the amount (%) of memory used.
As a reference, the total available memory is shown.
# of Disturbances (Total disturbances, First disturbance,
Last disturbance) is defined by the type of DataNode
connected. For a power quality-type DataNode, these
include events triggered by limit or threshold crossings.
# of Disturbances (Since your last logon, In the last 48
hours) is the amount of events that have occurred since
the user last logged on and in the last 48 hours.
#Disturbances is linked to the Event SummaryView.
DataNode Status
You can select the DataNode Status from either the
linked text on the Home Page, or by selecting the Setup
tab and clicking on the desired DataNode site in the tree
directory. This page provides information about specific
DataNodes connected to the InfoNode. This includes
DataNode Description, the Last Connection made,
DataNode site Health status, DataNode Model type,
Serial number, and software Version.
3-1
3
Home Page
Home, Views, Reports,
Real-time: where DataNode
settings are displayed in
meaningful format
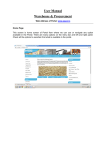
InfoNode Home page
Setup: where users
view and/or customize
the Datanode settings
click any DataNode hyperlink to
view specific DataNode information
3-2
Series 5500 User’s Guide
Home Page
Quality of Supply (QOS) Compliance
NOTE: Information on QOS Compliance only appears
when the 5560 DataNode support package (SW-IAP60)
is installed.
The Home page reports Quality of Supply compliance
status for the latest complete evaluation period of each
DataNode. Information about QOS compliance appears
in two parts of the Home page: the DataNode status
paragraph and the DataNode status table.
Compliance Message on DataNode Status Paragraph
An additional message on QOS compliance is appended
to the DataNode Status. Sample messages include “3
DataNodes are reporting Quality of Supply noncompliance" or “One DataNode is having problems. 2
DataNodes are inactive." Like other DataNode messages
in the status paragraph, the compliance message is
hyperlinked to the Quality of Supply Compliance section
in the DataNode status table.
Compliance Message on DataNode Status Table
An additional section showing the compliance status of
DataNodes is added to the DataNode status table. The
table indicates which DataNodes are in compliance, not
in compliance, or have undetermined compliance status
for the specified interval. DataNodes that are noncompliant are hyperlinked to the QOS Status view.
InfoNode Information
This table provides the following information about the
InfoNode: Name, Description, Model, Serial number,
Firmware version containing the different support
packages installed in the InfoNode, and Uptime duration.
3
Help
Much of what is written in this manual can be found in the
Help option onscreen. Expanding the Help tree will
produce Introduction and Index links.
Introduction
The Introduction page orients users that they are currently
viewing the Home page. Four active buttons are found in
this page: Contents, Index, <<, and >>. These buttons
present different ways to access the same Help
information. The differences lay only in the way each
button organizes and lists information.
The >> button brings the user forward to the next linked
page. It covers information across pages in all tabs, not just
the Home tab. Some pages have hyperlinks which contain
further detailed information on the topic.
The << button brings the user backward to the previously
linked page. It helps the user scan for information quickly
and easily through the linked pages.
Index
The Index page operates exactly like the Index portion of a
book. Information is listed and categorized in alphabetical
order. Click any button from A to Z to show various
related topics under each letter. The topics are featured as
hyperlinks.
The Contents button operates exactly like the Table of
Contents in books. Information is listed and organized
under different headings. The headings normally used here
are the menu tab names. Sub-topics per heading appear as
hyperlinks.
3-3
Series 5500 User’s Guide
3
Home Page
This page intentionally left blank.
3-4
Series 5500 User’s Guide
Views Page
This chapter describes the various interactive graphical
display screens formatted primarily for viewing data
through the browser, as opposed to printing out. If you
want to generate reports in print format, please select the
Reports tab and turn to Chapter 5 Reports Page.
General Procedures In Making Queries
The Views and Reports tabs both use a common Query
section where you select whether to display graphs or
reports in a new window or an existing window, select
which DataNodes are to be included in the presentation,
and over what time period to select the data from. To
arrive at your desired information, follow the designated
procedures below:
To Select Multiple DataNodes - keep the Control key
depressed while using the mouse and its left button to
select the DataNodes of choice.
NOTE: This option functions for all Views and Reports
except the Timeline.
To Select the Time Range - select one of eight pre-formatted time-range radio buttons, or enter any valid starting
and ending time/date range. Pre-filtered Time Ranges and
their definitions include:
4
Today - from 00:00 midnight of the present day until the
present time
Yesterday - the 24 hour period ending at 00:00 midnight
of present day
Last 48 Hours - previous 48 hours from present time
This Week - from 00:00 of Sunday of the present
week until the present time
Last 7 Days - previous 7 days ending with 00:00 of
today
Last 14 Days - previous 14 days ending with 00:00 of
today
Last 30 days - previous 30 days ending with 00:00 of
today
This month - from 00:00 of the first day of the month
until present day
This year - from January 1 of the present year until the
present day
Last year - from January 1 to December 31 of the previous year
To Customize Time/Date Ranges - enter the starting and
ending month/day/year as well as hour/minute/second in
the format selected in the Setup page (i.e. European date
format, 24 hour military time, etc.)
All Time - first event in memory to last event
Last Hour - previous hour from present time
4-1
Series 5500 User’s Guide
4
Views Page
Views Page
The Views page offers three ways to display data
sourced from the DataNode settings. First is through the
QOS Status which displays data relative to quality of
supply compliance. QOS Status appears in InfoNode
systems that have 5560 DataNode in use. See page 10-4
for information on QOS Status. Second is through
Timeline, featuring graphs of user-selected parameters
over user-selected time periods. Third is through the
Smart Views featuring different views of data that have
been pre-filtered or specified based on typical uses of
other Dranetz-BMI products. These include magnitudeversus-duration graphs, lists of all events or only those
events that are classified by IEEE 1159 as RMS variations or transients.
The left window pane contains the tree directory which
presents the QOS Status (if 5560 DataNode is in use, see
page 10-4), Timeline, Smart Views and Help options.
Clicking on any Timeline or Smart View option will
direct you to a common Query Section screen. The
Query section is used to select which specific DataNode
you want to view as well as the Time/Date Range when
that particular DataNode information was captured. Once
you have made those selections, click on either the
Display or Display in New Window button to view the
information that you are interested in.
The Timeline option displays a graph of user-selected
parameters over a user-selected time period. For some
parameters, the minimum, maximum and average values
are plotted, along with event markers that indicate detailed
waveform information also available at that specific time.
The lower portion of the screen displays a list of events
recorded over that time period.
Smart Views are similar to Reports of the same name,
except that they are designed to be viewed onscreen
instead of printed out. Smart Views selections include: 3D
RMS Mag/Dur (Magnitude-and-Duration), RMS Mag/Dur,
Smart Trends, Event Summary, RMS Variations,
Snapshots, Transients.
Displays QOS
Status query
screen (see
page 10-4)
Views Page
click to display
Timeline View in
existing window
click to display
Timeline View in
a new browser
window
(see page 4-3)
click desired
DataNode(s) to
view
set time period
of data to view
Query Section screen
4-2
Series 5500 User’s Guide
Views Page
Timeline
Once the DataNodes and time ranges have been selected,
you can select the Display or Display in New Window button to create a plot of one or two specified parameter(s) on
the vertical axis and the time range on the horizontal axis.
This plot is the Timeline View, which consists of two
areas: the Timeline Graph (top) and the Event List/Detail
(bottom). Click and drag the horizontal line that separates
the two areas to enlarge either of them.
Timeline Graph
The Timeline graph is auto-scaled to use the maximum
amount of space for viewing the data. Key features of the
timeline graph include:
1. Graphs of the minimum, average and maximum values
of the parameter over a user selectable time interval are
simultaneously displayed. The default average value has a
heavier line weight to distinguish it from the min/max
lines.
2. Graphs will show any timed readings, limit crossing or
threshold triggered events that occurred during the
selected time range. These are indicated by an Event
Marker on the horizontal time axis. Click on the event
marker to display the Event Detail in the lower portion
of the screen.
3. Graphs support zooming via a rectangle drag.
Zooming in on specific data can be done in both the horizontal and vertical axis. Position the cursor into the
graph area at one of the corners of the area of interest
and depress the left mouse button while dragging the
cursor towards the opposite corner of the area of interest.
A box will appear as the mouse is moved, indicating the
area being selected. Once the selection is complete,
release the left mouse button. The display will be resized
to show the area of interest.
4
different line weights distinguish
min, max, and avg values
right click on the graph, then
select General to open dialog
box
right click on the graph, then
select Channels to open dialog
box (see page 4-4)
double-click on desired event
to view details (see page 4-5)
Timeline Graph and Event List display
The General Options dialog box provides additional
options for altering the graph. This user preferences
command is available only to users assigned the
Security Level of Viewer, Operator or Administrator.
This option is not available to Guests.
4-3
Series 5500 User’s Guide
4
Views Page
4. Graphs support a right mouse button context menu
that displays additional options for altering the graph:
General Properties of the Timeline - will allow you to
change the title of the graph, font type, font size, background color, and whether parameters are displayed in
units of % or magnitude. In addition, accumulated data
such as Energy can be set for display on an internal
basis, in accumulated values, or as a normalized accumulated graph.
Axis Properties for the Timeline - will allow you to
change the title, fonts, scaling for the horizontal time
axis, label characteristics for the vertical axis, and grid
color.
Print - will print and save in PQDIF format
Copy Image - will save the displayed timeline to a new
window clipboard as a GIF file. This can then be saved to
any folder using the standard browser File|Save As... command.
Copy Data - will allow you to copy the data that makes up
the graph to the clipboard. Data can then be pasted into
applications such as Excel.
Channels - channnels to be displayed can be selected from
the expanding tree.
Full Scale - will return to the original, unzoomed data.
Zoom Out - will undo the previous zoom.
To Add/Remove Channel-Parameters: The Channel Selection box below allows the user to add or remove
channels/parameters from the graph. If there is a plus sign [+], then you can click on the plus sign to further
expand the tree to show more options available. A minus sign [-] shows that the tree directory has already
been fully expanded. Clicking on the minus sign will collapse the tree back up one level.
To display an additional parameter for a specific channel,
expand the tree to the necessary detail and then click on
the item. Click on the right arrow in the middle to move
the channel-parameter to the list of displayed data.
To move all channels of a given parameter at once to the
display list, highlight the parameter (rather than the individual channel) then click on the right arrow key.
To remove a channel-parameter from the display list,
highlight the parameter from the table on the right side
then use the left arrow to move it out of the display list.
Once the selections have been made, click on the
APPLY button to see the results without exiting the
selection window. OK will exit the selection window and
apply the changes. CANCEL will exit the window without
applying the selection changes.
4-4
Series 5500 User’s Guide
Views Page
Event List/Detail
The Event List shows a tabular display of the limit crossing or threshold triggered events that are displayed in the
timeline (see display screen below). The data associated
with an event depends on the type of DataNode and type
of event. Key features of the Event List/ Detail include:
1. The Event List table shows the Time/date of the event,
Event Type, Channel (phase), and Characteristic (description) of the event. The description may contain additional
information, such as minimum/maximum values, duration,
frequency and category.
2. Events are listed from most recent to oldest.
NOTE: If there are a very large number of events in the
range selected, only the most recent 250 events are listed.
3. To step through the events or to jump to the start or end
of the list, click on the arrow keys in the upper right hand
corner of the list. Use the horizontal and vertical scroll
bars to pan through the Event Listing table. Click on the
4
field descriptor on the top of the table to sort by that particular field, instead of chronological order.
4. If there are Event Details or waveforms associated
with those events, they can be displayed in additional
tabs. Double click on the row containing the event of
interest. This will produce additional tabs showing the
event details.
5. The event detail viewer supports overlay of multiple
channels with left and right axes.
6. You can zoom on the waveform by using the left
mouse button as was done in the Timeline Graph section.
7. Click the right mouse button with the cursor in this
display area to produce a similar menu to the Timeline
Graph section to allow you to change the properties of
the graph, as well as save the image.
8. Click on the arrow keys in the upper right corner to
step through the available waveforms.
vertical scroll bar
right-click on the
graph to set user
preference properties
(see page 4-3)
arrow keys
field descriptors
horizontal
scroll bar
Timeline Graph and
Event List display
Timeline View with Event Detail
Series 5500 User’s Guide
4-5
4
Views Page
Smart Views
There are a number of different views of the data that have been specified by type. These include magnitude-versusduration graphs, lists of all of the events, or lists of events that are classified by IEEE 1159 as RMS variations or transients. The same Query Section in the Timeline appears to allow you to select what date/time range and which
DataNodes are to be included in the views.
3D RMS Mag/Dur View
3-D Mag-dur graphs show the number of RMS variations of a specified range of magnitude and duration, also called
bins. For example, an RMS variation with a magnitude of 80-90% of nominal and 1-5 cycles in duration is one bin,
whereas 80-90% and 10-30 cycles is another, 70-80% and 10-30 cycles is another, and so on. Each time that the characteristics of an RMS variation match the criteria of the bin, the counter is incremented. Certain types of phenomena are
typically found in certain bin groupings such as: sags cleared by fuses versus sags cleared by breaker operations; versus
sags caused by the starting of large horsepower motors; versus the swells caused by loads being turned off and the
response time of the automatic tap changer. In the 3-D mag dur graph, it is a quick visual way to see what category most
of the disturbances fall into. This helps determine the source of the disturbance.
4-6
Series 5500 User’s Guide
Views Page
4
RMS Mag/Dur View
The RMS Magnitude-and-Duration graph is a plot of the magnitude of the event versus duration of the event with the
time plotted on a logarithmic scale. A data point is plotted for each event and the graph is overlaid with equipment
susceptible or safe-operating type curves, such as the ITIC curve or CBEMA. Events that fall between the two curves
will not usually cause equipment to malfunction (equipment with a similar set of susceptibles to those used to develop
the curve), whereas those outside the limits are likely to cause problems.
4-7
Series 5500 User’s Guide
4
Views Page
Smart Trend
Smart Trend will display a timeline type graph for a large range of parameters, based on the type of DataNode and which
parameters were saved for trending. After using the standard query to select the DataNodes and time/date range, a display of all possible parameters that can be trended is shown. Clicking on a green check mark onscreen will trend that
parameter for the selected phase and will also show a histogram of the different values with a cumulative probability
line. Red X marks onscreen indicate that the particular parameter is not available for trending. See sample display
screens below.
Two ways to view trend displays:
Left-click on the check mark of
the parameter you want to trend;
OR
Right-click on the check mark to
display this drop down menu,
then click Open Link/Open Link
in New Window to view trend display
4-8
Series 5500 User’s Guide
Views Page
4
Event Summary
The Event Summary table seen below is a listing of the newest to oldest events in memory of the InfoNode for the
DataNode selected. The data contained in the table include the: Event Time/Date, Monitor that recorded the event, Event
Type, Phase (channel), and event Characteristics as found in the Event List details. Click the Event Time/Date (in hyperlinks) to display the Event Details.
The event Characteristics include magnitude, duration, frequency, and category. The categories are defined according to
the graph explained next.
NOTE: If there are too many events in the selected range to be displayed in a timely manner, the most recent 500
events will be displayed along with the message “more data is selected than can be displayed”. This also applies to any
of the other Views.
RMS Variations
The RMS Variations table is a filtered version of the Event List. It includes only those events of RMS variation type
(sags, swells, and interruptions).
4-9
Series 5500 User’s Guide
4
Views Page
Definition of the Category Event Characteristic
Transients
The Transients table is a filtered version of the Event
List; only those events of Transient type are included.
Refer to Chapter 7 Setup Page, Answer Module section,
for further discussions on the above topics.
Help
Much of what is written in this manual can be found in
the Help option onscreen. Expanding the Help tree will
provide Views Topics and Index links.
Index
The Index page operates exactly like the Index portion of
a book. Information is listed and categorized in alphabetical order. Click any button from A to Z to show various
related topics under each letter. The topics are featured as
hyperlinks.
The Contents button operates exactly like the Table of
Contents in books. Information is listed and organized
under different headings. The headings normally used here
are the tab names. Sub-topics per heading appear as
hyperlinks.
Views Topics
The Views Topics page simply says that the user is currently in the Views page. Four active buttons are found
in this page: Contents, Index, <<, and >>. These buttons
present different ways to access the same Help information. The differences lay only in the way each button
organizes and lists information.
The >> button brings the user forward to the next
linked page.
The << button brings the user backward to the
previously linked page.
4-10
Series 5500 User’s Guide
Reports Page
5
This chapter describes the different types of reports that users can generate using the InfoNode system. It explains how
reports can be customized to suit the preference and needs of individual users.
Reports Page
The Reports home page shown below displays a list of the different Smart Reports, Standard Reports, and Answer
Module reports that are available. If a 5560 DataNode is in use, the Quality of Supply Compliance smart report will also
be included.
Reports home page
A Report differs from a View in couple of ways. If a report contains multiple sections then the report will contain a Table
of Contents. The Table of Contents provides a summary of what is in the report, and it provides a quick method for getting to a particular section of the report thru a hyperlink. A sample Table of Contents can be found next page. The
Reports do not allow for interactive functions, but they will always be printed in their original form. The Views should
be used for interactive functions.
5-1
Series 5500 User’s Guide
5
Reports Page
Sample Table of Contents
Smart Reports
Smart Reports provides several types of reports and
allows only minimal pre-filtering. The query setup for all
Smart Reports is identical. The only variance between
the reports is that some allow the selection of multiple
DataNodes. The query setup screen seen next page is
similar for all Smart Reports with its respective title.
DataNode Summary
The DataNode Summary Smart Report is a listing of
information about a selected DataNode over the specified
time period. This report includes RMS Variation
Summary, Transient Summary, Monitor Status,
DataNode Log, and the DataNode Setup.
QOS Compliance
The QOS Compliance Smart Report will generate tables
and graphs reflecting the compliance of the categories
specified in EN50160 for the intervals that were recorded
by the DataNodes you selected. The following reports
are presented: Compliance Summary, Compliance Graph,
Event Statistics, Harmonics Graph, Interharmonics
Graph, Power Frequency Graph, and Min/Max Tables.
See page 10-11.
Voltage Quality
The Voltage Quality Smart Report consists of a series of
timeplots of available voltage phases, along with event
summaries, histograms of event magnitudes, a Mag/Dur
curve, and a 3D Mag/Dur curve.
Energy and Demand
The Energy and Demand Smart Report consists of trends,
tables, and histograms for demand and energy parameters.
Event Summary
The Event Summary Smart Report consists of a table of
events that occurred within the date/time that were
selected for the query. This report allows for the selection
of multiple DataNodes. Events are displayed in
chronological order with the most recent event appearing
first.
Top 10 Events
The Top 10 Events Smart Report is similar to the Event
Summary Smart Report, except that it groups the events
by type (sags, swell, interruptions, and transients) and only
includes the 10 most severe events of each type. The
severity of the events is based on their category. Events of
each type are displayed in chronological order with the
most recent event appearing first.
5-2
Series 5500 User’s Guide
Reports Page
5
Smart Reports Query Selection
5-3
Series 5500 User’s Guide
5
Reports Page
Standard Reports
Standard Reports provide the user with a greater ability
to customize the contents of each report. The Smart
Reports Query Setup is also used for the standard
reports, with each Standard Report adding query parameters that are specific to its report type.
Event Statistics
Event Statistics Report is a series of statistical analysis
reports that you select for RMS variations and/or transients. The selections are shown in the following figure.
Event Summaries
The Event Summaries Report of the Standard Reports is
very similar to that of the Smart Reports. The Standard
Report version allows the user to select which event
types will be included in the report. The user selects the
types of events they want included in the report by
checking the box(es) next to the desired event type(s).
See figure below.
Event Statistics Specific Query Setup
Event Summaries Specific Query Setup
Top 10 Events
The Top 10 Events Report of the Standard Reports is
very similar to that of the Smart Reports. The Standard
Report version allows the user to select the method or
criteria for determining which events will be included in
the report. The method options are magnitude, duration,
area, or category. The user may specify whether to
include sags, swells, and/or transients. The user may also
select to include time plots of only the triggered phase,
the worst phase, or all monitored phases. See figure
below for the additions to the Query Setup for this
report.
Top 10 Events Specific Query Setup
RMS Variations
RMS Mag-Dur - a plot of the magnitude of the
event versus duration of the event. A data point is
plotted for each event, and the graph is overlaid
with equipment susceptible or safe-operating type
curves, such as the ITIC curve or CBEMA.
Duration Histogram - the duration of the variation versus the number of occurrences as a bar
chart, with a cumulative frequency of
occurrence line graph overlaid.
Transients
Magnitude Histogram - the magnitude of the
transient versus the number of occurrences as a
bar chart, with a cumulative frequency of
occurrence line graph overlaid.
Duration Histogram - the duration of the transient versus the number of occurrences as a bar
chart, with a cumulative frequency of occurrence
line graph overlaid.
Frequency Histogram - the principal frequency
of the transient versus the number of
occurrences as a bar chart, with a cumulative
frequency of occurrence line graph overlaid.
5-4
Series 5500 User’s Guide
Reports Page
Quality of Supply
The Quality of Supply Report is an analysis of the voltage,
similar to the requirements of the European Standard
EN50160, which specifies that various parameters must be
within a specified percentage for 95% of the time. The
user may select from an analysis of the Voltage
Regulation, Unbalance, and Frequency. The user may
select the presentation of the data in trend and/or
histogram form. The selections available are shown below.
5
Energy and Demand
The Energy and Demand Report of the Standard Reports
is very similar in content to that of the Smart Reports.
The Energy and Demand Report will allow you to
produce a trend, table and/or histogram for demand and
energy. An additional feature of the Standard report
version is that the user may include Power data. The user
may elect to include real, imaginary, apparent power,
displacement power factor and true power factor
calculations in a trend and/or histogram form.
The selections available are shown in the next figure.
Quality Supply Specific Query Setup
Waveform Distortion
The Waveform Distortion Report is an analysis of
harmonics. The user may select which data type at which
components they would like to include in the report. The
user may select Voltage THD (Total Harmonic Distortion)
and/or IEEE 519 Current TDD. The user may select to
present the data in trend and/or histogram form. The
selections available are shown below.
Energy and Demand Specific Query Setup
Waveform Distortion Specific Query Setup
InfoNode Summary
The InfoNode Summary table is a listing of the oldest to
newest administrative activity recorded by the InfoNode.
The table includes the following data:
Entry Time - the time that the logged activity occurred.
Entry - a name for the activity, such as "User login" or
"DataNode added".
User - identifies who carried out the activity.
Source Name - the part of the system affected by the
activity that could be the name of a user or a DataNode.
Description - provides additional information about the
entry. For example, if the Entry is "DataNode communication OK", then the Description could be "System
health is normal".
5-5
Series 5500 User’s Guide
5
Reports Page
Answer Module
Some answer modules provide information via a separate report. Other answer modules may just add characteristics to
the events that are displayed in the event summary table, such as direction of disturbance. Answer Modules that create a
separate report will be covered in this section.
RMS Variation Indices
The query information required for the RMS Variation Indices is very similar to all other reports. First, select the
DataNode of interest and then select the time range. The query setup for this report requires that two additional parameters be set. The query setup specific to this report is shown below.
Setup Screen for RMS Variation Indices Report
Monitoring Days Method
Many of the EPRI RBM RMS variation indices provide frequency of occurrence information or rates of occurrence. The
EPRI RBM technical report, TR-107938, discusses in detail the necessity of normalizing these rates based on the data
upon which the indices are calculated. There are two normalization methods: “Estimated” and “None (No
Normalization)”.
Estimated
The "Estimated" normalization method algorithm estimates the number of days a monitor is considered on-line by calculating the number of days between the 'From' and 'To' dates specified on the Date and Time Selection of the report setup.
None (No Normalization)
The "No Normalization" method results in a count rather than a rate. Thus, all frequency of occurrence indices calculated
using this normalization method are counts of all aggregate measurements occurring during the specified time period.
Index Normalization Setup
The Normalization Rate control designates the time period (number of day's data) to which the rate indices are
normalized. If the Normalization Method control is set to “None”, there is no rate used so the Rate control is disabled.
5-6
Series 5500 User’s Guide
Reports Page
5
see note
below
Sample RBM Sag Index Report
This report is generated using the RBM Aggregation Parameters and the query information described above. For more
information on the RBM Aggregation Parameters see page 7-26 of Chapter 7 Setup Page. The RBM Sag Index Report
calculates the indices listed below for 90%, 80%, 70%, 50%, and 10% voltage thresholds.
5-7
Series 5500 User’s Guide
5
Reports Page
Aggregated Energy Expense
The Aggregated Energy Expense features a query setup to enable users to generate a comparative expense report for
different DataNodes. Data is only available when the Energy Usage Answer Module is installed.
Setup screen for Aggregated Energy Expense Report
Select the DataNodes to aggregate in the expense report under the DataNodes window. As with the other reports, specify
the date and time range of interest.
Click on the Compare button if you want to compare the total of the aggregated DataNodes to that of another DataNode.
Click on the Aggregate Only button if you simply want to view the aggregate total.
Select any Rate Structure that is enabled under the Setup Page, Answer Module - Energy Usage. See page 7-23 of
Chapter 7 Setup Page for details on the Energy Usage - Rate Structures. If doing a comparison, select the desired
DataNode under the Comparison DataNode window.
NOTE: If a comparison is being performed, the comparison DataNode will not be included in the aggregation even if
selected.
5-8
Series 5500 User’s Guide
Reports Page
5
A sample Aggregated Energy Expense report is shown below. The report is divided into four sections: Energy Usage
kWHr, Energy Usage kvarHr, Demand Max kW, and Expense Summary.
Sample Aggregated Energy Expense Report
5-9
Series 5500 User’s Guide
5
Reports Page
Energy Expense
The Energy Expense features a query setup to enable users to generate an expense report for each DataNode. Data is
only available when the Energy Usage Answer Module is installed.
Setup screen for Energy Expense Report
Select the DataNode with which you want to generate an expense report. As with the other reports, specify the date and
time range of interest. The user may choose to divide the time range into smaller increments under the Increment
window. A typical selection for billing purposes is Weekly.
Select any Rate Structure that is enabled under the Setup Page, Answer Module - Energy Usage. See page 7-23 of
Chapter 7 Setup Page for details on the Energy Usage - Rate Structures.
5-10
Series 5500 User’s Guide
Reports Page
5
A sample Energy Expense report is shown below. The report is divided into four sections: Energy Usage kWHr, Energy
Usage kvarHr, Demand Max kW, and Expense Summary.
Sample Energy Expense Report
5-11
Series 5500 User’s Guide
5
Reports Page
Energy Usage Comparison Report
The Energy Usage Comparison Report features a query setup to enable users to generate a comparative energy usage
report for each DataNode. Data is only available when the Energy Usage Answer Module is installed.
Setup screen for Energy Usage Comparison Report
Select the DataNode with which you want to generate a comparative usage report. As with the other reports, specify the
date and time range of interest. The user may choose to divide the time range into smaller increments under the
Increment window. Then enter the reference period in which you want to compare the current usage against under the
Start of Comparison Period.
NOTE: If the reference period has more days than the current period, then it will be reduced to the number of days in the
current period. The start time will remain as selected.
5-12
Series 5500 User’s Guide
Reports Page
5
A sample Energy Usage Comparison report is shown below. The report is divided into three sections: Energy Usage
kWHr, Energy Usage kvarHr, and Demand Max kW. Each section displays the current usage vis-a-vis the percent change
from the refernce period for On Peak time, Partial Peak time, Off Peak time, and Total. A negative number indicates that
the current usage is smaller than that of the reference period.
Sample Energy Usage Comparison Report
5-13
Series 5500 User’s Guide
5
Reports Page
UPS Verification
Setup Screen for UPS Verification Report
NOTE: SARFI - System Average RMS (Variation) Frequency Index
SIARFI - System Instantaneous Average RMS (Variation) Frequency Index
SMARFI - System Momentary Average RMS (Variation) Frequency Index
STARFI - System Temporary Average RMS (Variation) Frequency Index
This report has a different query setup than the standard query setup. This report is produced for defined instrument
pairs. The instrument pairs were created under the Setup tab for the UPS Verification Answer Module. The query setup
for the UPS Verification report is shown above.
As with other reports, a date range or a start and end time need to be specified. However, for the UPS report instead of
selecting an instrument, the user selects one or more instrument pairs.
The purpose of the UPS Verification Answer Module is to verify that the UPS or another mitigation device is functioning
properly. A UPS DataNode pair consists of a DataNode monitoring the input of the UPS and another DataNode
monitoring the output of the UPS. This was designed to be done with DataNodes that support cross-triggering. If the
UPS is functioning properly, the DataNode at the UPS output will only see cross-triggered events. If the DataNodes
being used do not support cross-triggering, then no event should be seen on the output DataNode. However, without
cross-triggering, the absence of an event is not conclusive. The status determined by the UPS Verification Answer
Module may be one of the following:
5-14
Series 5500 User’s Guide
Reports Page
5
PASS
The UPS DataNode Pair has a status of PASS when an event is seen at the input DataNode, and only the cross-triggered
event is seen on the output. The UPS has been determined to be functioning properly, as the disturbance on the input was
not seen on the output.
FAIL
The UPS DataNode Pair has a status of FAIL when an event is seen at the input DataNode, and a disturbance event is
also seen on the output DataNode within the time window defined at setup. The UPS has been determined to be not
functioning properly.
Indeterminate
The UPS DataNode Pair has a status of Indeterminate when an event is seen at the input DataNode, and no event is seen
on the output DataNode. The status is Indeterminate because no cross-triggered event was seen to verify that the output
DataNode itself is functioning correctly.
The report consists of a table with event summary information for both the input and output DataNodes of the UPS Pairs
and status information. The report also contains a Mag/Dur plot with data from both DataNode marked separately. A
sample report can be seen below.
Sample UPS Verification Report
5-15
Series 5500 User’s Guide
5
Reports Page
Sample UPS Mag-Dur plot
5-16
Series 5500 User’s Guide
Reports Page
5
Fault Location
This report requires no additional query parameters. It allows for the selection of multiple DataNodes. The information
required for this Answer Module can be seen in page 7-24 of Chapter 7 Setup Page. The module computes distance-tofault for all possible balance and unbalance faults, i.e. three-phase fault; single-line-to-ground (SLG) fault of phases A,
B, and C; double-line-to-ground (DLG) faults of phases AB, BC, and CA; and line-to-line-to-ground (LLG) of phases
AB, BC, and CA. Thus, there are ten types of faults considered. The distance-to-faults are estimated using two different
equations; therefore, there are two estimates (lower and upper) for each fault type. A sample report is shown below.
Sample Radial Fault Report
RBM (Reliability Benchmarking Methodology)
The RBM Answer Module adds two reports. The first is the RBM RMS Variation Indices (see page 5-6 for description)
and the second is the RBM Aggregated RMS Event List described next.
5-17
Series 5500 User’s Guide
5
Reports Page
RBM Aggregated RMS Event List
This report is a table of RBM Aggregated Events for the specified DataNode and time range. The RBM Aggregation
Parameters define how the events are aggregated. For more information on the RBM Aggregation Parameters refer to
page 7-26 of Chapter 7 Setup Page. The query setup for this report is the standard report query information, and requires
no additional parameters to be selected. More parameters such as type of aggregation and method are set up in the Setup
tab. A sample report is shown below.
Sample RBM Aggregated Event Report
Help
Much of what is written in this manual can be found in the
Help option onscreen. Expanding the Help tree will
provide Reports Topics and Index links.
Report Topics
The Report Topics page simply says that the user is currently in the Reports page. Four active buttons are found
in this page: Contents, Index, <<, and >>. These buttons
present different ways to access the same Help information. The differences lay only in the way each button
organizes and lists information.
Index
The Index page operates exactly like the Index portion of
a book. Information is listed and categorized in alphabetical order. Click any button from A to Z to show various
related topics under each letter. The topics are featured as
hyperlinks.
The Contents button operates exactly like the Table of
Contents in books. Information is listed and organized
under different headings. The headings normally used
here are the tab names. Sub-topics per heading appear as
hyperlinks.
The >> button brings the user forward to the next linked
page.
The << button brings the user backward to the previously
linked page.
5-18
Series 5500 User’s Guide
Real-time Page
6
This chapter describes how the system enables users to view DataNode information in real-time mode. Through the
different display options available, the users are able to view and capture DataNode information as it happens and when
it happens on site.
Real-time Page
The Real-time page allows you to display the parameters being monitored by the DataNodes in a continually updated
manner. The definition of "real-time" is dependent on the DataNode itself, as well as the communication propagation
delays. Typically, the various parameter values are updated every couple of seconds. The data can be displayed in a
variety of formats, including a tabular meter panel. The Real-time menu page appears as follows.
Real-time home page
Views
Meter Dials
The Meter Dials enable you to define the parameters and create dial-type readings of each enabled DataNode parameter.
The readings are updated at approximately once per second.
After selecting the parameters and creating the meter panel, the attributes of the meter panel can be changed by rightclicking the mouse button when the cursor is over the dial. Three categories can be selected:
General (contains options for changing color of the background and the needle)
Axis (contains options for changing min/max limits, label and line color, and text font)
Set Points (contains options for changing color, value and active status)
In the sample screens found next page, parameter values for a Service Entrance DataNode have been checked, after
which the Create Meter Panel button was clicked. This resulted in the screen showing dial-type readings. Right-clicking
on the dials shows Properties for General, Axis and Set Point options. A sample Set Point display screen also appears
next page.
For a 5560 DataNode, new parameters are defined to support real-time display of flicker measurements. These parameters are required to meet the specification of a flicker meter. See page 10-20 for more information.
6-1
Series 5500 User’s Guide
6
Real-time Page
click to display parameters
in dial-type readings
click to display the
Set Point dialog box
The following are the reference points when
using the Set Point color drop down menus:
The 1st set point color originates from the
bottom (left of the dial), while the 2nd set
point color applies from the 1st going clockwise. The 4th set point color originates from
the top (right of the dial), while the 3rd set
point color applies from the 4th going counterclockwise.
6-2
Series 5500 User’s Guide
Real-time Page
6
Meter Panel
The Meter Panel real time display consists of a table showing the parameters being measured by the DataNode for each
of its channels. It is updated approximately every five seconds. Some power measurement information for a Service
Entrance DataNode is shown in the sample Meter Panel table below.
Meter panel screen display
Scope Mode
The Scope display shows real time waveform data for up to 8 channels. Scope mode is only available in certain
DataNode types, such as in EPQ DataNodes.
Voltage waveform
Current waveform
controls to set
waveform properties
6-3
Series 5500 User’s Guide
6
Real-time Page
Help
Much of what is written in this manual can be found in
the Help option onscreen. Expanding the Help tree will
provide Real-time Topics and Index links.
Real-time Topics
The Real-time Topics page simply says that the user is
currently in the Real-time page. Four active buttons are
found in this page: Contents, Index, <<, and >>. These
buttons present different ways to access the same Help
information. The differences lay only in the way each
button organizes and lists information.
The >> button brings the user forward to the next linked
page.
The << button brings the user backward to the previously
linked page.
Index
The Index page operates exactly like the Index portion of
a book. Information is listed and categorized in alphabetical order. Click any button from A to Z to show various
related topics under each letter. The topics are featured as
hyperlinks.
The Contents button operates exactly like the Table of
Contents in books. Information is listed and organized
under different headings. The headings normally used
here are the tab names. Sub-topics per heading appear as
hyperlinks.
6-4
Series 5500 User’s Guide
Setup Page
This chapter explains the various programmable settings
for the InfoNode. For security reasons, the settings can be
changed only by persons with admin access privileges.
7
InfoNode
InfoNode Setup can be expanded to reveal the following
data folders: Users, Notifications, Communications,
Answer Module, DataNodes, and Help Desk.
Setup Page
The Setup page is used to view and/or change any of the
programmable features of both InfoNodes and DataNodes.
The InfoNode Setup page is generic, without regard to
which types of DataNodes are connected to the system.
The DataNode Setup pages are specific to the type of
DataNode. The left-hand frame contains the interactive tree
from which users can view the setup information they
need. The Setup tree can be expanded or collapsed. Click
on the plus sign to further expand the tree and show more
of the options available. Click on the minus sign to collapse the tree back up one level.
In order for a new user to access the system, the system
administrator (someone with Admin privileges) must first
set up an account for the new user. The system is shipped
with default Admin, Guest and other accounts, which the
system administrator should customize with your own
name and password. Any changes made in the setup parameters are not confirmed until the Save Setup button found
on the bottom of the page has been clicked.
Users
The Users section includes Guest, Viewer, Operator and
Admin User. An Admin User can add new users by
right clicking the mouse while the cursor is over the
User folder. Only the Admin User can create accounts
for others and change Security Levels. Once the
accounts are created, the other types of User can change
the User Name, Password and Proficiency Level.
User Name - up to 30 alphanumeric characters can be
entered for the name.
Password - up to 12 alphanumeric characters can be
used for the password. A confirmation window pops up
to verify the password before proceeding.
Description - usually contains descriptive nature of the
account created for a particular user.
Security Level - can only be assigned by someone with
Admin privileges.
Proficiency Level - select either Novice or Expert user,
where the setting will determine which types of reports
and views will be displayed.
Setup home page
7-1
Series 5500 User’s Guide
7
Setup Page
Sample display window screen for a user named ‘guest’. By
selecting an item on the Properties column, a cursor or
choices will appear on the right column space. Enter your
desired Values.
Certain property items can be accessed only by those with
admin privileges. Read next sections on Security Level and
Proficiency Level.
Security Level
There are four levels of security provided. The security
levels can only be assigned by someone with Admin
privileges. These levels are known as roles and are
defined as follows:
Guest - Can only view data. Cannot change user preferences or system setups. Cannot change the configuration
of the instrument in any way.
Viewer - Can view data and access basic setup features.
Can change only basic user preferences, e.g plot title, text
size/color, background color, etc. You can open user preferences dialog box by right clicking on the event image
and selecting properties.
Operator - Can view data, change user preferences, and
change select DataNode and InfoNode setups. Cannot add
users or change security levels.
Administrator - Can access basic setup, security account
management, and network configuration parameters. Can
access all features of the InfoNode including factory
setup.
NOTE: The Administrator mode is accessible only to
users with administrative privileges.
The InfoNode supports log-in accounts that have a user
name, password and security level/role associated with
each account. The InfoNode is able to support 60 to 100
accounts.
allow basic user
privileges limited
to viewing (for
Guest) and
changing only
user preferences
data (for Viewer)
allow advanced
user privileges;
however only the
Administrator can
add users and
change security
levels
InfoNode Setup page. Above screen shows sample new user account being entered by the System
Administrator. The Administrator assigns the security level that determines extent of user privileges.
7-2
Series 5500 User’s Guide
Setup Page
Proficiency Level: Novice or Expert
Users may select between Novice or Expert modes which
determine the number of DataNode tab settings that can be
viewed and the types of reports and views that can be displayed. The novice mode allows users to access only the
Smart series of items (Smart Setup, Smart Reports).
Users assigned the security level of Guest can only view,
not change, DataNode settings. All Setup tab options for
Guests are disabled.
The Novice mode displays only those options absolutely
essential to the operation of the system. This entails only
allowing users access to view two (2) DataNode Setup
7
tabs, the General tab and Basic tab.
The Expert mode displays all the Setup tabs available in
a particular DataNode.
To switch between Novice and Expert mode:
1. Click on the Setup tab>Users>User name.
2. Click on Proficiency Level to display drop down
menu.
3. Select between Novice and Expert mode.
4. When done, click on Save Setup found at the bottom
of the page. A Save confirmation window will pop up.
5. Click on Yes to save changes or No to exit without
saving changes.
limited tab settings
Sample DataNode screen set under Novice mode; Basic tab activated
complete tab settings
(other tabs not captured
on screen)
Sample DataNode screen set under Expert mode; Basic tab activated
Series 5500 User’s Guide
7-3
7
Setup Page
Data
Data setup allows you to specify the number of additional days to keep each data type (Keep event data, Keep periodic
data, Keep summary data) before purging. When the InfoNode becomes full, it purges data in a first-in-first-out order.
This feature allows you to prioritize the order in which data is purged. The number of days to keep data values are used
to bias the purge time of each type of data respectively. In an InfoNode with sufficient storage, this results in the lifetime
of one type of data being extended by the specified number of days relative to other data types. The InfoNode always
purges old data when it needs space for new data. Consequently, the lifetime of data is only extended by the specified
number of days when sufficient storage is available. The purge time for data is biased and stored when the data is saved.
Changes to the bias values are not applied to previously stored data.
The Data setup also allows you to remove data stored in the InfoNode. Select any one or a combination of DataNodes
opposite Remove data from DataNodes. Specify the date and time range when you want the data removed from the
DataNodes using Remove data at or later than or Remove data earlier than. Choose one or more data types to remove
(Remove event data, Remove periodic data, Remove summary data). Once the data removal selection is specified, check
the Enable data removal property and save the properties to start removing data. When data removal is in progress, all
selection fields are disabled. You can stop data removal by clearing the Enable data removal property and saving the
properties. Data removal can be a long process, particularly in a busy InfoNode with large amounts of data. Refresh the
Data tab to see if data removal is complete.
Data - General tab properties
Storage
Storage setup is related to how much memory Space to keep free (MB) to add other software modules in the future, and
whether to Rebuild index or Rebuild query table to compact the memory.
Log
The Log setup allows you to specify the number of additional days to keep each log entry type (InfoNode activity, User
activity, DataNode management, Alarms) before purging. This mechanism is the same as that used for handling other
purgeable data in the InfoNode. Refer to Data setup for more information on purging data. Right-click on the Log setup
tree item to access the Clear Log menu command. Selecting this command removes all log entries stored in the
InfoNode.
NOTE: Only Admin users can configure the log settings and delete log entries.
7-4
Series 5500 User’s Guide
Setup Page
7
Notifications
The Notifications section is subdivided into Recipients and Senders. Notifications allow the system to automatically
inform users about specific events related to every DataNode connected to the InfoNode. Notifications also inform users
whether DataNode connection is lost or re-established, and when the InfoNode starts.
Recipients
Recipients define who will receive notifications. The General tab contains properties to indicate recipient notification
status. Only those with Admin privileges may set whether to dispatch notifications or not. Users who access the
InfoNode system as Guest, Viewer or Operator will find the General properties automatically disabled. They are not
allowed to dispatch notifications nor change time settings when notifications will be sent to recipients.
Notifications pending - a counter on the number of notifications that will be dispatched to recipients at specified time
interval. The counter will reset to zero once the pending notifications are sent to recipients. The counter sets automatically and is not user-programmable.
Dispatch notifications - the enable/disable checkbox indicate whether recipients will receive/not receive notifications.
Aggregation period (seconds) - the time interval upon which notifications are sent to recipients and updated.
Notifications update is done every specified number of seconds (i.e. every 900 sec = 15 minutes).
Recipients setup screen - General tab properties
To Add/Delete Recipient names:
· Right-click on the Recipient folder. The following options will appear: Add Recipient or Clear Notifications.
· Click on Add Recipients if you want to add a name in the list of recipients. Click on Clear Notifications if you want to
delete all names in the list of recipients.
· Click on the Recipient Name to enter or change name and to program information about the type of recipient. Note the
following tabs available on the bottom portion of the viewing area: ADAM 4060, E-Mail, Pager.
· Right-click on the recipient name if you want to Copy Recipient (duplicate recipient name and properties), Delete
Recipient (remove recipient on the list), Test Recipient (send test messages to recipient), or Clear Notifications (reset
pending notifications for the recipient).
Notifications are dispatched to recipients in three ways: through ADAM 4060 Relay outputs, E-Mail, and/or Pager.
Recipients must be set up before items in the Senders folder are programmed.
7-5
Series 5500 User’s Guide
7
Setup Page
Click on a recipient to display the General tab properties. The Recipient name provided will be used to identify recipient
and will appear under the Recipients folder on the left-hand frame. Further Description can be added to aid in recipient
identification. Each recipient has a corresponding ADAM 4060 Relay outputs tab, E-Mail tab, and Pager tab described
next. Note that when changing from one tab to another, a save confirmation box appears to confirm whether user wants
to save the most recent changes in settings or not.
Recipient Name/General properties setup
Click on the ADAM 4060 tab. The Enable ADAM 4060 Notifications box must be checked for communication signals to
ADAM modules to occur. The ADAM 4060 relay contact closure module is used to signal notifications to designated
recipients. See page 12-3 for instructions on how to set up the ADAM 4060 contact closure module. Data for the ADAM
modules may be configured in various format, one of which is the hexadecimal format displayed opposite the Output
Value property. This format is selected by setting bits 0 and 1 of the data format. ASCII’s condensed hexadecimal representation of data allows high resolution, quick communication and easy conversion to computer-compatible integer format. See page 7-12 for more information on ADAM Communication modules.
7-6
Recipient ADAM 4060 notification setup
Series 5500 User’s Guide
Setup Page
Click on the Email tab. The Enable Email must be checked to allow notifications to be sent to the recipient’s email
address. Type in the recipient’s electronic mail Address in the space provided.
7
Recipient Email notification setup
Click on the Pager tab. The Enable Pager must be checked to allow notifications to be sent to the recipient’s pager unit.
Type in the corresponding Pager Number and PIN Number where notification signals will be sent.
Recipient Pager notification setup
Senders
The Senders section branches out into DataNodes and InfoNodes.
DataNodes - each DataNode has its own unique identification and is monitored on their Connection status (whether
connection is lost or re-established) and on the Data that they register.
7-7
Series 5500 User’s Guide
7
Setup Page
Connection
The Recipients tab indicate the names of recipients who are currently connected to the DataNode. These recipients will
receive notifications pertaining to DataNode connection described next, provided the Administrator enabled/granted
Dispatch Notifications (see page 7-5).
DataNode Recipients connection setup
The Events tab contains the facility to communicate DataNode connection status to recipients. Connection lost must be
enabled if you want to notify recipients whenever DataNode connection is lost. Connection re-established must be
enabled if you want to notify recipients whenever DataNode connection is restored.
DataNode Events connection setup
7-8
Series 5500 User’s Guide
Setup Page
7
Data
The Recipients tab indicate the names of Recipients who are currently connected to the DataNode. These Recipients will
receive notifications pertaining to specified events detected by the DataNode, provided the Administrator enabled/granted Dispatch Notifications (see page 7-5).
DataNode Recipients notification setup
The Enable RMS Notification must be checked to allow the system to send RMS disturbance event notifications to recipients. Threshold properties for the different RMS Disturbance Categories have been set under the Basic Characterizer RMS Disturbance Categories tab (see page 7-19). The Enable Category allows users to select which category they want
to activate and, as per the RMS disturbance category definition on page 7-18, register as RMS event. This selective
enabling process allows users more control over the event notifications they receive.
DataNode RMS Disturbances event notification setup
Series 5500 User’s Guide
7-9
7
Setup Page
The Enable Transient Notification must be checked to allow the system to send Transient disturbances event notifications to recipients. Threshold properties for the different Transient Disturbance Categories have been set under the Basic
Characterizer - Transient Disturbance Categories tab (see page 7-20). The Enable Category allows users to select which
category they want to activate and, as per the transient disturbance category definition on page 7-20, register as transient
event. This selective enabling process allows users more control over the event notifications they receive.
DataNode Transient Disturbances event notification setup
The Enable Threshold Crossing Notification must be checked to allow the system to send specified parameter threshold
crossing notifications to recipients. The Threshold Registers lists the parameters available for which various threshold
limits can be defined. Click on a parameter (i.e. Harmonic Voltage) and select the threshold limit/s (High-High, High,
Normal, Low, Low-Low, Deadband) that you want enabled/disabled for that particular parameter. This means that once
an enabled parameter has exceeded the threshold limit, an event will be registered. This selective enabling process allows
users more control over the event notifications they receive and prevent the processing of unwanted data.
7-10
DataNode Parameter Threshold Crossing notification setup
Series 5500 User’s Guide
Setup Page
7
InfoNodes- contains notifications regarding InfoNode system shutdown and start-up.
Shutdown
The InfoNode Recipients tab indicates the names of recipients who will receive notifications when the InfoNode shuts
down operation. See page 7-5 for the procedure on how to add/delete recipients.
InfoNode Shutdown notification setup
Start-up
The InfoNode Recipients tab indicate the names of recipients who will receive notifications when the InfoNode starts up
operation. See page 7-5 for the procedure on how to add/delete recipients.
InfoNode Start-up notification setup
7-11
Series 5500 User’s Guide
7
Setup Page
Communications - The Communications data folder contains information on Internet Protocols and network
settings.
ADAM
ADAM Instrument and Communications Handler Setup
The ADAM handler supports the Advantech ADAM 4000 and 5000 series of distributed general purpose I/O modules.
All input modules are supported through the ADAM instrument handler. Relay output functions for notifications are set
as part of the communications handler. At this time only input modules are supported with the exception of the notification feature.
Port Setup tab
Select ADAM on the setup tree under the Communications branch. When selected, the following property page is displayed. The Port Setup tab is used to Enable ADAM communications. The Enable control must be checked for any communications to ADAM modules to occur. All ADAM communications will occur on the indicated port. Set the COM
Port that will be used for ADAM modules. Only one ADAM RS-485 and RS-232 network on one COM port is
supported.
Port Setup tab
ADAM 4060 tab
The ADAM 4060 relay contact closure module is used to signal notifications to a third-party system (i.e. SCADA,
BMS-Building Management System, etc.) that can only accept relay contacts as input. This portion of the setup allows
for global setup of the properties that will be common to all uses of the single 4060 allowed on the system.
The Hex (Hexadecimal) Address property specifies the address of the 4060. The Contact Logic property allows specification of the logic "sense" of the messages to be sent. The default value of "Positive" (or Normally Open) means that a
logical value of "1" is a closed contact and a logical "0" is an open contact. "Negative" (or Normally Closed) logic
means the opposite: logical "1" is an open contact and logical "0" is closed. The Contact Pulse Time specifies how long
the
contacts should be actuated to signal the notification. See the ADAM 4060 tab setup screen on page 7-13.
7-12
Series 5500 User’s Guide
Setup Page
7
ADAM 4060 tab
Operation of the ADAM 4060
The ADAM communications handler is available to all parts of the InfoNode system through the Communications
Manager. The handler is configured to use a specific serial port on the InfoNode. When a request for connection to an
ADAM module is received, the handler attempts to open the specified port at 9600, 8, N, 1.
Once a connection is made, the application may issue commands that send data to the 4060 based on the logic sense and
contact pulse time parameters. The connection attempts to verify that the command is completed. If the module reports
an error condition, the error condition is reported back as part of the function return. If positive or if no response is
detected, the connection attempts to restore the relay state to ‘normal’, 0 for positive logic and 1 for negative.
ADAM Instrument Handler Setup
See Chapter 12 ADAM Handler Setup for a detailed discussion on how to set up the individual InfoNode ADAM instrument handler. Programming of individual modules are accomplished via switch settings on the modules themselves.
Refer to the ADAM 4000 Series User’s Manual for more details on how to configure, set up and install the ADAM
modules. The Windows driver and the Utility disk for the ADAM-4000 Series are shipped along with the ADAM 4000
Series User’s Manual, Copyright ©1997 Advantech Co., Ltd. The user’s manual can also be accessed online at
http://service.advantech.com.tw/download/Files/1-A2XID/Adam-4000_ed7.pdf
7-13
Series 5500 User’s Guide
7
Setup Page
WTI CAS-8 Code Activated Switch
The Port Setup tab is used to enable/disable communications to a 5500 Series DataNode and/or GEKV DataNode. Check
Enable to allow communications to the specified DataNode. All DataNode communications will occur on the indicated
port. Set the COM Port that will be used for a specified DataNode. Only one RS-485 and RS-232 network on one COM
port is supported. The Baud Rate refers to the speed in bits per second by which the COM port processes DataNode
communications requests.
COMS Port Setup tab
7-14
Series 5500 User’s Guide
Setup Page
7
MMS
MMS or Manufacturing Messaging Specification is where communications address settings for the InfoNode are configured. The MMS protocol is used for connections to UCA compliant devices such as the Signature System 5520, 5530
and 5560 DataNodes. The InfoNode also accepts incoming MMS connections for system discovery functions.
MMS contains the following property settings:
InfoNode NSAP refers to the OSI network address. This value is the equivalent of the IP address for the InfoNode or OSI
networks. This value is not used and is removed as of firmware version 3.0.11.
InfoNode PSEL stands for Presentation Selector with default value 00 00 00 01.
InfoNode SSEL refers to Session Selector with default value 00 01.
InfoNode TSEL means Transport Selector with default value 00 01.
In general, you do not need to change the MMS settings from their default settings. The PSEL, SSEL, and TSEL values
of the InfoNode must match those of the DataNode that the InfoNode communicates with. A mismatch results in
“Connection Failures”.
MMS General setup tab
7-15
Series 5500 User’s Guide
7
Setup Page
Network
Network contains the properties that allow the InfoNode to link DataNodes and ADAM modules to its self-contained
web server and user interface. It is possible to communicate with the InfoNode through either LAN or modem connections. Each communication method requires specific configuration settings. In the ISP Setup screen below, the Network
Setup features the settings required for the InfoNode to operate on the network. The Modem Setup and ISP Setup feature
the settings required for dial-up networking and to establish interface links between the InfoNode and the computer’s
modem.
NET ISP Setup tab
The InfoNode uses the PAP protocol for PPP dial-up connection authentication. This is a simple, unencrypted authentication protocol. It is more secure than the standard web page authentication but less secure than an encryption based PPP
authentication protocol. You must therefore use an ISP that supports PPP dial-up accounts that allow PAP authentication.
Most ISPs permit PAP authentication.
Windows 2000 server is used by some enterprises to provide remote access. Windows 2000 defaults to a very secure
configuration and hence does not support PAP authentication by default.
To enable PAP authentication on Windows 2000 server, there are several configuration options that must be set:
· PAP must be enabled in the Routing and Remote Access Service management console for the RRAS server
· PAP must be enabled in the RRAS policy object in the RRAS management console
· Clear text authentication must be permitted in the RRAS policy object
Only when PAP is enabled in all three places will a Windows 2000 RRAS server authenticate a PAP authenticated PPP
login. In addition to this, you must specify the login ID in the InfoNode using DOMAIN\ UserID notation for PAP
authenticated logins to a Windows 2000 RRAS server. This is described in the Microsoft Knowledge Base article at
http://support.microsoft.com.
7-16
Series 5500 User’s Guide
Setup Page
7
Battery
The InfoNode system allows users to check on the Battery status (whether charged or discharged) and the remaining
Battery capacity. For convenience, the system allows users to keep date/time records when the Last discharge test was
and when the Next discharge test will be.
Time
The InfoNode optionally provides for an on-board GPS receiver capable of receiving time signals from the GPS system
and utilizing those signals to continuously update the system clock. If there is no GPS present or the GPS is present but a
signal is not available, then you can specify whether the Time Manager uses the internal clock or an Internet clock
source. To use the Internet clock source, you should specify the IP address of the NTP Server Host. A sample Time
window screen appears as follows.
Setup screen for Communications - Time
Regional Settings
Regional Settings allows you to use different formatting conventions found in different parts of the world.
The following properties are found under the Date and Time tab. Select the applicable Time zone depending on your geographic location. Enable/Disable the option to Adjust for daylight saving changes. Select your preferred date and time
settings to include Date separator (/ or - or .), Date ordering (mm/dd/yy, dd/mm/yy, yy/mm/dd), Time separator (: or .),
and Time format (12 versus 24 hour format).
Under the Number tab, users can set the Measurement system using the U.S. system or the Metric system of
measurement.
7-17
Series 5500 User’s Guide
7
Setup Page
Answer Module
Answer Modules provide different types of reports that answer specific questions about data, such as whether the
transient event was caused by a PF capacitor switching and whether the event occurred upstream or downstream from
the monitoring point. The list of Answer Modules depends upon which optional modules were purchased and installed
on the InfoNode. The minimum required InfoNode firmware version for the Graphical Interface Display (one-line)
AnswerModule is V3.2.
Basic Characterizer
Enables automatic detection of voltage sags which are often the most common type of power disturbance. Once detected,
the Answer Module characterizes the sag. This Answer Module is the general and/or basic characterizer of the data. It
characterizes RMS events as sags, swells, or interruptions. This Answer Module characterizes data based upon
categories. The default settings of the categories are based on IEEE 1159 guide for characterizing power quality events,
and these default settings can be seen in the figure next page.
The number in the magnitude column represents the range of values starting from that number up to but not including
the number in the cell above it.
For RMS Variations, the categories do not necessarily represent a continuum; they are simply numbers that represent
non-overlapping rectangles in mag/dur space. The categories generally represent increased risk of equipment malfunction. Note that Category 8 (swells) only stops at 125% for display purposes and in reality represents any swell greater
than 105%.
For Transient Variations, the categories represent a continuum of peak transient over voltage. Note that Category 7 only
stops at 205% for display purposes and in reality represents any transient with a peak magnitude greater than 190%.
Definition of RMS & Transient Disturbance Categories
The user may modify the categories. The setup for this Answer Module allows the user to define the criteria for RMS
and Transient Disturbance Categories.
7-18
Series 5500 User’s Guide
Setup Page
7
RMS Disturbance Categories
The user may define up to nine RMS disturbance categories using the threshold property settings found in the setup
screen. Click on a desired category, then set the corresponding threshold property limit (see definitions of the threshold
properties below). Assign different threshold settings for each category. Once the threshold limits are crossed and the
Category Enabled box checked, the RMS disturbance category will be classified as an event. These pre-defined RMS
disturbance event categories are then reported as signal notifications to recipients (see page 7-9).
For example, in the RMS Disturbance Categories setup screen below, Category 1 was selected. Limit values for
Category 1 were defined in the respective threshold property fields. The Category Enabled box has been checked to
activate Category 1 as an event when threshold limits have been crossed.
Setup screen for RMS Disturbance Categories
For the selected category, the following fields need to be defined. Care should be taken so that categories do not overlap
or that dead areas are created.
Category Enabled
For this to be a disturbance category it must be enabled. Check the box to activate or clear the box to deactivate.
Minimum Magnitude
The minimum magnitude is defined as a percent of normal that defines this category.
Maximum Magnitude
The maximum magnitude is defined as percent of normal that defines this category.
Minimum Time
The minimum duration is the minimum amount of time that the magnitude must be sustained.
Maximum Time
The maximum duration is the maximum amount of time that the magnitude can be sustained.
Category Name
The category name describes the defined category, and will appear in the characteristics field in Event Summaries and
Notifications.
7-19
Series 5500 User’s Guide
7
Setup Page
Transient Disturbance Categories
The user may define up to nine Transient disturbance categories using the threshold property settings found in the setup
screen. Click on a desired category, then set the corresponding threshold property limit (see definitions of the threshold
properties below). Assign different threshold limits for each category. Once the threshold limits are crossed and the
Category Enabled box checked, the Transient disturbance category will be classified as an event. These pre-defined
Transient disturbance event categories are then reported as signal notifications to recipients (see page 7-10).
For example, in the Transient Disturbance Categories setup screen below, Category 2 was selected. Limit values for
Category 2 were defined in the respective threshold property fields. The Category Enabled box has been checked to activate Category 2 as an event when threshold limits have been crossed.
Setup screen for Transient Disturbance Categories
Category Enabled
For this to be a disturbance category it must be enabled. Check the box to activate or clear the box to deactivate.
Minimum Magnitude
The minimum magnitude is defined as a percent of normal that defines this category.
Maximum Magnitude
The maximum magnitude is defined as percent of normal that defines this category.
Category Name
The category name describes the defined category.
EN50160
EN50160 is a European product standard for voltage characteristics in public distribution networks. The EN50160
requires a 5560 QOS (Quality of Supply) DataNode for data acquisition. As per EN50160, the QOS compliance evaluation period is one week, beginning at midnight on Sunday. These can be altered using the EN50160 setup properties,
however the system would no longer be calculating the information in strict compliance with the standard.
The EN50160 Setup properties include Start day and Start time, where users can program their preferred day and time
when they want the evaluation period to commence. Users can also set the Length of the evaluation period in days,
weeks, or months. Refer to Chapter 10 5560 QOS for more discussion on the 5560 DataNode.
7-20
Series 5500 User’s Guide
Setup Page
7
Energy Usage
The Signature System InfoNode provides users the ability to track power flow and generate reports for the purpose of
monitoring energy usage and expense. The setup necessary for the expense reports has three sections, namely Peak Time,
DataNode, and Rate Structures. See page 5-8 of Chapter 5 Reports Page for details on the energy expense and usage
reports.
NOTE: Utility rate structures are very complex and vary greatly. Therefore, the Energy Usage Answer Module is not
intended to completely replicate your utility bill and is intended for comparison only.
Peak Time
Reducing consumption during peak times or shifting loads to off-peak times amounts to significant savings on energy
costs. Energy providers typically charge different rates for energy consumption during peak time and energy consumption during off-peak times. The setup for peak time is described below.
Setup screen for Energy Usage - Peak Time
Under Peak Time or Partial Peak Time category, select the desired day (for bank select click+shift) and check the Include
Day box to enable time settings. Clear the box to disable the selected days.
Start Time
Start time refers to when the peak time begins.
End Time
End Time refers to when the peak time ends.
7-21
Series 5500 User’s Guide
7
Setup Page
DataNodes
The screen below enables users to select the DataNode site where they are monitoring energy consumption. The user
may specify the square footage that each DataNode is monitoring. This will allow the user to view energy expense on
per square foot basis. The setup required for the DataNodes can be seen below.
Setup screen for Energy Usage - DataNodes
Square Footage
Select the desired DataNode and enter the square footage that the DataNode is monitoring.
7-22
Series 5500 User’s Guide
Setup Page
7
Rate Structures
The user may define up to twenty different rate structures. The user-defined rate structures allow users to produce energy
expense reports that accurately reflect the charges being applied by a respective energy provider. The setups required are
discussed below.
Setup screen for Energy Usage - Rate Structures
Enable Rate Structure
For the rate structure to be available in the energy expense reports, it must be enabled. Check the box to activate or clear
the box to deactivate.
Rate Structure Name
The name used to describe the rate structure. This name will be displayed in the list for selecting a rate structure.
On-peak energy consumption $/kWHr
The cost of energy consumption, measured in kWHr, during the peak time.
Off-peak energy consumption $/kWHr
The cost of energy consumption, measured in kWHr, during the off-peak time.
On-peak power consumption $/kW
The penalty charged for the maximum demand (kW) that occurred during peak time over the billing period.
Off-peak power consumption $/kW
The penalty charged for the maximum demand (kW) that occurred during off-peak time over the billing period.
On-peak energy consumption $/kvarHr
The cost of energy consumption, measured in kvarHr, during the peak time.
Off-peak energy consumption $/kvarHr
The cost of energy consumption, measured in kvarHr, during the off-peak time.
Tax Rate
The tax applied on billings.
7-23
Series 5500 User’s Guide
7
Setup Page
kvar Change Observer
The kvar Change Observer Answer Module is for substation applications only. The Answer Module is an add-on to the
PF Capacitor switching module and determines if the kvar change is balanced or unbalanced. The setup required for this
Answer Module is described below.
Setup screen for kvar Change Observer
Activate kvar Change Observer
Check the box to activate or clear the box to deactivate.
kvar balance threshold between phase
If the difference between the phases is greater than the set threshold, the kvar change is unbalanced.
Radial Fault Location
Identifies the source of radial line faults as they occur. The Radial Fault Location estimates the distance to a fault location, allowing a quick dispatch of linemen for repairs, reducing the time for locating problem source. Required input data
are the three phase voltage and current waveforms along with the positive and zero sequence impedance of the primary
feeder. An optional input datum is the feeder length. The setup screen can be seen below.
Setup screen for Radial Fault Location
Activate Answer Module
Check the box to activate or clear the box to deactivate.
Ground fault pickup current threshold (amperes)
The value of the current that needs to be exceeded before it is considered a ground fault.
7-24
Series 5500 User’s Guide
Setup Page
7
Phase fault pickup current threshold (amperes)
The value of the current that needs to be exceeded before it is considered a phase fault.
Ratio of fault peak current to pre-fault peak current
A threshold to compare RMS values before and during a fault.
Sequence impedance unit
Units used for impedance and feeder length.
Length of primary feeder
This information is optional. If it is available, it should be supplied. If it is not available, enter feeder length = 0.
Positive-sequence impedance of the primary feeder (real)
The real part of the complex number positive sequence impedance.
Positive-sequence impedance of the primary feeder (imaginary)
The imaginary part of the complex number positive sequence impedance.
Zero-sequence impedance of the primary feeder (real)
The real part of the complex number zero sequence impedance.
Zero-sequence impedance of the primary feeder (imaginary)
The imaginary part of the complex number zero sequence impedance.
7-25
Series 5500 User’s Guide
7
Setup Page
RBM (Reliability Benchmarking Methodology)
Aggregation Parameters
The RBM Answer Module is an RMS Variation Index. The setup for this Answer Module consists of setting up
aggregation parameters. At different times it may be necessary to either break apart measurements into measurement
components or combine them through aggregation. The setup required for aggregation can be seen below.
Setup screen for RBM Aggregation Parameters
Characterization Level
· Phase Aggregation
The most basic of the three aggregation levels is phase aggregation. This characterizes the data in such a way that all of
the phases are analyzed. Measurement components are the constituent recordings of a three-phase measurement. By
definition, measurement components are single-phase. The process of phase aggregation entails finding the worst-case of
a series of measurement components associated with a single phase or channel.
· Measurement Aggregation
Measurement aggregation represents all of the data from all phases of a measurement by the characteristics of the worstcase phase. An event determined by measurement aggregation is a combination of measurement components.
· Temporal Aggregation
The goal of temporal aggregation is to collect all measurements taken by a monitoring instrument or instruments that
were due to the same power system occurrence, and identify them as one event.
Aggregation Time
This control specifies the width of the temporal aggregation window (in seconds). Selecting one of the pre-defined intervals from the drop-down list sets the aggregation window.
Aggregation Window Type
· Fixed
When a "Fixed" aggregation window type is specified, the length of the aggregation window is fixed by the aggregation
time. Thus, all measurements occurring within the specified number of seconds are aggregated.
· Variable
When a "Variable" aggregation window is specified, the length of the aggregation window is not fixed and is determined
by how closely the events occur to each other in time.
Worst Case Method
The Worst Case Method control allows the user to specify which measurement component characteristics are used to
represent the aggregated measurement. A popular method of performing phase aggregation is by finding the "worst-case"
measurement component from the measurement components associated with that phase.
· Max V Deviation
Using this method, the component exhibiting the maximum deviation from nominal voltage is used to represent the
aggregate measurement. Thus, the sag or swell that deviates the farthest in absolute value from nominal voltage (1.0 per
unit) is selected.
7-26
Series 5500 User’s Guide
Setup Page
7
· Max Area
Using this method, the component exhibiting the maximum product of voltage deviation and duration from within
tolerance is used to represent the aggregate measurement. Thus, the sag or swell that has the largest volt-seconds area
deviation from nominal voltage is selected.
· Min V
Using this method, the component exhibiting the minimum voltage is used to represent the aggregate measurement.
Thus, the largest sag is selected.
· Max V
Using this method, the component exhibiting the maximum voltage is used to represent the aggregate measurement.
Thus, the largest swell is selected.
UPS Verification
The UPS Verification Answer Module verifies the operation of a UPS or another mitigation device. This requires setting
pairs of DataNodes for monitoring the UPS. A DataNode is installed at the input and output of the UPS. This Answer
Module allows for creating up to five UPS DataNode pairs. The setup screen can be seen below.
Setup screen for UPS Verification
UPS Pair Name
This is a descriptive name for the DataNode pair monitoring the UPS.
UPS Input DataNode
Select the DataNode monitoring the UPS input from the list of available DataNodes. Selecting "Not Set" deactivates this
pair for the Answer Module.
UPS Output DataNode
Select the DataNode monitoring the UPS output from the list of available DataNodes. Selecting "Not Set" deactivates
this pair for the Answer Module.
Delta (sec) for time synchronization
The delta between the input event time and the output event time allowed for it to be considered the same event. If the
DataNodes are time-synched together, this should be set to 1.
7-27
Series 5500 User’s Guide
7
Setup Page
DataNodes
DataNodes, being the frontline, data-acquisition component of the Signature System, are available in various
models and configurations. The setup of a DataNode is
dependent on the DataNode type. Click on DataNodes in
the left frame to view the different DataNode types that
the InfoNode currently supports. The current list consists
of the following:
5571 DataNode
The 5571 is an upgrade path for users of the 7100
PQNode who wish to access the InfoNode and its webbased interface. An inexpensive upgrade kit is available to
convert existing 7100 PQNodes into 5571s for use in the
Signature System. The 5571 is available in two model
types, distinguished by their enlosures and connections to
the circuit: Model 5571 and Model 5571S.
5530/5520 DataNode
The 5530/5520 belong to the Enhanced Power Quality
(EPQ) family of DataNodes. EPQ DataNode is available
in three model types: Model 5530, Model 5520, and
Model 5510. They are designed to do comprehensive and
PQ-optimized acquisition of power quality related disturbances and events. The salient features of EPQ Datanode
include voltage and current trigger and capture mechanisms, increased system performance allowing users to
identify data of interest and to record only that data,
cross-triggering feature that permits linking of many
DataNodes, and TCP/IP Ethernet communications.
ADAM Modules
The Signature System readily interfaces with and acquires
data from the popular Advantech® ADAM-4000 and
ADAM-5000 series data acquisition and control modules.
The ADAM-4000 series modules interface through
RS-485 to an InfoNode. The ADAM-5000 series system
is a backplane configuration. Any combination of 5000
series plug-in modules may be used to monitor various
types of applications. The 5000 series is one of the most
diverse and flexible DA&C systems and is available in
four or eight slot configurations. Both are equipped with
CPU, Watchdog Timer, RS-232 & RS-485 (x2) interfaces,
error checking, system diagnostics and diagnostic display.
5540 DataNode
The 5540 is known as the Energy Management (EM)
DataNode. It is designed to help users manage their energy consumption. The 5540 is equipped with a 3-line LED
display for viewing all measured parameters without the
use of a computer. Among the more important parameters
it can measure are true RMS voltage and current, kW,
kVA, power factor, frequency, kWh, and kVAR. Energy
data from the 5540 EM DataNode can be viewed in real
time by multiple users using Signature System InfoNode
via a standard web browser.
5560 DataNode
The 5560, also known as Quality of Supply (QOS)
DataNode, is designed to monitor quality of supply
compliance as specified by European Standard EN50160.
It can be set in Strict compliance with EN50160 or can be
customized using Custom setups. Under Strict
compliance, only the General and Basic tabs are visible
and modifiable. This is the standard method in using the
5560. For those who have unique applications requiring
modification of the standard setups, the Compliance
Setup selection box on the Basic tab can be changed to
Custom.
GEkV DataNode
GE's kV Vector Electricity Meter is the first of a new
generation of electronic meters that extend functionality
beyond the the bounds of traditional metering. The kV
Meter adds automatic installation verification plus power
quality and cost of service measurements. The kV Meter
also improves traditional meter tasks by adding consolidated forms, 57 to 120 or 120 to 480 volt measurement
capability, improved billing protection and standardized
meter reading and programming.
MetOne DataNode
No data available at this time.
PQDIF Import
No data available at this time.
7-28
Series 5500 User’s Guide
Setup Page
General Guidelines in Setting Up DataNodes through
the InfoNode Setup Page
The following guidelines help promote smooth and
optimal system performance of DataNode program
settings. Bear in mind that while the InfoNode setup is
generic, the DataNode is not. This means that the
InfoNode setup section is not affected by the types of
DataNodes connected to it. On the other hand, the
DataNode setup section is customized and dependent on
particular DataNode model configurations.
1. Privileges to change DataNode settings depend on the
Security Level assigned by the system administrator (see
page 7-2). Without the proper access privileges, you can
only view the setup pages.
2. Make sure to select the appropriate DataNode group
that you wish to configure under the DataNode setup tree.
The Tree Directory of groups and sites is displayed on the
left side of the screen. It uses the standard convention of
collapsible trees and folders.
3. Clicking on a plus sign (+) that is adjacent to a
DataNode group will open up that folder and display the
elements (specific DataNodes site/s) contained within it.
Clicking on a minus sign (-) will collapse that folder and
no longer display the elements within it.
4. A DataNode group that has no plus or minus sign
displayed means that the folder is empty. To add a
DataNode site, select the appropriate DataNode group and
7
click on the right mouse button. The Add DataNode
button will appear; click on it. A new DataNode name
will appear in the tree directory. Click on the new name
to display the DataNode parameter screen on the right
window pane. Use this screen to modify the DataNode
parameters.
5. The InfoNode Setup page provides a wide variety of
user-configured features represented as tabs located
across the bottom of the Setup page. Click on a specific
DataNode site to display the various parameters on the
right hand pane. Consider this screen area as your work
space. The parameters change depending on which tab is
selected.
6. Use the arrow keys to navigate through the different
tabs.
< - automatically selects the first or leftmost tab
< - selects one tab left of another
> - selects one tab right of another
> - automatically selects the end or rightmost tab
7. DataNode setup display screens appear in two column
format: the Properties column and the Values column.
The Properties column lists the names of available
parameters in each tab. The Values column contains
either textual notations, numeric values, or check boxes
pertaining to the parameters described. Use the scroll
bars to view and access the different properties and
values available on screen.
Below is a sample DataNode site setup display with General tab selected as active screen.
specific
DataNode
site
arrow keys
tabs
7-29
Series 5500 User’s Guide
7
Setup Page
8. Parameters are enabled when Value settings appear in
blue or black and the field is clickable. Users may make
appropriate changes on enabled parameters anytime.
9. Parameters are disabled when value settings appear in
gray. Disabled value settings have either been configured
as such so they cannot be altered or they need to be activated in order to trend the values listed on the page.
10. After putting in the desired value changes, click on
the Save Setup button. You must always save the
changes you made before exiting or selecting a different
setup tab. Otherwise, the changes will not take effect. To
help ensure that changes are saved, a confirmation window appears after encoding new value settings and just
before you switch to a different tab or exit setups.
11. Checkboxes may be found under the Values column
of select properties in various tabs. A checked box
means that the parameter it represents is activated/
enabled. An unchecked box means that the parameter is
not activated/disabled.
12. The Active property is found under the General tab in
all DataNode types. Click on its corresponding checkbox
in the value field. The InfoNode does not start communications with the DataNode until the Active box is checked.
It is recommended that all changes and settings are made
prior to activating the DataNode.
13. Remember that the InfoNode acts as a complete
gateway for the various data captured and stored in the
DataNode. The InfoNode Setup tab is where users
configure properties and values for specific DataNode
sites. Users can view the resulting data using the Views
tab, Real-time tab, and Reports tab.
14. Help is available from any page, though it is tabsensitive, not context-sensitive. On-screen help is available
for various topics under the Help Desk folder. The Help
Desk can be accessed through hyperlinks to jump to a
selected topic, or by using the index.
15. Further assistance can be obtained by contacting
Dranetz-BMI Technical Support staff at 1-800-372-6832.
Below is a sample display screen showing the Save Setup button, the confirmation window for saving changes, and scroll
bar to view the different properties and values available on screen.
Properties column
Values column
scroll
bar
scroll bar
Save Setup button
Save Changes confirmation window
7-30
Series 5500 User’s Guide
5530/5520 DataNode Setup
This chapter describes the procedures on how to program
the 5530/5520 DataNode. It covers the following topics:
DataNode Tabs
Where Data for Programmed Settings Appear
Programming the Tabs
DataNode Tabs
The General Guidelines in Setting Up DataNodes found on
page 7-29 of Chapter 7 Setup Page provides important
background information for this chapter. Familiarity with
the General Guidelines is advised before continuing on
with the discussion below.
Below is a list of the various 5530/5520 DataNode tabs
available and the programmable setups found in each tab.
The list also notes which tabs are trending pages. A
trending page contains an enable/disable checkbox which
allows trending of values listed on that page. For
DataNodes that use Firmware version prior to V2.6, most
trending pages are optional and need to be enabled using
the checkboxes found in the Basic tab. For DataNodes that
use Firmware V2.6 and higher, all trending pages are
displayed and the enabling checkboxes can be found in the
individual tabs.
General tab - features Identification and Status information
of a particular DataNode. Contains property to activate
DataNode.
Basic tab - features Communications, Power System,
Steady State Trending, and Thresholds data
RMS Variations tab - features Limit, Pre- and Post- Event
Captures, RMS Variations Sampling Intervals, and
Intervals data
Transients tab - features Cycle Counts and Individual
Channel Parameters data
Metering tab - this trending page features checkboxes to
Enable Trending of Metering properties and to Select the
journal entry/entries to change
Revenue tab - this trending page features checkboxes to
Enable Trending of Revenue properties and to Select the
journal entry/entries to change
Demand tab - this trending page features checkboxes to
Enable Trending of Demand properties and to Select the
journal entry/entries to change
Advanced Energy tab - this trending page features
checkboxes to Enable Trending of Advanced Energy
properties and to Select the journal entry/entries to
change
Advanced Metering tab - this trending page features
checkboxes to Enable Trending of Advanced Metering
properties and to Select the journal entry/entries to
change
Unbalance tab - this trending page features checkboxes
to Enable Trending of Unbalance properties and to
Select the journal entry/entries to change
Harmonics tab - this trending page features checkboxes
to Enable Trending of Harmonics properties and to
Select the journal entry/entries to change
Flicker tab - this trending page features checkboxes to
Enable Trending of Flicker properties and to Select the
journal entry/entries to change; it also allows the setting
of Sample Intervals (minutes)
Advanced Harmonics tab - this trending page features
checkboxes to Enable Trending of Advanced Harmonics
properties and to Select the journal entry/entries to
change
Transducers tab - features data on Phase rotation,
Channel Mapping and Transducer Ratios
Advanced tab - features data on Cross Triggering,
additional data on Communications, Passwords, One
Time Operations, Channel Mapping, and One Time
Firmware Operations
Accumulator Resets tab - features checkboxes to
enable/disable Demand Resets and Energy
Accumulators
8
To illustrate DataNode program settings in detail, this
Chapter makes use of a hypothetical DataNode1 under
the 5530/5520 DataNode Setup. This Chapter provides a
detailed discussion of the functionalities in each tab.
Where Data for Programmed Settings Appear
The Signature System InfoNode/DataNode is designed
to provide programming support as well as data display.
The InfoNode Setup page is where the parameters and
value settings are programmed. The programmed
parameters and value settings are translated and
displayed in meaningful data format under the Views
page, Real-time page, and Reports page. Refer to the
previous chapters for more details on the Views, Realtime, and Reports pages.
8-1
Series 5500 User’s Guide
8
5530/5520 DataNode Setup
Programming the Tabs
LEGEND (Please note the following conventions are used in the screen displays):
Items in italics are not programmable, but included for information purpose to the user.
Items in bold are examples of what can be entered.
Selections available in drop down menu are enclosed in brackets { xxxx }.
Caution: Dranetz-BMI has already set default values for the various parameters in each DataNode. The default values
have been tested to result in optimal system performance. Users are advised not to change the default value settings unless
there are applications which require advanced setups.
1. General tab
Properties
Name
Description
Values
Identification Information
DataNode 1
Service Entrance
53000001
2.0.798
Status Information
;
Active
Get settings from DataNode on activation
7/25/01 4:38
Last contact at
System health is normal
Health
Serial Number
Version
The General tab contains identification and health status
description of the DataNode.
IDENTIFICATION INFORMATION includes the Name
and Description which users can assign for a particular
DataNode type. Simply click on the Name or Description
value field and the cursor is set for users to type in the
space provided. Description typically describes the place
where the DataNode hardware is located. Users are
allowed to enter up to 30 alphanumeric characters under
the Name and Description fields.
The Serial Number and Version of the DataNode
hardware are automatically set by default. This instrumentspecific information is available only for viewing and
cannot be altered or changed from the InfoNode.
NOTE: The serial number represents the network MAC
address of the DataNode and not its factory assigned serial
number.
8-2
STATUS INFORMATION properties includes Active,
which indicates whether communications between the
DataNode and the InfoNode are enabled. When checked,
this means that the DataNode is actively communicating
typically describes
where DataNode
is located
MAC address
enable to activate
the DataNode site
DataNode status
and exchanging information with the InfoNode. When
making changes in the different value settings of a
DataNode, it is recomended to uncheck the Active box
first, make the changes, then check the Active box again.
Also when adding a new DataNode, the Active box should
be checked last to establish link with the DataNode site.
Click the Home page to see which DataNodes are actively
communicating with the InfoNode.
Users also have the option to Get settings from
DataNode on activation. When checked, the default
DataNode settings will be overwritten by those contained
within the DataNode displayed. Remember to click the
Save Setup button found at the bottom of the page to save
any change that has been done. To aid users, a Save
confirmation window appears after changes have been
made and when users are about to switch to a different
tab. In order to use this feature, you must enter the
appropriate IP address via the Basic tab prior to activating.
Status properties also records the date and time of Last
contact. It also indicates the Health status, whether the
DataNode system is functioning normally or not, and
status of InfoNode to DataNode communications.
Series 5500 User’s Guide
5530/5520 DataNode Setup
2. Basic tab
Properties
8
Values
Communications
DataNode address
Password
PT Primary
PT Secondary
Base Voltage (Vrms)
Wiring configuration
Time between periodic samples (min)
Demand Interval (min)
Demand Sub Interval (min)
Instruments Thresholds set in
10.0.2.32
*************
Power System
1.00000000
1.00000000
120.0
Wye
{Single Phase, Wye, Delta, Split Single Phase}
Steady State Trending
5
15
5
Thresholds
Percent
{Volts, Per Unit, Percent}
The Basic tab (for 5530/5520 DataNodes using Firmware
V2.6 and higher) contains value settings for the following:
Communications, Power System, Steady State Trending,
and Thresholds.
NOTE: 5530/5520 DataNodes that use firmware versions
prior to V2.6 display a Basic tab that has different
functional interface than above. In the prior firmware
versions, trending pages are hidden and users need to
enable them using the checkboxes in the Basic page. These
checkboxes are found under Steady State Trending and it is
where various hidden tabs are selected to be made visible
or not. The trending tabs contain the setups for related
properties, and are named Basic Metering, Basic Revenue
Metering, Demand, Advanced Energy, Advanced
Metering, Unbalance and Sequence Components,
Harmonics, and Advanced Harmonics. Each of these labels
has a checkbox opposite them. To activate, click the
corresponding value field and the box is checked. Basic
Metering is the only hidden tab that is activated by default.
In subsequent firmware versions (V2.6 and higher), the
enabling checkboxes were moved to the tabs themselves.
COMMUNICATIONS is where the IP information for the
specific DataNode is entered. Each 5530/5520 DataNode is
shipped from the factory with an IP Address. This IP
Address is entered here. Password is the password for
click fields
to display
drop down
menu
InfoNode to DataNode communications. The password is
typically left at factory default.
NOTE: The password entered must match that of the
DataNode.
Under POWER SYSTEM, users can set values for PT
Primary, PT Secondary and Base Voltage (Vrms). PT
Primary and PT Secondary allow the setting of the
primary and secondary components respectively, of all
transducer ratios. Ratios for all three phases are set when
this field is changed and saved. If the values for the
individual phases are different, the phase A setting is
displayed. No setup values are changed unless the user
modifies this field and saves the changes. The values
being modified here are the same as the individual values
on the Transducers page (see page 8-22). For a 5530/
5520, the default value of both PT Primary and PT
Secondary is 1.
Users can also input values for the Base voltage (Vrms).
This field is where the user specifies the nominal line
voltage. The value serves as the basis for computing
High and Low limits under the RMS Variations tab when
percent of nominal or per unit options are used. Users
can also select the Wiring configuration of the circuit.
Simply click on the value field and a drop down menu
lists Single Phase, Wye, Delta and Split Single Phase.
8-3
Series 5500 User’s Guide
8
5530/5520 DataNode Setup
When making voltage connections to a Single phase
circuit, use channel A differential inputs. Neutral to
ground measurements are recommended but not required
for proper operation. When making Split Phase
measurements, use both channels A and B for voltage and
current connections. The neutral is chosen as the reference
for measurement purposes. Neutral to ground
measurements are recommended but not required for
proper operation. When using the Wye setup mode,
channels A, B and C are connected to voltage and current.
The neutral is connected to common and is the reference
for the three channels. Neutral to ground measurements
are recommended but not required for proper operation.
Various setups are possible when using the Delta setup
mode. For example, the 3 Phase Delta uses voltage
channels A, B and C as differential inputs with channel A
using source voltage A-B, channel B using B-C, and
channel C using C-A as the reference. Use channels A, B
and C for current connections. Neutral to ground
measurements are recommended but not required for
proper operation. Refer to the Series 5500 DataNode
User’s Guide, Chapter 2 Preparation for Use, for
illustrations of the different wiring configurations using
DataNode 5520 and DataNode 5510/5530.
STEADY STATE TRENDING allows for the periodic
sampling of the voltage and/or current waveforms. For
instance, the Time between periodic samples allows
users to set the time (in minutes) of how often RMS and
waveform snapshots will be recorded.
Demand interval and Demand sub-interval refer to that
time period used in calculating power demand values.
Both Demand properties can be assigned value settings
within the range of 1 to 120 minutes. Note however that
the value set for Demand sub-interval must be an integerdivisor of Demand Interval since the former applies when
updating certain parameters of the latter.
Under THRESHOLDS, users can choose the threshold
units under Instruments thresholds set in. Click on the
value field and a drop down selection of Volts, Per Unit,
and Percent appears. The limits entered in subsequent tabs
will correspond to the setting made here.
8-4
Series 5500 User’s Guide
5530/5520 DataNode Setup
3. RMS Variations tab
Properties
8
Values
Limits
A-N Voltage
{Bank selection enables programming limits below}
B-N Voltage
C-N Voltage
N-G Voltage
A-B Voltage
B-C Voltage
C-A Voltage
A Current
B Current
C Current
N Current
phase-to-neutral or
phase-to-phase
values displayed
depend upon the
Wiring Configuration
set under the Basic
tab
110.0
90.0
Limit enabled
High limit
Low limit
units of measure
depend on setting
in Basic tab
Pre- and Post- Event Captures
Pre-event start RMS samples (cycles)
2
Post-event start RMS samples (cycles)
238
Pre-event start waveform samples (cycles)
2
Post-event start waveform samples (cycles)
6
Post-event end RMS samples (cycles)
2
Pre-event end waveform samples (cycles)
6
Post-event end waveform samples (cycles)
2
Cycles in range to end event
1
Number of Rates to Use
RMS Variations Sampling Intervals
3
Intervals
Reduced sampling rate #1
Reduced sampling rate #2
Reduced sampling rate #3
Sample min/max/avg every N cycles
Number of seconds to use this rate
6
6.000000
RMS stands for root mean square, a mathematical
formula used to measure the average voltage and current
behaviors. Voltage and current activities are measured to
check their behavior patterns within a set or programmed
threshold. Threshold is the point within which the voltage
or current parameter is said to be within tolerance.
Thresholds are set in ranges with high limit (threshold
above the programmed limit) and low limit (threshold
below the programmed limit). RMS Variations result
whenever voltage or current behaviors rise above or fall
below the programmed thresholds. Dranetz-BMI
instruments label RMS voltage or current variations as
either sags (voltage or current decreases below low limit)
or swells (voltage or current increases above high limit)
as per IEEE 1159.
In the RMS Variations tab, the following properties can be
set: Limits, Pre and Post- Event Captures, RMS Variations
Sampling Intervals, and Intervals.
Under LIMITS, letters A, B and C represent each leg or
phase of a three-phase system, while letter N represents the
neutral conductor. The channels used to trigger threshold
values are automatically set depending on the wiring
configuration selected under the Basic tab. High limit and
Low limit values can be enabled and programmed
individually for each phase-to-neutral and phase-to-phase
setting.
To program individual limit values, select the appropriate
line that describes the phase-neutral or phase-to-phase
8-5
Series 5500 User’s Guide
8
5530/5520 DataNode Setup
setting that you wish to change. If the same limit value
will be assigned to more than one phase, press Shift +
click to select multiple phases. Enter your limit value for
the corresponding phase in the High limit and Low limit
fields. Click the Limit enabled box to activate. Click the
Save Setup button every time you assign different limit
values.
PRE- AND POST- EVENT CAPTURES contain
parameters that help users program the number of RMS
and waveform cycles to be saved before (pre-) and after
(post-) the start and the end of the event. These
parameters are Pre-event start RMS samples, Postevent start RMS samples, Pre-event start waveform
samples, Post-event start waveform samples, Postevent end RMS samples, Pre-event end waveform
samples, and Post-event end waveform samples. The
parameters capture RMS sample or RMS waveform
cycles that may be used to analyze and manage power
event patterns and behavior.
With regard to the beginning and end of RMS variation
events, such transition points are determined according to
the following rules. As per IEC and IEEE standards for
multi-phase systems, the beginning of the event occurs
when any phase goes outside the limits. The start of an
RMS variation event is denoted as the time one or more
phases of voltage or current goes outside of the
programmed high or low thresholds. The end point of the
event is defined as the point when all channels for which
triggers are enabled have come back within limits (plus
internally calculated hysteresis) for a minimum duration
of Cycles in range to end event. Until this criteria is met,
any subsequent excursions beyond the thresholds are
considered part of the original disturbance. Disturbance
monitoring requires that voltage be continuously sampled,
and recorded only if the signals exceed specified values.
Most types of disturbances, with the exception of voltage
variations, require that current be recorded as well.
The user also has the ability to specify how RMS trace
data is recorded during the event. This mechanism is
found under RMS VARIATIONS SAMPLING
INTERVALS, where Number of rates to use refers to
the number of reduced sampling rate ranges to be used to
record RMS variation activities. The sampling data
referred to here may be any or all of the three sample
rates found under INTERVALS - Reduced sampling
rate #1, Reduced sampling rate #2, and Reduced
sampling rate #3. When one of these items is selected,
the reduced sampling rate parameters can be set for that
item. Data for the sample rates only apply to RMS, not
waveform, variations.
The reason behind storing sampling rates is that the
memory capacity of the monitoring instrument makes it
impractical to record an entire long duration sag or swell
point by point. The waveforms before and after the trigger
are digitized to help identify the cause of the excursion,
but only RMS values are stored over the full duration
event that is longer than the pre- and post- trigger setting.
If the event has not ended after a programmed time period,
the instrument switches to averaging cycles of RMS data
to further conserve memory yet accurately represent the
event. At this point, the RMS plot diverges from a singlevalued line to a band of minimum, maximum and average
values. During extremely long events, the instrument
switches to successively longer averaging periods
explained next.
The sample rates represent three supplemental recording
interval or chart speeds defined for recording long events.
When recording at reduced rates, three values are saved
for each data point - the minimum, maximum, and average
value of the previous interval. The Sample min/max/avg
every N cycles refers to the number of cycles to average
for the selected reduced sampling rate. While Number of
seconds to use this rate refer to the number of seconds to
record at the selected reduced sampling rate.
The following default sequence is used to program
reduced sampling rates:
For 60 Hz systems
a. 6 cycle intervals for 8 seconds (80 samples)
b. 30 cycle intervals for 20 seconds (40 samples)
c. 60 cycle intervals for 90 seconds (90 samples)
For 50 Hz systems
a. 5 cycle intervals for 8 seconds (80 samples)
b. 25 cycle intervals for 20 seconds (40 samples)
c. 50 cycle intervals for 90 seconds (90 samples)
For further discussion on RMS Variation Triggering and
Recording, please refer to the EPQ DataNode Series
User's Guide.
8-6
Series 5500 User’s Guide
5530/5520 DataNode Setup
4. Transients tab
Properties
8
Values
Cycle Counts
1
Number of pre-trigger cycles
Number of post-trigger cycles
2
Individual Channel Parameters
A-N Voltage
B-N Voltage
C-N Voltage
N-G Voltage
A Current
B Current
C Current
N Current
phase-to-neutral
or phase-tophase values
displayed depend
upon the Wiring
Configuration set
under the Basic
tab
Instantaneous limit enabled
Instantaneous limit
Peak detector limit enabled
Peak detector limit
Waveform change limit enabled
120.0
Waveform change magnitude limit
Waveform change duration limit (% of cycle)
10.0
10.0
100
Transients are disturbances which are shorter in duration
than sags and swells. There are two basic types of
transients: 1) impulsive transients commonly caused by
lightning and load switching, and 2) oscillatory transients
often attributed to capacitor bank switching. The EPQ
DataNode has extensive transient recording capabilities for
all transient events, using waveshape, instantaneous peak,
and dual positive and negative high frequency peak
detectors.
Impulsive transients are characterized by a very rapid
change in the magnitude of the measured quantity. Because
these types of disturbances exhibit high frequencies, they
are quickly damped by the system. They tend to be
unidirectional when close to their source. Impulses are
commonly caused by capacitors or inductors switching on
line, loose wires, lightning, static, and power failures.
Oscillatory transients are defined as a temporary, rapid
discontinuity of the waveform. Frequency is the most
important characteristic in identifying this type of transient
event. Frequencies are further classified into high (500 kHz
or greater), medium (5 to 500 kHz), or low (5 kHz or less).
Transient events in the form of wave faults are captured
using the waveform change detection technique. This is
done by recording present cycle samples and comparing
it to samples from the previous cycle. Waveshape trigger
values include the magnitude and duration of the
difference between the present and previous cycle.
Transients can be captured using the high frequency
positive/negative peak detectors, crest factor peak
(instantaneous), and/or the waveshape variation
triggering functions. The high frequency detected
transient uses special circuitry to detect and capture
impulsive transients as small as 1 microsecond. These
transients are the positive and/or negative value above or
below the low frequency waveshape. These are only
enabled if the flicker tab is disabled. The crest factor or
instantaneous peak is the absolute peak sample value
within one cycle. The high frequency peak detector and
instantaneous transients are triggerable for voltage and
current.
Under the CYCLE COUNTS, the user can define a
number of cycles of waveform to record prior to the
8-7
Series 5500 User’s Guide
8
5530/5520 DataNode Setup
trigger point. This is set under the value field Number of
pre-trigger cycles. Users can also define the number of
cycles of waveform to record after the trigger. This value
is set under Number of post-trigger cycles. Typical
values for these settings are 1 and 2 respectively. Setting
these values to 0 causes one cycle of data to be recorded
for each event - the cycle in which the transient was
detected. Note also that the cycle of waveform containing
the trigger point is always recorded. For example, if the
pre-trigger cycle count is 1 and the post-trigger count is
set to 2, then a total of 4 cycles (including the cycle
containing the trigger point) of waveform and peak
detector values are recorded.
Under INDIVIDUAL CHANNEL PARAMETERS, letters
A, B and C represent different channels, N stands for
neutral, while G stands for ground conductor. The channel
values are pre-defined and automatically set depending
upon the Wiring configuration selected under the Basic
tab.
The DataNode provides configuration variables that
specifies how many cycles to record the Instantaneous
limit, Peak detector limit and Waveform change
magnitude limit. These limit values can be enabled and
programmed individually for each phase and phase-tophase setting.
The instantaneous limit value is compared against the
absolute value of each A/D sample of the voltage and
current channel waveforms (128 A/D samples taken per
cycle). If any point is greater than the specified limit, the
cycle the trigger occurred on plus the specified number of
pre- and post- trigger cycles will be recorded as an event.
Enter your limit values in the corresponding field for each
phase-neutral or phase-to-phase setting, and click the
Instantaneous limit enabled box to activate. In earlier
versions of the software, this same value is used for the
high frequency dual peak detectors as well.
The instantaneous limit is in units of Volts or Percent of
base depending on the unit of thresholds selected under
the Basic tab. If the instantaneous limit is set at or below
100%, transients are effectively disabled because a
permanent trigger condition exists and locks out further
events. The Peak detector limit can also be set in units of
Volts or Percent of base depending on the thresholds unit
set under the Basic tab. Since the fundamental frequency
component is filtered out using the peak detector trigger
mechanism, peak detector limits set below 100% can be
specified.
Other configuration variables that determine the operation
of transient capture capability of the DataNode are the
waveform trigger parameter, instantaneous peak
waveform trigger level, and dual peak high frequency
detector output trigger level. Values for these parameters
are set under Waveform change magnitude limit and
Waveform change duration limit. Normally the default
values for these is 10%. These limit values can be enabled
and programmed individually for each phase and phaseto-phase setting. To activate the waveform limit values,
click the Waveform change limit enabled box.
For further discussion on Transient Event Recording,
refer to the EPQ DataNode Series User's Guide.
8-8
Series 5500 User’s Guide
5530/5520 DataNode Setup
Trending Tabs
8
The following tabs are known as trending pages: Metering, Revenue, Demand, Advanced Energy, Advanced Metering,
Imbalance, Harmonics, Flicker, and Advanced Harmonics. These tabs contain an enable/disable checkbox at the top of the
page. The purpose of the checkbox on any trending page is to enable trending of properties and values listed on that page.
If the box is checked, the settings on that page go into effect. If the box is not checked, the remaining settings are
persisted but are not in effect. For DataNodes using Firmware V2.6 and higher, all trending pages are displayed. For
DataNodes using firmware versions prior to V2.6, most trending pages are hidden and need to be enabled for display (see
Note on page 8-3 Basic tab). When exiting from the page, a save confirmation window appears. Click on Yes to save
changes. Click on No to exit the menu tab without saving changes.
NOTE: All trending tabs operate in the same manner, the difference being the parameter measured. Therefore the same
description of how to use can appear once and not be repeated.
5. Metering tab
Properties
Values
Basic Metering (Metering, MMXUO)
Line-Neutral Voltage (A-N)
Line-Neutral Voltage (B-N)
Line-Neutral Voltage (C-N)
Neutral-Ground Voltage
Line-Line Voltage (A-B)
Line-Line Voltage (B-C)
Line-Line Voltage (C-A)
Line Current (A)
Line Current (B)
Line Current (C)
Line Current (N)
Active Power (A)
Active Power (B)
Active Power (C)
Total Active Power
Enable Periodic Sampling
High-High limit enabled
High-High limit
High limit enabled
High limit
Low limit enabled
Low limit
Low-Low limit enabled
Low-Low limit
Deadband enabled
Deadband
Enable Trending (This page)
;
Select the journal entry/entries to change
Apparent Power (A)
Apparent power (B)
Apparent Power (C)
Total Apparent Power
Power Factor (A)
Power Factor (B)
Power Factor (C)
Average Power Factor
Angle Between Phases (A)
Angle Between Phases (B)
Angle Between Phases (C)
Frequency
phase-to-neutral or
phase-to-phase
values displayed
depend upon the
Wiring Configuration
set under the Basic
tab
;
135.0
125.0
105.0
90.0
3.0
The RMS voltage variations have their own tab relative to
capturing and monitoring power quality events such as sags
and swells (see page 8-5 RMS Variations). In addition, the
RMS voltage and current values can be trended using
periodic readings that are stored in a journal.
Under ENABLE TRENDING (THIS PAGE) is a
checkbox in the value field opposite Basic Metering.
The box enables the trending of values listed in Metering
page. If the box is checked, the settings on the page go
into effect. If the box is not checked, the remaining
8-9
Series 5500 User’s Guide
8
5530/5520 DataNode Setup
settings are persisted but are not in effect.
Under SELECT JOURNAL ENTRY/ENTRIES TO
CHANGE, the various phase-neutral and phase-to-phase
parameters are displayed. High and low limits can be
enabled and individually set for each phase-neutral and
phase-to-phase value. Note however that the available
phase values depend on the Wiring Configuration selected
under the Basic tab. For instance, for wye circuits L-N, NG and L-L limits can be set. For delta circuits, only L-L
limits can be set.
Highlight the parameter value you wish to change, then
check the Enable periodic sampling box. Check the
threshold enable box, and then enter the value for that
threshold. Repeat this for all parameters of interest.
NOTE: The 5530 DataNode has an internal limit on the
number of variables it can track for the purpose of periodic
recording and limit rule evaluation. Indiscriminate
selection of parameters should be avoided.
Each parameter has five threshold limits: High-high,
High, Low, Low-Low, and Deadband.
High-High limit - specifies an absolute limit for
comparison that is higher than the high limit
High limit - specifices an absolute limit for comparison
that is higher than the low limit
Low limit - specifies an absolute limit for comparison that
is lower than the high limit
Low-Low limit - specifies an absolute limit for
comparison lower than the low limit
Deadband limit - specifies how much a value can change
before another event is recorded
The High-High must be greater than High, Low-Low less
than Low. The hysteresis values assigned to limits are set
by the system and not programmable by the user. All limit
values are used to determine if corresponding reporting or
logging action should take place. Note that these limits
are the absolute or actual values to trigger on, not a
percent of fixed or floating base as can be used in Voltage
RMS Variation and Transients limits.
For example, if a frequency is detected to cross the
threshold limit, then an event is recorded. If the frequency
goes from out of limits to within limits (that is below the
high limit minus the hysteresis and above the low limit
plus the hysteresis) then another event is recorded.
Enabling the parameters for periodic sampling make them
appear in the Real-time tab.
8-10
Series 5500 User’s Guide
5530/5520 DataNode Setup
6. Revenue tab
Properties
8
Values
Enable Trending (This page)
Basic Revenue Metering (Revenue, MMTRO)
Select the journal entry/entries to change
Phase Energy (A)
Phase Energy (B)
Phase Energy (C)
Total Energy
Integrated Reactive Power (A)
Integrated Reactive Power (B)
Integrated Reactive Power (C)
Total Integrated Reactive Power
Enable periodic sampling
High-High limit enabled
High-High limit
High limit enabled
High limit
Low limit enabled
Low limit
135.0
Low-Low limit enabled
Low-Low limit
Deadband enabled
Deadband
125.0
105.0
90.0
3.0
Under ENABLE TRENDING (THIS PAGE) is a checkbox
in the value field opposite Basic Revenue Metering. The
box enables the trending of values listed in Basic Revenue
Metering page. If the box is checked, the settings on the
page go into effect. If the box is not checked, the
remaining settings are persisted but are not in effect.
Low limit - specifies an absolute limit for comparison
that is lower than the high limit
Low-Low limit - specifies an absolute limit for
comparison lower than the low limit
Deadband limit - specifies how much a value can change
before another event is recorded
Each of the individual phase and three phase total energy
and integrated reactive power values found under SELECT
THE JOURNAL ENTRY/ENTRIES TO CHANGE can be
enabled.
The High-High must be greater than High, Low-Low less
than Low. Deadband is the equivalent of sensitivity. The
hysteresis values assigned to limits are set by the system.
All limit values are used to determine if corresponding
reporting or logging action should take place. Note that
these limits are the absolute or actual values to trigger on,
not a percent of fixed or floating base as can be used in
Voltage RMS Variation and Transients limits.
Highlight the parameter value you wish to change, then
check the Enable periodic sampling box. Check the
threshold enable box and then enter the value for that
threshold. Repeat this for all parameters of interest.
Each parameter has five threshold limits: High-high,
High, Low, Low-Low, and Deadband.
High-High limit - specifies an absolute limit for
comparison that is higher than the high limit
High limit - specifices an absolute limit for comparison
that is higher than the low limit
Series 5500 User’s Guide
For example, if Total Energy is detected to cross the
threshold limit, then an event is recorded. If the Total
Energy goes from out of limits to within limits (that is
below the high limit minus the hysteresis and above the
low limit plus the hysteresis), then the event is recorded.
Enabling the parameters for periodic sampling make them
appear in the Real-time tab.
8-11
8
5530/5520 DataNode Setup
7. Demand tab
Properties
Values
Enable Trending (This page)
Demand (Demand, MDMDUO)
Select the journal entry/entries to change
Real Power, Dmd, Total
Reactive Power, Dmd, Total
Apparent Power Dmd, Total
Average PF Over Last Interval
Peak Real Power Dmd Total
Var Dmd Coincident w/Pk W Dmd
VA Dmd Coincident w/Pk W Dmd
Avg PF Coincident w/Pk W Dmd
Peak Reactive Power Dmd, Total
W Dmd Coincident w/Pk Var Dmd
VA Dmd Coincident w/Pk Var Dmd
Avg PF Coincident w/Pk Var DMd
Peak Apparent Power Dmd, Total
W Dmd Coincident w/Pk W Dmd
Var Dmd Coincident w/Pk VA Dmd
Avg PF Coincident w/Pk VA Dmd
Predicted Real Power Dmd, Total
Predicted Reactive Power Dmd, Total
Predicted Apparent Power Dmd, Total
Current Demand (A)
Current Demand (B)
Current Demand (C)
Average Current Demand
Peak Current Demand (A)
Peak Current Demand (B)
Peak Current Demand (C)
Average Peak Current Demand
Enable periodic sampling
High-High limit enabled
High-High limit
High limit enable
High limit
Low limit enabled
Low limit
Low-Low limit enabled
Low-Low limit
Deadband enabled
Deadband
135.0
125.0
105.0
90.0
3.0
8-12
Series 5500 User’s Guide
5530/5520 DataNode Setup
Demand values are computed as the average value over the
demand interval, which can be programmed as a different
value than the periodic readings. The following parameter
values can be enabled: individual phase and three phase
total real power demand, reactive demand, apparent power
demand, average PF and peak real power values.
Under ENABLE TRENDING (THIS PAGE) is a checkbox
in the value field opposite Demand. The box enables the
trending of values listed in Demand page. If the box is
checked, the settings on the page go into effect. If the box
is not checked, the remaining settings are persisted but are
not in effect.
The following parameter values can be enabled under
SELECT THE JOURNAL ENTRY/ENTRIES TO
CHANGE: individual phase and three phase total real
power demand, reactive demand, apparent power demand,
average PF, and peak real power values.
Highlight the parameter value you wish to change, then
check the Enable periodic sampling box. Check the
threshold enable box, and then enter the value for that
threshold. Repeat this for all parameters of interest.
High limit - specifices an absolute limit for comparison
that is higher than the low limit
Low limit - specifies an absolute limit for comparison
that is lower than the high limit
Low-Low limit - specifies an absolute limit for
comparison lower than the low limit
Deadband limit - specifies how much a value can change
before another event is recorded
8
The High-High must be greater than High, Low-Low less
than Low. Deadband is the equivalent of sensitivity. The
hysteresis values assigned to limits are set by the system.
All limit values are used to determine if corresponding
reporting or logging action should take place. Note that
these limits are the absolute or actual values to trigger on,
not a percent of fixed or floating base as can be used in
Voltage RMS Variation and Transients limits.
For example, if Real Power Demand is detected to cross
the threshold limit, then an event is recorded. If the Real
Power Demand goes from out of limits to within limits
(that is below the high limit minus the hysteresis and
above the low limit plus the hysteresis), then the event is
recorded.
Each parameter has five threshold limits: High-high,
High, Low, Low-Low, and Deadband.
High-High limit - specifies an absolute limit for
comparison that is higher than the high limit
8-13
Series 5500 User’s Guide
8
5530/5520 DataNode Setup
8. Advanced Energy tab
Properties
Values
Enable Trending (This page)
Advanced Energy (Adv. Anergy, MFLOO)
Select the journal entry/entries to change
Forward fund. freq. WHrs (A)
Forward fund. freq. WHrs (B)
Forward fund. freq. WHrs (C)
Reverse fund. freq. WHrs (A)
Reverse fund. freq. WHrs (B)
Reverse fund. freq. WHrs (C)
Forward tot. fund. freq. WHrs
Reverse tot. fund. freq. WHrs
Forward fund. freq. VarHrs (A)
Forward fund. freq. VarHrs (B)
Forward fund. freq. VarHrs (C)
Reverse fund. freq. VarHrs (A)
Reverse fund. freq. VarHrs (B)
Reverse fund. freq. VarHrs (C)
Forward tot. fund. freq. VarHrs
Reverse tot. fund. freq. VarHrs
Fundamental freq. VA hours (A)
Fundamental freq. VA hours (B)
Fundamental freq. VA hours (C)
Total fundamental freq. VA hours
Enable periodic sampling
High-High limit enabled
High-High limit
High limit enabled
High limit
Low limit enabled
Low limit
135.0
Low-Low limit enabled
Low-Low limit
Deadband enabled
Deadband
125.0
105.0
90.0
3.0
8-14
Series 5500 User’s Guide
5530/5520 DataNode Setup
The Advanced Energy tab shows various energy
parameters on per phase and total basis as well as in
forward and reverse mode. Fundamental frequency is used
as the reference unit. Frequency is specified in hertz.
Fundamental frequency refers to the principal component
of a wave, i.e. the component with the lowest frequency or
greatest amplitude.
Under ENABLE TRENDING (THIS PAGE) is a
checkbox in the value field opposite Advanced Energy.
The box enables the trending of values listed in Advanced
Energy page. If the box is checked, the settings on the
page go into effect. If the box is not checked, the
remaining settings are persisted but are not in effect.
Under SELECT THE JOURNAL ENTRY/ENTRIES TO
CHANGE, highlight the phase value parameter you wish
to change then check the Enable periodic sampling box.
Check the threshold enable box and then enter the value
for that threshold. Repeat this for all parameters of interest.
Each parameter has five threshold limits: High-high,
High, Low, Low-Low, and Deadband.
High-High limit - specifies an absolute limit for
comparison that is higher than the high limit
High limit - specifices an absolute limit for comparison
that is higher than the low limit
Low limit - specifies an absolute limit for comparison
that is lower than the high limit
Low-Low limit - specifies an absolute limit for
comparison lower than the low limit
Deadband limit - specifies how much a value can change
before another event is recorded
8
The High-High must be greater than High, Low-Low less
than Low. Deadband is the equivalent of sensitivity. The
hysteresis values assigned to limits are set by the system.
All limit values are used to determine if corresponding
reporting or logging action should take place. Note that
these limits are the absolute or actual values to trigger on,
not a percent of fixed or floating base as can be used in
Voltage RMS Variation and Transients limits.
For example, if the Total Fundamental Frequency is
detected to cross the threshold limit, then an event is
recorded. If the Total Fundamental Frequency goes from
out of limits to within limits (that is below the high limit
minus the hysteresis and above the low limit plus the
hysteresis), then the event is recorded.
8-15
Series 5500 User’s Guide
8
5530/5520 DataNode Setup
9. Advanced Metering tab
Properties
Values
Enable Trending (This page)
Advanced Metering (Adv. Metering, MADVO)
Select the journal entry/entries to change
Total VA - Arith. Method
Total VA - Vect. Method
Total Fund. VA - Arith. Method
Total Fund. VA - Vect. Method
Worst True Power Factor
Total Arithmetic True PF
Total Vector True Power Factor
Displacement Power Factor (A)
Displacement Power Factor (B)
Displacement Power Factor (C)
Worst Displacement Power Factor
Average Displacement PF
Total Arithmetic Disp. PF
Total Vector Disp. Power Factor
Residual Current
Net Current
Enable periodic sampling
High-High limit enabled
High-High limit
High limit enabled
High limit
Low limit enabled
Low limit
135.0
Low-Low limit enabled
Low-Low limit
Deadband enabled
Deadband
125.0
105.0
90.0
3.0
Under ENABLE TRENDING (THIS PAGE) is a
checkbox in the value field opposite Advanced
Metering. The box enables the trending of values listed
in Advanced Metering page. If the box is checked, the
settings on the page go into effect. If the box is not
checked, the remaining settings are persisted but are not
in effect.
Under SELECT THE JOURNAL ENTRY/ENTRIES TO
CHANGE, multiple total apparent power and power
factor parameters, calculated using arithmetic and vector
sums of the individual phases, can be enabled. Highlight
the parameter value you wish to change, then check the
Enable periodic sampling box. Check the threshold
enable box, and then enter the value for that threshold.
Repeat this for all parameters of interest.
Each parameter has five threshold limits: High-High,
High, Low, Low-Low, and Deadband.
High-High limit - specifies an absolute limit for
comparison that is higher than the high limit
8-16
High limit - specifices an absolute limit for comparison
that is higher than the low limit
Low limit - specifies an absolute limit for comparison that
is lower than the high limit
Low-Low limit - specifies an absolute limit for comparison
lower than the low limit
Deadband limit - specifies how much a value can change
before another event is recorded
The High-High must be greater than High, Low-Low less
than Low. Deadband is the equivalent of sensitivity. The
hysteresis values assigned to limits are set by the system.
All limit values are used to determine if corresponding
reporting or logging action should take place.
For example, if the Displacement Power Factor is detected
to cross the threshold limit, then an event is recorded. If
the Displacement Power Factor goes from out of limits to
within limits (that is below the high limit minus the
hysteresis and above the low limit plus the hysteresis),
then the event is recorded.
Series 5500 User’s Guide
5530/5520 DataNode Setup
10. Unbalance tab
Properties
8
Values
Enable Trending (This page)
Unbalance and Sequence Components (Sequence,MSQIO)
Select the journal entry/entries to change
Sequence Voltage (Pos)
Sequence Voltage (Neg)
Sequence Voltage (Zero)
Sequence Current (Pos)
Sequence Current (Neg)
Sequence Current (Zero)
V Imbalance: L-N dev. from avg (A-N)
V Imbalance: L-N dev. from avg (B-N)
V Imbalance: L-N dev. from avg (C-N)
V Imbalance: L-L dev. from avg (A-B)
V Imbalance: L-L dev. from avg (B-C)
V Imbalance: L-L dev. from avg (C-A)
V Imbalance: L-N Max from avg
V Imbalance: L-L Max from avg
V Imbalance: Neg. Seq. Method
V Imbalance: Zero Seq. Method
I Imbalance: dev. from avg (A)
I Imbalance: dev. from avg (B)
I Imbalance: dev. from avg (C)
I Imbalance: Max dev. from avg
I Imbalance: Neg. Seq. Method
I Imbalance: Zero Seq. Method
Enable periodic sampling
High-High threshold enabled
High-High threshold
High threshold enabled
High threshold
Low threshold enabled
Low threshold
Low-Low threshold enabled
Low-Low threshold
Deadband enabled
Deadband
135.0
125.0
105.0
90.0
3.0
The voltage and current imbalance for each phase from the
average value for all three phases can be trended and limits
set. The positive, negative and zero sequence components
for voltage and current can be trended.
Under ENABLE TRENDING (THIS PAGE) is a checkbox
in the value field opposite Unbalance and Sequence
Components. The box enables the trending of values listed
in Unbalance page. If the box is checked, the settings on
the page go into effect. If the box is not checked, the
remaining settings are persisted but are not in effect.
Under SELECT THE JOURNAL ENTRY/ENTRIES TO
CHANGE, highlight the parameter value you wish to
change, then check the Enable periodic sampling box.
Check the threshold enable box, and then enter the value
for that threshold. Repeat this for all parameters of interest.
Each parameter has five threshold limits: High-high,
High, Low, Low-Low, and Deadband.
High-High limit - specifies an absolute limit for
comparison that is higher than the high limit
High limit - specifices an absolute limit for comparison
that is higher than the low limit
Low limit - specifies an absolute limit for comparison
that is lower than the high limit
Low-Low limit - specifies an absolute limit for
comparison lower than the low limit
Deadband limit - specifies how much a value can change
before another event is recorded
The High-High must be greater than High, Low-Low
less than Low. Deadband is the equivalent of sensitivity.
8-17
Series 5500 User’s Guide
8
5530/5520 DataNode Setup
11. Harmonics tab
Properties
Values
Harmonics (MHAIO)
Percent Eddy Current Loss
Maximum Demand Load Current
Enable Trending (This page)
8.000
100.000
Select the journal entry/entries to change
Voltage THD - Fund. Normalized (A-N)
Voltage THD - Fund. Normalized (B-N)
Voltage THD - Fund. Normalized (C-N)
Voltage THD - Fund. Normalized (N-G)
Voltage THD - RMS Normalized (A-N)
Voltage THD - RMS Normalized (B-N)
Voltage THD - RMS Normalized (C-N)
Voltage THD - RMS Normalized (N-G)
Voltage TID - Fund. Normalized (A-N)
Voltage TID - Fund. Normalized (B-N)
Voltage TID - Fund. Normalized (C-N)
Voltage TID - Fund. Normalized (N-G)
Voltage TID - RMS Normalized (A-N)
Voltage TID - RMS Normalized (B-N)
Voltage TID - RMS Normalized (C-N)
Voltage TID - RMS Normalized (N-G)
Voltage Harmonic RMS (A-N)
Voltage Harmonic RMS (B-N)
Voltage Harmonic RMS (C-N)
Voltage Harmonic RMS (N-G)
Voltage Interharmonic RMS (A-N)
Voltage Interharmonic RMS (B-N)
Voltage Interharmonic RMS (C-N)
Voltage Interharmonic RMS (N-G)
Voltage TIF - Fund. Normalized (A-N)
Voltage TIF - Fund. Normalized (B-N)
Voltage TIF - Fund. Normalized (C-N)
Voltage TIF - Fund. Normalized (N-G)
Voltage TIF - RMS Normalized (A-N)
Voltage TIF - RMS Normalized (B-N)
Voltage TIF - RMS Normalized (C-N)
Voltage TIF - RMS Normalized (N-G)
Voltage Crest Factor (A-N)
Voltage Crest Factor (B-N)
Voltage Crest Factor (C-N)
Voltage Crest Factor (N-G)
Current THD - Fund. Normalized (A)
Current THD - Fund. Normalized (B)
Current THD - Fund. Normalized (C)
Current THD - Fund. Normalized (N)
Current THD - RMS Normalized (A)
Current THD - RMS Normalized (B)
Current THD - RMS Normalized (C)
Current THD - RMS Normalized (N)
Current TID - Fund. Normalized (A)
Current TID - Fund. Normalized (B)
Current TID - Fund. Normalized (C)
Current TID - Fund. Normalized (N)
Current TID - RMS Normalized (A)
Current TID - RMS Normalized (B)
Currrent TID - RMS Normalized (C)
Current TID - RMS Normalized (N)
Current Harmonic RMS (A)
Current Harmonic RMS (B)
Current Harmonic RMS (C)
Current Harmonic RMS (N)
Current Interharmonic RMS (A)
Current Interharmonic RMS (B)
Current Interharmonic RMS (C)
Current Interharmonic RMS (N)
IT Product (A)
IT Product (B)
IT Product (C)
IT Product (N)
Current Crest Factor (A)
Current Crest Factor (B)
Current Crest Factor (C)
Current Crest Factor (N)
Current Total Demand Distortion (A)
Current Total Demand Distortion (B)
Current Total Demand Distortion (C)
K Factor (A)
K Factor (B)
K Factor (C)
K Factor (A)
Transformer Derating Factor (A)
Transformer Derating Factor (B)
Transformer Derating Factor (C)
Total Phase Harmonic Power (A-N)
Total Phase Harmonic Power (B-N)
Total Phase Harmonic Power (C-N)
Signed Phase Harmonic Power (A-N)
Signed Phase Harmonic Power (B-N)
Signed Phase Harmonic Power (C-N)
Enable periodic sampling
High-High limit enabled
High-High limit
High limit enabled
High limit
Low limit enabled
Low limit
Low-Low limit enabled
Low-Low limit
Deadband enabled
Deadband
135.0
125.0
105.0
90.0
3.0
8-18
Series 5500 User’s Guide
5530/5520 DataNode Setup
Harmonics are waveform distortion, a steady-state
deviation from an ideal power frequency sinusoid and is
characterized by the spectral content of the waveform.
Many non-linear devices such as battery chargers,
switching power supplies or transformers inject currents at
harmonic (integer multiples of the fundamental)
frequencies into the system. Harmonic currents and the
voltage distortion they create as they flow through system
impedances can reduce equipment operating reliability and
service life. Harmonics can be particularly troublesome
where capacitors are applied on the distribution system.
Capacitors may result in resonance at a harmonic
frequency, leading to high harmonic voltages and currents
throughout the system.
Interharmonics are frequency components between the
harmonic frequencies. The IEC 1000-4-7 Standard dictates
that harmonic analysis is done using 5Hz bins. The RMS of
the frequency bins between the 2nd and 3rd harmonic is
referred to as the H2-3 interharmonic.
Under ENABLE TRENDING (THIS PAGE) is a checkbox
in the value field opposite Harmonics. The box enables the
trending of values listed in Harmonics page. If the box is
checked, the settings on the page go into effect. If the box is
not checked, the remaining settings are persisted but are not
in effect.
Under SELECT JOURNAL ENTRY/ENTRIES TO
CHANGE, various harmonic parameters can be trended
using periodic readings that are stored in a journal.
Harmonic distortion of voltage or current is calculated
through a Fourier transformation of the waveform into
harmonic magnitudes and phase angle spectra. These
spectra are used to determine figures of merit such as total
harmonic distortion (THD) and telephone influence factor
(TIF). The total interharmonic distortion (TID) is calculated
similar to the THD. (See Appendix A Quantities Calculated
from Periodic Voltage and Current Measurements)
The InfoNode/DataNode system allows simultaneous
measurements of voltage and current so that harmonic
power flow can be obtained. Depending on value
parameters set, the program can record a sampling of the
waveform synchronized to the fundamental frequency, to
ensure accurate calculation of harmonic phase angles.
The sampling rate is sufficient to determine up to the
50th harmonic and interharmonic or better. A
comprehensive range of high and low limits can be
enabled and individually set for each measured
parameter. Highlight the value parameter you wish to
change, then check the Enable periodic sampling box.
Check the threshold enable box and then enter the value
for that threshold. Repeat this for all parameters of
interest.
8
Each parameter has five threshold limits: High-high,
High, Low, Low-Low, and Deadband.
High-High limit - specifies an absolute limit for
comparison that is higher than the high limit
High limit - specifices an absolute limit for comparison
that is higher than the low limit
Low limit - specifies an absolute limit for comparison
that is lower than the high limit
Low-Low limit - specifies an absolute limit for
comparison lower than the low limit
Deadband limit - specifies how much a value can change
before another event is recorded
The High-High must be greater than High, Low-Low
less than Low. Deadband is the equivalent of sensitivity.
The hysteresis values assigned to limits are set by the
system. All limit values are used to determine if
corresponding reporting or logging action should take
place. Note that these limits are the absolute or actual
values to trigger on, not a percent of fixed or floating
base as can be used in Voltage RMS Variation and
Transients limits.
For example, if the Voltage Harmonic RMS is detected
to cross the threshold limit, then an event is recorded. If
the Voltage Harmonic RMS goes from out of limits to
within limits (that is below the high limit minus the
hysteresis and above the low limit plus the hysteresis),
then the event is recorded. All activated Harmonic
parameters and value settings defined can be viewed
under the Real-time tab.
For further discussion on Harmonic Distortion, please
refer to the EPQ DataNode Series User's Guide.
8-19
Series 5500 User’s Guide
8
5530/5520 DataNode Setup
12. Flicker tab
Properties
Flicker (Flicker, MFLKO)
Pst Sample Interval
Plt Sample Interval
Values
Enable Trending (This page)
;
Sample Intervals (minutes)
10
180
Select the journal entry/entries to change
Pst of last complete interval (A)
Pst of last complete interval (B)
Pst of last complete interval (C)
Plt of last complete interval (A)
Plt of last complete interval (B)
Plt of last complete interval (C)
Sliding window Plt calculation (A)
Sliding window Plt calculation (B)
Sliding window Plt calculation (C)
Output 5-Pinst-peak value (A)
Output 5-Pinst-peak value (B)
Output 5-Pinst-peak value (C)
Output 4-1 min TC LPF of Pinst (A)
Output 4-1 min TC LPF of Pinst (B)
Output 4-1 min TC LPF of Pinst (C)
Output 3-square root of Pinst (A)
Output 3-square root of Pinst (B)
Output 3-square root of Pinst (C)
LPF of Output 3 (A)
LPF of Output 3 (B)
LPF of Output 3 (C)
Enable periodic sampling
High-High limit enabled
High-High limit
High limit enabled
High limit
Low limit enabled
Low threshold
Low-Low limit enabled
Low-Low limit
Deadband enabled
Deadband
;
0.00
0.00
0.00
0.00
0.00
There are three flicker values available for trending: the
Short term flicker or Pst, the long term flicker or Plt, and
Plt calculated on a sliding window. The other parameters
shown above (journal entries) are used primarily for
specialized testing. Flicker measurements are classified per
IEC 1000-4-15.
Under ENABLE TRENDING (THIS PAGE) is a checkbox
in the value field opposite Flicker which enables the
trending of values listed in this page. If the box is checked,
the settings on the page go into effect. Enabling this will
automatically disable the high-frequency dual peak
detectors located in the Transients tab. If the box is not
checked, the remaining settings are persisted but are not in
effect.
Under SAMPLE INTERVALS are two numeric edit
controls: the Pst Interval and the Plt Interval. Pst is
short term perceptibility, used to set the Pst calculation
interval. Typical calculation is over 10 minute interval,
though this can be programmed. Plt is long term
perceptibility, used to set Plt calculation interval. Typical
calculation is over 2 hour interval, though this can also be
programmed. The Plt interval must be an integer multiple
of the Pst interval. Sliding Plt recalculates the Plt value at
each Pst interval, rather than only at the Plt interval.
Under SELECT JOURNAL ENTRY/ENTRIES TO
CHANGE, various flicker parameters can be trended
using periodic readings that are stored in a journal.
8-20
Series 5500 User’s Guide
5530/5520 DataNode Setup
Highlight the value parameter you wish to change then
check the Enable periodic sampling box. Check the
threshold enable box and then enter the value for that
threshold. Repeat this for all parameters of interest.
Low-Low limit - specifies an absolute limit for
comparison lower than the low limit
Deadband limit - specifies how much a value can change
before another event is recorded
Each parameter has five threshold limits: High-high, High,
Low, Low-Low, and Deadband.
High-High limit - specifies an absolute limit for comparison
that is higher than the high limit
High limit - specifices an absolute limit for comparison that
is higher than the low limit
Low limit - specifies an absolute limit for comparison that
is lower than the high limit
The High-High must be greater than High, Low-Low
less than Low. Deadband is the equivalent of sensitivity.
The hysteresis values assigned to limits are set by the
system. All limit values are used to determine if
corresponding reporting or logging action should take
place. Note that these limits are the absolute or actual
values to trigger on, not a percent of fixed or floating
base as can be used in Voltage RMS Variation and
Transients limits.
8
13. Advanced Harmonics tab
Properties
Values
Enable Trending (This page)
;
Advanced Harmonics (Individual, MHAIO)
;
Trend harmonics for phase A
;
Trend harmonics for phase B
;
Trend harmonics for phase C
Phase Voltages
Neutral Voltages
Phase Currents
Neutral Current
Phase Voltages
Neutral Voltages
Phase Currents
Neutral Current
Harmonics to Trend
2-25
sample
harmonic
values to trend
Interharmonics to Trend
2-25
sample
interharmonic
values to trend
The following parameters are found under ENABLE
TRENDING (THIS PAGE): Advanced harmonics
(Individual) and Trend harmonics for phases A, B and
C. Opposite these parameters are checkboxes which enable
the trending of values listed in Advanced harmonics page.
If the box is checked, the settings on the page go into effect.
If the box is not checked, the remaining settings are
persisted but are not in effect.
Caution: Selection of numerous harmonics and
interharmonics can exceed the total number of journal
parameters (typically 200) that can be trended.
Voltage and current harmonics for each phase and neutral
channel can be trended under HARMONICS TO TREND.
Similarly, voltage and current interharmonics for each
Series 5500 User’s Guide
phase and neutral channel can also be trended under
INTERHARMONICS TO TREND. The value fields are
left blank to allow the users to choose the numbers or the
range of harmonic frequencies to trend.
Numbers can be entered individually with commas
separating the numbers, or a range of harmonics can be
specified using a dash between lower and upper values.
Also, the suffix ‘o’ or ‘e’ can be used to specify only the
odd or even harmonics, respectively, in a given range.
Selecting numerous harmonics indiscriminately can take
up all of the allowable trending parameters. Users are
advised to select harmonics to trend prudently.
Resulting individual harmonic sampling and graphs can
be seen in the Smart Trends folder under the Views tab.
8-21
8
5530/5520 DataNode Setup
14. Transducers tab
Properties
Phase rotation
Phase A voltage
Phase A current
Phase B voltage
Phase B current
Phase C voltage
Phase C current
Neutral voltage
Neutral current
Signal is connected to
Channel is inverted
Values
Normal (counter clockwise)
{Normal (counter clockwise), Reverse (clockwise)}
Channel Mapping
Channel 1
Transducer Ratios
Phase A-N VT
Phase B-N VT
Phase C-N VT
Neutral VT
Phase A CT
Phase B CT
Phase C CT
Neutral CT
Phase A-B VT
Phase B-C VT
Phase C-A VT
Transducer Primary
Transducer Secondary
Magnitude correction
Phase correction
DC offset
phase-to-neutral or
phase-to-phase
values displayed
depend upon the
Wiring Configuration
set under the Basic
tab
1.00000000
1.00000000
1.00000000
0.00000000
0.00000000
Transducers are typically PTs (potential transformers) and
CTs (current transformers) that are used to interface the
instrument to the power circuit. PTs allow the instrument
to measure circuits that are not within the measurement
range of the instrument. CTs measure the current of the
circuit and convert it to within the measurement range of
the instrument.
For Phase rotation, users can choose whether to have
phasor shift clockwise or counterclockwise, depending on
the way they have set up their system. Click the value
field to display the drop down menu featuring Normal
(counter clockwise) or Reverse (clockwise). Either
orientation will yield the same mathematical calculations
of voltage and current measurements. The 5530 is able to
automatically determine phase rotation of the voltage
channels and then match up the current channels.
The 5530 DataNode will swap voltage phases to ensure
positive sequence phase rotation (counter clockwise
according to IEEE definitions) and then swap and invert
current channels to match.
The InfoNode is designed with a software user interface to
enable users to do channel swapping and inversion
information. Channel mapping is used to correct for errors
in wiring the instrument to the circuit. If a mistake is
made, such as an inverted CT or a phase is connected to
the wrong channel, it can be corrected in the software
instead of changing the wiring to the instrument. Note that
it is recommended that the actual wiring be changed, but
channel mapping can correct the problem if this is not
practical.
8-22
Series 5500 User’s Guide
5530/5520 DataNode Setup
A channel-mapping array is provided to permit manual
configuration of channel swapping and inversion. Under
CHANNEL MAPPING, click on the corresponding
voltage or current phase to show which channel the Signal
is connected to. Click and enable the value field opposite
Channel is inverted to as it applies.
The channel-mapping array works by specifying a
numeric code in each array slot that indicates which phase
is connected to the physical 5530 DataNode channel.
Normally, the channels and phases are matched as shown
below. Channels can be swapped and/or inverted to
correct mistakes in wiring.
Voltage Phase A
Voltage Phase B
Voltage Phase C
Voltage Neutral
Current Phase A
Current Phase B
Current Phase C
Current Neutral
The DataNode employs two A/D converters to sample the
voltage and current channels for a given phase
simultaneously. Measurement errors may result if the
voltage and current signals are not correctly paired. Under
TRANSDUCER RATIOS, users can set values for the
Transducer Primary and Transducer Secondary.
Values to account for any voltage or current transformers
can be entered for each input channel. The primary and
secondary values are entered. For example, if the primary
voltage is 2400 volts and the secondary voltage is 120
volts, then those values should be entered. This gives an
effective 20:1 reduction in voltage. When the input voltage
to the DataNode is 120V, the displayed value will be 2400
volts. The Magnitude correction, Phase correction, and
DC offset values are not programmable.
8
Channel 1
Channel 2
Channel 3
Channel 4
Channel 5
Channel 6
Channel 7
Channel 8
8-23
Series 5500 User’s Guide
8
5530/5520 DataNode Setup
15. Advanced tab
Properties
Values
Broadcast Group ID
Enable sending rms trigger
Enable responding to received rms trigger
Enbable sending transient trigger
Enable responding to received transient trigger
Cross Triggering
1234
Broadcast address - if empty, uses local
When configurations differ ...
User Account Password
Admin Account Password
InfoNode Access User ID
Communications
... use the DataNode setup
{use the DataNode setup}
{use the InfoNode setup}
Passwords
*************
*************
admin
************
admin
InfoNode Access Password
Firmware Access User ID
Firmware Access Password
Reset 302 Default Setup
Clear 332 Database and reboot
Do both of the above
Don't save data from next download
Clear last journal ID
click to
display drop
down menu
*************
One Time Operations
One Time Firmware Operations
CAUTION: These operations will copy new firmware to the DataNode
Load IOP (302) firmware
Load ACP (332) firmware
Load both IOP (302) and ACP (332) firmware
Load both to all DataNodes
Parameters under the Advanced tab allow the
administrator or user to set up functions that affect
communications, information access and download
between the InfoNode and DataNode systems.
The 5530/5520 can be configured to issue a UDP (cross
trigger) broadcast message when an RMS variation and/or
transient occurs. The 5530/5520 can also be configured to
listen for such messages and cause an RMS variation or
transient recording to occur regardless of whether or not
its own trigger conditions for that instrument were met.
Under CROSS TRIGGERING, a Broadcast Group ID is
assigned to allow for different groups of cross trigger
senders/recipients.
The broadcast ID number in the InfoNode must match the
broadcast group ID set under the TCP/IP parameter of the
Datanode. The DataNode also uses this ID mechanism for
multiple DataNode cross triggering and is guaranteed only
on an un-routed network. The group ID is sent along with
the broadcast message and only those receivers with the
same group ID will respond to the broadcast if so enabled.
The broadcast address can be specified to send a broadcast
to a directed address other than the local network if
desired. However, results cannot be guaranteed and data
may be lost if the message takes too long to arrive at its
destination.
8-24
Series 5500 User’s Guide
5530/5520 DataNode Setup
Checkboxes are seen opposite the next four items Enable
sending rms trigger, Enable responding to received
rms trigger, Enable sending transient trigger, Enable
responding to received transient trigger. The user
specifies which event types are generated and/or listened
for through these checkboxes.When said parameters are
activated, the system in effect utilizes trigger messages as
trip signals. If Broadcast address is empty, message
broadcast is routed through the local network. The user
specifies a group ID and optionally a broadcast address.
Under COMMUNICATIONS, users are given the option
to return to the default InfoNode or DataNode settings
When configurations differ and communication errors
occur.
Access privileges are determined under PASSWORDS.
The passwords entered in the InfoNode system must
match the ones stored under the Password section of the
Signature System DataNode. Otherwise, access to
information may be denied. The User Account Password
and Admin Account Password refer to two different user
categories. An Admin User can create and add an account
for a new Basic User. Both Admin and Basic users can
assign properties such as their own user name and
password. See page 7-1 User section for more details.
The default InfoNode Access User ID is ‘admin’. The
default InfoNode Access Password is ‘password’. These
parameters allow access to view and change information
in the InfoNode system. The default Firmware Access
User ID is 'admin'. The default Firmware Access
Password is ‘password’. These parameters allow access to
view and change information in the DataNode system. To
change passwords, simply click on the Password value
fields. A confirmation window appears everytime you
click on the password value field. The window asks
whether you want to change and save a new password.
settings, activate the Reset 302 default setup value field.
To clear old data and reboot DataNode, activate the Clear
332 Database and reboot value field. To execute both
procedures at one time, activate Do both of the above.
To save memory space, the administrator or user may
choose to activate Don't save data from next download.
To discard the most recent journal ID entries, activate the
Clear last journal ID value field.
8
Finally, parameters for downloading new or updated
firmware are available under ONE TIME FIRMWARE
OPERATIONS. A firmware is a program or instruction
stored in Flash memory which implements the
communications interface and data acquisition between
the outside world and the instrument.
Based on the parameters available, the administrator or
user can activate value fields to Load IOP firmware or
to Load ACP firmware or to Load both IOP and ACP
firmware. The IOP and ACP firmware are two different
sets of firmware. The IOP communicates directly with the
InfoNode, while the ACP is comprised of the host CPU
and DSP. If the value fields are activated, new firmware
is downloaded on demand from InfoNode to DataNode.
New firmware is downloaded automatically if the boot
ROM finds that the existing firmware in the DataNode is
missing or corrupt. The administrator or user also has the
option to Load Both (IOP and ACP) firmware to all
DataNodes. Download is accomplished using the
standard Internet File Transfer Protocol (FTP). The
DataNode must be connected to the network where the
updates are to be extracted from to ensure a successful
download. Since these one time operations cannot be
undone, observe caution when performing download
firmware procedures.
Parameters are also available for ONE TIME
OPERATIONS on the EPQ DataNode. These one time
procedures include configuring the DataNode to its default
settings and/or clearing memory space by rebooting.
Observe caution in undertaking these procedures since
they cannot be undone. To return to the default DataNode
8-25
Series 5500 User’s Guide
8
5530/5520 DataNode Setup
16. Accumulator Resets tab
Properties
Values
Reset Real Power, DMD, total (Never reset)
Reset Reactive Power, DMD, total (Never reset)
Reset Apparent Power, DMD, total (Never reset)
Reset Peak Current Demand (A) (Never reset)
Demand Resets
Reset Peak Current Demand (B) (Never reset)
Reset Peak Current Demand (C) (Never reset)
Reset Peak Current Demand (N) (Never reset)
Reset Average Peak Current Demand (Never reset)
Reset All Values
Energy Accumulators
Reset Phase Energy (Never reset)
Reset Total Energy (Never reset)
Reset Integrated Reactive Power (Never reset)
Reset Total integrated Reactive Power (Never reset)
Reset Forward fund. freq. WHrs (Never reset)
Reset Reverse fund. freq. WHrs (Never reset)
Reset Forward tot. fund. freq. WHrs (Never reset)
Reset Reverse tot. fund. freq. WHrs (Never reset)
Reset Forward fund. freq. VarHrs (Never reset)
Reset Reverse fund. freq. VarHrs (Never reset)
Reset Forward tot. fund. freq. VarHrs (Never reset)
Reset Reverse tot. fund. freq. VarHrs (Never reset)
Reset Fundamental freq. V A Hours (Never reset)
Reset Total Fund. freq. VA Hours (Never reset)
In connection with electric utility billing practices, the
InfoNode and DataNode system has an interface to reset
demand and energy accumulation readings. The
Accumulator Resets tab allows one to reset the
parameters to defined values, but not to change or
configure new values. The notation 'Never reset'
appears to mean that the parameter values register
original readings and have never been reset at any time.
The moment the reset parameter is activated/enabled,
the notation will change and will reflect the date and
time of last reset.
Under DEMAND RESETS, Real or True Phase power
demand, Reactive power demand, and Apparent power
demand can be reset. See Appendix E Glossary for the
definitions of the various power parameter values. The
system maintains a running maximum known as "peak
demand" on per phase basis and per average demand
current value. It also stores the date and time of each peak
demand. Peak demand is the maximum electrical power
load consumed or produced in a defined period of time.
Under ENERGY ACCUMULATORS, the system
calculates and stores accumulated values for energy (in
kWHr unit), reactive energy (in kVarH unit), and apparent
energy (in kVAH unit). Kilowatt-Hour (kWHr) is the
equivalent energy supplied by a power of 1000 watts for
one hour. Watt is the unit for real power. Kilovar-hour
(kVarH) is equal to 1000 reactive volt-ampere hours. Var is
an abbreviation for volt ampere reactive. It measures the
integral of the reactive power of the circuit into which the
instrument is connected. Var is the unit for reactive power.
Kilovolt-ampere (kVA) is equivalent to 1000 volt-amperes.
VA is the unit for apparent power. Apparent power is the
product of voltage and current of a single-phase circuit in
8-26
Series 5500 User’s Guide
5530/5520 DataNode Setup
which the two reach their peaks at different times. See
Appendix E Glossary for the definitions of the various
power parameter values.
The accumulated energy values include real power factor
(average three-phase) which is mathematically defined as
"demand kW/demand kVA". It also displays integrated and
total integrated reactive power. The system also calculates
and stores apparent energy (VA). Real Power (W) and
Apparent Power (VA) are reset together; you cannot reset
one without resetting the other. Likewise, the Watthour
Meter and Varhour Meter are reset together.
The system uses the fundamental frequency as reference
for calculating energy values in one of two modes:
forward or reverse. In forward mode, the circuit monitor
considers the direction of power flow, allowing the
accumulated energy magnitude to both increase and
decrease. In reverse mode, the circuit monitor
accumulates energy as positive, regardless of the
direction of power flow. In other words, the energy
value increases, even during reverse power flow. The
default accumulation mode is reverse.
8
8-27
Series 5500 User’s Guide
8
5530/5520 DataNode Setup
Summary of EPQ DataNode Setup Parameters and Tabs Where they can be Found
PARAMETERS
Active Power
Active Power Demand
ANSI Transformer Derating Factor
Apparent Power
Apparent Power Demand
Arith. Sum PF
Arithmetic Sum DF
Arithmetic Sum VA
Avg PF @ Peak P Dmd
Avg PF @ Peak Q Dmd
Current Crest Factor
Current THD
Current THD (Rms)
Current TID
Current TID (Rms)
Displacement Power Factor
Frequency
Fund Arithmetic Sum VA
Fund Freq VA Hrs
Fund Vector Sum VA
Fwd Fund Freq varHrs
Fwd Fund. Freq WHrs
Harmonic Power
HRms Voltage
I Imbalance (rms/rms avg)
I Imbalance (S0/S1)
I Imbalance (S2/S1)
IEEE 519 Current TDD
Interharmonic Rms Current
Interharmonic Rms Voltage
IT Product
Negative Sequence Current
Negative Sequence Voltage
Net Current
P Dmd @ Peak Q Dmd
P Dmd @ Peak S Dmd
Peak Active Power Demand
Peak Apparent Power Demand
Peak Demand Current
Peak Reactive Power Demand
PF @ Peak VA Dmd
PF Demand
Positive Sequence Current
Positive Sequence Voltage
Predicted P Dmd
Predicted Q Dmd
Predicted VA Dmd
TAB WHERE FOUND
METER
DEMAND
HARMONICS
METER
DEMAND
ADVANCED METER
ADVANCED METER
ADVANCED METER
DEMAND
DEMAND
HARMONICS
HARMONICS
HARMONICS
HARMONICS
HARMONICS
ADVANCED METER
METER
ADVANCED METER
ADVANCED ENERGY
ADVANCED METER
ADVANCED ENERGY
ADVANCED ENERGY
HARMONICS
HARMONICS
UNBALANCE
UNBALANCE
UNBALANCE
HARMONICS
HARMONICS
HARMONICS
HARMONICS
UNBALANCE
UNBALANCE
ADVANCED METER
DEMAND
DEMAND
DEMAND
DEMAND
DEMAND
DEMAND
DEMAND
DEMAND
UNBALANCE
UNBALANCE
DEMAND
DEMAND
DEMAND
8-28
Series 5500 User’s Guide
5530/5520 DataNode Setup
Summary of EPQ DataNode Setup Parameters and Tabs where they can be Found
PARAMETERS
Pst
Plt
Plt Sliding
Q Dmd @ Peak P Dmd
Q Dmd @ Peak VA Dmd
Reactive Power Demand
Reactive Power Demand
Residual Current
Rms Current
Rms Current Demand
Rms Current Individual Harmonics
Rms Harmonic Current
Rms Voltage
Rms Voltage Individual Harmonics
Rvs Fund Freq varHrs
Rvs. Fund. Freq. WHrs
Total Fund Freq Q
Transformer K Factor
True Power Factor
V Imbalance (rms/rms avg)
V Imbalance (S0/S1)
V Imbalance (S2/S1)
V RMS Harmonic
V/I Angle
VA Dmd @ Peak Q Dmd
VA Dmd @ Peak P Dmd
Var Hours
Vector Sum DF
Vector Sum PF
Vector Sum VA
Voltage Crest Factor
Voltage THD
Voltage THD (Rms)
Voltage TID
Voltage TID (Rms)
Voltage TIF
Voltage TIF (Rms)
Watt Hours
Zero Sequence Current
Zero Sequence Voltage
8
TAB WHERE FOUND
FLICKER
FLICKER
FLICKER
DEMAND
DEMAND
METER
DEMAND
ADVANCED METER
RMS Variation, TRANSIENTS, METER
DEMAND
ADVANCED HARMONICS
HARMONICS
RMS Variation, TRANSIENTS, METER
ADVANCED HARMONICS
ADVANCED ENERGY
ADVANCED ENERGY
ADVANCED ENERGY
HARMONICS
METER, ADVANCED METER
UNBALANCE
UNBALANCE
UNBALANCE
HARMONICS
METER
DEMAND
DEMAND
REVENUE
ADVANCED METER
ADVANCED METER
ADVANCED METER
HARMONICS
HARMONICS
HARMONICS
HARMONICS
HARMONICS
HARMONICS
HARMONICS
REVENUE
UNBALANCE
UNBALANCE
8-29
Series 5500 User’s Guide
8
5530/5520 DataNode Setup
This page intentionally left blank.
8-30
Series 5500 User’s Guide
5540 DataNode Setup
5540 Energy Management (EM) DataNode Setup
Specifications for 5540 EM DataNode
Refer to the 5540 DataNode User's Guide for more
detailed information about connections and setups.
Measurements
23 parameters including true RMS voltage and current,
kVA, kW, PF, frequency, kVAR, kWh, kVAh, kVARh,
current demand, kVA demand, kW demand
9
Voltages
3-phase L-L or L-N (660 Vrms L-L, 500 Vrms L-N FS),
45-65 Hz fundamental, accuracy +0.3% RDG (FS for
10%-120% FS)
Currents
3-phase (5 Arms or 1Arms FS), accuracy +0.3% RDG
(FS for 2%-120% FS)
A 5540 Series DataNode
Recommended Setup before connecting to an InfoNode
The 5540 DataNode must be programmed from its front
panel to properly communicate with the InfoNode. To
enter the program mode, see the DataNode 5540 User's
Guide. The communications should be set as follows:
8 BIT EVEN
9600 baud
XON/XOFF
BINARY RS232
ADDRESS x (where x matches the value setup in
the InfoNode for that 5540)
If using RS232 or RS485, the cables between the
InfoNode and 5540 must go though a null modem; that is,
transmit and receive must be interchanged, as well as
interchanging the positive (+) and negative (-) lines for
both transmit and receive.
Instrument Power
96-138 Vac / 185-250 Vac; 50-60 Hz, 10 Va
Enclosure Environments
ABS panel mount, cutout 92x92mm (3.375” square);
screw terminal connections for voltage and current;
operating -20oC to +60oC, 0-95% RH non-condensing
Front Panel
GE Lexan film; daylight-visible display, sealed tactile
feedback controls
Communications
RS-485 to InfoNode, InfoNode supports up to 32
DataNodes (16 on each of two InfoNode COM ports),
InfoNode access through Internet, Ethernet, Intranet, or
dial-up telephone line
Additional Features
External synchronization via dry contacts; supports voltage and current multipliers, user-selected wiring configuration, communications address, kW demand period, and
Ampere demand period
9-1
Series 5500 User’s Guide
9
5540 DataNode Setup
Programming Standard Tabs
LEGEND (Please note the following conventions used in the screen displays):
Items in italics are not programmable, but included for information purpose to the user.
Items in bold are examples of what can be entered.
Selections available in drop down menu are enclosed in brackets { xxxx }.
Caution: Dranetz-BMI has already set default values for the various parameters in each DataNode. The default values
have been tested to result in optimal system performance. Users are advised not to change the default value settings
unless there are applications which require advanced setups.
1. General tab
Properties
Name
Description
Serial Number
Version
Values
Identification Information
Edison 5540
Unknown
65535
Status Information
;
Active
Get settings from DataNode on activation
Last contact at
11/05/2002 11:33:04
Health
System health is normal
General Setup contains DataNode Identification and Status information. Users can enter a 30 character alphanumeric
name for the DataNode, detailed DataNode description (such as location of DataNode), and enable checkboxes to
activate DataNode connection settings.
General tab parameters of the 5540 DataNode function similarly as that of the 5530/5520 DataNode. Refer to page 8-2
for the detailed description of the General tab parameters displayed above.
9-2
Series 5500 User’s Guide
5540 DataNode Setup
9
2. Basic tab
Properties
Address
Polling Interval (sec)
Serial Port
Baud Rate
Parity
Protocol
Display Thresholds as:
Base Voltage
Wiring Configuration
PT Ratio
CT Primary
Phase A RMS Voltage (L-L or L-G)
Phase B RMS Voltage (L-L or L-G)
Phase C RMS Voltage (L-L or L-G)
Phase A RMS Current (Amps)
Phase B RMS Current (Amps)
Phase C RMS Current (Amps)
Phase A Active Power (kW)
Phase B Active Power (kW)
Phase C Active Power (kW)
Total Active Power (kW)
Phase A Reactive Power (kvar)
Phase B Reactive Power (kvar)
Phase C Reactive Power (kvar)
Total Reactive Power (kvar)
Phase A Apparent Power (kva)
Phase B Apparent Power (kva)
Phase C Apparent Power (kva)
Total Apparent Power (kva)
Values
Communications
1
300
COM1
{COM1, COM2}
9600
{9600, 4800, 2400, 1200}
Even
{Even, None}
MODBUS
{MODBUS, ASCII}
Display
Percent
{Volts, Per Unit, Percent}
208.0
Inputs
4-wire, L-N
{3-wire, open delta}
{3-wire, direct}
{4-wire, L-L}
1.0000
20
Registers
;
;
;
;
;
Basic tab screen display continued next page
9-3
Series 5500 User’s Guide
9
5540 DataNode Setup
... continued
Phase A Power Factor (PU)
Phase B Power Factor (PU)
Phase B Power Factor (PU)
Total Power Factor (PU)
Frequency (Hz)
Total Positive Energy Flow (kWh)
Total Negative Energy Flow (kWh)
Total Positive Integrated Reactive Power Flow
(kvarh)
Total Negative Integrated Reactive Power
Flow (kvarh)
Total Integrated Apparent Power Flow (kvah)
kVA Dermand
Basic Setup contains data on Communications, Display,
Inputs and Registers.
COMMUNICATIONS parameters include the following:
•Address: must be a unique address between 1 and 32 for
each DataNode
•Polling Interval (sec): typically 300 seconds
•Serial Port: either COM1 or COM2 of the InfoNode
•Baud Rate: typically 9600 baud
•Parity: a method of checking the accuracy of binary
numbers where an extra bit, called parity bit, is added to a
number; if Even parity is used, the sum of all 1’s in the
number and its corresponding parity bit is alway seven; if
None (odd parity) is used, the sum of the 1’s and the parity bit is always odd
•Protocol: mechanism for information exchange between
InfoNode and DataNode; either MODBUS or ASCII
DISPLAY parameters include the following:
•Display Thresholds as: displays parameters in either
Volts, Percent, or PU (per unit)
•Base Voltage: needed if using percent or per unit
•Base Power: needed if using percent or per unit
REGISTERS parameters include the following:
•Registers: check boxes to select those to save for
trending
•RMS Voltage and Current
•Active Power in kilowatts, Reactive Power in
kVARs, Apparent Power in kVA, Power Factor
•Frequency in Hz
•Total Energy Flow: three phase sum of the real
or active energy flowing from the source to the
load (positive) and from the load to the source
(negative) in kWhr
•Total Reactive Integrated Power Flow: three
phase sum of the reactive energy flowing from
the source to the load (positive) and from the
load to the source (negative) in kVARhr
•Total Apparent Integrated Power Flow: three
phase sum of the apparent energy flowing in
kVAhr
•KW Demand: average real or active power over
the demand interval
•KVA Demand: average apparent power over
the demand interval
INPUTS parameters include the following:
•Wiring Configuration: set to either 3 wire open delta, 4
wire Line-to-Neutral, 3 wire direct, or 4 wire L-L
•PT Ratio: if the voltage inputs are connected to an external PT
•CT Primary: the maximum nominal current on the primary side of the CT; the secondary ratio is determined by
the version of the instrument in use
9-4
Series 5500 User’s Guide
5540 DataNode Setup
9
3. Advanced tab
Properties
Reset Accumulators on Next Connect
Demand Period (min)
15
Average Buffer Size
8 entries
;
Front Panel Reset Enabled
Phase A RMS Voltage (L-L or L-G)
;
Enabled
High-High Threshold
120.000
High Threshold
110.000
Low Threshold
90.000
Low-Low Threshold
80.000
Phase B RMS Voltage (L-L or L-G)
;
Enabled
High-High Threshold
120.000
High Threshold
110.000
Low Threshold
90.000
Low-Low Threshold
80.000
Phase C RMS Voltage (L-L or L-G)
;
Enabled
High-High Threshold
120.000
High Threshold
110.000
Low Threshold
90.000
Low-Low Threshold
80.000
Phase A RMS Current (Amps)
;
Enabled
High-High Threshold
24.000
High Threshold
20.000
Low Threshold
5.000
Low-Low Threshold
0.000
Phase B RMS Current (Amps)
;
Enabled
High-High Threshold
High Threshold
Low Threshold
Low-Low Threshold
Enabled
High-High Threshold
High Threshold
Low Threshold
Low-Low Threshold
Values
24.000
20.000
5.000
0.000
Phase C RMS Current (Amps)
;
24.000
20.000
5.000
0.000
Advanced tab screen display continued next page
9-5
Series 5500 User’s Guide
9
5540 DataNode Setup
... continued
Enabled
High-High Threshold
High Threshold
Low Threshold
Low-Low Threshold
Enabled
High-High Threshold
High Threshold
Low Threshold
Low-Low Threshold
Enabled
High-High Threshold
High Threshold
Low Threshold
Low-Low Threshold
Enabled
High-High Threshold
High Threshold
Low Threshold
Low-Low Threshold
Enabled
High-High Threshold
High Threshold
Low Threshold
Low-Low Threshold
Enabled
High-High Threshold
High Threshold
Low Threshold
Low-Low Threshold
Enabled
High-High Threshold
High Threshold
Low Threshold
Low-Low Threshold
Phase A Active Power (kW)
5750.000
4420.000
985.000
0.000
Phase B Active Power (kW)
5750.000
4420.000
985.000
0.000
Phase C Active Power (kW)
5750.000
4420.000
985.000
0.000
Total Active Power (kW)
17250.000
13260.000
2955.000
0.000
Phase A Reactive Power (kvar)
0.000
0.000
0.000
0.000
Phase B Reactive Power (kvar)
0.000
0.000
0.000
0.000
Phase C Reactive Power (kvar)
0.000
0.000
0.000
0.000
Advanced tab screen display continued next page
9-6
Series 5500 User’s Guide
5540 DataNode Setup
9
... continued
Enabled
High-High Threshold
High Threshold
Low Threshold
Low-Low Threshold
Enabled
High-High Threshold
High Threshold
Low Threshold
Low-Low Threshold
Enabled
High-High Threshold
High Threshold
Low Threshold
Low-Low Threshold
Enabled
High-High Threshold
High Threshold
Low Threshold
Low-Low Threshold
Enabled
High-High Threshold
High Threshold
Low Threshold
Low-Low Threshold
Enabled
Low Threshold
Low-Low Threshold
Enabled
Low Threshold
Low-Low Threshold
Enabled
Low Threshold
Low-Low Threshold
Total Reactive Power (kvar)
0.000
0.000
0.000
0.000
Phase A Apparent Power (kva)
5750.000
4420.000
985.000
0.000
Phase B Apparent Power (kva)
5750.000
4420.000
985.000
0.000
Phase C Apparent Power (kva)
5750.000
4420.000
985.000
0.000
Total Apparent Power (kva)
17250.000
13260.000
2955.000
0.000
Phase A Power Factor (PU)
0.000
0.000
Phase B Power Factor (PU)
0.000
0.000
Phase C Power Factor (PU)
0.000
0.000
Advanced tab screen display continued next page
Series 5500 User’s Guide
9-7
9
5540 DataNode Setup
... continued
Enabled
Low Threshold
Low-Low Threshold
Enabled
High-High Threshold
High Threshold
Low Threshold
Low-Low Threshold
Total Power Factor (PU)
0.000
0.000
Frequency (Hz)
0.000
0.000
0.000
0.000
Total Positive Energy Flow (kWh)
Enabled
High-High Threshold
0.000
High Threshold
0.000
Total Negative Energy Flow (kWh)
Enabled
Low Threshold
0.000
Low-Low Threshold
0.000
Total Positive Integrated Reactive Power Flow (kvarh)
Enabled
High-High Threshold
0.000
High Threshold
0.000
Total Negative Integrated Reactive Power Flow (kvarh)
Enabled
Low Threshold
0.000
Low-Low Threshold
0.000
Total Integrated Apparent Power Flow (kvah)
Enabled
High-High Threshold
High Threshold
Enabled
High-High Threshold
High Threshold
0.000
0.000
kVA Demand
17250.000
13260.000
Advanced Setup provides you with the ability to set limits
for triggering of various parameters, as well as to setup
other functions, such as demand interval.
•Demand Period: in minutes, typically 15
•Average Buffer Size: typically 8
•Front Panel Reset Enabled: check box to set
•Limits for each parameter, typically HI-HI, HI, LO,
LO-LO: Some parameters will only have the first two or
the last two, where the numbers could only be positive or
negative, respectively
9-8
Series 5500 User’s Guide
5560 QOS
Introduction
The 5560 QOS (Quality of Supply) DataNode is designed
to monitor and report quality of supply compliance as
specified by European Standard EN50160. The 5560
DataNode provides the full set of data required to verify
compliance with EN50160, while maintaining the power
quality diagnostic capabilities expected from DranetzBMI.
Scope of EN50160 Standard*
It is important to note that EN50160 is defined for the
electricity supplied at the supply terminals, and does not
deal with the supply system or the consumer’s installation
or equipment itself.
As the standard deals with the voltage characteristics in
public distribution networks, other aspects essential for the
supply quality (for instance short circuit power) are not
treated in this standard. The standard is applicable only
under normal operating conditions of the supply system.
This includes also the correct operation of protection
devices in the case of a fault in the network (blowing of a
fuse, operation of a circuit-breaker, etc.), the operation of
loads agreed between customer and supplier, and changes
in the network.
The standard lists several specific examples of exceptional
conditions, out of supplier's control, that can cause one or
more of the characteristics to go beyond the values given.
These conditions include exceptional weather conditions
and other natural disasters, third party interference, acts by
public authorities, industrial action, force majeure, and
power shortages resulting from external events. Under
such conditions the EN50160 does not apply.
EN50160 is not an EMC standard. It does not give compatibility levels or emission limits. Moreover the standard
does not have the function of specifying the requirements
for electrical equipment. Its sole function is to give values
for the main voltage characteristics of electricity supplied
by Low Voltage (LV) and Medium Voltage (MV) public
networks. That means EN50160 is a product standard
giving the voltage characteristics which can be expected at
the supply terminals. This standard does not describe the
average situation in the public supply networks but the
maximum values or variations of the voltage characteristics under normal operating conditions which can be
expected by the customer at any place of the network.
10
5560 DataNode QOS Functional
Components
The QOS compliance monitoring functionality of the
5560 DataNode is optimized to ensure error-free setup
and reporting for EN50160 applications. Selections are
provided to allow a user to configure the system to collect either a super-set or sub-set of the measurements
required for EN50160 monitoring. Statistical data is calculated on the required 12 parameters specified in
EN50160 over the (1 week) interval to produce a
PASS/FAIL decision of compliance. Statistical and
trending visualizations show what the values of each of
the parameters were over the interval, and at what time
did they approach or exceed limits.
As with other Dranetz-BMI DataNodes, the 5560
DataNode is set up and viewed through a web browser,
with no software to learn and install.
The QOS functional components built into the 5560
DataNode are incorporated into the various tab pages of
the InfoNode system. The user interface employed by
the 5560 DataNode is identical to that of other
DataNodes, except that additional monitoring and setup
protocols were installed to meet the data acquisition
requirements of the QOS compliance standards.
This Chapter describes the following QOS functional
components built into the 5560 DataNode.
· Specifications for 5560 DataNode
· Home Page Reporting of QOS Compliance
· QOS Status Views
> QOS Status Query
> QOS Status Summary
> Compliance Statistical Graph
> Smart Views
· QOS Compliance Reports
> Smart Reports
> Standard Reports
· Real-time Display of QOS Data
· 5560 DataNode System Setup
>EN50160 General Setup tab
>5560 DataNode Setup
References to the sections above are advertently made in
the other Chapters of this manual where they relate.
*Based on Draft Guide to the Application EN50160, CENELEC
Report, CLC/BTTF 68-6(SG)1 Rev., January 1999.
10-1
Series 5500 User’s Guide
10
5560 QOS
5560 DataNode Specifications
Configurations: External CT and voltage pods; 1A/5A
current with 5x overcurrent.
Voltages: 4 channels, accuracy +/- 0.1% of reading,
+/- 0.1% FS.
Currents: 4 channels, accuracy +/- 0.1% of reading,
+/- 0.1% FS.
Instrument Power: 90-250Vac, 50/60Hz; optional 105150Vdc; built-in UPS with 4-year battery life.
Enclosure/Environments: Rack, panel, desktop, NEMA
4x options; 0-60 deg C standard.
Communications: 10BaseT Ethernet to InfoNode.
InfoNode access through Internet, Intranet, dial-up or
wireless telephone line.
Additional Features: Remote firmware update; automatic
report writer software option.
Certifications and design standards: CE, ISO9001, EMC
Directive (89/366/EEC), IEC 61000-4-7, IEC 61000-415, EN61010-1 (1993), EN61010-1/A2.
NOTE: The 5560 DataNode is actually a 5520/5530 EPQ
DataNode with different firmware. EPQ DataNodes can
be upgraded to 5560. Please contact Dranetz-BMI factory
for details.
Measurements:
Power Frequency - Mean value based on time between
zero crossings of voltage of Phase A calculated over 10
second window.
Magnitude of the supply voltage - RMS calculated over 1
cycle with ½ cycle steps.
Supply voltage variations - Ten minute mean of RMS
calculated over 1 cycle with ½ cycle steps.
Rapid voltage changes (Flicker) - As per EN61000-4-15.
Supply voltage dips - 1% to 90% of Un. Depth of RMS
calculated over 1 cycle with ½ cycle steps, along with
10msec to 60 seconds in duration, reported in tabular
form.
Short interruptions of the supply voltage - <1% of Un on
½ cycle RMS with duration less or equal to 3 min. RMS
calculated over 1 cycle with ½ cycle steps.
Temporary power - Frequency overvoltage between live
conductors and earth - 110% of Un or Uc. RMS
calculated over 1 cycle with ½ cycle steps
Transient overvoltages between live conductors and earth
- Captured at 128 samples/cycle along with crest and
waveshape triggers.
Supply voltage unbalance - Negative phase sequence
divided by positive phase sequence components.
Harmonic voltage - As per EN61000-4-7.
Interharmonic voltage - As per EN61000-4-7.
Mains signalling voltage on the supply voltage - User
selectable 5 frequencies below 3KHz.
Parameters measured include kVA, KW, True PF, DPF,
KVAR, kWhr, kVAR and other power related parameters.
10-2
Series 5500 User’s Guide
5560 QOS
10
Home Page Reporting of QOS Compliance
The Quality of Supply compliance status for the latest complete evaluation period of each DataNode is reported via the
InfoNode Home page. Information about QOS compliance appears in two parts of the Home page: the DataNode status
paragraph and the DataNode status table.
NOTE: Other types of DataNode (EPQ, 5540, etc.) may exist in the system. QOS Status may not apply to the other
DataNodes.
Compliance Message on DataNode Status Paragraph
A report on QOS compliance appears in the DataNode status paragraph. If the 5560 QOS is compliant, the following
message is shown “There is one DataNode for monitoring Quality of Supply compliance. This DataNode is reporting
compliance." If the QOS DataNode is non-compliant or have undetermined compliance, further messages appear under
the DataNode status table described next. The non-compliance message is hyperlinked to the Quality of Supply
Compliance section in the DataNode status table.
Compliance Message on DataNode Status Table
An additional section featuring the non-compliance status of QOS DataNodes appear in the DataNode status table. The
table indicates which DataNodes are not in compliance and/or have undetermined compliance status for the specified
interval. DataNodes that are non-compliant are hyperlinked to the QOS Status view.
Compliance
message on
DataNode
status
paragraph
Compliance
message on
DataNode
status table
5560 DataNode Home Page
10-3
Series 5500 User’s Guide
10
5560 QOS
QOS Status View
QOS Status Query
A new element called QOS Status has been added in the Views page. QOS Status will appear in InfoNode systems that
have QOS data acquisition modules (5560 DataNode) in it. Click on the QOS Status to display the standard query selection shown below. Users have the option to view QOS status data for single or multiple DataNode(s). Users can also
select the time range or specify a time period to view data from. Only data for 5560 DataNodes will be displayed in the
set once the Display or Display in New Window button is clicked.
Once selections have been made, click on either Display or Display in New Window. The QOS Status Summary table
shown next page is displayed.
QOS Status Query Screen
10-4
Series 5500 User’s Guide
5560 QOS
10
QOS Status Summary
The QOS Status Summary table lists the monitoring periods (weeks) that fall within the selected date range for the
selected DataNode(s), as well as how many RMS and Transient Events occurred during the monitoring periods. The
standard monitoring period is one complete week, usually beginning Sunday 00:00. Any Time/Date Query that specifies
a range that would include part of a monitoring period (less than one week) will have that particular Evaluation Status
marked as Incomplete and the Compliance marked as Undetermined. For completed monitoring periods, Compliance status may either be PASS or FAIL. A PASS or FAIL status is hyperlinked to the Compliance Statistical Bar Chart. See text
below for the description of the items contained in the QOS Status Summary table.
PASS/FAIL status is
hyperlinked to the
Compliance Statistical
Graph (see page 10-6)
QOS Status Summary Table
Evaluation Status: The evaluation status is either
Complete (full week) or Incomplete (less than a week).
An evaluation status is Incomplete under the following
scenarios.
· It is the current evaluation period and it has simply not
completed.
· It is a previous evaluation period but not enough data
samples were included in the statistical analysis. This may
be due to the following reasons: data was not collected or
too many samples were tagged as unusable due to RMS
variations or some other EN50160 criteria.
NOTE: The criteria defining completeness of an evaluation period is described on page 10-21 EN50160 General
Setup tab.
Evaluation Period: This column displays the date and time
of the beginning of the evaluation period. Each evaluation
period is independent of each other.
Compliance: The EN50160 Answer Module determines
compliance. For completed periods, Compliance displays
PASS (Green) or FAIL (Red). For incomplete periods,
Compliance displays Undetermined (Black). A PASS or
FAIL compliance status is hyperlinked to the Compliance
Statistical Bar Chart featuring the 7 parameters required
for determining compliance. See sample bar chart on
page 10-6.
RMS Variation Event Count: The RMS variation event
count is a hyperlink to EN50160 DISDIP table for RMS
variation events. See page 10-15 for the EN50160 DISDIP Table and 3D Bar Chart for RMS Variations
Transient Event Count: The Transient event count is a
hyperlink to EN50160 Transient DISDIP table for
Transient Events and Transient Overvoltages. See page
10-15.
Monitor: This column displays the name of the DataNode
to which the evaluation period belongs.
10-5
Series 5500 User’s Guide
10
5560 QOS
Compliance Statistical Graph
The Compliance Statistical Bar Chart shown below displays the seven parameters that are required for determining compliance. The bar chart indicates the percentage of the intervals passing the specified compliance criteria. The color of the
bar indicates the compliance status. A green bar indicates that the parameter is within compliance. A red bar indicates
that the parameter does not comply with EN50160 Standard.
The graph atuoscales to enable maximum viewing. The minimum value on the left of the horizontal axis will be the 10%
multiple that is less than the lowest compliance level for the seven parameters displayed. If the value is less than 1%, the
bar will graph 1% so that is visible. See text below for the description of each parameter. For QOS compliance limits of
each parameter, refer to the Compliance Limits in QOS Setups and Reports table on page 10-8.
Compliance Statistical Bar Chart
Power Frequency: In case of fault operation, parts of an
interconnected system may become isolated. Compliance
will be assessed over an observation period of one week,
by a statistical analysis carried out over the sequence of
10 seconds measurements. Frequency is represented by a
single value and a single bar. The bar is a hyperlink to the
Power Frequency Graph. See page 10-17.
Supply Voltage Variations: Under normal operating conditions, load changes cause variations of the 10 minute
average supply voltage. Generally this is compensated by
automatic voltage regulation within a period of a few tens
of seconds. Supply Voltage Variations display a cluster of
bars, one for each phase. The color of each bar indicates
the compliance status for its phase. A green bar indicates
that the parameter is within compliance. A red bar indicates that the parameter does not comply with EN50160.
Rapid Voltage Changes (Flicker): Typical rapid voltage
changes do not exceed a magnitude of + 5% or - 5% of
the nominal or declared voltage. This limitation is possible because connection of loads capable of creating rapid
voltage changes is usually subjected to regulations. But
under certain conditions, higher values up to 10% may
occasionally occur. These higher values can occur for
instance in areas where higher power motor equipment
(blowers, pumps, compressors, etc.) is used. Flickers display a cluster of bars, one for each phase. The color of
each bar indicates the compliance status for its phase. A
green bar indicates that the parameter is within compliance. A red bar indicates that the parameter does not comply with EN50160.
10-6
Series 5500 User’s Guide
5560 QOS
Supply Voltage Unbalance: The unbalance of a three
phase supply voltage consists of a loss of symmetry of the
phase voltage vectors (magnitude and/or angle), created
mainly by unbalanced load. Compliance is verified when
95% of the sequence of valid 10 minute values are within
the specified tolerance of normally 2% (in single
phase/two phase supplies 3%). Supply Voltage Unbalance
is represented by a single value and a single bar. The color
of the bar indicates the compliance status. A green bar
indicates that the parameter is within compliance. A red
bar indicates that the parameter does not comply with
EN50160.
Harmonic Voltage: Harmonics display a cluster of bars,
one for each phase. The color of each bar indicates the
compliance status that is calculated by ‘anding’ the statuses of Total Harmonic Distortion (THD) and each
Harmonic 2 thru 25. The bars for Harmonic Voltage all
link to the same graph. See page 10-16.
With regard to the Harmonic bars (see graph on page
10-6), if 3 bars all go to 100% but one phase is red, this
indicates that the THD is in compliance but one or more
of the individual harmonic components is not in
compliance. Clicking on the bars will show harmonic
component detail.
10
Harmonic values are specified only up to order 25
(EN50160 limit), for the practical reason that for higher
orders the values are generally so small as to be impractical to measure. Another reason is because of the difficulty of giving values which would be relevant to all
networks.
Interharmonic Voltage: Interharmonics display a cluster
of bars, one for each phase. The color of each bar indicates the compliance status that is calculated by adding
the statuses of Total Interharmonic Distortion (TID) and
each Interharmonic 2 thru 25. The bars for Interharmonic
Voltage all link to the same graph. See page 10-16.
Mains Signalling: With regard to signal transmission
over the public supply network it is necessary to distinguish between ripple control systems (frequency range
from 100 Hz to 3 kHz) and mains communication
systems (frequency range 3 kHz to 148,5 kHz).
Mains Signalling display a cluster of bars, one for each
phase. The color of each bar indicates the compliance
status that is calculated by adding the statuses of each of
the defined frequencies (a maximum of five) for its
phase. A green bar indicates that the parameter is within
compliance. A red bar indicates that the parameter does
not comply with EN50160.
Many instruments used for harmonic measurements of
power supply systems express their output with reference
to the fundamental component of the voltage, especially
those indicating the THD Factor.
Harmonic Compliance Limit Values
Harmonic Number
DC
2
3
4
5
6 thru 24
7
9
11
13
15
17
19
21
23
25
Limit
2%
5%
1%
6%
0.5%
5%
1.5%
3.5%
3%
0.5%
2%
1.5%
0.5%
1.5%
1.5%
The general approach of EN50160 is to express all
voltage characteristics by reference to the nominal
voltage or declared voltage, as appropriate. The
following are the Harmonic Compliance Limit values
in relation to the nominal voltage.
10-7
Series 5500 User’s Guide
10
5560 QOS
Compliance Limits in QOS Setup and Reports
Low-Voltaqe Supply nominal voltage Un, upper limit 1Kv
Medium-Voltaqe Supply Characteristics - declared voltage Uc, range 1kV to 35kV
Category
Power frequency with synchronous
connection to an interconnected system
Limits for QOS Compliance to Pass
Mean value over 10 seconds
± 1% during 95% of a week
+4% / -6% during 100% of a week
Power frequency with no synchronous
connection to an interconnected system
Mean value over 10 seconds
± 2% during 95 % of a week
± 15% during 100% of a week
Magnitude of the supply voltage
(In low voltage systems, declared and
nominal voltage are equal)
Supply voltage variations
(Under normal operating conditions,
excluding situations arising from faults
or voltage interruptions)
Rapid voltage changes
Mean rms over 10 minutes
± 10% of Un or Uc during 95% of one week
+ 10% - 15% of Un during 100% of one week
Mean rms over 10 minutes
± 10% of Un or Uc during 95% of one week
+ 10% - 15% of Un during 100% of one week
Plt < 1 for 95 % of the time
Also 5% normal, 10% infrequent for LV, 4 & 6 for MV
Supply voltage dips
No criteria specified, just reported in DISDIP table
Short interruptions of the supply voltage
<1 second for 70 % of the short interruptions
Temporary power-frequency
overvoltage between live conductors
and earth
1.5KV for LV
170% for solidly or impedance earth, 200%
(unearthed of resonate earth)
Transient overvoltages between live
conductors and earth
Short duration surges: < 1 µs
Medium duration surges: > 1 to < 100 µs
Long duration surges: > 100 µs
Supply voltage unbalance
(Under normal operating conditions)
10 minute mean rms values of the negative phase
sequence component / positive phase sequence
component
<2 % during 95 % each period of one week
Harmonic voltage
(Under normal operating conditions)
10 minute mean rms values
th
Individual harmonic voltage up to 25
shall be less
than or equal to the value of Un given under
Harmonic Compliance Limits (on page 10-7) during
95% of one week
<8% THD (THD up to the 40) less than or equal
to 8
Interharmonic voltage
No criteria specified so use same as Harmonics
th
Individual interharmonic voltage up to 24-25
shall be
less than or equal to the value of Un given under
Harmonic Compliance Limits (on page 10-7) during
95% of one week
<8% THD (THD up to the 39/40)
Mains signalling voltage on the supply
voltage
3 second mean of signal voltages compared against
the Meister curve
10-8
Series 5500 User’s Guide
5560 QOS
10
Smart Views
Smart Views are similar to Reports of the same name. While Reports are used to summarize data, Smart Views are typically used to zoom in on data, fix data properties, and add/change channels for data trending (see page 10-10).
Smart Trend
Smart Trend displays timeline types of graph of a large range of parameters, based on the type of DataNode and which
parameters were saved for trending. After using the standard query to select the DataNodes and time/date range, a display of all possible parameters that can be trended is shown. Clicking a green check mark will trend that parameter for
the selected phase and will also show a histogram of the different values with a cumulative probability line. Red X marks
indicate that the particular parameter is not available for trending. In the sample screens below, a 5560 DataNode is
selected for display under the standard query selection. Clicking on the Display or Display in New Window will show
the list of parameters available for trending as the bottom screen shows.
Smart Trends Query Screen
Click the green check mark to
trend the parameter for the
selected DataNode. See page
10-10. (Screen capture shows
only a partial list of parameters)
Series 5500 User’s Guide
Trend Parameters for 5560 DataNode
10-9
10
5560 QOS
Timeline Graphs for Smart Trends
As discussed in the previous page, clicking on a green check mark will trend the parameter for the selected phase and
will also show a histogram of the different values with a cumulative probability line. Sample display screens below show
timeline graphs for Long Term Flicker (Pst) and Short Term Flicker (Plt) quantities. Plt Slide is also available for trending. See page 10-41 for the list of other Flicker parameters available for trending. Smart trends which are linked from the
EN50160 Status View display an item for 95% CPF in the data block.
Right-click to view menu options for
other parameters. For example, to view
data plots of other channels, select
Channels and follow instructions on the
Channel Selection dialog box below.
Timeline Graph with data trend for Long Term Flicker
Timeline Graph with additional data trend for Short Term Flicker
10-10
Series 5500 User’s Guide
5560 QOS
10
QOS Compliance Reports
Smart Reports
QOS Compliance allows the user to look at all EN50160 compliance information for all 5560 DataNodes. Click on QOS
Compliance to display the standard query selection shown below. Users have the option to view compliance reports for
single or multiple DataNode(s). Users can also select the time range or specify a time period to view data from. Only
data for 5560 DataNodes will be displayed in the result set once the Display or Display in New Window button is
clicked.
Once selections have been made, click on either Display or Display in New Window. The QOS Compliance table shown
next page is displayed.
QOS Compliance Query Screen
10-11
Series 5500 User’s Guide
10
5560 QOS
QOS Compliance Summary Table and Table of Contents
The QOS Compliance table shown below displays the 5560 DataNodes and time intervals specified in the QOS
Compliance Query screen. A check sign indicates the availability of a report for the DataNode in the specified interval.
The check sign is color coded: green means the DataNode is compliant during the specified interval; red means the
DataNode is non-compliant during the specified interval; gray means undetermined since evaluation status is still incomplete. The ‘X’ sign indicates the inavailability of a compliance report (the interval specified in the query screen is not
available for the DataNode device). Select and click on a check sign to produce the desired QOS Compliance Summary
Report. The report is summarily presented in Table of Contents format, wherein content data appear in hyperlinks. See
sample QOS Compliance Table of Contents at the bottom of this page.
QOS Compliance Summary Table
See page 10-13
10-14
10-15
10-16
10-16
10-17
10-18
QOS Compliance Table of Contents
10-12
Series 5500 User’s Guide
5560 QOS
10
QOS Compliance Reports
The compliance reports listed under the Table of Contents are for a single 5560 DataNode and appear as hyperlinks.
Click on the hyperlink to view the report in detail. Each compliance report, graph and statistical data is described below.
Note that these reports are identical to data that are accessible from the Views tab, except that Reports does not produce
data in hyperlinks (e.g. user will not be able to click on a bar as if it is a link).
1. Compliance Summary
The QOS Status Summary table lists the evaluation periods that fall within the selected date range of a single DataNode.
For completed periods (weeks), Compliance status may either be PASS or FAIL. For incomplete periods (less than a
week), Compliance status is Undetermined. Unlike the QOS Status Summary (see page 10-5) accessible from Views,
Compliance information accessed from Reports (i.e. PASS or FAIL status) is not hyperlinked. Refer to page 10-5 for the
description of each column heading found in the Compliance Summary table below.
10-13
Series 5500 User’s Guide
10
5560 QOS
2. Compliance Graph
The Compliance Graph displays the seven parameters that are required for determining compliance. The bars indicate the
percentage of the intervals passing the specified compliance criteria. A green bar indicates that the parameter is within
compliance. A red bar indicates that the parameter does not comply with EN50160 Standard. Unlike the Compliance
Statistical Bar Chart (see page 10-6) accessible from Views, users cannot click on the bar as if it is a link. Refer to page
10-6 for the description of each parameter contained in the graph below.
10-14
Series 5500 User’s Guide
5560 QOS
10
3. Event Statistics
The EN50160 DISDIP table is based upon the statistics calculated by the 5560 Answer Module. It includes the Table for
Transient Overvoltages and the EN50160 DISDIP 3D Graph. UNIPEDE DISDIP data is collected and saved on a weekly
basis with the counts reset as the final save occurs. If additional data is detected for an evaluation period after that period
has been saved, that interval data is retrieved and updated. The DISDIP sag and swells table is shown below. All data
required for this table is collected and saved. The observations containing the weekly data are marked for one-year
expiration allowing the data to be retained in the InfoNode for at least one year.
EN50160 DISDIP Table for Transient Events
Table for Transient Overvoltages
EN50160 3D Graph for RMS Variations
10-15
Series 5500 User’s Guide
10
5560 QOS
4. Harmonics Graph
The Harmonics Graph displays the status of each of the individual harmonics and THD for each phase. The bar chart
indicates the percentage of the intervals passing the specified compliance. Odd harmonic numbers are marked on vertical
axis. Even harmonic numbers are located in between. A sample harmonics plot is shown below.
5. Interharmonics Graph
The Interharmonics Graph displays the status of each of the individual interharmonics and TID for each phase. The bar
chart indicates the percentage of the intervals passing the specified compliance. Interharmonic numbers are actually
groups of 5Hz frequency bars between the adjacent harmonic values. For example, the IH3 is the interharmonic values
between 2nd and 3rd harmonic. A sample plot is shown below.
10-16
Series 5500 User’s Guide
5560 QOS
10
6. Power Frequency Graph
The Power Frequency parameter has two ranges considered for compliance. This graph displays the status of parameter
with respect to each range. The bar chart indicates the percentage of the intervals passing the specified compliance. A
sample plot is shown below.
10-17
Series 5500 User’s Guide
10
5560 QOS
7. Min/Max Tables
The Min/Max table displays the minimum, maximum and average values for Power Frequency and RMS Voltage along
with time and date of occurrence. Maximum phase values of Rapid Voltage Change, Flicker, Supply Voltage Unbalance,
and Harmonics are also displayed along with time and date of occurrence. A sample min/max table is shown below.
Harmonic values up to order
no. 25 (complete harmonic
values not captured on
screen)
10-18
Series 5500 User’s Guide
5560 QOS
10
Standard Reports
Quality of Supply
Quality of Supply Report is an analysis of the voltage, similar to the requirements of the EN50160, which specifies that
various parameters must be within a specified percentage for 95% of the time. Users can select from an analysis of the
Voltage Regulation, Unbalance, and Frequency, with the information presented as a trend and/or histogram. The screen
below shows the standard query selection for Quality of Supply Report. Once DataNode, Date, Time range, Data to Plot,
and Plot type selections have been made, click on the Display or Display in New Window button. A table of contents
featuring data trends in hyperlinks will appear as shown at the bottom of this page. QOS Regulation Trend and
Frequency Trend link to the same graphs as that of RMS Voltage and Frequency respectively under Views - Smart
Trends (see pages 10-9 thru 10-10).
Quality of Supply Query Screen
Quality of Supply Table of Contents
10-19
Series 5500 User’s Guide
10
5560 QOS
Real-time Display of QOS Data
Among the new parameters included in the 5560 DataNode, in addition to those available in DataNode 5530/5520, are
those required to meet the specification of a flicker meter as per EN61000-4-15. Thus, under Real-time page, new
channels are defined to support real-time display of flicker measurements. Flicker is the effect on the visual human
perception by a changing emission of light by lamps subjected to fluctuations of their supply voltage. Voltage
fluctuations consist of a sequence of rapid voltage changes, spaced in time close enough to stimulate the response of the
eye-brain is defined as flicker.
As the annoyance created by flicker is a function of both the intensity of Flicker and the duration of exposure, the
severity of the disturbance is described by two parameters: the short term severity (Pst) and the long term severity (Plt).
Values for the flicker parameter include the Pst of last complete interval, Plt of last complete interval, Plt calculated
using a sliding interval, maximum instantaneous P (Max. Pinst), LPF of Pinst, the square root of Pinst, and LPF of the
square root of Pinst. These values are included in the channel selection when configuringthe jpurnal recordings (see
Flicker Setup Tab on page 10-41). Note that only channels for which flicker data is present in the system are included in
the selection. A sample real time display parameter screen is shown below. Users can choose which channels (A, B, C,
N, Total) to activate by clicking on the respective checkbox. Refer to Chapter 6 for information on how to generate
meter-type readings.
Real Time Display Parameters
10-20
Series 5500 User’s Guide
5560 QOS
10
5560 DataNode System Setup
EN50160 General Setup tab
The EN50160 General tab requires several setup parameters. All Answer Module setups are global to the InfoNode and
apply to all instruments that are gathering EN50160 information.
EN50160 EVALUATION PERIOD properties consist of the Start day, Start time, and Length of the evaluation period.
The Start day and Start time properties can be altered and the unit will remain in strict compliance with EN50160. The
Length cannot be altered due to the 7-day week period by which the unit calculates information in strict compliance with
the EN50160. To program the properties, click on the respective value fields to display the drop down menu.
Start day - Specifies the day of the week when the statistics will be reset. Day is selected from a drop down menu
containing the days of the week. The default start day is Sunday.
Start time - Specifies the time of day when the statistics will be reset. Time is an edit box that defaults to 00:00:00
(midnight of Sunday according to standard). Click on the value field to change time.
Length - Allows the user to set the evaluation period to a value other than the EN50160 specified period of 1 week.
Users are cautioned against changing this value as this will result in a non-standard evaluation. The default is 1 week.
10-21
Series 5500 User’s Guide
10
5560 QOS
EN50160 Calculations and Statistics
This section lists the calculations and statistics that are
gathered from incoming data and processed by the
EN50160 Answer Module.
At the end of the evaluation period, the statistic calculations are completed and the statistical observation is
marked as Complete. If for some reason, the evaluation
period was less than a complete period, the observation is
marked as an Incomplete period so the reporting elements
can take appropriate action.
For each 5560 DataNode configured in the system, the
Answer Module compiles the required statistics and persists them to the database for retrieval under the Views
and Reports pages of the InfoNode. The partial statistics
are persisted as each set of incoming data is analyzed so
that partial period statistics are available, even though it
cannot predict that a site will pass in compliance until
interval is complete.
All EN50160 compliance statistics are calculated from
data retrieved from the DataNode journal (steady state
values) and characterized events (transients and RMS
variations).
For all periodic quantities, the total number of valid measurements in the evaluation period is tabulated. A particular period is excluded from the analysis if a sag below
85% of nominal or a swell above 115% of nominal
occurred based on cycle-by-cycle RMS voltage minima
and maxima. For those items tabulated in the InfoNode,
the exclusion is based on the minimum and maximum
value available in 10-minute RMS voltage min/max/avg
trend value log.
Intermediate statistics for the current evaluation period
are made available but are marked as incomplete. Early
in an evaluation period there may not be enough data to
provide meaningful statistics and Pass/Fail evaluations
for the various criteria. Due to this fact, partial statistics
are not available until at least 100 valid samples have
been accumulated and evaluated.
As disturbance based statistics (DISDIP) are simple
counts of events in various ranges, this information is
made available at any time during an evaluation period.
The table below details the statistical information gathered by the Answer Module.
Additional Data Collection
Parameter
Interval
(default)
Data Source
Stats
Magnitude of Supply 10 Min
SS VRMS
Supply Voltage
Unbalance
Power Frequency
10 Min
SS S2/S1
10 Min*
SS Count Reports
from DataNode
2 Hours
SS Plt
1 Week
RMS Variations
10 Min
SS Harmonic Group THD <= 8%, Table for
Spectra, THD + 2 to Individual Harmonics
25 Harmonics
Interharmonic
Voltage
10 Min
SS Interharmonic
Group, TID and
components 2 to 25
Mains Signaling
Frequencies
10 Min** SS Count Reports
from DataNode
Rapid Voltage
Changes – Flicker
Rapid Voltage
Changes - Step
Changes
Harmonic Voltage
Valid Intervals Within
+/- 10%
Valid Intervals <= 2%
Avg
Min Max
3
w/TS w/TS Phase
YES
YES
YES
YES
YES
NO
YES
NO
DataNode Calculation - NO
Pass in all intervals
within broad limit and
95% of intervals with
narrow limits
2 Hour Plt <= 1.0
YES
NO
NO
YES
YES
YES
YES
90% to 95% LV, 94%
to 96% MV
NO
NO
NO
YES
YES
NO
YES
YES
YES
NO
YES
YES
NO
NO
YES
TID <= 1%, All
components <= 0.5%
DataNode Calculation - NO
Pass if in range 99% of
intervals
Notes:
*Power Frequency sampling done in DataNode at 10 second intervals, reported to journal every 10 minutes.
**Mains Signalling sampling done in DataNode at 3 second intervals, reported to journal every 10 minutes.
10-22
Series 5500 User’s Guide
5560 QOS
5560 DataNode Setup
General Information
DataNodes have a wide variety of user-programmable features that can be set under the DataNode Setup tab of the
InfoNode. Select the appropriate folder under the
DataNode setup tree, then select the DataNode type that
you wish to program. DataNode Properties and Values will
be displayed on the right frame. Use the tabs across the
bottom of the page to select the appropriate category of
programmable features. Typically, a DataNode includes
such categories as General, Basic, RMS Variations, and
Advanced settings. Users can change setups depending on
their access privileges. See page 7-29 for more General
Guidelines on setting up DataNodes.
Where Data for Programmed Settings Appear
Data is recorded based upon programmed settings and dis-
10
played in Views page, Real-time page and Reports page.
Refer to the previous pages of this chapter as well as to
the previous Chapters for more details on the Views,
Real-time and Reports pages.
5560 DataNode
The setup of a DataNode is dependent on the DataNode
type. 5560 DataNodes can be set up in Strict compliance with EN50160 or can be set up using Custom
setups. Under Strict compliance, only the General and
Basic tabs are visible and modifiable. This is the standard method for using the 5560. For those who have
unique applications requiring modification of the standard setups, the Compliance Setup selection box on the
Basic tab can be changed to Custom. See sample screens
below.
5560 DataNode with
Compliance Setup: Strict
Tabs available under
Strict compliance:
General and Basic
(Basic tab shown)
5560 DataNode with
Compliance Setup: Custom
Tabs available under
Custom compliance:
General, Basic, RMS Variations,
Transients, Metering, Revenue, Demand,
Adv. Energy, Adv. Metering, Imbalance,
Harmonics, Flicker, Adv. Harmonics,
Transducers, Advanced, Accumulated
Resets
Series 5500 User’s Guide
10-23
10
5560 QOS
5560 DataNode Tabs
The parameters available in each tab are discussed in detail in the next sections. Note the following conventions used in
the screen displays.
LEGEND:
Items in italics are not programmable, but included for information purpose to the user.
Items in bold are examples of what can be entered.
Selections available in drop down menu are enclosed in brackets { xxxx }.
Caution: Dranetz-BMI has already set default values for the various parameters in each DataNode. The default values
have been tested to result in optimal system performance. Users are advised not to change the default value settings
(except user-defined properties i.e. Name, IP Address, etc.) unless there are applications which require advanced setups.
1. General tab
Properties
Name
Description
Serial Number
Version
Active
Get settings from
Last contact at
Health
Values
Identification Information
Edison SE 5560
Service Entrance
typically
describes
where
DataNode
is located
00-01-32-00-01-b9
E1.0.238000714
Status Information
;
DataNode on activation
08/01/2002 13:03:08
System health is normal
The General tab contains identification and performance
status description of the DataNode.
IDENTIFICATION INFORMATION includes the Name
and Description which users can assign for a particular
DataNode type. Simply click on the Name or
Description field to type in the space provided.
Description typically describes the location where the
DataNode is monitoring. Users are allowed to enter up to
30 alphanumeric characters under the Name and
Description fields.
The Serial Number and Version of the DataNode hardware are set by default. This instrument-specific information is available only for viewing and cannot be altered or
changed from the InfoNode.
STATUS INFORMATION properties include Active,
which describes current communications interface
between the DataNode and the InfoNode system. When
checked, this means that the DataNode is actively communicating and exchanging information with the system.
When making changes in the different value settings of a
DataNode, it is wise to uncheck the Active box first,
activate
(check) to
establish link
with the
DataNode site
make the changes, then check the Active box again. This
helps ease and speed up processing time. Also when
adding a new DataNode, the Active box must be checked
to establish link with the DataNode site. Click the Home
page to check which DataNodes are actively communicating with the InfoNode.
Users also have the option to Get settings from
DataNode on activation. When checked or enabled, the
default DataNode settings will be re-configured and redisplayed. The settings in the DataNode will overwrite
those in the InfoNode and be used for monitoring.
Remember to click the Save Setup button found at the
bottom of the page to save any change that have been
done. To aid users, a Save confirmation window appears
after changes have been made and when users are about
to switch to a different tab.
Status properties also records the date and time of Last
contact. It also indicates Health status, whether the
DataNode system is functioning normally or not. Both
information are set by default and cannot be altered by
users.
10-24
Series 5500 User’s Guide
5560 QOS
10
2. Basic tab
Properties
DataNode Address
Password
Voltage Class
PT Primary
PT Secondary
Declared Voltage
Wiring configuration
Synchronized to Grid
Compliance Setup
Frequencies to Trend
Values
Communications
198.69.18.202
*************
Power System
Low Voltage
{Low Voltage, Medium Voltage}
1.00000000
1.00000000
230
Wye
{Single Phase, Wye, Delta, Split Single Phase}
Custom
{Strict, Custom}
Mains Signalling
None
The Basic tab contains value settings for the following:
Communications, Power System, and Mains Signalling.
For a 5560 DataNode, the Basic page highlights those
fields necessary for the DataNode to properly acquire
data.
COMMUNICATIONS is where the IP information for the
specific DataNode is entered. Each 5560 QOS is shipped
from the factory with an IP Address. This IP address is
entered under the DataNode Address field. Password is
the password for InfoNode to DataNode communications.
The password is typically left at factory default.
NOTE: The password must match that of the DataNode.
Under POWER SYSTEM, users can configure Voltage
Class by clicking on the value field. A drop down menu
with two entries, Low Voltage (LV) and Medium Voltage
(MV), appears. LV is defined as <1kV nominal. MV is
1kV to 35kV nominal.
PT Primary allows for setting the primary component of
all the transducer ratios. Ratios for all three phases are set
when this field is changed and saved. If the values for the
individual phases are different, the phase A setting is displayed. No setup values are changed unless the user modifies this field and saves the changes. The values being
modified here are the same as the individual values on
the Transducers page. For a 5560 DataNode, the default
PT Primary value is 1.0 if the Voltage Class is Low and
click
fields to
display
drop
down
menu
120.0 if the Voltage class is Medium. (120:1 with 10V
nominal input is for monitoring 13kV distribution
voltage).
PT Secondary allows for setting the secondary component of all the transducer ratios. Ratios for all three phases
(A, B, C) are set when this field is changed and saved. If
the values for the individual phases are different when
using custom setups, the phase A setting is displayed. No
setup values are changed unless the user modifies this
field and saves the changes. The values being modified
here are the same as the individual values on the
Transducers page. The default value is 1.0 in all cases.
Declared Voltage (also known as Nominal Voltage in a
5530 DataNode) is where users specify the nominal input
line voltage. For a 5560 DataNode, the default is 230.0
when using Wye Configuration. For Delta Configuration,
Declared Voltage is set to 400 if the Voltage Class is Low
and to 11000.0 if the Voltage Class is Medium.
To set Wiring Configuration, click on the value field and
a drop down menu lists Single Phase, Wye, Delta and
Split Single Phase. The default wiring configuration is
Delta.
Synchronized to Grid indicates that the system being
monitored is not islanded (isolated from the power grid).
The box is checked by default indicating that the system
is synchronized, not islanded.
10-25
Series 5500 User’s Guide
10
5560 QOS
Compliance Setup is a drop down selection box containing two entries: Strict EN50160 and Custom EN50160.
Compliance setup determines which pages are visible to
the user and therefore which setup fields may be
changed. If Strict EN50160 is selected, only the General
and Basic pages are displayed. If Custom EN50160 is
selected, all Setup pages are visible. Strict EN50160
compliance setup is the default.
Under MAINS SIGNALLING, users can enter
Frequencies to Trend. This value field is editable. Use
None if no frequency values will be trended or enter a
delimited list of signalling frequencies to monitor using a
comma to separate the frequency values. Only the first
five valid frequencies in the list are stored. A valid frequency is divisible by 5 Hz. and is less than 3.84 kHz.
The Mains Signalling graph can be accessed from the
Views page, but the signalling frequency is not trended or
available for real-time meter.
10-26
Series 5500 User’s Guide
5560 QOS
10
3. RMS Variations tab
Properties
Values
Limits
A-N Voltage
{Bank selection enables programming limits below}
B-N Voltage
C-N Voltage
N-G Voltage
A-B Voltage
B-C Voltage
C-A Voltage
A Current
B Current
C Current
N Current
phase-to-neutral
or phase-tophase values
displayed here
depend upon
the Wiring
Configuration
set under the
Basic tab
;
Limit enabled
High limit
Low limit
110.0
90.0
Pre- and Post- Event Captures
2
238
Post-event start RMS samples (cycles)
2
Pre-event start waveform samples (cycles)
Pre-event start RMS samples (cycles)
Post-event start waveform samples (cycles)
Post-event end RMS samples (cycles)
Pre-event end waveform samples (cycles)
Post-event end waveform samples (cycles)
Cycles in range to end event
Number of Rates to Use
6
2
6
2
1
RMS Variations Sampling Intervals
3
Intervals
Reduced sampling rate #1
Reduced sampling rate #2
Reduced sampling rate #3
Sample min/max/avg every N cycles
Number of seconds to use this rate
6
6.000000000
RMS stands for root mean square, a mathematical formula
used to measure the average voltage and current. Voltage
and current changes are measured and checked against
their programmed limits. Thresholds are set in ranges with
high limit (threshold above the programmed limit) and low
limit (threshold below the programmed limit). RMS
Variations result whenever voltage or current RMS value
rises above or fall below the programmed thresholds.
The following properties can be set in the RMS
Variations page: Limits, Pre and Post- Event Captures,
RMS Variations Sampling Intervals, and Intervals.
Under LIMITS, letters A, B and C represent each leg or
phase of a three-phase system, while letter N represents
the neutral conductor. The channels used to trigger are
auto set. High limit and Low limit values can be
enabled and programmed individually for each phase-toneutral and phase-to-phase setting.
10-27
Series 5500 User’s Guide
10
5560 QOS
To program individual limit values, select the appropriate
line that describes the phase-to-neutral or phase-to-phase
setting that you wish to change. If the same limit value
will be assigned to more than one phase, press Shift +
click to select multiple phases. Enter your limit value for
the corresponding phase in the High limit and Low limit
fields. Click the Limit enabled box to activate. Click the
Save Setup button every time you assign different limit
values.
PRE- AND POST- EVENT CAPTURES contain
parameters that help users program the number of RMS
and waveform cycles to be saved before (pre-) and after
(post-) the start and the end of the event. These
parameters are Pre-event start RMS samples, Postevent start RMS samples, Pre-event start waveform
samples, Post-event start waveform samples, Postevent end RMS samples, Pre-event end waveform
samples, and Post-event end waveform samples. The
parameters capture RMS sample or RMS waveform
cycles that may be used to analyze and manage power
event patterns and behavior.
With regard to the beginning and end of RMS variation
events, such transition points are determined according to
the following rules. As per IEC and IEEE standards for
multi-phase systems, the beginning of the event occurs
when any phase goes outside the limits. The start of an
RMS variation event is denoted as the time one or more
phases of voltage or current goes outside of the
programmed high or low thresholds. The end of the event
is denoted as the time all phase voltages and currents are
back within the limits and the number of cycles specified
within limits has been satisfied. Disturbance monitoring
requires that voltage be continuously sampled, and
recorded only if the signals exceed specified values. Most
types of disturbances, with the exception of voltage
variations, require that current be recorded as well.
The reason behind storing sampling rates is that the
memory capacity of the monitoring instrument makes it
impractical to record an entire long duration sag or swell
point by point. The waveforms before and after the
trigger are digitized to help identify the cause of the
excursion, but only RMS values are stored over the full
duration of the event that are longer than the pre- and
post- trigger settings. If the event has not ended after a
programmed time period, the instrument switches to
averaging cycles of RMS data to further conserve
memory yet accurately represent event. At this point, the
RMS plot diverges from a single-valued line to a band of
minimum, maximum and average values. During
extremely long events, the instrument switches to
successively longer averaging periods explained next.
The sample rates represent three supplemental recording
interval or chart speeds defined for recording long events.
When recording at reduced rates, three values are saved
for each data point - the minimum, maximum, and
average value of the previous interval. The Sample
min/max/avg every N cycles refers to the number of
cycles to average for the selected reduced sampling rate.
While Number of seconds to use this rate refer to the
number of seconds to record at the selected reduced sampling rate.
The following default sequence is used to program
reduced sampling rates:
For 60 Hz systems
a. 6 cycle intervals for 8 seconds (80 samples)
b. 30 cycle intervals for 20 seconds (40 samples)
c. 60 cycle intervals for 90 seconds (90 samples)
For 50 Hz systems
a. 5 cycle intervals for 8 seconds (80 samples)
b. 25 cycle intervals for 20 seconds (40 samples)
c. 50 cycle intervals for 90 seconds (90 samples)
The user also has the ability to specify how RMS trace
data is recorded during the event. This mechanism is
found under RMS VARIATIONS SAMPLING INTERVALS, where Number of rates to use refer to the
number of reduced sampling rate ranges to be used to
record RMS variation activities. The sampling data
referred to here may be any or all of the three sample
rates found under INTERVALS - Reduced sampling
rate #1, Reduced sampling rate #2, and Reduced
sampling rate #3. When one of these items is selected,
the reduced sampling rate parameters can be set for that
item. Data for the sample rates only apply to RMS, not
waveform, variations.
10-28
Series 5500 User’s Guide
5560 QOS
10
4. Transients tab
Properties
Values
Cycle Counts
1
Number of pre-trigger cycles
Number of post-trigger cycles
2
Individual Channel Parameters
A-N Voltage
B-N Voltage
C-N Voltage
N-G Voltage
A Current
B Current
C Current
N Current
phase-to-neutral or
phase-to-phase
values displayed
here depend upon
the Wiring
Configuration set
under the Basic tab
Instantaneous limit enabled
Instantaneous limit
Waveform change limit enabled
;
Waveform change magnitude limit
Waveform change duration limit (% of cycle)
10.0
10.0
200.0
;
Transients are disturbances which are shorter in duration
than sags and swells. There are two basic types of
transients: 1) impulsive transients commonly caused by
lightning and load switching, and 2) oscillatory transients
often attributed to capacitor bank switching. The DataNode
program has extensive transient recording capabilities for
all transient events, using waveshape, instantaneous peak,
and dual positive and negative high frequency peak
detectors.
individually for each phase-to-neutral and phase-tophase setting.
Under CYCLE COUNTS, the user can define a number of
cycles of waveform to record prior to the trigger point.
This is set under Number of pre-trigger cycles. Users can
also define the number of cycles of waveform to record
after the trigger. This value is set under Number of posttrigger cycles. Typical values for these settings are 1 and 2
respectively.
Other configuration variables that determine the operation of transient capture capability of the DataNode are
the waveform trigger parameter, instantaneous peak
waveform trigger level, and dual peak high frequency
detector output trigger level. Values for these parameters
are set under Waveform change magnitude limit and
Waveform change duration limit. Limit values can be
enabled and programmed individually for each phase-toneutral and phase-to-phase setting. To activate the waveform limit values, click theWaveform change limit
enabled box.
Under INDIVIDUAL CHANNEL PARAMETERS, letters
A, B and C represent different channels, N stands for
neutral, while G stands for ground conductor. The channel
values are pre-defined and automatically set depending
upon the Wiring Configuration selected under the Basic
tab.
The instantaneous limit value is compared against the
absolute value of each A/D sample of the voltage and
current channel waveforms (128 A/D samples taken per
cycle). Enter your limit values in the corresponding field
for each phase or phase-to-phase setting, and click the
Instantaneous limit enabled box to activate.
The DataNode program provides configuration variables
that specifies how many cycles to record the RMS
Instantaneous limit and Waveform change magnitude
limit. These limit values can be enabled and programmed
10-29
Series 5500 User’s Guide
10
5560 QOS
Trending Tabs
The following tabs are known as trending pages: Metering, Revenue, Demand, Adv. Energy, Adv. Metering, Unbalance,
Harmonics, Flicker, and Adv. Harmonics. These pages contain an enable/disable checkbox at the top of the page. The
purpose of the checkbox on any trending page is to enable trending of properties and values listed on that page. If the
box is checked, the settings on that page go into effect. If the box is not checked, the remaining settings are persisted but
are not in effect. Trending pages are available only for Custom EN50160 Compliance Setup. Trending pages are hidden
under Strict EN5160 Compliance Setup.
5. Metering tab
Properties
Values
Basic Metering (Metering, MMXUO)
Line-Neutral Voltage (A-N)
Line-Neutral Voltage (B-N)
Line-Neutral Voltage (C-N)
Neutral-Ground Voltage
Line-Line Voltage (A-B)
Line-Line Voltage (B-C)
Line-Line Voltage (C-A)
Line Current (A)
Line Current (B)
Line Current (C)
Line Current (N)
Active Power (A)
Active Power (B)
Active Power (C)
Total Active Power
Enable Periodic Sampling
High-High limit enabled
High-High limit
High limit enabled
High limit
Low limit enabled
Low limit
Low-Low limit enabled
Low-Low limit
Deadband enabled
Deadband
Enable Trending (This page)
;
Select the journal entry/entries to change
Apparent Power (A)
Apparent power (B)
Apparent Power (C)
Total Apparent Power
Power Factor (A)
Power Factor (B)
Power Factor (C)
Average Power Factor
Angle Between Phases (A)
Angle Between Phases (B)
Angle Between Phases (C)
Frequency
phase-to-neutral
or phase-tophase values
displayed here
depend upon
the Wiring
Configuration
set under the
Basic tab
;
112.49
154.16
87.50
75.00
2.50
Under ENABLE TRENDING (THIS PAGE) is a checkbox in the value field opposite Basic Metering. The box
enables the trending of values listed in Metering page. If
the box is checked, the settings on the page go into effect.
If the box is not checked, the remaining settings are persisted but are not in effect.
Under SELECT THE JOURNAL ENTRY/ENTRIES TO
CHANGE, the various phase-to-neutral and phase-tophase parameters are displayed. High and low limits can
be enabled and individually set for each phase-to-neutral
and phase-to-phase value. Note however that the available
phase values depend on the Wiring Configuration selected
under the Basic Tab. For instance, for wye circuits L-N,
10-30
Series 5500 User’s Guide
5560 QOS
N-G and L-L limits can be set. For delta circuits, only L-L
limits can be set.
Highlight the phase value parameter you wish to change
then check the enable box. Check the threshold enable box
and then enter the value for that threshold. Repeat this for
all parameters of interest.
The enable box refers to the Enable periodic sampling
parameter. Note that the 5560 DataNode has an internal
limit on the number of variables it can track for the
purpose of periodic recording and limit rule evaluation.
Indiscriminate selection of parameters should be avoided.
Each parameter has five threshold limits: High-high,
High, Low, Low-Low, and Deadband.
High-High limit - specifies an absolute limit for comparison that is higher than the high limit.
High limit - specifices an absolute limit for comparison
that is higher than the low limit.
Low limit - specifies an absolute limit for comparison that
is lower than the high limit.
10
Low-Low limit - specifies an absolute limit for comparison lower than the low limit.
Deadband limit - specifies how much a value can
change before another event is recorded.
The High-High must be greater than High, Low-Low
less than Low. The hysteresis values assigned to limits
are set by the system and not programmable by the user.
All limit values are used to determine if corresponding
reporting or logging action should take place.
For example, if a frequency is detected to cross the
threshold limit, then an event is recorded. If the
frequency goes from out of limits to within limits (that
is, below the high limit minus the hysteresis and above
the low limit plus the hysteresis) then another event is
recorded.
Enabling parameters for periodic sampling make them
available in the Real-time tab.
10-31
Series 5500 User’s Guide
10
5560 QOS
6. Revenue tab
Properties
Values
Enable Trending (This page)
;
Basic Revenue Metering (Revenue, MMTRO)
Select the journal entry/entries to change
Phase Energy (A)
Phase Energy (B)
Phase Energy (C)
Total Energy
Integrated Reactive Power (A)
Integrated Reactive Power (B)
Integrated Reactive Power (C)
Total Integrated Reactive Power
Enable periodic sampling
High-High limit enabled
High-High limit
High limit enabled
High limit
Low limit enabled
Low limit
00.0
Low-Low limit enabled
Low-Low limit
Deadband enabled
Deadband
00.0
00.0
00.0
00.0
Under ENABLE TRENDING (THIS PAGE) is a checkbox in the value field opposite Basic Revenue Metering.
The box enables the trending of values listed in Basic
Revenue Metering page. If the box is checked, the settings on the page go into effect. If the box is not checked,
the remaining settings are persisted but are not in effect.
Each of the individual phase-to-neutral and three phase
total energy and integrated reactive power values found
under SELECT THE JOURNAL ENTRY/ENTRIES TO
CHANGE can be enabled.
Highlight the parameter value you wish to change, then
check the Enable periodic sampling box. Check the
threshold enable box and then enter the value for that
threshold. Repeat this for all parameters of interest.
Threshold enable refers to the checkboxes opposite the
limits. Each parameter has five threshold limits: Highhigh, High, Low, Low-Low, and Deadband.
High-High limit - specifies an absolute limit for comparison that is higher than the high limit.
High limit - specifices an absolute limit for comparison
that is higher than the low limit.
Low limit - specifies an absolute limit for comparison
that is lower than the high limit.
Low-Low limit - specifies an absolute limit for comparison lower than the low limit.
Deadband limit - specifies how much a value can change
before another event is recorded.
The High-High must be greater than High, Low-Low less
than Low. Deadband is the equivalent of sensitivity. The
hysteresis values assigned to limits are set by the system.
All limit values are used to determine if corresponding
reporting or logging action should take place.
For example, if Total Energy is detected to cross the
threshold limit, then an event is recorded. If the Total
Energy goes from out of limits to within limits (that is,
below the high limit minus the hysteresis and above the
low limit plus the hysteresis), then the event is recorded.
Enabling parameters for periodic sampling make them
available in the Real-time tab.
10-32
Series 5500 User’s Guide
5560 QOS
10
7. Demand tab
Properties
Values
Enable Trending (This page)
;
Demand (Demand, MDMDO)
Select the journal entry/entries to change
Real Power, Dmd, Total
Reactive Power, Dmd, Total
Apparent Power Dmd, Total
Average PF Over Last Interval
Peak Real Power Dmd Total
Var Dmd Coincident w/Pk W Dmd
VA Dmd Coincident w/Pk W Dmd
Avg PF Coincident w/Pk W Dmd
Peak Reactive Power Dmd, Total
W Dmd Coincident w/Pk Var Dmd
VA Dmd Coincident w/Pk Var Dmd
Avg PF Coincident w/Pk Var DMd
Peak Apparent Power Dmd, Total
W Dmd Coincident w/Pk W Dmd
Var Dmd Coincident w/Pk VA Dmd
Avg PF Coincident w/Pk VA Dmd
Predicted Real Power Dmd, Total
Predicted Reactive Power Dmd, Total
Predicted Apparent Power Dmd, Total
Current Demand (A)
Current Demand (B)
Current Demand (C)
Average Current Demand
Peak Current Demand (A)
Peak Current Demand (B)
Peak Current Demand (C)
Average Peak Current Demand
Enable periodic sampling
High-High limit enabled
High-High limit
High limit enable
High limit
Low limit enabled
Low limit
Low-Low limit enabled
Low-Low limit
Deadband enabled
Deadband
;
1.00
0.00
0.00
0.00
0.00
10-33
Series 5500 User’s Guide
10
5560 QOS
Demand values are computed as the average value over
the demand interval, which can be programmed as a different value than the periodic readings.
Under ENABLE TRENDING (THIS PAGE) is a checkbox in the value field opposite Demand. The box enables
the trending of values listed in Demand page. If the box is
checked, the settings on the page go into effect. If the box
is not checked, the remaining settings are persisted but
are not in effect.
The following parameter values can be enabled under
SELECT THE JOURNAL ENTRY/ENTRIES TO
CHANGE: individual phase and three phase total real
power demand, reactive demand, apparent power
demand, average PF, and peak real power values.
Highlight the parameter value you wish to change, then
check the Enable periodic sampling box. Check the
threshold enable box, and then enter the value for that
threshold. Repeat this for all parameters of interest.
High limit - specifices an absolute limit for comparison
that is higher than the low limit.
Low limit - specifies an absolute limit for comparison
that is lower than the high limit.
Low-Low limit - specifies an absolute limit for comparison lower than the low limit.
Deadband limit - specifies how much a value can change
before another event is recorded.
The High-High must be greater than High, Low-Low less
than Low. Deadband is the equivalent of sensitivity. The
hysteresis values assigned to limits are set by the system.
All limit values are used to determine if corresponding
reporting or logging action should take place.
For example, if Real Power Demand is detected to cross
the threshold limit, then an event is recorded. If the Real
Power Demand goes from out of limits to within limits
(that is, below the high limit minus the hysteresis and
above the low limit plus the hysteresis), then the event is
recorded.
Each parameter has five threshold limits: High-high,
High, Low, Low-Low, and Deadband.
High-High limit - specifies an absolute limit for comparison that is higher than the high limit.
10-34
Series 5500 User’s Guide
5560 QOS
10
8. Advanced Energy tab
Properties
Values
Enable Trending (This page)
;
Advanced Energy (Adv. Energy, MFLOO)
Select the journal entry/entries to change
Forward fund. freq. WHrs (A)
Forward fund. freq. WHrs (B)
Forward fund. freq. WHrs (C)
Reverse fund. freq. WHrs (A)
Reverse fund. freq. WHrs (B)
Reverse fund. freq. WHrs (C)
Forward tot. fund. freq. WHrs
Reverse tot. fund. freq. WHrs
Forward fund. freq. VarHrs (A)
Forward fund. freq. VarHrs (B)
Forward fund. freq. VarHrs (C)
Reverse fund. freq. VarHrs (A)
Reverse fund. freq. VarHrs (B)
Reverse fund. freq. VarHrs (C)
Forward tot. fund. freq. VarHrs
Reverse tot. fund. freq. VarHrs
Fundamental freq. VA hours (A)
Fundamental freq. VA hours (B)
Fundamental freq. VA hours (C)
Total fundamental freq. VA hours
Enable periodic sampling
High-High limit enabled
High-High limit
High limit enabled
High limit
Low limit enabled
Low limit
Low-Low limit enabled
Low-Low limit
Deadband enabled
Deadband
1.00
0.00
0.00
0.00
0.00
Journal entries in the Advanced Energy tab show various
energy parameters on per phase and total basis as well as
in forward and reverse mode. Fundamental frequency is
used as the reference unit. Frequency is specified in hertz.
Fundamental frequency refers to the principal component
of a wave, i.e. the component with the lowest frequency or
greatest amplitude.
Under ENABLE TRENDING (THIS PAGE) is a checkbox
in the value field opposite Advanced Energy. The box
enables the trending of values listed in Advanced Energy
page. If the box is checked, the settings on the page go
into effect. If the box is not checked, the remaining
settings are persisted but are not in effect.
Under SELECT THE JOURNAL ENTRY/ENTRIES TO
CHANGE, highlight the phase value parameter you
wish to change then check the Enable periodic
sampling box. Check the threshold enable box and then
enter the value for that threshold. Repeat this for all
parameters of interest.
10-35
Series 5500 User’s Guide
10
5560 QOS
Threshold enable refers to the checkboxes opposite the
limits. Each parameter has five threshold limits: Highhigh, High, Low, Low-Low, and Deadband.
High-High limit - specifies an absolute limit for comparison that is higher than the high limit.
High limit - specifices an absolute limit for comparison
that is higher than the low limit.
Low limit - specifies an absolute limit for comparison
that is lower than the high limit.
Low-Low limit - specifies an absolute limit for comparison lower than the low limit.
Deadband limit - specifies how much a value can change
before another event is recorded.
The High-High must be greater than High, Low-Low less
than Low. Deadband is the equivalent of sensitivity. The
hysteresis values assigned to limits are set by the system.
All limit values are used to determine if corresponding
reporting or logging action should take place.
For example, if the Total Fundamental Frequency is
detected to cross the threshold limit, then an event is
recorded. If the Total Fundamental Frequency goes from
out of limits to within limits (that is, below the high limit
minus the hysteresis and above the low limit plus the hysteresis), then the event is recorded.
9. Advanced Metering tab
Properties
Values
Enable Trending (This page)
Advanced Metering (Adv. Metering, MADVO)
Select the journal entry/entries to change
Total VA - Arith. Method
Total VA - Vect. Method
Total Fund. VA - Arith. Method
Total Fund. VA - Vect. Method
Worst True Power Factor
Total Arithmetic True PF
Total Vector True Power Factor
Displacement Power Factor (A)
Displacement Power Factor (B)
Displacement Power Factor (C)
Worst Displacement Power Factor
Average Displacement PF
Total Arithmetic Disp. PF
Total Vector Disp. Power Factor
Residual Current
Net Current
Enable periodic sampling
High-High limit enabled
High-High limit
High limit enabled
High limit
Low limit enabled
Low limit
Low-Low limit enabled
Low-Low limit
Deadband enabled
Deadband
1.00
0.00
0.00
00.0
0.0
10-36
Series 5500 User’s Guide
5560 QOS
Under ENABLE TRENDING (THIS PAGE) is a checkbox
in the value field opposite Advanced Metering. The box
enables the trending of values listed in Advanced Metering
page. If the box is checked, the settings on the page go
into effect. If the box is not checked, the remaining
settings are persisted but are not in effect.
Under SELECT THE JOURNAL ENTRY/ENTRIES TO
CHANGE, multiple total apparent power and power factor
parameters, calculated using arithmetic and vector sums of
the individual phases, can be enabled. The parameters
include: Total Arithmetic VA, Total Vector VA, Total
Fundamental Arithmetic VA, Total Fundamental Vector
VA, True Power Factor (PF), Worst True PF, Total
Arithmetic True PF, Total Vector PF, Displacement PF,
Worst Displacement PF, Average Displacement PF, Total
Arithmetic Displacement PF, Total Vector PF, Residual
Current, and Net Current. Definitions of these terms can be
found on Appendix E Glossary.
Highlight the parameter value you wish to change, then
check the Enable periodic sampling box. Check the
threshold enable box and then enter the value for that
threshold. Repeat this for all parameters of interest.
10
High limit - specifices an absolute limit for comparison
that is higher than the low limit.
Low limit - specifies an absolute limit for comparison
that is lower than the high limit.
Low-Low limit - specifies an absolute limit for comparison lower than the low limit.
Deadband limit - specifies how much a value can
change before another event is recorded.
The High-High must be greater than High, Low-Low
less than Low. Deadband is the equivalent of sensitivity.
The hysteresis values assigned to limits are set by the
system. All limit values are used to determine if
corresponding reporting or logging action should take
place.
For example, if the Displacement Power Factor is
detected to cross the threshold limit, then an event is
recorded. If the Displacement Power Factor goes from
out of limits to within limits (that is, below the high
limit minus the hysteresis and above the low limit plus
the hysteresis), then the event is recorded.
Each parameter has five threshold limits: High-High,
High, Low, Low-Low, and Deadband.
High-High limit - specifies an absolute limit for comparison that is higher than the high limit.
10-37
Series 5500 User’s Guide
10
5560 QOS
10. Unbalance tab
Properties
Values
Enable Trending (This page)
;
Imbalance and Sequence Components
(Sequence, MSQIO)
Select the journal entry/entries to change
Sequence Voltage (Pos)
Sequence Voltage (Neg)
Sequence Voltage (Zero)
Sequence Current (Pos)
Sequence Current (Neg)
Sequence Current (Zero)
V Imbalance: L-N dev. from avg (A-N)
V Imbalance: L-N dev. from avg (B-N)
V Imbalance: L-N dev. from avg (C-N)
V Imbalance: L-L dev. from avg (A-B)
V Imbalance: L-L dev. from avg (B-C)
V Imbalance: L-L dev. from avg (C-A)
V Imbalance: L-N Max from avg
V Imbalance: L-L Max from avg
V Imbalance: Neg. Seq. Method
V Imbalance: Zero Seq. Method
I Imbalance: dev. from avg (A)
I Imbalance: dev. from avg (B)
I Imbalance: dev. from avg (C)
I Imbalance: Max dev. from avg
I Imbalance: Neg. Seq. Method
I Imbalance: Zero Seq. Method
Enable periodic sampling
High-High limit enabled
High-High limit
High limit enabled
High limit
Low limit enabled
Low threshold
Low-Low limit enabled
Low-Low limit
Deadband enabled
Deadband
;
0.00
0.00
0.00
0.00
0.00
The voltage and current imbalance for each phase from
the average value for all three phases can be trended and
limits set. The positive, negative and zero sequence components for voltage and current can be trended.
change then check the Enable periodic sampling box.
Check the threshold enable box and then enter the value
for that threshold. Repeat this for all parameters of
interest.
Under ENABLE TRENDING (THIS PAGE) is a checkbox in the value field opposite Imbalance. The box
enables the trending of values listed in Imbalance page. If
the box is checked, the settings on the page go into effect.
If the box is not checked, the remaining settings are persisted but are not in effect.
Threshold enable refers to the checkboxes opposite the
limits. Each parameter has five threshold limits: Highhigh, High, Low, Low-Low, and Deadband.
High-High limit - specifies an absolute limit for comparison that is higher than the high limit.
High limit - specifices an absolute limit for comparison
that is higher than the low limit.
Low limit - specifies an absolute limit for comparison that
is lower than the high limit.
Under SELECT THE JOURNAL ENTRY/ENTRIES TO
CHANGE, highlight the parameter value you wish to
10-38
Series 5500 User’s Guide
5560 QOS
Low-Low limit - specifies an absolute limit for comparison
lower than the low limit.
Deadband limit - specifies how much a value can change
before another event is recorded.
The High-High must be greater than High, Low-Low less
than Low. Deadband is the equivalent of sensitivity. The
hysteresis values assigned to limits are set by the
10
system. All limit values are used to determine if corresponding reporting or logging action should take place.
For example, if the Positive Sequence Voltage is detected to cross the threshold limit, then an event is recorded.
If the Positive Sequence Voltage goes from out of limits
to within limits (that is, below the high limit minus the
hysteresis and above the low limit plus the hysteresis),
then the event is recorded.
11. Harmonics tab
Properties
Values
Enable Trending (This page)
;
Harmonics (Harmonics, MHAIO)
Percent Eddy Current Loss
8.000
Maximum Demand Load Current
100.000
Select the journal entry/entries to change
Voltage THD - Fund. Normalized (A-N)
Voltage THD - Fund. Normalized (B-N)
Voltage THD - Fund. Normalized (C-N)
Voltage THD - Fund. Normalized (N-G)
Voltage THD - RMS Normalized (A-N)
Voltage THD - RMS Normalized (B-N)
Voltage THD - RMS Normalized (C-N)
Voltage THD - RMS Normalized (N-G)
Voltage TID - Fund. Normalized (A-N)
Voltage TID - Fund. Normalized (B-N)
Voltage TID - Fund. Normalized (C-N)
Voltage TID - Fund. Normalized (N-G)
Voltage TID - RMS Normalized (A-N)
Voltage TID - RMS Normalized (B-N)
Voltage TID - RMS Normalized (C-N)
Voltage TID - RMS Normalized (N-G)
Voltage Harmonic RMS (A-N)
Voltage Harmonic RMS (B-N)
Voltage Harmonic RMS (C-N)
Voltage Harmonic RMS (N-G)
Voltage Interharmonic RMS (A-N)
Voltage Interharmonic RMS (B-N)
Voltage Interharmonic RMS (C-N)
Voltage Interharmonic RMS (N-G)
Voltage TIF - Fund. Normalized (A-N)
Voltage TIF - Fund. Normalized (B-N)
Voltage TIF - Fund. Normalized (C-N)
Voltage TIF - Fund. Normalized (N-G)
Voltage TIF - RMS Normalized (A-N)
Voltage TIF - RMS Normalized (B-N)
Voltage TIF - RMS Normalized (C-N)
Voltage TIF - RMS Normalized (N-G)
Voltage Crest Factor (A-N)
Voltage Crest Factor (B-N)
Voltage Crest Factor (C-N)
Voltage Crest Factor (N-G)
Current THD - Fund. Normalized (A)
Current THD - Fund. Normalized (B)
Current THD - Fund. Normalized (C)
Current THD - Fund. Normalized (N)
Current THD - RMS Normalized (A)
Current THD - RMS Normalized (B)
Current THD - RMS Normalized (C)
Current THD - RMS Normalized (N)
Current TID - Fund. Normalized (A)
Current TID - Fund. Normalized (B)
Current TID - Fund. Normalized (C)
Current TID - Fund. Normalized (N)
Current TID - RMS Normalized (A)
Current TID - RMS Normalized (B)
Currrent TID - RMS Normalized (C)
Current TID - RMS Normalized (N)
Current Harmonic RMS (A)
Current Harmonic RMS (B)
Current Harmonic RMS (C)
Current Harmonic RMS (N)
Current Interharmonic RMS (A)
Current Interharmonic RMS (B)
Current Interharmonic RMS (C)
Current Interharmonic RMS (N)
IT Product (A)
IT Product (B)
IT Product (C)
IT Product (N)
Current Crest Factor (A)
Current Crest Factor (B)
Current Crest Factor (C)
Current Crest Factor (N)
Current Total Demand Distortion (A)
Current Total Demand Distortion (B)
Current Total Demand Distortion (C)
K Factor (A)
K Factor (B)
K Factor (C)
K Factor (A)
Transformer Derating Factor (A)
Transformer Derating Factor (B)
Transformer Derating Factor (C)
Total Phase Harmonic Power (A-N)
Total Phase Harmonic Power (B-N)
Total Phase Harmonic Power (C-N)
Signed Phase Harmonic Power (A-N)
Signed Phase Harmonic Power (B-N)
Signed Phase Harmonic Power (C-N)
Harmonics screen display continued next page
Series 5500 User’s Guide
10-39
10
5560 QOS
...continued
Enable periodic sampling
High-High limit enabled
High-High limit
High limit enabled
High limit
Low limit enabled
Low limit
Low-Low limit enabled
Low-Low limit
Deadband enabled
Deadband
;
0.000
0.000
0.000
0.000
0.000
Harmonics are waveform distortion, a steady-state
deviation from an ideal power frequency sinusoid and is
characterized by the spectral content of the waveform.
Many non-linear devices such as battery chargers,
switching power supplies or transformers inject currents
at harmonic (integer multiples of the fundamental)
frequencies into the system.
Under ENABLE TRENDING (THIS PAGE) is a checkbox in the value field opposite Harmonics. The box
enables the trending of values listed in Harmonics page.
If the box is checked, the settings on the page go into
effect. If the box is not checked, the remaining settings
are persisted but are not in effect.
Under SELECT JOURNAL ENTRY/ENTRIES TO
CHANGE, various harmonic parameters can be trended
using periodic readings that are stored in a journal.
Harmonic distortion of voltage or current is calculated
through a Fourier transformation of the waveform into
harmonic magnitudes and phase angle spectra. These
spectra are used to determine figures of merit such as
total harmonic distortion (THD) and telephone influence
factor (TIF). (See Appendix A Quantities Calculated from
Periodic Voltage and Current Measurements)
The InfoNode/DataNode system allows simultaneous
measurements of voltage and current so that harmonic
power flow can be obtained. Depending on value
parameters set, the program can record a sampling of the
waveform synchronized to the fundamental frequency, to
ensure accurate calculation of harmonic phase angles. The
sampling rate is sufficient to determine up to the 50th
harmonic or better. A comprehensive range of high and
low limits can be enabled and individually set for each
measured parameter.
Highlight the value parameter you wish to change then
check the Enable periodic sampling box. Check the
threshold enable box and then enter the value for that
threshold. Repeat this for all parameters of interest.
Each parameter has five threshold limits: High-high,
High, Low, Low-Low, and Deadband.
High-High limit - specifies an absolute limit for comparison that is higher than the high limit.
High limit - specifices an absolute limit for comparison
that is higher than the low limit.
Low limit - specifies an absolute limit for comparison
that is lower than the high limit.
Low-Low limit - specifies an absolute limit for comparison lower than the low limit.
Deadband limit - specifies how much a value can change
before another event is recorded.
The High-High must be greater than High, Low-Low less
than Low. Deadband is the equivalent of sensitivity. The
hysteresis values assigned to limits are set by the system.
All limit values are used to determine if corresponding
reporting or logging action should take place.
For example, if the Voltage Harmonic RMS is detected to
cross the threshold limit, then an event is recorded. If the
Voltage Harmonic RMS goes from out of limits to within
limits (that is, below the high limit minus the hysteresis
and above the low limit plus the hysteresis), then the
event is recorded. All activated Harmonic parameters and
value settings defined can be viewed under the Real-time
tab.
10-40
Series 5500 User’s Guide
5560 QOS
10
12. Flicker tab
Properties
Flicker (Flicker, MFLKO)
Pst Sample Interval
Plt Sample Interval
Values
Enable Trending (This page)
;
Sample Intervals (minutes)
10
180
Select the journal entry/entries to change
Pst of last complete interval (A)
Pst of last complete interval (B)
Pst of last complete interval (C)
Plt of last complete interval (A)
Plt of last complete interval (B)
Plt of last complete interval (C)
Sliding window Plt calculation (A)
Sliding window Plt calculation (B)
Sliding window Plt calculation (C)
Output 5-Pinst-peak value (A)
Output 5-Pinst-peak value (B)
Output 5-Pinst-peak value (C)
Output 4-1 min TC LPF of Pinst (A)
Output 4-1 min TC LPF of Pinst (B)
Output 4-1 min TC LPF of Pinst (C)
Output 3-square root of Pinst (A)
Output 3-square root of Pinst (B)
Output 3-square root of Pinst (C)
LPF of Output 3 (A)
LPF of Output 3 (B)
LPF of Output 3 (C)
Enable periodic sampling
High-High limit enabled
High-High limit
High limit enabled
High limit
Low limit enabled
Low threshold
Low-Low limit enabled
Low-Low limit
Deadband enabled
Deadband
;
0.00
0.00
0.00
0.00
0.00
The Flicker page is an extended trending setup page
unique to the 5560 DataNode. There are three flicker values available for trending: the Short term flicker or Pst, the
long term flicker or Plt, and Plt calculated on a sliding
window. Flicker is measured as per IEC 1000-4-15.
Under ENABLE TRENDING (THIS PAGE) is a checkbox
in the value field opposite Flicker which enables the
trending of values listed in this page. If the box is checked,
the settings on the page go into effect. If the box is not
checked, the remaining settings are persisted but are not
in effect.
Under SAMPLE INTERVALS are two numeric edit
controls: the Pst Interval and the Plt Interval. Pst
Interval is used to set the Pst calculation interval. The
default value is 10 minutes. Plt interval is used to set the
Plt calculation interval. The default value is 120
minutes.
Under SELECT JOURNAL ENTRY/ENTRIES TO
CHANGE, various flicker parameters can be trended
using periodic readings that are stored in a journal.
10-41
Series 5500 User’s Guide
10
5560 QOS
Highlight the value parameter you wish to change then
check the Enable periodic sampling box Check the
threshold enable box and then enter the value for that
threshold. Repeat this for all parameters of interest.
Threshold enable refers to the checkboxes opposite the
limits. Each parameter has five threshold limits: Highhigh, High, Low, Low-Low, and Deadband.
High-High limit - specifies an absolute limit for comparison that is higher than the high limit.
High limit - specifices an absolute limit for comparison
that is higher than the low limit.
Low limit - specifies an absolute limit for comparison
that is lower than the high limit.
Low-Low limit - specifies an absolute limit for comparison lower than the low limit.
Deadband limit - specifies how much a value can change
before another event is recorded.
The High-High must be greater than High, Low-Low less
than Low. Deadband is the equivalent of sensitivity. The
hysteresis values assigned to limits are set by the system.
All limit values are used to determine if corresponding
reporting or logging action should take place.
13. Advanced Harmonics tab
Properties
Values
Enable Trending (This page)
;
Advanced Harmonics (Individual, MHAIO)
;
Trend harmonics for phase A
Trend harmonics for phase B
;
Trend harmonics for phase C
;
Phase Voltages
Harmonics to Trend
2-25
Neutral Voltages
Phase Currents
Neutral Current
Phase Voltages
Neutral Voltages
Interharmonics to Trend
2-25
Phase Currents
Neutral Current
The following parameters are found under ENABLE
TRENDING (THIS PAGE): Advanced harmonics
(Individual) and Trend harmonics for phases A, B and
C. Opposite these parameters are checkboxes which
enable the trending of values listed in Advanced
harmonics page. If the box is checked, the settings on the
page go into effect. If the box is not checked, the
remaining settings are persisted but are not in effect.
Voltage and current harmonics for each phase and neutral
channel can be trended under HARMONICS TO
TREND. Similarly, voltage and current interharmonics
for each phase and neutral channel can also be trended
sample
harmonic
values to
trend
sample
interharmonic
values to
trend
under INTERHARMONICS TO TREND. The value
fields are left blank to allow the users to choose the
numbers or the range of harmonic frequencies to trend.
Numbers can be entered individually with commas separating the numbers, or a range of harmonics can be
specified using a dash between lower and upper values.
Also, the suffix ‘o’ or ‘e’ can be used to specify only the
odd or even harmonics, respectively, in a given range.
Resulting individual harmonic sampling and graphs can
be seen in the Smart Trends folder under the Views tab.
10-42
Series 5500 User’s Guide
5560 QOS
10
14. Transducers tab
Properties
Phase rotation
Phase A voltage
Phase A current
Phase B voltage
Phase B current
Phase C voltage
Phase C current
Neutral voltage
Neutral current
Signal is connected to
Channel is inverted
Values
Normal (counter clockwise)
{Normal (counter clockwise), Reverse (clockwise)}
Channel Mapping
Channel 1
Transducer Ratios
Phase A-N VT
Phase B-N VT
Phase C-N VT
Neutral VT
Phase A CT
Phase B CT
Phase C CT
Neutral CT
Phase A-B VT
Phase B-C VT
Phase C-A VT
Transducer Primary
Transducer Secondary
Magnitude correction
Phase correction
DC offset
phase-to-neutral or
phase-to-phase values
displayed depend
upon the Wiring
Configuration set
under the Basic tab
1.00000000
1.00000000
1.00000000
0.00000000
0.00000000
Transducers are typically PTs (potential transformers) and
CTs (current transformers) that are used to interface the
instrument to the power circuit. PTs allow the instrument
to measure circuits that are not within the measurement
range of the instrument. CTs measure the current of the
circuit and convert it to within the measurement range of
the instrument.
For Phase rotation, users can choose whether to have
phasor shift clockwise or counterclockwise, depending on
the way they have set up their system. Click the value
field to display the drop down menu featuring Normal
(counter clockwise) or Reverse (clockwise). Either
orientation will yield the same mathematical calculations
of voltage and current measurements. The 5560 is able to
automatically determine phase rotation of the voltage
channels and then match up the current channels. The
5560 DataNode will swap voltage phases to ensure positive sequence phase rotation (counter clockwise according
to IEEE definitions) and then swap and invert current
channels to match.
Series 5500 User’s Guide
Channel mapping is used to correct for errors in wiring
the instrument to the circuit. If a mistake is made, such
as an inverted CT or a phase is connected to the wrong
channel, it can be corrected in software instead of
changing the wiring to the instrument. Note that it is
recommended that the actual wiring be changed but
channel mapping can correct the problem if this is not
practical.
A channel-mapping array is provided to permit manual
configuration of channel swapping and inversion. Under
CHANNEL MAPPING, click on the corresponding
voltage or current phase to show which channel the
Signal is connected to. Click and enable the value field
opposite Channel is inverted to as it applies.
The channel-mapping array works by specifying a
numeric code in each array slot that indicates which
phase is connected to the physical 5560 DataNode
channel.
10-43
10
5560 QOS
Normally, the channels and phases are matched as shown
below. Channels can be swapped and/or inverted to
correct recurring mistakes.
Voltage Phase A
Voltage Phase B
Voltage Phase C
Voltage Neutral
Current Phase A
Current Phase B
Current Phase C
Current Neutral
Channel 1
Channel 2
Channel 3
Channel 4
Channel 5
Channel 6
Channel 7
Channel 8
The DataNode employs two A/D converters to sample the
voltage and current channels for a given phase simultaneously. Measurement errors may result if the voltage and current
signals are not correctly paired. Under TRANSDUCER
RATIOS, users can set values for the Transducer Primary
and Transducer Secondary. Values to account for any
voltage or current transformers can be entered for each input
channel. The primary and secondary values are entered. For
example, if the primary voltage is 2400 volts and the secondary voltage is 120 volts, then those values should be
entered. This gives an effective 20:1 reduction in voltage.
When the input voltage to the DataNode is 120V, the
displayed value will be 2400 volts. The Magnitude
correction, Phase correction, and DC offset values are not
programmable.
15. Advanced tab
Properties
Values
Broadcast Group ID
Enable sending rms trigger
Enable responding to received rms trigger
Enbable sending transient trigger
Enable responding to received transient trigger
Cross Triggering
1234
Broadcast address - if empty, uses local
When configurations differ ...
User Account Password
Admin Account Password
InfoNode Access User ID
InfoNode Access Password
Firmware Access User ID
Firmware Access Password
Reset 302 Default Setup
Clear 332 Database and reboot
Do both of the above
Don't save data from next download
Clear last journal ID
Communications
... use the DataNode setup
{use the DataNode setup}
{use the InfoNode setup}
Passwords
*************
click to display
drop down
menu
*************
admin
************
admin
*************
One Time Operations
One Time Firmware Operations
CAUTION: These operations will copy new firmware to the DataNode
Load IOP (302) firmware
Load ACP (332) firmware
Load both IOP (302) and ACP (332) firmware
Load both to all DataNodes
10-44
Series 5500 User’s Guide
5560 QOS
Parameters under the Advanced tab allow the administrator
or user to set up functions that affect communications,
information access and download between the InfoNode
and DataNode systems.
The 5560 can be configured to issue a UDP cross-trigger
broadcast message when RMS variation and/or Transient
occurs. The 5560 can also be configured to listen for such
messages and cause RMS variation or transient recording
to occur regardless of whether or not its own trigger conditions for that instrument were met. Under CROSS TRIGGERING, a Broadcast Group ID is assigned to allow for
different groups of cross-trigger senders/recipients. The
broadcast ID number in the InfoNode must match the
broadcast group ID set under the TCP/IP parameter of the
Datanode. The DataNode also uses this ID mechanism for
multiple DataNode cross triggering and is guaranteed only
on an un-routed network. The group ID is sent along with
the broadcast message and only those receivers with the
same group ID will respond to the broadcast if so enabled.
The broadcast address can be specified to send a broadcast
to a directed broadcast address other than the local network
if desired but results cannot be guaranteed and data may be
lost if the message takes too long to arrive at its destination.
Checkboxes are seen opposite the next four items Enable
sending rms trigger, Enable responding to received rms
trigger, Enable sending transient trigger, Enable
responding to received transient trigger. The user
specifies which event types are generated and/or listened
for through these checkboxes.When said parameters are
activated, the system in effect utilizes trigger messages as
trip signals. If Broadcast address is empty, message
broadcast is routed through the local network. The user
specifies a group ID and optionally a broadcast address.
Under COMMUNICATIONS, users are given the option to
return to the default InfoNode or DataNode settings When
configurations differ and communication errors occur.
Access privileges are determined under PASSWORDS.
The passwords entered in the InfoNode system must match
the ones stored under the Password section of the
DataNode. Otherwise, access to information may be
denied. The User Account Password and Admin Account
Password refer to two different user categories. An Admin
User can create and add an account for a new Basic User.
Both Admin and Basic users can assign properties such as
their own user name and password. Refer to the Users
section on Chapter 7 Setup Page for more details on this.
Series 5500 User’s Guide
10
The default InfoNode Access User ID is 'admin'. This
has a matching valid InfoNode Access Password. The
default password is ‘password’. These parameters allow
access to view and change information in the InfoNode
system. The default Firmware Access User ID is
'admin'. This also has a matching valid Firmware
Access Password. These parameters allow access to
view and change information in the DataNode system.
To change passwords, simply click on the Password
value fields. A confirmation window appears everytime
you click on the password value field. The window asks
whether you want to change and save a new password.
Parameters are also available for ONE TIME OPERATIONS on the 5560 DataNode. These one time procedures include configuring the DataNode to its default
settings and/or clearing memory space by rebooting.
Observe caution in undertaking these procedures since
they cannot be undone. To return to the default
DataNode settings, activate the Reset 302 default setup
value field. To clear old data and reboot DataNode, activate the Clear 332 Database and reboot value field. To
execute both procedures at one time, activate Do both of
the above. To save memory space, the administrator or
user may choose to activate Don't save data from next
download. To discard the most recent journal ID entries,
activate the Clear last journal ID value field.
Finally, parameters for downloading new or updated
firmware are available under ONE TIME FIRMWARE
OPERATIONS. A firmware is a program or instruction
stored in Flash memory which implements the communications interface and data acquisition between the outside world and the instrument. Based on the parameters
available, the administrator or user can activate value
fields to Load IOP firmware or to Load ACP
firmware or to Load both IOP and ACP firmware.
The IOP and ACP firmware are two different sets of
firmware. The IOP communicates directly with the
InfoNode, while the ACP is comprised of the host CPU
and DSP. If the value fields are activated, new firmware
is downloaded on demand from InfoNode to DataNode.
New firmware is downloaded automatically if the boot
ROM finds that the existing firmware in the DataNode
is missing or corrupt. The administrator or user also has
the option to Load Both (IOP and ACP) firmware to
all DataNodes. Download is accomplished using the
standard Internet File Transfer Protocol (FTP). The
DataNode must be connected to the network where the
updates are to be extracted from to ensure a successful
download. Since these one time operations cannot be
undone, observe caution when performing download
firmware procedures.
10-45
10
5560 QOS
16. Accumulator Resets tab
Properties
Reset Real Power, DMD, total (Never reset)
Reset Reactive Power, DMD, total (Never reset)
Reset Apparent Power, DMD, total (Never reset)
Reset Peak Current Demand (A) (Never reset)
Values
Demand Resets
Reset Peak Current Demand (B) (Never reset)
Reset Peak Current Demand (C) (Never reset)
Reset Peak Current Demand (N) (Never reset)
Reset Average Peak Current Demand (Never reset)
Reset All Values
Energy Accumulators
Reset Phase Energy (Never reset)
Reset Total Energy (Never reset)
Reset Integrated Reactive Power (Never reset)
Reset Total integrated Reactive Power (Never reset)
Reset Forward fund. freq. WHrs (Never reset)
Reset Reverse fund. freq. WHrs (Never reset)
Reset Forward tot. fund. freq. WHrs (Never reset)
Reset Reverse tot. fund. freq. WHrs (Never reset)
Reset Forward fund. freq. VarHrs (Never reset)
Reset Reverse fund. freq. VarHrs (Never reset)
Reset Forward tot. fund. freq. VarHrs (Never reset)
Reset Reverse tot. fund. freq. VarHrs (Never reset)
Reset Fundamental freq. V A Hours (Never reset)
Reset Total Fund. freq. VA Hours (Never reset)
In connection with electric utility billing practices, the
InfoNode and DataNode system has an interface to reset
demand and energy accumulation readings. The
Accumulator Resets tab allows one to reset the
parameters to defined values, but not to change or configure new values. The notation 'Never reset' appears to
mean that the parameter values register original readings
and have never been reset at any time. The moment the
reset parameter is activated/enabled, the notation will
change and will reflect the date and time of last reset.
10-46
Under DEMAND RESETS, Real or True Phase power
demand, Reactive power demand, and Apparent power
demand can be reset. See Appendix E Glossary for the
definitions of the various power parameter values. The
system maintains a running maximum known as "peak
demand" on per phase basis and per average demand current value. It also stores the date and time of each peak
demand. Peak demand is the maximum electrical power
load consumed or produced in a defined period of time.
Under ENERGY ACCUMULATORS, the system calculates and stores accumulated values for energy (in kWHr
unit), reactive energy (in kVarH unit), and apparent
energy (in kVAH unit). Kilowatt-Hour (kWHr) is the
equivalent energy supplied by a power of 1000 watts for
one hour. Watt is the unit for real power. Kilovar-hour
(kVarH) is equal to 1000 reactive volt-ampere hours. Var
is an abbreviation for volt ampere reactive. It measures
the integral of the reactive power of the circuit into which
the instrument is connected. Var is the unit for reactive
power. Kilovolt-ampere (kVA) is equivalent to 1000
volt-amperes. VA is the unit for apparent power. Apparent
power is the product of voltage and current of a singlephase circuit in which the two reach their peaks at
different times. See Appendix F Glossary for the
definitions of the various power parameter values.
The accumulated energy values include real power factor
(average three-phase) which is mathematically defined as
"demand kW/demand kVA". It also displays integrated
Series 5500 User’s Guide
5560 QOS
and total integrated reactive power. The system also calculates and stores apparent energy (VA). Real Power (W) and
Apparent Power (VA) are reset together; you cannot reset
one without resetting the other. Likewise, the Watthour
Meter and Varhour Meter are reset together.
The system uses the fundamental frequency as reference
for calculating energy values in one of two modes: forward
or reverse. In forward mode, the circuit monitor
10
considers the direction of power flow, allowing the accumulated energy magnitude to both increase and decrease.
In reverse mode, the circuit monitor accumulates energy
as positive, regardless of the direction of power flow. In
other words, the energy value increases, even during
reverse power flow. The default accumulation mode is
reverse.
10-47
Series 5500 User’s Guide
10
5560 QOS
EN50160 Compliance Default Trending Setup
PARAMETERS
TAB WHERE
FOUND
STATUS
DEFAULT VALUES
& COMMENTS
Total Fund Freq Q
ADV. ENERGY
OFF
Fund Freq VA Hrs
ADV. ENERGY
OFF
Fwd Fund Freq varHrs
ADV. ENERGY
OFF
Fwd Fund. Freq WHrs
ADV. ENERGY
OFF
Rvs Fund Freq varHrs
ADV. ENERGY
OFF
Rvs. Fund. Freq. WHrs
ADV. ENERGY
OFF
Rms Current Individual Harmonics
ADV. HARMONICS
OFF
Rms Voltage Individual Harmonics
ADV. HARMONICS
ON
Arith. Sum PF
ADV. METER
OFF
Arithmetic Sum DF
ADV. METER
OFF
Arithmetic Sum VA
ADV. METER
OFF
Displacement Power Factor
ADV. METER
OFF
Fund Arithmetic Sum VA
ADV. METER
OFF
Fund Vector Sum VA
ADV. METER
OFF
Vector Sum DF
ADV. METER
OFF
Vector Sum PF
ADV. METER
OFF
Vector Sum VA
ADV. METER
OFF
Residual Current
ADV. METER
OFF
Net Current
ADV. METER
OFF
Active Power Demand
DEMAND
ON
is TOTAL only
Apparent Power Demand
DEMAND
ON
is TOTAL only
Avg PF @ Peak P Dmd
DEMAND
OFF
Avg PF @ Peak Q Dmd
DEMAND
OFF
P Dmd @ Peak Q Dmd
DEMAND
OFF
P Dmd @ Peak S Dmd
DEMAND
OFF
Peak Active Power Demand
DEMAND
OFF
Peak Apparent Power Demand
DEMAND
OFF
Peak Demand Current
DEMAND
OFF
Peak Reactive Power Demand
DEMAND
OFF
PF @ Peak VA Dmd
DEMAND
OFF
PF Demand
DEMAND
OFF
Predicted P Dmd
DEMAND
OFF
Predicted Q Dmd
DEMAND
OFF
Predicted VA Dmd
DEMAND
OFF
Q Dmd @ Peak P Dmd
DEMAND
OFF
Q Dmd @ Peak VA Dmd
DEMAND
OFF
Reactive Power Demand
DEMAND
ON
Rms Current Demand
DEMAND
OFF
VA Dmd @ Peak P Dmd
DEMAND
OFF
VA Dmd @ Peak Q Dmd
DEMAND
OFF
ANSI Transformer Derating Factor
HARMONICS
OFF
Current Crest Factor
HARMONICS
OFF
Current THD
HARMONICS
OFF
Current THD (Rms)
HARMONICS
ON
Current TID
HARMONICS
OFF
2-25 for Va,Vb,Vc. Limits per table.
is TOTAL only
A,B,C,TOT. no limits
10-48
Series 5500 User’s Guide
5560 QOS
EN50160 Compliance Default Trending Setup
PARAMETERS
TAB WHERE
FOUND
STATUS
Current TID (Rms)
HARMONICS
OFF
Harmonic Power
HARMONICS
OFF
HRms Voltage
HARMONICS
OFF
IEEE 519 Current TDD
HARMONICS
OFF
Interharmonic Rms Current
HARMONICS
OFF
Interharmonic Rms Voltage
HARMONICS
ON
IT Product
HARMONICS
OFF
Rms Harmonic Current
HARMONICS
OFF
Transformer K Factor
HARMONICS
OFF
Voltage Crest Factor
HARMONICS
OFF
Voltage THD
HARMONICS
OFF
Voltage THD (Rms)
HARMONICS
OFF
Voltage TID
HARMONICS
OFF
Voltage TID (Rms)
HARMONICS
OFF
Voltage TIF
HARMONICS
OFF
Voltage TIF (Rms)
HARMONICS
OFF
V RMS Harmonic
HARMONICS
OFF
I Imbalance (rms/rms avg)
UNBALANCE
OFF
I Imbalance (S0/S1)
UNBALANCE
OFF
I Imbalance (S2/S1)
UNBALANCE
OFF
Negative Sequence Current
UNBALANCE
OFF
Negative Sequence Voltage
UNBALANCE
ON
Positive Sequence Current
UNBALANCE
OFF
Positive Sequence Voltage
UNBALANCE
ON
V Imbalance (rms/rms avg)
UNBALANCE
OFF
V Imbalance (S0/S1)
UNBALANCE
OFF
V Imbalance (S2/S1)
UNBALANCE
ON
Zero Sequence Current
UNBALANCE
OFF
Zero Sequence Voltage
UNBALANCE
ON
Active Power
METER
OFF
Apparent Power
METER
OFF
Frequency
METER
ON
Reactive Power Demand
METER
OFF
V/I Angle
METER
OFF
True Power Factor
METER, ADV. METER
ON
Var Hours
REVENUE
OFF
Watt Hours
REVENUE
OFF
Rms Current
RMS VARIATION,
TRANSIENTS, METER
OFF
DEFAULT VALUES
& COMMENTS
2/3 thru 24/25, Va,Vb, Vc. Limits
per table.
Is TOTAL only. No limit
Is TOTAL only. No limit
Is TOTAL only. Limits per table.
Is TOTAL only. No limit
Is TOTAL only. Limits per table.
Total, no limits.
Rms Voltage
RMS VARIATION
ON
For Va, Vb, Vc: Low and High to
90 and 110%. All related values
per 5530 defaults.
Transient Voltage
TRANSIENTS
ON
For Va, Vb, Vc: Waveshape
10%/10%; Crest set to 200%.
ON
For Va, Vb, Vc : H-Hi to 150%; Hi
to 115%; Lo to 85%; Lo-Lo to 1%,
Deadband off.
Rms Voltage
METER
10
10-49
Series 5500 User’s Guide
10
5560 QOS
This page intentionally left blank.
10-50
Series 5500 User’s Guide
5571 DataNode Setup
11
5571/5571S DataNode Setup
Refer to the DataNode 5571/5571S User's Guide for
more detailed information about connections and setups.
Programming Standard Tabs
LEGEND (Please note the following conventions used
in the screen displays):
Items in italics are not programmable, but included for
information purpose to the user.
Items in bold are examples of what can be entered.
Selections available in drop down menu are enclosed in
brackets { xxxx }.
Caution: Dranetz-BMI has already set default values for
the various parameters in each DataNode. The default
values have been tested to result in optimal system performance. Users are advised not to change the default
value settings unless there are applications which require
advanced setups.
Basic Setup contains data on Communications, Display,
Inputs and Transformer Ratios (Scale Factors).
A 5571S DataNode
1. General tab
Properties
Name
Description
Serial Number
Version
Values
Identification Information
Edison 5571
7100UA53
4H
Status Information
;
Active
Get settings from DataNode on activation
Last contact at
11/05/2002 15:02:49
Health
System health is normal
General Setup contains DataNode Identification and Status information. Users can enter a 30 character alphanumeric
name for the DataNode, detailed DataNode description (such as location of DataNode), and enable checkboxes to activate DataNode connection settings.
General tab parameters of the 5571/S DataNode function similarly as that of the 5530/5520 DataNode. Refer to page
8-2 for the detailed description of the General tab parameters displayed above.
11-1
Series 5500 User’s Guide
11
5571 DataNode Setup
2. Basic tab
Properties
Serial Port
New Device Address
Present Device Address
Display Thresholds as
Low Neutral Range
Power Type
Input Ferquency (Hz)
Base Voltage (Vrms)
Primary
Secondary
Primary
Secondary
Primary
Secondary
Primary
Secondary
Primary
Secondary
Primary
Secondary
Primary
Secondary
Primary
Secondary
Values
Communications
COM2
{COM1, COM 2}
1
1
Display
Percent
{Volts, Per Unit, Percent}
Input
Three Phase Wye
{Single Phase, Split Single Phase, Three
Phase Wye, Three Phase Delta}
60
{50, 60}
208.0
Voltage A - Transformer Ratios
1.000
1.000
Current A - Transformer Ratios
1.000
1.000
Voltage B - Transformer Ratios
1.000
1.000
Current B - Transformer Ratios
1.000
1.000
Voltage C - Transformer Ratios
1.000
1.000
Current C - Transformer Ratios
1.000
1.000
Voltage N - Transformer Ratios
1.000
1.000
Current N - Transformer Ratios
1.000
1.000
11-2
Series 5500 User’s Guide
5571 DataNode Setup
COMMUNICATIONS parameters include:
•Serial Port: either COM1 or COM2 of the InfoNode
•New Device Address: must be a unique address
between 1 and 89 for each DataNode; if more than
one DataNode is to be connected on the same COM
port, they should be added one at a time; trying to
connect multiple units with the default address of 1
would not be successful
•Present Device Address: either what was previously
entered or the default address of 1 (one); if only one
DataNode is connected to the COM port and the
present address is unknown, 0 (zero) can be used
DISPLAY parameters include:
•Display Thresholds as: to display parameters in either
volts, percent, or PU (per unit)
11
INPUTS parameters include:
•Low Neutral Range: check box to enable Low Range
on Neutral Voltage Channel
•Power Type: sets the Wiring Configuration to either
single phase, split phase, 3 phase delta, 3 phase wye
•Input Frequency (Hz): either 50 or 60 Hz
•Base Voltage: needed if using percent or per unit
TRANSFORMER RATIOS include:
•PT Ratios: if the voltage inputs are connected to an
external PT, enter the primary and secondary values
•CT Ratios: if the current inputs are connected to an
external CT, enter the primary and secondary values
Memory Setup allocates memory along with number of
cycles captured to different types of events.
11-3
Series 5500 User’s Guide
11
5571 DataNode Setup
3. Memory tab
Properties
Enabled
Cycles Before
Cycles After
Enabled
Cycles Per Sample
Max. Event Duration (samples)
Cycles to Trigger
Cycles to End
Enabled
Cycles Before
Cycles After
Enabled
Interval (sec.)
Enabled
Interval (sec.)
Enabled
Demand Interval (min.)
Sliding Interval (min.)
Values
Waveform Changes
;
1
4
RMS Events
;
1
512
1
1
Impulses
;
1
4
Snapshots
;
10860
Timeline
;
10860
Demand Report
;
15
{1, 5, 15, 30, 60}
15
{1, 5, 15, 30, 60}
WAVEFORM CHANGES parameters include:
•Enabled: Waveshape (distortion) enabled check box
•Cycles Before: number of cycles before (typically 1)
•Cycles After: number of cycles after (typically 4)
SNAPSHOTS parameters include:
•Enabled: Snapshot (waveforms) enabled check box
•Interval (sec.): interval between recording in seconds
(typ. 10860)
RMS EVENTS parameters include:
•Enabled: RMS variation enabled check box
•Cycles per Sample: cycles per measurement sample
(typically 1)
•Max. Event Duration (samples): maximum event
duration (typ. 512)
•Cycles to Trigger: cycles to trigger (typ. 1)
•Cycles to End: cycles to end (typ. 1)
TIMELINE parameters include:
•Enabled: Timeline (steady state min/max/avg) enabled
check box
•Interval (sec.): interval between recording in seconds
(typ. 900)
IMPULSES parameters include:
•Enabled: Impulses (transients) enabled check box
•Cycles Before: cycles before (typ. 1)
•Cycles After: cycles after (typ. 1)
DEMAND REPORT parameters include:
•Enabled: Demand report (power) check box enabled
•Demand Interval (min.): demand interval in minutes
(typ. 15)
•Sliding Interval (min.): sliding demand interval in minutes (typ. 15)
11-4
Series 5500 User’s Guide
5571 DataNode Setup
11
4. Thresholds tab
Properties
Voltage (Percent)
Duration (% of cycle)
Swell (Percent)
Sag (Percent)
Swell (Percent)
Sag (Percent)
Swell (Percent)
Sag (Percent)
Swell (Percent)
Peak Voltage (Vpk)
Values
Waveform Changes
10.0
10
RMS Events
RMS Event - Voltage A
110.0
90.0
RMS Event - Voltage B
110.0
90.0
RMS Event - Voltage C
110.0
90.0
RMS Event - Voltage N
10.0
Impulses
200.0
Thresholds Setup provides you with the ability to set
limits for triggering of various parameters. Values
entered are based on the display settings under the Basic
tab (volts, percent, or per unit).
WAVEFORM CHANGES parameters include:
•Voltage: waveshape faults voltage variation from previous cycle (typ 8%)
•Duration: duration or window over which to compare
against in % of cycle (typ. 10)
RMS EVENTS parameters include RMS Events on per
phase basis:
•Swell (hi limit, typically 110%)
•Sag (low limit typically 90%)
IMPULSES parameter consists of:
•Peak Voltage (Vpk): Impulse in volts peak (typ 200)
11-5
Series 5500 User’s Guide
11
5571 DataNode Setup
5. Advanced tab
Properties
UPS Duration (sec.)
Send firmware on next connect?
Showing check sum error?
Send cal. on next connect?
5571 GPS option installed?
Values
300
Advanced Setup provides you with the ability to set
limits to setup other functions such as UPS time, not
previously described.
•UPS Duration (sec.): typ 300
•Send firmware on next connect?: check box
to enable such from InfoNode to DataNode
•Showing check sum error?: check box to enable
such in log
•Send calibration on next connect?: check box to
enable such from DataNode to InfoNode
•5571 GPS option installed?
11-6
Series 5500 User’s Guide
ADAM Handler Setup
12
ADAM Instrument Handler Setup
This section applies to the set up of the individual InfoNode ADAM instrument handler. Programming of individual
modules are accomplished via switch settings on the modules themselves. This handler supports both the 4000 and 5000
series modules from Advantech. The 4000 series consists of stand alone modules, where each module is assigned a
unique RS-485 address between 1 and 254. The 5000 series uses a single chassis to hold 4 or 8 modules. The chassis is
assigned a single RS-485 address and the individual modules are addressed by slot number within the chassis. Note that
the ADAM 5000 chasis can communicate with the InfoNode via RS-485 (requires external adaptor) or RS-232.
ADAM Module Connection Setup
The following are required to setup and configure an ADAM environment:
ADAM Modules
A host computer, such as an IBM PC/AT, that can output ASCII characters with an RS-232 or RS485 port
Power supply for the ADAM Modules (+10 and +30 VDC)
ADAM Series Utility software
ADAM Isolated RS-232/RS-485 Converter (optional)
ADAM Repeater (optional)
Host Computer: Any computer or terminal that can output in ASCII format over either RS-232 or RS-485 can be connected as the host computer. When only RS-232 is available, an ADAM RS-232/RS-485 Converter is required to transform the host signals to the correct RS-485 protocol. Since this module is not addressable by the host, the baud rate must
be set using a switch inside the module. The factory default setting is 9600 baud. The converter also provides opto-isolation and transformer-based isolation to protect your equipment.
Power Supply: ADAM Module operation is guaranteed when using any power supply between +10 and +30 VDC. All
power supply specifications are referenced at module connector. When modules are powered remotely, the effects of line
voltage drops must be considered. All modules use on-board switching regulators to sustain good efficiency over the +10
and +30 V input range, therefore we can assume that the actual current draw is inversely proportional to the line voltage.
Select power cables according to the number of modules connected and the length of the power lines.
Generic Connections for the 4000 Series ADAM Module
12-1
Series 5500 User’s Guide
12
ADAM Handler Setup
ADAM Utility Software: A menu-driven program is provided for ADAM Module configuration, monitoring and calibration. Dranetz-BMI ships ADAM Modules with the necessary Windows driver and the Utility software disk.
ADAM Repeater: When communication lines exceed 4,000 ft (1200 meter) or the number of ADAM modules
connected is more than 32, a repeater should be connected to expand the first segment. Up to 8 Repeater modules can be
connected allowing connection of up to 256 ADAM modules.
4080 M odule
4522 M odule
300 Ω
200 Ω
ADAM 4080 Module to KYZ Box Connection
For more information on ADAM Module setup, installation and configuration:
Refer to the ADAM 4000 Series User’s Manual for more details on how to configure, set up and install the ADAM modules. The Windows driver and the Utility disk for the ADAM-4000 Series are shipped along with the ADAM 4000 Series
User’s Manual, Copyright ©1997 Advantech Co., Ltd. The user’s manual can also be accessed online at
http://service.advantech.com.tw/download/Files/1-A2XID/Adam-4000_ed7.pdf
12-2
Series 5500 User’s Guide
ADAM Handler Setup
12
ADAM 4060 Contact Closure Module Setup
The ADAM 4060 relay contact closure module is used to signal notifications to designated recipients. Data for the
ADAM modules may be configured in various format, one of which is the hexadecimal format. The procedure below
describes how to set up the optional ADAM contact module to relay notifications from DualNode 5593 to the designated
recipient.
NOTE: Only those with admin privileges may set whether to dispatch notifications or not. Users who access the
InfoNode system as Guest, Viewer or Operator are not allowed to dispatch notifications nor change time settings when
notifications will be sent to recipients.
1. The RS232 cable between COM1 on the InfoNode and the ADAM 232 to 485 converter is wired 'straight' (as in
Dranetz-BMI 8010 PQNode) i.e. not null Modem.
2. There is no need to set up an ADAM 4060 or 5060 DataNode. It is just an alarm feature programmed in the
Recipients section.
3. Using the setup functions under Setup Page, set the unit up as a recipient. Recipients determine who will receive
notifications.
4. Enable the Dispatch Notifications field in the Recipients setup screen. Go to Setup Page - Notifications > Recipients
> General tab. See page 7-5 for more information on the Recipients - General properties tab.
12-3
Series 5500 User’s Guide
12
ADAM Handler Setup
5. The Hex value in the ADAM 4060 tab, under the ADAM folder, is the given HEX value of the particular 4060 viz 01.
Go to Setup Page - Communications > ADAM > ADAM 4060 tab. See pages 7-12 to 7-13 for more information on
the Communications - ADAM 4060 properties tab.
6. The relay (1-4) HEX address is different. It is chosen from the drop down box in the recipient section. For example,
Relay 1 is 0001 and is HEX 01; Relay 4 is 1000 and is HEX 8. Go to Setup Page - Notifications > Recipients >
ADAM 4060 tab. See page 7-6 for more information on the Recipient - ADAM 4060 notification setup screen.
NOTE: It takes approximately 4 seconds for a test transmission to close the relay and around 3.5 minutes for a rms sag
to be alarmed.
12-4
Series 5500 User’s Guide
ADAM Handler Setup
12
Signature System supports a wide variety of ADAM modules to fit any applications. See page 12-6 for the list of available modules supported by the Signature System. Right-click on the ADAM Module folder and click on Add DataNode
to add your particular ADAM module. Select the ADAM DataNode site name type and your work space area will be displayed on the right frame. Polling rate for ADAM modules typically last from 2 to 5 seconds (not a guaranteed rate). Use
the tabs across the bottom of the page to select the appropriate group of programmable features. The parameters available in each tab are discussed in detail in the next section.
1. General tab
The General tab is common with all other Instrument Handler Setup tabs. It contains ADAM DataNode specific status
information.
IDENTIFICATION INFORMATION includes the name and description that users can assign to the ADAM DataNode.
Simply click on the Name or Description value field to type in the space provided. The Name property is used to identify the instrument within the InfoNode and when data is downloaded from the InfoNode. The Description field allows a
longer more meaningful description string to be associated with the instrument.
The Serial Number and Version of the DataNode hardware are not available and will show as ‘None’. The InfoNode
supplies this information after establishing communications with the instrument. This instrument-specific information is
available only for viewing and cannot be changed from the InfoNode.
STATUS INFORMATION properties include the Active checkbox that indicates when the instrument should be online
and available for communications and download. The Get settings from DataNode on activation property is not available for ADAM modules.
The InfoNode records the date and time of Last contact with the instrument. It also indicates Health status, whether the
system is functioning normally or not. Both information are set by default and cannot be changed by users. The
InfoNode supplies both contact and health information after establishing communications with the instrument.
12-5
Series 5500 User’s Guide
12
ADAM Handler Setup
2. Basic tab
The Basic Tab is used to select a module type and set the Module address.
The following ADAM modules are supported:
4000 Series
4017
8 Channel Analog Input
4018
8 Channel Thermocouple/General Analog Input
4018M 8 Channel Thermocouple/General Analog Input with memory
4050
7 Channel Digital Input/8 Channel Digital Output (Output not supported)
4052
8 Channel Digital Input (6 differential, 2 single ended)
4053
16 Channel Digital Input
4080
2 Channel Counter/Frequency Module (up/down counter mode only)
5000 Series
5000
4 Slot Chassis
5000E 8 Slot Chassis
5017
8 Channel Analog Input
5018
7 Channel Thermocouple/General Analog Input
5050
16 Channel Digital Input/Output (Output not supported)
5051
16 Channel Digital Input/Output
5052
8 Channel Isolated Digital Input
5080
4 Channel Counter/Frequency Module (up/down counter mode only)
The ADAM Module dropdown property allows selection of the desired module from the available module types.
The Module Address property is used to specify the RS-485 address where ADAM 4000 series modules will be found.
For ADAM 5000 series modules, this is the address of the 5000 or 5000e chassis. The 5000 Series Slot Number is used
to indicate the position of the module in the chassis. Positions start at 0.
12-6
Series 5500 User’s Guide
ADAM Handler Setup
12
3. Module tab
Once the Module type has been selected, the remaining tabs apply to the specific Module selected. The Module tab is
module-specific and tabs vary depending on module type.
12-7
Series 5500 User’s Guide
12
ADAM Handler Setup
4. Channel tab (for Thermocouple/General Analog Input Modules - ADAM 4018, 5018)
When a general purpose analog input module or thermocouple module with voltage or current range is selected the
Channel Tab contains the following properties.
The tab shows each channel available for the selected module and range. The channels are labeled Channel 0 through
Channel n where n is the number of channels available. By selecting one of the entries in the list, you will be setting
the parameters for that channel.
The Enable property signals that the selected channel is to be monitored and stored.
The Channel Name property is used to label and select this channel in other interfaces in the InfoNode. Any arbitrary
name with up to 80 characters can be specified .
The Quantity Measured, Characteristic and Units properties are used to define the channel type in the InfoNode database. An example might be Voltage (Quantity Measured), Instantaneous Sampled (Characteristic), and Volts (Units).
The Channel Scale property specifies the number used to scale the value read from the ADAM Module. This depends
on the transducers that are measuring the real signal. For instance, a speed sensor might output 1 Volt per 50 rpm which
would give a Channel Scale of 50.
The Channel Offset property allows an offset to be applied to the signal measured from ADAM module. This must be
specified in scaled units. If a pressure transducer were to output 0 volts at 1000 mbar and you desire a reading of 1000
mbar, specify 1000 for the offset assuming the appropriate scale was specified in the Channel Scale to convert input signal to mbar.
12-8
The Averaging Interval property is used to tell the system how often to store values for this unit. The signals are sampled as quickly as the system can depending upon the number of instruments attached. The data is aggregated into minimum, maximum and average values over the averaging period and stored at the end of the interval.
Series 5500 User’s Guide
ADAM Handler Setup
12
5. Channel tab (for General Digital Input Modules - ADAM 4050/4052, 5050/5052)
The tab shows each channel available for the selected module. The channels are labeled Channel 0 through Channel n
where n is the number of channels available. By selecting one of the entries in the list, you will be setting the parameters
for that channel. Note that while the channels on the ADAM units begin numbering at 0, the channel numbering here
begins at 1. Input 0 maps to channel 1, input 1 maps to channel 2, etc.
The Enable property signals that this channel is to be monitored and stored. When the channel is enabled, a steady state
trend entry is made at every transition from low to high or high to low.
The Channel Name property is used to label and select this channel in other interfaces of the InfoNode. Any arbitrary
name with up to 80 characters can be specified .
The Hi to lo transition trigger property when checked will cause an event to be generated whenever the signal transitions from a logical 1 to a logical 0.
The Lo to hi transition trigger property when checked will cause an event to be generated whenever the input signal
transitions from a logical 0 to logical 1.
12-9
Series 5500 User’s Guide
12
ADAM Handler Setup
6. Channel tab (for Counter Input Modules - ADAM 4080, 5080)
The tab shows each channel available for the selected module and range. The channels are labeled Channel 0 through
Channel n where n is the number of channels available. By selecting one of the entries in the list, you will be setting the
parameters for that channel.
The Enable property signals that the selected channel is to be monitored and stored.
The Channel Name property is used to label and select the channel in other interfaces of the InfoNode. Any arbitrary
name with up to 80 characters can be specified.
The Data Recording Type property specifies how the data is to be stored. Data storage options are either Interval or
Accumulator. For Interval data, the value of the counter at the beginning of the sampling interval is subtracted from the
value of the counter at the end of the interval. For Accumulator data, accumulated value of the counter is stored.
The Quantity Measured, Characteristic and Units properties are used to define the channel type in the InfoNode database. Selection from these characteristics allows the InfoNode to group the channel with appropriate channels during
selection, and allow some reports to include the signals measured in more meaningful ways. Sample input values are
Voltage (for Quantity Measured), Instantaneous Sampled (for Characteristic), and Volts (for Units).
The Channel Scale property specifies the number used to scale the value read from the ADAM unit to the value you
wish to record. This depends on the transducers that are measuring the real signal. For instance, a flow sensor might output 5 counts per liter. If the unit of measure is in liters, the scale would be 1/5 or 0.20.
The Channel Offset property allows an offset to be applied to the signal measured from ADAM module. This must be
specified in scaled units. If a pressure transducer were to output 0 volts at 1000 mbar and you desire a reading of 1000
mbar, specify 1000 for the offset assuming the appropriate scale was specified in the Channel Scale to convert input signal to mbar.
The Averaging Interval property indicates how often the value should be saved. The values are read as fast as possible
to allow trigger checking as specified on the Advanced tab.
12-10
Series 5500 User’s Guide
ADAM Handler Setup
12
7. Advanced tab
The Advance tab is available for all analog and counter modules. It allows the specification of threshold limits for the
input channels.
The tab shows each channel available for the selected module and range. The channels are labeled Channel 0 through
Channel n where n is the number of channels available. By selecting one of the entries in the list, you will be setting the
thresholds for that channel.
There are 4 threshold settings available. These are used to specify the four available threshold trigger levels: Low-Low,
Low, High and High-High. Each threshold can be independently enabled and set.
12-11
Series 5500 User’s Guide
12
ADAM Handler Setup
This page intentionally left blank.
12-12
Series 5500 User’s Guide
Optional Equipment
13
Optional Accessories
The following optional accessories are available to
enhance the function and performance of theSeries 5500
InfoNode. Specifications are subject to change without
notice. Contact Dranetz-BMI Customer Service for the latest information on options and accessories.
Internal Options
Memory
(internal hardware for 5502)
•64M Flash Memory Module: 64MFLASH
•128M Flash Memory Module: 128MFLASH
•256M Flash Memory Module: 256MFLASH
Modem and GPS
(internal hardware and firmware for 5502 and 5504)
•56Kbps MNP10 Modem: 56KMDM
•GPS Receiver: GPSR
Software
(internal firmware for 5502 and 5504)
•PF Cap Directivity Answer Module: SW-PFCAP
•VAR Verifier Answer Module: SW-kVAR
(Requires SW-PFCAP - PF Cap Directivity SW
Module)
•RBM Indices Software Module: SW-RBMI
•Radial Line Fault SW Module: SW-RADL
•Sag Directivity SW Module: SW-SAG
•UPS Verification SW Module: SW-UPSV
•Advantech 4000/5000 ADAM Modules: SWIADAM
•GE KV Series of Wattmeters SW Module: SWGEKV
ADAM Module
•8 Channel Analog Input: ADAM 4017
•8 Channel Thermocouple/General Analog Input:
ADAM 4018
•8 Channel Thermocouple/General Analog Input w/
memory: ADAM 4018M
•7 Channel Digital Input/8 ChannelDigital Output:
ADAM 4050 (Output not supported)
•8 Channel Digital Input (6 differential, 2 single
ended): ADAM 4052
•16 Channel Digital Input: ADAM 4053
•Relay contact closure model: ADAM 4060
•2 Channel Counter/Frequency Module (up/down
counter mode only): ADAM 4080
•4 Slot Chassis: ADAM 5000
•8 Slot Chassis: ADAM 5000E
•8 Channel Analog Input: ADAM 5017
•7 Channel Thermocouple/General Analog Input:
ADAM 5018
•16 Channel Digital Input/Output: ADAM 5050
(Output not supported)
•16 Channel Digital Input/Output: ADAM 5051
•4 Channel Isolated Digital Input: ADAM 5052
•4 Channel Counter/Frequency Module (up/down
counter mode only): ADAM 5080
•RS-232 to RS-485 Converter: ADAM 4522
•Isolated RS-232 to RS-485 Converter: ADAM 4520
•12VDC 820ma power supply: ADAMPWR
Accessories
(external hardware for 5502-5504)
•AUI-to-Fiber Optic Transceiver: AUIFIBER
•Active Antenna for GPS w/ brackets: GPSANT
•100’ GPS Extension Cable: GPS100
•100’ Fiber Optic Extension Cable: FBR100
•9F-9F Pin Null RS-232 6’ Cable: RS232NUL
•10BaseT Null 6’Cable: 10BTNUL
•RS-232 to RS-485 Converter: RS232/485-9F
•Mounting Brackets (length: 15.12”): 550BRKTL
•Mounting Brackets (length: 8.88”): 550BRKTS
•19” Rack Mounting Panel: 55 RACK
•Dual Unit Mounting Enclosure: 55DUAL
•Enclosure for Single InfoNode (24x24x8):
NEMA4INFO
•INDC Power
13-1
Series 5500 User’s Guide
13
Optional Equipment
This page intentionally left blank.
13-2
Series 5500 User’s Guide
Specifications
InfoNode Specifications
Operating Range
AC Voltage
DC Voltage
Frequency
Power Consumption
NiCad Battery Replacement
UPS Time
Clock drift w/o GPS
5502
14
5504
90-250Vac
105-125Vdc
47-63Hz
35W max
4 years typical
10 seconds
10 msec/minute
maximum
32M
8M standard
90-250Vac
105-125Vdc
47-63Hz
35W max
4 years typical
10 seconds
10 msec/minute
maximum
32M
(hard drive)
Environmental
Operating Temperature
Storage Temperature
Operating Humidity
(non-condensing)
0 to 65°C
-20 to 70°C
0-95%
10 to 50°C
-20 to 70°C
0-95%
Physical Characteristics
Dimensions
Weight
Enclosure
13"W x 8"D x 5"H
7.1 lbs
Painted Aluminum
13"W x 8"D x 5"H
7.1 lbs
Painted Aluminum
Connections
Ethernet - 10 base T
Ethernet - AUI
COM1 - RS232
COM2 - RS232
GPS option
Modem option
RJ45
Female 15 pin D
Male 9 pin D
Male 9 pin D
Male BNC
RJ11C
RJ45
Female 15 pin D
Male 9 pin D
Male 9 pin D
Male BNC
RJ11C
Options
Memory
Flash
Disk Drive
64M, 128M, 256M
NA
NA
2G (available database,
not hard drive size)
10 msec
10 msec
Internal RAM Memory
Internal Flash Memory
GPS Receiver
Clock accuracy
Modem
Max Baud Rate
Type
Mounting
Rack mount
NEMA 4X
Bracket Set
56K
V56 / MNP 10
56K
V56 / MNP 10
19"
weatherproof
2 per unit
19"
weatherproof
2 per unit
Software
Upload Firmware
Browser
Via FTP
Microsoft IE5.5+
Via FTP
Microsoft IE5.5+
14-1
Series 5500 User’s Guide
14
Specifications
Theory of operation and detailed hardware
description
The InfoNode is based on a PC-104 bus architecture as
opposed to a PC ISA, EISA, or PCI bus. The CPU motherboard acts as the PC-104 backplane and implements a
PC architecture parallel port, serial RS-232/485 ports, an
Ethernet port, and a watchdog timer circuit. The parallel
port on 5502/04 is used as the interface to the power supply board.
There are three PC-104 modules used with the system the GPS, the Modem, and the solid state flash drive. The
solid state flash drive (16 MB for standard version) is the
core storage in the system for the primary system
firmware (3 MB) and also holds the data. The GPS uses
the Rockwell Zodiac chipset and is operated in binary
mode. The GPS is interfaced into the system by an
onboard serial port (COM3) and via a hard wired interrupt
request line (IRQ15). The optional modem is a 56 kbps
PC-104 bus modem that has an on-board serial port
(COM4). The 5504 replaces the solid state Flash drive
with a hard disk.
The motherboard also supports 1024K of on-board, write
protected flash memory which is used to hold the low
level boot code and diagnostics. This firmware allows
communication with the instrument even if the storage is
completely disabled. The InfoNode firmware architecture
is based on booting to the PharLap operating system monitor via this boot flash, then transferring control to either
the diagnostics program in the boot flash or to the primary
operating firmware on the solid-state drive.
boards power the unit, provide UPS capability during an
interruption or RMS variation, and is also where the hard
drive is mounted (5504). The power supply board communicates with the CPU board via a parallel port interface. This interface allows the InfoNode firmware to
detect when the power supply transitions to UPS so that
e-mail and/or pager notifications can occur and orderly
system shutdown can proceed. Upon a long duration
interruption, the InfoNode sends a signal to the power
supply board every few seconds to keep the UPS running
until these tasks are complete.
The InfoNode is an integral system component that participates in a hierarchical store-and-forward data/information management system with the added benefit of
advanced information processing at each stage in the
chain (DataNode, InfoNode, NodeCenter, NodeLink).
Data is stored internally using the Power Quality Data
Interchange Format (PQDIF) developed by Electrotek,
now being standardized by the IEEE as part of standard
1159.3. The system also uses ISO communication protocols (UCA). For enterprise systems, at the top of the
hierarchy is the NodeCenter management system (both
Utility and Facility versions) that is Microsoft NT Server
4.0/5.0 based. All end-user interaction with individual
DataNodes, InfoNodes and the NodeCenter system is via
a WWW browser. There are some stand-alone utility programs for administrative use when the NodeCenter software is not available (like backup/restore of individual
InfoNode databases, and periodic download of PQDIF
databases).
In addition to the PC-104 based CPU and boards, the
InfoNode contains two additional boards - the power supply and the power supply control board and UPS. These
14-2
Series 5500 User’s Guide
Specifications
Compliance information
FCC Part 68 Compliance Information
Introduction
Remote devices can be connected to the RJ-11C jack. A
modem is installed internal to the equipment.
Compliance with FCC Rules and Regulations
The internal modem complies with Part 68 of the FCC
rules. On the rear panel of this equipment is a label that
contains, among other information, the FCC registration
number and ringer equivalence number (REN) for this
equipment. If requested, this information must be provided to the telephone company.
Notification of the Telephone Company: All direct connection to the telephone network must be made through
standard plugs and jacks as described in Part 68, Subpart
F of the FCC Rules. The terminal equipment cannot be
used on public coin service provided by the telephone
company. Connection to Party Line Service is allowable
and subject to state tariffs. Contact the state public utility
commission, public service or corporation commission
for information.
Before connecting the equipment to the telephone network, notify the telephone company of the line that you
are using, the FCC Registration Number, the Ringer
Equivalence of the Modem, and the type of Jack used for
connection.
•FCC Registration Number:
5CQTAI-40146-MS-E
•Ringer Equivalence: 0.7B
•Phone Jack (USOC): RJ-11C
Ringer equivalence number: The REN is used to determine the quantity of devices which may be connected to
the telephone line. Excessive REN’s on the telephone
line may result in the devices not ringing in response to
an incoming call. In most, but not all areas, the sum of
14
the REN’s should not exceed five (5.0). To be certain of
the number of devices that may be connected to the line,
as determined by the total REN’s contact the telephone
company to determine the maximum REN for the calling
area.
Incidence of harm: If the terminal equipment causes harm
to the telephone network, the telephone company will
notify you in advance that temporary discontinuance of
service may be required. But if advance notice isn’t practical, the telephone company will notify the customer as
soon as possible. Also, you will be advised of your right to
file a complaint with the FCC if you believe it is necessary.
Responsibilities of the telephone company: The telephone
company may make changes in it’s facilities, equipment,
operations, or procedures that could affect the operation of
the equipment. If this happens, the telephone company
will provide advance notice in order for you to make the
necessary modifications in order to maintain uninterrupted
service.
In case of trouble: If trouble is experienced with this
equipment, please contact Dranetz-BMI Customer Service
Department, (732) 287-3680 for repair and warranty information. If the trouble is causing harm to the telephone network, the telephone company may request you to remove
the equipment from the network until the problem is
resolved.
Service: All service and repairs must be performed by
Dranetz-BMI. If unauthorized modification or repair is
performed, both the FCC Registration and the manufacturer’s warranty in effect become null and void. If a malfunction is suspected, it is your responsibility to contact
Dranetz-BMI Customer Service Department for further
instructions. Telephone Number: (732) 287-3680.
14-3
Series 5500 User’s Guide
14
Specifications
Maintenance and Service
In normal use, only the internal backup battery pack
requires periodic replacement. No other special maintenance or calibration of the InfoNode is required. Contact
Dranetz-BMI Technical Support in case of trouble.
Battery Pack Safety Precautions
• WARNING: DO NOT intentionally short circuit the
battery pack. The batteries are capable of providing
hazardous output currents if short circuited. Do not
attempt to charge the batteries with an external charger.
• ADVERTENCIA: NO ponga intencionalmente la
batería en cortocircuito. Las baterías son capaces de
proporcionar corrientes de salida peligrosas si están en
cortocircuito. No intente cargar las baterías con un cargador externo.
• AVERTISSEMENT: NE PAS court-circuiter délibérément le bloc-batterie. Lors d'un court-circuit, les batteries risquent d'émettre des courants effectifs dangereux. Ne pas tenter de charger les batteries au moyen
d'un chargeur externe.
• WARNUNG: Die Batterien dürfen NICHT
kurzgeschlossen werden. Im Falle eines Kurzschlusses
können die Batterien lebensgefährliche Ausgangsströme
leiten. Die Verwendung eines externen Ladegeräts kann
zu einer Explosion der Batterien führen.
Battery Safety Precautions
The following safety precautions must be adhered to.
o Keep batteries away from children. Never permit a child
to play with a battery as an ornament or toy.
o Do not disassemble battery or battery pack.
o Do not dispose of battery in fire.
o Dispose of a used battery promptly in accordance with
local Environmental Protection Agency (EPA) regulations.
o Visually inspect the battery pack for corrosion.
Medidas de seguridad de la batería
Deberán observarse las medidas de seguridad siguientes:
o No deberá mantenerse las baterías al alcance de los
niños. No deberá permitirse que un niño juegue con
una batería.
o No deberá desensamblarse ninguna batería ni el compartimiento de la misma.
o No deberá prenderse fuego a una batería.
o Toda batería agotada deberá desecharse de manera
rápida según las normas locales de la Agencia de protección del medio ambiente (EPA).
o Deberá verificarse que el compartimiento de las
baterías no esté corroído.
Mesures de sécurité relatives aux batteries
Il est très important de suivre les mesures de sécurité
suivantes.
o Ne pas laisser les batteries à la portée des enfants. Ne
jamais laisser un enfant jouer avec une batterie.
o Ne pas démonter de batterie ou de bloc-batterie.
o Ne pas jeter de batterie dans le feu.
o Se débarrasser rapidement des batteries usagées en se
conformant aux règlements de l’EPA (Agence américaine pour la protection de l’environnement).
o Inspecter le bloc-batterie à l’oeil nu pour rechercher
les signes de corrosion.
Batterie-Sicherheitsvorkehrungen
Die folgenden Sicherheitsvorkehrungen müssen
beachtet werden.
o Halten Sie Batterien von Kindern fern. Erlauben Sie
einem Kind unter keinen Umständen, eine Batterie als
Verzierung oder Spielzeug zu benutzen.
o Nehmen Sie Batterien oder Batteriepackungen nicht
auseinander.
o Entsorgen Sie Batterien nicht durch Verbrennen.
o Entsorgen Sie verbrauchte Batterien umgehend nach
den gesetzlichen Umweltschutzbestimmungen.
o Prüfen Sie die Batteriepackung optisch auf
Korrosion.
14-4
Series 5500 User’s Guide
Specifications
14
Battery pack replacement
The internal backup battery pack has a life expectancy of
four years under normal use.
• WARNING: Replace with Dranetz-BMI battery
pack 116455-G1 only.
• ADVERTENCIA: Reemplace con bateria DranetzBMI 116455-G1 solamente.
• AVERTISSEMENT: Remplacer par la batterie
Dranetz-BMI 116455-G1 exclusivement.
• WARNUNG: Nur mit Dranetz-BMI 116455-G1
Batteriesatz auswechseln.
To replace the battery pack:
1. Press the InfoNode power switch to the OFF position.
Verify that the power indicator lamp is off. Disconnect
all power to the unit. Disconnect all external communications cables from the rear panel.
2. Open the cabinet by removing the seven screws that
retain the cover to the chassis. Facing the rear panel,
carefully swing the cover upwards and back.
3. The battery pack is located on the Input Filter Board.
Observe the mounting orientation of the battery pack.
Remove the battery pack hold-down strap by loosening
its two retaining screws.
4. Disconnect the polarized battery pack connector from
the circuit board. Remove the old battery pack and
replace only with Dranetz-BMI Battery Pack, P/N
116455-G1. Observe correct mounting orientation.
5. Connect the polarized battery pack connector to the
circuit board. Replace the battery pack hold-down strap
and tighten the two screws securely.
6. Install the cover on the chassis and tighten the seven
screws securely.
14-5
Series 5500 User’s Guide
14
Specifications
This page intentionally left blank.
14-6
Series 5500 User’s Guide
Appendix
Quantities Calculated from Periodic Voltage and Current Measurements
Quantity
Defining Equation
Apparent Power
(eq. 2)
1 N
P =
∑ Vi ⋅ I i
N i =1
P
S
True Power Factor
PF =
Total Harmonic
Distortion (THD)
THD =
Comments
(eq. 1)
S = VRMS ⋅ I RMS
Real Power
A
N = Samples per cycle
Vi = Voltage at ith sample
Ii = Current at ith sample
(eq. 3)
1
X1
hmax
∑ Xh
(eq. 4)
2
h= 2
Xh = rms voltage or
current at harmonic h
hMax = Highest resolved
harmonic
hmax
Telephone Influence
Factor
IT Product
Crest Factor
∑ ( X h ⋅ Wh ) 2
(eq. 5)
h= 1
TIF =
X RMS
h
W
h
W
1
3
5
6
7
9
11
12
13
15
0.5
30
225
400
650
1,320
2,260
2,760
3,360
4,350
17
18
19
21
23
24
25
27
29
30
5,100
5,400
5,630
6,050
6,370
6,650
6,680
6,970
7,320
7,570
h
IT = I RMS ⋅ TIF
CF =
W
h
W
31 7,820 50
33 8,330 53
35 8,830 55
36 9,080 59
37 9,330 61
39 9,840 65
41 10,340 67
43 10,600 71
47 10,210 73
49 9,820 83.3
Max X i
X RMS
9,670
8,740
8,090
6,730
6,130
4,400
3,700
2,750
2,190
840
(eq. 6)
(eq. 7)
Wh = Harmonic
weighting factor from
table
Calculated for voltage by
replacing Irms with kVrms
Xi = Voltage or current at
ith sample in one cycle.
Note that CF for sinusoidal
wave is 1.414, not 1.0.
A-1
Series 5500 User’s Guide
B
Appendix
Summary of Power Quality Variations
Transients
Oscillatory Transient
Impulsive Transient
Decaying Oscillation
Low frequency < 5 kHz
Med. frequency 5-500 kHz
High frequency > 500 kHz
Unidirectional
Typical duration < 200 msec
Short Duration
Variations
Sag
Instantaneous
Momentary
Temporary
½ - 30 cycles
½ - 3 seconds
3 sec - 1 min
Long Duration
Variations
Undervoltage
Overvoltage
Duration > 1 minute
Interruptions
Momentary
Temporary
Outage
½ - 3 seconds
3 sec - 1 min
> 1 minute
A-2
Series 5500 User’s Guide
Appendix
B
Summary of Power Quality Variations
Waveform Distortion
Harmonic Distortion
Continuous distortion
2nd - 49nd harmonic
components
Noise
High frequency distortion
Broadband spectral
components < 200 kHz
Voltage Fluctuations
Flicker
Intermittent magnitude variations
Frequency components < 25 Hz
A-3
Series 5500 User’s Guide
C
Appendix
System Parameters Affecting Power Quality and Diagnostic Evaluations
C ategory
C auses
Im pacts
• Lightning
• Transformer failures
• Arrester failures
• Customer equipment damage
due to low -side surges
• Capacitor switching
• Tripping of ASDs and other
sensitive equipment
• Voltage magnific ation at
customer capacitors
Medium frequency
transients
• Traveling waves from
lightning impulses
• Capacitor and circuit
switching transients
• Failure of customer equipment
(transient is coupled to customer
system through transformer
winding capacitances)
High frequency
transients
• Switching on
secondary systems
• Lightning-induced
ringing
• Local ferroresonance
• Radiated noise may disrupt
sensitive electronic equipment
• High rate of rise oscillations may
cause low voltage power supplies
to fail
Voltage sags
• Local and remote
faults
• Dropouts of sensitive customer
equipment
Voltage swells
• Single-line-to-ground
faults
• Equipment overvoltages
• Failure of MOVs forced into
conduction
Long duration
voltage variations
• Load switching
• Capa citor switching
• System voltage
regulation
• Problems with equipment that
require constant steady -state
voltage
• Nonlinear loads
• Misoperation of sensitive
equipment
• Capacitor failures or fuse blowing
• Telephone interference
• Arc furnaces and
other intermittent
loads
• Lighting flicker
• Misoperation of sensitive loads
Impulses
Low frequency
transients
Harmonics
Voltage flicker
A-4
Series 5500 User’s Guide
Appendix
D
Protocols Supported for InfoNode and DataNodes
EPQ DataNodes
Internet Communication Protocols/Ports
HTTP
port 80
FTP
SNTP
TELNET
SMTP
SYSLOG
ModBUS/TCP
ISO/TCP
port 20 and 21
port 123
port 23
port 25
port 514
port 502
port 102
WPT Private
WPT Private
port 38642
ports 38643 and
38644
EPQ DataNodes
High Level/Non-Internet Protocols and Formats
UCA GOMSFE 0.9
over MMS/TCP
COMTRADE
normal web requests, replies, file
transfers, XML
firmware update
time synchronization
remote management
email protocol
debug logging
ModBUS over TCP/IP
RFC 1006 ISO protocol over TCP/IP
InfoNode
Internet Communication Protocols/Ports
HTTP
port 80
FTP
ISO/TCP
ports 20 and 21
port 102
normal web requests, replies, file
transfers, XML
firmware update
RFC 1006 ISO protocol over TCP/IP
SNTP
port 123
time synchronization
SYSLOG
port 514
debug logging
SMTP
port 25
email protocol
InfoNode
High Level/NonInternet Protocols and Formats
(dependent on installed handlers)
IEEE 1159.3
XML
Advantech ADAM
ModBUS
MetOne
RS232 & RS485
RS232 & RS485
RS232
DBMI 7100
ANSI C18.12
TAP
RS232 & RS485
RS232 & RS485
client only
client only
server only
slave only
slave only
for MMS
protocol
cross trigger protocol
discovery protocol
primary InfoNode to DataNode
communication protocol
event capture format converted to
PQDIF in InfoNode
UCA GOMSFE 0.9
over MMS/TCP
COMTRADE
server only
primary InfoNode to DataNode
communication protocol
event capture format converted to
PQDIF in InfoNode read only
PQDIF primary data storage and
exchange format
used for HTTP based information
transfer between InfoNode and client
software
serial protocol
serial protocol
proprietary protocol for meteorological
stations
proprietary serial protocol
metering protocol
pager modem protocol
create only
server only
client/server
for MMS
protocol
client and
server
client and
server
master only
master only
master only
master only
master only
A-5
Series 5500 User’s Guide
E
Appendix
Signature System Network Capabilities
The Signature System uses industry standard TCP/IP network communication. The Signature System is configurable to work with most popular network addressing schemes, including Classes A, B, and C. Most company local area networks or LANs utilize the Class C addressing scheme. Class C is also well suited for small
stand-alone networks. For these reasons, the factory default and the shipped network settings of the Signature
System makes use of the Class C addressing scheme.
For proper operation, the addressing scheme of the Signature System devices must match the addressing
scheme of the network to which they are connected. For example, you cannot mix Class C and Class B hosts
on the same physical network.
Description of Networking Classes
IP Addressing
An IP address is a 32-bit number, usually represented in a dotted decimal notation
(i.e. 146.34.47.24), which uniquely identifies every host connected to an internet network.
Each field between the periods is an 8-bit number (called an octet), with values between 0 and 255.
The numbers 0, 127, and 255, however, have special meanings when they appear.
For an unknown address, Zeros are used, i.e. when a machine is requesting that a server assign to it an IP
address.
When a machine refers to its own address, 127 is used. The terminology for this is loopback.
To broadcast a packet to every host on a local network, the value 255 is used.
Hosts use these addresses to send each IP packet along to its final destination. Routing is the process of
deciding how a particular packet travels to its final destination.
There are several classes of IP addresses as defined by the IETF (Internet Engineering Task Force):
Class A - very large networks
Class B - large networks
Class C - small networks
Class D - multicast
Class E - reserved future use
There are two parts to an IP address. Where the division takes place depends on the network class. The first
part of the address is the network address; the remaining part is the host address.
A-6
Series 5500 User’s Guide
Appendix
E
Class A
Class A is for very large networks. The first octet is of the form 0xxxxxxx, which means it can range from 1
to 126. Networks of this type use only the first octet as the network address. This means there can only be
126 Class A Networks. The remaining portion, the next 3 octets or 24 bits, form the host address. This allows
16,194,277 computers on a Class A network. An example of a Class A IP Address is 10.0.0.0, with a Subnet
Mask of 255.0.0.0.
Class B
Class B is for large networks. It is common for universities to have Class B addresses assigned to them. The
first octet has the form 10xxxxxx, which can range from 128 to 191. The definition of network address for
Class B is the first two octets, which allows 16,382 Class B networks. The last two octets form the host
address, allowing 64,009 hosts (remember that 0, 127, and 255 cannot be used) on each Class B network. An
example of a Class B IP Address is 129.10.0.0, with a Subnet Mask of 255.255.0.0.
Class C
Class C is for small networks, where the first octet is of the form 110xxxxx, which can range from 192 to
223. The network address consists of the first three octets, allowing 1,984,279 different Class C networks
with only 253 hosts per network. An example of a Class C IP Address is 192.168.1.0, with a Subnet Mask of
255.255.255.0.
Other Classes
The IP specification states that addresses whose first octet have the form 111xxxxx are 'extended' addresses,
reserved for future use. Since the first three classes were defined, Class D, Multicast, was added to the list.
The Internet Assigned Numbers Authority (IANA) has reserved the following three blocks of the IP address
space for private networks:
Class A
Class B
Class C
10.0.0.0
172.16.0.0
192.168.0.0
- 10.255.255.255 (10/8 prefix)
- 172.31.255.255 (172.16/12 prefix)
- 192.168.255.255 (192.168/16 prefix)
Note that by definition, these test network addresses are not routable on the Internet.
A-7
Series 5500 User’s Guide
F
Appendix
Glossary
Amp, Ampere
The quantitative unit measurement of electrical current.
Angle between Phases
The phase angle between the Phase Fundamental Voltage
and Current at power line Frequency.
Apparent Phase Power
RMS voltage * RMS current on per phase basis.
Average DPF
Arithmetic average of each phase displacement power
factor.
Current
The flow of electricity in a circuit as expressed in
amperes. Current refers to the quantity or intensity of
electrical flow. See voltage.
Deadband (or Sensitivity)
A value programmed as an incremental/decremental
threshold from the last deadband value that would be
recorded as an event, making it the new value to be compared with.
Delta
A type of connection in a three-phase circuit, often the
primary side of a transformer. A delta connection may or
may not have a neutral conductor.
Distribution
Outside the building, distribution refers to the process of
routing power from the power plant to the users. Inside
the building, distribution is the process of using feeders
and circuits to provide power to devices.
Fixed Base
A fixed nominal value that is used with the limits in percent.
Floating Base
The nominal value is the average value over the specified
update interval.
Frequency Deviation
A change in the power frequency lasting from several
cycles to several hours.
Ground
The point at which other portions of a circuit are referenced when making measurements. Power systems
grounding is that point to which the neutral conductor,
safety ground, and building ground are connected. This
grounding electrode may be a water pipe, driven ground
rod, or the steel frame of the building.
High Limit
Set point or threshold above the normal range.
High-High or Very High Limit
Set point or threshold above the high limit.
Demand Interval
Time interval used for the power demand values to be
calculated. The values are updated every sub-interval.
Hz, Hertz
The frequency of alternating current. The term Hertz is
synonymous with cycles per second.
Demand Sub-interval
An interval less than the demand interval, equal to the
demand interval divided by an integer value. Demand
calculations are made every sub-interval, on the values
that occured during the most recent Demand Interval.
Values become valid after the first Demand Interval has
expired.
Harmonic
A frequency that is a multiple of the fundamental frequency. For example, 120 Hz is the seond harmonic of 60 Hz,
180 Hz is the third harmonic, and so forth.
Displacement PF
Cosine of angle between fundamental frequency voltage
and current on a per phase basis.
Harmonic Distortion
Excessive distortion in the voltage or current waveform
that introduces harmonic frequencies. Harmonic distortion
can be caused by electronic loads drawing current in nonsinusoidal waveshapes. It can shorten equipment life and
cause serious safety problems by overheating transformers
and conductors.
Distortion
An abnormal waveshape.
A-8
Series 5500 User’s Guide
Appendix
Hysteresis
An amount by which a threshold is altered to suppress
disturbance graphs that would otherwise be triggered by
small fluctuations in the measured signal. If hysteresis is
used, the threshold is altered by the specific amount
(equal to the hysteresis value) after an initial disturbance
is triggered until the signal crosses the altered threshold.
Impulse
Instantaneous voltage deviation which may not affect rms
voltage because of its short time duration. Impulses can
be caused by loads switching on line, loose wires, lightning, static and power failures. Impulses can cause data
disruption and equipment malfunction and damage. See
transient.
Instantaneous or Crest Transient
The largest magnitude value in a cycle.
KHz, Kilohertz
1000 Hertz or cycles per second
Line
A current carrying conductor.
Line-to-Line
A given condition between conductors of a multi-phase
feeder.
Line-to-Line values for wye circuits
Vab = Van - Vbn; Vbc = Vbn - Vcn; Vca = Vcn - Van
Line-to-Neutral
A given condition between a phase conductor and a neutral conductor.
Load
Any electrical device connected to a power source.
Low-Low or Very Low Limit
Set point or threshold below the low limit.
Low Limit
Set point or threshold below the normal range.
MHz, Megahertz
One million Hertz or cycles per second.
Negative Sequence
The three phase vectors that would make a motor rotate
in the reverse direction. U2a = 1/3 (Ua + a2*Ub + a*Uc),
F
where a* is the 120 degree vector operator, a2* is the 240
degree vector operator.
Net Current
Vector sum of all phase currents, including neutral.
Neutral Conductor
One of the conductors of a three-phase wye system.
Sometimes called the return conductor, it carries the
entire current of a single-phase circuit and the resultant
current in a three-phase system. The neutral conductor is
bonded to the ground on the output of a three-phase delta
wye transformer.
Peak
The maximum instantaneous measurement of an electrical event.
Peak Detected Transient
High frequency deviation from low frequency or normal
sine wave value in either the positive or negative direction that exceeds programmed limits.
Periodic Reading Interval
Time interval used to periodically record the parameter
for trending or time plots.
Phase
The timing between two or more events tied to the same
frequency.
Phase Balancing
The practice of placing equal electrical loads on each leg
of a three phase system. See balance and neutral conductor.
Phase Shift
The displacement in time of one periodic waveform relative to other waveforms.
Positive Sequence
The three phase vectors that would make a motor rotate
in the positive direction. U1a = 1/3 (Ua + a*Ub + a2*Uc),
where a* is the 120 degree vector operator, a2* is the 240
degree vector operator.
Power
The capacity for doing work. In the electrical environment, this is usually measured in watts.
A-9
Series 5500 User’s Guide
F
Appendix
Power Factor
Watts divided by volt amperes, or the ratio of actual
power to apparent power.
Sag
A short term RMS voltage decrease that exceeds an established lower limit.
Power Factor - (true PF)
Watts divided by Volt-amperes on per phase basis (except
delta) and total values.
Secondary
The output winding of a transformer.
Power Factor Displacement
The ratio of the power of the fundamental wave, in watts,
to the apparent power on the fundamental wave, in voltamperes.
Power Quality
The concept of powering and grounding sensitive electronic equipment in a manner that is suitable to the operation of that equipment.
Sequence Imbalance
Negative sequence component divided by positive
sequence.
Single Phase
Portions of a power source that represents only a single
phase of the three phases that are available.
Sinusoid
A sine wave.
Primary
The input winding of a transformer.
Surge
See swell.
Reactive Phase Power
Volt ampere reactive power for individual phases.
Swell
A short term voltage increase that exceeds an established
upper limit.
Residual Current
Vector sum of phase currents (not including neutral).
RMS, Root Mean Square
The square root of the arithmetic mean of the squares of
a set of electrical amplitudes.
RMS Sag
Low RMS voltage or current excursions below some programmed threshold. Motor starts and faults on the utility
system are two common causes of sags. Sags can cause
loads to turn off and reset circuits to operate unexpectedly.
RMS Swell
High RMS voltage or current excursions above the programmed threshold. Swells can be caused by voltage regulation problems, removing loads from the system, or
adding loads with stored energy. Swells can damage
equipment or disrupt electronic loads.
RMS Variation
RMS voltage excursions exceeding some programmed
threshold. See RMS sag and/or RMS swell. A change in
square root of the sum of samples squared divided by
number of samples (128) that crosses limit.
THD, Total Harmonic Distortion
A percentage describing how much a measured waveform
differs from an ideal sine wave.
Total
The phases used in computing the totals depend on the
wiring configuration and parameter. Typically, wye and
delta configurations use the three individual phases,
except for power related, which use the IEEE 1459 equivalent wye method.
Three Phase
An electrical system with three different voltage lines or
legs each carrying sine waves that are 120 degrees out of
phase from one another.
Threshold
The point within which the measured parameter is said to
be within tolerance.
Total Apparent Power
Square root of (total WATTs squared + total VARs
squared).
A-10
Series 5500 User’s Guide
Appendix
Total Arithmetic True PF
Total Real Power divided by Total Arithmetic VoltAmperes.
Total Arithmetic VA
Arithmetic sum of individual phase volt-ampere values.
Total Fundamental Arithmetic VA
Arithmetic sum of the volt amperes of the fundamental
frequency components of each phase.
Total Fundamental Vector VA
Square root of (fundamental frequency component of
WATTs squared + fundamental VARs squared).
Total Power
Arithmetic sum of phase Watts.
Total Reactive Power
Arithmetic sum of phase VARs.
Total Vector VA
Square root of (total WATTs squared + total VARs
squared).
Transformer
A device used for changing the voltage of an AC circuit
and/or isolating a circuit from its power source.
Transient
A subcycle disturbance in the AC waveform that is evidenced by a sharp, brief discontinuity of the waveform.
May be of either polarity and may be additive to or subtractive from the nominal waveform.
Trend
A plot of an event characteristic versus time.
F
True Phase Power or Real Power
Measured in watts, of each phase, calculated over 1 second from cycle-by-cycle power values (voltage sample *
current sample). Not valid for delta configurations.
Volt
The quantitative measurement of electrical force or potential also called electromotive force.
Voltage
The force of electricity in a circuit as expressed in volts.
It is the measure of work it takes to move a charge
through a circuit.
Waveform
The graphic form of an electrical power.
Waveshape Fault
A cycle-to-cycle change in the voltage waveform characteristic. A waveshape fault may not be large enough or
fast enough to have impulse characteristics, and at the
same time, may not add or subtract significantly from the
voltage to create a sag or swell. Waveshape faults can be
caused by loose wiring, switching between two power
sources, etc. Waveshape faults can cause damage and disruption to all types of loads.
Worst Displacement PF
Displacement PF of phase with largest deviation from 1.
Worst PF
True PF of the individual phase with largest deviation
from 1.
Zero Sequence
U0a = 1/3 (Ua + Ub + Uc).
True PF
Total Real Power divided by Total VA.
A-11
Series 5500 User’s Guide
F
Appendix
This page intentionally left blank.
A-12
Series 5500 User’s Guide