1
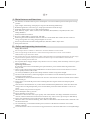
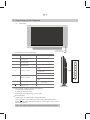
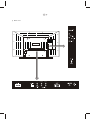
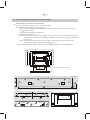
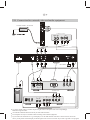
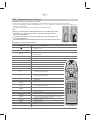
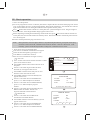
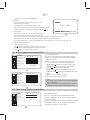
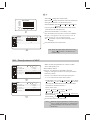
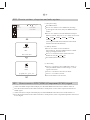
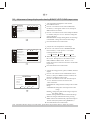
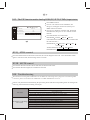
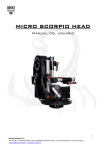
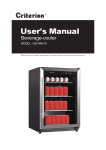
1
Dear customer
Thank you for selecting the high-definition TFT LCD Color TV.
Before operating the set, please read this Operating Instructions
carefully. In order to use and maintain the set better, please follow
its operating instructions.
Thank you for your cooperation.
Table of Contents
I. Main features and functions ------------------------------------------------------------------------
2
2
III. Specifications ------------------------------------------------------------------------------------- 3
IV. Accessories ----------------------------------------------------------------------------------------- 3
V. Operating system diagram ------------------------------------------------------------------------- 4
VI. The installation method for wall-mounting --------------------------------------------------- 6
VII. Connection for external video and audio equipment ------------------------------------------- 7
VIII. Preparation for switch on ----------------------------------------------------------------------- 8
IX. Basic operation ------------------------------------------------------------------------------------ 9
X. How to adjust the image effect --------------------------------------------------------------------- 11
XI How to adjust the sound effect ------------------------------------------------------------------- 11
XII The adjustment of MISC ------------------------------------------------------------------------ 12
XIII How to set time, sleep time and wake up time ------------------------------------------------ 13
XIV How to receive DTV(YPbPr)/Component(YCbCr) signal --------------------------------- 13
XV Adjustment of image display under Analog RGB(PC)/DTV(YPbPr) input status ---------- 14
XVI The PIP function under Analog RGB(PC)/DTV(YPbPr) input status --------------------- 15
XVII STILL control --------------------------------------------------------------------------------- 15
XVIII MUTE control -------------------------------------------------------------------------------- 15
XIX Troubleshooting -------------------------------------------------------------------------------- 15
Attached table 1 ---------------------------------------------------------------------------------------- 16
Attached table 2 ---------------------------------------------------------------------------------------- 16
II. Safety and operating instructions -----------------------------------------------------------------
2
I. Main features and functions
No radiation, low flicker and low power consumption. It is an environment-protective and power-saving
product.
Light weight, small cubage, dual-purpose usage of wall-mounting and desk-top.
Beautiful appearance, innovative type, simple operation and convenient usage.
With dual-function of TV receiver and computer monitor.
With multiway inputs: Video, S-Video, Scart (AV/RGB), DTV(YPbPr), Component(YCbCr) and
analog RGB(PC) .
With NICAM stereo function.
Receive CABLE/AIR TV signals (PAL, SECAM)
With no signal around 10 minutes under TV mode or 1 minute under other modes, the unit will be in a
energy saving status save energy and prolong the service life.
Picture in picture function under Analog RGB (PC) and DTV(YPbPr) input status.
Still picture function.
II. Safety and operating instructions
Safety instructions
Do not expose this TV outdoors or moisture to avoid fire hazard or electric shock.
There is high voltage inside the TV. It is not allowed to open the rear cover for service without
authorization to prevent electric shock.
Do not place the TV on an unstable cart, table or inclined plane to avoid falling and causing personal injury.
Liquid can not be spilled or object can not fall into the TV to prevent fire hazard or electric shock.
No objects shall be placed on the TV.
Do not put the Power Supply Adapter in any cabinet or cover it with any cloth. Please keep it in an airy space
when it is working.
Operating instructions
In order that your LCD TV will maintain good operation status, please read the following items before
using the unit:
There is high-voltage on the background luminaire socket inside. Do not uncover the back cover at will.
Do not put any articles on the screen.
It is strictly forbidden to put the unit in damp condition or under strong direct sunlight.
Dot not use this unit in noisy and strong magnetic environment. The unit shall be kept from fire source
and strong vibration source.
Avoid the direct contact with the chemicals. Do not use or store the unit in the environment which contains
the chemical gas.
Please always switch off the power before installing and removing the connection of the peripheral
equipment.
If the unit loses the due function or you have found some abnormal phenomenon, such as the emission of
strange odor or too high temperature, please switch off the power and contact the dealer or our service
center.
Do not watch a still picture for a long time.
Do not modify this unit by yourself.
Do not touch the screen directly.
When there is dust on the screen, wipe it gently with soft cloth after switching it off. Ethane can be used.
Acetone, Toluene and Alcohol cannot be used. If there is any water or saliva, please wipe it immediately.
Please switch off the AC power if the unit is not used for a long time.
When this unit is used as wall-mounting, there shall be a 5 mm distance between the whole set and the wall
for the heat emission.
If it is thundering, you should turn off the power, and remove the antenna connection to avoid the
damage to this unit.
In case the remote control is not used for a long period of time, take out the batteries to avoid liquid leakage.
3
III. Specifications
Screen Size
29.53 inch (diagonal)
Display Resolution
1280*768
Aspect Ratio of Screen
15:9
Max. Visual Angle
Horizontal angle
x + =85
(CR
) Vertical angle
x - =85
Y+
=85 (CR
AC/DC Adapter
Input 100~240V AC 50/60Hz
Output +24V DC 7.5A
TV Received Signal
48.25MHz-168.25MHz
Broadcast Signal System
PAL B/G,I,D/K, SECAM L, B/G, D/K
DTV input/Component input
YPbPr (480p,576p,720p,1080i)/YCbCr(480i,576i) (HDTV support
175.25MHz-463.25MHz
)
Y - =85
471.25MHz-855.25MHz
format is in the attached table)
Analog RGB Input
VGA (the supporting format is in the attached table)
Video Signal System
Video input
PAL , NTSC , SECAM
Video, S-video, Scart (AV/RGB)
Signal Intensity
DTV(YPbPr), Component(YCbCr), Analog RGB(PC)
60dB
Video Input Voltage
1 Vp-p
Audio Input Impedance
47K
Audio Input Voltage
0.75V~1.5V (rms
Sound Output Power
5W+5W
Power Consumption
Operation 160W(MAX), Stand-by: 3W, Energy saving: 15W
Weight
Desk-top
Dimension
Desk-top 810mm 130mm 515mm
Wall-mounting 810mm 84mm 476mm
14.5kg , Wall-mounting 12kg
Ambient temperature
5~35 C
Ambient humidity
20%-80%RH
Note: The specifications are subject to modification without notice .
IV. Accessories
Remote controller
1
Power supply adapter
AC power cord
1
1
Operating Instructions
1
4
V. Operating system diagram
Front view
Remote sensor
Power indicator
Description of basic control button
Control button The function during watching The function when using the menu
MENU
Select the screen display
menu system
Enter or select menu
P+
Select to display the next
stored channel
Select the previous menu/ item
P-
Select to display the previous
stored channel
Select the next menu/ item
P-
Select the submenu of current
item
Increase the value of the
current item
V+
V+
Increase volume
P+
VMENU
Confirmation
TV/AV
V-
Confirmation
Decrease volume
Decrease the value of the current
item
TV/AV
Switch the input signal
Exit menu
Stand-by / On
/
The operation situation shown by the Indicator :
1. Green light- Operation status.
2. Red light- Stand-by status.
3.Flaring of green light-Energy saving status.
Reset procedure
1.Make the set at Stand-by status. (Red LED lights)
2.Press P+ and V+ keys on the panel at the same time and don't release.
3.Press
key on the panel till the image or noise displays on the screen.
4.Release three keys.
Note: This unit is fixed and the panel can not be tilted vertically.
5
Rear view
OUT
Y
Pb/Cb
Pr/Cr
6
VI. The installation method for wall-mounting .
The installation method for wall-mounting
A.Unscrew and remove the four 4 X16 screws with washer.
B (a) Installation on wooden wall except soft one
Screw down the Pothhook Plate from the Accessories on wooden wall directly with 9 pieces of
ST4 16mm screw nails.
Note: The plate can not be out of upright.
(b) Installation on cement wall
Step1: Position 9 holes on the wall according to the position of 9 holes on the Pothook Plate. Then
drill the 9 holes on the wall. The diameter of the hole is just suited for the 4mm expansible
nylon sleeve.
Step2: Set the expansible nylon sleeves in the 9 holes on the wall respectively. Then fix the
Pothhook Plate in place with 9 pieces of ST4 16 screw .
C.Fasten the hooking holes at the back of the set on the supporting member of the Pothook Plate.
Fixed position of 4X16 screws with washer
Base
Pothook plate
Hooking hole
Pothook plate
Supporting
Member
Supporting
Member
7
VII. Connection for external video and audio equipment
AUDIO OUT
POWER SUPPLY ADAPTER
DVD& SET-TOP BOX
OUT
AUDIO OUT
R
L
Y
Pb/Cb
Y
Cb
r
Pr/Cr
AIR/CABLE
S-VIDEO
OUT
VIDEO
OUT
L
R
AUDIO OUT
L
AUDIO
OUT
R
DVD & VCD
L
R
AUDIO OUT
PC
S-VIDEO
OUT
L
R
AUDIO OUT
OUT
Y
Pb
Pr
VIDEO
OUT
L
AUDIO
OUT
R
DVD& SET-TOP BOX
Use proper signal Cables to connect outputs of signal sources and inputs of the unit correspondingly.
Make sure of good contact.
All connection and disconnection can only be done under off status.
The computer can only be switched on after switching on the external equipment.
If you connect an external device e.g. a DVD player over SCART interface with the TV and switch it on, the screen
shows you the picture of the DVD player and the signal source is still in TV mode. If you want to go back to TV program,
8
VIII. Preparation for switch on
1.Install the battery for the remote controller
a. Press the cover of the battery compartment on the back of the remote controller and remove it.
b. Insert 2 AAA batteries, make sure the polarity (+) or (-) of batteries conforms to the polarity marks in the
battery compartment.
c. Slide the cover of the battery compartment to the original place.
2.Description of remote controller buttons
Function
Name
Stand-by / On
TV/AV
SLEEP
PICTURE
PIP
EXIT
MENU
MUTE On/Off
TV/AV Scart/AV 1/AV 2/S-Video/Component/Analog RGB/
DTV YPbPr
Sleep time setting
Shortcut button for adjusting picture
Picture-in-picture selection under PC/DTV input status
Exit menu
Previous stored channel/next menu/next item
V+
Volume increase/ item value increase
/ item content selection
V-
Volume decrease/ item value decrease
/ item content selection
TV/AV
PICTURE
SLEEP
IT
P-
MUTE
EX
P+
Menu selection/confirmation
Next stored channel/previous menu/previous item
P
MUTE
PI
P+
MENU
V-
V+
MTS
Selection button of sound mode
DUAL/MONO/STEREO
SWAP
Channel playback
CALL
Channel information display
Digit selection
1234567890
SOUND
TIME
BRIGHT
ERASE
SKIP
INSERT
REPLACE
Shortcut button for adjusting Sound mode
Time display (TIME menu should be set at first)
Change of bright / dark image
Delete program
Skip program
Store program for manual scan
Replace program
IL
Adjustment of image size
XT
V-SIZE
TE
STILL
function of teletext
Still image
L
P-
TEXT
V-SIZE
ST
5
Note:
Please do not mix the new and old batteries. Do not mix manganese and
alkali batteries. Please use the remote controller carefully to avoid to
drop, wet or dismantle it .
In case the controller is not in use for a long time, take out the batteries
to avoid liquid leakage.
The used up batteries should be disposed in an environment-protection way.
MTS
SWAP
1
2
3
4
5
6
7
8
9
0
SOUND SLEEP
CALL
TIME BRIGHT
i
ERASE
SKIP
INSERT REPLACE
9
IX. Basic operation
1. Power on / off operation.
Insert one plug of the AC Power Cord in the jack of Power Input of the unit. Insert the other plug of AC Power
Cord to the suitable AC power socket with grounding. Then switch on the Power switch of this unit. The red
light of Power Indicator will be bright and the unit enter upon the stand-by status.
Press
button on the remote controller or on the panel, the system will begin to work. The green light of
Power Indicator will be bright and the image appears on the screen.
When completing watching the broadcasting content of this unit, press button on the remote controller or
on the panel, the unit will come back to the stand-by status. The Power Indicator on the front panel will turn
into red from green.
Switch it off and pull out the plug of AC Power Cord.
Note:
Most part of this circuit is digital. If there is any abnormal phenomenon, please pull out the plug
of Power Cord to switch off, and then switch on after 2 minutes. If the set still can not work
normally, please execute Reset procedure on Page 4 or contact the Service centre.
2. Select the receiving signal input status
Press the TV/AV button. And the menu will appear.
Select the desirable signal by pressing P+ or P-.
Press MENU to confirm the selection.
3. How to receive and watch the TV signal correctly
1 Auto scan
Press TV/AV button on the remote controller or on the
panel to select the TV status.
Press MENU button on the remote controller or on
the panel .
Press P+ or P- button to get TV SETUP menu,
the menu (a) will appear on the screen.
Press MENU button to enter, then press P+ or Pbutton to select AUTO SCAN item.
Press MENU button to enter. The menu(b) will
appear on the screen.
Press P+ or P- button to select SYSTEM item,
press V+ or V- button to adjust TV standard.
Press P+ or P- button to select STORAGE item,
press V+ or V- button to adjust program
number.
Press P+ or P- button to select SCAN item, press
MENU button to confirm. The unit will
begin the automatic search and store.
2 Manual scan
Press P+ or P- button to select MANUAL
SCAN item on TV SETUP menu.
Press MENU button to enter. The menu(c)/(d) will
appear on the screen.
Press P+ or P- button to select SYSTEM item,
press V+ or V- button to adjust TV standard.
Press P+ or P- button to select STORAGE item,
TV SETUP
MENU
UP
DOWN
EXIT
AUTO SCAN
Press MENU
MANUAL SCAN
Press MENU
50
FINE TUNE
Press MENU
EDIT
AUTO SCAN
SYSTEM
B/G D/K I
STORAGE
P1
SCAN
Press MENU
UP
DOWN
LEFT RIGHT
EXIT
MANUAL SCAN
SYSTEM
B/G
STORAGE
P1
BAND
V/UHF
CHANNEL
2
UP
DOWN
LEFT RIGHT
EXIT
10
press V+ or V- button to adjust program number.
Press P+ or P- button to select BAND item.
Press V+ or V- button to select V/UHF or CABLE.
Press P+ or P- button to select CHANNEL item.
Press V+, V- or digital button to select channel number.
If the program is desirable, press INSERT or REPLACE button
on the remote controller and the program will be stored under
the current program number.
Press EXIT for exiting.
7
MANUAL SCAN
SYSTEM
B/G
STORAGE
P1
BAND
V/UHF
CHANNEL
2
INSERT REPLACE
UP
DOWN
LEFT RIGHT
7
EXIT
3 FINE TUNE
If the image received is not very good, you can press P+ or P- to select FINE TUNE item in menu (a) . Then,
press V+ or V- button to adjust and improve the image quality.
4 Editing program
EDIT PROGRAM
The function is for users to write or change the name of the
S01BEST__ S02______ S03_____
program, change the number of the channel and delete the program.
S04______ S05______ S06_____
Press MENU and Press P+ or P- to select TV SETUP menu.
S07______ 08______ 09_____
Press MENU to confirm.
Press P+or P- to select the item Edit in menu (a) and press Menu
button to confirm. Menu(e) will appear on the screen.
( e)
Press P+or P- button to select the group of programs which are in the same page.
Press V+ or V- button to select the number of the program in the group to be changed, which becomes yellow.
Press MENU to confirm it and the program number becomes black.
Skip the program number: Press SKIP button on the remote controller. The program number and S in front
of the numbers turn into yellow from green.
The green S in front of the program number means that the program under this number is existing. The yellow
S means the program deleted. During watching, the deleted numbers can not be selected when selecting
channels by P+ or P- buttons. Select the program by digit buttons and the program numbers are yellow.
Erase the program number: Press ERASE button on the remote controller. The TV contents under the current
program number will be replaced with the TV contents of next program number. And the rest TV programs
afterwards will be moved to their previous program numbers correspondingly.
Change the program number: Press P+ or P- repeatedly to change the number of the program from 01 to 99.
Edit the program name: Press V+ or V- to select the position of the cursor. The black cursor is the editing position.
Press P+ or P- to change the cursor from 0 to 9 then from A to Z repeatedly.
For example, move the program 06 to the position of 01 and change the name of the program to BEST:
Press MENU. Press P+ or P- to select EDIT of TV SETUP menu.
Press Menu button and the menu(e) appears on the screen.
Press P+or P- button to select the group of programs containing program 06.
Press V+ or V- button to move the cursor to 06 and the number 06 becomes yellow. Press Menu button to
confirm. The number 06 becomes black and cursor position becomes yellow.
Press P+ or P- to change 06 to 01.
Press V+ or V- button to remove the cursor to the first bar. Then 01 becomes yellow and the first bar
becomes black. Press P+ button until B appearing.
Repeat the above steps to set the following bars for E,S,T. Press Exit button to exit. Thereby Program 06
becomes Program 01. P1 BEST will display when the Channel is switched.
5 SWAP
When watching the TV program, press the SWAP button on the remote controller and the current TV program
will be rapidly switched to the TV program which was previously watched.
11
6 How to use the function of teletext.
Start-up
Press TEXT button on the remote controller, the
function of teletext starts.
NO
DATA
If no data, image (f) will appear on the screen.
Press TEXT button on the remote controller repeatedly and the
image of teletext will change accordingly. Teletext
TV
100
Page turning
Press the P- or red button to turn to the previous page.
Press the P+or green button to turn to the next page.
Press yellow button, the content under item on the yellow bar will appear on the screen.
Press blue button, the content under item on the blue bar will appear on the screen.
Press digit buttons 0 to 9 to select the desirable page. For example, press 2,0,8 to select the page 208.
Special function of teletext
Press ? Button to reveal.
Press button to hold the current teletext on the screen.
Press i button to display the table of contents of teletext.
Press button to switch the size of teletext.
100
X. How to adjust the image effect
PICTURE
MENU
UP
DOWN
EXIT
BRIGHTNESS
50
CONTRAST
50
COLOR
50
50
SHARPNESS
TEMPERATURE
RECALL
PICTURE
Normal
Press MENU
MENU
UP
DOWN
EXIT
BRIGHTNESS
50
CONTRAST
50
COLOR
50
HUE
50
SHARPNESS
50
TEMPERATURE
RECALL
Normal
Press MENU
Press MENU button
Press P+ or P- button to select PICTURE menu, the
image (i) will appear on the screen and press MENU
button to confirm.
Press P+ or P- button to select the item, then press
V+ or V- to increase or decrease the value of item.
BRIGHTNESS change the brightness of the image.
CONTRAST change the contrast of the image.
COLOR
change the color of the image.
SHARPNESS
change the sharpness of the image.
TEMPERATURE change the color temperature of the
image.
RECALL- recover the factory setting.
Press EXIT button to exit the menu.
Note:
Item HUE will be available only when the input signal
is in NTSC mode.
There is a PICTURE shortcut button on the remote
controller to let you quickly adjust Brightness etc.
XI. How to adjust the sound effect
SOUND
MENU
UP
DOWN
BALANCE
SOUND MODE
AVC
EXIT
20
VOLUME
0
NORMAL
Off
Press MENU button
Press P+ or P- button to select SOUND menu, the
image (k) will appear on the screen, then press MENU
button to confirm.
Press P+ or P- button to select the item, and press MENU
to confirm then press V+ or V- button to increase or
decrease the value or select the status.
12
EQUALIZER
120Hz
500Hz
1.5KHz
5KHz
10KHz
0
0
0
0
0
SPATIAL
UP
DOWN
50
LEFT
RIGHT
EXIT
9
10
SOUND
MENU
UP
DOWN
EXIT
20
VOLUME
BALANCE
SOUND MODE
0
NORMAL
Off
AVC
VOLUME change the sound volume
BALANCE change the balance of the left sound track
and right sound track ( 0 is the balance point)
SOUND MODE: Normal Cinema News Flat User
Normal
( Pressing the SOUND shortcut button on the remote
controller has the same function.)
When SOUND MODE is set at USER, select
EQUALIZER item for desirable sound. Press MENU ,
image(l) will appear on the screen. Use P+ or P- to
select the item, V+ or V- to adjust the value
AVC Automatic volume control (limiting sound
volume)
Press EXIT button to exit the menu.
Note: When the signal input status is AV Scart
AV1, A 2, S-Video , the menu is (m),
instead of (k).
XII. The adjustment of MISC
MISC
MENU
UP
DOWN
EXIT
Fill Screen
VIDEO SIZE
OSD LANGUAGE
English
OSD SHEET
Opaque
OSD POSITION
FILM MODE
MISC
VIDEO SIZE
Video
MENU
UP
DOWN
EXIT
Fill Screen
OSD LANGUAGE
English
OSD SHEET
Opaque
OSD POSITION
FILM MODE
Video
MISC includes the adjustment of video size, OSD
sheet, OSD position, etc.
Press MENU button.
Press P- or P- button to select MISC menu, the
image (n) will appear on the screen, then press MENU
button to confirm.
Press P+ or P- button to select the item, then press
V+ or V- button to select the status of item.
VIDEO SIZE Fill Screen
Fit Aspect
TV Mode
Letter Box
Letter Box Title Auto Fill Screen
( Pressing the V-SIZE shortcut button on the remote
controller has the same function.)
OSD LANGUAGE:
German
Dutch
Portuguese
English
Italian
Spanish
French
OSD SHEET Translucent
Opaque
Translucent
OSD POSITION
FILM MODE Film
Video
Film
Press EXIT button to exit the menu.
Note:
When the signal input status is AV Scart, AV1 ,
AV2, S-Video , the menu is (o), instead of (n) .
Analog RGB and DTV modes have no Film
Mode item.
13
XIII. How to set time, sleep time and wake up time
(1) Sleep time setting
TIME
MENU
UP
DOWN
Off
SLEEP
WAKE UP
Press MENU
TIME
Press MENU
EXIT
Press MENU button.
Press P+ or P- button to select TIME menu, the image
(p) will appear on the screen, then press MENU button to
confirm.
Press P+ or P- button to select the SLEEP item and press
MENU to confirm. Then press V+ or V- button to select time.
Off
30Min
180Min
60Min
90Min
120Min
Off
( Pressing the SLEEP shortcut button on the remote
controller has the same function.)
(2) Wake up function
Press P+ or P- button to select WAKE UP
item in image(p). Then press MENU button to confirm.
Image (q) will appear on the screen.
Press V+ or V- button to set the content of the item.
WAKE UP: Everyday Once Off
Press EXIT button to exit the menu.
WAKE UP
Off
LEFT
RIGHT
EXIT
(3) Time setting
TIME
12:27
UP
XIV
DOWN
LEFT
RIGHT
EXIT
Press P+ or P- button to select TIME item in image (p).
Then press MENU button to confirm. Image ( r ) will
appear on the screen.
Press P+ or P- button to select hour or minute.
Press V+ or V- button to set time.
Press EXIT button to exit the menu.
How to receive DTV(YPbPr)/Component(YCbCr) signal
Connect the YPbPr output of the DVD player or SET-TOP BOX with Y Pb/Cb Pr/Cr INPUT of the set.
Press the TV/AV button on the remote controller or on the panel to select DTV input status and receive
YPbPr signal.
Connect the YCbCr output of the DVD player or SET-TOP BOX with Y Pb/Cb Pr/Cr INPUT of the set.
Press the TV/AV button on the remote controller or on the panel to select Component input status and receive
YCbCr Signal.
10
14
XV Adjustment of image display under Analog RGB(PC)/DTV(YPbPr) input status
1 The adjustment of brightness and contrast
PICTURE
MENU
UP
DOWN
EXIT
BRIGHTNESS
50
50
CONTRAST
TEMPERATURE
Normal
Press MENU
POSITION
Press MENU button.
Press P+ or P- button to select PICTURE menu,
the menu (s) will appear on the screen, then press
MENU button to confirm.
Press P+ or P- button to select item and press MENU
to confirm, then press V+or V- button to change the
value of the item.
BRIGHTNESS- Change the brightness of the image.
CONTRAST- Change the contrast of the image.
Press EXIT button to exit the menu.
2 Adjust the color temperature of the image
Press P+ or P- button to select TEMPERATURE
PICTURE
MENU
UP
DOWN
EXIT
BRIGHTNESS
50
CONTRAST
50
TEMPERATURE
item in menu (s) . Then press V+ or V- button
to change the item content.
Cool
User
Normal
Warm
User
Cool
RED
50
When selecting User , the menu (t) will appear on
GREEN
50
the screen. Then press P+ or P- button to select
50
BLUE
Press MENU
POSITION
RED, GREEN or BLUE item. Press V+ or Vbutton to increase or decrease the values of the items
respectively.
Press EXIT button to exit the menu.
POSITION
H-POSITION
50
V-POSITION
50
PHASE
52
50
H-SIZE
AUTO ADJUST
MENU
Press MENU
UP
DOWN
EXIT
3 Adjust the image position, phase, H-SIZE, and auto
adjust
Press P+ or P- button to select POSITION item in
menu (s), then press MENU button to confirm, the
menu (u) will appear on the screen.
Press P+ or P- button to select the item, then press
V+ or V- button to increase or decrease the
value of the item.
H-POSITION: change the horizontal position of the
image.
V-POSITION: change the vertical position of the
image.
PHASE
change the phase of the image to improve
the image quality.
H-SIZE: change the horizontal width of the image.
When selecting AUTO ADJUST item, pressing
MENU button can automatically adjust the image to
the best status(only under analog RGB status).
Press EXIT button to exit the menu.
Note: Sometimes the DTV image is not at the center, please follow the procedures above to adjust the position.
15
XVI. The PIP function under Analog RGB(PC)/DTV(YPbPr) input status
PIP
MENU
PIP ON/OFF
11
UP
DOWN
EXIT
PIP off
PIP SOURCE
TV
AUDIO SOURCE
PIP
PIP POSITION
Press MENU button.
Press P+ or P- button to select PIP menu, the
image (w) will appear on the screen, then press
MENU button to confirm.
Press P+or P- button to select the item. Select PIP
ON/OFF item, then press V+ or V- button to select
PIP ON.
Press EXIT button to exit the menu.
PIP ON/OFF PIP off
PIP on
PIP off
(The PIP shortcut button on the remote controller has
the same function.)
PIP SOURCE TV AV Scart
S-Video TV
AUDIO SOURCE MAIN
AV1
PIP
AV2
MAIN
PIP POSITION
XVII
STILL control
Press the STILL button on the remote controller, the current image becomes still . Press the STILL button
again or wait 20 seconds, the still image will be released.
XVIII. MUTE control
Press the MUTE button on the remote controller, the unit becomes mute .
Press the MUTE button again, the sound can be restored.
XIX. Troubleshooting
The intensities of TV signals in different areas are different. If the image of TV program received through RF
is not clear, please use AV OUT or S-VIDEO OUT on SET-TOP BOX to receive it.
If there is any abnormal situation during the operation, please make the corresponding check according to the
following instruction before sending it for repair.
Check the connection of the power cord.
Check if the power switch is On .
No raster
Check if the unit is under stand-by status. (Power indicator is red)
Check if the signal source has normal output under the current play status.
Pull off the power plug and switch on after 2 minutes.
Check the direction, location and connection of the antenna.
Check if the signal is interfered under the current play status .
Interference of the image
and sound
Check if there is any interference by the electric apparatus nearby .
Check if the power of the unit and the signal source is stable .
Check if the grounding of the signal cable is good .
Check if any of the buildings nearby reflects the radio wave.
11
16
Check if the power cable is connected .
Check if the signal source has normal output under the current play status.
Check the brightness and contrast of the image and check if the volume setting is correct.
No image and sound
If it is under stand-by status.
Check if the sound has been input correctly.
Image is normal, but
there is no sound
12
Check the volume setting.
Check the MUTE setting.
Check the color setting.
The image has no color
12
Check if the signal source has normal output under the current play status.
Check the contact and pole of the batteries in the remote controller , or change the batteries.
The remote controller does Clean the transmission window of the remote controller and the receiving window of this unit.
not work
Check if there is any obstacle between the transmission window of the remote controller and the Remote sensor of this unit.
Although the image and sound are normal, there could be noises sometimes with the change
of the channel and signal sources. It is normal .
Others
Note:
Do not uncover the back cover at you own will.
A few of constantly illuminated or off pixels could be found on the image due to manufacturing
engineering of the screen. It will not affect your watching.
Attached table 1
HDTV input support
60Hz
60Hz
60Hz
50Hz
60Hz
50Hz
X
X720(720p)
720X480 (480i)
720X576 (576i)
720X480 (480p)
720X576 (576p)
Attached table 2
PC input support
MODE
RESOLUTION
REFRESH FREQUENCY
X
X
X
X
2
X
X
X
X
7
75
85
X
X
X
X
X
Note: The image is the best when your PC is at
X
format.
H-Freq.(kHz)
31.5
37.5
43.3
37.9
48.1
46.9
53.7
48.4
56.5
60.0
68.3
64.0
80.0