1
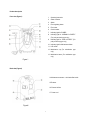
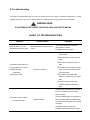
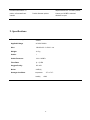
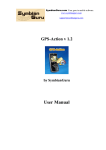
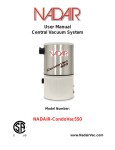
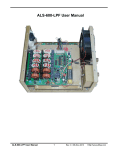
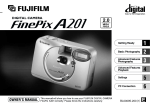
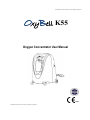
WARNING-Read instruction before operating this equipment
OxyBell K55
Oxygen Concentrator User Manual
1023
WARNING-Read instruction before operating this equipment
CONTENTS
Introduction············································································································· 3
Intended use of this device ························································································ 3
Safety Information···································································································· 4
Handling ·················································································································5
Transportation ······································································································· 5
Unpacking ············································································································ 5
Storage··············································································································· 5
Installation············································································································· 5
Installation location safety information································································· 5
Radio frequency interference··············································································· 6
Product description···································································· ························7
Operation················································································································ 8
Preparation································································································ ········8
Tubing connection·························································································8
Tubing connection with humidifier bottle (if needed)········································· 8
Setup················································································································ 8
Turning the concentration on ···············································································8
Purity indicating (for purity monitoring type only)····················································9
Nebulization instruction (for nebulization type only)························································9
SPA Treatment (for SPA type only)································································10
Circuit breaker (reset button)··············································································· 10
Turning the concentrator off ················································································10
Transport the oxygen concentrator············································································ 11
Using the luggage handle···················································································· 11
Maintenance··········································································································· 11
User Maintenance······························································································ 11
Cleaning the cabinet filter··············································································11
Cleaning the cabinet····················································································· 12
Replacement parts ·····························································································12
Cannula, mask, and tubing············································································ 12
Intake Filter ···················································································· ············ 12
Bacteria Filter······························································································ 12
Troubleshooting····································································································· 13
Specifications········································································································ 14
2
1. Introduction
This user manual contains important information and safety precautions for the OXYBELL Oxygen Concentrator. Before
using your oxygen concentrator, please read and understand this entire user manual. Save this user manual for future
reference.
Intended use of this device
The OXYBELL Oxygen Concentrator is intended for being used as an oxygen supplement device in household or care
facility. Use the concentrator only as prescribed by a physician. This user manual serves as a reference for your oxygen
concentrator. Take special note of all safety precautions marked DANGER and WARNING.
WARNING:
THIS DEVICE IS NOT INTENDED FOR LIFE SUPPORT. Power interruption could prevent the device from
operating. User who requires continuous oxygenation must plan for alternate reserve sources of power and oxygen in
the event of a failure or loss of power and oxygen.
Failure to observe the safety statements in this manual can result in severe fire, property damage, physical injury,
and/or DEATH.
Under certain diagnoses, oxygen therapy can be hazardous; use this concentrator only as prescribed by a
physician.
There are different accessories such as accessories include oxygen tubing, humidifiers, cannulas and masks that
can be used with an oxygen concentrator. Your physician or provider will recommend different types of accessories to
be equipped with your oxygen concentrator. OXYBELL accessories are available and recommended for use with the
OXYBELL Oxygen Concentrator.
3
2. Safety Information
The safety statements presented in this chapter refer to the basic safety information the operator of the oxygen concentrator
shall pay attention to and abide by. There are additional safety statements in other chapters or sections, which may be the
same as or similar to the following, or specific to the operations. Please note the following special statements, used
throughout this manual, and their significance:
DANGER: Indicates an imminent hazard situation that, if not avoided, will result in death or serious personal injury.
WARNING: Indicates a potential hazard situation or unsafe practice that, if not avoided, could result in death or serious
personal injury.
Caution: Indicates a potential hazard or unsafe practice that, if not avoided, could result in minor personal injury or
product/property damage.
DANGER:
To reduce the risk of electrocution, fire and/or explosion
DANGER: Do not use this device while bathing. If continuous usage is required by the direction of a physician, the
concentrator must be located in another room at least 3m from the bath.
DANGER: Do not place or store this device where it can fall or be pulled into a tub or sink.
DANGER: Do not place this device in or drop it into water or other liquid.
DANGER: Do not reach for a device that has fallen into water--unplug it immediately!
DANGER: DO not contact with the oxygen concentrator when you are wet.
DANGER: The oxygen concentrator contains no serviceable parts--do not open the cabinet! Opening of the
concentrator cabinet by anyone other than authorized service personnel could void the warranty and create a
hazardous condition, which could result in death or serious personal injury.
DANGER: Avoid creation of any spark near the oxygen concentrator. This includes sparks from static electricity created
by any type of friction.
WARNING:
To reduce the risk of burns and/or serious personal injury
WARNING: Use this device only for its intended use as described in this manual.
WARNING: This device is to be used only in accordance with the prescription of a physician and this user manual. DO
NOT make adjustments to the flow rate unless prescribed by a physician.
WARNING: If at any time you feel that you are not receiving the correct amount of oxygen, contact your provider and/or
physician immediately.
WARNING: DO NOT allow any powder or powder-like substance near the oxygen concentrator and/or its tubing; the
powder could cause contamination of the device, and the possible resulting device malfunction could cause
oxygen to drop to ineffective levels.
WARNING: Supervise use of this device closely when it is used by, on, or near children or those who require extra care.
WARNING: Always unplug this device immediately after use.
WARNING: Do not leave this device unattended when it is plugged in.
4
Caution:
To reduce the risk of minor personal injury and/or product/property damages
Caution: During transport, always keep the concentrator upright to prevent damage. If the concentrator is transported in
the trunk of a car, ensure that the concentrator is secured so that it will remain upright.
Caution: Ensure that the temperature at the concentrator's location during transport does not fall below -5℃or exceed
70℃
.
3. Handling
Transportation
The oxygen concentrator should ALWAYS be kept in the upright position to prevent damage during transportation. The
OXYBELL packaging has been designed to assure maximum protection of the concentrator.
Unpacking
1. Remove all loose packing from the carton.
2. Carefully remove all the components from the carton.
3. Examine exterior of the oxygen concentrator for nicks, dents, scratches or other damages. Inspect all components.
Note: Unless the oxygen concentrator is to be used immediately, retain containers and packing materials for storage until
usage is required.
Caution: To avoid any damage during transportation, the compressor in the concentrator is fastened with belts. Before using,
operate as follow:
1. Upside down the machine gently;
2. Cut off the fastening belts, then pull them out and make sure no remains in the machine.
Storage
Store the repackaged oxygen concentrator in a dry area. DO NOT place anything on top of the repackaged concentrator.
Always store the concentrator upright to prevent damage.
Caution: Ensure that the temperature at the concentrator's location during storage does not fall below -5℃or exceed 70℃
.
4. Installation
Installation location safety Information
Select a well-ventilated, fume-free room in your house where using the oxygen concentrator would be most convenient. The
concentrator can be easily moved from room to room on its casters.
To reduce the risk of electrocution, fire, explosion burns, serious Personal Injury, and/or Property damage
WARNING: Keep the oxygen concentrator away from flammable and explosive areas.
5
WARNING: To reduce the risk of fire, special care must be taken when using an oxygen concentrator. DO NOT SMOKE
while using this device. Keep all matches, lighted cigarettes, and other sources of ignition out of the room in
which this concentrator is located. In public settings or when used in hospital or long-term care environments,
prominently display NO SMOKING signs.
WARNING: A spontaneous and violent ignition could occur if oil, grease, or greasy substances come in contact with oxygen
under pressure. ALWAYS keep these substances away from the oxygen concentrator and all other oxygen
equipment.
WARNING: Textiles and materials that normally would not easily burn can ignite and burn with great intensity in
oxygen-enriched air; ALWAYS keep these materials away from the oxygen concentrator and all other oxygen
equipment.
WARNING: The oxygen concentrator is intended to be rolled from room to room. Do not place the oxygen concentrator in
surroundings where its airflow is obstructed.
WARNING: Be certain to place the concentrator so that all sides are at least 30cm away from walls, draperies, furniture, or
other obstructions. Do not place the concentrator in a confined area.
WARNING: The oxygen concentrator MUST be kept away from heat, fire, flammable and explosive areas, and excessive
water sources and conditions. Keep all oxygen tubing, cords and oxygen concentrator away from heated or hot
surfaces, including space heaters, blankets, stoves and similar electrical appliances.
WARNING: Do not use a household extension cord if the AC cord does not reach the power outlet. Use of an extension cord
could result in fire and electric shock.
WARNING: DO NOT connect the concentrator in parallel or series with other oxygen concentrators or oxygen therapy
devices.
WARNING: DO NOT plug the concentrator into the same outlet as any other major appliance.
WARNING: Always place the concentrator on a hard surface. Never place the concentrator on a surface such as a bed or
couch, where the concentrator could tip or fall.
WARNING: Do not place items on top of the concentrator.
WARNING: NEVER block the concentrator's air openings.
WARNING: Keep the concentrator openings free from lint, hair, etc.
Caution: The concentrator should be appropriately placed to keep it from falling, strong vibration or other mechanical
damage.
Caution: Only use stable and safe electrical power sources.
Caution: Do not pull the oxygen concentrator by the power cord.
Caution: If the oxygen concentrator has been subjected to sub-freezing temperatures for an extended period of time, allow it
to warm up to the stated operating temperatures before power up. Failure to do so could result in improper
performance and or alarm conditions until the device reaches normal operating temperatures.
Radio frequency Interference
Most electronic equipment is influenced by Radio Frequency Interference (RFI). ALWAYS exercise caution with regard to the
use of portable communication equipment in the area around the oxygen concentrator.
6
Product description
Front view (Figure1)
1.
Operating instruction
2.
Outlet connector
3.
Switch
4.
Flow regulating button
5.
Flow meter
6.
Circuit breaker
7.
Indicating light for POWER
8.
Indicating light for “NORMAL O2 PURITY”
(For purity-monitoring type only)
9.
Indicating light for “LOW O2 PURITY” (For
purity-monitoring type only)
10. Indicating light for Maintenance Alarm
11. LCD screen
12. Nebulization cup (For nebulization type
only)
13. Nebulization button (For nebulization type
only)
Figure 1
Back view (Figure2)
14. Maintenance entrance - with Intake filter inside
15. Exhaust
16. External air filter
17. Power cord
Figure2
7
5. Operation
WARNING: Read the safety section and operating instructions in this manual before use.
Preparation
Attach appropriate accessories to the oxygen outlet.
Tubing Connection: (Figure 3)
1. Thread the oxygen output connector onto the outlet.
2. Directly attach the oxygen tubing to the connector.
Figure 3
Tubing Connection with Humidifier bottle:(Figure 4)
WARNING: The use of a humidifier bottle with a concentrator must be prescribed by a physician. If you are prescribed to
use a humidifier bottle as part of your therapy, please follow these steps:
1. Fill the humidifier bottle with distilled water up to the top mark.
WARNING: DO NOT overfill the humidifier bottle.
2. Thread the wing nut on the top of the bottle to the oxygen outlet
so that the bottle is suspended. Make sure it is firmly tightened.
3. Attach the oxygen tubing to the outlet of the bottle.
Figure 4
WARNING: DO NOT reverse the oxygen inlet and output connections, or water from the humidifier bottle will travel through
the oxygen hose back to the patient.
Setup
1. Before proceeding, ensure that all instructions in Section 4, Installation, have been followed, and that you have read the
SAFETY section of this manual.
2. Ensure that the concentrator power switch is in the OFF position. Plug the concentrator's AC connector into the power
outlet.
Turning the Concentrator on
1. Press the power switch to “ON” position. The system starts running, and the power light will illuminate.
2. Turn the flowmeter knob to center the flowmeter ball on the LPM prescribed. The flowmeter can be adjusted only after the
unit is powered on.
NOTE: Your supplier might have preset the flowmeter so you can skip this step.
3. Now your oxygen concentrator is running. Please choose the using time as prescribed.
WARNING
Improper use to the power cord and plug can cause burning, fire or other electric shock hazards.
WARNING
Oxygen is flammable. No smoking near the working oxygen concentrator.
8
Purity Indicating: (FOR PURITY-MONITORING TYPE ONLY)
Unique purity indicating function is available for purity-monitoring type unit only. There are four lights (“POWER”, “NORMAL
O2 PURITY”, “LOW O2 PURITY”, “CALL CERVICE”) on the control panel. When unit is on, green light for “POWER” will be
on and yellow light for “LOW O2 PURITY” will be on for several minutes before off. Then green lights for “NORMAL O2
PURITY” will be on.
Description for purity indicating lights on the display as follow:
1.
Green light for “NORMAL O2 PURITY” on with LCD information “Normal Oxygen”: output oxygen purity is normal, and
with purity higher than 85%.
2.
Yellow light for “LOW O2 PURITY” on with LCD information “Low Oxygen”: output oxygen purity is lower than
acceptable 85% purity.
Once output oxygen purity is lower than acceptable 85% purity, then green light for “NORMAL O2 PURITY” will be off and
yellow light for “LOW O2 PURITY” will be on. In this case, switch to your alternate reserve oxygen sources.
Warning: If purity keeps going down, continuous siren alarms occur. In this case, contact your dealer.
Nebulization Instruction: (FOR NEBULIZATION TYPE ONLY)
Infuse liquid medicine into nebulization cup before starting nebulization. (Figure 5)
a. Connect the accessory tube with the output oxygen connector. Liquid medicine in the nebulization cup starts to be
nebulized, although it is not very obvious enough.
Caution: nebulization cup must be connected to output oxygen connector, and it is prohibited to be connected
with humidifier bottle.
Figure 5
b.
Press the nebulization button at the right side of the unit top for 5 seconds (Figure 6), and then release when you hear
a beep. Now the nebulization is on with LCD nebulization indication (Figure 7) and the visual effect is obvious. The ball
in the flow meter will drop to the bottom.
Figure 6
Figure 7
9
C. Once the potion in the nebulization cup runs out, press the nebulization button as well for a few seconds and release
after a beep sound. Now nebulization is off. Remove the nebulization cup and make the unit running in normal condition.
CAUTION: The nebulization Mode must be used with a nebulization cup.
The output pressure will be higher when the nebulization Mode starts, so please do not inhale oxygen
directly without nebulization cup.
SPA Treatment (FOR SPA TYPE ONLY)
For SPA type unit, it has two functions of normal mode (oxygen inhalation mode) and SPA treatment mode (cosmetic SPA
treatment):
1. Normal Mode:
When you switch on the unit, the LCD shows "Oxybell O2 concentrator". After 3 seconds, it shows "NORMAL MODE
Runtime 0000hr".
1.1 thread the humidifier bottle or oxygen outlet connector to the unit oxygen outlet port.
1.2 connect the oxygen inhalation tubing with the humidifier bottle or oxygen outlet connector.
1.3 put on the oxygen inhalation tubing and enjoy the oxygen inhalation.
2. SPA Treatment Mode:
The unit also has the function of cosmetic skin oxygen SPA treatment. If you need this, just do as following:
2.1Connect the SPA tubing with the unit and airbrush.
Caution: do not use the humidifier bottle for SPA treatment mode.
2.2Press the SPA button (nebulization button), then the LCD shows "Treatment mode Runtime 0000hr".
2.3Adjust the flowmeter knob for suitable output pressure you need.
2.4Now you can enjoy the skin oxygen SPA treantment.
3. Pressure the SPA button again, then the unit switched to Normal Mode again.
Circuit breaker (reset button)
Your oxygen concentrator is equipped with a circuit breaker (reset button), to protect the electrical circuits from overload,
next to the power switch. In the event of an overload, the circuit breaker button will pop out. To reset the circuit breaker,
please push down the button.
Turning the Concentrator off
After using the concentrator for the time prescribed by your physician, move the concentrator's power switch to the OFF
position to turn off concentrator power. Unplug the concentrator's AC connector from the power outlet.
10
6. Transport the oxygen Concentrator
The OXYBELL Oxygen Concentrator is equipped with a luggage handle and casters for transportation. To transport the
concentrator:
1. Remove and store any accessories, such as tubing, cannulas, masks, and humidifier bottle, if equipped.
2. Fold and wrap the power cord and attach it to the concentrator cabinet using the strap.
Using the luggage handle
Extend the luggage handle: Pull the handle up completely. Ensure that the handle is completely extended and securely in
place.
Retract the luggage handle: Lower the handle completely. Ensure that the handle is completely retracted and securely in
place.
Caution: Do not lift oxygen concentrator by the luggage handle.
7. Maintenance
I. Clean the housing once in the month.
II. Nasal cannula should be replaced every 3 months.
III. Use only distilled water to the humidifier bottle.
All repairs and regular maintenance can be performed only by authorized OxyBell service. Once a year, the oxygene
concentrator should go through periodic inspection in accordance with the manufacturer's service operation.
User maintenance
DANGER: The concentrator was specifically designed to minimize routine preventive maintenance. Preventive maintenance
or adjustments to the concentrator are to be performed only by authorized service personnel; the performance of
such maintenance or adjustment by any other personnel could void the warranty and create a hazardous
condition or serious personal injury.
WARNING: Ensure that the concentrator is unplugged from the AC power source and the power switch is at the “OFF”
position before performing maintenance on the concentrator.
Cleaning the cabinet filter
Clean the cabinet filter two times in the month, or more often if it gets dirty or your environment has high dust or
pollutant levels.
1. Ensure that the power cord is unplugged and the power switch is at the “OFF” position.
11
2. Remove the filter carefully from the rear of the cabinet.
3. Vacuum the filter carefully or wash it with a mild detergent and tap water. If washed, allow the filter to air dry before
reinstalling it in the concentrator.
4. Reinstall filter in concentrator.
Caution: Do not operate the concentrator without the cabinet filter installed, or while the filter is wet. These actions could
permanently damage the concentrator.
WARNING: The cabinet filter shall be cleaned two times in the month or more often if it gets dirty. Failure to follow this
caution may cause permanent damage of the unit, which results in the loss of warranty.
Cleaning the cabinet
Clean the cabinet monthly, or more often if it gets dirty or your environment is very dirty.
1. Ensure that the power cord is unplugged and the power switch is at the “OFF” position.
2. Clean the cabinet with a mild household cleanser and a clean, non-abrasive cloth or sponge.
WARNING: Do not immerse the concentrator in water or other liquid. Do not pour liquids on the concentrator while cleaning.
Do not allow any liquid to enter the concentrator.
Caution: Many cleansers must be diluted before use. Follow the manufacturer's directions carefully to avoid damaging the
cabinet.
Replacement Parts
Below replacement parts and accessories are available through your distributor or medical stores.
I. Cannula tubing
II. Humidifier bottle
III. Oxygen mask
Cannula, Mask and Tubing
Clean and replace the cannula, mask and tubing as dealer’s instruction.
Intake Filter
The intake filter should be replaced after each 12 months of usage. It is available from your local dealer.
Bacteria Filter (HEPA)
The bacteria filter inside the oxygen concentrator (micro disc) should be replaced after each 15000 hours use. Contact your
dealer after this period.
Failure to follow above maintenance rules may result in damage of the oxygen concentrator and void the
warranty.
12
8. Troubleshooting
The following troubleshooting chart can help you analyze and correct oxygen concentrator malfunctions. If below
suggested procedures do not work, please switch to an alternate reserve oxygen source and contact dealer.
WARNING AGAIN
DO NOT REMOVE THE CABINET UNLESS YOU ARE A QUALIFIED TECHNICIAN
CHART OF TROUBLESHOOTING
Symptoms
Possible Causes
When the switch is on, unit
Belts fastened the compressor are not
vibrates fiercely with loud noise.
cut off.
Remedies
Cut off belts fastened the compressor.
(See operation in Section
3:Handling-Unpacking-Caution)
1)Ensure that power cord is connected to
the wall outlet.
2)Ensure that there is power in the wall
outlet.
3)Ensure that an extension cord is not
Concentrator power switch is on,
used.
but concentrator will not turn on
Red LED illuminates
4)If the wall outlet is connected to a light
No power to the device
(nonflashing)
switch, ensure that the light switch is
in the ON position.
Audible alarm sounds
5)Ensure that circuit breaker (reset
button) is not popped out; if so, push it
down.
6)If condition persists, contact your
OXYBELL authorized distributor for
repair.
1)Inspect tubes and cannula to ensure that
they are not kinked or blocked. Smooth
tubes to unblock.
Concentrator works, but little or
no oxygen from outlet.
2)Check humidifier bottle, if so equipped, for
Possible blockage
leaks or jamming. Remove humidifier bottle,
clean with warm soapy water, rinse, reinstall,
and tighten.
3)If condition persists, contact your
OXYBELL authorized distributor for repair.
13
Flowmeter ball located on “0”
position, or flowmeter float is
Adjust flowmeter knob. If condition persists,
Possible flowmeter problem
unstable.
Contact your OXYBELL authorized
distributor for repair.
9. Specifications
Power Consumption:
≤300 W
Applied Voltage
AC 230V 50-60Hz
Size:
305×300×610(L×W×H)mm
Weight:
14.5 kg
Outlet:
1
Outlet Pressure:
0.04 - 0.06 MPa
Flow Rate:
(0~5) LPM
Oxygen Purity:
93%±3%
Noise:
~40dB (A)
Storage Condition:
temperature
humidity
-5℃ to 70℃
≤80%
14