1
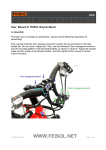
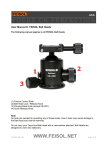
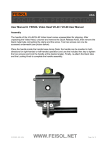
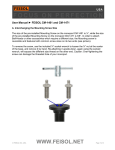
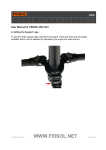
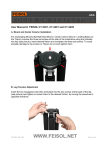
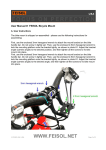
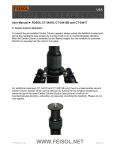
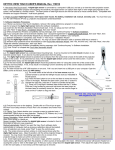
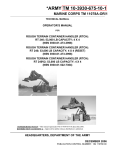
User Manual ► FEISOL Tripod Maintenance
Care and Maintenance for your FEISOL Tripod
Like all other instruments, your FEISOL tripod needs some routine care to keep it in top
operating condition for many years.
The very best maintenance is preventative care: The largest threat is posed by sand and
grit which works its way into the joints and locks of your tripod. The best way to counteract
this potential hazard is to rinse the legs or wipe them with a damp cloth before collapsing
them, whenever you notice residual sand after shooting.
In the event that grit has still accumulated, occasional cleaning and re- lubricating of all
moving parts is a good idea. The most vulnerable spots are the twistlocks where the
different leg-sections collapse.
Cleaning of the twistlocks
1.) For each section, unscrew the twistlock cover completely (work on one section at a
time, rather than undoing them all at once).
2.) Pull out the lower leg section.
3.) At the tip of the carbon tube you will find a large C-Ring and a series of 4
Compression Rings – the fourth one tends to “hide out” inside the twist lock cover
(some older models have only 3 Compression rings).
2011 models or older
2012 models or newer
© FEISOL INC, USA
WWW.FEISOL.NET
Page 1 of 3
4.) After making a note of the ring sequence, remove them and wipe them and the
carbon tube with a damp cloth.
5.) Next, trace the thread of the twistlock with a cloth to remove any grit and old grease,
repeat several times.
6.) Before re-assembling the leg section, apply a small amount of Marine Grease
(available at Hardware Stores) to the thread – do not use liquid lubricant .
7.) Now, put the Twistlock Cover back on the lower leg section, the opening facing the
top.
8.) Next, re-place the compression rings (see picture rings 1 for correct sequencing) .
Note how the edges of the rings are beveled to fit together neatly.
9.)
10.)
Place the large C-Ring which is secured by two elevated round “buttons"
being fixated on the two visible holes in the carbon tube.
© FEISOL INC, USA
WWW.FEISOL.NET
Page 2 of 3
11.)
Now, you are ready to re-insert the carbon tube into the larger tube. Be sure to
feed all but the last compression ring (with the edge) into the tube of the top
section before screwing on the twist lock cover. If they are not inserted, the
cover will not screw on all the way and the twistlock will fail.
For Rapid models, when putting your finger inside the top (larger tube), you will notice a
ridge. Place the tube with the ridge on top to facilitate the next step: The large C-Ring has
an opening where the two ends of the "C" meet - please align this channel with the ridge in
the larger tube when feeding the rings into the tube.
Tightening and cleaning the angle adjustment of the legs
1.) To tighten or loosen the legs’ angle adjustment, simultaneously insert the two hex
tools (included) in the Allan screws at the very top of the leg (where it is attached to
the mainframe) and turn them in opposite directions until desired degree of tension is
reached (see picture leg tightening).
2.) If there is evidence that dirt has worked its way into the assembly – e.g. the leg will
not hold tension, unsrew completely and remove the bolt for cleaning with a rag.
Before re-assembling, re-lubricate using a small amount of Marine Grease (do not
use liquid lubricant).
If you need any assistance, please contact your FEISOL Service team at [email protected]
© FEISOL INC, USA
WWW.FEISOL.NET
Page 3 of 3