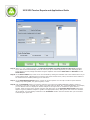
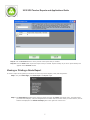
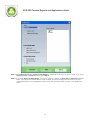
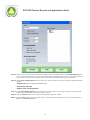
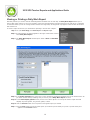
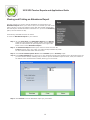
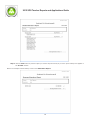
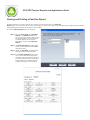
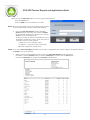
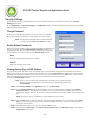
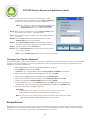
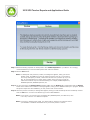
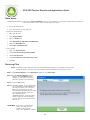
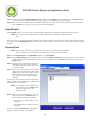
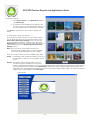
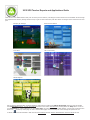
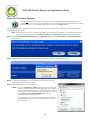
1
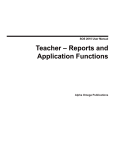
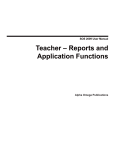
SOS 2012 User Manual
Teacher – Reports and
Application Functions
Alpha Omega Publications
MMVI Alpha Omega Publications, Inc.
Switched-On Schoolhouse® 2012, Switched-On Schoolhouse®. Switched-On®, and their logos are registered trademarks of
Alpha Omega Publications, Inc.® All Rights Reserved.
No part of this publication may be reproduced, stored in an electronic retrieval system, or transmitted in any form by any means
– electronic, mechanical, photocopy, recording, or otherwise – without the prior written permission of Alpha Omega Publications,
Inc.® Brief quotations may be used in literary review.
Table of Contents
Reports...........................................................................................................................4
Viewing or Printing a Report Card.............................................................................5
Viewing or Printing a Grade Report...........................................................................7
Viewing or Printing a Subject Report.......................................................................10
Viewing or Printing a Daily Work Report.................................................................12
Viewing or Printing an Attendance Report...............................................................13
Viewing or Printing a Past Due Report ...................................................................15
Viewing or Printing a Transcript ..............................................................................16
Application....................................................................................................................18
Security Settings......................................................................................................19
Change Password..............................................................................................19
Enabling Student Passwords.............................................................................19
Viewing Answer Keys in SOS Student...............................................................19
Changing Teacher Passwords................................................................................20
Backup/Restore.......................................................................................................20
Backing Up.........................................................................................................21
Restoring Files...................................................................................................23
Import Export...........................................................................................................24
Exporting Data....................................................................................................24
Importing Data....................................................................................................25
Setup Wizard...........................................................................................................26
Sample Lesson...................................................................................................26
Change Theme........................................................................................................26
Checking For Application Updates..........................................................................29
Check for Curriculum Updates................................................................................30
Filtering Words in the Dictionary...................................................................................31
3
Switched-On Schoolhouse® 2012
Reports
Looking for some information about how to view or print reports of your students’ grades? Wondering how much time your
student(s) are spending on a certain subject? Need to provide student attendance records? You have several reports available to
help.
Report Card
Grade Report
Subject Report
Daily Work Report
Attendance Report
Past Due Report
Transcript
Switched-On Schoolhouse® (SOS) automatically records student scores and keeps up-to-date records of grades and activities. As
students answer problems, their work is graded and their scores are recorded. When they finish assignments, their assignment,
unit, and subject scores are computed and displayed on both the Schoolwork screens in SOS Student and the Lesson Book
screens in SOS Teacher. This is designed so that you and your students can easily see how well they’re doing in their studies at
any given time. SOS also tracks the amount of time each student spends in every subject, as they read the presentation material,
play the games, and work the problems, so you are better able to assess how effectively your students are using their time.
The SOS Reports button/link consolidates all this information, allowing you to view and print student grades, as well as evaluate
the way your students are spending their time while in SOS. You have not only up-to-the-minute status on how students are
progressing but also the ability to print reports for your students’ records. To create and customize reports, so you can view, print,
organize, and add to the information in them:
Choose one of these reports:
Report Card—Features a student’s subject grades to a given term
Grade Report—Features a student’s subject grades, the individual unit and assignment grades within the subjects
Subject Report—Features the amount of time each selected student has spent on each assigned subject as well as their total
time spent in SOS
Daily Work Report—Features a list of assignments students worked on during a specified date range. each assignment
displays on the last day the student worked on it, with the current grade and assignment status
Attendance Report—Features either a detailed list of days and dates a student attended school for a selected time period or
a summary of the number of days a student attended school each month in the designated period.
Past Due Report—Features a list of overdue assignments for each selected student.
Transcript—Features a list of courses the selected student completed by term, including letter grade, credits earned and
grade point average (GPA).
4
2012 SOS Teacher Reports and Applications Guide
Viewing or Printing a Report Card
To create a report of the grades your students are receiving in their subjects:
Step 1: On your Home Page, click Grade Report in the Reports widget. Step 2: The Report Card window opens. Select a school term from the Terms drop-down menu. The report card you
create lists subjects by student within this school term.
Step 3: After you select a term, two sets of choices appear on the screen, as shown above. Immediately below the term
you have the choice of selecting that the report is by term of by a specific range of dates; and in the box on the
right side of the screen you see a box listing all of your students.
Step 4: Click the circle to the left of Report by Term to select that choice and go to Step 6 to continue or
Click the circle to the left of Report by Date Ranges to select that choice. The screen below appears.
NOTE: If you choose Report by Date Ranges, customized report card data is NOT saved.
Comments are retained, but Subject and Grade information must be entered each time
you run the report.
5
2012 SOS Teacher Reports and Applications Guide
Step 5: Select 1, 2, 3 or 4 grading periods in the Choose the number of grading periods for this report dropdown
menu. SOS will then automatically divide the school year by the number of periods you select and assign dates
to the ranges. You may change those dates using the dropdown menus below Start Date and End Date for each
Grade Period.
Step 6: In the Select student box, select one or more students by clicking the checkbox next to the student name. As you
select student names, indicating that you want to print report cards for them, notice, the buttons at the bottom of
the window become enabled, allowing you to click them.
Step 7: In the Grade Display Options section, choose one of three options. You can opt to create a report card that
displays only letter grades, only percent grades, or both.
Step 8: Click the Customize button if you want to customize your report card, adding additional subjects, grades, or
comments. If you have a student who is taking a non-SOS class, like Music, Art, or Physical Education, for example,
you can add this class so it displays as another subject on the report card. To customize a report card for a
student, select the name of the student using the drop-down menu in the Customize Report Card window that
appears. Type any additional subjects or grades in the appropriate boxes, adding these new entries to a student’s
list of subjects. You may add any comments in the Comments window. Close the window when you are finished
customizing the report card.
6
2012 SOS Teacher Reports and Applications Guide
Step 9: Click the Preview button to see a preview of the report card you created.
Step 10: Click the Print button to print the report card you created. It prints exactly as you set it up and exactly as it
appears in the Preview window.
Viewing or Printing a Grade Report
To create a report of the grades your students are receiving in their subjects, units, and assignments:
Step 1: On your Home Page, click Grade Report in the Reports widget.
Step 2: The Grade Report window opens. Select a school term from the Terms drop-down menu. The grade report
you create lists subjects, units, and assignments from within this school term. After you select a term, a list of
students is displayed in the Select student(s) box to the right side of the screen.
7
2012 SOS Teacher Reports and Applications Guide
Step 3: Select Report by Term or Report by Date Ranges by clicking the circle to the left of your choice. If you select
Report by Term, skip Step 4 continuing with Step 5.
Step 4: If you select Report by Date Ranges, your screen refreshes to display the Start Date and End Date dropdown
boxes. You may leave the default dates or select the dates you wish by clicking the small arrows to the right
of the displayed dates or by highlighting the dates shown and entering the dates you want in the MM/DD/YYYY
format.
8
2012 SOS Teacher Reports and Applications Guide
Step 5: Select one or more students by clicking the checkbox next to the student name in the Select student(s) box
on the right side of the screen. As you select student names, indicating that you want to print grade reports for
them, notice, the buttons at the bottom of the window become enabled, allowing you to click them.
Step 6: In the Level of detail options section, choose one of three options. You can opt to create a grade report that
displays:
subjects only (which is essentially a Report Card)
subjects and units only
subjects, units, and assignments
Step 7: In the Grade display options section, choose one of three options. You can opt to create a report card that
displays only letter grades, only percent grades, or both.
Step 8: Click the Preview button to see a preview of the grade report you created.
Step 9: Click the Print button to print the grade report you created. It prints exactly as you set it up and exactly as it
appears in the Preview window.
9
2012 SOS Teacher Reports and Applications Guide
Viewing or Printing a Subject Report
SOS also provides you a tool to monitor how much time a student spends on each subject. The Subject Report allows you to
select a term and any or all of your students. It then lists each student selected and displays their assigned subjects and the
amount of time spent on each one. Total time spent working on all subjects is also displayed.
To create a report of the time your students are spending in each of their subjects:
Step 1: On your Home Page, click Grade Report in the Reports widget. Step 2: The Subject Report window opens. Select a school term from the Terms drop-down menu. The report you create
lists time by subjects for each selected student within this school term.
Step 3: In the Select student(s) box, select one or more students by clicking the checkbox next to the student name. As
you select student names, indicating that you want to print a subject report for them, notice, the buttons at the
bottom of the window become enabled, allowing you to click them.
10
2012 SOS Teacher Reports and Applications Guide
Step 4: Click
to see a preview of the subject report you created.
Step 5: Click the Print button to print the subject report you created. It prints exactly as you set it up and exactly as it
appears in the Preview window.
11
2012 SOS Teacher Reports and Applications Guide
Viewing or Printing a Daily Work Report
SOS also provides you a tool to monitor what assignments students work on each day. The Daily Work Report allows you to
select a date range and any or all of your students. It then lists the assignments a student worked on for that day. It is important
to remember that if you do use a range of dates instead of a single date, an assignment only appears under the date the student
last worked on it.
To create a report of the time your students are spending in each of their subjects:
Step 1: On your Home Page, click Grade Report in the Reports widget. Step 2: A small submenu of options appears to the right of this button. Click to
select Daily Work Report.
Step 3: The Daily Work Report window opens. Select a Start and End Date
for the report.
Step 4: In the Select student(s) box, select one or more students by clicking the checkbox next to the student name. As
you select student names, indicating that you want to print a Daily Work Report for them.
Step 5: In the Grade display options section, choose one of three options. You can opt to create a report card that
displays only letter grades, only percent grades, or both.
Step 6: Click the Preview button to see a preview of the grade report you created.
Step 7: Click the Print button to print the grade report you created. It prints exactly as you set it up and exactly as it
appears in the Preview window.
12
2012 SOS Teacher Reports and Applications Guide
Viewing and Printing an Attendance Report
SOS also provides you a tool to monitor attendance for each student. The
Attendance Report allows you to select a term, level of detail you want on the
report, and any or all of your students. It then lists each student selected and
lists each day the student attended to schoolwork or if you chose the Summary
option, the total number of days
the student(s) attended school for the month.
To create an Attendance Report for your students:
Step 1: On your Home Page, click Attendance Report in the Reports
widget or If you are using the "Classic" theme, click the Reports
button. A small submenu of options appears to the right of this
button. Click to select Attendance Report.
Step 2: The Attendance Report window opens. Select a school term from the
Terms drop-down menu. The report you create lists days attended by month
for each selected student within this school term.
Step 3: In the Level of detail options choose either Detailed report or Summary report.
Step 4: In the Select student(s) box, select one or more students by clicking the checkbox next to the student name. As
you select student names, indicating that you want to print an attendance report for them, notice, the buttons at
the bottom of the window become enabled, allowing you to click them.
Step 5: Click Preview to see the attendance report you just created.
13
2012 SOS Teacher Reports and Applications Guide
Step 6: Click the Print button to print the report you created. It prints exactly as you set it up and exactly as it appears in
the Preview window.
Below is an example of the Summary version of the Attendance Report:
14
2012 SOS Teacher Reports and Applications Guide
Viewing and Printing a Past Due Report
SOS also provides you a tool to monitor any overdue work for each student. The Past Due
Report allows you to select the term, date, and students you want on the report. It then displays each student selected and lists
each assignment that is past due by date for each student.
To create a Past Due Report for your students:
Step 1: On your Home Page, click Past Due
Report in the Reports widget or If
you are using the "Classic" theme, click
the Reports button. A small submenu
of options appears to the right of
this button. Click to select Past Due
Report.
Step 2: The Past Due Report window opens.
Select a school term from the Terms
drop-down menu.
Step 3: Select the Due Date. All assignments
past due as of this date are listed.
Step 4: In the Select student(s) box, select
one or more students by clicking the
checkbox next to the student name. As
you select student names, the buttons
at the bottom of the window become
enabled, allowing you to click them.
15
2012 SOS Teacher Reports and Applications Guide
Viewing and Printing a Transcript
Most post-secondary educational institutions and many other organizations require a transcript of student schoolwork. SOS provides
two transcript formats for your use. Both are designed for the high school level student.
One is a totally manual transcript, where you enter all of the student information into a form that you can modify to
meet your individual needs. Access it from the Tools folder on your SOS installation disc.
The second format is a report SOS populates and allows you to customize by adding non-SOS course work.
There are a few points to keep in mind as you work on a transcript:
Select a term for each grade level you want to include on the transcript. Do this prior to entering any Non-SOS courses.
Only COMPLETED courses appear on the transcript.
Terms may be added for grade levels where no SOS course work was completed.
Only one grade level can be associated to a term.
Transcripts can only be created for active students. (If a student is inactivate, go to Student Setup, select the
Student and click the button beside Activate Student, then you can run a transcript for the student.)
To access the second:
1. Click Transcript in the Reports widget on your Home Page.
2. Select the student whose transcript you want to create.
3. Select a term for each grade level using the drop-down lists for 9th Grade Term through 12th
Grade Term.
If you want to add courses for a term when a student was not enrolled in any SOS courses, you can
click the Add Term button to create a new term for those courses.
16
2012 SOS Teacher Reports and Applications Guide
When you click the Add Term button, you see a pop-up window like this:
Enter the Term name.
Select a Grade level to associate the term with.
NOTE: Be sure to select terms in order, for all grade levels you want
on the transcript before entering any Non-SOS Subjects.
4. Enter each Non-SOS Subject with the associated
Grade achieved in the course, the number of Credits
the student was eligible to earn for the course, and the
Term the course is associated with.
Usually the number of credit hours possible for a course
are based on whether the course is a full year course or
a semester course. In most locations:
.5 credit hour = a one semester course
1 credit hour = a full year course (2 semesters)
NO credit is granted for a failed course
NOTE: If you enter a Non-SOS Subject and later need to delete it, highlight the line with the subject to be deleted and press
the Delete key on your keyboard.
5. When you have selected all SOS terms and entered any Non-SOS Subjects and the associated
information, click the Preview button to view the Transcript on screen or click the Print button
to print the Transcript. An example of a Transcript is shown below.
17
2012 SOS Teacher Reports and Applications Guide
Application
The Application button gives you access to several of Switched-On Schoolhouse’s (SOS) high-level features. You can use it to
perform any of the following functions:
Security Settings—enables you to change and control your teacher password settings
•
Changing Your Teacher Password
•
View Answer Keys in SOS Student
•
Enabling the Student to View Answer Keys in SOS Student
Backup/Restore—allows you to make and retrieve an extra copy of school data
•
Backing Up Files •
Restoring Files
Import/Export—permits you to work on school data from other computers
•
Exporting Data
•
Importing Data
Setup Wizard—enables you to quickly and easily create terms, enroll students, and install and assign curriculum
Change Theme—allows you to select the look and feel of SOS
Check for Updates—lets you manually check for application updates whenever you choose
Check for Curriculum Revisions—permits you to manually check to see if there are any new revisions or updates to your
curriculum.
18
2012 SOS Teacher Reports and Applications Guide
Security Settings
Because password settings control what both you and your students can access, it’s important to know how the Security
Settings window works.
On your Home Page, click Security Settings in the Application widget. This opens a small window where you can set several
different password-related options: Change Password
Allows you to change the login password you use each time you start SOS.
For security reasons, the characters you type appear as a series of dots.
NOTE: You may also choose NOT to have a teacher password. To do this, leave the New and Confirm boxes blank.
Enable Student Passwords
Allows you to require students to log in with both username and password each
time they enter SOS. Click the Enable Student Passwords checkbox, and
when they next start SOS, their login screens will require them to type in the
correct passwords you chose for them on their Student Setup screens.
Save
Saves any changes made to SOS security settings.
Cancel
Cancels any changes not yet saved.
Viewing Answer Keys in SOS Student
This is a security feature that allows you to view answer keys from your students’ assignment screens. Allows you to enter a
password in this box, so you and your students can view answer keys and use Show Answer in SOS Student without having to
find answer keys separately in SOS Teacher. You may choose to give your students access to the Help button—it gives them the
ability to unassign problems as well as see answer keys for problems they haven’t yet completed.
(The student Problem Helps window)
NOTE: If this is your first time in SOS, the password in the window is your teacher password.
Be sure to change your password to something else if you plan on letting student use
Problem Helps.
Step 1: Click Security Settings n the Application widget on your Home Page.
Step 2: A small Security Settings pop-up window appears. Check to see that a password appears in the Problem
Helps Password box. This password is very likely the one you selected when you installed SOS, since it was
automatically applied to this box. If you wish to change this password, or if the box is blank, add a new password
now.
NOTE: For security reasons, the characters you type appear as a series of dots.
Step 3: Click the Save button to save your password. The pop-up window disappears, and you are back on your Home
Page. You can now view answer keys from your students’ assignment screens. Let’s go to a student screen so
you can see how this works.
Step 4: Open SOS Student and log in so you see a student’s Home screen.
Step 5: On the student’s Home Page, select click to see your Schoolwork in the Schoolwork widget. The student’s
Assignments screen opens.
19
2012 SOS Teacher Reports and Applications Guide
Step 6: To view answer keys for lessons that students have not yet
completed, click any assignment title in the Today’s Schoolwork
section on the top of the screen to open the assignment.
NOTE: You already have access to answer keys for assignments
students have completed in the Review Completed
Assignements section at the bottom of the screen.
Step 8: When you are in an assignment, click the Show Problems button
at the bottom of the screen. A problem displays.
Step 9: Click a problem number you want to see. That problem displays on
the screen.
Step 10: Click the Help button at the bottom of the screen. A small
Problem Helps pop-up window appears.
Step 11: Select Show problem answer to indicate that you want to see
the answer to the problem displayed on the assignment screen.
Step 12: Type your password in the password box.
Step 13: Click the Show Answers button and a window with the answer
to the problem appears.
NOTE: See the Problem Helps topic for more information on this topic.
Changing Your Teacher Password
SOS does not limit the number of times you can try entering your password if you cannot remember it exactly. If you have totally
forgotten it and can’t open SOS, you can reset your password. To reset or change the password you log in with each time you
start SOS you need the installation CD.
• Put the SOS application disc into the CD-ROM or DVD drive of your pc.
• If the Install window opens, click Close.
• Click Start on your computer taskbar, and select My Computer (Computer if using Vista).
• Right-click the drive containing the SOS application disc, and click Open.
• Double-click the Tools folder, and then double-click the DataUtility.exe.
• When you are prompted to select a database, choose SOS Home 2012 and click OK.
• Click the circle beside the Change Password option and click Update.
• You are prompted to enter your new Password twice. Click Save after doing that. When the
window closes, notice the “Successfully Changed Password” message by the Update button.
• Remove the disc from the CD-ROM or DVD drive.
Remember:
Your password is case sensitive, so check to see if your Caps Lock key is on.
If your password is longer than 12 characters, you will get an error.
Note: Be sure to write your password down and put it somewhere safe. Protect your teacher
password by keeping the SOS installation CD in a secure location. Backup/Restore
Backup/Restore is a feature that protects against the loss of data such as student work, grades, teacher commentary, and other
information. The tool provides a convenient way to backup your entire SOS database at any time. Backing up saves everything
exactly as it is, so you can restore a previously-created backup whenever you need.
20
2012 SOS Teacher Reports and Applications Guide
It’s a good idea to perform regular backups—on a daily basis if possible. If anything happens to your computer’s hard drive, all
student work could be lost. It’s also especially important to backup student work whenever students might be away from their
computers for any great length of time.
If anything happens to your computer’s hard drive, all student work could be lost.
Attention Vista Users: If you have a Client Installation, when you run a backup, you will get a warning telling you that
you cannot write to the C: drive. There are two things you can do:
• Run as an administrator
• Turn User Account Control (UAC) off.
To Run as an administrator:
• Open your C: drive.
• Open Program Files.
• Open the AOP folder.
• Open Switched-On Schoolhouse 2012 Home.
• Right-click SOSHAPP.exe.
• Select Run as administrator.
To turn off UAC:
• Open your Control Panel.
• Select User Accounts and Family Safety.
• Select User Accounts.
• Select Turn User Account Control On or Off.
• Click OK.
Backing Up Files
Backup is a feature that protects all of your data. Performing daily backups of your entire SOS database is critical. Copying work,
grades, and other data to a different location safeguards all schoolwork and eliminates the concern that everything could be lost
in the event of a problem with your computer’s hard drive. A second advantage of performing backups is that everything is saved
exactly as-is. A previously created backup can be restored if needed.
Keep these points in mind before beginning a backup of your data:
• The backup file is too large to be saved to a diskette. Backing up to a flash drive is highly encouraged as well as backing
up your hard drive and then burning the created backup file to a CD.
• The file name, including the path, must not exceed 256 characters.
• Verify that the drive has sufficient free space and you have write permissions to this drive.
NOTE: The backup/restore operations can only be performed when there are no students
currently doing schoolwork. Before you begin, have all students exit their schoolwork to
protect against losing their work.
NOTE: Vista users with Client Install, it is important that you read Vista Users section below
before performing a backup.
Step 1: Click Backup/Restore in the Application widget on your Home Page.
Step 2: A small Backup/Restore window appears. Click the Backup tab to highlight it. This means you want to perform
a backup of data.
21
2012 SOS Teacher Reports and Applications Guide
Step 3: SOS automatically populates the backup folder name SOSbackup2012T on your C drive. It is strongly
recommended that you leave the backup file as this name and location.
Step 4: Click the Save button.
NOTE: If a backup file was previously created, a message box appears, telling you the file
already exists. Click Yes if you want to replace it with the new one. If you want to
save every backup file you make, rename the file each time you back up. If you do
this, we recommend that you simply add a number at the end of the current file
name and increment it by one with each backup; for example, SOSbackup2012T1,
SOSbackup2012T2, SOSbackup2012T3, etc.
Step 5: You are returned to the Backup/Restore window. Make sure the Backup tab is selected and click the Backup
button at the bottom of the window. A message appears, telling you the database backup is in progress. Because
this process copies the entire database, you may need to wait a few moments.
Step 6: When the process is finished, a message box appears, telling you that the backup file was successfully created.
Click the OK button. You have now backed up your entire SOS database.
NOTE: If you choose, you can also copy your backup file (SOSbackup.bak) to a flash drive, burn
it on a CD, or store it on a different computer.
NOTE: If you have a Teacher/Client install, your back-up file is placed on the computer where
your database is installed. Remember this if you need to perform a restore.
22
2012 SOS Teacher Reports and Applications Guide
Vista Users
Attention Vista Users: If you have a Client Installation, when you run a backup, you will get a warning telling you that you
cannot write to the C: drive. There are two things you can do:
1. Run as an administrator
2. Turn User Account Control (UAC) off.
To Run as an administrator:
•
Open your C: drive.
•
Open Program Files.
•
Open the AOP folder.
•
Open Switched-On Schoolhouse 2008 Home.
•
Right-click SOSHAPP.exe.
•
Select Run as administrator.
To turn off UAC:
•
Open your Control Panel.
•
Select User Accounts and Family Safety.
•
Select User Accounts.
•
Select Turn User Account Control On or Off.
•
Click OK.
Restoring Files
NOTE: The backup/restore operations can only be performed when there are no students currently doing
schoolwork. Before you begin, have all students exit their schoolwork so their work is not lost.
Step 1: Click Backup/Restore in the Application widget on your Home Page.
Step 2: A small Backup/Restore window
appears. Click the Restore tab to
highlight it. This means you want to
perform a restore of your SOS data.
Step 3: Click the File button.
Step 4: A window appears, so you can find and
open the backed-up SOS database file
you want to restore. It is in the new
folder you created when you were
performing the database backup. Unless
you selected a different name, the
file is probably called
“SOSbackup2012T.” If you have been
retaining copies of previous backups,
you may have an incremental number
after the “T”.
REMEMBER: If you have a Teacher/Client
install, your back-up file is
located on the computer
where your database is installed.
23
2012 SOS Teacher Reports and Applications Guide
Step 5: You are returned to the Backup/Restore window. Make sure the Restore tab is selected and click the Restore button
at the bottom of the window. A message appears, telling you the database restoral is in progress.
Step 6: When the process is finished, another message box appears, telling you that the restore file was successfully created.
Click the OK button. You have now restored your entire SOS database.
Import/Export
Import/Export allows you to move (export) and add (import) data between computers that have SOS installed on them.
NOTE: It is necessary to have SOS installed on every computer that is importing or exporting student
data.
When would you use this feature? Suppose a student, who normally works on a home computer, wants to take a laptop computer
on vacation. Use the Import/Export feature to export the student’s data from the home computer and import it onto the laptop
computer.
Exporting Data
NOTE: Import/export operations may be performed only when no students are doing schoolwork. Before you begin, have all students exit their schoolwork, so their work will not be lost.
Step 1: Click Import/Export in the Application widget on your Home Page.
Step 2: A small Import/Export window appears. Notice, it has both Import and Export tabs at the top. Since you first need to
export data from one computer before you can import it onto another, click the Export tab to highlight it and go to the
Export window.
Step 3: You see a screen with students’ names and
checkboxes next to them. Click the boxes
next to the names of student(s) whose work
you want to export.
Step 4: As you click to select students, all the terms,
subjects, and units assigned to each student
appear below his/her name. Click to remove
the checkmarks next to the subjects and
units you do not want to export to another
computer.
The boxes you leave checked represent subjects to be
exported, while the unchecked boxes indicate students
whose work will not be exported.
NOTE: If you change your mind about any of
your selections, click the Clear button
to start over and return to the
previous window.
Step 5: When you’re ready with the list of items you
want to export, click the Export button. A
window appears, allowing you to decide:
• The file name you want to assign to your
export file.
• The location where you want to save your
export file.
Notice, the file in the File Name box automatically
appears as “export” with the .sosx extension.
24
2012 SOS Teacher Reports and Applications Guide
Step 6: Create a new folder. Click the Create New Folder icon (
) at the top of the directory.
Step 7: Name your new folder whatever you like. Choose a name that helps you remember what it contains.
Step 8: Open this new folder by double-clicking it.
Step 9: Either rename your export file or choose to leave it “export.”
Step 10: Click Save.
NOTE: Once a file is created, a message box appears, telling you the file already exists. Click Yes to
replace it with the new one or rename the file if you want to keep older export files.
Step 11: You are returned to the Import/Export window. Make sure the Export tab is selected. A message appears, telling you
that the export is in progress.
Step 12: When the process is finished, a message box appears, telling you the export file was successfully created. Click the Ok
button. You have now exported a SOS file.
Importing Data
NOTE: The import/export operations can only be performed when there are no students currently doing
schoolwork. Before you begin, have all students exit their schoolwork so their work is not lost.
Step 1: Click Import/Export in the Application widget on
your Home Page.
Step 2: A small Import/Export window appears. Notice,
it has both Import and Export tabs at the top.
If you have previously exported files that you’re
ready to import, click the Import tab to make
sure you’re in the Import window.
Step 3: Click the File button.
Step 4: A window appears, allowing you to find and open
the previously exported file to import. You see it
in the new folder you created when you
performed the export of data. Unless you selected
your own name for this file, it is probably called
“export.”
Step 5: To select the student to import, click the Open
button. If more than one student’s file was
exported, a drop-down menu appears. You can
select all students or only one.
Step 6: Click the Import button.
Step 7: A drop-down menu appears, asking you to select
the current term for your student.
NOTE: This occurs for each student, one at a time.
Select the current term and click the OK button.
Step 8: Another drop-down menu appears, asking you to select the correct term for each subject for your student.
NOTE: This occurs for each student, one subject at a time. Select the correct term and click the OK
button. You must repeat the import process for each student, one subject at a time.
Step 9: When the Import successful pop-up window appears, click OK. You have now imported SOS files.
25
2012 SOS Teacher Reports and Applications Guide
Setup Wizard
The first time you log on to SOS Teacher 2012, the Setup Wizard appears and walks you through the initial setup of your school.
You can:
Add a School Term - (You need to add a new school term for each new school year and you can always use the Setup
Wizard to do this. Access it using the Application button on your Home Screen.)
Use the already created term or create a new school term to:
Add New Students
Install Subjects
Assign Subjects
See the Setup Wizard
tutorial for additional help with the Setup Wizard.
When you click the Finish button, the basic setup for SOS is complete. You and your students can begin working immediately. You
can modify school or student settings at any time. You can also go to your school calendar to make changes as needed.
NOTE: You can use the Setup Wizard at any time.
Click the Application button on your Home screen. Select the Setup Wizard from the menu that pops up to the right of the
button.
Sample Lesson
NOTE: The sample lesson was modified slightly for 2012. If you uninstalled the 2008 or earlier
version of SOS, you are not able to access the previous sample lesson or any prior work,
even though the lesson appears in the student’s course list with a grade if any work was
completed. If you want your student to have access to the sample lesson, you must
reassign it. You can access any work done on a sample lesson from SOS 2009.
While you are installing subjects, you have the option to assign a sample lesson to your students. There are two versions of this
lesson, one for grades 3-5 and one for grades 6-12. Each lesson walks students (and you) through the various screen elements
and the different problem types. It is a chance to see how lessons and problems are structured and try them out, without impact
to grades.
The sample lesson contains each problem type, including teacher graded problems. These do not hinder student progress in the
sample lesson if you do not get them graded. They are there to provide the student with an opportunity to practice with each
problem type and you, as the teacher, an opportunity to see how the grading function works. The student may continue with the
sample lesson, just as they continue in their regular lessons. In regular lessons though, teacher graded problems must be graded
by you so they can complete a unit.
The sample lesson installs in the same folder where the application is installed. We recommend that you not move them. If
you need to find them for any reason, look in the folder where your application is located. For example, if you installed SOS
to the default location on the C drive, look for the sample lesson for grade 3-5 at: C:\Program Files\AOP\Switched-On
Schoolhouse 2012\Home Demo\Demonstration3
The sample lesson for 6-12 can be found at: C:\Program Files\AOP\Switched-On Schoolhouse 2012\Home Demo\
Demonstration6. Change Theme
The MiSOS format allows you options and flexibilty to choose (and in the “Custom” theme, design) the way your Home Page
appears. Sea Dreams is the name of the theme that Switched-On Schoolhouse displays for teachers when you begin. (The default
for students is the Splash theme.) You have the option of changing your Home Page. Depending on the settings you choose for
your school and students, they can also customize their Home Page.
26
2012 SOS Teacher Reports and Applications Guide
To change your theme:
1. Click Change Theme in the Application widget on
your Home Page.
2. A graphic menu of available choices displays. Click
the one you want. You are automatically returned to
your Home Page with the new theme you selected.
Click Close, if you decide you do not want to change your
theme.
To change again, simply repeat steps 1 - 3.
If you want your student to access only the “Classic” theme,
you can block their access to all of the other themes on the
School Setup Home Page Settings screen. You can also
control the widgets students can display on the other theme
Home Pages from this screen. (You can modify options for an
individual student using the Student Options Home Page
Settings screen.)
Note: If the only theme you are able to access is the
“Classic” theme (example below), you must upgrade
your version of Internet Explorer to IE 7 or higher.
There are a couple of terms used on the MiSOS theme pages:
Avatar - a small picture that represents something you enjoy a
are interested in. Think of it as an expression of who
you are.
Widget - the module or box holding the links you use to
access the functions and features of the various
sections of Switched-On Schoolhouse. There are default widgets (those represented by the functions you also access by
clicking the buttons on the “Classic” theme Home Page) and optional widgets. Optional widgets include things like a
Daily Bible verse, a Photo Album, facts about the day in history. Default widgets always display. You choose the optional
widgets when using a MiSOS-themed Home Page.
Classic Theme
27
2012 SOS Teacher Reports and Applications Guide
There are five new MiSOS Themes this year. All of the previous themes, including the Custom theme are still available. Scroll through
the graphic theme selector (Change Theme menu) to get an idea of what they look like. Below are images of the new themes for this
year.
Camping by Starlight
Flux Wave
Panda Playtime
Carnival at the Beach
Owl in the Family
See the Teacher Administration Functions Guide for instructions on setting the School Home Page options as well as Student
level Home Page settings. You can also find instructions in the online User Manual by clicking either the Help button or link on
your Home Page or pressing F1 while on your Home Page. On many of the pages in SOS Teacher you also see a small question
mark icon ( ) at the top of the page or near a section of the page. Click it for help. All of the settings and options for the
“Custom” theme are also detailed in both the online User Manual and the Teacher Administration Functions Guide as well.
28
2012 SOS Teacher Reports and Applications Guide
Check for Application Updates
Switched-On Schoolhouse® provides a feature to automatically check for system updates. This feature runs approximately once a
month (every 30 days). If you would like to check more frequently, simply follow the steps below.
NOTE: This feature only checks for updates to the SOS software. It does not automatically
check for curriculum updates. You need to periodically check www.sosupdates.com for
curriculum updates.
Step 1: Click Check for Updates option in the Application widget on your Home Page.
The Check for Updates screen opens.
Step 2: Click the Ok button. When the system is finished checking for updates, a results window opens. (See next page.)
Step 3: If updates are available, a link displays in the window. Click the link to view the updates and determine whether
you want to download them. Follow the instructions on screen to download the updates.
Step 4: Click the Close button when you are finished.
29
2012 SOS Teacher Reports and Applications Guide
Check for Curriculum Updates
If you do not have internet access, you need to periodically contact AOP Customer Service toll-free at
1-800-622-3070. They can send you a disk with the most current curriculum revisions. When you receive
that disk, insert it in your CD-ROM or DVD drive and continue with Step 1 below.
Switched-On Schoolhouse prompts you to check for curriculum revisions weekly. If you would like to check more frequently,
simply follow the steps below.
NOTE: This feature only checks for revisions to the SOS curriculum you have installed on your computer. It does not
check for application updates. (Click Check for Updates in the Application widget for application updates.)
Step 1: Click Check for Curriculum Revisions in the Application widget on your Home Page. The Curriculum Update
screen opens.
Step 2: Click the Ok button. When the system is finished checking for updates, a results window opens.
Step 3: If updates are available for any curriculum you have installed, they are
automatically downloaded and installed.
Step 4: Click the Ok button when you are finished.
NOTE: If you see a Browse For Folder window like the one to the right,
either no internet connection could be detected or your computer
could not connect to the AOP server. Please check your connection
and try again. You may need to try again later. This is the same if
you use Check For Curriculum Revisions or when the
application does the automatic check.
If you are loading the revisions from the disc you received from
Customer Service, you may need to use this window to browse to
the “rev” folder.
30
2012 SOS Teacher Reports and Applications Guide
Filtering Words in the Dictionary
If you determine a need to limit particular words or phrases your students
can access while using the dictionary in SOS, this tool allows you to specify
words and phrases to be filtered or unfiltered in the SOS dictionary.
To use:
1. Insert the SOS 2012 installation disc in your drive. The SOS 2012
Setup window opens automatically.
2. Click Close.
3. Go to My Computer.
4. Right-click the CD-ROM drive containing the installation disc.
5. Select Open.
6. Double-click the Tools folder.
7. Double-click the Data Utility.exe icon to open the dictionary filter
tool.
8. The Data Utility 2012 window (shown to the right) opens.
9. Select the Database Name you want to use, if it is not already
displayed, by clicking the dropdown box. (The default is the current
year database, i.e. SOS Home 2012.)
10. Click Connect.
11. In the Commands section, click the dropdown arrow and select the
Edit Vulgar Words option. (Last entry in the list.)
12. Click Execute Command. The Edit Vulgar Words box opens.
13. Enter the word or phrase you want excluded from the SOS Dictionary
in the textbox at the top of the window.
14. Click Exclude Word.
Repeat Steps 13 and 14 for all words or phrases you want to filter.
15. Click
when you are finished, to close the tool. Adding Words Back to the Dictionary
To return a filtered word or phrase to the dictionary:
• Follow steps 1 through 12 to access the list of filtered words
and phrases. The list of filtered words will appear in the box in
the center of the Edit Vulgar Words window (as seen in the
last screenshot on the previous page).
• Click the checkbox next to any words or phrases you want
back in the dictionary.
• Click Return Selected Word.
• Click
when you are done to close the tool.
The selected words or phrases are once again available in the SOS
Dictionary.
31