1
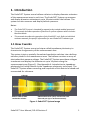
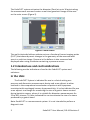
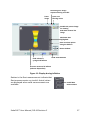
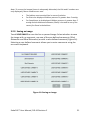
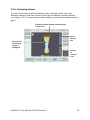
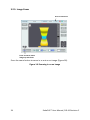
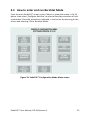
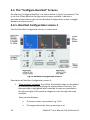
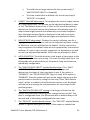
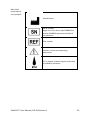
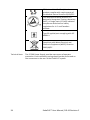
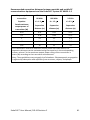
EndoFLIP® System Functional Lumen Imaging Probe EF-100 User Manual Copyright © 2014 Crospon Ltd. This document is the sole property of Crospon Ltd. No part of this document may be copied or otherwise reproduced, or stored in any electronic information retrieval system, without the prior consent of Crospon Ltd. EndoFLIP®, EsoFLIP® and FLIP® are registered trademarks of Crospon Ltd. EndoFLIP® User Manual, DD-41 Revision C Table of contents 1. 2. 3. 4. Introduction ............................................................................................... 1 1.1 How it works ..................................................................................... 1 1.2 Intended use and contraindications ................................................. 2 1.3 Device features ................................................................................ 3 1.4 Warnings ........................................................................................... 5 Getting started ........................................................................................... 7 2.1 Connecting to power ........................................................................ 8 2.2 Power on/off..................................................................................... 9 2.3 Preparing the Catheter for use ....................................................... 10 2.4 Configuring the unit ........................................................................ 13 Using the EndoFLIP® System, Normal Mode ............................................ 16 3.1 Inflating the balloon ....................................................................... 16 3.2 Using EndoFLIP® System tools ........................................................ 18 3.2.1. Minimum Diameter and Cross Sectional Area Display ............... 20 3.2.2. Saving an image .......................................................................... 21 3.2.3. Comparing images ...................................................................... 22 3.2.4. Estimating volume ...................................................................... 23 3.2.5. Image Zoom ................................................................................ 24 3.3 Deflating the balloon ...................................................................... 25 3.4 When the procedure is complete ................................................... 26 3.5 Alarms ............................................................................................. 27 EndoFLIP® BaroStat Mode........................................................................ 32 4.1 Overview ......................................................................................... 32 4.2 EndoFLIP® BaroStat Mode Features ............................................... 32 EndoFLIP® User Manual, DD-41 Revision C iii 5. 4.3 How to enter and run BaroStat Mode ............................................ 33 4.4 The “Configure BaroStat” Screens .................................................. 34 4.4.1. BaroStat Configuration screen 1 ..................................................... 34 4.4.2. BaroStat Configuration screen 2 ..................................................... 37 4.5 Running BaroStat Mode.................................................................. 39 4.6 Main BaroStat Screen ..................................................................... 39 4.6.1. Pressure Volume Graph (PVG) ........................................................ 40 4.6.2. Procedure Step Tracking (PST) ........................................................ 40 4.6.3. Patient Sensitivity Entry .................................................................. 40 4.6.4. Stop Key/Emergency Key Press ...................................................... 40 4.6.5. Tension and Resting Pressure ......................................................... 40 4.7 Exiting BaroStat Mode .................................................................... 41 4.8 Resuming, Re-Running or Resetting a BaroStat Procedure ............ 41 Maintenance ............................................................................................ 42 5.1 Cleaning .......................................................................................... 42 5.2 Periodic maintenance ..................................................................... 43 5.2.1. Air inlet filter ................................................................................... 43 5.3 Service............................................................................................. 44 5.4 Parts list and accessories ................................................................ 45 Appendix A: Introduction to impedance planimetry ....................................... 46 A.1 Measurement method .................................................................... 46 Appendix B: Specifications ............................................................................... 48 B.1 B.1.1 iv Compliance ..................................................................................... 55 Electromagnetic emissions ......................................................... 56 EndoFLIP® User Manual, DD-41 Revision C 1. Introduction The EndoFLIP® System uses a balloon catheter to display diameter estimates of the measurement area in real-time. The EndoFLIP® System can measure and display diameter estimates at up to 16 points within the balloon. The system can also measure and display balloon pressure. Notes: • • • The EndoFLIP® System is intended for operation by trained medical personnel. This manual describes operation of Revision E system software which includes BaroStat Mode. This manual describes the operation of the EndoFLIP® unit. Refer to individual catheter manuals for specific information for each EndoFLIP® catheter type. 1.1 How it works The EndoFLIP® System uses a technique called impedance planimetry to characterize the geometry of the measurement area. The system injects a specially-formulated conductive solution into a balloon catheter placed in the measurement area. The balloon contains an array of electrodes that measure voltage. The EndoFLIP® System uses these voltages to estimate and display the diameter at up to 16 points along the measurement area (Figure 1). (See Appendix A: Introduction to impedance planimetry for further details on the impedance planimetry technique). The EndoFLIP® System allows recording and snapshots of this data to be saved and commented for reference. Catheter Balloon inflated with conductive solution. Tissue Estimated diameter (Dest) measured at each electrode pair (up to 16 measurements). Figure 1: EndoFLIP® System Image EndoFLIP® User Manual, DD-41 Revision C 1 The EndoFLIP® system estimates the diameter (Dest) at up to 16 points along the measurement area and creates a real-time geometric image of the area on the main screen (Figure 2). Figure 2: Main screen The multi-electrode balloon catheter acts as a functional lumen imaging probe (FLIP®) that shows dynamic changes in the geometry of the measurement area in a real-time image. Pressure in the balloon is also measured and displayed when using a catheter containing a pressure sensor. 1.2 Intended use and contraindications The following are the indications of use for the EndoFLIP® system and catheters: In the USA: The EndoFLIP® System is indicated for use in a clinical setting as a pressure and dimension measurement device and as an adjunct to other methods in the comprehensive evaluation of patients with symptoms consistent with esophageal sensory hypersensitivity. It is also indicated for use as an adjunct to a bougie for measuring the size of a gastric sleeve created during bariatric surgery, where it is suitable for diameter measurements for 22 to 60Fr sleeves. It is also indicated for use to estimate the size of a stoma produced by a gastric band. Note: EndoFLIP® is a measurement system. It is not intended to perform a diagnostic test. 2 EndoFLIP® User Manual, DD-41 Revision C Outside the USA: The EndoFLIP® System is used in a clinical setting to obtain an estimation of the dimensions and balloon pressure within the alimentary canal. Contraindications The EndoFLIP® System is contraindicated where endoscopy is contraindicated. The EndoFLIP® System is contraindicated for use in patients with actively bleeding varices in the esophagus. 1.3 Device features USB connector Catheter connector Touchscreen Syringe backlight Syringe lock Syringe door Air inlet filter Syringe supplied with conductive Fluid. Catheter Assembly Figure 3: EndoFLIP® System front view Element Description USB connector USB memory device connector for patient data storage. Touchscreen High-resolution touchscreen is the primary user interface. Catheter connector Catheter connector allows the system to read geometric and pressure data, where applicable, from the catheter. The catheter assembly includes a syringe and balloon catheter. The syringe contains a conductive solution to inflate or deflate the balloon catheter according to user-selected settings. Syringe door and The syringe door and lock hold the syringe in position, allowing the lock system to detect that a syringe is installed. EndoFLIP® User Manual, DD-41 Revision C 3 Syringe backlight The backlight shows syringe contents and plunger position in lowlight conditions. Air inlet filter Draws air into the system and out rear vents for internal cooling. Do not block or obstruct. Keyboard connector Communications connector On/Off (I/O) switch USB connector DC power connector VGA display connector Figure 4: EndoFLIP® System back view Element Description Communications connector Reserved for future use. Do not remove the cover or connect any devices to this connector. Keyboard connector Connector for an optional external keyboard. Only use keyboard(s) specified by Crospon Ltd. VGA display connector Connector for an optional remote VGA display. Display devices and adapters connected to the VGA display connector must meet the requirements of IEC 60601-1 and be located in the same room as the EndoFLIP® System. To connect a VGA cable, remove the two screws to remove the dust cover, and install the two hex nuts from the localisation kit. Use only VGA cables with non-conductive shells and thumbscrews with no exposed metal. Retain the dust cover and screws to cover the VGA connector if the VGA cable is removed. USB connector Connector for a USB memory device. DC power connector Connector for DC power adapter. Only use adapters specified by Crospon Ltd. On/Off (I/O) switch Powers the unit On (I) and Off (O). 4 EndoFLIP® User Manual, DD-41 Revision C 1.4 Warnings • • • • • • • • • • • • • • • Federal law (U.S.) restricts this catheter to sale by, or on the order of, a physician. To reduce the risk of electric shock, always disconnect the device from AC power before opening the enclosure. Do not use the device if any damage to the AC power cord (such as frayed wires, cracks, or cut insulation) is evident. Do not use the device if the touchscreen is not functioning correctly or is not clearly readable. Do not use this device if an error condition cannot be corrected. The EndoFLIP® System should be mounted on a flat stable surface. When In use, keep the catheter and power cord stowed or positioned in a safe manner in order to avoid a tripping or snagging hazard. Do not allow the air inlet at the side of the unit or ventilation ports at the rear to become covered or obstructed. Use the EndoFLIP® System only with the supplied power adapter (part number EF-500). Do not use the device if any damage to the power adapter (such as frayed wires, cracks, or cut insulation) is evident. The power adapter is not fieldserviceable. Medical electrical equipment requires special precautions regarding electromagnetic compatibility (EMC) and must be installed and put into service according to the EMC information provided in this user manual (see Appendix B: Specifications). Before using the EndoFLIP® System on a patient, allow the device to acclimate to conditions of use following transport or storage. Do not insert the syringe into the EndoFLIP® System before connecting power or powering on. Use the EndoFLIP® System on a patient when in Normal or BaroStat operating mode only. Do not attach to the patient during power on self-test (POST) or in service mode. Maintain continuous observation of the patient during use. In the unlikely event that the EndoFLIP® System stops normal operation during a procedure, use the back panel on/off switch to turn the unit off, remove the syringe from the unit and retract the syringe plunger manually to withdraw any remaining fluid from the balloon catheter. The catheter can then be carefully removed from the patient. Use the EndoFLIP® System only with parts and accessories approved by Crospon Ltd. Do not place fingers or hands near the syringe drive system when it is moving. EndoFLIP® User Manual, DD-41 Revision C 5 • • • • • • • • • • • • • • • • • • • 6 Service on this device should be performed only by a qualified service technician. To ensure proper operation, do not make unauthorized modifications to the device. Transport, set up, and store the device so that it does not pose a tripping hazard. Use proper technique for lifting the device. Wipe the exterior of the device clean with a damp cloth and mild detergent solution before the first use, between each patient use, and as needed. To minimize the risk of puncturing or damaging the device, do not use sharp objects on the touchscreen. This equipment is not suitable for use in the presence of a flammable anesthetic mixture with air, oxygen, or nitrous oxide. To minimize the risk of fire, use this device in well-ventilated areas away from flammable anesthetics. To minimize the risks associated with excess inflation pressure, observe the patient and all alarms during use, and refer to the display to observe diameters and pressure during a procedure, and while making settings or setting changes. Verify that there are no leaks in the catheter during the purge cycle. During operation, check that the amount of fluid in the syringe matches the amount shown onscreen, and verify that the syringe refills as indicated when the plunger aligns with the arrow on the syringe (indicating that the balloon is empty) before carefully removing the catheter from the patient. Replace the catheter if a Dest value remains consistently at a maximum or minimum compared to adjacent Dest values; this can indicate a faulty catheter. Do not use this device near magnetic resonance imaging (MRI). For accurate measurements, high-frequency devices such as electro-surgery or diathermy /cautery equipment should be deactivated. Remove the catheter if the patient requires defibrillation. Display devices and their adapters connected to the VGA connector of the EndoFLIP® System must meet the requirements of IEC 60601-1 and be located in the same room where the EndoFLIP® System is being used. The EndoFLIP® System must be connected to a wall outlet or a single-outlet extension only. Do not use multiple-outlet sockets. Install all equipment according to applicable national wiring requirements. If used in conjunction with endoscopy equipment, the leakage current from the EndoFLIP® System catheter may be additive to the leakage current from the endoscope. When using a catheter with integrated pressure sensor, for optimal pressure measurements, do not expose the balloon portion of the catheter to excessive light during operation. EndoFLIP® User Manual, DD-41 Revision C 2. Getting started This section describes how to prepare the EndoFLIP® System for use, including: • Connecting to AC power • Power on/off • Preparing the catheter for use • Configuring the unit All components of the EndoFLIP® System described in this manual are suitable for use in the patient environment. Warning: To avoid the risk of personal injury, place the EndoFLIP® Unit on a flat, stable surface. Do not attempt to lean on or use the EndoFLIP® System for support. EndoFLIP® User Manual, DD-41 Revision C 7 2.1 Connecting to power Warnings: • The EndoFLIP® System must be connected to a wall outlet or a single-outlet extension only. Do not use multiple-outlet sockets. • Install all equipment according to applicable national wiring requirements • Connect the EndoFLIP® System to power and turn the device on before installing the syringe to the system. The EndoFLIP® System comes with a power adapter that accepts mains (AC) power and provides DC power to the device (Figure 5). DC power connector Power adapter Figure 5: EndoFLIP® System power adapter (EF-500) Note: To remove mains power to the power adapter, switch off power at the wall outlet (if a switch is provided) and disconnect the power cord at the outlet. Note: When not in use, stow the power cord(s) in a safe manner. 8 EndoFLIP® User Manual, DD-41 Revision C 2.2 Power on/off O (off) Use the switch at the back of the device to turn it on (I) or off (O). At power on, the device performs a power on self-test (POST) for up to 30 seconds. I (on) Before inserting the catheter assembly, follow these steps: 1. Turn the EndoFLIP® System on, and verify that two beeps sound, indicating the audible alarm system is functioning. 2. After the 30-second POST, an initialization screen (Figure 6) appears. 3. Touch CONTINUE to start syringe driver initialization. Do not touch until the syringe driver stops moving. Figure 6: Syringe Driver initialization screen EndoFLIP® User Manual, DD-41 Revision C 9 2.3 Preparing the Catheter for use Warning: Before use, inspect the catheter assembly from end to end for breakage, occlusions, or debris. Do not use if damage to the parts or packaging is evident, or if any portion of the catheter packaging has been previously opened. Do not use any part after its expiration date or if the expiration date cannot be verified. 1. Remove the catheter assembly from its packaging as described in the catheter user manual. 2. Insert the catheter electrical connector into the slot at the front of the unit, with the green dot on the connector aligned with the green dot on the unit. Note: The catheter electrical connector must be connected before continuing. 3. Depending on the catheter type, the system may need to reinitialize the syringe driver position. If so, the initialization screen (Figure 6) appears: touch CONTINUE and do not touch the system until the syringe driver stops moving. 4. Insert the syringe into the front of the system with the syringe luer pointing away from the unit as shown (Figure 7). Catheter electrical connector: align green dots on connector and unit Syringe luer points away from unit: connect catheter fill lumen Syringe lock Syringe door Figure 7: Installing the syringe and catheter assembly WARNING: TO ENSURE PROPER OPERATION AND TO MINIMISE THE RISK OF PATIENT INJURY, ONLY USE THE PRE-FILLED SYRINGE SUPPLIED WITH THE CATHETER. DIFFERENT CATHETER PART NUMBERS ARE SUPPLIED WITH DIFFERENT SOLUTION CONCENTRATIONS. 10 EndoFLIP® User Manual, DD-41 Revision C 5. Slide the syringe door over the syringe shoulder and turn the syringe lock counter-clockwise to secure the syringe. 6. Remove the luer cap from the syringe, then, connect the male luer of the catheter fill lumen to the syringe. 7. Verify that all connections between the syringe, catheter, and device are secure. 8. Verify that the onscreen balloon and syringe graphics show that the catheter electrical connector and syringe are in place (Figure 8). Actual syringe volume depends on catheter type Figure 8: Onscreen syringe and catheter graphic 9. If the catheter type is the same as previously connected, a prompt asks whether to continue using current patient data. Touch NEW PATIENT, for a new patient, or CONTINUE if you wish to use the new catheter and append the data record to the current patient. If the catheter type has changed since the previous connection, a prompt asks whether to archive or delete previous patient data. Touch ARCHIVE AND CONTINUE (a USB memory device must be connected to the USB connector port to complete this action and save the data to the USB memory device) or DELETE AND CONTINUE. 10. You must enter new patient data (Figure 9) if you selected NEW PATIENT or the catheter type has changed. Enter patient data then touch SAVE DATA & CONTINUE. EndoFLIP® User Manual, DD-41 Revision C 11 Caution: Use a unique ID for each patient. Re-entering the previously-entered ID causes previous information to be overwritten when archiving patient data. Figure 9: Patient data entry screen 11. At the first catheter connection, a prompt asks you to prepare for the pre-use check (catheter purge, which removes air from the balloon). Place the balloon, tip first, into the pre use checkout tube, which holds the balloon in a vertical position. Touch PURGE CATHETER to begin. Note: The pre-use check is mandatory when the catheter is first connected to the EndoFLIP® unit. Following completion of the pre-use check, if the catheter needs to be disconnected and re-connected for any reason (e.g. moving the unit position) you can choose to purge the catheter or continue to begin use without performing a purge. The pre-use check time is dependent on the type of catheter connected, it typically takes 3 minutes. Once verified, a message notifies you that the CATHETER IS READY FOR USE. Touch CONTINUE. If the catheter pre-use check procedure detects a problem, a message notifies you that the catheter may be faulty and should be replaced. 12. Remove the balloon from the pre use checkout tube and wipe down the catheter and balloon with isopropyl alcohol prior to deployment. 12 EndoFLIP® User Manual, DD-41 Revision C Notes: • • The system automatically performs a pressure zero during the pre-use checkout, if the catheter contains a pressure sensor. You can subsequently perform a pressure zero at any time if there is less than 10 ml in the balloon by touching the onscreen PRESSURE ZERO button. If there is less than 2 ml in the balloon the system will inflate the balloon to 2 ml before performing the pressure zero. It is recommended that the catheter is held horizontally, and the pressure sensor is zeroed just before it is introduced into the patient. If the syringe or catheter electrical connector are disconnected then reconnected, a purge pop-up window appears and you can perform another purge or touch CONTINUE to continue without purging. It is not recommend to dis-connect the catheter once it is purged. 2.4 Configuring the unit The configuration menu (Figure 10) allows you to: • Enter or change patient details • Select inflation settings and pressure alarm threshold (if the connected catheter has an integrated pressure sensor). • Set date/time. • Select user Preferences i.e. language, units, data filter settings. • Enter BaroStat Configuration mode, enter BaroStat mode, enter Normal Mode. To access the configuration menu, touch MENU on the main screen (Figure 2). Note: MENU is not available during inflation or deflation. EndoFLIP® User Manual, DD-41 Revision C 13 Figure 10: Configuration menu Note: The patient details screen reverts to the main screen if there is no activity for 60 seconds, and any unsaved entries are lost. Note: The version of software running on the EndoFLIP® unit is displayed in the Configuration screen menu bar, at the top of the screen as shown in Fig 10. Configuration Menu item Description NEW PATIENT DETAILS Allows you to enter patient name, ID, male/female, procedure details, physician name, and patient age using the onscreen keyboard. At minimum a patient ID must be entered. Once the “Save Data and Continue” button is pressed, the screen prompts you to archive or delete previous patient data. CHANGE PATIENT DETAILS Allows you to add to or change patient information except patient ID. CONFIGURE BAROSTAT Allows you to configure a sequence of up to 10 balloon distensions, see the BaroStat Chapter. 14 EndoFLIP® User Manual, DD-41 Revision C GO TO BAROSTAT MODE Allows you to run a defined sequence of up to 10 balloon distensions, see the BaroStat Chapter. CONFIGURE BALLOON INFLATE Allows you to configure the set volume and rate of balloon inflation during measurements. CHANGE PRESSURE ALARM Allows you to set the maximum balloon inflation pressure. CHANGE DATE/TIME Allows you to set date and time. USER PREFERENCES Allows you to change the language and the display units for pressure and estimated diameter (Dest): FILTER SETTINGS GO TO NORMAL MODE Note: This option is available after a catheter is connected. Note: This option is available after a catheter with an integrated pressure sensor is connected. • Language: English, French, Danish, Dutch, Finnish, German, Italian, Norwegian, Portuguese, Spanish and Swedish • • • Pressure units: mmHg, cmH2O and hPa Diameter units: millimeters(Dest) or French(Frest) Export Logs: exports logs from the unit to a USB key if a USB key is attached (used for technical support only) Allows you to select data averaging filter settings: • • • Weighted average: Low, Medium, High Standard average: Average over 1 to 20 sec Off: No filtering Returns to main screen in Normal Mode. EndoFLIP® User Manual, DD-41 Revision C 15 3. Using the EndoFLIP® System, Normal Mode This section describes how to use the EndoFLIP® System, including: • Inflating the balloon • Using EndoFLIP® System tools • Deflating the balloon • When the procedure is complete • Alarms For BaroStat Mode, see the BaroStat chapter. 3.1 Inflating the balloon Inflating the balloon allows the EndoFLIP® System to visualize and measure the area of interest for clinical evaluation. You can inflate the balloon in either of two ways: • Use INFLATE/DEFLATE and STOP to inflate the balloon to a particular volume or pressure (up to the balloon volume and pressure alarm limits at the inflate rate set in the configuration menu). • Use the configuration menu (CONFIGURE BALLOON INFLATE) to select the rate of balloon inflation, and to set the balloon volume at which the unit will automatically stop inflation, after pressing INFLATE on the main screen. To begin inflation, touch INFLATE at the main screen and the syringe driver starts to advance the syringe plunger and inflate the balloon. The screen shows a graphic representation of the measurement area and syringe and balloon inflation status (Figure 11). To stop inflation at any time, touch STOP. Once stopped, you can touch INFLATE to resume inflation or DEFLATE to empty the balloon catheter. 16 EndoFLIP® User Manual, DD-41 Revision C Recording icon: image sequences being recorded Zoom image Filter icon: filtering active PAUSE LIVE pauses image for viewing RUN LIVE resumes live image Minimum Dest highlighted Dest at various points along the balloon Status window Fluid volume in syringe and balloon STOP: halts inflation Pressure measured in balloon (catheter-dependent) Figure 11: Display during inflation Dashes in the Dest measurements indicate that Dest measurements are invalid. Actual values are displayed when valid measurements are available. EndoFLIP® User Manual, DD-41 Revision C Invalid Dest measurement 17 3.2 Using EndoFLIP® System tools The display shows estimated diameter (Dest) and balloon pressure (catheter dependent) during inflation, for clinical assessment (Figure 12). Typically you might choose to perform several inflation procedures at various balloon volumes, and save one or more images from every inflation procedure for comparison. You can also choose to compare images from before, during, or following surgical procedures. Figure 12: System tools 18 EndoFLIP® User Manual, DD-41 Revision C System tool Description MENU Touching MENU displays the Configuration Menu (Section 2). Unavailable while the syringe pump is moving. ARCHIVE DATA Saves data to a USB memory device. Unavailable if a USB device is not connected. Up to 8 hours of measurement data can be stored for each patient. PAUSE LIVE/ RUN LIVE PAUSE LIVE pauses the live image for extended viewing. RUN LIVE cancels the pause and returns to the live image. SAVE IMAGE Saves the current image. Offers the option of saving the image with user defined comments. Unavailable when comparing images and when the syringe pump is moving. COMPARE Selects a previously-saved image for comparison to the live image, or compares two saved images. Unavailable until an image has been saved. CLEAR COMPARE Clears the comparison of images, and returns to the live image. SAVE CLIP Saves a continuous sequence of images (similar to a video clip) that can be replayed. Unavailable when a clip is playing or the syringe pump is moving. SELECT CLIP Selects a previously-recorded clip from a list. CLEAR CLIP Clears the screen during replay of a selected clip. PRESSURE ZERO Zeroes the balloon pressure sensor. Only available when there is less than 10ml of saline in the balloon, and a catheter with an integrated pressure sensor is connected. If there is less than 2 ml of saline in the balloon, the system automatically inflates to 2 ml before the pressure zero. ZOOM Zooms in or out on an image. Up and Down Arrows Up and down arrows are used to display the upper or lower half of the image when in zoom view. The arrows appear at the bottom left hand corner of the screen when the zoom is active. Data Filter This Filter symbol is shown at the top of the screen if the data filter is turned on. The filter can be turned off/on and configured by pressing the Menu button followed by the Filter Settings button. EndoFLIP® User Manual, DD-41 Revision C 19 3.2.1. Minimum Diameter and Cross Sectional Area Display If there is more than 10ml of saline in the balloon, the main screen displays the minimum diameter (Dmin) and Cross Sectional Area (CSA), or Compliance and Distensibility (Figure 13) if a catheter with a pressure sensor is connected. Minimum diameter and CSA or Compliance and Distensibility display Touch to toggle between these displays: Minimum Diameter and CSA Distensibility and Compliance Figure 13: Minimum diameter or compliance and distensibility display Pressing the Minimum diameter and CSA display will change the display to the Distensibility and Compliance display and vice versa. Dmin or Frmin Minimum estimated diameter. Dmin is displayed if selected diameter unit is mm; Frmin is displayed if selected unit is French. CSAmin Minimum cross sectional area. Dist Distensibility, defined as CSAmin divided by balloon distending pressure. Note this requires a catheter configured with a pressure sensor. C Zone compliance, defined as the volume of a region enclosed by two Dest readings above and below the minimum diameter divided by balloon distending pressure. Note this requires a catheter configured with a pressure sensor. 20 EndoFLIP® User Manual, DD-41 Revision C Note: To ensure the imaged lumen is adequately distended, the Dist and C numbers are only displayed if these conditions are met: The balloon must contain 10ml or more of solution. For Dist to be displayed: Balloon pressure is greater than 5 mmHg. For Compliance to be displayed: Balloon pressure is greater than 5 mmHg and the Minimum diameter (Dmin) is located at one of the center five Dests in the balloon. 3.2.2. Saving an image Touch SAVE IMAGE to save the live or paused image. Select whether to save the image with no comment, use one of the pre-defined comments (20ml Distension and 30ml Distension) or with a user-defined comment (Figure 14). Selecting a user defined comment allows you to enter comments using the on-screen keyboard. Figure 14: Saving an image EndoFLIP® User Manual, DD-41 Revision C 21 3.2.3. Comparing images Touch COMPARE to select one previously-saved image for comparison with the live image, or select two of the saved images for comparison with each other (Figure 15). You can scroll through the saved images using the left and right arrow buttons. Figure 15: Selecting saved images (two saved images highlighted) Select one image and touch OK to compare a saved image with the live image, or, touch the two saved images you want to compare, then touch OK to display the images (Figure 16) or CANCEL to cancel the compare. Figure 16: Comparing images 22 EndoFLIP® User Manual, DD-41 Revision C 3.2.4. Estimating volume To view an estimate of volume between two selected points, press the diameter values in the Dest column at the top and bottom of the selected area (Figure 17). To remove the volume display, press the two selected points again. Estimated volume between selected points, in units of ml. Top of selected area Selected area of estimated volume is highlighted Bottom of selected area Figure 17: Estimating volume EndoFLIP® User Manual, DD-41 Revision C 23 3.2.5. Image Zoom Press to zoom out Press arrows to move image up and down Press the zoom button to zoom in or out on an image (Figure 18). Figure 18: Zooming in on an image 24 EndoFLIP® User Manual, DD-41 Revision C 3.3 Deflating the balloon 1. Touch STOP to stop inflation if required. 2. Once stopped, touch DEFLATE to empty fluid from the balloon. The screen shows the deflation status (Figure 19). Graphic shows deflation status Figure 19: Display during deflation EndoFLIP® User Manual, DD-41 Revision C 25 3.4 When the procedure is complete When the procedure is complete, deflate the balloon fully. To confirm that the syringe plunger has returned to its original position, check that the syringe plunger aligns with the arrow on the syringe (Figure 20). Once the balloon is fully deflated, carefully retract the catheter from the patient. 1. Following removal of the catheter from the patient, disconnect the catheter and syringe from the EndoFLIP® unit and check the structural integrity of the catheter. Dispose of the catheter and syringe per institutional guidelines for single-use devices. 2. To export data to the EndoFLIP® USB memory stick, connect the memory stick to the USB connector and touch ARCHIVE DATA. Do not remove the USB memory device until prompted to do so. 3. Use the on/off switch on the back panel to turn off the system, or connect a new catheter and enter new patient details as required. Syringe returned to original position: plunger aligns with the arrow on the syringe. Figure 20: Syringe plunger in original position 26 EndoFLIP® User Manual, DD-41 Revision C 3.5 Alarms The EndoFLIP® System has two types of alarms: • User alerts (low priority), indicating that some intervention is required to continue (no audible alarm). Touch CONTINUE to return to main screen. • System errors (medium priority), which display an alarm window and sound an audible alarm. System errors require the system to be turned off and on. Continued operation is not allowed. If an alarm occurs, an alarm window appears on the screen (Figure 21). User alert: user intervention required to continue operation System error: Condition must be corrected and system turned off, then back on Figure 21: Sample alarm messages EndoFLIP® User Manual, DD-41 Revision C 27 From the main screen, touch VIEW ALARMS (Figure 22) to view time-stamped alarm messages that have occurred. The window can display up to five of the most recent alarms. VIEW ALARMS button Figure 22: VIEW ALARMS button 28 EndoFLIP® User Manual, DD-41 Revision C This table summarizes possible system alarms (User Alerts or System Errors). Follow the corrective actions in order until the problem is resolved. Alarm message Description Corrective action Balloon Temperature is out of range System has detected a balloon temperature sensor out of range. User alert. Check patient. Verify that catheter electrical connector is correctly installed. Deflate balloon as required. Remove the catheter from the patient. Replace catheter. When a balloon temperature alarm is active all Dests are shown in a red background to indicate that the Dests are being calculated assuming a balloon temperature of 37⁰C. Balloon Temperature Sensor Failure System has detected a balloon temperature sensor failure. User alert. Check patient. Verify that catheter electrical connector is correctly installed. Deflate balloon as required. Replace catheter. When a balloon temperature alarm is active all Dests are shown in a red background to indicate that the Dests are being calculated assuming a balloon temperature of 37⁰C. Catheter EEPROM Failure EEPROM Write Failure System has detected a faulty catheter. User alert. Check patient. Verify that catheter electrical connector is correctly installed (disconnect and re-connect the catheter connector). Deflate balloon as required. Replace catheter. EndoFLIP® User Manual, DD-41 Revision C 29 Alarm message Description Corrective action Catheter not connected Electrical connector of catheter not connected. Syringe movement stops User alert. Check patient. Check that catheter is connected correctly. Verify that catheter electrical connector is correctly installed. Replace catheter if needed. Contact Service Enclosure Temperature Alarm Enclosure temperature above or below allowable limits. If below limit, syringe movement stops. User alert. If above limit, operation halts. System error. If temperature is below limit, operation automatically resumes when temperature is within limit. Check ambient conditions. Manually retract syringe if needed, remove catheter from patient. Contact Service. Estimated Diameter Values are Invalid System has detected that Dest values are out of range. User alert. Check patient. Verify that catheter is correctly installed. Verify that there is fluid in the balloon and no large air bubbles. Replace catheter if needed. Contact Service. Failed to export file Failed to delete file Failed to copy file Failed to load file System has detected a file operation failure when accessing a USB storage device. User alert. Check USB data key. Check USB data key file capacity. Disconnect USB key, power cycle unit, connect USB key and archive data again. Contact Service. High Pressure in Balloon Balloon pressure above set level for 2 seconds. Inflation stops. User alert. Check patient. Check that catheter is connected correctly. Deflate balloon as required. Adjust balloon pressure alarm or inflation settings as needed. 30 EndoFLIP® User Manual, DD-41 Revision C Alarm message Description Corrective action Patient Data File is Full Live data file has reached maximum size. Normal operation continues. Screen prompts user to stop or continue recording data. User alert. To continue recording, the existing data must be archived or deleted. If user stops recording, no further live data is recorded and current data is not deleted. Power loss occurred during procedure Unexpected power loss. Inflation stops. User alert. Check patient. Touch CONTINUE and inflate or deflate as required. Check power source. Pump Failure Faulty syringe pump. Operation halts. System error. Check patient. Manually retract syringe if needed, remove catheter from patient. Contact Service. Syringe Not in Place Syringe not in place. Syringe movement stops. User alert. Check patient. Verify that syringe is correctly installed and the syringe door is closed. Replace catheter if needed. Contact Service. EEPROM Format Not Supported System has detected that the type of catheter connected to the unit is not supported by the unit. User alert. Check patient. Replace the catheter. Contact Service. Any message not shown in this table. Faulty system operation. Operation halts. System error. Check patient. Manually retract syringe if needed, remove catheter from patient. Contact Service. EndoFLIP® User Manual, DD-41 Revision C 31 4. EndoFLIP® BaroStat Mode 4.1 Overview The BaroStat Mode on EndoFLIP® allows a pre-defined sequence of up to 10 balloon distensions to be carried out. During each distension, patient feedback of discomfort level can be acquired from a standard keyboard connected to the keyboard connector at the rear of the unit. The Patient Discomfort level is displayed and recorded by the EndoFLIP® system, along with balloon dimensions, balloon volume, and balloon pressure when a catheter with pressure sensing is being used. 4.2 EndoFLIP® BaroStat Mode Features • A pre-defined sequence of up to 10 balloon distension steps. • The user may change each distension’s parameters as required (target volume, inflate rate, time at target volume) before the sequence begins, using on-screen set-up controls from the Configure BaroStat menu located on the Configuration Mode screen. • The user may choose to import a pre-defined sequence from file (USB key) for ease of set-up and consistency of protocols. Protocol export is also possible to the USB key. • The user may choose to deflate between distensions or not. • The user can stop the distension at any time via the EndoFLIP® screen. The Patient can stop the distension at any time or immediately deflate the balloon via the patient keypad. • Patient feedback of discomfort level can be acquired via a keyboard connected to the keyboard connector at the rear of the unit and is automatically recorded with Dest, volume and pressure, and a snapshot taken for each patient input. • A user settable Pressure Alarm can be set to stop the distension if a pressure limit is reached, when a catheter with pressure sensing is being used. • BaroStat mode can be used with any EndoFLIP® catheter type. 32 EndoFLIP® User Manual, DD-41 Revision C 4.3 How to enter and run BaroStat Mode From the main EndoFLIP® screen, select ‘Menu’ to show the screen in Fig 23 below, then select ‘Configure BaroStat’ to select a BaroStat procedure or edit a procedure. Once the procedure is selected, it can be run by returning to this screen and selecting ‘Go to BaroStat Mode’. Figure 23: EndoFLIP® Configuration Mode Menu screen EndoFLIP® User Manual, DD-41 Revision C 33 4.4 The “Configure BaroStat” Screens On selecting ‘Configure BaroStat’, the screen below in Fig 24 is presented. This is the first of two BaroStat Configuration screens available. A button is provided at the bottom right of each BaroStat Configuration screen to toggle between the two screens. 4.4.1. BaroStat Configuration screen 1 The first BaroStat Configuration screen is shown here: Fig 24: BaroStat Configuration screen 1 Description of BaroStat Configuration screen 1: 1. “Step-preview” windows. Any of the 10 available steps can be edited by selecting the step by touching the step window of interest. The selected step is highlighted when selected. Arrows are provided to the left and right of the preview images to scroll through the steps available. Each preview displays: 34 The step number represented, e.g. 1/10. The target volume for the current step in ml. EndoFLIP® User Manual, DD-41 Revision C The hold time at target volume for the current step (if ‘WAIT PATIENT INPUT’ is Disabled). The time to wait after a deflation for the current step (if ‘DEFLATE’ is Enabled). 2. TARGET VOLUME adjustment. This displays the current target volume for a highlighted step. The volume can be adjusted up/down in steps of 1ml. The default volume limit is 50ml until a connected catheter determines the actual volume limit based on the catheter type. If a step volume target exceeds that allowed by a connected catheter then the target volume figure is displayed in red and can only be adjusted downwards. Valid volume targets are displayed in black. 3. INFLATE RATE adjustment. Displays the current inflation rate for a highlighted step. The inflation rate can be adjusted up/down in steps of 20ml/min to a limit of 60ml/min by default. Further restrictions may be applied if the default rates are not supported by a connected catheter. If a rate is not currently supported it is displayed in red and can only be adjusted downwards. Valid rates are displayed in black. 4. HOLD DURATION. The hold duration is the length of time spent at the target volume for the current step. The time is configurable from 1 to 60 seconds with a default delay of 10 seconds. Step hold times are individually configurable. 5. The “WAIT PATIENT INPUT” enable/disable button. The “WAIT PATIENT INPUT” option is a global setting for all steps and determines the types of inter-step delay in use. If the option is “DISABLED”, the “HOLD DURATION” figure is used. If the option is “ENABLED” then the system will wait at the target volume until the patient enters a sensitivity rating for that step. If the “Wait Patient Input” option is enabled, the hold duration option is not displayed and the current settings for that parameter are not shown on the preview graphs. 6. The “WAIT AFTER DEFLATE” setting is the length of time that the system will pause after deflating from a target volume to 0ml. The time is configurable from 1 to 60 seconds with a default delay of 10 seconds and is individually configurable for each step. 7. The “DEFLATE” enable/disable button. The “DEFLATE” enable/disable option is a global setting for all steps. If this option is enabled the EndoFLIP® User Manual, DD-41 Revision C 35 balloon will be deflated after reaching each target volume, and then the system will pause for the time indicated by the “WAIT AFTER DEFLATE” setting. If the option is disabled the balloon will not deflate after each step and will move immediately to the target volume for the next step. If the “DEFLATE” option is disabled then “WAIT AFTER DEFLATE” is not shown and the preview graphs do not display the step wait times. 8. SAVE CHANGES button. The save button only appears after procedural changes have been made and requests that the user enter a procedure name for any changes made as shown on the BaroStat procedure naming screen in Fig 25. The current procedure name may be reused and is presented by default. When the procedure name is accepted the changes made are saved to file and the active procedure is updated. 9. CANCEL button. This button cancels any changes to the current procedure and returns to the configuration menu screen. 10. Settings page toggle. This button toggles between the available settings screens for BaroStat mode. 36 EndoFLIP® User Manual, DD-41 Revision C 4.4.2. BaroStat Configuration screen 2 The second BaroStat Configuration screen is shown here: Figure 25: The second BaroStat Configuration screen (USB data key connected) Description of BaroStat Configuration screen 2: 1. PROCEDURE TITLE: The name of the current procedure in use is listed in this display area. The default is ‘Ascending Method of Limits’. 2. CURRENT STEP number: This displays the step currently in use or the next step to run in the case of a procedure that has not yet started or has been reset. 3. RESET button. The reset button resets the current step setting to the starting step for the current procedure. 4. STEP RANGE SELECTION. This setting allows the user to define the starting and ending step number inclusive for the current procedure. The step number changes in increments of 1 and the starting and ending step may be the same (indicating that the procedure only contains one step). EndoFLIP® User Manual, DD-41 Revision C 37 5. RESTING PATIENT PRESSURE. The resting patient pressure allows the clinician to enter a baseline resting pressure for the current patient. The pressure may be positive or negative. 6. PRESSURE SCALE setting. The pressure scale setting may be one of 50, 100 or 150 units of pressure and refers to the limit of the pressure reading that may be viewed on the Pressure Volume graph when the procedure is running. 7. Procedure list area. When a USB key is connected, the procedure list area will display an “Export” button to allow the current settings to be exported to a USB data key. If the connected USB key already contains stored BaroStat procedures then they will be listed under the “Procedures Available” region of the list area. If the “Export” key is selected the user will be presented with the procedure naming screen (Fig 26) with the current procedure title displayed by default. If a procedure is selected from this area an “Import” key will be presented. If the user selects the “Import” button, the settings in the imported file are applied to the current procedure settings. The BaroStat Configuration screens will timeout and return to the configuration menu screen if there is no user interaction for 60 seconds. Figure 26: Procedure naming screen for saving changes 38 EndoFLIP® User Manual, DD-41 Revision C 4.5 Running BaroStat Mode Once the BaroStat procedure has been selected or edited as required, the sequence is started by returning to the main menu screen by pressing Save Changes on Settings Screen 1 or 2 above. The BaroStat sequence is run from the configuration menu when the “Go To BaroStat Mode” option is selected. 4.6 Main BaroStat Screen The screen shown when running a BaroStat procedure is described here. Balloon Dest and pressure values are shown, similar to the normal mode EndoFLIP® screen. The balloon graphic is replaced by two graphs. The upper graph displays Balloon Pressure and Volume versus time (the PVG graph). The lower graph shows the progression through the selected sequence, called the Procedure Step Tracking graph (PST). Balloon Dest Values Pressure Volume Graph (PVG) Hold time counter (counts down) Patient Severity Rating Procedure Step Tracking Balloon Pressure Figure 27: Main Display in BaroStat mode EndoFLIP® User Manual, DD-41 Revision C 39 4.6.1. Pressure Volume Graph (PVG) The PVG displays current Balloon inflation volume (in blue) and current balloon Pressure (in yellow) versus time. The Volume units are shown on the left and pressure unit on the right. A vertical red line indicates the current readings and updates as it moves left to right. 4.6.2. Procedure Step Tracking (PST) The PST displays an over-view of the full sequence with balloon Target Volumes represented by the vertical blue lines. The current step is shown in yellow. This gives the user a view of where in the sequence the procedure is currently at. When a Hold Time at the target volume is in progress, a count-down timer is presented to indicate the remaining time. 4.6.3. Patient Sensitivity Entry During a BaroStat procedure the user or patient is normally expected to enter a patient sensitivity rating using a keypad when the target volume is reached. Depending on the step setting, the user will have a defined time period to enter a value or will be required to enter a value before the procedure can progress. The user can enter a sensitivity rating at any time and the procedure will pause and display the rating over the step on the PST graph. Key presses in the range 1-9 will trigger an automatic snapshot of the data at the time when the key was pressed. This information will be stored as a standard snapshot and the data is presented in the normal EndoFLIP® mode balloon image when the snapshot is recalled. 4.6.4. Stop Key/Emergency Key Press Using the keypad, the patient has the option to stop the inflation by pressing space-bar or ‘+’ once), or to perform an emergency deflation by pressing space-bar or ‘+’ twice within 1 second. The user can also stop the procedure and deflate at any time using the onscreen Inflate/Deflate/Stop controls. 4.6.5. Tension and Resting Pressure The resting pressure (Presting) entered during BaroStat configuration is displayed in the status window. 40 EndoFLIP® User Manual, DD-41 Revision C Wall Tension is also displayed and is determined as: Tension = (P-Presting))*r where ‘P’ is pressure in mmHg, Presting is the resting Pressure, and ‘r’ is the current minimum radius in mm. 4.7 Exiting BaroStat Mode BaroStat mode can be exited at any time by stopping the inflation or deflations and selecting ‘Menu’ then ‘Go to Normal Mode’, returning to the EndoFLIP® configuration screen. 4.8 Resuming, Re-Running or Resetting a BaroStat Procedure The BaroStat procedure is paused following patient input or if the STOP button is pressed. To resume, press the RESUME button which appears on the Main BaroStat screen. To re-run a completed BaroStat procedure, press START on the Main BaroStat screen. To reset a BaroStat procedure before it has completed, press RESET in BaroStat Configuration screen 2 (See section 4.4.2, Fig 25) to set the step tracking to the first step as selected in the Step Range Selection. After saving and returning to the Main BaroStat Screen, press RESET to return the syringe to the start position. The patent sensitivity entries are cleared from the screen. Press START to run the procedure. EndoFLIP® User Manual, DD-41 Revision C 41 5. Maintenance This section describes maintenance of the EndoFLIP® System, including: • Cleaning • Periodic maintenance • Service • Parts list and accessories 5.1 Cleaning Clean the exterior of the EndoFLIP® unit and preparation area before the first use, between patients, and as needed. Use a soft, lint-free cloth moistened with any of these cleaners: Mild detergent or soapy water 10% bleach solution (10% bleach, 90% water) 70% isopropyl alcohol Caution: To avoid internal part corrosion, do not use chlorine bleach on the touchscreen. To minimize the risk of contamination between patients, clean the catheter preparation area between each patient use. Clean the stainless steel pre use checkout tube as per the hospital policy for the cleaning of operating room equipment. The tube may be steam sterilized. Only use a dry, lint free non-abrasive cloth to clean the external keyboard accessory. 42 EndoFLIP® User Manual, DD-41 Revision C 5.2 Periodic maintenance This table summarizes periodic maintenance procedures for the EndoFLIP® System. Warning: To ensure proper EndoFLIP® System operation, perform periodic maintenance at the specified intervals. Part Interval Periodic maintenance procedure Air inlet filters Every 2 years or as needed. Replace air inlet filter. System exterior Before first use, between patients, and as needed. Use recommended cleaners. Do not allow liquid to penetrate the system. 5.2.1. Air inlet filter Replace the Air Inlet Filter, EF-110 (Figure 30) every 2 years. To remove the air inlet filter cover, loosen its retaining screw on the underside of the device. Air inlet filter cover Air inlet filter cover Air inlet filter Figure 30: Air inlet filter EndoFLIP® User Manual, DD-41 Revision C 43 5.3 Service Full service and repair is available from: Crospon Ltd. Galway Business Park Dangan Galway Ireland Phone: +353-91-519880 Fax: +353-91-519889 email: [email protected] Or, in the USA: Crospon 701 Palomar Airport Road Carlsbad, CA 92011 Phone: 1-855-CROSPON (Toll Free) Fax: 760-406-5644 Email: [email protected] Web: www.endoflip.com Or contact your local dealer. 44 EndoFLIP® User Manual, DD-41 Revision C 5.4 Parts list and accessories The EndoFLIP® System (EF-100) is compatible with the following accessories. Please contact your local Crospon Ltd. representative before using other accessories. Description Part number EndoFLIP® Catheter, 25mm, 80mm measurement length, with Pressure, Nasal Tip. EF-325N EndoFLIP® Band Adjust Catheter, 25mm, 40mm measurement length. BF-325 EndoFLIP® Sleeve Catheter, 20mm, 160mm measurement length. EF-620 EndoFLIP® Catheter, 25 mm, 80mm measurement length. EF-825 EndoFLIP® USB memory stick. EF-600 EndoFLIP® External Keyboard. EF-700 EndoFLIP® Power Supply. EF-500 Air Inlet Filter. EF-110 EndoFLIP® Pre-Use Check Kit FRU LK-200 For the most up-to-date accessories list, contact your local Crospon sales office. EndoFLIP® User Manual, DD-41 Revision C 45 Appendix A: Introduction to impedance planimetry Impedance planimetry (IP) is an established technique for performing measurements of cross sectional areas in the alimentary tract [1], [2], [3]. The following is a brief technical description of the technique. A.1 Measurement method Impedance planimetry uses AC voltage measurements made between receiver probes to estimate the extent of the diameter of the medium (a conductive fluid) between the probes. This can be done provided the voltage drop across the medium is generated from a constant AC current source and the conductivity of the medium is constant and known for a given temperature. 46 EndoFLIP® User Manual, DD-41 Revision C Considering the following: V/I = R = = L A L 2 Dest / 2 where R is resistance (impedance) σ is the conductivity of the medium, L is the distance between the voltage probes, A is the cylinder area and Dest is the cylinder diameter. R can be calculated as the AC current (I) is known and is fixed, and the AC voltage (V) is measured between the voltage probes. If L is the fixed distance between the voltage probes and the medium conductivity (σ) is known for a given temperature, then Dest can be determined. An estimate of the balloon diameter, Dest, at a given electrode position is derived from the measured area using the assumption that the balloon is symmetrical about its longitudinal axis at that electrode position. The above shows that V is inversely proportional to Dest², thus the diameter can be estimated based on the voltage reading. If the conductive medium is contained in a flexible balloon and an array of voltage electrodes used, the shape of the balloon can be reproduced based on the voltage readings. This is the basis of the FLIP® imaging technique. [2] References [1] “The functional lumen imaging probe (FLIP®) for evaluation of the esophagogastric junction”, Am J Physiol. 2007 Jan:292(1):G377-84. [2] “Functional oesophago-gastric junction imaging”, 2006 May 14; 12(18): 2818-2824 World Journal of Gastroenterology. [3] “Do we really understand the role of the oesophagogastric junction in disease“, 2009 Jan 14; 15(2): 144-150 World Journal of Gastroenterology. EndoFLIP® User Manual, DD-41 Revision C 47 Appendix B: Specifications Operating modes New patient settings 48 Normal mode: Impedance planimetry measurements can be made and displayed, and the syringe pump can be controlled. Configuration mode is accessible from Normal mode if the syringe pump is inactive. Configuration mode: Patient information can be entered or device settings can be adjusted. Exiting Configuration mode returns the system to Normal mode. BaroStat mode: Allows a pre-defined sequence of up to 10 balloon distensions to be carried out. During each distension, patient feedback of discomfort level can be acquired from a standard keyboard connected to the keyboard connector at the rear of the unit. The Patient Discomfort level is displayed and recorded by the EndoFLIP® system, along with balloon dimensions, balloon volume, and balloon pressure when a catheter with pressure sensing is being used. Setting Description Patient ID Range: Any alphanumeric character available on the onscreen keyboard (up to 16 characters). Default setting: PATIENT1234 Patient name Range: Any alphanumeric character available on the onscreen keyboard (up to 26 characters). Default setting: ----- Patient sex Range: Male, Female Patient age Range: 0 to 100. Comments Range: Any alphanumeric character available on the onscreen keyboard (up to 235 characters). Physician name Range: Any alphanumeric character available on the onscreen keyboard (up to 26 characters). EndoFLIP® User Manual, DD-41 Revision C Displayed data, Normal mode Data Description Live image Measurement area graphic, with estimated balloon diameter (Dest) at up to 16 points in the balloon. Measurement length is catheter-dependent. Balloon pressure is displayed below the graphic if the catheter includes a pressure sensor. Saved image Measurement area graphic and time of day in HH:MM:SS format, with balloon pressure displayed below the graphic and volume of saline solution in balloon when image was saved above it. Saved images can also be labeled with a user-selected comment. Up to 200 images can be saved. Continuous live data For each patient, the system saves up to 8 hours of continuous live data starting from first pump movement, until a new patient is selected. Dest Estimated balloon diameter (Dest) at up to 16 points in the balloon, displayed in numeric and graphical form, using the assumption that the balloon is symmetrical about its longitudinal axis at that electrode pair position. Measurement length is catheter-dependent. Displayed at a resolution of 0.1mm (or 0.1Fr). Refer to catheter user manual for specific accuracy and range information. Note: “---“ indicates that a measurement is not available. Balloon pressure Displayed in numeric form below the measurement area graphic. Displayed at a resolution of 0.1mmHg. Refer to catheter user manual for specific measurement range and accuracy information. Note: “---“ indicates that a measurement is not available. Balloon volume Displayed at a resolution of 1ml with an accuracy of 1ml over a range 0 to 100ml. EndoFLIP® User Manual, DD-41 Revision C 49 Displayed data, Normal mode Balloon inflate settings Alarm settings Date and time settings Data Description Syringe volume Displayed at a resolution of 1ml with an accuracy of 1ml over a range 0 to 100ml. Patient name Any alphanumeric character available on the onscreen keyboard. Default setting: ----- Patient ID Any alphanumeric character available on the onscreen keyboard. Default setting: PATIENT1234 Setting Description Balloon inflate rate Range: See catheter user manual Resolution: 20 mL/min Balloon inflate volume Range: See catheter user manual Resolution: 1 mL Setting Description Balloon pressure alarm setting Range: See catheter user manual Resolution: 1 mmHg Alarm accuracy See Balloon Pressure Accuracy Setting Description Hours Range: 1 to 24, 24-hour format Minutes Range: 0 to 59 Day Range: 1 to 31 Year Year Setting, YYYY format. Error log Stores time-stamped entries that identify error and device status at the time of occurrence. Display Size and type: 10¼-in. LCD touchscreen. Resolution: 800 x 600 pixels. Onscreen keyboard: For entering alphanumeric data. (The device can accommodate external keyboard P/N EF-700.) 50 EndoFLIP® User Manual, DD-41 Revision C VGA cable Maximum cable length: 10 m (32.8 ft) Physical EndoFLIP® System unit Dimensions: 324 mm H x 365 mm W x 311 mm D (12.8 in. H x 14.4 in. W x 12.2 in. D) Weight: 5 kg (11 lb) Operating and storage conditions Operating conditions Temperature 20 to 40 °C Humidity 15 to 95% relative humidity (noncondensing) Atmospheric pressure 700 to 1060 hPa Storage conditions Temperature -20 to 50 °C (EndoFLIP® unit) Humidity 10 to 95% relative humidity (noncondensing) Atmospheric pressure 500 to 1060 hPa Note: When not in use, store the EndoFLIP® system in clean sanitized plastic bag. Electrical EndoFLIP® System operates on DC input from AC/DC power adapter (P/N EF-500), which operates on 90 – 264 VAC, 47 – 63 Hz, 80 VA rating. EndoFLIP® User Manual, DD-41 Revision C 51 Back panel symbols Caution, consult accompanying documents. USB port Direct current (DC) input Video (VGA) output Keyboard Front panel symbols USB port Catheter electrical connector Syringe thumb lock Syringe door Side panel symbols Caution, consult accompanying documents. 52 EndoFLIP® User Manual, DD-41 Revision C Main label (underside of unit) symbols Manufacturer Serial number. Digits are of the form: xxxxYYMMDD-xx where YYMMDD represent the date of manufacture. Part number Caution, consult accompanying documents IPX 1, degree of water ingress protection provided by enclosure. EndoFLIP® User Manual, DD-41 Revision C 53 CE Mark and Notified Body Number: product complies with requirements of the Medical Device Directive 93/42/EEC. TUV Rheinland of North America is a Nationally Recognized Testing Laboratory (NRTL). A single mark (cTUVus) indicates compliance with electrical safety regulations for U.S. and Canadian markets. Type BF applied part complying with IEC 60601-1. Compliant with Waste Electrical and Electronic Equipment (WEEE) Directive 2002/96/EC Technical Note: 54 The EF-500 Power Supply provides two means of operator protection. Earth continuity testing should not be performed on the connectors to the rear of the EndoFLIP® system. EndoFLIP® User Manual, DD-41 Revision C B.1 Compliance International standards IEC 60601-1 Classification WEEE/RoHS Recycling Directive • IEC 60601-1:2005 (Third Edition) Medical Electrical Equipment Part 1: General Requirements for Safety, plus corr.1 (2006) and corr.2 (2007) to the standard and U.S. and Canadian deviations. • EN 60601-1-2:2007, Third Edition, Medical Electrical Equipment - Electromagnetic Compatibility Requirements and Tests. • IEC 60601-2-18:2009 (Third Edition) Medical Electrical Equipment- Particular requirements for the safety of endoscopic equipment. Class I, Type BF, drip-proof equipment, continuous operation. WASTE ELECTRICAL AND ELECTRONIC EQUIPMENT AND RESTRICTION OF THE USE OF CERTAIN HAZARDOUS SUBSTANCES IN ELECTRICAL AND ELECTRONIC EQUIPMENT (WEEE/ROHS) RECYCLING DIRECTIVES. If you are subject to the WEEE/RoHS directives, contact Crospon Ltd. regarding recycling this product. EndoFLIP® User Manual, DD-41 Revision C 55 B.1.1 Electromagnetic emissions Warning: Using cables other than those supplied by Crospon may result in increased emission and/or decreased immunity of the EndoFLIP® System. Guidance and manufacturer’s declaration: electromagnetic emissions, EN 60601-1-2:2007, Third Edition. The EndoFLIP® System is suitable for use in the specified electromagnetic environment. The customer and/or the user of the EndoFLIP® System should ensure that it is used in an electromagnetic environment as described below: Electromagnetic environment guidance Emissions test Compliance RF emissions CISPR 11 Group 1 The EndoFLIP® System uses RF energy only for its internal function. Therefore, its RF emissions are very low and are not likely to cause any interference in nearby electronic equipment. RF emissions CISPR 11 Class A Harmonic emissions EN 61000-3-2 Class A The EndoFLIP® System is suitable for use in all establishments other than domestic and those directly connected to the public low-voltage power supply network that supplies buildings used for domestic purposes. Voltage fluctuations/flicker emissions EN 61000-3-3 Complies Guidance and manufacturer’s declaration: electromagnetic immunity, EN 60601-1-2 2007, Third Edition. 56 EndoFLIP® User Manual, DD-41 Revision C The EndoFLIP® System is suitable for use in the specified electromagnetic environment. The customer and/or the user of the EndoFLIP ® System should ensure that it is used in an electromagnetic environment as described below: EN 60601 test level Compliance level Electromagnetic environment guidance Electrostatic discharge (ESD) IEC 61000-4-2 6 kV contact 6 kV contact 8 kV air 8 kV air Floors should be wood, concrete, or ceramic tile. If floors are covered with synthetic material, the relative humidity should be at least 30 %. Electrical fast transient/burst IEC 61000-4-4 2 kV for power supply lines 1 kV for input/output lines 2 kV for power supply lines 1 kV for input/output lines Mains power quality should be that of a typical commercial and/or hospital environment. Surge IEC 610004-5 1 kV line(s) to line(s) 2 kV line(s) to earth 1 kV line(s) to line(s) 2 kV line(s) to earth Mains power quality should be that of a typical commercial and/or hospital environment. Voltage dips, short interruptions and voltage variations on power supply input lines IEC 61000-4-11 < 5 % UT (> 95 % dip in UT) for 0,5 cycle. 40 % UT (60 % dip in UT) for 5 cycles. 70 % UT (30 % dip in UT) for 25 cycles. < 5 % UT (> 95 % dip in UT) for 5 sec. < 5 % UT (> 95 % dip in UT) for 0,5 cycle. 40 % UT (60 % dip in UT) for 5 cycles. 70 % UT (30 % dip in UT) for 25 cycles. < 5 % UT (> 95 % dip in UT) for 5 sec. Mains power quality should be that of a typical commercial and/or hospital environment. If the EndoFLIP® System user requires continued operation during power mains interruptions, it is recommended that the EndoFLIP® System be powered from an uninterruptible power supply or a battery. Immunity test EndoFLIP® User Manual, DD-41 Revision C 57 Immunity test Power frequency (50/60 Hz) magnetic field IEC 61000-4-8 EN 60601 test level Compliance level Electromagnetic environment guidance 3 A/m 3 A/m Power frequency magnetic fields should be at levels characteristic of a typical location in a typical commercial and/or hospital environment. Note: UT is the AC mains voltage prior to application of the test level. 58 EndoFLIP® User Manual, DD-41 Revision C The EndoFLIP® System is suitable for use in the specified electromagnetic environment. The customer and/or the user of the EndoFLIP ® System should ensure that it is used in an electromagnetic environment as described below: Immunity test IEC 606011-2 test level Conducted RF IEC 610004-6 3 Vrms 150 kHz to 80 MHz 3Vrms Radiated RF IEC 610004-3 3 V/m 80 MHz to 2,5 GHz 3V/m Compliance level Electromagnetic environment guidance Portable and mobile RF communications equipment should be used no closer to any part of the EndoFLIP® System, including cables, than the recommended separation distance calculated from the equation appropriate for the frequency of the transmitter. Recommended separation distance: d = 1.2 P d = 1.2 P 80 MHz to 800 MHz d = 2.3 P 800 MHz to 2,5 GHz where P is the maximum output power rating of the transmitter in watts (W) according to the transmitter manufacturer and d is the recommended separation distance in meters (m). Field strengths from fixed RF transmitters, as determined by an electromagnetic site survey,a should be less than the compliance level in each frequency range.b Interference may occur in the vicinity of equipment marked with the following symbol: EndoFLIP® User Manual, DD-41 Revision C 59 Immunity test IEC 606011-2 test level Compliance level Electromagnetic environment guidance a Field strengths from fixed transmitters, such as base stations for radio (cellular/cordless) telephones and land mobile radios, amateur radio, AM and FM radio broadcast, and TV broadcast cannot be predicted theoretically with accuracy. To assess the electromagnetic environment due to fixed RF transmitters, an electromagnetic site survey should be considered. If the measured field strength in the location in which the EndoFLIP® System is used exceeds the applicable RF compliance level above, the EndoFLIP® System should be observed to verify normal operation. If abnormal performance is observed, additional measures may be necessary, such as reorienting or relocating the EndoFLIP® System. b Over the frequency range 150 kHz to 80 MHz, field strengths should be less than 3 V/m. Note: These guidelines may not apply in all situations. Electromagnetic propagation is affected by absorption and reflection from structures, objects, and people. 60 EndoFLIP® User Manual, DD-41 Revision C Recommended separation distances between portable and mobile RF communications equipment and the EndoFLIP® System IEC 60601-1-2 Frequency of transmitter 150 kHz to 80 MHz 150 kHz to 800 MHz 800 MHz to 2.5 GHz Equation d = 1.2 P d = 1.2 P d = 2.3 P Rated maximum output power of transmitter (W) Separation distance (m) Separation distance (m) Separation distance (m) 0.01 0.12 0.12 0.23 0.1 0.38 0.38 0.73 1 1.2 1.2 2.3 10 3.8 3.8 7.3 100 12 12 23 For transmitters rated at a maximum output power not listed above, the separation distance can be estimated using the equation in the corresponding column, where P is the maximum output power rating of the transmitter in watts (W) according to the transmitter manufacturer. Note: These guidelines may not apply in all situations. Electromagnetic propagation is affected by absorption and reflection from structures, objects, and people. EndoFLIP® User Manual, DD-41 Revision C 61 Warranty 62 Crospon warrants the EndoFLIP® System to be free from defects in material and workmanship for a period of 12 months from the date of purchase, provided that the unit is operated under conditions of normal use as described in this manual. At its discretion, Crospon will make replacements, repairs, or issue credits for equipment or parts that are found to be defective. THE WARRANTY SET FORTH ABOVE IS THE SOLE AND EXCLUSIVE WARRANTY WITH RESPECT TO THE PRODUCT AND CROSPON DOES NOT MAKE, AND HEREBY SPECIFICALLY DISCLAIMS, ALL OTHER WARRANTIES, EXPRESS OR IMPLIED, INCLUDING WITHOUT LIMITATION, ANY IMPLIED WARRANTY OF MERCHANTABLITY OR IMPLIED WARRANTY OF FITNESS FOR A PARTICULAR PURPOSE. THE REPAIR, REPLACEMENT OR CREDIT REMEDY SET FORTH ABOVE WILL BE THE SOLE REMEDY FOR BREACH OF WARRANTY. IN NO EVENT SHALL CROSPON BE LIABLE FOR LOST PROFITS, LOSS OF GOOD WILL, OR INCIDENTAL OR CONSEQUENTIAL DAMAGES EVEN IF CROSPON HAS BEEN ADVISED OF THE POSSIBLITY OF SAME. Exclusions: This warranty does not apply to any unit or individual parts which have been repaired or altered in any way that in Crospon’s judgment, affect its ability or reliability, or which has been subjected to misuse, negligence, abuse, or accident. Unauthorized service and/or failure to perform periodic maintenance may void this warranty. This warranty does not cover damage that may occur in shipment. EndoFLIP® User Manual, DD-41 Revision C Manufacturer information Crospon Ltd. Galway Business Park Dangan Galway Ireland Europe: Phone: +353-91-519880 Fax: +353-91-519889 email: [email protected] US: Phone: 1-855-CROSPON Fax: 760-406-5644 email: [email protected] EndoFLIP® User Manual, DD-41 Revision C 63 64 EndoFLIP® User Manual, DD-41 Revision C