1
User manual
EtherShare
Version 2.6
User manual
April 03, 2000
Copyright information
0-2
Copyright information
Copyright 2000 HELIOS Software GmbH (HELIOS). All rights reserved.
This software and the accompanying documentation are
subject to copyright. You may not modify, adapt, translate,
reverse engineer, decompile, or disassemble the software
– or create derivative works based on it – without prior written consent of HELIOS Software. HELIOS Software does
not give any guarantees or make any warranty or representation regarding this software and documentation, its correctness, accuracy, reliability, currentness, or otherwise.
Neither HELIOS nor anyone else who has been involved in
the creation, production or delivery of this product shall be
liable for any direct, indirect, consequential, or incidental
damages (including loss of business profits, business interruption, loss of business information, and suchlike) arising
from the use or inability to use the product.
HELIOS Software GmbH
Steinriede 3
D–30827 Garbsen, Germany
Internet: www.helios.de
Copyright information
0-3
The program HELIOS Terminal uses the Macintosh Communications Toolbox and the VT320 Terminal Emulation
from the Apple Computer, Inc., the use of which requires
stating the following conditions:
Apple Computer, Inc. (“Apple”) makes no warranties, express or implied, including without limitation the implied
warranties of merchantability and fitness for a particular
purpose, regarding the Apple software. Apple does not warrant, guarantee or make any representations regarding the
use or the results of the use of the Apple software in terms
of its correctness, accuracy, reliability, currentness or otherwise. The entire risk as to the results and performance of
the Apple software is assumed by you. The exclusion of implied warranties is not permitted by some states. The above
exclusion may not apply to you.
In no event will Apple, its directors, officers, employees or
agents be liable to you for any consequential, incidental or
indirect damages (including damages for loss of business
profits, business interruption, loss of business information,
and the like) arising out of the use or inability to use the Apple software, even if Apple has been advised of the possibility of such damages. As some states do not allow the
exclusion or limitation of liability for consequential or incidental damages, the above limitations may not apply to you.
Apple’s liability to you for actual damages for any cause
whatsoever, and regardless of the form of the action
(whether in contract, tort (including negligence), product liability or otherwise), will be limited to $50.
Copyright information
0-4
The following products, which are protected by trademarks, are mentioned in
this manual:
HELIOS, EtherShare OPI, and PCShare are trademarks of HELIOS
Software GmbH.
Apple, AppleTalk, Macintosh, and LaserWriter are registered trademarks, EtherTalk, and LocalTalk are trademarks of Apple Computer, Inc.
Microsoft and MS-DOS are registered trademarks, Windows and
Windows 95/98/NT are trademarks of Microsoft Corporation.
Sun and SPARCstation are registered trademarks of Sun Microsystems, Inc.
IBM RS/6000 is a registered trademark of IBM Corporation.
Ethernet is a registered trademark of XEROX, Inc., Digital Equipment Corporation and Intel Corporation.
UNIX is a registered trademark of AT&T Bell Laboratories.
VT320 is a trademark of Digital Equipment Corporation.
PostScript is a trademark of Adobe Systems, Inc.
All other trademarks used in this documentation belong to their respective
owners.
Welcome to EtherShare 2.6
0-5
Welcome to EtherShare 2.6
Thank you for purchasing HELIOS EtherShare 2.6.
The idea
behind it
HELIOS EtherShare is a powerful networking software for
UNIX-based servers and Apple Macintosh clients. It is reliable, flexible, and easy to administer. It offers AppleTalk
implementation with routing support, automatic AppleTalk
configuration, and an Admin Macintosh tool that allows
e.g. “Users”, “Groups”, “Volumes”, and “Printers” administration from a Macintosh. The program includes all you
need for successful networking, for example an AppleShare
File Server, a Print Server, a Font Server for all printers, a
Time Server, multiple servers support, and printer queue
and server accounting. EtherShare is extremely fast with
AppleShare IP acceleration.
The program includes the “dt” utilities which mimic the
functionality of some major UNIX commands for handling
files, while maintaining the integrity of the desktop database. Furthermore, the software comprises and automatically installs HELIOS Terminal (a vt320 terminal emulation for Macintosh clients) and HELIOS Mail (a UNIX mail
tool for Macintosh clients).
EtherShare 2.6 perfectly supports PCShare 2.5 or later, the
HELIOS software product for UNIX-Windows networks,
and it forms the basis for the powerful HELIOS expansions
EtherShare OPI 2.1, PDF Handshake, and Print Preview.
Course of
development
Our EtherShare 2.6 follows EtherShare 2.5. The new program version comes with a large number of improvements.
Welcome to EtherShare 2.6
0-6
Details are given in chapter 3.6 “New features of program
version 2.6”.
Note:
If you need information about a certain update or update level, please check the distribution CD-ROM or
the HELIOS Web site: www.helios.de
Contents of
the software
package
Your EtherShare 2.6 software package includes an ISO
9660 CD-ROM, a software manual, and an “Activation
Key Request” form that serves to request the individual key
(kind of password) you need to license and run the software.
License
information
Your individual EtherShare 2.6 software activation key has
to be entered during the server installation process. Without
the activation key, you cannot start the software. The generation of your key is based on the serial number of your
EtherShare copy, on the machine ID of your server, and on
the number of users you have purchased the software for.
Keep in mind that – in case you buy several EtherShare licenses – you should make a long-term decision about which
license you want to use on which server machine and about
which license you want to use as base product for expansions you intend to install (like user expansions, PDF Handshake, or EtherShare OPI). These expansions always
remain bound to the original EtherShare base product.
What you have
to do
We enclose with our software package an “Activation Key
Request” form that has to be used for obtaining the key.
Welcome to EtherShare 2.6
0-7
➢
The form already contains your 8-digit EtherShare serial
number. You have to add your (“Enduser”) name and address, and the machine ID of your server.
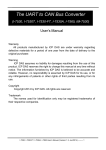
The machine ID consists of “8-2” digits. The last two characters serve to identify the make of the machine. We have
implemented in our product installer a program that displays the machine ID automatically. So, to find out your
server’s machine ID, you have to proceed as follows:
Mount our distribution CD-ROM and follow the instructions given in the accompanying booklet to open the
“Networking Products Installer CD-ROM” menu that is
shown in figure 0-1. Note that the commands that are required to open the menu are different on different platforms. That is why we have listed all of them in the CD’s
booklet. After writing down the machine ID, quit the menu
again by entering the number of the “Quit” item (here: 8)
and pressing RETURN.
Fig. 0-1: Finding out the server’s machine ID
➢
Fax or mail the “Activation Key Request” form to HELIOS
Software GmbH, Steinriede 3, 30827 Garbsen, Germany,
Fax: +49-5131-70 93 25.
Welcome to EtherShare 2.6
0-8
Please note that
❍ we only accept requests by fax or regular mail.
❍ in some countries, the keys are issued by our distribu-
tors. You should ask your dealer for details.
What you will
get in return
On receipt of your request form we will generate your individual activation key and then send you an “Activation Key
Reply” summarizing the data that are required for software
licensing, namely:
❍ your EtherShare serial number (digits given in line
“Serial:”)
❍ the machine ID of your server (hexadecimals given in
line “MachID:”)
❍ the number of clients you can connect (given in line
“Units:”)
❍ your EtherShare Activation key (characters given in
line “Checksum”)
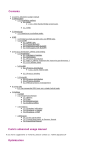
Figure 0-2 shows an example of an “Activation Key Reply”
form.
Welcome to EtherShare 2.6
0-9
Activation Key Reply
Distributor:
Dealer:
Enduser:
Promo
Datentechnik und
Systemberatung GmbH
Eduardstr. 46-48
20257 Hamburg
Deutschland
T: 040-851744-0
Hello MacUsers GmbH
Paul Smiley
Schiffgraben 226
30175 Hannover
Deutschland
T:
Lavesstr. 153
30159 Hannover
Deutschland
T:
System Information
Product:
EtherShare
Serial:
54080022
MachID:
80024a74-8b
Units:
20
Checksum:
qwer-asdf-yxcv-abcd
Fig. 0-2: Example of an “Activation Key Reply”
Date:
13.10.1998
Welcome to EtherShare 2.6
0-10
Contents
Contents
Copyright information ................................................................. 0-2
Welcome to EtherShare 2.6 ......................................................... 0-5
1
About the chapters of this manual ........................................ 1
2
Using the manual .................................................................... 7
2.1 Conventions ...................................................................... 8
3
2.1.1
Structure ............................................................... 8
2.1.2
Font and syntax conventions ................................ 9
Introduction ........................................................................... 11
3.1 General considerations ................................................... 12
3.2 Introduction to EtherShare and AppleTalk ...................... 14
3.3 EtherShare and UNIX programs and files ...................... 20
3.4 Network hardware ........................................................... 25
3.5 Network topology ............................................................ 27
3.6 New features of program version 2.6 .............................. 29
Contents
4
Installation ............................................................................. 35
4.1 System requirements ...................................................... 36
4.2 General remarks ............................................................. 38
4.3 Preparing the installation ................................................ 39
4.3.1
Have your activation key at hand? ..................... 39
4.3.2
Preparing the UNIX host ..................................... 39
4.3.3
Driver (AppleTalk) ............................................... 41
4.3.4
Preparing Macintosh workstations ...................... 42
4.3.5
Preparing DOS/Windows workstations .............. 43
4.3.6
Preparing upgrade installations .......................... 44
4.4 The UNIX installation procedure ..................................... 46
4.5 Verifying the UNIX installation ........................................ 60
4.6 The client installation procedure ..................................... 73
4.7 Uninstalling EtherShare .................................................. 77
4.7.1
Deleting the Macintosh utilities ........................... 77
4.7.2
Deleting the EtherShare UNIX software ............. 77
4.8 Installing updates using the HELIOS update installer ..... 79
5
EtherShare Admin ................................................................. 87
5.1 General remarks ............................................................. 88
5.2 Starting the EtherShare Admin ....................................... 92
5.3 Logging on to the Administration Server ......................... 93
5.4 Setting Admin preferences ............................................. 98
5.5 About list windows ........................................................ 102
Contents
5.6 Users list ....................................................................... 104
5.7 Groups list ..................................................................... 112
5.8 Volumes list .................................................................. 118
5.9 Volume menu ................................................................ 129
5.10 Printers list .................................................................... 136
5.11 Printer menu ................................................................. 158
5.12 Printer job windows – moving, restarting,
and deleting jobs ........................................................... 164
5.13 Other lists and accounting files ..................................... 168
5.13.1 Fonts list ........................................................... 168
5.13.2 Active Users list and sending messages
with the EtherShare Admin ............................... 170
5.13.3 Printer Log File ................................................. 172
5.13.4 Server Log File ................................................. 175
5.13.5 System Messages ............................................ 176
5.13.6 Versions ............................................................ 178
5.13.7 Extension Mappings ......................................... 179
5.13.8 IP Access .......................................................... 182
5.14 Editing “atalk.conf” (and other configuration files)
manually ....................................................................... 188
5.15 Multiple EtherShare hosts ............................................. 190
5.16 Logging off from the Administration Server .................. 194
5.17 Retrieving information about your EtherShare copy ..... 195
Contents
6
HELIOS Mail ......................................................................... 197
6.1 General remarks ........................................................... 198
6.2 Starting HELIOS Mail .................................................... 200
6.3 Setting Mail preferences ............................................... 201
6.3.1
General preferences ......................................... 202
6.3.2
Text preferences ............................................... 203
6.3.3
Insert preferences ............................................. 204
6.3.4
Header preferences .......................................... 206
6.3.5
Inbox preferences ............................................. 207
6.4 Configuring the connection ........................................... 208
6.5 Incoming mail ................................................................ 212
6.6 Sending mail ................................................................. 217
6.7 Using/editing the address book .................................... 228
6.8 Defining a signature/a vacation message ..................... 231
6.9 The Windows menu ...................................................... 233
6.10 Mail Notification Feature ............................................... 234
7
HELIOS Terminal ................................................................. 237
7.1 General remarks ........................................................... 238
7.2 Starting HELIOS Terminal ............................................ 239
7.3 Setting Terminal preferences ........................................ 240
7.4 Configuring the connection ........................................... 242
7.5 Copy and paste ............................................................. 247
7.6 Function keys ................................................................ 249
Contents
8
The EtherShare System ...................................................... 251
8.1 General remarks ........................................................... 252
8.2 System configuration .................................................... 253
8.3 The AppleTalk protocol stack ....................................... 255
8.4 Parameters of the “atalkd” program .............................. 257
8.5 AppleTalk stack utility programs ................................... 259
9
The EtherShare File Server ................................................ 263
9.1 General remarks ........................................................... 264
9.2 The File Server programs ............................................. 265
9.3 Directory and file formats .............................................. 266
9.4 Parameters of the “afpsrv” program .............................. 275
9.5 Users and groups ......................................................... 290
9.6 Public and private volumes ........................................... 301
9.7 Access privileges .......................................................... 311
9.8 Data backup .................................................................. 318
9.9 File Server utility programs ........................................... 321
9.10 EtherShare versus AppleShare .................................... 324
10
The Desktop Server ............................................................ 329
10.1 General remarks ........................................................... 330
10.2 The Desktop Server Program ....................................... 331
10.3 Parameters of the “rebuild” program ............................. 340
10.3.1 “rebuild” error messages .................................. 341
Contents
10.4 Parameters of the “desksrv” program ........................... 342
10.4.1 “desksrv” error and status messages ............... 342
10.5 “afpsrv” and “desksrv” coordination .............................. 346
11
The Print Server .................................................................. 349
11.1 General remarks ........................................................... 350
11.2 The Print Server Interfaces ........................................... 351
11.3 The Print Server Programs ........................................... 352
11.4 The Print Server in operation ........................................ 359
11.5 Parameters of the “papsrv” program ............................. 364
11.6 Configuring printers manually ....................................... 371
11.6.1 Global parameters ............................................ 372
11.6.2 AppleTalk (PAP) connections ........................... 378
11.6.3 Serial PostScript connections ........................... 383
11.6.4 TCP/IP PostScript connections ........................ 387
11.6.5 Shared Memory software RIPs ......................... 393
11.6.6 Printing to disk .................................................. 395
11.6.7 Printing to a hold/error queue ........................... 397
11.6.8 Balancing print job loads .................................. 398
11.7 Adobe Document Structuring Conventions ................... 399
Contents
12
Text-to-PostScript Converter ............................................. 403
12.1 General remarks ........................................................... 404
12.2 Options ......................................................................... 406
12.3 Escape Interpreter ........................................................ 409
12.4 Umlauts and special characters .................................... 411
13
The Administration Server ................................................. 415
13.1 General remarks ........................................................... 416
13.2 The Administration Server Program ............................. 417
13.3 Parameters of the “admsrv” program ............................ 418
13.4 Administration Server utility program ............................ 424
13.5 Configuration with Yellow Pages .................................. 425
14
The Mail Server ................................................................... 429
14.1 General remarks ........................................................... 430
14.2 The Mail Server Program .............................................. 431
14.3 Parameters of the “mailsrv” program ............................ 432
14.4 The POP3 Server ......................................................... 438
15
The Terminal Server ........................................................... 441
15.1 General remarks ........................................................... 442
15.2 The Terminal Server Program ...................................... 443
15.3 Parameters of “termsrv” program ................................. 444
16
The Time Server .................................................................. 447
Contents
17
Technical support ............................................................... 449
17.1 Support options ............................................................. 450
17.2 Keys and updates ......................................................... 454
17.3 Error Messages ............................................................ 457
17.3.1 “license” error messages .................................. 457
17.3.2 “generic” error messages ................................. 459
17.3.3 “atalkd” error messages .................................... 460
17.3.4 “afpsrv” error messages ................................... 465
17.3.5 “papsrv” error messages .................................. 468
17.3.6 “termsrv”, “mailsrv” and “admsrv”
error messages ................................................. 470
17.3.7 Printer interface errors and status messages ... 470
17.3.8 Messages shared by all printer interfaces ........ 471
17.3.9 “balanceif” error messages: .............................. 487
17.3.10“diskif” error messages: .................................... 488
17.3.11“papif” error messages: .................................... 490
17.3.12“psof” error messages: ..................................... 492
17.3.13“psif” error messages: ....................................... 492
17.3.14“psresolve” error messages: ............................. 493
17.3.15“shmif” error messages: .................................... 494
17.3.16“tcpif” error messages: ...................................... 495
Contents
Appendix 1:
Sample configurations ..................................... A-1
Appendix 2:
Files in the EtherShare directory .................... A-9
Appendix 3:
Configuring EtherShare as an
AppleTalk network router .............................. A-17
A 3.1:
A 3.2:
A 3.3:
A 3.4:
A 3.5:
General remarks ........................................... A-18
Example network setups .............................. A-19
Network automatic configuration option ....... A-22
Seed routers, non-seed routers .................... A-24
Manual network configuration ...................... A-26
Appendix 4:
EtherShare utility programs .......................... A-41
Appendix 5:
Standard UNIX utility programs .................... A-49
Appendix 6:
Data backup with “dump” and “restore” ..... A-51
Appendix 7:
Technical notes .............................................. A-55
A 7.1:
A 7.2:
A 7.3:
A 7.4:
A 7.5:
EtherShare log files ...................................... A-56
PostScript RIP INITs in the
EtherShare Admin ........................................ A-61
Using the ISO-8859-1 character set
under IBM AIX 4 ........................................... A-63
Accessing spool queues from
an IBM logical printer .................................... A-65
Accessing the System V “lpr” from
the Print Server ............................................ A-66
Contents
A 7.6:
A 7.7:
A 7.8:
Accessing the Print Server
through “Remote LPR” ................................. A-68
AppleTalk kernel configuration ..................... A-69
A 7.7.1 Loadable Drivers ............................ A-69
A 7.7.2 Re-linking the kernel ...................... A-71
UNIX kernel tuning ....................................... A-73
Appendix 8:
IP configuration – Reference Part ................. A-75
Appendix 9:
The Desktop utilities ...................................... A-83
A 9.1:
A 9.2:
A 9.3:
A 9.4:
A 9.5:
Introduction ................................................... A-84
Do I need the “dt” utilities? ........................... A-85
How to install the “dt” utilities ........................ A-88
Notes about error messages ........................ A-89
Command descriptions ................................. A-90
A 9.5.1 General remarks ............................ A-90
A 9.5.2 dt (no argument) ............................. A-93
A 9.5.3 dt rm ............................................... A-94
A 9.5.4 dt rmdir ........................................... A-95
A 9.5.5 dt mv .............................................. A-96
A 9.5.6 dt cp ............................................... A-98
A 9.5.7 dt set ............................................ A-100
A 9.5.8 dt iddump ..................................... A-104
A 9.5.9 dt ls ............................................... A-104
A 9.5.10 dt mkdir ........................................ A-107
A 9.5.11 dt touch ........................................ A-108
A 9.5.12 dt upd ........................................... A-108
A 9.5.13 dt chmod ...................................... A-109
Contents
A 9.6:
A 9.7:
A 9.5.14 dt chown ....................................... A-111
A 9.5.15 dt chgrp ........................................ A-112
A 9.5.16 dt idinfo ......................................... A-113
“dt” warning messages ............................... A-115
Additional information ................................. A-116
A 9.7.1 General remarks .......................... A-116
A 9.7.2 Macintosh files under UNIX .......... A-116
A 9.7.3 Default resource fork handling ..... A-117
A 9.7.4 EtherShare and desktops ............. A-117
A 9.7.5 “mount points” and “auto-mounter” A-119
A 9.7.6 Zero IDs ....................................... A-119
A 9.7.7 Using “dt” for backup/restore ........ A-120
Appendix 10:
Macintosh and Windows characters .......... A-123
Appendix 11:
Glossary ........................................................ A-127
Index
Contents
1 About the chapters of this manual
1
1
About the chapters of this
manual
In the following, we give a brief summary of every chapter
of this manual. These summaries are supposed to help you
find the information you are looking for.
Chapter 2
2 “Using the manual” explains how to read and understand
the manual. The chapter gives information about the manual version, the structure of the contents, and the meanings
of font and syntax conventions.
Chapter 3
3 “Introduction” gives background information about networks in general, and about the components that make up
EtherShare. For those who are already familiar with the
product it explains the new features of the EtherShare version 2.6.
Installation on server and clients
Chapter 4
4 “Installation” covers all questions that might arise during
installation. The chapter contains a list of hardware and
software requirements and gives detailed instructions on
how to install EtherShare from our CD-ROM. It explains
how to add program updates, and how to verify the installation, e.g. by using our “vpoll” utility. Finally, it describes
how to uninstall EtherShare, if necessary.
1 About the chapters of this manual
2
Description of the Macintosh software modules
Chapter 5
5 “EtherShare Admin” thoroughly explains the Macintosh
administration program EtherShare Admin. It shows how
to configure EtherShare (e.g. users, groups, volumes, printers, and fonts), and how to control print jobs, extension
mapping tables, and IP access.
Chapter 6
6 “HELIOS Mail” gives advice on how to use EtherShare’s
mail program. It describes how to change the preferences,
how to handle incoming mails, how to set up and send new
mails, and how to use the program’s functions for process
automation, such as address book, signature, and vacation
message.
Chapter 7
7 “HELIOS Terminal” describes EtherShare’s terminal emulation that can be used on every Macintosh in the EtherShare network.
Description of the server software modules
Chapter 8
8 “The EtherShare System” describes the AppleTalk protocol stack that forms the core of the EtherShare system.
Chapter 9
9 “The EtherShare File Server” describes the function, the
configuration, and the operation of the file server. It explains how the administrator can configure users, groups,
and volumes, create folders, and define access privileges.
The chapter also gives advice on how to archive data from
the file server on mass storage.
1 About the chapters of this manual
3
Chapter 10
10 “The Desktop Server” describes the function and configuration of the Desktop Server, which is invisible to users,
but is responsible for storing icon and application data, and
for managing file and directory ID’s for network volumes.
Chapter 11
11 “The Print Server” lists and describes all Print Server
and interface programs that belong to the EtherShare installation. The chapter explains the “papsrv” and printer interface parameters that can be set in the main configuration
file “atalk.conf”, and describes how to configure printers
manually.
Chapter 12
12 “Text-to-PostScript Converter” describes the conversion of “flat” ASCII text files to PostScript print jobs with
the help of the “pstext” program.
Chapter 13
13 “The Administration Server” describes the “admsrv”
program on the server. The chapter lists all “admsrv” parameters that are recognized in the main configuration file
“atalk.conf”, and explains how the Administration Server
co-operates with the UNIX Yellow Pages system.
Chapter 14
14 “The Mail Server” describes the “mailsrv” program that
implements mail server functions on the server and manages the communication with HELIOS Mail on a Macintosh.
The chapter lists all “mailsrv” parameters that are recognized in the main configuration file “atalk.conf”.
Chapter 15
15 “The Terminal Server” describes the “termsrv” program
that implements terminal server functions on the server and
manages the communication with HELIOS Terminal on a
Macintosh. The chapter lists all “termsrv” parameters that
are recognized in the main configuration file “atalk.conf”.
1 About the chapters of this manual
4
Chapter 16
16 “The Time Server” explains how to synchronize the time
on a Macintosh client with the time on the EtherShare server.
Technical support
Chapter 17
17 “Technical support” gives information about the
HELIOS key and update system. Furthermore, it gives advice on how to set up a complete error description when requesting technical support. Last but not least, the chapter
explains the meanings of the error messages you may receive when using HELIOS EtherShare.
Additional information
Appendix 1
A 1: “Sample configurations” shows examples of some major configuration files, such as “atalk.conf”, “printcap”,
“afppasswd”, and “afpvolumes”.
Appendix 2
A 2: “Files in the EtherShare directory” lists the directories
that belong to an EtherShare installation.
Appendix 3
A 3: “Configuring EtherShare as an AppleTalk network
router” provides technical information on EtherShare’s network auto-configure option and also explains manual configuration of the network connection. For that purpose, the
HELIOS “netconf” utility is described.
Appendix 4
A 4: “EtherShare utility programs” describes the
“logrotate” utility and the HELIOS LanTest.
1 About the chapters of this manual
5
Appendix 5
A 5: “Standard UNIX utility programs” gives information
about UNIX tools that can help you with network diagnostics and EtherShare configuration, namely “hostname”,
“uname”, “arp”, “ifconfig”.
Appendix 6
A 6: “Data backup with “dump” and “restore”” shows an
example of how to backup and restore an entire partition of
a hard disk.
Appendix 7
A 7: “Technical notes” contains a number of technical information that are meant for experienced UNIX users only.
Appendix 8
A 8: “IP configuration – Reference Part” gives background
information about IP addresses, “firewalls”, and the settings we recommend for the “AppleShare Client Setup”.
Appendix 9
A 9: “The Desktop utilities” describes the “dt” utilities,
which mimic the functionality of some major UNIX commands for handling files, while maintaining the integrity of
the desktop database.
Appendix 10
A 10: “Macintosh and Windows characters”
Glossary
“Glossary” briefly explains some terms of the network terminology.
Index
1 About the chapters of this manual
6
2 Using the manual
7
2
Using the manual
2 Using the manual
8
2.1 Conventions
2.1
Conventions
Note that our update information files and TechInfo files
are also part of our documentation. They may contain details about our products that have not yet made it into the
manuals. So, make it a habit to read the update info texts
whenever you install updates, and to read the TechInfos
regularly. For that purpose, check the folders “UPDATES”
and “SUPPORT” on the current CD-ROM, or the support
section on our Web site www.helios.de.
Do always read the product specific README files on
your current CD-ROM. You can access these files e.g. during software installation (see figure 2 in chapter 4.4).
For full-scale information on all our products, you may
check the “manuals” directory on the CD-ROM. It contains
all manuals, data sheets, and brochures of our products in
PDF format.
2.1.1
Structure
This manual contains five main parts, namely:
❍ installation of EtherShare 2.6 on server and clients
❍ description of the Macintosh software modules
(administration of EtherShare on a Macintosh client and
usage of the Macintosh programs Helios Mail and Helios Terminal)
❍ description of the server software modules
(usage and configuration of the different EtherShare
programs on the server)
❍ technical support
2 Using the manual
9
2.1 Conventions
❍ additional information (appendices including descrip-
tion of the “Desktop utilities”).
❍ a glossary of network-related terms
2.1.2
Font and syntax conventions
Some font and syntax conventions are used in this manual.
Their meanings and uses are explained below.
The italics style is used for words of particular importance.
The courier font indicates text that appears on your monitor if you are working on a UNIX platform. It is also used
for UNIX commands you have to enter.
The Chicago font indicates menu items, folder and button
names on your Macintosh computer.
Cross-references to side heads appear in Helvetica bold.
The arrow (➢) in the left margin characterizes direct instructions to the user, e.g.:
➢
Select EtherShare from the “Networking Products
Installer CD-ROM” menu.
Note:
Notes give details that might be useful as additional information. They can also contain a reference to other
chapters where additional information can be found.
Important:
These paragraphs should be read carefully. They are
supposed to help you avoid problems and save time.
2 Using the manual
10
3 Introduction
11
3
Introduction
3 Introduction
12
3.1 General considerations
3.1
General considerations
This chapter discusses basic features of an AppleTalk network and introduces the EtherShare network software. The
modules that make up EtherShare are explained and hardware considerations when setting up a network are discussed.
Note:
The chapters at the end of this manual describe in detail how to configure EtherShare by modifying the appropriate UNIX configuration files with a standard
UNIX editor program such as vi. However, the
EtherShare Admin program offers a much easier way
to carry out EtherShare configuration and network
management tasks.
The EtherShare Admin accesses and modifies the system
configuration files directly, just as if the changes had been
made with an editor. However, the EtherShare Admin has
built-in safety checks to ensure that conflicting or invalid
configuration settings are not possible.
In the following chapters, the distinction is often made between “logging on to EtherShare” and “logging on to the
UNIX host”. The latter is only necessary if you want to configure the EtherShare system manually instead of using the
EtherShare Admin program, or if you want to access the
UNIX host in order to develop or run software under the
UNIX programming environment. This type of connection
needs a conventional terminal (screen and keyboard), or a
terminal program such as HELIOS Terminal, and means
that you will need to be experienced in the UNIX operating
conventions and utility programs, which are very different
from those found on the Macintosh.
3 Introduction
3.1 General considerations
13
On the other hand, “logging on to EtherShare” is a routine
task for any Macintosh user who needs access to the file
server and print server facilities provided by EtherShare.
Obviously, in this case too, the workstation is “logged-on”
(or connected) to the UNIX host. Fortunately, EtherShare
simulates the usual Macintosh environment in every way,
as described in Apple’s AppleShare manual, and users may
not even be aware that they are linked to a UNIX-based
computer rather than just another Macintosh.
3 Introduction
14
3.2 Introduction to EtherShare and AppleTalk
3.2
Introduction to EtherShare and
AppleTalk
The software which makes up EtherShare provides AppleShare server functions for Apple Macintosh (and DOS/
Windows-based) computers connected together in an
AppleTalk network. Rather than running on an Apple Macintosh computer like conventional AppleShare servers,
EtherShare is based on the powerful multitasking/multiuser
features available under the UNIX operating system. Due to
the availability of a large range of different UNIX-based
computer systems of varying performance and price, with
EtherShare, it is very easy to expand the power of your
AppleTalk network at a later date, when the amount of
work and the number of users increase.
EtherShare includes the EtherShare Admin program, which
makes it very easy for the system administrator to configure
the network. The EtherShare Admin can also be used by
regular users to check the configuration. However, they are
prevented from making any changes.
The EtherShare software can be subdivided into eight functional modules:
•
•
•
•
•
•
The AppleTalk protocol stack with network routing
File Server with Desktop Server
Print Server with Font Server
Text-to-PostScript converter “pstext”
Terminal Server with the HELIOS Terminal program
Administration Server with the EtherShare Admin
program
• Mail Server with the HELIOS Mail program and “Helios Mail Init”
• Time Server
3 Introduction
3.2 Introduction to EtherShare and AppleTalk
15
EtherShare
and PCShare
PCShare is a high-end TCP/IP-based file server, print server, and terminal server software for MS-DOS/Windows
computers which are attached to UNIX computers through
Ethernet, Token Ring, etc. Since PCShare is compatible
with EtherShare, DOS/Windows users can share network
printers and files with Macintosh and UNIX users, too.
The AppleTalk
protocol stack
The AppleTalk protocol stack forms the backbone for the
EtherShare servers. It is responsible for basic AppleTalk
network functions, including those of network routing.
Routing means that EtherShare can be used to interconnect
several physically separate AppleTalk networks, and transparently pass information between them as required.
The EtherShare
File Server
While maintaining complete compatibility with the AFP
specification, the EtherShare “File Server” program allows
access to documents and applications throughout the whole
network via high speed EtherTalk connections or via other
connection such as FDDI, insofar as the interface is supported on the hardware being used.
With the help of an AppleShare 2.0 - 2.2 compatible client,
you can also connect IBM-PC-compatible computers under
MS-DOS (or PC-DOS) version 3.1 or later to EtherShare.
EtherShare actively supports AppleShare connections from
PC-compatible computers and even takes care of former
MS-DOS file naming conventions. EtherShare can also be
used to centrally store MS-DOS files and to access network
printers from MS-DOS-based computers.
The following problem can arise when accessing Apple
Macintosh files from an MS-DOS computer on the AppleTalk network: the Macintosh system allows up to 31 characters in the file name, whereas (old) MS-DOS file names
are in upper case only and consist of a max. 8-character root
3 Introduction
16
3.2 Introduction to EtherShare and AppleTalk
file name and a max. 3-character extension separated by a
period, e.g. “AAAABBBB.CCC”. Furthermore, Macintosh
file names can contain any of the displayable characters
from the Macintosh character set, which is different from
the character set of the IBM-PC.
To solve this problem, the EtherShare File Server automatically checks and translates file names when PCs access
Macintosh files through AppleShare. Characters that cannot be displayed on the IBM-PC, or are disallowed in file
names by DOS conventions, are replaced by the underline
character “_” and/or a checksum, and PC characters that
cannot be displayed on the Macintosh are replaced by a box
character.
Another, much faster, way to network your UNIX host and
thus your Macintosh computers with IBM-PC-compatible
computers is to use HELIOS PCShare (see chapter A 11:
“Glossary”). PCShare has its own built-in algorithm for
dealing with long file names containing accented characters.
The EtherShare
Print Server
The EtherShare “Print Server” program (“papsrv”) is a central spooler for print jobs destined for PostScript devices
such as page printers (e.g. LaserWriter) and photo-typesetting machines (e.g. Linotype). The ImageWriter II, and ImageWriter LQ are also supported.
One or more printers can be connected to EtherShare simultaneously, either through, Ethertalk, TCP/IP, or connected
directly to the UNIX host via a serial interface. Print jobs
are received from the network and temporarily stored on the
UNIX host before being sent to the assigned printer (print
spooling). This considerably improves the throughput of
the workstations on the network, since they can immediate-
3 Introduction
3.2 Introduction to EtherShare and AppleTalk
17
ly dispatch their print jobs and do not have to wait for the
printer. Other connection types are also supported (see
chapter 11 “The Print Server”).
Since EtherShare allows PostScript devices to be directly
connected to the print server via a serial interface, it is not
necessary for them to support Apple’s “Printer Access Protocol” (PAP). The interface between such printers and
AppleTalk networks is implemented in the Print Server,
which allows such printers to be accessed from any workstation as if they were directly connected to AppleTalk.
However, you may get problems with applications that send
images as binary bitmap data, since serially connected PostScript printers interpret certain binary codes as control signals. Accordingly, we recommend AppleTalk, which is
transparent to 8-bit data (see chapter 11.6 “Configuring
printers manually”). Additionally, it is much faster than a
serial connection, which is an important factor for images.
All printers (including those that support AppleTalk)
should be driven through the Print Server, in order to take
advantage of EtherShare’s print job spooling feature –
please select the corresponding printer queue from the
Chooser and NOT the printer to which the queue is connected. This is especially important if you need to use different LaserWriter driver versions at the same time, since
the Print Server will manage different “prep” file versions
automatically without having to reset the printer each time.
In addition to printing to the assigned printer and providing
spooling functions, the Print Server automatically interprets messages returned by the printer and forwards them to
the appropriate user via electronic mail and “afpmsg”.
Apart from convenience, this feature allows rapid reaction
to situations such as “paper out” or “paper misfed”.
3 Introduction
18
3.2 Introduction to EtherShare and AppleTalk
The various features of the Print Server are also available
for MS-DOS workstations connected to the network via an
AppleShare client or HELIOS PCShare. The “pstext” program which is provided (see paragraph below) can be used
for printing DOS or UNIX text files on PostScript printers.
Text-to-PostScript
converter
The text-to-PostScript converter “pstext” converts “flat”
ASCII files to PostScript, to allow DOS and UNIX text
files to be printed on PostScript printers. It also allows you
to print from DOS and UNIX applications which do not
support PostScript. “pstext” has facilities for switching
fonts and for “intelligent” semi-automatic pagination (see
chapter 12 “Text-to-PostScript Converter”).
The Terminal
Server and
HELIOS
Terminal
The Macintosh program HELIOS Terminal allows workstations in the AppleTalk network to make one or more simultaneous connections to one or more UNIX hosts via a
terminal emulation with multiple session capability.
HELIOS Terminal communicates with UNIX through the
Terminal Server.
The Mail
Server and
HELIOS Mail
The Macintosh program HELIOS Mail allows workstations
in the AppleTalk network to send electronic mail messages
and files to other Macintosh or UNIX users on the network.
HELIOS Mail communicates with UNIX through the Mail
Server. With the built-in TCP POP3 server in EtherShare
2.6, you can also use workstations other than Macintosh
and mail programs other than HELIOS Mail with the EtherShare Mail Server.
HELIOS Mail offers an editor and an address book function. Incoming mail is received in the background and notified by a “Mail Notification Feature”, which displays a
dialog box including the Subject: and the New mail from:
lines if you receive mail. You also receive EtherShare serv-
3 Introduction
3.2 Introduction to EtherShare and AppleTalk
19
er messages, such as printer messages, via electronic mail.
If you have a modem attached to the UNIX host and configured for UNIX mail (uucp), you can also communicate with
several hundred thousand users of this worldwide e-mail
system.
The Administration Server
and EtherShare Admin
The Macintosh program EtherShare Admin makes it very
easy for system administrators to configure EtherShare
from one of the Macintosh workstations. It can also be used
by regular users to check the configuration. However, they
are prevented from making any changes.
EtherShare Admin communicates with EtherShare through
the Administration Server. The Administration Server runs
on the UNIX host while EtherShare Admin runs on the
Macintosh workstations. The communication between
these two programs takes place through a custom protocol
derived from the AppleTalk Filing Protocol (AFP), which
was especially developed by HELIOS Software GmbH for
this purpose and is transparent to other AppleTalk devices,
or via a TCP/IP connection which allows for managing
multiple servers remotely and supporting concurrent
AppleTalk and TCP/IP connections. (see via TCP/IP in chapter 5.3 “Logging on to the Administration Server”).
The Font
Server
The Font Server is an integral part of the Print Server. It reduces network loading, increases throughput and allows
central administration of printer fonts.
The Desktop
Server
The Desktop Server is responsible for storing icon and application data for the entire EtherShare server, and for managing file and directory IDs for network volumes.
The Time
Server
The Time Server is provided to allow time synchronization
between a server and all connected Macintosh clients.
3 Introduction
20
3.3 EtherShare and UNIX programs and files
3.3
EtherShare and UNIX programs
and files
Many of the functions of EtherShare are aided by the high
performance of the UNIX operating system, and EtherShare is closely integrated with a number of the more common system programs and facilities in UNIX.
For example, EtherShare often uses the UNIX programs
“lpr”, “mail” and “syslogd”. All three programs are responsible for passing information within the UNIX system itself, and are used by EtherShare mainly as a medium of
transport.
EtherShare also accesses the UNIX system files
“/etc/passwd”, “/etc/group”, “/etc/printcap” and
“/etc/rc.local”.
syslogd
“syslogd”, which runs continuously in the background
within UNIX, has the task of processing status and error
messages from other active programs, and sending them to
a specific output device or file in accordance with its configuration. All of the EtherShare modules use the services
of “syslogd” to output system error messages and warnings.
By changing the configuration file “/etc/syslog.conf” on the
UNIX server, the administrator is able to exactly control the
flow of messages. For example, messages can be automatically passed on to users logged-on to the system (or entire
groups), or simply stored in files or output to the system
console.
With some operating systems, EtherShare (as many other
UNIX programs) will not log any error messages or warnings unless “syslogd” has been appropriately configured.
3 Introduction
3.3 EtherShare and UNIX programs and files
lpr
21
“lpr”, which is responsible for passing print jobs to the appropriate printer, is used by the EtherShare Print Server.
“lpr” is configured through the UNIX configuration file
“/etc/printcap”. This file contains an entry for each printer
queue assigned to the system in order to define how the
printer is connected to the network, and to specify which
programs are responsible for transferring data to the printer.
The EtherShare Admin updates this file automatically
whenever you change the printer configuration.
The Print Server is based on the BSD printing system. If
your host uses the System V printing system (e.g. Sun Solaris 2.x), the Print Server automatically uses its own BSDstyle “lpr” program, which is provided in the “$ESDIR” directory in such cases.
mail
Under UNIX, the “mail” program is responsible for passing
electronic mail messages between users or groups of users.
Messages sent by the mail program to a particular user are
stored on the host in the user’s “mailbox”. Either immediately, or at a later point in time, the user can call up “mail”
to read the post. “mail” is also used by the EtherShare Print
Server to pass printer status and error messages to the appropriate user.
Electronic mail is automatically sent directly to your Macintosh if you have installed our HELIOS Mail program.
You no longer need to use the UNIX “mail” program to
read it. Incoming mail is received in the background with a
“Mail Notification Feature” which displays a dialog box including Subject: and the New mail from: line when you
receive new mail.
3 Introduction
22
3.3 EtherShare and UNIX programs and files
/etc/passwd
/etc/group
Any user in the AppleTalk network who requires access to
the EtherShare File Server must be entered as a UNIX user
in the “/etc/passwd” file. The user must also be assigned a
group in the “/etc/group” file. Note that the administrator
can specify whether an AppleTalk user is permitted direct
access to the UNIX host or not, in addition to EtherShare
access. The EtherShare Admin updates these files automatically whenever you change users or groups.
passwd
program
The UNIX “passwd” program is used to assign passwords
to users. The administrator can allocate new passwords,
which are then automatically stored in the “/etc/passwd”
file following encryption. The EtherShare Admin updates
this file automatically whenever you change user passwords.
/etc/rc.local
or
/etc/inittab/
This file contains the commands that are automatically executed when starting (booting) the UNIX system (rc = run
commands). The EtherShare installation program optionally inserts commands in this file to automatically start all of
the EtherShare servers when UNIX is booted.
mkdir and
rmdir
The UNIX program “mkdir” can be used to create new subdirectories in the UNIX file system. “mkdir” can also be
used by the administrator to create new folders for the Macintosh. Please refer, however, to the notes contained in
chapter 9.3 “Directory and file formats”. Folders are best
created or deleted by using the Finder from a Macintosh
workstation. “rmdir” (remove directory) can be used to remove directories/folders when they are no longer needed.
3 Introduction
3.3 EtherShare and UNIX programs and files
chmod
The UNIX system program “chmod” (change mode) can be
used to change user privileges for files and directories in the
UNIX file system. You can also use “chmod” to change access privileges for Hierarchical File System (HFS) volumes
created for Macintosh computers on the EtherShare File
Server, although you should normally use the Macintosh
program Sharing... (in the File menu) for this purpose.
Please refer to chapters 9.3 “Directory and file formats” and
9.7 “Access privileges”.
Important:
chown
chgrp
You should never change the privileges of files in the
EtherShare program directories, or in spool directories
used by the EtherShare Print Server.
The UNIX programs “chown” and “chgrp” can be used to
change the owner (creator) or group of a file or directory,
although you should normally use the Macintosh program
Sharing... (in the File menu) for this purpose. Only the system administrator can change the owner of a file or change
the file’s group to one in which the owner is not a member.
Important:
cron
23
For all of the commands mentioned above, we recommend to use the HELIOS Desktop utilities that belong
to EtherShare 2.6. These utilities mimic the functionality of the UNIX commands “mkdir”, “rmdir”, “chmod”,
“chown”, “chgrp”, etc., while maintaining the integrity
of the desktop database. The Desktop utlities are described in appendix A 9 “The Desktop utilities”.
The UNIX program “cron” (cronos <Greek>= time ),
which runs continuously within UNIX, can be configured
to start and stop specified programs at predetermined times.
An appropriate entry in the cron configuration table
3 Introduction
24
3.3 EtherShare and UNIX programs and files
(crontab) can be used to start and stop a particular server at
a specified time of day. “cron” can also be used to automate
data backup procedures.
ufsdump,
restore
“ufsdump” is a data archiving program available on BSD
UNIX systems. It is the recommended program for making
backup (security) copies of network volumes to a tape
streamer or other removable storage media attached to
the UNIX host. You can read in the archive again with
“restore”. See chapter 9.8 “Data backup” and appendix
A 6: “Data backup with “dump” and “restore””.
portmap,
rpcbind
Either “portmap” or “rpcbind” are needed by the Desktop
Server.
3 Introduction
25
3.4 Network hardware
3.4
Network hardware
There are several different ways of connecting workstations
and printers together to build a network. If you want to
build e.g. an Ethernet or FDDI network you may have to install appropriate interface cards in some or all of the workstations and servers.
AppleTalk
AppleTalk is a generic name used by Apple for all types of
Apple-compliant network connections. EtherTalk is the
name Apple gives to the AppleTalk protocol when it is used
on an Ethernet network. TokenTalk is the name Apple
gives to the AppleTalk protocol when it is used on an IBM
Token Ring network. AppleTalk is not “compatible” with
TCP/IP, but can co-exist with TCP/IP (and other network
protocols) on the same network cable without mutual interference. Under EtherShare, the same host network card is
often used for TCP/IP and AppleTalk simultaneously.
AppleShare IP
AppleShare IP stands for AFP over a TCP/IP connection.
Ethernet
Ethernet is a hardware and network protocol standard
which has found worldwide acceptance by a large number
of computer manufacturers. Ethernet (EtherTalk) interface
cards are available for most Macintosh computers, highend Apple printers, and all UNIX hosts. Many UNIX hosts
and some newer Macintosh computers have an Ethernet interface already built in.
Ethernet networks are capable of simultaneously supporting
several network protocols such as TCP/IP and AppleTalk.
3 Introduction
26
3.4 Network hardware
IBM
Token Ring
IBM Token Ring is a hardware and network protocol standard which is supported by many types of IBM computers
including IBM mainframes and the RS/6000 workstation.
Token Ring (TokenTalk) interface cards are available for
most Macintosh computers. A Token Ring card can be
plugged into the IBM RS/6000 workstation to allow it to be
used as an EtherShare host.
AppleTalk
Router
If you have two or more different network types in the same
building (e.g. Ethernet and FDDI) you may already have installed an AppleTalk router box to interconnect them. Alternatively, you may be using a software router (e.g. the
AppleTalk Internet Router), which operates in the background in one of the Macintosh workstations.
EtherShare has automatic built-in routing functions.
Whereas the EtherShare routing system can co-exist quite
happily with other routers in the network, it might be worthwhile re-arranging your network to route with EtherShare
instead, since this will give you significantly better performance than software routers.
3 Introduction
27
3.5 Network topology
3.5
Network topology
The various junctions, routers, bridges and devices in the
network are called nodes, and the way that they are physically connected together is called the topology of the network. On the one hand, the topology is dependent on usage
requirements (the required position of the workstations
within an office building). On the other hand, it is also necessary to take account of physical limitations imposed by
the chosen hardware (e.g. maximum cable lengths) and by
network standards.
Ethernet is logically characterized by a linear bus topology.
However, nowadays the 10Base-T Ethernet and 100Base-T
Ethernet – also called Fast Ethernet – have, from the physical point of view, a star-shaped topology. This means that
all workstations and printers etc. connected to the network
are attached to a hub in the logical center of the “star”. Token Ring is, physically seen, also star system, with active
hubs (“amplifiers”) at the center of each star. The “ring” is
only virtual – the “token” packet is passed in a pre-defined
sequence from one workstation to the next.
Network
cabling
When installing the network cable, it is important to make
sure that it is not installed with sharp bends or under tension. It should be laid in such a way that it cannot be damaged, and it should be routed as far away as possible from
powerful electrical fields. Please observe the exact specifications of the hardware manufacturer. The manufacturer’s
documentation contains all required information on admissible cable lengths, types of connectors to be used and other
points to be noted.
3 Introduction
28
Zones,
Phase II
3.5 Network topology
The AppleTalk protocol allows a number of physically separated networks to be linked together. The separate networks can use either the same or different hardware
standards. The connection between two networks is implemented with so-called routers. The special software that
runs in routers is called router software.
Each separate network is assigned a unique network number. A zone is a group of one or more logical networks with
the same symbolic (logical) name. A device in the network
is a member of a particular zone. However, a router between two networks (e.g. between FDDI and EtherTalk) is
a member of at least two logical networks. Furthermore, in
some cases two logical networks can co-exist on the same
hardware cable (provided, of course, that they use the same
hardware standard).
Under AppleTalk Phase II – in contrast to the outdated
AppleTalk Phase I – one cable can support several logical
networks, and a zone can contain more than one network,
provided that the set of network numbers constitutes a continuous range (e.g. 101-108). Furthermore, several zones
can co-exist on the same cable. There is a limit of 254 nodes
per sub-network (section), but it is possible to have a larger
number of devices per network. This became necessary
when very large Ethernet networks started to appear.
3 Introduction
3.6 New features of program version 2.6
3.6
29
New features of program version
2.6
Note that some new features were not included in the first
release of EtherShare 2.6, but have been added by means of
an update. Updates are published on our Web server
www.helios.de and on our distribution CD-ROMs. They are
released to make fixes or new features available.
New MachID
The MachID is now a 8-2 digit hexadecimal string with the
last two digits representing the make and model of your
host computer. The MachID is required to request the software activation key.
Base product
for powerful
extensions
EtherShare 2.6 is the base software for our powerful extensions EtherShare OPI 2.1, PDF Handshake, and Print Preview. Note that EtherShare 2.6 does not support our old
EtherShare OPI 1.2.
New Macintosh Installer
The EtherShare Macintosh applications for client computers – e.g. EtherShare Admin and HELIOS Mail – can now
be installed more easily, using the new “EtherShare Client
Installer”.
IP access
support
EtherShare considerably speeds up with AppleShare IP accelerated clients. EtherShare 2.6 supports AppleShare IP.
AFP servers were traditionally only available in local area
networks. The new AFP over IP transport allows connections to the AFP server from anywhere in the Internet. To
protect your site, you might want to create an IP access list
to restrict access to your server. You can create such a list
on your UNIX server, but it is much easier to use the EtherShare Admin program instead. It offers all options that are
required for a standard access control.
3 Introduction
30
3.6 New features of program version 2.6
“Fast” Finder
copy
EtherShare 2.6 contains a “Fast” Finder copy as available in
AppleShare Workstation 3.6. This Finder is able to create
and handle large data packages and thus is much faster than
previous Finder copies.
Improved
“Find File by
Name”
You may now search files by name on the server within a
reasonable period of time, namely within a few seconds.
With former software versions “Find File by Name” sometimes took a few minutes or even longer.
File locking
File locking has been improved for AFP volumes. For details, please refer to the explanations File and record locking
in chapter 9.3 “Directory and file formats”.
Client
messages
With EtherShare 2.6 you can send short “AFP” messages to
any connected client provided that EtherShare is running.
These messages can be sent from the UNIX server using the
UNIX “afpmsg” program, or from a Macintosh client using
the EtherShare Admin program.
Enhanced
“netconf”
program
The new “netconf” program has been improved considerably as far as the automation of processes is concerned. The
program also comes with an enhanced user interface.
New “vpoll”
utility
Our new “vpoll” UNIX program follows the former “poll”
program. The program serves to list and check network devices and entities. “vpoll” is an interactive program. It behaves similar to the Apple program “InterPoll”.
EtherShare
Admin via
TCP/IP
The new EtherShare 2.6 supports administration over
AppleTalk and TCP/IP. This allows to manage multiple
servers remotely via TCP/IP connection, and additionally
supports concurrent TCP/IP and AppleTalk connections.
3 Introduction
3.6 New features of program version 2.6
31
New Admin
user interface
The appearance of the Admin user interface has changed.
We have built icons that characterize the different items in
the Lists windows.
New Volume
settings
We have added two checkboxes to the Volumes dialog (see
chapter 5.8 “Volumes list”):
• the Invisible option
• and the Unicode/UTF8 option with the Charset pulldown menu
Easy PPD file
administration
We have implemented two new items in the Admin’s
Printer menu. They allow to choose the desired PPD file
for each printer queue, and to display the contents of the
PPD file that is currently selected.
Convenient
hold and error
queues
You can define hold and/or error queues with the new Admin and automatically direct print jobs into one of these
queues after they have been processed. The jobs are stored
in the hold or error queue for a given period of time and can
easily be restarted without the need to open the original application again.
Load
balancing
With EtherShare 2.6, you can set up a group of printers for
load balancing that is for shifting print jobs to a second or
third printer in a group whenever the other printers are busy
with a huge job.
Printing to
disk
With the new Print To Disk connection you can induce the
print server to print to a file.
New printer
administration groups
There are now two different printer administration groups,
namely “PrnAdm” and “QueueAdm”. One group is only
allowed to manipulate print jobs, the other one (the
“QueueAdm” group) is allowed to change the configuration
of printer queues.
3 Introduction
32
3.6 New features of program version 2.6
Enhanced log
files
The organization of log files has changed. They are now arranged by date and deleted automatically after seven days.
Furthermore, EtherShare 2.6 log files contain extended information. Printer log files e.g. state the total number of
bytes printed and indicate whether you have printed composite or separations.
Extended
information
about versions
and
configuration
The Versions window provides several information about
the program versions of the various Macintosh and UNIX
programs that are installed on your system. With EtherShare 2.6 this window additionally contains information
about your EtherShare, interface, and syslog configuration.
New features
for HELIOS
Mail
The new features are:
❍ New user interface with icons that characterize the spe-
cific items (e.g. large mail or unread mail)
❍ More preferences available, new user interface of the
Preferences...
dialog
❍ Different reply options (e.g. Reply including Letter)
❍ Wrap and Find... options in the Edit menu
❍ Possibility of sorting incoming mails by type, date,
name of sender, or subject (you just have to click on the
respective headline, e.g. From or Date)
❍ Possibility of creating templates (using File> New>
New Template)
❍ Save as Signature option
❍ Vacation option
❍ POP3 Server
3 Introduction
3.6 New features of program version 2.6
New features
for HELIOS
Terminal
33
The new features are e.g.:
❍ Open on Key Press option
❍ Close Window on Connection Close option
New
Time Server
With the Time Server you can make sure that the time on
your Macintosh clients is always synchronized to the time
on the server you have chosen.
New LanTest
version
The EtherShare 2.6 software package contains the HELIOS
LanTest version 2.5. This LanTest software is able to measure transfer rates during printing and lets you switch between two different file sizes, namely 3 MB (recommended
for testing standard Ethernet networks) and 30 MB (recommended for testing FastEthernet or FDDI networks).
Desktop
utilities
The HELIOS Desktop utilities allow to manipulate Macintosh files under Unix in a way that Macintosh resource information are left intact. The main UNIX commands for
handling files incl. “rm”, “mv”, “cp”, “ls”, “mkdir”,
“touch”, “chmod”, “chown”, and “chgrp” are enhanced by
these utilities. Thus, the utilities will turn out to be a helpful
tool for system integrators, experienced EtherShare users,
and developers. See appendix A 9: “The Desktop utilities”
for more details.
3 Introduction
34
4 Installation
35
4
Installation
4 Installation
36
4.1 System requirements
4.1
System requirements
The following list gives details about the hardware and software you need for successfully working with EtherShare 2.6
as released on HELIOS CD 015.
Network
❍ Ethernet, Fast Ethernet, Token Ring, or FDDI (depen-
dent on the system platform)
Server
computer
❍ One of the following UNIX systems:
•
•
•
•
•
•
•
•
SunSPARC Solaris 2.x (SunOS 5.5.1 to 5.7)
IBM RS/6000 AIX 4.1.5 to 4.3
HP-UX 11.0
Silicon Graphics Irix 5.3 & 6.5
DG AViiON 5.4.11 Intel
Digital Alpha UNIX 3.2d & 4
Linux for Intel
Mac OS X Server
❍ CD-ROM drive (or possibility of using a tape instead)
❍ 6 MB in the “/usr” file system, in addition to the indi-
vidual disk storage requirements of each of the users
(This value is valid for pure EtherShare. It becomes
considerably higher if you install any add-ons such as
EtherShare OPI or PDF Handshake.)
❍ about 1 MB RAM per active user
❍ about 1 MB RAM per printer queue that receives a job
❍ about 1 MB RAM per print process
❍ at least 64 MB RAM on the server
❍ at least one supported network adapter installed and ac-
tivated
❍ RPC (UNIX) and TCP/IP must be installed and running
4 Installation
37
4.1 System requirements
Note:
Network client
For installing EtherShare, you have to be able to log in
as “root” on your host.
❍ Recommended: computer running Mac OS version 7.5
or higher
• alternatively: UNIX workstation or DOS/Windows
workstation (with PCShare running on the server together with EtherShare 2.6)
Printer
❍ PostScript compatible printer
• alternatively: Apple ImageWriter II or Apple ImageWriter LQ
❍ Network printers are usually connected to the network
via Ethernet (EtherTalk)
The Print Server also supports “TCP/IP streams”,
“Remote LPR”, “Shared Memory”, and “Print To Disk”
connections. And – it also allows PostScript printers to
be connected to the UNIX host via a serial port on the
File Server. However, you may get problems with applications that send images as binary bitmap data, since serially connected PostScript printers interpret certain
binary codes as control signals. (Please refer to chapter
11.6 “Configuring printers manually” for more information.) Accordingly, we recommend Ethernet, because it is transparent to 8-bit data and much faster than
a serial connection – which is an important factor for
images. See chapter 11 “The Print Server” for more information.
4 Installation
38
4.2 General remarks
4.2
General remarks
About this
chapter
This chapter describes the steps that are indispensable for a
standard installation, and gives short explanations if necessary. Please remember that all activities you have to perform are marked by an “instruction” arrow in the left
margin. For a quick installation, you may proceed directly
from one instruction to the other and skip the explanations
in between.
The disk we
provide
Our EtherShare 2.6 software is delivered on an ISO-9660
CD-ROM. For convenience, the CD-ROM also includes a
script which allows you to copy each of the products to a
standard installation tape. The procedure is described in
chapter 4.4 below.
The
installation
program(s)
The installation is executed by two separated programs.
The first program (“install.sh”) must be started from the
CD-ROM. It lets you select the product you want to install
and copies all related files and the product specific installation program to the local disk of your UNIX computer.
Then, the product specific installation program (here:
“install”) is started automatically by the “install.sh” program and guides you through the installation procedure. If
required, “install” can be started again at any time from the
local disk.
Updates
HELIOS issues EtherShare updates every now and then to
enhance the product. These updates are distributed via the
HELIOS Web server www.helios.de, and they are included
on every HELIOS CD-ROM. The installation procedure for
software updates is described in chapter 4.8 “Installing updates using the HELIOS update installer”.
4 Installation
39
4.3 Preparing the installation
4.3
Preparing the installation
4.3.1
Have your activation key at hand?
You cannot start the EtherShare software without a software activation key (kind of password). The key has to be
entered during the installation procedure on your host computer. In case you have no activation key at hand, please
follow the instructions given in paragraphs License information and What you have to do in the chapter “Welcome to
EtherShare 2.6” at the beginning of this manual.
Note:
If you do not enter any Activation Key the HELIOS
product you have installed will run in a 3 hour demo
mode only.
Under certain conditions, HELIOS issues so-called demo
licenses. If you are entitled to get a demo license, you will
receive an activation key for demonstration purposes that
expires after a given period of time.
Important:
4.3.2
The old EtherShare 2.2 activation key will not activate
program version 2.6!
Preparing the UNIX host
The UNIX host must be provided with a fully installed and
fully configured operating system. You should have the
rights to boot the host yourself, in case a reboot is necessary
during installation. You must also be able to log in as the
4 Installation
40
4.3 Preparing the installation
superuser (“root”), in order to allow the installation program to create subdirectories and make the required system
modifications.
Since it may be necessary to reconfigure the operating system, no other users should be logged-in during the installation.
Important:
Before starting the installation, you should create a
backup copy of the system disk of your host computer.
If you have a network without routers you can use the
EtherShare “Automatic configuration” option for network
configuration. This also applies to networks with different
zones and an existing AppleTalk router. For more information and manual EtherShare network configuration, see appendices A 3.3 “Network automatic configuration option”
and A 3.5 “Manual network configuration”.
The host’s “/etc/hosts” file must contain the following
loopback entry in addition to the host’s own entry (and optional entries for other hosts):
127.0.0.1
localhost
EtherShare usually cannot co-exist on the same host with
AppleTalk software, such as file servers, from other manufacturers (with the exception of Mac OS X Server and
Linux). You must uninstall all other AppleTalk software on
the host before installing EtherShare, and stop all related
host processes.
4 Installation
4.3 Preparing the installation
41
Depending on your hardware which affects the installation
procedure the C compiler and the linkable operating system
may need to be installed.
Printers may need to be configured. Depending on the
printer, this is done for example with DIP switches, front
panel settings, or with Apple’s “LaserWriter Utilities” program. With some printers, it is first necessary to unplug the
serial interface cable before the printer’s AppleTalk interface will operate (see the printer’s documentation). For serial printers, please also refer to chapter 11.6 “Configuring
printers manually”.
Notes about
installing
other HELIOS
products
If you want to install additional HELIOS products, e.g.
PCShare or EtherShare OPI, we recommend to install the
programs on the server in a fixed order, namely the order
that is suggested by the installation menu on your current
product CD-ROM. The following order is valid for the
HELIOS products as delivered on CD-ROM 015:
❍ install EtherShare 2.6 first
❍ install PCShare 3.0 second
❍ install EtherShare OPI 2.1 and/or PDF Handshake third
4.3.3
Driver (AppleTalk)
EtherShare’s AppleTalk modules, which form the backbone of the EtherShare system, are either contained in a
UNIX loadable module, which is designed to be added to
the operating system during runtime, or in a driver which is
built into the UNIX kernel during EtherShare installation.
Kernel modifications require a system reboot. The behavior
4 Installation
42
4.3 Preparing the installation
depends on the type of server: DG/UX e.g. does not support
loadable modules. On some architectures dynamic loading
is supported, whereas unloading requires a reboot.
4.3.4
Preparing Macintosh workstations
If a Macintosh computer is to be connected via Ethernet or
FDDI, it may need to have an appropriate network card installed. Please install the network card according to the
manufacturer’s instructions before installing EtherShare.
No changes are required to the Apple system software in order to use EtherShare. However, please make sure that each
workstation has the option “AppleShare” in the Chooser.
This option appears automatically if the “AppleShare” file
is present in the “Extensions” subfolder of the System Folder when booting the Macintosh. If necessary, use the system
program “Installer” to install the AppleShare client software. AppleShare is responsible for making the logical connection to all network devices of type “AFPServer”. It allows users to log on to the EtherShare File Server and select
file server volumes. Please refer to the Apple documentation for more details about AppleShare. Please note that
Mac OS 8 contains the AppleShare client software by default. Installation is not required.
If you are using an Apple LaserWriter, Apple LaserWriter
Plus or a compatible PostScript printer, the “LaserWriter”
printer driver is required in the “Extensions” subfolder of
the Macintosh’s System Folder. “LaserWriter” is responsible for making the logical connection to all network devices
of type “LaserWriter”. Note that the Apple Laser Writer
GX driver is not compatible to EtherShare and has to be uninstalled.
4 Installation
4.3 Preparing the installation
43
If you are using an ImageWriter II or ImageWriter LQ, appropriate printer drivers (such as “AppleTalk ImageWriter”
for the ImageWriter II printer) must be present in the “Extensions” subfolder of the System Folder. “AppleTalk ImageWriter” is responsible for making the logical connection
to all network devices of type “ImageWriter”.
“AppleShare” and printer drivers such as “LaserWriter” are
accessed through the Chooser to allow you to select network zones, file servers and printers. On some systems, the
AppleTalk Zones: scroll box is only visible if you have any
zones. Refer to the Apple Macintosh user manual for more
details.
The AppleShare and AppleTalk files, and printer drivers
such as “LaserWriter”, are included in the standard Apple
system software. If the AppleTalk connection is being
made via Ethernet, FDDI, or Token Ring, the EtherTalk,
FDDITalk, or TokenTalk file must also be available.
EtherShare is also provided with several Macintosh utility
programs. One of these programs, Helios Mail, uses the
UNIX “mail” program, which must be installed and working for Helios Mail to work. To test this, make a UNIX login and try to send a mail between two UNIX users. If
necessary, refer to your UNIX documentation for details.
4.3.5
Preparing DOS/Windows workstations
DOS/Windows PCs can also be connected to EtherShare,
provided that appropriate software is installed on the server.
A very convenient and fast way of connecting IBM-PCcompatible computers to your network is to use HELIOS
PCShare 2.5 or higher which smoothly co-operates with
EtherShare 2.6.
4 Installation
44
4.3 Preparing the installation
4.3.6
Preparing upgrade installations
Stop PCShare
Please note that installing EtherShare 2.6 will require a stop
of all EtherShare services, that is file access as well as
spooling and printing. On some architectures even a reboot
of the UNIX server is required. If EtherShare volumes are
shared with PCShare 2.x on the same server, make sure to
stop PCShare prior to the EtherShare 2.6 installation, otherwise the PCShare 2.x clients will encounter loss of write access to the shared volumes. Only after successful
installation of EtherShare 2.6, PCShare server processes
can be started again.
Updating to 2.6
Before you install the new EtherShare 2.6 version you
should make sure that all Macintosh users are logged-out
from the EtherShare server and that there are no active print
jobs. The installation script will stop all EtherShare services
in order to install the new software version successfully.
You should keep all existing files in your old EtherShare directory. The EtherShare 2.2 configuration files in
“$ESDIR/conf” are re-used by EtherShare 2.6 if the new
version is installed on top of the old version in the same directory.
The EtherShare 2.6 distribution differs slightly from the
earlier EtherShare 2.2 version; some data and program files
became obsolete and will be moved to a directory
“$ESDIR/obsolete” after a successful installation.
If you have changed any of the UNIX script files in the
“$ESDIR” directory for your old EtherShare installation,
you should make a copy of these files to integrate your
changes into the new version.
4 Installation
4.3 Preparing the installation
45
In case you implemented your own scripts or adjusted some
of EtherShare’s, please verify these scripts immediately in
order to assure proper operation of your scripts.
Updating from
v. 1.x to 2.6
Due to major differences between EtherShare 1.x and
EtherShare 2.6, EtherShare 1.x has to be removed prior to
the EtherShare 2.6 installation. Therefore, you must run the
“$ESDIR/stop-atalk” script to stop the EtherShare processes. You then need to run the “$ESDIR/etc/uninstall” script
to uninstall any kernel extensions which may have been applied by an EtherShare installation script.
After you have written down the EtherShare 1.x configuration you must remove the complete contents of the EtherShare 1.x directory before you begin the installation of
EtherShare 2.6. After the installation you can setup the new
configuration according to your notes from the EtherShare
1.x configuration. After successful installation, a reboot of
the UNIX server is required.
4 Installation
46
4.4 The UNIX installation procedure
4.4
The UNIX installation procedure
At first, we will describe the installation from CD-ROM.
Instructions on how to install EtherShare from a tape are
given at the end of this chapter.
During the installation, you are guided by menu-driven programs. Most questions in these programs have a default answer which is given in brackets. You can accept this default
by simply pressing ENTER or type an alternative answer.
If there is nothing within the brackets, the system will expect an entry from you.
Important:
Please note that if you quit the installation before having finished the complete procedure, you will have to
start with step 1 again when you install EtherShare
anew. Do not skip any steps you think you have already taken.
Important:
The following installation example describes the steps
that are to be taken on an IBM RS/6000 computer under AIX 4. Slight deviations may occur — depending
on your system type and configuration.
➢
To start the installation, log in as “root” on your host.
➢
For upgraders only: Please follow the instructions given
in chapter 4.3.6 “Preparing upgrade installations” before
proceeding.
➢
Then place the CD-ROM in the CD drive of your UNIX
computer and enter the mount and install commands which
may be different for different UNIX systems. The correct
4 Installation
4.4 The UNIX installation procedure
47
commands for your specific computer are stated in the
booklet we enclose to our CD-ROM.
Example for an IBM/RS 6000 computer under AIX 4:
mount -r -v cdrfs /dev/cd0 /cdrom
cd /cdrom
sh install.sh
As soon as you have entered the last command, the “Networking Products Installer CD-ROM” menu will appear
(see figure 1).
Networking Products Installer CD-ROM
------------------------------------The machine ID of this computer is "00205420-63"
1)
2)
3)
4)
5)
6)
7)
8)
EtherShare
PCShare
EtherShare OPI
PDF Handshake
Print Preview
Install Updates
Display readme.txt
Quit
* Your choice [] 1
Fig. 1:
The “Networking Products Installer CD-ROM” menu
➢
Select EtherShare by entering the number of the respective
menu item (here: 1) and press ENTER.
➢
Read the information about update installations that is displayed now, and type y (for “yes”) to continue.
4 Installation
48
4.4 The UNIX installation procedure
➢
Select the version you want to install. (This prompt is
skipped automatically, if there is only one program version
available on that CD-ROM.)
Available product versions:
...
* Select a version? []
The program will then display a list of the currently available disk space. This list can help you find an adequate directory for EtherShare.
➢
Select the directory you want to install EtherShare in (the
default directory is /usr/local/es) and then start the installation procedure.
* Select a directory to install the product in?
[/usr/local/es]
* Ok to start installation? [y]
The installation program (“install.sh”) now stops EtherShare, in case an older version is running on the server.
Then, the program removes old updates – if there are any –
and copies the EtherShare program files to the directory
you have selected.
➢
At this stage, you can induce the installation program to automatically start the HELIOS update installer and install all
updates that are available on the CD-ROM. If there are no
updates, this step is skipped. Otherwise, you will see a
prompt similar to the following:
4 Installation
4.4 The UNIX installation procedure
49
The following updates are available for the newly
installed product:
u0101: (subject line)
u0104: (subject line)
.
.
u0125: (subject line)
u0128: (subject line)
* Do you want to install these ? [y]
If you decide to install the updates now (which is convenient and thus recommended), the update installer will start
and perform the installation automatically. Else, you can
start the update installer manually at a later date and install
the updates you want to use.
After update installation, the script will call the product
specific installation program for EtherShare.
Calling product installation script
/usr/local/es/install
EtherShare Installation Menu
------------------------------------The machine ID of this computer is "00205420-63"
1)
2)
3)
4)
5)
6)
7)
Install programs and configuration files
Install and configure AppleTalk kernel modules
Enter activation key to license HELIOS programs
Create a demo user
Configure AppleTalk network numbers
Display README file
Quit
* Your choice? [1] 1
Fig. 2:
The “EtherShare Installation Menu”
4 Installation
50
4.4 The UNIX installation procedure
The product specific installation menu is shown in figure 2.
Items 1 to 5 of this menu deal with the installation
and Display README file should be selected if you want
to check the latest information which has not done it into
the manual yet.
The EtherShare
installation
menu
Important:
➢
Items 1–3 must always be executed, even if you are
upgrading from an earlier version.
Select Install programs and configuration
from the “EtherShare Installation Menu”.
files
The “install” program automatically creates a suitable shell
script to start the EtherShare server programs. The script includes a command to set the UNIX environment variable
“$ESDIR” to the EtherShare home directory (by default
/usr/local/es).
Setting up configuration files ...
Changing ESDIR variable in various shell scripts ...
Performing symlinks from files in /usr/local/es/lib to
/usr/lib ...
Arranging for EtherShare to start automatically after the
next reboot ...
To install a shared volume, we recommend that you choose
the local partition from the following list with the
biggest available free space. Then use that partition's
mount point (the rightmost column) as the prefix to the
ethershare directory to be created. Please make sure that
volumes do not overlap, e.g. do not make /home a volume
if you want to access your home directory under
/home/username.
Filesystem ...
* Directory for shared volume ? [/usr/ethershare]
Creating EtherShare configuration file
/usr/local/es/conf/atalk.conf.
4 Installation
4.4 The UNIX installation procedure
51
The crontab entry to periodically clean up EtherShare log
files does not exist. This entry will make sure that the
server.acct and printer.acct files will not grow without
bounds.
* Ok to create the crontab entry ? [y]
Please note that Ok to create the crontab entry ? may fail
on hosts on which “root” privileges have been manipulated.
In case of failure, please refer to the crontab manual pages.
➢
Select item Install and configure AppleTalk kernel
modules from the “EtherShare Installation Menu”.
EtherShare Installation Menu
------------------------------------The machine ID of this computer is "00205420-63"
1)
2)
3)
4)
5)
6)
7)
Install programs and configuration files
Install and configure AppleTalk kernel modules
Enter activation key to license HELIOS programs
Create a demo user
Configure AppleTalk network numbers
Display README file
Quit
* Your choice? [2] 2
No kernel generation necessary on this system.
Important:
You must select item [2], even though a kernel rebuild
may not be required on all platforms. The script will
verify this and will behave accordingly.
4 Installation
52
4.4 The UNIX installation procedure
The script will have to perform configuration and administrative tasks for a successful installation. So this part of the
installation may be different for different platforms.
In case the installation program installs a new kernel it will
inform you about the steps it will take. The program will finally come up with the prompt:
* Ok to install new kernel ? [y]
If your answer to this question is n (for “no”), you will have
to copy the kernel manually to the directory “/”.
Please note that after a kernel rebuild you will have to reboot the system after installation. The installation script
will inform you about this as well.
➢
Now, you have to license your HELIOS product.
Select Enter activation key to license Helios
programs from the “EtherShare Installation Menu”.
EtherShare Installation Menu
------------------------------------The machine ID of this computer is "00205420-63"
1)
2)
3)
4)
5)
6)
7)
Install programs and configuration files
Install and configure AppleTalk kernel modules
Enter activation key to license HELIOS programs
Create a demo user
Configure AppleTalk network numbers
Display README file
Quit
* Your choice? [3] 3
4 Installation
4.4 The UNIX installation procedure
53
The installation program displays a brief explanation about
the HELIOS licensing scheme. This information is also included in chapter “Welcome to EtherShare 2.6” at the beginning of this manual. After providing the license
information the installation program will prompt:
* Press return to continue ? []
➢
Press RETURN and then select item [1] or [2] – depending
on whether you want to install a new base license or expand
an existing license – from the “EtherShare License Menu”
that is shown below.
EtherShare License Menu
------------------------------------The machine ID of this computer is "00205420-63"
1)
2)
3)
4)
5)
Enter a EtherShare base license
Enter an user expansion license
Display licenses
Delete a license
Return to main menu
* Your choice? [1] 1
➢
Enter your 8-digit software serial number.
* Software serial number (8 digits, q to quit)? []
54080022
➢
Enter an expiration date if you have a demo license.
If you have a full license, leave the next field blank.
* Expiration date (eg.1-Oct-1991,q to quit)? []
4 Installation
54
4.4 The UNIX installation procedure
➢
Enter the number of users allowed to work with this license.
* Number of users (units, one or more decimal digits, q
to quit) ? [20]
➢
Enter the checksum that is stated on your “Activation Key
Reply” form.
* Checksum (eg. abcd-defg-hjkl-mnop, q to quit) ? []
qwer-asdf-yxcv-abcd
License is valid and has been entered into the license
database.
Important:
If you get any error messages instead of the License
is valid ... prompt, you may check your entry
again and repeat the licensing procedure if necessary.
Make sure you have used the correct key reply form
values.
When all procedures to enter the Activation Key fail, direct to your HELIOS distributor, or – if you received the
key from HELIOS directly – to HELIOS.
➢
You have successfully licensed your EtherShare copy and
may now choose from the “EtherShare License Menu” either item [3] to display all license information again, or
item [5] to return to the “EtherShare Installation Menu”.
4 Installation
4.4 The UNIX installation procedure
➢
55
Proceed to item [4] in the “EtherShare Installation Menu”
and create a demo user to allow Macintosh users to log on
to the server without further configuration.
EtherShare Installation Menu
------------------------------------The machine ID of this computer is "00205420-63"
1)
2)
3)
4)
5)
6)
7)
Install programs and configuration files
Install and configure AppleTalk kernel modules
Enter activation key to license HELIOS programs
Create a demo user
Configure AppleTalk network numbers
Display README file
Quit
* Your choice? [4] 4
* Ok to add a demo user named “macuser” and a demo group
“macusers” ? [y]
➢
Select a home directory for the demo user as shown below.
Please select the home directory for the demo user.
* Home directory for user macuser ? [/data/macuser]
Created group “macusers” for Macintosh users.
The test user “macuser” has now been created. This user
has no password at present. This user should be deleted
as soon as you have created real users, for example by
using the EtherShare Admin program.
➢
When you see the “EtherShare Installation Menu” again,
choose [5] to configure the network connections by setting
up the “atalkd” entry in the main EtherShare configuration
file “atalk.conf”.
4 Installation
56
4.4 The UNIX installation procedure
If your EtherShare host has a single network interface only,
you will get the following message when you select
Configure AppleTalk network numbers :
This system has only one network interface installed, thus
there is no need to configure any network numbers.
Else, if your host has more than one network interface, the
AppleTalk Network Setup Program “netconf” will be started automatically. It will, by default, show “Automatic configuration” for every network interface. You can – at this
stage – press ENTER and then quit “netconf”. In some cases, however, it will be necessary to configure your network
manually. The usage of the “netconf” program is described
later in this manual: See A 3.3 “Network automatic configuration option” for a technical explanation of automatic
configuration, and the other paragraphs of the appendix for
details about manual configuration of network interfaces
and zones.
➢
Unless you opt for manual network configuration, the
EtherShare base system is now fully installed and is ready
for testing. Press ENTER to reach the “EtherShare Installation Menu” again and choose [6] to check the information
given in the README file and then item [7] to quit the
“install” program:
* Your choice ? [7]
The EtherShare configuration is now finished. If you want
to add printers, users, groups or volumes, read the book
first and use vi, or use our EtherShare Admin application
from one of the Macs. The latter is much easier, even if
you are experienced with vi (the famous UNIX editor).
➢
For No kernel generation necessary only: If loadable
modules are supported and enabled, you will not be asked
4 Installation
4.4 The UNIX installation procedure
57
to reboot. Instead, the installation program will start EtherShare automatically and you will see the “Networking
Products Installer CD-ROM” menu again. Select Quit to
finish the installation procedure on the host and go on with
the verification and client installation (chapters 4.5, 4.6).
Networking Products Installer CD-ROM
------------------------------------The machine ID of this computer is "00205420-63"
1)
2)
3)
4)
5)
6)
7)
8)
EtherShare
PCShare
EtherShare OPI
PDF Handshake
Print Preview
Install Updates
Display readme.txt
Quit
* Your choice [] 8
➢
For systems with kernel rebuild only: If a kernel rebuild
was necessary on your host you have to reboot now.
The EtherShare configuration is now finished.
Because we have now built a new kernel, it is time to halt
the system and reboot with the modified kernel.
If you want to add printers, users, groups or volumes,
read the book first and use vi, or use our EtherShare Admin application from one of the Macs. The latter is much
easier, even if you are experienced with vi (the famous
Unix editor).
* Do you want to reboot now ? [y] y
After rebooting, EtherShare will be started automatically.
4 Installation
58
4.4 The UNIX installation procedure
Note:
Installation
from tape
If it was necessary for the installation process to modify your UNIX kernel, the old kernel version is preserved as a copy with the same file name but a
different extension (e.g. “.noatalk”). The dialog of the
“install” program will tell you whether this was necessary or not, and which file name was chosen for the old
copy.
The files MKTAPE.SH and README.TXT on our CDROM give a full description of how to make an EtherShare
tape. When installing EtherShare from tape you have to be
logged-in as “root” and enter the following commands:
cd /usr/local
mkdir es
cd es
umask 0
insert tape here
tar xvf /dev/<device>
where <device> is:
rmt0
for IBM RS/6000 computers
rmt0h
for Digital computers
tape
for SGI computers
for System V.4 computers, e.g. (Sun computers under Solaris 2.x)
rmt/0
4 Installation
4.4 The UNIX installation procedure
59
Please do not forget the command “umask 0”. It influences
the permissions which are set for the EtherShare program
modules and directories. Incorrect permissions can cause
serious malfunction of the EtherShare system.
Finally, you have to start the product specific installation
program manually – using /usr/local/es/install – and
then follow the instructions given in paragraph The EtherShare installation menu above.
4 Installation
60
4.5 Verifying the UNIX installation
4.5
Changes
made by the
installation
Verifying the UNIX installation
All EtherShare programs are contained in the EtherShare
home directory “$ESDIR” specified during the installation
(default /usr/local/es), and in several sub-directories.
For example, “$ESDIR” contains EtherShare system and
utility programs, “$ESDIR/etc” contains sub-programs of
the “install” program and example configuration templates,
“$ESDIR/conf” contains EtherShare configuration files
and “$ESDIR/macapps” contains Macintosh programs for
use with EtherShare.
“$ESDIR/psfonts” and “$ESDIR/dicts” are for manually
installed printer fonts and PostScript “dicts”, respectively.
The former directory is initially empty and the latter contains several special “dict” files. The Print Server automatically captures more “dict” files there when you use
EtherShare.
Please see appendix A 2: “Files in the EtherShare directory” for more details about the files that make up EtherShare.
After installing printers, the EtherShare Admin adds new
entries to the UNIX file /etc/printcap.
In some cases, the “install” program needs to rebuild the
hosts’s kernel. A copy of the old kernel is retained (under
the name “vmunix.noatalk”) to allow you to boot if the new
kernel does not work successfully.
The “install” program also adds the following command to
the file “/etc/rc.local” or “/etc/inittab”:
if [ -f /usr/local/es/start-atalk ]; then
/usr/local/es/start-atalk
fi
4 Installation
61
4.5 Verifying the UNIX installation
This command is necessary to automatically start the EtherShare server programs when booting UNIX.
The “install” program automatically sets up the EtherShare
main configuration file (“atalk.conf”) with default values
for the parameters. The values can be changed if necessary
by using an editor such as vi, but we strongly recommend
that you do this with the EtherShare Admin program and
the network configuration option of the “install” program
instead.
Checking the
process list
➢
The first thing to do after starting EtherShare for the first
time is to check the process list with the ps command.
Enter the ps command (“ps -ef”, “ps -e”, or “ps ax” – depending on your UNIX system) to prompt a listing of all the
processes currently running on your server (the following
example shows a listing on Solaris 2.x).
helios$ ps -e
PID
TTY
0
?
1
?
2
?
3
?
333
console
.
.
6885
?
6890
?
9181
?
9209
?
9671
?
9704
?
9772
?
9782
?
9845ß
?
362
console
355
console
.
.
TIME
0:01
0:28
0:01
55:56
0:01
CMD
sched
init
pageout
fsflush
ksh
0:00
0:00
0:08
0:00
0:08
0:01
0:01
0:25
0:00
0:00
0:00
in.rlogin
atalkd
admsrv
afpsrv
mailsrv
termsrv
desksrv
timesrv
lpd
fbconsol
xinit
4 Installation
62
4.5 Verifying the UNIX installation
If one of the EtherShare processes is missing, something is
wrong. You should then inspect the system message file
which will contain an error message from the program in
question. The name and location of the system message file
is dependent on the operating system, it is e.g.:
for SunOS, AIX and DG/UX
/var/adm/messages
The File Server (“afpsrv”), Terminal Server (“termsrv”),
Administration Server (“admsrv”), and Mail Server
(“mailsrv”) each spawn an additional process for each user
login, so you may see these entries more than once if someone is already logged-in. The Print Server (“papsrv”)
spawns an additional process for each printer queue and
each print job. You should see only one Desktop Server
(“desksrv”) process. See also the discussion of the process
list in the description of the “swho” command in chapter 8.5
“AppleTalk stack utility programs”.
Checking the
RPC list
The EtherShare Desktop Server requires RPC (remote procedure call) to be configured on your host. First make sure
that the “portmap (UNIX)” or “rpcbind (UNIX)” process is
running. Then check all RPC registered processes with the
command rpcinfo -p. The following shows a typical RPC
list:
rpcinfo -p
program
100000
100000
100007
100007
100007
100007
100024
100024
100021
100021
100021
100021
vers
2 tcp
2 udp
2 tcp
2 udp
1 tcp
1 udp
1 udp
1 tcp
1 udp
3 udp
4 udp
2 tcp
proto
111
111
1027
1027
1027
1027
892
894
902
905
908
911
port
portmapper
portmapper
ypbind
ypbind
ypbind
ypbind
status
status
nlockmgr
nlockmgr
nlockmgr
nlockmgr
4 Installation
63
4.5 Verifying the UNIX installation
395572
395572
100005
100005
100005
100005
100005
100005
100003
100003
100026
150001
100017
100001
100001
100001
100002
100002
100012
100008
33554441
33554441
395572
395572
395572
395572
395572
395572
390113
390103
390109
390110
390103
390109
390110
390107
390107
390107
390107
300261
300619
300619
300430
300430
#
602 udp
602 tcp
1 udp
2 udp
3 udp
1 tcp
2 tcp
3 tcp
2 udp
3 udp
1 udp
1 udp
1 tcp
1 udp
2 udp
3 udp
1 udp
2 udp
1 udp
1 udp
1 tcp
1 udp
1 tcp
1 udp
2 tcp
2 udp
3 tcp
3 udp
1 tcp
2 tcp
2 tcp
1 tcp
2 udp
2 udp
1 udp
2 tcp
3 tcp
4 tcp
5 tcp
1 udp
1 tcp
1 udp
1 tcp
1 udp
837
839
624
624
624
628
628
628
2049
2049
1032
1033
1032
1034
1034
1034
1035
1035
1036
1037
898
900
904
907
912
915
918
920
7937
936
936
936
940
940
940
948
948
948
948
985
984
987
644
646
mountd
mountd
mountd
mountd
mountd
mountd
nfs
nfs
bootparam
pcnfsd
rexd
rstatd
rstatd
rstatd
rusersd
rusersd
sprayd
walld
desksrv
afpsrv
afpsrv
pcshare
pcshare
The EtherShare Desktop Server has the official allocated
program number 300261; the AFP Server has number
300619. You have to add suitable entries to “/etc/rpc” to
4 Installation
64
4.5 Verifying the UNIX installation
make sure that the strings “desksrv” and “afpsrv” are displayed alongside the “desksrv” and “afpsrv” processes as
shown above. Use the following command to check for example whether “desksrv” is running and responding:
rpcinfo -u localhost 300261
program 300261 version 1 ready and waiting
The next thing you should do is use the AppleTalk echo diagnosis program “$ESDIR/atechoping” to test the network
for services, and thus see if the EtherShare base system is
communicating with other AppleShare nodes. When you
run this program on the host, you should get one response
line for the host’s loopback channel and one for each Macintosh which is switched on and connected to the same network segment. If no Macintosh computers are connected
you should get a single response line for the host’s loopback channel.
atechoping
➢
When you enter the atechoping command, you will see
something like the following:
# cd /usr/local/es
# ./atechoping
got packet from 21.27, skt 4, type 4
got packet from 29.216, skt 4, type 4
got packet from 20.168, skt 4, type 4
got packet from 20.128, skt 4, type 4
got packet from 20.218, skt 4, type 4
got packet from 20.229, skt 4, type 4
got packet from 25.62, skt 4, type 4
got packet from 26.143, skt 4, type 4
got packet from 24.30, skt 4, type 4
got packet from 21.214, skt 4, type 4
got packet from 20.143, skt 4, type 4
got packet from 21.39, skt 4, type 4
4 Installation
65
4.5 Verifying the UNIX installation
got
got
got
got
got
got
got
got
got
#
packet
packet
packet
packet
packet
packet
packet
packet
packet
from
from
from
from
from
from
from
from
from
29.116, skt 4, type 4
20.230, skt 4, type 4
28.175, skt 4, type 4
25.174, skt 4, type 4
20.251, skt 4, type 4
27.54, skt 4, type 4
20.207, skt 4, type 4
20.249, skt 4, type 4
20.144, skt 4, type 4
Each line shows the net node, socket, and echo type.
You can also enter atechoping <nn>, where <nn> is the
network number, to echo test other networks. Other EtherShare hosts also return a one-line message.
The HELIOS
vpoll program
➢
Our UNIX application “vpoll” can be used to get a more detailed view of the available devices in the network. The program is comparable to the former Macintosh application
“Inter•Poll”. However, it is a very sophisticated program
that can be used on different occasions – not only for verifying the installation. “vpoll” is an interactive program that
lets you set several parameters before starting the network
check, and it lets you observe how fast the different devices
in your network respond to the network check.
After installation “vpoll” is available in the “$ESDIR” directory. To start the program, just enter:
cd /usr/local/es
./vpoll
Figure 3 shows the startup screen of the program with the
default settings.
Note that “vpoll” provides the information online, but also
allows to save the data in a file. Use Ctrl-W for that purpose. If you press CTRL-W, e.g. in the “Device-List” win-
4 Installation
66
4.5 Verifying the UNIX installation
dow, you will be queried for a “Logfile Name” where
current settings and lists should be saved as ASCII. Subsequent saves will be appended to the logfile. After finishing
and restarting “vpoll”, the first CTRL-W you enter will induce the program to query for a “Logfile Name” again.
Fig. 3:
User interface of the “vpoll” program
The following keys are relevant for using “vpoll”:
•
•
•
•
TAB key: navigate within a “vpoll” dialog
“+” and “-”: (un)select items from a list
ARROW keys: navigate within a list of items
ESC key: quit the current dialog
Whenever a user changes any parameters (as shown in figure 4), the new settings will be saved for this specific user.
You can use the Name and Type lines to limit the network
check to specific devices. The “=” is used as a wildcard.
4 Installation
4.5 Verifying the UNIX installation
67
Please note that the bottom line gives short descriptions of
the currently selected item (compare figure 4 again).
Fig. 4:
Setting new parameters for “vpoll”
In figure 5, we have set up a network check for all devices
in zone “HELIOS II”.
Fig. 5:
Settings for a network check that includes all devices
4 Installation
68
4.5 Verifying the UNIX installation
➢
To start the network search, proceed to the
ing the TAB key) and then press ENTER.
Ok
button (us-
You will get a device list like that shown in figure 6. All devices of the zone “HELIOS II” are listed – they are sorted
by name. The device list includes the network number
(Net), the node number (Node), the socket number (Sckt.)
and the Name, Type, and Zone of the respective device.
Usually, any combination of Net, Node and Sckt. should
be unique. It is possible, however, that a combination appears several times; in that case the zones are different.
Fig. 6:
➢
Device list provided by the “vpoll” program
You can scroll through the device list and press ENTER to
open the “Device Ping” dialog for a specific device.
In the “Device Ping” dialog you can – again – set individual
parameters for a device check, namely: the number of packets, the packet size, the poll interval and a value for timeout.
4 Installation
4.5 Verifying the UNIX installation
➢
69
The device check will start the moment you select the Ok
button in the “Device Ping” dialog (see figures 7 and 8).
Fig. 7:
Setting up the “Device Ping” dialog
Fig. 8:
Watching the ping statistics (device response)
4 Installation
70
4.5 Verifying the UNIX installation
You can stop and restart the ping statistics at any time; the
behavior of the respective button (the Stop button in figure
8) will change, depending on the status.
➢
The HELIOS
poll program
Use the Cancel button (or the ESC key) to close the current
dialog. The Cancel button in the “Network Search” dialog
(see figure 3) will quit the “vpoll” program.
The HELIOS “poll” program is older than “vpoll”, and in
contrast to the latter one, it is a command line utility for network checks. It can be executed automatically in the background, e.g. if you include the poll command into a batch
program. “poll” returns one message line for each AppleTalk service (entity) on any network, that can be found
within 1 second response time. This includes one response
line for the EtherShare servers “atalkd”, “afpsrv”, “papsrv”,
“admsrv”, “termsrv”, “timesrv” and “mailsrv” for each
EtherShare host that can be found and for each registration
(if the services are registered in several zones).
Each line shows the network number, node number, socket
number, object name, object type and zone name. The network number is the netno parameter in the main configuration file “atalk.conf”.
Please note that:
❍ “desksrv” does not appear in this list.
❍ “poll” can be specified with command line parameters
as follows:
poll “name:type@zone”
You can use “=” as a wildcard for “name”, “type”, and
“zone”.
4 Installation
4.5 Verifying the UNIX installation
71
❍ “poll” has a limited buffer – only 3 to 4 pages of infor-
mation can be displayed at a time – for large networks,
you may need to use wildcards to limit the range of services which are polled. For example:
poll “=:Laser=@*”
lists all services whose type starts with “Laser”. The “*”
represents “this zone”; the zone you are currently a
member of.
“poll” may display entities multiple times – depending on
the route an “echo” took; this is normal.
The following example shows the responses you may get
when using the “poll” program:
# cd /usr/local/es
# ./poll
20 168
2 690c0d3e
EtherShare
*
20 143 253 ans
AFPServer
*
20 143 238 printpreview-SpoolerLaserWriter
*
20 143 245 ans-PrintToDisk-SpoolerLaserWriter
20 143 246 ans-lw8500-spoolerLaserWriter
*
20 143 248 ans-color-spoolerLaserWriter
*
20 143 243 ans
MailServer
*
20 143
2 0025f98a
EtherShare
*
20 143 221 ans
TimeServer
*
20 143 221 ans
TimeServer
*
20 128
2 DEMO_002614cb
EtherShare
*
20 251
2 DEMO_00205420
EtherShare
*
41 142 251 HELIOS EtherShare PublicAFPServer
41 142 253 proxy
AdminServer
*
20 143 229 ans
UNIXTerminal
*
20 143 231 ans
AdminServer
*
20 196
2 6906eae9
EtherShare
*
20 241
2 807de1b8
EtherShare
*
20 145
2 807de1ad
EtherShare
*
20 211
2 2bbf260c
EtherShare
*
20 230
2 7758302e
EtherShare
*
20 144
2 726041aa
EtherShare
*
20 249
2 80024a74
EtherShare
*
20 250
2 56010ee6
EtherShare
*
20 229
2 2be5ffb7
EtherShare
*
20 141
2 0c027a2f
EtherShare
*
#
*
*
4 Installation
72
The zones
program
4.5 Verifying the UNIX installation
The “zones” program can be used to list the names of all
zones that can be found and to quickly find out which zone
is the current default zone. You should get the same zone
list as that shown in the Chooser of Macintosh computers
connected to the same network segment. If given an “-l” argument, only local zones are shown.
Since the “zones” program uses the EtherShare AppleTalk
protocol modules, which reference “atalk.conf” for configuration details, mistakes in the latter file will cause you to
see less zones than those shown on the Macintosh clients.
For example, if you get the zone name(s) wrong for a router, “zones” will not show any zones which exist on the other
side of the router.
Mistakes in “atalk.conf” will affect “vpoll”, “poll” and
“atechoping”, too, for the same reason.
In the following example, you see all zones and a “*” in
front of the current default zone “HELIOS I”:
# cd /usr/local/es
# ./zones
* HELIOS I
HELIOS II
HELIOS Support
HELIOS FDDI
HELIOS Tokenring
#
4 Installation
4.6 The client installation procedure
4.6
73
The client installation procedure
Several Macintosh applications were copied to the directory “$ESDIR/macapps” and its subdirectories when installing EtherShare. They are available to all Macintosh
computers on the network in the “EtherShare Applications”
volume and can be installed using the “EtherShare Client
Installer” which is described below.
➢
You should save your work and quit all applications before
using the installer because you will have to restart your
Macintosh after successful installation.
Fig. 9:
➢
Items on the “EtherShare Applications” volume
To install our Macintosh applications, mount the
“EtherShare Applications” volume and double-click the
“EtherShare Client Installer” (compare figure 9).
4 Installation
74
4.6 The client installation procedure
Fig. 10:
Installing the EtherShare Macintosh applications
With the Easy Install option (see figure 10) the installer
program copies the EtherShare Admin program, the terminal emulation (Helios Terminal), and the mail program
(Helios Mail) to the Apple folder (q) of your client computer. If older versions of these applications exist in the Apple
folder, they will be overwritten. The Helios Time Server
will be added to the Chooser. The result of Easy Install is
shown in figure 11 below.
If you use Custom Install (instead of Easy Install) you
can install two additional items, namely the OPI Tools
“touch” and “Tagger”. Both programs are only meant for
EtherShare OPI 2.1 users and thus are described in the
EtherShare OPI documentation.
4 Installation
4.6 The client installation procedure
Fig. 11:
75
The client Apple menu and the Time Server utility
In order to work properly, Helios Terminal and Helios Mail
both need to access the ADSP driver. Helios Terminal also
needs to access the Macintosh Communications Toolbox,
the communication tool “AppleTalk ADSP Tool”, and the
emulation tool “VT320 Tool”. The Helios Mail program requires the “Mail Notification Program” (“Helios Mail Init”).
All these drivers or tools are either available with the system
software or installed automatically by the “EtherShare Client Installer”:
Mac OS 7.5 and higher already includes the Macintosh
Communications Toolbox and the ADSP driver in the operating system. The “AppleTalk ADSP Tool”, the “VT320
Tool”, and the “Helios Mail Init” are copied automatically
from the “EtherShare Applications” volume to the “Extensions” subfolder of your local System Folder.
4 Installation
76
4.6 The client installation procedure
➢
You have to restart your Macintosh after successful installation.
➢
Repeat this procedure for each Macintosh that needs to use
the client applications and then proceed to chapters 5
“EtherShare Admin” and 6 “HELIOS Mail” in order to set
up users, groups, printers, and volumes, and in order to configure the Helios Mail program. Helios Terminal and the
Time Server are described in the chapters 7 “HELIOS Terminal” and 16 “The Time Server”.
4 Installation
77
4.7 Uninstalling EtherShare
4.7
Uninstalling EtherShare
4.7.1
Deleting the Macintosh utilities
If you want to uninstall EtherShare completely, please, first
of all, open the EtherShare Admin program to delete all
printers which are registered for use with EtherShare. This
is indispensable for removing EtherShare from the server
(see chapter 4.7.2 “Deleting the EtherShare UNIX software”). Furthermore, you should delete all data files from
the EtherShare volumes and the volumes themselves.
➢
The Macintosh utilities can be deleted by simply putting
them into the trash. You have to remove the following
items:
❍ Helios Terminal and any connection documents it has
created
❍ EtherShare Admin
❍ Helios Mail
❍ the “Mail Preferences”, “Terminal Prefs” and
“EtherShare Prep” (from the “Preferences” subfolder of
the System Folder)
❍ the “AppleTalk ADSP Tool”, “VT320 Tool”, “Helios
Mail Init”, and “Time Server” (from the “Extensions”
subfolder of the System Folder).
4.7.2
Deleting the EtherShare UNIX software
Two steps are necessary to delete the EtherShare UNIX
software.
4 Installation
78
4.7 Uninstalling EtherShare
➢
First of all, you have to use the EtherShare Admin to delete
all printers which are registered for use with EtherShare.
Delete all jobs and spool directories under UNIX.
Additionally, delete all EtherShare volume directories under UNIX.
➢
After this, you can delete the EtherShare software itself by
entering a command similar to the following:
cd /usr/local/es
./stop-atalk now
./etc/uninstall
cd ..
rm -r es
Replace “/usr/local/es” in the above command with your
“$ESDIR” path if you did not use the default directory.
The “uninstall” script disables any kernel modifications
made by the EtherShare installation. The kernel changes
will be removed completely the next time you do a rebuild
of the kernel. Some systems also need to be rebooted. If
your system did not need any kernel modifications for
EtherShare, “uninstall” is a dummy script.
4 Installation
4.8 Installing updates using the HELIOS update installer
4.8
79
Installing updates using the
HELIOS update installer
If EtherShare is already running on your server you can use
the EtherShare Admin on a Macintosh client to get information about the current update level of the EtherShare modules. Log in as “root” or “SysAdm” and open the Versions
window as described in chapter 5.13.6 “Versions”. This
window lists all modules of EtherShare and the respective
update level. For example, the entry “afpsrv 2.5.0u0117”
indicates that the HELIOS update u0117 is already installed.
The Versions window, however, is sorted by module
names and does not give an overview about updates. Thus,
it is more reliable to insert the HELIOS CD-ROM and use
the update installer (options List Updates and List
History) for precise information about the update level on
your server. The update installer is described below.
Availability of
updates
New HELIOS updates are available on every new distribution CD-ROM and can also be downloaded from our Web
server. If you receive a new CD-ROM and want to add the
updates on this CD-ROM to your EtherShare installation
you should check the /updates directory for the update
program files and the /support/techinfo directory for
detailed descriptions of the updates.
The HELIOS
update
installer
For update installations, we strongly recommend to use our
update installer. The tool is able to find and install all updates that are required for a particular product and to check
interdependencies of certain updates. The installer is easy
to handle and can also be used to retrieve information about
updates or to uninstall a particular update, if required.
4 Installation
80
4.8 Installing updates using the HELIOS update installer
➢
To start the update installer, mount the CD-ROM, open the
“Networking Products Installer CD-ROM” menu as described in chapter 4.4 “The UNIX installation procedure”,
and select item Install Updates (compare figure 12).
Fig. 12:
Starting the HELIOS update installer
The update installer offers seven different options in its
main menu (see figure 13):
Fig. 13:
Menu of the update installer
4 Installation
4.8 Installing updates using the HELIOS update installer
81
❍ Express Update will induce the installer to automati-
cally perform the installation of all available updates for
the chosen product.
❍ Custom Update lets you select the updates you want to
install.
❍ Remove Updates allows you to uninstall certain up-
dates.
❍ Commit Updates removes backup files and makes up-
dates permanent. Usually, if you install an update, the
system stores a backup file of your old EtherShare version. This allows you to uninstall the update in case of
problems and to return to your initial installation. If new
updates work as expected you may want to remove the
backup files. This can be achieved by using the Commit
Updates option.
❍ List Updates lets you list all available updates, and
can also be used to display the update info texts that describe the purpose of the respective updates.
❍ List History gives information about the date of pre-
vious update installations. The list tells you who did
what, and when he did it.
❍ Setup allows you to set preferences, e.g. change the
search path. This can be necessary if you move the update files to another directory, or if you have the CDROM and additional update repositories.
4 Installation
82
Precautions
4.8 Installing updates using the HELIOS update installer
Note that the update installer does not automatically stop
EtherShare, because this is usually not required. However,
to avoid problems, we recommend to stop all printer queues
before starting to install updates and to stop and restart
EtherShare (commands stop-atalk and start-atalk, respectively), some time after update installation to make the
newly installed modules available. You must stop
EtherShare before you select the update installer’s Commit
option. Otherwise, serious problems can arise.
Important:
We recommend to install the programs on the server in
a fixed order, namely the order that is suggested by the
installation menu on your current product CD-ROM.
The following order is valid for the HELIOS products as
delivered on CD-ROM 015:
– install EtherShare 2.6 first
– install PCShare 3.0 second
– install extensions or add-ons (EtherShare OPI,
PDF Handshake, Print Preview) third.
Skip those modules which are not installed.
Navigating the
update
installer
The items in the main menu can be selected by typing the
first letter. Typing s, e.g., will highlight the Setup item.
You can also use the ARROW keys for up and down navigation within a list of items.
Press ENTER to open a pop-up menu – in case there is one
available. The ENTER key also activates the item that is
currently highlighted.
Use the TAB key to proceed from one option in a dialog
window to the next one, e.g. from the Cancel to the Ok
button.
4 Installation
4.8 Installing updates using the HELIOS update installer
83
The ESC key always lets you return to the start-up window
and the main menu which is shown in figure 13.
The Setup
window
To install new updates, you should always open the Setup
dialog first and check whether the update search path is correct (compare figure 14).
Fig. 14:
The “Setup” dialog window
If you have to replace the path entry use the BACKSPACE
key to delete the old one. You can enter several search paths
at a time, in case you have different updates repositories. In
figure 14, e.g., we have defined two search paths. They are
separated by a “:”.
The Express
Update
window
The easiest way of installing updates is to use the Express
option. In the “Express Update” window (see figure 15), you only have to select the product you want to update. The correct Install path is detected automatically
Update
4 Installation
84
4.8 Installing updates using the HELIOS update installer
by the update installer. However, it is possible to overwrite
the path entry. The installation will be performed automatically when you click the Ok button.
Fig. 15:
The List
Updates
window
The “Express Update” dialog window
The “List Updates” window is for information purposes. It
lists all updates that are related to a certain product and indicates the state of each update. This means, you can see
e.g. whether an update is applied, already superseded, or
4 Installation
4.8 Installing updates using the HELIOS update installer
85
not installed (compare figure 16). If you select an update
from the list and press ENTER the update installer will display the corresponding update info text.
Fig. 16:
The Remove
Update
window
The “List Updates” dialog window
Some updates change the behavior of certain product modules. To uninstall updates you do not want to work with, use
the Remove Update option. The respective dialog window
is shown in figure 17.
Note that there may be interdependencies between several
updates. This means that certain updates cannot be removed
as long as they are required by other updates that are still installed. You can display in the dialog window either all removable, or all not removable updates. Remember that
updates you have already committed can no longer be removed.
4 Installation
86
4.8 Installing updates using the HELIOS update installer
Fig. 17:
The “Remove Update” dialog window
The following keys are available to select updates to remove:
• + select one item
• - unselect one item
• * select all items
• = unselect all items
Commit
updates
Please remember that you have to stop EtherShare before
committing any updates. Otherwise, the Commit command
could “kill” certain processes.
Updates for
Macintosh
applications
If a certain update contains a new, revised Macintosh application, e.g. a new EtherShare Admin, this application will
be copied to the “EtherShare Applications” volume by the
update installer. You have to mount the volume on your
Macintosh clients and replace any old local copies of the respective application.
5 EtherShare Admin
87
5
EtherShare Admin
5 EtherShare Admin
88
5.1 General remarks
5.1
General remarks
This chapter describes the use of the Macintosh application
EtherShare Admin by the system administrator or other
designated persons in order to configure the EtherShare
system from any Macintosh workstation in a convenient
and secure way. It can also be used to set up regular users,
groups, and printers on the server. In a multi-host environment, you can make several EtherShare Admin connections
simultaneously to copy certain configuration data between
two or more hosts.
EtherShare Admin is also available to other, regular EtherShare users, to allow them to inspect the current EtherShare
configuration and printer queues, but only designated persons can make changes (see Security – who can use the
EtherShare Admin? below).
In order to use the EtherShare Admin, the Administration
Server must already be running on the host you want to configure. EtherShare is configured to start this server automatically when the system is booted. The Administration
Server communicates with the EtherShare Admin through
a custom protocol derived from the AppleTalk Filing Protocol (AFP), which was especially developed by HELIOS
for this purpose and is transparent to other AppleTalk devices, or via a TCP/IP connection which allows for managing multiple servers remotely and supporting concurrent
AppleTalk and TCP/IP connections.
Important:
With the EtherShare Admin, version 2.6, you cannot
configure a version 2.2 (or older) EtherShare. The other way round, a version 2.2 Admin cannot be used for
setting up EtherShare 2.6 on the server.
5 EtherShare Admin
5.1 General remarks
89
Other chapters in this manual describe how administrative
work, which is required to configure and maintain the
EtherShare System, can be carried out directly on the host,
e.g. with the help of a standard editor program such as vi.
Most of these tasks can be carried out much easier by using
the Macintosh application EtherShare Admin from one of
the Macintosh workstations.
The EtherShare Admin application offers a high degree of
convenience to the system administrator. The user environment of the Macintosh allows the host configuration to be
represented graphically with lists and windows. The EtherShare Admin allows users, groups, volumes, and printers to
be installed, configured and deleted from one of the workstations. You can also interrogate each PostScript printer
for available resident fonts and install download fonts to the
print server.
The EtherShare Admin accesses and modifies various system configuration files, just as if the changes had been
made with an editor. However, the EtherShare Admin and
the Administration Server have built-in safety checks to ensure that conflicting or invalid configuration settings are
not possible.
Changes to the configuration files “afpvolumes” and
“suffixes” will be recognized immediately by all “afpsrv”
processes.
Any changes applied directly to the configuration files
“suffixes” and “afpvolumes” with EtherShare Admin do
not require a new login. However, changes that have been
applied manually or without using EtherShare Admin at all,
still require that AppleShare clients unmount all volumes
from the EtherShare server and login anew.
5 EtherShare Admin
90
5.1 General remarks
Benefits:
❍ Any new suffix mappings or changes to existing ones
will be available immediately.
❍ Any new EtherShare volumes will be available immedi-
ately.
❍ Any changes to EtherShare volumes, e.g. setting
“Groups” membership, will be available immediately.
Potential drawbacks:
❍ Any changes to EtherShare volumes, e.g. removing vol-
umes, changing volume mount points, switching volume characteristics to “Read Only”, “Invisible”, or
changes in “Groups” membership may result in side effects for AppleShare clients. This may range from write
errors to volumes getting dismounted (!), etc.
❍ Especially removing access to volumes for clients that
still have documents open on that volumes might cause
damaged or only partially saved documents.
Make it a habit to use EtherShare Admin’s feature of sending messages to connected Macintosh clients to notify these
in advance of potential damaging chances. You can verify
with Lists/Active Users which user does have certain volumes in access. Just open this menu before you save any
settings to volumes and it will list the currently logged-in
AppleShare clients. The Lists/Active Users will be updated automatically every 15 seconds.
Security –
who can use
the
EtherShare
Admin?
The EtherShare Admin is available to all EtherShare users,
to allow them to inspect the current EtherShare configuration and printer queues, but only the system administrator
and members of three special groups are allowed to make
5 EtherShare Admin
91
5.1 General remarks
any configuration changes or delete and re-schedule print
jobs.
Members of the System Administrator group (default group
name “SysAdm”) can do all tasks that the system administrator can do with the exception of changing user data for
any users with a user ID less than 100 (note: the system administrator has a user ID of 0).
Members of the Printer Administrator group (default group
name “PrnAdm”) can perform print job related tasks.
The additional Queue Administrator group (default group
name “QueueAdm”) can change queue settings, i.e. perform all tasks which are related to printer queue configuration and printer queue management.
“PrnAdm” is allowed to:
•
•
•
•
•
delete a job
move a job to another queue
change a job’s priority
set a queue to Spool only / Spool and Print
restart a printer queue (with
Lists/Printers/Printer/Restart Printer)
“QueueAdm” is allowed to:
•
•
•
•
•
•
•
•
perform any task “PrnAdm” is allowed to do
create/change/remove printer queues
update fonts for queues
download fonts to the EtherShare server
adjust PDF Settings
adjust OPI/ICC Settings
adjust Edit Initialization settings
specify PPDs for queues
5 EtherShare Admin
92
5.2 Starting the EtherShare Admin
5.2
Starting the EtherShare Admin
During the installation of EtherShare, the “install” program
automatically creates a public Macintosh volume called
“EtherShare Applications”. This volume is used to store
Macintosh applications such as Helios Terminal, Helios
Mail and EtherShare Admin.
➢
You can start the EtherShare Admin from any of the Macintosh workstations on the network by opening the network
volume “EtherShare Applications” and clicking twice on
the EtherShare Admin icon. Alternatively – if you have installed the Macintosh applications on your local Macintosh
as described in chapter 4.6 – you can start the EtherShare
Admin program from the menu.
After loading, the EtherShare Admin normally shows a
copyright notice (compare figure 18), unless you have
changed your preferences (see chapter 5.4 “Setting Admin
preferences”).
Fig. 18:
EtherShare Admin Copyright Notice
5 EtherShare Admin
5.3 Logging on to the Administration Server
5.3
➢
Logging on to the Administration
Server
Log on to the Administration Server (AppleTalk or TCP/IP)
by choosing Login... from the File menu (figure 19).
Fig. 19:
via AppleTalk
93
Choosing Login... from the File menu
When you choose Login... for the first time, the EtherShare
Admin opens a window to let you choose the EtherShare
host you want to connect to (compare figure 20).
Use the list on the left to choose the zone where the EtherShare host is located. The list shows all known zones. Unless you have external routers in your network, only the
zones from internal EtherShare routers will be visible. If
you only have one zone (because you only have one hardware interface, or because other zones are not available for
some reason), you will see an asterisk “*” (representing the
current zone) instead of a zone name. After choosing the
zone, the list on the right shows all hosts in the chosen zone
you can connect to (i.e. all hosts that are running the Administration Server). If you click the Server IP Address...
button, the TCP/IP login window (figure 22) appears instead and you can log in as described below in via TCP/IP.
5 EtherShare Admin
94
5.3 Logging on to the Administration Server
Fig. 20:
➢
Selecting an Administration Server via AppleTalk
Choose the host you want to connect to and click OK.
The EtherShare Admin then opens a window to allow you to
log on to the Administration Server by entering your EtherShare user name, or full name, and password (see figure 21):
Fig. 21:
via TCP/IP
Dialog for User Name and Password (AppleTalk)
Likewise, logging on to the Administration Server via a
TCP/IP connection is also possible by choosing Login...
from the File menu (see figure 19).
5 EtherShare Admin
5.3 Logging on to the Administration Server
95
When you choose Login... for the first time, the EtherShare
Admin opens a window to let you enter the EtherShare host
name you want to connect to (compare figure 22). Clicking
the Server via AppleTalk... button lets you log on to the
Administration Server via AppleTalk as described above in
via AppleTalk (compare figure 20).
Fig. 22:
➢
Selecting an Administration Server via TCP/IP
Enter the EtherShare host name, or the IP-address, you
want to connect to and click OK.
The EtherShare Admin then opens a window to allow you to
log on to the Administration Server by entering your EtherShare user name, or full name, and password (see figure 23):
Fig. 23:
Dialog for User Name and Password (TCP/IP)
5 EtherShare Admin
96
5.3 Logging on to the Administration Server
Logging in via
AppleTalk or
TCP/IP
The User Name default entry is the one that is specified in
the File Sharing dialog on the Macintosh. If an individual
user name is not yet configured you have to log in as “root”
which usually is the name of the system administrator on a
UNIX system. To log in as “root”, you have to know the
“root” password.
When you log in for the first time, you have the option of
choosing Save name and/or Save password. If you check
both you will not have to log in manually the next time you
start the EtherShare Admin. The name and password are
stored in a hidden file on your local hard disk.
Important:
For maximum security do not use the Save password
option.
If you have checked Save name, the EtherShare Admin
makes a note of your name, and the zone and name (or
IP-address, respectively) of the Administration Server you
want to use. The next time you start the EtherShare Admin,
you only have to enter your password.
If necessary, you can log on to more than one host at the
same time – see chapter 5.15 “Multiple EtherShare hosts”.
➢
Click OK when all inputs have been made.
The EtherShare Admin then attempts to make the connection to the chosen server. If your inputs were correct, one or
more Lists windows should now appear automatically (unless you have changed your preferences as described later).
5 EtherShare Admin
5.3 Logging on to the Administration Server
97
Figure 24 shows the EtherShare Admin menu and four of
the available Lists windows.
Fig. 24:
Note:
Four of the Lists windows for host “ibm”
By default, only a maximum number of clients (i.e. users) are permitted to work with the EtherShare Admin
concurrently. See also sessions in chapter 9.4 “Parameters of the “afpsrv” program”
5 EtherShare Admin
98
5.4 Setting Admin preferences
5.4
➢
Setting Admin preferences
Choosing Preferences... from the Edit menu opens a window that allows various standard settings for the EtherShare Admin to be changed according to your individual
taste (see figure 25).
The settings are stored in the Admin preferences file
“EtherShare Prep” on your local hard disk, whenever you
click OK in the “Preferences” window. This allows EtherShare Admin to be configured individually for each workstation.
Fig. 25:
The “Preferences” window
Technical note for system integrators: The default spool directory is “/var/spool”. Depending on the operating system
and configuration “/var/spool” may reside on root “/”,
“/var”, or on another file system. You should always verify
the free space in the spool directory you choose, because
5 EtherShare Admin
5.4 Setting Admin preferences
99
the space requirements may be high during printing. To
verify the free space available, go to “/var/spool”
(cd /var/spool) and issue the “df .” command. Compare
the free space value to other file systems by using the “df”
command. If necessary, establish a separate file system for
spooling.
Window
positions
Information about which windows are open (and about
their positions and sizes) are stored in the Admin preferences file “EtherShare Prep”. This allows you to arrange windows according to your individual taste, and have the
arrangement retained between sessions. However, this only
works if you have checked Save name in the Login dialog.
Background
windows
active
Background windows active
Log on
automatically
Log on automatically specifies whether the EtherShare
Admin should immediately start with the Login dialog, or
if you want to choose Login... from the File menu manually.
specifies whether a background (i.e. non-active) window should react immediately
to a mouse click, or whether the mouse click should initially
swap the window into the foreground (activate it). When
carrying out comprehensive work with a number of lists, an
active background window can save much time by allowing
rapid selection.
Save name also causes auto-login. The Log on automatically checkbox is ignored if Save name is checked, and
EtherShare Admin will immediately open the windows last
specified with your preferences after you have entered your
password. If you have also checked Save password, the
Login dialog will be skipped, too.
Important:
For maximum security do not use the Save password
option.
5 EtherShare Admin
100
5.4 Setting Admin preferences
Starting
program,
User home
directory,
Primary group
Three of the default parameters which are prompted when
creating a new user can be specified here: the user’s Starting program (login), the User home directory, and the
Primary group. Setting appropriate defaults can save time
when creating new users, since these three fields are generally configured with similar entries. The entry in the User
home directory field should be terminated with a “/” character.
Spool
directory
Use this field to configure the default spool directory to be
used when creating a new printer. Setting an appropriate
default can save time when setting up new printers, since
this field is generally the same for all printers. The entry in
the Spool directory field should be terminated with a “/”
character. If required, the spool directory can be set to swap
out the spool files to other file systems (hard disks), but you
should avoid NFS-mounted spool directories because of the
performance loss.
Important:
When setting up a new printer in the Spool directory
field make sure the directory already exists!
Minimum
User ID,
Minimum
Group ID
Minimum User ID and Minimum Group ID specify the low-
Language
The pop-up menu Language is used to select the desired dialog language for menus, messages and screen prompts.
The default for this field is the language setting of your
Macintosh system file or English if the local language is not
supported. If you change Language, you must close and reopen each window before the new language will take effect.
est number allowed for user numbers (user IDs) and group
numbers (group IDs). This parameter is provided as an additional security feature.
5 EtherShare Admin
5.4 Setting Admin preferences
101
EtherShare Admin also supports plug-in modules that define new languages. This feature allows additional language localizations without the need to release an update to
EtherShare Admin. The first external module supports Japanese.
To be able to access the new Japanese language module,
you have to mount the “EtherShare Applications” volume.
The “Admin Plug-Ins” folder contains the external language module (see figure 26) and once you have mounted
the volume, Japanese will automatically appear in the
Language pop-up menu.
Fig. 26:
“Admin Plug-Ins” folder on the “EtherShare Applications” volume
Note that the languages that are included in the EtherShare
Admin binary, cannot be overwritten by a plug-in module.
Saving your
preferences
If you make any changes in the “Preferences” window, they
are only valid after clicking OK. Click Cancel to close the
Preferences window without saving changes.
5 EtherShare Admin
102
5.5 About list windows
5.5
About list windows
Window titles always show the name of the chosen Administration Server (normally the host name) and the function
of the window. List windows have a scroll bar on the right
hand side to enable the list to be scrolled up and down. Lists
are available for users, groups, volumes, printer queues,
Print Server fonts, active users, log and message files, versions, extension mappings, and IP access (compare figure
27). The items OPI Server Settings... and PDF Settings...
in the Lists menu are only active if you have purchased and
installed HELIOS EtherShare OPI, or HELIOS PDF Handshake, respectively. Otherwise they are grayed out.
Fig. 27:
EtherShare Admin Lists menu
If the required list windows do not appear immediately after
logging on, use the Lists menu to open the required lists
manually. Information on which windows are open (and on
their positions and sizes) is stored in the Admin preferences
file “EtherShare Prep”. This allows you to arrange windows
according to your individual taste, and have the arrange-
5 EtherShare Admin
5.5 About list windows
103
ment retained between sessions. However, this only works
if you have checked Save name in the Login dialog.
List limits
The number of entries a list (users, groups, fonts, etc.) can
hold, is limited. The current limit (independent of adjusted
memory in the Macintosh Finder info field) is 8192 entries,
and it is, due to a limitation of the Macintosh list manager,
used to display these lists. Usually, only very large sites
with more than 8000 users or more than 8000 fonts stored
on the EtherShare Print Server may encounter this problem.
The lists will be displayed but may not sort or hold all entries.
Selecting
multiple
entries from
a list
The EtherShare Admin is generally compliant with standard Macintosh conventions (e.g. keyboard shortcuts) for
selecting multiple entries (such as users) from list boxes.
This saves time if you want to open multiple windows, for
example.
Use Shift-click to select a range of entries and use Command-click to select/deselect individual entries from a list.
Go to the top of a list and type a letter to jump to the first
entry that starts with that letter.
EtherShare Admin also issues warning messages before
some operations. You can suppress the warnings by pressing and holding the Option key when choosing the operation.
5 EtherShare Admin
104
5.6 Users list
5.6
Users list
The Users list shows all users known to the host. The Administration Server automatically creates this list by inspecting the host’s system file “/etc/passwd” (or the
appropriate yellow pages file, see chapter 13.5 “Configuration with Yellow Pages”).
➢
If the Users list is not already open, choose Users... from
the Lists menu (see figure 28).
Fig. 28:
Changing user
data
➢
Users list on host “ibm”
In order to change the parameters for a particular user, you
have to open the user’s window that displays all available
information about him/her (see figure 29).
Select the required user and choose Open from the File
menu (or double-click on the user name).
5 EtherShare Admin
105
5.6 Users list
Fig. 29:
User data for user “michael” on host “ibm”
The window title shows the name of the Administration
Server, the window type Users, and the user name.
The window shows the User name (case sensitive!), the
user Password field (case sensitive!), the Full name of the
user, the Home directory of the user, the Start program,
the Primary group and the list of Groups to which the user
belongs. Note that the latter also includes the user’s primary
group.
The Password field is always displayed empty – this field
is only used when the system administrator needs to change
or define a user’s password. Note that users can also change
their own passwords themselves, with the Change password... button in the Macintosh Chooser.
5 EtherShare Admin
106
5.6 Users list
Important:
You must not use accented characters (umlauts) in the
User name, Home directory or Start program fields.
It is best not to use them in the Password and Full
name fields either; otherwise, your UNIX login will be
different from your Macintosh login. Moreover, to be
on the safe side, your User name and Password
should not exceed eight characters.
The Administration Server gets the user information from
the file “/etc/passwd”, with the exception of the list of
groups to which the user belongs, which is obtained from
the file “/etc/group”. If yellow pages (NIS) is installed, the
information is obtained from the appropriate yellow pages
files instead.
It is now possible to change any of the fields as required;
editing is carried out “as usual” in a regular Macintosh environment. Note that the user Home directory field can be
left blank, but a starting program and a primary group are
obligatory. If the user should not receive the rights to access
the UNIX shell, “/bin/date” can be entered in the Start
program field. If the user Home directory field is left
empty, a private user volume will not be provided by the
File Server. Otherwise, it is provided automatically by
EtherShare (see also homedir in chapter 9.4 “Parameters of
the “afpsrv” program”).
Note:
“/” as EtherShare volume is not allowed at all. Use another directory if “root” needs a private volume.
In order to assign an additional group to the user, activate
the Groups list and click on one of the group names. Without releasing the mouse button, drag the name away from
the list – a dotted frame is drawn around the selection – and
5 EtherShare Admin
107
5.6 Users list
release the mouse button over the user’s list of groups
(compare figure 30). The list will appear bold when the cursor is positioned correctly.
Fig. 30:
Assigning group “general” to user “michael” on host
“ibm”
Provided that the user is not already a member of this group,
the group is assigned to the user and the user is now a member of the group. Most UNIX hosts only allow up to 8 or 16
groups per user.
Please note that this procedure is only possible between
user lists and group lists on the same host (see also chapter
5.15 “Multiple EtherShare hosts”).
In order to delete a group from the user’s assignments, select the group and choose Clear from the Edit menu. This
operation should not be confused with deleting a group
from the Groups list. Solely the membership of the user in
5 EtherShare Admin
108
5.6 Users list
the group is deleted, which is not the same as deleting the
group from the system.
Any user must be a member of at least one group. So, if you
delete all entries from the user’s list of groups, the user will
automatically become a member of the group “nogroup”
(though the entry “nogroup” is invisible in the user’s list of
groups).
➢
If you make any changes in the user data window, they are
only valid after clicking Save and only take effect with the
next user login. Provided that the changes have not been
saved, the Revert button can be used to recall the original
data. If an attempt is made to close the window without saving or reverting changes, the EtherShare Admin prompts
whether saving should be carried out or not.
Changing user
passwords
When amending and saving user data, the password is only
changed if an entry has been made in the Password field.
Note that the Password field is always shown empty, even
if the user has already been allocated a password. On
changing the password, the EtherShare Admin prompts for
the new password to be entered once again, to ensure that
no typing mistakes have been made (see figure 31).
Fig. 31:
Re-typing the new user password
5 EtherShare Admin
109
5.6 Users list
The changed password is entered in the file “/etc/passwd”
and in the optional AFP user list (“$ESDIR/conf/
afppasswd”). It is immediately valid, but only takes effect
with the next user login. If yellow pages (NIS) is installed,
the information is changed in the appropriate yellow pages
files instead.
Note that users can also change their own passwords themselves, with the Change Password... button in the Macintosh Chooser.
Creating users
➢
A new user can be created by filling in a new user data window.
Activate the Users list and choose New from the File menu
(see figure 32).
Fig. 32:
Creating a new user entry
The EtherShare Admin then opens a user data window
which already contains some default values from the “Preferences” window. Fill in or change the fields as required
(compare figure 29 above).
5 EtherShare Admin
110
5.6 Users list
When typing in the user name, a suggested home directory
is automatically filled into the corresponding field. The default suggestion can be changed if required.
➢
A new user is entered in the server’s Users list as soon as
you click on Save. If the user data window is closed without saving, the new user entry is discarded.
On saving the new user, a new entry with the corresponding
user data is made in the “/etc/passwd” file. The user ID will
be assigned automatically. If groups were specified, these
are entered in “/etc/group”. If yellow pages (NIS) is installed, the information are changed in the appropriate yellow pages files instead. Note that if NIS+ is installed on
your system, user and group data cannot be configured with
the EtherShare Admin application.
Deleting users
➢
Note:
EtherShare (with the exception of Helios Terminal) will
allow you to log in either with your user name or with
your full name.
Note:
The AIX operating system e.g. does not “like” user and
group names longer than 8 characters, but the EtherShare Admin does not check for this. If you use longer
names, you will receive various UNIX error messages.
You may not be able to make a UNIX shell login if your
login name is too long, or one of your group names is
too long, but you can still log on to the File Server. We
recommend to use user and group names of up to 8
characters only.
A user can be deleted from the host as follows:
Highlight the user name in the Users list and select Clear
from the Edit menu (see figure 33).
5 EtherShare Admin
111
5.6 Users list
Fig. 33:
Deleting a user entry
The Admin then prompts for acknowledgment of deletion,
to allow it to be aborted if required (see figure 34).
Fig. 34:
Confirming deletion of a user entry
If deletion is confirmed, the entry is removed from the window and the corresponding entries are deleted from the files
“/etc/passwd” and “/etc/group”. Files in the user’s home directory are not deleted. They must be removed by the system administrator.
Important:
Do never delete UNIX users like bin, daemon, etc. This
may cause serious problems.
5 EtherShare Admin
112
5.7 Groups list
5.7
Groups list
The Groups list shows all groups known to the host (see figure 35). The Administration Server automatically creates
this list by inspecting the UNIX system file “/etc/group” (or
the appropriate yellow pages file).
➢
If the Groups list is not already open, choose Groups...
from the Lists menu.
Fig. 35:
Groups list on host “ibm”
In order to change the parameters for a particular group,
you have to open the data window that displays all available
information about the selected group (see figure 36).
Changing
group data
➢
Select the required group and choose Open from the File
menu (or double-click on the group name).
5 EtherShare Admin
113
5.7 Groups list
Fig. 36:
Group data for group “develo_b” on host “ibm”
The window title shows the name of the Administration
Server, the window type Groups and the group name. The
window shows the Group name and the list of the Members
of the group. The Administration Server gets the group information from the files “/etc/group” and “/etc/passwd” (or
from the appropriate yellow pages files).
It is now possible to change the group name and the members of the group.
In order to assign an additional user to the group, activate
the Users list and select one of the user names. Without releasing the mouse button, drag the name away from the Users list – a dotted frame is drawn around the selection – and
release the mouse button over the group’s list of members
(compare figure 37). The list will appear bold when the cursor is positioned correctly.
5 EtherShare Admin
114
5.7 Groups list
Fig. 37:
Assigning user “peter” to group “develo_b” on host “ibm”
Provided that the user is not already a member of this group,
he/she will be added to the list of members now. Please note
that this procedure is only possible between user lists and
group lists on the same host (see also chapter 5.15 “Multiple EtherShare hosts”).
In order to delete a user from the group’s list of members,
select the user name and choose Clear from the Edit menu.
This operation should not be confused with deleting a user
from the user list. Solely the membership of the user in the
group is deleted, which is not the same as deleting the user
from the system.
➢
If you make any changes in the group data window, they are
only valid after clicking Save and only take effect with the
next user login. Provided that the changes have not been
saved, the Revert button can be used to recall the original
data. If an attempt is made to close the window without sav-
5 EtherShare Admin
115
5.7 Groups list
ing or reverting changes, the EtherShare Admin prompts
whether saving should be carried out or not.
A new group can be created as follows:
Creating
groups
➢
Activate the Groups list and choose New from the File
menu (compare figure 38).
Fig. 38:
Creating a new group entry
The EtherShare Admin then opens a new group data window. Fill in the group name and add members to the group
as required (compare figure 36 above).
➢
A new group is entered in the server’s Groups list as soon
as you click Save. If the group data window is closed without saving, the new group entry is discarded.
On saving the new group, a new entry with the corresponding group data and member list is made in the “/etc/group”
file (or the appropriate yellow pages files). The “group id”
will be assigned automatically.
5 EtherShare Admin
116
5.7 Groups list
Note:
The AIX operating system e.g. does not “like” user and
group names longer than 8 characters, but the EtherShare Admin does not check for this. If you use longer
names, you will receive various UNIX error messages.
You may not be able to make a UNIX shell login if your
login name is too long, or one of your group name is
too long, but you can still log on to the File Server. We
recommend to use user and group names of up to 8
characters only.
A group can be deleted from the host as follows:
Deleting
groups
➢
Highlight the group name in the Groups list and select
Clear from the Edit menu (see figure 39).
Fig. 39:
Deleting a group entry
EtherShare Admin then prompts for acknowledgment of
deletion to allow it to be aborted if required (see figure 40).
5 EtherShare Admin
117
5.7 Groups list
Fig. 40:
Confirming deletion of a group entry
If deletion is confirmed, the entry is removed from the window and the corresponding entry is deleted from the file
“/etc/group”. The file “/etc/passwd” is checked for users
who were assigned that group as their primary group; if any
are found, the ID for the primary group in the user’s entry
in the “passwd” file is changed by convention to the group
ID of the group “nogroup”. The user must then be assigned
a new primary group before he/she can log on again. Also,
make sure that the group is not used for the volume Groups
list of any of the volumes.
If yellow pages (NIS) is installed, the information are
changed in the appropriate yellow pages files instead. Note
that if NIS+ is installed on your system, user and group data
cannot be configured with the EtherShare Admin application.
Important:
Do never delete UNIX groups like bin, daemon, lp, or
mail. This may cause serious problems.
5 EtherShare Admin
118
5.8 Volumes list
5.8
Volumes list
The Volumes list shows all public AppleShare volumes
known to EtherShare (see figure 41). The Administration
Server automatically creates this list by inspecting the
EtherShare public volume list “$ESDIR/conf/afpvolumes”.
➢
If the Volumes list is not already open, choose Volumes...
from the Lists menu.
Fig. 41:
Changing
volume data
Volumes list on host “ibm”
Before changing volume data, make sure that the volume is
not in use. All users should unmount the volume, because
changes take effect immediately and this could lead to
strange effects, e.g. if you set a volume to “Read Only”.
In order to change the parameters for a particular volume,
you have to open the data window that displays all available
information about the selected volume.
5 EtherShare Admin
119
5.8 Volumes list
➢
Open the Volumes list, select the volume name, and choose
Open from the File menu (or double-click on the volume
name).
Figure 42 shows volume data for a removable magneto-optical disk. In figure 43 a directory of a remote Digital Equipment VAX computer has been mounted through NFS at the
local directory “/vax” and made available to EtherShare as
the volume “VAX NFS-AFP Gateway”.
Note:
Fig. 42:
The options Create Layouts and PC Layouts in the
volume data window are grayed out unless you have
purchased and installed HELIOS EtherShare OPI 2.1.
Volume “Magneto Optical” on host “ibm”
5 EtherShare Admin
120
5.8 Volumes list
Fig. 43:
Remote NFS volume from a digital VAX computer
The window title shows the name of the Administration
Server (usually the host name), the window type Volumes
and the volume name. The window shows the Volume
name, the name of the UNIX Directory where the volume
is mounted, the optional Password for the volume, and the
volume Groups list. Note that the password is only displayed (as a matching number of dots) to the system administrator and members of the “SysAdm” group.
The Administration Server finds this information by inspecting the public volume list (“$ESDIR/conf/afpvolumes”).
5 EtherShare Admin
5.8 Volumes list
121
It is now possible to change the volume name, the UNIX directory of the volume, the volume password, and the checkboxes for Exchangeable, Read Only, Invisible, and
Unicode. The volume Groups list is described later in this
chapter.
If you change the Directory entry keep in mind that EtherShare does only create one new subdirectory. Parent directories must already exist.
Only check Exchangeable for removable media attached
to the UNIX host which are normally changed while the
host is running (e.g. magneto-optical drives). Do not check
Exchangeable for local volumes and for storage mounted
remotely (e.g. through NFS). The latter is usually mounted
automatically on booting UNIX.
Removable media such as magneto-optical disks and CDROMs must be mounted with a UNIX command or (preferably) by using the EtherShare Admin, before they can be
mounted on the desktop with the Chooser.
To mount a removable volume, select the volume in the
Volumes list of the EtherShare Admin and choose Mount
from the Volume menu.
Removable media must be formatted with a UNIX (UFS)
file system which is compatible to your host. They will be
unreadable if they are formatted with the Macintosh (HFS)
file system.
Make sure the Read Only checkbox status reflects the readonly flag set under UNIX. This must be checked for exchangeable media which are write-protected with a writeprotect tab. Otherwise you will not be able to mount them.
5 EtherShare Admin
122
5.8 Volumes list
Invisible is used to create, on a specific server, a volume
that will not be displayed by the Chooser and thus cannot
be mounted. This may be useful e.g. if you are working with
EtherShare OPI and want to separate your File Server from
your Print Server, in order to prevent users from working on
the Print Server – which is only needed for storing high-resolution images and replacing images during printing. The
specific volume (e.g. /hmac) must be available on both
servers but users have to work on the File Server only in order to avoid too much traffic on the network. In that case,
you have to activate Invisible for the specific volume on
the Print Server (compare the illustration in figure 44).
OPI File Server
+ layout generation
/hmac
Files
OPI Print Server
+ image replacement
/hmac
Invisible
Macintosh clients
Fig. 44:
Printers
Applying the Invisible option to a specific volume
With the checkbox Unicode/UTF8 ticked, the character set
encoding for the specific volume is set to Unicode. This
provides a correct cross-platform file name transfer (particularly if the names contain special characters such as Umlauts) between Macintosh clients, PC clients (provided that
HELIOS PCShare is installed), and UNIX servers; on all
machines the file names are displayed in the same way.
5 EtherShare Admin
123
5.8 Volumes list
The pull-down menu Charset lets you select the character
set which is appropriate for your workstation’s setup. You
can select MacRoman or the Japanese SJIS encoding, depending on which OS you are running or what language kit
is installed on your Macintosh client. More character sets
will be available as plug-ins.
The pull-down menu Charset appears grayed-out if the
Unicode/UTF8 checkbox remains unticked since in this
case the character encoding is automatically set to the old
EtherShare character set (compare Calling “rebuild” in
10.2 “The Desktop Server Program”).
➢
If you make any changes in the volume data window, they
are only valid after clicking Save and only take effect with
the next user login. Provided that the changes have not been
saved, the Revert button can be used to recall the original
data. If an attempt is made to close the window without saving or reverting changes, EtherShare Admin prompts
whether saving should be carried out or not.
A new volume can be created as follows:
Creating
volumes
➢
Activate the Volumes list and choose New from the File
menu (compare figure 45).
5 EtherShare Admin
124
5.8 Volumes list
Fig. 45:
Creating a new volume
The EtherShare Admin then opens a new volume data window. Fill in the volume name, UNIX directory (volume
mount point) and password fields as required. The entire directory path to the mount point must already exist, with the
exception of the bottom-most directory, which will be created by the EtherShare Admin, if required. The volume
Groups list is described later in this chapter.
The volume’s directories must not overlap or include the directories of other EtherShare volumes. You should choose
the volume mount point carefully to make sure this does not
happen. Furthermore, although EtherShare can utilize file
systems which are mounted remotely through NFS, the directory tree of each Macintosh volume should not be split
among more than one file system. Otherwise, the values for
used and free space would not reflect the correct status, and
trashing of files would only be possible immediately.
5 EtherShare Admin
125
5.8 Volumes list
Important:
Note that symbolic links pointing to directories would
confuse the File Server. For example two directories in
one volume might have the same directory ID and a
“Double-click” on one of the folders then could open
the other. To prevent this, EtherShare does not follow
symbolic links on folders. If you need links, use the
Macintosh “Make Alias” function instead.
If EtherShare detects overlapping volumes it will not
mount them and issues an error message instead.
Finally, the volume’s directories should not be “crossmounted” through NFS, since Ether Share will not allow
you to mount the same volume twice from two different
servers (hosts). As soon as the volume is mounted by a user
from one host, it will be grayed out in the Chooser for all
users of other hosts. The volume will be released again automatically when it is unmounted. You can always mount
the volume by logging on to the host from which it is already mounted, of course.
➢
A new volume is entered in the server Volumes list as soon
as Save has been clicked. If the volume data window is
closed without saving, the new volume entry is discarded.
On saving the new volume, a new entry with the corresponding volume data is made in the public volume list
(“$ESDIR/conf/afpvolumes”). See Volume size limits in
chapter 9.6 “Public and private volumes”, and Available
storage space on volumes in chapter 9.10 “EtherShare versus AppleShare” for related information.
5 EtherShare Admin
126
5.8 Volumes list
Especially if you store a large number of files on your
EtherShare server, or if the server is used by several different departments in your company, you probably want to
subdivide the hard disk(s) of your EtherShare host into several different logical AppleShare volumes. You can then set
access permissions on each volume (and on individual folders in the volume) with the Sharing... option in the File
menu of the Finder. To provide additional security, you can
also make specified EtherShare volumes completely invisible to selected user groups, by using the volume Groups
feature.
Volume
Groups list
➢
In order to assign a group to a volume, open the volume
data window and the Groups list and select one of the group
names. Without releasing the mouse button, drag the name
away from the Groups list – a dotted frame is drawn around
the selection – and release the mouse button over the volume’s list of groups (see figure 46). The list will appear
bold when the cursor is positioned correctly.
In the following example, the “EtherShare” volume will
only be visible to members of the groups “helios” and
“general”. You can assign more than one group to each volume, but if you do not assign any groups at all, then the volume will by default be visible to all groups and thus to all
EtherShare users (unless you have checked Invisible in the
volume data window).
5 EtherShare Admin
127
5.8 Volumes list
Fig. 46:
Assigning group “general” to volume “EtherShare” on
host “ibm”
A volume can be deleted from the host as follows:
Deleting
volumes
➢
Highlight the volume name in the Volumes list and select
Clear from the Edit menu (see figure 47).
The EtherShare Admin then prompts for acknowledgment
of deletion, to allow deletion to be aborted, if required (see
figure 48).
If deletion is confirmed, the entry is removed from the window and the corresponding entry is deleted from the public
volume list (“$ESDIR/conf/afpvolumes”). Note that if the
5 EtherShare Admin
128
5.8 Volumes list
volume still contains files and folders, they are not deleted.
However, they are no longer accessible to Macintosh users.
Fig. 47:
Deleting a volume entry
Fig. 48:
Confirming deletion of a volume entry
5 EtherShare Admin
129
5.9 Volume menu
5.9
Volume menu
If you have selected a volume in the Volumes list window,
or if the foreground (active) window is a window containing volume data, an additional menu item Volume is available in the menu bar at the top of the screen (see figure 49).
The functions in the Volume menu only apply to the volume you have selected.
Fig. 49:
Rebuild
Desktop
The Volume menu item
AppleShare volumes contain a special, invisible file called
the volume “desktop”, which is used internally by EtherShare. It contains organizational information such as the
icons you see in the Finder. See chapter 10 “The Desktop
Server” for details.
After a period of time, each volume desktop tends to collect
a number of icons which are no longer needed, since the
corresponding application has been removed from the volume. For this reason, Apple recommends to rebuild your
desktop from time to time – a process which scans the entire
5 EtherShare Admin
130
5.9 Volume menu
volume for applications and makes sure that the desktop
only contains icons for existing files.
You can rebuild your desktop for local Macintosh volumes
(built-in hard disk) by restarting your Macintosh while
holding down the Option and Command keys. However,
starting with System 7, it is no longer possible to rebuild
network volumes in this way.
➢
To rebuild the desktop of an EtherShare volume, make sure
that all users unmount the respective volume. Then, select
the volume in the Volumes list of the EtherShare Admin
and choose Rebuild Desktop... from the Volume menu (see
figure 50). You will be asked for confirmation before the
process is started (see figure 51).
Fig. 50:
Rebuilding a volume desktop
Fig. 51:
Confirming the Rebuild Desktop process
5 EtherShare Admin
5.9 Volume menu
131
Important:
You cannot rebuild read-only volumes – in this case
Rebuild Desktop... in the Volume menu will be grayed
out. The Read Only option can be temporarily unchecked for hard drives and magneto-optic cartridges
to allow the desktop to be rebuilt. See chapter 10.2
“The Desktop Server Program” for related information.
Note:
You can optionally select several volumes and thus rebuild several desktops at the same time.
During an EtherShare desktop rebuild, missing resources
for directories and files are automatically created for all directories in the EtherShare volume, and file IDs are created
(or verified if a matching resource file already exists).
Empty Trash
AppleShare volumes with “readwrite” access – this includes both local Macintosh hard disks and EtherShare
server volumes – contain a special, invisible folder called
the trash folder which is used internally by the operating
system. It is used to store files that you have deleted, until
you choose to empty the trash and thus delete the files physically. In the case of network (shared) volumes, the trash
folder actually contains multiple trash cans which are maintained separately for each user connection.
Unlike local volumes, if you unmount network volumes,
the trash is usually emptied by AppleShare automatically,
and its contents is no longer available to you the next time
you log on. Thus, make sure you have not trashed something by mistake before you unmount a network volume.
However, this auto-clearing mechanism fails in case you
shut down the Macintosh without first unmounting the network volumes. This can cause problems because of the way
5 EtherShare Admin
132
5.9 Volume menu
AppleShare allocates trash cans. Users do not have the
same trash can every time they log in, but they receive a
trash can number that corresponds to the number of user
connections currently established. The first user who
mounts a volume receives trash can number 1, the second
one receives trash can number 2, and so on. Now, if user
number 20 leaves his trash unemptied, and if this trash can
is not allocated again (because there are always less than 20
users who mount the respective volume simultaneously),
the trash will never be emptied.
If you notice that there is a lot less free space on the volume
than you expected (knowing the total size of the files stored
there), this may be because one of the users switched off the
workstation without emptying a very full trash can. Your
system administrator can check this easily with a UNIX login by looking at the total size of the network trash folder.
The Finder’s Get Info dialog on a Macintosh only shows
the trash can size of the current user.
➢
To empty the trash of an EtherShare volume completely,
select the required volume in the Volumes list of the EtherShare Admin and choose Empty Trash... from the Volume
menu (compare figure 52). There is no need anymore to unmount the volume before emptying the trash:
Fig. 52:
Empty volume trash
5 EtherShare Admin
5.9 Volume menu
133
This operation empties all trash for the volume, including
the trash of those who are currently using the volume. Accordingly, you should warn logged-on users before calling
this function (use the Active Users... option to see who
uses a specific volume).
Important:
You cannot empty the trash of read-only volumes – in
this case Empty Trash... in the Volume menu will be
grayed out.
Note:
You can optionally select several volumes and thus
empty several volume trash cans at the same time.
Removable media such as magneto-optical disks and CDROMs must be mounted with a UNIX command or (preferably) by using the EtherShare Admin, before they can be
mounted on the desktop with the Chooser.
Mounting
removable
volumes
➢
To mount a removable volume, select the volume in the
Volumes list of the EtherShare Admin and choose Mount
from the Volume menu.
Removable media must be formatted with a UNIX (UFS)
file system which is compatible to your host. They will be
unreadable if they are formatted with the Macintosh (HFS)
file system.
Mounting causes the Administration Server to carry out a
UNIX mount by calling the script “$ESDIR/etc/mountafp”. The script accesses the host’s file system table (e.g.
“/etc/fstab”) for mounting information. After the UNIX
mount, the volume can be mounted on the desktop with the
Chooser. You will only see the correct Macintosh icons if
the medium contains Macintosh files and has a desktop file
5 EtherShare Admin
134
5.9 Volume menu
in valid EtherShare format. Otherwise you will see generic
UNIX icons only, or alternatively, the icons that have been
defined in your extension mappings table (see chapter
5.13.7 “Extension Mappings”).
A tick mark shows that the volume is currently mounted
(compare figure 53).
Unmounting
removable
volumes
Before you can eject the medium from the drive again, all
users of the volume must first unmount it by trashing the
volume’s desktop icon (use the Lists/Active Users... option to see who uses a specific volume). You must then do
a UNIX unmount by selecting the volume in the Volumes
list and choosing Mount from the Volume menu a second
time, so that the tick mark disappears. You will get an error
message from the EtherShare Admin if you try to unmount
a drive which is still in use.
Note:
Fig. 53:
A removable “read only” volume , e.g. a CD-ROM, has
no “.Desktop” file. You can unmount it without getting
any error message, as long as no file is still in use.
Mounting a CD-ROM
5 EtherShare Admin
135
5.9 Volume menu
Preflight conversion
A volume’s character set encoding may be converted according to the procedure described in 5.8 “Volumes list”,
Changing volume data. Before saving the changes, you can
have a preview by choosing Preflight conversion from the
Volume menu. Then a “convert.log” file (see figure 54) will
be displayed showing the directories/files which will be renamed.
Fig. 54:
“convert.log” file
5 EtherShare Admin
136
5.10 Printers list
5.10
Printers list
The Printers list shows all printer queues known to EtherShare (see figure 55). The Administration Server automatically creates this list by inspecting the contents of the
“printcap” file and the EtherShare main configuration file
“atalk.conf”.
➢
If the Printers list is not already open, choose Printers...
from the Lists menu.
Fig. 55:
Printers list on host “ibm”
Each printer (i.e. printer queue) is shown in the list under its
own unique logical (UNIX) name as specified in
“/etc/printcap”. Each queue also has an AppleTalk name,
which is usually not the same as the UNIX name. The
AppleTalk name is the one that appears in the Chooser under “LaserWriter”, “ImageWriter” etc. alongside the names
of any physical printers that might also be present in the
same zone. We recommend that you name your printer
queues by adding “spooler” to the AppleTalk name of the
5 EtherShare Admin
137
5.10 Printers list
physical printer. Thus, you can easily distinguish between
queues and printers in the Chooser (see figure 56).
Important:
You should always select the printer queue (the spooler) rather than selecting the old entry (the physical
printer) in the Chooser for printing. Due to print job
spooling, it is not only much more efficient to access
printers through the printer queues, but it also avoids
the problem of long waiting periods that may occur if
you try to access a printer both directly and through the
spooler.
Select the correct spooler in the Chooser list and press the
Create and Auto Setup buttons to configure the printer.
Fig. 56:
Choosing a printer queue in a multi-zone network
Usually, each printer queue is associated with a single
physical printer. However, you may want to allocate more
5 EtherShare Admin
138
5.10 Printers list
than one printer queue to a printer, for example to be able
to select different printer initialization strings for the same
printer (see later). In this case, you will have several
Chooser names for the same physical printer. However,
each printer queue is always associated with its own unique
logical (UNIX) printer name and “/etc/printcap” entry.
Note:
In the following, the term “printer” is meant to encompass all aspects of setting up a particular printer, not
only the configuration of the printer’s network connection but also the configuration of the associated printer
queues.
Changes in the printer configuration affect the files
“atalk.conf”, “/etc/printcap”, and in some cases the
“$ESDIR” directory (for the purpose of linking the interface program, such as “papif”).
In order to change the parameters for a particular printer
queue, you have to open the data window that displays all
available information about the selected printer (see figure
57):
Changing
printer data
➢
Open the Printers list, select the printer name from the list
and choose Settings from the Printer menu item (which
appears automatically in the main menu bar whenever the
Printers list is active).
5 EtherShare Admin
139
5.10 Printers list
As an aid to printer configuration, pop-up windows let you
choose from a list of valid choices (compare figure 58).
The window title shows the name of the Administration
Server, the window type Printers and the logical printer
name.
Fig. 57:
Printer data for AppleTalk printer “ibm-opi-spooler”
5 EtherShare Admin
140
5.10 Printers list
Fig. 58:
Pop-up windows help you when configuring printers
The appearance of the printer data window may differ, depending on the connection type. Please refer to paragraph
Creating printers below for details about the fields and possible entries.
The Administration Server gets most of the printer information from the files “atalk.conf” and “/etc/printcap”.
➢
If you make any changes in the printer data window, they
are only valid after clicking Save. Provided that the changes have not been saved, the Revert button can be used to recall the original data. If an attempt is made to close the
window without saving or reverting changes, EtherShare
Admin prompts whether saving should be carried out or
not.
5 EtherShare Admin
141
5.10 Printers list
A new printer can be set up as follows:
Creating
printers
➢
Activate the Printers list and choose New from the File
menu (compare figure 59).
Fig. 59:
Creating a new printer entry
The EtherShare Admin then opens a new printer data window, which has already been partly filled in with default
values from the “Preferences” window.
For all printer types, the window shows the logical (UNIX)
Printer Name for the printer queue, the AppleTalk (NVE)
name and the printer’s Spool Directory. The NVE name is
the name by which the printer queue is known to the AppleTalk network (the Chooser Name).
➢
First type in the required logical UNIX name for the printer
queue (Printer Name), and also the associated AppleTalk
name (Chooser Name).
5 EtherShare Admin
142
5.10 Printers list
➢
When typing in the Printer Name, a suggested Spool Directory is automatically filled into the corresponding field.
The default suggestion can be changed if required.
The Spool Directory field specifies the directory in the
UNIX file system where print jobs are to be temporarily
stored before they are sent to the printer. If required, the
spool directory can be set to swap out the spool files to other
file systems (hard disks), but you should avoid NFS-mounted spool directories because of the performance loss. Note
that the spool directory must be unique for each printer and
that it is recommended to check whether there is enough
free space in the directory you choose.
Note:
➢
Make sure a directory path already exists since the
EtherShare Admin will only create the last subdirectory, e.g. “PrintToDisk”.
You can then define a Hold Queue and/or an Error Queue
for your current printer queue.
Usually, print jobs vanish after they have been sent to the
output device. Hold and error queues act as a kind of archive. All print jobs that have been sent to this specific
printer queue are printed and stored for a given period of
time in the connected hold/error queue. They can be restarted even if the application that has initially launched the job
has already been closed. All “correct” print jobs automatically proceed to the hold queue after printing. Whenever a
mistake has occurred during printing, however, the print
job will be shifted to the error queue (as long as hold and
error queues have been specified in the pull-down menus).
This holds true for technical mistakes (e.g. if the connection
to the printer has been interrupted) and for errors that are
5 EtherShare Admin
5.10 Printers list
143
due to a specific configuration (e.g. if you have defined
“Check Images” for an OPI printer queue and the print
server cannot find a particular image file that has been
placed in the document by reference).
The setting up of hold and error queues is described later in
this chapter.
Banner page
The Banner Page switch determines whether the printer
will print a title (banner) page before outputting the print
job. The banner page contains information about the print
job such as the user name, the time and the document name.
It is useful when sorting out a pile of pages if a number of
users have been printing at the same time. The banner page
is generated automatically. If a file named “BANNER” exists in the printer’s spool directory, this file will be used.
See psof in chapter 11.3 “The Print Server Programs” for
more information.
Accounting
File
The Accounting File switch determines whether the print
server will write print job details such as the user name and
the number of printed pages to the host’s printer log file.
The user name assigned to the job is the one specified in the
Macintosh File Sharing control panel. The job will be assigned to “root” if no name is specified in File Sharing, or
if the name specified is unknown to EtherShare. See User
and document names in print jobs in appendix A 7.1 “EtherShare log files” for more information.
Hide Queue
The Hide Queue option is used to create a printer queue that
is invisible to the Macintosh EtherShare users. This may be
useful, e.g., if you want to set up a queue for UNIX and PC
users only. With Hide Queue active, this queue will be invisible in the Macintosh Chooser.
5 EtherShare Admin
144
5.10 Printers list
Require Authentication
➢
AppleTalk
connection
Printing to LaserWriter queues is password-protected if the
Require Authentication option is activated. Thus, print
jobs can only be processed on LaserWriter-queues after
correct authentication. This option affects all LaserWriter
printer queues on the same server. Please note that this feature is only supported by Mac OS 8.6 or later.
Now, choose the desired Connection type for the printer
queue. The different types are explained below:
Choose AppleTalk in the Connection box (figure 60) for
printers that are connected to the network via AppleTalk
(i.e. LocalTalk, EtherTalk etc.). The AppleTalk (NVE)
name, type and zone of the printer must now be specified.
First choose the printer Type. You only need to change the
type from the default of LaserWriter if printers of other
types are available, such as AppleTalk ImageWriter printers. Now choose the Zone: if more than one zone is available, pop up the Zone list and select the one you want. Now
click on the Name field to pop up a list of all devices of the
specified type which are available in the selected zone, and
choose the one required. The list is determined by interrogating the network for all printers. Accordingly, the printer
you want to configure must be connected and online.
Important:
Be careful to choose a physical printer from the list,
and not another queue.
The Hide Printer option may be checked if you want to prevent the printer from being displayed in the Chooser. Thus,
users cannot choose this printer – and cannot print directly
to the output device. This is sensible, because printing to an
output device, both directly and through a spool queue, may
lead to long waiting periods on the Macintosh – in case the
5 EtherShare Admin
145
5.10 Printers list
printer is executing a large job from a queue and the job that
has been sent directly is not accepted immediately.
Fig. 60:
Data for AppleTalk-connected printer “lw” on host “ibm”
If any of the entries in Zone/Name is displayed in italics,
this indicates that this zone or device is currently not reachable. You should make sure that the desired printer is connected and online.
Serial
connection
Choose Serial from the Connection box (figure 61) for
PostScript printers that are connected directly to the UNIX
host via a serial interface.
5 EtherShare Admin
146
5.10 Printers list
Fig. 61:
Data for serially-connected printer “epson” on host “ibm”
In this case, it is necessary to specify the correct Baud Rate
for data transfer to the printer. The Device field is used to
enter the designation of the host serial port to which the
printer is connected (e.g. “/dev/ttya”). The device must already exist on the host – the EtherShare Admin checks for
a valid character device at this address.
EtherShare uses 8-bit, no parity and hardware handSee 8-bit transparency and nobinmode in chapter
11.6 “Configuring printers manually” for more information
about serial connections.
shake.
5 EtherShare Admin
147
5.10 Printers list
Note:
TCP
connection
If Connection is shown as Serial and Baud rate is
shown as -1, this means that the EtherShare Admin
is unable to decode the syntax of the entry in
“/etc/printcap”. If the printer was previously configured
correctly, this usually indicates that the “/etc/printcap”
entry has been subsequently modified manually, without using the EtherShare Admin.
Choose TCP from the Connection box (figure 62) for PostScript printers that are connected to the network via the
TCP/IP stream protocol.
Fig. 62:
Data for TCP/IP stream printer “TCP_Laser” on host
“ibm”
5 EtherShare Admin
148
5.10 Printers list
Enter the name (or internet number) of the TCP/IP printer
(or terminal server) in the Host Name field. Enter the service port name (or service number) in the Port field. There
should be a PostScript interpreter listening at this address.
TCP/IP stream printers must be compatible with the EtherShare TCP/IP stream implementation – contact your printer
manufacturer or HELIOS supplier (see the HELIOS Web
site: http://www.helios.de) if you are not sure about this. The
CTRL-D switch causes a Ctrl-D character to be sent to the
printer at the end of each job. This is only necessary if the
TCP/IP printer is connected to a TCP/IP terminal server via
a serial interface. See TCP/IP PostScript connections in chapter 11.6 “Configuring printers manually” for details.
Remote LPR
connection
Note that “Remote LPR” is another TCP connection type,
but it is not identical to TCP/IP stream. Choose Remote
LPR from the Connection box (figure 63) for PostScript
printers that are connected to another remote host on the
network via TCP/IP. Enter the name (or internet number) of
the remote host to which the printer is attached in the Remote Host field. Enter the remote printer’s logical (UNIX)
name in the Remote Printer field. The service port name
is set to “printer” (service number 515) by default. The entry can be checked in the UNIX file “/etc/services”.
Remote LPR printers require more spooling space (the size
of the resolved job) on the local host than TCP/IP stream
printers, and they do not return status messages or answer
font queries (see TCP/IP PostScript connections in chapter
11.6 “Configuring printers manually” for more details).
EtherShare’s “remote lpr” specification in “/etc/printcap”
differs somewhat from standard conventions, and thus the
EtherShare Admin will not list other Remote LPR printers
which have been manually configured for other purposes.
5 EtherShare Admin
149
5.10 Printers list
However, EtherShare Admin will not modify other
“/etc/printcap” entries unless you inadvertently choose an
already existing logical (UNIX) printer name.
Fig. 63:
Data for Remote LPR printer “remLW” on host “ibm”
EtherShare’s Print Server is based on the BSD printing system. If your host uses another system (as e.g. System V, the
printing system Sun Solaris 2.x uses), the Print Server automatically uses its own BSD-style “lpr” program, which is
provided in the “$ESDIR” directory. Manual pages for the
BSD-style “lpr” are provided in PDF-format on the CDROM in the “manuals” directory (see file
“LPRMAN.PDF”).
5 EtherShare Admin
150
5.10 Printers list
You can specify a TCP/IP stream printer either with host internet number and service port number, or with host name
and service port name. The latter method requires corresponding entries in the local host’s “/etc/hosts” and
“/etc/services” files. For Remote LPR, the local host must
be defined on the remote host, in the “/etc/hosts” and
“hosts.equiv” (or “hosts.lpd”) files. Both connection types
require you to configure your host for TCP/IP, of course.
Shared
Memory
connection
Choose Shared Memory from the Connection box (figure
64) for PostScript interpreters (software RIPs) running on
the same host which are able to communicate through a
“Shared Memory” interface.
Fig. 64:
Data for “Shared Memory” RIP “shm_1” on host “ibm”
5 EtherShare Admin
151
5.10 Printers list
Enter the path of the Shared Memory “key” file in the Key
File field. The key file must already exist on the host. See
the key parameter in chapter 11.6 for more information. The
RIP must be compatible with the EtherShare “Shared Memory” interface specification – contact your RIP manufacturer or HELIOS supplier (see the HELIOS Web site:
www.helios.de) if you are not sure about this.
Print To Disk
connection
With the Print To Disk connection (figure 65) you induce
the Print Server to print to a file.
Fig. 65:
Data for “printtodisk” queue on host “ibm”
You have to specify a destination for the file (UNIX Direcand you can enter a Name Prefix and a Notify Pro-
tory)
5 EtherShare Admin
152
5.10 Printers list
gram, if desired. The prefix serves to identify the files that
are coming from this specific printer queue (in case you
have several Print To Disk queues that print to the same
destination). The Notify Program option lets you enter a
path that leads to a specific UNIX program. This program
will be started automatically after printing has been finished successfully. Furthermore, you can select a mode of
Compression for the destination file and you can decide
whether or not your print job has to be resolved the same
way it would be resolved when printing to an output device.
If the Resolve option is switched off the job will be written
to the file “as is”; things that are usually accomplished during printing, as e.g. font inclusion or image replacement
(for OPI only), will be skipped.
The Print To Disk option may e.g. be used for automatic
generation of PDF files. You can print to files in a specific
UNIX directory and induce the Acrobat Distiller software
to scan this directory regularly and convert incoming files
to PDF.
Balance Group
connection
Choose the connection Balance Group (figure 66) in the
printer data window to set up a group of printers for load
balancing – that is for shifting print jobs to a second or third
printer in a group whenever the first printer is busy with a
huge job.
To specify a group of printers you just have to drag and
drop the desired printers from the Printers window to the
respective field in the printer data window (see figure 66).
5 EtherShare Admin
153
5.10 Printers list
Fig. 66:
Hold Queue
connection
Data for a load balancing queue on host “ibm”
Hold and error queues can be defined using the Hold Queue
connection as shown in figure 67.
The Hide Queue option will be set automatically for this
type of queues, because – usually – users should not be allowed to print directly to a hold or error queue; see paragraph Creating printers above for the purpose of hold and
error queues.
The dialog lets you specify an individual Hold Time. The
default value is 3 hours. If you set the hold time to 0 days
5 EtherShare Admin
154
5.10 Printers list
and 0 hours this would mean “on hold forever”. Print jobs
in such a hold or error queue will be stored until you move
them to another queue or delete them manually.
Important:
Fig. 67:
Print Preview
connection
Note that you may enter non-negative integer values
only. Floating point or negative integer values may
lead the Print Server to unexpected behavior.
Data for a hold queue on host “ibm”
in the Connection pop-up menu will only
be active if you have purchased and installed the HELIOS
Print Preview product. This connection type is described in
your Print Preview manual.
Print Preview
5 EtherShare Admin
155
5.10 Printers list
➢
Click Save to finally install a new printer queue.
Important:
Once you click on Save the Admin prompts to select a
PPD file for the new printer queue. A Macintosh dialog
window is opened automatically for that purpose. You
can cancel the process and select the PPD file later
(using the Select PPD item from the Printer menu).
You will get a warning message on every login if there
are printer queues on the server that have not yet been
assigned a PPD file. (Remember that you have to select the same PPD file later when you select the queue
in the Apple Chooser.)
The Print Server needs to have a list of resident fonts for
each installed printer. The printer’s resident font list (the
“FONTS” file in the printer’s spool directory) is created automatically by the Administration Server by interrogating
the printer when you first set it up. The printer must be connected and online for this to work. A warning is displayed
if the Administration Server is not able to make the font list
for some reason, for example because the printer is offline
or busy with another job at the time (see figure 68).
Fig. 68:
Message box: No font list
For all output devices where no fonts can be queried, for example Remote LPR, Print To Disk or Balance queues,
EtherShare will rely on the font information provided in the
5 EtherShare Admin
156
5.10 Printers list
PPD files specified for these printer queues. Make sure to
select proper PPD files which contain current information
for your output device. If there is no PPD file, EtherShare
will fill in the default 34 LaserWriter Plus fonts. Another
possible cause for this error is an incorrectly configured
EtherShare network connection in “atalk.conf”.
If the font list is missing, you should connect the printer, put
it online, and select Update Fonts in the Printer menu
manually (see later).
Changes
made when
you create a
printer
When you create a printer queue with the EtherShare
Admin, the following changes are made on your host:
❍ A new entry is made in “/etc/printcap”. And
new entries are made in “$ESDIR/atalk.conf”:
papsrv: section... (for the Print Server)
name: section... (for the interface program)
❍ A link is created from “$ESDIR/if/name” to the inter-
face program.
❍ The lockfile is created in “$ESDIR/lprdevdir/name”.
❍ The printer’s spool directory is created and the printer’s
“FONTS” file and its PPD file are placed there. The Admin can only create the bottom-most directory. Parent
directories have to exist. Privileges are defined by the
Admin in case a new directory is created. Else, the privileges that have already been defined, are used. They
have to be set up properly, otherwise it may happen e.g.
that jobs are not deleted after printing and remain stuck
in the spool directory.
More information about changes on the server are given in
chapter 11 “The Print Server”.
5 EtherShare Admin
157
5.10 Printers list
The spool directory and its contents are not removed when
deleting a printer queue. We recommend to clear any existing print jobs and wait until the printer is idle before deleting the queue.
Deleting
printers
➢
For deletion, activate the Printers list, select the printer
name, and choose Clear from the Edit menu (see figure 69).
Fig. 69:
Deleting a printer entry
The Admin then prompts for acknowledgment of deletion,
to allow it to be aborted, if required (see figure 70).
Fig. 70:
Confirming deletion of a printer entry
On confirmation, the entry is removed from the window
and the queue on the host is stopped. The Admin deletes the
configuration entries in the main configuration file
“atalk.conf” and in “/etc/printcap”, and the corresponding
link for the interface program will be removed (if present).
5 EtherShare Admin
158
5.11 Printer menu
5.11
Printer menu
If you have selected a printer in the Printers list window,
or if the foreground (active) window is a window containing printer data, an additional menu item Printer is available in the menu bar at the top of the screen (see figure 71).
The functions in the Printer menu only apply to the printer
you have selected. The item OPI/ICC Settings in the Printer menu is grayed out, unless you have purchased and installed HELIOS EtherShare OPI 2.1 and/or HELIOS PDF
Handshake.
Fig. 71:
The Printer menu items
Settings
The Settings menu item is used to open the printer data
window of a specific printer and then change its configuration. You have to highlight the printer you want to set up
before choosing the item (compare figure 71).
Update Fonts
Update Fonts is used to update the Print Server’s resident
font list for the selected printer. Since this takes place
through printer interrogation, the printer must be connected
and online for this to work. You need to do this if new fonts
5 EtherShare Admin
159
5.11 Printer menu
have been installed in the printer, through font cartridges,
printer cache disks etc.
Do not confuse the resident font list with download fonts
which have been installed by EtherShare in the Print Server, and are available to all printers on that host. The latter
can be seen by clicking Fonts... in the Lists menu.
The printer’s resident font list is created automatically by
the Administration Server when you set it up for the first
time. The list is stored in the “FONTS” file in the printer’s
spool directory.
Show Fonts
The option Show Fonts shows the resident fonts of the selected printer. The Administration Server gets this information from the “FONTS” file in the printer’s spool directory.
The window title shows the host name, Fonts, and the
printer name (see figure 72).
Fig. 72:
Resident font list for printer “lw”
5 EtherShare Admin
160
Edit
Initialization
5.11 Printer menu
Edit Initialization is used to create or change a PostScript
printer initialization sequence (“INIT”) for the selected
printer. For example, you can use this to define a PostScript
filter sequence to remove unwanted single and double
“Ctrl-D” codes generated by some MS-Windows applications. A suitable filter for this is shown in the example in
figure 73.
Usually, each physical printer is associated with a single
printer queue. However, you can allocate more than one
printer queue to a printer, which allows you to have different printer initialization strings for the same printer and to
select between them in the Chooser.
Fig. 73:
Printer initialization string
Note that writing INITs requires some knowledge of the
PostScript language. PostScript INITs must not contain the
“exitserver” operator, because the following print job will
not execute properly (see appendix A 7.2 “PostScript RIP
INITs in the EtherShare Admin”).
The EtherShare Admin can be extended with custom PostScript calibration tools, which appear automatically in the
Edit Initialization menu. On request, HELIOS will pro-
5 EtherShare Admin
161
5.11 Printer menu
vide programming guides for developing such tools to typesetter manufacturers.
The “init” sequence is stored in the “SETUP” file in the
printer’s spool directory.
Another way of defining a specific behavior during printing, is to edit the queue’s PPD file. This is described in
paragraph Edit PPD below.
Edit Trailer
The menu item Edit Initialization can also be used to edit
a queue’s trailer, i.e. to define a PostScript sequence that is
appended to the print job. If you press the Option key when
selecting Edit Initialization the “Trailer” window will
open automatically. An example of a trailer file is shown in
figure 74. Note that editing a trailer file also requires some
PostScript knowledge.
Fig. 74:
Editing the trailer of a specific printer queue
The trailer sequence is stored in the “TRAILER” file in the
printer’s spool directory.
Select PPD
The PostScript printer description (PPD) file contains a
complete description of the output device as for example paper margins, resolution, and PostScript Level compatibility.
5 EtherShare Admin
162
5.11 Printer menu
Assigning the correct PPD file to a printer guarantees the
best possible output results (provided that you assign the
same PPD file later, when you set up the printer with the
Chooser on your Macintosh client). Usually, the EtherShare
Admin will prompt for assigning a PPD file the moment you
create a new printer queue. If you cancel the dialog box then,
you will get a warning when you log in the next time. Highlight the printer name in the Printers window and choose
Select PPD from the Printer menu to finally define – or if
necessary change – the PPD file for a specific queue.
Edit PPD
Once you have selected a PPD file for a queue, you can display the contents of that file in a text window, and root and
members of the SysAdm or QueueAdm group can even edit
the file, if necessary. For that purpose, highlight the printer
name in the Printers window and choose Edit PPD from the
Printer menu. You can use this feature for information purposes at any time, e.g. to find out which PPD file is currently
valid on a specific queue. However, you should be very
careful as far as the “edit” functionality is concerned. Editing a PPD file requires some knowledge about the structure
and syntax of PPD files. Also, your changes may have different effects when printing with different applications.
Moreover, there is currently little safeguard against different
PPDs selected for an EtherShare printer queue and selected
for the LaserWriter driver on a Macintosh. With LaserWriter 8, you can “Create” or “Setup” a PPD for an entry in
the Chooser and as long as you choose Auto Setup, the selected PPD on the Macintosh will at least be a PPD with the
same “*NickName” entry as the PPD specified for the
EtherShare printer queue. Nevertheless, in case you edited
the PPD on the server, there is no mechanism to retrieve this
new PPD information. You would have to adjust the PPD
file on the Macintosh manually to reflect all changes of the
printer queue’s PPD.
5 EtherShare Admin
163
5.11 Printer menu
Restart Printer
The option Restart Printer is used to stop and restart printing on the job queue and to re-initialize the UNIX “lpd” program for the selected printer. This may be necessary if a fatal
error or network connection fault occurs while printing. You
will be asked for confirmation (compare figure 75):
Fig. 75:
Spool only
Spool & Print
Restarting printer “LaserWriter”
The option Spool only (see figure 76) causes following
print jobs for the selected printer to be spooled to disk but
not sent to the printer. This can be useful if it is required to
hold back some jobs, e.g. for processing during the night
shift rather than during daytime. Printing is restarted with
the Spool & Print option (see below). If you switch back
from Spool & Print to Spool only, the current print job will
be finished on the output device, and the printing will then
be stopped again.
Fig. 76:
Choosing Spool only
5 EtherShare Admin
164
5.12 Printer job windows – moving, restarting, and deleting jobs
5.12
Printer job windows – moving,
restarting, and deleting jobs
Printer job windows display the current job queue for the
selected printer. The windows are updated about twice a
minute. The list shows the document name, the user name,
the job size in the spool queue, the job sequence number,
and the starting time, and includes both Macintosh and
UNIX print jobs (compare figures 77 and 78). For related
information, see also the chapter 5.13.3 “Printer Log File”.
Showing
printer jobs
➢
A printer job window for a specific printer queue is opened
with a double-click on the queue name in the Printers window (or by highlighting the queue name and choosing Open
from the File menu).
Fig. 77:
List of jobs for printer “hold” (hold queue on host “ibm”)
Fig. 78:
Printer job window for printer “lw” on host “ibm”
5 EtherShare Admin
5.12 Printer job windows – moving, restarting, and deleting jobs
165
The list window also contains a status line showing printer
status and the quantity of data in kByte already sent to the
printer for the job which is currently printing (compare figure 78). The status line is also updated about twice a
minute. Due to inclusion of fonts etc., the quantity of data
sent to the printer can be larger than the job size in the spool
queue; if EtherShare OPI is also installed, due to image inclusion it may be considerably larger than this.
The user name assigned to the job is the one specified in the
Macintosh File Sharing control panel. The job will be assigned to “root” if no name is specified in File Sharing, or
if the name specified is unknown to EtherShare. See User
and document names in print jobs in appendix A 7.1 “EtherShare log files” for more information.
Print jobs with a PDF icon in front of them – like those
shown in figure 77 – are jobs that have run through a preview queue. To get these PDF previews of a print job, you
have to purchase and install HELIOS Print Preview.
The option Bring to Front in the Edit menu can be used to
move one or more selected print jobs to the 2nd top position
of the queue (since the “top position” print job is considered
as being processed, and therefore “untouchable”).
You may also want to move print jobs manually inside the
queue. Select one or more (Use Shift-click to select a range
of entries and use Command-click to select/deselect individual entries from a list) print jobs by clicking with the
mouse and dragging.
If you have several printer queues, you can simultaneously
open printer job windows for each of them; non-active
(background) windows are also updated.
5 EtherShare Admin
166
5.12 Printer job windows – moving, restarting, and deleting jobs
Note that the “admsrv” does interpret octal backslash escape sequences in PostScript %%Title comments. This
means that e.g. Japanese job titles can be displayed in a job
window, provided that you use a local operating system or
the “Japanese Language Kit” on your Macintosh.
To delete a job, you have to proceed as follows:
Deleting
printer jobs
➢
Select the job in the printer job window and choose Clear
from the Edit menu.
You can choose multiple jobs for deletion using standard
Macintosh keyboard shortcuts (see Selecting multiple entries
from a list in chapter 5.5 “About list windows”). You are
only allowed to delete your own jobs, unless you are “root”
or a member of the “SysAdm”, “QueueAdm”, or
“PrnAdm” groups.
The EtherShare Admin will prompt for acknowledgment of
deletion, to allow deletion to be aborted if required. You
can suppress the warning by holding the Option key when
choosing Clear. This can be useful when deleting a number
of entries at the same time.
Moving jobs
and restarting
hold queues
If you have more than one printer queue running on the
same host, you can open two or more printer job windows
simultaneously and move jobs between queues (printers) by
clicking with the mouse and dragging. You might want to
do this if one of the queues is too long, or a printer needs to
be stopped for cleaning. You can do this without stopping
the printers.
Hold and error queues are usually not connected to a physical printer. Thus, in order to restart a job from a hold or error queue, you have to drag it to the printer job window of
5 EtherShare Admin
5.12 Printer job windows – moving, restarting, and deleting jobs
167
a queue that will execute the job. An example is shown in
figure 79, where a job from a hold queue is moved to the
“real printing” queue “lw”.
Fig. 79:
Interpreting
the hold time
in a hold
queue’s
job window
Moving jobs between printers “hold” and “lw”
Hold queues are updated according to the “watchtime” parameter in the configuration file “atalk.conf”. By default,
this is every 30 seconds. However, the remaining hold time,
which is displayed in the headline of the printer job window
is not updated that regularly. The list below shows when
and how often the counter in a hold queue is changed:
Remaining hold time:Counter changes every...
1 day
60 minutes
1 hour
10 minutes
5 EtherShare Admin
168
5.13 Other lists and accounting files
5.13
Other lists and accounting files
5.13.1
Fonts list
in the Lists menu shows PostScript printer fonts
which have been installed on the host with the EtherShare
Admin. They are available to all printer queues on that host.
The EtherShare Admin gets the print server’s fonts list from
the file “$ESDIR/psfonts/FontDirectory”.
Fonts...
The window title shows the host name and Fonts (see figure 80). Do not confuse this window with Show Fonts in
the Printer menu, which displays the list of resident fonts
for the selected printer.
You can double-click on the font name to inspect the manufacturer’s coded font header (see figure 80).
Fig. 80:
Fonts list for host “ibm” showing font header information
5 EtherShare Admin
5.13 Other lists and accounting files
169
EtherShare Admin can install Adobe “Type 1” and
“Type 3” printer fonts (not Screen fonts or TrueType fonts)
onto the Print Server, directly from the font manufacturer’s
original font disks or another depository:
➢
Open the Fonts... window in the Lists menu and choose
New in the File menu. Then select the drive and folder. Select individual fonts for copying or choose Load all Fonts:
(compare figure 81) to load all fonts from the folder that is
currently opened.
Fig. 81:
Installing fonts on the print server
Storing printer fonts on the server reduces the network load
caused by font downloading from the Macintosh client.
You can copy the printer fonts from one host to another, by
opening both fonts lists and selecting and dragging the fonts
(see chapter 5.15 “Multiple EtherShare hosts”). Of course,
you cannot do this with the printer’s resident fonts.
5 EtherShare Admin
170
5.13 Other lists and accounting files
Note:
5.13.2
The PostScript fonts that come with the HELIOS
PDF Handshake product cannot be copied between
different servers.
Active Users list and sending messages
with the EtherShare Admin
Active Users shows all users currently logged-on to EtherShare. Spool jobs and other connections, e.g. PCShare users, are also listed (see figure 82).
➢
Open the Active Users window by selecting the respective
item from the Lists menu.
Selecting one or more users and then choosing Clear from
the Edit menu will kill their current server connection. This
is not the same as Users... in the Lists window, which
shows all users with a valid account. Note that only the user
him/herself, the SysAdmin or “root” are allowed to clear a
connection. The Active Users... option gets its information
from the file “$ESDIR/stmp”. See “swho” command in
5 EtherShare Admin
5.13 Other lists and accounting files
171
chapter 8.5 “AppleTalk stack utility programs” for related
information.
Fig. 82:
Active Users window on host “ibm”
You can send short “AFP” messages to any client connected via AFP server or PCShare server. This can be done using the Message menu item that automatically appears in
the menu bar whenever the Active Users window is open
and brought to the foreground.
➢
To send a message, highlight the users you want to address,
select Message and Send Message... from the menu and
enter your individual message in the dialog as shown in figure 83. This feature is available to AFP server clients only!
“AFP” messages are displayed automatically in a message
window on the addressees’ monitors. They are not saved in
5 EtherShare Admin
172
5.13 Other lists and accounting files
a file; the addressees delete them on closing the respective
message window by clicking the OK button.
Fig. 83:
Important:
Sending a message to several EtherShare users
The Message To All... option in the Message menu
lets you send a message to all current users. It is, however, available to “root” and members of the “SysAdm”
group only.
Such messages can also be sent from the UNIX server using
the UNIX “afpmsg” program. For more information read
the “afpmsg” chapter in your UNIX manual.
5.13.3
Printer Log File
The printer log file shows print job accounting details for
the selected host, such as job status, printer name, user
name, document name, starting date/time, duration of job,
number of printed pages, and printer fonts used. The job
status can be √ = no info and ok, ◊ = extended info and ok,
or • = extended info and error.
5 EtherShare Admin
5.13 Other lists and accounting files
173
The messages file, that belongs to each entry in the log file,
contains even more information, e.g. the total number of
bytes printed and whether you have printed composite or
separations. If you are working with EtherShare OPI 2.1 the
printer log messages file also provides information about
image replacement. This information is especially useful
for print jobs in an error queue because you will get details
about the mistakes that have occurred.
To open a specific log file, select Printer Log File... from
the Lists menu and specify the required day (see figure 84).
Fig. 84:
Opening a printer log file
Printer log files are arranged by date. Every night at midnight the (UNIX) “cron” program starts automatically in
the background and renames the log file information of the
last seven days. The file “Today” becomes the file “Yesterday”, “Yesterday” is renamed into “Two Days Ago”, and so
on. You can then select e.g. the printer log file of “Three
Days Ago”. Log files which are older than seven days are
deleted automatically.
➢
From the printer log file you can open the related messages
files with a double-click on the respective items (compare
5 EtherShare Admin
174
5.13 Other lists and accounting files
figure 85). This is especially helpful when errors have occurred (error status = • ).
Fig. 85:
➢
Printer log file and corresponding messages file
Choose Save as... from the File menu to save the printer
log file as a text file. You can then read this information into
a word processor or spreadsheet program for billing purposes, or to prepare job statistics. The messages files can
also be saved as text files.
Users are also sent a message via UNIX mail and an additional AFP message if a printer error occurs, including
“paper out”. Users who have installed Helios Mail will receive the message directly on their Macintosh.
5 EtherShare Admin
5.13 Other lists and accounting files
Note:
175
The user name assigned to the job is the one specified
in the Macintosh File Sharing control panel. The job
will be assigned to “root” if no name is specified in File
Sharing, or if the name specified is unknown to EtherShare. See User and document names in print jobs
in appendix A 7.1 “EtherShare log files” for more information.
The EtherShare Admin gets its information from the files
“$ESDIR/printer.acct.” (which contains the data of “Today”) to “$ESDIR/printer.acct.6” (“Seven Days Ago”). See
Printer log file structure and User and document names in
print jobs in appendix A 7.1 for related information.
Please see also the description of mail in chapter 11.6 “Configuring printers manually” for details about which printer
messages are recorded in the printer log file and which ones
are recorded in the system messages file.
5.13.4
Server Log File
The server log file contents depend on the operating system. Usually, the log file shows messages from all the
EtherShare servers such as status ( √ = OK, • = unsuccessful or illegal login), server name, AppleTalk (NVE) address, user name, starting date/time, duration of execution,
CPU time, and memory (see figure 86).
Server log files are arranged by date. Every night at midnight the (UNIX) “cron” program starts automatically in
the background and renames the log file information of the
last seven days. The file “Today” becomes the file “Yesterday”, “Yesterday” is renamed into “Two Days Ago”, and so
on. You can then select e.g. the server log file of “Three
5 EtherShare Admin
176
5.13 Other lists and accounting files
Days Ago”. Log files which are older than seven days are
deleted automatically.
➢
To open a specific log file, select Server Log File... from
the Lists menu and specify the day you want.
Fig. 86:
➢
Example of a server log file
Choose Save as... from the File menu to save the server log
file as a text file. You can then read this information into a
word processor for further use.
The EtherShare Admin gets its information from the files
“$ESDIR/server.acct.” (which contains the data of “Today”) to “$ESDIR/server.acct.6” (“Seven Days Ago”). See
Server log file structure in appendix A 7.1 “EtherShare log
files” for details.
5.13.5
System Messages
The system messages file shows messages from the UNIX
host in standard UNIX format (see figure 87).
5 EtherShare Admin
5.13 Other lists and accounting files
➢
Open the system messages file by choosing System
Messages... from the Lists menu.
Fig. 87:
Note:
➢
177
System messages file on host “ibm”
If the Messages window opens blank (or with an error
message), the system message file may be too large
to open with the memory allocated. In this case exit
EtherShare Admin, and increase the memory in the
Finder’s Get Info dialog.
Choose Save as... in the File menu to save the system messages file as a text file. You can then read this information
into a word processor, or fax it e.g. to your UNIX manufacturer in case you have a system problem.
The Admin gets its information from your host’s system
message file. The location of this file is specified in
“/etc/syslog.conf” and depends on the UNIX system. It is
e.g. “/var/adm/messages” for Solaris 2 and DG-UX.
5 EtherShare Admin
178
5.13 Other lists and accounting files
The system message file can grow quite large. It cannot be
cleared using the EtherShare Admin – the UNIX operating
system usually is responsible for keeping it at a manageable
size. See the description of the “cron” program in your
UNIX documentation for details.
5.13.6
Versions
HELIOS continuously improves all its software products,
and improved versions are released now and then. The standard EtherShare package offers a wide range of facilities
and includes a number of separate Macintosh and UNIX
program modules and utilities. If you ever need to contact
our support department, they will want to know the software versions installed on your host (see chapter 17.1 “Support options”).
➢
With Versions... from the Lists menu you can list the versions of all major EtherShare server modules and Macintosh programs (see figure 88).
Fig. 88:
Program versions
5 EtherShare Admin
5.13 Other lists and accounting files
Important:
179
For “root” and members of the “SysAdm” group, the
Versions window will be updated on call. Therefore, it
may take a few seconds to open the window. Regular
users will get the information that was valid on the last
start of EtherShare. This information may be outdated!
Besides the program versions, the Versions window also
provides information about your EtherShare, interface, and
syslog configuration (compare figure 89).
Fig. 89:
Extended information in the Versions window
The information comes from the file “$ESDIR/Versions”.
5.13.7
Extension Mappings
“afpsrv” usually simulates Finder info (such as file type and
creator) automatically for files without Macintosh resource.
The type of file is determined by inspecting the file’s contents. This allows about 20 different icons to be shown for
5 EtherShare Admin
180
5.13 Other lists and accounting files
non-Macintosh files (see Generic icons in chapter 9.3 “Directory and file formats”).
In the case of files created by DOS/Windows applications,
the file type is typically indicated by adding a suffix to the
file name, the so-called file name “extension”.
Under EtherShare, appropriate icons can be displayed for
such files by specifying the extensions in the so-called
“extension mapping table” (the default file name is
“$ESDIR/conf/suffixes”). See the suffixes parameter in
chapter 9.4 “Parameters of the “afpsrv” program” and
Automatic extension mapping in chapter 9.6 “Public and private volumes” for related information.
➢
Select Extension Mappings... from the Lists menu to view
the extension mapping table (see figure 90).
Fig. 90:
Extension mapping table
For each entry in the “suffixes” file, Extension Mappings
lists the configured file name extension alongside the cho-
5 EtherShare Admin
5.13 Other lists and accounting files
181
sen Macintosh application (with its mini-icon) and chosen
document type (with the document mini-icon).
➢
Double-click on an entry to edit the mapping, or choose File
and New to create a new mapping (see figure 91).
Fig. 91:
➢
Editing the extension mapping table
Specify the required extension in the Suffix: field. Then
click on Choose to select an existing application. The
Document: pop-up menu will list all document types for
the chosen application, select the one you want. Click on
Save when you are finished.
Important:
This feature allows you to allocate file name extensions to icons of applications or documents which
already reside on the File Server or on the client computer, but it does not allow you to create new icons.
The mapping specified in the mapping table will only be
applied to files that do not yet include resource information.
5 EtherShare Admin
182
5.13 Other lists and accounting files
5.13.8
IP Access
AFP servers were traditionally only available on local area
networks. The AFP over IP transport allows connections to
the AFP server from anywhere in the Internet. To protect
your site, you might want to create an IP access list to restrict access to your server. You can create such a list on
your UNIX server (see appendix A 8: “IP configuration –
Reference Part”), but it is much easier to use the EtherShare
Admin instead. It offers all options that are required for a
standard access control configuration. Some additional parameters are available under UNIX only. By default, access
is restricted to the local network.
System
requirements
To make use of IP access control, you have to install/run:
• Open Transport 1.1.2 or later
• System Software 7.6 or later for Macintosh clients
• New AppleShare client for Macintosh clients. This
new client is available from Apple:
http://www.apple.com/appleshareip
Look for file AppleShare
Note:
About defaults
Client 3.8.1
or later
System Software 8 includes the AppleShare IP client
software.
If no access list is available, any AppleShare client in the
Internet will be able to access your server. The EtherShare
installation program, therefore, automatically creates an access list. This list will allow all locally connected AppleShare clients to access the server (clients on the same
network segment), and it will deny access to the server to
any other computer outside.
5 EtherShare Admin
5.13 Other lists and accounting files
Description of
the access list
183
Figure 92 shows an example of an IP access list. The list is
sorted. At first, it contains all addresses of computers/networks to which access is explicitly denied. Then, it lists
those to which access is allowed. At the end, it contains a
Deny any other entry that denies server access to all computers/networks that do not appear in the list before. The
representation of “any other” is 0.0.0.0 (for Address) and
0.0.0.0 (for Mask). If the Deny any other entry was missing, access would – by default – be granted to anybody in
the Internet whose address had not been entered in the “Deny” section. Please note that the Deny any other entry cannot be deleted.
Fig. 92:
Example of an IP access list
The access list will always be sorted that way automatically. This allows the program to go through the list from top
to bottom and react very quickly. E.g. if an IP address is denied, the program can send the respective message after going through the “Deny” section only – it does not have to
check the whole list. The checking mechanism is illustrated
in figure 93 below.
5 EtherShare Admin
184
5.13 Other lists and accounting files
Start
Access
list
available?
no
yes
Address
denied?
yes
no
yes
Address
allowed?
no
Deny
any other
Establish
connection
End
Fig. 93:
Display warning
and
deny connection
How the program deals with access requests
The columns in the access list contain the following information (see figure 92 again):
5 EtherShare Admin
5.13 Other lists and accounting files
Access
185
specifies whether access is denied or allowed.
IP specifies whether the entry is meant for a single computer (Host) or a network (Net).
Address contains the IP address of the host/network. An IP
address consists of 32 bits (4 groups of 8 bits). This number
of bits allows well over 2 billion unique numbers to be used
to identify a node on a network. When specifying an IP address, it is common to use a dotted decimal representation
of four numbers between 0 and 255 divided by a period
(e.g. 192.168.4.40).
is only meaningful for network entries. The mask is
structured like an IP address and specifies the number of
bits that are relevant to the network identification. It filters
out the logical network address. The mask 255.255.255.0
for example specifies that 24 bits are to be compared with
the IP number. The remaining 8 bits (that identify the individual computers of a given network) are not relevant.
Mask
Comment contains a description or name that may help you
remember to whom the respective computer or network belongs.
Defining
access rights
In order to set up or change the access list for your individual server, you have to select Lists and IP Access from the
Admin menu and then click the Add Entry button in the access list to open the dialog that lets you set up new definitions (compare figure 94):
5 EtherShare Admin
186
5.13 Other lists and accounting files
Fig. 94:
Setting up the IP access list
First of all, you just have to click the respective radio button
to specify whether you want to Allow or Deny either a host
(IP Node) or a network (IP Net). For IP Node entries you
only have to enter the correct IP Address. For IP Net entries you have to enter both, an Address and a Mask (see
figure 95). The Comment field is restricted to 32 characters. The access list will automatically be re-sorted after
adding a new entry.
Fig. 95:
Setting up an entry for a network
5 EtherShare Admin
5.13 Other lists and accounting files
187
You can edit an existing entry directly if you want to
change it. Just double-click the entry in the access list.
The Deny any other entry cannot be removed. For security
reasons, it is always kept at the end of the list.
There will be rudimentary consistency checks, so you will
have to be familiar with IP net/mask structuring and conventions. See your TCP documentation if you have questions.
Additional volume settings (e.g. ipaccess=...) are described in chapter 9.6 “Public and private volumes”.
Please note that under UNIX, there are additional parameters available (allowdomain, denydomain). They are described in appendix A 8: “IP configuration – Reference
Part”. If someone edited the access list under UNIX and
used these parameters, you would get a warning on opening
the list with the Admin program again, because the Admin
cannot display the “domain” entry. Editing the list with the
Admin will replace all settings that have been defined under
UNIX.
5 EtherShare Admin
188
5.14 Editing “atalk.conf” (and other configuration files) manually
5.14
Editing “atalk.conf” (and other
configuration files) manually
We strongly recommend to use the EtherShare Admin to
carry out the majority of configuration tasks required by
your EtherShare installation. Particularly in the case of
printer setup, the EtherShare Admin only accepts meaningful parameter values and always generates syntactically
correct entries in the EtherShare main configuration file
“atalk.conf”. However, certain seldom used parameters and
switches in “atalk.conf” can only be configured manually.
System administrators with UNIX experience can edit
“atalk.conf” using a UNIX editor such as vi.
Macintosh users can use the EtherShare Admin to load,
view, or edit “atalk.conf” – and several other configuration
files, namely “/etc/printcap”, “ethershare.license”, and
“afpvolumes”.
Important:
➢
Before opening one of the configuration files with the
EtherShare Admin you should make it a habit to close
all open Admin windows. Otherwise, the changes you
make could collide with the definitions specified in an
open dialog window, and thus will never take effect.
To open the window that contains the desired configuration
file, press the Option key and then select the respective item
from the Lists menu (compare figure 96).
You need sufficient permissions to save the changes you
make (and, depending on what you change, you may need
to stop and restart EtherShare for the changes to take effect), but regular users can also use this option in order to
5 EtherShare Admin
5.14 Editing “atalk.conf” (and other configuration files) manually
189
inspect the respective files and thus check the current configuration.
Fig. 96:
Opening the Lists menu while pressing the Option key
More information about parameters of the “atalk.conf” file
and about syntax conventions are given in chapter 8.2 “System configuration”.
5 EtherShare Admin
190
5.15 Multiple EtherShare hosts
5.15
Multiple EtherShare hosts
In networks with more than one EtherShare host, the EtherShare Admin can access several of them at the same time,
for example to allow configuration data and print server
download fonts to be copied from one host to another.
Printer jobs cannot be copied between hosts.
➢
Multiple lists
To make multiple connections, choose Login... from the
File menu as often as you need it.
The presence of additional Administration Servers (i.e.
hosts) is shown graphically in the Lists menu by appending
“...” to all entries – e.g. Users... rather than Users – (compare figure 97).
Fig. 97:
Lists menu when logged-on to more than one host
If you are logged-on to more than one host, on selecting any
of the Lists items (Users..., Groups..., Volumes..., etc.), a
new window will open to allow you to choose the host
whose window you want. In figure 98, Volumes... has been
5 EtherShare Admin
5.15 Multiple EtherShare hosts
191
chosen in the Lists menu, and three Administration Servers
are active. To open the required data window, highlight the
respective host and click on the Volumes button.
Fig. 98:
Choosing the host whose volume list you want
Copying
configuration data
from one host
to another
Furthermore, you can copy the configurations for users,
groups, volumes, extension mappings and printers from
one host to another. Print server download fonts can also be
copied between two hosts. Print jobs in a printer job queue,
however, can only be moved between printers on the same
host, and you cannot copy resident printer fonts, of course.
➢
To copy items, select one or more of them in the list of one
of the hosts with the mouse. You can choose multiple entries using standard Macintosh keyboard shortcuts (see Selecting multiple entries from a list in chapter 5.5). Without
releasing the mouse button, drag the item away from the list
– a dotted frame is drawn around the selection – and release
the mouse button over the corresponding list for the other
host (see figure 99).
5 EtherShare Admin
192
5.15 Multiple EtherShare hosts
Fig. 99:
Copying the user entry “selma” from host “hp” to host
“ibm”
A new data window is automatically opened for the item on
the target host. Please note that the default values entered in
the fields of the new data window are those of the copied
object, and are not the default values from the target host’s
EtherShare Admin application. Then click Save in order to
save the new entry for the target host.
When copying a user to another host, only the user name is
copied, but not the list of groups that the user belongs to.
When the new entry is saved, the EtherShare Admin tries to
preserve the old user ID if it is not already assigned to another user.
When copying a group to another host, only the group name
is copied, but not the list of members of the group. In contrast, when copying volumes and printers, all parameters of
the object are copied. Note that in case you copy printer
queues or volumes to another host, the spool directories or
5 EtherShare Admin
5.15 Multiple EtherShare hosts
193
volume directories that are specified for the queue/volume
must exist on the target host as well.
Please note that it is not possible to assign a user to a group
of another host. Similarly, you are not allowed to assign a
group to a user of another host. Furthermore, it is not recommended (and normally not necessary) to copy user and
group data to another host if your installation uses yellow
pages (NIS).
If you copy items between servers that have different software products installed you will possibly not be able to save
the items on the target server. For example, if you have set
up a Print Preview queue on a server and want to copy this
queue to a second server on which the Print Preview product is not installed, the Save button in the queue’s
Settings window will be disabled on the target server.
5 EtherShare Admin
194
5.16 Logging off from the Administration Server
5.16
➢
Logging off from the
Administration Server
In order to log off from an Administration Server, choose
Logout... from the File menu. If more than one Administration Server is active, a dialog box will appear allowing you
to choose the one you want to log off from (see figure 100).
Fig. 100: Logging off from an Administration Server
➢
Select the server you want to log off from. Click Logout to
confirm your selection.
EtherShare Admin then closes the connection to the Administration Server of the selected host, and closes all associated windows on the screen.
➢
Choosing Quit from the File menu will terminate the Admin
program and will – at the same time – close all connections.
5 EtherShare Admin
5.17 Retrieving information about your EtherShare copy
5.17
195
Retrieving information about your
EtherShare copy
In some situations – e.g. if you contact your dealer for administrative or support matters – you may need information
about your EtherShare copy, such as serial number, machine ID, or activation key. There are different ways of retrieving these information.
You can display the complete machine ID for example by
using the HELIOS product installer which is described in
chapter 4 “Installation”.
Or you may Option-click in the Logout... window of the
EtherShare Admin after having selected the server in question. Then the serial number in digits and the machine ID in
hexadecimal notation will be appearing (see figure 101).
Another possibility of retrieving product information, is to
use the Admin’s Versions option. This feature is described
in chapter 5.13.6.
Fig. 101: Getting serial number and machine ID
5 EtherShare Admin
196
6 HELIOS Mail
197
6
HELIOS Mail
6 HELIOS Mail
198
6.1 General remarks
6.1
General remarks
This chapter describes the configuration and use of the
Macintosh program HELIOS Mail, which allows to send
and receive electronic mail messages and files from other
Macintosh or UNIX users on the network.
If you have a modem attached to the UNIX host and configured for UNIX mail (uucp) or Internet mail (SMTP) you
can use HELIOS Mail to communicate with several million
users of this worldwide e-mail system. You also receive
EtherShare Print Server messages (“paper out” etc.) via
electronic mail.
HELIOS Mail contains an integrated editor and an address
book function.
HELIOS Mail is also provided with a “Mail Notification
Feature”, which displays a flashing mail icon and a notification message and outputs a configurable sound if you receive new mail, regardless of which Macintosh program
you happen to be using at the time. The installation of the
“Mail Notification Feature” is described in chapter 4.6
“The client installation procedure”. Its activation and use
are described at the end of this chapter.
In order to use HELIOS Mail, the Mail Server must already
be running on the host you want to connect to. EtherShare
is configured to start the Mail Server automatically when
UNIX is booted. The Mail Server communicates with
HELIOS Mail through the Apple Data Stream Protocol
(ADSP); the protocol is transparent to other AppleTalk devices.
6 HELIOS Mail
6.1 General remarks
199
HELIOS Mail needs to access Apple’s ADSP driver (see
chapter 4.6 “The client installation procedure” for details).
Important:
The POP3
Server
HELIOS Mail also uses the UNIX “mail” program,
which must be installed and working. To test this,
make a UNIX login and try to send a mail between two
UNIX users. See your UNIX documentation for more
details.
EtherShare 2.6 includes a POP3 Server so that it is possible
to use a client workstation other than Macintosh and/or a
mail application other than HELIOS Mail with the Mail
Server on the UNIX host. See chapter 14.4 “The POP3
Server” for details about this.
6 HELIOS Mail
200
6.2 Starting HELIOS Mail
6.2
Starting HELIOS Mail
During the installation of EtherShare, the “install” program
automatically creates a public Macintosh volume with the
name “EtherShare Applications”. This volume is used to
store Macintosh applications such as HELIOS Terminal,
HELIOS Mail and the EtherShare Admin.
➢
You can start HELIOS Mail from any of the Macintosh
workstations on the network by choosing and opening the
network volume “EtherShare Applications”, opening the
HELIOS Mail folder and clicking twice on the HELIOS
Mail icon. Alternatively – if you have installed the Macintosh applications on your local Macintosh – you can start
HELIOS Mail from the q menu.
After loading, HELIOS Mail usually shows a copyright notice (see figure 102) – unless you have changed your Preferences (see later) – and a new menu bar.
Fig. 102: HELIOS Mail copyright notice
6 HELIOS Mail
6.3 Setting Mail preferences
6.3
➢
201
Setting Mail preferences
When you start HELIOS Mail for the first time, you should
initially choose Preferences... from the Edit menu in order
to specify your standard settings (see figure 103):
Fig. 103: Selecting Preferences... from the Edit menu
The Preferences... dialog is divided into several sections
– in the left column of the dialog window you can select different types of preferences and thereby change the contents
of the window respectively.
➢
Click the OK button in the dialog only after having set up all
the different sections. The settings will then be valid. They
will be ignored, however, if you click Cancel.
6 HELIOS Mail
202
6.3 Setting Mail preferences
6.3.1
General preferences
The dialog that lets you define General preferences is
shown in figure 104. It contains the following options:
Fig. 104: Dialog box for General preferences
specifies whether a background (i.e. non-active) window should react immediately
to a mouse click, or whether the mouse click should initially
swap the window into the foreground.
Background
windows
active
Background windows active
Automatic
login
The Automatic login option specifies whether HELIOS
Mail should immediately start with the login dialog, or
whether it should first display the “About HELIOS Mail”
dialog. In the latter case, you will have to choose Login in
the File menu manually. HELIOS Mail can also be configured to complete the connection to the Mail Server automatically. Save name in the Login dialog also causes autologin. The Automatic login checkbox is ignored anyway if
Save name is ticked (compare chapter 6.4 “Configuring
the connection”).
6 HELIOS Mail
6.3 Setting Mail preferences
203
Don’t use
Navigation
Dialogs
You may check the DonÕt use Navigation Dialogs option
if you do not want to use Apple’s Navigation Service dialogs (e.g. for faster performance). In this case you will get
the conventional “Attach File” dialog without the possibility to select the file encoding format and without features
like using shortcuts, bookmarks, or browsing recently used
files. For detailed information on how to attach files to a
mail see Attaching a file below in this chapter.
Language
The pop-up menu Language is used to select the desired dialog language for menus, messages and screen prompts.
The default for this field is the language setting of your
Macintosh system file. If you change Language, you must
close and re-open each window before the new language
will take effect.
6.3.2
Text preferences
The dialog that lets you define Text preferences is shown in
figure 105. It contains the following options:
Fig. 105: Dialog box for Text preferences
6 HELIOS Mail
204
6.3 Setting Mail preferences
Horizontal
Scrolling
The Horizontal Scrolling option specifies whether each
new “Untitled” mail window scrolls horizontally, to allow
you to enter up to about 80 “M” characters (“M” is the widest proportional character) on each line, before wrapping.
Otherwise, the text will wrap after the right-hand edge of
the window that is currently open has been reached.
Translation
Table
Translation Table: specifies the character conversion table
Font,
Size
Font: and Size: specify the font and font size of characters
Wrap At
Usually, the number of characters in one line depends on
the dimensions of your text window. Here, you can enter a
value that specifies a given number of characters for text
wrap. If you enter e.g. “72” for Wrap At:, and later choose
Wrap from the Edit menu for a selected text in an outgoing
mail, all selected text lines will end after the 72nd character
– no matter how large the text window might be. The addressee will see the wrap effect, too.
to be used if you send mail containing national accented
characters such as “umlauts”. This allows you to send mail
containing umlauts to UNIX users, too. You can choose
“ISO 8859-1” to specify the extended character set used by
almost any e-mail program.
to be used when you edit or print mail.
6.3.3
Insert preferences
The dialog that lets you define Insert preferences is shown
in figure 106. It contains the following options:
Insert
Cc: line
Bcc: line
Signature
Insert Cc: line specifies whether each new “Untitled” mail
window should automatically include a “Cc:” (carbon copy
to...) line in the header. This saves you typing it manually if
you regularly carbon copy mail items to additional recipi-
6 HELIOS Mail
6.3 Setting Mail preferences
205
ents. The Insert Bcc: line checkbox would insert a “Bcc:”
(blind copy to...) line in the header of each new mail document. This “Bcc:” line lets you enter addresses of people to
whom you want to send a copy “secretly”. All recipients
will see in the header of the mail the name of the addressee
and of those who have received a copy – they will not see,
however, if anybody has received a blind copy.
Signature specifies whether your individual signature
should be added automatically to each new mail you write.
How you can set up or change your signature is described
later in this chapter.
Fig. 106: Dialog box for Insert preferences
6 HELIOS Mail
206
6.3 Setting Mail preferences
6.3.4
Header preferences
The dialog for Header preferences is shown in figure 107.
It lets you specify what kind of header you prefer:
Fig. 107: Dialog box for Header preferences
Important:
Full/Smart/No
Header
If you need to save an e-mail message for use on a different e-mail client or unpacking utility the Full Header
option must be turned-on.
If Full Header is specified for your incoming mail, the documents will contain all available information about origin,
size, and status of the mail. Smart Header will only display
the date, the names of the sender and addressee, and the
subject line. With No Header you can suppress the header
information completely.
6 HELIOS Mail
6.3 Setting Mail preferences
6.3.5
207
Inbox preferences
The dialog that lets you define Inbox preferences is shown
in figure 108. It contains the following options:
Fig. 108: Dialog box for Inbox preferences
Font
Size
Font: and Size: specify the font and font size that will be
applied to your “Incoming” mail window (compare chapter
6.5 “Incoming mail”).
Ignore “Re:”...
Mails in the “Incoming” mail window can be sorted – e.g.
by subject (see also chapter 6.5 “Incoming mail”). If you
check Ignore ÒRe:Ó when sorting by subject, the “Re:”
– that precedes every reply mail – will be ignored.
6 HELIOS Mail
208
6.4 Configuring the connection
6.4
Configuring the connection
When you choose Login in the File menu for the first time,
HELIOS Mail opens a window to let you choose the EtherShare host that you want to connect to (see figure 109).
Fig. 109: Choosing the zone and host
Use the list in the box on the left to choose the zone where
the EtherShare host is located. The list shows all known
zones. Unless you have other, external routers in your network, only the zones from internal EtherShare routers (e.g.
Ethernet) will be visible. If you have no zones (because you
have no router, or because zones are not available for some
reason), you will see an asterisk “*” as a substitute for zone
names.
After choosing the zone, the list in the box on the right
shows all UNIX hosts in the chosen zone with which you
are able to establish a connection (i.e. all hosts that are running the Mail Server).
6 HELIOS Mail
6.4 Configuring the connection
➢
209
Please choose the host you want and click OK.
HELIOS Mail then opens a window to allow you to log on
to the Mail Server by entering your EtherShare user name
(or full name) and password (see figure 110).
Fig. 110: HELIOS Mail login box
When you log in for the first time, you have the option of
choosing Save name and/or Save password. If you check
both you do not have to log in manually the next time you
start HELIOS Mail. The name and password are stored in a
hidden file on your local hard disk. For maximum security,
do not use the Save password option.
If you have checked Save name, HELIOS Mail makes a
note of your name, and the zone and name of the Mail Server you want to use. Next time you start HELIOS Mail, you
only need to enter your password. Furthermore, if you log
on to the EtherShare File Server on the same host first, you
do not have to enter your name and password for either the
Mail Server or the “HELIOS Mail Init” anymore. See the
autologin parameter in chapter 14.3 “Parameters of the
“mailsrv” program” for related information.
6 HELIOS Mail
210
6.4 Configuring the connection
➢
Temporary
users
Click the OK button when all inputs have been made.
HELIOS Mail then attempts to make the connection to the
chosen server. If your inputs were correct, the “Incoming”
mail window should appear (see figure 112 in chapter 6.5
“Incoming mail”).
If other users want to temporarily use your workstation to
send and receive their mail, they should first close the connection to the Mail Server by closing all HELIOS Mail windows, and log in again with Login in the File menu. Guest
users should uncheck Save name in the login box, since
otherwise the original owner of the workstation will receive
new mail notifications for the temporary user rather than for
him/herself. If guest users uncheck Save name, no notifications will be received until the next login, which is less
confusing.
HELIOS Mail also allows you to log on to more than one
Mail Server at the same time and it allows several users to
log in simultaneously. You may not log on twice to the
same Mail Server with the same user name (not even with
different mail programs). This could seriously confuse the
Mail Server.
If you just want to see who is currently logged-in from this
Macintosh, choose Login from the File menu without closing the connection to the Mail Server (leave at least the “Incoming” mail window open). Information about the current
session will then be displayed in a login confirmation box
(compare figure 111).
6 HELIOS Mail
6.4 Configuring the connection
Fig. 111: Login confirmation box
211
6 HELIOS Mail
212
6.5 Incoming mail
6.5
Incoming mail
As soon as you log in, HELIOS Mail opens the “Incoming”
mail window, which lists all mails in your in-basket (see
figure 112). The window title shows the host name, “Incoming” and your user name. The icons in the left column
illustrate status information – i.e. they show whether the
mail is large, already read or still unopened. If there is no
mail, the “Incoming” mail list will be empty.
Fig. 112: ”Incoming” mail window
About the
“Incoming”
mail window
If you have a large amount of mails (more than 50 items),
there might be a slight time delay before you can scroll
through the whole list, but you can start using HELIOS
Mail immediately because the list is processed in the background.
Use the mouse (or the Windows menu – which is described
later in this chapter) to bring one of the items to the foreground if it is hidden behind other windows.
If necessary, you can double-click anywhere in the column
titles row (the row starting with “St”, “No.”, etc.) to force
an update of the “Incoming” mail window. The time that is
6 HELIOS Mail
6.5 Incoming mail
213
needed for automatic updating depends on the system and
configuration of your host computer.
You may click on a column title to sort the contents of the
window. In figure 112, e.g., the window is sorted by No.;
this is indicated by the column title being underlined. You
can select any of the column titles for sorting (and reverse
sorting, holding down the Option key when clicking).
Reading,
saving, and
printing mails
If you want to read one or more mail items, you have to proceed as follows:
➢
Double-click on the item you want to read. Use Shift-click
to select several entries at a time and use Command-click
to select/deselect individual entries from the list. If you
press the Option key while double-clicking the item, the
original unfiltered message is loaded into the text window
and can be saved to a file.
Note:
➢
This complete e-mail may contain large attachments
which are loaded into memory. You may need to increase the HELIOS Mail memory partition (File >
Get Info > Memory) to work with unfiltered e-mails in
a text window.
When you are finished, and while the mail item is still open,
you can save the item with Save from the File menu or print
it with Print... from the same menu. Adjust the window
width to the column width of the printout.
You can re-open saved mails at a later date, e.g. in order to
re-read them, print them, send replies, or forward them. Use
the menu items File and Open... for that purpose.
6 HELIOS Mail
214
6.5 Incoming mail
Please note that
❍ if you double-click on a saved mail with the Finder,
HELIOS Mail will be started automatically.
❍ a saved mail can be edited using any Macintosh word
processing application.
Saving an attachment
If the message contains an attached text or binary (program)
file you will see a document icon at the top of the “Incoming” mail window, just below the title bar (compare figure
113). You will also see the name of the attached file(s), the
size, and the type of encoding.
Fig. 113: Incoming mail (here: with attached file)
➢
The Find
option
Double-click on the document icon below the title bar to
save the attached file. You will get a file dialog box that allows you to choose a new name and folder. (See also the
paragraph Attaching a file in chapter 6.6 “Sending mail” for
information on how to send attached files.)
You can search for specific expressions in incoming mails.
For that purpose, open the desired mail and select Edit and
6 HELIOS Mail
6.5 Incoming mail
215
Find... from the menu. Then enter the word you are looking
for (see figure 114).
Fig. 114: Using the Find... option in HELIOS Mail
Deleting mails
In order to delete one or more mail items from the in-basket,
you have to proceed as follows:
➢
Activate the “Incoming” mail window and choose the items
to delete. Use Shift-click to select a range of entries and use
Command-click to select/deselect individual entries from
the list.
➢
Then choose Clear from the Edit menu.
A “Trash” icon will appear in front of every mail you have
deleted. You can choose Edit/Clear a second time to undo
deletion, if required.
➢
At last, close the “Incoming” mail window to have the deleted items removed. Alternatively, you can select Remove
Deleted from the Edit menu to remove deleted items without closing the window (see figure 115).
6 HELIOS Mail
216
6.5 Incoming mail
Fig. 115: Deleting mail items
HELIOS Mail then prompts for acknowledgment of deletion, to allow it to be aborted if required (see figure 116).
Fig. 116: Confirming deletion of mails
You do not have to delete items immediately if you want to
deal with them again at a later date.
6 HELIOS Mail
217
6.6 Sending mail
6.6
Sending mail
To open a new mail document, you have to proceed as follows:
New mail
➢
Open the File menu and choose New and New Mail as
shown in figure 117 (New Template will be described later
in this chapter).
An editor window “Untitled” will open, containing a header
consisting of a blank “To:” line and a “Subject:” line. Further lines (e.g. a “Cc:” line) in the header are optional – their
appearance depends on your settings in the Preferences...
dialog (see chapter 6.3.3 “Insert preferences”).
Fig. 117: Writing a new mail message
➢
Enter the e-mail address of the addressee in the “To:” line.
Alternatively, you can choose To... (and optionally Copy
to... or Blind Copy to...) from the Mail menu to automatically paste the recipient’s mail address from the address
book into the header of your message (see figures 118 and
119). You can do this before, during, or after writing the
message itself. (For a comprehensive description of the ad-
6 HELIOS Mail
218
6.6 Sending mail
dress book, please see chapter 6.7 “Using/editing the address book”.)
Fig. 118: Selecting an addressee
Fig. 119: Address book
Note:
You can enter several addressees at a time in the “To”,
“Cc:”, and “Bcc:” line. The addresses have to be separated by a comma. Each line is limited to 255 characters.
6 HELIOS Mail
6.6 Sending mail
➢
219
You can enter a subject in the “Subject:” line to allow the
addressee to quickly find out what the mail is about.
Use Option-Tab to toggle between the “To:” and “Subject:”
line – and further lines in the header.
➢
Write your message using the normal Macintosh editing
keys. If you change the current window size, the text will
automatically re-wrap to the new size.
The Macintosh does not save Line Feed characters at the
end of each line of your message. If you want to preserve
the layout of messages sent to UNIX users, choose a suitable current window size and press the Return-key at the
end of each line, or use the Edit > Wrap option instead. This
option makes the text lines end after a given number of
characters (the number that has been specified in the “Preferences” dialog). You can thereby influence the layout of
the entire text or of individual lines you have highlighted
before. The wrap option does not hyphenate text. If a word
does not fit it is moved to the next line completely. See
chapter 6.3.2 “Text preferences” for wrap preferences.
Attaching a
file
You can add one text or binary (program) file to your message. Please note that if you attach a very large file, you and
the addressee may have to change the “Memory Requirements” (File > Get Info > Memory) for the HELIOS Mail
program in order to allow proper handling of the attached
file.
Choose Attach File... from the Mail menu to send one text
or binary (program) file with your message. You will get a
file dialog to allow you to choose the file (see figure 120).
Then, you may select the type of file encoding from the
Format pull-down menu.
6 HELIOS Mail
220
6.6 Sending mail
Note:
If you use the Navigation Dialog consider that this may
slightly slow down the performance of HELIOS Mail.
Fig. 120: Mail file encoding types
Furthermore, the Navigation Dialog offers three more features which can be reached through the buttons:
Provides quick access to the
desktop, your AppleTalk netShortcuts button work, AppleShare IP servers,
and your mounted volumes.
Favorites button
Displays a list of items that
you have selected as favorite
places to visit. These items
are also available in the Favorites folder in the Apple
menu.
6 HELIOS Mail
221
6.6 Sending mail
Displays a list of documents
you have recently chosen.
Recent button
For the different types of file encoding and their compatibility with different operating systems see Table 1.
Mac
Windows
UNIX
Mime-base64 (Data files)
+
+
+
Binhex (Mac files)
+
–
–
uuencode (Data files)
+
+
+
uuencode (Mac files)
+
–
–
Table 1:
Note:
File encoding formats
“Data files”, e.g. “.doc” or “.pdf”, contain plain data information. “Mac files”, on the other hand, additionally
contain a resource fork beneath the data fork (e.g. given an “.eps” file, the data fork contains the PostScript
information whereas the resource fork holds a “PICT”
preview of the file).
E-mail attachments without “Type” and “Creator” info are
automatically classified according to their file name suffix:
FileSuffix
pdf
FileSuffix
tif
MacCreator
CARO
MacCreator
ogle
MacType
PDF
MacType
TIFF
6 HELIOS Mail
222
6.6 Sending mail
FileSuffix
tiff
FileSuffix
jpg
MacCreator
ogle
MacCreator
ogle
MacType
TIFF
MacType
JPEG
FileSuffix
jpeg
FileSuffix
pict
MacCreator
ogle
MacCreator
ogle
MacType
JPEG
MacType
PICT
FileSuffix
doc
FileSuffix
xls
MacCreator
MSWD
MacCreator
XCEL
MacType
W8BN
MacType
XLS4
FileSuffix
htm
FileSuffix
html
MacCreator
MSIE
MacCreator
MSIE
MacType
HTML
MacType
HTML
FileSuffix
rtd
FileSuffix
rtt
MacCreator
C#+A
MacCreator
C#+A
MacType
C#+D
MacType
C#+D
FileSuffix
sit
FileSuffix
hqx
MacCreator
SITx
MacCreator
SITx
MacType
SITD
MacType
SITD
FileSuffix
wav
FileSuffix
qt
MacCreator
WAVE
MacCreator
MooV
MacType
TVOD
MacType
TVOD
6 HELIOS Mail
223
6.6 Sending mail
FileSuffix
mov
FileSuffix
ppt
MacCreator
MooV
MacCreator
PPT3
MacType
TVOD
MacType
SLD8
After choosing the file, you will see a document icon at the
top of the “Untitled” window, just below the title bar (see
figure 121). You will see the name of the attached file, its
size, and the type of encoding.
Fig. 121: Outgoing mail message with attached file
If the receiving mail host does not have the EtherShare Mail
Server installed and running, you can still unpack attachments by using HELIOS Mail stand-alone, as follows: copy
the mail including attachment as a plain text file from the
UNIX host to a Macintosh, start HELIOS Mail, open the
file with Open... in the File menu and save the attachment
as described above in Saving an attachment.
6 HELIOS Mail
224
6.6 Sending mail
Note:
If your Macintosh client runs Mac OS < 8.5, Helios Mail
will start up with the DonÕt use Navigation Dialogs
checkbox (in Edit > Preferences... > General) ticked.
This means that – by default – files are attached in
“Mime-base64” format or, if you press the Option key
while attaching a file to the mail, in “Mac-binhex40”.
If you want to send several files to another Macintosh user,
use an archiving program such as Stuffit to create a single
compressed file to attach since HELIOS mail can only attach one file at a time although it is capable of receiving
more than one attached file at a time (see Saving an attachment above).
New template
HELIOS Mail allows to create and use templates. You may
create a template if you have to send a certain text several
times to different people on different occasions.
Fig. 122: Creating and using templates
➢
For creating a template, use the items File/New, and New
Template from the HELIOS Mail menu (see figure 122).
6 HELIOS Mail
225
6.6 Sending mail
Once you have edited the text you can save the template (favorably to the same folder where HELIOS Mail is located)
using Save as....
All templates that are stored in the same folder than
HELIOS Mail will be added to the submenu as shown in
figure 122 and can be opened by selecting the respective
item. You can also create text files with a word processing
application and use them as templates. They will also be
available in the submenu after you have moved them to the
folder where HELIOS Mail resides.
Setting up a
reply mail
➢
If you want to send a mail to a specific person, you can open
a new mail or reply to a mail you have received from him/
her. In that case, sending a reply mail is much more comfortable, because the new editing window already includes
the correct address as well as a complete “Subject:” line
that starts with “Re:”, indicating the reply mail status.
To send a reply mail, highlight the mail you have received
in the “Incoming” mail window (or open it) and then select
Reply from the Mail menu. See figure 123 as an example
for a reply mail.
Fig. 123: Sending a reply mail
6 HELIOS Mail
226
6.6 Sending mail
Please note that
❍ if you have opened several mail items simultaneously,
Reply opens a new window to reply to the currently active (foreground) item.
❍ if you have selected several items in the “Incoming”
mail window but not opened them, Reply opens new
windows to reply to all of them.
❍ you may select Reply including Letter from the Mail
menu instead of Reply. This will include the letter you
have received (without its header) into your reply mail.
It allows you to refer to specific sentences without having to re-type them.
❍ you may select Reply including Template from the
Mail menu. This lets you send a reply to a letter you
have received with your personal template. This might
be quite reasonable if you want to reply to a few mails
of the same kind.
➢
You can now start to write your reply. The “Subject:” line
can be kept as is, or changed, if required.
For editing a mail, see also the paragraphs New mail and Atabove.
taching a file
Setting up a
group reply
mail
Instead of replying to just one addressee you can reply to a
previously defined group of addressees with all the features
Reply offers. Just hold down the Option key when clicking
into Mail in the menu bar. Now, you can do a Group Reply,
Group Reply including Letter, and Group Reply including Template.
6 HELIOS Mail
227
6.6 Sending mail
When you have finished your mail document, you can now
send it to the addressee.
Sending/
forwarding
mail
Important:
The “Incoming” mail window has to be open, i.e. you
have to be logged-in, if you want to send a mail. Otherwise, the send command will not do anything.
There are several possibilities of sending a mail:
➢
Choose Send from the Mail menu to simply send the mail.
Mails that have not been written, but received can be sent
to further addressees using the “Forward” option. When
making use of this feature, you should select Full Header in
the “Preferences” dialog to allow the complete header of
the original mail to be forwarded. Otherwise, it may happen
that the addressee will only see your e-mail address in the
“From:” line, but has no chance of seeing the address of the
person who sent the original mail.
➢
To forward a received mail, highlight the mail you have received in the “Incoming” mail window (or open it) and then
select Forward to... or Edit and Forward... (first edit –
then forward) from the Mail menu.
The address book pops up automatically, allowing you to
select the addressee(s). See also chapter 6.7 “Using/editing
the address book”.
6 HELIOS Mail
228
6.7 Using/editing the address book
6.7
Using/editing the address book
The address book is a file containing a global list of e-mail
addresses (see figure 124). User specific address books are
not supported.
Fig. 124: Addresses in the address book
You can use this list to save time when you often send mail
to the same people. When sending new mail, carbon copying mail or forwarding mail, choose To..., Copy to.../
BlindCopy to... or Forward to.../Edit and Forward from
the Mail menu to automatically open the address book and
paste the user’s address into your message header.
➢
In the address book, use Shift-click to select a range of entries and use Command-click to select/deselect individual
entries from the list. Press the first letter of a name to jump
forward to the first name which starts with that letter (backward searching is not supported). Click OK when you have
made your selection.
6 HELIOS Mail
6.7 Using/editing the address book
229
When you installed EtherShare, a new address book was
automatically created as the empty UNIX text file
“addressbook” in “$ESDIR/conf”.
➢
Choose New Address... in the Addresses menu to add a
new address to the list (see figure 125).
Fig. 125: The Address menu
➢
Enter the recipient’s first name or a nickname in the Real
name: field and the users’s e-mail address in the Electronic
address: field (see figure 126).
Fig. 126: Entering a new address in the address book
When you use the address book, you will also see all users
of your UNIX host, including “root”, in addition to users
you have included manually with the New Address... func-
6 HELIOS Mail
230
6.7 Using/editing the address book
tion. See the passwd parameter in chapter 14.3 “Parameters
of the “mailsrv” program” for related information.
Addresses of users reachable via “uucp” on other hosts are
specified according to standard uucp conventions as “username@hostname. domain_name”. Sometimes you need to
specify them as “hostname!hostname!...!username”. If you
have already received mail from someone, his mail header
will usually show the correct address format to use – provided that it has been set up properly.
➢
You may choose Delete Address... from the Addresses
menu to open the address book for deletion. Highlight the
address you want to remove and click the OK button.
6 HELIOS Mail
6.8 Defining a signature/a vacation message
6.8
231
Defining a signature/a vacation
message
You can save your personal signature in a file and configure
the mail program to add the signature automatically to every mail you write.
Signature
➢
To create a signature, open a new mail using File/New/
New Mail. Then enter your signature, and select from the
File menu Save As Signature (see figure 127).
Your signature will be stored on the server and automatically added to any mail you send – provided that the Signature checkbox is activated in the Preferences... - Insert:
window (compare with figure 106 in chapter 6.3 “Setting
Mail preferences”).
Fig. 127: Defining an individual signature
Figure 128 shows an example of a new mail window with
included signature.
6 HELIOS Mail
232
6.8 Defining a signature/a vacation message
Fig. 128: New mail with signature
In addition to the “Signature” file, you can set up a vacation
message. This message contains information about the time
you will be on vacation. HELIOS Mail, or – to be precise –
the “sendmail” program on the server, can be configured to
automatically send the vacation message as a reply mail to
all the people who try to contact you during your holidays.
Vacation
message
➢
Write your message into a new mail window and select
Save As Vacation Message from the File menu to store
your note on the server.
➢
You can activate or de-activate automatic sending of the
message by selecting Edit > Vacation (see figure 129).
Fig. 129: Activating automatic sending of vacation message
6 HELIOS Mail
233
6.9 The Windows menu
6.9
The Windows menu
If you have opened several windows and you are looking
for a specific one, use the Windows menu to see a list of all
open windows and to bring the desired one to the foreground. The current foreground window is marked by a √
(see figure 130).
Fig. 130: The Windows menu
Fig. 131: Stacked windows
The option Stack Windows neatly re-arranges all the windows on the screen (see figure 131). The options Next Window and Previous Window let you switch back and forth.
6 HELIOS Mail
234
6.10 Mail Notification Feature
6.10
Mail Notification Feature
When you installed the Macintosh utilities for EtherShare,
you copied the “HELIOS Mail Init” into your system folder. After the “init” has been activated as described below, it
will inform you immediately if any new mail arrives, regardless of which Macintosh program you happen to be using at the time. It notifies you with a flashing mail icon, a
notification message, and a sound (see figure 132).
Fig. 132: Notification of a new mail
In order to read the mail, you have to start the HELIOS Mail
program.
The “init” does not need to poll the network to do its job.
This minimizes network loading, a factor which can become significant in large networks.
Activating the
Mail Notification Feature
➢
In order to work, the “Mail Notification Feature”, activated
by the “HELIOS Mail Init” in the Extensions Manager
folder, has to know for whom a particular mail item is destined, i.e. your user name. The “init” you receive on your
HELIOS CD-ROM must be activated before it will work.
You activate the “init” by logging on to the Mail Server
with HELIOS Mail as described earlier, and checking the
6 HELIOS Mail
6.10 Mail Notification Feature
235
box (and optionally, the Save password box)
in the login window (see figure 133).
Save name
The “init” will then be active the next time you start your
Macintosh. If you only checked Save name, the “init” will
always show a login box when starting the system, to let
you enter your password (see figure 133 again).
Fig. 133: Login box of “Mail Notification Feature”
If you have checked Save password, too, the “init” will
make the connection to the Mail Server automatically, and
no login box will appear.
In either case, having logged-in with the “init” you will not
have to log in a second time when you start HELIOS Mail.
See also the autologin parameter in chapter 14.3 “Parameters of the “mailsrv” program” for related information.
6 HELIOS Mail
236
6.10 Mail Notification Feature
Please note that
❍ if you have not initialized the “Mail Notification Fea-
ture” in this way, no login box will appear and the “init”
will not be active. This does not stop you from using
HELIOS Mail. You just will not get any automatic notification.
❍ both the “Mail Notification Feature” and HELIOS Mail
notice automatically if you have already mounted
EtherShare volumes on the desktop with the Chooser
from the host where the Mail Server is installed. In this
case, you do not have to log in a second time.
However, if you want to suppress automatic notification of
incoming mail, do the following steps:
➢
Choose Control Panels from the Apple menu and then select the Extensions Manager. In the “Extensions” folder,
uncheck the “Helios Mail Init” icon and click the Restart
button.
The next time you start your Macintosh – as long as the
HELIOS Mail program is not running – no notification of
incoming mail will occur.
7 HELIOS Terminal
237
7
HELIOS Terminal
7 HELIOS Terminal
238
7.1 General remarks
7.1
General remarks
This chapter describes the configuration and use of the
Macintosh program HELIOS Terminal, which allows to
make simultaneous terminal connections to one or more
UNIX hosts from any Macintosh computer in the AppleTalk network (multiple session capability).
In order to use HELIOS Terminal, the Terminal Server
must already be running on the host you want to connect to.
EtherShare is configured to start the Terminal Server automatically when UNIX is booted. It communicates with
HELIOS Terminal through the Apple Data Stream Protocol
(ADSP); the protocol is transparent to other AppleTalk devices.
HELIOS Terminal uses Apple’s “Communications Toolbox” utility with its ADSP driver, the communication tool
“AppleTalk ADSP” and the emulation tool “VT320” (they
are shown in figure 134). See also chapter 4.6 “The client
installation procedure”.
Fig. 134: Tools in the “Extensions” subfolder of the local “System
Folder”)
7 HELIOS Terminal
7.2 Starting HELIOS Terminal
7.2
239
Starting HELIOS Terminal
During the installation of EtherShare, the installation program automatically creates a public Macintosh volume with
the name “EtherShare Applications”. This volume is used
to store Macintosh applications such as HELIOS Terminal,
HELIOS Mail and EtherShare Admin.
You can start HELIOS Terminal from any of the Macintosh
workstations on the network by choosing and opening the
network volume “EtherShare Applications”, opening the
HELIOS Terminal folder and clicking twice on the
HELIOS Terminal icon. After loading, HELIOS Terminal
usually shows a copyright notice (compare figure 135) –
unless you have changed your preferences; see later.
Fig. 135: HELIOS Terminal Copyright Notice
7 HELIOS Terminal
240
7.3 Setting Terminal preferences
7.3
Setting Terminal preferences
When you start HELIOS Terminal for the first time, you
should initially choose Preferences in the Edit menu in order to specify your standard settings (see figure 136):
Fig. 136: Dialog box for preferences
The dialog box “Preferences” is used to specify various
standard settings which do not relate to an individual connection.
specifies whether a background (i.e. non-active) window should react immediately
to a mouse click, or whether the mouse click should initially
swap the window into the foreground.
Background
windows
active
Background windows active
New window
on start
New window on start
specifies whether HELIOS Terminal should immediately open a new session window on
7 HELIOS Terminal
7.3 Setting Terminal preferences
241
starting, or whether it should first display the “About
HELIOS Terminal” dialog box. In the latter case, you will
then have to choose New in the File menu each time manually.
Use saved
window
location
Use saved window location automatically stores the position of each session window when you save the connection settings as a connection “document” (see later).
Connect on
open
Connect on open specifies whether or not a connection at-
tempt should be made as soon as a window is opened. If this
box is not checked, you will have to choose Open Connection in the Session menu each time manually.
If Connect on open and New window on start are both
active when you start HELIOS Terminal, you will get an
automatic connection to the first host that replies. If you
have more than one host, an easy way to make connections
is to use connection “documents” (see later).
Connection,
Emulation
Please specify the ADSP Tool and the VT320 Tool in the popup menus Connection: and Emulation: respectively. Note
that the standard UNIX VT100 emulation is a subset of
VT320. Refer to the appropriate documentation from Apple
for more information on the VT320 Tool.
Language
The pop-up menu Language is used to select the desired dialog language for menus, messages and screen prompts.
The default for this field is the language setting of your
Macintosh system file. If you change Language, you must
close and re-open each window before the new language
will take effect.
Saving your
preferences
If you apply any changes to the Preferences window, they
are only valid after clicking OK. Click Cancel to close the
window without saving changes.
7 HELIOS Terminal
242
7.4 Configuring the connection
7.4
Configuring the connection
When you choose New from the File menu, HELIOS Terminal opens a new window with the chosen tools. If you
have chosen Connect on open, you will also get an automatic connection to the first host that replies.
Assuming that Connect on open is not specified, you must
configure the connection settings before you can make a
connection to a particular host. To do this, choose Connection... in the Settings menu (see figure 137).
Fig. 137: Settings menu
First of all, make sure that AppleTalk ADSP Tool is specified
as Method: in the “Connection Settings” dialog (compare
figure 138). This tool is the one you need to communicate
with the Terminal Server. If you have installed other communications tools such as the “Modem Tool”, they will also
be visible in this pop-up menu.
7 HELIOS Terminal
7.4 Configuring the connection
243
Then check whether UNIXTerminal is specified in the Connection Type: field. This must be the same AppleTalk
(NVE) type as that of the Terminal Server on the host.
Fig. 138: Choosing the AppleTalk ADSP Tool
Then use the list in the box on the left to choose the zone of
the UNIX host that you want to connect to. The list shows
all known zones. Unless you have other, external routers in
your network, only the zones from internal EtherShare routers (e.g. Ethernet) will be visible. If you only have one zone
(because you only have one hardware interface, or because
other zones are not available for some reason), you will see
an asterisk “*” (this represents the current zone) rather than
a zone name.
After choosing the zone, the list in the box on the right
shows all UNIX hosts in the chosen zone with which you
are able to make a connection (i.e. all hosts that are running
7 HELIOS Terminal
244
7.4 Configuring the connection
the Terminal Server). Please choose the desired host and
click OK.
Fig. 139: Session menu
Now choose the option Open Connection from the Session
menu (see figure 139). The UNIX host should reply in the
emulation window (see figure 140).
Fig. 140: Emulation window
Please enter your UNIX login name and password, which
are both to be entered with respect to case sensivity!) in order to complete the connection to the selected host.
7 HELIOS Terminal
7.4 Configuring the connection
245
To avoid having to make the above entries for zone, host
name, etc. each time you make a connection, you can save
the connection settings as a connection “document” by
choosing the option Save As... in the File menu. Choose an
easy-to-remember file name for the document, e.g. the
name of the UNIX host with which you have made the connection, and save the document in the folder containing the
HELIOS Terminal application. The next time you start
HELIOS Terminal, you can make the same host connection
again by choosing the previously saved connection document in the Documents submenu of the Windows menu.
This saves time, particularly if you want to connect to several different hosts. Alternatively, if you double-click on a
particular connection document with the Finder, HELIOS
Terminal and the selected connection will be started.
Fig. 141: Windows menu
If you have opened several sessions and you are not sure
which is which, use the Windows menu to see a list of all
open windows and to bring one of them to the foreground.
The current foreground window is marked with a √ (compare figure 141). If you open more than one session on the
same host, the window names will be numbered automatically (e.g. isis-1, isis-2 etc.). The option Stack Windows
neatly re-arranges all the windows (see figure 142).
7 HELIOS Terminal
246
7.4 Configuring the connection
Fig. 142: Multiple sessions showing stacked windows
7 HELIOS Terminal
247
7.5 Copy and paste
7.5
Copy and paste
The Edit menu contains the typical Macintosh options for
processing selected blocks of text (see figure 143).
Fig. 143: Edit menu
The special option Copy Table is a variant of the Copy option, which automatically replaces one or more blanks by a
“Tab” character. This makes it easy to copy tabular information from the UNIX host into a spreadsheet program on
the Macintosh.
Particularly for tables, it is useful to be able to mark a rectangular block for copying rather than using the normal
Macintosh way of highlighting a block of text. You can select a rectangular area by pressing the Command key while
you are marking the area with the mouse. In figure 144, this
option has been used to omit the first three screen columns
on the left.
This is especially helpful in conjunction with the Copy Taoption: after selecting the rectangle you want, choose
ble
7 HELIOS Terminal
248
7.5 Copy and paste
Copy Table, switch to your spreadsheet program, and
choose Paste (see figure 145).
Fig. 144: Using “select rectangle” with the Copy Table option
Fig. 145: Pasting the table into a spreadsheet program
7 HELIOS Terminal
249
7.6 Function keys
7.6
Function keys
The various Macintosh computer models have several different keyboard layouts, whereby only the “Apple Extended Keyboard” is provided with function keys. Choose the
Function Keys submenu in the Keys menu to see a picture
of the function keys of the VT320 terminal (see figure 146).
Select the required function key with the mouse.
Fig. 146: Function keys
A similar feature is available for the keypad and for the editing keys.
Fig. 147: Editing keys
7 HELIOS Terminal
250
7.6 Function keys
Fig. 148: Keypad keys
If you want to use applications on the UNIX host which
regularly use function keys, and you do not have an “Apple
Extended Keyboard”, you can use a program like Macromaker to redefine the function keys to your own choice of
Macintosh keyboard shortcuts.
8 The EtherShare System
251
8
The EtherShare System
8 The EtherShare System
252
8.1 General remarks
8.1
General remarks
The EtherShare software can be subdivided into eight functional modules:
❍ The AppleTalk protocol stack with network routing
❍ File Server with Desktop Server (+ Desktop Utilities)
❍ Print Server with Font Server
❍ Text-to-PostScript converter “pstext”
❍ Terminal Server with the HELIOS Terminal program
❍ Administration Server with the EtherShare Admin pro-
gram
❍ Mail Server with the HELIOS Mail program and
“HELIOS Mail Init”
❍ Time Server
The AppleTalk protocol stack forms the central core of the
EtherShare system. It provides elementary services for
AppleTalk networks and is the backbone for the various
EtherShare server programs. The Font Server is implemented as part of the Print Server – see Font including in chapter
11.4 “The Print Server in operation” for information on this
feature.
8 The EtherShare System
253
8.2 System configuration
8.2
System configuration
The main configuration file “$ESDIR/conf/atalk.conf” –
the most important configuration file within the EtherShare
system – contains configuration parameters for all of the
EtherShare programs. They all access this file when first
starting in order to determine their configuration.
The “install” program automatically sets up this file with
default values for the parameters. The values can be
changed if necessary by using an editor such as vi, but we
strongly recommend that you do this with the EtherShare
Admin program and the network configuration option of
the “install” program instead.
A valid entry in “atalk.conf” has the following structure:
program:parameter {, parameter}
program is the name of the program, or a special “wild card”
section, e.g. “zones” or “if”, for which the configuration is
destined, and parameter defines various configuration options, which vary from program to program (see later). Note
that the parameters for each program can all be specified on
a single line. To improve clarity, however, long lines should
be split after commas, and continued on the next line, optionally indented with space characters, e.g.:
program: parm1,
parm2, parm3
Do not repeat the program name in multi-line commands
(except for “papsrv”, all other program names are only allowed to show up once).
8 The EtherShare System
254
8.2 System configuration
The syntax for parameter has two forms:
parametername=value
parametername
The first form assigns a value to a parameter variable. The
value can be optionally contained in quotation marks (“ ”)
to allow the inclusion of space characters. The second form
is called a “switch”. It is used to enable or disable specific
features of a program. Accordingly, each switch usually exists in both, positive and negative pendants. Negative pendants have the same name, but are preceded by “no”. For
example, the negative form of the switch “clientmessages”
is “noclientmessages” (see clientmessages in chapter 11.6
“Configuring printers manually”).
The configuration file can also contain comments by starting an entry line with the “# ” character. This can be used
to add additional information, e.g. explanatory remarks.
8 The EtherShare System
8.3 The AppleTalk protocol stack
8.3
atalkd
255
The AppleTalk protocol stack
EtherShare’s AppleTalk protocol stack is either contained
in a UNIX loadable module, which is designed to be added
to the operating system during runtime, or in a driver which
is built into the UNIX kernel during EtherShare installation.
Note:
Under Mac OS X Server there is no “atalkd”. All parameters are set in the Network panel.
The AppleTalk protocol stack is closely connected to the
“atalkd” (AppleTalk Daemon) program. The protocol stack
and “atalkd” provide important basic functions for AppleTalk networks. The EtherShare servers (Print Server, Terminal Server, etc.) are constructed around this base system.
The “atalkd” program implements permanent services on
the AppleTalk network which are required to operate the
EtherShare system. For example, all EtherShare servers are
dependent on the functions of this program in order to be
able to communicate with the network. None of the servers
will start until “atalkd” is running (you will get a “cannot
register...” error message). The host is normally configured
to start “atalkd” automatically when UNIX is booted.
“atalkd” is also responsible for making known to the AppleTalk network the names of all AppleTalk services which
are available on the UNIX host (i.e. the EtherShare File
Server, Print Server, Administration Server, Terminal
Server, Mail Server, and Time Server).
When an EtherShare server is started, the chosen AppleTalk name for the server (defined in the main configuration
file “atalk.conf”) is passed to “atalkd”, which also receives
8 The EtherShare System
256
8.3 The AppleTalk protocol stack
a corresponding message from the server when it is shut
down. “atalkd” automatically checks whether the chosen
name is unique to the network zone. If the name is already
in use, the server is immediately aborted with the error message “Duplicate name exists already”, and it is necessary to
change the name in the main configuration file.
“atalkd” is also responsible for ApplTalk routing table
maintenance, to allow the kernel modules to route between
all active network interfaces.
Network
administration
Another task of “atalkd” is to manage all information about
connected AppleTalk networks. Under AppleTalk, different logical networks are grouped into zones. “atalkd” automatically maintains an internal routing table to keep track
of changes in the network configuration. The routing table
allows services and information to be routed through different segments of the network if required.
Changes in the routing table are also passed on to the
AppleTalk protocol modules to allow data packets to be
routed between different network segments.
8 The EtherShare System
8.4 Parameters of the “atalkd” program
8.4
257
Parameters of the “atalkd”
program
When it starts, the AppleTalk Daemon program “atalkd”
first accesses the main configuration file “atalk.conf” to determine its configuration. The “install” program automatically sets up this file with default values. The values can be
changed if necessary by using an editor such as vi, but we
strongly recommend that you do this with the network configuration option of the “install” program or the “netconf”
utility instead.
The parameters described below can be defined for
“atalkd” in “atalk.conf” (note that the parameter list is preceded by the program name “atalkd:”):
interface
atalkd: interface=ifname:netno:snode:zonename
If required, interface can be abbreviated here to “if”. The
parameters after the “=” sign can optionally be surrounded
by quotes: “ifname:netno:snode:zonename”. This is
obligatory if zonename includes space characters.
An entry of this type is required for each hardware interface
(e.g. Ethernet). ifname is the name of the interface as
known to the kernel. netno is the network number in the
AppleTalk network. The network number must be specified
as a range with a dash (e.g. 10-15); the interface will then
automatically be configured by “atalkd” as a Phase II network with this number range.
is the starting node number at which “atalkd” starts
to look for a free node for the EtherShare host on the AppleTalk network (dynamic node number allocation). By convention, servers in an AppleTalk network have node
snode
8 The EtherShare System
258
8.4 Parameters of the “atalkd” program
numbers greater or equal to 128 (EtherShare usually starts
at 140). zonename is the name (or a list of names delimited
by colon) of the AppleTalk zone for this interface.
The simplest configuration for “atalkd” contains only one
interface entry in the parameter list, which describes the
first (here the only) hardware interface between the UNIX
host and the AppleTalk network (note: all EtherShare servers will be registered in the zone of the first “atalkd” entry).
See appendix A 3.3 “Network automatic configuration option”.
Phase II
A typical “atalkd” entry with a parameter list for a Phase II
network with three hardware interfaces is as follows:
atalkd:
if=“le0:30-35:128:EtherTalk”,
if=“le1:10-10:128:Zone1”,
if=“le2:20-20:128:Zone2”
The “le0” interface has been allocated the network number
range 30-35. Compared to an outdated Phase I network, the
maximum number of AppleTalk devices allowed on the
network here increases from 254 to (35-30+1) * 254. You
must not use the same network number range for more than
one hardware interface (see example above).
The network configuration option of the “install” program
automatically sets up parameter values for “atalkd” in the
main configuration file “atalk.conf”.
Note that if you see an “atalkd” entry like
nif=“le2:20-20:128:Zone2” (instead of if=...)
this indicates that the configuration has been edited by
means of the “netconf” program, and that the interface stated here, has been set to inactive.
8 The EtherShare System
259
8.5 AppleTalk stack utility programs
8.5
AppleTalk stack utility programs
The following programs are created automatically in the
“$ESDIR” directory during EtherShare installation:
start-atalk
“start-atalk” is a shell script that contains all the necessary
commands to start the entire EtherShare system (“atalkd”
and all EtherShare servers). Specifically, it starts all servers
listed in the file “$ESDIR/conf/servers”. During installation, start-atalk is included in the UNIX file “/etc/rc.local”
or “/etc/inittab”, in order to automatically start all EtherShare servers (Desktop, File, Print, Mail, Admin, Terminal,
and Time) as soon as UNIX is booted.
“servers” file
The file “$ESDIR/conf/servers” contains a list of all EtherShare server modules which should be started when EtherShare is started. It is referenced by the “start-atalk” script as
described above.
desksrv
afpsrv
opisrv
papsrv
mailsrv
admsrv
termsrv
timesrv
lpd
stop-atalk
(optional)
(optional)
“stop-atalk” is a shell-script which closes down the entire
EtherShare system (“atalkd” and all EtherShare servers) after a delay of five minutes, ensuring that all active processes
have been correctly terminated. All logged-in users receive
a warning message on their workstations before the system
is finally closed down.
If the “stop-atalk” command line includes the parameter
“now” (“$ESDIR/stop-atalk now”), EtherShare is stopped
immediately. Instead of “now”, you can specify
8 The EtherShare System
260
8.5 AppleTalk stack utility programs
“-g grace period” and thereby change the number of seconds to wait before stopping atalk. Additionally, you can
specify “-m message” with the “stop-atalk” command.
“swho”
command
Important:
Only the superuser (“root”) can run “stop-atalk”. Use
the “swho” command (or choose Active Users in the
Lists menu of EtherShare Admin) to make sure that
no other users are using the File Server before running
this script (use “afpmsg” to inform connected users).
Additionally, make sure that there are no active print
jobs and/or OPI layout generation processes. “stopatalk” will interrupt all of them.
Note:
“stop-atalk” does not unload the AppleTalk kernel
modules.
The “swho” command can be used to list all currently active EtherShare and PCShare child server processes, together with the process ID (PID), the network address
(EtherShare: AppleTalk/IP address; PCShare: internet address or client name), user name and process starting time:
$ swho
Server
PCShare
AFPServer
MailServer
AFPServer
AFPServer
AFPServer
UNIXTerminal
UNIXTerminal
PCShare
$
PID
15984
56438
26744
16812
27866
46534
24730
23084
29610
Address
deskjetpc.helios
0029.062.249
0029.062.248
dyn-3-234.helios
dyn-3-233.helios
dyn-3-227.helios
0026.072.249
0029.216.249
dyn-3-248.helios
User
When
nobody
Thu 8:35
support Thu 8:37
support Thu 8:37
sam
Thu 8:47
paul
Thu 8:50
michael Thu 13:12
michael Thu 12:56
<unknown> Thu 15:26
nobody
Thu 10:31
PCShare is another networking product from HELIOS. It is
described briefly in the glossary.
8 The EtherShare System
261
8.5 AppleTalk stack utility programs
Use the “-c” switch to include an optional comment field,
which shows more information on the session. EtherShare
file servers (“AFPServer”) show the names of the currently
mounted Macintosh volumes, PCShare servers show the
name of the corresponding mounted UNIX directory or
print command:
$ swho
Server
AdminServer
AFPServer
PID Address
9692
...
9715
...
User
root
sam
When
Comment
Wed...
Wed... EtherShare Appl
“swho” gets its information from the file “$ESDIR/stmp”,
which is updated by each of the EtherShare servers. The
EtherShare environment variable “$ESDIR” needs to be set
correctly for the “swho” command to work.
Use the “-f” switch to specify an alternative input file for
the “swho” command. The default file is “$ESDIR/stmp”.
Related information is available from the host’s process
list. In the following example, we have used “grep” to limit
the otherwise extensive list to “/es” only:
ramses$ ps ax | grep /es
410
?
S 0:52 /usr/local/es/atalkd
418
?
S 0:00 /usr/local/es/admsrv
421
?
S 0:00 /usr/local/es/afpsrv
424
?
S 0:00 /usr/local/es/desksrv
427
?
S 0:00 /usr/local/es/mailsrv
437
?
S 0:00 /usr/local/es/papsrv
442
?
S 0:00 /usr/local/es/papsrv
443
?
S 0:00 /usr/local/es/papsrv
444
?
S 0:00 /usr/local/es/papsrv
445
?
S 0:00 /usr/local/es/termsrv
448
?
S 0:00 /usr/local/es/timesrv
461
?
S 0:00 /usr/local/es/lpd
5555
?
S 0:00 /usr/local/es/termsrv
5615
p1
S 0:00 grep /es
8 The EtherShare System
262
8.5 AppleTalk stack utility programs
The EtherShare File Server (“afpsrv”), Administration
Server (“admsrv”), Mail Server (“mailsrv”), Terminal
Server (“termsrv”), and Time Server (“timesrv”) each
spawn a child process for each user login, so you may see
these entries more than once if someone is using them. The
master processes are always allocated to user “root” and the
child processes show the name of the corresponding user.
You will see a Print Server entry (“papsrv”) for each configured printer queue, and an additional “papsrv” child process for each active print job currently being spooled. All
“papsrv” processes are allocated to user “root”.
PCShare file server, terminal server and print server functionality is all implemented in a single “pcshare” master
process, which spawns a child for each mounted DOS virtual drive, terminal session, and active print job. All children are also called “pcshare”.
9 The EtherShare File Server
263
9
The EtherShare File Server
9 The EtherShare File Server
264
9.1 General remarks
9.1
General remarks
This chapter is devoted to the EtherShare File Server. The
function, the configuration and the operation of the file
server is described. Information is included to allow the administrator to install users, groups, and volumes, create
folders, and define access privileges. Finally, methods are
described with which data on the file server volumes can be
archived to mass storage (e.g. a tape streamer).
9 The EtherShare File Server
9.2 The File Server programs
9.2
265
The File Server programs
The EtherShare File Server system is contained in the two
programs “afpsrv” and “afppasswd”. They are copied to the
“$ESDIR” directory during installation. The server is normally configured to start “afpsrv” automatically when
UNIX is booted.
afpsrv
“afpsrv” is the program that implements the AppleTalk Filing Protocol (AFP) file server functions. It waits for filing
requests from the AppleTalk or TCP/IP network, which are
then immediately processed. Each new logon request results in a separate “afpsrv” process being created. Accordingly, when a number of users access the file server at the
same time, a number of “afpsrv” processes run on the host
simultaneously.
The number of concurrent connections to the AFP server via
AppleTalk is limited to 250. To establish more than 250 connections at the same time use AppleShare IP, instead. See
also sessions in 9.4 “Parameters of the “afpsrv” program”
afppasswd
program
“afppasswd” is used to create and amend entries in the AFP
user list: “$ESDIR/conf/afppasswd” and all related UNIX
files like “/etc/passwd”. The program “afppasswd” is called
automatically by “afpsrv” whenever you click the Change
password button in the Chooser. It is necessary to separate this functionality from the “afpsrv” program, in order
to give the system permission to modify the password database online.
You can call “afppasswd” from UNIX manually, to change
passwords from a shell login. If you are having problems
with yellow pages, for example, “afppasswd” will return error messages which you will not see in the Chooser.
9 The EtherShare File Server
266
9.3 Directory and file formats
9.3
Directory and file formats
The EtherShare File Server simulates the Macintosh’s Hierarchical File System (HFS) on the UNIX file system
(UFS); the latter is found in many UNIX variants. Due to
the differences between these two systems, the same Macintosh file appears differently when it is viewed through the
UNIX file system compared to when it is viewed from a
Macintosh workstation.
The structure
of volumes
and files
Under EtherShare, each HFS volume is mapped to a specified part of the UNIX file system and mounted at a specified directory. This directory is then the root directory of
the volume.
You specify the volume mount point when setting up new
volumes with the EtherShare Admin.
In contrast to files under DOS and UNIX, all Macintosh
files are associated with so-called “Finder info” contained
in the file’s directory entry, which stores among other
things the file type and creator, file creation date etc.
Each file is split into two parts, the “data fork” and the “resource fork”. This “split” is normally invisible to the Macintosh user; the “Finder info” in the file’s directory is also
invisible.
The file type and creator are used by the Finder to select the
right icon to display. They are each 4 bytes long. The file
creator is also used to automatically find and start the corresponding program when you double-click on the icon of
a document. The icons themselves are stored in the desktop
file, which exists only once for each volume. Each application is normally associated with a single file creator code
9 The EtherShare File Server
9.3 Directory and file formats
267
(e.g. “MSWD” for Microsoft Word), but can as well have
several file type codes (e.g. “WDBN” for normal Word
documents, “WHLP” for Word help files, “DCT5” for the
Word dictionary etc.). See Icon data in chapter 10.2 “The
Desktop Server Program” for more information.
Under EtherShare, the file’s data fork is stored with the
chosen file name in the UNIX directory corresponding to
the folder.
The file’s resource fork is combined with the Finder info
and stored in a separate “resource file” of the same name in
the so-called “resource” directory, which is the “.rsrc” subdirectory of the folder’s directory.
The first 512 bytes of the resource file are used for the Finder info (bytes 0-511), and the files resource data start at byte
512. Files created by UNIX applications have no resource
fork, and the EtherShare resource file (if present) may then
be shorter than 512 bytes, this is normal. A description of
the resource file structure is available on the HELIOS Web
site www.helios.de.
Macintosh file names which are invalid for UNIX are converted according to a specified algorithm.
When you create a folder under EtherShare, which you do
with the Finder in the normal way, a UNIX directory is created with the same name as the folder. Folders, too, have
Finder info, which stores among other things the folder’s
window position and size and the viewing style. The Finder
info for a folder is stored in the parent’s folder “resource”
directory, which is created automatically when the folder is
created. See Creating new folders under UNIX in chapter 9.7
“Access privileges” for related information.
9 The EtherShare File Server
268
9.3 Directory and file formats
Suppose you have a file “Test” in folder “Demo” which is
in “dave’s” home volume. Under UNIX you will have:
/home/dave/Demo/Test
/home/dave/Demo/.rsrc/Test
/home/dave/.rsrc/Demo
file’s data fork
file’s resource fork
folder’s Finder info
Furthermore, if for example the volume mount point is
“/home/apps”, the volume desktop is contained in the
UNIX file “/home/apps/.Desktop”. The “Network Trash
Folder” for the volume is contained in the UNIX directory
“/home/apps/Network Trash Folder” and the file
“/home/apps/.rsrc/Network Trash Folder”. Finder info for
the root of the volume (viewing style, layout info etc.) is
contained in “/home/apps/.rsrc/::volrsrc”. See chapter 10
“The Desktop Server” for related information.
The file names “.Desktop”, “.Desksrv”, and the “.rsrc”
folder are protected by EtherShare, and cannot be copied or
accessed from a Macintosh client.
Inside an EtherShare volume, “.rsrc” directories can only
be missing if folders were created manually from UNIX or
if “.rsrc” folders were removed manually from UNIX.
“afpsrv” automatically creates missing “.rsrc” directories
for every folder opened from the Macintosh in case a “.rsrc”
directory is available in the volume root directory of the
EtherShare volume. This applies to files as well; if “.rsrc”
folders are available, resources inside the “.rsrc” folder will
be created automatically.
9 The EtherShare File Server
9.3 Directory and file formats
269
UTF-8 encoded file names
Provided the utf8 flag is set in the “afpvolumes” list, special characters such as “ä” can be used on different platforms (Macintosh and PC clients) since under “Unicode/
UTF-8” they are 8-bit encoded. Exceptions are the “/”-character, which is translated into a particular sequence which
consists of caret (^) and two following characters representing the hexadecimal value of the character (^2F), and all
control characters (hexadecimal code < 20).
Non-UTF-8 encoded file
names
On a non-UTF-8 volume (utf8 flag not set; compare UTF-8
encoded file names above), Macintosh special characters are
automatically translated by the EtherShare File Server into
a three-character escape sequence, but in this case led by a
leading colon (:) instead of the caret (^). For instance, the
special character “ä” is translated into “:8a”.
However, accented characters (Umlauts) are not recommended for user names and passwords (otherwise you will
need to remember different passwords for Macintosh and
UNIX logins). Your UNIX host name must never include a
slash character (for example “my_rs/6000”). See hostname,
uname, arp in appendix A 5: “Standard UNIX utility programs” for related information.
Generic icons
Finder infos for UNIX files (which do not have and do not
need resource files) are simulated automatically as “generic
icons” by EtherShare. EtherShare automatically recognizes
about 20 UNIX file types (e.g. shell script, socket etc.), and
simulates the Macintosh file type and creator even if the
folder has no resource directory. If the resource directory is
already present, EtherShare will create a suitable resource
file, too, when the corresponding folder is first opened. The
resource file will be ignored by UNIX applications, but allows EtherShare to recognize the file type immediately the
next time the folder is opened. EtherShare also recognizes
9 The EtherShare File Server
270
9.3 Directory and file formats
TIFF and EPSF files, but it cannot automatically create the
PICT resource for EPSF files. The following special UNIX
file types are recognized directly (the type and creator
codes are shown in parentheses):
❍ block device (BDEV/UNIX)
❍ character device (CDEV/UNIX)
❍ socket (SCKT/UNIX)
❍ named pipe (PIPE/UNIX)
With normal UNIX data files, the file server tries to determine the file type by examining the first 512 bytes of the
file, in order to place it into one of the following groups:
❍ executable file (EXEC/UNIX)
❍ executable script file (TEXT/UXSC)
❍ object file (OBJ/UNIX)
❍ archive file (AR/UNIX)
❍ cpio archive file (CPIO/UNIX)
❍ Lempel-Zev compressed file (COMP/UNIX)
❍ Huffman packed file (PACK/UNIX)
❍ SUN raster image file (RAS/UNIX)
❍ PostScript file (including EPS) (TEXT/UXPS)
❍ mailbox file (TEXT/UXMB)
❍ TIFF file (TIFF/UNIX)
❍ Gnu Zip file (Gzip/UNIX)
❍ PDF file (PDF/CARO); (TEXT/CARO)
❍ EPSF file (EPSF/UNIX)
9 The EtherShare File Server
9.3 Directory and file formats
271
If the UNIX file does not correspond to any of these types,
a differentiation is solely made between either text or binary data files. A binary data file is defined as a file where at
least 30% of the characters are not contained in the 7-Bit
ASCII code. All other files, including empty files, are classified as type TEXT. Accordingly, the following two file
types should be added to the above list:
❍ text file (TEXT/UNIX)
❍ binary data file (DATA/UNIX)
If the user does not have sufficient access privileges to read
a particular file, the file is classified as type NOPE:
❍ no permission (NOPE/UNIX)
If a file cannot be read by a particular user because a physical read error has occurred, the file is classified as type unreadable:
❍ unreadable file (????/UNIX)
After determining the type, each UNIX file is assigned one
of about 20 different icons by EtherShare (see figure 149).
This allows Macintosh users to easily differentiate between
files created under UNIX (all icons include the name
“UNIX”) and normal Macintosh files.
You can also create or modify the file type or creator manually, with a program such as the shareware program FileTyper, or you can use the MakeAuto Typer tool to create an
“Auto Typer” document (System 7 only). The latter converts type/creator information according to a specified
scheme automatically. See Automatic extension mapping in
9.6 “Public and private volumes” for related information.
9 The EtherShare File Server
272
9.3 Directory and file formats
Note:
If a file type is assigned the code “UNKN/UNIX” (using
e.g. the MakeAuto Typer tool), the File Server automatically enforces a file type conversion.
If necessary, the generic icons feature can be disabled (see
the “afpsrv” switch nobinonly). In that case all UNIX files
are classified as binary data files (DATA/UNIX).
Fig. 149: Generic icons for UNIX files under EtherShare
You can also assign suitable icons to non-Macintosh files
by using the Extension Mappings feature in the EtherShare Admin. This option is particularly useful if you are
also using MS-DOS networking software, such as HELIOS
PCShare, on your server, since under MS-DOS the file
name extension is typically used to indicate the file type.
UNIX file types such as: Mailbox, Text, and Shell Script
can be edited using e.g. TeachText (Macintosh).
The File Server will recognize EPSF files and will apply the
type “EPSF” and creator “UNIX” to these files (for more
9 The EtherShare File Server
9.3 Directory and file formats
273
information regarding the recognition of PC-created
“*.eps” files, see 5.13.7 “Extension Mappings”). The icon
is the same as used for plain PostScript files. In older EtherShare versions, these files were recognized as PostScript
only and were classified type “TEXT” with creator
“UXPS”. Since these resources were already created, the
creator/type combination will not be changed for existing
files. This applies only to files stored on the server by UNIX
or DOS applications, Macintosh files supply their own type
and creator.
An automatic recognition feature for Adobe Acrobat PDF
files allows easy access to HELIOS documentation provided in PDF format, e.g. on the HELIOS distribution CDs.
You can mount our distribution CD on a UNIX server, on a
Macintosh, or on a DOS/Windows PC, and open the contained PDF files with Acrobat Reader/Acrobat Exchange
on any of these platforms.
File and
record locking
The EtherShare File Server supports file and record locking
between Macintosh workstations. Likewise, PCShare – a
TCP/IP-based Windows networking product developed by
HELIOS – supports file and record locking between Windows workstations. Locks of both file servers are shared by
accessing the same “locktable” file which resides in the directories “$ESDIR” and “$PCDIR”, respectively.
The “UNIX Sharing” option has to be switched on, however, if you want to share an EtherShare volume with UNIX
applications.
“afpsrv” supports UNIX (advisory) locking in addition to
the built-in Apple AFP-compatible (mandatory) locking.
9 The EtherShare File Server
274
9.3 Directory and file formats
Check with your supplier of UNIX applications whether
these do also support and use advisory locking before you
use Macintosh/PC-based applications accessing files concurrently with UNIX based applications.
If you use NFS-imported file systems for EtherShare or
PCShare volumes the “lockd” and “statd” daemons must be
configured and running. See your NFS documentation for
further details.
In the following, there is an example of “$ESDIR/conf/
afpvolumes” where the shared volume “ES-PS shared
volume” resides in “/data/shared/images”, is writable, with
option unixlocks activated and accessible by group “dtp”
only. Below that, you see the default parameter settings for
a volume “EtherShare”:
$ cat $ESDIR/conf/afpvolumes
/data/shared/images:ES-PS shared volume::fixed:
readwrite,unixlocks:dtp
/usr/ethershare:EtherShare::fixed:readwrite
This option is only active after the Macintosh client unmounted and remounted all volumes from an EtherShare
Server.
Symbolic links
Please note that symbolic links pointing to directories in- or
outside the current volume would confuse the File Server,
and are therefore not displayed. For example two directories in one volume might have the same directory ID.
A double-click on one of the folders then could open the
other. If you need links, use the Macintosh Make Alias
function instead.
9 The EtherShare File Server
9.4 Parameters of the “afpsrv” program
9.4
275
Parameters of the “afpsrv”
program
When it starts, the File Server program “afpsrv” first accesses the main configuration file “atalk.conf” to determine
its configuration. The associated program “afppasswd”
does not require an entry in the configuration file. The
“install” program automatically sets up “atalk.conf” with
initial values. The values can be changed if necessary by using an editor such as vi. See also chapter 5.14 “Editing
“atalk.conf” (and other configuration files) manually”.
The parameters described below can be defined for
“afpsrv” in “atalk.conf” (note that the program name “afpsrv” precedes the parameter list):
name
name=netname
netname is the
AppleTalk (NVE) name of the File Server.
This is the name with which it is known to the network. It
is the name you see in the workstation’s Chooser under
“AppleShare”.
The default for netname is the name of the UNIX server.
Important:
zone
It is not possible to run more than one EtherShare File
Server on the same UNIX server.
zone=zonename
zonename is the
name of the AppleTalk zone to which the
file server should be allocated. This parameter determines
the zone in which the file server can be seen in the Chooser.
The chosen zone must be one of the local zones that the
server is connected to. You can test this with the “zones -l”
9 The EtherShare File Server
276
9.4 Parameters of the “afpsrv” program
command (see chapter 4.5 “Verifying the UNIX installation”).
The default for zonename is “*”, i.e. the zone of the first interface entry in “atalk.conf”.
“afpsrv” will accept multiple zone= and name= specifications. It is possible to have the file server services being displayed in all local zones.
The following example will display the EtherShare Server
“FileServer” in the two zones “EtherTalk 1” and “EtherTalk 2”, but not in the TokenTalk or FDDITalk zones.
atalkd:
if=“et0:30-35:140:EtherTalk 1”,
if=“et1:36-40:140:EtherTalk 2”,
if=“tr0:41-44:140:TokenTalk 1”,
if=“fi0:45-49:140:FDDITalk 1”
afpsrv: name=“FileServer”,
zone=“EtherTalk 1”,zone=“EtherTalk 2”
The following example will display the EtherShare Servers
with the two names “FileServer-1” and “FileServer-2” each
in the two zones “EtherTalk 1” and “EtherTalk 2”, but not
in the TokenTalk or FDDITalk zones.
atalkd:
if=“et0:30-35:140:EtherTalk 1”,
if=“et1:36-40:140:EtherTalk 2”,
if=“tr0:41-44:140:TokenTalk 1”,
if=“fi0:45-49:140:FDDITalk 1”
afpsrv: name=“FileServer-1”,name=“FileServer-2”
zone=“EtherTalk 1”,zone=“EtherTalk 2”
9 The EtherShare File Server
9.4 Parameters of the “afpsrv” program
277
EtherShare’s “afpsrv” will recognize if you are already
connected to the same EtherShare Server and automatically
log in to the already existing connection.
localwinsize
localwinsize=maxlpackets
maxlpackets specifies the maximum number of AppleTalk
data packets that are passed from “afpsrv” to workstations
through the network during a transaction. The number of
packets may need to be limited if the buffer size in the
workstations is too small. maxlpackets can be varied to optimize the data transfer rate.
The default (and maximum) for maxlpackets is 8.
remotewinsize
remotewinsize=maxrpackets
maxrpackets specifies the maximum number of AppleTalk
data packets that are passed from workstations to “afpsrv”
through the network during a transaction. The number of
packets may need to be limited if the buffer size in the
UNIX server is too small. maxrpackets can be varied to optimize the data transfer rate.
The default (and maximum) for maxrpackets is 8.
dsiblocksize
dsiblocksize=maxbytes
maxbites specifies the maximum
size of AppleShare/IP
data packets that are passed via TCP/IP from “afpsrv” to
workstations through the network during a transaction.
The default for maxbytes is 131 072 (128 blocks x 1024).
9 The EtherShare File Server
278
dsitickletime
9.4 Parameters of the “afpsrv” program
dsitickletime=timeinterval
timeinterval specifies the time
interval in seconds after
which “afpsrv” sends a tickle packet to signal that the server is still running.
The default for timeinterval is 30.
volstatinterval
volstatinterval=timevolstat
timevolstat specifies the time interval in seconds how of-
ten “afpsrv” checks the amount of free space on the server.
The default for timevolstat is 10.
volcheckinterval
volcheckinterval=timevolcheck
timevolcheck specifies how often volstatinterval
is
communicated to the Macintosh client.
The default for timevolcheck is 10.
ipaddress
ipaddress=numberstring
numberstring specifies the
IP-address the “afpsrv” program offers to the Macintosh clients for logging in via IPprotocol.
The default for numberstring is the number of all configured IP-addresses of all network cards installed in the server.
ipaddresses
ipaddresses (see ipaddress) is applied for handling more
than one IP-address, and is given out in a string in which the
addresses appear comma-separated.
9 The EtherShare File Server
279
9.4 Parameters of the “afpsrv” program
ip
[no]ip
Switches the AppleShare IP on or off, depending on the setting.
The default (if this switch is omitted) is ip.
nosortdirs
[no]sortdirs
This parameter sorts the directories coming from the server
to the Macintosh clients by name.
The default (if this switch is omitted) is nosortdirs.
connectlimit
connectlimit=connecttime
connecttime specifies the time in seconds a Macintosh cli-
ent is allowed to stay logged-on to “afpsrv”.
The default for connecttime is 0 (i.e. ∞).
afpport
afpport=portnumb
portnumb specifies the
port number for the AppleShare IP.
Apple’s default for portnumb is 548.
ipaccess
ipaccess=ipaccessname
ipaccessname is the name of the file containing the access
list with the IP-addresses which are permitted to log on to
“afpsrv”.
The ipaccessname default is “$ESDIR/conf/afpipaccess”.
logdenied
[no]logdenied
This parameter lets “afpsrv” append a record to the system
messages if, due to the IP-access list, access to one or more
users has been denied.
The default (if the switch is omitted) is logdenied.
9 The EtherShare File Server
280
xferlog
9.4 Parameters of the “afpsrv” program
xferlog=xferlogname
If xferlogname is specified,
the file names of all edited
(written, read, saved, etc.) files on the server are recorded
and stored sequentially in an “xferlog” file. Use this option
with care since it considerably causes load on the server.
Note:
homeipaccess
Make sure that an empty “xferlog” file exists at the specified location and set file permissions sufficiently so that
“owner”/“group” and “others” can write to that file.
homeipaccess=homeipaccessname
homeipaccessname is the name of the
file which contains
the IP-access list, and makes the home directory visible to
the respective user.
homevolname
homevolname=homevolmacname
homevolmacname is the Macintosh
volume name for user
home directories. The following “%” escapes are valid:
•
•
•
•
“%u”
“%f”
“%p”
“%h”
UNIX user name
full user name
UNIX home directory path
server name
Make sure that the volume name length does not exceed 27
characters. The default for homevolname is “~%u”.
idletime
idletime=time
time is the time
in minutes which a user has at his/her disposal, idling on the File Server before he/she gets loggedout by “afpsrv”.
The default for time is 0 (i.e. ∞).
9 The EtherShare File Server
9.4 Parameters of the “afpsrv” program
idlewarntime
281
idlewarntime=warntime
warntime is the time in minutes
after which the “afpsrv”
program gives the user a warning before he/she is loggedout by the “afpsrv” idletime parameter.
The default for warntime, if no value is specified, is automatically set to half the value of time (see idletime).
sessions
sessions=maxclients
maxclients specifies the
maximum number of workstations (clients) that are permitted to work on the file server
simultaneously. This value should normally be the same as
the total number of Macintosh workstations that are connected to the AppleShare server. The value you choose
should be less than or equal to the number of sessions allowed by your software license. The maximum tolerable
number of workstations is dependent on the type of Macintosh applications you mostly use (whether they are file-intensive or client-server applications), on the configuration
of your UNIX system, and on its expansion stage.
The default for maxclients is the number of sessions allowed by your software license.
locks
locks=maxlocks
maxlocks specifies
the maximum number of record locks
that are permitted on the File Server simultaneously.
The default for maxlocks is maxclients multiplied by 10.
files
files=maxfiles
maxfiles specifies
the maximum number of files that can
be opened by the File Server simultaneously. The achievable maximum may be limited by the maximum number of
open files for the “afpsrv” process allowed by the server.
This limit is normally set by “afpsrv” for itself automatical-
9 The EtherShare File Server
282
9.4 Parameters of the “afpsrv” program
ly. In case of problems, refer to “limit” and “ulimit” in your
UNIX documentation for details about how to increase the
limit manually for your server. To conserve system resources, do not set this value higher than necessary.
The default for maxfiles is 256.
findercache
findercache=cachesize
The File Server caches Finder information in RAM memory to optimize performance. cachesize specifies the number of Finder entries to cache, and thus the amount of RAM
needed that should be allocated for this purpose. Higher
values require more RAM but lead to a File Server speed
improvement for some Finder operations.
The default for cachesize is 2048 entries. Each entry requires about 100 bytes of RAM. The cache is used by only
one single “afpsrv” (i.e. client) at a time, since it cannot be
shared.
afppasswd
afppasswd=exename
exename specifies the
complete path name of the
“afppasswd” program, which is used by “afpsrv” to change
passwords in the AFP user list. This parameter only needs
to be changed if, for administrative reasons, it is necessary
to modify EtherShare’s default directory system on the
UNIX server.
Or, in order to protect the password against changes by unauthorized users, exename can be left blank. This would e.g.
disable the “afppasswd” program.
The default for exename is “$ESDIR/afppasswd”.
9 The EtherShare File Server
9.4 Parameters of the “afpsrv” program
savepasswd
283
[no]savepasswd
As a time-saving feature when logging on, the AppleShare
selection in the Chooser on the Macintosh lets you save
your File Server user name and/or user password on the
Macintosh’s local hard disk.
To improve security, specify the nosavepasswd switch to
disable the saving of user passwords in this way, in which
case all users have to enter their password manually each
time they log on to EtherShare.
Note: you can still change your File Server password in the
Chooser in the normal way (with Change Password).
The default (if this switch is omitted) is savepasswd.
Note:
minpwlen
The [no]savepasswd setting only works for Mac OS
Version 7.0 and above.
minpwlen=length
The AppleShare selection in the Chooser on the Macintosh
accepts passwords of any length from 0 byte to max. 8
bytes. Short passwords may represent a security risk. A
password of zero length is equivalent to no password. Specify length as a numeric value between 0 and 8.
To improve security, a meaningful minimum value for this
parameter is 5.
minuid
minuid=minuidlimit
minuidlimit specifies the lowest number allowed for user
numbers (user IDs). All users defined in “/etc/passwd”
which have a lower user number than that specified by
minuidlimit are not recognized as valid users of Ether-
9 The EtherShare File Server
284
9.4 Parameters of the “afpsrv” program
Share. This parameter is provided as an additional security
feature.
The default for minuidlimit is 0.
maxuid
maxuid=maxuidlimit
maxuidlimit specifies the highest number allowed for user
numbers (user IDs). All users defined in “/etc/passwd”
which have a higher user number than that specified by
maxuidlimit are not recognized as valid users of EtherShare. This parameter is provided as an additional security
feature.
The default for maxuidlimit is infinity.
guestid
guestid=logname
logname specifies the
user name which is automatically allocated to guest users. The name is invisible to the guest users themselves, it is solely used to assign an entry for guests
in the user list. If this parameter is specified, the file server
automatically supports guest access to available volumes.
Otherwise, guest access to available volumes is not possible.
homedir
[no]homedir
The switch nohomedir specifies that all users are prevented
from seeing their home volume, which stops them from being able to store Macintosh files there. Their UNIX home
directory still exists, and can still be used from the UNIX
shell.
The default (if this switch is omitted) is homedir.
Note:
If the home directory of user “root” is “/”, it will not be
displayed.
9 The EtherShare File Server
9.4 Parameters of the “afpsrv” program
suffixes
285
suffixes=suffixfile
“afpsrv” normally simulates Finder info (such as file type
and creator) automatically for files without Macintosh resource. The type of file is determined by inspecting the
file’s contents. This allows about 20 different icons to be
shown for non-Macintosh files (see Generic icons in chapter
9.3 “Directory and file formats” for more information).
In the case of files created by MS-DOS applications, the file
type is typically indicated by adding a suffix to the file
name, the so-called the file name “extension”. For example,
DOS executable programs have the extension “.COM” or
“.EXE” and DOS batch files have the extension “.BAT”.
Under EtherShare, suitable icons can be displayed for such
files by specifying them in the so-called extension mapping
table. This is particularly useful in the case of applications
such as FrameMaker for Macintosh which are able to directly read documents created by the MS-DOS version
without prior conversion. The suffixes parameter allows
you to specify the location and name of the extension mapping table.
The default for suffixfile is “$ESDIR/conf/suffixes”.
See Automatic extension mapping in chapter 9.6 “Public and
private volumes” for an example of this file. We recommend that you specify extension mapping with the
Extension Mappings option in the EtherShare Admin, and
not by editing the above file manually.
nobinonly
[no]binonly
“afpsrv” normally simulates Finder info (such as file type
and creator) automatically for files without Macintosh resource. The type of file is determined by inspecting the
file’s contents. This allows about 20 different icons to be
9 The EtherShare File Server
286
9.4 Parameters of the “afpsrv” program
shown for non-Macintosh files (see Generic icons in chapter
9.3 “Directory and file formats”). Specify the binonly
switch if this feature is not required, in which case all nonMacintosh files will be treated as type DATA/UNIX, which
means that UNIX text files will then become invisible to
most Macintosh text editors.
The default (if this switch is omitted) is nobinonly.
nofiledatesync
[no]filedatesync
Whenever you modify a Macintosh file, the changes you
make do not necessarily affect both the data file and resource file, and in many cases only the data file is changed.
“afpsrv” only checks the modification date of the data file
when it needs to display date and time information in the
Finder. Accordingly, “afpsrv” is designed to always update
(“touch”) the modification date of the data file, even if only
the resource fork has been modified.
However, “afpsrv” does not normally update the modification date of the resource file if only the data fork has been
modified. The modification date of the resource file is usually not important, even to incremental backup procedures,
and updating it would waste system resources and slow
down the File Server somewhat.
Nonetheless, situations may exist where differences between the modification date of the data and resource files
can cause difficulties. Such situations are typically those involving automatic data migration to slower external storage.
Specify the filedatesync switch to cause “afpsrv” to always synchronize the modification date of the resource and
data files, even if only the data fork has been modified.
9 The EtherShare File Server
9.4 Parameters of the “afpsrv” program
287
The default (if this switch is omitted) is nofiledatesync.
fakeoffspring
[no]fakeoffspring
“afpsrv” will return, by default, the number of offsprings
(entries in a subdirectory) as 9999 while enumerating a directory. This option can be turned off by using the switch
nofakeoffspring. Then, the AFP-call “GetFileDirParms”
on a directory gives the real number of entries.
This feature is especially useful when folders containing
many subfolders, which on their part may contain many
files, are in use. The Macintosh Finder, or application program, will request information not only on files in the current folder, but in addition on files in subfolders, although
this information is currently not used. Therefore, this option
may accelerate the opening and displaying of folders with
many subfolders.
There are few Macintosh applications which rely on the exact offspring count. For those, disabling of this parameter
may be required.
The default (if this switch is omitted) is fakeoffspring.
nogroupwriteisowner
[no]groupwriteisowner
In the Mac OS file system only the owner of a folder or volume can permanently change the folder’s layout, e.g. sorting order, icons placement and label settings. This feature
has been added to allow workgroups, e.g. users who are all
member of the same group, to change layout settings as labels according to the organization of their work.
For the folder or volume the checkbox “Make changes” for
group must be activated. See also chapter 9.7 “Access privileges”.
9 The EtherShare File Server
288
9.4 Parameters of the “afpsrv” program
The default for this switch is nogroupwriteisowner.
notranslateany
[no]translateany
This option has been added to “afpsrv” in order to translate
any file which is regarded as type “TEXT”.
The default (if this switch is omitted) is notranslateany.
nohidedotfiles
[no]hidedotfiles
This option has been added to “afpsrv” in order to hide files
starting with a dot (“.”).
The default (if this switch is omitted) is nohidedotfiles.
welcome
message and
shutdown
message
You can specify a welcome message to output on Macintosh workstations when they log on to EtherShare, and a
shutdown message. There are no parameters to specify in
“atalk.conf” for this feature. Instead, create two text files
“login.msg” and “shutdown.msg” with a UNIX editor (or
with TeachText on a Macintosh), and store them in
“$ESDIR/macapps” (the root of the Macintosh volume
“EtherShare Applications”). The messages will then be
used automatically by the File Server during login and shutdown. Normally, only the administrator has write privileges
to this directory (volume).
For example, the two messages could be: “Welcome to the
Support server of HELIOS Software GmbH” and “The
Support server of HELIOS Software GmbH has now been
shut down”.
Note:
If you are running a demo copy of EtherShare on your
server you cannot alter the default welcome message.
9 The EtherShare File Server
9.4 Parameters of the “afpsrv” program
289
A maximum of 199 characters will be displayed (excess
characters are truncated). If you want to include national
accented characters such as “umlauts” in your messages,
use TeachText to write them: since the Umlaut codes are
stored here in Macintosh binary format, it is a lot of work to
enter the right codes with a UNIX editor.
notexttran
The option “notexttran” has been added to “afpsrv” in order
to turn off the newline translation for all types of text files.
“notexttran” will disable line end translation for all files of
type ‘TEXT’, without regard to creator.
This feature may be helpful in case Macintosh applications
do write binary data into text files. For further reading on
CR/LF conversion see also the paragraph Generic icons in
chapter 9.3 “Directory and file formats”.
This flag is set by default.
nodotafpvolumes
This option, if set, rules out the possibility of defining additional private volumes in a user’s home directory.
The default (if this switch is omitted) is nodotafpvolumes.
Note:
The “.afpvolumes” file is still supported, although deprecated. It is turned off by default and must be explicitly
turned on using an option in “atalk.conf”. This flag will
disappear in the next major revision.
9 The EtherShare File Server
290
9.5 Users and groups
9.5
Users and groups
Before a user can access the File Server, it is necessary for
him/her to be registered by the administrator, and be allocated a user name and password, which both are needed
during the logon procedure. The user name has a maximum
length of 31 characters, and the password has a maximum
length of 8 characters.
Note:
The AIX operating system handles user and group
names only up to 8 characters.
Though users and groups can be set up by using an editor
such as vi, we strongly recommend that you do this with the
EtherShare Admin instead.
The “install” program optionally installs a demo user
“macuser”, with no password, and a demo group “macusers”,
by defining them in the appropriate configuration files.
In theory, the user name and password can contain any
character in the Macintosh character set. However, it is recommended not to use accented characters (ä, ü, é, etc.) and
punctuation characters such as colon and comma, in order
to avoid conflicts with the UNIX system files “/etc/passwd”
and “/etc/group”. Since some of the Macintosh special
characters appear differently on the UNIX server, the
names might be difficult to recognize.
User names and passwords for users that want to access the
UNIX server in addition to the AppleTalk network must
follow UNIX conventions anyway, in order to ensure acceptance by UNIX system programs such as “login”.
9 The EtherShare File Server
9.5 Users and groups
UNIX user list
/etc/passwd
291
The UNIX system file “/etc/passwd” contains a list of all
users known to the system. An entry line in this file specifies for each user the user name, his/her password in encrypted form, the user number (user id), the group number
(group id) of the user’s primary group, comments (generally the full name of the user), the user’s home directory, and
the program (or shell) which should be started when the
user logs on to the UNIX system.
If a particular user should be prevented from directly accessing the UNIX server, it is necessary to assign him/her a
starting program which permits no (or very limited) UNIX
system access.
The EtherShare File Server also uses the UNIX system file
“/etc/passwd” for user administration. Each user that needs
to access volumes on the File Server must have an entry in
this file. The entry specifies the user number and thus the
assigned access privileges. The field for home directory can
be left empty if the user does not require his/her own home
volume.
UNIX group
list
/etc/group
Users can be assigned to one or more groups, whereby assignment to at least one group – the primary group – is compulsory. The user’s primary group is specified (as the group
id number) in the “/etc/passwd” file.
The file “/etc/group” contains a list of all groups known to
the system. The primary groups, too, must be included in
this list. An entry line in this file specifies the name of the
group, a group password (which is only significant when
accessing directly through the UNIX system), the group id
number, and a list of members (user names) that have been
9 The EtherShare File Server
292
9.5 Users and groups
assigned to the group. The group id number is used as a link
between the group list “/etc/group” and the user list
“/etc/passwd”.
AFP user list
and
passwords
Each time a user logs on to the server, user name and password are requested. Although the UNIX standard password
file “/etc/passwd” contains passwords in encrypted form,
the password typed in by the user at the workstation is normally transmitted via the network cables to the server in unencrypted form. The UNIX login program then encrypts the
password before checking it against the “/etc/passwd” file.
The passwords in the “/etc/passwd” file are stored encrypted to prevent users with direct access to the UNIX system
from finding out passwords of other users.
To provide additional AFP security, EtherShare supports an
optional AFP user list (“$ESDIR/conf/afppasswd”), which
prevents transmission of unencrypted passwords via the
network cables when logging on to EtherShare. The AFP
user list contains the same passwords, but encrypted with a
different method to that used by UNIX itself, as follows:
During the logon procedure, the File Server generates a random number which is sent to the Macintosh. The random
number is then encrypted using the password that the user
types in, and sent back to the File Server. At the same time
the File Server encrypts the same random number with the
password in the AFP user list before carrying out the comparison.
Even when this added security does not at first appear necessary, we still recommend it. For example, the danger exists that a particular “system” user entry in “/etc/passwd”
(such as “bin”) also has access privileges to the EtherShare
9 The EtherShare File Server
9.5 Users and groups
293
volumes. In such cases, the parameters minuid and maxuid
can be used to configure “afpsrv” to only accept users
which have IDs within a specified range. This problem is
avoided if an AFP user list is used, since then only those users with entries in the list are allowed access to the EtherShare volumes.
If the AFP user list is active, you will see the message
2-way Encrypted Password beneath the Password field
in the Chooser; otherwise, you will see Clear Text Password.
afppasswd file
The optional EtherShare AFP user list, which specifies all
UNIX users who are also EtherShare users, together with
their encrypted passwords, is contained in the UNIX text
file “$ESDIR/conf/afppasswd”.
Important:
The “$ESDIR/conf/afppasswd” file is indispensable for
running PCShare 3 on the same server.
The AFP user list improves network security by preventing
passwords from being sent through the network cabling in
unencrypted form during the logon procedure. If the AFP
user list is active, Macintosh passwords are only transmitted over the network in encrypted form.
If you want the additional security, you can create the AFP
user list by calling the “$ESDIR/etc/mkafppasswd” program from UNIX. “mkafppasswd” then copies user entries
for the user id 0 (“root”) and all users with user numbers
greater than or equal to 100 to the afppasswd file. It gets this
information from the “/etc/passwd” file. Initially, all passwords are blank.
9 The EtherShare File Server
294
9.5 Users and groups
Note:
On creation, the AFP user list initially contains blank
passwords but for “root”, you are requested by the
“afppasswd” program to enter a (new) password.
If you want to disable the added security feature again, simply delete the file “$ESDIR/conf/afppasswd”. No other
changes are necessary. EtherShare will then fall back to using the UNIX system file “/etc/passwd” only, and Macintosh passwords will be passed unencrypted over the
network when logging on.
If you have any “real” UNIX users with ID numbers below
100, as distinct from “system” users such as “bin”, you
must manually add a corresponding entry with blank password to the AFP user list, as follows:
username:
You should then set up initial passwords immediately.
Please note that on creation, the AFP user list initially contains blank passwords. The “afppasswd” program then asks
for the “root” password. Other EtherShare users can set up
their own passwords (which here even could be blanks –
though this is not recommended), or the system administrator can allocate initial passwords for them. Change passwords by calling the password program
“$ESDIR/afppasswd” from UNIX, or with the Change
password button in the Chooser.
For the following reasons, it is better to set up passwords
with the Chooser (or with the “$ESDIR/afppasswd” program) rather than with the “/usr/bin/passwd” program:
9 The EtherShare File Server
9.5 Users and groups
295
❍ “$ESDIR/afppasswd” automatically sets up the same
password in both password files (“/etc/passwd” and the
optional “$ESDIR/conf/afppasswd”). If you use
“/usr/bin/passwd” instead, a particular user might end
up with a different password for UNIX server access
and EtherShare access (which is inconvenient).
❍ “$ESDIR/afppasswd” automatically maintains “Yellow
Pages” entries (if used).
The EtherShare Admin offers a convenient way of adding
new users, including UNIX host users, with the advantage
that “Yellow Pages” entries (if used) are also maintained
automatically.
Creating users
As discussed, each new user needs an entry in the system
file “/etc/passwd”. The user must be assigned a name that is
not yet known to the system. Following this, a unique user
number must be specified, and the user’s primary group
must be chosen. If the user requires access to private volumes, the user’s home directory must also be specified.
Specification of the “start program” depends on whether
the user should also be granted direct access to the UNIX
system, or not. If the user should solely have access to
EtherShare, the starting program should automatically reject the user with a corresponding message if he/she attempts to log on directly to the UNIX system. For example,
you can write a shell script called “nologin” for this purpose. Such a shell script can automatically write a history
report of logon attempts with user name, date and time to a
file, to allow the administrator to see which non-authorized
users have tried to obtain direct access to the UNIX server.
9 The EtherShare File Server
296
9.5 Users and groups
The following shows a typical entry for “/etc/passwd”:
David::152:16:David Smith:/usr/home/David:/bin/sh
In this example, the username is “David” and the user number is 152. His password has not yet been allocated. His primary group is group number 16 (the group must already
exist in the file “/etc/group”). The comment to this entry is
“David Smith”, the user’s full name. The user’s home directory is “/usr/home/David”, which is automatically allocated to him as a private volume. The starting program is
“/bin/sh”, which is the standard UNIX Bourne shell – in this
example the user is permitted direct access to the UNIX
server. The empty field following the user name (“::”) will
later contain the encrypted user password. On inserting the
above line into “/etc/passwd” with an editor program, the
administrator should initially leave this password field
empty. The password is allocated with the system program
“/bin/passwd” or with the Chooser on the workstation,
whereupon the password will be inserted in encrypted form
at this position automatically. To avoid a temporary security risk, the administrator should use the Chooser to assign
an initial password to each user, which the user can change
afterwards by himself.
A typical entry for a user who only has access to public volumes (i.e. a user who does not need private volumes), and
should not be permitted direct access to the UNIX system,
is as follows:
Rita::201:18:Rita Lovely::/bin/date
Note that the field for private volumes has been left empty,
and that the starting program is the program “/bin/date”,
9 The EtherShare File Server
9.5 Users and groups
297
which displays the date but does not allow UNIX server access.
If the administrator decides to use the AFP user list
(“$ESDIR/conf/afppasswd”), it must also contain an entry
for each user. For the above example, the AFP user list
should initially contain the following two entries:
David:
Rita:
The encrypted passwords will be added later automatically
by the File Server, when you select Change password in
the Chooser or use the “$ESDIR/afppasswd” program.
Creating
groups
Groups are listed centrally in the UNIX system file
“/etc/group”. A group entry includes the group name, group
password (obsolete), the group number (group id) and a list
of group members (specified as user names, not user numbers!).
As already mentioned, each user must be a member of at
least one group, his/her so-called primary group.
The use of a password for groups is only meaningful if users are allowed to access the UNIX server directly since, in
this case, the user may be permitted to dynamically change
groups after logging on, and/or add a new group to the list
of assigned groups. These features are not available for the
EtherShare File Server, since AFP does not currently allow
such dynamic group changes: A user is only a member of
those groups which were assigned in the file “/etc/group”
when he/she last logged-in.
9 The EtherShare File Server
298
9.5 Users and groups
As an example, a team of users who jointly work in a
project group could have the following entry in
“/etc/group”:
Projects:*:21:David,Tim,Rita
The entry line specifies the group name “Projects” and assigns the group number 21. The asterisk (“*”) in the password field specifies that it is not possible to switch to this
group dynamically after logging on. The group number is
followed by a list of the group members. One of the members is already known to us: David. Note that, since David’s
entry in “/etc/passwd” specified a primary group for him
with the number 16, group 16 also needs to be included in
“/etc/group”, as follows:
Projects:*:21:David,Tim,Rita
MacUsers:*:16:
The user name “David” does not need specifying here,
since the group has already been clearly assigned to him in
“/etc/passwd”.
Guest access
Users that are not registered in the system but still need access to the network from time to time can log on to the File
Server as a guest. The administrator can configure EtherShare to either accept or reject guest access.
During logging on, guests are not required to enter either
user name or password. Guests only have access to public
volumes, and do not have a private volume. If necessary,
guests can be denied access to specific public volumes by
suitably configuring the access privileges of the volumes.
9 The EtherShare File Server
9.5 Users and groups
299
Although guest users do not need to enter a user name,
guest access must still be allocated a dummy user name in
“/etc/passwd” and declared in the main configuration file
“atalk.conf” (under “guestid=...”), in order to allow guests
to be members of groups.
In order to ensure that guests do not have access to protected applications or documents of other users, the administrator should assign the guest a primary group which has no
other users or members. Folders and files are protected
against access by guests as long as access for the user category “Everyone” has been explicitly disabled.
Since user volumes are only available for registered users,
a home directory entry for guests in “/etc/passwd” is ignored by the File Server.
Deleting users
A user is removed from the system by deleting the corresponding entry line in “/etc/passwd”. The administrator
should also check whether files in the user’s home directory
should be deleted or archived at this stage.
If the AFP user list is being used, users that have been removed from the “/etc/passwd” file should also be removed
from the AFP user list. This is done automatically if you use
the EtherShare Admin to delete users.
If it is only required to prevent access of a particular user to
the system for a short period, or if removal is being considered but not yet decided, the user can be disabled temporarily by inserting an asterisk (or any other character) to the
beginning of the encrypted password in “/etc/passwd” (or
in “$ESDIR/conf/afppasswd”). This causes password validation to fail, preventing the user from logging in. Note that
direct UNIX access is still possible if only
9 The EtherShare File Server
300
9.5 Users and groups
“$ESDIR/conf/afppasswd” has been corrupted in this way
– the UNIX logon procedure only checks the “/etc/passwd”
file. On deleting the additional character, the user is enabled
again.
Deleting
groups
Groups are deleted by removing the corresponding entry
line from “/etc/group”. Before deleting the group, make
sure that no users have been assigned this group as their primary group. Otherwise it will no longer be possible for
them to log on to the system, since the primary group is no
longer available. Also, make sure that the group is not used
for the Volume groups list of any of the volumes.
9 The EtherShare File Server
9.6 Public and private volumes
9.6
301
Public and private volumes
A volume (a Macintosh file system) can be stored both on a
floppy disk or on a hard disk. A hard disk can also be subdivided into several volumes, i.e. several separate file systems. The file system used by Macintosh computers is called
HFS (Hierarchical File System) or HFS+, respectively.
The UNIX File System (UFS) is able to use storage capacity which is available through the network remotely in another computer (NFS-mounted volume = Network File
System). Such remote storage can also be used by EtherShare. This allows any computer which supports UFS (e.g.
many computers running a UNIX variant) to store volumes
for an AppleTalk network.
Under EtherShare, the UNIX file system can be treated like
an Apple hard disk: one or more volumes containing folders
and files can be mounted at a particular UNIX directory and
made available to a group of users.
Volumes can be set up by using an editor such as vi, but we
strongly recommend that you do this with the EtherShare
Admin instead.
Note:
Public
volumes
Please see Creating volumes in chapter 5.8 “Volumes list” for related information, especially if you are
using file systems mounted remotely through NFS.
When a volume is created, it can be optionally made available to all users/groups. Such volumes are called public
volumes (even if not all users/groups have the right to access them). Public volumes can be optionally protected
with a password.
9 The EtherShare File Server
302
Volume list
9.6 Public and private volumes
Public AFP volumes are set up by including them in the
public volume list, which is the UNIX text file
“$ESDIR/conf/afpvolumes”.
The “install” program automatically installs a public volume “EtherShare” (by default located in the UNIX directory with the most free space) by specifying it in the volume
list. The “install” program also creates a volume “EtherShare Applications” in “$ESDIR/macapps”. It is used for
Macintosh programs such as Helios Terminal, Helios Mail
and EtherShare Admin. A sample “afpvolumes” file is
shown in the appendix on page A-5 afpvolumes.
If you only want access to user volumes, and not public volumes, just delete the public volume list. No other configuration changes are necessary.
An entry in the volume list has the following structure:
directory:volname:[passwd]:flags1:flags2:
[volume_groups]
is the directory in the UNIX file system (specifying the full path) which is the root directory of the volume; it is usually called the volume “mount point”.
directory
Important:
The “mount point” name must not be the UNIX directory name “/”.
volname is the name of the volume, and passwd contains an
optional password. If a password is specified, all users attempting to access the volume are required to enter the
password before access is allowed. Passwords are useful for
public volumes if guest access is enabled. flags1 and
9 The EtherShare File Server
9.6 Public and private volumes
303
flags2 are either fixed (fixed media) or changeable (removable media like magneto-optical drives).
Entries in flags could be:
noguest,unixlocks,unixshare,nopublish,readwrite,
utf8,charset=MacRoman,ipaccess, and readonly.
noguest
If you select the noguest flag, the volume is invisible for
guest login.
unixlocks
Specify unixlocks if you want to use UNIX record locking
in addition to the standard mandatory record locking used
between EtherShare clients, to allow file and record locking
between Macintosh applications and UNIX applications.
unixshare
Compare to unixlocks above. Specify unixshare if you
want to use UNIX file locking.
nopublish
With nopublish set, the volume is invisible for all users.
readwrite
This flag determines that you have both read and write access to the respective volume.
readonly
This flag must be set when the underlying physical media
is write protected (e.g. CD-ROM). Then, there is – for all
users – only read access to the specific volume. A small
“padlock” is displayed in the Finder then.
Note:
Do not use the readonly flag for administering access privileges to a volume since this could prevent
the “desksrv” from locking the volume correctly.
For such purposes use Sharing... from the Finder’s
File menu instead.
9 The EtherShare File Server
304
9.6 Public and private volumes
ipaccess=...
states the name of the file containing the access list with the
IP-addresses which are permitted to log on to a specific volume.
utf8
If utf8 is specified, the Unicode character set is used on the
volume.
charset=MacRoman
If utf8 is active, the charset=MacRoman flag is used to
translate and encode file names to MacRoman.
volume_groups
volume_groups is, like flags, a comma-delimited list of
groups. See Volume Groups list in chapter 5.8 “Volumes
list” for details.
The volume list can also contain comments by starting an
entry line with the “# ” character. This can be used to add
more information, e.g. the installation date of the volume.
A volume can thus be temporarily disabled by placing the
“# ” character at the beginning of the corresponding entry.
Private
volumes
Under UNIX, each user must be assigned a home directory
to be able to log in. This is not mandatory for EtherShare
users – if you use EtherShare Admin to create a user you
can leave the home directory field empty, in which case
only EtherShare access, and not UNIX access, is possible.
Each time you log on to EtherShare, if a home directory has
been specified, you are automatically assigned a private
“home” volume by the File Server. The name of the home
volume is shown abbreviated on the Macintosh workstation
by using the tilde character (“~”) together with the user
name (e.g. “~david”). It can be used to store the user’s private files; with the exception of the administrator no other
user has access to someone else’s home volume.
If a particular user should only be allowed access to public
EtherShare volumes, and not be assigned a home volume,
9 The EtherShare File Server
9.6 Public and private volumes
305
when creating the user you can leave the home directory
field empty in the EtherShare Admin (which is equivalent
to omitting the home directory entry in the system file
“/etc/passwd”). This may – depending on the UNIX system
– disable the login to the UNIX shell, but is not the same as
specifying nohomedir in “atalk.conf” (under “afpsrv...”),
which simply makes the home volume invisible to (all)
Macintosh users.
“afpsrv” checks very extensively for overlapping EtherShare volumes during each mount request. If an already
mounted volume does include (or is included inside) a volume to be mounted, this will be grayed out in the Chooser
volume list and an appropriate system error message, which
contains the names of the overlapping directories, will be
logged from “desksrv”.
Please make sure that no single public or private EtherShare
volume overlaps any other EtherShare volume. We suggest
to establish a set of EtherShare volumes which serve your
workflow well and are administered by the EtherShare or
UNIX system administrator.
If in doubt, please consult your HELIOS dealer to implement a safe volume configuration.
Duplicate
volume names
Volume names must be unique. If the user or administrator
defines the same volume name more than once, the entry
encountered last during user logon is ignored, since no two
volumes on the File Server can have the same name. Otherwise, it would not be possible for workstations to uniquely
access a particular volume. The new volume must be given
another name.
9 The EtherShare File Server
306
9.6 Public and private volumes
If the administrator installs a new public volume and a user
has already installed a private volume of the same name, the
latter is no longer available in the Chooser when the user
logs on to the File Server the next time. In such cases, the
private volume must be renamed before it can be used
again.
The administrator should be particularly careful not to create a volume with the same name as a user’s home volume
(e.g. “~rita”), because the user will then no longer be able to
access his/her home volume any more.
Maximum
number
of volumes
The maximum number of network volumes that can be
opened by Macintosh users on the File Server simultaneously is normally 128. Each open volume is only counted
once, even if it has been opened by more than one user. See
maxdesktop in chapter 10.4 “Parameters of the “desksrv”
program”.
Note:
Volume size
limits
The Macintosh System 7.1 (and earlier) cannot handle
more than 20 volumes simultaneously, including local
volumes (although the Finder allows you to mount
much more).
The maximum (network) volume size displayable in the
Macintosh Finder depends on the EtherShare settings, the
EtherShare update level, the AppleShare client version, and
the used Mac OS (see fig.150).
9 The EtherShare File Server
9.6 Public and private volumes
Note:
307
Up to AppleShare client 3.8, Macintosh workstations
set allocation blocksize values dependent on the server’s network volume size.
As of AppleShare client version 3.8, however, Macintosh workstations recognize the server’s allocation
blocksize value so that the “used” value in the Finder’s
Get Info states a more precise actual used space.
Mac OS 7.5 (or later) supports network file system sizes of
up to 4.0 Gigabytes and EtherShare will do clipping at 4.0
GB instead of 2.0 GB for volume free/used space values.
Independent of the chosen clipping value, there will be no
difference in the amount of data that can be stored on that
EtherShare volume (see fig150).
The older Mac OS 7.0/7.1 only supports network file
system sizes of up to 2.0 Gigabytes (the exact Mac OS
7.0/7.1 file system limit is 2,080,373,760 bytes).
If Macintosh clients with these older versions are still in
use, you have to adjust the “afpsrv” program’s behavior
with the option “clip2g” (“noclip2g” is default!). As long as
no EtherShare volume with more than 2.0 GB is defined,
the only penalty may be a wrong display for values of the
free/used disk space. In case that EtherShare volumes larger
than 2.0 GB are defined, these Mac OS clients may not be
able to mount any of the EtherShare server volumes any
more.
Important:
The “noclip2g” option (default!) should only be set for
sites with all Macintosh clients running Mac OS 7.5.
Otherwise, Macintosh clients running Mac OS 7.0/7.1
will display wrong values for free/used space, or may
have problems mounting volumes at all.
9 The EtherShare File Server
308
9.6 Public and private volumes
clipping
AppleShare client version
Mac OS 7.1
2 GB
3.5
Mac OS 7.5
4 GB
3.6
Mac OS 7.6+
unlimited
3.7/3.8
Fig. 150: Volume size clipping
EtherShare limits the number of concurrently used public
and private volumes to at most 450. By default, 128 are accessible. Please see chapter 10.4 “Parameters of the
“desksrv” program” for more details.
Starting with Mac OS 7.5, local file systems can be larger
than 2 GB, up to 1 TB (Terabyte). Since the AppleTalk Filing Protocol 2.1 is still limited to 32-bit values for volume
sizes, AppleShare volumes are still limited to approx. 4 GB.
With AFP version 2.2 and AppleShare client 3.8 (or later),
network file systems are displayed with their proper size.
Note:
Generally, we recommend to use current AppleShare
clients as released from Apple.
For Mac OS < 7.6 Apple suggests using AppleShare client
3.6.5
For Mac OS ≥ 7.6 Apple suggests using AppleShare client
3.8.x
9 The EtherShare File Server
309
9.6 Public and private volumes
Automatic
extension
mapping
The File Server supports automatic mapping of file name
extensions. This works in a similar way to the extension
mapping feature provided in products like DOS Mounter,
Access PC or Apple’s PC Exchange.
It simplifies sharing files between EtherShare, UNIX and
UNIX-DOS networking products such as PCShare from
HELIOS, by simulating an appropriate Macintosh type and
creator, allowing Macintosh users to open files created under MS-DOS or UNIX with a double-click.
Note:
This feature allows you to allocate specified file name
extensions to icons of applications or documents
which already reside on the File Server, but it does not
allow you to create new icons.
The required mapping is specified in the file
“$ESDIR/conf/suffixes”, which has the following structure:
#type
'TEXT'
'TEXT'
'TEXT'
'TEXT'
'TEXT'
'TEXT'
'TEXT'
'TEXT'
creator
'KAHL'
'KAHL'
'MSWD'
'MSWD'
'XCEL'
'XCEL'
'XCEL'
'XCEL'
suffix
.c
.h
.txt
.doc
.wks
.wk1
.wk3
.xls
We recommend that you specify extension mapping with the
Extension Mappings option of the EtherShare Admin, and
not by editing the above file manually. See the suffixes parameter in chapter 9.4 “Parameters of the “afpsrv” program”
for related information.
“afpsrv” does not translate the line endings in files of type
TEXT and creator UXPS. This creator/type combination
9 The EtherShare File Server
310
9.6 Public and private volumes
could only be generated for files stored on the server by
UNIX or DOS applications. Macintosh applications supply
their own type and creator.
Now EtherShare also recognizes EPSF files and will generate type “EPSF” and creator “UNIX” although the icon will
be the same as for UXPS/TEXT files. CR/LF conversion is
not provided for UNIX/EPSF files.
Newline conversion
The Metrowerks CodeWarrior software will – by default –
apply newline conversions to the following type ‘TEXT’
files:
Type
Creator
TEXT
CWIE
TEXT
MMCC
TEXT
MPCC
TEXT
MPS_
TEXT
UXMB
TEXT
UXSC
For more detailed information on newline conversions to
“TEXT” files see notexttran in chapter 9.4 “Parameters of
the “afpsrv” program”.
9 The EtherShare File Server
311
9.7 Access privileges
9.7
Access privileges
Access privileges – called “permissions” under UNIX – define which users are allowed to work with which folders
and files. Access privileges are assigned by the administrator or the owner of a folder, and always relate to the whole
folder or volume: if a user has privileges to read from and
write to a particular folder, the same privileges are available
for all files contained in the folder.
Under Apple’s Hierarchical File System (HFS), no access
limitation mechanisms are available for individual files,
since the concept of user authorization is not known. A file
can solely be “locked” (write-protected) to prevent unintended writing/deleting operations. This attribute, however,
can be disabled by any user at will. Furthermore, write-protection is not available for folders.
In a file server environment, considerably more sophisticated access privileges mechanisms are necessary. Apple’s
AFP specification for sharing files differentiates between
four different types of privileges:
❍ “Read & Write”
❍ “Read only”
❍ “Write only” (Drop Box)
❍ “None”
“Read only” specifies whether a particular folder is visible
to the user. If a particular file is visible, it can also be read.
The attribute “Read & Write” additionally allows modifications applied to the files in the folder. “Write only” allows
only files being “dropped” into a specific folder. “None”
9 The EtherShare File Server
312
9.7 Access privileges
means that any form of access to that folder is denied, i.e.
neither reading the contained files, nor applying changes to
them is possible. See fig. 151.
In contrast to UNIX, since under AFP the access privileges
are assigned to a particular folder, it is not possible to specify different rights for individual files in the same folder. If
it is necessary to be able to change a particular file, but not
to change another file, the two files should normally be
stored in separate folders. If this is not possible, your only
choice is to use the UNIX “dt chmod” command to change
the privileges for one file only.
The four types of privileges are separately defined for four
categories of AFP users: the owner of the folder (“Owner:”),
group members (“User/Group:”), all other users of the system (“Everyone”, equivalent to “Other” under UNIX), and
the administrator. This allows access privileges to be individually tailored. With the exception of the administrator,
the owner of a folder is the only one who is allowed to
change the privileges of the folder (if necessary, you can set
“Owner:” to “<Any User>” by just leaving the field blank).
Read & Write
The folder is visible and all files can be read, changed and
deleted. New files and folders can be created.
Read only
The folder is visible and all files can be read. Amendment
or deleting of files is not allowed. New files and folders
cannot be created.
Write only
The directory contents is not visible and files in the folder
cannot be read, amended or deleted. However, new files
and folders can still be created since the folder acts as a drop
folder (Drop Box).
9 The EtherShare File Server
313
9.7 Access privileges
None
Access to the files and folders is not possible. New files and
folders cannot be created and the folder cannot be deleted.
Correlation to
UNIX access
privileges
The following table shows the four combinations of access
privileges for the EtherShare File Server, and the corresponding rights in the UNIX file system. Remember that
the files which are stored in the folders have always the
same access privileges as the folders themselves.
EtherShare File Server
Read & Write
Read only
Write only (Drop Box)
None
Note:
UNIX file system
(rwx) read write execute
(r-x) read execute
(-wx) write
(---)
The System V UNIX semantics use “x” on directories,
whereas “s” provides an additional bit in BSD UNIX for
setting group IDs. For more detailed information see
also Creating new volumes under UNIX in 9.7 “Access privileges” and the respective UNIX documentation.
The Finder’s Sharing... program (in the File menu) can be
used to display and edit the access privileges. Figure 151
shows the privileges for a folder named “contracts”, and
figure152 displays the corresponding directory listing for
this folder, made with the UNIX program “ls”.
9 The EtherShare File Server
314
9.7 Access privileges
Fig. 151: Folder access privileges in the “Sharing” window
$ ls -ld contracts contracts/.rsrc
drwxrwsrwx 2 root wheel 1024 contracts
drwxrws--- 3 market_a marketing 1024 contracts
drwxrws--- 3 market_a marketing 1024 contracts
Fig. 152: Folder access privileges as seen from UNIX
Only the folder’s owner or the system administrator
(“root”) can change the access privileges of the folder. The
9 The EtherShare File Server
9.7 Access privileges
315
corresponding fields and checkboxes are grayed out when
another user asks for privileges information (see figure153)
Fig. 153: Access privileges for user “dave”
Extreme care should be taken when changing access privileges of AFP files from the UNIX server directly (e.g. never
forget the resource part) or, in order to avoid such problems, use the UNIX “dt” program. Incompatible combinations of privileges could lead to EtherShare access problems. For example, it may not be possible to read from or
write to a file anymore, or it may no longer be possible to
use a folder.
Creating new
folders under
UNIX
As discussed earlier, a folder in a volume is represented as
a directory in the UNIX file system, which is also associated with a (normally invisible) resource directory. The
EtherShare File Server uses the resource directory to store
9 The EtherShare File Server
316
9.7 Access privileges
the Macintosh’s resource fork and the Finder info for the
files.
If it is required to create a folder directly from UNIX use the
“dt mkdir” program, so both the main and the resource directory will be created. The “dt chown” and “dt chgrp”
commands are used to set the owner and group of the folder.
Use the “dt chmod” command to set the appropriate access
privileges. Figure 154 shows how this could be done, figure
155 shows the resulting directory entries.
$ dt mkdir FolderName
Fig. 154: Creating a folder from UNIX
$ ls -ld FolderName FolderName/.rsrc
drwxrws--- 3 market_a marketing 1024 contracts
Fig. 155: Resulting directory entries (UNIX program “ls”)
Please refer to the UNIX system documentation for more
details of the “mkdir”, “chown”, “chgrp”, “chmod”, and
“ls” commands.
Also refer to the “dt mkdir”, “dt chown”, “dt chgrp”,
“dt chmod”, and “dt ls” commands in chapter A 9.5 “Command descriptions”, respectively.
9 The EtherShare File Server
9.7 Access privileges
317
We recommend that network folders are always created by
using the Finder on the Macintosh, in the same way as local
folders, since this guarantees that all of the above considerations are handled automatically. The administrator should
only use UNIX system programs for this purpose in an
emergency. The exception is when you need to change the
privileges for a single file within a folder – the Macintosh’s
“Permissions” program (called “Sharing” on System 7.x)
can only set privileges at the folder level (compare Correlation to UNIX access privileges in this chapter).
Deleting
folders
A folder can be deleted in an analogous way, by using the
UNIX command “dt rm -r”, provided that the user has sufficient privileges. If the folder contains further folders
and/or files, these are also deleted.
Creating new
volumes under
UNIX
IBM and Sun operating systems set or clear the “setgid” bit
on directories to indicate whether files created in that directory should follow BSD semantics or System V semantics,
respectively. The “setgid” bit is then automatically propagated to nested directories. AppleShare users expect the
BSD style, thus the EtherShare Admin ensures that the
“setgid” bit is set if it creates a directory for a new volume
or a new user.
The “dt” utility will automatically make sure that the “setgid” bit is set.
9 The EtherShare File Server
318
9.8 Data backup
9.8
Data backup
As with all computer systems, it is highly advisable to make
regular backups of network volumes to tape or disk. Although UNIX provides comprehensive safety mechanisms
in case of system faults, it is never possible to fully exclude
loss of data. For this reason, the administrator should regularly archive all volumes of the file server to mass storage.
Two methods are available for archiving volumes. Data
backup can be carried out either from one of the workstations with a Macintosh archiving program, or directly from
the UNIX server by using one of UNIX’s system backup
programs.
Archiving programs on a Macintosh workstation will back
up HFS volumes to disk or tape. The disadvantages of this
method are that all the files must first be transferred over
the network before they can be stored on the backup medium, and that each volume must be separately archived; the
latter can represent a considerable effort on a large file server with a large number of public and private volumes.
For this reason, workstation backup programs are generally
only suitable for archiving single volumes (and not for the
main system backup). Users should be encouraged to regularly archive their own private volumes and folders, in order to be able to access older versions of files at a later stage
if required.
By accessing the UNIX server directly, the administrator
can archive all volumes in a single process, and at the same
time benefit from the high data transfer rates available
through UNIX, since the files do not first need to be transferred via the network (provided that the hard disks and
9 The EtherShare File Server
319
9.8 Data backup
tape systems are directly linked to the server, and not connected at another point in the network). Since UNIX computers are usually provided with some kind of built-in tape
streamer, this method also has the advantage that no additional hardware needs to be purchased.
Various UNIX system programs allow convenient backup
of directories and files; the most common programs used
for this purpose are the programs “ufsdump”, “cpio” and
“tar”.
Important:
Make sure, while performing a data backup from a
UNIX system, that the volume to be stored is not currently used by Macintosh clients or “opisrv” or “dt”.
Otherwise, the result would be inconsistent file/.rsrc
data.
The volume’s “.Desktop” and “.DeskServer” files may
not be backed up because at times of restoring they
would be different from the volume’s content.
cpio and tar
“cpio” and “tar” are not capable of storing path names longer than approximately 100 characters. This makes these
programs unusable on Macintosh volumes, which support
much longer path names.
ufsdump and
restore
“ufsdump” is a backup program available on many UNIX
systems which is characterized by high speed and by the
fact that it is able to archive all file types. Furthermore,
“ufsdump” only archives blocks in the file system that actually contain real data (sparse files). “ufsdump” is the recommended backup program for the EtherShare system.
Please refer to appendix A 6: “Data backup with “dump”
and “restore”” for an example of using “ufsdump” and its
companion “restore”. See nofiledatesync in chapter 9.4 “Parameters of the “afpsrv” program” for related information.
9 The EtherShare File Server
320
9.8 Data backup
Another possibility to perform data backups preserving a
high grade of security, is to save both the data and the resource file to the same destination (e.g. streamer, tape etc.)
and not to split them up to different storage media.
Automated
backup
The UNIX system program “cron” allows data backup to be
automated. Daily backup to tape can be carried out with
minimum effort if the corresponding commands have been
entered in the “cron” configuration table. It is only necessary to ensure that a tape with sufficient storage capacity is
loaded in the appropriate tape drive.
9 The EtherShare File Server
9.9 File Server utility programs
9.9
321
File Server utility programs
The following programs are created automatically in the
“$ESDIR/etc” directory during EtherShare installation:
stop-afp
“stop-afp” is a shell-script which closes down the File Server after a delay of five minutes, ensuring that all active processes have been correctly terminated. All logged-on users
receive a warning message on their workstations before the
system is finally closed down.
If the “stop-afp” command line includes the parameter
“now” (“$ESDIR/etc/stop-afp now”), the File Server is
stopped immediately.
Note:
mkafppasswd
Only the superuser (“root”) can run “stop-afp”. Before
running this script, use the “swho” command (or
choose Active Users in the Lists menu of EtherShare Admin) to make sure that no other users are using the File Server, or use “afpmsg” to notify other
users in advance.
“mkafppasswd” is a shell script that you can call in order to
copy user entries for the user id 0 (“root”) and all users with
user numbers greater than or equal to 100 from the
“/etc/passwd” file to “$ESDIR/conf/afppasswd”. The output is sent to “$ESDIR/conf/afppasswd”. You will get an
error message if “afppasswd” already exists. After creating
this file the command asks you for a new “root” password,
because all entries are initially without any password. If
you have any “real” UNIX users with ID numbers below
100, as distinct from “system” users such as “bin”, you
must manually add a corresponding entry (initially without
password) to the “afppasswd” file as follows:
9 The EtherShare File Server
322
9.9 File Server utility programs
username:
Then set up initial passwords with Change password in
the Chooser, or from UNIX with the password program
“$ESDIR/afppasswd”.
afpmsg
With “afpmsg” a UNIX user can send a display message to
an AFP client – with a maximum of 199 characters, or to all
users if logged-in as “root”, see fig. 156. For detailed parameter information type afpmsg -?.
makes references to a file containing the actual
message. This may be required, e.g. if you want to send a
multi-line message, which is not possible with the message
parameter only.
afpmsg -f
-p
is the parameter for sending a message to a particular
process id #.
-u
is the parameter for sending a message to another user.
Examp.:
afpmsg -u dave “Hi Dave, this is a test.”
Fig. 156: Example of a display message
9 The EtherShare File Server
9.9 File Server utility programs
323
If neither -p is specified, nor -u and you are “superuser”,
the message reaches all users logged-on to the respective
server.
Note:
In order to avoid “distorted” display messages, make
sure the appropriate version of AppleShare client (min.
3.8) for the respective Mac OS (starting with 7.1 and
above) is installed on your Macintosh workstation.
9 The EtherShare File Server
324
9.10 EtherShare versus AppleShare
9.10
EtherShare versus AppleShare
When compared to the original AppleShare file server from
Apple, EtherShare has a few minor limitations but also offers powerful additional features which result in part from
specific features of the UNIX environment on which EtherShare is based.
Casesensitivity
The following table compares the behavior of the different
operating systems when it comes to the case of file names.
case preserve
case ignore
Mac OS
✓
✓
UNIX
✓
–
MS-DOS
–
✓
W95/98/NT
✓
✓
Fig. 157: Operating systems and the case-sensitivity of file names
As figure 157 shows, there is no case preserving under
MS-DOS, i.e. file names entered in lowercase will appear
uppercase in the directory listing. In contrast to UNIX, the
Macintosh (as well as Windows) operating system is not
case-sensitive when it looks for files or creates or opens
them – if your application looks for “Dave”, it will also find
“dave”, and you cannot create a file “Dave” and a file
“dave” in the same folder on a local volume. Due to its
UNIX heritage, this is unfortunately not true for EtherShare
volumes.
9 The EtherShare File Server
9.10 EtherShare versus AppleShare
325
This distinction is normally not a problem – if an application has created a file called “Editor Prefs”, for example,
and needs to open the file again, it usually tries to open it
using the same name and not under the name “EDITOR
PREFS”. If an application cannot find a file which it has
created, and the file is visible under UNIX and in the Finder, it is likely that case-sensitivity is to blame. If you are
able to determine the name of the file which the application
is trying to open, you can often provide a workaround by
using a Macintosh link (alias) or by renaming the file. Contact your application vendor for assistance.
ASCII “0”
You will get a file system error if you try to copy files
whose names contain ASCII “0” (zero) to the server, or if
application programs or tools try to create such files. This
somewhat dubious technique is used by some INITs to
force their name to the top of an alphabetic list of files. This
restriction also applies to all AppleShare file server products (including those from Apple).
Private
volumes
Private volumes are a particularly powerful feature of the
EtherShare File Server which is not available on original
AppleShare file servers. By automatically allocating a private “home” volume to each user, it is possible to keep
his/her data separate and protected from other users without
requiring any additional measures to be carried out. The
home volume feature – which is implemented with the
UNIX home directory concept – underlines the high degree
of integration of the UNIX file system in the EtherShare
File Server.
Private volumes are used to improve structuring and ordering of private files, but it is generally better to use the Volume groups feature for this purpose, because private
volumes cannot be seen in the Volumes list of the Ether-
9 The EtherShare File Server
326
9.10 EtherShare versus AppleShare
Share Admin, and thus cannot be readily managed or rebuilt (see Rebuild Desktop in chapter 5.9 “Volume menu”).
Note:
Many private volumes may require an increase of the
“maxdesktops” value in “desksrv” (EtherShare’s default value is 128).
Access
privileges
Accordingly, when changing the access privileges of a folder/volume, file and folder attributes can only be set to the
same value, and you will need to close and re-open the
Finder’s “Sharing...” window (figure 151) before you can
see this. If you need to change the privileges for a single file
within a folder, you have to do it with the UNIX “dt chmod”
command.
Available
storage space
on volumes
When determining the available free storage capacity of a
volume, the AFP specification only permits interrogation of
the root directory of a volume. This assumes that the entire
volume is present on the same file system.
In contrast, under the UNIX file system, “volumes” can extend over several storage devices which are installed at different UNIX directories (mount points) and physically
located at different points on the network. This mounted
volumes feature is completely unknown to AFP – AFP does
not recognize cases where a volume extends over several
storage devices, with each of them having a different storage capacity.
Accordingly, in order to maintain control over the available
storage capacity, it is not recommended to mount EtherShare volumes that extend over more than one file system.
Otherwise, you may get problems with Macintosh applications that check the available storage capacity on the volume before writing files or documents. See also Volume size
9 The EtherShare File Server
9.10 EtherShare versus AppleShare
327
limits in chapter 9.6 “Public and private volumes” for related information.
Note:
Folders and
volumes
without
groups
If you have more than one UNIX mount point on a
Macintosh volume, do not move files or folders to the
trash since this may fail.
Original AppleShare file servers allow folders to be created
which are not assigned to a group. This feature is not permitted on an EtherShare File Server due to limitations inherent in UFS. If it is required to create folders which are
not assigned to a specific group, it is necessary to create a
new special group (pseudo-group) which does not have any
members. By convention, the group “nogroup” is often
used for this purpose.
The same is true for volumes. Since the access privileges of
HFS volumes are always the same as those of the corresponding UFS directories, if it is required to create HFS
volumes which are not assigned to a specific group, they
must also be assigned to the pseudo-group “nogroup”.
Users without
primary group
In contrast to generic AppleShare file servers, EtherShare
always requires each user to be assigned a primary group,
since all files must be assigned to a specific group. A pseudo-group can be used in this case too, although the name of
the pseudo-group should be different from the one used for
groupless folders and volumes (e.g. “noprimary”).
Preventing
password
changes
Original AppleShare file servers allow the “Change password” feature to be disabled for individual users. In an
EtherShare File Server, the rights to change passwords can
only be enabled or disabled for all users at the same time,
by marking the program “$ESDIR/afppasswd” as non-executable for categories “other” and “group”. In this case,
9 The EtherShare File Server
328
9.10 EtherShare versus AppleShare
passwords can only be changed by the administrator, in the
“User data” window in the EtherShare Admin (see
chapter 5 “EtherShare Admin”).
Search Desktop
“afpsrv” does conduct a search of file or folder names in the
desktop database. Although this search is much faster than
searching for file/folder names in the UNIX file system, it
may fail to find files if the desktop database does not correspond to the files and folders on an EtherShare volume
caused, for example, by overlapping EtherShare volumes
(see Private volumes in 9.6 “Public and private volumes”).
Note:
Choose Rebuild Desktop... from the Volume list
in the EtherShare Admin. Then, all files on that volume
can be found again.
Under UNIX, type rebuild -f (in “$ESDIR”).
10 The Desktop Server
329
10
The Desktop Server
10 The Desktop Server
330
10.1 General remarks
10.1
General remarks
This chapter describes the function and configuration of the
Desktop Server. The Desktop Server is responsible for storing icon and application data for the entire EtherShare
Server, and for managing file and directory IDs for network
volumes. The Desktop Server is usually invisible to users
and has no associated Macintosh application. The exception is the Rebuild Desktop... option in the EtherShare
Admin.
10 The Desktop Server
10.2 The Desktop Server Program
10.2
331
The Desktop Server Program
The EtherShare Desktop Server system consists of the program “desksrv”. It is created in the “$ESDIR” directory
during installation. EtherShare is configured to start
“desksrv” automatically when UNIX is booted.
desksrv
“desksrv” manages a database containing icon and application data for the entire EtherShare server, and file and directory ID information for network volumes. The database
data are contained in the “.Desktop” file in the root directory of each HFS volume. The file name “.Desktop” is protected by EtherShare, and is normally invisible to
Macintosh users.
Application
data
The application data records in each “.Desktop” file contain
the information required to assign documents to the Macintosh applications that created them. The Macintosh’s
Finder uses this information to start the corresponding
application when the user double-clicks on a particular document. Each time a new application is copied into an EtherShare volume, the desktop server creates a new entry in the
corresponding desktop database file.
Icon data
The icon data records in each “.Desktop” file contain icons
from all the applications in the volume, sorted by type and
creator codes.
In order to let the Finder display icons for documents and
applications, each application contains icon images (bitmaps) for its own icons in several sizes and styles, and icons
for all the document types it can create. For example, Microsoft Word can create text, glossary, dictionary documents, etc., each with its own icon. Each icon is associated
with unique file type and file creator codes. The applica-
10 The Desktop Server
332
10.2 The Desktop Server Program
tion’s documents normally contain the file type and file creator codes only (stored in their resource forks), but no
icons. See The structure of volumes and files in chapter 9.3
“Directory and file formats” for more information.
Each time a new application is copied into a local Macintosh volume, the Finder copies all of the icons it contains to
the volume’s desktop file. In the case of EtherShare, the
Desktop Server stores them in the “.Desktop” database file,
after checking that the same icons are not already stored
there.
If you copy documents of an application to your Macintosh
without ever having owned the corresponding application,
then the icons may appear blank. This is because the icons
you see in the Finder are taken from the desktop file and not
from the documents, the latter simply supply the correct
type/creator codes.
Files created by UNIX applications do not have a resource
fork. In such cases, EtherShare normally assigns icons to
them automatically. See Generic icons in chapter 9.3 “Directory and file formats” for more details.
Directory and
file IDs
When the Finder or an application needs to open a file, in
addition to looking for the specified file name in a named
directory and volume, a system option is available to open
the file by a reference number instead. This reference number is called the “file ID”. The directory path, too, can be
specified by its “directory ID”. By using file and directory
IDs, files can still be found after a user has renamed or
moved them. This provides Macintosh users with a lot more
flexibility than MS-DOS users, for example.
10 The Desktop Server
10.2 The Desktop Server Program
333
This principle is used in the “Alias” facility introduced with
Macintosh System 7.
Each “.Desktop” file contains file and directory IDs for all
the files and directories in the volume. The file ID is also
stored in each file’s resource file; the directory ID is also
stored in each directory’s resource file.
The file and directory IDs are allocated when the file or directory is first created, and never change even if the file is
renamed or moved to another location. The IDs are normally invisible to the user.
Desktop
rebuild
After a period of time, each volume desktop file tends to
collect a number of icons which are no longer needed, since
the corresponding application has been deleted from the
volume. For this reason, you may rebuild your desktop
from time to time, i.e. start a process which scans the entire
volume for applications and makes sure that the desktop
only contains icons for existing ones.
You can rebuild your desktop for local Macintosh volumes
(built-in hard disk) by restarting your Macintosh while
holding down the Option and Command keys. To rebuild
the desktop of an EtherShare volume, you must make sure
that the volume is not mounted (e.g. with the Active Users... option in 5.13.2 “Active Users list and sending messages with the EtherShare Admin”) and then start the
EtherShare Admin application on one of your Macintosh
clients, select the volume in the volume list, and choose Rebuild Desktop... from the Volume menu (see Rebuild Desktop in chapter 5.9 “Volume menu”).
10 The Desktop Server
334
10.2 The Desktop Server Program
The rebuild process will always add files to the desktop database in order to allow file name searches in the volume
desktop database. This requires that a resource for every
file/folder is available.
During an EtherShare desktop rebuild, missing resource directories and resource files are automatically created for all
directories in the EtherShare volume (including the volume root directory); existing directory IDs are verified and
missing ones are created.
With files, missing file IDs are created and existing file IDs
are verified. Missing resource files are created as well. The
file type in that case, is substituted by a dummy, e.g.
“UNIX/UNKN”. The generic UNIX icons and extensionmapped icons are created later by the File Server, when the
corresponding folder is first opened.
Note that a desktop rebuild with EtherShare 2.6 and the creation of missing resource files may cause difficulties if you
try to access these files from an EtherShare 2.2 (or older)
server via NFS. Old EtherShare versions cannot display
such files properly; the icons are displayed blank. Therefore, you should make sure that in a multi-EtherShare-Server environment, all servers are updated to EtherShare 2.6.
By default, the rebuild program uses two passes to update
the volume desktop database. The two pass approach does
have the benefit that on volumes where duplicate file/folder-IDs exist (usually resulting from manipulations of
files/folders by UNIX commands), files/folders will get an
adjusted ID only after the complete desktop is verified, and
all other objects will retain their original ID.
10 The Desktop Server
10.2 The Desktop Server Program
335
File and directory IDs are stored in both the “.Desktop” file
and the file’s (or directory’s) resource file; if the verification detects differences, the IDs from the resource files are
assumed to be the correct ones.
While a rebuild is running, it is possible to write to an
EtherShare volume. As long as the desktop database is not
yet complete, changes to files or folders may result in
different file-/folder- IDs issued for objects not yet reenumerated by rebuild.
To prevent inconsistencies between information stored in
the desktop databases of an EtherShare volume and the
files/folders on this volume, the rebuild process encountering an RPC timeout will exit immediately. Desktop information for this volume will be incomplete until a rebuild
finished successfully.
In case “afpsrv” processes also encounter RPC timeouts,
the volume will get secured against write access and will be
grayed out in the Chooser’s volume list. Opening folders
and reading files will still be possible, but creating/renaming/moving files or folders will not be possible any longer.
Not even trashing files/folders will be allowed.
RPC timeouts are symptoms which are usually caused by
high server or I/O load, slow I/O devices, network or communication problems. Assure that the cause of this problem
is solved before restarting EtherShare services. Depending
on the severity of the problem, it may be necessary to stop
and restart EtherShare services on the server by using the
scripts “$ESDIR/stop-atalk now” followed by “$ESDIR/
start-atalk”.
10 The Desktop Server
336
10.2 The Desktop Server Program
In the case of files created by UNIX applications, the resource directories are unnecessary – although they do not
affect UNIX applications which access the original files,
they take up a certain amount of disk space. Accordingly, it
may be better to organize your directories and volumes with
separate file systems for UNIX-only and Macintosh files.
Important:
Desktop
auto-rebuild
We strongly recommend to use the “rebuild” option to
put your desktop in order. Do never delete the desktop
database under UNIX.
Each time you open an EtherShare volume with the Chooser, the desktop server checks the logical consistency of the
desktop file and may trigger a desktop rebuild if it finds invalid information. This process takes place automatically
and in the background. The same check is done, too, for
each of the volumes in the volume list “$ESDIR/conf/
afpvolumes” when EtherShare is first started.
Most computers such as the Sun SPARC and IBM RS/6000
use the so-called Motorola byte order, and others such as
the DEC Alpha and IBM PC use the Intel byte order. An
auto-rebuild also takes place if you mount a volume whose
desktop was created by a computer with a different byte order.
Furthermore, the volume’s directories must not overlap
or include the directories of other EtherShare volumes.
You should choose the volume mount point carefully to
make sure this does not happen. To avoid problems,
EtherShare 2.6 checks for overlapping volumes; volumes
will be grayed out if they overlap a volume you have already mounted. You will receive an error message (see later). The EtherShare Admin will check for overlapping
10 The Desktop Server
10.2 The Desktop Server Program
337
volumes as well. Nevertheless, it may happen that existing
volumes are not checked and that you are able to create a
new volume that overlaps an existing one.
UNIX
“rebuild”
program
Instead of using the Rebuild Desktop... option in the EtherShare Admin, you can also call the “rebuild” program from
a UNIX shell. There is one particular situation where this
may be required:
❍ If you want to rebuild the “.Desktop” database for your
home volume or a private volume. The Desktop Server
will create a “.Desktop” database and resource directories the first time you access your home volume from
the Chooser, and will rebuild it if it becomes corrupted,
but you will not be able to rebuild it manually from
EtherShare Admin, since it does not appear in the volume list.
Resource
orphans
The rebuild program offers an option to clean (delete) resource orphans. As discussed earlier, the File Server creates
resource files for files created by UNIX applications when
the corresponding folder is opened. However, when you delete a file directly from the UNIX host, the matching resource remains untouched. (But when you delete a file from
a Macintosh, the resource file is deleted, too).
So particularly if your EtherShare volume contains a mixture of Macintosh files and UNIX-only files, after a period
of time the volume will tend to collect a number of unused
resource “orphans”, wasting space. Calling the “rebuild”
program will automatically delete the resource orphans.
You would have to specify the “not clean resource orphans”
switch of the “rebuild” program to prevent the program
from automatic deletion. Alternatively, you can specify the
“nocleanorphans” switch for the “rebuild” program in
10 The Desktop Server
338
10.2 The Desktop Server Program
“atalk.conf”, causing orphans to be maintained each time a
desktop rebuild takes place (see chapter 10.3 “Parameters
of the “rebuild” program”).
Calling
“rebuild”
Call the “rebuild” program from a UNIX shell as follows:
rebuild <switches> <path_of_volume_root>
The available switches are:
-n
-o
-f
-c
-C
-s
-v
-2
-x
output to system messages file instead of “stdout”
open “.Desktop” file only, repair if corrupted
force “.Desktop” file to be rebuilt
(force create is off if you do not specify -f)
do not clean resource orphans automatically
(clean orphans is default if you do not specify -c)
volume can be converted to another character set
scan desktop only
(scan only is off if you do not specify -s)
verbose for diagnostics
(verbose is off if you do not specify -v)
2 ID check passes is active by default
(two passes is disabled if you specify -2)
volume is exclusively opened for rebuilder
Usually, you call “rebuild” with the “-f” switch, for example:
rebuild -f /usr/local/es/macapps
If you call “rebuild” with the “- C” option, you can specify
a new character set, e.g. “MacRoman” or ”SJIS”:
rebuild - C macroman <path_of_volume_root>
If you want to convert from a new to the old EtherShare
character set (“oldes”), call:
rebuild - C oldes <path_of_volume_root>
Readonly
volumes
In the case of CD-ROM volumes, or volumes such as Magneto-Optic (MO) cartridges which have been mounted with
the EtherShare Admin as “read-only”, the desktop server
10 The Desktop Server
10.2 The Desktop Server Program
339
first checks to see if a valid “.Desktop” file is available on
the volume’s root. This can be the case, for example, for MO
cartridges which were previously mounted under EtherShare
as “read-write”, allowing a valid desktop to be created.
If a valid “.Desktop” file cannot be found (this will almost
always be the case for CD-ROMs), the desktop server creates a temporary desktop file in the host’s “/tmp” directory
using a unique file name starting with “desksrv...”. Since the
files on the CD-ROM almost certainly have no resource
forks in this case, the Finder will use the information that are
available in the extension mapping table or show one of the
about 20 generic EtherShare icons.
10 The Desktop Server
340
10.3 Parameters of the “rebuild” program
10.3
Parameters of the “rebuild”
program
When it starts, the “rebuild” program first accesses the
main configuration file “atalk.conf” to determine its configuration. The “install” program automatically sets up this
file with initial values for some of the EtherShare servers.
The values can be changed if necessary by using an editor
such as vi. See also chapter 5.14 “Editing “atalk.conf” (and
other configuration files) manually”.
The parameter described below can be defined for
“rebuild” in “atalk.conf” (note that the parameter list is preceded by the program name “rebuild:”):
cleanorphans
[no]cleanorphans
The cleanorphans
switch for the “rebuild” program in
“atalk.conf” causes resource orphans to be deleted each
time a desktop rebuild takes place (see Resource orphans in
chapter 10.2 “The Desktop Server Program”). This operation requires a certain amount of processing time.
The default for this switch is cleanorphans.
twopass
[no]twopass
The twopass parameter
induces the “rebuild” program to
run 2 times: in the first session, “rebuild” tries to restore all
already-known IDs on the volume and makes records of all
conflicts. In the second session, all those files which have
caused conflicts are allocated a new ID.
The default for this switch is twopass.
10 The Desktop Server
10.3 Parameters of the “rebuild” program
341
10.3.1 “rebuild” error messages
The following error messages can be issued by the
“rebuild” program:
compressed resources
This is a warning which indicates that some resource information, e.g. icon information, cannot be uncompressed.
This could happen e.g. with fonts that have a custom icon:
rebuild[]: /apple2/FremdeSchriften/Fre:a7Schriften/
Helvetica Neu(L63-65,185)/HelveNeuLigCon:
unable to add to desktop, compressed resources
volume %s is currently in use, no exclusive access possible
Someone is already using the volume, i.e. you cannot access exclusively with the rebuild -x switch.
charset %s for volume %s not found (%s)
This error message leads to a fatal error; the “rebuild” program is stopped.
volume is already using the selected charset, nothing to convert
The current character set was selected anew.
volume %s is read-only
You cannot apply any changes since there is no write access
to the volume, e.g. a CD-ROM volume.
10 The Desktop Server
342
10.4 Parameters of the “desksrv” program
10.4
Parameters of the “desksrv”
program
When it starts, the Desktop Server program “desksrv” first
accesses the main configuration file “atalk.conf” to determine its configuration. The “install” program automatically
sets up this file with initial values for some of the EtherShare servers. The values can be changed if necessary by
using an editor such as vi. See also chapter 5.14 “Editing
“atalk.conf” (and other configuration files) manually”.
The parameter described below can be defined for
“desksrv” in “atalk.conf” (note that the parameter list is
preceded by the program name “desksrv:”):
maxdesktop
maxdesktop=number
number is the maximum
number of network volumes that
can be opened by Macintosh users on the File Server simultaneously.
The default for number is 128 volumes. Each open volume
is only counted once, even if it has been opened by more
than one user. The absolute maximum value is 450, but the
achievable maximum may be limited by the maximum
number of open files for the “desksrv” process allowed by
the host. This limit is normally set by “desksrv” for itself
automatically. In case of problems, refer to “limit” and
“ulimit” in your UNIX documentation for details about
how to increase the limit manually for your host.
10.4.1 “desksrv” error and status messages
Although there is a large number of possible messages from
“desksrv”, we will only describe a few of the more common
messages here because the majority of them are non-fatal
10 The Desktop Server
10.4 Parameters of the “desksrv” program
343
and simply result in an automatic desktop rebuild. Fatal errors result in “desksrv” stopping, in which case you will see
the message “desksrv: stopped”.
All messages are written to the system messages file (which
can be accessed via the Lists menu of the EtherShare
Admin) and are preceded by the host name, time and date,
and the string “desksrv:”. If the Desktop Server triggers a
desktop rebuild, or if you call the rebuild program manually
from a UNIX shell, the message will include the string
“rebuild:” instead.
corrupt at open
The desktop file is corrupted and will be rebuilt automatically.
unknown file type on open (maybe wrong byte order)
The “.Desktop” file is not a valid desktop, e.g. the desktop
file is in Intel byte order and should be in Motorola byte order, or vice versa; it will be rebuilt automatically.
read failed, or write failed
These messages are usually related to volumes mounted
over NFS, and point to NFS communications errors.
creation error, too many open files on volume...
“desksrv” has attempted to open more files than the maximum number allowed by your host. The limit is normally
set by “desksrv” for itself automatically. Refer to “limit”
and “ulimit” in your UNIX documentation for details about
how to increase the limit manually for your host.
10 The Desktop Server
344
10.4 Parameters of the “desksrv” program
too many desktops
Macintosh users have attempted to mount more volumes
than the presently configured maximum number for the
desktop server. Please refer to the description of the
maxdesktop parameter in this chapter for more details. This
message is usually associated with a Macintosh Finder error message similar to the following: “the connection could
not be made to file server <name> - please contact your system administrator”.
no response from host <hostname>
If you access volumes on another EtherShare host through
NFS, and the remote “.Desktop” file seems to be already in
access, queries will be sent to the remote host’s File Server
and Desktop Server to check whether they are really in use.
The remote “.Desktop” file will not be accessed directly.
You will get the “no response...” error message if the remote host does not respond to queries after a suitable timeout. In such cases, the local Desktop Server will take
control of the remote “.Desktop” file and rebuild it if necessary.
nested desktops
A message like desksrv [] : nested desktop
[/data/opi/OPI1] in [/data/opi/.Desktop] indicates
that there are overlapping volumes. The message pops up
when you try to mount a volume that has a “.Desktop” file
in its parent directory.
10 The Desktop Server
10.4 Parameters of the “desksrv” program
345
Add ID - name too long
If you create a file with a too long file name under UNIX,
using the Desktop Utilities, “opisrv”, or the EtherShare OPI
“layout” program which will try to add this file to the desktop, you will receive an error message similar to those listed
in the examples below:
desksrv[]: AddId - name too long
or
opisrv[]: Warning: /apple1/software/Wilhelm
Kaiser/Kaiser/R&R-Beilage 8 Seiten, 41 KW/Bilder
41 KW/8 S. Abb. 6 Gianna Nannini.eps.lay: Path too
long. This file may not be accessed from a Macintosh workstation.
10 The Desktop Server
346
10.5
“afpsrv” and “desksrv”
coordination
“afpsrv” will try 6 times for 5 seconds each to reach the
desktop server to retrieve or store information from/to the
desktop database of its volumes. Earlier versions of
“afpsrv” tried 3 times for 5 seconds. Although even the older values were a very long time for network or RPC connections, we decided to even extend these values.
If “afpsrv” does not get a response from “desksrv” during
this period, this indicates a severe problem with the underlying UNIX operating system, UNIX file system or
RAID/HSM drivers, or a hardware problem related to SCSI
or hard disks.
To prevent inconsistencies between information stored in
the desktop databases of an EtherShare volume and the
files/folders on this volume, the “afpsrv” client process encountering this timeout will secure this volume (all mounted volumes) against write access. Opening folders and
reading files will still be possible, but creating/renaming/
moving files or folders will not be possible any longer. Not
even trashing files/folders will be allowed.
Apart from the usual messages issued in the UNIX system
error log, “afpsrv” will issue an error message on the client
if the communication to “desksrv” fails and inform users
that the volume falls back to “read-only” access. The message is:
Volname: localhost: RPC: Timed out
Only readonly access possible
10 The Desktop Server
10.5 “afpsrv” and “desksrv” coordination
347
Under certain conditions, an additional error message is issued and the volume is unmounted automatically by the
Finder.
Though this message is issued by one “afpsrv” client process only, it is likely that all other “afpsrv” processes may
encounter the same problem and therefore, the UNIX system administrator should be notified immediately.
Since applications usually work with temporary files/folders, it may not be possible to save single files. If this problem was only temporary, unmounting all EtherShare
volumes and remounting them will make these volumes
writable again. If not, this was no temporary problem and is
not solved in the meantime the Macintosh volume Chooser
will list all volumes grayed out, and no volume will be
mountable. Not even “root” will be able to mount any of
these volumes.
Depending on the severity of the problem, it may be necessary to stop and restart EtherShare services on the server by
using the scripts “$ESDIR/stop-atalk now” followed by
“$ESDIR/start-atalk”.
Assure that the cause of this problem is solved before restarting EtherShare services.
10 The Desktop Server
348
11 The Print Server
349
11
The Print Server
11 The Print Server
350
11.1 General remarks
11.1
General remarks
This chapter describes the Print Server and its function,
configuration and operation. This is followed by notes on
the installation, configuration and operation of printers.
11 The Print Server
351
11.2 The Print Server Interfaces
11.2
The Print Server Interfaces
As described in detail in the following, the EtherShare Print
Server supports 5 different output interface options, plus
the possibility of spooling the resolved print job to disk. It
can be considered as a kind of telephone exchange for printer connections, as shown in Table 2:
Input options
Job comes from:
Output options
Supported printer types:
AppleTalk
Serial
AppleTalk
UNIX “lpr”
TCP/IP stream
remote “lpr” through TCP/IP
Remote LPR
Shared Memory
Resolve and print to disk
Table 2:
Print Server input and output options
Suitable configuration allows any combination of input and
output option to be used.
11 The Print Server
352
11.3 The Print Server Programs
11.3
The Print Server Programs
The Print Server consists of the programs “papsrv”, “psof”,
“papif”, “psif”, “tcpif”, “shmif”, “diskif”, “holdif”,
“balanceif”, and “psresolve”. They are created in the
“$ESDIR” directory during installation. In conjunction
with the UNIX system programs “lpr”, “lpd” and “mail”,
their purpose is to process and spool print jobs received via
AppleTalk and pass them on to shared printers connected to
the UNIX host either through Ethernet, TCP/IP, “Shared
Memory” or via a serial interface. The host is normally configured to start “papsrv” automatically when UNIX is booted.
EtherShare’s Print Server is based on the BSD printing
system. If your host uses the System V printing system
(e.g. Sun Solaris 2.x), the Print Server automatically uses
its own BSD-style “lpr” program, which is provided in the
“$ESDIR” directory in such cases.
driver
description
papif
AppleTalk (Printer Access Protocol) printers interface
program
psif
serially-connected printers interface program
tcpif
TCP/IP stream & Remote LPR printers interface program
shmif
Shared Memory interface program
diskif
Print To Disk interface program
holdif
hold queue interface program
balanceif balance queue interface program
psresolve pseudo-interface program for use without “lpd”
Table 3:
Printer interface programs
11 The Print Server
11.3 The Print Server Programs
papsrv
353
“papsrv” is the program that implements Printer Access
Protocol (PAP) functions for the Print Server. PAP is used
in AppleTalk networks for communicating with most types
of printers and print servers. Once started, “papsrv” continuously monitors the AppleTalk network for printing requests. When a print job is received, it is first stored in the
UNIX file system before being passed to the UNIX system
program “lpr”, which transfers the job to “lpd”. The latter
calls the appropriate interface program (“papif”, “psif”,
“tcpif”, diskif”, “holdif”, “balanceif”, or “shmif”) and the
optional output filter (“psof”). The interface program then
passes the job to the printer (see “Table 3”).
A separate “papsrv” process is started for each printer
queue on your host.
psof
“psof” is the so-called output filter program, which is responsible for generating the title page (or “banner”) as a
PostScript job (a banner is not generated for non-PostScript
printers). The banner page contains information about the
print job such as the user name, the time, and the document
name. It is optionally output before the print job, and is useful when sorting out a pile of printed pages if a number of
users have been printing at the same time. “psof” is automatically called by the UNIX program “lpd” at the start of
each print job, and generates a banner if one was specified
with the “banner” switch when configuring the printer (the
“banner” switch sets the “sh” flag in “/etc/printcap”). The
banner page is generated from a PostScript file which is
compiled into the interface programs “*if” (e.g. “papif”), or
from “BANNER” in the printer’s spool directory. The latter
takes precedence, if it exists. The following special sequences (“variables”) in the banner file are replaced auto-
11 The Print Server
354
11.3 The Print Server Programs
matically by information about the print job (see User and
document names in print jobs in appendix “A 7.1 EtherShare
log files” for related information):
^U
The user who created the print job (set by “%%For”)
^T
The current time
^N
The file name of the document
^C
The number of pages in the print job
^P
The logical (“printcap”) name of the printer
^H
Host name
^n
UNIX job title
^u
UNIX user ID (login name)
Please note that the code “^U” in the above list does not
mean Control+U, it means uparrow (“^”) followed by an
uppercase “U”. With the Banner Page switch in the EtherShare Admin (which sets the “sh” suppress headers flag in
“/etc/printcap”) you can determine whether the printer will
print a title (banner) page before outputting the print job or
not.
papif
“papif” is the interface program for printers that support
Apple’s Printer Access Protocol (PAP) and are connected
to the print server through AppleTalk. “papif” is used for all
PostScript PAP printers (including photo-typesetters), and
the Apple ImageWriter II and ImageWriter LQ.
11 The Print Server
11.3 The Print Server Programs
355
Print jobs received by the Print Server from a workstation
on the network are processed and queued before being sent
to the PAP printer through the network again.
Due to print job spooling, it is more efficient to drive
AppleTalk printers through the Print Server, rather than accessing them directly from the workstations. Accordingly,
users should select the printer queue in the Chooser, and
not the printer it is connected to. We recommend that you
select a Chooser name for the queue which shows which
printer it drives and also indicates that it is a queue and not
a printer. For example, add “spooler” to the printer’s name.
“papif” forms the link between “lpr” and PAP printers.
psif
“psif” is the interface program for PostScript printers which
are connected directly to the UNIX host via a serial
(RS232C) interface. Due to slow data transfer rates we normally do not recommend serially-connected printers for use
with Desktop Publishing applications.
“psif” forms the link between “lpr” and serially-connected
printers.
tcpif
“tcpif” is the interface program for PostScript printers that
support the TCP/IP stream protocol. It is also used for printers which are connected with the Remote LPR protocol.
TCP/IP stream printers must be compatible with the EtherShare TCP/IP stream implementation – contact your printer
manufacturer or HELIOS supplier if you are not sure
about this. TCP/IP stream has significant advantages over
“Remote LPR” – see later.
11 The Print Server
356
11.3 The Print Server Programs
Print jobs received by the Print Server from a workstation
on the network are processed and queued before being sent
to the printer through TCP/IP.
“tcpif” forms the link between “lpr” and TCP/IP printers.
diskif
“diskif” is the interface program for printing files to disk.
This can be useful e.g. if you want to automatically generate PDF files. In this case you can print to files in a specific
UNIX directory and induce the Acrobat Distiller software
to scan this directory regularly and convert incoming files
to PDF.
“diskif” forms the link between “lpr” and the disk where
print jobs are directed to.
holdif
“holdif” is the interface program if you want to “store” print
jobs which have been processed on a hold queue. “holdif”
can be configured e.g. to forward faulty print jobs to a specific hold queue (“error” queue), and resolved print jobs to
another (“hold” queue). In the Settings window of the
EtherShare Admin (see Hold Queue connection in “5.10
Printers list”), Hold Time, i.e. the time a print job is stored
on the “hold” queue or “error” queue respectively, can be
specified.
“holdif” forms the link between “lpr” and hold/error
queues.
balanceif
“balanceif” is the interface program for printer queues
which are mutually connected in order to balance print job
loads. For more information about “balanceif” settings refer to “ Balance Group connection” in “5.10 Printers list”.
11 The Print Server
11.3 The Print Server Programs
357
“balanceif” forms the link between “lpr” and the balanced
printer queues.
shmif
“shmif” is the interface program for PostScript interpreters
(software RIPs) running on the same host which are able to
communicate through a “Shared Memory” interface. The
RIP must be compatible with the EtherShare “Shared Memory” interface specification – contact your RIP manufacturer or HELIOS supplier if you are not sure about this.
Print jobs received by the Print Server from a workstation
on the network are processed and queued before being sent
to the RIP through a common “Shared Memory” segment.
“shmif” forms the link between “lpr” and software RIPs.
Configuration
If more than one printer is to receive print jobs from the
Print Server, each of them requires a new interface program
task to be started. Each task requires a separate entry line in
the main configuration file “atalk.conf” to specify, among
other things, the printer queue’s unique AppleTalk (NVE)
name, type and zone.
“atalk.conf” is not allowed to have more than one entry
with the same name (i.e. the printer queue name must be
different from printer name) – the Print Server, otherwise,
could not access a unique configuration for a particular
physical printer. Accordingly, it is necessary to start the interface program with a new name for each additional printer.
By convention, a copy of the appropriate interface program
(“papif”, “tcpif” or “shmif”) is renamed to the name of the
logical (UNIX) printer, even if only one printer is being
11 The Print Server
358
11.3 The Print Server Programs
driven by the interface. “atalk.conf” then contains a separate entry for each printer (e.g. “Laser1 ” and “Laser2”), but
no longer contains an entry for the interface program itself.
The new names for the interface programs are assigned
with the UNIX “ln” program during printer configuration,
in order to avoid having to make several physical copies of
the program on the hard disk.
11 The Print Server
11.4 The Print Server in operation
11.4
359
The Print Server in operation
Each print job consists of the print data itself and one or
more so-called “prep” files (PostScript print procedures and
dictionaries, also called control files or “inits”), which precede the print data. It may also be necessary to send download fonts and a banner page to the printer.
The originator of the print job (the application’s printer
driver in the workstation) communicates automatically
with the Print Server via the PAP protocol to agree which
“prep” files must be sent to the printer before printing can
start. After being sent by the workstation for the first time,
“prep” files are copied automatically by the Print Server to
the so-called “prep directory” (“$ESDIR/dicts”) this is
called “dictionary caching”.
If they are needed again, the “prep” files can be sent from
the UNIX host directly, rather than from the workstation.
This reduces network loading and increases throughput.
See chapter “11.7 Adobe Document Structuring Conventions” for related information.
Font including
Fonts required by a particular print job which are not normally supported by the printer (download PostScript fonts)
must also be included in each job before sending it to the
printer. In order to let the Print Server know which fonts to
send, those fonts which are permanently available in each
printer (resident fonts) are specified in the “FONTS” file in
the printer’s spool directory (usually “/usr/spool/
<printername>/FONTS”).
Furthermore, the EtherShare Admin can install Adobe
“Type 1” and “Type 3” printer fonts (not screen fonts or
TrueType fonts) into a central font directory on the host
11 The Print Server
360
11.4 The Print Server in operation
(“$ESDIR/psfonts”), directly from the font manufacturer’s
original font disk. The Print Server only sends those fonts
to the printer which are not already resident. Missing fonts
are sent preferentially from the central font directory, and
are not requested from the originating workstation. This reduces network loading, increases throughput and allows
central administration of printer fonts.
The printer’s resident font list is created automatically
when you install a new printer with the EtherShare Admin
program by interrogating the printer. The list must be updated (with Update Fonts in EtherShare Admin) if new
fonts have been installed on the printer, through font cartridges, printer cache disks, etc.
If your printer is not fully LaserWriter compatible, and font
interrogation does not work, standard font lists for the Apple LaserWriter and the Apple LaserWriter Plus are supplied automatically. For “Remote LPR” printers, the
copying is done automatically if you set them up with the
EtherShare Admin. The “FONTS” file may subsequently
need manual editing if your printer’s font selection is different from those of the Apple printers.
As soon as “papsrv” has received and spooled the entire
print job, the job is passed to the UNIX system program
“lpr”. “lpr” then queues it and passes control to “lpd”. “lpd”
is responsible for passing the job to the output filter “psof”
and to the specified interface program, such as “papif”,
which makes the connection to the printer itself: “lpd” determines how the printer is connected to the server by examining the entry for the printer in the system file
“/etc/printcap”. “/etc/printcap” also specifies (with the “sh”
11 The Print Server
11.4 The Print Server in operation
361
suppress headers flag) whether a title page (“banner”) is required. If necessary, the banner is generated in PostScript
by “psof”, and printed before the print job.
The specified interface program includes the needed fonts,
resolves any references to external images if you have the
“OPI” option installed, resolves “%%Include...” references
(see “11.7 Adobe Document Structuring Conventions”),
transfers the job to the printer, and waits for messages that
may be returned. It is also responsible for interrogating the
printer’s page count before and after the job.
If an error message is returned, it is sent to the user by the
UNIX system program “mail”. Users who have Helios Mail
installed on their Macintosh will receive the message directly on their workstation. The user will also be notified by
the “afpmsg” program, which displays an error message on
the Macintosh. See mail and clientmessages in chapter
“11.6 Configuring printers manually” and User and document names in print jobs in appendix “A 7.1 EtherShare log
files” for related information.
Several types of error message, e.g. “out of paper” or “paper jam” are also sent to the program “syslogd”, which can
be configured by the administrator (in “/etc/syslog.conf”)
to specify the route that the message then takes (e.g. output
to console). This allows rapid response to those error conditions that demand immediate attention.
If the Print Server determines that the printer has refused
the print job completely (e.g. due to a syntax error in the
PostScript code), the rest of the job is immediately aborted
with an appropriate error message and, depending on settings in the EtherShare Admin, e.g. forwarded to an error
queue.
11 The Print Server
362
11.4 The Print Server in operation
Since the print job is temporarily stored in the UNIX file
system, it can be rapidly transmitted from the workstation
to the host without the workstation having to wait for the
printer (spooling function). Further processing of the print
job is carried out automatically by the Print Server, while
the user can continue with other jobs.
As described above, the Print Server stores all “prep” files
in the “prep directory” and only transfers them to the printer
when they are required. The “prep” files are not made resident in the printer. This allows switching between different
“prep” files which are incompatible with each other, without having to manually reset the printer. The print server
appends the “prep” files in non-resident form to the beginning of the print job, and sends the complete file to the
printer as a single job.
However, the standard “prep” files provided for the Apple
LaserWriter 6.0 printer drivers are designed to be transferred to the printer as resident “preps” in advance of the
print job itself. Due to problems in the standard Apple
“prep” files, errors may occur when the Print Server appends them to the job, and the job may not print properly.
For this reason, modified versions of the standard “prep”
files for the drivers “LaserWriter Version 5.2” and “LaserWriter Version 6.0” are included in EtherShare in
“$ESDIR/dicts”. Their names are “_AppleDict_md_68_0”
and “_AppleDict_md_70_0”, respectively. The Print Server uses these modified files automatically, instead of the
versions provided by Apple. This problem is no longer
present with Mac OS Version 7.0 and above, since Apple
no longer make their “prep” files resident. “$ESDIR/dicts”
also contains a Linotype dictionary and a HELIOS dictionary.
11 The Print Server
11.4 The Print Server in operation
363
Restarting the
Print Server
If the server shuts down while there are print jobs running,
you will need to restart the affected printers using the UNIX
command “lpc restart all”. This can also be done with the
Restart Printer option of the EtherShare Admin application.
restart-pap
The shell script “$ESDIR/restart-pap” is used internally by
EtherShare to restart all printer queues. This is necessary to
enable printer configuration changes in the “atalk.conf” file
to come into effect immediately, without restarting the entire EtherShare system.
11 The Print Server
364
11.5 Parameters of the “papsrv” program
11.5
Parameters of the “papsrv”
program
When it starts, the Print Server “papsrv” first accesses the
main configuration file “atalk.conf” to determine its configuration and the number of printers that are available. Printers can be set up if necessary by using an editor such as vi,
but we strongly recommend that you do this with the EtherShare Admin instead. See also chapter “5.14 Editing
“atalk.conf” (and other configuration files) manually”.
The parameters described below can be defined for each
“papsrv” process in “atalk.conf” (note that the parameter
list is preceded by the program name “papsrv:”):
name
name=netname
netname is the AppleTalk (NVE) name of the Print Server.
This is the name with which it is known to the network. It
is the name you see in the workstation’s Chooser under
“LaserWriter”.
type
type=nettype
nettype is the
AppleTalk type of the Print Server with
which it is known to the network. nettype should normally
be set to “LaserWriter”, “ImageWriter” etc., since only then
it will be recognized by the standard Macintosh Chooser
extensions on the workstations. If the workstations are provided with a later version of the LaserWriter program,
which also allows other printer types, a different type can
be specified here if necessary.
The default for nettype is “LaserWriter”.
11 The Print Server
11.5 Parameters of the “papsrv” program
zone
365
zone=zonename
zonename is the
name of the AppleTalk zone to which the
Print Server should be allocated. Thus it determines the
zone in which the Print Server can be seen in the Chooser.
The chosen zone must be one of the local zones that the
server is connected to. We strongly recommend to test this
using the UNIX program “zones -l” (“$ESDIR/zones”)
By default “papsrv” registers itself in the first zone of the
first interface entry in “atalk.conf”.
printer
printer=printername
printername is the logical
(UNIX) name of the printer to
which the Print Server should send the print jobs. By convention, this is also the name to which a copy of “papif” or
“tcpif” has been renamed if the printer is connected via
AppleTalk or TCP/IP. The same printer name must also be
specified in the UNIX file “/etc/printcap”, which is accessed by the “lpr” program. The printer name is passed from
the “papsrv” program to “lpr” without checking. Accordingly, it is up to the administrator to make sure that a correct
entry is also included in “/etc/printcap”. This is done automatically when you set up a new printer with the EtherShare Admin.
dictdir
dictdir=path
path is the path
containing PostScript dictionaries and
printer “prep” files, such as “AppleDict...”, “HeliosDict...” and “LinoDict...”. You can specify an alternative
path here if one of your printers is not fully compatible to
the Apple LaserWriter and needs other dictionaries and/or
“prep” files. Normally, all PostScript printers share the
same files.
11 The Print Server
366
11.5 Parameters of the “papsrv” program
The default for dictdir is “$ESDIR/dicts”. If you change
the default, you must copy “HeliosDict...” (and optionally
the other dictionaries, too) to the new directory.
lpr
lpr=path
path specifies the path (including the file name) of an alter-
native “lpr” program to the one normally used by “papsrv”.
If your server uses the BSD printing system, “papsrv” uses
the standard “lpr” program provided by the server (e.g.
“/bin/lpr”). If your host uses the System V printing system
(e.g. Sun Solaris 2.x), “papsrv” automatically uses its own
BSD-style “lpr” program, which is provided in the
“$ESDIR” directory in such cases.
The lpr parameter can be used to specify another “lpr”
program which is different from the one normally selected
by “papsrv”. You should use this parameter if you have developed your own custom “lpr” program. You can also use
this option to specify a shell script.
The default for path depends on the server type, and is usually “/bin/lpr” or “/usr/local/es/lpr”.
This parameter cannot be specified with the EtherShare Admin – you need to edit “atalk.conf” manually.
noresolve
[no]resolve
This following paragraph (resolve parameter) is maintained for historic reasons since with EtherShare 2.6, the
printer interface program “diskif” is the easier way to handle “Print To Disk” files.
The resolve switch causes “papsrv” to “resolve” all print
jobs for the specified printer queue before they are sent to
“lpr”, i.e. “papsrv” incorporates all required font, dictionary
11 The Print Server
11.5 Parameters of the “papsrv” program
367
and OPI image information into the jobs in advance, and resolves “%%Include...” references. This is needed whenever
you want to use printers that cannot be driven directly by
the printer interface programs supplied with EtherShare.
This includes the printer interface program “diskif” and
proprietary printer connections. But be aware that if you
use the resolve switch you will need substantially more
spooling space on the local server.
Normally, print job resolving is done on-the-fly, by the
specified interface program, such as “papif”, and jobs
queued in the printer’s spool directory are not yet resolved.
This design approach saves spooling storage, particularly if
you are using EtherShare OPI.
The resolve switch causes the “papsrv” to call the pseudointerface program “$ESDIR/psresolve”, which compares
the fonts needed by the document with the printer’s resident
font list which resides in the “FONTS” file in the printer’s
spool directory, and with the list of available server fonts in
“$ESDIR/psfonts/FontDirectory”. Thus, it is more intelligent than choosing Postscript Job from the application’s
Print dialog – the latter always includes all document fonts,
regardless of whether you need them or not. See Font including in chapter “11.4 The Print Server in operation” for related information.
You should use the resolve switch to prepare print job files
for printing offline or with a printer or typesetter whose
hardware interface is not supported by EtherShare, but you
must not use resolve in conjunction with the standard
EtherShare interface programs, because all references will
be included twice and the job will fail.
11 The Print Server
368
11.5 Parameters of the “papsrv” program
The resolve switch must be specified in each “papsrv” entry for which job resolving is desired.
Be aware that if the job then gets printed on a different host
and/or printer, it will not contain all required fonts if it has
been resolved with an inappropriate “FONTS” file.
The default for this switch is noresolve, i.e. interrogate the
printer for required fonts and dictionaries on a job-by-job
basis, and include OPI images on-the-fly.
This parameter cannot be specified with the EtherShare Admin – you need to edit “atalk.conf” manually.
filter
filter=path
path specifies
the path (including file name) of a custom
filter program which is called in a pipe with the “standard
input” connected to the print job and the “standard output”
connected to “lpr”. The job will already be resolved if the
resolve switch is specified.
Argv[0] is the printer name in this case. There is no default
for path.
filter may be used in conjunction with the standard EtherShare interface programs.
This parameter cannot be specified with the EtherShare Admin – you need to manually edit the “atalk.conf” file.
filtercmd
filtercmd=path
path specifies the
path (including file name) of a custom
filter program which is called as follows:
path -Pprintername spoolfile
11 The Print Server
11.5 Parameters of the “papsrv” program
369
The “filtercmd” program can then process the file (which is
not resolved) as required. The output file should appear under the same name (“spoolfile”) given in the argument –
“papsrv” will wait until the custom filter program has finished before processing the job further. Compared to the
filter parameter, filtercmd can be used for example to
add a header (e.g. a PostScript init) or a trailer to the file
without having to process the whole file. Use filter instead if you need to parse the entire file, e.g. for font names
or job information.
There is no default for path.
may be used in conjunction with the standard
EtherShare interface programs.
filtercmd
This parameter cannot be specified with the EtherShare Admin – you need to manually edit the “atalk.conf” file.
publish
The [no]publish switch can be used to have a queue appear or not in the chooser. If the switch is set to nopublish
the respective printer queue will not be appearing in the
chooser. However, it can still be seen and configured in the
EtherShare Admin. To set this flag to nopublish, tick the
checkbox Hide Queue in the Printers list of the EtherShare
Admin.
The default for this flag, i.e. the checkbox in the EtherShare
Admin remains unticked, is publish.
groups
groups=name
name specifies,
separated by commas, the names of the
groups which are allowed to access the “papsrv”.
11 The Print Server
370
noauthenticate
11.5 Parameters of the “papsrv” program
The [no]authenticate switch determines whether printing to a LaserWriter queue is password-protected or not. In
case the parameter is set to authenticate, user name and
password have to be entered before printing. This setting
affects all LaserWriter printer queues on the same server.
The default for this switch is noauthenticate.
foreground/
background
The Mac OS 9 LaserWriter (version 8.7) printer driver’s
behavior is background printing by default. This means that
spooling of print jobs is performed two times, locally on the
Macintosh and on the selected printer queue.
The “papsrv” however induces Apple’s LaserWriter printer
driver to spool the jobs directly on the selected queue by default, unless the background option is specified in the
configuration file “atalk.conf”.
The default setting for this option (i.e. no flag is set) is
foreground.
11 The Print Server
11.6 Configuring printers manually
11.6
Important:
371
Configuring printers manually
Generally, it is more convenient and safer to set up
printers with the EtherShare Admin program.
If more than one printer queue is being serviced by the Print
Server, a separate “papsrv” process must be configured for
each of them. When first started, “papsrv” automatically
determines the number of printer queues from the number
of entries in “atalk.conf”, and starts a separate child task for
each one by forking.
The program “papsrv”, which implements AppleTalk printing functions for the network, has no way of knowing how
each printer is physically connected. All communication
with the printer is done through the UNIX system program
“lpd”, which extracts information about the printer from the
UNIX system file “/etc/printcap”, using the logical (UNIX)
printer name received from “papsrv” as the key. “lpd” then
routes the job through the output filter program “psof” (to
generate the optional banner page) and sends it to the appropriate interface program (“papif”, “psif”, “tcpif”,
“balanceif”, “diskif”, “holdif”, or “shmif”).
Each printer queue requires an entry in “/etc/printcap” to
describe in detail the way in which the associated physical
printer is connected.
The entry in the “/etc/printcap” file specifies which interface program and output filter program are required. The
output filter is used to print the banner page, and the interface program implements the connection to the physical
printer. The output filter for all PostScript printers is the
“psof” program.
11 The Print Server
372
11.6 Configuring printers manually
11.6.1
Global parameters
When it starts, each printer interface program first accesses
the main configuration file “atalk.conf” to determine its
configuration.
The parameters described below can be defined in
“atalk.conf” for any of the interface programs. They can be
specified individually for each printer, together with the
other parameters described later, in an “atalk.conf” section
which is preceded by the logical printer name such as
“Laser1:”. Alternatively, they can be specified in a special
global “atalk.conf” section “if:”, in which case they apply
to all interface programs (but the former method has precedence if they are specified in both locations). Currently,
none of the parameters below can be specified with the
EtherShare Admin – you need to do this manually using an
editor such as vi. See also chapter “5.14 Editing
“atalk.conf” (and other configuration files) manually”.
watchtime
watchtime=time
time specifies the
time interval in seconds with which the
printer interface program interrogates the printer’s status
channel. As a diagnostic aid, you can use the UNIX “lpq”
program to check the status of each spooled printer. “lpq”
returns the status messages that you normally see in the dialog box of the LaserWriter driver for locally connected
AppleTalk printers.
The Print Server does not return such status messages to the
workstations – it only returns them to the “Print jobs” window in the EtherShare Admin. The watchtime parameter has
been provided because the PostScript processors of some
printers time out in certain unusual situations if you check
the printer’s status channel for extended periods of time.
11 The Print Server
11.6 Configuring printers manually
373
The default for time is 10 seconds.
Specify 0 (zero) if you do not want the printer interface program to check the printer’s status channel. This does not affect the processing of printer error messages. However, in
this case, “lpq” only returns “Printing job” or “No entries”,
depending on whether there are any jobs in the printer’s
queue.
If you need to be able to check the printer status with “lpq”,
a meaningful value of time is about 10 - 60 seconds.
mail
[no]mail
The mail
switch determines whether printer errors are reported back to the originator of the print job through Helios
Mail. Even if you specify nomail, printer errors are still recorded in the printer log file, and many types of errors are
also written to the system messages file, allowing you to
view them later with the EtherShare Admin or an editor
program such as vi. See User and document names in print
jobs in appendix “A 7.1 EtherShare log files” for related information.
The default for this switch is mail.
chargebanner
[no]chargebanner
This switch causes the printer’s page count to include the
number of banner pages – if, in the EtherShare Admin’s
Settings menu, Banner Page is ticked – to the total
amount of pages.
The default for this switch is chargebanner.
11 The Print Server
374
11.6 Configuring printers manually
bannerfirst
The bannerfirst parameter causes the printer to output a
banner page before the print job.
bannerlast
bannerlast
determines that the banner page is ouput after
the print job has been terminated on the printer.
The default setting is bannerfirst.
clientmessages
[no]clientmessages
The clientmessages
switch determines whether printer
status messages are reported to the AFP-client (or PCShare
client, respectively). These messages pop up as display
messages and report e.g. paper jams, misfed paper, and other printer-related errors.
The default for this switch is clientmessages.
nospoolspool
[no]spoolspool
This switch determines whether a spooled print job is
“marked” with the information that it has already been
spooled. If it is set to spoolspool, a spooled print job is not
recognized as already spooled, thus setting this switch to
spoolspool is only sensible at the first spooler in line of a
chained EtherShare queue.
The default for this switch is nospoolspool.
ignoreresolveopts
The parameter ignoreresolveopts, when set, makes a second EtherShare spooler ignore all remarks on resolved references from a prior spooling process. If you merely want a
spooler to ignore single references, e.g. references regarding included fonts etc., you may set one or more of the following flags:
11 The Print Server
11.6 Configuring printers manually
375
ignoreprocsetresolveopt
With the ignoreprocsetresolveopt flag set, the next (second) EtherShare spooler ignores information about included procsets only.
ignorefontresolveopt
With the ignorefontresolveopt flag set, the next (second)
EtherShare spooler ignores information about included
fonts only.
ignoreincluderesolveopt
With the ignoreincluderesolveopt flag set, the next (second) EtherShare spooler ignores information about included EPSF files only.
ignoreopiresolveopt
With the ignoreopiresolveopt flag set, the next (second)
EtherShare spooler ignores information about resolved
OPI-references only.
nice
nice=niceincrement
The priority of a printer interface program – compared to
other executable programs on the Print Server – can be altered. The UNIX parameter nice lets you increase/reduce
the priority, and therefore the speed of a program. The higher the priority of a program, the less “nice” its behavior towards other applications. The values for niceincrement
are as follows:
> 0slower / “nice” towards other applications
niceincrement
< 0faster / less “nice” towards other
applications
niceincrement
The default value for niceincrement is 0.
About the current range of nice see the respective pages of
your UNIX manual.
11 The Print Server
376
extendedinfo
11.6 Configuring printers manually
[no]extendedinfo
The Printer Log file (“$ESDIR/printer.acct.x”) contains information about printing time/date, document name, user,
fonts, and more. With extendedinfo set, the range of information for each print job is increased by e.g. an OPI image
replacement list and the total number of bytes printed.
The default for this switch is extendedinfo.
facility
facility=logfacilityname
facility is a string that ought
to be set by the system administrator only since its use requires advanced knowledge
on UNIX programming. For further reference see the UNIX
manual pages “syslogd(1)”.
rsslimit
rsslimit=maxbytes
rsslimit (resident set size limit) is determined by maxbytes which is the maximum number of kB a printer inter-
face program can utilize as memory. If this parameter is not
set, the memory administration is up to your system settings.
nomagic
[no]magic
PostScript printers normally cannot accept print jobs consisting of “flat” ASCII data. They require the print job to be
in PostScript format. ASCII print data can be manually converted to PostScript with the “pstext” utility. In addition to
this, the interface programs of the Print Server are also able
to automatically detect whether a particular job is in PostScript or ASCII format, by scanning the start of the job for
the “signature” string “%!PS-Adobe”. If this string is missing, the job is assumed to be non-PostScript, and is converted to PostScript automatically before printing.
11 The Print Server
11.6 Configuring printers manually
377
Some application programs, particularly those running under MS-Windows, do not generate the PostScript signature
string reliably, causing job type auto-detection to fail,
whereupon a PostScript program is printed rather than your
document. In such cases, you can specify the nomagic
switch to disable job type auto-detection.
The default for this switch is nomagic. The magic switch
should only be used for PostScript printers – do not specify
it in the global section “if:” if the Print Server is serving
non-PostScript printers too – instead, specify it for each interface separately.
fontdir
fontdir=string
string is the path
of the host directory which contains the
server font list “FontDirectory”. The fonts themselves are
contained in subdirectories of fontdir, arranged alphabetically.
The default for string is “$ESDIR/psfonts”.
volumes
volumes=string
string is the path
(including name) of the file containing
the EtherShare volume list.
The default for string is “$ESDIR/conf/afpvolumes”.
dictdir
dictdir=path
path is the path
containing PostScript dictionaries and
printer “prep” files, such as “AppleDict...”, “HeliosDict...” and “LinoDict...”. You can specify an alternative
path here if one of your printers is not fully compatible to
the Apple LaserWriter and needs other dictionaries and/or
“prep” files. Normally, all PostScript printers share the
same files.
11 The Print Server
378
11.6 Configuring printers manually
The default for path is “$ESDIR/dicts”. If you change the
default, you must copy “HeliosDict...” (and optionally the
other dictionaries, too) to the new directory.
11.6.2
AppleTalk (PAP) connections
PAP-compatible printers which are connected via AppleTalk are identified on the network by their so-called Network Visible Entity (NVE), consisting of the NVE name,
type and AppleTalk zone. These parameters must be known
to the interface program in order to be able to uniquely
identify a physical printer.
Printers that support PAP include Apple’s LaserWriter,
LaserWriter Plus, ImageWriter II, and ImageWriter LQ.
The interface program for AppleTalk PostScript printers is
the “papif” program (see “11.3 The Print Server Programs”). “papif” is called by the UNIX system program
“lpd”, and extracts additional configuration information
from the “/etc/printcap” file by using the logical (UNIX)
printer name received from “lpr” as the key.
When it is started, each “papif” process first accesses the
main configuration file “atalk.conf” to determine its configuration. Printers can be set up, if necessary, by using an editor such as vi, but we strongly recommend that you do this
with the EtherShare Admin instead. See also chapter “5.14
Editing “atalk.conf” (and other configuration files) manually”.
The parameters described below can be defined for “papif”
in “atalk.conf”. The parameter list is preceded by the logical printer name such as “Laser1:”, which is assigned to
“papif” by linking.
11 The Print Server
11.6 Configuring printers manually
entity
379
entity=nvename
nvename is the NVE
name/type/zone of the printer with
which it is known to the AppleTalk network (NVE = Network Visible Entity). This name is not the same as the
AppleTalk name of the printer queue. Note that if print jobs
are sent from workstations directly to the printer, they bypass the printer queue, and thus do not gain the advantages
of spooling, “prep” file management, etc.
The NVE address has the following structure:
entity=“name:type@zone”
name is the NVE name of the printer and type is the NVE
type. zone is the AppleTalk zone in which the printer resides. If both the UNIX host and the AppleTalk printer are
in the same zone, the zone field can be specified as “*”.
localwinsize
localwinsize=maxlpackets
maxlpackets specifies the maximum number of data pack-
ets that are passed from “papif” to the printer through the
network during a transaction. The number of packets may
need to be limited if the buffer size in the printer is too
small. maxlpackets can be varied to optimize the data
transfer rate.
The default (and maximum) for maxlpackets is 8.
remotewinsize
remotewinsize=maxrpackets
maxrpackets specifies the maximum
number of data packets that are passed from the printer to “papif” through the
network during a transaction. The number of packets may
need to be limited if the buffer size in the UNIX host is too
small. maxrpackets can be varied to optimize the data
transfer rate.
11 The Print Server
380
11.6 Configuring printers manually
The default (and maximum) for maxrpackets is 8.
As described above, a fully configured PAP printer requires
an entry in both “atalk.conf” and “/etc/printcap”.
The following is a typical “atalk.conf” entry for a PAP
printer:
papsrv: name=“SilentSpooler”, printer=“Laser1”
Laser1:entity=“Silentwriter:LaserWriter@LocalTalk”
The following is a typical “/etc/printcap” entry for a PAP
printer:
Laser1:\
:lp=/usr/local/es/lprdevdir/Laser1:\
:if=/usr/local/es/if/Laser1:\
:of=/usr/local/es/psof:\
:sh:mx#0:du#0:sf:\
:sd=/usr/spool/Laser1:\
:af=/usr/local/es/printer.acct:\
:lf=/usr/spool/Laser1/Laser1-log:
This entry contains a few special features which are not
normally found in UNIX “printcap” entries. For example, a
network printer does not need a device file in the “/dev” directory, although the “lpr” spool system still tries to obtain
exclusive rights to such a file. Accordingly, it is necessary
to create an empty, dummy file for each printer. The necessary file can be created for each printer with a command
similar to the following:
touch /usr/local/es/lprdevdir/Laser1
11 The Print Server
11.6 Configuring printers manually
where
Laser1
381
is the logical printer name.
This command is issued automatically if you set up printers
with the EtherShare Admin. The use of a separate file for
each printer allows multiple printers to work in parallel.
Otherwise, it is only possible for “lpr” to service one printer
at a time.
The other feature is the interface program (“if=”), which
specifies the logical printer name “Laser1” instead of
“papif”. “Laser1” is a “link” to “papif” through a subdirectory of the “$ESDIR” directory.
The necessary symbolic link for each printer can be created
with commands similar to the following :
cd /usr/local/es
ln -s if_name /usr/local/es/if/xPrinter
where if_name is the interface program, and xPrinter is
the logical (UNIX) printer name,
for example:
ln -s /usr/local/es/papif /usr/local/es/if/Laser1
or
ln -s /usr/custom/if_name /usr/local/es/if/Laser1
The “if=” line in “/etc/printcap” entry then specifies the
symbolic interface “/usr/local/es/if/Laser1” rather than the
real interface.
11 The Print Server
382
11.6 Configuring printers manually
In this way, the “/etc/printcap” entry points to the printer’s
interface program, but also allows the interface program to
find the path to the EtherShare directory at the same time,
to obtain auxiliary programs it needs while printing. Furthermore, in a situation with multiple printer queues, this allows each interface program to uniquely access its own
configuration entry in “atalk.conf”.
The following shows an example of the symbolic links used
by three printers, two connected via the EtherShare “papif”
(AppleTalk) interface program and one through TCP/IP:
ibm$ ls -l *if
-rwxr-xr-x
-rwxr-xr-x
-rwxr-xr-x
1 root staff Jun 17 1991
1 root staff Jul 03 1991
1 root staff Nov 13 1991
20:01 papif
20:01 psif
20:01 tcpif
if:
total 0
lrwxrwxrwx 1 root system 8 Jun 17 1991 xw3 ->../tcpif
lrwxrwxrwx 1 root system 8 Jul 03 1991 lw ->../papif
lrwxrwxrwx 1 root system 8 Nov 13 1991 lwform ->../papif
ibm$
The necessary links are made automatically if you set up
printers with the EtherShare Admin.
Lastly, when creating printers with the EtherShare Admin,
the user of the printer dameon is set in “/etc/printcap” by
default to ID 0 (“root”) with the flag “du#0”. This avoids errors relating to permissions when printing, especially if the
print job contains external references to OPI images or
“%%Include....” comments. This feature is associated with
a slight security risk. See the daemonuid parameter in chapter “13.3 Parameters of the “admsrv” program” for related
information.
11 The Print Server
11.6 Configuring printers manually
383
If the printer needs several alternative logical names,
they can be specified manually on the first line of the
“/etc/printcap” entry separated by the “|” character, for example:
Laser1|lw|ps|PostScript:\
Note that all logical (UNIX) printer names must be unique
on each host; the names must not include spaces.
11.6.3
Serial PostScript connections
Serially connected PostScript printers do not have a network identification. They are uniquely addressed by the
host’s physical “RS232” (serial or V24) port specified in
the “/etc/printcap” file.
The interface program for serially connected PostScript
printers is the “psif” program (see “11.3 The Print Server
Programs”). “psif” is called by the UNIX system program
“lpd”, and extracts additional configuration information
from the “/etc/printcap” file by using the logical (UNIX)
printer name received from “lpr” as the key. “psif” then initializes the hardware parameters for the serial interface accordingly. The Print Server requires 8-bit, no parity and
hardware handshake – please see 8-bit transparency below
for more details.
8-bit
transparency
Many Macintosh applications need an 8-bit transparent
communications channel to the printer, particularly if you
print PostScript files which include binary bitmap data. If
you connect a printer via “RS-232”, as well as making sure
that “/etc/printcap” specifies 8-bit communication and
hardware handshake (this is taken care of by the EtherShare
Admin automatically), you must also set up the printer ac-
11 The Print Server
384
11.6 Configuring printers manually
cordingly, and use a printer cable which is suitable for hardware handshake. Even with the correct setup and cabling
please note the possible problems described under nobinmode below.
Some printers have front panel or DIP switches for adjusting communications parameters, and with others you can
do this with Apple’s “LaserWriter Utilities” program (often
supplied with LaserWriter printers). Please select the printer directly when you use this program, not a printer queue.
Since serially connected PostScript printers are uniquely
addressed by the host’s physical RS232 port (e.g.
“/dev/ttyb”), which is specified in the “/etc/printcap” file,
the printer’s address does not need specifying in
“atalk.conf”, and thus “psif” does not always need an entry
in this file.
The single parameter described below can be defined manually for “psif” in “atalk.conf”. The parameter list is preceded by the logical printer name such as “Laser2”, which
is assigned to “psif” by linking.
nobinmode
[no]binmode
Even if your communications channel is set to 8-bit, no parity and hardware handshake, bitmap images may still contain binary information which inadvertently correspond to
special control codes for the serial port of the printer’s PostScript interpreter. In particular, Ctrl-C is reserved for “abort
current job”, Ctrl-D is reserved for “end of file”, and Ctrl-T
is reserved for “return status”. This problem only affects serial printer connections – AppleTalk, “TCP/IP stream” and
“Shared Memory” connections are always binary transparent, and have a separate communications channel for status
messages.
11 The Print Server
11.6 Configuring printers manually
385
PostScript interpreters of printers manufactured from about
1992 on – especially those that support Level 2 PostScript
– often support a special 8-bit binary transparent mode
called “binmode”, which avoids conflicts with control
codes by “quoting” them instead with two 7-bit characters.
The binmode parameter causes “psif” to query the specified printer at the start of each job for binary mode capability, and to automatically set binary mode if possible. Binary
mode queries cause a small amount of processing overhead,
so you should only specify this parameter if your printer
supports this option.
The default for this switch is nobinmode.
The following is a typical “/etc/printcap” entry for a serially
connected PostScript printer:
Laser2:\
:lp=/dev/ttyb:\
:br#9600:rw:fc#0000374:\
:fs#0000003:xc#0:xs#0040040
:of=/usr/local/es/psof:\
:if=/usr/local/es/psif:\
:sh:mx#0:du#0:sf:\
:sd=/usr/spool/Laser2:\
:af=/usr/adm/printer.acct:\
:lf=/usr/spool/Laser2/Laser2-log:
This example configures a PostScript printer for direct connection to the serial interface of a Sun workstation.
11 The Print Server
386
11.6 Configuring printers manually
The first line in the above example specifies the printer’s
logical name “Laser2”. This is the name that must be included in the parameter list for “papsrv” (“printer=Laser2”)
in order to be able to assign the physical printer to the appropriate printer queue.
The two-character flags in subsequent entries of the example characterize specific features of the printer. The following list summarizes the parameters used. Please refer to
your UNIX system documentation for full details or read,
on the HELIOS CD-ROM, the online documentation
(manuals/lprman.pdf).
lp
br
rw
fc
fs
xc
xs
if
of
sh
du
mx
sf
sd
af
lf
printer device
baud rate
read/write
flag clear
flag set
local mode clear
local mode set
interface program
output filter
suppress headers
daemon user
maximum file size
suppress form feeds
spool directory
accounting file name
log file name
If the printer needs several alternative logical names, they
can be specified manually on the first line of the “/etc/printcap” entry separated by the “|” character, for example:
Laser2|lw|ps|PostScript:\
11 The Print Server
11.6 Configuring printers manually
Note:
11.6.4
387
All logical (UNIX) printer names must be unique on
each host; the names must not include spaces.
TCP/IP PostScript connections
PostScript printers which are connected via TCP/IP are
identified in the TCP/IP network by their Internet number
and service port. These parameters must be known to the interface program in order to be able to uniquely identify a
particular printer.
The interface program for TCP/IP PostScript printers is the
“tcpif” program (see “11.3 The Print Server Programs”).
“tcpif” is called by the UNIX system program “lpd”, and
extracts additional configuration information from the
“/etc/printcap” file by using the logical (UNIX) printer
name received from “lpr” as the key.
“tcpif” supports both the “TCP/IP stream” protocol and the
“Remote LPR” protocol. “TCP/IP stream” is the default;
“Remote LPR” is configured if the “service” parameter in
“atalk.conf” is set to “printer” or “515”. You must specify
the parameter rprinter=”printer_queue_name”, too.
Note:
Keep in mind that if you edit “rm/rp” configurations in
printcap manually, EtherShare will not recognize
them anymore.
“TCP/IP stream” printers must be compatible with the
EtherShare TCP/IP stream implementation – contact your
printer manufacturer or HELIOS supplier (see the HELIOS
Web site: www.helios.de) if you are not sure about this.
11 The Print Server
388
11.6 Configuring printers manually
“TCP/IP stream” allows bidirectional communication with
the printer, whereas “Remote LPR” only allows unidirectional communication. Furthermore, the HELIOS implementation provides a separate but optional communications
channel for status messages with the address <port+1>
(see below). This address cannot be configured.
You can test for bidirectionality by making a “telnet” connection to your TCP/IP printer from the UNIX command
line as follows:
telnet <host> <port>
e.g.
“telnet 192.9.200.1 4000” or “telnet osiris bspp”
is the Internet number (or host name) of the printer;
host names are usually listed in the “/etc/hosts” file. port is
the service port number (or service name) which specifies
the process within host. If your printer has a network interface which supports TCP/IP, these parameters should be
specified in your printer documentation.
host
You should be able to communicate with the printer’s PostScript interpreter and get PostScript responses (bidirectional communication), although this test alone is no proof that
the connection is fully compliant with the EtherShare
TCP/IP stream implementation.
Contacting the print server with “telnet” checks that at least
basic communication is running properly. It does not verify
that the communications channel is binary transparent and
thus suitable for printing bitmap (graphics) data.
11 The Print Server
11.6 Configuring printers manually
389
If the “telnet” session is able to communicate in a bidirectional way with the printer, try to set up the printer using the
EtherShare Admin with the same host and port parameters
you specified in the “telnet” test.
If it is not able to do this, then the TCP/IP connection is unsuitable for the “tcpif” filter in EtherShare. In this case you
need to configure “Remote LPR”, or use a third-party
TCP/IP driver and specify the EtherShare “resolve” option,
as described elsewhere.
EtherShare uses a second service port with the address
<port+1> to receive status information from the printer.
You are still able to print if this address is not implemented
on your printer, but you will not be able to receive status information on your print jobs, such as the “busy” message,
or to cancel and flush jobs which are already being processed by the printer.
“Remote LPR” printers require substantially more spooling
space on the local host than “TCP/IP stream” printers since
they demand the total size of a print job first before they
start transferring it. So the complete print job has to be
spooled to a local disk first. Furthermore, they do not return
status messages or answer font queries. Accordingly, a
“TCP/IP stream” or AppleTalk connection is preferable.
Furthermore, the local host must be defined on the remote
host, in the remote “/etc/hosts” and “hosts.equiv” (or
“hosts.lpd”) files. Otherwise, the print job will be rejected.
For “Remote LPR” printers, the EtherShare Admin copies
the font information from the chosen PPD file into the
“FONTS” file in the printer’s spool directory when the
printer is created.
11 The Print Server
390
11.6 Configuring printers manually
When it starts, each “tcpif” process first accesses the main
configuration file “atalk.conf” to determine its configuration. Printers can be set up if necessary by using an editor
such as vi, but we strongly recommend that you do this with
the EtherShare Admin instead. See also chapter “5.14 Editing “atalk.conf” (and other configuration files) manually”.
The following parameters can be defined for “tcpif” in
“atalk.conf”. The parameter list is preceded by the logical
printer name such as “Laser3:”, which is assigned to “tcpif”
by linking.
host
host=inetno
inetno is the
Internet number of the printer in the TCP/IP
network (or of the printer’s terminal server, if any). inetno
can be specified in the conventional way (dotted decimal
notation) by using the “.” character as a separator. Alternatively, a host name from the “/etc/hosts” file can be specified here instead. Examples:
host=192.9.200.1 or host=osiris
In the case of “Remote LPR” connections, inetno is the Internet number or name of the host which the remote printer
is connected to.
statusport
[no]statusport
This switch determines whether a separate communications
channel for status messages with the address <port+1> is
provided.
The default is statusport.
11 The Print Server
11.6 Configuring printers manually
service
391
service=port
port is the service
port number (also called the service
code), which specifies the process within host which is responsible for the printer. The port number lies between 1
and 65535. Alternatively, a service name from the
“/etc/services” file can be specified here instead.
Examples:
service=4000 or service=bspp
“tcpif” normally uses the “TCP/IP stream” protocol; the
“Remote LPR” protocol is configured instead if you specify
service=printer or service=515. You must specify the
“rprinter” parameter, too.
noctrld
[no]ctrld
ctrld determines
whether the Ctrl-D character should be
used to indicate “end-of-print-job”. This is necessary if the
printer is connected to TCP/IP through a terminal server
and a serial interface. See 8-bit transparency above for related information.
The default for this switch is noctrld.
tcpresolve
[no]tcpresolve
When a print job is processed, and the switch is set to
notcpresolve, the print job remains “untouched” and passes without any changes.
The default is tcpresolve.
writesize
writesize=block
block is the number
of bytes that are send through the network in a single write. The minimum value for block is
4096.
11 The Print Server
392
11.6 Configuring printers manually
The default value for block is 8192.
rprinter
rprinter=name
name is the name
of the remote printer on the remote host,
as specified in the remote “/etc/printcap” file.
Example:
rprinter=rlw
The following is a typical “atalk.conf” entry for a “TCP/IP
stream” printer:
papsrv: name=“TCPSpooler”, printer=“Laser3”
Laser3: host=192.9.200.1, service=4000
The following is a typical “atalk.conf” entry for a “Remote
LPR” printer:
papsrv: name=“osiris-remote-spooler”,printer=“rm1”
rm1: host=“ibm”, service=printer, rprinter=“lw”
The entry required by the “lpr” program in “/etc/printcap”
for a “TCP/IP” or “Remote LPR” printer is very similar to
that required by a PAP PostScript printer.
The following is a typical example:
Laser3:\
:lp=/usr/local/es/lprdevdir/Laser3:\
:if=/usr/local/es/if/Laser3:\
:of=/usr/local/es/psof:\
:sh:mx#0:du#0:sf:\
11 The Print Server
11.6 Configuring printers manually
393
:sd=/usr/spool/Laser3:\
:af=/usr/adm/printer.acct:\
:lf=/usr/spool/Laser3/Laser3-log:
The interface program (if=) specifies the logical printer
name “Laser3” instead of “tcpif”. “Laser3” is a “link” to
“tcpif” through a subdirectory of the “$ESDIR” directory.
Do not be concerned that the above entry does not contain
the string “remote” or “rm”, this is normal since EtherShare
does not recognize that entry.
If the printer needs several alternative logical names, they
can be specified manually on the first line of the “/etc/printcap” entry separated by the “|” character, for example:
Laser3|lw|ps|PostScript:\
Note that all logical (UNIX) printer names must be unique
on each host; the names must not include spaces.
11.6.5
Shared Memory software RIPs
PostScript software RIPs running on the same host as
EtherShare can communicate with the Print Server through
a “Shared Memory” interface. The RIP must be compatible
with the EtherShare “Shared Memory” interface specification and be installed by authorized personnel (RIP vendor
technical staff) – contact your RIP manufacturer or
HELIOS supplier if you are not sure about this.
The RIP must be configured and running before you create
the printer queue with the EtherShare Admin.
11 The Print Server
394
11.6 Configuring printers manually
The interface program for the “Shared Memory” interface
is the “shmif” program (see “11.3 The Print Server Programs”). “shmif” is called by the UNIX system program
“lpd”, and extracts additional configuration information
from the “/etc/printcap” file by using the logical (UNIX)
printer name received from “lpr” as the key.
When it starts, each “shmif” process first accesses the main
configuration file “atalk.conf” to determine its configuration. Printers can be set up if necessary by using an editor
such as vi, but we strongly recommend that you do this with
the EtherShare Admin instead. See also chapter “5.14 Editing “atalk.conf” (and other configuration files) manually”.
The following parameter can be defined for “shmif” in
“atalk.conf”. The parameter list is preceded by the logical
printer name such as “shm1”, which is assigned to “shmif”
by linking.
key
key=path
path specifies the path (including file name) of the Shared
Memory “key” file. The file must already exist. The RIP
must be configured with the same path.
The RIP and the “Shared Memory” interface program use
the key file’s “inode” to create a unique numeric key, and
do not modify or write to the file in any other way. Accordingly, any existing file (such as “/bin/ls”) can be used for
this purpose. See the description of “ftok” in your UNIX
documentation for related information.
There is no default for path.
The following is a typical “atalk.conf” entry for a “Shared
Memory” RIP:
11 The Print Server
11.6 Configuring printers manually
395
papsrv: name=“shm-spooler”, printer=“shm1”
shm1: key=“/bin/ls”
The entry required by the “lpr” program in “/etc/printcap”
for a “Shared Memory” software RIP is very similar to that
required by a PAP PostScript printer.
11.6.6
Printing to disk
You may want to automatically generate PDF files, then
you can print to files in a specific UNIX directory and induce the Acrobat Distiller software to scan this directory
regularly and convert incoming files to PDF.
The interface program which processes the print jobs is
“diskif” (see “11.3 The Print Server Programs”). It comprises the following parameters:
dir
dir=path
path specifies
the (absolute) UNIX path of the directory,
where the processed print job is stored. The file name results from the print job title with the typically appended suffix “.ps”.
If path points to UNIX FIFO (named “pipe”) rather than
pointing to a directory, the processed print data are written
to that “pipe” directly.
If path starts with a pipe character (“|”) the whole string following “|” is recognized as a UNIX command line, and the
processed print data are piped into the executed program.
11 The Print Server
396
pssuffix
11.6 Configuring printers manually
[no]pssuffix
This switch determines whether the suffix “.ps” is appended to the processed print job file. In case the switch is set to
nopssuffix the file name extension “.ps” is omitted.
The default is pssuffix.
prefix
prefix=filenameprefix
filenameprefix specifies
whether files which come from
a specific printer queue are “marked” with a prefix before
their original file name. This may be quite reasonable when
several “Print To Disk” queues print to the same destination.
resolve
[no]resolve
When a print job is processed to a “Print To Disk” queue,
and the switch is set to noresolve, the print job remains
“untouched” and passes without any changes.
The default is resolve.
notifyprog
notifyprog=path
path is the (absolute) UNIX path of the program which, as
soon as “diskif” has successfully resolved the print job, is
started with the parameters: -Pprintername pathtopsfile
e.g.: notifyprog=/usr/local/bin/distillnotify
“diskif” exports the following environment variables during the program call:
HELIOS_JOBFOR=<user name (if available) of print job
creator>
HELIOS_JOBUSER=<user name (if available) as known
to “lpd”>
11 The Print Server
11.6 Configuring printers manually
397
HELIOS_JOBHOST=<name (if available) of server which
hosts the printer queue>
HELIOS_JOBTITLE=<print job title (if available)>
HELIOS_PRINTERNAME=<logical (UNIX) name of the
printer queue>
HELIOS_JOBPAGES=<expected number of pages. This
value may differ slightly from the actual number>
HELIOS_JOBSIZE=<expected print job size (in bytes).
The stated value is often smaller than the actual size>
compression
compression=mode
mode determines the
compression type. You can choose
from different types of compressing: LZW, ZIP, and None.
None means there is no file compression at all.
11.6.7
Printing to a hold/error queue
The printer interface programs (e.g. “tcpif”, “psif”, “diskif”, etc.) can be configured to forward all processed print
jobs to a hold queue. On a hold queue the resolved jobs are
stored for an adjustable amount of time. However, the printer interfaces can also be configured to forward faulty print
jobs – e.g. due to PostScript errors or failed pre-flight
checks – to an error queue. In fact, an error queue is basically also a hold queue.
The interface program “holdif” (see “11.3 The Print Server
Programs”) stores the print jobs for an adjustable amount of
time before dropping it. It has the following parameters:
11 The Print Server
398
jobholdtime
11.6 Configuring printers manually
jobholdtime=seconds
seconds determines the time a processed print job remains
on a hold/error queue. If seconds is set to 0, the print job
perpetually remains on the hold/error queue. This parameter is compulsory, i.e. it has to be set with a certain value.
11.6.8
Balancing print job loads
You may direct your print jobs to a balance queue. In a balance queue two or more printers form a group of printers
from which the print jobs are shifted to a second or third
printer in this group whenever the first printer is busy with
a huge job.
The interface program for balancing print jobs is “balanceif” (see “11.3 The Print Server Programs”). It has the following parameter:
printers
printers=listofprinters
listofprinters is a string which
contains, separated by
commas and without any spaces, the logical (UNIX) printer
names of those devices which form a printer group for balancing print loads
E.g.: printers=color,color2,pro630
11 The Print Server
11.7 Adobe Document Structuring Conventions
11.7
399
Adobe Document Structuring
Conventions
The EtherShare Print Server system has been designed to
meet Adobe’s Document Structuring Conventions. The following paragraphs describe some of the more important
features. Please refer to Adobe’s “Guidelines for a Distributed Printing Environment” for more details.
“ProcSet Queries” are handled as follows by the Print Server program “papsrv”:
“procsets” sent by a Macintosh application with a print job
are captured automatically by “papsrv” and stored in
“$ESDIR/dicts” with a name similar to the original
“procset” name. If a following application needs the same
“procset”, it is sent from the “$ESDIR/dicts” directory rather than transferring it again from the Macintosh to the Print
Server via the network.
Certain PostScript comments are recognized and reacted on
by the EtherShare printer interface programs (“papif”,
“psif”, “tcpif”, “shmif”, and “diskif”) as follows:
%%IncludeProcSet
%%IncludeResource: procset
If possible, the specified procset will be included in the
print job from the “$ESDIR/dicts” directory. Otherwise,
you will get a warning message.
%%DocumentProcSets
%%DocumentNeededProcSets
%%DocumentNeededResources: procset
11 The Print Server
400
11.7 Adobe Document Structuring Conventions
All procsets needed – but not supplied – by the document
will be included from the “$ESDIR/dicts” directory in the
print job.
%%IncludeFont (obligatory includes)
%%IncludeResource: font
If possible, the specified font will be included in the print
job from the “$ESDIR/psfonts” directory, which contains
download PostScript fonts which have been installed there
manually with the EtherShare Admin.
%%DocumentFonts
%%DocumentNeededFonts
%%DocumentNeededResources: font
All fonts needed by the document which are not resident in
the printer are included with the print job. To do this, the
Print Server checks the corresponding printer resident font
list “/usr/spool/<printername>/FONTS”. This file can be
updated using the EtherShare Admin if you install new resident fonts on your printer. In case the resident font list cannot be determined, the font information from the chosen
PPD is used instead.
In case a requested font cannot be included the respective
interface program sends an error message via “afpmsg” to
the user. Users who have installed Helios Mail on their
Macintosh will additionally receive the message directly on
their workstation.
%%IncludeFile
%%IncludeResource: file
%%IncludeDocument
11 The Print Server
11.7 Adobe Document Structuring Conventions
401
If possible, the specified file (e.g. an EPS picture) will be
included in the print job. The file can be specified with either UNIX or Macintosh file and path name conventions. In
the latter case, the Print Server determines the corresponding UNIX directory by inspecting the File Server’s volume
list from “$ESDIR/conf/afpvolumes”.
%%IncludeFeature
If possible, the specified feature from the printer queue’s
PPD file will be included in the print job.
The printer interface program accepts messages from each
printer while printing. The messages are checked for error
situations, which are forwarded to the originating user accordingly.
EtherShare’s automatic font downloader also supports all
programs that print with Apple’s “QuickDraw” driver, or
with native PostScript containing “Adobe Document Structuring” comments. TrueType fonts are passed transparently
from the Macintosh to the printer through the Print Server,
but cannot be installed in the font downloader in the present
version.
Linotype
Color
Separation
Extensions
The Print Server also supports “Linotype Color Separation
Extensions” – the Print Server interface programs function
as an ICS (Included Color Separation) includer. A special
PostScript dictionary “LinoDict 1.0” is provided in
“$ESDIR/dicts” for this purpose. This functionality can
also co-exist with the EtherShare OPI option without conflict. Please contact HELIOS if you need more details.
11 The Print Server
402
12 Text-to-PostScript Converter
403
12
Text-to-PostScript
Converter
12 Text-to-PostScript Converter
404
12.1 General remarks
12.1
General remarks
This chapter describes the conversion of “flat” ASCII text
files to PostScript print jobs with the help of the “pstext”
program.
pstext
The “pstext” program in the “$ESDIR” directory allows
simple ASCII files and files in “nroff” format to be printed
on PostScript printers. Since PostScript printers usually
cannot accept print jobs consisting of “flat” ASCII data, it
is normally not possible to print UNIX program listings or
to print from UNIX programs that only support a simple
matrix printer. The necessary conversion can be made with
this program. “pstext” can also check the print job for special sequences starting with the “ESC” character, which can
be used to control simple highlighting features such as bold
printing, underscoring, and different fonts.
The EtherShare Print Server is able to differentiate “flat”
ASCII data from PostScript data automatically, and calls
“pstext” to convert the job accordingly. Thus, it is usually
not necessary to call “pstext” manually. See the nomagic
parameter in chapter 11.6 “Configuring printers manually”
for related information.
“pstext” is started from the command line in order to convert an existing file for printing, or from inside a UNIX pipe
in order to be able to directly print from an application without having to spool the ASCII print output to disk. “pstext”
can be controlled with additional parameters in typical
UNIX style.
The following is an example of a typical command to print
an ASCII file:
pstext -P lw .profile
12 Text-to-PostScript Converter
12.1 General remarks
405
This command converts the file “.profile” to PostScript and
sends it to the printer “lw”. To do this, “pstext” calls “lpr”
with the specified printer name. “pstext” first looks for
“lpr” in the $ESDIR directory (usually “/usr/local/es”), and
then in the directories specified in the hosts’s path. If the
option “-P printername” is omitted, the generated PostScript code is output to the terminal for test purposes, rather
than to the printer.
The following is an example of the use of “pstext” in a
UNIX pipe. It outputs the current directory to the printer
“lw”:
ls -l | pstext -P lw
The following example prints one entry from the UNIX
manual:
nroff -man /usr/man/man1/ls.1 | pstext -P lw
12 Text-to-PostScript Converter
406
12.2 Options
12.2
Options
The command line options of “pstext” have the following
significance:
-f
font
font is the font with which the document should be printed.
The default here is “Courier”, because this is one of the few
commonly available non-proportional fonts, which makes
it particularly suitable for listings and tables.
-s
size
size
is the size of the font in points. The default is 10
points. One point is 1/72 inch.
-e
prepfile
prepfile
is the name of a PostScript language “prep” file
which should be added to the start of each print job. If you
do not specify the -e option, “pstext” automatically uses the
internal “prep” file. This file contains definitions which are
needed by “pstext”. Instead of specifying an alternative
“prep” file name in the command line with the -e option as
above, you can set the name with the UNIX environment
variable “$PSTEXT_PREP”. This avoids having to specify
the -e option. See the -d option below, and chapter 12.4
“Umlauts and special characters” for more information
about using and editing the “prep” file.
-h
title
title is automatically printed on the top line of each page.
If this option is omitted, “pstext” automatically prints the
file name and the date on the top line.
12 Text-to-PostScript Converter
407
12.2 Options
-L
leftmargin
leftmargin
specifies the space to the left paper edge in
points. The default varies slightly from printer to printer,
and is approximately 20 points.
-T
topmargin
topmargin is the spacing in points from the top paper edge.
The default varies slightly from printer to printer and is approximately 14 points.
-o
This option suppresses the title line. You normally want to
suppress the title line if you are using the “pstext” escape
interpreter, because you are probably printing with a more
“intelligent” program which generates its own header in
this case.
-l
This option rotates the printed output by 90˚ (landscape
mode printing).
-m
This option is used to print the date of the last modification
to the file on the top line of each page, instead of the current
date.
-n
This option turns off the “pstext” escape interpreter. No
characters are checked for control functions.
-t
tabsize
tabsize
specifies the distance of each tabulator stop in
units of the width of the character “M”. The default is eight,
i.e. the width of eight Ms (“MMMMMMMM”) for each tab
stop.
-P
printer
printer
is the name of the printer to which the file should
be output. If this option is omitted, the generated PostScript
code is output to the terminal (“stdout”).
12 Text-to-PostScript Converter
408
-c
12.2 Options
lpi
lpi
defines the desired line spacing in font height. The default is once the height of the used font.
-d
NewPrepFile
NewPrepFile
parameter can be set to dump the internal
“prep” file pstext.ps to a file for further editing and use it
with -e option.
12 Text-to-PostScript Converter
409
12.3 Escape Interpreter
12.3
Escape Interpreter
“pstext” can check the print job for special sequences starting with the “ESC” character, which can be used to control
simple highlighting features such as bold printing, underscoring and different fonts. This is particularly useful for
programs that normally work with a matrix printer. With
such programs, it is often possible to enter the control codes
to specify particular print attributes such as bold printing
into a configuration table.
An escape sequence for “pstext” has three parts: The first is
the ESC character (Hex 1B), which is then followed by a
command (a digit between one and six), followed by the
value of the parameter within square brackets, for example:
ESC 4 [10]
or in hex:
1B 34 5B 31 30 5D
Escape
sequences
The following is a list of the supported escape sequences:
ESC 1 [1]
Underline on.
ESC 1 [0]
Underline off.
ESC 2 [1]
Bold printing on.
ESC 2 [0]
Bold printing off.
12 Text-to-PostScript Converter
410
12.3 Escape Interpreter
ESC 3 [Helvetica]
Choose a new font, in this example “Helvetica”.
ESC 3 [Courier]
Choose the standard font. “Courier” is the
default font.
ESC 4 [12.5]
Choose a new font size in points, in this example
12.5 points.
ESC 5 [
gsave
newpath
50 50 moveto
80 80 lineto
closepath
stroke
grestore
]
This escape sequence example shows how to include your
own PostScript code (e.g. a trademark) during the printing
procedure. It is important to store and restore the current
position, which is why the program should always start
with “gsave” and finish with “grestore”.
ESC 6 [2]
Set line spacing (in this example to 2 times the font
height).
12 Text-to-PostScript Converter
12.4 Umlauts and special characters
12.4
411
Umlauts and special characters
“pstext” provides facilities to allow the PostScript coding
(character set translation) of the printer font to be changed,
for example to allow national accented characters such as
Umlauts to be printed correctly. The default character set
coding in PostScript only supports a few of the available accented characters. “pstext”, however, re-codes the allocation of such characters by accessing the PostScript language “prep” file that is built into EtherShare. This file
contains two different, modified versions of the so-called
“Standard Encoding Vector”, called “decEncoding” (for
DEC Ultrix computers) and “ibmEncoding” (for IBM computers) respectively. Neither of these encoding tables are
complete implementations of the corresponding character
sets, they have only been set up to support the German Umlaut characters. However, they can easily be extended to
add other special characters, or to specify completely new
codings. Note that modification of the coding requires some
knowledge of the PostScript language.
To edit the default “prep” file, you have to use the “pstext”
program with the “-d” option. This dumps the “prep” contents into a file which can then be revised. We assume that
the file name of the editable “prep” file is “pstext.ps”.
The two alternative encoding tables can be found at the beginning of the “pstext.ps” file. They both function by copying the standard coding and changing it to add the required
special characters. The following is the code table provided
for the DEC VT200 character set:
12 Text-to-PostScript Converter
412
12.4 Umlauts and special characters
%
reencode font for DEC VT200 font
/decEncoding StandardEncoding dup length array
copy
dup 196
/Adieresis
put
dup 228
/adieresis
put
dup 220
/Udieresis
put
dup 252
/udieresis
put
dup 214
/Odieresis
put
dup 246
/odieresis
put
dup 223
/germandbls put
def
Each line of this table re-defines a single character. The
decimal number (e.g. 196) is the decimal value of the character (“ASCII” value) in the input file’s character set. This
is followed by the PostScript name of the character. In PostScript, characters have names and not numbers. For example, “/Adieresis” is the PostScript name for “Ä”.
The encoding tables are followed by a line which determines which of the two tables are used when printing. The
table “decEncoding” implements a character set according
to ISO 8859-1 (DEC VT200) whereas “ibmEncoding” implements a character set that corresponds to the IBM PC extended ASCII code. The following line in “pstext.ps”
selects DEC encoding:
% we use the DEC encoding by default
/theEncoding decEncoding def
If you want to use IBM PC umlaut codes, change the above
line as follows:
% we use the IBM encoding by default
/theEncoding ibmEncoding def
12 Text-to-PostScript Converter
12.4 Umlauts and special characters
413
You can as well make a local copy of “pstext.ps” with a
new – more individual – name, then modify this file, and
specify its name with the -e option when calling “pstext”,
e.g.:
pstext -e myprep1.ps -P lw testfile
This command prints the file “testfile” using a new PostScript definition contained in the “prep” file “myprep1.ps”.
If you use a particular encoding table often, instead of specifying the “prep” file name in the command line as above,
you can write the name to the UNIX environment variable
“$PSTEXT_PREP”. This avoids having to specify the “-e”
option.
12 Text-to-PostScript Converter
414
13 The Administration Server
415
13
The Administration Server
13 The Administration Server
416
13.1 General remarks
13.1
General remarks
This chapter describes the function and configuration of the
Administration Server. In conjunction with the EtherShare
Admin application, the Administration Server allows the
EtherShare system to be configured from any Macintosh
workstation in the network in a secure and convenient way.
13 The Administration Server
13.2 The Administration Server Program
13.2
417
The Administration Server
Program
The EtherShare Administration Server system consists of
the program “admsrv”. It is created automatically in the
“$ESDIR” directory during installation. EtherShare is configured to start “admsrv” automatically when UNIX is
booted.
admsrv
“admsrv” implements administration server functions on
the host and manages the communication with the EtherShare Admin program on Macintosh workstations. Each
new login request from the EtherShare Admin results in a
new “admsrv” process being created. Accordingly, when a
number of users use the EtherShare Admin application at
the same time, a number of “admsrv” processes run simultaneously.
13 The Administration Server
418
13.3 Parameters of the “admsrv” program
13.3
Parameters of the “admsrv”
program
When it starts, the Administration Server program
“admsrv” first accesses the main configuration file
“atalk.conf” to determine its configuration. The “install”
program automatically sets up this file with initial values.
The values can be changed if necessary by using an editor
such as vi. See also chapter 5.14 “Editing “atalk.conf” (and
other configuration files) manually”.
The parameters described below can be defined for
“admsrv” in “atalk.conf” (note that the parameter list is preceded by the program name “admsrv”):
name
name=netname,name=netname2,name=netname3
netname is the AppleTalk (NVE) name of the Administra-
tion Server. This is the name with which it is known to the
network. It is the name you see in the Chooser of the EtherShare Admin program. Several names in a row, separated
by a comma, are optional.
The default for netname is the name of the UNIX host.
Note:
zone
The AppleTalk type of the Administration Server is not
configurable. The type is always AdminServer.
zone=zonename,zone=zonename2,zone=zonename3
zonename is the name of the AppleTalk zone to which the ad-
ministration server should be allocated. This parameter determines the zone in which the Administration Server can be
found in the Chooser of the EtherShare Admin program. The
chosen zone must be one of the local zones that the host is
connected to. You can test this with the “zones -l” program.
13 The Administration Server
13.3 Parameters of the “admsrv” program
419
The default for zonename is “*”, i.e. the zone of the first interface entry in “atalk.conf”. Several names in a row, separated by a comma, are optional, e.g.:
admsrv: zone="marketing", zone="support",
zone="developer"
sessions
sessions=maxclients
maxclients specifies the
maximum number of workstations (clients) that are permitted to work on the Administration Server simultaneously. This value can be the same as
the total number of workstations that are connected to the
AppleTalk network, but is usually smaller than that.
The default for maxclients is 4.
yppasswd
yppasswd=file
file specifies the
name and path of the file in which the
user data for the “Yellow Pages” system are stored (see later).
There is no default for file.
ypgroup
ypgroup=file
file specifies the
name and path of the file in which the
group data for the “Yellow Pages” system are stored (see
later).
There is no default for file.
ypafppasswd
ypafppasswd=file
file specifies the name
and path of an optional AFP user
list for use with the “Yellow Pages” system.
There is no default for file.
13 The Administration Server
420
savepasswd
13.3 Parameters of the “admsrv” program
[no]savepasswd
As a time-saving feature when logging on, the AppleShare
selection in the Chooser on the Macintosh lets you save
your File Server user name and/or user password on the
Macintosh’s local hard disk.
To improve security, specify the nosavepasswd switch to
disable the saving of user passwords in this way, in which
case all users have to enter their password manually each
time they log on to the EtherShare Admin. Note: you can
still change your File Server password in the Chooser in the
normal way (with Change Password).
The default (if this switch is omitted) is savepasswd.
Note:
fontdir
The [no]savepasswd setting only works for Mac OS
Version 7.0 and above.
fontdir=file
file is the path
of the host directory which contains the
server font list “FontDirectory”. The fonts themselves are
contained in sub-directories of file, arranged alphabetically.
The default for file is “$ESDIR/psfonts”.
is also available as a global printer parameter. You
should make sure that you do not specify different font directories for the Administration Server and the Print Server.
fontdir
unprotected
[un]protected
This switch (if set to protected) can be specified to protect
(lock) all configuration data. Then, merely maintaining
spool queues is possible.
The default for this switch is unprotected.
13 The Administration Server
13.3 Parameters of the “admsrv” program
sysadmgroup
421
sysadmgroup=groupname
The EtherShare Admin allows users with sufficient permissions to configure the EtherShare system from any Macintosh workstation on the AppleTalk network in a convenient
and secure way. For example, it can be used to set up users,
groups, volumes, and printers, and re-schedule print jobs.
Normally, only the system administrator is allowed to make
any changes. Non-privileged users can inspect the configuration and the print job queue, but cannot change anything
except delete their own print jobs.
Members of the special “system administrators” group can
also use the EtherShare Admin to make any changes they
like, including printer configuration, and sending AFP messages with Lists/Active Users/Message/Message To
All... to all AppleShare users logged-on to the EtherShare
server. However, these group members are not allowed to
modify any information on users with an ID less than 100
(note: the system administrator has a user ID of 0). The
groupname parameter specifies the name of the special
“system administrators” group.
The default for groupname is “SysAdm”.
prnadmgroup
prnadmgroup=groupname
Members of the special “printer administrators” group can
use the EtherShare Admin to manipulate print jobs from a
Macintosh workstation, i.e. they are allowed to:
• delete a job
• move a job to another queue
• change a jobs priority
• set a queue to Spool only/Spool and Print
• restart a printer queue with
Lists/Printers/Printer/Restart Printer
13 The Administration Server
422
13.3 Parameters of the “admsrv” program
The groupname parameter specifies the name of the special
“printer administrators” group.
The default for groupname is “PrnAdm”.
queueadmgroup
queueadmgroup=groupname
Members of the special “queue administrators” group can
use the EtherShare Admin to manipulate print jobs and
queue configurations from a Macintosh workstation. Thus,
they have even more privileges than members of the
“printer administrators” group that is described above.
Queue administrators are allowed to:
• any task “PrnAdm” is allowed to do
• create/change/remove printer queues
• update fonts for queues
• download fonts to the EtherShare Server
• adjust “PDF Settings”
• adjust “OPI/ICC Settings”
• adjust “Edit Initialization” settings
• specify PPDs for queues
The groupname parameter specifies the name of the special
“queue administrators” group.
The default for groupname is “QueueAdm”.
Note:
daemonuid
The default values “SysAdm”, “PrnAdm”, and
“QueueAdm” are created automatically during installation.
daemonuid=idnumber
When creating printers with the EtherShare Admin, the user
of the printer daemon is set in “/etc/printcap” by default to
ID 0 (“root”) with the flag “du#0”. This simplifies
13 The Administration Server
13.3 Parameters of the “admsrv” program
423
permission considerations when printing, especially if the
print job contains external references to OPI images or
“%%Include...” comments. This feature is associated with
a slight security risk. Specify daemonuid to instruct the
EtherShare Admin to set the user of the printer daemon to
the ID of another user, for example to ID 1 (user “daemon”). An alternative option for the system administrator is
to change the “du” flag value for all printer entries in
“/etc/printcap” manually.
The default for idnumber is 0 (the ID of “root”).
13 The Administration Server
424
13.4 Administration Server utility program
13.4
Restarting the
Admin Server
Administration Server utility
program
If you are unlucky enough to experience a system crash, the
following temporary files are occasionally left over by the
“admsrv” program: “ptmp”, “gtmp”, “atmp” and “vtmp” in
the directories “/etc” or “$ESDIR/conf”.
They must be deleted before restarting “admsrv” to ensure
proper functioning of this program. This is done automatically by the “start-atalk” script.
13 The Administration Server
13.5 Configuration with Yellow Pages
13.5
425
Configuration with Yellow Pages
The Administration Server has been designed to support the
UNIX yellow pages (NIS) system, which, in a network of
several UNIX hosts, allows user names, group names, and
passwords as well as other configuration details to be stored
centrally on the so-called “Yellow Pages Master” host. This
considerably simplifies setting up new users, particularly if
they each need access to more than one host. Please note
that the user configuration data maintained under Yellow
Pages is only stored on the Master host. You can only
change it with the EtherShare Admin by logging on to the
Administration Server on the Master host, and not one of
the Slaves.
Furthermore, the special Yellow Pages password and group
files (e.g. “/var/yp/passwd” and “/var/yp/group”) are usually stored on the Master host in a subdirectory of “/etc”. For
this reason, and assuming that you also have EtherShare installed on the Master host, the configuration entry for the
Administration Server in “atalk.conf” allows you to specify
the name and location of the Yellow Pages password and
group files with the parameters yppasswd and ypgroup, respectively. These parameters only need specifying on the
Master host.
If you have not installed EtherShare on the Yellow Pages
Master host, you can edit the Yellow Pages password and
group files to set up Slave users by using the standard
UNIX Yellow Pages tools in the normal way. We would
like to point out, however, that the EtherShare Admin is
much easier to use for setting up Yellow Pages users and
groups than the standard UNIX tools. You can use the
EtherShare Admin to set up both, EtherShare users and regular UNIX users.
13 The Administration Server
426
13.5 Configuration with Yellow Pages
The optional AFP user list (“$ESDIR/conf/afppasswd”)
can also be used with the Yellow Pages system by setting
up a second “afppasswd” file on the Master host (e.g.
/var/yp/afppasswd) containing the names of all users of the
Master and its interconnected Slaves. You must specify its
name and path in the Master’s Administration Server parameter ypafppasswd. The Master host’s “$ESDIR/
conf/afppasswd” file should only contain the “root” and
system logins, terminated by “+:” in the last line.
The installation includes in the directory “$ESDIR/etc” the
script “ypMakefile”, which contains the necessary changes
required to implement the AFP user list under Yellow Pages. It must be copied as “Makefile” to “/var/yp”.
Since, in the Yellow Pages system, the password and group
files are often stored in “/var/yp” rather than in “/etc”, a typical configuration for the Administration Server on the
Master host is as follows:
admsrv:
name=“AdminServer”, sessions=8,
yppasswd=/var/yp/passwd,
ypgroup=/var/yp/group,
ypafppasswd=/var/yp/afppasswd
The “$ESDIR/conf/afppasswd” file of each host in the Yellow Pages system (Master and Slaves) must include a line
containing only “+:” at the position where the Yellow Pages
user and group map should be included. This usually follows entries for the “root” and the system logins only, to
make sure that it is still possible to log on to the host in the
case of a failure of the network connection to the Master:
13 The Administration Server
13.5 Configuration with Yellow Pages
427
root:8c9373c57a229c7a
+:
When the Yellow Pages system is being used, the Administration Server automatically calls the program “$ESDIR/
etc/yp-update” whenever user or group data are changed, in
order to update the Yellow Pages files. The network connection results in a slight additional time delay when making such changes.
If you install your yellow pages using different directories
to the ones listed above under “admsrv:”, you will also need
to modify the “$ESDIR/etc/yp-update” script accordingly.
13 The Administration Server
428
14 The Mail Server
429
14
The Mail Server
14 The Mail Server
430
14.1 General remarks
14.1
General remarks
This chapter describes the function and configuration of the
EtherShare Mail Server. In conjunction with the HELIOS
Mail application, the Mail Server allows workstations in the
AppleTalk network to send electronic mail messages and
files to other Macintosh or UNIX users on the network. Incoming mail is received in the background while you will
be informed by a “Mail Notification Feature”. You also receive EtherShare server messages, such as printer messages, via electronic mail.
HELIOS Mail requires to install and configure your host’s
mail program (e.g. “sendmail”). If you have a modem attached to your host and configured for UNIX mail (uucp),
you can also communicate with several million users of this
worldwide e-mail system.
EtherShare’s built-in (TCP) POP3 Server allows you to use
mail clients other than Macintosh and mail applications
other than HELIOS Mail.
14 The Mail Server
14.2 The Mail Server Program
14.2
431
The Mail Server Program
The Mail Server system consists of the program “mailsrv”.
It is created automatically in the “$ESDIR” directory during installation. EtherShare is configured to start “mailsrv”
automatically when UNIX is booted.
mailsrv
“mailsrv” implements mail server functions on the host and
manages the communication with HELIOS Mail and the
UNIX “mail” programs on the host. It also notifies Macintosh users of incoming mail via the “Mail Notification Feature”, which runs in the background on each workstation.
Each new login request from the HELIOS Mail program on
a Macintosh workstation starts a new host process.
14 The Mail Server
432
14.3 Parameters of the “mailsrv” program
14.3
Parameters of the “mailsrv”
program
When it starts, the Mail Server program “mailsrv” first accesses the main configuration file “atalk.conf” to determine
its configuration. The “install” program automatically sets
up this file with initial values. The values can be changed if
necessary by using an editor such as vi. See also chapter
5.14 “Editing “atalk.conf” (and other configuration files)
manually”.
The parameters described below can be defined for
“mailsrv” in “atalk.conf” (note that the parameter list is preceded by the program name “mailsrv”):
name
name=netname,name=netname2,name=netname3
netname is the AppleTalk (NVE) name of the Mail Server.
This is the name with which it is known to the network. It
is the name you see in the Chooser of the HELIOS Mail
program. Several names in a row, separated by a comma,
are optional.
The default for netname is the name of the UNIX host.
type
type=nettype
nettype is the
AppleTalk type of the Mail Server. This is
the type with which it is known to the network. nettype
should normally be set to “MailServer”.
The default for nettype is “MailServer”.
zone
zone=zonename,zone=zonename2,zone=zonename3
zonename is the name of the AppleTalk zone to which
the
Mail Server should be allocated. This parameter determines
the zone in which the mail server can be seen in the Chooser
of the HELIOS Mail program. The chosen zone must be
14 The Mail Server
14.3 Parameters of the “mailsrv” program
433
one of the local zones that the host is connected to. You can
test this with the “zones -l” program (see zone in chapter 13.3
“Parameters of the “admsrv” program”).
The default for zonename is “*”, i.e. the zone of the first interface entry in “atalk.conf”. Several names in a row, separated by a comma, are optional, e.g.:
admsrv: zone="marketing", zone="support",
zone="developer"
localwinsize
localwinsize=maxlpackets
maxlpackets specifies the maximum
number of data packets that are passed from “mailsrv” to workstations through
the network during a transaction. The number of packets
may need to be limited if the buffer size in the workstations
is too small. maxlpackets can be varied to optimize the data
transfer rate.
The default (and maximum) for maxlpackets is 8.
remotewinsize
remotewinsize=maxrpackets
maxrpackets specifies the maximum
number of data packets that are passed from workstations to “mailsrv” through
the network during a transaction. The number of packets
may need to be limited if the buffer size in the UNIX host
is too small. maxrpackets can be varied to optimize the data
transfer rate.
The default (and maximum) for maxrpackets is 8.
spooldir
spooldir=spooldirectory
spooldirectory is the directory to which all incoming mail
is spooled. Outgoing mail is not spooled, since it is passed
directly to the UNIX mail system.
14 The Mail Server
434
14.3 Parameters of the “mailsrv” program
The default for spooldirectory is “/var/spool/mail”, or
“/var/mail” (depending on your UNIX operating system).
mailinterval
mailinterval=seconds
seconds gives the interval
in seconds with which the mail
directory is polled for new mail. Usually, you use the “biff”
program for mail notification instead, since you get immediate notification this way, and because “biff” needs less
system overhead.
The Mail Server only polls for mail at the time interval
specified by seconds if “biff” has been disabled or is not
available for some reason.
The default for
biff
seconds
is 60 (one minute).
[no]biff
This switch specifies whether or not to use the UNIX “biff”
program for mail notification. “biff” is the preferred method, since it needs less system overhead than polling for
mail. However, on some systems “biff” is already used by
other programs such as “comsat”, and may not be available
for use by the Mail Server. In this case, the Mail Server automatically falls back to polling for mail.
If you want to release “biff” from “comsat” for use with the
Mail Server, bracket out the corresponding line in the
UNIX configuration file “/etc/inetd.conf” by inserting a “#”
at the start of the line.
Then re-initialize “inetd” with the command “kill -1 xxx”,
where “xxx” is the process id of the “inetd” process. Finally, stop and restart the AppleTalk network with “stop-atalk”
followed by “start-atalk”.
14 The Mail Server
14.3 Parameters of the “mailsrv” program
History:
435
“biff” was the name of a dog belonging to a Berkeley
programmer who wrote part of the UNIX mail system.
Biff used to bark each time the postman delivered a
(conventional paper) letter to the door.
The default for this switch is biff (for all UNIX architectures) provided that it is not already in use by other programs.
passwd
[no]passwd
When you installed EtherShare, a new address book was
automatically created as the empty UNIX text file
“addressbook” in “$ESDIR/conf”. You can add new addresses to the list with the New Address... function of
HELIOS Mail. When you use the address book, normally
you will also see all users of your UNIX host, including
root, in addition to users you have included manually with
the New Address... function. Specify nopasswd to turn off
this feature, in which case the address book will only show
users who have been included manually.
The default for this switch is passwd.
officialname
officialname=name
name is a string containing
the official name (UNIX mail
name) of your host. This is the name which users of other
systems need to include in their mail address when they
want to reach you. It is made up of a name (e.g. the host
name “osiris”) and the domain in which the host resides
(e.g. “helios.de”).
The default for name is made by concatenating the name of
your host and its domain name (e.g. “osiris.helios.de”).
14 The Mail Server
436
addresses
14.3 Parameters of the “mailsrv” program
addresses=filename
filename is the name and path of a file containing a list of
e-mail addresses. The list can be accessed by and maintained from HELIOS Mail. You can use it to save time
when you often mail to the same people.
The default for
mailer
filename
is “$ESDIR/conf/addressbook”.
mailer=mailerpgm
mailerpgm is the name and path of the UNIX program used
to send mail. You should normally use the “sendmail” program for this purpose. In some cases, you may need to use
“/bin/mail” instead. However, you may encounter problems
with the mail program, such as lack of 8-bit transparency.
You need 8-bit transparency if you want to send mail containing national accented characters such as “Umlauts”. A
character conversion table in the Mail Server allows you to
send mail containing Umlauts to UNIX users, too (see
chapter 6.3.2 “Text preferences”).
The default for mailerpgm is “/usr/sbin/sendmail”.
autologin
[no]autologin
If you check Save name
in the HELIOS Mail login window, HELIOS Mail makes a note of your name, and the
zone and name of the Mail Server you want to use (see
chapter 6.4 “Configuring the connection”). Next time you
start HELIOS Mail, you only need to enter your password.
Furthermore, if you log on first to the EtherShare File Server on the same host, you will not have to enter your name
and password for either the Mail Server or the “Mail Notification Feature” anymore. This is convenient, but presents
a security risk if you leave your Macintosh unattended with
volumes mounted – even if you have quit HELIOS Mail,
others can start it again and have access to your mailbox
without needing to type in any password. Specify the
noautologin parameter to force HELIOS Mail to ask for a
14 The Mail Server
14.3 Parameters of the “mailsrv” program
437
password each time it is started. This is similar to unchecking the Save name box in the HELIOS Mail login window,
but applies to all HELIOS Mail users on that host. To make
use of the noautologin feature, do not forget to always uncheck Save password in the same window. The default for
this switch is autologin.
TCP/IP
pcmail port
port=2001 (or other value)
vacation
vacation=file
You have to configure the pcmail port. The default port
number is 2001.
The UNIX vacation program is required if you want to
make use of HELIOS Mail’s vacation message option. For
details about the vacation program and the “.vacation.msg”
file, see the respective UNIX man pages.
14 The Mail Server
438
14.4 The POP3 Server
14.4
The POP3 Server
EtherShare 2.6 includes a POP3 Server so that it is possible
to use a mail client other than HELIOS Mail with the Mail
Server on the UNIX host.
Configuration
In order to use this feature, you have to activate the
“TCP/IP” Control Panel on the Macintosh client. In the
“TCP/IP” setup window, you have to specify how the Macintosh allocates its IP address, e.g. by “Using DHCP
Server”. This, however, is determined by your system administrator. The mail client has to be configured as well.
You have to enter the name of the server on which EtherShare is running as POP3 Server. Note that some programs
call the POP3 Server “Email account”, “POP account”, or
“Mail Server”.
Sockets
For internal communication, EtherShare uses certain TCP
sockets which have to be available, otherwise certain EtherShare services will not be available and an appropriate error
message will be issued.
For the EtherShare Mail Server which is providing POP3,
POPPASSD, and PCMAIL services, the “mailsrv” process
has to be able to connect to specific sockets to allow POP
clients to communicate properly. In the following, there is
a list of the sockets used on the server:
Service
socket
poppassd
pop3
pcmail
106/tcp
110/tcp
2001/tcp
You can verify available/used sockets by checking the contents of “/etc/services” and the output of “netstat -a -n”.
14 The Mail Server
439
Verifying
whether the
HELIOS POP3
Server is
running
In order to check whether the HELIOS POP3 Server is running, you can enter the following command under UNIX:
telnet localhost 110
The server will issue the following response:
+OK HELIOS POP3 Mail Server <...> ready
Type
quit.
If you receive a response other than that shown above, this
indicates that another Mail Server had already been running
before HELIOS Mail was started. In that case, HELIOS
Mail cannot use the socket, recognizes the other Mail
Server, and does not start.
Passwords
The POP3 protocol allows non-encrypted and encrypted
passwords. If you want to use encrypted passwords, you
have to make sure that your UNIX host is configured accordingly. The users have to be set up with “afppasswd”.
You will get an error message from the client if the server
has not been configured properly. For more information,
please refer to chapter 9.5 “Users and groups”.
14 The Mail Server
440
15 The Terminal Server
441
15
The Terminal Server
15 The Terminal Server
442
15.1 General remarks
15.1
General remarks
This chapter describes the function and configuration of the
Terminal Server. In conjunction with the HELIOS Terminal application, the Terminal Server allows workstations in
the AppleTalk network to make simultaneous terminal connections to one or more UNIX hosts (multiple sessions capability).
15 The Terminal Server
15.2 The Terminal Server Program
15.2
443
The Terminal Server Program
The EtherShare Terminal Server system consists of the program “termsrv”. It is created automatically in the
“$ESDIR” directory during installation. EtherShare is configured to start “termsrv” automatically when UNIX is
booted.
termsrv
“termsrv” implements terminal server functions on the host
and manages the communication with HELIOS Terminal.
Each new login request from a Macintosh workstation
starts a new host login process. “termsrv” then re-directs
the host’s input and output to the workstation via the network.
15 The Terminal Server
444
15.3 Parameters of “termsrv” program
15.3
Parameters of “termsrv” program
When it starts, the Terminal Server program “termsrv” first
accesses the main configuration file “atalk.conf” to determine its configuration. The “install” program automatically
sets up this file with initial values. The values can be
changed if necessary by using an editor such as vi. See also
chapter 5.14 “Editing “atalk.conf” (and other configuration
files) manually”.
The parameters described below can be defined for
“termsrv” in “atalk.conf” (note that the parameter list is
preceded by the program name “termsrv”):
name
name=netname,name=netname2,name=netname3
netname is the AppleTalk (NVE) name of the Terminal
Server. This is the name with which it is known to the network. It is the name you see in the Chooser of the HELIOS
Terminal program. Several names in a row, separated by a
comma, are optional.
The default for
type
netname
is the name of the UNIX host.
type=nettype
nettype is the AppleTalk type of the Terminal Server. This
is the type with which it is known to the network. nettype
should normally be set to “UNIXTerminal”. The same type
must be set in the “Connection Settings” window of the
HELIOS Terminal program.
The default for
zone
nettype
is “UNIXTerminal”.
zone=zonename,zone=zonename2,zone=zonename3
zonename is the name of the AppleTalk zone to which
the
Terminal Server should be allocated. This parameter determines the zone in which the Terminal Server can be seen in
15 The Terminal Server
445
15.3 Parameters of “termsrv” program
the Chooser of the HELIOS Terminal program. The chosen
zone must be one of the local zones that the host is connected to. You can test this with the “zones -l” program (see zone
in chapter 13.3 “Parameters of the “admsrv” program”).
The default for zonename is “*”, i.e. the zone of the first interface entry in “atalk.conf”. Several names in a row, separated by a comma, are optional, e.g.:
termsrv: zone="marketing", zone="support",
zone="developer"
localwinsize
localwinsize=maxlpackets
maxlpackets specifies the maximum
number of data packets that are passed from “termsrv” to workstations through
the network during a transaction. The number of packets
may need to be limited if the buffer size in the workstations
is too small. maxlpackets can be varied to optimize the
data transfer rate.
The default (and maximum) for
remotewinsize
maxlpackets
is 8.
remotewinsize=maxrpackets
maxrpackets specifies the maximum
number of data packets that are passed from workstations to “termsrv” through
the network during a transaction. The number of packets
may need to be limited if the buffer size in the UNIX host
is too small. maxrpackets can be varied to optimize the
data transfer rate.
The default (and maximum) for
term
term=capname
capname is the
maxrpackets
is 8.
name of the terminal emulation. This name
is written by “termsrv” to the UNIX environment variable
“$TERM” on starting a new connection. In the standard
UNIX configuration, the VT100 emulation (i.e. a definition
15 The Terminal Server
446
15.3 Parameters of “termsrv” program
of terminal control codes) is defined in each of the files
“termcap” and “terminfo”. If you change capname to specify another emulation, you must ensure that the new emulation definition has been added to both files. Whereas many
programs refer to the “termcap” file, an entry is also required in “terminfo”, since, under Solaris 2, some programs
refer to “terminfo” (like the editor program vi) instead of
“termcap”. Note that the standard UNIX VT100 emulation
is a subset of the VT320 emulation provided in HELIOS
Terminal.
The default for capname is vt100.
banner
banner=bannerstring
bannerstring is a string which is output to each Macintosh
terminal whenever a connection is made and before the login itself is started. For example, you can use this parameter
to output a company trademark. The following escape sequences are recognized within bannerstring:
%n
The host name of the UNIX system
\r
A Carriage Return character
\n
A Line Feed character
\f
A Form Feed character
\t
A tabulator character
\033An Escape character. This allows any
required bit pattern to be constructed
with a 3-position octal number.
If you do not specify
bannerstring,
the default is:
“\r\n\r\nADSP Terminal Server on host
%n\r\n\r\n(C) 1990 Helios Software GmbH\r\n\r\n”.
Specify banner=“” if you do not want a banner.
16 The Time Server
447
16
The Time Server
With the “EtherShare Client Installer” that is described in
chapter 4.6 you can add the “Time Server” option to your
Chooser as shown in figure 158 below. You can then select
a specific server, press the Set Time button in the Chooser
dialog and thus make sure that the time on your Macintosh
client is always synchronized to the time on the server you
have chosen. If the time of your Macintosh goes wrong by
one hour, you have to open the Date & Time control panel
and check whether Daylight Savings Time has been set up
correctly.
Fig. 158: Selecting a time server for time adjustment
16 The Time Server
448
After the Time Server has been selected, the local Macintosh time will be set according to the server time whenever
you boot your Macintosh.
17 Technical support
449
17
Technical support
17 Technical support
450
17.1 Support options
17.1
Support options
HELIOS offers a variety of support options to help you get
the most from HELIOS products. This section summarizes
those options.
If you have any questions about your HELIOS product, first
read the printed documentation. Also consult the README
files, which may have been provided with the product to describe late news which are not covered by the main manual.
Last but not least, you may check our Web site regularly:
http://www.helios.de
If you still cannot find the answer to your question, your
first line of support is your HELIOS product supplier or
dealer. Please have the following information at hand:
❍ Did you try to get help from one of our dealers or dis-
tributors? Please let us know if you found your dealer to
be little helpful and/or lacking in experience.
❍ The serial number of your HELIOS product (this is
printed on your “Activation Key Request” form. Alternatively, the machine ID of your computer (see What
you have to do in chapter “Welcome to EtherShare
2.6”).
❍ Your full address, telephone/fax number, and e-mail ad-
dress, if available.
❍ HELIOS partner contact: name, e-mail address, fax,
phone.
17 Technical support
17.1 Support options
451
❍ For every EtherShare/PCShare server at your site:
• EtherShare: contents of “atalk.conf”, “afpvolumes”,
“Versions”
• PCShare: contents of “pcshare.cnf”, “exports.pcs”,
“Versions”
❍ UNIX: information about the hardware and operating
system
❍ The version of all relevant HELIOS software modules
(see chapter 5.13.6 “Versions”) and the name and version of any Macintosh application software (such as
DTP programs) or INITs you were using at the time.
❍ Details about your EtherShare configuration file
“atalk.conf”. For printer-related queries, we will need
details of your “/etc/printcap” file, too.
❍ The type of hardware you are using and the operating
system version (use the “uname” command ( with an
appropriate parameter e.g. uname -a to find out).
❍ The exact wording of any messages that appeared on
your screen, and details of relevant messages in the following files:
• Printer log file
• System message file
❍ What happened and what were you trying to do at the
time the problem occurred?
❍ How did you try to solve the problem? Contents of
“/etc/passwd”, “yp/passwd” (we are only interested in
the location of users’ home directories)
17 Technical support
452
17.1 Support options
For “dt” utilities-related problems:
❍ Output of “/etc/(v)fstab”, “exports”
❍ Output of “find / -name .afpvolumes -print”,
“find / -name .Desktop -print”
❍ “rebuild -s” for every EtherShare volume
❍ In case any changes have been made to your initial
EtherShare/PCShare configuration, we need the contents of the current configuration files.
❍ Send the exact and complete command sequences you
issued together with the exact and complete output produced by the “dt” utilities and/or other UNIX programs
you have used. (If you can use a scrollable command
window, e.g. within XWindows, OpenWindows, CDE,
or similar tools, this will facilitate the task of providing
this information, especially since the history of earlier
command sequences is also available in this window!)
❍ Let us have the output of “ls -la” for the directory where
you applied the “dt” command, as well as for the corresponding “.rsrc” directory. In case you applied a change
recursively, you can simply use
“ls -laR”.
❍ If you used a “dt” command which processes a source
and destination file/folder, please submit all the information for both, source and destination.
❍ Let us have the output of “ps -efl”, or “ps aux”, respec-
tively.
❍ Let us have the output of “$ESDIR/swho -c” and
“$PCDIR/swho -c”.
❍ Let us have the output of “df”.
17 Technical support
453
17.1 Support options
❍ Specify the contents of the system messages files since
the last start of EtherShare.
❍ Let us have a description of what you wanted to
achieve, and what – you think – has happened.
❍ Is the result reproducible or does it emerge only occa-
sionally? Any clue on the suspected pattern will be
helpful!
❍ In case you have additional information available, e.g.
core files, trace output, please store it safely and make a
note in your report – do only send it on request.
Depending on the severity of the problem it may be necessary to stop and start EtherShare services completely. If you
use shared volumes together with PCShare, stop PCShare
first, and restart it only after restarting EtherShare.
If the dealer cannot solve the problem, he or she can contact
the official HELIOS distributor in your country. HELIOS
has appointed distributors in about 20 countries – you can
find their addresses on HELIOS product brochures or on
the HELIOS Web site www.helios.de. Each distributor and
HELIOS OEM customer is obliged by contract to have
technical support staff who are experienced with HELIOS
products.
Note:
The current HELIOS CD-ROM provides a support
questionnaire called “es_quest.pdf” which helps you
have all important information at hand when contacting the HELIOS product supplier or dealer.
17 Technical support
454
17.2 Keys and updates
17.2
Demonstration keys
Keys and updates
All HELIOS products require an Activation Key (or password) to be entered during (or after) the installation. Without the Activation Key, the software cannot be started. Enduser Activation Keys are dependent on the machine ID of
the host and the EtherShare serial number. The installation
program will let you know your machine ID automatically.
Note:
If we generate a key twice for the same combination of
machine ID and EtherShare serial number, the second
key may be different from the first one. This is normal.
At their discretion, HELIOS distributors can provide their
dealers – for a reduced fee – with so-called dealer demonstration versions of our products, which are fully working
copies of our software but carry a special Activation Key
which expires after a given period of time. You will be informed about the time remaining on your demonstration
copy by a “afpsrv” message which pops up each time you
log on to the File Server, and then each 3 - 4 hours while being logged-on to the File Server (see figure 159):
Fig. 159: Demonstration key warning
17 Technical support
17.2 Keys and updates
Activation Key
Transfers
If you are transferring your EtherShare software from one
host to another, then we call this an “Activation Key Transfer”. When you apply for a new key, you will need to state
that you will no longer use EtherShare (and depending
EtherShare OPI, PDF Handshake, Print Preview, or user
expansion licenses) on the original host – fax our key registration department (+49-5131-70 93 25) and ask for details of the exact wording to use and the conditions that
apply.
Note:
Update service
455
If you do not enter any Activation Key the HELIOS
product you have installed will run in a 3 hour demo
mode only.
HELIOS releases new versions of its software products
from time to time, for example to make improvements or to
correct known faults. HELIOS distributors and OEM customers automatically receive the latest version in new shipments.
An automatic software update service (“Software Update
Service Agreement”) is available for endusers who wish to
receive new major product versions and intermediate product releases automatically. This is implemented by shipping
a single CD-ROM containing the latest versions of all of
our products. The CD-ROM will be produced whenever a
significant new product version is released.
Customers not taking part in the update service will only receive replacement software modules if their installation
does not function according to the claims made by HELIOS
at the time of purchase. For example, if Apple upgrades its
printer driver and this causes a problem with one of our
products, the solution to the problem will only be made
17 Technical support
456
17.2 Keys and updates
available to customers with a service contract. Other customers can still upgrade their software when new major releases become available, by paying the appropriate upgrade
fee. HELIOS will inform all customers who do not have an
update service contract about fees for upgrading existing
installations as soon as new releases become available.
Another way to obtain the latest HELIOS software updates
is called “Internet Update Access”, which provides the customer with the latest updates via HELIOS Web site.
For both update service products contact your supplier for
price information and for a copy of the relevant application
form, or visit the HELIOS Web site: www.helios.de.
17 Technical support
457
17.3 Error Messages
17.3
Error Messages
The following section lists and describes the most important error messages for all UNIX program modules except
for the Desktop Server. Desktop Server errors are described
in the corresponding chapter.
All error messages are constructed the same way. They start
with the name of the issuing program followed by the
UNIX process ID [in brackets]. This is then followed by a
verbose error message which may include variable strings
and numbers, for example:
afpsrv[12345]: The file %s cannot be opened: %m
In the following, strings are abbreviated by “%s”, numbers
by “%d” and UNIX system error messages by “%m”. Refer
to your UNIX documentation for more information on
UNIX system error messages.
17.3.1 “license” error messages
All EtherShare servers verify the integrity of the executable
image by performing a checksum and verify the license by
reading the license file “$ESDIR/conf/ethershare.license”.
program file corrupted, please reinstall
The program checksum did not match. A common reason is
that you have transferred your EtherShare installation via
FTP and you have forgotten to set FTP to image (binary)
mode.
17 Technical support
458
17.3 Error Messages
$ESDIR/conf/ethershare.license: %m
The license file could not be opened, probably because it is
missing.
no valid EtherShare license found
The license file “$ESDIR/conf/ethershare.license” contains
no valid license for EtherShare.
the demo license has expired
EtherShare demo versions run for a limited time, and the license has now expired. Each user is warned at every login
to the File Server that he is using a demo version, and also
for how many days the license will still be valid. Thus, the
expiry should not take effect surprisingly. See Demonstration keys in chapter 17.2 “Keys and updates”.
the license checksum is invalid
The “Checksum” field in the license does not match the
data in the other fields. This should not happen as the installation procedure verifies that a license is valid before entering it into the license file. However, this error message may
appear e.g. if you have upgraded from EtherShare 2.2 to
EtherShare 2.6 but still use the old key, or when you installed another version of the product to another directory
and the data mix up.
the license is not valid on this machine
The “MachID” field of the license does not match the host’s
machine ID. This might happen if you transfer a complete
installation to a new host or if you get a new machine due
to a hardware replacement. Contact our license department
17 Technical support
17.3 Error Messages
459
for a license transfer (see Activation Key Transfers in chapter
17.2 “Keys and updates”).
missing required base license %08lx
The user expansion license did not find the proper base serial number. Verify that you have specified the proper base
serial number when requesting the user expansion license
from our license department.
17.3.2 “generic” error messages
Most programs issue a generic error message when anything goes wrong for a simple system call.
syscall: %m
Various error messages from system calls are logged-in this
form. “syscall” is one of the common system calls (fork,
malloc...) and “%m” gives the reason why the call failed.
Common reasons like “No more processes” or “Not enough
core” point to resource shortages, such as “not enough swap
space”, or “process table too small”. Refer to your UNIX
documentation for more details.
MPPOpen: %s
The AppleTalk toolkit could not be initialized. This happens if “atalkd” is not running or not a single known interface could be activated. This situation is usually preceded
by messages from “atalkd”. The message can also start with
“ATPLoad” or “OpenXPP” rather than “MPPOpen”.
17 Technical support
460
17.3 Error Messages
PRegisterName: %s
The server in question could not register its name on the
network. If “%s” = “Duplicate name exists already”, this indicates that the AppleTalk name of the specified EtherShare server is already in use. EtherShare servers by default
use the UNIX host name, but you can stop EtherShare on
the server in question and rename it using the “name=” parameter in “atalk.conf”.
17.3.3 “atalkd” error messages
“atalkd” is the first program started by “start-atalk”, and is
responsible for configuring the network interfaces. Thus,
most of the error messages are concerned with network errors. All error messages are prefixed with “atalkd:”. This is
left out in the following for brevity. “atalkd” can also issue
any of the error messages listed above under 17.3.1 ““license” error messages” and 17.3.2 ““generic” error messages”.
Some error messages depend on the class of operating system (OS). “atalkd” divides the variations in two classes:
streams-based OS (e.g. Solaris 2.x) and socket-based OS
(SGI, RS/6000...).
/dev/ddp: %m
“atalkd” could not open the DDP streams multiplexor. This
will happen if the kernel modules are not installed (streamsbased OS only).
PopenSkt %s: %s
An error occurred while opening an AppleTalk socket. The
first “%s” is the socket (rtmp, nbp...) and the second “%s”
17 Technical support
17.3 Error Messages
461
is the error cause. The most likely reason is that an attempt
was made to start a second “atalkd” process while one is already running.
addif: garbled interface “%s”
“atalkd” could not understand the syntax of the “if=%s” entry in “atalk.conf”. Use “netconf” (in “$ESDIR”) for network configurations instead.
addif %s: %m
The interface “%s” could not be opened due to “%m”. You
will get this error e.g. if you specify a non-existent interface
in the “if=” parameter in “atalk.conf” (streams-based OS
only).
addif DL_ATTACH_REQ %s to %d: cannot attach
With a streams-based OS, you will get this error if you
specify an interface unit number which is not supported by
the underlying network driver (e.g. “le2” if you have only
“le0” and “le1”).
addif DL_BIND_REQ %s: cannot bind to sap 0x%x
With a streams-based OS, this can happen if the specified
service access point is already in use. For example, this
could happen if you start “atalkd” twice or if you have another product installed that already uses AppleTalk.
ignoring interface %s, no seed router found
The interface “%s” was supposed to be configured automatically, but no external seed router was found to supply
network numbers and zone names. For example, more than
17 Technical support
462
17.3 Error Messages
one interface card is installed on your server and none of the
network segments has an active seed router.
network range conflict on %s:%d-%d, ignoring interface
The interface “%s” was configured with a network number
range that conflicts with other network interfaces. Use the
“autoconf” option in “netconf” (in “$ESDIR”) to let
“atalkd” automatically configure the interface.
conflicting seed info on %s, using %d-%d instead of %d-%d
The interface “%s” was configured manually to use a particular network range, but an external seed router did supply a different range for this cable segment. “atalkd” will
use the value from the external seed router and ignore the
manual configuration.
routing conflict on %s from net %d, node %d
While the network was already up and running a new router
on network interface “%s” was sending conflicting routing
table information. The conflicting information will be ignored. This can happen if a router starts up later (e.g. on a
dialup line) or two previously independent AppleTalk networks are merged. All routers that seed that cable segment
must be checked for proper configuration.
too many hops via %s to %d (%d)
The routing information received on interface “%s” shows
that the maximum hop count of AppleTalk packets would
be exceeded attempting to reach network “%d”. Check your
AppleTalk network topology in order to provide no network is more than 15 hops away from any other part of the
network.
17 Technical support
17.3 Error Messages
463
autoconf: socket %m
With a socket-based OS, “atalkd” could not create an
AppleTalk socket. If “%m” = “Protocol not supported”, this
means that no AppleTalk kernel modules are found in the
currently running UNIX. If “%m” = “Can’t assign requested address”, this means that none of the network interfaces
specified in “atalk.conf” succeeded to configure.
autoconf %s: SIOCGIFFLAGS %m
“atalkd” could not get the flags associated with interface
“%s”. This can happen if the interface specified in the “if=”
parameter in “atalk.conf” does not exist (socket-based OS
only).
autoconf: SIOCSIFADDR %m
“atalkd” could not set the AppleTalk address for an interface. This happens on all interface cards that do not support
AppleTalk.
routine: DDPWrite to %d: %s
The named routine (nbp, rtmp...) could not write a packet to
network “%d”. If “%s” = “Network unreachable”, this usually means that network numbers are misconfigured.
rtmp_kupdate: %m
A route could not be added by “atalkd” to the kernel-resident routing table. This usually means that network numbers are misconfigured.
17 Technical support
464
17.3 Error Messages
multi_kupdate on %s: %m
“atalkd” could not add a multicast address (functional address on Token Ring) for interface “%s”. This can happen
if there are too many zones configured for one Phase II network, or if the hardware interface does not support multicast addresses.
register_me: cannot register %s
“atalkd” could not register its serial number on the network.
This can happen if you use the same enduser serial number
twice on the network, e.g. you have transferred EtherShare
to a new host and not deleted the old copy.
nbp_listener: duplicate EtherShare serial
“atalkd” has detected that there is another end user copy of
EtherShare on the network which is using the same serial
number.
Note:
The following “atalkd” error message can only occur
with EtherShare 2.6 under Linux:
addif: cannot autoconf more than one interface, entry “%s” ignored
With a socket-based OS, “atalkd” can only configure one
network interface automatically. All following interfaces
are ignored. See appendix A 3.3 “Network automatic configuration option” for more details.
17 Technical support
17.3 Error Messages
465
17.3.4 “afpsrv” error messages
“afpsrv” can issue any of the error messages listed above
under 17.3.1 ““license” error messages” and 17.3.2 ““generic” error messages”, as well as a few messages related to
the communication with “opisrv” and “desksrv” and the
“Shared Memory” segment used to hold the file and record
locking table.
setrlimit: cannot increase open file limit: %m
The “maxfiles=” parameter specified more open files per
process than the current system configuration allows.
cannot create %s: %m
“afpsrv” cannot create the “Shared Memory” segment file
“%s” (“$ESDIR/locktable”).
share_fork: cannot reopen %s: %m
“afpsrv” could not open the “Shared Memory” file “%s”
(“$ESDIR/locktable”) after forking for a new login. If this
file is removed, no one can log in until the next restart of
“afpsrv”.
share_brlock: no more locks
The number of record locks issued by clients exceeds the
number configured by the “locks=” parameter.
initEvents bind: %m
“afpsrv” could not bind its event listener socket. If the reason is “Address already in use” then this is due to a second
master “afpsrv” process running on the same machine.
17 Technical support
466
17.3 Error Messages
Bad syntax in %s, line %d
“afpsrv” could not parse file “%s” (“$ESDIR/conf/
suffixes”) in line “%d”. This might happen if you edit the
“suffixes” file by hand instead of using the EtherShare Admin.
Added additional error messages for “afpsrv” to indicate potential problems
due to corrupted “Shared Memory” segments:
lock_shm: mutex held by non-existent process <ID>
Shows up to indicate that a process has been terminated by
UNIX or user.
afpsrv slave process <ID> was killed by signal <signal>, use stop-atalk followed
by start-atalk to ensure integrity of shared memory segments
This message can occur on all currently supported platforms and indicates that “afpsrv” slave processes were intentionally killed by a UNIX user.
[Volume name]: RPC: Timed out. Only readonly access possible.
“afpsrv” will try 6 times for 5 seconds each to reach the
desktop server to retrieve or store information from/to the
desktop database of its volumes. Earlier versions of
“afpsrv” tried 3 times for 5 seconds. Although even the older values were a very long time for network or RPC connections, we decided to even extend these values.
If “afpsrv” does not get a response from “desksrv” within
this period of time this indicates a severe problem with the
underlying UNIX operating system, UNIX file system or
17 Technical support
17.3 Error Messages
467
RAID/HSM drivers, or a hardware problem related to SCSI
or hard disks.
To prevent inconsistencies between information stored in
the desktop databases of an EtherShare volume and the
files/folders on this volume, the “afpsrv” client process encountering this time-out will secure this volume (all mounted volumes) against write access. Opening folders and
reading files will still be possible, but creating/renaming/
moving files or folders will not be possible any longer. Not
even trashing files/folders will be allowed.
Apart from the usual messages issued in the UNIX system
error log, this message will also be sent to the Macintosh
client whose “afpsrv” server process encountered the problem. For more information on the Macintosh client messages refer toafpmsg in chapter 9.4 “Parameters of the “afpsrv”
program”.
Since applications usually work with temporary files/folders, it may not be possible to save single files. If this problem was only temporary, unmounting all EtherShare
volumes and remounting them will make these volumes
writable again. If instead, this was no temporary problem
and is not solved in the meantime the Macintosh volume
Chooser will list all volumes grayed out, and no volume
will be mountable. Not even root will be able to mount any
of these volumes.
Note:
Each time such an error message occurs, EtherShare
has to be restarted by entering “stop-atalk” and “startatalk” respectively, otherwise the File Server is prone
to improper operation.
17 Technical support
468
17.3 Error Messages
Make sure that the cause of this problem is solved before restarting EtherShare services.
“afpsrv” will now issue error messages on the client if the
communication to “desksrv” fails and the volume falls back
to read-only access. The message is:
Volname: localhost: RPC: Timed out
Only readonly access possible
Under certain conditions, an additional error message is issued and the volume is unmounted automatically by the
Finder.
Though this message is issued by one “afpsrv” client process only, it is likely that all other “afpsrv” processes may
encounter the same problem and therefore, the UNIX system administrator should be notified immediately.
lock_shm flock: Bad file number
“afpsrv” could not lock the “Shared Memory” segment file
“locktable”. This might happen if the file was removed using the UNIX command “rm”.
17.3.5 “papsrv” error messages
“papsrv” can issue any of the error messages listed above
under 17.3.1 ““license” error messages” and 17.3.2 ““generic” error messages”, as well as a few messages related to
the spooling system and to the communication with the client.
17 Technical support
17.3 Error Messages
469
SLInit failed for entity %s: %s
“papsrv” could not register its name on the network. This is
because the name in the Chooser specified by “name=” in
“atalk.conf” is already being used by another printer or
spooler on the network.
chdir %s: %m
“papsrv” could not change its current directory to the spool
directory. Check if the directory specified in the printcap
entry really exists and the spelling is correct.
opening dir %s: %m
“papsrv” cannot scan the “dicts” directory for PostScript
dictionaries. Check that the “$ESDIR/dicts” directory exists or the “dictdir=” parameter in “atalk.conf” points to the
appropriate directory.
%s: %m
If “%s” is an argument to a “filtercmd=” parameter specified in “atalk.conf”, then it could not be executed. Check
the syntax, it has to be a valid shell command.
execl %s: %m
“papsrv” could not execute the program “%s”. This program may be an argument to a “filter=” or “lpr=” parameters in “atalk.conf”.
open tmp file %s: %m
“papsrv” could not open the temporary spool file in the
spool directory. Check the free space (blocks and inodes)
on the disk containing the spool directory.
17 Technical support
470
17.3 Error Messages
17.3.6
“termsrv”, “mailsrv” and “admsrv” error
messages
“termsrv”, “mailsrv” and “admsrv” can issue any of the error messages listed above under 17.3.1 ““license” error
messages” and 17.3.2 ““generic” error messages”. There
are only a few other commonly encountered error messages
from “mailsrv”.
cannot find mail spool directory
Use spooldir= in “atalk.conf”.
cannot find mail send program
Use mailer= in “atalk.conf”.
cannot find vacation program
Use vacation= in “atalk.conf”.
A more detailed description of the Mail Server parameters
and their default settings are described in chapter 14.3 “Parameters of the “mailsrv” program”.
17.3.7
Printer interface errors and status
messages
Since, under EtherShare, printer interface programs are referenced by the logical (UNIX) printer name rather than
their real name (such as “papif” or “tcpif”) it is neccessary
to look up the real program name in the “if” directory as described in chapter 11 “The Print Server”. The following
section describes errors using the real program names.
17 Technical support
17.3 Error Messages
471
17.3.8 Messages shared by all printer interfaces
The following messages can be issued by any of the printer
interfaces.
Usage: %s [-n user] [-h host] [acctfile]
The interface program “%s” was called with missing or
wrong parameters.
Cannot create an unique log filename: %m
A temporary file name for saving error output until the real
error message file has been established could not be determined. System call failure.
Cannot open log file `%s': %m
The temporary file “%s” for saving error output until the
real error message file has been established could not be
created. System call failure.
Cannot initialize library libsched.
The “libsched” shared library could not be initialized.
Mostly a system call failure.
Cannot initialize library libhelios: Error %d
The “libhelios” shared library could not be initialized. Error
is given in “%d”.
Cannot register AppleTalk error handler: %m
AppleTalk error handler could not be registered. System
call failure.
17 Technical support
472
17.3 Error Messages
Cannot find product locations: %s
None of the locations (directories) of the HELIOS products
were found. “%s” is an explanatory error message.
Cannot find HELIOS EtherShare product location.
The HELIOS EtherShare product location (directory) could
not be found. Mostly an installation error.
Cannot find executable `%s'.
The executable program could not be found. Mostly an installation error.
Cannot open resource `%s': %s
The named resource “%s” could not be opened. “%s” is an
explanatory error message.
Cannot initialize library libprint: %s
The print support library could not be initialized. “%s” is an
explanatory error message.
Cannot initialize resource messages `%s': %s
The message string handling for the message block “%s”
could not be initialized. “%s” is an explanatory error message.
License initialization failed
License code init failed. Mostly a lack of system resources.
17 Technical support
17.3 Error Messages
473
License read failed
License file is seriously corrupted.
No valid license found
No valid license could be found in the license file.
Invalid license
The license found is not valid.
Printer not in printcap
The printer does not have an entry the “/etc/printcap” file.
Missing spooldir entry in printcap
The printer has an entry in the “/etc/printcap” file but lacks
the information about its spool directory.
Preference does not exist
A preference requested does not exist. This is mostly an informative message.
The following messages may appear while retrieving information from a
printer’s PPD file. They mostly occur because of bad, misformed or damaged
PPD files:
Missing REQUEST object
Missing UI object!
Missing KEY object!
17 Technical support
474
Missing group object!
Unknown attribute!
fseek failed!
fread failed!
Syntax error!
Wow...a recursive error! Error in error
Invalid PPD file name!
Cant open file
Syntax error: Missing "!
Error in the translation string
Expected *End key
Unknown object!
Illegal use of attribute GROUP_PROC
Missing Key word
Group proc expected
17.3 Error Messages
17 Technical support
17.3 Error Messages
Mismatched OpenUI, CloseUI!
Missing UI name
Missing order parameter
Missing section parameter
Missing keyword parameter
Missing Key!
Missing Object!
Out of memory!
Invalid value!
Function not executed
Key not found
Function not yet implemented
Line too long!
No more entries available!
'Key-name' not found!
475
17 Technical support
476
17.3 Error Messages
'Key-Option' not found!
'Key-OptionTrns' not found!
'Key-ValueTrns' not found!
'Group-NameTrns' not found!
'UI-NameTrns' not found!
Error while restarting lpd
A fatal error occured while restarting the line printer daemon. Mostly a UNIX system failure caused by a lack of system resources or an already running “lpd”.
No current control file
The current print job does not have an control file. This may
occur in case a printer interface program is started manually
and not by the “lpd”.
No history information found
The current print job should have a history entry in its control file but none is found. This occurs with damaged control files either created while the system was out of resources or manipulated manually.
No such printer in cap
The printer requested has no entry in “/etc/printcap”.
17 Technical support
17.3 Error Messages
477
No such value in cap
The capability requested is not listed in the printer’s capabilities.
Output from lpd: %s
The line printer daemon process issued the output “%s”
while starting or handling requests. This output normally is
an error message and indicates a serious problem of the
“lpd” system.
Allocation of %d bytes failed: %m
A memory block of “%d” bytes could not be allocated. This
indicates a lack of virtual memory.
Cannot parse filename `%s'
The filename “%s” could not be parsed into its key and path
parts. This indicates a configuration error of a preference
value.
Cannot open file `%s'
The file “%s” could not be opened. This indicates an access
problem either because the file does not exist or there are
not enough privileges to open the file.
Cannot find spool directory for printer `%s': %s
The spool directory for printer “%s” does not exist. “%s” is
an explanatory error message.
17 Technical support
478
17.3 Error Messages
Cannot open printer queue `%s': %s
No information could be gathered for printer queue “%s”.
This indicates a configuration error. “%s” is an explanatory
error message.
Cannot query status for queue `%s': %s
The status of the printer queue “%s” could not be determined. This indicates a configuration error. “%s” is an explanatory error message.
Cannot read control file for current job: %s
The control file of the current print job cannot be read. This
indicates a damaged or missing control file. “%s” is an explanatory error message.
Cannot rewrite control file `%s': %s
The modified print job’s control file could not be written.
This indicates a UNIX system call failure. “%s” is an explanatory error message.
Cannot open job history file `%s': %m
The print job’s history file could not be opened due to a
UNIX system call failure.
Cannot seek in job history file `%s': %m
The print job’s history file could not be sought due to a
UNIX system call failure.
17 Technical support
17.3 Error Messages
479
Cannot seek in job log file: %m
The print job’s message log file could not be sought due to
a UNIX system call failure.
Cannot write to job history file `%s': %m
Writing to a print job’s history file failed due to a UNIX
system call failure.
Cannot write to job log file: %m
Writing to a print job’s message log file failed due to a
UNIX system call failure.
Cannot add job history to control file: %s
The job history file entry could not be appended to a job’s
control file. “%s” is an explanatory error message.
Cannot find resource `%s': %s
The HELIOS resource “%s” could not be found. This indicates a corrupted program file. “%s” is an explanatory error
message.
Cannot create stream from pagecount string: %m
A file stream could not be created due to a system call failure.
Cannot fstat() `%s': %m
Information on an open file could not be retrieved due to a
UNIX system call failure.
17 Technical support
480
17.3 Error Messages
Cannot query hold queue status: %s
The status of the hold queue for the current job’s printer
queue could not be queried. “%s” is an explanatory error
message.
Cannot copy job to hold queue: %s
The current print job could not be copied to the hold queue
after job completion. “%s” is an explanatory error message.
Cannot restart hold queue: %s
The hold queue could not be restarted after a job had been
copied. “%s” is an explanatory error message.
Cannot query error queue status: %s
The status of the error queue for the current job’s printer
queue could not be queried. “%s” is an explanatory error
message.
Warning: Cannot query queue status: %s
The status of printer the queue for the current job could not
be queried. “%s” is an explanatory error message.
Cannot disable queue after fatal error: %s
The status of the printer queue for the current job could not
be changed. “%s” is an explanatory error message.
Cannot copy job to error queue: %s
The current print job could not be copied to the error queue
after job completion. “%s” is an explanatory error message.
17 Technical support
17.3 Error Messages
481
Cannot restart error queue: %s
The error queue could not be restarted after a job had been
copied. “%s” is an explanatory error message.
Error while writing accounting file
An error occured while writing to the EtherShare printer accounting file. This is mostly due to a UNIX system call failure in case no space is left on the disk.
Cannot mail to print job initiator: missing user name
A printer interface program could not send mail to a print
job’s originator because the originator is unknown.
No mailer program found
A printer interface program could not find the required program for delivering mail to a print job’s originator. This is
mostly caused by an inappropriate system installation.
Cannot read from job log file: %m
A UNIX system call error occured while reading from the
job’s message log file.
Error while opening mailer: %m
A printer interface program could not start the required program for delivering mail to a print job’s originator. This is
mostly caused by an inappropriate system installation.
17 Technical support
482
Error while writing to mailer
A UNIX system call failed while piping data to the mailer
program. This is mostly caused by an unexpected abortion
of the mailer program due to e.g. a lack of resources.
Cannot copy data to `%s': %m
A UNIX system call failure occured while copying data to
a file or location “%s”.
Error while writing to `%s': %m
A UNIX system call failure occured while writing data to
the file “%s”.
Cannot reopen file `%s': %m
A UNIX system call failed while trying to reopen the just
created file “%s”.
Cannot open file `%s': %m
A UNIX system call failed while trying to open the file
“%s”.
Cannot open pipe to `%s': %m
A UNIX system call failed while trying to open a pipe to the
program “%s”.
Error during read: %m
A UNIX system call failed while reading data from a file.
17 Technical support
17.3 Error Messages
483
Error while writing: %m
A UNIX system call failed while writing data to a file.
Cannot parse PostScript: %s
An error occured while parsing PostScript data. “%s” is an
explanatory error message.
Cannot create temporary string stream: %m
A UNIX system call failed while creating a temporary
stream.
Cannot initialize OpenImage
The OpenImage library could not be initialized. This mostly happens in case EtherShare has not started correctly.
More error output follows after this text.
Cannot set OpenImage parameter
An error occured while setting an OpenImage parameter.
More error output follows after this text.
Cannot include procset `%s': %m
The required procset “%s” could not be included into the
PostScript print jobs due to a UNIX system call failure.
Unknown or illegal option `%s'
The unknown or illegal option “%s” was supplied to a
printer interface program.
17 Technical support
484
17.3 Error Messages
Missing font `%s'
The required font “%s” could not be found and the option
“checkfonts” is switched on. Therefore printing is aborted.
Warning: cannot open font file `%s': %m
The required font “%s” could not be found and the option
“checkfonts” is switched off. Therefore printing is continued.
Cannot read directory `%s': %m
The UNIX directory “%s” could not be enumerated due to
a UNIX system call failure.
Warning: cannot find procset file `%s' %s %s
The required procset “%s” version “%s” revision “%s”
could not be found. This error is ignored due to real world
programs which mostly generate wrong procset references
which can be ignored without messing up the print job.
Missing version in procset file `%s'
The procset file “%s” does not contain a version string and
therefore is ignored.
Cannot move font to fontlist: %s
An error occured while moving font information between
internal lists. “%s” is an explanatory error message.
Your print job has been interrupted.
A print job has been canceled by user request.
17 Technical support
17.3 Error Messages
485
Printing disabled due to a fatal error. Please inspect system and printer logs.
A fatal error occured while initializing a printer interface
program. This error will be a persistent system failure and
would cause the following print jobs also to fail. Therefore
the printer queue has been stopped until the cause of the
failure has been eliminated. The queue has to be restarted
manually by using the EtherShare Admin.
Error on printing device:
A serious error occured on a printing device. More error
output follows this message.
PostScript error on printing device:
A PostScript error occured on a printing device. More error
output follows this message.
Warning: Cannot set RSS limit to %dkB: %m
The “Resident Set Size” UNIX parameter could not be
changed to “%d Kilo bytes”.
Warning: PPDCreate failed: %s
A PPD file query request could not be established. “%s” is
an explanatory error message.
Warning: PPDSend failed: %s
A PPD file query failed. “%s” is an explanatory error message.
17 Technical support
486
17.3 Error Messages
Warning: Cannot open PPD file `%s': %m
The PDD file “%s” could not be opened due to a UNIX system call failure.
Warning: Cannot open PPD file `%s': %s
The PDD file “%s” could not be opened due to error “%s”.
Cannot add execution op
An internal execution operation failed. This mostly occurs
in case the system is low on virtual memory. More error
output follows after this text.
Warning: Execution of DSC comment `%s' failed (ignored)
The execution of the DSC comment “%s” failed but can be
ignored.
Error while executing DSC comment `%s'
The execution of the DSC comment “%s” failed. The print
job does continue printing but the result may not be as expected.
Fatal error while executing DSC comment `%s'
The execution of the DSC comment “%s” failed. The print
job is aborted.
Error while reading from PostScript stream
An error occured while reading from a PostScript data
stream. Mostly an explanatory error message follows.
17 Technical support
487
17.3 Error Messages
Cannot insert registered fonts: %s
An error occured while registering font information in internal lists. “%s” is an explanatory error message.
Cannot read from file: %m
A UNIX system call failed while reading from a file stream.
Cannot create string stream: %m
A UNIX system call failed while creating a stream.
17.3.9
“balanceif” error messages:
Cannot get job history from control file: %s
The job history file reference in the control file of the current print job is required but missing or damaged.
Missing parameter `%s' in `%s'
The parameter “%s” is missing in file “%s”.
No printer queues for balancing available
The list of balanced queues is empty.
Cannot copy job to queue `%s': %s
An error occured while copying a job from the balance
queue to the balanced queue “%s”. “%s” is an explanatory
error message.
17 Technical support
488
17.3 Error Messages
Cannot restart queue `%s': %s
The balanced queue “%s” could not be restarted. “%s” is an
explanatory error message.
Cannot rename `%s' to `%s': %m
A UNIX system called failed while renaming file “%s” to
“%s”.
17.3.10 “diskif” error messages:
Command `%s' be must a named pipe or executable
The configured notify program “%s” is neither an executable program nor a named pipe.
Cannot start command `%s': %m
The notify program could not be started due to a UNIX system call failure.
Cannot stat `%s': %m
Information about the file “%s” could not be gathered due
to a UNIX system call failure.
`%s' must be a directory
The file “%s” must be a UNIX directory.
Cannot create file `%s': %m
The file “%s” could not be created due to a UNIX system
call failure.
17 Technical support
17.3 Error Messages
489
Cannot write to `%s': %m
The “diskif” program could not write data to the file “%s”
due to a UNIX system call failure.
PostScript resolving failed
An error occured while resolving the PostScript print job.
Mostly more error messages follow this text.
Read failed: %m
A read UNIX system call failed.
Cannot copy to `%s': %m
A UNIX system call failed while copying the PostScript
print job to the file “%s”.
Error while closing output: %m
A UNIX system call failed while flushing and closing the
PostScript output file.
Error while writing to `%s': %m
A UNIX system call failed while piping PostScript data to
an executable program or named pipe “%s”.
Cannot convert `%s' to UNIX path
The configured directory for placing resolved PostScript
print jobs is in an unknown notation and cannot be converted to a UNIX filename.
17 Technical support
490
17.3 Error Messages
Cannot lock `%s'
The file “%s” could not be locked for exclusive access.
Cannot create output discipline for requested compression `%s'
The requested compression method could not be created.
Attention: Disk full. Waiting for disk free space becoming available...
The disk space went low while creating the PostScript output file. In this case the “diskif” program stops and waits
until more disk space is available.
Free disk space available. Continuing writing to output file
The “diskif” returned to normal operation after waiting for
disk space to become available.
17.3.11 “papif” error messages:
The following error messages are issued by the “papif”
printer interface program.
NBPExtract failed: %s
Extraction of the AppleTalk address obtained from an NBP
lookup failed. “%s” is an explanatory error message.
PPAPOpen failed: %s
Initiating open of a PAP connection failed. “%s” is an
explanatory error message. It can also appear if AppleTalk
sockets are exhausted.
17 Technical support
17.3 Error Messages
491
PPAPOpen completion failed: %s
An AppleTalk error occured while trying to open the PAP
connection. “%s” is an explanatory error message.
Cannot find printer `%s'
The PAP printer “%s” could not be found on the network.
Mostly this indicates that the printer is switched off.
ATPLoad failed: %s
An error occured while loading an AppleTalk protocol
module. “%s” is an explanatory error message.
Cannot initiate PPAPRead: %s
An error occurred during “establish read data” from a PAP
connected printer. “%s” is an explanatory error message.
Cannot initiate PPAPWrite: %s
An error occurred during “establish write data” to a PAP
connected printer. “%s” is an explanatory error message.
PPAPRead failed: %s
An error occured while reading data from a PAP connected
printer was in progress. “%s” is an explanatory error message.
PPAPWrite failed: %s
An error occured while writing data to a PAP connected
printer was in progress. “%s” is an explanatory error message.
17 Technical support
492
17.3 Error Messages
PPAPNetworkInfo failed: %s
An error occured while retrieving network address of a PAP
connected printer. “%s” is an explanatory error message.
PPAPStatus failed: %s
An error occured while gathering status information from a
PAP connected printer. “%s” is an explanatory error message.
Cannot open file from string: %m
A UNIX system call failed while creating a file stream from
a string buffer.
17.3.12 “psof” error messages:
The following error message is issued by the “psof” printer
output filter.
Cannot open banner file `%s': %m
The bannerfile “%s” cannot be opened for reading. This indicates the failure of a UNIX system call.
17.3.13 “psif” error messages:
The following error messages are issued by the “psif” printer interface program.
Cannot set non-blocking mode to serial line: %m
A UNIX system call failed while setting the serial line into
a non-blocking mode.
17 Technical support
17.3 Error Messages
493
Cannot get attention of printer
The printer cannot be accessed.
Writing to printer failed: %m
A UNIX system call failed while writing data to a serially
connected printer.
Read from printer failed: %m
A UNIX system call failed while reading data from a serially connected printer.
17.3.14 “psresolve” error messages:
Usage: %s [-o options] [PrinterName]
A illegal or wrong option was given or an argument is missing while running the “psresolve” program from the command line.
Cannot write to output file: %m
A UNIX system call failed while writing the resolved PostScript data to disk. This indicates mostly that there is not
enough disk space available.
17 Technical support
494
17.3 Error Messages
17.3.15 “shmif” error messages:
Cannot find shared memory printer `%s'
Cannot connect to the printer with key “%s”.
Error while opening shared memory printer `%s': %m
An error occured while opening the “Shared Memory” interface.
Warning: cannot get maximum write size (using default size %d bytes): %m
A UNIX system call failed while retrieving information
about the maximum size for a write operation.
Warning: cannot send EOF to shared memory printer: %m
A UNIX system call failed while signaling EOF to the
“Shared Memory” printer.
Warning: cannot interrupt shared memory printer: %m
A UNIX system call failed while signaling an interrupt to
the “Shared Memory” printer.
Cannot request I/O buffer from shared memory: %m
A UNIX system call failed while accessing the “Shared
Memory” buffer space.
Cannot release I/O buffer to shared memory: %m
A UNIX system call failed while accessing the “Shared
Memory” buffer space.
17 Technical support
17.3 Error Messages
495
Cannot read from shared memory: %m
A UNIX system call failed while reading data from the
“Shared Memory” printer.
Cannot receive from shared memory: %m
A UNIX system call failed while reading status messages
from the “Shared Memory” printer.
17.3.16 “tcpif” error messages:
The following error messages are issued by the “tcpif”
printer interface program.
Cannot find protocol `%s'
The TCP/IP protocol is missing in the UNIX system databases. Please check your UNIX network configuration.
Cannot find host `%s’
The host with name “%s” is missing in the UNIX
“/etc/hosts” database. Please check your UNIX network
configuration.
Cannot find service `%s' for protocol `%s'
The service “%s” specified in the UNIX “/etc/services” database is missing, or the service is not supported in conjunction with protocol “%s”. Please check your UNIX network
configuration.
Cannot open socket: %m
Cannot create a socket for TCP/IP network usage. This indicates the failure of a UNIX system call.
17 Technical support
496
17.3 Error Messages
Cannot open reserved port: %m
Cannot open a reserved network port to connect to a “Remote LPR”.
Connect to printer `%s' failed: %s
Cannot connect to the TCP/IP internetworked printer. This
indicates the failure of a UNIX system call.
Cannot shutdown tcp connection: %m
A UNIX system call failed during shutdown of the TCP/IP
network connection to the printer.
Writing to remote failed: %m
The connection to the “Remote LPR” “%s” is broken. This
might be caused by a crash of host “%s”.
Connect to remote lpd on `%s' failed: %s
Connecting to a remote “lpd” on host “%s” failed. “%s” is
an explanatory error message.
Read from remote failed: %m
A UNIX system call failed while reading data from a
TCP/IP connected printer.
Cannot set non-blocking I/O on tcp connection: %m
A UNIX system call failed while setting the TCPI/IP connection into non-blocking mode.
17 Technical support
17.3 Error Messages
497
Cannot create name for temporary file
A temporary file used for storing resolved PostScript data
could not be created.
Cannot write to file: %m
A UNIX system call failed while writing data to a temporary file.
Error while copying file: %m
A UNIX system call failed while copying PostScript data
from a temporary stream into the output stream.
Error while writing to file: %m
A UNIX system call failed while writing PostScript data
into the output stream.
Lost connection to printer `%s' on `%s': %m
Lost TCP/IP connection while talking to printer “%s” on
host “%s”.
Lost file: %m
A recently created file cannot be accessed anymore.
No space on remote; waiting for queue to drain
The “lpd” on the remote system signals that its queue has
no disk space left to store the print job.
17 Technical support
498
17.3 Error Messages
Cannot send to remote; queue full
The “Remote LPR” printer “%s” will not accept a print job
any longer because the remote queues are overfilled.
File `%s' changed size
The transfer of file “%s” to a “Remote LPR” failed because
the local and transferred size of the file differ.
A 1: Sample configurations
A-1
Appendix
A 1: Sample configurations
atalk.conf:
main configuration file
“atalk.conf” in “$ESDIR/conf” is the main configuration file
for the EtherShare programs. The following example (figure
A-1) shows a sample configuration for the AppleTalk protocol stack (“atalkd”), the File Server (“afpsrv”), the Print
Server with three printers (three “papsrv” entries, “lw” and
“ps”), the Terminal Server (“termsrv”), the Mail Server
(“mailsrv”), and the Administration Server (“admsrv”).
The AppleTalk protocol stack is connected to the AppleTalk network via an Ethernet interface (interface=“le0...”).
The network number 10 will be assigned as a Phase II network to zone “EtherZone”. The UNIX host’s node number
will be larger or equal to 140.
The File Server has been assigned the name “isis”. Guest
access is enabled (guestid=...). As a security feature, it is
not possible to save passwords on the local Macintosh hard
disk (nosavepasswd) and the minimum password length is
7 characters (minpwlen=...).
The Print Server will show the names of three printers in the
Macintosh’s Chooser window (“SilentSpooler”,
“TCPSpooler”, and “SerialSpooler”, specified by
name=...). Print jobs can be passed to the logical printers
“lw”, “ps” and “Laser2” (specified by printer=...). “lw” is
defined as the AppleTalk Printer “Silentwriter” in zone
“LocalZone” (entity=...). “ps” is defined as the TCP/IP
stream printer with service port number 4000 on internet
A 1: Sample configurations
A-2
host 192.9.200.1. “Laser2” is defined as the printer connected to local host port “ttyb”, which designates a serial
(RS-232) interface in this example.
The Terminal Server will use a VT100 emulation.
The Mail Server will notify recipients immediately if mail
is received (biff), check every 30 seconds for incoming
mail (mailinterval=...) if “biff” is otherwise occupied, and
send mail with the UNIX “sendmail” program (mailer=...).
The Administration Server has been assigned the name
“AdminServer” (name=...), The maximum number of
workstations that can use the Administration Server at the
same time is 8 (sessions=...).
# $ESDIR/conf/atalk.conf
#
atalkd: if=“le0:10-10:140:EtherZone”
if=“le1:20-20:140:OtherZone”
afpsrv: name=“isis”, guestid=macuser,
nosavepasswd, minpwlen=7
papsrv: name=“SilentSpooler”, printer=“lw”
lw: entity=“Silentwriter:LaserWriter@LocalZone”
papsrv: name=“TCPSpooler”, printer=“ps”
ps:
host=192.9.200.1, service=4000
papsrv: name=“SerialSpooler”, printer=“Laser2”
termsrv: term=vt100
mailsrv: biff, mailinterval=30,
mailer=/usr/lib/sendmail
admsrv: name=“AdminServer”, sessions=8
Fig. A-1: Example of “$ESDIR/conf/atalk.conf”
/etc/printcap:
UNIX printer
configuration
file
The example for “/etc/printcap” (see figure A-2) contains
the required entry for the three printers “lw”, “ps” and
“Laser2”. The “lw” entry directs data to an AppleTalk
printer via the interface program “papif”, here: “lw”
A 1: Sample configurations
A-3
(/usr/local/es/if/lw). The “ps” entry directs data to a TCP/IP
printer via the interface program “tcpif”, here: “ps”
(“/usr/local/es/if/ps”). The “Laser2” entry directs data to a
serially connected PostScript printer via the interface program “psif”, here: “Laser2” (“/usr/local/es/if/Laser2”).
# /etc/printcap
#
lw:\
:lp=/usr/local/es/lprdevdir/lw:\
:if=/usr/local/es/if/lw:\
:of=/usr/local/es/psof:\
:sh:mx#0:du#0:sf:\
:sd=/usr/spool/lw:\
:af=/usr/local/es/printer.acct:\
:lf=/usr/spool/lw/lw-log:
ps:\
:lp=/usr/local/es/lprdevdir/ps:\
:if=/usr/local/es/if/ps:\
:of=/usr/local/es/psof:\
:sh:mx#0:du#0:sf:\
:sd=/usr/spool/ps:\
:af=/usr/local/es/printer.acct:\
:lf=/usr/spool/ps/ps-log:
Laser2:\
:lp=/dev/ttyb:\
:br#9600:rw:fc#0000374:\
:fs#0000003:xc#0:xs#0040040
:of=/usr/local/es/psof:\
:if=/usr/local/es/if/Laser2:\
:sh:mx#0:du#0:sf:\
:sd=/usr/spool/Laser2:\
:af=/usr/local/es/printer.acct:\
:lf=/usr/spool/Laser2/Laser2-log:
Fig. A-2: Example of “/etc/printcap”
afppasswd:
AFP user list
The file “$ESDIR/conf/afppasswd” contains an entry for
every Macintosh user who is allowed access to the EtherShare File Server. It is optionally created by calling the
“$ESDIR/etc/mkafppasswd” program, in order to create
the “AFP user list” and thus provide additional AFP security. Three users and the administrator (“root”) are shown in
A 1: Sample configurations
A-4
this example (see figure A-3). The entry after the user’s
name is the encrypted password of the user. If the AFP user
list exists, the password is inserted automatically by the File
Server (by calling the “afppasswd” program) whenever the
Change Password... function is used in the Chooser, and
should not be inserted manually.
# $ESDIR/conf/afppasswd
#
root:8c9373c57a229c7a
David:723bd87a5c623214
Tim:2095abc56eff899a
Doris:6abc295d9ace901c
Fig. A-3: Example of “$ESDIR/conf/afppasswd”
You can delete this file if you do not want the additional security it provides (see mkafppasswd in chapter 9.9 “File
Server utility programs” for details).
The corresponding UNIX password file may look like the
following (note that, in this example, passwords have not
yet been allocated for users David, Tim and Doris):
root:HCg9Cb2AhPkqE:0:0:System Admin:/:/bin/csh
David::152:16:David Smith:/usr/home/David:/bin/sh
Tim::154:16:Tim Arty:/usr/home/Tim:/bin/sh
Doris::201:18:Doris Lovely::/bin/date
Fig. A-4: Example of “/etc/passwd”
In this example, user “David” has the user number 152. His
primary group is group number 16, his full name is “David
Smith” and his home directory is “/usr/home/David”. If he
logs on to UNIX directly, he will get the UNIX Bourne
A 1: Sample configurations
A-5
shell. User “Tim” has the user number 154 and his primary
group is also group number 16. His full name is “Tim Arty”
and his home directory is “/usr/home/Tim”. Like David, he
will get the UNIX Bourne shell. User “Doris”, however,
will not get any home directory and has a disabled shell.
Her full name is “Doris Lovely”, she has the user number
201 and belongs to the primary group 18.
/etc/group:
UNIX group
list
The file “/etc/group” contains an entry for every group on
the UNIX host, both UNIX groups, and EtherShare groups.
Two groups are configured in this example (see figure A-5).
The group “Projects” has the group number 21 and its members are users David and Tim. The asterisk (“*”) in the password field specifies that it is not possible to switch to this
group dynamically after logging in. The group “MacUsers”
has the group number 18 and its sole member is Doris.
Projects:*:21:David,Tim
MacUsers::18:Doris
Fig. A-5: Example of “/etc/group”
afpvolumes
The file “$ESDIR/conf/afpvolumes” contains an entry for
each public File Server volume. In this example (figure A-6),
four public volumes have been configured: “EtherShare Applications”, “EtherShare”, “Projects” and “MO Disk”. Each
user’s optional private volume list, which is disabled by default, (“.afpvolumes” in the user’s home directory) has the
same format.
“EtherShare Applications”, “EtherShare” and “Projects”
are accessible to members of the “helios” group, “EtherShare Applications” is also accessible to the “developers”
A 1: Sample configurations
A-6
group. “MO Disk” is accessible to the “developers” group
only.
For space reasons, the first line starting “/usr/...” and ending
“...developers” is shown on two lines in figure A-6; in reality, it is a single line without a hyphen in “read-only”.
# $ESDIR/conf/afpvolumes
#
/usr/macapps:EtherShare Applications::fixed:readonly:helios,developers
/usr/ethershare:EtherShare::fixed:readwrite:helios
/usr/Projects:Projects::fixed:readwrite:helios
/mo:MO Disk::changeable:readwrite:developers
Fig. A-6: Example of “$ESDIR/conf/afpvolumes”
A 1: Sample configurations
A-7
Font Directory
Figure A-7 shows an example of “$ESDIR/psfonts/
FontDirectory”.
Helvetica
ZapfDingbats
Bookman-Light
Bookman-LightItalic
BrushScript
Centennial-Bold
Centennial-BoldItalic
Centennial-Italic
Centennial-Light
Centennial-LightItalic
Centennial-Roman
Chicago
Futura-Condensed
Futura-CondensedBold
Futura-CondensedLight
Futura-CondensedLightOblique
Futura-CondensedOblique
Futura-CondExtraBoldObl
Garamond-Bold
Garamond-BoldItalic
Garamond-Light
Garamond-LightItalic
NewCenturySchlbk-Bold
NewCenturySchlbk-BoldItalic
NewCenturySchlbk-Italic
NewCenturySchlbk-Roman
Fig. A-7: Example of “$ESDIR/psfonts/FontDirectory”
A 1: Sample configurations
A-8
A 2: Files in the EtherShare directory
A-9
Appendix
A 2: Files in the EtherShare
directory
The following directory listing shows all files created in the
“$ESDIR” file system after installation.
The “$ESDIR” directory contains the “install” program
(which uses “machid”), the AppleTalk protocol stack
(“atalkd”), all server programs (“afpsrv”, “afppasswd”,
“papsrv”, “psof”, “papif”, “psif”, “diskif”, “balanceif”,
“shmif”, “holdif”, “tcpif”, “termsrv”, “timesrv”, “lpd”,
“mailsrv”, “admsrv”, “desksrv”, etc.), the “pstext” program
with its configuration file, printer and server accounting
files, a README file, and some user utility and test
programs (“atechoping”, “rebuild”, “dt”, “start-atalk”,
“stop-atalk”, “poll”, “vpoll”, “swho” (which uses “stmp”),
“netconf”, and “zones”).
The “$ESDIR/etc” directory contains a script to mount/unmount removable volumes (“mount-afp”), two scripts used
by the EtherShare Admin to update Yellow Pages information (“yp-update”) and to restart the “papsrv” (“restartpap”), some internal utility programs (“forall” , “mkafppasswd”), the “uninstall” script and sub-programs, templates for the “install” program, and sample files.
The “conf” directory contains the following EtherShare
configuration files: the public volumes list (“afpvolumes”),
the optional AFP user list (“afppasswd”), the main config-
A 2: Files in the EtherShare directory
A-10
uration file (“atalk.conf”), the mail program address book
(“addressbook”), the licensing file “ethershare.license”, the
extension mappings file “suffixes”, the EtherShare servers
list “servers”, and the IP-access list “afpipaccess”.
The “dicts” directory contains corrected Apple dictionaries,
the HELIOS dictionaries, and the dictionary for the “Linotype color separation” process.
The “kernel” directory contains UNIX drivers (AppleTalk
etc.) for various machine and interface types.
The “macapps” directory (the Macintosh volume
“EtherShare Applications”) contains the Macintosh applications “EtherShare Admin”, “Helios Terminal”,
“Helios Mail”, and the “EtherShare Client Installer”
as well as the “Admin Plug-Ins” directory (containing the
Japanese localization plug-in for the EtherShare Admin),
and the “Time Server”.
Macintosh files are stored on the host in two parts – the data
file and the resource file. The latter is stored in the resource
directory. In the case of Macintosh applications (as distinct
from documents), the program code is stored in the resource file only, and the data file will have zero length.
The “macapps/Helios Terminal” directory (“Helios Terminal” folder on the “EtherShare Applications” volume) contains “Helios Terminal”, tools, drivers and utilities needed
by the toolbox, and a README file.
The “macapps/Helios Mail” directory (“Helios Mail” folder on the “EtherShare Applications” volume) contains the
Macintosh program “Helios Mail”, the mail notification
program “Helios Mail Init”, and a README file.
A 2: Files in the EtherShare directory
A-11
The “macapps/Unsupported” directory (“Unsupported”
folder on the “EtherShare Applications” volume) contains
the “HELIOS LanTest” and an “About LanTest” file.
The “macapps/Time Server” directory (“Time Server”
folder on the “EtherShare Applications” volume) contains
the “Time Server” and a README file.
The “psfonts” directory (initially empty) is used to store the
Print Server’s download PostScript fonts.
The actual listings depend on the machine type and may
vary slightly. For space reasons, the columns “owner” and
“group” were omitted in this manual. However, if you call
up a directory listing (ls -lR) in your EtherShare directory
those two columns are part of the list, of course.
Directory
listings
$ pwd
/usr/local/es
$ ls -lR
total 8814
-rw-rw-r-- 1
-rw-r--r-- 1
-rw-r--r-- 1
-rwxr-xr-x 1
-rwsr-xr-x 1
-rwxr-xr-x 1
-rwxr-xr-x 1
-rwxr-xr-x 1
drwxrwsr-x 2
-rwxr-xr-x 1
drwxrwsr-x 2
-rwxr-xr-x 1
-rwxr-xr-x 1
drwxrwsr-x 2
-rwxr-xr-x 1
-rwxr-xr-x 1
drwxrwsr-x 2
-rwxr-xr-x 1
3938
5610
4297
207358
34900
189305
17268
308522
1024
176949
1024
333074
558484
1024
308054
3685
1024
92936
Mar
Mar
Sep
Mar
Mar
Mar
Mar
Mar
Sep
Mar
Sep
Mar
Mar
Sep
Mar
Mar
Sep
Mar
12
12
14
12
12
12
12
12
14
12
14
12
12
14
12
12
14
12
1999
1999
10:57
1999
1999
1999
1999
1999
10:56
1999
10:46
1999
1999
10:47
1999
1999
10:46
1999
Manifest
README
Versions
admsrv
afppasswd
afpsrv
atechoping
balanceif
conf
desksrv
dicts
diskif
dt
etc
holdif
install
kernel
lcheck
A 2: Files in the EtherShare directory
A-12
drwxrwsr-x
-rw-rw-rw-rws--s--x
-rws--s--x
-rws--s--x
-rws--s--x
drwxrwsr-x
-rws--s--x
drwxrwsr-x
-rwxr-xr-x
-rwxr-xr-x
-rwxr-xr-x
-rwxr-xr-x
-rwxr-xr-x
-rw-rw-r-drwxrwsr-x
-rwxr-xr-x
-rwxr-xr-x
-rwxr-xr-x
-rwxr-xr-x
-rwxr-xr-x
-rw-rw-rw-rwxr-xr-x
-rwxr-xr-x
-rw-rw-rw-rwxr-xr-x
-rwxr-xr-x
-rwxr-xr-x
-rwxr-xr-x
-rwxr-xr-x
-rwxr-xr-x
-rwxr-xr-x
2
1
1
1
1
1
2
1
8
1
1
1
1
1
1
2
1
1
1
1
1
1
1
1
1
1
1
1
1
1
1
1
1024
700416
42832
60732
34516
26080
1024
26268
1024
58948
80562
333366
122506
17256
0
1024
334058
17268
323974
50114
45914
0
459992
5267
320
1550
17368
341990
45605
35913
168660
17252
Sep
Dec
Mar
Mar
Mar
Mar
Sep
Mar
Sep
Mar
Mar
Mar
Mar
Mar
Sep
Sep
Mar
Mar
Mar
Mar
Mar
Sep
Mar
Sep
Sep
Sep
Mar
Mar
Mar
Mar
Mar
Mar
14
16
12
12
12
12
14
12
14
12
12
12
12
12
14
14
12
12
12
12
12
14
03
14
14
14
12
12
12
12
12
12
10:46
15:00
1999
1999
1999
1999
10:46
1999
10:57
1999
1999
1999
1999
1999
10:47
10:46
1999
1999
1999
1999
1999
10:47
18:41
10:47
11:01
10:47
1999
1999
1999
1999
1999
1999
lib
locktable
lpc
lpd
lpq
lpr
lprdevdir
lprm
macapps
machid
mailsrv
papif
papsrv
poll
printer.acct
psfonts
psif
psof
psresolve
pstext
rebuild
server.acct
shmif
start-atalk
stmp
stop-atalk
swho
tcpif
termsrv
timesrv
vpoll
zones
./conf:
total 12
-rw-rw-rw-rw-r--r--rw-r--r--rw-r--r--rw-r--r--rw-r--r--rw-r--r--
1
1
1
1
1
1
1
0
381
103
122
101
63
21
Sep
Sep
Sep
Sep
Sep
Sep
Sep
14
14
14
14
14
14
14
10:47
10:47
10:47
10:47
10:56
10:47
10:47
addressbook
afpipaccess
afpvolumes
atalk.conf
ethershare.license
servers
suffixes
./dicts:
total 132
-rw-r--r--rw-r--r--
1
1
30871 Mar
35206 Mar
12 1999
12 1999
_AppleDict_md__68_0
_AppleDict_md__70_0
A 2: Files in the EtherShare directory
A-13
./etc:
total 738
-rw-r--r--rwxr-xr-x
-rwxr-xr-x
-rwxr-xr-x
-rwxr-xr-x
-rwxr-xr-x
-rwxr-xr-x
-rwxr-xr-x
-rwxr-xr-x
-rwxr-xr-x
-rwxr-xr-x
-rwxr-xr-x
-rwxr-xr-x
-rwxr-xr-x
-rwxr-xr-x
-rwxr-xr-x
-rwxr-xr-x
-rwxr-xr-x
-rwxr-xr-x
-rwxr-xr-x
-rwxr-xr-x
-rwxr-xr-x
-rwxr-xr-x
-rwxr-xr-x
-rwxr-xr-x
-rwxr-xr-x
-rwxr-xr-x
-rwxr-xr-x
-rw-r--r--rwxr-xr-x
-rw-r--r--
1
1
1
1
1
1
1
1
1
1
1
1
1
1
1
1
1
1
1
1
1
1
1
1
1
1
1
1
1
1
1
2716
8415
26160
25876
160
837
363
17240
1354
930
17048
1540
711
543
16728
8575
184
280
324
343
17472
753
16680
124932
1633
1464
3318
67356
1581
187
10388
Mar
Sep
Mar
Mar
Sep
Sep
Sep
Mar
Sep
Sep
Mar
Sep
Sep
Sep
Mar
Sep
Sep
Sep
Sep
Sep
Mar
Sep
Mar
Mar
Sep
Sep
Sep
Mar
Mar
Sep
Sep
12
14
12
12
14
14
14
12
14
14
12
14
14
14
12
14
14
14
14
14
12
14
12
12
14
14
14
12
12
14
14
1999
10:47
1999
1999
10:47
10:47
10:47
1999
10:47
10:47
1999
10:47
10:47
10:47
1999
10:47
10:47
10:47
10:47
10:47
1999
10:47
1999
1999
10:47
10:47
10:47
1999
1999
10:47
10:47
ESmodes
activate
afpmsg
afpshutdown
dirname
es.daily
forall
ifstat
kconfig
logrotate
lsif
mkafppasswd
mkipaccess
mount-afp
nl
prginstall
procstat
rc.atalk.rhappc
restart-pap
rmtrash
setmode
stop-afp
suser
tic
uninstall
update-versions
usrinstall
uwhat
vt200.ti
yp-update
ypMakefile
1
1
1
1
1
1
1
1
1375411
89556
41816
1070412
169728
71824
193644
124520
Mar
Mar
Mar
Mar
Mar
Mar
Mar
Mar
12
12
12
12
12
12
12
12
1999
1999
1999
1999
1999
1999
1999
1999
libOI_s.a
libddpi_s.a
libdl_s.a
libhelios_s.a
libimgfmt_s.a
libsched_s.a
libsfdisc_s.a
libsfio_s.a
./kernel:
./lib:
total 5426
-r-xr-xr-x
-r-xr-xr-x
-r-xr-xr-x
-r-xr-xr-x
-r-xr-xr-x
-r-xr-xr-x
-r-xr-xr-x
-r-xr-xr-x
A 2: Files in the EtherShare directory
A-14
-r-xr-xr-x
1
149432 Mar
12 1999
libtoolkit_s.a
1024
322894
2116
1024
1024
1024
1024
14
10
16
14
14
14
14
AdminPlug-Ins
EtherShare Admin
EtherShare Client Ins
Helios Mail/
Helios Terminal/
Time Server/
Unsupported/
./lprdevdir:
./macapps:
total 656
drwxrwsr-x
-rw-rw-r--rw-rw-r-drwxrwsr-x
drwxrwsr-x
drwxrwsr-x
drwxrwsr-x
4
1
1
3
3
3
3
Sep
Mar
Jun
Sep
Sep
Sep
Sep
./macapps/Admin Plug-Ins:
total 2
drwxrwsr-x 3
1024 Sep
10:46
1999
1997
10:47
10:46
10:46
10:46
14 10:46 International/
./macapps/Admin Plug-Ins/International:
total 0
-rw-rw-r-- 1
0 Mar
3 1999 Japanese*
./macapps/Helios Mail:
total 266
-rw-rw-r-- 1
130178 Mar
-rw-rw-r-- 1
0 Mar
-rw-rw-r-- 1
840 Feb
8 1999
3 1999
24 1997
Helios Mail
Helios Mail Init
READ ME
./macapps/Helios Terminal:
total 114
-rw-rw-r-- 1
0 Mar 10 1999
-rw-rw-r-- 1
51261 Mar
3 1999
-rw-rw-r-- 1
489 Sep
9 1998
-rw-rw-r-- 1
0 Oct 20 1998
-rw-rw-r-- 1
0 Feb 24 1997
AppleTalk ADSP Tool
Helios Terminal
READ ME
VT320 Tool
VT320Font
./macapps/Time Server:
total 2
-rw-rw-r-- 1
518 Feb
-rw-rw-r-- 1
0 Mar
27 1997
3 1999
READ ME
Time Server
./macapps/Unsupported:
total 208
-rw-rw-r-- 1
7588 Sep
-rw-rw-r-- 1
92582 Sep
9 1998
9 1998
./psfonts:
About LanTest
Helios LanTest
A 2: Files in the EtherShare directory
A-15
./terminfo:
total 8
drwxrwsr-x
drwxrwsr-x
drwxrwsr-x
drwxrwsr-x
2
2
2
2
1024
1024
1024
1024
Sep
Sep
Sep
Sep
14
14
14
14
10:46
10:46
10:46
10:46
d
s
v
x
./terminfo/d:
total 4
-rw-r--r-- 1
1505 Mar
12 1999
dtterm
./terminfo/s:
total 6
-rw-r--r-- 1
-rw-r--r-- 1
1019 Mar
1049 Mar
12 1999
12 1999
sun
sun-cmd
./terminfo/v:
total 16
-rw-r--r-- 1
-rw-r--r-- 1
-rw-r--r-- 1
-rw-r--r-- 1
-rw-r--r-- 1
1143
1137
959
959
1286
12
12
12
12
12
1999
1999
1999
1999
1999
vt100
vt102
vt200
vt220
vt300
./terminfo/x:
total 4
-rw-r--r-- 1
1378 Mar
12 1999
xterm
Mar
Mar
Mar
Mar
Mar
A 2: Files in the EtherShare directory
A-16
A 3: Configuring EtherShare as an AppleTalk network router
A-17
Appendix
A 3: Configuring EtherShare as an
AppleTalk network router
A 3: Configuring EtherShare as an AppleTalk network router
A-18
A 3.1 General remarks
A 3.1
General remarks
The HELIOS “netconf” utility offers a very convenient user
interface for network configuration.
Note that HELIOS “netconf” only is a configuration tool.
Messages, like information about whether “Automatic configuration” is possible or not, are issued by the respective
server programs, not by “netconf” itself.
“netconf” automatically recognizes and displays the network interfaces that are supported by EtherShare, i.e. Ethernet, FDDI, and Token Ring. Even though it is possible to
enter new interfaces not yet known to EtherShare, you
should keep in mind that these new interfaces may, under
certain conditions, cause a system crash.
You do not need stop EtherShare before configuring your
interfaces and zones with “netconf”. However, you have to
stop and start EtherShare after the work is done in order to
let the new configuration take effect.
You can use the HELIOS “vpoll” program to check your
network for existing zone information. See The HELIOS
vpoll program in chapter 4.5 “Verifying the UNIX installation” for a more detailed description of this program.
A 3: Configuring EtherShare as an AppleTalk network router
A 3.2 Example network setups
A 3.2
A-19
Example network setups
The following figures show example network setups with
one NIC (Network Interface Card) up to four NICs:
Single Network
Figure A-8 shows a network setup comprising a server
(with one NIC), two clients, and a network printer. This
configuration is simple because all nodes are attached directly to the bus.
Fig. A-8:
Network with 1 NIC
A 3: Configuring EtherShare as an AppleTalk network router
A-20
Internet with
router and two
NICs
A 3.2 Example network setups
In the second example configuration the setup again comprises one server, but now with two NICs. The server has to
link two networks, which enclose two clients each. Additionally, a network printer is connected to one of the “single” networks (see figure A-9). A set of single networks,
linked together by routers and forming a larger network, is
called internet.
Fig. A-9:
An internet with 2 NICs and one router
A 3: Configuring EtherShare as an AppleTalk network router
A 3.2 Example network setups
Internet with
two routers
and 2+2 NICs
A-21
In the last example configuration (figure A-10) three single
network segments form an internet. Two servers route the
networks via four (2+2) NICs. The nodes (see Node in chapter A 11: “Glossary”) in each segment are accessible from
any other network in this particular internet.
Fig. A-10: An internet with 2+2 NICs and two routers
A 3: Configuring EtherShare as an AppleTalk network router
A-22
A 3.3 Network automatic configuration option
A 3.3
Network automatic configuration
option
If your EtherShare host only has a single network interface,
or you do not want to configure EtherShare as a “seed device” (see below), EtherShare’s AppleTalk protocol stack
can be configured to “interrogate” network numbers and
zone information automatically each time it loads, and thus
avoid the necessity of manually specifying these parameters during EtherShare configuration. This situation is automatically recognized by the install script. If automatic
configuration is possible, you will get the following message when you select the menu item
Configure AppleTalk network numbers :
This system has only one network interface installed, thus there is no need to configure any
network numbers
If only one interface is existing, the installation program
does not allow manual configuration with “netconf”.
Note:
The “Automatic configuration” option requires other
AppleTalk routers to be connected up and online during EtherShare startup. If it does not detect any available external routers it starts in single-network mode.
For all EtherShare-supported UNIX operating systems (except for Linux) , the “Automatic configuration” option is
also allowed if you have more than one network interface.
A 3: Configuring EtherShare as an AppleTalk network router
A 3.3 Network automatic configuration option
A-23
In such cases, you can allow automatic configuration by
omitting the Configure AppleTalk network numbers
step during installation.
Automatic configuration is enabled by a simplified interface specification in the EtherShare main configuration file
“atalk.conf” as follows:
atalkd: if=<interface name>
Example for Solaris 2.x with a single Ethernet interface:
atalkd: if=le0
Example for Solaris 2.x with two Ethernet interfaces:
atalkd: if=le0, if=le1
The entries are inserted automatically by the “install” script
for all recognized hardware interfaces.
To reinstate automatic configuration after you have already
configured the interfaces with Configure AppleTalk
network numbers during EtherShare installation, you need
to edit “atalk.conf” manually and insert appropriate entries
as shown above – or start “netconf” as described in chapter
A 3.5 “Manual network configuration”.
A 3: Configuring EtherShare as an AppleTalk network router
A-24
A 3.4 Seed routers, non-seed routers
A 3.4
Seed routers, non-seed routers
If, in addition to EtherShare, your network includes other,
external routers, or if it includes certain other types of
AppleTalk entities such as a “Novell Netware for Macintosh” file server, then it is necessary to specify network
numbers and zone information for each physical segment in
your network. Routers are configured in accordance with
the manufacturer’s instructions. The EtherShare configuration is described below.
When you consider an example network with two standalone routers, you can either “hard-configure” both routers
with identical zone information, or configure one of them to
“interrogate” the zone information broadcast by the other
one. In the first case, both routers are so-called “seed” routers. In the latter case, one of the routers is a “seed router”,
since it is responsible for broadcasting the zone information, and the other router is a passive, “non-seed” device.
The latter case requires less work, because you only have to
hard-configure one of the routers. If you change the configuration of the seed router, the non-seed router automatically
reconfigures itself after a short delay. Of course, this will
require EtherShare to be restartet.
However, the first case is technically safer because the network is left completely without zone information if the seed
router fails or loses power. This can cause serious disruption of your entire network.
EtherShare can be configured as a “seed” device by manually configuring the network connection as described below. However, even if you have chosen to use EtherShare’s
“Automatic configuration” option instead, it is still not a
A 3: Configuring EtherShare as an AppleTalk network router
A 3.4 Seed routers, non-seed routers
A-25
true non-seed router, because it only “interrogates” network
numbers and zone information of the local network segments once, when the AppleTalk module loads, and not onthe-fly like a conventional non-seed router. Nonetheless, it
always adjusts automatically to changed network numbers
and zone names of remote network segments (on the far
side of external routers), of course.
You can use the HELIOS “vpoll” program to check your
network for existing zone information. See The HELIOS
vpoll program in chapter 4.5 “Verifying the UNIX installation” for a more detailed description of this program.
A 3: Configuring EtherShare as an AppleTalk network router
A-26
A 3.5 Manual network configuration
A 3.5
Manual network configuration
Automatic configuration is described earlier in this appendix, and also in chapter 4 “Installation”. Manual configuration is only necessary if automatic configuration is not
possible or not desired.
The Configure AppleTalk network numbers option of
the installation script edits the EtherShare configuration by
calling the routine “$ESDIR/netconf”. We strongly recommend that you configure your network connection in this
way, and not by editing the “atalk.conf” file, because
“netconf” checks the validity of your entries, and in particular the use of valid network numbers.
Note:
➢
If required, you may see paragraph atalkd in chapter
8.3 “The AppleTalk protocol stack” for technical details
of network configuration parameters in “atalk.conf”.
Start “netconf” with the Configure AppleTalk network
numbers option of the installation script. Alternatively, if
you have already finished the installation and quit the installation script, you can start “netconf” with the following
UNIX command:
cd /usr/local/es (or current EtherShare directory)
./netconf
Important:
You should not run “netconf” from a terminal connection on one of the Macintosh computers. Always run it
on the host’s console. Otherwise, you cannot stop and
restart EtherShare after you have finished (using
“stop-atalk” and “start-atalk”), because the “stop-atalk”
command would cut the connection to the server.
A 3: Configuring EtherShare as an AppleTalk network router
A 3.5 Manual network configuration
A-27
The “netconf” startup screen shows the program’s main
menu (see figure A-11).
Fig. A-11: Main menu of the “netconf” program
Using
“netconf”
The following keys are available to handle the “netconf”
program:
• TAB key: navigate within a “netconf” dialog
• CTRL -J, CTRL -K (or ARROW keys): navigate
within a list of items
• “+” and “-”: (un)mark items from a list
• ESC key: quit the current dialog
Further keys that are required in a specific dialog only, are
listed in the bottom line of the respective dialog. Alternatively, they are described in the help windows.
Online help
system
“netconf” includes a convenient online help system which
can be activated by pressing “?”. An example is shown in
figure A-12.
A 3: Configuring EtherShare as an AppleTalk network router
A-28
A 3.5 Manual network configuration
Fig. A-12: The “netconf” online help system
General
remarks
Please note that:
❍ “netconf” gets its information from the “atalk.conf” file.
❍ If you are making an upgrade installation, the “install”
program automatically preserves your previous
“atalk.conf” file so that previously entered zone, network, and printer information, etc. do not get lost.
❍ If you de-activate one interface temporarily, the config-
uration will also be saved in “atalk.conf”, and will be
available again on re-activating the interface.
❍ If you have an IBM RS/6000 host, note that two logical
interface names exist for each card. “et0” is used for
AppleTalk (and is used by EtherShare), and “en0” is
used for TCP/IP. You should see in the list an “et0” entry for the AppleTalk connection and an “tr0” entry if
your host has a “Token Ring” interface as well.
A 3: Configuring EtherShare as an AppleTalk network router
A 3.5 Manual network configuration
Configure
Adapter
A-29
The Configure Adapter option from the main menu lets
you see the list of interfaces that are available.
Figure A-13 shows a network with one single interface
only, where no configuration is necessary. If you pressed
RETURN in order to open the configuration dialog a corresponding information message would pop up.
Fig. A-13: The “No need to configure” information message
List of
interfaces /
Adding an interface entry
Figure A-14 shows a network with two interfaces. As mentioned before, “netconf” automatically checks for all recognized Ethernet interfaces in your host and shows them on
the screen. If an interface cannot be recognized it will be
missing in the list. In that case, you can press CTRL-V (on
some machines it may be necessary to press CTRL-V two
times) to open a dialog that lets you enter a new interface.
This dialog is shown in figure A-15. For instructions on
how to fill in the dialog, please read paragraph Changing an
interface entry below.
A 3: Configuring EtherShare as an AppleTalk network router
A-30
A 3.5 Manual network configuration
Remember that for a new entry, you need to know the correct name of the interface and whether it supports AppleTalk. Incompatibilities may cause system crashes.
Fig. A-14: Network with two interfaces
Fig. A-15: Creating a new interface entry
A 3: Configuring EtherShare as an AppleTalk network router
A 3.5 Manual network configuration
Changing an
interface entry
A-31
If you want to change the configuration of an existing interface, you have to switch off automatic configuration by using the “a” key, and then press RETURN.
Note that you can enter a manual configuration and then
switch between active and non-active. The manual settings
will be stored in the “atalk.conf” file when you switch on
automatic configuration, and they will be available when
you switch automatic configuration off again.
Figure A-16 shows the dialog window that lets you change
the configuration of a particular interface.
Fig. A-16: Changing the configuration of interface “le0”
In the above dialog, you have to enter a network number
range from Start – End, where Start can be equal to
End.
If you have either an external or an internal router, a valid
number for Start and End is any number between 0 and
65279. Numbers between 65280 and 65534 are only used if
you do not have a router, otherwise they are reserved. Note
A 3: Configuring EtherShare as an AppleTalk network router
A-32
A 3.5 Manual network configuration
that EtherShare provides an internal router automatically if
you have more than one network connection, as in this example.
Each range, e.g.
10-10, allows approx. 250 entities (nodes).
The correct choice of the network number range is subject
to the following restrictions:
❍ If you have no router (i.e. only one internal Ethernet
connection in your host and no other, external routers)
do always use the “Automatic configuration” option.
❍ If you want to connect your host to an external router
box on the same network segment (cable), you must use
the same network number range (Start - End) and the
same zone names in the same order as the router. Please
refer to the router’s manual to find out how to determine
its configuration. This is often done with a configuration program on a Macintosh attached to the router.
❍ If an external router broadcasts information that differ
from the configuration you have entered, you will receive a warning when EtherShare starts. The system
will always rely on the router’s information, in that
case, and will ignore your entries.
❍ If your host has more than one network connection, as
in this example, network numbers and network number
ranges must be unique and must not overlap each other
or those of other, external routers to which you do not
want to establish a connection.
A 3: Configuring EtherShare as an AppleTalk network router
A 3.5 Manual network configuration
A-33
❍ If you have two internal Ethernet interfaces and want to
route between Phase II and a (rather old) Phase I connection, the network number Start must be equal to
the network number End (e.g. 30–30). This may require
reconfiguring external Phase II routers (if you have any)
accordingly.
Note:
Phase I connections are no longer supported by
EtherShare.
Proceed to the “Zones” list in the dialog and press
RETURN to open a second dialog that lets you specify the
name of the default zone for the current interface (see figure
A-17). You can use the “New Zone” dialog again to define
additional zones for the interface later.
Fig. A-17: Entering an individual zone name
When entering names, please keep the following in mind:
❍ Zone names may have up to 31 characters.
A 3: Configuring EtherShare as an AppleTalk network router
A-34
A 3.5 Manual network configuration
❍ After entering the default zone name, you can enter ad-
ditional zone names for the same network number
range.
❍ If you want to connect your host to an external Apple-
Talk router box, you must use exactly the same zone
name(s) in the same order as the router. Please refer to
the router’s instruction manual to find out how to determine its configuration. This is often done with a configuration program on a Macintosh attached to the router.
❍ If an external router provides one or more zone names
for the local network segment, you must either specify
all of them or none of them. In the latter case, EtherShare “interrogates” the router for the names. This is,
however, less safe, as described in chapter A 3.4 “Seed
routers, non-seed routers” above.
❍ If your network has more than 12 zones, they can be
specified by editing the “atalk.conf” file manually.
❍ If you want to replace an entry, use the BACKSPACE
key first to delete the existing one.
❍ In the “New Zone” dialog, you can use the “*” key to
open a pop-up menu that shows all recently used zone
names.
A 3: Configuring EtherShare as an AppleTalk network router
A 3.5 Manual network configuration
A-35
Figure A-18 shows the completed dialog. The settings will
be saved on selecting the Ok button and then appear in the
list of interfaces as illustrated in figure A-19.
Fig. A-18: Saving the settings in the interface dialog
Fig. A-19: List of interfaces showing the new settings for “le0”
A 3: Configuring EtherShare as an AppleTalk network router
A-36
A 3.5 Manual network configuration
Figure A-20 shows the dialog for the interface “le1”. In that
dialog, we have entered two zones, and have made the second one the default zone by pressing the SPACE key.
Fig. A-20: Adding zones to an interface and changing the default
zone setting
The final example configuration is shown in figure A-21.
The configuration includes two interfaces with two zones
each. One of the zones is a shared one.
You can now press the ESC key to return to the main menu
and then select item Configure Zones to register the available zones (see figure A-22).
A 3: Configuring EtherShare as an AppleTalk network router
A 3.5 Manual network configuration
A-37
Fig. A-21: Example of a final adapter configuration
Fig. A-22: Opening the “Configure Zones” dialog
Figure A-23 shows the dialog that lets you register zones,
i.e. specify zones where EtherShare services should be listed.
A 3: Configuring EtherShare as an AppleTalk network router
A-38
Fig. A-23: Moving entries between two lists of zones
You can move a zone between the left and right column of
the dialog by using the CTRL-L, or the CTRL-H key. This
is illustrated in figures A-23 above and A-24 below.
Fig. A-24: Removing items from “Zones providing ES Services”
A 3: Configuring EtherShare as an AppleTalk network router
A 3.5 Manual network configuration
A-39
The Auto Zones button in the dialog can be used to make
sure that for each active interface at least one of its zones is
registered.
EtherShare services can only be registered in local zones,
i.e. in zones that have been set up on a network segment (cable) which is directly connected to the server.
Note:
The lists in the dialog (“Available Zones” and “Zones
providing ES Services”) would be empty if “Automatic
configuration” was activated.
Priorities in
“atalk.conf”
In “atalk.conf”, the line “atalkd” indicates the zones that are
available. The line “zones” will be checked by all starting
server processes (such as “afpsrv”, “papsrv”, ...) to find out
in which zones they have to register. In case the line
“zones” is missing in “atalk.conf”, and there is no “zone=”
entry for the server, the server processes will register in the
default zone. The default zone can be seen when using the
zones -l command on a UNIX shell. In the list of zones,
the default zone is marked by a “*”.
Reconfiguring
network
connections
If your network changes (on segments where EtherShare is
installed) , for example if you have added a new router, you
can use “netconf” again to reconfigure the network connection at a later date, without re-installing EtherShare. To do
this, stop EtherShare from the host’s console using the
“stop-atalk” command, start the “install” program, and select menu item
Configure AppleTalk network numbers .
The connections will be active as soon as you restart EtherShare with “start-atalk”.
A 3: Configuring EtherShare as an AppleTalk network router
A-40
A 3.5 Manual network configuration
If you have chosen the “Automatic configuration” option
rather than manual configuration with “netconf”, all you
need to do is stop EtherShare with “stop-atalk” and restart
it again – EtherShare’s AppleTalk protocol stack will “interrogate” the network numbers and zone information again
when it re-loads.
A 4: EtherShare utility programs
A-41
Appendix
A 4: EtherShare utility programs
The following utility programs are provided with EtherShare.
HELIOS
LanTest
HELIOS LanTest is a tool for testing and measuring the
performance of AppleShare services. It offers detailed
AppleTalk network evaluations for file and record locking
as well as for many typical file system operations. LanTest
results can be used for finding bottlenecks, for troubleshooting, or just for maintenance purposes.
Fig. A-25: HELIOS LanTest dialog window
The LanTest tool resides on the “EtherShare Applications”
volume in the folder “Unsupported”. After double-clicking
A 4: EtherShare utility programs
A-42
on the program icon the LanTest dialog window (see figure
A-25) opens.
From the File menu choose Select Test Volume... and confirm with the Select Ò<Volume name>Ó button. Before you
start examining the performance you should state the type
of your network:
From the Edit menu choose Edit Other Settings... and – in
the upcoming dialog window – select the net type you are
connected to (see figure A-26). Depending on the network
specified in this window, LanTest determines the test load,
i.e. the size of test files that are processed at a time.
Fig. A-26: Other settings dialog window
This is sensible since FDDI or Fast Ethernet (100 Mbit/s)
networks have a higher data throughput than the standard
Ethernet (10 Mbit/s). The new Gigabit Ethernet is very fast
and reaches a data throughput up to 1 Gbit/s (1000 Mbit/s).
logrotate
Log files such as printer or server log files are being modified with each new login on the respective server. To maintain a certain order, they can be allocated a particular file
name extension, e.g. by an ascending numbering. For ex-
A 4: EtherShare utility programs
A-43
ample, the printer log file which records the entries of today
may be named printer.acct, the one with yesterday’s entries printer.acct.0 and so on.
It may be reasonable to determine a cycle after which the
oldest log file is discarded, e.g. after one week. The EtherShare utility program logrotate coordinates the “rotation”
of the log files with the following parameters:
logrotate [-n numlogs] [-m mode] [-o owner]
[-g group] logfile
The next line shows a practical example:
logrotate -n 6 -m 664 -o John -g helios printer.acct
Preferences
6
number of accumulated log files before
logrotate starts the “rotation”
664
octal expression for the file access rights,
i.e. “owner” and “group” have the right to
read and write, whereas “others” are just
allowed to read the file
John
owner of the file
helios
group to which the file is allocated
printer.acct
log file name
The programs “prefrestore”, “prefdump”, and “prefvalue”
can be used to create and update the EtherShare, PC Share*,
EtherShare OPI 2.1*, PDF Handshake*, and Print Preview*
preferences file “$ESDIR/conf/Preferences”.
* only if installed on the same server
A 4: EtherShare utility programs
A-44
Usage:
prefrestore [-p PreferencesFile] ASCIIPreferenceExport
is the binary preference database file
which imports the preferences from ASCIIPreferenceExport. Any old preferences are deleted then.
PreferencesFile
If omitted, the default file “$ESDIR/conf/Preferences” will
be taken.
is a text file, normaly exported
from the preference file using prefdump, which builds the
new preference file.
ASCIIPreferenceExport
Dumping preferences into a readable form can be done using prefdump.
Usage:
prefdump [-o AsciiPreferenceExport] [PreferencesFile]
is the binary preference database file
which exports the preferences. If omitted, the default file
“$ESDIR/conf/Preferences” will be taken.
PreferencesFile
If ASCIIPreferenceExport is specified the preference database will be exported to that file. If omitted, the preference
database will be printed to “stdout”.
Setting and retrieving single entries of the preference database can be done using the program “prefvalue” found in
“$ESDIR/etc”.
A 4: EtherShare utility programs
A-45
Usage:
prefvalue -k Keys [-d] [-t type] [-p PreferenceFile]
[-f valuefile||value]
PreferenceFile is the binary preference database file to use.
If omitted, the default file “$ESDIR/conf/Preferences” will
be taken.
Valuefile is a pathname of a file to print a preference value
to or read a preference value from. If omitted stdout respective stdin will be used.
is a single string conatining the key strings for the
preference delimited by “/” characters. To set an OPI preference system wide, the first key element is OPI. To set a
preference for a specific program, the first key element is
the name of the program (for example “opisrv”). To set a
preference for all printers, the first key element is “If”. To
set a preference for a specific printer, the first key element
is the UNIX name of the printer. Please keep in mind that
key names are case sensitive!
Keys
Value
is the value the preference will be set to.
is one of the following and may only be used when
setting a preference:
Type
Type
Value is
bool
TRUE or FALSE
int
a signed (32 bit) integer
value
A 4: EtherShare utility programs
A-46
uint
an unsigned (32 bit) integer value
int64
a signed (64 bit) integer
value
uint64
an unsigned (64 bit) integer value
double
a floating point number
ulist
a list of unsigned integers
separated by comma
str
a string
strlist
a list of strings separated
by comma
data
The value cannot be
taken from the command
line and therefore requires
a valuefile specified
To get the current value of a preference only specify a key.
To set a preference value, specify a key, type and value together.
To delete a preference, specify a key and the -d option.
A list of recognized keys can be found in the file
“$ESDIR/etc/OpenImagePreferences”.
A 4: EtherShare utility programs
A-47
A few examples:
To add a color alias for 'Process Black' to 'Black' for system
wide use, specify:
prefvalue -k 'Opi/ColorAliases' -t strlist "Process
Black=Black"
To set the layout creator to “UNIX” for the “opisrv” program only, specify:
prefvalue -k 'opisrv/LayoutCreator' -t str 'UNIX'
To set the “nice increment” value for all printer interfaces
to 10, specify:
prefvalue -k 'If/NiceIncr' -t uint 10
To set the “Resolve All” option for the printer “lw” only,
specify:
prefvalue -k 'lw/ResolveAll' -t bool true
A 4: EtherShare utility programs
A-48
A 5: Standard UNIX utility programs
A-49
Appendix
A 5: Standard UNIX utility programs
The following standard UNIX tools can help you when configuring EtherShare and diagnosing network problems.
Other UNIX tools, such as “swho”, “poll”, “netstat”,
“zones”, “vpoll”, and “machid”, are described elsewhere.
hostname,
uname, arp
Your UNIX host name must never include a slash (“/”)
character (for example “my_rs/6000”). It is best to use lower case characters only, no spaces, no underlines and no
punctuation marks except hyphen.
A slash causes problems with EtherShare, PCShare and
other UNIX programs. This is because “/” is also the directory path separator. AIX does not return an error message if
you use the “/” character in your host name.
The procedure to follow to determine the host’s name and
internet address depends on the UNIX operating system
type, and sometimes on its version, too. The following programs are often available:
The “hostname” command (BSD systems) or the “uname”
command (System V systems) can be used to determine a
UNIX computer’s host name. Call “uname” with the “-n”
switch (uname -n). Use the “-a” switch instead to see your
operating system version, too.
“arp” is used to display and edit the UNIX host’s “internet
address/computer name” conversion table. If the “arp”
A 5: Standard UNIX utility programs
A-50
command includes a computer name as a command line argument, it tries to get more information on the specified
computer, including its internet address. Although the conversion table does normally not contain information on
your own host, it is still often possible to determine its internet address in this way, for example:
ibm $ <path>/arp ibm
0021-237 arp: The entry ibm (192.9.200.11) is not
present in the local arp table.
ifstat
This tool (“$ESDIR/etc/ifstat”) is used to determine, for
each built-in network interface, the AppleTalk and TCP/IP
configurations.
ans$ ifstat
lo0: flags 134744075<UP,BROADCAST,LOOPBACK
SIMPLEX,NOECHO> mtu 16896
inet 127.0.0.1 netmask 255.0.0.0 broadcast
127.255.255.255
en3: flags 134744163<UP,BROADCAST,NOTRAILERS
RUNNING,SIMPLEX,NOECHO> mtu 1500
inet 172.16.0.1 netmask 255.255.252.0
broadcast 172.16.3.255
atalk locable 20 hicable 30 net 20 node 143
en0: flags 134744163<UP,BROADCAST,NOTRAILERS
RUNNING,SIMPLEX,NOECHO> mtu 1492
atalk locable 31 hicable 40 net 31 node 142
The parameters locable
merly used range 31-40.
31 hicable 40
replace the for-
A 6: Data backup with “dump” and “restore”
A-51
Appendix
A 6: Data backup with “dump” and
“restore”
Under UNIX, hard disks are usually subdivided into partitions, each being allocated to a particular logical device.
The “2” partition usually specifies the entire disk. Information on disk partitioning can be displayed with a UNIX program (e.g. “format” under Solaris 2.x), and the corresponding logical devices can be determined by inspecting the
“vfstab” file. The “df” (disk free) program shows how
much of the disk space is already allocated:
$ cat /etc/vfstab
/dev/dsk/c0t0d0s0 /dev/rdsk/c0t0d0s0 /
ufs
/dev/dsk/c0t0d0s3 /dev/rdsk/c0t0d0s3 /space ufs
$ df -k
Filesystem
/dev/dsk/c0t0d0s0
/dev/dsk/c0t0d0s3
“dump”
kbytes
1984230
6484885
cap.
79%
34%
1
2
no
yes
Mounted on
/
/space
To improve data throughput, “dump” should be called without disk caching. Accordingly, in the following example,
which backs up the entire “2” partition to the tape streamer
“/dev/rmt/0”, the “/dev/rdsk” prefix has been placed in
front of the device name:
$ dump 0ucstbf 560 12 126 /dev/rmt/0 /dev/rdsk/c0t0d0s0
A 6: Data backup with “dump” and “restore”
A-52
Note:
The program name “dump” originates from BSD-style
UNIX . Under Solaris 2, the appropriate command is
ufsdump, under AIX backup. For the appropriate
commands on other UNIX architectures refer to your
UNIX documentation.
You can use “cron” to automate data backup with “dump”.
Please refer to your UNIX documentation for details.
Using
“restore”
The easiest way to use “restore” is in interactive mode,
which you call as follows:
restore -i -f <device>
You are presented with restore’s interactive prompt, which
looks similar to the following:
restore>
Use standard UNIX directory related commands like “cd”
and “ls” to find the files and directories you want to restore;
use wildcards “*” and “?” in the usual way. Use the “add”
command to add files or directories to the list of things you
want to restore, e.g. add helios* adds all files and directories in the current directory which start with the string
“helios”. For Macintosh files, do not forget to restore the resource files too, for example:
add helios*
add .rsrc/helios*
Use the “extract” command when you have finished choosing. Files are extracted into the current directory, so usually
you will want to use the “cd” command to switch first to the
same directory from which you made the backup.
A 6: Data backup with “dump” and “restore”
A-53
“restore” does not accept file name specifications containing spaces or accented characters (Umlauts). You can get
round this limitation by using wildcards.
See also A 9.7.7 “Using “dt” for backup/restore” for related
information on backing up and restoring files.
A 6: Data backup with “dump” and “restore”
A-54
A 7: Technical notes
A-55
Appendix
A 7: Technical notes
The following section contains miscellaneous technical information about EtherShare which is primarily of interest to
experienced system administrators only.
A 7: Technical notes
A-56
A 7.1 EtherShare log files
A 7.1
EtherShare log files
The following describes the structure of the EtherShare
printer log file and server log file. Please refer to your
UNIX manuals for a description of the “system messages”
file. All three files can be inspected in the EtherShare Admin by choosing the appropriate item in the Lists menu.
Printer log file
structure
Each entry in the printer log file “$ESDIR/printer.acct”
(with the appendices “.0”, yesterday to “.6”, seven days
ago) has the following format:
status, ptrName, “username”, “JobTitle”,
startTime, duration, pages, ListOfFonts
where:
status
(decimal):
3
2
1
0
-1
-2
-3
-4
ptrName
general UNIX warning
PostScript output
UNIX info (e.g. Extended print information)
OK
communications error
PostScript error
terminated job (e.g. killed signal)
UNIX error (e.g. file not found)
(string): logical (UNIX) printer name
“username”
(string): from PostScript header of job
(string): i.e. document name, from PostScript
header of job
“JobTitle”
A 7: Technical notes
A-57
A 7.1 EtherShare log files
(decimal): seconds since 1.1.1970 (UNIX
time_t values)
startTime
duration
(seconds): = endTime-startTime
(decimal): = endPage-startPage (determined by
printer interrogation with the “pagecount.ps” query.
pages
ListOfFonts
(string array): fonts used, space delimited
If status≠0, the line is followed by the error output of the
printer, bracketed by the lines “Error output:” and “End error output”. Also, if no printable data are sent to the printer
(pages=0), then duration will be “0”.
Please refer to mail in chapter 11.6 “Configuring printers
manually” for information on which types of message are
written to the printer log file. Messages are only written to
the printer log file if you checked the Accounting File
switch when creating the printer queue with the EtherShare
Admin.
User and
document
names
in print jobs
The user name logged with each print job in the printer log
file “$ESDIR/printer.acct” (and the user to which error
messages are sent as mail) is determined by interrogating
the PostScript header of the job for the name in the
“%%For” comment.
Under Macintosh System 7.x or later, the name in the
“%%For” comment is automatically set to the user name
specified in the Macintosh’s “Sharing Setup” control field.
If the “%%For” comment or the name field is missing, all
jobs will be allocated to “nobody” by default.
A 7: Technical notes
A-58
A 7.1 EtherShare log files
If a name is specified but it cannot be found in the list of
long or short names in “/etc/passwd”, the specified (unknown) user name will still appear in the printer log file, but
any error messages are sent as mail to “nobody” instead.
If you check Save My Name Only or Save My
Name and Password in the Macintosh Chooser,
the name saved in the system may not be the same as
the name in the File Sharing control field, since it is
possible to overwrite the prompted name before saving it. The name stored in File Sharing is the one
used by the log file.
Note:
The document title is determined by interrogating the PostScript header of the job for the name in the “%%Title” comment.
It may be possible for you to set these comments for UNIX
and MS-DOS print jobs, too, in order to ensure that they
also have complete records in the printer log file.
Server log file
structure
Each entry in the server log file “$ESDIR/server.acct”
(with the appendices “.0”, yesterday to “.6”, seven days
ago) has the following format:
status, svrName, ws_address, pe_status, usrname,
startTime, duration, usrTime, sysTime, rusage
where:
status
= 1 (normal login)
svrName
(string): server name
A 7: Technical notes
A-59
A 7.1 EtherShare log files
ws_address (string): workstation network address (TCP/IP
or AppleTalk)
(decimal): UNIX process exit status (0 = OK;
1...127 = error exit, i.e. the program has been terminated;
128... = abnormal termination, ask your system administrator)
pe_status
usrname
(string): user login name
(decimal): login time, seconds since 1.1.1970
(UNIX time_t values)
startTime
duration,
usrTime
seconds: = endTime-startTime
(decimal): processor time consumed by user pro-
cess
sysTime (decimal): processor time consumed by the process while in system mode
rusage (decimal array): = resource usage information. The
structure is operating system dependent – see the description of “getrusage” in your UNIX documentation. Some of
the resource usage fields are decoded and used by the
EtherShare Admin in the “Server log file” window.
Each entry in the server log file “$ESDIR/server.acct” has
the following format for an unsuccessful login:
status, svrName, ws_address, pid, name, time
where:
status
= 2 (bad login)
A 7: Technical notes
A-60
A 7.1 EtherShare log files
svrName
(string): server name
ws_address (string): workstation network address (TCP/IP
or AppleTalk)
pid:
process ID
name
(string): attempted login name
(decimal): attempted login time, seconds since
1.1.1970 (UNIX time_t values)
time
A 7: Technical notes
A 7.2 PostScript RIP INITs in the EtherShare Admin
A 7.2
A-61
PostScript RIP INITs in the
EtherShare Admin
Printer INITs in the EtherShare Admin must not contain the
“exitserver” operator, because the following print job will
not execute properly. This is because the INIT is sent to the
printer in the same PAP (RIP) session as the following job.
Discussion: The INIT does not normally need to permanently change the server dictionary, because it automatically pre-fixes each and every print job. Furthermore, it is not
recommended to try and change the server dictionary in an
Admin INIT, because serverdict information is written each
time you print to RIP EEPROM, and the latter has a programming life of 10,000 cycles only.
Solution: Simplify the INIT by removing the “exitserver”
operator.
If possible, the INIT should also be designed to test the parameter it wants to change first, in order to see if the parameter already has the required value. This saves RIP
processing time. For example:
INIT recommended in the RIP manual:
serverdict begin 0 exitserver
statusdict begin 2400 setresolution end
INIT recommended for use in EtherShare Admin:
statusdict begin
resolution 2400 eq not {2400 setresolution} if
end
A 7: Technical notes
A-62
A 7.2 PostScript RIP INITs in the EtherShare Admin
The EtherShare Admin can be extended with custom PostScript calibration tools, which appear automatically in the
Edit Initialization menu. HELIOS will provide on request
programming guides for developing such tools to typesetter
manufacturers.
Note:
INITs cannot contain PostScript code to interrogate
the RIP because at present, there is no way of returning the response to the EtherShare Admin.
Important:
Please contact your RIP supplier and not HELIOS if
you have any problems and/or questions regarding
RIP INITs or RIP configuration.
A 7: Technical notes
A 7.3 Using the ISO-8859-1 character set under IBM AIX 4
A 7.3
A-63
Using the ISO-8859-1 character
set under IBM AIX 4
Starting with AIX version 3.2, IBM supports two character
sets for all text displayed by application programs and system utilities. The two supported character sets are IBM-850
(IBM-PC style) and ISO 8859-1 (DEC VT200 style). AIX
3.1 supported the IBM-850 character set only.
Helios Terminal is a DEC VT320 emulator and thus uses
the ISO-8859-1 character set. By default, AIX uses IBM850 encoding and thus all national accented characters such
as German umlauts will not display properly. The “LANG”
environment variable determines the encoding used. If the
first letter of the “LANG” variable is in upper case, IBM850 encoding is used, if the first letter is lower case, ISO8859-1 is used. For Germany this would be:
LANG=de_DE
for ISO-8859-1
LANG=De_DE
for IBM-850
The “LANG” environment variable can be set locally in
your “.profile” or “.login” files or globally as the default for
the whole system with SMIT using the following SMIT
menu path:
System Environments
-> Manage Language Environment
-> Change Language Environment
Unfortunately, not all message catalogs are available in all
character sets. Luckily, SMIT has a menu option to convert
message catalogs from one character set to another. Use the
following SMIT menu path to do this:
A 7: Technical notes
A-64
A 7.3 Using the ISO-8859-1 character set under IBM AIX 4
System Environments
-> Manage Language Environment
-> Convert Files
-> Convert System Messages
You then specify inputs similar to the following (the example converts the German catalogs):
* CURRENT DIRECTORY name
NEW DIRECTORY name
CURRENT CODE set
NEW CODE set
[/usr/lib/nls/msg/De_DE]
[/usr/lib/nls/msg/de_DE]
[IBM-850]
[ISO8859-1]
+
+
+
This converts all messages catalogs in the
“/usr/lib/nls/msg/De_DE” directory from IBM-850 to ISO8859-1 format. The original IBM-850 files are retained, so
you will then have all message output available in both formats.
A 7: Technical notes
A 7.4 Accessing spool queues from an IBM logical printer
A 7.4
A-65
Accessing spool queues from an
IBM logical printer
To use a printer setup for EtherShare from the IBM spooling system, you can define a new IBM queue to automatically forward all jobs it receives to the EtherShare spooling
system. Assuming you have used the EtherShare Admin to
define a UNIX printer that is named “lw”, you should add
the following lines to “/usr/lpd/qconfig”:
lw:
device = lwdev
discipline = fcfs
lwdev:
backend = /usr/local/es/lpr -Plw
This creates an AIX queue named “lw” that uses the EtherShare queue “lw”.
As all jobs are forwarded, you will no longer be able to see
jobs in the IBM queue, and the jobs will appear in EtherShare’s queue display instead.
Alternatively, you get the same functionality if you always
remember to specify the full path of the EtherShare “lpr”
program (“/usr/local/es/lpr”) each time you use “lpr”.
You can also create a queue that automatically converts text
to PostScript, e.g.:
pstext:
device = textdev
discipline = fcfs
textdev:
backend = /usr/local/es/pstext -Plw
A 7: Technical notes
A-66
A 7.5 Accessing the System V “lpr” from the Print Server
A 7.5
Accessing the System V “lpr”
from the Print Server
The EtherShare Print Server is based on the BSD printing
system. If your host uses the System V printing system (e.g.
Sun Solaris 2.x), the Print Server normally uses its own
BSD-style “lpr” program, which is provided in the
“$ESDIR” directory in such cases. Manual pages for the
BSD-style “lpr” are provided on the CD-ROM in the “manuals” directory.
In order to access the System V “lpr” from the EtherShare
Print Server, you need a configuration which is very similar
to that of “Printing to disk”:
papsrv: name=“xxxx”, printer=xPrinter,
lpr=/bin/lpr, resolve
where:
xxxx
is the required AppleTalk printer name,
xPrinter
is the logical (printcap) printer name, and
lpr
specifies the System V “lpr” program rather
than the EtherShare “lpr” program in
“/usr/local/es”.
In order to set up the required spool directory and symbolic
link, and create a “/etc/printcap” entry and “FONTS” file
automatically, we recommend that you first set up a dummy
printer with a “Remote LPR” connection, then edit the corresponding “atalk.conf” entry and “FONTS” file manually.
A 7: Technical notes
A 7.5 Accessing the System V “lpr” from the Print Server
A-67
A BSD-style “lpq” command is also provided with the
RS/6000 version of EtherShare, because it is not included
with AIX. You can use it to check the job status from a
UNIX shell as follows: lpq
/usr/local/es/lpq -P<printername>.
Or instead, you can use “diskif” and a notify script (see
notifyprog in 11.6 “Configuring printers manually”).
A 7: Technical notes
A-68
A 7.6 Accessing the Print Server through “Remote LPR”
A 7.6
Accessing the Print Server
through “Remote LPR”
If your host uses the System V printing system (e.g. Sun Solaris 2.x), in the special case where you want to receive
print jobs through “Remote LPR” into EtherShare’s BSDbased printing system, you must disable the local System V
network printing functionality before you can do this. By
default the install procedure comments out the “printer”
line in “/etc/inetd.conf”.
A 7: Technical notes
A 7.7 AppleTalk kernel configuration
A 7.7
A-69
AppleTalk kernel configuration
In order to be able to communicate using the AppleTalk
protocols, EtherShare needs support from the operating
system. Commonly, UNIX suppliers deliver the TCP/IP
networking protocols together with their standard operating
system release, but no AppleTalk networking protocols.
EtherShare thus contains drivers that implement the AppleTalk protocol with Ethernet. On some machines, EtherShare also supports other network connections like Token
Ring. All files that relate to the kernel side of the EtherShare system reside in the directory “$ESDIR/kernel”. The
following is a detailed description of what is changed in the
operating system by the EtherShare installation. This is
probably of interest to advanced UNIX users only, since the
EtherShare configuration shell scripts hide most of the details necessary to get the AppleTalk drivers running.
The kernel modules come in two flavors, depending upon
host operating system architecture. System V.4 based systems use a streams-based architecture where each AppleTalk communication endpoint is represented as a file
descriptor opened through the streams multiplexor
“/dev/ddp”. Berkeley-based systems use file descriptors
opened through the socket mechanism.
A 7.7.1
Loadable Drivers
Solaris 2.x, SGI IRIX, HP-UX 11, and IBM RS/6000 systems support a concept of loading drivers, which can be
loaded into the operating system during runtime. In such
cases, it is not necessary to re-link the UNIX kernel with
new modules. The “start-atalk” shell script takes care of
A 7: Technical notes
A-70
A 7.7 AppleTalk kernel configuration
loading the driver when starting AppleTalk, if the driver is
not already loaded.
Solaris 2.x
systems
EtherShare uses two kernel modules on Solaris 2 systems,
“aarp” contains the “AppleTalk Address Resolution Protocol” streams module and “ddp” the “Datagram Delivery
Protocol” streams multiplexor. “aarp” is located in
“/kernel/strmod” and “ddp” in “/kernel/drv”. The installation procedure copies the files from “$ESDIR/kernel” to
the “/kernel” directory. In addition, the installation script
adds a line to the “/etc/minor_perm” and “/etc/devlink.tab”
and files to get the proper link from “/devices/ pseudo/
clone:ddp” entry to “/dev/ddp” using the proper permissions. The drivers are loaded and unloaded by Solaris 2.x
automatically, no loading or unloading should be necessary.
A long list of all loaded modules can be produced by using
the “modinfo” command. The “modunload” command can
be used to unload the drivers, but only if they are unused.
IBM RS/6000
systems
On IBM RS/6000 systems, only one driver is loaded by the
“start-atalk” script (“$ESDIR/kernel/atalk”). This driver is
dependent upon the AIX version. The installation procedure makes a link from the corresponding and appropriate
file to “/usr/lib/drivers”.
In addition, entries are added to the ODM database to allow
the loading of the driver through the “mkdev” command.
The logical name for the kernel module is “atalk0”. Use the
following command to load the module:
mkdev -t atalk
A 7: Technical notes
A 7.7 AppleTalk kernel configuration
A-71
The “lsdev” command can be used to see if the kernel module is loaded:
lsdev -C -l atalk0
Note:
Under AIX, the unloading of network protocols is not
supported.
SGI IRIX
On SGI IRIX systems, the loadable drivers reside in
“/usr/local/es/kernel” and are automatically loaded by
“start-atalk” with the ml command. A list of all loaded drivers can be displayed using ml list. With ml unld and the
corresponding ID number (which can be obtained from the
drivers list) the module can be unloaded again.
HP-UX 11
The drivers “aarp” and “ddp” are copied into the system directory of a HP-UX 11 operating system by the kminstall
command. To automatically load the modules in the kernel
use kmupdate.
To delete the drivers again, use the following commands:
kminstall -d aarp
kminstall -d ddp
A 7.7.2
Re-linking the kernel
For Data General AViiON systems, the AppleTalk driver is
supplied in linkable form. The “install” shell script takes
care of installing the necessary files in the system directory
and rebuilding the kernel. All files modified or replaced by
the script are saved with the “.noatalk” suffix.
A 7: Technical notes
A-72
DG AViiON
A 7.7 AppleTalk kernel configuration
On AViiON systems the installation procedure uses the
“sysadm” menus to do most of the complicated rebuilding
procedure. The installation procedure copies template and
library files from the “$ESDIR/kernel” directory to
“/etc/master.d” and “/usr/src/uts/aviion”. The kernel is rebuilt using the following command:
asysadm -m system:kernel -o auto
The automatic option causes “sysadm” to collect all templates into a new system description and build a new kernel
accordingly. The new kernel is installed into “/” when successful. Upon each boot, the “ddp” multiplexor driver creates a “/dev/ddp” entry for the user programs.
A 7: Technical notes
A-73
A 7.8 UNIX kernel tuning
A 7.8
UNIX kernel tuning
This section describes optional tuning procedures which require substantial UNIX experience. With the exception of
Other tuning tips (below), they should not be attempted by
beginners.
If the EtherShare host has plenty of memory, it may be
worthwhile adjusting some data structures inside the operating system to be larger than normal. This keeps more information in memory that otherwise may need to be
continuously re-read from the disk. Modern operating systems adjust the data structure values depending on the
available memory size. See your UNIX documentation for
more information.
Solaris 2.x
tuning
The Solaris 2.x operating system has no facilities to rebuild
the kernel. Thus parameters are not set by modifying a
C-language source and rebuilding the kernel, but simply by
editing a text file. The file “/etc/system” may contain simple statements of the form “set variable=value” to tune system parameters. The two parameters especially interesting
for EtherShare are “ufs_ninode” and “ncsize”. “ncsize” is
not prefixed by “ufs_” because it relates to all file systems,
not just the normal UNIX file system. To set these two values to 20000, one would include the following statements
in “/etc/system”:
set ufs_ninode=20000
set ncsize=20000
Increasing the number of inodes that can be held in memory
improves the performance considerably when doing Macintosh Finder operations or repeated opening and closing of
A 7: Technical notes
A-74
A 7.8 UNIX kernel tuning
files. Each file that needs to be accessed (directories are
files as well) will occupy an inode entry. The inode will be
kept around after closing a file or directory in case it will be
referenced again, unless the operating system is out of free
entries. In the latter case, the entry may not be re-used but
is used for a different entry that will be loaded from disk.
Thus, if you have several megabytes of memory to spend,
you may increase the number of inode entries to, e.g. 20000,
which will require approximately 4 MB of RAM.
If the kernel fails to boot because of wrong parameters in
“/etc/system” you can boot the system using the “-a” option. You will then be asked which files and partitions to
use, when asked for “/etc/system” just answer “/dev/null”
instead.
Other tuning
tips
EtherShare contains highly-efficient AppleTalk router
modules which do not present an excessive load on the
host’s CPU, even with heavy routing traffic. You can often
improve network response by installing two or more network cards in your host, and arranging your network to
share traffic between two separate network segments. This
approach is particularly beneficial if you have installed the
EtherShare OPI option – in such cases we recommend installing a second network card to deal with printer/RIP traffic only, and thus separate it from workstation traffic. There
is no theoretical limit to the number of network cards supported by the EtherShare router, but generally there are no
gains to be made by installing more than 3 cards except in
the fastest hosts.
Other UNIX architectures
For tuning on other UNIX architectures, please refer to the
appropriate UNIX documentation. Generally, the sections
describing “Performance tuning” in the respective manuals
may be read carefully.
A 8: IP configuration – Reference Part
A-75
Appendix
A 8: IP configuration – Reference
Part
General
remarks
AppleShare IP offers some new features that are quite useful for your EtherShare UNIX–Macintosh network. In the
following, we give you a rather short summary of configurations we recommend when using TCP/IP.
For advice on the software requirements, please refer to
chapter 5.13.8 “IP Access”.
Access
control via
addresses and
domains
(under UNIX)
IP access configuration can be performed on a Macintosh
using the EtherShare Admin program or under UNIX using
an editor such as vi. The “Macintosh solution” is much easier and more convenient – it is described in chapter 5.13.8.
Before proceeding with this paragraph, please read “About
defaults” in chapter 5.13.8 “IP Access”.
If you configure IP access under UNIX, you have to change
the “afpipaccess” configuration file. This does not require
stop/start-atalk. EtherShare will read the configuration file
on every login.
The script “$ESDIR/etc/mkipaccess” will create an initial
configuration file in “$ESDIR/conf/afpipaccess”, allowing
access to clients on the same network segment only. This
file may contain the following statements:
allow ipaddr/mask
deny ipaddr/mask
A 8: IP configuration – Reference Part
A-76
allowdomain do.main
denydomain do.main
If the file is empty – or not present at all – access is allowed
(this corresponds to
allow 0.0.0.0/0.0.0.0).
The IP Address 0.0.0.0 with the mask 0.0.0.0 matches any
address, it is thus a good idea to use the statement:
deny 0.0.0.0/0.0.0.0
as the last line in the access file and only explicitly allow access to selected networks or IP numbers. You can grant access to the class C net 192.9.200 only using the following
statements:
allow 192.9.200.0/255.255.255.0
deny 0.0.0.0/0.0.0.0
The mask (255.255.255.0 in the example) specifies the significant bits that are to be compared against the IP number.
If the mask is not specified, it is assumed to be
255.255.255.255, meaning that it will match the number
exactly. The example:
allow 192.9.200.1
deny 0.0.0.0/0.0.0.0
will thus allow access to a single machine only, namely to
192.9.200.1.
A 8: IP configuration – Reference Part
A-77
The IP address can also be specified as a normal host name,
it must then be resolvable through the configured name service, e.g. DNS or NIS. If DNS or NIS is properly configured to resolve host names, you can also use domain-based
access controls.
The statement:
denydomain hacker.com
will deny access to any IP number that resolves to a host
name that ends with the domain hacker.com. The
allowdomain statement works the other way round:
allowdomain company.com
deny 0.0.0.0/0.0.0.0
would allow access to any machine that uses an IP address
that resolves to a host name ending in company.com.
The domain-based access controls do cause a reverse lookup for the host name of every IP address that is used to connect to the server. If you use any IP addresses that do not
have reverse mapping, timeouts might occur that slow
down establishing a connection to the server. Please note
that anybody who owns the reverse mapping of a set of IP
addresses can specify arbitrary domains in his reverse DNS
mapping, not only his own domains.
Access
control via
port number
(Firewalls)
AFP over TCP uses connections to port 548. The port can
be changed by specifying the “afpport” parameter in
“atalk.conf”:
afpsrv: afpport=1024
A 8: IP configuration – Reference Part
A-78
would use port 1024 instead. For successful connections,
the port number on the client side must be changed accordingly. This can be done by either specifying
hostname:port in the dialog that lets you enter an IP number or by using the “AppleShare Client Setup” tool:
(http://www.apple.com/appleshareip/)
Figure A-27 shows the user interface of this setup tool – the
Default TCP Port is set to 1024.
Fig. A-27: Setting up a default TCP port on a Macintosh
A 8: IP configuration – Reference Part
A-79
Configuring
message
delivery
The above-mentioned “AppleShare Client Setup” tool is
also very useful for defining timeouts for server messages.
You can induce your Macintosh to close specific message
dialogs automatically after a given period of time. This can
be sensible, because otherwise all processes that are running on your computer will be stopped until you close the
message window. Figure A-28 shows an example configuration. The settings are always valid for one client only.
Fig. A-28: AppleShare settings for incoming server messages
A 8: IP configuration – Reference Part
A-80
Learn more
about the
AppleShare
Client Setup
As far as the other dialogs of the “AppleShare Client Setup”
tool are concerned, we recommend to keep the default settings. For specific questions you may refer to Apple’s online documentation. Please note, that for some
configurations, you have to specify the respective parameter on both platforms, the Macintosh and the UNIX server.
New EtherShare
parameter for
volume
modification
checking
AFP 2.2 specifies the use of server notifications that avoid
the client polling for changes on volumes. By default, the
server checks for volume changes every ten seconds and
notifies clients accordingly. This is similar to previous AFP
versions where the client did poll every 10 seconds. If you
have very busy volumes that change all the time, however,
you may wish to specify another interval. With EtherShare
2.6 you can configure the respective parameter on the server in “atalk.conf”. For example:
afpsrv: volcheckinterval=60
The above command will induce the server to check every
minute for volume changes, which reduces the volume status traffic to one sixth compared to previous AFP versions.
Please note that clients using workstation software older
than 3.7 will continue to poll every 10 seconds.
Note:
Additional
information
about
AppleShare IP
Changes to “afpsrv” require stop-atalk and then
again start-atalk.
IP access to the server can also be switched off completely
– if necessary. You can use the noip parameter to deny the
mounting of volumes via TCP/IP:
afpsrv: noip
A 8: IP configuration – Reference Part
A-81
The number of AppleTalk sockets is still limited to 250. If
you now use AppleShare IP connections for mounting
EtherShare volumes, you have the 250 sockets available for
pap (printers) and adsp (terminal, mail) connections.
A 8: IP configuration – Reference Part
A-82
A 9: The Desktop utilities
A-83
Appendix
A 9: The Desktop utilities
A 9: The Desktop utilities
A-84
A 9.1 Introduction
A 9.1
Introduction
License
information
The “dt” utilities are not a separate product. They may be
used by owners of a full HELIOS EtherShare 2.6 license
only.
About the
product
This appendix describes the “dt” utilities, which mimic the
functionality of some major UNIX commands for handling
files, while maintaining the integrity of the desktop database. “dt” utilities also provide access to Macintosh specific
file information from a UNIX prompt.
About YOU –
the potential
users of the
“dt” utilities
These utilities are meant for people who have some knowledge about UNIX and Mac – from novice to expert
UNIX/Macintosh users.
Important:
The ”dt“ program does not consider any file locking
and can therefore also copy files in use. In order to
avoid damage, consider this and make sure nobody is
working concurrently on these particular files before
manipulating them with ”dt“.
A 9: The Desktop utilities
A 9.2 Do I need the “dt” utilities?
A 9.2
A-85
Do I need the “dt” utilities?
If you access all your files from your Macintosh only, you
do not need to read any further. But if you need to access
files which are stored in an EtherShare volume from the
UNIX prompt, there are a lot of reasons for using the “dt”
utilities.
Note:
“UNIX prompt” here means any access under UNIX,
e.g. any script or program (like a backup program),
which accesses files stored on an EtherShare volume.
Any manipulation to a file or folder inside a Macintosh volume using ordinary UNIX commands like “cp”, “mv”,
“rm” or other programs, will cause an inconsistency between volume information and the related desktop database. Especially restoring files from a backup will trigger
such an inconsistency.
In the following sections, you will find more information
on this problem and about how the “dt” utilities help avoid
it.
Please use the utilities whenever you would (usually) use
any of the following UNIX commands (in case either
source and/or destination files/folders are located in an
EtherShare volume):
•
•
•
•
•
•
•
•
rm
rmdir
mv
cp
ls
mkdir
touch
chmod
A 9: The Desktop utilities
A-86
A 9.2 Do I need the “dt” utilities?
• chown
• chgrp
You may use the “dt” utilities even if the source or destination is not located in an EtherShare volume, or if you are not
sure about this. The “dt” utilities automatically select the
proper mode of operation.
It is required to use the “dt” utilities together with EtherShare 2.6, PCShare 2.5 or higher and/or EtherShare OPI
2.1. These HELIOS product versions have improved verification mechanisms to recognize potentially harmful configurations, and will disable access to volumes for which
consistency between volume and desktop information cannot be assured. In addition, warning or error messages are
logged to the system error log which may help you locate
the cause of the problem.
What are the
differences to
standard UNIX
commands?
Just to help you understand the possible error messages and
the specific behavior of the “dt” utilities, here are the main
differences to standard UNIX commands:
Each Macintosh file consists of two parts, the so-called “data fork” which is stored as a standard UNIX file, and a corresponding “resource fork” which is stored by EtherShare
in a “.rsrc” subdirectory. Additional information for each
file are stored in a corresponding entry in a volume based
“desktop” database. Therefore, when using UNIX commands, each operation like move, copy, or delete, must consider both the “data fork” and “resource fork”, as well as the
database entry instead of just a single file.
When looking into a volume as a UNIX directory you may
not notice the differences, because the resource fork subdirectory and the database files are stored as hidden UNIX
files.
A 9: The Desktop utilities
A 9.2 Do I need the “dt” utilities?
A-87
The “dt” utilities simulate the behavior of standard UNIX
commands as close as possible, but there are slight differences in the number and functionality of the available options, and due to the extended functionality you may notice
a different behavior and different error messages. For example, you may see error messages about the resource fork
of a file, which you would not see when using standard
UNIX commands (the UNIX commands – in fact – ignore
this part of the file).
For all of the “dt” utilities commands, a behavior that differs from that of their UNIX counterparts may be visible.
This is due to the fact that different semantics are used by
Macintosh Finder operations on the one side and UNIX file
system operations on the other. The “dt” utilities will behave like an “afpsrv” on recognized EtherShare volumes,
and will behave like ordinary UNIX commands like “cp”,
“mv”, “rm”, in areas where no EtherShare volume is defined. The “dt” utilities will process data and resource part
of files and will also assure that ownership and permissions
are compatible to the Macintosh Finder operations. Due to
the limitation on file/folder name length, “dt” will only process objects with a name of 31 characters at the most on
EtherShare volumes (filefolder names exceeding 31 characters will be invisible on Macintosh workstations). See
also chapters 9.3 “Directory and file formats”, and 9.5 “Users and groups” to 9.7 “Access privileges”.
Before you try and use any of the “dt” commands, you
should be well familiar with the corresponding UNIX commands. If you need more information about how the “dt”
utilities work and how problems arise without the utilities,
please read the “Technical notes” following each command
description, and chapter A 9.7 “Additional information”.
A 9: The Desktop utilities
A-88
A 9.3 How to install the “dt” utilities
A 9.3
Installing “dt”
How to install the “dt” utilities
The “dt” utilities do not require a special installation procedure.
We do not recommend to sym-link regular “cp”, “mv”,
“rm” commands to the “dt” utilities. Although this is possible, you should verify your current and future system environment very carefully, to assure proper operation of your
programs, scripts and established workflow.
Especially, you should check whether your site uses special
HSM, tape robot, or RAID software which may also use
their own versions of these UNIX commands. Take into account that different users and script based programs may
make use of different shells and environment settings.
Before getting
started...
We suggest to check for each EtherShare volume the consistency between the volume information and the volume’s
desktop database. EtherShare 2.6 offers a new rebuild option, namely -s (scan only), which can be used for this purpose.
Simply issue rebuild -s <volume mount point> for every defined public or private EtherShare volume. Any output of this “scan” indicates a potentially harmful
inconsistency between volume and desktop information.
You should only continue after having re-synchronized the
desktop database by means of an ordinary rebuild.
Take some time to make yourself familiar with the utilities
and the way they behave inside a Macintosh volume, between different Macintosh volumes, and between nonMacintosh and Macintosh volumes.
A 9: The Desktop utilities
A 9.4 Notes about error messages
A 9.4
A-89
Notes about error messages
The “dt” utilities use standard error messages starting with
the program name (including the command argument), followed by the file or directory currently processed, and the
error message, e.g.:
dt rm notHere
may result in the error message:
dt rm: notHere: no such file or directory
The error messages used are similar to the errors issued by
the standard UNIX commands. Please note that you may
encounter additional error messages regarding the resource
fork or the desktop database.
In some cases the “dt” utilities may issue error messages
displaying the full path of a file name instead of the passed
relative one. This is due to the fact that the desktop database
always needs absolute file names instead of relative ones.
In this case, you may see the completely resolved (including symbolic links) absolute path name in the error message.
A 9: The Desktop utilities
A-90
A 9.5 Command descriptions
A 9.5
A 9.5.1
Command descriptions
General remarks
In the following command descriptions the knowledge of
the functionality of the corresponding UNIX commands is
assumed. Please refer to your UNIX manual if you are not
familiar with the commands.
If you do not need or want to know, how the “dt” utilities
operate, you only need to read the main command description for each UNIX command which is emulated by the
“dt” utilities. The technical description following each
command is meant for advanced users or system administrators and explains some details or the special behavior of
the respective command.
With very few exceptions, “dt” behaves identically on all
HELIOS-supported platforms. Please note that therefore
some platform-specific options could not be implemented.
For all commands, the standard UNIX permissions apply
when accessing, removing, or overwriting a file.
“dt” checks each passed argument for the following names:
.Desktop
.DeskServer
.rsrc
These files are handled implicitly by “dt” and there is no
need to specify them directly. You should never move,
A 9: The Desktop utilities
A 9.5 Command descriptions
A-91
copy, or remove these files with other commands, as e.g.
the standard UNIX tools. Do not manipulate them at all.
Note:
In the following, the term “volume” is used for a directory that is defined as an EtherShare volume which
contains a desktop database (in contrast to a simple
UNIX “directory”).
Note:
In the following, the term “volume root” means the top
level folder of an EtherShare volume. The “EtherShare
Applications” volume, e.g., is by default defined to reside in the “/usr/local/es/macapps” directory, which is
its “volume root” directory under UNIX.
“dt” will recognize an EtherShare volume by locating its
desktop database “.Desktop” file.
“dt” will recognize access to EtherShare volumes from another server only by means of available “.DeskServer”
files.
“dt” will process all supplied files and folders, but only
file/folder names of up to 31 characters will be kept in desktop databases.
“dt” may process files/folders differently, depending on
whether the source/destination of the operation is inside/outside an EtherShare volume. The Macintosh Finder
and the UNIX file system use different semantics and “dt”
assures that on EtherShare volumes the Macintosh semantics will be applied. The differences are mainly visible in
permissions/ownership.
A 9: The Desktop utilities
A-92
A 9.5 Command descriptions
Symbolic links to folders will not be processed on EtherShare volumes.
“dt” will process data and resource parts of files/folders on
EtherShare volumes. In case no resource information exists, “dt” will be able to create at least minimum information. Especially copy or move operations may require more
free space on destination file systems.
The following command modes are supported:
rm
remove a file or directory (UNIX “rm”)
rmdir
remove directory (if empty)
(UNIX “rmdir”)
mv
move/rename a file or directory
(UNIX “mv”)
cp
copy a file or directory (UNIX “cp”)
set
set or change the Macintosh specific file
attributes
ls
list contents of a directory including
Macintosh specific file attributes
(UNIX “ls”)
mkdir
create a directory (UNIX “mkdir”)
touch
create a file or set its access time
(UNIX “touch”)
upd
force update of Macintosh volume view
A 9: The Desktop utilities
A-93
A 9.5 Command descriptions
chmod
change or assign the mode of a file
(UNIX “chmod”)
chown/
chgrp
set the user and group ID of a file
(UNIX “chown”, “chgrp”)
idinfo
display database information for the
passed ID
A 9.5.2
dt (no argument)
If called without any argument, “dt” prints the usage line:
Usage: dt { rm | rmdir | mv | cp | set | ls |
mkdir | touch | upd | chmod | chown | chgrp |
idinfo }
Calling “dt” with the command argument but no arguments,
prints the usage for the specific command,
e.g. calling dt rm prints:
Usage: dt rm [-fir] file ...
Calling “dt” with a question mark, prints the version in addition to the usage line, e.g. calling dt -? prints:
dt (c) Helios Software GmbH, Version 2.6.0
Usage: ...
A 9: The Desktop utilities
A-94
A 9.5 Command descriptions
A 9.5.3
dt rm
The “rm” command removes the directory entry specified
by each file argument.
Usage: dt rm [-fir] file ...
The following options apply:
-f
force removing without prompting the user.
-i
prompt for confirmation for each file. If
the answer begins with y (yes), the file
is deleted, otherwise the file remains.
-r
recursively remove passed directory and
its subdirectories.
In case of symbolic links, the link itself and not the file the
link refers to is removed.
If the standard input is not a terminal, the command will operate as if the -f option were set.
Examples
dt rm a.out core
removes the directory entries: a.out and core.
dt rm -rf junk
removes the directory junk and all its contents, without
prompting.
Technical
notes
Missing resource forks are not reported unless the -v verbose option is set.
A 9: The Desktop utilities
A-95
A 9.5 Command descriptions
The volume root directory is automatically touched to announce the changes to any Macintosh that has mounted the
volume.
When removing a directory using the -r option, “dt” automatically tries to remove any orphan resource forks. The
volume root directory may only be removed, if this volume
is not in use by any other client, either EtherShare or the
“dt” utilities, otherwise a “directory not empty” error is issued.
A 9.5.4
dt rmdir
The “dt rmdir” command will remove the directory entry
specified by each dirname operand, provided that this operand refers to an empty directory.
Usage: dt rmdir [-ps] dirname ...
The following options apply:
-p
allow users to remove the directory
dirname and its parent directories which
become empty. A message is printed on the
standard error about whether the whole path
is removed or part of the path remains for
some reason.
-s
suppress the message printed on the
standard error when -p is in effect.
A 9: The Desktop utilities
A-96
A 9.5 Command descriptions
A 9.5.5
dt mv
“dt mv” moves the selected files or directories to a destination file or directory.
Usage:
dt mv [-fiknvz] f1 f2
dt mv [-fiknvz] f1 ... fn d1
dt mv [-fiknvz] d1 d2
The three different usages are provided for the following
cases:
• move a file f1 to the destination file f2
• move the passed files “f1... fn” into the destination directory “d1”
• move the passed directory into the destination directory “d2”, and create “d2” if it
does not exist.
The following options apply:
-c
move a file from one Macintosh volume to
another Macintosh volume with a different
character set without getting an error
message.
Important:
-f
If you do not use the -c option with the “dt mv” and “dt
cp” commands, an error message only occurs if you
copy/move files from a Macintosh volume to another.
Copying/moving from a UNIX directory or a PCShare
volume to a Macintosh volume will not provoke any
warning at all and might irritate the “.Desktop” file.
move the file(s) without prompting even
if it is overwriting an existing target.
Note that this is the default if the
standard input is not a terminal.
A 9: The Desktop utilities
A 9.5 Command descriptions
Technical
notes
A-97
-i
prompt for confirmation for each file. If
the answer begins with y (yes), the file is
moved, otherwise it remains where it is.
-k
keep ID, try to allocate the source ID and
use it for the destination as well (see
also
A 9.7.7 “Using “dt” for backup/restore”).
In case this is impossible, you will only
get a warning if -v is set.
You can use this parameter to preserve
proper working of Macintosh aliases.
-n
no resource forks if no desktop (see
A 9.7.3 “Default resource fork handling”).
-v
verbose, display extended warnings.
-z
force zero ID for destination, please
refer to A 9.7.6 “Zero IDs” and
A 9.7.7 “Using “dt” for backup/restore”.
The behavior of the different UNIX implementations differs if both, the -f option and the -i option, are set.
“dt mv” uses the following rule: if both the -f option and
the -i option are set, this is not considered an error; here,
the -f option will override the -i option.
If you move a directory between two EtherShare volumes,
“dt” cannot simply move just the directory entry. The Macintosh Finder would have to perform two steps for this operation, namely copying a folder from one volume to the
other and then deleting the folder on the source volume.
“dt” has a similar task to accomplish. For every file and
folder within the directory to move, first the object must be
moved to the destination volume and registered in the destination desktop. Then, the moved objects must be deleted
from the source volume and unregistered from its desktop
database.
A 9: The Desktop utilities
A-98
A 9.5 Command descriptions
Please note that any Macintosh files/folders to which aliases are pointing, will have lost their connection after successfully been moved between volumes. This would be the
same if you used the Macintosh Finder for this operation.
If source and target directory are on different file systems,
“dt mv” copies the file and deletes the original; any hard
links to other files are lost.
Volume root for both source and destination, is automatically touched to announce the changes to any Macintosh
that has mounted the volume.
Please note that whenever the destination is a volume, the
volume specific permissions will apply, meaning that the
file you have moved will automatically inherit the permissions of the directory it has been moved to.
Usually, if a file is copied to a directory without a desktop
(pure UNIX directory), the file ID is set to zero. When using the -k option, the file ID is maintained (if possible).
Even though the execution bit of the data fork should be
masked out (according to the permission handling implemented by “afpsrv”), this is often inconvenient to UNIX users. Therefore, any existing execution bit is preserved by
default.
A 9.5.6
dt cp
“dt cp” copies the passed files or directories to a destination
file or directory.
Usage:
dt cp [-finpvz] f1 f2
A 9: The Desktop utilities
A-99
A 9.5 Command descriptions
dt cp [-finpvz] f1 ... fn d1
dt cp -r [-finpvz] d1 ... dn-1 dn
The three different usages are provided for the following
cases:
• copy a file f1 to the destination file f2
• copy the passed files “f1... fn” into the destination directory “d1”
• copy the passed directory into the destination directory “dn”
The following options apply:
-c
copy a file from one Macintosh volume to
another Macintosh volume with a different
character set without getting an error
message.
-f
copy the file(s) without prompting even
if it is overwriting an existing target.
Note that this is the default if the
standard input is not a terminal.
-i
prompt for confirmation for each file. If
the answer begins with y (yes), the file is
copied, otherwise it is not.
-r
recursively copy passed directory.
-n
no resource forks if no desktop (see
A 9.7.3 “Default resource fork handling”).
-p
preserve the owner and group IDs,
permission modes, modification and access
time.
-v
verbose, display extended warnings.
A 9: The Desktop utilities
A-100
A 9.5 Command descriptions
-z
Technical
notes
force zero ID for destination, please refer
to A 9.7.6 “Zero IDs” and
A 9.7.7 “Using “dt” for backup/restore”.
The volume root directory for both, source and destination,
is automatically touched to announce the changes to any
Macintosh that has mounted the volume.
If your source does not have a resource fork, and your destination is a volume, a default resource fork is created.
These default resources are only recognized properly by
EtherShare 2.6; earlier EtherShare versions will display
files with plain document icons. Please do also take into account that every default resource will require 64 bytes, thus
using the minimum disk block size on the destination file
system. If there is only little free disk space on the destination volume, first check whether the destination file system
can store all of the files. You can roughly calculate 1K
(fragment size) per file/folder. Consult your UNIX system
administrator or the appropriate pages in your UNIX manual for information on how to retrieve more exact information about your file system settings.
Even though the data fork execution bit should be masked
out (according to the permission handling implemented by
“afpsrv”), this is often inconvenient to UNIX users. Therefore, any existing execution bit is preserved by default.
A 9.5.7
dt set
“dt set” modifies the additional file information stored in
the file’s resource fork. For more information about the
flags and fields used here, please refer to your Macintosh
documentation, e.g. Apple’s “Inside Macintosh”.
A 9: The Desktop utilities
A-101
A 9.5 Command descriptions
You can use the EtherShare Admin to extract the creator/type information an application sets for certain icons.
See also chapter 5.13 “Other lists and accounting files” in
your EtherShare documentation (and the contents of
“$ESDIR/conf/suffixes”).
Usage:
dt set [-t type | -c creator | -f sfile
| -L integer | -C clear] file ...
dt set -a[-][isrlbp] file ...
dt set -v[mini symbol name date
size type label list button]
The following options apply:
-t
set the file type for “file” to the
passed value
-c
set the file creator for “file” to the
passed value
-f sfile
copy the file type and creator from
“sfile” to “file”
-L integer
set the file to number of allowed
concurrent program launches, where
“integer” is the number of
launches
-C
clear the file ID numbers in the
resource fork (set to zero) and
force the “afpsrv” to allocate new
ID numbers
Note:
The dt set options -L and -C replace the outdated
setlaunch program from older EtherShare versions.
A 9: The Desktop utilities
A-102
A 9.5 Command descriptions
-a
flag, where flag specifies the following modes:
i
invisible
s
system
r
read only
l
locked (norename nodelete)
b
backup
p
protected
-v flag, where flag specifies one of the following Macintosh view modes:
mini symbol name date size type label list
button
Note:
button applies to Mac OS 8.x and later only.
Please note that you may list these information using
“dt ls”. If you need to set type or creator info with nonprintable values, you may as well enter these values as octal
values with a preceding backslash (“\”), and use the following escape sequences:
\b
backspace
\n
newline
\r
carriage-return
\t
tab
\f
form-feed
\E
escape
A 9: The Desktop utilities
A 9.5 Command descriptions
A-103
Please note that for both type and creator, all characters including 0 are valid. Each passed creator or type must be exactly 4 bytes long.
Examples
dt set -t “TEXT” -c “R*ch” file
sets type and creator for file using ASCII values.
dt set -c “\001\002\003\004” file
sets creator for file using octal values.
dt set -f mypic file
copies type and creator from mypic to file.
dt set -ai file
sets the invisible flag for file.
dt set -a-i file
clears the invisible flag for file.
Technical
notes
When you call “dt set” for a file without a resource fork, a
default resource fork updated with the passed parameters is
created, even if the destination file does not lie in a Macintosh volume.
A 9: The Desktop utilities
A-104
A 9.5 Command descriptions
Please note that “dt set” does not create a missing “.rsrc” directory; use “dt touch” first on the file name in order to
force creation of a related “.rsrc” subdirectory where the
file’s resource information can be stored.
A 9.5.8
dt iddump
Each Macintosh file on an EtherShare volume has an ID
number that is stored in both its resource fork and the desktop database. The dt iddump command outputs all file IDs
of the volume in question (specify volume path) from the
desktop database to stdout.
Usage: dt iddump [path to Macintosh volume]
A 9.5.9
dt ls
For each file that is a directory, the contents of the directory
is listed; for each file that is an ordinary file, the name and
resource related information are listed. When no argument
is given, the current directory is listed.
Usage: dt ls [-axotTsmldi] file ...
The following options apply:
-a
list all entries, including those
beginning with a dot (.), which are
normally not listed.
-x
force printing of non-printable characters
for type and creator – which are normally
shown as underscore (_) – in the
hexadecimal \xdd notation.
A 9: The Desktop utilities
A 9.5 Command descriptions
A-105
-o
force printing of non-printable characters
for type and creator – which are normally
shown as underscore (_) – in the octal \ddd
notation.
-t
for each file, print the Macintosh creation
time.
-T
for each file, print the UNIX last
modification time.
-s
for each file, print the size of the data
and the resource fork.
-m
print file name stored in the desktop
database instead of UNIX name. If any
difference between these names is detected,
both names are shown. If the target
directory does not have a corresponding
desktop, this option is ignored.
-l
list in long format. This option is
equivalent to specifying the option -tsi.
-d
if the argument is a directory, list only
its name and not its contents.
-i
for each file, print the file or directory
id (as stored in the resource fork) and the
parent id (as stored in the desktop
database).
This information may not be correct in case
files/folders were manipulated with UNIX
programs other than the “dt” utilities.
Use “rebuild -s” to verify consistency
between volume and desktop information.
The attributes printed in the first column consist of 8 characters, and are indicated as follows:
A 9: The Desktop utilities
A-106
A 9.5 Command descriptions
d
A
i
s
r
l
b
p
directory
alias
invisible
system
read only
locked (norename nodelete)
backup
protected
Please note that Macintosh aliases cannot be created with
the “dt” utilities. The internal structure of aliases is not documented by Apple.
Examples
dt ls /usr/ethershare
d-i-rl--
Network Trash Folder
d------- OpiPics
-------- 'XDOC' 'XPR3'mydoc
This command prints the names of all files in the passed directory “/usr/ethershare”, showing the file attributes, the
type and creator for that file and its name. Please note that
directories do not have any type or creator and therefore the
fields are empty for directories.
Often you may want to include more Macintosh specific information in the output. You can use the -l option for that:
dt ls -l /usr/ethershare
Here you see the attributes, the ID, parent ID, type, creator,
Macintosh date, size of the data, size of the resource fork,
and the file name.
d-i-rl-
3201/15/97 09:47 51264 Network
Trash Folder
A 9: The Desktop utilities
A-107
A 9.5 Command descriptions
Technical
notes
d------
4201/16/97 13:50 51264 OpiPics
-------
222 'XDOC' 'XPR3'06/09/97 13:39 97664
mydoc
Please note that the output format (e.g. time format) is dependent on the current settings for the local environment.
The output will not be sorted (as it would be if you used the
UNIX “ls” command).
A 9.5.10
dt mkdir
The “mkdir” command creates the passed directories including the corresponding resource fork and the desktop
database entry.
Usage: dt mkdir [-m mode] [-p] dir ...
The following options apply:
-m mode
-p
Example
specify the mode to be used when
creating the directory.
With this option, mkdir creates “dir”
by creating all the non-existing
parent directories first. The mode
given to intermediate directories will
be the difference between 777 and the
bits set in umask.
dt mkdir -m0444 mydir
creates the directory “mydir” with the passed modes.
A 9: The Desktop utilities
A-108
Technical note
A 9.5 Command descriptions
If no mode parameter is set, the final directory is created in
mode 777 considering the file mode creation mask
“umask”.
A 9.5.11
dt touch
The command “touch” sets the access and modification
times for the passed files. A file is created if it does not already exist.
Usage: dt touch file ...
Example
dt touch myfile
A 9.5.12
dt upd
The “upd” command touches the volume directory for the
passed file or directory, so that all Macintosh computers
that have mounted this volume can display the changes.
This may be necessary e.g. if a file is created under UNIX
and the Macintosh would display the new icon only after
closing and re-opening the corresponding window.
Please note that all “dt” commands automatically update
any needed volumes; so this command is only required, if
files are created or changed by other, non-“dt” commands.
Check whether you can adjust your workflow to “dt” commands and thus avoid potentially harmful non-“dt” commands.
Usage: dt upd file... | dir ...
Example
dt upd myfile
A 9: The Desktop utilities
A-109
A 9.5 Command descriptions
Technical note
The Macintosh clients only scan for changes every 10 seconds. Usually, folder information are updated within this 10
seconds period. However, depending on folder sizes, number of folders open, foreground applications, etc., this may
take longer. Thus, it may take some time after issuing an
“upd” command, before the changes become visible on the
client. You can either click into the folder window, or close
and re-open it in case the displayed information do not
seem to be up-to-date. In rare situations, it may be necessary to unmount and remount the volume in question in order to let the Macintosh flush its cache entries. Make sure
that you are using the latest Macintosh OS and up-to-date
AppleTalk/Network drivers.
A 9.5.13
dt chmod
The “chmod” command changes the permission mode of a
file. The mode may be absolute or symbolic.
Usage: dt chmod [-fRn] absMode file ...
dt chmod [-fRn] [ugoa]{+|-|=}[rwxstugo]
file ...
The following options apply:
-f
force, do not complain if the mode change
fails.
-R
recursively descend through directory
arguments.
-n
change directory only – not the files
within the directory. The default
behavior of the “dt chmod” command is
as follows:
A 9: The Desktop utilities
A-110
A 9.5 Command descriptions
If a pure UNIX directory is changed,
the changes are applied to the directory
only. Else, if a directory on a volume
is changed, the changes are applied to the
files within this directory as well (they
are not applied to subdirectories).
The -n option makes sure that the
command is always applied to the directory only.
An absolute mode is specified using octal numbers (0-7),
please see the UNIX documentation for a full description.
A symbolic mode specification is a comma-separated list
(without any intervening spaces) of symbolic mode expressions of the form:
[who] operator [permissions]
In order to adjust permissions to files/directories and their
related resource parts, you must own the directory in question. In case the resource directory does not match the enclosing directory’s permissions, “dt chmod” cannot adjust
the “.rsrc” directory’s permissions. You have to log in as
“root” in order to synchronize permissions of the two directories. Please refer to the UNIX documentation for a full description.
Examples
dt chmod 444 file
sets only read permission (0444) to “file”.
dt chmod a=rwx,g+s file
sets read (“r”), write (“w”), and execution (“x”) permission
for all (“a”) users, and adds group set-ID mode (“s”) for
groups’ permissions.
A 9: The Desktop utilities
A-111
A 9.5 Command descriptions
A 9.5.14
dt chown
The “chown” command sets the user ID of the passed file
to the new user ID specified by owner, and, optionally, the
group ID to the new group.
Usage: dt chown [-fhRn] owner[:group] file ...
The following options are supported:
-f
do not report errors.
-h
if the file is a symbolic link, change the
owner of the symbolic link (not the owner
of the file that is referenced by the
symbolic link). This option is not
supported on all platforms.
-R
recursively descend through the directory
when setting the ownership for each file.
-n
change directory only – not the files
within the directory. The default
behavior of the “dt chown” command is
as follows:
If a pure UNIX directory is changed,
the changes are applied to the directory
only. Else, if a directory on a volume
is changed, the changes are applied to the
files within this directory as well (they
are not applied to subdirectories).
The -n option makes sure that the command
is always applied to the directory only.
owner[:group] (use “.” or “:”)
A user ID and an optional group ID to be
assigned. Both IDs may either be specified
by the numeric ID or by the corresponding
user or group name.
A 9: The Desktop utilities
A-112
A 9.5 Command descriptions
Please note that you need the necessary access rights to
change the user or group ID of a file – according to UNIX
semantics, only the user id “root” is allowed to change ownership settings.
Examples
dt chown frank:support myfile
changes the owner for myfile to “frank”, and the group to
“support”.
dt chown 100 myfile
changes the owner for myfile to the user defined with the ID
100.
A 9.5.15
dt chgrp
The “chgrp” command sets the group ID of a given file to
that of the new group.
Usage: dt chgrp [-fhRn] group file ...
The following options are supported:
-f
do not report errors.
-h
if the file is a symbolic link, change the
group of the symbolic link (not the group
of the file that is referenced by the
symbolic link). This option is not
supported on all platforms.
-R
recursively descend through the directory
when setting the group for each file.
A 9: The Desktop utilities
A-113
A 9.5 Command descriptions
-n
change directory only – not the files
within the directory. The default
behavior of the “dt chgrp” command is
as follows:
If a pure UNIX directory is changed,
the changes are applied to the directory
only. Else, if a directory on a volume
is changed, the changes are applied to the
files within this directory as well (they
are not applied to subdirectories).
The -n option makes sure that the
command is always applied to the directory only.
A group ID may either be specified by the numeric ID or by
the corresponding group name.
Please note that you need the necessary access rights to
change the group ID of a file – according to UNIX semantics, only the user id “root” is allowed to change ownership
settings.
Examples
dt chgrp support myfile
changes the group to “support”.
dt chgrp 100 myfile
changes the group for myfile to the group defined with the
ID 100.
A 9.5.16
dt idinfo
The main purpose of this command is problem detecting.
The Macintosh file, or respectively directory ID, is stored
in both the file’s resource fork and the desktop database.
A 9: The Desktop utilities
A-114
A 9.5 Command descriptions
The ID stored in the resource fork may be listed by using
the “dt ls” command.
The “idinfo” command may be used to display database information for the passed ID. If there is no difference between the resource data and the corresponding database
entry, you should get the same information, otherwise the
system administrator should issue a “rebuild” for the specific volume. You can use rebuild -s <volume root> to
verify that the volume information is properly reflected in
the related desktop database; see Before getting started... in
chapter A 9.3 “How to install the “dt” utilities” above.
Usage: dt idinfo [-v volume] id ...
Please note that each volume has its own ID scope. Therefore, you must specify the correct volume for each ID you
request. If you do not specify a volume with the -v option,
the current working directory is assumed.
-v
Example
allows to specify the volume to be used, or
any file or directory inside the target
volume.
dt idinfo -v /usr/ethershare/etc 20
prints the following information:
volume: “/usr/ethershare” id=20 pid=18 name:
“qdoc”
specifying the volume detected, the ID, the parent ID for
this file, and the corresponding name stored in the database.
Technical note
Please note that an ID detected in the database that does not
have any corresponding file in that volume does not cause
any problems or data loss.
A 9: The Desktop utilities
A 9.6 “dt” warning messages
A 9.6
A-115
“dt” warning messages
%s: move to volume with different charset not permitted.
This warning message appears if you intend to move a file
from one Macintosh volume to another, and the volumes’
character sets do not match.
%s: copy to volume with different charset not permitted.
This warning message appears if you intend to copy a file
from one Macintosh volume to another, and the volumes’
character sets do not match.
A 9: The Desktop utilities
A-116
A 9.7 Additional information
A 9.7
A 9.7.1
Additional information
General remarks
The information in this section are mainly meant for system
administrators who want to integrate the “dt” utilities into
custom solutions, e.g. backup scripts. You do not need
these information for the simple use of the “dt” utilities (it
does not hurt, however, to read on).
A 9.7.2
Macintosh files under UNIX
As described in this EtherShare manual, each volume used
in EtherShare is accompanied by a corresponding desktop
database, which holds additional information about each
file or directory stored on this volume.
Each file or directory in a Macintosh volume consists of
two parts: “the data fork” and the “resource fork”.
Though invisible to the Macintosh user, both parts of a file
and the corresponding information in the desktop database
are handled transparently and automatically by EtherShare.
If you also use EtherShare OPI 2.1 and/or PCShare 2.5 or
higher, these HELIOS products will also coordinate access
to shared files/folders with EtherShare’s volume desktop
databases (see chapter 9 “The EtherShare File Server”).
When you look at a volume from the UNIX point of view,
you will find two files: the data fork as the “normal” UNIX
file, and the resource fork in a subdirectory “.rsrc” of the
same name.
A 9: The Desktop utilities
A-117
A 9.7 Additional information
You will find more information about this in chapter 9.3
“Directory and file formats”.
A 9.7.3
Default resource fork handling
Since UNIX files consist of only one part, but Macintosh
files of two (see A 9.7.2 “Macintosh files under UNIX”),
each pure UNIX directory (“UNIX-dir”) should only have
entries without a corresponding resource fork, and in a
Macintosh volume (“volume-dir”) each entry should have a
corresponding resource fork.
If you now copy or move an entry from a “UNIX-dir” into
a “volume-dir”, “dt” always creates a default resource for
this file. This is also the default behavior, if you move or
copy a file from one “volume-dir” to the other.
If you copy an entry from a “volume-dir” into a “UNIXdir”, “dt” copies or moves the resource fork as well, even if
the resource fork is not needed here. This is done in order
to avoid any unintentional data loss. If you do not want to
consider the resource forks here, you may use the -n option
for the “mv” or “cp” command.
A 9.7.4
EtherShare and desktops
The “dt” utilities do not require EtherShare to run on the
UNIX server where you issue the commands, but by default
the “dt” utilities try to connect to the local desktop server on
the server where you issue the commands first.
If this volume is already in use (e.g. mounted as a volume
on a Macintosh) the “dt” utilities try to connect to the current server which serves this volume. This could be a differ-
A 9: The Desktop utilities
A-118
A 9.7 Additional information
ent server, e.g. if this volume is mounted via NFS. Source
and destination are handled completely independently, e.g.
a source file for a copy command may be served by a local
desktop server, while the destination directory which is located on a NFS-mounted directory is served by another
EtherShare desktop server.
You can run “dt” utilities on a workstation without having
EtherShare installed. In this case, a reference to the host
running the “desksrv” program must be defined by the environmental variable “DESKSERVER_HOST”=[host
name] which must be exported in order to take effect.
The “dt” utilities are unable to connect to a desktop server,
when the target directory is not mounted by any Macintosh
and no local desktop server is running. In this case start a
local EtherShare copy or mount this volume on a Macintosh.
The “dt” utilities will do an extensive verification in order
to connect to the proper desktop server. Nevertheless,
please verify your environment so that no single EtherShare
volume can be accessed at the same time from different
EtherShare servers.
Note:
In case different desktop servers are involved in a
move directory operation, it may be necessary to
traverse through directories instead of just moving the
directory entry – see Technical notes for “dt mv” for
more details.
A 9: The Desktop utilities
A-119
A 9.7 Additional information
A 9.7.5
“mount points” and “auto-mounter”
Double mounts (access to the same directory under different mount points, e.g.:
mount
myserver:/usr/es
/es
mount
myserver:/usr/es
/home/user1/es_copy)
will lead to differences between volume and desktop information, resulting in inconsistencies.
Please note that you may unintentionally cause this problem by accessing an already mounted volume via automounter:
dt cp /net/myserver/usr/etherhare/file1 file2
You may avoid this problem by running auto-mounter on
any involved server (source and destination).
A 9.7.6
Zero IDs
On any mounted volume, EtherShare automatically detects
any file which has an accompanying resource fork with a
zero ID (the ID set to numerical zero) when the parent directory is opened from a Macintosh.
A file without a valid ID does not have any database entry,
and therefore, a new desktop database entry is created, and
the resource fork is updated using the new ID.
The “dt” utilities never create zero ID resource forks in volumes unless you force this behavior using the -z flag for the
“cp” and “mv” command.
A 9: The Desktop utilities
A-120
A 9.7 Additional information
Important:
A 9.7.7
This option should only be used by system administrators – it is not intended for normal use.
Using “dt” for backup/restore
One main purpose of the “dt” utilities is to avoid problems
when restoring data from a backup device. Here we describe how you should use the “dt” utilities for backup/restore purposes:
backup
You may backup your data as usual directly from your volume. Please make sure that the hidden “.rsrc” directories are
included. To prevent backup of incomplete data in files,
make sure that the files/folders to be backed up will not be
manipulated from other Macintosh or UNIX applications.
Only if you intend to do a complete backup and restore of
an EtherShare volume you might include the “.Desktop”
file. For the period of time you need to backup and restore
this volume, EtherShare must be stopped with “stop-atalk”.
restore
Important:
Do never restore your data directly into the destination
volume!
Please create a restore directory on the same device (partition) where the destination volume resides, e.g. if you intend to restore files into “/data/mypics”, create a directory
“/data/restore”. This “restore” directory must not be defined as a volume, or mounted.
Now restore your data using your usual restore procedure
into this newly created directory “restore”. Make sure that
you do not restore the “.Desktop” and “DeskServer” files.
A 9: The Desktop utilities
A-121
A 9.7 Additional information
Important:
Do never remove these files (“.Desktop” and
“.DeskServer”) from a mounted volume or manipulate
them directly. This may cause not only data loss for
this volume, but may cause problems for all defined
volumes on the server. In case you want to backup/restore these files, make sure that EtherShare and
PCShare (if you are sharing volumes) are stopped
completely prior to your backup/restore operation.
Only if you stop EtherShare by means of ”stop-atalk”
and stop access from other EtherShare servers, intermediate access to these files from EtherShare processes can be prevented.
Finally move the restored files with e.g.:
dt mv /data/restore /data/mypics
into their final destination. This procedure avoids any data
loss and may be used on a mounted destination volume.
Usually, new (unused) file IDs are assigned when you copy
files to a backup destination. It may, however, be sensible
to keep the file ID (using the -k option). Thus, the file can
be re-used with its original ID.
This is especially useful if you are using Macintosh aliases
pointing to these files/folders. You should use this option
sensibly. In case a complete desktop rebuild has been conducted after your backup operation, aliases may point to the
wrong destination.
To avoid any problems, it may be a good idea to run an integrity check for the destination volume using the
“rebuild -s” command before restoring any files.
A 9: The Desktop utilities
A-122
A 10: Macintosh and Windows characters
A-123
Appendix
A 10:Macintosh and Windows
characters
When it comes to character transfer between Windows 98 /
Windows NT and Macintosh computers respectively, it
must be considered that Macintosh and Windows character
encoding utilizes 8-bit values which are not always mutually compatible. A well-known example are special characters.
Thus, in order to provide proper file name exchange between the different platforms, the “Unicode/UTF-8” encoding can be applied (compare “UTF-8 encoded file names” in
chapter 9.3 “Directory and file formats”).
Notwithstanding, there are some characters which are not
displayable at all on the other system. The following tables
show the characters in question, categorized by the operating system, and their respective hexadecimal value.
Fig. A-29 shows Windows 98 (left) and Windows NT4
(right) characters which the Macintosh cannot display.
Fig. A-30 shows Macintosh characters which Windows 98
cannot display. Similarly, Macintosh characters not displayable by Windows NT4 are shown in Fig. A-31.
A 10: Macintosh and Windows characters
A-124
Fig. A-29: Windows 98 (left) and Windows NT4 (right) characters
not displayable by Macintosh
A 10: Macintosh and Windows characters
A-125
Fig. A-30: Macintosh characters not displayable by Windows 98
A 10: Macintosh and Windows characters
A-126
Fig. A-31: Macintosh characters not displayable by Windows NT4
A 11: Glossary
A-127
Appendix
A 11:Glossary
A 11: Glossary
A-128
AFP server
Apple file server using the AppleTalk Filing Protocol
(AFP).
AppleTalk
A generic term for the most common network protocol used
by Apple Macintosh computers.
Chooser
A program provided by Apple for Macintosh computers
which lets you choose a server for a particular service, such
as printing or storing files.
Client
Software that uses the services of a server in a network.
Driver
A program which is part of the operating system of a computer and controls part of the hardware of the computer.
Ethernet,
Fast Ethernet
Ethernet is a network system which has been standardized
by the XEROX company. A differentiation is made between Thin Ethernet (which uses low-cost thin coaxial cable with a maximum length of approximately 185 m per
network segment), and 10Base-T Ethernet, which uses
standard telephone cable with a connector like a US telephone jack. Network cards for Thin Ethernet are usually
provided with coaxial (BNC) connectors. Some network
cards have connectors for more than one of these methods.
Ethernet (see also chapter 3.5 “Network topology”) is logically characterized by a linear bus topology. However,
nowadays the 10Base-T Ethernet and 100Base-T Ethernet
– also called Fast Ethernet – sport, from the physical point
of view, a star-shaped topology. Fast Ethernet is similar to
Ethernet but achieves data transfer rates of 100 Mbit/s (instead of 10 Mbit/s).
EtherShare
A program developed by HELIOS for AppleTalk networks.
It allows among other things the sharing of hard disks (file
server function) and printers (print server function), and
A 11: Glossary
A-129
uses the AppleTalk protocol and AppleShare IP for network communications.
EtherShare
OPI
An optional add-on for EtherShare which considerably
speeds up print spooling if you are printing DTP layouts
containing large high-resolution images. OPI (Open Prepress Interface) is an interface specification which was developed by Aldus Corp.
EtherTalk
A term used by Apple Computer when the AppleTalk protocol is used on an Ethernet network.
FDDI
The Fiber Distributed Data Interface (FDDI) is a network
system based on fiber-optic cables. FDDI is characterized
by very high speed and medium to high cost. It largely is
immune to electromagnetic interference, which is an advantage in certain industrial situations.
FDDITalk
A term used by Apple Computer when the AppleTalk protocol is used on an FDDI network.
Finder
A part of the Macintosh operating system provided by Apple for Macintosh computers.
Home
directory
Private directory provided for each UNIX user. The home
directory is the current directory as soon as you log in to a
server.
Host
In this manual, the UNIX computer on which the EtherShare Software runs.
LocalTalk
A low speed network interface which is built into Apple
Macintosh computers. A LocalTalk interface is provided in
all Macintosh workstations and in many printers. Nowadays, the LocalTalk technology is outdated already.
A 11: Glossary
A-130
Network
A cabling system which allows a number of devices such as
workstations and printers to communicate with each other.
Each device in the network can offer specific services, or be
a user of services provided by other devices. For example,
when a printer offers services to the network (the printing
of documents), it can be used by any of the workstations in
the network.
Node
A node is a data-link addressable entity on a network.
NVE
A network-visible entity (NVE) is a resource that is addressable through a network. Typically, the NVE is a socket client for a service available in a node.
PCShare
PCShare is a high-end TCP/IP-based file server, print server, and terminal server software for MS-DOS/Windows
computers which are attached to UNIX computers through
Ethernet, Token Ring, etc. Since PCShare is compatible
with EtherShare, DOS/Windows users can share network
printers and files with Macintosh and UNIX users, too.
PDF
The “Portable Document Format” (PDF) is an Adobe Acrobat file format that has been created for application independent file exchange. With the Acrobat Reader software
— which can be installed from our CD-ROM or downloaded from the Adobe Web site — you may read and print any
given PDF document.
Phase II
A new version of the AppleTalk protocol which, among
other improvements, allows up to 254 units in each network
segment and approximately 224 units in each network.
PPD
“PostScript Printer Description” (PPD), is a file format developed by Adobe Systems, Inc. PPD files contain information enabling software to produce the best results possible
for each type of designated printer.
A 11: Glossary
A-131
Protocol
A standardized data format which allows workstations to
communicate via a network.
RIP
A “Raster Image Processor” (RIP) performs the final calculation of the data which are sent to the output device. The
RIP may be either an external unit or part of the output device itself. A PostScript laser printer for example contains
its RIP.
Root
directory
The top-most directory on a UNIX computer is called
“root” directory. If you are logged in as “root”, you can access all other directories and subdirectories on the system.
Router
A program or hardware unit which interconnects two or
more networks (or zones) in order to transfer data in a bidirectional way between them. For example, EtherShare can
be configured as a router to interconnect a FDDI and an
Ethernet network.
Server
Software which provides services to a network, such as
printing (print server) or the storage of files (file server). In
this book, when we write Print Server or File Server in capitalized initial letters like this, we refer to the EtherShare
Print Server and File Server.
Socket
A socket is an addressable entity within a node connected
to an AppleTalk network. Sockets are owned by software
processes known as socket clients.
Spooler
A spooler is a set of programs which manage print jobs. A
spooler acts as a buffer for the files that have been sent to
an output device. A spooler may also be called “printer
queue”.
TCP/IP
An internet network is a virtual data network specification
based on a packet-oriented protocol (the internet protocol =
A 11: Glossary
A-132
IP) which allows data to be transferred between otherwise
incompatible networks. Thus, the internet specification describes a hardware-independent data protocol that lies
above the hardware protocol (such as Ethernet). The internet protocol (IP), however, is only able to exchange data
packets between computers. The “Transmission Control
Protocol” (TCP) extends this ability to allow processes to
be addressed on the target computer and to improve the reliability of the inter-process communication. TCP/IP has
been implemented by all major software and hardware providers.
Token Ring
Token Ring is a network system which was pioneered by
IBM. It is based on a token-passing system (i.e. a logical
ring) but its topology usually is a distributed star (see also
chapter 3.5 “Network topology”).
TokenTalk
A term used by Apple Computer when the AppleTalk protocol is used on a Token Ring network.
Workstation
Any computer connected to a network, for example a Macintosh computer, or a PC-compatible computer running the
AppleShare-PC program.
Zone
A section of a network. You need a router if you want to use
two or more zones. Note that the Macintosh’s Zone menu
may not be shown in the Chooser if you do not have zones.
Index
$ESDIR
/atechoping. (See atechoping)
/conf, Directory contents ......................................................... 60
/conf/afppasswd. (See AFP user list)
/conf/afpvolumes. (See afpvolumes)
/dicts, Directory contents ........................................................ 60
/etc, Directory contents ........................................................... 60
/macapps, Directory contents ........................................... 60, 73
/psfonts, Directory contents .................................................... 60
/stmp. .................................................................................... 261
Automatic creation .................................................................. 50
Directory contents ................................................................... 60
$ESDIR/dicts ......................................................................... 359, 362
$ESDIR/psfonts ............................................................................ 360
$PSTEXT_PREP .......................................................................... 406
$TERM .......................................................................................... 445
%%Include... references ............................................................... 361
.Desktop file .......................................................................... 268, 331
/etc/group
General explanation ................................................................ 22
/etc/hosts ....................................................................................... 390
Preparing the file for installation ............................................. 40
/etc/inittab
Changes during installation .................................................... 60
General explanation ................................................................ 22
A
/etc/passwd ................................................................................... 292
General explanation ................................................................ 22
/etc/printcap .......................................................................... 360, 365
alternative names ................................................................. 383
General explanation ................................................................ 21
serial example ....................................................................... 385
TCP/IP example .................................................................... 392
Viewing and editing the file (from a Mac) .............................. 188
/etc/rc.local
Changes during installation .................................................... 60
General explanation ................................................................ 22
/etc/services .................................................................................. 391
/etc/system .................................................................................. A-73
/home/apps/.rsrc/::volrsrc .............................................................. 268
_AppleDict_md_68_0 .................................................................... 362
_AppleDict_md_70_0 .................................................................... 362
“AppleTalk Address Resolution Protocol”. (See aarp)
A
aarp ............................................................................................. A-70
Accented characters
Character conversion tables of HELIOS Mail ....................... 204
in names (user names, passwords, etc.) .............................. 269
accented characters ...................................................................... 411
Access privileges .......................................................................... 311
access privileges
(---) ........................................................................................ 313
(rwx) read write execute ....................................................... 313
(r-x) read execute ................................................................. 313
(-w-) write .............................................................................. 313
AFP vs. UNIX ........................................................................ 313
changing manually ................................................................ 315
A
access privileges for EtherShare .................................................. 326
access privileges mechanisms ..................................................... 311
Activation Key
transfer .................................................................................. 455
Activation key
Example of an Activation Key Reply form .............................. 0-9
Regular license/demo license ................................................. 39
Activation Key (or password) ........................................................ 454
Address
AppleTalk NVE ............................................................. 175, 379
HELIOS company address .................................................... 0-2
TCP/IP .................................................................................. 389
Administration Server. (See also admsrv)
Administration Server and EtherShare Admin ........................ 19
configuration ......................................................................... 416
login ........................................................................................ 93
admsrv .......................................................................................... 417
error messages ..................................................................... 470
parameters of ........................................................................ 418
Adobe “Type 1” and “Type 3” printer fonts .................................... 359
Adobe fonts ................................................................................... 169
ADSP
AppleTalk ADSP Tool. (See AppleTalk)
AFP security .................................................................................. 292
AFP server
Definition ........................................................................... A-128
AFP user list .................................................................. 292, 426, A-3
initial contents ....................................................................... 294
AFP user list (“$ESDIR/conf/afppasswd”) ..................................... 292
afppasswd (atalk.conf) .................................................................. 282
afppasswd (UNIX program) .......................................................... 265
A
afpport (atalk.conf) ........................................................................ 279
afpsrv (UNIX)
Description ............................................................................ 265
error messages ..................................................................... 465
Parameters ........................................................................... 275
afpvolumes .................................................................................... A-5
AppleShare-PC ............................................................................... 15
AppleTalk
ADSP Tool, Installation ........................................................... 75
Characterization ...................................................................... 25
Definition ........................................................................... A-128
PAP connection .................................................................... 378
Protocol stack ......................................................................... 15
AppleTalk router .............................................................................. 40
Application count ......................................................................... A-41
Application data (desksrv) ............................................................. 331
ASCII “0” ....................................................................................... 325
atalk.conf
Description ............................................................................ 253
Editing atalk.conf manually ................................................... 188
Parameter syntax .................................................................. 253
atalk.conf, main configuration file .................................................. A-1
atalkd (UNIX)
Description ............................................................................ 255
error messages ..................................................................... 460
Parameters of the atalkd program ........................................ 257
atechoping
Using atechoping to test the network for services .................. 64
Available storage space on volumes with EtherShare .................. 326
B
B
balanceif ................................................................................ 352, 356
Balancing print job loads (atalk.conf) ............................................ 398
Banner .......................................................................................... 353
bannerfirst (atalk.conf) .................................................................. 374
bannerlast (atalk.conf) .................................................................. 374
bannerstring .................................................................................. 446
Base license
missing .................................................................................. 459
biff program ................................................................................... 434
binonly (atalk.conf) ........................................................................ 285
BSD
“lpr” ....................................................................................... 149
printing system .............................................................. 149, 366
BSD-style “lpq” command ........................................................... A-67
C
capname ....................................................................................... 445
CD-ROM volumes ......................................................................... 338
Change
Access privileges for files and directories ............................... 23
password .............................................................................. 294
Passwords ............................................................................ 265
chargebanner (atalk.conf) ............................................................. 373
charset=MacRoman (AFP volumes) ............................................. 304
chgrp (UNIX)
General explanation ................................................................ 23
chmod (UNIX)
General explanation ................................................................ 23
C
Chooser
Change password button ...................................................... 265
Definition ........................................................................... A-128
chown (UNIX)
General explanation ................................................................ 23
Client
Definition ........................................................................... A-128
clientmessages (atalk.conf) .......................................................... 374
compression (atalk.conf) ............................................................... 397
Configuration
Administration Server ........................................................... 416
as network router ................................................................ A-17
Configuring the network connection during installation .......... 55
Desktop Server ..................................................................... 330
EtherShare Admin .................................................................. 88
HELIOS Terminal .................................................................. 238
kernel .................................................................................. A-69
Mail Server ............................................................................ 430
manual network configuration ............................................. A-26
NIS (Yellow Pages) ............................................................... 425
Print Server ........................................................................... 350
printers manually .................................................................. 371
re-network connection ........................................................ A-39
sample .................................................................................. A-1
System messages .................................................................. 20
Terminal Server .................................................................... 442
connectlimit (atalk.conf) ................................................................ 279
Conventions
Font and syntax conventions for the manual ............................ 9
cpio ............................................................................................... 319
Creating
groups ................................................................................... 297
users ..................................................................................... 295
D
cron (UNIX)
General explanation ................................................................ 23
cron used for backup .................................................................... 320
Ctrl-D
Generated by Windows ........................................................ 160
Ctrl-D for end of file ....................................................................... 384
Ctrl-T for return status ................................................................... 384
Custom Install (EtherShare Client Installer) .................................... 74
D
daemonuid
security risk ........................................................................... 423
daemonuid (admsrv) ..................................................................... 422
Data backup .................................................................................. 318
Datagram Delivery Protocol streams multiplexor ........................ A-70
ddp .............................................................................................. A-70
/dev/ddp .............................................................................. A-69
boot function ....................................................................... A-72
error message ............................................................... 460, 463
Delete
EtherShare Macintosh utilities ................................................ 77
EtherShare UNIX software ..................................................... 77
EtherShare users (using the EtherShare Admin) ................. 110
Groups (using the EtherShare Admin) .................................. 116
Incoming mails (HELIOS Mail) .............................................. 215
Printer jobs (using the EtherShare Admin) ........................... 166
Printer queues (using the EtherShare Admin) ...................... 157
Volumes (using the EtherShare Admin) ............................... 127
Deleting
groups ................................................................................... 300
user ....................................................................................... 299
Demonstration key ........................................................................ 454
D
DESKSERVER_HOST (environmental variable) ...................... A-118
desksrv .......................................................................................... 331
Checking the desksrv process ................................................ 62
Commands for checking the desksrv process ........................ 64
error messages ..................................................................... 465
errors and messages ............................................................ 342
parameters of ........................................................................ 342
Desktop
auto rebuild ........................................................................... 336
rebuild (desksrv) ................................................................... 333
dictdir (atalk.conf) .......................................................................... 377
dir (atalk.conf) ............................................................................... 395
Directory
ID, File ID .............................................................................. 332
diskif ...................................................................................... 352, 356
DOS/Windows workstations
Preparing a PC for installation ................................................ 43
Download PostScript fonts ............................................................ 359
Driver
Definition ........................................................................... A-128
Driver (AppleTalk)
Availability ............................................................................... 41
dsiblocksize (atalk.conf) ................................................................ 277
dsitickletime (atalk.conf) ................................................................ 278
dt chgrp command ............................................................ 316, A-112
dt chmod command .......................................................... 316, A-109
dt chown command ........................................................... 316, A-111
dt command ................................................................................ A-93
dt cp command ........................................................................... A-98
dt iddump command ................................................................. A-104
E
dt idinfo command ..................................................................... A-113
dt ls command ........................................................................... A-104
dt mkdir command ............................................................ 316, A-107
dt mv command .......................................................................... A-96
dt rm command ........................................................................... A-94
dt rmdir command ....................................................................... A-95
dt set command ........................................................................ A-100
dt touch command .................................................................... A-108
dt upd command ....................................................................... A-108
dump (UNIX) ............................................................................... A-51
E
Easy Install (EtherShare Client Installer) ........................................ 74
entity (atalk.conf) ........................................................................... 379
Error Messages ............................................................................. 457
Ethernet
Characterization ...................................................................... 25
Definition ........................................................................... A-128
Network topology .................................................................... 27
EtherShare
Definition ........................................................................... A-128
Functional modules of the EtherShare software ..................... 14
New features of program version 2.5 ...................................... 29
Supported printers .................................................................. 37
Supported UNIX platforms ...................................................... 36
EtherShare Admin
Active Users (Lists menu) ..................................................... 170
Changes made when creating a new printer ........................ 156
Changing group data ............................................................ 112
Changing printer data ........................................................... 138
Changing user data .............................................................. 104
Changing user passwords .................................................... 108
E
EtherShare Admin (contin.)
Changing volume data .......................................................... 118
Configuration .......................................................................... 88
Copying configuration data to different hosts ....................... 191
Creating new groups ............................................................. 115
Creating new users ............................................................... 109
Creating new volumes .......................................................... 123
Creating printers ................................................................... 141
Deleting groups ..................................................................... 116
Deleting printer jobs .............................................................. 166
Deleting printers .................................................................... 157
Deleting users ....................................................................... 110
Deleting volumes .................................................................. 127
Edit Initialization (Printer menu) ............................................ 160
Empty Trash (Volume menu) ................................................ 131
Extension Mappings (Lists menu) ......................................... 179
Fonts (Lists menu) ................................................................ 168
General explanation ................................................................ 19
Group data, Adding members to a group ............................. 113
Groups (Lists menu) ............................................................. 112
Installation ............................................................................... 74
List windows ......................................................................... 102
Logging in via AppleTalk ......................................................... 93
Logging in via TCP/IP ............................................................. 95
Logging off ............................................................................ 194
Mounting a volume ............................................................... 133
Multiple EtherShare hosts ..................................................... 190
Multiple lists .......................................................................... 190
Opening printer job windows ................................................ 164
Password security ................................................................... 96
Preferences
Background windows active ........................................... 99
Language ...................................................................... 100
Log on automatically ....................................................... 99
Minimum Group ID ........................................................ 100
E
EtherShare Admin
Preferences (contin.)
Minimum User ID .......................................................... 100
Primary group (User) .................................................... 100
Saving preferences ....................................................... 101
Spool directory .............................................................. 100
Starting program (User) ................................................ 100
User defaults ................................................................ 100
User home directory ..................................................... 100
Printer data
“Print To Disk” (Connection) ......................................... 151
Accounting File ............................................................. 143
AppleTalk (Connection) ................................................ 144
Balance Group (Connection) ........................................ 152
Banner Page ................................................................. 143
Baud rate (Serial connection) ....................................... 147
Chooser Name ............................................................. 141
Compression (“Print To Disk” connection) .................... 152
CTRL-D (TCP connection) ............................................ 148
Hide Printer (AppleTalk connection) ............................. 144
Hide Queue .................................................................. 143
Hold Queue (Connection) ............................................. 153
Hold Time (Hold Queue connection) ............................ 153
Host Name (TCP connection) ....................................... 148
Key File (Shared Memory connection) ......................... 151
Name (AppleTalk connection) ...................................... 144
Name Prefix (“Print To Disk” connection) ..................... 151
Notify Program (“Print To Disk” connection) ................. 151
Port (TCP connection) .................................................. 148
Printer Name ................................................................ 141
Printers (Balance Group connection) ........................... 152
Require Authentication ................................................. 144
Resolve (“Print To Disk” connection) ............................ 152
Serial (Connection) ....................................................... 145
Shared Memory (Connection) ...................................... 150
E
EtherShare Admin
Printer data (contin.)
Spool Directory ............................................................. 142
TCP (Connection) ......................................................... 147
Type (AppleTalk connection) ........................................ 144
UNIX Directory (“Print To Disk” connection) ................. 151
Zone (AppleTalk connection) ........................................ 144
Printer Log File (Lists menu) ................................................. 172
Printer menu ......................................................................... 158
Printers (Lists menu) ............................................................. 136
Rebuild Desktop (Volume menu) .......................................... 129
Restart Printer (Printer menu) ............................................... 163
Save name (login) ................................................................... 96
Save password (login) ............................................................ 96
Select PPD (Printer menu) ................................................... 161
Selecting multiple entries from a list ..................................... 103
Sending messages to users (Messages menu) .................... 171
Server Log File (Lists menu) ................................................. 175
Setting preferences ................................................................. 98
Settings (Printer menu) ......................................................... 158
Show Fonts (Printer menu) ................................................... 159
Spool & Print (Printer menu) ................................................. 163
Spool only (Printer menu) ..................................................... 163
Starting the Admin .................................................................. 92
System Messages (Lists menu) ............................................ 176
Update Fonts (Printer menu) ................................................ 158
User data
Groups list .................................................................... 106
Home directory ............................................................. 106
Primary group ............................................................... 106
Start program ................................................................ 106
User name, Password, Full Name ................................ 105
Users (Lists menu) ................................................................ 104
Versions (Lists menu) ........................................................... 178
F
EtherShare Admin (contin.)
Volume data
Directory ....................................................................... 120
Exchangeable ............................................................... 121
Invisible ......................................................................... 122
Password ...................................................................... 120
Read Only ..................................................................... 121
Removable medium ...................................................... 119
Volume Groups list ....................................................... 126
Volume menu ........................................................................ 129
Volumes (Lists menu) ........................................................... 118
Window positions .................................................................... 99
EtherShare Applications
Volume contents ..................................................................... 73
EtherShare Client Installer
Description .............................................................................. 73
EtherShare OPI
Definition ........................................................................... A-129
EtherTalk
Definition ........................................................................... A-129
exitserver operator ...................................................................... A-61
extendedinfo (atalk.conf) ............................................................... 376
Extension mapping ....................................................................... 309
F
facility ............................................................................................ 376
fakeoffspring (atalk.conf) ............................................................... 287
Fast Ethernet
Definition ........................................................................... A-128
FDDI
Definition ........................................................................... A-129
FDDITalk
Definition ........................................................................... A-129
G
file (ypafppasswd) (admsrv) .......................................................... 419
file (ypgroup) (admsrv) .................................................................. 419
file (yppasswd) (admsrv) ............................................................... 419
File Server
General explanation ................................................................ 15
filedatesync (atalk.conf) ................................................................ 286
filename (mailsrv) .......................................................................... 436
files (atalk.conf) ............................................................................. 281
Finder
Definition ........................................................................... A-129
Finder file info
Location ................................................................................ 268
findercache (atalk.conf) ................................................................. 282
Folders
creating under UNIX ............................................................. 315
Creation of folders on a Macintosh computer ......................... 22
without groups ...................................................................... 327
fontdir (atalk.conf) ......................................................................... 377
Fonts
EtherShare Print Server fonts - Printer’s resident fonts ........ 159
including ................................................................................ 359
Printer’s resident font list ...................................................... 158
FONTS file .................................................................................... 359
G
generic
error messages ..................................................................... 459
Group "nogroup" ........................................................................... 327
groupwriteisowner (atalk.conf) ...................................................... 287
Guest access ................................................................................ 298
guestid (atalk.conf) ........................................................................ 284
H
H
HELIOS
Contents of the software package ......................................... 0-6
Example of an Activation Key Reply form .............................. 0-9
HELIOS company address .................................................... 0-2
License information ................................................................ 0-6
HELIOS Mail
Activating the Mail Notification Init ........................................ 234
Addresses menu ................................................................... 229
Attached files in incoming mails ............................................ 214
Attaching a file to a mail document ....................................... 219
Configuration ........................................................................ 198
Configuring the connection ................................................... 208
Deleting incoming mails ........................................................ 215
Forwarding a mail ................................................................. 227
General explanation ................................................................ 18
Incoming mail window ........................................................... 212
Installation ............................................................................... 74
Login dialog .......................................................................... 209
Preferences (General)
Automatic login ............................................................. 202
Background windows active ......................................... 202
Don’t use Navigation Dialogs ....................................... 203
Language ...................................................................... 203
Preferences (Header)
Full/Smart/No Header ................................................... 206
Preferences (Inbox)
Font, Size ..................................................................... 207
Ignore “Re:” .................................................................. 207
Preferences (Insert)
"Cc:", "Bcc:" line ............................................................ 204
Signature ...................................................................... 205
Preferences (Text)
Font and Size ............................................................... 204
Horizontal Scrolling ....................................................... 204
H
HELIOS Mail
Preferences (Text) (contin.)
Translation Table .......................................................... 204
Wrap At ......................................................................... 204
Reading, saving and printing a mail ...................................... 213
Reply mail ............................................................................. 225
Saving a vacation message .................................................. 232
Saving one’s signature ......................................................... 231
Send ..................................................................................... 227
Setting preferences ............................................................... 201
Starting HELIOS Mail ............................................................ 200
Template, Creating and using templates .............................. 224
Temporary users (login) ........................................................ 210
Updating and sorting incoming mails .................................... 212
Using the address book ........................................................ 228
Using the Mail Notification Feature ....................................... 234
Windows menu ..................................................................... 233
Writing a new mail ................................................................ 217
HELIOS Mail Init
Installation ............................................................................... 75
Usage ................................................................................... 234
HELIOS Terminal
Configuration ........................................................................ 238
Configuring the connection ................................................... 242
Copy and paste ..................................................................... 247
Function keys ........................................................................ 249
General explanation ................................................................ 18
Installation ............................................................................... 74
Preferences
Background windows active ......................................... 240
Connect on open .......................................................... 241
Connection ................................................................... 241
I
HELIOS Terminal
Preferences (contin.)
Emulation ...................................................................... 241
Language ...................................................................... 241
New window on start .................................................... 240
Use saved window location .......................................... 241
Saving preferences ............................................................... 241
Setting preferences ............................................................... 240
Starting Helios Terminal ....................................................... 239
hidedotfiles (atalk.conf) ................................................................. 288
Hierarchical File System (HFS) ..................................................... 266
holdif ..................................................................................... 352, 356
Home directory
Definition ........................................................................... A-129
home directory .............................................................................. 295
home directory entry ..................................................................... 299
home volume name ...................................................................... 304
homeipaccess (atalk.conf) ............................................................ 280
homevolname (atalk.conf) ............................................................. 280
Host
Definition ........................................................................... A-129
host (atalk.conf) ............................................................................ 390
host’s name and internet address ............................................... A-49
hostname (UNIX), uname (UNIX), arp (UNIX) ............................ A-49
I
IBM PC extended ASCII code ....................................................... 412
IBM RS/6000 host ....................................................................... A-28
Icon
Finder file icon ...................................................................... 266
Generic icons ........................................................................ 269
volume data .......................................................................... 331
I
ICS (Included Color Separation) ................................................... 401
idletime (atalk.conf) ....................................................................... 280
idlewarntime (atalk.conf) ............................................................... 281
if (atalk.conf) ................................................................................. 257
ignorefontresolveopt (atalk.conf) ................................................... 375
ignoreincluderesolveopt (atalk.conf) ............................................. 375
ignoreopiresolveopt (atalk.conf) .................................................... 375
ignoreprocsetresolveopt (atalk.conf) ............................................. 375
ignoreresolveopts (atalk.conf) ....................................................... 374
Installation
Checking the installation with atechoping ............................... 64
Checking the installation with poll ........................................... 70
Checking the installation with vpoll ......................................... 67
Checking the process list after installation .............................. 61
Checking the RPC list after installation ................................... 62
Installing Admin, Time Server, HELIOS Mail + Terminal ........ 74
Installing EtherShare updates ................................................. 79
Installing other HELIOS products ........................................... 41
Installing the EtherShare UNIX software from CD-ROM ........ 46
Installing the EtherShare UNIX software from tape ................ 58
Licensing EtherShare during installation ................................ 53
System requirements .............................................................. 36
Uninstalling EtherShare. (See Delete) .................................... 77
Updating from version 2.2 or older to 2.5 ............................... 44
Using the EtherShare Client Installer ...................................... 73
Interface (atalk.conf)
Description ............................................................................ 257
ip (atalk.conf) ................................................................................ 279
ipaccess ........................................................................................ 304
ipaccess (atalk.conf) ..................................................................... 279
ipaddress (atalk.conf) .................................................................... 278
J
ipaddresses (atalk.conf) ................................................................ 278
ISO 8859-1 (DEC VT200) ............................................................. 412
J
jobholdtime (atalk.conf) ................................................................. 398
K
Kernel linking .............................................................................. A-71
key (atalk.conf) .............................................................................. 394
Keyboard Shortcuts for working with EtherShare Admin .............. 103
L
license
error messages ..................................................................... 457
LinoDict 1.0 ................................................................................... 401
Linotype Color Separation Extensions .......................................... 401
Loadable drivers ......................................................................... A-69
LocalTalk
Definition ........................................................................... A-129
localwinsize (atalk.conf)
afpsrv .................................................................................... 277
mailsrv .................................................................................. 433
papsrv ................................................................................... 379
termsrv .................................................................................. 445
locks (atalk.conf) ........................................................................... 281
Logging on
Logging on to EtherShare/to UNIX server .............................. 12
lpd ................................................................................................. 353
lpq ................................................................................................. 372
lpq (UNIX) ................................................................................... A-67
lpr (UNIX)
General explanation ................................................................ 21
M
M
Mac-binhex40 encoding ................................................................ 224
machid .......................................................................................... A-9
Machine ID
Extracting the server’s machine ID ........................................ 0-7
Macintosh workstations
Preparing a Macintosh for installation ..................................... 42
Magneto-Optic (MO) cartridges volumes ...................................... 338
mail (atalk.conf) ............................................................................. 373
mail (UNIX)
General explanation ................................................................ 21
Mail Notification Feature
Installation ............................................................................... 75
Mail program on Macintosh. (See HELIOS Mail)
Mail Server. (See also mailsrv)
configuration ......................................................................... 430
Mail Server and HELIOS Mail ................................................. 18
mailerpgm ..................................................................................... 436
mailsrv ........................................................................................... 431
error messages ..................................................................... 470
parameters of ........................................................................ 432
Manual
Logical units in this manual ....................................................... 8
matrix printer ................................................................................. 404
ESC character ...................................................................... 409
maxclients (admsrv) ...................................................................... 419
maxdesktop (atalk.conf) ................................................................ 342
maxuid (atalk.conf) ........................................................................ 284
Mime-base64 encoding ................................................................. 224
minpwlen (atalk.conf) .................................................................... 283
N
minuid (atalk.conf) ......................................................................... 283
mkafppasswd ........................................................................ 293, 321
mkdir (UNIX)
General explanation ................................................................ 22
Modules of EtherShare
List of functional modules ....................................................... 14
Multiple
EtherShare hosts .................................................................. 275
Terminal sessions ................................................................. 238
multiple printers ............................................................................. 381
N
name (official name) (UNIX mail name) ........................................ 435
netconf
configuration tool ................................................................ A-18
enhanced version ................................................................... 30
manual network connection ...................................................... 4
manual network connection configuration ................................ 4
netname ........................................................................................ 444
netname (admsrv) ......................................................................... 418
netname (afpsrv) ........................................................................... 275
netname (mailsrv) ......................................................................... 432
nettype .......................................................................................... 444
nettype (mailsrv) ........................................................................... 432
Network
Cabling .................................................................................... 27
Definition ........................................................................... A-130
Network Trash Folder
Location ................................................................................ 268
newline conversion ....................................................................... 310
NFS-mounted volume = Network File System .............................. 301
O
nice (atalk.conf) ............................................................................. 375
noautologin (mailsrv) ..................................................................... 436
nobiff. (See biff program)
nobinmode (atalk.conf) ................................................................. 384
noctrld ........................................................................................... 391
Node
Definition ........................................................................... A-130
nodotafpvolumes ........................................................................... 289
noguest (AFP volumes) ................................................................ 303
nohomedir (atalk.conf) .................................................................. 284
nologdenied (atalk.conf) ................................................................ 279
nomagic (atalk.conf) ...................................................................... 376
nopasswd (mailsrv) ....................................................................... 435
nopublish (AFP volumes) .............................................................. 303
nosortdirs (atalk.conf) ................................................................... 279
nospoolspool (atalk.conf) .............................................................. 374
notexttran ...................................................................................... 289
notifyprog (atalk.conf) ................................................................... 396
nroff format .................................................................................... 404
NVE
Definition ........................................................................... A-130
O
OPI. (See EtherShare OPI)
opisrv
error messages ..................................................................... 465
P
P
papif ...................................................................................... 352, 354
papsrv ................................................................................... 352, 353
parameter
background ................................................................... 370
dictdir ............................................................................ 365
filter ............................................................................... 368
filtercmd ........................................................................ 368
foreground .................................................................... 370
groups ........................................................................... 369
lpr .................................................................................. 366
name ............................................................................. 364
noauthenticate .............................................................. 370
noresolve ...................................................................... 366
printer ........................................................................... 365
publish .......................................................................... 369
type ............................................................................... 364
zone .............................................................................. 365
papsrv (UNIX)
configuring manually ............................................................. 371
error messages ..................................................................... 468
General explanation ................................................................ 16
operation ............................................................................... 359
parameter ............................................................................. 364
Parameter
cleanorphans ........................................................................ 340
papsrv ................................................................................... 364
printer (global) ....................................................................... 372
rebuild ................................................................................... 340
twopass ................................................................................. 340
passwd (UNIX)
General explanation ................................................................ 22
Password
preventing changes .............................................................. 327
P
PC
Requirements for DOS/Windows workstations ....................... 43
PCShare
Definition ........................................................................... A-130
PCShare and EtherShare ....................................................... 15
PDF
Definition ........................................................................... A-130
Phase I
routing between Phase I and Phase II ................................ A-33
Phase II
Definition ........................................................................... A-130
Example entry for Phase II network in atalkd ....................... 258
Interface ................................................................................ 257
Zones ...................................................................................... 28
poll
Checking the installation with poll ........................................... 70
poll (UNIX)
General description of HELIOS poll ........................................ 70
portmap (UNIX)
Checking the portmap process ............................................... 62
PostScript
INIT ....................................................................................... 160
PostScript coding (character set translation) ................................ 411
PostScript comments .................................................................... 399
PPD
Definition ........................................................................... A-130
prefix (atalk.conf) .......................................................................... 396
Print Server
restarting ............................................................................... 363
Print Server. (See also papsrv)
P
printcap (UNIX)
example ................................................................................ A-2
flags ...................................................................................... 386
printcap, example .......................................................................... 380
Printer
INIT
exitserver operator ...................................................... A-61
interface errors ...................................................................... 470
log file structure .................................................................. A-56
Network connections .............................................................. 37
status channel ....................................................................... 372
status messages ................................................................... 490
printers (atalk.conf) ....................................................................... 398
Printing to a hold/error queue (atalk.conf) ..................................... 397
Printing to disk .............................................................................. 395
Private volume .............................................................................. 304
Private volumes on EtherShare File Server .................................. 325
PrnAdm group ................................................................................. 31
prnadmgroup (admsrv) ................................................................. 421
Process list
Checking the process list ........................................................ 61
ProcSet Queries ............................................................................ 399
protected (admsrv) ........................................................................ 420
Protocol
Definition ........................................................................... A-131
ps (UNIX command) ....................................................................... 61
psif ........................................................................................ 352, 355
error messages ..................................................................... 492
psof ....................................................................................... 352, 353
error messages ..................................................................... 492
pssuffix (atalk.conf) ....................................................................... 396
Q
pstext (UNIX) ................................................................................ 404
pstext.ps
encoding tables ..................................................................... 411
Public volumes .............................................................................. 301
Q
QueueAdm group .......................................................................... 422
queueadmgroup (admsrv) ............................................................. 422
R
readonly (AFP volumes) ............................................................... 303
Readonly volumes ........................................................................ 338
readwrite (AFP volumes) .............................................................. 303
rebuild
error messages ..................................................................... 341
rebuild (UNIX) ............................................................................... 337
Remote LPR
receive jobs through ........................................................... A-68
Remote LPR protocol .................................................................... 387
remotewinsize (atalk.conf)
afpsrv .................................................................................... 277
mailsrv .................................................................................. 433
papsrv ................................................................................... 379
termsrv .................................................................................. 445
Removable volume
Mounting a removable volume .............................................. 133
resolve (atalk.conf) ........................................................................ 396
resolve, OPI .................................................................................. 361
Resource orphans ......................................................................... 337
restart-pap (UNIX) ......................................................................... 363
restore (UNIX) ..................................................................... 319, A-52
General explanation ................................................................ 24
S
RIP
Definition ........................................................................... A-131
rmdir (UNIX)
General explanation ................................................................ 22
Root directory
Definition ........................................................................... A-131
Router
Definition ........................................................................... A-131
General explanation ................................................................ 26
Routing
Definition ................................................................................. 15
EtherShare’s built-in routing functions .................................... 26
Routing table ......................................................................... 256
Routing table maintenance ................................................... 256
RPC (UNIX)
Required for installation .......................................................... 36
rpcbind (UNIX)
Checking the rpcbind process ................................................ 62
rprinter (atalk.conf) ........................................................................ 392
rsslimit (atalk.conf) ........................................................................ 376
S
savepasswd (atalk.conf) ....................................................... 283, 420
Screen fonts .................................................................................. 169
seconds (mailsrv) .......................................................................... 434
Security
Password security (EtherShare Admin) .................................. 96
User/Group security .............................................................. 100
Who can use the EtherShare Admin? .................................... 90
security with minuidlimit parameter ............................................... 284
security with the “nosavepasswd switch” ...................................... 420
security with the nosavepasswd switch ........................................ 283
S
Serial
PostScript connection ........................................................... 383
Server
Definition ........................................................................... A-131
Server log file (Admin)
structure .............................................................................. A-58
servers (UNIX) .............................................................................. 259
service (atalk.conf) ........................................................................ 391
sessions (atalk.conf) ..................................................................... 281
setgid ............................................................................................ 317
Shared Memory
software RIP ......................................................................... 393
shmif ..................................................................................... 352, 357
shutdown message ....................................................................... 288
Socket
Definition ........................................................................... A-131
Solaris 2
tuning .................................................................................. A-73
Solaris 2.x ................................................................................... A-70
spooldirectory (mailsrv) ................................................................. 433
Spooler
Definition ........................................................................... A-131
start-atalk (UNIX) .......................................................................... 259
statusport (atalk.conf) ................................................................... 390
stop-afp (UNIX) ............................................................................. 321
stop-atalk (UNIX) .......................................................................... 259
suffixes (atalk.conf) ....................................................................... 285
swho (UNIX) .................................................................................. 260
symbolic link for each printer ........................................................ 381
Symbolic links ............................................................................... 274
T
SysAdm group .............................................................................. 421
sysadmgroup (admsrv) ................................................................. 421
syslogd (UNIX)
General explanation ................................................................ 20
System message file
Checking the system message file ......................................... 62
System V printing system ............................................................. 149
T
Tape
Installation from tape .............................................................. 58
tar .................................................................................................. 319
TCP/IP
Definition ........................................................................... A-131
PostScript connection ........................................................... 387
TCP/IP stream protocol ................................................................. 387
tcpif ....................................................................................... 352, 355
error messages ..................................................................... 495
tcpresolve (atalk.conf) ................................................................... 391
termcap ......................................................................................... 446
Terminal Server. (See also termsrv)
Terminal Server and HELIOS Terminal .................................. 18
terminfo ......................................................................................... 446
termsrv .......................................................................................... 443
error messages ..................................................................... 470
termsrv (UNIX)
error messages ..................................................................... 470
parameters of ........................................................................ 444
The file “/etc/group” ....................................................................... A-5
Time Server
Installation ............................................................................... 74
U
Token Ring .................................................................................. A-28
Characterization ...................................................................... 26
Definition ........................................................................... A-132
Network topology .................................................................... 27
TokenTalk
Definition ........................................................................... A-132
translateany (atalk.conf) ................................................................ 288
TrueType fonts .............................................................................. 169
U
ufsdump (UNIX) ............................................................................ 319
General explanation ................................................................ 24
Uninstall. (See Delete)
UNIX
group list ............................................................................... 291
Preparing the UNIX host for installation .................................. 39
user list ................................................................................. 291
UNIX File System .......................................................................... 301
UNIX file system (UFS) ................................................................. 266
UNIX file types (editable by TeachText on Macintosh) ................. 272
UNIX VT100 emulation ................................................................. 446
UNIX yellow pages ........................................................................ 425
unixlocks (AFP volumes) .............................................................. 303
unixshare (AFP volumes) .............................................................. 303
Updates
Access to EtherShare server updates .................................... 79
Installing updates for Macintosh applications ......................... 86
Installing updates, necessary precautions .............................. 82
User interface of the HELIOS update installer ........................ 82
Using the HELIOS update installer ......................................... 80
V
User
names in print jobs, Document names ............................... A-57
without primary group ........................................................... 327
utf8 (AFP volumes) ....................................................................... 304
UTF-8 encoding ............................................................................ 269
V
volcheckinterval (atalk.conf) .......................................................... 278
volstatinterval (atalk.conf) ............................................................. 278
Volume
create under UNIX ................................................................ 317
duplicate names .................................................................... 305
Trash folder ........................................................................... 131
without groups ...................................................................... 327
Volume desktop
Location ................................................................................ 268
Volume list .................................................................................... 302
Volume size limits ......................................................................... 306
Volumes
maximum number of volumes ............................................... 306
volumes (atalk.conf) ...................................................................... 377
vpoll
Checking the installation with vpoll ......................................... 67
General description of HELIOS vpoll ...................................... 65
user interface of HELIOS vpoll ............................................... 66
VT320 emulation ........................................................................... 446
VT320 Tool
Installation ............................................................................... 75
W
watchtime (atalk.conf) ................................................................... 372
welcome message ........................................................................ 288
X
Workstation
Definition ........................................................................... A-132
writesize (atalk.conf) ..................................................................... 391
X
xferlog (atalk.conf) ........................................................................ 280
Y
Yellow pages .........................................................106, 109, 193, 419
Z
Zone
Definition ........................................................................... A-132
zonename ..................................................................................... 444
zonename (admsrv) ...................................................................... 418
zonename (afpsrv) ........................................................................ 275
zonename (mailsrv) ...................................................................... 432
Zones (UNIX)
General explanation ................................................................ 72