1
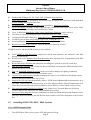
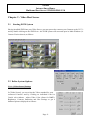
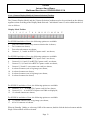
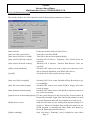
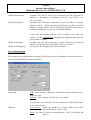
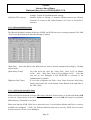
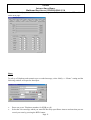
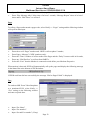
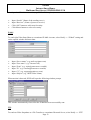
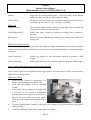
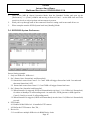
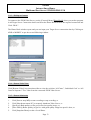
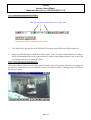
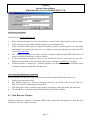
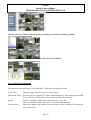
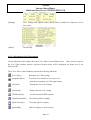
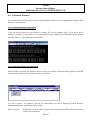
iDVR Internet Surveillance Multicam Host Server STD / RIO / PRO V5.0 User’s Guide Copyright © 2000-2002 Protectserve Pacific Ltd. iDVR is trademark of Protectserve Pacific Ltd. Windows 98, Windows ME, Windows 2000, Windows NT and Windows XP are registered trademarks of Microsoft Corporation. Indeo is registered trademark of Intel Corp. All brand names, trademarks, and registered trademarks are the property of their respective holders. iDVR Internet Surveillance Multicam Host Server STD/RIO/PRO V5.0 Table Of Contents Chapter 1 : Overview................................................................................................... 4 1.1 System Introduction ............................................................................. 4 1.2 Versions & Integration ........................................................................ 4 1.3 Versions & Packaging .......................................................................... 4 1.4 Versions & Major Functions ............................................................. 5 1.5 Installing iDVR STD / RIO / PRO Systems ................................. 6 Chapter 2 : Video Host Server ...................................................................................11 2.1 Starting iDVR System ........................................................................11 2.2 Define System Options .......................................................................11 2.2.1 2.2.2 2.2.4 2.3 [Video Source] Settings ..................................................................... 11 Video Compress Settings ................................................................... 12 [Camera Display Mode] & [Camera Selection] Toolbars.................. 13 iDVR STD System Preferences ...................................................... 14 2.3.1 2.3.2 2.3.3 2.3.4 2.3.5 2.3.6 2.3.7 2.3.8 [Administration] Setup....................................................................... 15 [Film Storage] Setup .......................................................................... 16 [Network] Setup................................................................................. 17 [Dial-Up] Setup.................................................................................. 19 [Record Schedule] Setup.................................................................... 20 [MD Notify Schedule] Setup ............................................................. 20 [Cam1 to Cam16] Setup..................................................................... 24 Camera [MD Target Area’s & Sensitivity] Settings.......................... 25 2.4 iDVR RIO System Preferences ...................................................... 26 2.5 iDVR PRO System Preferences ..................................................... 28 Chapter 3 : Dial-Up Remote Monitoring ................................................................. 29 3.1 Installation ............................................................................................. 29 3.2 Using rViewer ....................................................................................... 30 3.2.1 3.2.2 3.2.3 3.2.4 3.2.5 3.2.6 3.2.7 Tool Bar Options................................................................................ 30 Define Connection Settings ............................................................... 32 Dialing to Connect ............................................................................. 33 Remote Video View ........................................................................... 33 Remote Monitoring............................................................................ 33 Playing Pre-Recorded AVI Films....................................................... 34 Last 100 Video Frames Playback....................................................... 34 Page 2 iDVR Internet Surveillance Multicam Host Server STD/RIO/PRO V5.0 Chapter 4 : Web Browser Remote Monitoring ......................................................... 35 4.1 Connecting Intranet Web Browsers ............................................. 35 4.2 Connecting Internet Web Browsers ............................................. 36 4.2.1 Video Server Setup ............................................................................ 36 4.2.3 Internet Web Browser Connection ..................................................... 37 4.3 Web Browser Window ....................................................................... 37 4.3.1 Web Browser Functions ..................................................................... 38 4.3.2 Web Browser Live Video Options ..................................................... 39 4.4 Advanced Features ............................................................................. 40 4.4.1 Checking Intranet Connections.......................................................... 40 4.4.2 Checking Visitor’s On-Line Status .................................................... 40 4.4.3 Network Log Files ............................................................................. 41 4.4.4 Accessing Multiple iDVR Systems On An Intranet .......................... 41 4.4.5 To Enable IP Protection ..................................................................... 42 Chapter 5 : Interactive Voice Response.................................................................... 43 Chapter 6 : Frequently Asked Questions.................................................................. 44 Page 3 iDVR Internet Surveillance Multicam Host Server STD/RIO/PRO V5.0 Chapter 1 : Overview 1.1 System Introduction iDVR is a Professional “State Of The Art” four to sixteen port Multi Cam Digital CCTV Surveillance System that runs on standalone or distributed Video Host Servers which support remote monitoring and control from authorised dial-up rViewers, networked Browsers or from its networked corporate Control Centre Console. 1.2 Versions & Integration The iDVR Video Host software is available in three versions – Standard (STD), Real Time I/O (RIO) and Professional (PRO). The STD version has all basic Digital Video Recorder + Network Surveillance functions, whilst RIO adds on Digital Input / Output + Speed Dome PTZ functions and the PRO version adds on ISP Web Server + Integrated Application Text Pasting functions. As such the RIO has all the functions of the STD and the PRO has all the functions of both the STD + RIO versions. The STD, RIO and PRO versions are shipped with the Video Host Server software, Network Browser software as well as a Dial-Up rViewer software. The iDVR Command Center Console software is available in one Version which will work with any of the iDVR Video Host software systems and is Distributed separately with its own User Manual. 1.3 Versions & Packaging The iDVR STD, RIO and PRO versions are available in X4, X8, X12 and X16 input packages as follows: iDVRX4 iDVRX8 iDVRX12 iDVRX16 8 Cams Software + 1 Capture Card (1 ~ 4 Cameras-IN), 8 Cams Software + 2 Capture Cards (1 ~ 8 Cameras-IN), 16 Cams Software + 3 Capture Cards (1 ~ 12 Cameras-IN), 16 Cams Software + 4 Capture Cards (1 ~ 16 Cameras-IN), Each Video Capture Card (VCC) has a total of four Video Input Ports each with a individual capture rate of 3.75 Frames / Second (FPS) or on a X16 System providing a collective total of 60 FPS. Note that each VCC has the ability of “Load Balancing” which means that if the user is only using one of the four ports then a full 15 FPS Video Capture and Recording is applied to that camera. Page 4 iDVR Internet Surveillance Multicam Host Server STD/RIO/PRO V5.0 Each iDVR Package includes: 1. 2. 3. 4. 5. A CD with the iDVRX8 / X16 / Video Host Server software, Web Browser software, Remote Viewing (rViewer) software, ePlayer Browser software, MS DirectX8.0 software and the eBT878 Driver software, 1, 2, 3 or 4 iDVR Video Capture Cards, Printer port Security Key (dependent on different versions), User Guide, Software License Card. Minimum iDVR Video Host Server Computer Specifications include: Operating System DirectX 8.0a CPU & Memory Mother Board CDRW Drive Floppy Disk Capture Device/s Display Monitor Sound Dial-Up Networking Web Browser Windows 98 (SE Version), 2000, ME or XP. Microsoft DirectX 8.0a or higher iDVRX4 : Pentium III 450 Mhz128MB RAM iDVRX8 : Pentium III 600 Mhz 128MB RAM iDVRX12 : Pentium III 800 Mhz 256MB RAM iDVRX16 : Pentium III 866 Mhz 256MB RAM Up to six PCI slots - one for the Modem, one for the LAN and one for each eBT878 Video Capture Card. Minimum 24X CD Drive, Any 1.44 FD Drive, eBT878 Video Capture Card/s (VCC), Any Monitor set at “True Color 24 Bit”, PCI Sound Card (Optional), 56K Voice/Fax/Data Modem (Optional), TCP/IP protocol stack with 10/100 Mbps LAN card (Optional), Netscape 4.5X or Internet Explorer 5.0X or higher supporting JAVA Applet & Server Push. 1.4 Versions & Major Functions The STD version has all basic Digital Video Recorder + Network Surveillance functions, whilst RIO adds on Digital Input / Output + Speed Dome PTZ functions and the PRO version adds ISP Web Server + Integrated Application Text Pasting functions. As such the RIO has all the functions of the STD whilst the PRO has all the functions of both the STD + RIO versions. Page 5 iDVR Internet Surveillance Multicam Host Server STD/RIO/PRO V5.0 iDVR supports the following STANDARD functions: Standard MS Windows 98 SE / 2000 / ME / XP based User Interface, Video Server Access is managed by Access Accounts for Supervisor/s and User/s with individual Access Settings and Log On time outs, All standard System Operation features are controlled by Preference Settings, Up to 16 Camera’s in groups of four can be directly connected to each Video Server where Video Standard and Display settings can be defined by Camera, Up to 16 different Multiplexor Video Views with Feature Windows can be selected, Can Observe, Record & Playback Video from between 4 to 15 FPS / Camera, Can Record individual cameras by Video MD, Time Lapse or Non Stop Modes, On MD Event can Auto Notify Phone, Pager, Fax, E-Mail & FTP, Local and Remote Search, Select, Play, Edit & Print any Recorded Film, Remote Surveillance & Control by Network Browser or Dial-Up rViewer. UNIQUE features and that iDVR presents to users include: Latest MPEG-4 Film Recording compression which both optimises and minimises and Disk Storage requirements, Rolling and cyclic Multiple Hard Disk Recording that eliminates File Fragmentation and Disk Maintenance, Record Week Day Schedule that automates recording time periods on specific week days, MD Week Day Schedule that overlays the Record Schedule and automates MD Notification time periods on specific week days, Day and Night MD Sensitivity Levels can be set to offset changes in Lighting Conditions commonly presented in Monitoring Surveillance area’s, Camera Views that Sequence through all displayed Camera’s are available from both the remote Network Browsers and the Dial-Up rViewer, Single Video File Up-Load dramatically reduces iDVR Network Bandwidth requirements by up to 16 Times, Video Server CPU Resources by up to 50% and provides the Fastest Simultaneous ALL Video Re-Fresh for all remote Network Browser and or Dial-Up rViewer Multi Camera Views, The same Integrated Film Player & Editor in the Video Server, Network Browser & Dial-up rViewer make it very easy to PLAY, EDIT and PRINT recorded, Interactive Voice Response for users with Phones to Dial into iDVR and Record & Playback Voice Messages, Remotely Manage the iDVR Video Server and or send Video Snapshots to any Dial-In Fax. 1.5 Installing iDVR STD / RIO / PRO Systems 1.5.1 eBT878 Capture Card/s 1. Turn iDVR Host Video Server power OFF and open the Casing, Page 6 iDVR Internet Surveillance Multicam Host Server STD/RIO/PRO V5.0 2. 3. 4. 5. 6. 7. 8. Insert all eBT878 capture cards into available PCI (1 to 4) slots, Fix the eBt878 capture card inside PC case’s bracket, Put casing back onto the PC, Turn PC Power ON to install eBT878 software driver/s, When your Windows 98(SE) / ME / 2000 starts, it will detect ant new eBT878 cards and request the installation of their Drivers, Put the iDVR [MultiCam] CD into CD drive, Follow the instruction of Windows dialog box to specify the location of eBt878 driver at CD’s directory as \eBT878-WDMDrv Note: When you install each eBT878 driver, Windows system will read information from CD’s directory \eBT878-WDMDrv, and then get Windows related data from Windows’ system CD. Switching both CD’s may result in an incomplete driver installation. To overcome this, copy \eBT878-WDMDrv to hard disk c:\eBT878-WDMDrv, and then specify the directory c:\eBT878-WDMDrv on system request prompts. 9. After finishing the setup, go to the [Start]->[Settings]->[Control Panel]-> Select [system]-> click [Device Manager] to display the entries as follows: BT878, WDM Audio Capture (for 4 Cams) BT878, WDM Audio Capture1 (for 8 Cams) BT878, WDM Audio Capture2 (for 12 Cams) BT878, WDM Audio Capture3 (for 16 Cams or 4Cams Pro) BT878, WDM Video Capture (for 4 Cams) BT878, WDM Video Capture1 (for 8 Cams) BT878, WDM Video Capture2 (for 12 Cams) BT878, WDM Video Capture3 (for 16 Cams or 4Cams Pro) In MS Windows ME the same Capture Card Drivers are displayed as per the following “System Properties” window: 10. If all BT878 Capture devices are available then the installation is OKAY. Page 7 Note however that iDVR Internet Surveillance Multicam Host Server STD/RIO/PRO V5.0 RCA connectors (AV1-IN, AV2-IN, AV3-IN and AV4-IN) are Cam1, Cam2, Cam3, & Cam4 respectively - and if no active camera is connected to each RCA connector, that Cameras View will be BLUE in color. 1.5.2 Microsoft DirectX8.0a iDVR system requires the installation of Microsoft’s latest version of DirectX 8.0a 1.5.2.1 Download Microsoft DirectX 8.0a If you can’t find the DirectX 8.0a runtime module in iDVR CD, please go to Microsoft web site and download from the following Web Address: http://www.microsoft.com/directx/homeuser/downloads/default.asp .. and at DirectX web page, select a version matched your Windows System ( Windows 98 SE, ME or Windows 2000) and Localized language. E.g.: For Windows 95, Windows 98, Windows 98 SE, Windows ME: DirectX 8.0a Runtime (English) …………………… DirectX 8.0a Runtimes (Localized) For example select DirectX 8.0a (English) Version - 8.0a Release Date - 5 Feb 2001 Estimated Download Size/Time @28.8 - 11,208 kb / 54min 1.5.2.2 Setup Microsoft DirectX 8.0a System Requirements - The DirectX installation process requires approximately 50 megabytes (MB) of free space on your hard drive. After installation, the DirectX download takes approximately 15 MB of hard drive space. - If you have an earlier version of DirectX installed on your system, you will see little difference in used space on your hard drive following installation of DirectX 8.0a. DirectX 8.0a will overwrite the earlier versions. - NOTICE: After installation, the DirectX 8.0a run time cannot be uninstalled. The installation process changes numerous registry items within your operating system and Microsoft does not support de- installation. Operating System - Windows 95, 98 & Windows Me, Windows 2000 [Note: Data from Microsoft web site] Run DX80NTeng.exe - 7,346 KB for Windows 2000, or Run DX80Eng.exe 11,478 KB for Windows 98SE/ME 1.5.2.3 Testing Microsoft DirectX 8.0a After Finishing the installation of DirectX 8.0a, you can run: C:\Program Files\System\DxDiag.exe to test whether DirectX is installed correctly. Or run iDVR’s testing program at iDVR’s directory: Page 8 iDVR Internet Surveillance Multicam Host Server STD/RIO/PRO V5.0 PlayCap0.exe ------ Testing eBT878 Card 0 PlayCap1.exe ------ Testing eBT878 Card 1 PlayCap2.exe ------ Testing eBT878 Card 2 PlayCap3.exe ------ Testing eBT878 Card 3 1.5.3 iDVR Software After completing the eBt878 driver and DirectX 8.0a installation, insert iDVR CD into CD drive and it will automatically self start and prompt for language selection as follows: After selecting your preferred language version, install the Video Server Software by Clicking on the Install button and to install the Dial-Up Viewer Program on to the Video Server or any PC, Click on the RViewer button 1.5.4 Installation Notes After completing the installation above, if iDVR is still not working properly please check the following inspection items: 1. Run VCC test programs at directory: c:\Program Files\Protectserve Pacific Ltd.\iDVRMcams Playcap0.exe – Test eBT878-01 capture card Playcap1.exe – Test eBT878-02 capture card Playcap2.exe – Test eBT878-03 capture card Playcap3.exe – Test eBT878-04 capture card 2. If testing program can’t work, check the following files: C:\Windows\Inf\Other\KSPV878.INF (necessary: Note 1) C:\Windows\Inf\Other\ConexantPVBT878.INF (necessary) C:\windows\System\KSPV878.AX (necessary) C:\windows\System32\Drivers\BT848_0.SYS (Card 1 necessary) C:\windows\System32\Drivers\BT848_1.SYS (Card 2 necessary) C:\windows\System32\Drivers\BT848_2.SYS (Card 3 necessary) C:\windows\System32\Drivers\BT848_3.SYS (Card 4 necessary) Page 9 iDVR Internet Surveillance Multicam Host Server STD/RIO/PRO V5.0 Note 1: The directory, C:\Windows\Inf, is hidden with Windows Default. Show hidden files and folder through [My Computer] -> [Tools]->[Folder Options]->click [View] as follows (Windows Me): If some of files are missing, please remove all of eBT878 drivers from [Start] -> [Settings] -> [Control Panel] -> Select [system] -> click [Device Manager]. 3. Reinstall eBT878 driver. If still not work, copy \eBT878-WDMDrv\PVBT878.INF and \eBT878-WDMDrv\KSPV878.INF into C:\Windows\Inf\Other directory and Reinstall eBT878 driver and DirectX8. Directly install DirectX8 to replace old files without removing old Directx8. 4. If the Live image of some capture cards are not shown, check the usage of shared system IRQ. Some PC motherboards will decrease the performance if too many PCI cards share same IRQ. From [Start] -> [Programs] -> [Accessories] -> [System Tools] -> [System Information], check Hardware Resources’ IRQs and change from BIOS CMOS settings as required. 5. Remember to turn on “Quick Compression”, if you choose “IndeoR Video 5.04” CODEC Turn off Screen Saver feature by going to the Desktop, click right button of mouse to select [Display Properties] -> [Screen Saver] -> [Settings] as below: 6. Turn off automatic cleanup for “Recycle Bin” and each disk. Page 10 iDVR Internet Surveillance Multicam Host Server STD/RIO/PRO V5.0 Chapter 2 : Video Host Server 2.1 Starting iDVR System Having installed iDVR into your Video Server, you may proceed to connect your Cameras to the VCC’s and by double clicking on the iDVR Icon - the iDVR system will start and open its Main Window (16 Camera Version shown) as follows: 2.2 Define System Options 2.2.1 [Video Source] Settings In [Video Source] you can select the Video standard for your connected Camera’s and by Clicking on individual Cam1 to Cam16 sub windows - adjust Video Color (Same for B&W), Brightness, Contrast, Saturation and Hue Settings to get a balanced pictures displayed as follows: Page 11 iDVR Internet Surveillance Multicam Host Server STD/RIO/PRO V5.0 2.2.2 Video Compress Settings For [Video Compress] Settings, iDVR defaults to using Windows IndeoR Video 5.04 set with Compression Quality set at 70% as follows: Please note that other Compress Algorithms are available and may be optionally selected as required. MPEG-4 algorithms are also available providing the latest compression for Film Recording which minimizes and optimizes the AVI Film Storage size and ensures best play back quality. 2.2.3 [Standard] Toolbar iDVR [Standard] Toolbar controls the operation functions of the system as follows: 1 1. 2. 3. 4. 5. 6. 7. 8. 9. 10. 11. 2 3 4 5 6 7 8 9 10 11 [Standby] puts iDVR in Display Mode only, [MD Record and Alarm] puts iDVR into MD Record and Alarm Mode, [MD Alarm] puts iDVR into MD and Alarm only Mode, [Snapshot] takes a picture of the current live video window, [Waiting for Dial-In] puts iDVR Modem into connection Mode, [Waiting for Network] puts iDVR LAN Card into connection Mode, [Zoom In] increases the size of the live view video window, [Zoom Out] decreases the size of the live view video window, [MD Setup] activates the existing MD Target Frames on the current live view window and allows them to be adjusted, [Preferences] opens a set of system preferences windows so the user can go through and define and or change, [Search Recorded Films] opens iDVR “Film Seeker” which allows users to search for pre-recorded Films between defined TIME frames. Page 12 iDVR Internet Surveillance Multicam Host Server STD/RIO/PRO V5.0 2.2.4 [Camera Display Mode] & [Camera Selection] Toolbars The [Camera Display Mode] and the [Camera Selection] toolbars need to be positioned on the desktop together so that according to the Display Mode Selected – individual Camera’s can be added into the live view as follows: Display Mode Toolbar 1 2 3 4 5 6 7 8 9 10 11 12 13 14 15 16 17 For iDVRX4 and Above Users, the following options are available: 1. Only one camera selected by camera selection bar is shown,. 2. Two cameras are shown, 3. Four selected cameras are shown, 4. Camera 1, 2, 3 and 4 in eBT878 Capture card 1 are shown, For iDVRX8 and Above Users, the following options are available: 5. Camera 5, 6, 7 and 8 in eBT878 Capture card 2 are shown, 6. Camera 9,10,11 and 12 in eBT878 Capture card 3 are shown, 7. Camera 13,14,15 and 16 in eBT878 Capture card 4 are shown, 8. Camera 1,5,9 and 13 (one camera one card) are shown, 9. 6 selected cameras (one is big image) are shown, 10. 6 selected cameras are shown, 11. 8 selected cameras (one is big image) are shown, 12. 9 selected cameras are shown, For iDVRX12 and Above Users, the following options are available: 13. Camera 1, 2, 3,…8 in eBT878 Capture card 1&2 are shown, 14. Camera 9,10,…16 in eBT878 Capture card 3&4 are displayed, 15. 12 selected cameras are shown, For iDVRX16 and Above Users, the following options are available: 16. 13 selected cameras (one is big image) are shown, 17. All of 16 cameras are shown. When in [Standby ] Mode, to select any ONE of the cameras, double click the desired camera and the Single Camera Mode will be activated. Page 13 iDVR Internet Surveillance Multicam Host Server STD/RIO/PRO V5.0 Camera Selection Toolbar Camera Number Camera Number Active Camera’s Feature Camera 2.2.5 Feature Click to select which camera to be displayed on screen. Are identified by their sunk number as above. Selected camera is displayed in big camera window in selected Display Mode Bar. Function Key Short Cuts To speed up operation of iDVR, special Function Keys have been set up as follows: F2 F3 F4 F5 F6 F7 F8 F9 F10 Ctrl+F2 Ctrl+F3 Ctrl+F4 Ctrl+F5 Ctrl+F6 Ctrl+F7 Ctrl+F8 Ctrl+F9 2.3 Standby Mode MD Record Mode MD Alarm Waiting for Dial-In Waiting for Network Preferences Search Recorded Film View all Cameras in largest Camera Display Mode available Full Screen View Display Mode 4 (Camera 1 , 2, 3, and 4) Display Mode 5 (Camera 5 , 6, 7, and 8) Display Mode 6 (Camera 9 , 10, 11, and 12) Display Mode 7 (Camera 13, 14, 15, and 16) Display Mode 8 (Camera 1, 5, 9, and 13) Display Mode 13 (Camera 1 , 2, 3, … 8) Display Mode 14 (Camera 9 , 10, 11, … 16) Display Mode 17 (Camera 1 , 2, 3, … 16) iDVR STD System Preferences To define System Preferences, either go to the [Edit] Menu and select the [Preferences] Option OR click on the [Preferences] option in the [Standard] Toolbar - and a group of windows opens up covering Administration, Film Storage, Network, Dial-Up, Record Schedule, MD Notify Schedule and individual Cam1 >> Cam16 preferences. These System Preference windows are described in the following sub sections: Page 14 iDVR Internet Surveillance Multicam Host Server STD/RIO/PRO V5.0 2.3.1 [Administration] Setup This window defines all of the Optional System Administration parameters as follows: [Host location] [Auto run when system boot] [Auto start to Record / to Alarm] [Auto wait For Dial-Up connect] [Auto wait for Network connect] [Allow remote shutdown] [Log file] [Auto save film (Overnight)] Define the location name of Video Server, Turn ON to auto Start iDVR, Turn ON to auto activate optional Modes, Normally ON if rViewer / Telephone / Fax / Dial-In Users are expected, Normally ON if Intranet / Internet Web Browser Users are expected, Normally OFF unless you want to allow your supervisor to be able to remotely Shutdown your iDVR Video Server, Normally ON to allow system activity tracing, Normally ON if user wants Scheduled Daily Recording to go over midnight, [Auto full screen when startup] Normally OFF unless users wants iDVR to display full video screen at startup. [Auto minimized when startup] Normally OFF unless users wants iDVR to minimize and sit in tray icon bar at startup. [System access account management] For the system Supervisor and Users define Account Names & Passwords, automatic Login Time Out Period (minutes) as well as system Functions that each are permitted to see and access. [Enable host re-start] Only turn ON when you are running Non Stop Recording of 16 Camera’s. When ON schedule Time and Day Frequency for the iDVR Program to automatically Shut Down and Restart to Re-Fresh Operating System Resources. [Enable watchdog] Only ON when a Watchdog Card is installed to auto reboot Page 15 iDVR Internet Surveillance Multicam Host Server STD/RIO/PRO V5.0 [Snapshot Quality] 2.3.2 Video Server if it hangs. Setting the “Snapshot Quality” where 100% is best quality, [Film Storage] Setup This window defines the Size and how AVI Films are to be stored on a Single Hard Drive Disk or Multiple Hard Drive Disks. When using Single Disk mode a monthly Defrag of the Disk will be required as Film Files are constantly written and deleted. When using Multi Disk mode we recommend that you partition a large Disk into 5 GB virtual disks and after reserving the “C” drive for the Operating System – allocate the remaining disks for recording AVI Film files. [Max Single Film Size] [Reserved for Windows] [Action on Full Disk/s] [Save Films In Single Disk] [Save Films In Multiple Disks] This specifies the Maximum Size of each Film File as they are recorded and is normally set to between 10 to 30 MB. This specifies how much space is to be left “Unused” on each Record >> Disk and triggers in Single Disk mode the Deletion of the Oldest Film and in Multi Disk mode movement to the Next Disk. Set to “Delete Oldest Film” to roll record. This records all Films to a specified Film Folder C:\eLarFilms. When eLarFilms is full, iDVR will “Stop recording” or “Delete Oldest Film” in this folder as preset. This records films to a number of nominated disks (e.g. D: E: F: G: H: Etc). When a disk is full iDVR switch’s to the next disk by Page 16 iDVR Internet Surveillance Multicam Host Server STD/RIO/PRO V5.0 [Current Disk] 2.3.3 specified sequence. When all of disks are full, iDVR automatically clears the oldest Disk and writes new Films to that Disk. This allows users to specify the first or change to Disk. [Network] Setup This window defines all setup parameters required to permit network Intranet / Internet Browser users to connect to the iDVR Video Server. [Login Counter] [Listen Port] [Max. Connections] [Transfer Speed] [Video Quality] [Network ID] Initially set to Zero, this counter represents the number of Intranet / Internet Browser Connections established. Normally set to 80, this is the Modem Port Address. This is the maximum number of Simultaneous Intranet / Internet Browser Connections allowed where for 10 Mbps LANS this should be set at 8 and for 10/100 Mbps LANS this can be set up to 20. Should set at 30 FPS to maximize Film Frame transfer through the LAN. Normally set at 30% to quickly send Video Film Frames but can be increased up to 100% when quality video is required. Select which IP address is used when iDVR system has multiple IP addresses assigned for Dialup and LAN connections. There are two methods to specify either one digital Number or Keyword String. For One Digital Number Input 0 ,1 ,2, …,and 9 to specify the index number in IP address table. 0 is for 1st IP address, 1 is 2nd IP, 2 for 3rd IP. Run IPCONFIG.EXE in DOS mode to get the sequence of IP address table. For Keyword String Input the string e.g. “PPP”, “Ethernet” (no quote). Run IPCONFIG.EXE in DOS mode to get the IP Configuration table as follows: Page 17 iDVR Internet Surveillance Multicam Host Server STD/RIO/PRO V5.0 Windows 2000 IP Configuration Ethernet adapter LAN: Connection-specific DNS Suffix .: IP Address. . . . . . . . . . . .: 210.64.109.89 Subnet Mask . . . . . . . . . . .: 255.255.255.224 Default Gateway . . . . . . . . .: PPP adapter Seednet: Connection-specific DNS Suffix .: IP Address. . . . . . . . . . . .: 211.74.5.213 Subnet Mask . . . . . . . . . . .: 255.255.255.255 Default Gateway . . . . . . . . .: 192.72.81.16 [Seq. Dwell Time] [All Cams Quality] [Enable Password] iDVR will get the IP address 211.74.5.213 for “PPP” keyword, or get IP address 210.64.109.89 for “Ethernet”. After input [Network ID] and click “Apply”, Click “Wait Network Connect” from Standard Toolbar, you will view the IP address on iDVR title line and get the connection line message on left part of bottom status. Run IPCONFIG.EXE to make sure the IP address you want. Specify the Sequence dwell time (Seconds) that camera’s will be displayed in all connecting Web Browsers and the rViewer. Specify the All Cams transfer quality, QHigh (640x480) / Qmed (512x348) / Qlow (320x240) / Qpoor (160x120) that will be displayed in all connecting Browsers and the rViewer. Normally ON, used to define User Groups, Passwords and Privilege Level (Guest, User or Supervisor) of all authorized Intranet or Internet Browser users as follows: Available Options Live Photo Zoom List iDVR Servers Split Tool Box Logs (Films and Parameters) List Visitors Remote Setting [Auto Search iDVR] [Auto Notify iDVR Hosts] Guest OK OK OK OK OK N/A N/A N/A N/A User OK OK OK OK OK OK OK N/A N/A Supervisor OK OK OK OK OK OK OK OK OK Normally ON, searches for and sets the iDVR Video Servers modem port number to be broadcast to the Intranet LAN, Normally OFF, turn ON and define if you have a number of iDVR Video Servers connected to your Page 18 iDVR Internet Surveillance Multicam Host Server STD/RIO/PRO V5.0 [Enable IP Protection] [Post My IP Address] [Enable Web Alarm] [Enable NAT Mapping] 2.3.4 LAN and you want all to be Browser accessible. Normally OFF, but for extra access protection turn ON and define IP Address (or IP Ranges) of Permitted LAN PC’s (e.g.:203.67.1.1 to 203.67.255.255), Normally OFF for Intranet connections as your IP Address is already defined and fixed. When connecting to an ISP and you have a fixed IP Address - turn this feature ON and it will Post your iDVR Video Servers IP address and Display it at the top of the iDVR Window. If your ISP dynamically allocates your IP Address every time you connect – run the “winipcfg.exe” Program from the [Run] Option from the [Start] Menu to identify. Normally ON, this feature activates an Audio Alarm on all connected Intranet / Internet Browsers after MD events have occurred. For Dynamic IP, through a Shared Internet Router, [Dial-Up] Setup This window allows administrators to define all Dial-Up Passwords, set Modem Connection Options as well as E-Mail and FTP parameters as follows: [Password] [Modem] IVR : Click “Setting” to define the 4 Digit Password for Interactive Voice Response users. Dial-Up : Click “Setting” to define the “Users Name”, “Login Name” and “Password” for users authorized to Dial into the Video Server from rViewers. Auto Answer : define the number of seconds iDVR waits before answering any in bound IVR and or rViewer calls. Mode : Set “Data” for rViewer connection only, “IVR”, for IVR only OR Page 19 iDVR Internet Surveillance Multicam Host Server STD/RIO/PRO V5.0 [E-Mail & FTP connect] 2.3.5 “Data/IVR” for both rViewer and IVR connections. Settings : Define all installed Modem settings. Method : Define as “Dialup” or “Intranet”.(Dialup means to use “Dial up Network” to connect to ISP whilst Intranet is for LAN or Fixed line to internet.) [Record Schedule] Setup The [Record Schedule] window defines the START and STOP times for activating automatic Full / MD / Time Lapse Recording from Monday through to Sunday. [Week Day] Select the Days of the Week that you want to activate automatic Recording by Clicking on their boxes. [Start & Stop Times] For each week day enter the “Start Time” Hour (0-23) & Minute (0-59) …and… “Stop Time” Hour (0-23) & Minute (0-59). Note that you can go over Midnight if this FEATURE is activated in the [Administration] window. [Duplicate Day Times] If you want to duplicate the Start / Stop Times down the Week Days simply Select and Click on the Round Action Button at the right side of the “Min” label. 2.3.6 [MD Notify Schedule] Setup iDVR will ONLY activate the real time MD Notify Schedule feature when it is in [Record] Mode AND at least one Camera that’s in the active View has this feature activated AND that Camera’s predefined MD Sensitivity Threshold is exceeded. Please note that the iDVR Video Server must also have a voice/fax/data Modem and Driver correctly installed and configured – AND - the Dial-Out Modem must not be used by iDVR Users for other activities such as rViewer Users Dialing In. Page 20 iDVR Internet Surveillance Multicam Host Server STD/RIO/PRO V5.0 Available MD Notify options include >> Phone, >> Pager, >> FAX, >> E-Mail and >> FTP as follows on the next page : Phone To call up a Telephone and transmit a pre-recorded message, select Notify >> “Phone” setting and the following window will open for data input: • • Enter one or two Telephone numbers for iDVR to call, Select the Voice message which you want iDVR to Play upon Phone Answer and note that you can record your own by pressing the RED button, Page 21 iDVR Internet Surveillance Multicam Host Server STD/RIO/PRO V5.0 • • Input “Dial Prefix” number for dial outside. (e.g. 0) and enable it, Enter “Play Message After” delay time of at least 3 seconds, “Message Repeat” times of at least 3 times and to “Dial Times” to at least 2. Pager To call up a Pager and transmit a pager code, select Notify >> “Pager” setting and the following window will open for data input: • • • • • Enter the to call “Pager” number and “iDVR’s call out phone” number, Enter Pager “Message” CODE (numbers only). Enter the “Times” number of calls to make to the Pager and the “Delay” between calls in Seconds, Enter any “Dial Prefixes” to call out from PABX’s, Select the “Line” that the Modem is connected to and define your Modems Properties. When motion is detected, iDVR will automatically call up the pager and display the following message in the Status Bar at the bottom of iDVR window: If iDVR could not dial out successfully, the message “Dial to Pager Failed” is displayed. Fax To send out MD Event Video Snapshots to a nominated FAX, select Notify >> “Fax” setting on the following window and enter required data: • • • Input “Fax Name” Input “Fax number”. Input “Second Fax number” (If any) Page 22 iDVR Internet Surveillance Multicam Host Server STD/RIO/PRO V5.0 • Input the “Title” shown on fax (e.g. iDVR MD Snapshots) • • • • Input “Sender” (Name of the sending server) Input “Receiver” (Name of person to receive) Click “OK” button to add a new fax entity. Click Mouse button to select a fax entity. E-Mail To send eight Video Snap Shots to a nominated E-Mail Account, select Notify >> “E-Mail” setting and on the opened window and enter data: • • • • • • Input “Server name” (e.g. mail.netvigator.com) Input “User name” (e.g. Vincent Chiu) Input “From” (e.g. [email protected]) Input “To” (e.g. [email protected]) Input “CC” (e.g. [email protected]) Input “Subject” (e.g. iDVR Video Alarm) When motion is detected, iDVR will open the following window prompt. This window automatically closes after the E-Mail has been successfully sent. FTP To send out Video Snapshots as a File Transfer to a nominated Network Server, select Notify >> “FTP” Page 23 iDVR Internet Surveillance Multicam Host Server STD/RIO/PRO V5.0 setting on the following window and enter data: • • • • 2.3.7 Input “Server” (e.g. webhk.net) Input “User name” (e.g. sample) Input “Password” (e.g. 2433) Input “Upload path” (e.g. /public_html/idvr.htm) [Cam1 to Cam16] Setup Each camera has its own Presentation, Recording and Motion Detection (for both Day and Night environments) parameters to define. As an aid to speed up Cam1 to Cam16 setup – an option is available on the bottom of each Cam1 Setup window to duplicate the same settings to all following Cam windows. The Cam1 window that’s opened for data entry is as follows: Presentation [Camera Presented] [Camera Name] Checked: Camera Video is available . Unchecked : Camera Video is unavailable. Define a descriptive name for each Camera. Recording [To Record] Checked: Will Record AVI Films as selected by Mode. Page 24 iDVR Internet Surveillance Multicam Host Server STD/RIO/PRO V5.0 [Mode] [Time Lapse] MD Action [Alarm Seconds] [On MD Record for] [MD Notify] Select one of four Recording modes – Full View (MD), Inside Region (MD), Non Stop (No MD) or Time Lapse (No MD). Checked: Time Lapse Frames are recorded according to the Time Interval specified (e.g. time interval: e.g. 1 frame per 5 seconds). Choose which Sound (Silence, Police car, Dog bark, etc) is invoked and alarm duration when a motion detected. Define how many seconds to continue recording when a motion is detected. Checked: Activate [MD Notify] settings for this camera when a MD event is triggered. MD Day & Night Sensitivity For cameras placed in environments where the Lighting Changes dramatically between Day and Night (where you define the Start and Finish times) then you can set individual settings to cover both situations as follows : [Area Sensitivity] [Color Sensitivity] 2.3.8 Defines the amount of Area Movement required to generate a MD Trigger, Defines the amount of Color Variation required to generate a MD Trigger, Camera [MD Target Area’s & Sensitivity] Settings If you want to add up to twenty different MD Target Frames into each Camera’s Video View and set its MD Sensitivity settings then: MD Target Frames 1. Select desired Camera by displaying it in Single Camera Multiplexor Display View, 2. Click [Set MD Range] Icon in Standard Toolbar, 3. In the [Video View] window, a rectangle with 4 red dots on its corners is highlighted indicating the active MD area. To increase or decrease the size of this active area, simply Click any of the red dots and drag and drop to resize. 4. To define multiple MD rectangles on the same Video Picture, Click on the [Mouse] right button and repeat Step 3. 5. Click [Set MD Range] Icon again to apply the new settings. Page 25 iDVR Internet Surveillance Multicam Host Server STD/RIO/PRO V5.0 MD Sensitivity 1. Turn on the [MD & Alarm] Operation Mode from the Standard Toolbar and open up the [Preferences] >>> [Cam1] window and moving in front of Cam1 – set the MD Area and Color sensitivity levels to only trip when real movement is present. 2. Work your way through each of the connected Camera’s setting each in turn until all are set. 3. When complete turn the iDVR System back into [Standby] Mode. 2.4 iDVR RIO System Preferences Sensor Setting example: 1. Only one IODevice: IODevice1. 2. Set 2 Sensor Outs: SensorOut1 and SensorOut2. 2.1 SensorOut1 comes from Cams 2: I.e. Cam2’ MD will trigger SensorOut1 with 2 seconds and then turn SensorOut1 OFF 2.2 SensorOut2 comes from Cams 15: Cam15’MD will trigger SensorOut2 once. 3. Set 2 Sensor Ins: SensorIn1 and SensorIn2. 3.1 When SensorIn1 is triggered, iDVR will immediately trig Outs 1/1 (I.e. IODevice1/SensorOut1) for either at Standbye or at Recording mode. At same time, iDVR generates a MD signal for Cams 2 (Cam2) to record, if at Recording mode. 3.2 When SensorIn2 is triggered, iDVR will immediately invoke Outs 1/2 (IODevice1/SensorOut2) to work. 4. PTZ Enable 4.1 Enabled if this IODevice1 is installed a PTZ camera. 4.2 Define the PTZ features: Pan, Tilt, … 5. Device No 5.1 It could have multiple IODevices in RS485 daisy chain. Page 26 iDVR Internet Surveillance Multicam Host Server STD/RIO/PRO V5.0 5.2 Device NO. define physical Device ID. 6. Protocol 6.1 iDVR defines PTZ control and Sensor In/Out control language as example TechCity.RIO (See below). 7. Communication Port 7.1 Define Comport settings. Example Cam2 Setting 1. Time Lapse Recording 2. Enable Sensor In 2.1 Although IODevice1/SensorIn1 (1/1) defines the relation of SensorIn1 and Cam2, User also can enable this SensorIn (Reget only list corresponding SensorIn for Cam2). 2.2 In MD box, user can enable Sensor Out as 2.1. 3. SO When IODevice1/SensorIn1 (1/1) is triggered, Cam2 will record the current frame for “Record Seconds on MD” 0 second. (If you define 5 seconds, Cam2 will continuously record 5 seconds. And more, Cam2 trigs IODevice1/SensorOut1. Example Cam15 Setting: 1. Cam15 records with “Inside Region (MD) mode. 2. No Sensor In is enabled. 3. Enable Sensor Out Page 27 iDVR Internet Surveillance Multicam Host Server STD/RIO/PRO V5.0 3.1 When cam15’s image Motion is detected , cam15 records and trigger IODevice1/SensorOut2 (1/2). E.g. Live image motion will trig light ON. 2.5 iDVR PRO System Preferences Page 28 iDVR Internet Surveillance Multicam Host Server STD/RIO/PRO V5.0 Chapter 3 : Dial-Up Remote Monitoring Dial-Up remote monitoring is available by installing the iDVR “rViewer” Software on any remote PC with a Modem that is connected to a direct outgoing Telephone Line. Using rViewer’s Telephone Book, iDVR Video Server Modem Access Names, Passwords and Telephone Numbers can be stored and selected as required to establish Dial-Up connections. Once the rViewer is logged onto any iDVR Video Server, it can remotely: 1. View Live Video from All Cams at four optional sizes, 2. View Live Video from a specific selected Cam, 3. View Live Video from individual Cams in Sequence Mode, 4. Be notified of MD Events, 5. Playback Local Video Snapshots, Films and Last 100 Frames, 6. Download and Playback pre-recorded Video Server Video Films, 7. Download and re-set the Video Servers Weekly Record Schedule, 8. Turn ON and OFF the iDVR Video Server Record option and optionally Shutdown the iDVR Server. 3.1 Installation Insert the iDVR CD and Run Autorun.exe from your PC and install the iDVR rViewer Software onto your Remote PC’s Hard Disk. Page 29 iDVR Internet Surveillance Multicam Host Server STD/RIO/PRO V5.0 3.2 Using rViewer After starting rViewer the following window appears: To Dialup and connect to the iDVR Video Server, use the [Connect] Menu [Phone Book] – OR - [Speed Dial] Option to define your connection parameters and Select “DIAL”. If the Access User Name and Password are correct, rViewer will then display the Live Video in the center of the window and activate all the other Tool Bar options. 3.2.1 Tool Bar Options Tool Bar options control the use of the rViewer and include: 1 2 3 4 5 16 17 6 7 8 9 10 11 12 13 14 15 Connecting & Disconnecting 1. [Start to Dial up] prompts a request to input Phone Number of the Target Video Server and related data, and then click OK to Dial-Out. 2. [Hang up] click this button to disconnect. Selecting Live Views 1. [View Live] After connecting to iDVR Video, you can click this button to view live. If you have enabled [Connect] >> [Setting] >> [Receive live image when connected] - rViewer will automatically enter into live view. 2. [Cam Selection] Use this drop down list to select an All Cams, an Individual Camera or All Page 30 iDVR Internet Surveillance Multicam Host Server STD/RIO/PRO V5.0 Cameras in Sequence. Remote Film Control 1. [Get Film List] Get the File Names of all pre recorded AVI Films from the Video Server, 2. [Select] From the Pull Down Film List select required Film, 3. [Playback] Playback the selected AVI Film with Speed {Low Speed / High Quality} & Quality {High Speed / Low Quality} settings. 4. 5. [Playback Control] Playback control for a selected recorded film. [Start/Stop Recording] Click this button to start Recording of the Replayed Film at the remote rViewer’s PC. Film Speed & Quality 1. [Low Speed/High Quality] Click “Low Speed” if you want a HIGH Quality . 2. [High Speed/Low Quality] Click “High Speed” if you want a LOW Quality. 3. [Zoom In] Click to make the live view window larger. 4. [Zoom Out] Click to make the live view window smaller. Server MD Alarm 1. [Stop Alarm] When you are playing a recorded file and iDVR is in recording mode, rViewer will generate an alarm to inform that there is a motion detection event at the Video Server. At same time, rViewer will automatically switch to current live view where you can click [Stop Alarm] to turn the Alarm off. Take Snapshot 1. [Snapshot] Video Server Remote Control 1. [Start/Stop Remote MD Record] Click the button to enable iDVR Video starting to record. After finishing, this button is sunken. You can click the sunken button to stop iDVR Video recording. 2. [Weekly Record Schedule] Click to download and display the iDVR Video Weekly Record Schedule and allow you to edit and save changes, 3. [Shutdown Video Server] Click to automatically Shutdown the connected to iDVR Video Server. Page 31 iDVR Internet Surveillance Multicam Host Server STD/RIO/PRO V5.0 3.2.2 Define Connection Settings To define rViewer Connection Parameters, select the [Connect] menu and then Click on the [Setting] option and after the Settings window opens up, define the following settings: 1. Set “Video Quality” for remote video at between 30 to 100 %. the frame re-fresh rate. 2. In the Setting Options for normal operations select: ON Receive live image when connected. OFF Start to record on connected. OFF Start to record on motion detected. ON Make an alarm on motion detected. ON Switch to live video on getting a motion detect event. Page 32 The higher the quality the slower iDVR Internet Surveillance Multicam Host Server STD/RIO/PRO V5.0 3.2.3 Dialing to Connect To connect to the iDVR Video Server, use the [Connect] Menu [Phone Book] where you need to program in all Target Server Connection details and from the Phone Book click on the required connection and Click “DIAL”. The Phone Book window opens and you can input your Target Server connection data by Clicking on ADD or MODIFY as per the second following window: 3.2.4 Remote Video View Click [Remote Video] icon on main toolbar to view the real time “All Cams”, “Individual Cam” or “All Cams in Sequence” Live Video from the connected iDVR Video Server. 3.2.5 1. 2. 3. 4. 5. Remote Monitoring Click [Start or stop MD] to start recording or stop recording, or Click [Shut down remote PC] to remotely shutdown Video Server, or [Speed up] (Bad quality) to fast get live but low quality image, or [Slow Down] (Better quality) to get live with good quality image but speed is slow, or Click [Snapshot Photo] to take a Local Photo. Page 33 iDVR Internet Surveillance Multicam Host Server STD/RIO/PRO V5.0 3.2.6 Playing Pre-Recorded AVI Films Play Selected Film (in disk H) at 12:35 Aug. 15th Playback control will be enabled to play remote film 1. [Get films list] to get the list of all iDVR AVI Films showed on [Select one film] combo list. 2. [Select one film] and then click [Remote film] to play. Note: If you have turned [Start to record] on, iDVR will automatically switch to the current live image on detecting a Motion event, even if you are playing back a pre-recorded AVI Film! 3.2.7 Last 100 Video Frames Playback rViewer provides a [Local Last 100 Video Frames] option in the [View] menu, which lets you replay the last 100 Live Video Frames received whether you are viewing Live Video or Playing back a AVI Film at the time of request. Page 34 iDVR Internet Surveillance Multicam Host Server STD/RIO/PRO V5.0 Chapter 4 : Web Browser Remote Monitoring Intranet or Internet Web Browser using MS Explorer or Netscape can Monitor and Manage any number of remote connected iDVR Video Servers. On an Intranet or through the Internet, users can load up their Web Browser and knowing the IP Address of the iDVR Video Server, can type in its ULR, type in a registered User Name and Password and get access according to assigned Privilege Level. Further more, if multiple iDVR Video Servers are on the same Intranet then their addresses can be automatically displayed and live Video Sessions established at the Click of a mouse. Once a Web Browser user is logged onto any iDVR Video Server, the user can remotely: • • • • • • View Live Video from one or many Video Server Sites, Select “All Cams”, “Individual Cams” or “Sequence all Cams”, Download, Playback and Edit AVI Films, View all Network Connections, Be notified of MD Events via a Web Alarm from connected Video Servers, Remotely manage each iDVR Video Server according to access privilege. 4.1 Connecting Intranet Web Browsers iDVR Video Servers connected to an Intranet LAN need to be assigned a fixed IP Address and Subnet Mask in the TCP/IP Properties Window in the systems [Network] Control Panel by your network administrator. Having been assigned a Fixed IP Address, the iDVR Video Server must be put into “Wait Network Connect” mode (with [Post my IP address] OFF in the Network System Setup window) and the iDVR Video Servers IP address will be displayed in the browsers windows title as below. ---- you can also run the ipconfig.exe and it will tell you all of the IP Address in your Windows system. Knowing the IP Address, remote Web Browser users on the Intranet can simply key it in as the URL and the browser will return with a Connection Dialog requesting User Name & Password which has to match a defined [System Settings - Network - Enable Password] User Name and Password. Depending on the Privilege Level assigned the connected user will get full access if he is a Supervisor, Page 35 iDVR Internet Surveillance Multicam Host Server STD/RIO/PRO V5.0 Limited access if he is a User and browse only access if he is a Guest. 4.2 Connecting Internet Web Browsers To connect Internet Web Browsers to a specific iDVR Video Server, it’s important that the iDVR Video Server has been correctly setup and its ULR notified to Remote Users wishing to connect. 4.2.1 Video Server Setup On the iDVR Video Server, Access the [System Settings] “Network” window as below and define the “Access Accounts” and “Post my IP Address” Settings and then enable both by Clicking on them and the “Apply" Button. Please refer to Chapter 2.3.4 for details on setting up “Access Accounts” settings window. To setup your “Post My IP Address” Option, you need to have access to a registered FTP Server on an ISP (free personal home page are also provided by operators like XOOM at http://www.xoom.com/) and you then need to open its [Settings] window as below and define your FTP Server, User Name, Password and Upload File Name. Page 36 iDVR Internet Surveillance Multicam Host Server STD/RIO/PRO V5.0 Video Server Activation To activate your iDVR Video Server: 1. 2. 3. 4. 5. 6. 4.2.3 With “Post My IP Address” ON, Set the Video Server into Listen “Wait Network Connect” mode, iDVR will request you to Dial-Up and connect to your nominated ISP, Upon connection iDVR will get a dynamic IP address, generate an html type file (as video.html) and upload it to your personal web site (e.g. members.xoom.com) through your nominated FTP server ( ftp.xoom.com). The “Waiting for network connection“ message will then be displayed and iDVR Video Server is ready for Remote Web Browser users to connect, To get the Dynamic IP Address (ULR) of your iDVR Video Server, you need to go your PC’s Windows [Start] Menu, select the [Run] Option and execute the “winipcfg.exe” program, From the returned “winipcfg.exe” window, announce your iDVR Servers ULR to Remote Users wishing to connect through their Web Browsers. Internet Web Browser Connection Remote Internet Web Browser users may then connect to the defined iDVR Video Server by: 1. Dialing up the nominated ISP, 2. Run Internet Explorer or Netscape Navigator and enter your iDVR Video Servers ULR (e.g. http://210.64.109.93:8888) and get connection, 3. The iDVR Video Server will then issue a dialog requesting a valid login Name and Password, 4. The Web Browser will then load the iDVR Remote Surveillance window. 4.3 Web Browser Window Following Intranet or Internet Connection, iDVR Video downloads and displays its Web Browser window in “All Cam” Mode as follows: Page 37 iDVR Internet Surveillance Multicam Host Server STD/RIO/PRO V5.0 You can select any Camera Display option by clicking on it and then clicking “Submit” You can view different Cams from Multiple Video Servers as follows: 4.3.1 Web Browser Functions Web Browser Functions on the “Left Hand Side” of the browser window include: [Live Video] [Download Files] [Quad] [Connections] Displays single Video Servers Live Video image. Provides lists of recorded AVI Films, Snapshot Photo’s, Voice Messages and MD (Faxed) Photo’s, which can be selected, downloaded and Re-Played. Splits Live Display window up to 4 sub screens to view live Video’s of different iDVR Video Server locations simultaneously. Shows the number and details of current users on line (available for Supervisor Level users only). Page 38 iDVR Internet Surveillance Multicam Host Server STD/RIO/PRO V5.0 [Settings] View, Change and Upload remote iDVR status (available for Supervisor Level users only). [About] On line help. 4.3.2 Web Browser Live Video Options On the right side of the window there are 8 Live Video Control Button icons. Move mouse cursor on the Live Video window and the respective location name will be displayed (on Status row if use Microsoft IE). The 8 Live Video Control Buttons perform the following functions: [Live Video] Redisplay Live Video image. [Snapshot Photo] Freeze the Live window so as to save or to print the frozen photo (or Click right button) [Zoom In] Enlarge the size of live image. [Zoom Out] Reduce the size of live image. [iDVR Stations] List all connected iDVR systems. [Split Horizontally] Horizontal split live display. [Split Vertically] Vertically split live display. [Quad Split] Split live display to 4 sub screens. Page 39 iDVR Internet Surveillance Multicam Host Server STD/RIO/PRO V5.0 4.4 Advanced Features For advanced users, iDVR offers the following additional features for the management of Remote Web Browser connected users. 4.4.1 Checking Intranet Connections If you are not sure that you can connect to another PC on your Intranet LAN, if you know the IP Address’s of the PC’s concerned you can test connections by running the [MS-DOS Prompt] program from the [Start] >> [Programs] menu and PING……… 4.4.2 Checking Visitor’s On-Line Status When iDVR is in waiting for Internet Connect, click [View] Menu, [Network Status] Option and iDVR will display the Network Connections window as follows: To select a Visitor - Left Mouse Click on the connections List, and to Display the three Network Management options again Right Mouse Click. [Deny Connect] Disable this visitor to come in again, until canceling the iDVR waiting for Internet connect or rerun iDVR. Page 40 iDVR Internet Surveillance Multicam Host Server STD/RIO/PRO V5.0 [Disconnect] Temporarily disconnect the connection, but visitor can visit again. [Refresh] Get the latest Internet connection status. 4.4.3 Network Log Files On the iDVR Video Server, Click on the [View] Menu, [Log Files] Option and then [Network[ Sub Option to display all Network Connection activities as follows: From the above log, you can check login User Names, Passwords, IP Address’s and review activities performed. 4.4.4 Accessing Multiple iDVR Systems On An Intranet If you have installed multiple iDVR Video Servers on the same Intranet (where each Server has its own unique IP address in the same Subnet (e.g. Get from DHCP for NT server)) then you can use the “Auto search iDVR” option in the [Network] Setup window to define each iDVR Servers Broadcast Port. If you have also activated the “Auto Notify iDVR Videos” option in the [Network] Setup window, then iDVR Video Servers automatically go around the Intranet, pick up the Broadcast Ports and then when Web Browsers display the Live Video, by Left Clicking on the same window - the following Status Location Table is displayed. Page 41 iDVR Internet Surveillance Multicam Host Server STD/RIO/PRO V5.0 Status Icons include: iDVR is not yet running, iDVR is running but Internet waiting not active, iDVR run and wait for Internet but is not responding due to a broken internet/intranet line or network traffic congestion, iDVR does not enable the feature of “Auto Search iDVR Stations” or” Auto Notify iDVR Videos”. Remote iDVR is waiting for Internet connection with password protection. Remote iDVR is waiting for Internet connection with no password protection. By clicking on the “Location” in this Status Table, Multiple Location Live Video streams are made available and optionally displayed in Split, Quad, or Multiple Quad Views. 4.4.5 To Enable IP Protection Fill all of IP’s (or IP ranges) of network connected PC’s which are only allowed to browse each iDVR Video Server, even if some visitor has correct password. This function is to protect each iDVR Video Server so that only pre-approved PC’s can access and logon. Click “Enable IP Protection” button to set up the IP(s) . The right table shows only allow the range IP address, 203.67.1.1 to 203.67.255.255 and 203.69.162.82 to access your iDVR station. Legal IP syntax in iDVR includes: 210.64. *.* 203.*.*.* 210.*.178.1 203.67.*.1 (legal) (legal) (illegal) (illegal) Page 42 iDVR Internet Surveillance Multicam Host Server STD/RIO/PRO V5.0 Chapter 5 : Interactive Voice Response Using a telephone anywhere in the world, iDVR users can Dial-Up any iDVR Video Server and use the following IVR Commands to either Leave or Playback Recorded Messages and or Remotely Manage the iDVR Video Server. If a FAX Machine is being used, then the iDVR Video Server may be asked to take a Snapshot Photo of what’s occurring at that time and Transmit it to the used Fax. To use the IVR Features from any Remote Phone or Fax: 1. Dial iDVR Video Servers telephone number (iDVR has to be in “Wait Dial In Connect” Mode), 2. Listen to the IVR Voice Commands as follows and Enter appropriate responses as detailed below: [Welcome Message] Welcome to the iDVR - Press 1 to leave message - Press 2 to continue Press 0 to quit. (You can press 1, 2 or 0 from your telephone set), [Press 1] Please leave your message after the tone and press 0 to Stop Message Recording, [Press 2] Please input your four numeral IVR Password as defined in the [Dial-Up] System Settings window in the iDVR Video Server], [If Password correct] Press 1 to listen to any incoming message/s, Press 2 to stop the iDVR Video from Recording, Press 3 to start the iDVR Video Recording, Press 4 to get video Snapshot Photo taken and sent to the used Fax Machine where the START button has to be activated, Press 7 to shut the iDVR Video Server down, Press 9 to hear the IVR Instruction Again, Press 0 to quit. Page 43 iDVR Internet Surveillance Multicam Host Server STD/RIO/PRO V5.0 Chapter 6 : Frequently Asked Questions Q1. How can I make sure that my voice/fax/modem supports the voice feature and is the voice driver already installed? A: Normally most 56K modems have the voice feature on hardware, but some modems do not include the voice driver on their setup CD. You can check whether the message “Wave Device for Voice Modem” is shown on Device in System icon from Control panel. If no such message, ask for you dealer to help. Q2: What is Unimodem V, may I need to install it? A: Unimodem V is a Microsoft’s driver for voice modem. If your operating system is Windows 98 or higher, windows 98 will automatically install the correct driver. If your Windows is a 95 version, you have to install it. Windows NT 4.X doesn’t support this feature and you cannot do interactive voice response. Q3: How to install Unimodem V driver? A: Click [UnimodemV] folder from iDVR CD. Select [Unimodem.inf] icon and press mouse right button. You can select [setup] from pop menu to install driver and after finishing the installation, restart you computer. Q4: How to speed dial from rViewer? A: 1. Set delaying1 second to connect after iDVR detects ringing. If you select [Voice/Data Mode] in iDVR Setting, append the extension code to telephone number, e.g. “886-2-28743498 ,,,,,, 7 “: “,,,,,,” is dial waiting (refer to you modem manual); “7” is iDVR’s default extension number for data connect mode. Q5: How to speed up the video refresh from rViewer? A: If you decrease the video quality, it will speed up the transfer rate where normally a 30% setting achieves good results. Q6: I cannot get the video fax when I dial in from a fax machine? A: When you press 4 to get fax by Interactive Voice Response, you should press the START button from fax machine after getting a beep sound. Don’t press 4 and then press the START button without getting a beep sound. The beep sound is for handshaking. Don’t press the START button without the voice message “Press the START button on you fax machine to get fax”. Sometimes, both modem and fax may be failure to handshake. Try again. Q7: How can I adjust or test audio sensibility? A: First of all it is to make sure the sound card and microphone is workable. You can run windows’ audio recorder software to test it. If it is still not workable, check microphone is correctly installed and turn on the microphone feature on mixer program, and turn volume higher. If your sound is with the auto gain Page 44 iDVR Internet Surveillance Multicam Host Server STD/RIO/PRO V5.0 control feature, turn it on as follows: iDVR uses the Windows’ audio format. If your system has not audio compression feature, iDVR cannot do audio recording. There are 3 types of audio recording, PCM is best for clear sound, but more space; L&H CELP is less space, but use more CPU resource. It needs more CPU resource to record video and audio at same time. If you need clear sound, it is best to use higher CPU or reduce the number of frames per second (Pentium III 450 with Intel Indeo5 video codec (640x480) and audio recording can record 9 frames per second.) Q8: How can I test real time phone voice/ fax image notification, when motion detected? A: 1. First of all, make sure voice function of voice/fax/data modem workable by following interactive voice response(IVR) to get voice from regular telephone dialing to iDVR? If yes, get fax image from fax machine according to IVR instruction? 2. If both voice and fax work right, the modem’s driver setting is correct. If neither, check FAQ Q1. NOTE: remember [System setting]->[Dialup] must be in voice/data Modem mode. 3. Now, try real-time dial out features: 4. Setting the parameters of phone in [System setting]->[System_ Notify], and test whether the sample.wav is ok or record your own voice message. 5 Check whether the modem (e.g. line 1: 56000 modem) is correctly selected in setting dialog. If more than two modem drivers are installed in system, you have to select correct modem driver. 6 Remember to enable the [Phone] and clicking "Apply" 7. Last, click the Record Mode. (don't go before step 3) 8. The right side on iDVR’s status line, bottom of live image, shows the "phone" meaning enabling the feature of "Phone alarm " 9. When a motion is detected, the left side on status line shows the phone number, and you can check whether the modem's OH light is on and listing the dialing tone. 1. For dial out fax notification, steps are same above. Q9: How can I setup iDVR Web Page? A: Please refer to iDVR_example.htm and iDVR_Link.htm files in iDVR’s httpdoc directory. Page 45


![Corel Office Document [PFP#241512617]](http://vs1.manualzilla.com/store/data/005699212_1-655f6a875c479857ca50d39f97eeaf8f-150x150.png)