1
User
Manual
Scrivener 2.0
Literature & Latte
July, 2010
Revision: 2.0-01
c 2010, Literature & Latte LTD. All rights reserved.
7.1
7.2
7.3
7.4
7.5
7.6
Project Size Limitations .
Creating a New Project . .
Saving and Making Copies
Opening Existing Projects
Templates . . . . . . . . . .
Backing Up Your Work .
36
37
37
38
38
42
46
Acknowledgements
8 Setting Up the Binder
8.1
How the Binder is Orii
ganised . . . . . . . . . . . .
iii
8.2
Binder Controls . . . . . .
8.3
Using Collections . . . . .
iv
8.4
Document Templates . . .
I
2
9 Navigating and Organising
9.1
General Navigation .
9.2
Go To Menu . . . . . .
9.3
Hoisting the Binder .
9.4
Locking the Editor . .
9.5
Scrivener Links . . . .
9.6
Using Favourites . . .
9.7
Layouts Panel . . . . .
.
.
.
.
.
.
.
58
58
59
60
61
61
66
67
11 10 Setting Up Meta-Data
10.1
Meta-Data Types . . . . . .
10.2
Keywords HUD . . . . . .
14
10.3
Naming Text Highlights .
14
68
68
73
74
Contents
Contents
About This Edition
Introduction
1 Philosophy
3
2 About This Manual
2.1
Terms and Conventions .
5
6
3 What’s New
3.1
Hundreds of Other Improvements . . . . . . . . .
8
4 Installation and Upgrading
4.1
Registering . . . . . . . . . .
4.2
Application Updates . . .
4.3
Upgrading
from
Scrivener 1 . . . . . . . . . .
5 Interface
5.1
Interface Overview . . . .
5.2
View Modes . . . . . . . . .
5.3
Full Screen Interface . . . .
6 Quick Tour
6.1
Project Format . . . .
6.2
The Main Window .
6.3
Outlining Your Draft
6.4
Compiling the Draft
II
Preparation
7 Project Management
.
.
.
.
.
.
.
.
.
.
.
.
.
.
.
.
.
.
.
.
.
.
.
.
.
.
16
46
50
51
55
11 Gathering Material
11.1
File Import . . . . . . . . . .
16
11.2
Scrivener Services . . . . .
11.3
Scratch Pad Panel . . . . . .
18
18
23 12 Project Planning
12.1
The Corkboard . . . . . . .
25
12.2
The Outliner and the
Binder . . . . . . . . . . . . .
26
12.3
Project Notes . . . . . . . .
26
12.4
Capturing Ideas with
28
Scratch
Pad . . . . . . . . . .
28
12.5
Custom Icons . . . . . . . .
31
77
77
80
82
13 Cloud Integration and Sharing
13.1
Simplenote . . . . . . . . . .
34
13.2
Synchronised Folders . . .
13.3
SimpleText.ws . . . . . . .
36
88
88
96
104
ii
83
83
87
87
87
87
CONTENTS
13.4
III
Index Card for iPad . . . .
Writing
iii
104
105
17.4
17.5
17.6
Document Support Panes
Locking the Inspector . . .
Advanced Inspector Keyboard Usage . . . . . . . . .
156
159
160
14 Writing and Editing
14.1
Rich Text Editing Philosophy . . . . . . . . . . . . . .
14.2
Editing Basics . . . . . . . .
14.3
Editing with Scrivener . .
14.4
Formatting Tools . . . . . .
14.5
Searching and Replacing .
14.6
Header Bar . . . . . . . . . .
14.7
Footer Bar . . . . . . . . . .
14.8
Viewing Media in the Editor . . . . . . . . . . . . . . .
14.9
Splitting the Editor . . . .
14.10 Using Snapshots . . . . . .
14.11 Auto-Completion . . . . .
14.12 Text Bookmarks . . . . . .
14.13 Editing Multiple Documents (Scrivenings View)
14.14 Goals and Statistics
Tracking Tools . . . . . . .
108 18 QuickReference
18.1
QuickReference
Mini108
Inspector . . . . . . . . . . .
109
18.2
Using QuickReference
112
Panels in Full Screen . . . .
116
123 19 Scriptwriting
19.1
Formatting a Script in
129
Scrivener . . . . . . . . . . .
132
19.2
Creating Your Own
Script Formats . . . . . . .
133
19.3
Importing a Script from
136
Final Draft and Other
138
Programs . . . . . . . . . . .
139
19.4
Export the script from Fi139
nal Draft as an RTF file. .
19.5
Printing a Script . . . . . .
140
19.6
Exporting a Script . . . . .
19.7
Final Draft 8 . . . . . . . . .
143
161
15 Full Screen
15.1
Using a Background Image
15.2
Full Screen HUD . . . . .
15.3
Full Screen Inspector HUD
15.4
Customising Full Screen
Appearance . . . . . . . . .
15.5
Using Full Screen with
Multiple Displays . . . . .
149 20 Bibliography Management
150
150 21 Transcribing Media
151
22 Page View
174
16 Annotating and Marking Your
Text
16.1
Inline Notation . . . . . . .
16.2
Linked Notation . . . . . .
16.3
Text Colour and Highlights
16.4
Marking Revisions . . . . .
17 Inspector
17.1
Synopsis Card . . . . . . . .
17.2
General Meta-Data View .
17.3
Custom Meta-Data View .
151
23 The Name Generator
162
162
163
163
164
168
169
170
171
171
175
176
177
151
IV
Final Phases
178
153 24 Creating a Table of Contents
153
153 25 Compiling the Draft
154
25.1
Basic Presets . . . . . . . . .
154
25.2
Expanded Compile Interface . . . . . . . . . . . . . . .
155
25.3
Option Panes . . . . . . . .
155
25.4
Available Compile Formats
156
156 26 Exporting
179
182
182
183
183
214
221
iv
CONTENTS
27 Printing
27.1
Document Printing .
27.2
Printing Index Cards
27.3
Printing Outlines . .
27.4
Compile and Print . .
27.5
Page Setup . . . . . . .
V
.
.
.
.
.
.
.
.
.
.
.
.
.
.
.
Advanced
222
222
222
222
222
222
223
A.3
A.4
A.5
A.6
A.7
A.8
A.9
Edit Menu . . . . .
View Menu . . . .
Project Menu . . .
Documents Menu
Format Menu . . .
Window Menu . .
Help Menu . . . . .
.
.
.
.
.
.
.
B Preferences
B.1
General . . . . . . . .
B.2
Appearance . . . . .
B.3
Corkboard . . . . . .
B.4
Full Screen . . . . . .
B.5
Navigation . . . . . .
B.6
Editor . . . . . . . . .
B.7
Formatting . . . . . .
B.8
Auto-Correction . .
B.9
Import and Export
B.10 Backup . . . . . . . .
.
.
.
.
.
.
.
.
.
.
.
.
.
.
.
.
.
.
.
.
.
.
.
.
.
.
.
.
.
.
.
.
.
.
.
.
.
.
.
.
.
.
.
.
.
.
.
.
.
.
.
.
.
.
.
.
.
.
233
239
249
250
256
260
261
.
.
.
.
.
.
.
.
.
.
262
262
265
266
270
273
275
277
279
280
282
28 Using MultiMarkdown
28.1
What is Markdown? . . . .
28.2
What is MultiMarkdown?
28.3
MultiMarkdown
and
Scrivener . . . . . . . . . . .
28.4
Importing MultiMarkdown Files . . . . . . . . . .
28.5
Exporting MultiMarkdown Files . . . . . . . . . .
28.6
Updating MultiMarkdown
28.7
Further Information . . .
224
224
225
A Menus and Keyboard Shortcuts
A.1
Scrivener Menu . . . . . . .
A.2
File Menu . . . . . . . . . .
229 D Tips and Tricks
229
D.1
Bookmarks or Small Files
230
D.2
Hidden Preferences . . . .
225
226
226
227
227 C Replacement Tokens
284
285
285
285
About This Edition
This version of the manual is mostly complete, with the exception of a few sections.
These are being worked on as quickly as possible, but be rest assured if you note
something missing, we probably already know it is missing and will have an updated
version available soon.
Latest copies of the PDF can be downloaded from our Support page1 .
1
http://www.literatureandlatte.com/support.php
v
Acknowledgements
Many thanks to the following people for very kindly donating time or code to Scrivener:
found on their respective websites).
Philip Dow (author of Journler7 )—help with
the custom ruler code.
Wagner Truppel for help figuring out how
to draw the diagonal status text in the corkboard.
Martin Wierschin of Nisus, for various help
with the chicaneries of the text system and
RTF.
Peter Maurer—help with the custom animated disclosure triangles (and kindly provided the images too).
Christian and Eric at Devon Technologies8 —
help with keeping Scrivener in the background when the clippings services are used.
Positive Spin Media—the tab bar in the
project notepad uses PSMTabBarControl,
Copyright c 2005, Positive Spin Media
(all rights reserved), which in turn uses portions of code from Copyright 2004 The Shiira
Project9 (all rights reserved).
Malte Rosenau—for pointing me in the direction of the code I needed to import web pages
with their titles intact.
James Hoover, creator of Bean10 , for providing the basis of the “show invisibles” code and
Heinrich Gliesen—help with inline image
scaling.
Jonathon Mah—help with the bubble highlights around comments and footnotes.
Andreas Mayer—NSBezierPath and table
view extensions2 .
Andrew C. Stone—smart quotes code3 .
Todd Ransom (author of Avenir) at
returnself.com—filtering and page number
printing code.
Jesse Grosjean (author of Mori and WriteRoom) at Hog Bay Software—auto-saving
code.
Split view code based on OASplitView from
the excellent OmniGroup4 .
Andy Matuschak—Scrivener uses the superb
Sparkle framework for software updates, created by Andy Matuschak.
Matt Gemmell—various code snippets (including the colour contrast code, the use of
QuickLook for the file link view and the
corkboard options bubble window) from his
source code site5 .
Andy Matuschak6 and Matt Gemmell are
also responsible for the basis of the code for
Scrivener’s HUD panels in Tiger (code to be
2
http://www.harmless.de/cocoa.html
http://www.stone.com
4
http://www.omnigroup.com
5
http://mattgemmell.com/source/
6
http://andymatuschak.org
7
http://journler.com/
8
http://www.devon-technologies.com
9
http://www.positivespinmedia.com
10
http://www.bean-osx.com
3
vi
vii
for sharing various other code snippets from
his work on Bean.
Brent Simmons—the OPML importer code
is based on a class created by Brent Simmons
for NetNewswire (Copyright c 2002, Brent
Simmons).
Shortcut Recorder is c Contributors of
11
ShortcutRecorder —thanks to Jesse Grosjean for pointing me in the direction of this
project.
Nathan Day—the PDF Services alias file is
created using Nathan Day’s NDAlias class12 .
Mark Onyschuk—help with the window flipping code for the templates panel, which is
based on his LIFlipEffect13 .
Kino—the Snapshot comparison tool was inspired in large part by Kino’s “Compare Documents” macro for Nisus Writer Pro.
Robert Warwick14 —the improvements to
text table support are based on code Robert
wrote for Stone Hill Invoicer.
Improved PDF anti-aliasing was provided by
a line of code from Skim15 .
The redoubtable Douglas Davidson, Apple
engineer and guru, for responding so helpfully to so many of my enquiries about the
intricacies of the Cocoa text system.
Aki Inoue at Apple for advice about the word
count code.
Fletcher Penney, for contributing so much
time and effort in helping me get MultiMarkdown implemented in Scrivener.
Everyone on the Cocoa-Dev list for their
help and support, with special mention to
Bill Cheeseman, Malcom Crawford, Max
and Marcus at Blue Technologies (authors
of Ulysses), J. Nozzi at Bartas Technologies
(author of CopyWrite).
Stephen Kochan, author of Programming
in Objective-C, for answering my questions
when I was getting started.
Beta Testers
Too many to mention everyone, but a big thanks to all of you, especially those who
helped beta test during the early stages - your feedback led directly to the freeware
release of Scrivener Gold and a much enhanced Scrivener. Special mention to:
Alexandria Pallas-Weinbrecht, for all the help in testing Scrivener’s full screen mode
on a dual-monitor set up.
Ernesto Salcedo, for help with a bug in viewing webarchives.
And in the best Oscars-speech-style, thanks to Kurt Vonnegut for making me want
to write and my father for buying me a ZX Spectrum when I was a boy and thus
forever turning me into a geek.
11
http://code.google.com/p/shortcutrecorder/
http://homepage.mac.com/nathan_day/pages/source.xml
13
http://www.lorem.ca
14
http://www.codehackers.net
15
http://skim-app.sourceforge.net/
12
1
Part I
Introduction
2
Chapter 1
Philosophy
Most word processors and text editors aimed at writers assume the creative process
will take place in linear form; that is, they assume that the writer knows how his
or her work will begin, and will start at the beginning and continue through until reaching the end. Planning and restructuring is therefore forced into a separate
workflow—the writer must either plan before beginning and keep track of hundreds
of different files using the Finder, or face the laborious task of cutting and pasting
numerous chunks of text to restructure a long piece of work at the end. For shorter
pieces of writing, this is not a massive problem, but for longer texts—such as novels
or academic theses—the writer can often find him- or herself battling against the tools
of his or her trade.
Over the past few years, a number writing solutions have appeared, aimed at those
who don’t write in a linear fashion. All have pros and cons, and writers with varying styles of working fortunately now have a wider choice. Scrivener is one such
nonlinear tool. Scrivener was developed because no other writing environment quite
provided all of the features required for the sort of writing that demands easy access
to research, a quick overview of numerous documents and the easy restructuring of
swathes of text.
The main concepts of Scrivener can be summarised as follows:
§ The software should allow the writer to use many of the formatting features
familiar to word processors—different fonts, italics, paragraph styles and so on.
It is up to the writer to avoid distractions, not the software.
§ What looks good in print is not always the best way of viewing something on
the screen: the software should allow the user to completely reformat the text
on export or for printing without affecting the original (thus making it easy to
export a manuscript in a format suitable for an editor and then export it just as
easily in a format more suited to publishing on the internet).
§ There should be a synopsis linked with each document, which can be viewed
with other synopses to get an overview of the project as a whole.
§ Linked to the above, it should be easy to view the project as an outline and use
drag and drop to restructure the project. Moving between the outline and the
text itself should be fluid.
3
4
CHAPTER 1. PHILOSOPHY
§ It should be possible to view individual “documents” either as discrete chunks
of text, or combined with other (arbitrary) documents. Thus, for instance, a
chapter could be viewed as a whole, or each scene could be viewed individually.
§ The user should be able to view more than one document at the same time—for
instance, the end of one chapter alongside the beginning of the next, a character
sketch alongside a scene in which that character appears, or a research document
alongside the writing it is being used to support.
§ The software should be capable of storing and displaying common research
documents, because writers do not just use text—they also refer to images, web
pages, recorded interviews and other media.
The overriding philosophy behind Scrivener was in part inspired by a passage written by the author Hilary Mantel, in a collection of essays by writers on the process of
writing entitled The Agony and the Ego. Hilary Mantel described a process of “growing a book, rather than writing one,” which can be summed up as follows:
1. During the first stage of writing, you might jot ideas down on index cards—
phrases, character names, scene ideas; any insight or glimpse.
2. When you have gathered a few index cards, you might pin them to a corkboard.
Other ideas build around them, and you might even write out a few paragraphs
and pin them behind the index card with which they are associated. At this
stage, the index cards have no particular order.
3. Eventually, you may begin to see an order emerging and repin the index cards
accordingly.
4. After you have gathered enough material, you might take all of your index
cards, sheets of paper and jottings and place them into a ring-binder. You are
still free to move everything around, but now you have a good idea of how
much work you have done and how much more work you have to do.
Scrivener is thus a nonlinear writing tool that provides the writer with all of the
features found in any text editor, along with the functionality for “growing” your
work organically within the program itself.
Chapter 2
About This Manual
This manual has been written using Scrivener, and is available in three different formats. If you purchased a boxed copy of Scrivener, you should have a printed version
of it available for desktop reference. It can also be accessed as a PDF from the Help
menu, under User Manual. You should also find two copies which have been specially formatted to be printed on either US Letter or A4 standard printer paper on
our website1 . Lastly, the Scrivener project used to author the manual has been provided to you as a demonstration of writing in Scrivener, and can be downloaded from
the Support section of the Literature & Latte website. It has been written using the
MultiMarkdown formatting syntax, and so also is a demonstration of that system as
well.
The manual itself has been split into four primary sections and an appendix. The
first section introduces Scrivener’s terminology and interface, and has a quick tour
for those who want to start writing as fast as possible. It is highly recommended that
you also go through the separately available interactive tutorial as well (which can be
accessed via the Help menu in Scrivener) to get the most out of Scrivener and eliminate confusion over some of its unique features, but if you want to start writing as
soon as possible, the quick tour (chapter 6) should have you writing using Scrivener’s
basic main features within half an hour.
Scrivener has a wide variety features to accommodate many different purposes
from novels, screenplays, academic papers and dissertations, general non-fiction, journalism, blogging, and much more. While it strives to present as simple an interface as
possible, once you start digging into the application, you will find a degree of flexibility and complexity to suit even the most esoteric needs. To help organise all of these
concepts, the other three sections take a pragmatic look at the primary stages of any
major project, Preparation (Part II), Writing (Part III), and Editing and Submission
(Part IV). In each section the features most useful to you during those phases will
be referenced in-depth. If you want to find a specific feature, but don’t know which
section it might be located in, consult the appendices at the end of the manual, which
have a cross-referenced list to every menu item and window in Scrivener, or the index.
Users who are already familiar with prior versions of Scrivener will want to consult
the What’s New (chapter 3) section, where new major features are briefly explained,
1
http://www.literatureandlatte.com/support.php
5
6
CHAPTER 2. ABOUT THIS MANUAL
and a list of minor changes and features is provided as well. For a full description of
everything that has changed, as well as bug fixes, check out the Release Notes2 online.
The PDF and Scrivener project versions of this manual will always be the most
up-to-date.
2.1
Terms and Conventions
Whenever the documentation refers to an action that must be taken by you, the visible name for that action will be formatted like so. Button labels, menu items, and
keyboard shortcuts will all be displayed in this fashion.
Menus will be displayed in a hierarchy using the “ ” character to separate toplevel, sub-menu, and items. To convert a range of selected text to uppercase, invoke
the Format Convert To Uppercase command.
Keyboard shortcuts will use the following symbols:
§
–:
The Command key, or the Apple key, is the one located directly to the left
and right of your spacebar.
§
: The Option key is also labelled the Alt key on some keyboards, depending
on which country you purchased your Mac from. Some laptops only have one
Option key on the left side.
§
: Control is usually located to the left of the Option key. Some laptops only
have one Control key between the Option key and the Fn key.
§ Fn: If you have a laptop, or a newer Apple keyboard, you might have a Function
key available. Scrivener tends to avoid this key since not everyone has one
available.
§
: The Shift keys are rarely used by themselves in shortcuts, but are often used
on combination with other modifier keys.
When a keyboard shortcut requires a combination of modifier keys, they will be
– V which matches Edit Paste and Match Style,
printed together. Example:
means you should hold down all three of these modifier keys, and then tap the V key
on your keyboard. The hyphen is used to separate the modifier keys from the target
key, and is not meant to be included in the shortcut itself.
Interface elements will be capitalised as proper nouns to help differentiate them
from standard nouns, when appropriate. A Collection is an interface element, while
the word ‘collection’ can be used to indicate a casual grouping of items, and not necessarily a formal Collection.
2
http://www.literatureandlatte.com/scrivChangeList.php
2.1. TERMS AND CONVENTIONS
7
Some of the names for various elements within Scrivener are customisable on a per
project basis, and how you name these things will impact much of the interface. A
good example is the Draft, a place where your manuscript in progress is built. This
can be called whatever you like, and what you name it will impact the names of menu
items that refer to it. In all cases, this documentation will refer to these malleable
elements by their default names.
In cases where file paths are printed, the UNIX convention of providing a shorthand to describe your personal home folder will be used. An example might look
like:
~/Documents
The tilde is a shorthand which means: “/Users/yourusername”. In this case, it
would refer to the Documents folder in your home folder.
Chapter 3
What’s New
Scrivener 2 is a major revision, featuring comprehensive overhauls of the interface
to make it even more intuitive and easy to use. It includes a substantial list of longawaited new features, such as a better style system, non-linear collections of documents, free-form corkboards, better snapshot integration, and much more. We understand that you are a busy person, and while new software can be fun for some,
others just want to keep working in the ways they are used to. Scrivener 2 has been
designed so that the majority of the new features will not get in your way until you
want them. When you first start using version 2, you should be up and running in the
way you are accustomed with a minimal period of transition. When you do get the
time to explore the new features, they are easily accessible and we think you’ll find
they add valuable tools and methods to your writing process.
In addition to the list below, you might want to also check out the new preferences
(Appendix B) and menus (Appendix A).
3.0.1
Free-form Corkboards
Up until now, the corkboard feature has been another way to view the order of your
book by placing it into a familiar metaphor. Scrivener 2 takes the metaphor the rest
of the way. Now you can view a free-form corkboard for your sections where cards
can be moved around freely, allowing the right brain to visualise your book in new
ways. If you decide to commit the new order into book outline, you can do so with
the press of a button. For more information, read The Corkboard (section 12.1).
3.0.2
Collections
Collections add tabs to your binder, giving you the ability to collect groups of documents together for whatever purpose you desire, without moving them from their
original position. It’s a bit like making groups of aliases, without all of the fuss. You
could create a tab to collect all of the sections have your editor has marked as being
too verbose, and remove them from the collection as you trim them down, or create
another tab to store all of the documents that still need citations. Build smart collections that automatically look for search terms every time you view the tab. For more
information, read Using Collections (section 8.3).
8
9
3.0.3
Marginalia
Now you get a choice between in-line annotations and footnotes, or placing your
notes into a new panel located in the Inspector. This not only lets you place long
notes out of the way of the primary draft, it can also work as a bookmarking system.
Clicking on the notes in the Inspector column will automatically scroll your editor
to its linked position in the document. When using Edit Scrivenings, you can see all
of the notes for the collected document at once. Your old projects will use the in-line
system as they always have, but you can easily convert to the new system with a single
menu command, or vice-versa. For more information, read Annotating and Marking
Your Text (chapter 16).
3.0.4
Improved Compile
For most Scrivener authors, compile is the last crucial step where all of your hard
work is bound together into a single document. It lets you write in a way that is comfortable for you, while quickly generating a format that your editor is comfortable
working with. Scrivener 2 recognises the importance of this process, and has increased
its abilities in nearly every facet. Now you can design export instructions which automatically title and number your chapters for you; insert custom separators between
types of documents; filter compile according to meta-data or other criteria; export to
more formats, including ePub and WebArchive, with even better Final Draft support.
Compile now takes your export format into account, and reduces the complexity of
the options provided accordingly. For more information, read Compiling the Draft
(chapter 25).
3.0.5
iPad Workflow Support
While the iPhone and iPod touch gave people a taste of mobile writing, the iPad
has made this more practical. In response, 2.0 features integration with the popular
Simplenote service, and the ability to syncfiles with an external folder. The latter
provides integration with plain-text editors on the iPad that can access DropBox and
can also be used as a collaboration tool. To read more about these new features, see
Cloud Integration and Sharing (chapter 13).
3.0.6
Better View Integration
The relationship between corkboard, outliner, and editor was for many, a stumbling
block when learning Scrivener. A lot of thought has gone into making this relationship more intuitive. You no longer have to worry about choosing between Edit
Scrivening modes (now called Scrivenings—but we’ll come to this later), or setting
preferences to change the behaviour of clicking on items in the Binder. Whatever
view you used last is what Scrivener will use the next time, and the toolbar buttons
10
CHAPTER 3. WHAT’S NEW
for selecting modes have been refined to make it clearer that you are changing the way
you view a binder item and/or its children items.
3.0.7
QuickReference Windows
There are still occasions where it is fruitful to have more than two documents open
at once. Now Scrivener provides a QuickReference window. It’s a bit like Finder’s
QuickLook, except unlike that, you can actually edit content, and have multiple panels open at once. You can also split the window and edit nearly anything in the
second pane that would ordinarily require the Inspector to be open. QuickReference
windows can also be used while working in Full Screen Mode. For more information
on how to use QuickReference windows, read QuickReference (chapter 18).
3.0.8
Snapshots and Changes
Taking snapshots of your documents as you work has always been a crucial safety net
in Scrivener, but Scrivener 1 just gave you a list of old snapshots in a window, and
let you do all of the hard work figuring out what changed and which one was which.
Snapshots have now been moved into the inspector, meaning you can view them right
alongside your current version. They can also be loaded right into the editor itself as a
read-only reference. Split your editor into two panes, and load an older snapshot into
that pane for full size editing and reference. You can also now ask Scrivener to look
for changes between revisions. It will highlight new words and overstrike deleted
words for you. For more information, read Snapshots Pane (subsection 17.4.4).
3.0.9
Automatic Backups
To keep your work safe, you can now tell Scrivener to automatically back up your
projects as you work. There are a number of ways in which to do so, including timebased, opening and closing, and force saves. Tell Scrivener to use your DropBox1
folder for automatic backups, and never worry about keeping all of your machines
up to date. You can still make manual backups using the File Menu as before.
3.0.10
Document Templates
Before, if you wrote a template character sheet, reference page, and so on, you had to
make sure to remember to duplicate the original and then move the copy to the right
spot. Now you can set up a template folder which will let you draft your templates in
a single spot, then place them in an easy to use menu to be inserted right into the draft
where you want them. Document templates will be clearly marked with a special icon
in the binder. For more information, read Document Templates (section 8.4).
1
DropBox is a free tool that lets you keep a folder synchronised between all of your computers.
For more information, visit the DropBox homepage2
3.1. HUNDREDS OF OTHER IMPROVEMENTS
3.0.11
11
Page View
Display your work in a variety of visual page formats, including single-page, twopage side by side, and custom page sizes. While not intended to replace your word
processor or layout program, Page Layout preview will give you a rough idea of how
many pages your sections are. This will be of considerable use to scriptwriters, or
others who prefer to work in a page-based method, or just anyone who prefers the
aesthetic appeal of seeing virtual pages scrolling by.
3.1
Hundreds of Other Improvements
Often when a new product version says hundreds of new improvements, you know
they are counting each and every change, including bugs fixes. Scrivener 2 actually
does have hundreds of improvements, far too many to list right now, though if you
want a complete list, consult the change log3 online. You’ll notice most of these
refinements as you go about working in the way you’ve grown accustomed to. Here
is a list of just a few of the new things you can do.
Binder Favourites: Set documents or folders as “favourites” and they’ll get pinned
to various document selection menus in the interface, such as Go To, and Scrivener
Links.
Text Bookmarks: Set bookmarks in the text of your document to mark places of
interest. Bookmarks are set using the existing inline annotation feature, so it is easy
to spot where they are while you work.
New Style System: Apple’s built-in style system has been completely replaced
with an improved style builder and selection mechanism. It is important to note
that Scrivener styles are still a way of applying favourite formatting rules and font
variations, not dynamic styles in the sense of a word processor, but the system for
maintaining and creating these should be much easier.
Refined Menu Layout: Much thought has been put into storing the vast number
of functions available. The new menus have been re-arranged to be more intuitive
and logical.
Preferences Overhauled: More control is available, letting you personalise your
copy of Scrivener even further, and the sections have been re-arranged to be more
logical and accessible.
Better Keywords: Keywords are now stored centrally for each project, and can be
assigned colours which you can optionally choose to display on index cards in the
corkboard. This raises the visibility of keywords, making them more useful when
viewing large groups of documents together.
Custom Binder Icons: Create or import your own custom icons and assign them
to documents and folders in the binder.
3
http://www.literatureandlatte.com/scrivChangeList.html
12
CHAPTER 3. WHAT’S NEW
Project Specific Formatting Preferences: In addition to the global application
editing formatting preferences, you can now set up each project to have special formatting defaults.
Improved Project Templates: Creating a new project is now even easier. Scrivener
comes loaded with a number of useful starter templates, and it is even simpler to make
your own and sort them using the new topical category system.
New Index Card Appearance: In addition to the existing choice of index card
styles, the new Rounded theme gives both the card and the “pins” an entirely new
look.
Revision Marking: Set up revision marking “pens” that automatically colour new
text according to the revision number as you type it in.
New Format Search: You can now search by a wide collection of format-based
criteria. For example you can look for all italic or bold texts, search by revision
markings, in-line annotations, highlights, and more.
Titles in Scrivenings: Display and edit the titles of documents right in the editor
while working in Scrivenings.
Integrated Title and Synopsis in Outliner: The outliner no longer requires a
second column for both the Title and Synopsis; they can be displayed in a single
integrated column, familiar to users of outlining tools like OmniOutliner, giving you
more space for other columns.
View Enclosing Group: It’s now easy to jump straight to the corkboard or outliner that contains the document you are currently editing. With a single menu command, view the current document with its neighbours.
Expanded Scratchpad: The Scratchpad has been modified to work better as an outboard research collection tool. You can now store multiple scratchpads, and these
files will be saved right on your disk in Documents. The Scratchpad has also been
approved to better enable the transfer of data from it to documents in your open
projects.
Optimised Text Engine: Snow Leopard introduced changes in the way text is rendered; Scrivener 2 has been optimised to better work with these changes, improving
performance when working with large documents.
Character Name Generator: Authors of fiction will be pleased to find that a powerful name generator has been built into the application. You can supply it with a
wide range of criteria, including ethnic background, gender, forenames, surnames, or
both, alliteration, the ability to add your own custom name lists, and more.
Store Any Kind of File: A new advanced feature which must be enabled in preferences allows you to drag any type of file into your project. When accessed Scrivener
will let you load it in an external editor that supports that file type. Unlike references,
these files will be stored with your project, turning it into a hub for all your file types.
3.1. HUNDREDS OF OTHER IMPROVEMENTS
13
Full Screen Backdrop: Now you can customise your full screen experience by
choosing images from your hard drive.
Improved Navigation: New keyboard shortcuts let you traverse the binder from
right within the editor session. No more switching back and forth between binder
and editor to select the next document.
Expanded Export Features: More of your work can now be saved when using the
Export feature. Include all of your Snapshots as well.
Multiple Project Notepads: Project notes can still be accessed in the inspector,
just like you are used to, but now you can also load them in a separate window which
has been designed to look like a tabbed notebook. Add new tabs to have multiple
notebooks, and these will be accessible from the inspector as well. Now you can have
both your document notes and project notes available at the same time.
Format Bar: The new format bar collects the most common formatting tools into
a single, compact space. No more hunting around in menus, or messing with font
palettes. The margin and tab stop ruler has been separated and simplified, so now
you can show only the tools you need rather than having to keep one large all-in-one
tool at the top of your editing window. The new format bar is slim, and stays out of
your way at the top of the editing session.
Chapter 4
Installation and Upgrading
If you purchased the boxed version of Scrivener, insert the CD-ROM into your computer and wait for it to appear in the Finder. Create a new Finder window with – N
and choose the Go Applications... menu item. Drag the Scrivener application from
the CD to your Applications folder.
For online downloadable purchases, download the trial version from the Literature & Latte website. The trial version can be unlocked with the registration serial
number that was sent to you when you purchased the application. When the DMG
finishes downloading, double-click on it in the Finder (if it hasn’t opened for you
automatically), and follow the above instructions to drag the Scrivener icon to your
Applications folder.
Scrivener will not be correctly installed on your system if you drag the icon from
either the CD, or the DMG, straight into the Dock. It must be dragged into the
Applications folder, or if you have do not have administrative rights to the computer,
into your user folder.
After copying the Scrivener application to your hard drive, you can then drag a
copy to the Dock from the Applications folder if you wish. To install the optional
bonus material, including starter templates, export presets, scriptwriting presets, and
more, double-click the Extras Installer which should be available in both the DMG
and the CD.
Once this is complete, you should eject the DMG or CD from your computer.
Click the Scrivener icon in the Dock (if you have placed it there), or double-click
from the Applications folder to launch Scrivener.
4.1
4.1.1
Registering
The Trial Version
You can try out all of the features of Scrivener for 30 non-consecutive days without
having to pay or register. During that period, Scrivener will be fully functional. After
30 days of use, you will no longer be able to access Scrivener at all unless you register.
(Actually, Scrivener will allow you a single “grace” session after the 30 days so that you
can export all of your work. This way, if you have decided not to buy Scrivener but
forgot to export during the 30 days, you can still get your work out of the program.)
14
4.1. REGISTERING
4.1.2
15
Purchasing Scrivener
During the trial period, whenever you launch Scrivener, you will be reminded of
how many trial days you have left and given the option of buying and registering.
Clicking on the “Buy Online” button will take you to the Literature & Latte online
store, where you can purchase a licence for Scrivener. You can also visit the online
store at any time whilst using Scrivener by going to the Help menu and choosing
“Purchase Scrivener”.
If you are reading the paper copy of this manual, you probably already have a
Scrivener serial number in the box.
When you buy a licence for Scrivener online, you will be e-mailed your unique
serial number, which will have the following format:
scrivenXXX-XXXX-XXXX-XXXX-XXXX-XXXX
Make sure that you keep this serial number, along with the exact name under which
you registered Scrivener (the “Serial Number Name”), in a safe place, as you will need
both to register Scrivener (remember that you may need to re-register at a later date,
too - for instance when installing Scrivener on a new computer, or re-installing after
wiping your hard drive for whatever reason - so it is very important to store this
information safely).
4.1.3
Registering Scrivener
After purchasing a licence and receiving your unique serial number, you can register
Scrivener by clicking on the “Enter Licence. . . ” button in the “Scrivener is Unregistered!” box that appears whenever you launch Scrivener. Alternatively, you can
choose “Register. . . ” from the application (Scrivener) menu. Either way, you will be
presented with the registration panel or sheet.
Enter the exact name under which you registered Scrivener (referred to as the “Serial Number Name” in the e-mail you received with your registration details) in the
“User Name” box and your unique serial number in the “Registration Code” box and
then click on the “Register” button. You must make sure that both the user name
and serial number are exactly as they appear in the registration e-mail you received,
or registration will fail. (For this reason, it is probably best to copy and paste both
the user name and serial number directly from your e-mail.)
Once Scrivener has been registered, there is no longer a time limit on its use and
you will no longer see the nag box at startup - the application will launch immediately
without any messages.
16
CHAPTER 4. INSTALLATION AND UPGRADING
4.2
Application Updates
When you first launch Scrivener, you will be presented with a panel which asks
whether or not Scrivener should automatically check itself for updates. To use this
feature, you must have a connection to the Internet.
If you click Yes, whenever you launch Scrivener, if your machine is connected to
the internet, Scrivener will do a quick check to see if there is a newer version available.
If so, you will be presented with a panel giving details of the update and asking you
whether or not you want to install the newer version (it is strongly recommended
that you always update to the newest version available). If you click “No” to “Check
for updates on startup?”, Scrivener will not do this check automatically. Whether
you click “Yes” or “No”, however, you can always check for updates manually by
choosing “Check for Updates. . . ” from the application (Scrivener) menu.
You can change your mind later by setting this option in the application preferences, under the General tab (section B.1).
4.3
Upgrading from Scrivener 1
While it is possible to run more than one version of Scrivener at once on your computer, it is advisable to first delete your copy of 1.x, before installing the new version.
To do this, simply locate Scrivener in the Applications folder, and drag its icon to
the Trash in your Dock, then follow the above instructions to install Scrivener 2.0
on your hard drive. Since the application preferences have all been updated, you will
need to go through the new preference system and set up your defaults again.
The Scrivener project file format has been updated considerably, and new or upgraded projects cannot be opened in Scrivener 1.x versions of the application. For
each project on your system, you will be presented with a dialogue box, asking if you
wish to upgrade the project format. Until you do so, it will not be possible to open
these older projects in Scrivener 2.x. When updating the project, Scrivener will create a backup copy of the original project, preserved in the 1.x format which you can
choose to backup, or delete once you’ve verified the update was successful.
Once the update process is complete, the project will open in 2.0 and you can begin
working immediately.
Updating large projects: When updating very large projects, be prepared to wait
a while for the process to complete. A good rule of thumb is how long it would
take to copy the project from one disk to another. If your project is so large that
it will take 20 minutes to copy, then you should be prepared to wait at least that
long for the project to update, as part of the update process is creating a backup of
the original. You will also want to keep this fact in mind when considering drive
space. Do not attempt to update a multi-gigabyte project file on a drive that does
not have enough space left on it to accommodate a duplicated copy.
4.3. UPGRADING FROM SCRIVENER 1
17
In some cases, you may need to keep a copy of 1.x installed. If you are working with
a colleague which has yet to upgrade to 2.0, you will want to make sure to not update
these collaborative projects, and use 1.x to interface with them until they upgrade. If
you elect to keep a copy of Scrivener 1.x installed, you will need to take the following
items into consideration:
§ .scriv files will open in Scrivener 2.0 by default. To open older projects in
Scrivener 1.x, you will need to drag these items onto the Scrivener 1.x icon
in the Dock, or use the File Open... menu command from within Scrivener
1.x.
§ So long as you have both versions installed, the Mac might get confused over the
clipping services, which can be used to clip information from other programs
into Scrivener. Once you have fully uninstalled the old version of Scrivener,
these clipping services should work just fine.
§ It is safe to run both copies at once, as they both use different preference files.
Chapter 5
Interface
The Scrivener interface has been carefully designed to cover a wide range of uses. At
its most minimal, the interface could look no more complicated than TextEdit. Most
projects will require some level of interface balance between these two examples. In
this section, we will go over some of the basic interface elements that will be present
in nearly every project you work in. Advanced features, such as many seen above,
will be gradually introduced in their own sections as they pertain to specific areas of
the writing process.
5.1
Interface Overview
The main interface comprises six main elements, not all of which are visible when a
new project is created.
1. Toolbar: Frequently used tools displayed in a standard fashion, familiar to most
Mac OS X applications, which can be customised as you see fit.
2. The Binder: A hierarchal list of all items in your project, including the
manuscript; a general collection area for research materials, notes, and so forth;
a trash can for collecting deleted items; and finally the top-level area where you
can create your own files and folders.
3. The Format Bar: Supplies frequently used text editing and formatting tools,
available to both editor splits.
4. The Editor: As shown in the screenshot, the editor can be split into to panes
which can show two parts of the same document, or two different items altogether. This is where all viewing and editing is done.
5. The Inspector: A feature-packed tool providing information about the currently active split. The Inspector has five separate sub-panes, which address
various aspects of the viewed resources. Not all of them are available for all
media types.
Most of the main interface sections (binder, editors, and Inspector) can be resized
within the window via the grab handles located at the bottom, or in the case of splits,
by the divider line between splits.
18
5.1. INTERFACE OVERVIEW
5.1.1
19
Toolbar
Scrivener has a customisable toolbar which includes many common functions, including a project search bar. To adjust the icons available, or their appearance, use
the View Customize Toolbar... menu item, or right-click anywhere in the toolbar
background area.
It is possible to hide the toolbar by clicking the clear, pill shaped button in the topright corner of the window, or by using the View Hide Toolbar menu item. Note
that when the toolbar is hidden, you can still access project search via the Edit menu,
or
– F, which will provide a pop-up window featuring the same controls available
as on the toolbar.
5.1.2
The Binder
The binder is so-called because it really acts as the ring-binder of your project. It
provides a hierarchical list of all items in your project. You can drag items around
to restructure your project and double-click on any item to rename it. Selecting an
item in the binder displays its content in the editor pane that most recently had the
keyboard focus (see below) and its meta-data in the Inspector (again, see below).
Whilst you can create as many folders and files as you wish in the binder, there are
three root-level folders that cannot be deleted (although they can be moved around
within the top level and renamed):
Draft The Draft folder is where you place all of the documents you want to include
in your final manuscript. As such, the Draft folder is unique in that it can only
hold text files and folders - it cannot hold image files, PDF files, QuickTime
media or web pages as other folders can. All of the writing you want to be part
of your finished work should be placed inside the Draft folder, in the order you
want it (which, of course, is easy to change by dragging and dropping). When
you are ready to export or print your manuscript, use Compile Draft. . . in the
File menu. This will combine all of the individual documents inside the Draft
folder into one long document, formatted as you specify. Each file you place
inside the Draft may represent a chapter, a scene, a paragraph or whatever you
want.
Note, some templates will have renamed this folder to something else, but its
function remains the same.
Research The Research folder can hold any type of file supported by Scrivener (text,
image, QuickTime, web archive or PDF files). It provides a default place for
non-text files to be imported and stored (although you can create other rootlevel folders for this purpose if you so wish).
Note, some templates will have renamed this folder to something else, but its
usage remains the same.
20
CHAPTER 5. INTERFACE
Trash When you delete an item in the binder, it is not really deleted but just moved
to the Trash folder. You can drag items in the Trash folder back into the main
binder, but you cannot create new items inside the Trash. To empty the Trash,
select Empty Trash from the File menu. This will permanently delete all items
inside the Trash folder (and cannot be undone).
The Collection interface can be toggled on and off with the associated toolbar button, or the View Collections Show Collections menu item.
Collections and search results can also be dismissed by clicking the X button in the
footer bar for the Binder.
This allows you to view search results, save them for future use, or collect arbitrary
binder items from throughout your project. For more information on how to use the
Binder and Collections, see Navigating and Organising (chapter 9).
5.1.3
Format Bar
The Format Bar stretches across the top of the main application view, right below
the toolbar, and provides easy access to the most common text formatting tools. For
more information, read The Format Bar (subsection 14.4.2).
5.1.4
Editor
Scrivener has two identical editor panes which allow you to view two parts of the
same document or different documents entirely alongside one another. The editors
will look different depending on what sort of document you are displaying and which
mode you are in (combined text, corkboard, outliner, standard text editor, or media
view mode). See the section on views (section 5.2) for more information on the different editor modes. The editors can be displayed alongside one another in a vertical
or horizontal split for referring between them, or you can just view one editor.
Above each editor pane is a “header bar”. This contains navigation buttons (the
arrows) which allow you to navigate backwards and forwards through the document
history. Next to the navigation buttons is the title of the document along with its
icon. Clicking on the icon will display a pop-up menu that displays some common
editor commands (all of which can be found in the main menus, too). The entire
header bar has three colour status modes:
§ Plain grey is the default, and is what you will see unless you have split the view.
§ Blue appears when you have split editors, and indicates the active editor.
§ Mauve appears when the editor has been locked (
receiving binder clicks.
– L), which inhibits it from
5.1. INTERFACE OVERVIEW
21
On the right side are two vertical arrows which allow you to navigate through the
binder in a flat list fashion. You can also use the keyboard shortcuts,
– UpArrow
and
– DownArrow. Using these navigation tools will also focus the binder on
what you are selecting.
On the far right of the header view is a button that controls the split. The icon
in the button will indicate the type of split that is available - horizontal, vertical or
none (close split). Option-clicking on this button will change the split type; clicking
on this button when both editors are visible will cause the editor associated with that
header view to take over and the other editor to close.
Below each editor pane is a “footer view”. This will change depending on the
type of document visible and the current editor mode. When a text document is
being viewed, for instance, it will display the word and character count along with a
pop-up button for changing the text scale and a button for setting document targets.
In scriptwriting mode, it will provide shortcuts for accessing various script entry
macros. Various types of multimedia, and PDF, will display their own appropriate
relevant information in the footer bar.
5.1.5
The Inspector
The inspector displays all meta-data associated with the document shown in the editor
pane that most recently had the keyboard focus. Note that the special root folders in
the binder - Draft, Research and Trash - have no meta-data associated with them, and
therefore the inspector just shows the project notes or references when these items are
selected. (Project notes and references can also be viewed in the notes or references
pane of any document - see below.)
The Inspector has five different sub-views, which can all be accessed via buttons
along the very bottom of the Inspector. If an associated view has had data entered
into it, an asterisk will appear in the upper-right corner of the button. The sub-panes
are listed in the order they appear:
1. Meta-data and Notes
2. Meta-data and References
3. Meta-data and Keywords
4. Snapshots
5. Linked Text Notes
In the above screenshot, the displayed document has references, keywords, and
snapshots, but no document notes or marginalia. The lock icon at the end locks
the inspector so that you can reference the material in it even when switching to a
different split.
22
CHAPTER 5. INTERFACE
The first three sub-panes include general meta-data in addition to their specialised
information. These sections can be collapsed by clicking the disclosure arrow on the
left side of the header bar for each. The two meta-data sections are as follows:
Synopsis & Image The top frame can show either the synopsis for the binder item,
which is what also appears in the index card representation of the item in corkboard view. Using the top drop-down menu, you can optionally also attach an
image to the item to represent it in Corkboard mode, instead of a text synopsis.
General & Custom Meta-data The General pane of the inspector shows basic metadata for the current document. This includes the label and status (which can be
renamed), the modified and created date of the document (click on the arrows
to switch between the modified and created date) and checkboxes that affect
how (and whether) the document will appear as part of the compiled draft for
exporting or printing. Click on the header bar to switch between general and
custom-meta data, which can be set up for each project. For more information,
read Setting Up Meta-Data (chapter 10).
Notes, References, and Keywords all display the above meta-data boxes. They are
described as follows:
Notes Displays a notepad for the document. Each document has an auxiliary
notepad associated with it. Clicking the header bar of the notes area will bring
up a pop-up menu from which you can select “Document Notes” or “Project
Notes”, which are global to the project. If you have multiple project notepads,
you may see more than one option here in parenthesis. For more information,
read Document and Project Notes (subsection 17.4.1).
References The References table allows you to hold links to related material within
the project itself, elsewhere on your hard drive or on the internet. Click the
header bar to switch between document references and global project references. Use the latter to make links available throughout the project. For more
information, read References (subsection 17.4.2).
Keywords Displays a list of keywords associated with this binder item. Keywords
can be used to tag your document. Use the + and - buttons to add and remove
keywords, or the gear menu to access the project’s central keyword list. Read
more about them in Keywords Pane (subsection 17.4.3) and Using Keywords
(subsection 10.1.4).
The last two sub-panes, Snapshots and Linked Notes, take up the entire Inspector.
Snapshots An integrated view which displays all of the document’s snapshots and
the contents of the selected snapshot in the text area below. Snapshots can be
5.2. VIEW MODES
23
created (from the state of the current text) or deleted with the + and - buttons
in the header bar. The Compare button will show changes between the selected
snapshot and the current text. The Roll Back button lets you revert to an older
version of the text. For more information on using this, see Snapshots Pane
(subsection 17.4.4), and Snapshots and Changes (subsection 3.0.8).
Linked Notes Words and phrases in the text editor can have notes attached to them.
The contents of the notes will be stored in this pane. New notes can be created
with the + button, or new footnotes with the +fn button. Selected notes can
be deleted with the - button. For more information, see Linked Notes Pane
(subsection 17.4.5), and Annotating and Marking Your Text (chapter 16).
5.2
View Modes
There are three primary “view modes” available in Scrivener. View modes give you a
powerful way to view and modify multiple documents at once in a variety of fashions,
each tailored for different tasks. View modes are generally only triggered when the
editor is asked to view more than one document at a time. This can happen if you
Cmd-click on more than one Binder Item, or even if you just click on a folder. It is
also possible to manually enable a view mode, allowing you to easily flesh out a single
document with new index cards.
For the most part, Scrivener will anticipate what you are trying to do, and react
accordingly. If you click on a single text file, it will display the contents of that text
file in the editor. If you then click on a folder containing that file, it will automatically
switch to your preferred view mode, the one which you used last.
A key principle is that view modes are just that. They are alternative ways of
viewing a Binder Item, and thus like the Binder are methods for organisation. All
documents in the Binder can both contain text and children. This is a departure from
how most applications work, where the only way to organise items into other items
is to use a Folder. Scrivener doesn’t restrict you to that, and indeed even allows you
to convert a text file to a folder and back again. Consequently, even though it selects
the most appropriate view mode depending upon what you click on, you can always
override the default. For folders, you can turn off the current view mode and read or
add text to it. For files you can select a view mode manually. When performing the
latter, you will most likely be presented with an empty corkboard or outliner. This
is fine, because you can still go ahead and add items to that view, and in doing so you
will add children automatically to that file. This is a great way of expanding scenes
and fleshing out rough ideas, so take a moment to play around with the view mode
buttons in the toolbar, or use their corresponding shortcut keys to see how you can
get the most out Scrivener’s unique file and folder structure.
The default view mode will prefer whatever mode you have selected last. If you
choose Outliner, then this is the mode that all containers will default to when clicked
24
CHAPTER 5. INTERFACE
upon.
The section on Project Planning (chapter 12) goes into greater detail on how to
use corkboard and outliner modes to their maximum power. The section on Editing
Multiple Documents (section 14.13) will cover the Combined Text mode in detail.
5.2.1
Corkboard
Scrivener has made the corkboard metaphor popular in the modern Macintosh community, and even outside of it. The concept of representing many documents as index
cards, letting you move them around to restructure your book, or opening them up
to edit their text, is unique—but Scrivener 2 takes this even further. Now you are
no longer constrained to viewing index cards in columns and rows; you can use the
new free-form mode to move cards around as freely as you might on a desk or a real
corkboard. Group together cards that are related, but spread throughout your draft;
spread things out in a chronological order; the choice is yours. While you can choose
to commit your free-form ordering back into your draft, you can also feel free to just
leave things as they are, as an alternate way of viewing a section of your work.
The important thing to realise with the corkboard is that each of the displayed
index cards are actual files or folders in your binder outline. They display the title
and the synopsis (a short description of the item) on the cover, and optionally can
represent a few kinds of meta-data using real-world metaphors as well. Just remember,
cards are documents, and conversely documents can all be viewed as cards.
The corkboard view is rich with features, to read more about it and how to best
use it, see The Corkboard (section 12.1).
5.2.2
Outliner
While the binder is in a sense a very simple outliner, there are often times when you
need to view your book, or parts of it, in a much larger context and with a greater
degree of information at your disposal. The outliner view lets you see your book
structure in a standard outline format with indenting used to indicate depth. It also
has the ability to display many built-in aspects of your documents, from their label
colour, to word counts, modification dates, keywords, and much more, including
your own custom meta-data.
Outliner is also a great view for making bulk changes to lots of documents at once.
Since it provides feedback for so many different aspects of your document it is easy to
see what has been changed at a glance.
Many people also like to brainstorm in the Outliner view as well. Whether you
prefer the analogue experience of the corkboard, or the more literal information in
the outliner is up to you.
As with the Corkboard, there are many features and usages for the Outliner. To
read more about it, see the Outliner (section 12.2).
5.3. FULL SCREEN INTERFACE
5.2.3
25
Scrivenings
This is a unique view mode in that it works not with the viewed items themselves, but
specifically with their text. All of the text content (even empty documents) will be
stacked together as if on a long spool of paper, letting you read through large sections
of your book at once, no matter where they are located. As you make adjustments
to the text in this view, each of the corresponding documents will be updated as you
work. The overall effect is as if you were working in a single long document, but in
fact you are editing potentially dozens or even hundreds of files as you go.
Combined text sessions, also referred to frequently as Scrivenings, and known to
users of version 1.x as Edit Scrivenings, are temporary editing sessions. You don’t
need to worry about saving them, or what will happen if you click on something and
they go away. It is merely a way of pulling together a number of files so you can edit
their text at once, and then releasing them when you move on.
For more information on how to best take advantage of this editing mode, see
Editing Multiple Documents (section 14.13).
5.3
Full Screen Interface
Full Screen is a special interface which will blot out not only the rest of Scrivener,
but the rest of your Mac as well, allowing you to concentrate fully on the production
of text. It only works for documents and folders, and while it allows access to the
menus, QuickReference panels, and most aspects of the inspector, its default state is
to simply display the text contents of the selected document (or documents, if you are
viewing an combined text) in a “page” in the middle of your screen. Read more about
full screen mode (chapter 15).
Chapter 6
Quick Tour
Before going over this section, it is suggested that you skim through the prior chapter,
introducing the interface.
This chapter will get you up and running with a simple sample project, and introduce a few of the most basic concepts you’ll need in order to start working with
Scrivener. It is recommended that you eventually go through the full interactive tutorial in the Help menu, but if you are in a hurry, this guide should get you going in
thirty minutes or less. Scrivener is a complex program with a lot of depth, but we
hope this section will demonstrate that despite this, it is also a very straightforward
and intuitive, so its complexity can be gradually learned as required.
We will go over the following tasks:
§ Creation of a new project from a blank template
§ Navigating the binder and adding new documents to the draft outline
§ Introduction to corkboard and Scrivenings text view
§ Compiling the document into an RTF file
If you need to learn more than the above, we suggest that going through the full
tutorial would be best.
6.1
Project Format
Scrivener is a project based application, which means that it stores your projects as
separate files, rather than working like a database which hides the location from you
and loads everything automatically when you start up the program, or a file based
program like TextEdit, which creates an empty document whenever you launch it.
The intended use of a project is to store everything relating to a single major work,
be it your next novel, screenplay for a film, a dissertation for your masters, or a serial
collection of articles for a magazine or blog.
It is recommended that for each new “real world” project you embark on, a new
project file should be created. When you create a new project, Scrivener asks where
you want to save the file, by default this location is your personal Documents folder,
26
6.1. PROJECT FORMAT
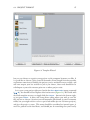
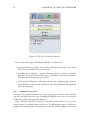
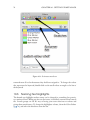
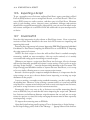
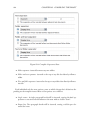
27
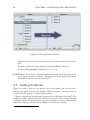
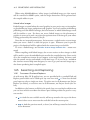
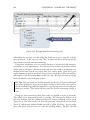
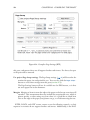
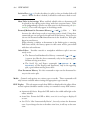
Figure 6.1: Template Wizard
but you can choose to organise your projects on the computer however you like. It
is a good idea to choose a place you will remember. Even though Scrivener provides
convenience functions for finding the projects you’ve worked on most recently, and
will even reopen your last session for you if you choose, these tools should not be
relied upon as your sole reference point for of where projects exist.
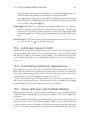
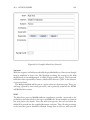
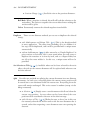
Let’s create a new project right now. Invoke the File New Project menu command
(
– N). You should see the template selection interface (Figure 6.1). We’ll stick with
the blank template for now, so simply click the Choose... button in the bottom right,
or just press Return. A sheet will come down asking where you wish to save the
file; feel free to choose a location you will remember (the default is your Documents
folder, but you might wish to create a special sub-folder just for Scrivener projects),
and give the project a name. This name should be considered an internal name; it
won’t be printed on the final draft, and should just be something that you’ll easily
28
CHAPTER 6. QUICK TOUR
remember.
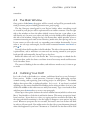
6.2
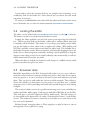
The Main Window
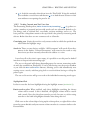
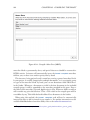
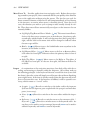
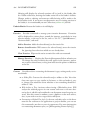
Once you’ve clicked Okay the project will be created, and you’ll be presented with a
fresh [Scrivener project window][interface-new_project.png].
The left, blue-grey tinted panel is your Project binder, where everything stored
or created in your project will be represented in an outline structure. On the right
side of the window we have the editor (which is more than just a text editor, as we
will shortly see). In most cases, what you click on in the binder will be displayed on
this side of the window. Along the top is the Format Bar, which provides access to
common formatting tools such as font selection, justification, line spacing, and so on.
If you cannot see all of the tools, try expanding your window horizontally. If you
want to see tab stops and margins, use the menu command Format Show Ruler or
press – R.
Directly below the Format Bar is the Header Bar. The title of the current document
is printed here, and as well there are some tools for moving around in your project
both spatially and temporally, but we’ll get to that later.
Below the editor text area is the Footer Bar. You can magnify or shrink the displayed text here, and it also shows a real-time view of how many words and characters
are in the editor above.
The cursor is blinking in the text editor, and with zero words so far, it’s time to get
to work!
6.3
Outlining Your Draft
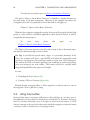
Let’s take a look at the binder for a minute, and discuss how best to use Scrivener’s
Draft section. Unlike a word processor, Scrivener’s design philosophy revolves
around creating and organising your writing project in small pieces. The binder
displays these pieces like an indented outline. Let’s try it. If you haven’t touched
anything yet, the cursor should still be blinking in the main text editor (if it isn’t, just
click in the middle of this white text area with your mouse). Type a few words in here
and then press the Return key to create a new paragraph.
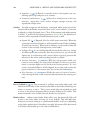
Glance up to the top-left and note the far-left window button (which is red on most
Macs). You should see a little dot in within the button. This means you project hasn’t
been saved yet. If you don’t see a dot, try typing another word into the editor. By
the time you finish examining it, the dot ought to disappear—your project has been
saved. Whenever you pause for two seconds, Scrivener’s auto-save feature will kick
in and save all your work. You might notice that the title of your document changed
when this happened. If you leave a document as “Untitled” the first line will be used
6.3. OUTLINING YOUR DRAFT
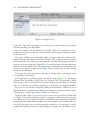
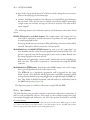
29
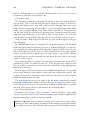
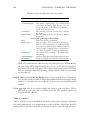
Figure 6.2: Progress so far
as the title. This will only happen once, and you can always change the automatic
title for something more descriptive.
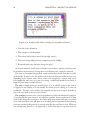
First, let’s make a new document in the binder. There are a number of ways to
do this, but first let’s try the most direct method, click the green Add button in the
toolbar just once.
The cursor will flip over to the binder and let you type in the name of the new document. Just type something in here, like “Chapter Two”, and press Enter to confirm.
You’ll notice that the content you just typed into the editor has disappeared, that is
because you are now viewing “Chapter Two”. Let’s fix the name of the first document
while we are in the binder. Press the UpArrow once. Immediately, you should see the
words you just typed, re-appear in the editor. That is because you are now viewing
the first starter document.
To change the name, just press Esc and type in “Chapter One”, pressing Esc again
to confirm the name change.
You might notice something going on with the icons (Figure 6.2). Document
“Chapter One” looks like a page of text, but “Chapter Two” just looks like a blank
sheet of paper. That’s because we haven’t typed anything into the editor for “Chapter
Two” yet. Scrivener lets you know which parts of your project are still placeholders.
For now, let’s use another method for adding new documents. When you are in
the binder, there is a simple way to add new ones below the current document. Select
“Chapter Two”, and just press Enter. Call this one “Wineries”.
Now let’s take a look at a great way to get an overview of your Draft. Either click
on “Draft” in the binder with your mouse, or simply press the LeftArrow to jump up
to it. When you view a folder in Scrivener, by default it will automatically switch to
showing you the corkboard in the editor area. You should see three index cards, one
for each of the items we’ve created (sometimes referred to as ‘Scrivenings’), but the
cards will be blank; this is because they display the synopsis for a document, not its
30
CHAPTER 6. QUICK TOUR
internal text. Double-click in the empty ruled text area on the “Wineries” card and
type in a short synopsis for this section of the book. When finished, pressed Enter to
confirm.
At this point, if you look in the binder you’ll see a third icon type that looks like
a small index card, next to “Wineries”. This new one indicates that you’ve typed in a
synopsis, but haven’t yet typed in any text for the section. Once you enter text into
the editor for the “Wineries” section, the icon will be replaced with the one you see
for “Chapter One”. Some people like to work in a top-down fashion, where they’ll
build a conceptual outline and then fill in what they intend for each section in the
synopsis. These three levels of icons give you an over-all idea of your level of progress
with this task.
We’ll try that now. Load the “Wineries” card by double-clicking on the icon next
to the name. If you can’t find the right spot, just click on it in the binder. There are
multiple ways to do nearly everything in Scrivener. We could have also selected the
“Wineries” card and pressed
– O to open it in the current editor, or used click-anddrag to drop the card onto the header bar. Type in a short sentence and observe that,
as predicted, the icon has now changed to match the “Chapter One” section.
You might be wondering how much text each section should hold. The answer
is largely up to you. With a word processor, it is often convenient to work in long
documents because lots of small windows can create clutter, but Scrivener allows you
to break things down into smaller pieces, since it organises all of these files for you and
keeps them in a logical order in the binder. In fact some people break things down
into pieces as small as paragraphs, but the size of these chunks of text are entirely up
to you. You can use index cards to represent beats, scenes, whole chapters, or even
a mix of these depending on how much attention you need to give that portion of
the book. It’s all very flexible, and in many ways you can use the Scrivener outline
to structure things according to how you think, not according to how the book will
appear.
Scrivener also contains features intended to make that balance a little easier to work
with. Unlike most applications of this type, you can choose to view many different
sections at once, and edit them as if they were a single file without actually merging them all together permanently. Doing this is easy. Select the Draft item in the
binder by clicking on it once with the mouse. You’ll get a corkboard again, now
invoke View Combined Text, or press – 1. You are now viewing the collection of
documents as a Combined Text View, rather than a Corkboard View.
Each section will be divided with a horizontal rule, letting you know where one
ends and the next begins. Try clicking in the blank line between the two sections
you’ve already added text to, and keep an eye on the Header Bar, note the title changes
to let you know where you are, “Chapter Two”. We can do one more thing to make
this even easier, select View Editor Show Titles for Combined Text. You should now
see the titles of the sections shown right in the text, and you can edit these titles right
6.3. OUTLINING YOUR DRAFT
31
here as well. Try adding some text to the second, empty section, then select that
section in the binder all by itself. Note that your edits have been made directly to the
document.
Now we will do something that is impossible in many programs. Right-click on
“Chapter One” and select Convert to Folder. The icon will change to a blue folder
with a small page in the corner. That page means the folder has text stored in it. Note
that the text you added to this document earlier is still there, that’s what the small
page icon means in the corner of the folder icon. Let’s move that text into a child
document. You can select just the text of a document by clicking anywhere in the
text, holding down the Option key, and invoking Edit Select Current Text. Now cut
the selection with – X and note the folder icon loses its page icon badge—it no longer
has any text in it.
Press – N, which is another way to create new documents, and is especially useful
with Combined Text mode, as it will insert new sections while you are writing. If you
turned on titles for Combined Scrivenings, you should be able to immediately enter
a name in the editor, call it “Scene A”, and press Return to start editing the document.
Then press – V to paste the text you cut. As you can see, expanding a portion of the
outline as you write, with Combined Text and titles turned on can be very efficient. If
you click the arrow icon to the left of “Chapter One” in the binder, you’ll see “Scene
A” tucked away inside it.
No doubt you can see that Scrivener is very comfortable with the notion of splitting things up, and with this feature you can feel free to work in small portions without losing sight of the big picture.
Use the View Corkboard menu item to return to the Corkboard view. What you
are looking at is the corkboard for the “Chapter One” folder, which currently only
contains one card, “Scene A”. Try clicking the draft again in the binder. Now you
are viewing the index cards that belong to the draft again. “Scene A” has disappeared,
because it is a child item of “Chapter One”. The corkboard can only show you one
layer of depth in your outline at once, but you can tell when index cards are folders
(or files that contain sub-items) by the stacked appearance of their index card. Doubleclick on the “Chapter One” index card’s icon and you’ll return to where you were at
the start of this paragraph. You’ve navigated “into” the “Chapter One” folder.
Hopefully by now you understand the relationship between index cards, the
binder, and the text within the items in the binder a bit better. Feel free to play
around with things a bit more if necessary, before proceeding to the next step. If you
want to import some text from an existing work in progress, you might find the Documents Split sub-menu to be quite useful in converting a long document into an
agile outline.
32
CHAPTER 6. QUICK TOUR
6.4
Compiling the Draft
We’ve only scratched the surface of what can be done, but before ending this tour
we’ll look at one more thing: compiling. Compile is Scrivener’s terminology for
what most applications refer to as Exporting. This name was chosen to reflect the fact
that Scrivener is doing quite a bit more than just converting the data from one format
to another. Scrivener’s compiler can generate documents to nearly a dozen different
formats; do simple or complex transformations on the binder structure; reformat
everything to a consistent look; and much more. The philosophy of letting you work
the way you want to work is very much supported by the compiler. No need to work
in Courier, Times New Roman, or whatever your editor prefers. You can choose an
elegant font or one that is easy to read at 3am with sore eyes. In the end Scrivener
will generate a document to your required specifications.
Let’s try it now. Press
– E or select File Compile.... After all of the features described above, you might think you got the wrong sheet at first. By default Scrivener
present a very simple form with some industry standard presets and an export file
format chooser.
§ From the “Format as” menu, select “Novel”
§ Change the “Compile for” option to RTF
That’s it. Click the Compile button, choose a name and location for your RTF file,
and once the dialogue box dismisses, open the file using the Finder. It should open
in your preferred word processor, or TextEdit. As you can see, all of the test lines
you typed in are there, separated by hash marks in between the sections as well, those
came from the Compiler too, as a part of the Novel preset. This can be turned off, or
changed entirely.
Let’s try one more thing. Switch back to Scrivener and open up the Compile sheet
again. Leave everything the same, but this time click the down arrow which appears
to the right of the “Format As” drop-down menu. The full Compile interface will
appear, and with that, you’ll be able to see just how much power is available. Feel
free to explore the interface. Many of the options are self-explanatory, but if you find
yourself confused over something, read the chapter on Compiling the Draft (chapter 25).
There is much more to learn, but if you are in the middle of a major project and
want to get started right away, you should now know enough to make a simple outline
and start writing content into that outline, and then compile this as a simple draft.
As you’ve seen from the amount of flexibility we’ve demonstrated, you can rest easy
on the topic of “doing things the right way from the start”. Unlike many programs,
Scrivener makes it easy to change your mind later on. Folders can become files, items
can be easily re-arranged, and so on; so don’t worry too much about adhering to any
6.4. COMPILING THE DRAFT
33
standards. Scrivener has no standard except for your standard, which will develop in
time as you become more familiar with the interface.
If you have a spare hour or two, it would be really beneficial to go through the
full interactive tutorial or watch the introductory videos1 available on the Scrivener
homepage. Together, they cover Scrivener’s features in much more detail and should
address most things you should know to get the best results out of Scrivener.
Further recommended reading:
1. Interface (chapter 5)
2. Navigating and Organising (chapter 9)
3. Gathering Material (chapter 11)
4. Writing and Editing (chapter 14)
5. Compiling the Draft (chapter 25)
For now, happy writing!
1
http://www.literatureandlatte.com/videos/index.php
Part II
Preparation
34
6.4. COMPILING THE DRAFT
35
One of the principle goals of Scrivener is to be your first stop when a new major
project is embarked upon. The program therefore contains a variety of tools which
address the early phases of a writing project. These include: brainstorming, outlining,
collecting and organising research, gathering prose snippets, building background and
world-building information, and so on. This section will cover the majority of the
tools that you may use to accomplish these goals. If your method of writing couples
the process of writing with preparation, you might find it beneficial to read both this
section and Writing (Part III). The level of fuzziness between preparation and writing
in Scrivener is very intentional, because the same tools you use to build up initial
structures and ideas will be the backbone of your actual text. In Scrivener, there is no
separation between outline and book order. This seamless approach will help you get
straight into the writing phase.
The topics that will be covered in this part are:
§ Project Management (chapter 7): Creating, saving, backing up, and managing
projects on the disk.
§ Setting Up the Binder (chapter 8): Using the built-in sections of the binder,
managing collections, organising your work, and setting up document templates.
§ Navigating and Organising (chapter 9): Optimise how you navigate within a
project.
§ Setting Up Meta-Data (chapter 10): The various forms of meta-data available
for tracking progress and types.
§ Gathering Material (chapter 11): How to collect material from other resources
and applications.
§ Project Planning (chapter 12): How to rapidly capturing your ideas and give
them shape, shapes that will eventually become your manuscript.
§ Cloud Integration and Sharing (chapter 13): Introduces tools for integrating
your project with various Internet services.
Chapter 7
Project Management
As mentioned before, Scrivener is a project based application and stores your projects
as separate files. These project files are saved into your Documents folder by default,
though you can choose to organise these projects however you like, even after you’ve
created them. Some find it convenient to rely upon the File Recent Projects menu
item to organise their projects, or simply just let Scrivener maintain which projects
are open whenever they start Scrivener for the day. These tools are valuable, but
shouldn’t be a substitute for good organisation on your drive.
The intended use of a project is to store everything relating to a single major work,
be it your next novel, screenplay for a film, a doctoral dissertation, or a serial collection of articles for a magazine. This can be approached in a flexible manner. It is
possible to use a project as a daily journal, a collection of random things you intend
to one day utilise in future projects, and so forth.
Going a bit deeper, the project file is a bundled package containing all of the pieces
that make up your project. This format is meant to be used as a last resort safe-guard,
not as a way to allow you to edit a project in places where Scrivener is not available.
7.1
Project Size Limitations
Since Scrivener was primarily written with the large-format author in mind, much
effort has been put into making it as robust as possible. It can handle book-length
manuscripts with ease, store large quantities of research material, and handle many
thousands of individual components, even on a single corkboard. Scrivener has been
tested against projects with millions of words in them; way beyond what it would
normally have to face. So for ordinary usage, you will never need to worry about
limitations.
There is one caveat to keep in mind, however. The bigger your project is on the
disk, the longer it will take to produce backups. When combined with the automated
backup system, this could mean waiting long periods of time for backups to complete
in the most extreme cases. While Scrivener is very capable of handling large amount
of media, some users have found it better to use database software in conjunction with
Scrivener, when gigabytes of data are involved.
36
7.2. CREATING A NEW PROJECT
7.2
37
Creating a New Project
When you first start Scrivener, you will be presented with the Project Templates window. In addition to providing an easy selection mechanism for new projects based on
templates, you can also create a blank new document, which is the default for new
installations, open existing projects from your disk, or select from a short list of recently opened projects. To call up this window, use the File New Project... menu
command, or press
– N.
Along the left side of the window are template categories. A number of useful
presets have been provided, and it is easy to make your own templates as well. The
Options drop-down menu provides template management tools. To read more about
creating and managing templates, see Templates (section 7.5).
To create a new project based on an existing template, click on that template to
make it active, or select the “Blank” template to start with a fresh project. A description of the template, if one has been provided, will appear in the grey text box below
the selection area. Click the Choose... button to proceed.
The next step is selecting where you would like to save the project file. It is a good
idea to choose a place that you will remember. You might want to create a special
folder in the Documents folder just for your Scrivener projects. You can use the New
Folder button to do so. Type the name of your project into Save As field. This can
be changed later if you require, so if your project doesn’t have a final title yet, don’t
worry! At any point, you can go back and change your initial selection if you change
your mind, by clicking the Cancel button.
The Create button will activate once you have supplied a name and valid save location. Click this button to proceed with the settings you have chosen.
7.3
Saving and Making Copies
While you work, your projects will be automatically saved on a frequent basis. By
default, this means that after two seconds of inactivity, the project will always be
saved. You can monitor this process by watching the upper-left corner of the window.
The left-most “traffic light” button will have a dot inside of it whenever the project
contains edits which have yet to be saved to the disk. If you stop typing for a moment,
the dot should disappear after a brief pause. You can change how rapidly this happens
by adjusting the inactivity interval in the General section of the Preferences tab.
At times, or if you have selected a very long interval for some reason, you might
wish to manually save the project. This can be done as per normal in any application,
by selecting File Save, or pressing – S.
It is also possible to save a separate copy of the project, while working, and continue
– S), and choose a new
working in the new copy. To do this, select File Save As... (
name for the project. Upon clicking the Save button, the active project will become
38
CHAPTER 7. PROJECT MANAGEMENT
the new one you created, and the old copy will be closed. This can be a useful tool
when you wish to experiment with a series of radical structural changes, or simply as
a way to leave a trail of history as you work.
Additionally, since Scrivener projects are just files on your system, you can use the
Finder to manage projects, create duplicates, and archive old versions. Always be
sure to close your projects before doing so.
7.4
Opening Existing Projects
Existing projects can be opened in a variety of ways. For convenience, Scrivener keeps
track of the last several projects you have opened, and stores them in a list, accessible
from File Recent Projects.... In addition, this list can be accessed from the Project
Template window, via the Open Recent drop-down menu in the bottom.
You can also configure, in the General section, to have all projects left open when
you last quit, reopened for you automatically when you start up Scrivener.
You can open older projects using File Open... ( – O), or click the Open an Existbutton in the Project Templates window.
ing File...
As with managing projects that have been saved, you can also use the Dock, Finder,
Spotlight, or other system tools to open files stored on your drive. Simply doubleclick the project you wish to open in the Finder.
Mac OS X Tip: If you cannot find a project, often it is easy to locate it using
Spotlight and typing in the name of the project. If you cannot remember the name,
you can search for “.scriv” to find every Scrivener project that your computer has
indexed.
It is not possible to delete old or test-bed projects from within Scrivener. To remove
projects you no longer want, use the Finder.
7.5
Templates
Simply put, templates are ordinary projects which have had some basic structure and
settings added to them. In some other applications, templates are almost a way of
modifying the way the entire application behaves, but in Scrivener, it’s best to think
of them as starter projects. Many of them will come with a few example items added
to the binder, but these are meant to be helpful guides for laying out your book, not
forms that you have to fill out, or features that must be worked around. The items
added to templates are like any other items you’ve added to projects on your own.
They can be deleted, modified, duplicated, or set aside and ignored.
In fact, you can create your own templates for future use, which will be covered in
more detail in the following pages.
7.5. TEMPLATES
7.5.1
39
Using Built-in Templates
Most of the built-in templates will provide you with an explanatory readme style file,
explaining what the purpose of the template is, what has been modified and set up for
you, and how best to use it to develop your project.
For templates that do not come with a Help file, here are a few things to keep in
mind as you explore templates:
§ Templates are just starter projects. With the exception of a few, and somewhat
technical, differences, there is nothing in a template generated project that is different from a blank project. In fact, a blank project is just another template that
is extremely minimal. Everything that you see in a template can be handled
just as you would handle any other items in the binder. They can be duplicated, deleted, modified, turned into document templates, or what have you.
Scrivener templates do not provide you with “forms”, “wizards”, or parts of
the interface that you must fill out before proceeding. A sample chapter folder
with a header in it is just that, a folder with some rich text in it that is of a large
font size and bold. To change it, edit it as you would any other text. If you want
another one to make a second chapter, duplicate it. Scrap it if you don’t like the
style at all and want to design your own.
§ When you use a new template for the first time, check the Meta-Data settings
(
– ,) and make sure that everything is arrange the way you prefer.
§ Some project templates will have document templates already pre-configured.
This will provide you with starter documents for creating new elements within
the template. You can modify the items in this folder to customise these.
§ Some templates will change the name of the Draft and Research folders to something more appropriate. The novel template, for example, changes the Draft
name to Manuscript. Note that when the Draft has been renamed, all interface
elements that refer to it will have their labels updated.
7.5.2
Creating Your Own Templates
Creating custom templates is as easy as creating a new project, and if you often set up
similar projects with items—like character sheets, keywords, to mention a few—they
will save you a lot of time. Here is a list (by no means complete) of things that are
commonly changed or added to custom templates:
§ Custom labels & status: add the types of labels, preferred colours, and status
stamps that you find useful for your projects.
§ Project references: try making a list of writing resources and research portals
that you often use.
40
CHAPTER 7. PROJECT MANAGEMENT
§ Character sheets or research note starters: use Document Templates (section 8.4) to supply yourself with your favourite starter documents.
§ Compile settings: since Compile settings are stored in the project preferences,
you can set these up so that your future projects will be ready for one-click
export (or close to it!)
§ Generic collections: standard collections as well as saved search collections can
be placed in a template as well, though initially they will probably be empty.
§ Starter story structure: set up your favourite story-building techniques.
The important concept to keep in mind is that, when it comes to the content of
what you can do with a project, a template is identical. There are a few differences
(most pertain to how it is loaded and the explanatory information and thumbnail
that can be saved with it) but for what will be saved, consider it no different than an
ordinary project.
Try not to worry about getting everything perfect the first time through. On
average, it will take at least half a dozen new projects before things start to settle
down. It is easy to updated existing templates with revised starting parameters by
simply naming them identically with the template you wish to update.
Once you have set everything up, use the File Save as Template... menu item to
start the template creation process.
In the “Template Information” box, provide the following details:
Title The visible title of the template (what will appear beneath the thumbnail in the
template browser).
Category Which section to add the template to.
Description A brief description on what the template provides. You may not find
this useful for yourself, but if you intend to share the template with others, it is
a good idea to explain what the template is meant to provide.
The “Icon” box on the right gives you options for setting the appearance of the
template thumbnail. You can choose from a number of available presets, or if you
wish to make your thumbnail stand out from the built-in templates, you can click
the Save Icon as File... button, which will generate an image file for you, based on
the currently selected thumbnail. After you have edited this image in your favourite
image editor and saved it as a PNG file, you can use the drop-down menu to select
Custom... and choose the saved file from your computer.
After clicking OK, the template will be saved into the system, and you can either
go ahead and continue working in the new project you started setting up (it won’t be
associated with that template any longer), or close it safely.
7.5. TEMPLATES
41
Template Variables
In addition to the standard project elements you can include in a template, there are
a few variables that might be of interest to you, especially if you intend to share the
template with others. For example, if making a template for yourself, you could
just write in your name and address on the manuscript submission cover-page you
designed. This wouldn’t work so well if you wish to share the template, though.
Template variables let you place a special code in the place where text should occur,
and when the template is first loaded, it will consult the user’s address book for the
relevant information.
The template codes are:
Code
Description
<$template_firstName>
<$template_lastName>
<$template_fullName>
First name from address book
Last name
Combines the first and last name for you, ordering them according to system language preferences.
Street address
City
Postal code
Country
Work number, if provided.
E-mail address
The name of the project from when it was created. Note this will not include the “.scriv” portion on the end.
<$template_street>
<$template_city>
<$template_ZIP>
<$template_country>
<$template_phoneNumber>
<$template_email>
<$template_projectName>
If you wish to edit a template which has had template variables used (such as many
of the built-in templates), then follow these instructions:
1. Create a new project (
– N)
2. Select the template you wish to edit
3. Hold down the option key, and click on the Choose... button
4. You can let go of the option key and give the project a name
This will inhibit the substitution of these tokens for their address book equivalents,
allowing you to edit the template file, and then update it.
42
CHAPTER 7. PROJECT MANAGEMENT
Updating Templates
To update a template which has already been saved, follow the above instructions
to safely open it without substitute variables, make the changes you wish, and then
repeat the instructions for creating a new template. When you access the Save as
Template... sheet, you will note that all of the information from the template will be
provided, so you do not have to worry about replicating this information every single
time. If you do not need to make any changes here, just click the OK button and then
Yes to confirm that you wish to update the existing template.
Note that after you have created a project from a template (even when holding
down the option key to click on the Choose... button), the project will have no
further connection with that template. So if you have created a project purely to
update a template, there is no need to keep the project around after that point, and
allowing the project to auto-save will not automatically update the template, you must
follow the template creation procedure in full.
Built-in templates cannot be overwritten. However you can open them for editing,
and then save your modifications as a new template by giving it a new name.
7.5.3
Managing Templates
In the Template browser window, Options menu in the bottom left provides the following functions for managing templates:
Set Selected Template as Default Changes the default template selection to
whichever template you currently have selected. A yellow border will appear
around the selected template. Once this is set, the next time you call up this
window it will highlight that template for you.
Import Template. . . If you have downloaded templates from the Web, or would
like to transport your custom templates to another computer, use this feature
to import template files from the disk, into the template system.
Export Template. . . Useful for sharing your templates on the Web with other authors, or if you wish to transfer templates to another working computer.
Delete Selected Template When a custom template is selected, you can use this
menu item to remove it from your system. Note that the built-in presets cannot
be removed.
7.6
Backing Up Your Work
Regularly backing up your work is an important part of the writing process, and
while there are many external strategies for keeping your work safe from catastrophes
and mistakes, the most important part is remembering to do it. Fortunately it is
possible to set up Scrivener to handle most of the latter part for you.
7.6. BACKING UP YOUR WORK
7.6.1
43
Configuring Automated Backups
By default, Scrivener will automatically back up every project that you work on,
whenever you close it. These backups will be stored in your user folder:
~/Library/Application Support/Scrivener/Backups
This location can be changed in preferences, and could even be set to save into
a synced folder over the Internet. Also by default, projects will be zip archived to
save space and protect the internal files, and Scrivener will rotate the files (delete old
backups) to keep the maximum for each project under 25 backups. In most cases,
the more automatic functions you activate here, the slower things will get. Finding a
balance between frequent backups and usable settings will be up to you.
In cases where security is a concern (if you are working with confidential files in
protected area for example) the automated backup system might present a security
risk if it produces files in an unencrypted area of your hard drive. If you are working in an encrypted environment, make sure the backup location is set to also output
to that area, or use the File Back Up Exclude From Automatic Backups menu command to restrict the sensitive file from getting backed up with the rest.
Read about the various options available in the section on the Backup tab (section B.10) in Scrivener’s preferences.
7.6.2
Managing Backups for Large Projects
Very large projects can conflict with what would ordinarily be good settings for the
automated backup system. If a project has reached a point where backing it up automatically has become a nuisance, rather than decreasing the amount of backup security globally, consider excluding the large project from the automated system.
While the project is open, use the File Back Up Exclude From Automatic Backups
menu command. Once this option is checked off, the automatic backup system will
ignore this project entirely. It will then be up to you to keep manual backups of the
project. The File Back Up Back Up Now feature is useful in this regard.
7.6.3
Manually Backing Up
Backups can be created whenever and wherever you want, regardless of the automated
settings, just as in Scrivener 1.x. Use File Back Up Back Up To... and select a backup
location. The “Backup as ZIP file” option will compress your project into a zip file
prior to saving it, and is thus useful when backing up to remote storage locations,
such as MobileMe or DropBox. By default, backups will be timestamped according
to your system’s locale settings, making it easy to find a precise version later on.
It is also possible to manually trigger the automatic backup system, even for
projects which have been excluded, by using File Back Up Back Up Now. This
44
CHAPTER 7. PROJECT MANAGEMENT
will follow any relevant options that have been set in preferences, such as how many
to keep, where to store them, and how many to keep around.
Frequent use of this feature will help safeguard your work in progress, and it is
recommended that you start forming a habit of making backups whenever a decent
amount of work has been committed to the project.
7.6.4
Tips for Using Time Machine
Mac OS X Leopard and greater provides the Time Machine feature, which will automatically back up your computer once every hour, and store backups as far back
in time as possible, reducing the frequency of these backups the further back in time
you go.
This presents a unique problem with Scrivener in that the hourly backup routine is
likely to run while you are working in Scrivener. This means that Time Machine will
be capturing your project while it is open and in progress, a state that could produce
corrupted backups if you try to restore from that particular point in time. Frequent
users of Scrivener may very well keep their projects open for weeks at a time, meaning
good backups of their project will be few and far between.
There are fortunately a few tips you can use to help Time Machine work effectively
with Scrivener:
1. Time Machine can be set to run manually at any time of your choosing, using
the menu status icon in the upper-right hand portion of your display. You can
thus control when Time Machine makes a backup of your projects, making sure
they are closed first.
2. As Time Machine starts to erase hourly backups that are old, it saves only the
last backups made in a single day. In conjunction with the first tip, you can
make certain that your “safe” backups are retained once Time Machine starts
erasing old backups, by always running Time Machine manually at the end of
every day.
3. Always use Apple’s Time Machine interface to restore projects. The way they
are stored on the backup disk means they are in actuality held at scattered locations throughout the disk. It only saves the parts of a project that have changed
to save space. Copying a .scriv file out of the backup disk will hardly ever result in a valid project file. Apple’s Time Machine tool will always re-assemble
a complete version of your project by building it together from hundreds of
individual backups.
Going the extra mile: Time Machine is a wonderful tool for what it does, but
it shouldn’t be used as your sole backup for two important reasons. First, being
attached to your computer at all times, it is thus susceptible to the same risks of
7.6. BACKING UP YOUR WORK
45
damage and loss due to theft or catastrophe. Second, no backup system should
be considered infallible, and thus you should have more than one method. Time
Machine isn’t perfect; don’t let it be your single safety net.
Chapter 8
Setting Up the Binder
8.1
How the Binder is Organised
The binder is the document browser on the left of the main window where you can
organise your files. It allows you to structure and rearrange your work with the
utmost flexibility, much like a ring-binder in the real world (hence the name). You
can drag files from the Finder straight into the binder to import them, too, which you
can read more about in Gathering Material (chapter 11).
The binder is an optional element, though in most cases you’ll want to rely on its
organisational features at all times. To hide the binder, click the Binder icon in the
toolbar, select View Layout Hide Binder, or press
– B. All of these commands
can be used to restore its visibility if it has been hidden.
The binder is labelled at the top. Some functions will automatically replace the
Binder view with a temporary data display. Project Search Results is the most common of these. This label will change to reflect whatever automatic data is currently
being viewed. You can always get back to the binder by clicking the small X button
in the footer bar of the binder.
This section will go over the various aspects of the binder, and how to best use
Scrivener’s features to structure, navigate around in, edit, and write your draft.
Scrivener does some things which are unusual, and generally restricted to highpowered expensive applications. As a consequence, this can result in some interesting surprises, some of which are revealed in the basic templates distributed with
Scrivener’s installable extras.
8.1.1
The Three Root Folders
The binder has three default root folders which cannot be deleted or moved from
the root (although they can be renamed, moved around within the root, or assigned
custom icons). To use Scrivener effectively, it is very important to understand the
significance of these folders.
The Draft Folder
As the name suggests, the Draft folder is where you place all of the files that you
want included in your actual draft. How you structure it is entirely up to you—you
46
8.1. HOW THE BINDER IS ORGANISED
47
Figure 8.1: The three default root folders
may have parts and chapters, or you may have separate files for each scene within each
chapter, or even separate files for each individual paragraph if you so wish. Everything
that goes inside the Draft folder will be compiled into one long text file when you use
Compile Draft from the File menu (excepting documents that have their “Include in
Draft” setting unchecked). Thus, the Draft folder is central to Scrivener: ultimately,
you are aiming to complete and arrange everything inside the Draft folder so that
each of the elements it contains form an organic whole that can then be output as
a single manuscript file. Because the Draft folder is what is used to create the final
manuscript, it is unique in that it can only contain text and folder files.
The Research Folder
The Research folder is the default folder for non-text documents such as images, PDF
files and so on (although it can hold text files too). You can create as many subfolders
as you wish to organise your research, or you can rename it and create other folders
in the root to hold different types of research.
The Trash Folder
Whenever you delete a file in Scrivener (by hitting the – Delete, for instance, or
by selecting the Edit Delete menu item), the file is not actually removed from the
project but is instead moved to the Trash folder. You can tell at a glance if the Trash
folder has anything in it, as its icon will appear full. To permanently remove files from
the project, select “Empty Trash” from the File menu after having moved files to the
Trash folder. Note that although you can rearrange items inside the Trash folder or
view it like any other binder item (and of course, you can move files into the Trash
folder by dragging); you cannot create new files inside it.
Files that have been place in the Trash will have their icons ghosted. This is useful
in differentiating old files, since project search results will include trashed items as
well.
48
CHAPTER 8. SETTING UP THE BINDER
8.1.2
Files and Containers
If, like many authors, you are used to using a word processor for all of your writings,
you probably have a few habits that you’ll inevitably end up bringing with you to
Scrivener. One of these is that of working with large sections of information. In a
word processor, it can be awfully clumsy to work in extremely long files the length of
an entire book, but at the same time it can also be clumsy working with sections that
are too short; it means having so many files open at once and no good way to keep all
of the windows organised.
A common tendency is to treat the binder like a collection of those semi-large files,
say the length of a chapter, because even just that small incremental step can be so
much better than working in a word processor. But if you organise your project in
this fashion, you are missing out on a part of the Scrivener experience.
As it uses the convention of folders and files, you might instinctively approach the
binder as a sort of “meta-Finder”, but in actuality, it’s far better to think of the Binder
in terms of being a bonafide outliner. You might have been drawn to Scrivener for this
very reason, but because of the daunting number of things that must be learned all at
once, have found yourself falling back to using a simplified file-is-chapter approach.
The next section will demonstrate that it’s not only easy to work more dynamically, but it will save you countless hours in the long run if you just take a few
minutes to sort things out, cut them up, and allow your book to emerge as a genuine outline. That’s what Scrivener’s binder can do for you, and unlike other word
processor applications or plug-ins that tout outlining capabilities, you can use your
own internal “authorial outline” which may or may not have anything to do with the
actual construction of the book itself.
8.1.3
Folders are Files are Folders
As you no doubt instinctively know, a folder is a place where you organise files. You
can create folders on your disk, put files and even other folders inside of them to keep
everything nice and tidy.
Let’s throw away all of those notions for a moment and take a new, fresh look at
folders, because in Scrivener, folders are an entirely different animal. Select a folder in
one of your projects by clicking on it in the binder. You’ll probably get a corkboard
view of its child items1 or perhaps an Outliner view if that is how you have things set
up. This is all pretty straight-forward, but what happens if you close the corkboard
view?
1
This is a term from outlining applications which means: items which are contained by the parent
item. It is a relative term, for a parent could be a child of another parent. You’ll often see items referred
to in genological terms like “siblings”, “aunts”, “ancestors” and so on. Most of these are intuitive and
mean exactly what you’d expect. “Aunts” are a little more esoteric, but it refers to an item that is one
level “higher” in the hierarchy than the previous item. A item has an “aunt” if the next item below it
in the list is thus a sibling of its “parent”.
8.1. HOW THE BINDER IS ORGANISED
49
With the folder still selected, click the currently selected view icon (Corkboard is
the default) in the main toolbar, and you should get a blank view that looks suspicious
like an empty text document. In fact, that’s precisely what it is. Type in some text
and see what happens. Note that in the binder, the Folder icon has changed, and now
sports what looks like a little page of paper in its corner. This means the folder itself
has text associated with it.
Let’s try something a little more radical. Right-click on the Folder in the binder
and select “Convert to File”. It should change to a stack of papers with words on
them. Delete the line you wrote in that item and it will turn into a stack of paper
with an empty page in front. Go ahead and right-click and select “Convert to Folder”.
Nothing fundamental changed here. You didn’t lose any information, the only thing
that changed is the underlying type of the item, which is really primarily a visual
change. When an item has other items beneath it, but it is a file, it is often referred
to as a document stack, or a file group, but fundamentally it can act just like a folder
does.
Let’s test that theory. Select one of your files in the binder. You should see the
text in that file as you always do. But let’s do the same thing we did earlier with the
Folder, click on the corkboard icon. It will be empty, but you are now looking at
the corkboard for that file. With the focus in the Corkboard, press – N to make
a new document. An index card should appear, just as if you were adding items to
a folder. In the binder, you’ll notice that the icon for this file has changed to the
aforementioned stack of paper.
Perhaps you can better see why it is a good idea to think of the binder as an outliner,
instead of a glorified Finder. What is all of this flexibility good for? You don’t have to
be thinking in terms of constrictive structural elements as you flesh out the skeleton
for your book. You can just add items as you go, building out new corkboards, and
changing things to folders or back to files once a structure begins to emerge.
Scrivener lets you work the way you find most comfortable. There is no need to
build out a strict outline if you’ve always worked text-first, but if you like to work
in outlines, or use the snowflake model of expansion, you can accomplish these with
ease. An outline can literally emerge out of your book, or the book can be built onto
an outline. It’s all up to you and how you work best.
In Scrivener, the concept of a Folder is fluid. It’s an important concept to grasp, because organising your book will inevitably mean a hierarchy of documents, and wherever that hierarchy takes you it will take so in the form of folders, or their cousins,
the document stack. The concept of hierarchy is important, because it means you
can keep the parts of the book you aren’t currently working on tucked away, and
that means you can feel free to break things down as far as you want, no matter how
many hundreds of items you make in the binder, if you sort things into folders (or file
groups!) you can always keep the clutter at bay.
50
8.2
CHAPTER 8. SETTING UP THE BINDER
Binder Controls
Revealing and Hiding Elements Click on the arrow to the left of any container to
reveal or hide its contents in the binder.
Use the LeftArrow and RightArrow keys
In conjunction with the Option key with either of the above methods, expand
or collapse an entire portion of the outline tree at once.
Reveal and Hide All View Outline Expand All and Collapse All will disclose or
reveal the entire outline at once.
Expand All can be accomplished with
–9
Collapse All with – 0. Both of these commands work in many areas of the
interface where it is possible to disclose items.
Hoisting Focus on one area of the binder by selection a container and choosing Documents Hoist Binder.
Documents Unhoist Binder will return the binder to its full display.
Drag and Drop Items can be moved around in the binder with drag and drop. Simple pick up the item by clicking and holding on it, then drag it to where you
wish to move it. The binder will display a target preview showing where the
drop will result.
Holding down the Option key while dragging will inhibit the “Drop on” feature, making it easier to move siblings amongst one another.
Moving items with the keyboard
– ArrowKeys can be used to move an item
around in the binder. Up and down will increase or decrease its placement
in the outline, while left and right will promote and demote the item.
Keyboard navigation The arrow keys move around in the binder.
Up and down arrows will move up and down the outline
Left and right will ascend and descend the hierarchy
and
DownArrow will jump from one visible container to the
next. If a container is hidden from view, it will not be selected. When “Treat all
documents with subdocuments as folders” is enabled in the Navigation preferences, file groups will be included when navigating this way.
UpArrow
and DownArrow jump to the top and bottom of the binder. Note
this is different than the Home and End keys, which will only scroll the view,
but retain your current selection.
UpArrow
8.3. USING COLLECTIONS
8.3
51
Using Collections
Collections are a new feature to Scrivener, a way to augment the binder method of
organisation, which will temporarily supplant the binder view in the sidebar, allowing you to reorganise or arrange collections of items in a flat list, regardless of their
position in the actual project.
You can think of collected items as being a bit like an alias, or a shortcut to that
item. Changes made to items within the collection will also be made to the original
item in the binder. A single item can be outside of the collections, or in one, or even
in many. Each instance all points back to the same original item in the binder.
When setting up a new project, you might like to create a few starting Collections
to help organise material as it flows into the project, or as you generate new outline
ideas. If you find yourself creating a sequence of common Collections at the start
of every project, you might want to design a custom template (subsection 7.5.2) for
yourself. Here are some example uses for Collections:
§ Experiment with an alternate scene flow without disrupting the original layout
§ Collect all scenes which still need to be edited
§ Designate items which you wish to share with another author using one of the
various syncing methods
§ Create a special compile group with an alternate selection and order than a
typical compile of the draft
§ Store saved searches for future use, or to monitor workflows.
8.3.1
The Collection Interface
To reveal the Collection interface, click the Collections icon in the toolbar, or select
View Collections Show Collections.
Each virtual tab represents a single collection. In the screenshot (Figure 8.2), the
“Binder” tab is selected. While not a true collection, this is how you can navigate back
to the Binder after viewing a Collection. Click on any tab to select it; when a tab is
selected, it will re-colour and ghost all of the tabs below it to help indicate which is
the active tab. Additionally the header bar will change its title to the name of the tab.
You could hide the Collections interface at this point and continue working in that
tab. The background colour of the sidebar and the header bar will help remind you
that you are not in the full Binder.
When first created, Collections will be assigned with an automatically generated
colour, but their tabs can be recoloured by double-clicking the rectangular colour
chip to the right of the label. Likewise, double-click on the title to change the name
of a collection. The Binder and Search Results tabs cannot be renamed.
52
CHAPTER 8. SETTING UP THE BINDER
Figure 8.2: The basic Collection interface.
The are three main types (excluding the Binder) of Collections:
1. Standard Collections: allows you to freely add and remove items as you work.
This is the most flexible form of Collection.
2. Search Results Collection: a special collection type that cannot be removed.
Any project searches will have their query and results stored in this collection.
This is persistent between project sessions.
3. Saved Search Collections: indicated with the same magnifying glass used for
Search Results, on the left side of the label; they will be dynamically populated
with a search query).
8.3.2
Standard Collections
Creating a new standard Collection is as easy as pressing the + button. Any items that
you have selected in the active view (including the Binder, other views, or even other
Collections), will be automatically added to it.
Once a Collection has been created, you can add or remove items to it, so it is not
critical to select everything before you create it. To add existing items to a Collection,
simply click and drag them to the appropriate tab, they will be added to the bottom
8.3. USING COLLECTIONS
53
Figure 8.3: Standard Collection Controls
of the collection list. If an item already exists in the collection it will not be added
again.
Removing items by selecting them, and then clicking the - key (Figure 8.3) in the
lower title bar, or by simply pressing Delete on your keyboard.
Delete the entire Collection by first selecting the tab you wish to remove, and then
clicking the - key in the upper title bar.
Items can be re-ordered within the list using click and drag, or the same
–
ArrowKey combinations used in the Binder. Note that since there is no hierarchy
in a Collection, you will not be able to promote or demote items.
Where new items go: In Standard Collections, you may create new items using
all of the ordinary tools available for doing so. Since collections are uncoupled
from the Binder structure in every way, new items will be placed into folders with
names corresponding to the name of the collection they were created within. These
folders will be created at the top level of the binder, at the very bottom of the list.
An example might be a new text file called “Joseph” in the Characters collection.
When you return to the binder, you will find a new text file called “Joseph” in a
folder named “Characters (New)”.
Collections take advantage of the same view modes that containers do. Click the
coloured header bar title (not the tab) to view all of the contained items using the
default view mode. This can be used to view Scrivenings, Corkboard (freeform and
linear), or Outliner. You can also remove items from a Collection by deleting them
from these views.
54
CHAPTER 8. SETTING UP THE BINDER
Figure 8.4: The Search Result Collection
8.3.3
Search Result Collection
If you’ve used Project Search before, then you’ve been using a Collection without
perhaps realising it. Search results are placed into this special collection every time
you run a search, and the criteria of your search are saved into it along with the
project. This means the last Project Search that you ran will always be available to
you, even after you have rebooted your computer. Like the Binder tab, the Search
Result tab cannot be deleted, and there is always one included with every new project.
Both the built-in Search Results collection, and Saved Search Result Collections,
allow you to view the label and status of the matching items, making it convenient to
enact workflow changes without using the outliner.
When you click on the Search Results tab, the previous search criteria will be
loaded into the search bar tool, allowing you to further tweak the results if you desire. Since search results depend upon the search criteria, you cannot manually add,
remove, or change the order of items from the Collection, as you can with the standard type.
8.3.4
Saved Search Result Collections
As with the Search Results tab, saved searches have a magnifying glass in the corner to
indicate that it is a special type of Collection which cannot have its contents modified.
Saved searches are created by clicking the magnifying glass in the Project Search tool,
and selecting Save Search.
If the Collection interface is hidden, the sidebar background will change to a random, automatically generated colour, and the header bar title will adjust to the name
8.4. DOCUMENT TEMPLATES
55
you provided. To leave the saved search, you can either click the close button in the
sidebar footer, or enable the Collection tab interface and select another tab.
Limitations: Searches performed using the Binder Selection Only option cannot
be saved for future use, because the binder selection is a temporary state which
changes whenever you click in the binder. If you find yourself unable to save a
search, make sure this option is disabled.
The contents of a saved search are dynamic. Every time the tab is loaded, the saved
criteria will be checked against the current state of the project. If you wish to “freeze”
a list for later reference, there are two ways you can do so:
1. Convert the saved search to a standard type: This will destroy the saved search,
so only use this method if you no longer need to the search criteria. To convert a saved search result to a standard collection, View Collection Convert
to Standard Collection.
2. Copy the contents into a new collection: This is quite easy to do. Simply select
all of the items ( – A) in the search result, and click the + button to create a new
Standard Collection.
Saved Search Collections can be removed in the same fashion as Standard Collections, by selecting the tab and clicking the - key, as shown here (Figure 8.3)
See Also:
§ Project Search (subsection 14.5.3).
8.4
Document Templates
Document templates give you the ability to designate a set of items which can be used
to create new items. Much as with project templates (section 7.5), everything that
you add to a template item will be added to new items created off of it. This includes
the various meta-data, notes, keywords, references, synopsis, and of course any text.
Additionally, folder items designated as templates will create copies of their children
too, allowing you to quickly generate complex repeating structures.
Document templates do not provide forms that you can fill out with the tab key.
They are simply a convenient way to reproduce ordinary folders and files, with their
meta-data intact.
56
CHAPTER 8. SETTING UP THE BINDER
Figure 8.5: Example Document Template Structure
8.4.1
Setting a Document Template Folder
Templates are designated by placing them into a special folder, marked as being a
template container (which can be a folder or file group). Each project can only have
one template container at a time. To set it up, select the container of templates, and
use the Project Set Selection as Templates Folder. The binder icon will change to
indicate its status, and all of the items beneath it will have a small blue “T” badge
added to their icons.
To clear a document template container designation, use the Projects Clear Templates Folder menu item. This action will not delete anything in your project. It will
merely remove the special status from the designated templates folder. Template folders can be placed (or designated) anywhere in the binder, even in the Draft (though do
note that if you do that, they will likely show up in the final manuscript, and toggling
them to be hidden would lead to generated items being hidden by default, as well).
Some of the built-in project templates will come with a template folder already set
up for you. To use your own templates folder, first clear the default setting using the
above menu item. Optionally, you could just remove the contents of the default, and
supply it with your own templates.
If you find yourself doing this often, you might wish to create your own project
template (subsection 7.5.2).
8.4.2
Creating Document Templates
Creating new templates is as easy as creating a normal file or folder item in the binder.
There is nothing special about these items, save for their position within the designated templates folder. Anything that you create within the templates folder will be
available for usage in the project.
8.4. DOCUMENT TEMPLATES
57
It is possible to pre-configure all aspects of an item. The only thing which will not
get carried over is Snapshots. The latest version of the item’s text will always be used
and Snapshots will be ignored.
8.4.3
Using Document Templates
Once a container is designated as a Template Folder,and items have been added to
it, you can generate copies of these templates via the Projects New from template...
sub-folder. The items in this folder will be arranged precisely as they have been organised in the binder. Groups will become further sub-menus. As with the other
commands that create new items, they will be created in relation with the current
binder selection.
§ If you select an entire group, it and all of its child items will be created in the
selected position.
§ The first template item in the template folder is a special spot as it will be given
a keyboard shortcut,
– N. Using this shortcut, you can easily create that
item on the fly, so if applicable, choose the top position for a template you will
be using most frequently.
§ As with project templates, once created, document templates have no connection with the item that they were modelled after. It is safe to delete a template
that is no longer being used to create new items. You might wish to, however,
move the template item to another spot outside of the template folder, in case
you ever need it again.
Chapter 9
Navigating and Organising
9.1
General Navigation
Moving around within a large project is an important part of writing efficiently, especially in an application like Scrivener, which lets you cut your work up into small
pieces. An average book might have anywhere between several dozen and a few hundred sections arranged into many folders. Along with the binder, there are two primary tools for making sense of all of these pieces: the Outliner (section 12.2) and
The Corkboard (section 12.1), covered later in this portion of the book. For now we
will concentrate on how to use them as navigational tools, and as your skills increase,
you’ll find other uses for them beyond mere navigation.
Beyond the three primary navigation tools, there are a number of other features
which can be used as needed to enhance the main three, and these will be covered in
this section as well.
Some navigation features which are common to both the corkboard and the outliner are:
§ Double-click on an icon to load that document in the editor.
§
§
to load the selected item in the editor, or when more than one item is
selected, isolate the focus on just the selected items.
–O
– O to load the select item in the other split
§ Both views have an Auto-Load feature, which when enabled, will load any selected item(s) in the other split, if one is opened. The Auto-Load button1 is
located in the footer bar, and will appear blue when switched on.
1
nav-auto_load_button.png
Figure 9.1: The Auto-Load button will appear blue when activated.
58
9.2. GO TO MENU
9.2
59
Go To Menu
In most cases, it will be easiest to use the binder or views to select and navigate to
various components in your project. However there are a few cases where this will
not be true. If you prefer to work with the binder hidden, are working in Full Screen
mode, or just would rather not drill down to a particular spot solely to select an item,
the Go To menu is an easy substitute for other methods, and in some cases can even
be faster than traditional navigation. The Go To menu always takes action on the
activated split, even when it has been locked.
There are two locations where this menu appears:
§ The main application menu, View Go To.... The main application menu version also provides three shortcuts for navigating within an editing session:
– Previous Document (
– UpArrow): Selects the previous item in the
binder, no matter what the relative depth.
– DownArrow): Selects the next item in the binder, no
– Next Document (
matter what the relative depth.
– R): Selects the parent container which the cur– Enclosing Group (
rently selected item is within; in effect traversing up the hierarchy.
§ Via clicking on the item icon in the editor header bar.
In both cases, both sub-folders and items can be selected. When a sub-folder is
selected, it will be loaded with the default view mode (Corkboard by default). The
header bar menu is provided as a convenience, and more readily applies the navigation
action to a particular split, whereas one must first ensure the right split is active before
using the application View menu.
Standard Mode In standard mode, the Go To menu will list every item in the binder,
organised in such a way that containers will be converted into sub-menus.
Go To is one of the menus which is modified by the list of favourite items in
the project. Favourites will be placed at the very top of the menu in a flat list,
allowing quick access to frequently visited areas of the Binder.
See also, Using Favourites (section 9.6).
Scrivenings Mode When the active split contains a Scrivenings session, the Go To
menu will be transformed into a table of contents for that session, letting you
quickly jump to sections within the session. The main application Go To menu
will adhere likewise to this model, but if a split that is not in a Scrivenings
session is activated, the menu will return to presenting the entire binder. The
60
CHAPTER 9. NAVIGATING AND ORGANISING
Figure 9.2: Hoisting: Before and After
header bar menu will always show the contents of the current session for that
split.
Favourites will not be shown when the menu is modified in this way.
See also, Editing Multiple Documents (section 14.13).
In Full Screen To use the Go To menu in Full Screen mode, move the mouse to the
top of your screen for a moment. The application menu should drop down,
and you’ll be able to access the View menu.
9.3
Hoisting the Binder
When you need to focus on one specific area of the binder, you can use Documents Hoist Binder to isolate the currently selected container. Only one item can
be selected, and it must be a container (file or folder).
When a container has been hoisted, the appearance of the binder will change2 . The
header bar will be replaced with the name of the container that has been selected,
including a small icon representation of its type, and the list of items available will be
reduced to only those items which are children of the selected container.
2
action-hoisting.png
9.4. LOCKING THE EDITOR
61
If you wish to select the container itself (to for example view Scrivenings, or its
corkboard), click on the header bar. Once selected you can choose the view mode
you prefer, if necessary.
To return to standard Binder view, either click the indicated X button in the footer
bar of the binder area, or select the menu command, Documents Unhoist Binder.
9.4
Locking the Editor
The editor can be locked with View Editor Lock in Place or the
The feature can also be accessed from the header bar menu.
–L
shortcut.
Locking the editor prohibits external click actions from impacting the locked editor. This means that clicks in the binder, corkboard or outliner (when Auto-load
is enabled), will be blocked. This makes it easy to keep your editing session while
you use the binder or these other views to explore the outline. What locking will
NOT do is prohibit actions taken from within the editor itself. This includes use of
the binder navigation arrows, History functions, and manually dragging items to the
header bar, or menu navigation commands. Locking is meant primarily to keep the
interface from taking actions that it would ordinarily take automatically. It will not
inhibit intentional actions that you make.
When the editor is locked, the header bar will change to a reddish colour, which
persists even when the split is not active.
9.5
Scrivener Links
Much like hyperlinks on the Web, Scrivener Links make it easy to create and use a
network of text-based cross-references within your project. Since they do not export
from you project, it is safe to use them in the text of your work wherever you need
them. They can also be used within the various available notepads. Their ability to
elevate the visibility of information in your project can turn them into a valuable
navigation tool, as well as providing convenient uses beyond the project itself, during
Compile.
The creation of links can even be a good brainstorming tool, as you can build your
outline with links, while typing. Links appear much like URL links do on the Web.
They will sport a pale blue appearance and be underscored. The link colour can
be customised in the Appearance tab, under “Customisable Colours”, in the Editor
section. The underscore cannot be removed, so even links set to same colour as the
base text can be identified.
Richard Stengel, managing editor of Time magazine, on why he chose to run on
the magazine’s cover a photo of a young
62
CHAPTER 9. NAVIGATING AND ORGANISING
9.5.1
Creating Scrivener Links
Links can be created in a variety of ways, to suit different styles of working.
Drag and drop
§ To create a link to specific item in the binder, drag the item into the text where
you would like it to appear, while holding down the Option key. The blinking
cursor will help show you where the final location of the drop will occur. When
creating links in this fashion, they will be automatically titled by the name of
the document that was dragged.
§ It is possible to drag more than one item into the text area at once. Select multiple items in the binder and drag them over as above. Links will be separated
one per line.
§ Items can be dragged into the Notes Pane (and the Project Notes window) as
well as the main text area, in this fashion.
Select Items and Copy
When you want to create links to items in multiple places, it is usually easier to use
the Edit Copy Special Copy Documents as Scrivener Links menu command. Now
you can paste ( – V) the items into several different places rapidly. As with Drag and
Drop, you can select more than one binder item at once, producing quick lists of
links.
Select Text and Link
Often you will want to link a phrase to a specific document without having the name
of that document be a part of the link. To create links in this fashion, select the text
you wish to link, and then right-click on the selected text. Use the Scrivener Link
sub-menu to create a new link. This menu is also located in Edit Scrivener Link.
This sub-menu functions in a very similar manner to the “Go To” menu (section 9.2), by providing an organised list of every item in the binder. The menu is
organised as follows:
New Link ( – L) Brings up a sheet which gives you the option between creating a
new item and choosing where to place that item, or to navigate through a list
of items that already exist.
There are two tabs available in the sheet. The default tab, “Create New Linked
Document”, will let you generate a new document and attach it to an existing container (or optionally, another item, forming a new container).
9.5. SCRIVENER LINKS
63
Figure 9.3: Create a New Linked Document
The “Destination” drop-down menu provides a list of all the containers in the
project binder. Use this to select where the new document should be created. By
default, it will select the Research folder for you. If you have unchecked “Only show
containers in destination list”, then the drop-down menu will display all items in the
binder, allowing you to form new containers by creating new items beneath existing
documents3 .
The “Title” field is where you type in the name of the new binder item which will
be created. It does not need to match the text of the link.
The “Link to Existing Document” tab will provide a browser with which you can
look for an existing binder item and link to it. Using this method is very similar to
right-clicking on the text and selecting an item from the Scrivener Link sub-menu,
and is mainly provided as a convenience for people using the – L shortcut to create
new links, or wiki linking, discussed below.
Suggestions If the selected text contains material that is found in existing binder item
titles, these matching titles will be added to the menu as well as suggestions.
This is handy when you have typed out the name of a Binder item, and wish to
create a link to it.
This section will not appear if no suggestions are found.
3
If this is hard to understand, I suggest reading Folders are Files are Folders (subsection 8.1.3).
64
CHAPTER 9. NAVIGATING AND ORGANISING
Favourites As with the Go To menu, Favourites will be added to the list. Consider
adding frequently linked to items as Favourites to make it easier to access them
in the future.
This section will not appear if no Favourites have been created.
Item List The remainder of the menu will be organised according to how your
project is laid out. Containers will be converted into sub-menus, allowing you
to navigate the project and select a link target (much as you would with the “Go
To” menu).
Wiki Link Style
An optional method lets you type in new links without using the mouse at all, or
even being fully aware of the title you wish to link to. To enable this method, visit
the Auto-Correction tab of Scrivener’s preferences, and turn on and [[Scrivener links]]
in the Substitutions section.
To use this method, while typing in the text you can enter two double-brackets,
type in the title of the item you wish to link to, and then close it with a second pair of
brackets, as shown. Scrivener will detect what you are trying to do, and if it finds an
exact match to a document, will link it for you automatically. If it does not recognise
the text inside the brackets as correlating with an existing title, the New Link sheet4
will pop-up, giving you the option to either create a new item and place it in the
Binder, or via the second tab, “Link to existing document”, navigate to an existing
document in the Binder and create a non-literal link. Non-literal links are useful
when you wish to link phrases in your text without directly referencing the name of
the item you are linking to. Once substitution has been performed, the brackets will
be removed.
As with other substitution types, wiki linking5 works only on newly typed material. If you have previously typed in double-bracketed words, and then enable the
option, you will need to re-bracket them.
9.5.2
Removing Links
Any type of link can be deleted (including URLs to external web pages) with the
Edit Unlink menu command. Any link falling within the currently selected text will
be removed, so there is no need to be precise about what you select. This is an easy
way to wipe out dozens of links at once, something which is of particular use when
pasting text from webarchive files, or other Scrivener documents with links.
Note that linked comments and footnotes will not be deleted with this command.
4
sheet-new_link-new.png
Referring to these links as “wiki links” does not imply that your project can become a wiki. It
merely refers to the appearance of the syntax as it is typed in. Scrivener links must always point to an
existing resource, unlike true wiki links, which can be placeholders for items which do not yet exist.
5
9.5. SCRIVENER LINKS
9.5.3
65
Configuring How Links Work in the Interface
Most of the configuration options for links are located within the Navigation tab
(section B.5), in the Scrivener Links section. Here you can configure how links will
act when they are clicked, and what will happen when new links are created.
Both settings have three options available:
§ Current Editor: The link will replace the current editing session with the
linked item. This method works most like a web browser, and like a web
browser you can use the forward and backward buttons to get back to where
you were, after following a link.
§ Other Editor: Will use the other split to load the clicked link. If necessary,
Scrivener will open up a new split (section 14.9) for you, using the last used
split type (horizontal or vertical).
§ QuickReference Panel: The item will be loaded into a QuickReference panel
(chapter 18).
The colour appearance of links can also be adjusted in the Appearance tab (section B.2).
9.5.4
When Scrivener Links can be Compiled
For the most part, Scrivener Links are a feature which reside completely within the
realm of Scrivener. When compiling, they will be stripped out of the source text, and
thus are handy for inserting useful links for your own purposes, which will not show
up at all in the finished manuscript.
There is one optional exception to this rule that requires a chain of conditions to
be present.
1. Links which are solely the title of the document they link to.
2. Enable the “Update Scrivener Links containing titles to include prefix/suffix”
option, in Compile under “Document Settings”.
3. A title prefix or suffix applied to the document level that contains the links.
This is a more advanced feature of Compile, but in essence it allows you to create a
list of document titles in the text which will be altered to match their final appearance
in the compiled version. Since titles can be added to, or even entirely replaced, by the
compiler, this set of features will ensure that referenced titles will remain valid after
export. An applied example:
The original text reads:
66
CHAPTER 9. NAVIGATING AND ORGANISING
To read more about this topic, see How to Grow Better Tomatoes .
The phrase “How to Grow Better Tomatoes” is linked to a binder document of
the same name, in the final manuscript. However, in the compiler the author has
arranged for this title to be prefixed, so that in the book it will appear as:
Chapter 7: How to Grow Better Tomatoes.
With the above options configured correctly, Scrivener will recognise that this link
points to a title and that it should be updated to reflect the final version. It will be
compiled in the manuscript as:
To
read
more
about
this
Chapter 7: How to Grow Better Tomatoes .
topic,
see
The Table of Contents generator uses this trick to keep its list of documents up to
date with the final manuscript version of titles.
Pro Tip: If you link the special token, <$p>, to a particular document in the
Draft, the compiler will insert a special RTF code which lets compatible word
processors cross-reference the actual page number of that item. This technique is
also used in the Table of Contents generator, but could also be used for formatting
nicer cross-references for your readers. This feature will also be available when
using the Print/PDF format option in Compile.
See also:
1. Compiling the Draft (chapter 25)
2. Creating a Table of Contents (chapter 24)
Richard Stengel, managing editor of Time magazine, on why he chose to run on
the magazine’s cover a photo of a young
9.6
Using Favourites
Setting binder items as favourites will increase their visibility in a few key areas of
the application. One of these has already been covered; the Go To menus. Setting an
item as a favourite will make it easy to navigate to that item in the future, as it will
always be present at the top level of that menu (with the exception of when the menu
is acting as a table of contents for a Scrivenings session).
9.7. LAYOUTS PANEL
67
The second menu which will have favourites added to it is the Scrivener Link creation menu. When creating a new Scrivener Link, your favourites will be placed at
the top of this menu.
Adding and removing items from the list of favourites is easy to do. Simply select
the item in the binder and right-click on it to view its contextual menu. At the bottom
of the menu, there will be two options:
§ Add to Favorites: Adds the selected document(s) to the favourite list.
§ Remove from Favorites: Removes the selected document(s) from the favourite
list.
Favourites will be added to the following menu functions:
§ Edit Go To : Provides navigation features to any spot in the binder.
§ Edit QuickReference : Opens a QuickReference Panel for the selected item
from that menu.
§ Edit Scrivener Link : Creates text links to documents, like URLs in a web
browser.
§ Documents Move To : Moves selected binder items to other locations in
the binder.
9.7
Layouts Panel
(Material not finished)
Chapter 10
Setting Up Meta-Data
Documents of any type in Scrivener can have various meta-data associated with them.
Some of this meta-data can be viewed in the corkboard, outliner views, and the QuickReference panes, but the main interface for viewing and editing all of the meta-data
for a given document is the Inspector (chapter 17). This section will brief you on the
various types of meta-data available, and how to create more types if necessary. It will
not go into all of the details of the Inspector pane; please read that section to gain a
full understanding of how meta-data is assigned to documents.
10.1
Meta-Data Types
The basic meta-data types include the title, text synopsis, and an optional image replacement for the synopsis. The title is the most important component of any item in
the binder, as it will be used to identify the document in the many views, menus, and
export methods. When exporting as files, filenames will be set according to the title
field; when compiling, titles can be used to generate headers for that section; index
cards use the title; the outliner is composed of a list of titles.
The synopsis is a plain-text field, primarily intended to be a short summation of
the contents of the document, though how you choose to use it is entirely up to you.
The synopsis is displayed in a variety of ways.
1. Corkboard: used to display the content area of the card.
2. Outliner: will be placed beneath the title (which appears in bold), by default.
3. Binder: revealed in the tooltip when hovering the mouse over the corresponding title.
Instead of the text synopsis, you can elect to use an image to represent a document
on the corkboard. This image will be used on the corkboard and in the inspector,
but whatever text exists in the standard synopsis field will be used in the outliner and
binder as described above, and in the various export and print options that include a
synopsis field. The image is not a replacement for the synopsis, but an override for the
corkboard.
68
10.1. META-DATA TYPES
69
In all cases, specific types of meta-data can be displayed as columns in the Outliner
view, including custom meta-data.
10.1.1
Setting Up Label & Status
The next two forms of meta-data are flexible in what you can refer to them as. Using
– ,) you can set up custom names for both the
the Project Meta-Data Settings... (
label and status, and the interface will adjust accordingly, no longer referring to them
as “label” and “status” for that project. If you wanted, you could have “POV” and
“Location” instead of “Label” and “Status”, or “Focus” and “Type”, or “Monkeys”
and “Bananas”, or anything else you want. This document will continue to refer to
them as labels and status for convenience. They are also, after the title, the most
visible items in the entire interface. They can be represented in the corkboard and
outliner views, are best administered in the inspector, are given a priority position
in the QuickReference panel, are displayed in search results, and are given priority
placement in most of the printing methods.
The default blank project and many of the templates come packaged with a few
example status & labels, but you will most likely wish to create your own. To add or
remove project labels, use the Project Meta-Data Settings menu item, or press
– ,.
The interface provides tables for three meta-data types; we’ll discuss custom meta-data
below.
For each of the first two tabs, you can provide a custom title, which will replace
the generic “Label” and “Status” designations throughout the interface.
Labels and status can be added or removed with the + and - buttons. Edit an existing
label by double clicking on the text. For labels, the colour can be changed by doubleclicking on the colour chip to the left. The order in which the these items appear in
their respective menus is determined by their arrangement in this table. Click and
drag rows to rearrange them.
When you create new items in the binder, either by adding items or importing,
they will automatically be supplied by a default label and status value. Ordinarily this
will be assigned to the “No Label” or “No Status” choices. If you wish to change this
behaviour, select the alternate value by clicking on its row, and then click the Make
Default button.
Once you click the OK button, the interface will update with your changes.
10.1.2
Label Colours
Labels can have a colour associated with them and are completely customisable - you
can even rename “Label” to “POV” or something that better fits your project (see
below). Labels are one of the most flexible meta-data types in terms of how visible
they are in the interface, so you can pick a colour to reflect how prominent you wish
them to be, depending on their associated material’s content. Label colour can be
70
CHAPTER 10. SETTING UP META-DATA
depicted in the following ways, many of which are optional, and can be enable in the
View Use Label Color In sub-menu.
1. Corkboard: will be used to shade the upper right corner of the card when using
the rounded card theme. When using the classic card themes, the pin will be
coloured according to the label. Use View Corkboard Show Pins or
– P to
toggle the visibility of pins.
2. Outliner: The outliner can be set to tint the background colour for each row
using the label colour with View Use Label Color In Outliner Rows.
3. QuickReference Panels: the label is one of the priority meta-data values always
visible at the top of the QuickReference panel for each document.
4. Binder: can be set to highlight the background of each binder item using the
label colour in a manner similar to the Finder. Toggle this behaviour with
View Use Label Color In Binder.
5. Icons: enabled with View Use Label Color In Icons, this option will tint document icons wherever they appear.
6. Index Cards: enable with View Use Label Color In Index Cards this optional
method will tint the background colour of index cards wherever they appear.
The label can also be used to tint colour printouts when printing corkboards and
outliners.
10.1.3
Status Stamps
As with the label, the status field can have its representative name altered to suit your
project preferences. By default, this field represents that status of a document in terms
of its completion, such as “To do” or “Rough draft”, but this field can be used for
whatever purpose you desire. Unlike the label, there is no corresponding colour, and
so its display potential is more limited.
1. Corkboard: can be displayed as a diagonal “stamp” across the face of the card.
The appearance of this can be adjusted in the corkboard and Appearance preference panes, and display can be toggled with View Corkboard Show Stamps
– S.
or
2. QuickReference Panels: the status is one of the priority meta-data values always
visible at the top of the QuickReference panel, for each document.
10.1. META-DATA TYPES
10.1.4
71
Using Keywords
Each document can have a list of keywords associated with it. These are useful for
making documents easily searchable - for instance, you can list all characters and locations connected with a scene in the keywords even if they are not mentioned explicitly in the text. Creative uses for keywords also include extended status control, plot
management, and whatever else you can think of.
Like labels, keywords have an associated colour which will be displayed beside the
keyword in the inspector list, as an underscore in the relevant outliner column, and
in the Keywords HUD (see below). Additionally, keywords can be used in the corkboard as small coloured squares along the right-hand edge of the card. The visibility
of these can be toggled with View Corkboard Show Keyword Colors, or
– K. The
display preferences for these can be adjusted via the corkboard display controls (subsection 12.1.3).
When exporting or printing, keywords will be displayed on a single line, separated
by commas.
10.1.5
Minor Meta-Data
In addition to the primary types of meta-data, there are a few smaller items, mostly
located in the General meta-data section of the Inspector:
Created Date The date and time the document was first created.
Modified Date The date and time the document was last changed and saved.
Include in Compile A checkbox determining whether the document should be included in the draft when exported or printed via Compile Draft from the File
menu. If checked, the document is exported or printed; if not, it is excluded
from the export/print (this can be temporarily overridden in Compile). This
way, you can have documents in the Draft folder that act as notes and that
are never included in the final draft. Note that this setting really only has any
meaning for documents that are inside the Draft folder, though it can be set
anywhere, allowing you to modify text documents outside of the Draft in cases
where they might at some point end up being compiled, or used as templates
for files that will be compiled. The checkbox never has any meaning for media
entries, as these items can never be compiled.
Page Break Before If this checkbox is ticked, a page break will be inserted before
the document when compiled. Useful, for instance, if the document marks the
beginning of a chapter. As with Include in Draft, this only has any meaning for
text documents inside the Draft folder.
Compile As-Is All options set in the formatting pane (subsection 25.3.2) will be ignored for the checked document. This means no extra material will be added,
72
CHAPTER 10. SETTING UP META-DATA
including titles, and no reformatting of the text will be done. Text will always
be included, even if it would otherwise be excluded. As with the above two
items, this checkbox has no meaning for items outside of the Draft.
10.1.6
Custom Meta-Data
When you need to keep track of more details than the default meta-data options provide, adding custom fields to your project can be a valuable move. Custom fields are
fundamentally free-form text labels. Setting them up is done using the Project MetaData Settings control, in the third tab. For each column you wish to add, press the +
button and supply a field title. Each field has two options:
Wrap Text Useful for fields where you want to display all of the entered text, even
if that text causes the row to expand in height in the outliner. Unwrapped
columns will only ever show the first line of text unless you edit the field.
Colored Text When checked, the colour selection tool at the bottom will be enabled,
allowing you to customise the text colour for this column. Text colour will be
displayed in the inspector and outliner columns.
As with label and status, fields can be re-ordered by dragging rows in the configuration table.
Custom-meta usage is generally limited to the inspector and outliner, though it
can also be exported along with the rest of the meta-data when compiling, exporting
binder items, and printing.
10.1.7
Exporting Meta-data
All meta-data can be exported in a variety of ways, usually text-based for maximum
compatibility, so you needn’t fear having important organisational information getting locked-in with the project format. Meta-data can be exported in the following
fashions:
1. Compiling: when compiling the Draft, enabling meta-data export is an optional
feature of the Formatting pane. The various types of meta-data will be exported
into the Draft in a variety of ways best suited the type of data involved.
2. File export: when exporting files from the Binder, meta-data can be placed into
optional “sidecar” plain-text files corresponding to the main document being
exported. This method is used to preserve the integrity of the original document, and to enable meta-data export in formats which would not otherwise
allow text data to be inserted into it, such as QuickTime movies.
10.2. KEYWORDS HUD
73
3. Outline and Corkboard printing: both of these printing methods optionally
allow meta-data to be expressed in the printout. Unlike the above two examples,
these allow for a more fine-grained approach, letting you export just the label
or keywords if you want.
4. Drag and Drop: When dragging documents from one Scrivener project to another, all meta-data will be preserved where applicable. In some cases, like labels
and status, these values will need to already exist in the target project.
10.2
Keywords HUD
The Keywords HUD holds all of the keywords in use by the project. As you enter
new keywords into the Inspector (subsection 17.4.3), they will be added automatically
to the central project list. You can access this pane via Window Show Keywords HUD,
or
– H.
You can create a new keyword by clicking on one of the buttons at the bottom of
the HUD. The left-most button creates a new keyword as the sibling of the selected
keyword, and the one next to it creates a new keyword as a child of the selection.
The third button deletes the selected keyword(s). Note that the keywords are automatically sorted alphabetically. You can drag any keyword onto any other keyword
to make the dragged keyword a child of the one onto which it was dropped. Note
that for the most part, the hierarchical structure of keywords are really only an organisational convenience, and has no effect on how the keywords are represented in
documents themselves. There is one exception to this, below.
To assign keywords in the HUD panel to a document in the main window, select and drag the desired keywords from the HUD and drop them onto either the
keywords table in the inspector of the main window, the header view above the document editor or onto the document in the binder, corkboard or outliner. If there is a
multiple selection in the binder, corkboard or outliner and the keywords are dropped
onto one of the selected documents, the keywords will be applied to all selected documents. Hold the Option key down whilst dragging to drag not only the keyword
but also any parent keywords under which it is grouped.
You don’t have to use the HUD to create keywords, of course - you can also enter keywords directly into the keywords table in the inspector (subsection 17.4.3) to
apply them to the current document. Note that whenever you apply keywords via
the inspector, they will automatically be added to the list in the HUD if they are not
already contained there, so that the HUD should always contain a complete list of
the keywords you are using in your project no matter how you have created them.
Keywords can be managed from the HUD. By changing the name of a keyword
in the HUD, all of the associated keywords in the project will be updated instantly
in the background. When removing keywords from the HUD, they will also be
74
CHAPTER 10. SETTING UP META-DATA
Figure 10.1: Scrivener swatch set
removed from all of the documents they had been assigned to. To change the colour
that represents the keyword, double-click on the small colour rectangle to the left of
the keyword.
10.3
Naming Text Highlights
The default text highlight marker names can be changed to something less generic,
on a universal level. When you first ran Scrivener, it installed a custom colour swatch
file. Swatch groups are OS X’s way of letting you create selections of colours and
giving them useful names. To change the highlighter colours, show the Color Palette
(
– C), and select the third icon from the left.
10.3. NAMING TEXT HIGHLIGHTS
75
Next, from the “Palettes” drop-down menu, select the group titled, “Scrivener”.
You should now see something resembling the above screenshot. Double-click on any
of the provided highlights to rename it. Your changes should be visible immediately
in the Scrivener interface, where applicable.
Your own colours can be added to any of Scrivener’s various colour selection
menus, as well. If necessary, click and drag downward in the location marked above,
“Custom colour shelf”. You should see a row of white squares appear. You can drag
out as many rows as you like.
The easiest way to create new custom colours is to use either the colour wheel
(first icon) or the sliders (second icon). When you find a hue that you’d like to use as a
highlight, text colour, or annotation colour, drag from the large colour preview area
at the top of the pane, and drop into one of the empty slots in the custom shelf.
If you check one of Scrivener’s colour menus right now, you’ll see that it has already
been added below the base sets. To change the name of your custom colour, click on
the swatches icon again, make sure the Scrivener set is active, and drag the colour from
the custom shelf into the list. Now that it is there, you can double-click to rename it.
Note that due to the way colours are estimated, if you have several subtle variations
they will all get the same name. To avoid this, create a new named colour swatch for
each variation. This is a purely aesthetic feature though. Names are not used for
anything, except for your own reference.
Mac OS X Tip:If you wish to share your colour sets with other users, or transfer
them to another computer, you will find a file in your user Library folder, under Colors, named Scrivener.clr. Place this file into the same folder on the second
computer and it should become instantly available.
76
CHAPTER 10. SETTING UP META-DATA
Figure 10.2: Custom named colours
Chapter 11
Gathering Material
11.1
File Import
Whether you are using Scrivener for the first time and want to use it with documents
you have already created in other programs, or whether you just have reference files
lying around that you want to bring into an existing project, the chances are that at
some point you will need to import documents created in other word processors and
programs into your Scrivener project. Fortunately, this is very easy.
Importing files into the project binder means that these files will be copied (and
possibly transformed into a fashion that Scrivener can use better) into the project
file itself. The original copies on your disk will not be removed or altered in any
way. While it is possible to easily edit many file types from within Scrivener with an
external editor, if you wish to retain maximum external control over the files, you
might wish to use References (subsection 17.4.2) instead.
There are two ways to import documents from other programs:
1. Drag and Drop. In the Finder, select the files you wish to import and then just
drag them straight into the binder in Scrivener. (Note that you cannot drag files
from the Finder into the corkboard or outliner, but only into the binder.)
2. The File Import... sub-menu provides a number of handy methods for bringing existing material into your project binder. In cases where the imported
material has some sort of innate or optionally defined structure, Scrivener will
attempt to convert that into outline hierarchy. Files and folders will be turned
into likewise in the binder, documents with split markings can be set up to create many documents upon import, and MultiMarkdown files with their innate
header structure will be converted to outline hierarchy
The first time you import anything, you will be presented with an informative
sheet describing important information pertaining to the various limitations of the
import feature. If you do not wish to view this warning every time you import files,
be sure to check “Do not show this warning again”.
When importing text documents, they are internally converted to the RTF format
so that Scrivener can work with them easily (again, note that this has no effect on the
77
78
CHAPTER 11. GATHERING MATERIAL
original file in the Finder, only on the copy that is made inside the Scrivener project
during the import process). This can cause some loss of data for some file types (see
“Compatibility Issues” below).
When using the import menu items, material will be imported according to where
the current binder selection is set. If you have a line selected in the binder, the material
will be inserted between the selected line and the one below it. If more than one item
is selected, the last item (in top-down fashion) will be used as the insertion point. This
means that some forms of import will be disabled depending on where your selection
is. If your selection is in the Draft, you will be unable to import media of any kind;
if your selection is in the Trash, all import will be disabled. The only exception to
this is importing another Scrivener project, and importing from SimpleText.ws, both
of which ignore binder selection and create top-level folders at the bottom of your
binder.
When using drag and drop, the dropped material will be placed wherever the insertion indicator in the binder shows. If you try to drag media into the Draft, the drop
will be prohibited until you move the mouse out of that folder.
11.1.1
Supported File Formats
Scrivener supports the following text types for importing:
§ RTFD (rich text format directory—the standard Apple rich text format).
§ RTF (rich text format—the rich text standard; note that this is often the best
format to use for importing from word processors, as Scrivener can import
footnotes, comments and images from RTF files but not from DOC files).
§ DOC & DOCX (Microsoft Word format—as with TextEdit, Scrivener ignores
images, footnotes and comments in DOC files, so if you have these elements in
your documents and need them preserved when importing, re-save the file as
RTF in Word and import the RTF file into Scrivener instead of the .doc file).
§ TXT (plain text—note that Scrivener tries to import all plain text files using
Unicode UTF8 encoding; this should be absolutely fine in most cases, but if a
plain text document gets imported as gibberish you may need to convert it to
UTF8 format using TextEdit before importing it into Scrivener).
§ FDX (Final Draft format—using the standard document format for Final Draft,
you can import scripts directly into any area of the Binder and have those imported documents converted to Scrivener’s script formatting). Better yet, use
the Import and Split command to automatically split an FDX file into smaller
documents, with the ability to select where splits occur.
§ OPML (Outline Processor Markup Language—)
11.1. FILE IMPORT
79
§ No extension - documents with no extension get imported into Scrivener as
plain text files (note that this can often be a source of confusion - if you try to
import an RTF file that has no .rtf extension, when you import it into Scrivener
you will see all of the RTF syntax because it will be imported as plain text;
make sure you add the .rtf extension before importing to ensure that Scrivener
recognises it as an RTF file).
As well as these text file types, Scrivener also supports all of the main image file
types (TIF, JPG, GIF, PNG, BMP etc), all of the main QuickTime formats (MOV,
MPG, WAV, MP3 etc), PDF files and HTML, HTM and .webarchive file types for
importing saved web pages.
11.1.2
Web Page
Web Page: This lets you enter the URL of a web page that you would like to
import into Scrivener. The web page will be imported as a web archive into the
Scrivener project (note that you can convert it to a text file afterwards by using Documents Convert Web Archive to Text should you wish to edit the file). Note that
web pages cannot be imported into the Draft (which only supports text), so you must
ensure that a non-Draft item in the binder is selected for this item to be available.
11.1.3
MultiMarkdown File
This imports a MultiMarkdown text file into the project by splitting it into multiple
files based on its structure, and recreating that structure in the binder. The Meta-data
block will be inserted as the first document at the top level, which Compile will use
as auxiliary meta-data on top of any Compile Meta-data settings for MultiMarkdown.
Below that, each header found in the MMD file will be used to create a new document
at an appropriate level of depth with any text following that header up to the point of
the next header included in that document.
11.1.4
Plain Text Formatted Screenplay
When importing screenplays from Movie Magic Screenwriter, Celtx, and other programs that export plain-text scripts, you can use this import utility to have them converted into Scrivener’s script formatting automatically. You can optionally choose to
have the imported file split into multiple scene documents for you. If you are working in Final Draft, you should use the FDX format instead, with the Import and Split
utility.
11.1.5
From Simpletext.ws
If you use WriteRoom for the iPhone, or the SimpleText.ws service, you can login
using this utility and select from your available note files online, choosing which ones
80
CHAPTER 11. GATHERING MATERIAL
to download into the binder. If you are using your own server to provide SimpleText
services, you can use the Options... button to supply the proper connection information.
Scrivener does not support uploading documents to SimpleText.ws, if you wish
to use a note taking service that offers round-trip synchronisation, we recommend
Simplenote (section 13.1).
11.1.6
Scrivener Project
Allows you to import another Scrivener project. The files of the other project will
be imported into a folder entitled “Imported Project” at the bottom of the binder,
with the structure intact. Keywords and project references are also imported, and
any project notes are imported as a text document which is placed at the top of the
folder. This command can also be used to import—and therefore retrieve—corrupted
projects. If you have a project that has somehow become corrupted so that it can no
longer be opened in Scrivener, use File Import Scrivener Project to have Scrivener
do its best to retrieve all the data. All the text, synopses and notes will be retrieved,
along with snapshots. The structure cannot be retrieved for corrupted projects, however, and folders will be imported as text documents (which you can convert back to
folders using Documents Convert to Folder.
11.1.7
Import and Split
There are two modes for this tool:
1. Plain-text: when a plain-text file is selected you will be presented with a text
field. Type in the separator that was used in the text document to define sections. A common example might be a “#” character. Any line in the document
that contains only the text entered into this box will be removed from the file
and used to split the results in two. This process continues, further splitting the
work into subsequent binder items, until all of these lines have been processed.
2. FDX: Final Draft files can be imported using this tool, and when they have been
selected the interface will change, giving you a selection of elements to choose
from. You can select any one element to split by, such as scene breaks. The
imported FDX file will be split into multiple binder items at these break points,
and the script formatting will be converted to Scrivener’s internal formatting.
11.2
Scrivener Services
Scrivener installs several services that aid in grabbing text from other applications
and getting them straight into Scrivener without having to worry about manually
opening Scrivener and then pasting in the text yourself. The Services menu is not
11.2. SCRIVENER SERVICES
81
found in the main menu bar, but in the Services submenu of the application menu
(which will be named according to whichever application currently has the focus).
In all cases, you will need text to be selected for the appropriate services to become
available. In versions of OS X prior to Snow Leopard, the menu options will appear
greyed out, but in all newer versions, they simply won’t appear until text is selected.
Services never show up: In some cases, you will need to log out of your account
and back in, after installing Scrivener for the system to properly register the services.
Where the clipped text shows up will depend in part on the service chosen. In all
cases, the active project (the last project in use, even in Scrivener is in the background)
will be used as a target, and in some cases the active document or split will be used as
the target. In all cases, you must have at least one project open for services to work.
If you wish to collect text into Scrivener, but do not yet have a project created, you
can use the Scratch Pad (subsection B.1.4) instead.
Each method has an alternate form that will bring the selected text in unformatted.
This can be useful when clipping text from the web, which often has inappropriate
text colour and other formatting applied to it. All methods include an optional titling
prompt. If you supply a separator or title, this will be placed into the document separating it from whatever content already existed. When using the formatted services,
this title will be emboldened.
The following methods are available:
Append to Current Notes Targets active document split.
Selected text will be appended to the active document’s Notes field, which may
not appear to do anything unless you have the Inspector open.
Append to Current Text Targets active document split.
Selected text will be appended to the active document’s main text area. If the
current document in Scrivener is not one that can hold text (for instance, if it is
an image document), the Scrivener icon will bounce and Scrivener will display a
warning panel telling you that you cannot append text to any open documents,
and asking if you would like to create a new clipping for the text instead.
Make New Clipping Targets active project.
Creates a new text document in the active project in Scrivener from the selected
text in the active application. Note that all new clippings are placed inside a
“Clippings” folder which will appear right at the bottom of the binder. This
service is slightly different from the above two in that the title you provide will
be used to name the clipping document that is created in the binder. A default,
date-based title will be provided in case you do not wish to bother with naming
them individually.
82
CHAPTER 11. GATHERING MATERIAL
11.3
Scratch Pad Panel
The scratch pad is a universal Scrivener tool that is not tied to any particular project.
You can use it to jot down any notes that don’t fit anywhere else, or that arise whilst
you are looking at another application. You can access it by selecting Show Scratch
Pad from the Window Show Scratch Pad menu ( – ), or you can use the Dock
menu by right-clicking on the Scrivener icon in the Dock and selecting “Scratch
Pad” (which will bring up the scratch pad over the currently active application). The
scratchpad is a floating panel, which means that you can have it open over the main
window (or in full screen) while you work on other documents or even other applications.
The top pane contains a list of all the note pads you currently have stored in the
scratch pad. New notes can be added by clicking the + button in the lower-left, and
notes you no longer need can be deleted with the delete button next to it.
When projects are open, the Send to Project... sub-menu will provide you with a
list of all opened projects. There are two ways of bringing notes into the project:
1. Append Text To: The contents of the selected note will be appended after any
existing text of the document you select in the project sub-menu. A list of your
entire binder will be arranged so you can easily select any text item. Note that
media files will not be listed since they can not have text appended to them.
2. Import as Sub-Document Of: A new document will be created beneath the selected document. This sub-menu operates in a similar fashion to the above,
though it will allow you to select any of the items in the binder since all types
can contain children. The name of the scratch pad note will be used to populate
the title field for the new document.
Since Scratch Pad does not store your notes in any projects, it uses ordinary RTFD
files, which by default will be stored in your Documents folder, under “Scrivener
Scratch Pad Notes”. These are ordinary files that you can edit with other programs,
or you can even make your own RTF files in this directory, making it possible to add
notes while Scrivener is not even open.
To change the location of where notes are stored, use the General preferences pane
(section B.1). You may also set up a system-wide shortcut that will make it possible to
toggle the visibility of this panel while in other applications. Scrivener must be open
for this to work.
Chapter 12
Project Planning
12.1
The Corkboard
The corkboard provides a familiar, visual way of viewing documents in your Binder.
You can arrange index cards in direct correlation with their order in the outline structure, or alternatively as a freeform corkboard where cards can be freely moved about
without directly impacting the structure of the book. We will explore the various
features in depth, shortly, but first let’s take a look at the index card itself.
In Scrivener, every document you create is a document and an index card and a
corkboard and an outline. This can be a little confusing at first, for in the real world,
an index card clearly cannot also be a corkboard. In Scrivener, though, you can choose
to view any document as a corkboard. Each index card on the corkboard represents
a document held within the selected document in the binder that is represented by
the corkboard itself. Another way of looking at it: the corkboard displays the subdocuments of the selected document as editable index cards. At the same time, the
document displayed as a corkboard or outline also is also an index card (which holds
the synopsis of that document), and itself could also be viewed as an index card on a
corkboard or a row in the outliner.
If that is as clear as mud, I’d recommend going through the Quick Tour (chapter 6),
which introduces these concepts in an interactive tutorial fashion.
12.1.1
So What are Index Cards, Anyway?
One of the issues that takes some adjustment to get used to is the relationship between
index cards and the text of the book itself. You can type titles and text onto the card
just like you would the real thing, but there is sometimes confusion as to why that
text doesn’t get dropped into the book.
So let’s take a look at what an index card really is. There are really seven different
components to an index card, but depending on your preferences you might not see
them all at once.
1. The document icon
2. The document location numeral
83
84
CHAPTER 12. PROJECT PLANNING
Figure 12.1: A fully loaded index card using the rounded card theme.
3. The title of the document
4. The synopsis of the document
5. The colour label (colour swatch in top-right corner)
6. The status stamp (diagonal text stamped across the middle)
7. Keywords indicators (swatches along the right)
At its most minimal, you’ll only see the first four of those, and the second can even
be turned off in preferences, leaving three core elements that cannot be removed.
The icon, as you might have guessed, correlates directly with the icon that is visible
in the binder. In most cases, this will be one of the variations of a folder or text icon,
depending on its content status, but in some cases it might be a custom icon if you
have supplied it with one, or if you are viewing a corkboard outside of the Draft, it
might be some kind of media file icon.
The title is simply what you would expect: it is an editable name of the item as
it appears in the binder, or in the header bar when you are editing it or view its
corkboard. The title is also used by the compiler if it has been set up to consider it,
but we’ll come back to that in a later section.
The synopsis is meant to be a brief encapsulation of what the document’s purpose
is, but beyond that you can use it for whatever you like. Some people use it to keep
track of the things they need yet to do, others keep notes about what they’ve written
so far, and some don’t even fill them in at all either just leaving them blank or letting
Scrivener automatically generate a synopsis from the first few lines of text. Whatever
you end up using them for, it is important to realise that they are separate from the
12.1. THE CORKBOARD
85
Figure 12.2: Corkboard options pane
actual text of the document, and in most cases what you type into them will not
appear in the final book. Use this to your advantage.
To edit either the title or the synopsis on a card, double-click in the text field you
wish to edit. Once editing, you can use Tab and Tab to navigate between cards and
their two editable fields, much like you would in a spreadsheet.
12.1.2
Using the Corkboard
(Material not finished)
12.1.3
Corkboard Options
The Corkboard Options pane contains settings which are specific to each split.
Changes made to this pane will only impact the active split they have been made
in, letting you have two entirely different visual appearances per editor split. Any
changes made will be saved with the project.
To access the pane, click on the “Corkboard Options” footer bar button, as shown
(Figure 12.2).
Size There are two ways of arranging index cards within a corkboard. The first is to
set the size of cards and then let the corkboard wrap the cards as they fit, the
second is to provide a number of cards you always want to see in each row, and
let the corkboard resize the cards to fit that number. When the latter method is
in use (see below, for setting that), the Size control will be disabled.
86
CHAPTER 12. PROJECT PLANNING
Ratio Determines the size ration between height and width. By default this will
be 3 x 5, in order to emulate the appearance of real index cards. If you write
very long or very short synopses however, you might find that adjusting this to
produce shorter or taller cards will be of benefit.
Spacing The amount of space that will be drawn between index cards, both vertically
and horizontally. To pack more cards into the display at once, move the slider
toward the left. To spread out the cards and make them more readable, move
the slider to the right.
This option is only available in linear corkboards.
Cards Across Set this to the number of cards you would like to appear in each row.
When this option is anything but “Auto”. Setting this option will disable the
Size slider.
This option is only available in linear corkboards.
Keyword chips Set the maximum number of keyword colours to be “taped” to the
left side of the index card. When a document has more than that amount assigned to it, all keywords below the specified point will be ignored. You may
wish to adjust the Ratio to increase the height of the index card, if you want to
view large numbers of keyword chips at once.
Size to fit editor This option is not available when “Cards Across” is set to Auto.
When the Cards Across option is set to a number, this option will resize
the cards to fit the current editor width, which was the default behaviour in
Scrivener version 1. With this option off, the card size option will be used, and
cards will be forced to wrap at the specified number regardless of the window
size.
This option is only available in linear corkboards.
Use small font The small font settings can be configured in the Corkboard preferences pane (section B.3). Note that since you have full control over this and the
standard index card fonts, “small fonts” might not actually be any smaller than
the regular font size.
12.1.4
Linear Corkboard
(Material not finished)
12.1.5
Freeform Corkboard
(Material not finished)
12.2. THE OUTLINER AND THE BINDER
87
Commit Order
(Material not finished)
12.1.6
Stacked Corkboards
(Material not finished)
12.2
The Outliner and the Binder
(Material not finished)
12.3
Project Notes
(Material not finished)
12.4
Capturing Ideas with Scratch Pad
The Scratch Pad is a floating window which can be called up or dismissed with –
, or the Window Show (Hide) Scratch Pad menu command. Read more about the
Scratch Pad Panel (section 11.3).
12.5
Custom Icons
(Material not finished)
Chapter 13
Cloud Integration and Sharing
It is becoming increasingly important to have the ability to make your work instantly
available everywhere you go, no matter what device you might currently be using.
Sharing files amongst a circle of colleagues, proofers, and editors is also becoming
common. In conjunction with the Simplenote1 network, you can distribute copies of
text items from your binder to your note network, and access them from anywhere
using portable devices or other Simplenote-aware applications. In addition, a generalised tool using simple files and folders has been provided, which can be integrated
with file sharing services such as DropBox2 .
Synchronization should always be done with care, no matter what method you
use. Computers will always do exactly what we tell them to do, even if the outcome
wasn’t what our original intention was. Whenever using automated syncing tools, be
sure to double-check your settings, and backup frequently. Scrivener uses automatic
Snapshots to protect your work by default. This can mean a lot of automated Snapshots may build up over time, but given the unpredictability of all the many factors
involved, it’s generally a good idea to leave it turned on.
13.1
Simplenote
The Simplenote Sync wizard allows you to easily sync documents in your Scrivener
project with Simplenote, so that you can work on or create documents while on the
go using an iPad, iPhone, iPod Touch or the Simplenote web application.
To use this feature, you will need to create a Simplenote account by downloading
the Simplenote app to your iPad, iPod or iPhone.
13.1.1
How It Works
Simplenote is a general purpose note-taking system and knows nothing of Scrivener
or Scrivener projects. When uploading documents to Simplenote, Scrivener therefore
places some information on the first line so that it is able to find and recognise these
documents again later, when you want to sync them. The information Scrivener
places on the first line is formatted like this:
1
2
http://simplenoteapp.com/
http://www.dropbox.com
88
13.1. SIMPLENOTE
89
MyDocumentName (MyProjectKeyword [ID])
--
“MyDocumentName” represents the document title as it appears in the binder,
“MyProjectKeyword” is the keyword you assign to the project in this wizard (see
below), and “ID” is an internal numerical ID that Scrivener assigns to all documents,
which users don’t normally see. In practice, it might look like this:
The Grand Finale (MyGreatNovel [756])
--
These three pieces of information in combination allow Scrivener to sync documents with Simplenote. You should therefore not edit this line in Simplenote. In
particular, if you edit the project keyword or numerical ID, Scrivener may not recognise the Simplenote text as belonging to the current project, or worse, it may try to
sync it with the wrong document in Scrivener. It is thus generally recommended that
you leave this line alone. However, you can edit only the document title (the part
before the parentheses), which will update the title in Scrivener when synced, if you
really want to.
13.1.2
Getting Started
Login details The Simplenote Sync wizard will first prompt you to enter your login
details. Enter the e-mail address and password which you used to register for
Simplenote. You can check “Remember in keychain” to have your login details
remembered for the future.
Project keyword Along with your Simplenote login details, you must also enter a
project keyword if you have not already chosen one. This is used by Scrivener to
identify documents in Simplenote that are associated with the current project.
You should choose a keyword that is meaningful to the project, easy to remember, and that is unlikely to occur on the first line of documents in general. For
instance, you might use a wordsJammedTogether version of your project title,
such as “MyGreatNovel”.
NOTE: It is important to understand that Scrivener has no way of knowing which
documents in Simplenote are associated with which Scrivener project without this
keyword, so it is up to the user to choose a unique keyword for each project. If two
projects have the same keyword, you could run into problems, with each trying to
sync the other’s documents in Simplenote.
90
CHAPTER 13. CLOUD INTEGRATION AND SHARING
Figure 13.1: Simplenote Sync: Configuration
The project keyword is also very useful for viewing notes in Simplenote, because
you can use it as a search term to filter Simplenote so that only documents from your
project are shown in its file list. In addition, Scrivener will add this project keyword
as a tag to each document, so you can view by tags to isolate notes corresponding to a
specific project.
Once you have entered your login details and ensured that a project keyword has
been supplied, click on Continue. You won’t be prompted for the project keyword
or login details next time you sync the project with Simplenote, but if you need to
changing anything you can return to this pane by clicking on the Change Settings
button in Step 1. Note that the project keyword is shown in the top right of the
wizard in steps 1 and 2.
13.1.3
Step 1: Synchronizing Existing Documents
You will next be asked to choose which documents in the project you wish to sync
with Simplenote. You can choose to sync all documents in the current project or
to specify individual documents. It is generally recommended that you don’t sync
all documents in a project, because this can clutter up Simplenote and severely slow
13.1. SIMPLENOTE
91
Figure 13.2: Simplenote Sync: Step One
down synchronisations. Because Simplenote notes are stored on the cloud (that is,
online), Scrivener has to download them into memory every time you sync, so the
more notes you have in Simplenote, the longer the sync process will take.
If you choose to identify the documents you wish to sync (as recommended), you
are presented with separate lists for documents contained in the Draft folder and all
other text documents in the project (Simplenote is text-only so you can only choose
text documents). You should go through and tick the documents you wish to upload
to Simplenote for editing while on the go.
All documents that have already been uploaded and exist in Simplenote will be
ticked for syncing automatically. The icons next to the document titles will tell you
what will happen when you choose to sync, as follows:
The following options are available.
Take snapshots of affected documents before updating When ticked, Scrivener
will take a snapshot of documents being updated before overwriting them with
the new version of the text. This ensures that you can return to the earlier
version if something goes wrong with the sync process. It is therefore highly
92
CHAPTER 13. CLOUD INTEGRATION AND SHARING
Icon
Meaning
Green check
The document is up to date both in the project and on
the Simplenote servers—the version in the project is the
same as the version in Simplenote.
The document will be uploaded. This indicates either
that the version of the document in the Scrivener project
is newer than the one in Simplenote or that it has not yet
been uploaded at all and is now selected for syncing.
The document will be downloaded. This indicates that
there is a newer version of the document in Simplenote
which will be downloaded in order to update the version
in the project.
The document needs updating in Simplenote. This green
asterisk appears if you choose (by deselecting) not to sync
a document that exists on the Simplenote servers but
which has been edited in Scrivener since the last sync.
If you select to sync the document, the asterisk will turn
into a green “up” arrow to indicate that it will be uploaded.
The document needs updating in Scrivener. This red asterisk appears if you choose (by deselecting) not to sync a
document that has a newer version available on the Simplenote servers. If you select to sync the document, the
asterisk will turn into a red “down” arrow to indicate that
it will be downloaded.
The document is not selected for syncing and does not
exist on the Simplenote servers.
Up arrow
Down arrow
Green asterisk
Red asterisk
No icon
recommended that you keep this ticked, as it provides a good degree of protection against losing work in cases where you have inadvertently made changes to
the documents both in Scrivener and in Simplenote between syncs.
Delete from Simplenote any project documents not selected for syncing When
ticked, Scrivener will delete from Simplenote any files that were previously
uploaded from this project that are no longer ticked for syncing. This is
recommended in order to avoid clutter and slowing down Simplenote.
Once you are happy with the documents selected for sync, click Continue.
13.1.4
Step 2: Importing Documents From Simplenote
The final part of the wizard allows you to choose to import documents that exist in
Simplenote but which do not yet have corresponding files in the project. Given that
Simplenote is a general purpose note-taking system, there may be many notes in your
13.1. SIMPLENOTE
93
Figure 13.3: Simplenote Sync: Step two
Simplenote account that you do not wish to import, including notes belonging to
other Scrivener projects. This pane of the wizard therefore contains two lists.
The first list contains documents that seem to have been marked as belonging to
this project. These are documents that contain the project keyword (see above) on
the first line of the note enclosed in brackets, and which were not detected as already
belonging to the project. This makes it very easy to create a document in Simplenote
and mark it for importing into a particular Scrivener project: just write the document
title followed by the project keyword in brackets on the first line of the note, e.g:
MyNewNote (MyProjectKeyword)
--
(The two hyphens on the second line are optional.)
Note that there is no numerical ID in square brackets in this case because that is
something only Scrivener can assign (and when you sync these documents, Scrivener
will indeed add a numerical ID). Do not try to guess and assign your own. The documents in this first list are usually all ticked by default. The exception are documents
that Scrivener thinks might have been deleted from the project but are still on the
94
CHAPTER 13. CLOUD INTEGRATION AND SHARING
server—such documents appear in this list but are coloured red and are not ticked.
These are documents that contain the project keyword on the first line and a document ID in square brackets, but for which the ID does match any existing documents
in the project. If you see notes coloured red in this list, the most likely explanation
is that you synced them in the past but have since deleted them from the project.
If you leave them unticked and have “Delete from Simplenote notes marked for this
project but not selected for syncing” checked, then these notes will be removed from
the Simplenote servers too.
The second list contains all other Simplenote documents, and these are not ticked
by default.
The following options are available:
Import selected documents into At the top of the “Import” pane you can choose
the folder in the project into which imported documents should be placed (the
Research folder is used by default). Only show containers in destination list
limits the documents shown in the list to folders and containers; if unchecked,
you can choose to import documents as the subdocuments of any file in the
project. (If you are unsure, just leave it ticked.)
Remove blank lines between paragraphs in imported notes Allows
you
to
choose whether or not empty lines should be removed in imported documents:
because Simplenote is plain text, it is common to separate paragraphs using
empty lines, but in Scrivener paragraphs are less likely to need blank lines
between them. (Note that when uploading documents to Simplenote, Scrivener
automatically places blank line padding between paragraphs to make them
easier to read in Simplenote.)
Delete from Simplenote notes marked for this project but not selected for syncing
When checked, any notes that appear in the “Notes marked for this project” list
that are not ticked for syncing will be removed from the Simplenote servers.
(Given that this could result in the deletion of the only copies of such notes,
you will be asked to confirm this deletion during sync.)
Once you are happy with the documents you have selected for synchronization
and import, click on Sync. You can choose Go Back at any point to make changes.
13.1.5
Clearing Out Simplenote
When you’ve reached a point in your project where you no longer require external
syncing, or would for any other reason like to clear off everything belonging to your
project, it is very easy to remove everything from the server pertaining to the project.
Before following these instructions, it might be a good idea to run one last sync
to make sure everything is up to date. Then, simply make sure the “Delete from
13.1. SIMPLENOTE
95
Simplenote notes marked for this project but not selected for syncing” is enabled in
Step 1 and Step 2, and then Click on any file checkbox currently enabled. This will
de-select everything and wipe out the related notes on Simplenote when you click the
Sync button. Note that nothing in the project will be impacted when you do this, it
will only clear out the associated notes on the Simplenote server.
13.1.6
Using Simplenote Tags
When syncing files, Scrivener will assign two tags to each file:
1. The tag: “Scrivener”, which will make it easy to find all files associated with
any Scrivener project.
2. A tag corresponding to the project keyword you selected above, making it easy
to filter your note list in the Simplenote application by project.
You can also add new documents to the project from Simplenote by simply adding
the project keyword tag to that document. When using this method, you needn’t
supply the project keyword in parentheses after the title; Scrivener will add it for
you.
13.1.7
Limitations
Formatting Note that Simplenote, like most mobile note-taking solutions, can only
store plain text, so all formatting—bold, italics, line spacing and so forth—will
be stripped in the versions of documents stored in Simplenote. Thus, when
updating documents in a project with corresponding versions that have been
edited in Simplenote, the following formatting limitations apply.
§ Scrivener maintains the formatting of paragraphs within a note that have
not been changed.
§ Any paragraphs that have been edited in Simplenote will lose their formatting in Scrivener.
§ Images will be stripped from documents that have been edited in Simplenote.
§ To avoid having inline notation become confused with standard text,
Scrivener will export inline annotations by wrapping them in square ([
and ]) brackets. Inline footnotes will be similarly wrapped in curly braces
({ and }). However since Scrivener only updates changed paragraphs, unless
you edit a paragraph with one of these types, no loss of notation should
occur in the rest of the document. In the case that you do edit a paragraph
with notes in it, the bracket notation will be retained so that you can manually fix the formatting. A helpful tip to remember is that you can copy
and paste from snapshots.
96
CHAPTER 13. CLOUD INTEGRATION AND SHARING
§ Inspector comments and footnotes will not be exported. If the retention
of this information is important to you, it is recommended you use inline
notation with plain-text. You can easily convert your notes to inline with
the Format Convert tools.
Number of Notes At the time of writing, Simplenote is limited to syncing 2,000
notes a day. Although this sounds a lot, if you end up syncing the entire contents of ten projects that contain 200 text documents, you can soon end up with
a lot of notes in your Simplenote account. It is therefore strongly recommended
that you only sync the documents you need for working on while away from
Scrivener, and that you ensure the option is ticked to trim documents that are
not being synced. This will also help ensure that syncing remains as fast as
possible.
13.2
Synchronised Folders
Scrivener lets you prepare a special external folder on your disk, which it will use to
keep the text contents of a project up to date as changes are made to the contents of
this folder. Because it works with simple flat list of files and a few built-in folders,
the format is uniquely suited for integrating with various folder sharing services such
as DropBox, SugarSync, MobileMe, and others. Using this feature, you can share
your work in progress with collaborators, agents, or editors, and later read back any
changes they have made directly into your project. Additionally, you could use the
feature in conjunction with mobile applications which are aware of DropBox, making
it possible to edit your project’s content on an iPad or iPhone, and later merge those
edits with your main project.
Important Note
Note that this feature is not intended for keeping two versions of the same project in
sync and should not be used in such a manner - you should never try to sync two
different projects with the same folder. Rather, this feature is intended to allow you
to edit or share project files with other applications or on other platforms, and then
to have any changes made to the shared files reflected in your Scrivener project. It also
cannot be used to perform structural or outline order modifications, just simple text
content modifications.
13.2.1
Setting it Up
To access the feature, select the menu item, File Sync with External Folder.... A sheet
will drop down in the active project with some basic settings.
The first thing you will need to do is select a new, empty folder which Scrivener
will take over and use for syncing files with this project from this point forward.
Click the Choose... button (1), and navigate to the location where your cloud service
13.2. SYNCHRONISED FOLDERS
97
Figure 13.4: Sync External Folder Sheet
keeps your computer synchronised. For DropBox users, this will be the DropBox
folder in your home directory. Keep in mind that the folder you create will need to
be dedicated to this Scrivener project, and so must be initially empty. When you sync
documents with this folder, Scrivener will create one or more of the following three
subdirectories to store the synced files:
§ “Draft” - stores documents contained inside Scrivener’s Draft folder.
§ “Notes” - stores text documents contained elsewhere in the project.
§ “Trashed Files” - stores documents that had been synced but have since been
removed from Scrivener, or which had some sort of conflict. You should occasionally review these files and trash them if they are no longer required.
98
CHAPTER 13. CLOUD INTEGRATION AND SHARING
Do not select a folder which has already been used to synchronise another
Scrivener project! The only time you should choose an existing Scrivener sync folder
is if you are certain it is for the same project, and that you have total control over the
project (it isn’t being edited by anyone else with a copy of the project). It is safe to
transfer your Scrivener project from one computer to another, and then use the same
sync folder to share changes made on the second computer. While the project will
save your sync folder selection, the second computer might have a different address
to that spot and require you to reselect it. In that case, you will get a warning when
choosing the folder, but you can dismiss the warning and safely continue.
Using this feature in an attempt to merge projects, or to have more than one person
using a copy of the project, could result in lost data or confusing results. When in
doubt, always create a new folder.
This feature provides the following options:
Sync the contents of the Draft folder Enabled by default, the entire Draft folder
will be kept in sync with the folder when this is on.
Sync all other text documents in the project Keep the rest of the project up-todate with this option. Note it will only work with text files. Enabling this
option also activates the Import settings, below.
Sync only documents in collection If this is selected, only documents that are contained in the collection specified in the pop-up list next to this checkbox will be
kept in sync with the folder. This essentially acts as a filter for the other two
above “Sync” options. For instance, if “Sync the contents of the Draft folder” is
selected but “Sync all other text documents” is not, and if this option is selected,
then only documents that are contained in the Draft folder and in the specified
collection will be synced.
Use file numbering By default, Scrivener will prefix each filename with a numeral
corresponding to its position in the binder. This will keep your files in the same
order as the binder, making them easier to find. Disabling this will remove the
number and the contents of the folder will be subject to ordinary alphanumeric
sorting based on the names of your binder items.
Take snapshots of affected documents before updating Enabled by default. With
this option turned on, Scrivener will automatically generate snapshots of each
document if it requires updating. If you prefer to handle snapshots manually,
you may want to turn this off. However be aware that leaving it on is the safest
option, particularly when both items have been accidentally edited separately.
Since Scrivener cannot determine which is meant to be the most up-to-date
other than by the file modification date, having snapshots available will allow
you to review the specific changes and decide how to manage conflicts should
they occur.
13.2. SYNCHRONISED FOLDERS
99
Check for changes in external folder on project open Enabled by default. When
this project is opened, it will briefly scan the contents of the external sync folder
and alert you if there are any changes detected, offering you the ability to update
your project immediately.
The Import section allows you to choose where files that have been created in the
Notes folder outside of Scrivener will be imported. You can select a target container
(Research by default), or uncheck the “Only show containers” option to choose any
item to become a container for imported files. This section will be disabled if “Sync
all other text documents in the project” is turned off, above.
The Format section determines how the files will be created in the sync folder.
Because script writers might not want to use a script format for notes and research
documents, there are separate options for files stored in the Draft folder and other
files in the project. There are three file formats available, and depending on your
intended purpose, selecting the right option will be important:
§ Rich Text (RTF) This provides the cleanest transfer of information. Most formatting will be retained, especially when used in conjunction with a word processor
that handles all of Scrivener’s RTF features, such as Word or Nisus Writer. This
is the best option for collaborating with other individuals who do not have access to Scrivener, or for working in a multi-platform setting yourself. (Note
that all versions of Microsoft Word fully support the RTF format.)
§ Plain text (TXT)Formatting will be stripped when using this option. The
resulting files will be standard, plain-text files in the UTF-8 format. If they
are edited outside of Scrivener, when synced back in, all custom formatting in
paragraphs that have been edited will be lost. Scrivener will protect those areas
of the files which have not been edited, wherever possible. Scrivener does its
best to retain as much formatting as possible when re-syncing, but if formatting
is as important to your workflow as synchronising, then you will either need to
find a solution that can take advantage of RTF files, or save formatting for the
final stages in your writing project.
§ Final Draft (FDX) Those working with Final Draft and scriptwriting mode
should use this setting, as it will retain all special script formatting in a roundtrip.
Automatically convert plain text paragraph spacing When this option is engaged,
Scrivener will intelligently convert your documents’ paragraph spacing to better suit the intended environment. Since Plain-text editors cannot display
pseudo-spacing between paragraphs, this option will insert a second carriage
return to help set them apart from one another. Upon import, these extra carriage returns will be removed for you.
100
CHAPTER 13. CLOUD INTEGRATION AND SHARING
Using Folder Sync with the iPad and iPhone: If you intend to use this feature
in integration with Dropbox and the iPad or iPhone, you should always use the
plain-text format. At the time of this writing, there are no Dropbox aware editors
on the iOS that can read RTF files.
Keep this setting turned off if you require a certain standard, one way or the other,
and do not want Scrivener to adjust things for you. In particular, those working
in the MultiMarkdown workflow require double-spaced paragraphs, and so will not
want Scrivener to remove these spacings upon import. Note that this option only
affects plain text (TXT) documents.
Additional settings which impact export and import can be found in the application preferences, under Import & Export. If you prefer to work with inline annotations
and footnotes, make sure the default setting in this pane has been changed, otherwise
your RTF comments will all become Inspector comments after a sync cycle. For
further documentation on this pane, see Import & Export Preferences (section B.9).
13.2.2
Usage
After clicking the Sync button for the first time, Scrivener will export a copy of every
item according to the options above. If the export folder is located in an area where it
is accessible to other computers and mobile devices, you can log on to DropBox with
your external application and start browsing the files as soon as they finish uploading.
Note that folders in the Scrivener project will appear as ordinary files in the sync
folder, because Scrivener folders can contain text.
Scrivener will export all items associated with your manuscript into the Draft folder.
If you choose to export non-Draft files, everything else will be placed into the Notes
folder. If you intend to start editing these files immediately, it would be a good idea
to close your Scrivener project at that point. While Scrivener will make scrupulous
copies of everything it changes (unless you’ve disabled snapshot generation), it’s best
to work in an alternating pattern to reduce confusion between which file is the most
up to date.
In a collaboration environment, it may not be possible to wait until the other person is finished. It is safe to work in both the project and the exported copies at once,
so long as changed files are looked over after syncing. In most cases Scrivener will
select the best option for you, but in cases where both you and your colleague have
changed the file in between syncs, you might need to resolve the differences using
Snapshots and the Compare feature. For more information on using Snapshots, see
the Snapshots Pane (subsection 17.4.4).
When performing a folder sync, only resources which have changed (either in the
project or on the disk) will be synchronised, to save time. In the case where project
binder items have been updated from the disk, a list of these changed items will be
presented to you upon completion. The list will not contain items which have only
13.2. SYNCHRONISED FOLDERS
101
changed on the disk. Use this tool to browse through the changed items and review
them with the Snapshot Compare feature. This interface is much like Project Search,
and can be dismissed by clicking the X button in the bottom corner of the binder
footer bar.
For those that want to dig a little deeper, this is really a Collection that will be
created and titled “Synced Documents”, with each changed project document added
to it. Every time sync needs to change project files, it will look for a Collection named
“Synced Documents”, and replace the contents of it with the results of the latest sync,
so if you wish to retain a list of changed files for future reference, change the name of
the Collection to something else.
New files can be created while you are away from your project. Simply name
them whatever you would like them to be called in the binder, and save them to
the Draft or Notes folder. Scrivener will import files created in the external Draft
folder into the project’s Draft folder, and files created in the external Notes folder
into the designated auxiliary container (Research by default), when you sync. Initially
they will be imported at the bottom of their respective containers, but once you sort
them to their proper location, they will sync from that point forward in an ordinary
fashion.
When you have returned to your computer and wish to integrate any of the changes
made, simply load the project in Scrivener. It will, by default, check for any changed
files and alert you that your project is out of date. If you have this option disabled, or
the project is already open, you can manually activate the sync panel again, using the
menu item, and click the Sync button. Moments later, your project will be updated
with all of your external changes.
13.2.3
Tips for Working with Synced Folders
Here are a few guidelines which, if followed, will prevent problems in everyday use:
§ Alternate between external files and the project. This is a rule of thumb, not a
strict rule. Scrivener reads the modification date of each file, and uses the latest
one to determine which should be the binder copy. It does not examine the
contents of files. It is thus best to alternate between using the external files,
and the project folder, rather than working in both separately for a while, and
trying to merge them later.
§ Never try to sync one project’s folder with another. Even if those two
projects originally came from the same identical project, over time there will
be differences in each project that you cannot see, and these differences will
lead to confusing results at the best, and a loss of data at the worst. A sync
folder is meant to allow you to work without Scrivener for a while, and then
come back later and update your project with those changes. If you try to break
this rule, you will be warned by a dialogue box.
102
CHAPTER 13. CLOUD INTEGRATION AND SHARING
§ When working from multiple computers sharing the same sync folder, always make
sure your project file is the most current. It is perfectly safe to use the same project
to sync to a shared folder from multiple computers provided you are always
using the most recent version of the project and are not trying to bend the
feature to sync two different versions of the project (see above). You will receive
a warning dialogue the first time you try on each system, but in this one case it
can be ignored.
§ Avoid editing the filename. The numeric value on the very end of the filename
enclosed in hyphens, such as “-78-” (the precise number will be different for
each item), is vital to keeping the file identifiable by the item it is linked with
in the project; damaging the number could produce unintended duplication, or
data loss in some cases3 .
§ Session target goals will include synced changes. When updating project files with
external edits, the session target will be incremented by the amount of text that
has been added. If you wish to keep track of your session target separately, you
might wish to reset the counter after updating your project.
§ If using mixed inspector comments and inline annotations: When using sync folders, it is best to use either all Inspector footnotes and comments, or all inline
annotations and footnotes, and set your Import & Export preferences accordingly. In some rare cases, comments adjacent to annotations can result in one
of the notes getting lost, due to the limitations of the RTF format.
Dropbox and iOS: When using Dropbox with the iPad or iPhone, you can elect
to have documents stored on your device. Ordinarily, you need an active Internet
connection to view files, but when a file has been marked as a “Favorite” it will be
stored on your device for perusal at any time. Note that if you are using a thirdparty editor to interface with Dropbox and allow remote editing, this trick will
not work, but many of these editors store their text files on your device as well,
and any changes made to them will be synced the next time you have an Internet
connexion.
If you are using this feature in conjunction with another author or editor, make
sure to communicate these ground rules with them where relevant. Since it is not
possible for Scrivener to guess at your intentions, good communication over where
new files should go, and what is being independently worked upon will be beneficial.
3
You can safely edit the filename so long as the dashed number is untouched. When a file has been
edited in the sync folder, if the binder name portion of the filename is changed, the sync function will
update the binder with the new name. This is considered an advanced feature, however, to be used with
care. Note that changing the sequence number will have no effect on the binder order. Also note that
if all you changed is the filename, nothing will happen due to the way modification dates are stamped
on the filesystem. Advanced users could use the UNIX command, touch, to force an update.
13.2. SYNCHRONISED FOLDERS
13.2.4
103
Limitations
RTF Format Limitations: When using the RTF export format, you can expect zero
to minimal loss of formatting information when used in conjunction with a good
word processor. There are a few features in Scrivener that have no comparison in
RTF, such as multi-colour annotations and comments, and Scrivener links, which
will be normalised or lost, respectively.
§ If you use sequential annotations separated only by colour, it would be a good
idea to move them so that they have a word or two in between them, or separate
them by putting them on different lines.
§ Expect loss of some features when using RTF editors that do not fully support
the RTF specifications, such as TextEdit, Pages and similar. Footnotes, comments, lists, images, and tables are the most common items which have limited
support. Using fully-featured word processors with good RTF support, such as
Word or Nisus Writer Pro will help you avoid this, and even be quite useful as
comments can be used to aid in the collaboration process.
Plain-text Limitations: Since it is impossible to convey formatting in plain-text
without some sort of visible mark-up, Scrivener takes steps to protect as much of
your formatting as it possibly can. As with RTF, only those files which have been
edited will be transferred back to your project, but further, each changed file will
be analysed at the paragraph level and only replace those paragraphs that have been
changed, leaving the rest of the file untouched with its original formatting.
§ To avoid having inline notation become confused with standard text, Scrivener
will export inline annotations by wrapping them in square ([ and ]) brackets.
Inline footnotes will be similarly wrapped in curly braces ({ and }). However
since Scrivener only updates changed paragraphs, unless you edit a paragraph
with one of these types, no loss of notation should occur in the rest of the
document. In the case that you do edit a paragraph with notes in it, the bracket
notation will be retained so that you can manually fix the formatting. A helpful
tip to remember is that you can copy and paste from snapshots.
§ Inspector comments and footnotes will not be exported. If the retention of
this information is important to you, it is recommended you use inline notation with plain-text. You can easily convert your notes to inline with the
Format Convert tools.
§ Inline images will be stripped from documents that have been edited outside of
Scrivener.
104
CHAPTER 13. CLOUD INTEGRATION AND SHARING
13.3
SimpleText.ws
The SimpleText.ws service is very simple, and only supports one-way import access
to files which have been created with tools that support the SimpleText.ws4 environment.
The feature can be found in the File Import From SimpleText.wsmenu item (subsection 11.1.5).
13.4
Index Card for iPad
(Material not finished)
4
http://www.simpletext.ws/
Part III
Writing
105
106
CHAPTER 13. CLOUD INTEGRATION AND SHARING
When it comes to the process of writing itself, nobody can tell you how it should be
done. Each author has their own methods, their own rituals, and their own favourite
tactics. Scrivener was designed to recognise that everyone is different, and as a result
the program features an extraordinarily amount of flexibility and interface power.
You will find workflows and tools for all manner of writing projects, from a doctoral
thesis, to a novel, to a collaborative scientific article, to biographies, and much more.
Because of this, you will find that there are many features you just won’t need! That is
fine, because Scrivener has also been designed to keep these features out of your way
unless you need them.
This section contains a few chapters which could be considered optional. In particular, screenwriting, collaboration, and bibliographies can be safely skipped unless
your works require these functions.
Everyone should read the chapter on Writing and Editing, as this will introduce
the full power of the editor, and if you haven’t already done so, at least skim the prior
section on preparation. Vital concepts have been introduced there, and many of the
following chapters will build off of those concepts.
The topics that will be covered in this part are:
§ Writing and Editing (chapter 14): Full documentation of the various editor
views, full screen, formatting, layout, and tools to enhance the editing and revision processes.
§ Full Screen (chapter 15): Scrivener’s full screen feature. Wipe aside all distractions and just write!
§ Searching and Replacing (section 14.5): How to search for information in your
project, and perform powerful project-wide search and replace actions.
§ QuickReference (chapter 18): Taking QuickLook to the next level. Open items
in persistent, editable windows. When two splits aren’t enough, use QuickReferences.
§ Annotating and Marking Your Text (chapter 16): Learn how to comment as
you write using either Scrivener’s exclusive in-line annotation tool, or linked
comments. Also covers footnotes/endnotes; marker highlighting; and revision
pens.
§ Inspector (chapter 17): All about the inspector, which displays document metadata, notation, references, and more.
§ Scriptwriting (chapter 19): While Scrivener is not meant to replace an industrial strength scriptwriting tool, it can still function as a very adept first-draft
scriptwriting solution, and produce exports which will work seamlessly in industry standard applications, like Final Draft.
13.4. INDEX CARD FOR IPAD
107
§ Bibliography Management (chapter 20): If your book requires extensive citation management, Scrivener has methods for integrating with the most popular
citation databases.
§ Backing Up Your Work (section 7.6): Avoid the catastrophe of lost data.
Scrivener’s automated backup service will keep your data safe. Also learn about
manual backups.
Chapter 14
Writing and Editing
Scrivener uses the standard OS X text engine for rendering its text, and therefore all
of the features of OS X’s rich text editing system (which are showcased in Apple’s
TextEdit application) are available1 . Scrivener also provides some extra basic word
processing features. Most of these features are available via the Text menu, so it is
recommended that you familiarise yourself with the Text menu help section (section A.3).
The text engine, and Mac OS X: Please note that because Scrivener uses the OS
X text system, its behaviour in this regard is defined by Apple. The way doubleand triple-clicking on text works, the occasional awkwardness of features such as
tables and bulleted lists, font changes and so forth, are all governed by the OS X text
system, which is programmed by Apple and is out of my hands. On the other hand,
this also means you get access to many sophisticated tools which would otherwise
take years to program.
14.1
Rich Text Editing Philosophy
Scrivener supports a rich text editing environment, which means that it is loosely
“what you see is what you get”. Unlike word processors or desktop layout applications, however, the precise formatting that you use when writing in Scrivener may in
fact look nothing at all like the final product. The compiler will be covered in greater
detail in a later section (chapter 25), but suffice to say that you can work in one font,
say the default Optima, but publish in an industry standard font like Courier, without having to change your source text. What this means for you is that certain aspects
of your editing can be conveyed through the compiler, like a range of italicised text,
while the base font itself can be changed beneath that. Scrivener’s editor can thus
be used like a typical word processor, but with the knowledge that rich text formatting can be altered later on to produce different results. Scrivener is not intended
to be a full-blown word processor, but rather a word generating environment. It is
1
The only exception to this is that in Scrivener, you are not allowed to paste QuickTime files
into the text. This is because of a bug in OS X that can cause crashes or strange behaviour when a
QuickTime file is contained inside a single piece of text that is being viewed in two panes, such as
Scrivener’s split view.
108
14.2. EDITING BASICS
109
not a layout tool, but a tool for cutting the text that will become your book. Many
authors who have stricter formatting requirements, such as scriptwriters, will start
their projects in Scrivener, and end in a word processor or desktop publishing, or
some other specialised application.
You might be wondering if Scrivener offers a plain-text editing environment as
well. There is no plain text option, as Scrivener is a writer’s tool rather than a strict
text editor, and many of the tools that are made available to you for writing rely upon
rich text to function, such as highlight, annotating, and marking revisions. Even if
you do not require formatting, you will probably find the formatting tools useful in
the writing process, especially if you are compiling to plain-text, where they will all
be safely stripped out and invisible to the reader.
Emulating plain-text: If you find working in a plain-text environment to be more
productive, you may wish to set the default font in Formatting Preferences to one
that does not support rich text features, such as Monaco (Monaco 10-point is used
by most plain text editors on the Mac), and change the ruler settings so that there
are no indents or paragraph spacing. This set-up will emulate a plain-text environment whilst still allowing features such as annotations and highlighting.
Someone writing a novel or short story could very well do the whole thing in
Scrivener, including the final print for submission and export to Word format for
sending an electronic copy. Other writers are likely to export from Scrivener and
then use an intermediary tool dedicated to the sort of formatting they require to
prepare the final draft. Scrivener concentrates on the drafting stage of a long text; it
is not intended to replace your word processor entirely.
When using MultiMarkdown to format your work, you will find that some formatting, such as inline images, footnotes, and so forth will be converted to MMD
markings during compile. Most formatting, however, will be stripped and thus can
be useful in an annotation setting.
14.2
Editing Basics
If you are unfamiliar with OS X’s standard text engine, it might be a good idea to
take a look at the Help file of TextEdit (which can be found in your computer’s
Applications folder), which covers the basics of text editing on OS X in some detail.
The bare essentials can be found below.
14.2.1
§
Keyboard Shortcuts and Modifier Keys
ArrowKeys:
Extend current selection in the direction of the arrow key that is
used.
§
LeftArrow or RightArrow:
Extend the selection by word.
110
CHAPTER 14. WRITING AND EDITING
§
UpArrow or DownArrow:
Extend the selection by paragraphs.
§
– UpArrow:
§
– DownArrow:
§
– LeftArrow or RightArrow:
Select from the caret position to the top of the editor.
Select from the caret position to the bottom of the editor.
Select from caret position to beginning or end of
line respectively. Note the definition of line is not paragraph. To select to the
beginning or end of the paragraph, use
UpArrow or DownArrow.
§
MouseDrag:
Extend the current selection using the mouse.
§
– MouseDrag:
By holding down the Command key and selecting using the
mouse, you can select several areas of non-consecutive text.
§ Double-click: Select word. Can be used in conjunction with dragging to select
a range by word.
§ Triple-click: Select paragraph. Can be used in conjunction with dragging to
select a range by paragraph.
14.2.2
Contextual Menu for the Text Editor
The text view’s contextual menu contains the standard OS X text view contextual
menu commands such as Cut, Copy, Paste, Spelling and so forth, along with several
commands specific to Scrivener. Several common tools, such as Spotlight searching,
dictionary access, and selected word/character counts2 , and so forth have been moved
to the Writing Tools sub-menu. If a selection has not already been made, right-clicking
will select whatever word was under the mouse pointer.
In addition to the basic system tool, there are also a number of additional commands available. The Scrivener-specific commands (the appearance of which will depend on the selection) are listed below:
Text Editing Contextual Menu
§ Split at Selection: Splits the current document into two documents at the selection point (the current blinking cursor point, or the initiating edge of the
selection, which will be on the left by default, or on the right when using rightto-left languages).
§ Split with Selection as Title: Splits the current document into two documents
using the current selected text as the title for the newly created document. The
selection will remain after splitting, making it easy to remove the redundant
2
Users of version 1 will want to note that the footer bar now counts word and character counts
for the active selection, whenever a selection is made in the editor. This menu counter is available for
scriptwriters, and others who have disabled the footer bar view.
14.2. EDITING BASICS
111
title text if necessary, or style it like a header. For more details on splitting documents, read Managing Documents with Split and Merge (subsection 14.3.2).
§ Append Selection to Document: Provides a menu of all documents in the binder.
Selecting a document from this menu will cause the selected text in the editor to
be appended to the document selected from the menu. Read Gathering Material
(chapter 11) for more tips on moving text around and organising information
in the Binder.
§ Set Selected Text as Title: Sets the title of the current document to the text selected in the editor.
§ Add Selection to Auto-Complete List: Adds the selected text to the project’s
auto-complete list, which can be maintained with the Project Auto-Complete
List... menu command. Read more about this feature in Auto-Completion (section 14.11).
§ Scrivener Link: Allows you to create a link to another document in the project
within the text. Read more about linking items together in Scrivener Links
(section 9.5).
§ Text Color: Provides the text colour menu, from which you can select from
the built-in colours, or those custom colours you have saved into your colour
palette.
§ Highlight: Provides the highlight menu, allowing you to select a highlight
colour for the selected text, or to clear it. Read more about this and the above
feature in Text Colour and Highlights (section 16.3).
Images Contextual Menu
These options appear when right-clicking on an image that has been placed within
the text stream (subsection 14.4.6).
§ Save As Picture. . . : Available if you have clicked on an inline image. Allows you
to save the image to disk. You can also drag images into the Binder.
§ Scale Image. . . : Available if you have clicked on an inline image. Brings up the
image scaling panel. Read more about Inline Images, here (subsection 14.4.6)
Linked inline images (section 14.4.6) also provide the ability to edit the image in
your default image editing software, via Open in External Editor.
112
CHAPTER 14. WRITING AND EDITING
Tables Contextual Menu
When right-clicking within a table in the editor, additional options will be provided:
§ Table. . . : Accesses the standard OS X table palette, which provides formatting,
cell dimension, and nesting, and cell split and merge features.
§ Add Row Above/Below: Will insert a new table row of empty cells above or
below the row in which you right-clicked.
§ Add Column Before/After: Inserts a new table column of empty cells to the left
or right of the column in which you right-clicked.
§ Delete Row/Column: Will delete the entire row or column in which the cell
you right-clicked upon is located.
§ Borders: This sub-menu provides some handy border tools.
§ Distribute Rows/Columns Evenly: Adjusts the height or width of all rows or
columns so that every cell has the same dimensions.
14.2.3
Spell Checking
Scrivener uses OS X’s built-in spell checker. Spell checking as you type can be turned
on or off via the Edit Spelling and Grammar sub-menu or by hitting – \. You
can use the contextual menu to get suggested spellings for selected words, or use the
spell checker (also available in that sub-menu). When “Check Spelling as You Type”
is turned on, words that OS X thinks you have misspelled are underlined in red.
14.3
Editing with Scrivener
Beyond the basics of text editing, which are common to many applications, Scrivener
provides further tools, specifically designed for writers, in its editor interface. The
rest of this chapter will focus on these tools in a comprehensive fashion, where you
can glance through the list of topics covered and pick which items you feel are best
suited to your writing style and the task in hand. You could read this section cover
to cover, but it is mean to be a collection of individual nuggets that you can learn
independently, as you gradually build up your knowledge of the application.
14.3.1
Scaling Text
The text of the editor can be scaled up and down, without affecting the font size, via
the ability to zoom the scale of the text. Each split can have its own zoom setting;
additionally the full screen mode can have its own independent zoom setting as well.
All of these settings are preserved between sessions and saved into the project file
itself.
14.3. EDITING WITH SCRIVENER
113
In the standard text editor interface, zoom can be set using the zoom tool in the
footer bar (section 14.7). In full screen, this same tool is provided within the HUD
(section 15.2). You can also use the menu commands:
1. View Zoom Zoom In (
2. View Zoom Zoom Out (
– .)
to increase the size of the text.
– ,) to decrease the size of the text.
If you prefer to always work from a certain zoom setting, the default zoom level
for both standard editors and the full screen editor can be adjusted in the Editor
preference pane (section B.6), and the Full Screen preferences pane (section B.4), respectively. Note that this setting will impact all new projects, or recently upgraded
projects, not projects that have already been created.
14.3.2
Managing Documents with Split and Merge
The ability to expand and contract the outline in a fashion which best suits how you
work is important, and Scrivener provides several tools which make it easy to fashion
your outline into as broad or detailed a map as you require.
Before discussing the specific tools which let you cut apart documents or sew them
back together, it would be useful to also discuss a few methods that you can use to
mitigate the regular need for these tools.
When you wish to merge two or more documents together, it is good to ask
whether or not this action is necessary. With most applications, and thus the habits
we have cultivated from using them, the answer to whether or not one should merge
is, yes. However Scrivener offers two powerful answers for the merging problem.
First, for visualising smaller pieces of a document as a single document (section 14.13),
but only temporarily, you can select any container in the binder, or even just a scattering of items, and choose to view and edit them as a single document. Second,
the compilation (chapter 25) system enables you to publish your final manuscript as a
single document, no matter how many pieces it may be divided into within Scrivener.
For splitting long documents, in some cases you may be able to utilise two import tools which do most, if not all, of the splitting for you. The first tool,
File Import Import and Split..., will let you supply a separator, or a string of characters. Whenever Scrivener encounters this separator, it will automatically start putting
the remaining content into a new binder item, continuing to split into new binder
items until it runs out of material. The second tool, special for MultiMarkdown users,
is File Import MultiMarkdown File.... This tool will examine the incoming file for its
header structure, and not only split files between headers, but title them according to
those headers, and even reconstruct the hierarchy of the original document.
For most other cases, read on.
114
CHAPTER 14. WRITING AND EDITING
Splitting The Document
Often, when importing material that you have composed in other applications that
do not support an easy to use built-in outline, your text will arrive in Scrivener in one
large chunk. Where you choose to break this long document apart is up to you, and
the split tools make it easy to do so.
To split in a document into two pieces, you will first need to place the caret at the
precise point in the document where you wish to split it in two. If you select a range
of text, the start of the selection will be considered the caret point, for purposes of
splitting. Once the selected location has been chosen you can use one of two methods
to split the document:
( – K) This will create a new document directly below the current document in the outline. The new document will contain everything that follows the caret position, and this material will be removed from
the original document. It can be useful to think of splitting in terms of “above”
and “below” the selection. Everything above the caret (and also to the left if in
the middle of a line) will remain in the original document, while everything to
the right and below of the caret will be moved to the new document.
Documents Split at Selection
After splitting, you will be given the option to name the new document in the
Binder.
(
– K) This alternative method will only
appear when a range of text has been selected in the editor. This method works
identically as at Selection does, only the selected text will automatically become
the title of the new document. This text will remain selected after you split,
making it easy to remove it, or style it as a header.
Documents Split with Selection as Title
Pro Tip: You might also find the ability to search by formatting (subsection 14.5.2)
to be of use as well, as often the places you will want to split the document will
coincide with headers. While the Find by Format panel is open, you can use the
Split with Selection as Title function without closing it, and then quickly go to the
next search result within the portion that has been split off. If you wish to use
– K to split the
keyboard shortcuts, this means you can alternate between using
found text, and
– G to skip to the next search result.
When splitting documents, all meta-data will be carried over to both documents.
The only exception to this will be any snapshots. They will remain attached to the
original document (everything falling before the split point), and can thus be useful
in seeing what a document looked like before it was split up. It is thus a good idea to
set up any common meta-data before you start splitting up a document.
It is not possible to undo a split action, but you can use the Merge feature to effectively undo any unwanted splits.
14.3. EDITING WITH SCRIVENER
115
Merging Documents Together
In opposition to splitting, the ability to select two or more documents and merge
them together into a single document is also made easy with Scrivener. Unlike the
split function, merging is a super-document level action, and thus requires a selection
to be made in a Corkboard, Outliner, or Binder view, or from within a Collection.
Documents do not have to be in consecutive order, they can be picked from
throughout the project. When selecting non-linear items, here are some tips to determine ordering:
§ If the view you are picking documents from is based on the outline order (such
the Binder, Outliner, or Corkboard3 ), then the merged document will retain
the original outline order.
§ When using a Collection to select items, the collection order will be used to
established the structure of the merged document.
When it comes to merging, Scrivener will attempt to retain as much meta-data is is
logically possible. The Synopses, Notes, Keywords, and References will be concatenated together, much in the same fashion that the main text will be. Meta-data which
cannot be combined (such as Title, Label, any custom meta-data, compile option flags,
and so forth) will use the top-most document as a reference point. For example:
§ Document A
– Synopsis: “This is the first document”
– Keyword: “Apples”
– Status: “First Draft”
§ Document B
– Synopsis: “This is the second document”
– Keyword: “Carrots”
– Status: “ToDo”
– Notes: “Mix these two together in a blender for a great tasting, healthy
beverage.”
Both Document A and Document B are selected in the Binder, and Documents Merge is invoked (
– M), producing the following single document (with
the bold items indicating material used from Document B):
3
Note that for this purpose, a freeform corkboard is still considered to adhere to Outline Order, as
is depicted by the card number (View Corkboard Show Card Numbers) on the index cards.
If you wish to impose a new order based on the freeform spatial placement, make sure to use the
Commit Orderbutton (section 12.1.5), first, and then merge.
116
CHAPTER 14. WRITING AND EDITING
§ Document A
– Synopsis: “This is the first document
This is the second document”
– Keywords: “Apples”, “Carrots”
– Status: “First Draft”
– Notes: “Mix these two together in a blender for a great tasting,
healthy beverage.”
When merging, the main text will be combined according to the preferences you
have set in the General preferences pane (section B.1), under the Separators section.
Merged documents can be combined with a single line, a full empty line (useful in situations where plain-text is in use and paragraphs need to have an empty line between
them), or a custom separator, which allows you to type in any sequence of characters.
Note you can add carriage returns and tabs to this field by holding down the Option
key and typing in the special character.
14.3.3
Typewriter Scrolling
You can turn “typewriter scrolling” on for the main editors, QuickReference panes,
and for the full screen editor independently via the Format Options sub-menu
(
– T). Typewriter scrolling was an innovation of the Blue-Tec Group’s Ulysses.
When it is switched on, just as with a typewriter, the line of text you are typing
will remain centred vertically in the editor. This means that your eyes do not have to
be glued to the bottom of the screen all the time when typing in a long piece of text.
14.4
14.4.1
Formatting Tools
The Ruler
The text editor in Scrivener uses a slimmed down ruler, which can be shown or hidden
via Format Show(Hide) Ruler or – R. This will present a simple margin, indenting,
and [tab stop interface][editor-ruler.png].
The following elements can be found in the ruler:
Tab Stops Stops can be created by clicking on the line between the grey and numbered area, or by right-clicking in the grey area and choosing a type. Once
placed, they can be moved via click-and-drag, and the numerical value of its
position will be printed above the mouse pointer as you drag. These will be
depicted by type using icons. The various tab stop types available are:
14.4. FORMATTING TOOLS
117
Figure 14.1: Example Ruler Settings
§ Left: This is the standard, default type. Text will be left-aligned, with the
first line indented to the position of the tab stop.
§ Center: Text will be centre-aligned, using the position of the tab stop as
an anchor point; this can be anywhere on the line.
§ Right: Will right-align text with the right-indent set to the point of the tab
stop.
§ Decimal: Most often used for aligning rows of numbers, so that the system
decimal value is lined up vertically with everything before the decimal
being right-aligned, and any fractional values left-aligned.
To remove a tab stop, simply drag it out of the ruler.
Using tab stops while writing is as simple as pressing the tab key to advance to the
next available stop. If there are no more tab stops available on that line, the system
will wrap around to the next line at the first tab stop. This allows you to enter tabular
information into a single line, without creating multiple paragraphs. To remove a tab
from the line, simply delete it as you would any other character. Tabs can be viewed
as symbols with Format Options Show Invisibles.
14.4.2
The Format Bar
The Format Bar is a new addition to Scrivener which provides easy access to common
formatting features, typically found in fewer quantities with the combined tab and
margin ruler in other applications. If you are looking for the tab and margin control,
you can still toggle that per text view with – R. The visibility of the Format Bar is
toggled with
– R.
The first section (Figure 14.2) of controls handle font face, size, and variant. All
of these tools act immediately on the currently selected text. If no selection is given,
then they will alter how you type from the current caret position onward.
§ The first drop-down menu lets you select from all of the available font families
on your system.
118
CHAPTER 14. WRITING AND EDITING
Figure 14.2: Format Bar: displayed in sections
§ The second menu provides the available variants available for that family. Note
that not all fonts come with a full complement of variants. If for some reason
you cannot change a selection of text to bold or italic, check this menu to make
sure that the current font supports these variants.
§ The third menu provides a quick list of common font sizes. If you need a custom size that is not available on this list, use the Font Panel... item at the bottom
to access the standard OS X font palette (subsection 14.4.4).
The next three buttons (section 2 (Figure 14.2)) provide toggling shortcuts to the
most common text format tools, bold, italic, and underscore, respectively. When
the caret is in a range of text that matches the format style, the buttons will appear
activated.
The next portion in this section allows control of paragraph-level text alignment.
Paragraph-level alignment comes in three flavours:
§ Left Align (default)
§ Centre Align
§ Right Align
§ Full Justification
In all cases, these adjust the entire paragraph. If you need multiple alignments on
a single line, you will need to add special alignment tab-stops to the standard ruler
( – R).
In the third section (Figure 14.2), the left colour selection drop-down will alter the
foreground text colour. Click the button once to set the selected text to the depicted
colour (black by default), or right-click to access further options. You can opt to strip
out all colour code from here, and at the very bottom of the menu (which may be
hidden if you have a lot of colour favourites added), access the standard colour palette.
For more information on using the colour palette, see Text Colour and Highlights
(section 16.3).
The second colour selection drop-down works in an identical fashion to the first,
but it sets the background highlight colour for the selected range. Click once to toggle
14.4. FORMATTING TOOLS
the current highlight (or use
described above.
119
– H),
or use right-click to access further options as
The final, fourth section (Figure 14.2) of the Format Bar accesses paragraph and
line spacing, lists, and favourite styles.
The line spacing drop-down provides some quick presets, but for more complex
multi-type spacing preferences, select the Spacing... item at the bottom of this menu.
The list tool provides most common Western list formats. For custom and international formats, select the Other... menu item. Lists can be enumerated or bulleted in
a variety of methods. They will transform the current paragraph (even if empty) into
the first list item, and will continue generating new list lines until you enter a blank
line. While entering lists, it is possible to indent or outdent lists with Tab and Tab.
Finally, the Presets menu hooks into Scrivener’s formatting preset system. As
with Apple’s default system, it is important to note that these are format and ruler
“brushes”, not word processor stylesheets. They apply saved formats to the selected
text or the caret position, but once these have been applied they will not automatically update later on if you change the preset. To read more about Scrivener’s style
system, see Formatting Presets (Styles) (subsection 14.4.3).
14.4.3
Formatting Presets (Styles)
Previously known as “Styles”, the new system changes the name to avoid confusion with word processor styles, which keep assigned ranges of text up to date with
stylesheets. The new system improves upon the management of presets, and increases
the reliability of custom keyboard shortcuts when applied to them, by placing the
styles into the Scrivener menu itself, rather than in solely in toolbars.
The first time you run Scrivener, you old Apple Styles should be converted to
Presets automatically, and can be found either in the Format Bar, under the Presets...
drop-down menu, or in the Format Formatting Apply Preset sub-menu.
There are two different types of presets available:
1. Paragraph style: This will save all of your ruler settings, as well as alignment
and line-spacing attributes, and anything else found in the Format Text submenu.
2. Character attributes: This will save any format level adjustments, like bold,
underscore, kerning, or anything else found in the Format Font sub-menu.
These two types can be used exclusively, or combined into a single Preset, controlling all aspects of the text appearance, and both can optionally also apply font size and
font family information. The Preset menus will display small icons in blue, next to
each entry, indicating whether the style will impact one or both of these types when
applied to your text.
120
CHAPTER 14. WRITING AND EDITING
Applying Presets
The method of application will depend upon the type of preset. For character attributes presets, you must select the text you wish to apply the preset to, just as you
would when using bold or italics. For paragraph style presets, the caret can be anywhere in the target paragraph and no selection need be made. Of course, if you wish
to change many paragraphs at once, using the selection tools will allow you to do so.
Note that whatever paragraphs the selection falls into will be impacted, even if they
are not fully selected.
Presets which contain both character and paragraph attributes will apply all stylings
to the entire paragraph, regardless of selection. If you wish to only apply font styles
to a portion of your paragraph, then you will need to create a character attribute
preset to do so. For example, if you saved the bold attribute into the paragraph and
character preset, the entire paragraph will be emboldened, regardless of the selection
you’ve made.
Creating New Presets
To create a new preset, you will need some exemplar text in your editor, containing
the styling you wish to preserve for future use. If you intend to create a paragraph
style, the caret should be placed anywhere within the paragraph you intend to use as
a default. For character attributes, you will need to place the caret in the text where
that format appears. It is often best to not select any text for this procedure, as doing
such will increase ambiguity where multiple styles and attributes are employed.
Invoke Format Formatting New Preset From Selection. You will be presented
with a sheet that will let you name the new style, choose whether it will impact
character attributes, paragraph styles, or both, and optionally if font settings should
be stored as well. If you do not want the preset to change the underlying font family
or size, then make sure these checkboxes are disabled. Once a name has been added
to the sheet, you will be able to save the preset for future use. It will appear in the
Format Bar menu, as well as in the application menus.
Modifying a Preset
Adjusting an existing preset is easy to do. If you want to make a minor modification to a preset, the best way to do so is to apply the preset to some text and then
modify the styling of the text. With the caret still located in that text, use the Format Formatting Redefine Preset from Selection sub-menu to select the preset you
wish to modify.
You will be presented with the same sheet you used to create the preset, only the
information you saved into it will be pre-populated into the sheet. In most cases you
will not need to change anything here, and can just submit the form to apply the
formatting changes you’ve made. If you do wish to change the parameters of how
14.4. FORMATTING TOOLS
121
much the style saves, you can make these changes to the sheet, or even change the
name of it.
If you wish to create a derivative, instead of replacing an existing preset, use the
preset to style your text, modify it, and then use the Format Formatting New Preset
From Selection menu command to create the new version.
Deleting a Preset
Deleting a formatting preset can be done at any time by using the Format Formatting Delete Preset sub-menu. This command cannot be undone, but
if you do accidentally delete an important preset, you can re-create it by finding an
example in your text, and creating a new one from scratch.
14.4.4
Font Palette
The font palette is a standard tool provided by Apple, and can be toggled with Format Font Show Fonts and Hide Fonts. You can also use – T to toggle this view
at any time. This palette provides full access to the font typesetting engine, including
access to many OpenType features and custom font effects. For basic font changes,
the Format Bar (subsection 14.4.2) will suffice.
The precise appearance of the palette will change depending how large you make it.
As the size of the palette increases, more options will be made available to you. Since
this palette is provided by Apple, please refer to the help files provided by TextEdit,
for details in using it.
To use the font palette to change the appearance of your text, you will need to first
select the text you wish to change, and then call up the palette. Any changes you
make will be immediately reflected in the editor.
14.4.5
Preserve Formatting
If you are planning on letting Scrivener’s compiler do all of the final formatting for
you, it can often be useful to preserve ranges of text from the effects of the formatting engine. A common example of this might be the use of block-quoting as a left
and right indent. Technical writers might find it useful to set apart blocks of text
as “code”, using a special font and layout. In the past, you had to break out these
special sections into their own documents and preserve the formatting of the entire
document. Now you can define these ranges right in their original context.
To specify a range of text for preservation, select the text in the editor, and then
invoke the Format Formatting Preserve Formatting menu command. This will draw
a dashed box around the text, which can be worked around and within like any other
type of formatting range. Also like other formatting tools, to toggle a preserved range
off, simply select the entire range and use this same menu command.
122
CHAPTER 14. WRITING AND EDITING
Preserved formatting will also protect your text when using the Documents Convert Formatting to Default Text Style tool, which is useful for homogenising the look of your document according to your editor preferences. Any text contained within these blocks will retain their original formatting and not be touched by
this tool.
MultiMarkdown users can define preserved formatting ranges to define code
blocks. Any paragraphs located within a Preserve Formatting range will have a tab
character added to the front of the line, informing the MMD engine to treat the text
like a code block.
14.4.6
Inline Images
While images themselves cannot be placed into the Draft, you can insert an image into
the text either by dragging an image file in from the Finder, dragging an image document in from the Binder, Outliner or Corkboard, or by selecting Edit Insert Image
From File.... The image will be placed at the current cursor position. Images placed into
documents in this fashion will create a new copy of that image, even if it was dragged
in from the Binder. This becomes important when working with placeholder images.
If you intend to later edit your images or replace them with updated copies from a
graphic designer, you may wish to use Linked Images instead (below).
Viewing inline images full-size: To view an image contained inside text on its
own, you can drag the image from the text into the header view of one of the
editors. You can then double-click on the image and zoom in or out on the image.
Note that any changes made here will not impact the embedded image in the text.
To resize the inline image, double-click on it. This will bring up the image scaling
panel. Drag the sliders left to shrink the image or right to increase its size, and then
click on OK. Unchecking “Lock aspect ratio” allows you to move the sliders independently and therefore distort the image. Clicking Cancel restores the image to its
former size. Note that some images types cannot be resized; double-clicking on such
images will do nothing.
To save the image to the disk, right-click on the image and select Save as Picture....
Printing with Images: There is a bug in the OS X text system whereby if your
text contains an image that is much wider than the page, when printing, the page
containing the image and all subsequent pages may not get printed at all. If you
find that Scrivener is not printing all of the pages it should, check that you haven’t
got an image scaled too large in the text - if you have, fix it by double-clicking on
it and resizing it. This bug can be reproduced in TextEdit by placing a very large
image in the text and switching to “Wrap to Page” mode - the image and anything
after it will disappear.
14.5. SEARCHING AND REPLACING
123
When using MultiMarkdown, inline images (and linked images for that matter)
will be converted to MMD syntax, and the images themselves will be gathered into
the compile folder for you.
Linked Inline Images
Linked images are useful when the actual graphics in your project text are incomplete
or placeholders for larger, production-ready graphics. If you are familiar with desktop
publishing tools like Adobe InDesign, then the manner in which linked images work
will be familiar to you. For those not aware, linked images are the placement of
graphics in your text in such a way that the representation of the image in your editor
is being generated by files outside of the file.
Note that for increased performance, Scrivener uses a cached version of your image
when you create a link to it while the project is open. Whenever you re-open the
project, this thumbnail will be updated with the current image on the disk.
To create a linked image, use the Edit Insert Image Linked to File... menu command.
When compiling with linked images, the current version of those images on disk
will be used to create the embedded copies used in the compiled version. Since nearly
all of the compilation formats do not support active image linking, Scrivener must
take the current version and embed it in the final copy. So if you are in a workflow
that involves external help from designers, be sure to get your external images up to
date before producing final compiled copies.
14.5
14.5.1
Searching and Replacing
Document Find and Replace
As with many Mac OS X applications, you are provided with a standard Find and
Replace panel which can be called up in any text view with – F. Note that the find
panel operates only on single text views. To replace text in all documents use Project
Replace (see below); to search for text in all documents, use Project Search (also below).
In addition to the buttons available in the panel, there are some keyboard shortcuts
you can learn which can reduce the reliance upon clicking within the panel to carry
out searches.
§
– G:
finds the next available match; will wrap around to the top of the document if there are no more matches available below the current point.
§
– G: finds the previous match; as above, but will wrap around to the bottom
of the document.
124
§
CHAPTER 14. WRITING AND EDITING
the currently selected text into the “Find” field. Using this method,
you can define a search term and then use – G to find the next instance of that
term without even opening the panel at all.
14.5.2
– E: loads
Find by Format and Text Function
The Formatting Finder palette, Edit Find Find by Formatting (
– F), gathers together a number of powerful project-wide search tools for otherwise difficult to locate things, such as italicised text; cross-links; revision markings; and so on. The
basic panel has a drop-down menu at the top which is the primary formatting mode
selector. Below that there are two common tools to all modes.
Containing text Limits the search to only return results in which the specified text
falls within the highlight range.
Search in There are two choices available: “All Documents” will search all text documents in the binder; “Selected Documents” will constrict the search to only
those items you have currently selected in the sidebar or a view.
If you leave all of the criteria types empty, it is possible to use this panel to find all
instances of the particular formatting type.
The rest of the panel will change depending upon the current formatting mode.
As with the standard text Find panel, it can be left floating over the project window
as you click the Next and Previous buttons, allowing you to edit immediately after
coming across a match, and then going back to search without having to call up the
palette again.
The rest of this section will go over each of the individual formatting search types.
Highlighted Text
Looks for text that has been highlighted using the highlight feature (section 16.3).
Limit search to color When enabled, only those highlights matching the chosen
colour will be found. If this is disabled, all highlight colours will be considered a match. Note that the colour must be precisely the same, so stick to using
swatches or the built-in highlighter defaults when using this tool.
Click once on the colour chip to bring up the colour palette, or right-click to select
from the system defaults and your custom colour swatches in a manner similar to the
Format Ruler.
14.5. SEARCHING AND REPLACING
125
Comments and Footnotes
Will search within any inspector-based comments or footnotes in the project. By
default all will be considered as potential matches, but you can narrow this down by
selecting one of Comments or Footnotes from the “Type” menu.
Inline Annotations and Footnotes
Searching for inline annotations gives you three colour matching options:
§ Any Color: No limits will be made on the search results.
§ Limit Search to Color: will only consider annotations of precisely the specified
colour as matching.
§ Exclude Color from Search: any annotations precisely matching the provided
colour will be excluded from the search. The default configuration of this
search mode is set to exclude all “Blueberry Blue” annotations. This is because
Scrivener uses this colour to add bookmark annotations. Since it is unlikely that
you will want to find these types of annotations in your search, it is provided as
a handy default.
Inline footnote searching is much more simple. Since footnotes cannot have custom
colours, no additional criteria is necessary.
Revision Colour
You will be given the choice to search for a particular revision level in the drop-down
menu. These are hard-coded as provided by the Format Revision Mode sub-menu.
Do note that if you have changed Scrivener’s default colours, and are working with a
colleague that has not changed their default colours, this can lead to situations where
their revisions are not visible to you and vice versa. When working in collaboration
with other Scrivener users, it is best to not customise these colours.
Coloured Text
The interface for this type of search is similar to the Highlight search. You can provide a custom colour restriction in the additional criteria section. Note that since
revision markings are essentially just formalised coloured text, you can use this panel
to work around the problems brought up above, by searching for your colleagues custom colours manually. Do note the colour choice still needs to be precise, so getting
these custom colours from them, and turning them into custom swatches will be of
benefit.
126
CHAPTER 14. WRITING AND EDITING
Links
You may search for URL or internal Scrivener Links using this tool. By default all
links will be returned, but if you wish to narrow the search down to a particular link
type, use the “Link Type” menu to make this choice.
Text with Preserved Style
This will find text which has had a Preserve Style block drawn around it, from the
Format Formatting Preserve Formatting tool. Since there are no optional qualities
to these blocks of text, no additional criteria is required.
Character Format
Arbitrary text-level formatting can be searched for using this tool. Any number of
options in the additional criteria can be stipulated. They work in an additive fashion, so if you have both Bold and Underline selected, a successful match must be
both bold and underlined. “Keep with next” search for paragraphs that have the Format Text Keep With Next marker added.
14.5.3
Project Search
The Project Search feature has been refined in Scrivener 2, to be integrated with the
new collection system. When you perform a project search, the results will be placed
into a temporary, dedicated collection called “Search Results”. If the collections interface has been hidden, this fact will be obscured from you, but the collection will be
created, and can be accessed later so long as you do not run another search.
There are two ways to access Project Search. You can either click in the search
field in the toolbar, or press
– F to place the cursor focus there. If the toolbar has
been hidden, a convenience window will be opened providing the same features as the
toolbar search.
When nothing is entered in the search field, greyed out text will inform you of
the current search mode. By default this is “All (Exact Phrase)”, which means all
searchable elements in the project will be analysed with the exact phrase operator.
The search scope, data type, and operator mode can be adjusted via the project search
options menu, by clicking on the magnifying glass to the left of the search field. The
options are as follows:
Search In Sets the data type of the search. You can set the search to only query a
certain type of meta-data or text field, rather than everything.
§ All: The default search mode. Every available type of searchable field will
be queried for matches.
14.5. SEARCHING AND REPLACING
127
§ Title: Only the titles of binder items will be searched for. This is similar
to title filtering in the binder.
§ Text: The text contents of files and folders will be queried. Note this does
not include notes and synopsis.
§ Notes: The auxiliary document notes will be searched. Note this does not
include project notes.
§ Synopsis: The synopsis field for each document will be searched. This is
anything that has been typed into the text area of an index card or in the
synopsis portion of the outliner.
§ Keywords: Only keywords will be searched. Note you can also perform
keyword searches quickly by using the Keywords HUD.
§ Label: The text (not colour) of the label meta-data will be searched. Note
the name of this meta-data field can be changed per project.
§ Status: The text of the status meta-data will be searched. Note the name of
this meta-data field can be changed per project.
§ Custom-Meta-Data: The text values (not meta-data field name) will be
searched.
Operator Set the method by which search terms will be handled as you type them
in.
§ Exact Phrase: The default method. What is typed into the field will be
queried precisely as it is typed in. “the book” will only match documents
that have the phrase “the book” as written, not documents that just have
the word “book”. It will also return documents that contain “the books”.
For exclusive matching, use Whole Word (below).
§ All Words: Every word entered into the search field must appear in the
selected data type. Documents which only match some of the words will
not be returned. Words can be entered in any order. Analogous to logical
AND.
§ Any Word: Queried documents must contain at least one of the words
typed into the search field. Analogous to logical OR.
§ Whole Word: Unlike any of the above search methods, the term supplied
will only match whole words. A search for “Jo” will only return documents with that word, not documents that also contain “Joseph”.
Options Provides a few extra options, as well as searching scope limiters. Scope
limiters instruct the search engine to only analyse parts of your binder, rather
than the entire thing.
128
CHAPTER 14. WRITING AND EDITING
§ Search Draft Only: Will only look in the Draft folder of the binder. Note
that if the name of Draft has been changed in the project, the title of this
option will reflect that name change.
§ Search Binder Selection Only: Pre-select items in the binder and then perform the search against those items only. This selection is explicit, not
implicit. Selecting a folder will not include all of its children in the search
query as well.
§ Search “Included” Documents: Include documents that have been marked
as “Include in Draft” in their meta-data. This option can be combined
with the below.
§ Search “Excluded” Documents: Include documents that have not been
marked as “Include in Draft” in their meta-data. This option can be combined with the above.
§ Case Sensitive: By default, the search engine ignores letter case. If you
need to search for proper nouns and are getting a lot of false positives, this
option can help.
Save Search. . . Creates a special Saved Search Result Collections (subsection 8.3.4),
which will keep itself dynamically updated whenever you view them.
14.5.4
Project Replace
The menu command, Edit Find Project Replace provides the ability to replace text
throughout the entire project. Set the text to find, the text with which to replace it,
whether the search should be case-sensitive or apply to whole words only and specify
what should be affected by the replace (any combination of text, titles, notes, synopses and snapshots). Note that a Project Replace cannot be undone (except by using
“swap” to exchange the search term for the replacement text and repeating the Replace
All operation, which in some cases might have unexpected results). A progress bar at
the bottom of the sheet shows you the progress of the replacement operation—bear
in mind that it could take a little while on large projects.
As with all tools that make widespread changes in a fashion which cannot be undone, it is often a good idea to back up your project prior to use it. A simple mistake
can render your entire draft illegible, or even worse, produce subtle flaws that even
your editor ends up missing. Using the “Whole words only” option can mitigate this
a great deal. Without that option, searching for the character name “Sam” and replacing it with “Joseph” could end you up with such (bleakly) amusing concoctions as
“Josephe” in place of every “same”.
14.6. HEADER BAR
14.6
129
Header Bar
The header bar appears at the top of each editor pane, and can be toggled on and off
via View Layout Show (Hide) Header View. It contains a number of useful navigation tools, displays the current title of the edited document(s), and provides a tool for
splitting the editor.
The header bar has three colour states:
1. Grey: when no split is active, this is the default state. If splits are turned on, the
inactive editor will be grey.
2. Blue: when splits are active, this denotes the active split. Any actions taken
which will impact the current editor will be made to the blue document. The
title itself will also be underlined for the active split.
3. Red: when an editor has been locked, it will turn red to remind you that clicks
in the Binder will not load any files into the editor.
14.6.1
History
On the left-most side of the header bar are the navigation arrows. Use these to navigate backward and forward through the navigation history. If you right-click on the
either of the arrow buttons, a menu will be provided, making it easy to jump straight
to something far back or forward in the history without having to go through each
point in between.
14.6.2
Item Icon Menu
Next to the navigation buttons is the document icon, which shows what type of document is being displayed (and its content status if it is a folder or text file). Clicking on
this icon brings up a menu containing some useful shortcuts to oft used commands:
Reveal in Binder (
– R) Will show the location of the currently edited file in the
binder, disclosing containers as necessary to do so. This is most useful when the
method you used to arrive at the current document did not involve clicking in
the binder (such as using the history navigation buttons), or if you are currently
viewing a collection and wish to find where the file is actually located in your
project outline.
Path Reveals the location of the current document in descending order. The top entry will always be the current document; the entry below that its immediately
parent; and so on until the top of the project binder is reached. These can be
selected to immediately jump to any ancestor of the current it.
130
CHAPTER 14. WRITING AND EDITING
Go To Offers an alternate way to jump to a specific binder item without using the
binder. If the binder is hidden, or hoisted, for instance, will let you navigate to
other areas of the project without having to alter your settings. Your favourites
(section 9.6) will be placed in the top of this menu, making it easy to jump to
them from anywhere in the project.
When viewing a Scrivenings session, the contents of this menu will be replaced
with the contents of the current session only, thus providing a miniature “table
of contents” for the current session.
Pro Tip: If you want to use the Go To menu to access other portions of the Binder
while viewing a Scrivenings session, quickly isolate the current document by itself
with Cmd-4. Once you are in single document viewing mode, the standard Go To
menu will be revealed.
Bookmarks Displays any text bookmarks (section 14.12) that have been added to the
current document in a handy menu. Header style bookmarks will be offset and
set to bold, making it easy to cut a larger document into sections of bookmarks.
If you are viewing a Scrivenings session, all of the bookmarks in the entire
session will be displayed together.
Bookmarks can be added to your document using
Edit Insert sub-menu.
– B,
or from the
Take Snapshot This command will take a snapshot (section 14.10) of the current text
and store it for later use.
Match Split Document(s) Will open the currently viewed item in the inactive split.
This command will not be available if no splits are open.
Lock In Place (
– L) Locks the editor (or split) so that no Binder clicks will affect
it. When an editor is locked, its header bar will turn a shade of red.
14.6.3
Header Bar Title
Next to the icon is the title of the current view. This is a dynamic label depending
on what you are viewing. In the most simple cases, it will display the title of the
document you are currently viewing or editing. Whenever the presented title consists
of only the title itself, you may edit the name of it by clicking within the text, and
pressing Enter to confirm.
When you are viewing a collection of items in a corkboard or cutliner, the name of
the viewed container will be displayed. That is, if you click on a folder in the binder,
the name of that folder will be displayed in the header bar, regardless of which index
card or outliner row you have currently selected.
14.6. HEADER BAR
131
When viewing the result of multiple item selections in the binder, the view will display the title, “Multiple Selection”. This is a unique view which lets you know that
the corkboard or outliner you are viewing doesn’t “exist” anywhere in the project.
You are viewing a selection of items, but you will not be able to add new items or
re-arrange existing items because there relationship amongst each other does not correlate with anything in the Binder.
In the case of a Scrivenings session that comes about as the result of clicking on a
container, the name of the container will be displayed first followed by “(Composite)”. Suffixed to this will be the name of the current document you are editing within
that session. When the Scrivenings session is the result of a Multiple Selection, it will
be stated as such, and the name of the currently edited document within the session
will be suffixed to that reminder.
In all cases where the title is a composite of information, you will lose the ability
to edit the name of the document. You will need to use the inspector or the binder to
make this change, or enable View Editor Show Titles in Scrivenings.
14.6.4
Sidebar Navigation
Moving to the right-hand side of the header bar, you will find two arrows pointing
up and down. These arrows allow you to navigate within the project sidebar (be it
the binder, Search Results, or Collection that is currently viewed), as though it were a
flat list. This form of movement is unique in that the binder selection will update. In
most cases, when you navigate to documents using the menus or the various controls
available in the header bar, the binder selection will not update to follow your select,
by design. In this case however, these two buttons are actually synonymous with
clicking on documents in the sidebar.
Clicking the up-arrow will move you to the document immediately above the current document in the sidebar. Ordinarily, this will be the binder. The selected document will always be the one immediately above, even if that item is currently hidden
and on an entirely different hierarchal level. Clicking the down-arrow will always
move you to the document immediately below, in the current sidebar list.
If you are viewing a container as a Scrivenings session, the behaviour of this feature
will modify slightly. The nature of selection will still be the same in terms of linear
above/below selection, but the current session will not be dismissed. It thus can be
used as a form of navigation within a Scrivenings session. Note that if you navigate
above or below the boundary of the selection, it will be dismissed. This feature is
an augmentation of the basic behaviour. It is not available to multiple selection based
sessions. If you wish to navigate within a multiple selection based Scrivenings session,
use the Go To menu instead.
These two buttons can also be activated with the keyboard shortcuts,
– DownArrow, respectively.
and
– UpArrow
132
14.6.5
CHAPTER 14. WRITING AND EDITING
Split View Button
Finally, the last button on the right-hand side is a multi-purpose button which changes
depending upon the current layout of the application and your last preferred split
orientation.
When no splits are open, a small line will be drawn through the icon in the horizontal or vertical orientation to let you know which way the editor will be split if
you click upon the icon. If you hold down the Option key, this will switch to the
opposing orientation, and that preference will be saved for future splitting as well.
When a split is already open, the icon will appear blank. Clicking on it in this state
will close the opposing split. This means you should click on the icon in the header
bar for the document view you wish to retain once the split has closed. Either side
can be dismissed by clicking on the opposing header bar button. Additionally, if you
hold down the Option key while a split is open, a vertical or horizontal line will be
drawn, allowing you to switch split orientations without otherwise disturbing your
layout. Both splits will remain open, only the orientation will shift.
14.7
Footer Bar
Below each editor pane is a footer bar. This is the most dynamic part of the editor, in
that it will change depending on the type of document visible and the current editor
mode. When a text document is being viewed, for instance, it will display the word
and character count along with a pop-up button for changing the text scale and a
button for setting document targets. When a QuickTime document is displayed, it
shows the current playing time. And so on. This section will cover the tools available
to the standard text editor.
§ For information on the various other document footer bars, see Viewing Media
in the Editor (section 14.8)
§ For details on how to use the footer bar in script mode, see Scriptwriting (chapter 19).
§ Read the chapters on The Corkboard (section 12.1) and The Outliner and the
Binder (section 12.2) for details on how to use the footer bar in those view
modes.
14.7.1
Text Zoom
You can make the text in the text editor bigger or smaller without changing the font
by using the text scaling pop-up in the left side of the footer bar. See Scaling Text
(subsection 14.3.1) for more information.
14.8. VIEWING MEDIA IN THE EDITOR
14.7.2
133
Quick Text Statistics
In the middle of the footer, the current word and character account of the text you
are editing will be displayed in real-time as you type. This counter works for all
visible text, even if it would otherwise not be compiled, and will aggregate all text
together when using Scrivenings view. This counter will also display the statistics for
the current text selection if one exists. When the counter is displaying selected text, the
colour will turn blue to indicate that it is no longer counting the entire document(s)
text.
Pro Tip: If you want to easy grab the word count for the current section you are
working on within a Scrivenings session, you can use the selection counting feature mentioned above in conjunction with the Edit Select Current Text command,
which can be enabled by holding down the Option key, or pressing
– A. This
will quickly select only the text of the current section you are editing, showing the
word and character count in the footer.
14.7.3
Text Goals
When you are editing a single document, a small target icon will appear on the right
side of the footer bar. This button brings up the target options for the document
which will let you set a numeric word or character goal that you intend to achieve
with the section. You can optionally use Growl notification to let you know when
you’ve reached your goal. These notifications work in both ways, whether you are
working up to a number while writing, or working down to a number while editing.
When enabled, the footer bar will acquire a progress bar next to the target icon
which will fill as you type, gradually changing colour until you reach your quota.
These targets can be set individually for each document. You may also monitor and
set them using the Outliner, by revealing the “Target”, “Target Type”, and “Progress”
columns.
To disable the goal metre, enter a value of “0” into the target configuration for the
document.
14.8
Viewing Media in the Editor
The editor is capable of viewing most of the file types that you will need to interface
with for research and creative use. The footer bar will often change to provide tools
for working with different media types. Note that Scrivener is, by and large, not
intended to operate as an editor for all types of files. It would take years to design these
features, and in most cases your existing applications will do a better job of editing
PDFs, movies, and images. Consequently, a convenient button will be provided in
most media views making it simple to load the document in an external editor of your
134
CHAPTER 14. WRITING AND EDITING
choice. Changes made to the file will be saved within the Scrivener project when you
return.
14.8.1
Viewing Images
The image view is displayed whenever an image document is selected, allowing you to
zoom in and out and rotate it. If the image is larger than the viewable area, click and
hold the mouse on the image and move the mouse to drag-scroll the image around.
To zoom in and out and rotate, double-click anywhere within the image or the grey
area around it. This will bring up the image tools HUD.
The slider at the top of the HUD allows you to scale the image. The button on the
left of the slider zooms the image as far out as it will go (that is, makes it as small as
possible) and sets the slider to the far left; the button on the right of the slider zooms
the image as far in as it will go (makes it as large as possible) and sets the slider to the
far right. Below the slider, you can check a “Scale to fit” option which will disable the
slider and always size the image according to how big the editor is.
There are three tools available: there is a button for rotating the image (rotating
it 90 degrees clockwise, or anti-clockwise when Option-clicked); a button for fitting
the image to the current viewable area; and a button that returns the image to 100%
magnification.
In the footer bar, click the toolbox button to open the image an your default external editor. If you wish to open the file in another program, right-click on this button
to select an alternate from a menu. This menu is provided by the operating system,
so if your favourite program isn’t showing it, you can resolve this by sorting out why
it isn’t showing up in the OS (making sure it is in the Applications folder will solve
most issues of this nature). Beside this button you’ll see a reload button. You will
need to click this after saving your edits in the external image editor in order to see
the changes.
14.8.2
Viewing PDFs
The PDF view is displayed when a PDF document is selected. Its main view looks
and acts exactly the same as Preview.app. You can control the display of the PDF
document via the View Media PDF Display sub-menu, and you can zoom in and
out of it using the “Zoom In” and “Zoom Out” controls in the View Zoom submenu. You can also access many of these tools via right-click on the PDF display
itself.
The footer bar contains arrow buttons on the left, which allow you to browse back
and forth through the pages of the PDF document, and text in the centre showing the
number of pages the PDF document has and which page you are currently viewing.
14.8. VIEWING MEDIA IN THE EDITOR
135
As with images, you can open PDFs in external editors for annotation or more fullfeatured browsing, and use the reload button to load PDFs from the disk if changes
are not showing up immediately.
14.8.3
Viewing QuickTime Documents
The QuickTime view is used to display movie and sound files. It should be familiar
to most OS X users. From the control bar beneath the viewing area (above the footer
view), you can play or pause the movie, change the volume, or step backwards and
forwards through it. On the lower right, you’ll see a rewind symbol with a pause
button in the middle of it. This is an optional mode which will show up as blue if
engaged, which will rewind your media by a set number of seconds whenever you
pause. This interval can be configured in the Navigation pane (section B.5) of preferences. Read Transcribing Media (chapter 21) for more practical information on using
these tools while writing.
14.8.4
Viewing Web Pages
The web view displays imported web pages. Note that clicking on any links in a
page displayed in the web view will open the link in the system’s default internet
browser. Scrivener does not allow internal browsing simply because this would mean
integrating many of the features of a browser into the web view (such as back and
forward buttons, a refresh button, maybe even a download manager. . . ) and this is
outside of Scrivener’s scope.
When the web view is shown, the content of the footer will display the original
URL a as a link that can be clicked on to open the original page in the system’s default
browser.
You can increase and decrease the size of the web page font using the standard
View Zoom sub-menu.
Pro Tip: If you archive search forms, such as http://www.google.com/, and
searches that you perform will have their results opened up in your web browser.
Thus it can be useful to store a number of common research portals in your Binder
for quick access. Note that since this uses an archived version of the web page, if
the host site changes their searching protocol, your archived search might break
(this generally only happens rarely).
14.8.5
Viewing Unsupported Document Types
By default, Scrivener will not let you import files into the Binder that it cannot display in the editor. You can remove this restriction by disabling “Import supported
file types only”, in the Import & Export (section B.9) preference pane. When unsup-
136
CHAPTER 14. WRITING AND EDITING
ported file types are dragged into the Binder, they will use whatever icon they have
been assigned by the system.
When loaded in an editor, the file icon and its filename will be displayed. Doubleclick on the icon to load the file in its default external editor, or right-click on the
toolbox icon to select an alternate application. The toolbar will also feature a QuickLook icon. Clicking this will produce the same effect as using QuickLook in the
Finder.
As with supported files, unsupported files are imported into the project package
itself.
14.9
Splitting the Editor
Scrivener’s editor uses a powerful technique known as editor splitting. You may have
encounter split screen editing in other applications, but the level of integration and
power between the two splits in Scrivener is likely to be unfamiliar to new users.
Rather than arbitrarily splitting the interface any number of times and ways, the
editor uses a two-way split system so that you can actually control the flow of information in the opposing split while you work, in a number of ways.
14.9.1
Horizontal and Vertical Splits
The editor interface can be split in one of two orientations. In vertical mode, the divider will be drawn down the middle of the screen, and is most suitable to viewing two
documents side-by-side as it maximises vertical space. Horizontal mode creates a split
that is familiar to many applications like Mail with content on the top and bottom.
In either case, both sides of the split have the same degree of power in loading various
views, media types, and text editing. You can easily switch between orientations by
choosing the opposite split type in the View Layout sub-menu, or Option-clicking
the split icon in the header bar (section 14.6).
When the editor has been split, a header bar and footer bar will be created for each
split. This means that each side has its own history queue, view modes, zoom settings,
and so on. Everything that you can do to a single editor window can be done to a split
window, and those changes will be remembered for that side of the split. An example
of this would be view modes. With a single editor interface, if you choose to view
containers using the Corkboard model, every time you click on a container or select
more than one item, a Corkboard will be presented to you. However, when splits are
engaged, each side has its own view preference. This means the left side (in a vertical
orientation) can be set to Outliner, and the right side set to Scrivenings.
Quickly switching between editors: It is easy to jump between splits without
using the mouse, by using
– E and
– R. When the split orientation is ver-
14.9. SPLITTING THE EDITOR
137
tical, E will access the left editor and R the right; when the split orientation is
horizontal, E will access the bottom editor and R the top.
14.9.2
Controlling the Opposing Split
There are a few commands that you can use to impact the editor your are not currently working in, reducing the need to flip back and forth between them. These are
located in the View Editor Other Editor sub-menu, and have shortcuts for handy
usage.
Remote scrolling To scroll the other text editor up and down, use
– UpArrow
and
– DownArrow. This command does not work when the other editor
is viewing Corkboard or Outliner views, or media that would not otherwise
respond to scrolling.
Note that this form of scrolling is based on the scrollbar, not actual text position, so the position of the scroll point will not be saved when using in conjunction with the history button, like cursor position is. The exception to this
are PDF files, which are always saved by scroll-point, not cursor position.
Remote history access Just as you can quickly flip through the history with – [
and – ], you can cause the other editor the jump back and forth in its own
history queue with
– [ and
– ]. A nice trick here, when working with
a sequence of reference documents, is to “pre-load” them into your reference
split by clicking on each one sequentially. Now they are loaded into the history
queue and easily accessible while you write in the other split.
Controlling media While typing in one split, you can start and stop QuickTime
– R, making this setup extremely useful for
movies and audio tracks with
transcription. If you have Rewind on Pause enabled (subsection 14.8.3), this
shortcut will also rewind the piece by a set amount (3 seconds by default), making it easy to catch up.
14.9.3
Swapping Splits and Matching Editors
If you wish to swap the actual position of the material in the editors, so that the content on the left now appears on the right, for example, use the View Layout Swap
Editors menu command.
To match the content of the alternate split to the active split you are working in,
click the document icon in the header bar, and select the Match Split Document(s)
command. This will duplicate your current view selection in the other editor. So if
you are in a Scrivenings session, that session will be duplicated; if you have a Multiple
Selection view, that selection will be duplicated in the bottom view—and the current
138
CHAPTER 14. WRITING AND EDITING
view mode in the active split will be used instead of the active default for that split
(and will thus set the default for that split to the acquired view model).
14.10
Using Snapshots
Snapshots provide a way of backing up and saving different versions of individual document. Taking a “snapshot” of a document takes a copy of the text of that document
as it exists at that exact moment in time and stores it so that you can return to it, or
restore it, at a later date. Using snapshots, you never need worry about making major
edits to a document, because you can take a snapshot of it before you begin editing
and then restore the older version later if you change your mind about the changes
you have made. Note that snapshots only affect the text of documents (not notes,
synopses or meta-data), and are therefore only available for documents that contain
text (files, folders and saved searches).
You can tell if a text document has any associated snapshots by its icon. Documents
that have had snapshots taken of them have the top-right of the paper icon folded
down.
There are two primary ways to manage snapshots: using the Documents Snapshots sub-menu, and the Inspector pane (subsection 17.4.4), the latter of which will be covered in the reference section. You can also conveniently use
the – 5 keyboard shortcut while editing a document to take a quick snapshot in the
background.
14.10.1
Creating Snapshots
While working on a document, there are three easy ways to snapshot it for future
reference.
The key thing to understand with Snapshots is that they provide a way to set milestones for individual documents. They are not a tool for providing an overall snapshot of the entire project, structurally speaking, and are probably not the best tool
for taking a quick snapshot of your entire draft. In most cases, large scale backups
like this would be best created using the File Back Up Back Up To... menu item.
That aside, it is easy to quickly snapshot multiple documents. Simply select the documents you wish to snapshot in the binder sidebar, corkboard, or outline, and press
– 5, or Documents Snapshots Take Snapshots of Selected Documents to create a
snapshot of each. Snapshots can later be accessed individually in the Inspector pane.
You can jump straight to them with
– M, or Documents Snapshots Show
Snapshots.
A second way of taking snapshots is to supply them with a title as they are created.
This can be done for single or multiple selections. In the latter case, the title will be
added to each document in the selection. Snapshots can be titled at a later time using
the Inspector.
14.11. AUTO-COMPLETION
139
The third method for creating snapshots is from the Snapshot pane itself in the Inspector. Simple click the + button in the header for this pane to create a new snapshot,
and you’ll see it appear in the list below.
14.10.2
Managing and Comparing Snapshots
Existing snapshots are all managed in the inspector pane. To jump to snapshots, click the button with a camera in the Inspector footer bar, use the Documents Snapshots Show Snapshots menu item, or press
– M. You can read
more about the particulars of the interface (subsection 17.4.4), to learn more about:
1. Deleting existing snapshots
2. Running comparisons between the current text and a snapshot, or between two
snapshots
3. Reverting your changes to an older snapshot.
14.10.3
Viewing Snapshots in the Editor
It is possible to load snapshots as read-only text into the main editor splits. To do this,
simply drag the snapshot you wish to view into the header bar for the editor split you
wish to load it in. You can also load the snapshot in comparison mode by holding
down the Option key as you drag the snapshot into the header bar.
14.10.4
Automatically Created Snapshots
Some functions in Scrivener will create automatic snapshots for you. When a document is scheduled to be changed to a sync action, the default behaviour is to create a
snapshot before updating the document with the remote changes. This makes it easy
to find what has changed with the external document. This behaviour can be suppressed within the sync configuration panes if you wish to keep the snapshots area
for your milestones, only.
14.11
Auto-Completion
(Material not finished)
14.11.1
Typographic and Grammar Adjustments
(Material not finished)
140
CHAPTER 14. WRITING AND EDITING
14.11.2
Custom Auto-completion
14.12
Text Bookmarks
Text bookmarks are useful when you wish to quickly mark a spot in your text in a
way that can be easily recalled later on, or for marking out sections of text in longer
documents. There are two types of bookmarks:
1. Bookmark Annotation: This is your standard bookmark. Great for quickly
marking a spot for later editing, quick navigation, or whatever you require.
2. Bookmark Header Annotation: Will create an offset label in the bookmark navigation menu, indenting regular bookmarks beneath it until another header style
bookmark is encountered. Useful for documents with many bookmarks.
Bookmarks work by placing a special marking at the beginning of a paragraph or
line, and there are two tools for doing this without disrupting your writing process.
Use the Edit Insert Bookmark Annotation menu command, or
– B to place the
marker at the front of the current paragraph without moving your cursor.
Use Edit Insert Bookmark Header Annotation to insert a header style annotation
in a similar fashion as a standard annotation.
Custom bookmark labels: Bookmarks are simply an inline annotation starting
with an asterisk and a space. The first few words of the line following will be used
to label the bookmark in the navigation menu. If you wish to provide a custom
label, add it to the annotation after the asterisk and the rest of the line will be
ignored.
The same holds true for header style bookmarks. These use two asterisks and then
a space, so to give them a custom label, enter the label into the annotation after
these asterisks.
In addition to formal bookmarks, any annotations that appear on a line by themselves will be added to this menu as well, regardless of whether or not they have an
asterisk in front.
14.12.1
Navigating to Bookmarks
Once bookmarks have been created, they can be viewed in the header bar icon menu,
under Bookmarks, or View Text Bookmarks menu. To navigate to a particular bookmark, select it from this menu.
When viewing several documents in a Scrivenings session, all of the bookmarks
found within the individual documents will be used to populate this menu.
To remove a bookmark, simply delete the inline annotation on the respective line.
14.13. EDITING MULTIPLE DOCUMENTS (SCRIVENINGS VIEW)
14.13
141
Editing Multiple Documents (Scrivenings
View)
The “Scrivenings” view mode (View Scrivenings) allows you to edit multiple text
documents as though they were one long document4 . This way, you can write in
small chunks and then combine them in any way you like to see how they work
together. For instance, you might write lots of small scenes for a chapter, and then
view (and edit) them all together in an Scrivenings session to see how the chapter
works as a whole.
As an example of how Edit Scrivenings might be used, imagine that the Draft folder
in the binder has four documents in it. Normally, if one document is selected, the
text of this document will be displayed in the main editor, as below. This is similar to
how many notebook-sidebar applications work. In Scrivener, you can select several
documents and then edit them all together, or a folder (like the Draft itself).
Scrivenings mode is only available when the entire selection (or contents of the
selected container) are text or folders.
14.13.1
Viewing Multiple Texts as One Document
Scrivenings mode is, like corkboard and outliner view modes, another way to view
multiple selections of documents. How you view more than one document changes
depending on your approach. Viewing more than one document can be as simple as
clicking on a folder. By default, this will view the items within that folder as index
cards on a corkboard. However using the Group Mode segmented control, you can
easily switch your view over to Scrivenings, the left-most icon showing a stack of
papers. Another way of switching is to use the View Scrivenings menu command,
or pressing – 1 on your keyboard. As with corkboard or outliner, you can also
form scrivenings sessions by selecting multiple items in the binder, or clicking on the
header bar of a collection or search result.
Usage Tip: Unlike corkboard and outliner, scrivenings can be taken into full
screen mode. Simply press the Full Screen button in the toolbar (
– F) after
setting up the session.
You can tell when you are in Scrivenings mode by the gradated horizontal divider
lines that will be drawn between each section represented in the session. Meanwhile,
the header bar will state the name of the currently viewed container followed by
“Composite” in parenthesis—or “Multiple Selection” followed by the title of the document you are currently editing within the session. As you switch from document to
document, the inspector will follow along and the header title suffix will update.
4
This feature was known in prior versions as Edit Scrivenings, but it has been renamed as the
feature is no longer an action you have to set up.
142
CHAPTER 14. WRITING AND EDITING
Scrivenings sessions are one of the few areas in Scrivener that consider your text
from a “flat” perspective, or how it will appear once it has been compiled. There
is no indication of depth while editing documents. This is intentional, so you can
concentrate solely on the same flow of text that your readers will have.
The footer bar will switch to an alternate mode which disables the per-document
goal meter as it no longer has any meaning in a multiple document setting. Additionally, the word and character counter in the footer will count the entire session,
making Scrivenings a great way to quickly view the word count of a particular section
of your book.
If you would like for titles to be displayed more prominently, you can enable them
by switching them on in View Editor Show Titles in Scrivenings. The appearance
of these titles will be dictated in Formatting preferences pane (section B.7). These
titles can be edited in the same fashion as editing any other piece of text in the editor
(though formatting will not be allowed).
14.13.2
Editing with Scrivenings
For the most part, editing in Scrivenings mode is no different than editing a single
document one at a time; most of the tools that you have learned thus far will be
available to you. You can select all of the text and format it, copy and paste it to
another application, create snapshots of individual portions of the session, and so on.
You will not be able to do the following:
§ Select text from more than one document and delete it; this includes implied
deletions, like selecting some text and then typing over the selection.
§ Select the entire last paragraph of any document and delete it; to do this, be
careful to only select the characters of the paragraph, not the the whitespace at
the end.
These limitations are unavoidable. Each block of text is separated by protected
characters which separate the documents and draw the divider line (and the title if
this option has been turned on). These characters are, of course, not part of any
document, so deleting them has no meaning. Moreover, if you were to delete a range
of text that spanned two or more documents, Scrivener would have to guess where
one document now ended and the other now began - and if the whole of the text
of one document had been deleted in the process, Scrivener would have to decide
whether to delete that document, too. These are all decisions that are better left to
the user - hence the limitation.
Since Scrivenings is now a proper view, it affords a greater latitude in how integrated it is with the outlining process, especially with a locked editor (
– L).
14.14. GOALS AND STATISTICS TRACKING TOOLS
143
§ While editing, new documents can be created with – N, inserting them below
the current document that is being edited; likewise with splitting documents.
§ With titles turned on, it is possible to create new items without ever switching
back to the Binder, making this combination of actions one of the most seamless
ways to flesh out your outline while you write.
§ Moving documents around in the Binder will automatically update the order in
which they appear in the Scrivenings session.
§ Deleted documents will be removed from the session.
§ Merging documents from the Binder will make this change in the session
14.13.3
Useful Tips
Navigating with the sidebar navigation buttons If you click one of the navigation
buttons (subsection 14.6.4) in the header bar, and that navigation action will
result in movement within the boundaries of the active session, you will be
navigated from section to section without disturbing the session. If you leave
the boundaries of the session, or if the original selection was the result of a
non-linear multiple selection, it will be dismissed.
Using the Go To menu to navigate While the active split is in Scrivenings mode,
the View Go To sub-menu and the duplicate of that menu in the header bar
icon menu will display only the contents of the current Scrivenings session.
Selecting items from that list will jump you straight to that document like a
small table of contents.
Selecting only the document you are editing Use
– A to select the entire text
area for only the document you are actively editing within the session. Standard
– A will always select the text of the entire session. Selecting by section is also
a useful way to get a quick word count of the active document in the footer bar.
Lock in Place navigation If you are in an Edit Scrivenings session and lock the editor containing the Scrivenings view in place (using “Lock in Place” from the
View Editor Lock In Place or header view icon menu), clicking on documents
in the sidebar that are in the Scrivenings session will move the insertion point
to the beginning of that document in the editor (just like Go To).
14.14
Goals and Statistics Tracking Tools
At some point, most writers will want to get some idea of the progress of their work
by checking the word, character or page count. There are several ways of doing this
in Scrivener:
144
CHAPTER 14. WRITING AND EDITING
§ To get word, character and page counts for the whole of the draft (that is, the
contents of the Draft folder) and for any documents selected in the binder, use
Project Project Statistics. To calculate the Draft statistics, Scrivener internally
generates the actual draft based upon your Compile Draft settings—so you need
to remember that if you have only got Compile Draft set up to print off synopses, only the synopses will be counted. This can also mean that there will be
a delay in displaying this panel with larger projects.
§ To get word, character, paragraph and line counts for the current document,
and a breakdown of word frequency (the number of times you use different
words), select the Project Text Statistics menu command (this will only be available if a text document has the keyboard focus).
§ To set a target word or character count and track your progress for the entire
draft or the current session, select Project Show|Hide Project Targets.
§ To set a target word or character count and track your progress for a single
document, click on the target button in the bottom-right of the footer view
(this is not available in scriptwriting mode, though, where word and character
counts are rarely useful anyway). See information on the footer view for more
information.
§ To get the word or character count for a selection of text, select some text in
a document and examine the footer bar of the editor. The word and character
count will appear in blue text. When there is no selection, this area will be used
to count the entire document or Scrivenings session.
§ To view the word, character counts and targets for several documents at once,
use the outliner view and make visible the appropriate columns by clicking on
the “>>” button in its header bar (or by selecting View Outliner Columns).
You can use the “Total Words” column to collect aggregate counts for items
which have children.
§ To view a combined word and character count of an arbitrary selection of documents, use the outliner or corkboard to select several documents, and then
Ctrl-click on the selection. The combined word and character count for those
documents will appear greyed-out at the bottom of the contextual menu. Note
this method only counts texts within the actual selection, not the implied selection in the case of children beneath the selected items. To count them too,
disclose the items in the outliner and select them along with their parent items.
Usage Tip: The word frequency tool in Text Statistics only counts text within
a current view, which can include a Scrivenings session. Thus, to perform this
analysis on the entire Draft or large portions of it, create a Scrivenings session first,
and then use the Project Text Statistics tool.
14.14. GOALS AND STATISTICS TRACKING TOOLS
14.14.1
145
Project Targets
The project targets panel allows you to set goals for your writing—either for the Draft
as a whole or for the number of words you want to write during the current session—
and to check on your progress. To bring it up, select Project Show Project Targets or
press
– T to toggle its display.
The targets panel displays two progress indicators: one showing the progress of the
draft and the other showing the progress of the current session5 . Using this panel,
you can set a target word count for the draft (that is, the contents of the Draft folder)
and for the current session, and keep track of how far you have to go before you
reach those goals. To change the targets, just click in the appropriate text field and
enter a new target word count (or target character count—you can set whether the
target should be in words or characters by clicking on “words” so that a pop-up menu
appears allowing you to choose between “words” and “characters”).
Using targets to hit an editing goal: While this tool was originally designed to
set a writing goal you work up toward, it can easily be used as an editing tool when
cutting text. It not only counts words added, but words subtracted. You can set an
editing goal in the same way you would set a writing goal. The progress bars will
appear maxed out. Once you have edited below the target, you can be optionally
alerted to this fact with Growl, or just keep an eye on it as you work.
This panel will float over your project if you leave it open, and update itself in realtime as you write and edit. If you want to track a goal for an individual document,
rather than the entire project, use the Text Goals (subsection 14.7.3) tool in the footer
bar.
If you delete lots of text, session statistics will not start showing any progress until
you have written as much again—it is perfectly possible to have a negative session
word or character count! In other words, it shows your net gain during the session.
The session target only counts anything typed or pasted into a main text view (either
of the editors or the full screen text view) it does not count imported documents or
appended text and so forth (so you can’t cheat!).
Project Targets Options
Click the Options button in the Project Targets panel to configure how these progress
bars are calculated, and what Scrivener should do if you meet your goals.
Draft Target § Count documents included in compile only* will only monitor
those texts which have the “Include in Compile” checkbox set. If your
work style has note documents scattered about in the Draft folder, they
will not be counted toward your final goal unless you disable this option.
5
Session being defined as the period between the project being opened and closed again.
146
CHAPTER 14. WRITING AND EDITING
§ Target applies to the current compile group only* takes this a step further
and only calculates off of documents that have been chosen in the Content
pane of the Compile interface. For performance reasons, this only works
off of the top drop-down selection in the Content pane; dynamic filters
will not be used.
Session Target § Count text written anywhere in the project*. Turning this on
will count anything you type or paste into the any document in the project
binder, even if it is a character sheet or a grocery list.
§ Allow negatives*. When disabled, the session counter will never drop
below zero. Leave this on to get an accurate net total of your writing
session. When disabled, deletions will still be counted, but only until the
counter reaches zero, so some deletions would no longer be counted after
that point, making it less accurate.
§ Show target notifications using Growl. If you have Growl installed on your system, Scrivener will register itself for announcements, and use that system to
post notices when you exceed a goal, or fall back under it.
14.14.2
Project Statistics
Project statistics can be called up at any time with Projects Project Statistics or
S on the keyboard. This sheet has two sections to it:
–
§ Draft: Everything included in the Draft folder (and by default, only the current
compile group). Note that compile options which modify export content in
any way can impact this counter. If your compile is set up to only export titles
in an outline format, you’ll get a pretty small word count. Likewise, Compile content selection filters, and the state of the Include/Exclude/All selection
drop-down will impact the total. In general, consider what your document
looks like when you compile: that is what will be counted.
§ Selection: A count of everything you have currently selected in the Binder,
including all of their children items by default.
Each of these sections have identical statistics available to them. The word and
character counters are self-explanatory. The two page count estimates are based on
different algorithms.
Paperback uses the industry standard est. 350 words per page to calculate against
the total word count. This of course, does not take into account whitespace. Dialogue
heavy text will take more space than long, Kafkaesque paragraphs will. However it is
a standard metric that many publishers use, and on average produces a good result. It
can be tweaked in the Options tab.
14.14. GOALS AND STATISTICS TRACKING TOOLS
147
Pages printed will be in many cases much more accurate as it will compile your
draft in the background, using your formatting and page layout settings, and then
count the total pages that resulted from that. Consequently, in large projects it make
take a few moments for this sheet to display.
14.14.3
Project Statistics Options
To access options for how project statistics are calculated, click the Options tab in the
sheet.
Draft Statistics Options Controls how the top, Draft only section of the stats are
calculated.
§ Count current compile group only: only calculates off of documents that
have been chosen in the Content pane of the Compile interface. This
is the only compile-time option that can be disabled. All other compile
options that restrict or modify output quantity will still be factored into
the count.
§ Count footnotes: Footnotes are by default included in the count. If your
publishing environment demands these be considered separate, here is
where you can disable them in the total count.
Selection Statistics Options Selection works a little differently than above. Since a
sample compile is not produced in the background (and such might be meaningless if the selection is outside of the Draft), some of the filters that would
otherwise be a part of the compile option setup are provided to help you hone
the results.
§ Count all documents: In this context, all documents means: regardless of
whether the document meta-data flag, “Include in Compile” is on or off.
§ Count only documents marked for inclusion: Only those documents that
have “Include in Compile” checked will be counted.
§ Count only documents not marked for inclusion: As above, only with the
inverse logic.
§ Exclude comments and annotations: All inspector comments and annotations will be disregarded by default. If you wish to count them too, check
this option.
§ Exclude footnotes: Footnotes are by default included in the count.
§ Count sub-documents: When disabled, only the literal selection will be
counted. With this option on, the selected items and all of their children
will be counted, all the way down to the bottom of the outline.
148
CHAPTER 14. WRITING AND EDITING
Page Count Options Set the counting algorithm used to estimate paperback page
counting. This figure will be divided from the total word count to produce an
estimate.
14.14.4
Text Statistics
The Text Statistics panel can be accessed with Project Text Statistics or
– S, is
only available when the active editor is displaying text, and it will produce statistics
for all of the text being displayed, even if that editor is currently displaying many
documents in a Scrivenings session. The types of information it provides are more
pertinent to the topology of the text document, as opposed to the end product (where
page counts and paperback estimations come into play).
In addition to the simple counter statistics, you can flip down the Word Frequency
chart to display a table of discovered words, how often they have been used numerically, and graphically how often in comparison with other words in the table. These
columns can be sorted by clicking on their header fields.
Chapter 15
Full Screen
Full screen mode allows you to edit your text in a distraction-free environment. You
can view any text document (or Scrivenings session (section 14.13)) in a full screen
mode akin to the one in iPhoto, so that you can compose and refer to your notes
without the noise of the rest of your desktop or even Scrivener itself. Consequently,
you’ll find that Scrivener “disables itself” to a degree, while in full screen mode. Menu
commands that would otherwise be available are turned off—in most cases these are
commands which would have no meaning at all, such as commands for merging two
selected items in the Binder, or enabling Corkboard view.
To enter full screen, you must have a text document as the active document (you
cannot view images or any other type of media in full screen), and it must be visible as
text (that is, the corkboard or outliner modes must not be active). Launch full screen
either by hitting
– F, or select View Enter Full Screen.
Pre-loading History In Full Screen: The one instance in which you can enter full
screen if the corkboard or outliner is visible is if you have selected multiple items
in the binder. In this case, the currently selected document in the corkboard will
be displayed in full screen mode, and all of the other documents on the corkboard
will get loaded into the full screen navigation history. This is a good way of loading
multiple documents so that you can easily flip between them in full screen using
the – [ and – ] keyboard shortcuts.
It can also lead to confusion if the editor itself is already in Scrivenings mode for
these selected items. Make sure to call the Full Screen command with focus in the
area you wish to edit from. To add multiple items to the history queue from the
binder, leave your focus in the binder. If you wish to edit the Scrivenings session
that resulted from that selection, make sure to call Full Screen from the editor itself.
When you first enter full screen, you will see your document in the middle of the
screen set to a pinkish-grey paper colour, and blocking the rest of the screen, a black
background. Nearly every aspect of this experience can be changed, some right within
Full Screen mode. You will also briefly see the Full Screen HUD (detailed below). To
retrieve it, slide the mouse pointing down to the bottom of the screen and let it sit for
a moment. So long as the mouse remains in the HUD area, it will stay visible. Once
moved back up, it will disappear out of view.
149
150
CHAPTER 15. FULL SCREEN
The menu bar can be accessed by similarly sliding the mouse pointer to the top of
the screen. After a momentary pause, the menu will appear. This is a useful way to
access advanced formatting tools, and even navigate around in your project using the
View Go To sub-menu without leaving full screen.
15.1
Using a Background Image
You can replace the default solid background colour with an image of your choosing,
by accessing the View Full Screen Backdrop menu. The image will be scaled to fit
your screen using the maximum height or width, whichever is better. This can mean
that if the image does not match your screen’s aspect ratio, the background colour
may still be visible along the sides or top and bottom.
15.2
Full Screen HUD
The full screen control panel contains various controls for manipulating the interface
elements available in full screen. All of these settings operate on a project-by-project
basis, as opposed to the global scope of Preferences.
In order from left to right:
Text scale This operates in an identical fashion to the text scale zoom in the standard editor. The only difference is that full screen stores its own scale setting,
independent of the editor splits.
Paper Position Allows you to choose where the “paper” (the column of text) should
appear on the screen: on the left, in the centre or on the right. You may want
it in a non-central position, for instance, if you have a lot of notes to which to
refer and you want the inspector open (and wide) next to the text.
Paper Width Use this slider to change the width of the text. You can set it so that
the text takes up the whole width of the screen or appears as a column.
Paper Height To access this slider, hold down the Option key. It will replace the
Paper Width slider, above. This sets how tall the paper column should be,
giving you a “letterbox presentation” at its more extreme settings.
Keywords Brings up the standard Keywords HUD (section 10.2) which you can use
in conjunction with the inspector (below) to assign keywords to the current
document.
Inspector Brings up the full screen inspector HUD panel (see below).
Dynamic Controls & Statistics The middle portion of the HUD changes depending upon your editing mode. In standard editing mode, this will display the
15.3. FULL SCREEN INSPECTOR HUD
151
word and character count for the document. As with the standard editor, this
will also display the counts for any selected text, using a blue label.
In scripting mode, this portion of the HUD will display element hints (much
like in Final Draft and Montage) as well as the element selection menu (which
you can always call up with
– Y).
Background Fade Fades the background (everything outside of the text column—
black by default but customisable via Preferences) in and out. Useful if you
want to refer to material in other applications open in the background whilst
remaining in full screen. When using a backdrop image this slider will do nothing.
Exit Full Screen The button at the far right will exit full screen mode. You may also
press the Esc key, or
– F to dismiss full screen.
15.3
Full Screen Inspector HUD
The full screen version of the inspector gives you near full access to the inspector data.
Use the top-drop down menu to access the different data views. Label and Status
will always be visible at the bottom of this window. For a full discussion on these
views and what they represent, read Meta-Data Types (section 10.1), and Inspector
(chapter 17).
15.4
Customising Full Screen Appearance
Most appearance controls can be set in the Full Screen preference pane (section B.4).
Refer to the documentation provided for this pane for greater detail on available options. Most colour settings will be found in the full screen sub-section of the “Customizable Colors” area in the Appearance pane (section B.2).
Due to limitations in the OS X text system, it is not possible to temporarily override the font family in full screen. The text colour can be overridden, but changing
the font would be an irreversible adjustment to your formatting.
15.5
Using Full Screen with Multiple Displays
When using two monitors, you can configure Scrivener to use the secondary display
as the full screen window instead of the primary display. This can be adjusted in
preferences.
Also, if you don’t mind taking a performance hit, you can choose to leave the main
Scrivener interface open on the primary display. When doing so, Option-clicking
on text or folder items in the Binder will load these items into your live full screen
session. As with the standard editor, using the Command and Shift keys will select
152
CHAPTER 15. FULL SCREEN
multiple documents and form a Scrivenings session. To utilise this in the active full
screen window, just add the Option key to these modifier keys.
Chapter 16
Annotating and Marking Your
Text
(Material not finished)
Important note: Although you can create tables and bulleted lists inside annotations and footnotes in Scrivener, they are not supported inside annotations and
footnotes in the RTF, RTFD and Word exporter. This means that if you create
tables or bulleted lists inside annotations or footnotes in Scrivener, when you export to RTF you will find that the tables and lists are stripped out. This is because
certain limitations in the OS X system can cause crashes or strange results during
the RTF conversion process in situations where tables and bulleted lists clash with
the boundaries of annotations and footnotes. If you require such elements, it is
thus recommended that you format them at a later stage of the draft in a dedicated
word processor.
16.1
16.1.1
Inline Notation
Inline Annotations
(Material not finished)
16.1.2
Inline Footnotes
(Material not finished)
16.1.3
Finding Inline Notations
(Material not finished)
16.2
16.2.1
Linked Notation
Linked Comments
(Material not finished)
153
154
16.2.2
CHAPTER 16. ANNOTATING AND MARKING YOUR TEXT
Linked Footnotes
(Material not finished)
16.2.3
Finding Linked Notations
(Material not finished)
16.3
Text Colour and Highlights
16.4
Marking Revisions
16.4.1
Setting a Revision Level
16.4.2
Marking Existing Text
16.4.3
Removing a Revision Level
16.4.4
Removing all Revision Markings
16.4.5
Finding Revision Markings
Chapter 17
Inspector
The inspector displays all meta-data associated with the document shown in the editor
pane that most recently had the keyboard focus. Note that the special root folders in
the binder - Draft, Research and Trash - have no meta-data associated with them, and
therefore the inspector just shows the project notes or references when these items are
selected.
You may toggle the appearance of the inspector with View Layout Show|Hide
Inspector, or by pressing
– I.
17.1
Synopsis Card
At the top of the Inspector (for the Notes, References and Keywords panes) you will
find a depiction of the document’s index card, using whatever index card theme and
appearance options you have set in preferences (Corkboard specific display features
will not be rendered on the card, such as the pin, stamp, or keyword colours). As
with the index card on the corkboard, you can edit the title and synopsis right on the
card, updating the documents corresponding representation on the corkboard.
To the right in the header bar you’ll see a drop-down menu with an index card
graphic in it. Click here to select between text synopsis and graphical synopsis. In
graphical mode, you can drop an image from the Finder (or the binder) which will be
used to “represent” this document on the Corkboard. The text synopsis will not be
erased, and in fact will still be used on the outliner and various export methods, but
in the Inspector and Corkboard, the graphic will be used instead.
When in text synopsis mode, the button on the far right will automatically generate
a synopsis based on the current text in the document. It will take the first few lines of
text and place it into the card for you. Clicking this button is synonymous with the
Documents Auto-Generate Synopsis menu command.
The Synopsis section can be collapsed to make space for the other elements of the
Inspector.
See also: So What are Index Cards, Anyway? (subsection 12.1.1)
155
156
17.2
CHAPTER 17. INSPECTOR
General Meta-Data View
This collapsible section appears in the Notes, References and Keywords panes of the
Inspector. It displays the basic document meta-data and provides controls for editing
it. Read Meta-Data Types (section 10.1) for further detail.
17.3
Custom Meta-Data View
Click on the header bar for General Meta-Data to reveal the Custom Meta-data control. You can also alternate between General and Custom meta-data by pressing – 7.
The interface presents a table with the meta-data field name in the left column, the
editable values you may supply on the right. If custom colours have been assigned to
any fields, they will be rendered here as text colour. Also, word-wrapping will impact
this table. Read Custom Meta-Data (subsection 10.1.6) for more information.
If no custom meta-data has been configured for the project, this panel will not be
available.
17.4
Document Support Panes
The five panes of the inspector present further access to notes, reference links, keywords, text snapshots, and linked comments and footnotes, respectively. The first
three share space with the synopsis and meta-data panels, the last two take up the
entire inspector interface.
The five panes can be accessed at any time by clicking on the icons in the bottom
of the inspector, using the View Inspect sub-menu.
17.4.1
Document and Project Notes
Document notes provide a rich text writing area that is outside of the main text area.
You can use notes to store any auxiliary information about the current document
for reference whilst writing. Clicking the header bar of the notes area will bring up
a pop-up menu from which you can select “Document Notes” or “Project Notes”.
Document notes are always attached to the current document.
Project notes are similar to document notes, except they are visible to the entire
project, no matter what document you have selected. In addition, you can also create
multiple project notepads, using the Project Notes window (section 12.3). When
more than one notepad has been created for a project, you will see them appear in
this menu as well. There will always be at least one project notepad.
You can cycle forward and backward through all available document and project
notepads with – 6 and
– 6.
17.4. DOCUMENT SUPPORT PANES
17.4.2
157
References
The References table allows you to hold links to related material within the project
itself, elsewhere on your hard drive or on the internet. Drag documents from the
binder or the Finder and URLs from the internet into the table to create links, or use
the buttons in the References header bar to add and remove reference links. Doubleclicking on the icon of the reference, or selecting it and hitting Return, will open
the document, either inside Scrivener or in the default application depending on the
reference type. Clicking the header bar of the references area will bring up a pop-up
menu from which you can select “Document References” or “Project References”.
As with notes, document references are attached to the current document whereas
project notes are global and remain the same no matter which document you are
viewing.
References to files on your disk which are supported by Scrivener’s editor can
be dragged into the header bar for viewing, even without importing them into the
project. URLs and unsupported file formats will not allow a drop on the header bar.
When you create a Scrivener Link to a document in any way, a Reference back
to the originating document will be placed in its references list. This way you can
easily track “back links” while browsing your project. These links are, however, not
dynamic. They are created once upon linking, and can later be removed or altered.
Pro Tip: If you change the “URL” for internal links (which otherwise just state
“[Internal Link]” in the URL field) to a single asterisk, that item will be placed
at the very top of the header bar icon menu. If accessed from there, it will load
that file in accordance with your navigation settings for internal references. Use
this to create a more visible “soft link” between one or more documents, such as
frequently used research material, instructions for preparation, and so on.
17.4.3
Keywords Pane
You can associate keywords with documents to help you find them when performing
a project search. Use the buttons in the header bar above the keywords table to add
and remove keywords (or you can drag words and phrases from text to the keywords
table to create a new keyword). You can also use the Keywords HUD, which stores a
repository of all keywords used in the project, to assign keywords by dragging them
from the HUD into the keywords table in the inspector. You could use keywords to
hold character names, locations, themes, or anything else. This way, you could assign
the name of a theme to a document as a keyword, and then later you could perform
a keyword search to find all documents that deal with that theme (especially useful as
you are unlikely ever to use the name of a theme directly in the text itself).
See Also:
1. Using Keywords (subsection 10.1.4)
158
CHAPTER 17. INSPECTOR
2. Keywords HUD (section 10.2)
17.4.4
Snapshots Pane
This section of the Inspector gives you easy access to all of your existing snapshots, the
ability to create new ones, delete old ones, and load up comparative displays between
snapshots or the current editor.
At the top of the Inspector, you will find two buttons. Clicking the + button will
create a new untitled snapshot for the current document. To remove a snapshot, select
it in the table below, and click the - button. To read the contents of a snapshot, click
on any of the rows and its text will appear in the text preview area below the table.
The Compare button lets you analyse the differences between versions of your text.
There are two ways of using this:
1. Compare with current: Simply select the snapshot you wish to compare against
the current text, and then click the Compare button. The changes will be highlighted in the text preview area.
2. Compare two snapshots: Select two snapshots in the table and then click the
Compare button. The differences between those two versions will be highlighted.
While in comparison mode, the text preview area will switch to plain-text so that
only actual changes to the content can be analysed. To return to standard viewing
mode, click the Original button. The two arrow buttons which will appear in comparison mode let you jump from change to change. You can use
– [ and
– ] to
navigate between changes, as well.
In some cases, the level of editing will be as such that the comparison mode produces confusing results. The method of analysis can be fine-tuned by clicking the
down-arrow beside the comparison button at any time. In many cases, removing
word-level analysis will produce a cleaner result, when extensive edits have been made.
These options work in a descending fashion, meaning that the lowest selected option
overrides the options above it.
1. By Paragraph: any changes made within a paragraph will trigger the entire paragraph as having been modified.
2. By Clause: any changes made within a clause (as in a sentence) will mark the
entire clause as having been modified.
3. By Word: individual words will be marked, producing the most precise (and
thus “noisy”) results.
17.5. LOCKING THE INSPECTOR
159
The Roll Back button will revert the current editor text to the text in the selected
snapshot. To use it, select the snapshot you wish to revert to, and click the Roll Back
button. Scrivener will request confirmation from you, and give you the opportunity
to snapshot the current text if you wish. Note this cannot be undone.
Read more about using snapshots here (section 14.10).
17.4.5
Linked Notes Pane
The final pane keeps track of all the comments and footnotes that appear in the current text view. This means that in Scrivenings mode where multiple documents are
represented, this display will show a combined view of all notes across the documents,
in the order that they appear.
Along the top of the pane, you will find three buttons which in order of appearance
from left to right do the following:
§ Add a new comment in the text at the current text position or selection
§ Add a new footnote in the same manner as above
§ Delete the selected comment(s) for footnote(s).
Select multiple items in the same fashion you would select multiple documents
with the Cmd and Shift keys. Notes can be independently collapsed or revealed by
clicking the triangles beside their title. Opt-clicking these arrows will collapse or
expand all notes. Likewise the – 0 and – 9 universal shortcuts for collapse all and
expand all work as well.
Press the Esc key to return to the main text editor at any time, even while editing a
note.
Using notes as bookmarks: Clicking on a note will scroll the text editor to the
position that they appear in within the text. This means you can use notes as a
form of bookmark, or quickly jump through your text point-by-point to areas that
need addressing.
See also: Annotating and Marking Your Text (chapter 16) for full usage notes on
the comments and footnotes themselves.
17.5
Locking the Inspector
You can lock the inspector to the current editor so that when the other editor in
the split view receives the focus, the inspector does not change contents but instead
continues to display information about the document in the first editor. To lock it,
just click on the icon of the padlock in the bottom right of the inspector (in the footer
view, near the window resizing area).
160
17.6
CHAPTER 17. INSPECTOR
Advanced Inspector Keyboard Usage
The following keyboard shortcuts may be used to access the individual Inspector
panes:
§
– H — Notes
§
– N — References
§
– J — Keywords
§
– M — Snapshots
§
– K — Comments and Footnotes
These five keys are all placed under the right hand in ascending order, making it
easy to memorise them and use them without leaving the home-row. These shortcuts
have two modes of operation. If the pane in question is not visible, the Inspector
will open if necessary and switch to that pane. If the keyboard shortcut is pressed
while the particular pane is already visible, it will be focussed. This means you can
always start typing in notes, even if the Inspector is hidden, by quickly tapping the
corresponding keyboard shortcut twice. The focus model is used in the panes like so:
1. Notes: Immediate access to existing text so you can start writing and editing in
notes immediately. Switch between notepads with – 6 and
– 6.
2. References: Selection is moved to the list so you can navigate with arrow keys;
tap Enter to activate a link; or Del to remove a link from the list.
3. Keywords: Selection is again moved to the list. Use arrow keys to navigate
between existing keywords; tap Enter to add new keywords; tap Del to remove
keywords.
4. Snapshots: Focus is moved to the text preview field so you can quickly copy
and paste from here if necessary.
5. Comments & Footnotes: Focus is moved to the note list. Use the up and down
arrow keys to move between notes and jump to their corresponding position in
the main document; Enter to edit the text of an existing comment or footnote;
left and right arrows to collapse or reveal a note; and Del to remove notes.
Chapter 18
QuickReference
QuickReference Panels give you the ability to open more than two documents at
once. They are in a way similar to Mac OS X’s QuickLook, but rather than limiting
you to only one QuickLook panel and a view-only model, many QuickReference panels can be opened simultaneously, and when viewing items which would otherwise
be editable in the standard editor, allow full editing capability. They also provide full
editing access to most data you can get in the Inspector, with the notable exception of
snapshots (more on that below). Once opened, QuickReference panels will remember their size and position on the screen, as well as their meta-data viewing options
for the duration of the session only.
There are two easy ways to open a document in QuickReference mode:
1. Select one or more documents in the sidebar or a view and tap the Spacebar. If
more than one document is selection, multiple QuickReference windows will
be opened at once.
2. Use the View QuickReference sub-menu to navigate your project binder
and open a document from anywhere, without disturbing your existing editor
views or requiring an editor lock. This method is also accessible from Full
Screen mode. This menu functions in a similar manner to the Go To menu.
Each item in the Binder will have an entry, and you select a container entry just
as easily, to open that container in its own QuickReference window.
The panel itself is composed of four major parts, one which is hidden by default. At
the top you have quick access to the Label and Status meta-data fields. In the middle
is the editor/viewer. This is an editable, full-power text editor when viewing standard
file or folder documents, and a standard media viewer just like the main editor when
viewing PDFs, images, or QuickTime documents1 . Below the editor/viewing area
you will find a compact footer bar which will display a word and character count for
standard file or folder documents. Beside that, a drop-down menu will give you access
to some document meta-data.
1
Unlike loading film and audio in a split, the remove pause and resume commands will not work
in QuickReference panes, as you can have many audio files open at once, and Scrivener would not
know which one to trigger.
161
162
CHAPTER 18. QUICKREFERENCE
You might want to take a moment to examine the Navigation pane in preferences
(section B.5) to see how you can use QuickReference panels to open things you might
otherwise have thought you could only open in standard editor splits.
See also:
§ Inspector (chapter 17)
§ Meta-Data Types (section 10.1)
18.1
QuickReference Mini-Inspector
Each QuickReference panel has the ability to load up key components of the inspector’s meta-data into a split view. Using the drop-down menu, you can select which
type of meta-data you wish to view:
1. Synopsis: the content of the index card
2. Picture: the representational graphic if one has been selected
3. Notes: standard document notes (you cannot access project notes from a QuickReference window)
4. Keywords: document keywords; this table also serves as a drop-point for keyword drags from the HUD.
5. References: the list of document references; as with notes, project references
cannot be viewed.
6. Comments & Footnotes: this is the only view that will pop-up on its own if
you add a comment or footnote while writing in the editor. This pane works
identically to its inspector counter-part.
18.2
Using QuickReference Panels in Full Screen
Since QuickReference Panels float over the Scrivener interface, they will remain
visible even when entering full screen mode, making them useful for bringing
reference material into this dedicated writing environment. Additionally, you
can open new QuickReference windows while in full screen, by accessing the
View QuickReference sub-menu.
Chapter 19
Scriptwriting
(Please note this chapter is not up to date yet)
Although Scrivener is in no way intended to be a dedicated scriptwriting program
(for such a program you might want to try Final Draft or Celtx if you have not done
so already), it does allow for basic script formatting.
19.1
Formatting a Script in Scrivener
To format a script in Scrivener, select the format you want to use from the Scriptwriting menu inside the Text menu. When in scriptwriting mode, the top item in the Text
> Scriptwriting submenu will be checked and will display the name of the format you
are using.
In the above example, the standard “Screenplay” format is selected and Scrivener
is in scriptwriting mode. If “Script Mode - Screenplay” did not have the tick next to
it, then we would know that the current editor was not in scriptwriting mode (that
is, it would be in normal prose mode for general writing). You can more easily tell
whether or not you are in scriptwriting mode by looking at the footer view, which
will look different (see below).
Note that it is possible to set the script mode individually for the two editors in the
main window, so that you could be writing a script in the top pane but using general
text mode in the bottom pane. (However, you cannot use different script types in
each editor; that is, you cannot use screenplay format in one editor and stage play
format in the other.)
At the bottom of the scriptwriting menu you can see a list of all the different script
formats that are available. Scrivener comes with “Screenplay” format built in. Several
other script formats are installed if you run the “Extras” installer that comes with
Scrivener. You can also create and save your own script formats which will appear in
this list (see below).
You can, of course, mix up different text modes in the same document or draft, so
that parts of a document may be written as a script and other parts written as general
text. This makes it very easy to write treatments in Scrivener.
The screenplay format that comes with Scrivener by default is based on a Hollywood standard, but with half an inch added to the left indent of each element so
163
164
CHAPTER 19. SCRIPTWRITING
that when you print with a standard set-up of one inch margins, the left margin will
actually start at one-and-a-half inches, which is the standard to allow for three-hole
binding.
The scriptwriting mode in Scrivener works much like other scriptwriting programs
(or, to put it more honestly, it has been strongly influenced by Final Draft). On
the right of the footer view is a pop-up button with a menu containing the various
elements for the selected format. Clicking on an element will reformat the current
paragraph to the format of the selected element. So, for instance, if you clicked on
“Character”, the current paragraph might all be capitalised and centered.
Upon hitting enter and typing, the paragraph formatting will be changed to that of
the next set element (although hitting shift-enter allows you to create a new paragraph
without changing element). So, for instance, if you hit enter after having typed in a
Scene Heading, the typing attributes might be set to Action. At this point, you could
easily change the current element by hitting Tab - hitting it once would change the
current element to Character. Hitting it several times will cycle through different
elements.
The footer view tells you which element will be created next by hitting tab or
return. In the image above, the prompt text in the footer view says, “[Tab] Transition,
[Enter] Dialogue”. The cursor is at the end of the character name. This tells us that
if we hit the Tab key, we will be able to start typing a transition; if we hit enter, we
can start typing our dialogue.
The scene elements menu can be quickly and easily accessed from the keyboard
so that your fingers do not have to leave the keys for the mouse: hit cmd-Y to bring
up the menu, and then hit the letter or key-combination associated with the script
element you want to use (for instance, “c” for Character or “p” for Parenthetical).
Auto-completion is available for some elements. Upon choosing Scene Heading,
for instance, you can start typing and then hit cmd-period or option-Escape to choose
from a list of “INT.”, “EXT.” and so forth (auto-completion can also be set to display
a list of options automatically, without the need for hitting cmd-period or optionEscape - see below).
Note on US Stageplay format: After selecting the “Set Description” element in
Stageplay US mode, you will need to hit tab to move the cursor to the correct indent.
This way you can type “SETTING:” or “AT RISE:” and so on before hitting tab if you
require descriptive words set at the left margin. (The US Stageplay format will only
be available if you installed it using the Extras installer that comes with Scrivener.)
19.2
Creating Your Own Script Formats
Scrivener comes with Screenplay format mode built in. You can also install several
other format modes by using the Extras Installer that comes with Scrivener. This will
install a format for comic script writing and the standard formats for both UK and
19.2. CREATING YOUR OWN SCRIPT FORMATS
165
US stage play scripts. It will also install an extra screenplay format entitled “Screenplay (Final Draft)”, which has elements that have been tweaked to match the ones
in Final Draft. You can also create your own script formats tailored to your own
requirements.
To create your own script format mode, select Scriptwriting > Script Settings. . .
from the Text menu and use the panel that appears to name your format and define
its various elements. At the top of the panel is the Format Title text field. Enter the
name of your format here (e.g. “Television (BBC Comedy)”).
On the left of the panel is the Elements list. This is a list of the parts that make
up your script, such as “Scene Heading”, “Dialogue” and so on. You can add new elements and delete existing ones using the “+” and “-” buttons beneath the list, and you
can rename elements by double-clicking into them. You can also reorder elements
by dragging and dropping them. Note that “General Text” and “General Text (Centered)” will be added to the end of any element list you create but will not appear
here.
At the bottom-left of the panel is a pop-up button entitled “Manage. . . ”. This
allows you to reset your script elements to the default screenplay settings, to save
your format for use with other projects, to save it for back-up somewhere on your
hard drive (or to share it with others) and to load from file an existing format mode
created either by yourself or someone else (note that some formats have been created
by other users and shared on the forums).
Next to the “Manage. . . ” pop-up is another pop-up button that allows you to
choose the units used to define your style - inches, centimetres or points (most script
formats use inches, of course).
On the bottom-right of the panel are the “OK” and “Cancel” buttons for saving
or cancelling the changes you have made to the format mode respectively. Note that
clicking “OK” saves the script format into the current project package. This means
that if you share your .scriv file with someone else, that someone else will be able to
open the project and use the script format regardless of whether they have this script
format installed on their machine. The format will not be available for use with other
projects until you select “Save for use with other projects” from the “Manage. . . ”
menu, though. Once you are happy with the format, it is thus strongly recommended
that you make it available for use with other projects.
Note that making a format available for use in other projects saves it as an XML
file in ∼/Library/Application Support/Scrivener/ScriptFormats. For script formats
you use a lot, it is recommended that you also use Manage. . . > Save to File and save a
copy of the format somewhere safe in case you ever need to reformat your hard drive.
On the right of the panel is the tab view. This is used for setting the format for each
element. Select the element from the list on the left, and then set the formatting for
that element using the controls in the tab view on the right. The setting controls are
grouped under four different tabs:
166
19.2.1
CHAPTER 19. SCRIPTWRITING
Font
The Font pane (see the image above) provides options for setting the font and character appearance for the selected element, as follows:
Font: Allows you to set the font for the current element. By default, “Use script
font set in Preferences” is selected. With this selected, the font set in the “Text Editing”
pane of the Preferences will be used. (Note that Scrivener does not use the font to
identify elements, so you can change the font in the preferences without messing up
Scrivener’s recognition of script elements.)
Size: Allows you to set the font size (provided “Use script font set in Preferences”
is not selected above).
Style: Provides a number of options for determining the appearance of the current
element, mostly self-explanatory. Bold emboldens the element’s font; Italics italicises it (you would never have guessed that, would you?). Parenthesis encloses the
current element in brackets when you hit tab or enter. No Underline/Single Underline/Double Underline allows you to set the underline style for the current element.
If single or double underline is selected, you can check Underline by word to underline words only (not spaces). All caps to: If this is checked, the element will be
capitalised. If End of line is selected, the element will be capitalised all the way to the
end of the element. If First tab is selected, the element will be capitalised only up to
the first tab character. This accommodates formats such as the UK stage play format,
which has character names and dialogue on the same line, with character names in
capital letters followed by a tab and dialogue in normal sentence case. If Character(s)
is selected, you can enter the characters into the text field that will terminate capitalisation. For instance, if you entered a colon in the text field, the element would only
be capitalised up to the first colon.
Menu shortcut: Enter a letter here that will be used in the script elements menu
as a shortcut key. (Hitting cmd-Y brings up the script elements menu whilst you are
typing or editing; hitting the key you enter here will select the element - thus your
hands don’t have to leave the keyboard to select script elements.)
19.2.2
Paragraph
The paragraph pane allows you to set the paragraph formatting of the selected element:
Alignment: Sets the current paragraph alignment (left, centered, right or justified).
Spacing: Sets the inter-line spacing (single, 1.5 or double).
Spacing Before: Sets the number of blank lines to appear before the selected element
(0, 1, 2, or 3).
First Line Indent: Sets the left indentation of the first line of the paragraph.
Left Indent: Sets the left indentation of all lines in the paragraph excepting the first.
19.2. CREATING YOUR OWN SCRIPT FORMATS
167
Right Indent: Sets the right indentation of the paragraph.
First Tab: Sets the first tab stop of the paragraph. (Note that subsequent tab stops
may be added automatically to differentiate elements should any elements have the
same formatting.)
Advanced: Allows you to set the writing direction, minimum line height and default tab interval (the latter for cases where extra tabs are added as mentioned in “First
Tab”, above).
19.2.3
Tab/Return
The Tab/Return pane allows you to control the tab and return behaviour for the
selected element; that is, it lets you specify what happens when you hit the tab or
return keys.
On return: Sets which element formatting the text will use when you hit the return
key. In the above image, “Scene Heading” is selected in the list on the left and “Action”
is selected for “On return”. This means that if you hit the return key after typing
a Scene Heading, the text will automatically be formatted ready to type an Action
element. (Note that the pop-up buttons in the “Tab/Return” pane take on the same
order as the elements in the list on the left. Thus, if you reorder the elements on
the left by dragging and dropping them, the elements in the pop-up buttons will be
reordered to match, which could lead to different elements being selected - so be sure
to do this part only after you have arranged the elements list on the left in the order
you desire.)
Tab behavior: Sets what happens when you hit the tab key. Allow tabs: If this
is checked, the tab key works as it would normally - that is, it inserts tabs. With
this checked, none of the other options for tab behaviour are available. Tabbing on
an empty line: Choose an element from the “Go to:” pop-up button to set which
element will be formatted when you hit tab on an empty line. This allows you to
cycle through elements using the tab key. For instance, in the example image above,
if you have hit return to find the text formatted as a Scene Heading, you can then
hit the tab key to reformat the line as an Action element provided you haven’t typed
anything yet. Tabbing after typing: Sets what happens when you hit the tab key
after typing something in the current element. Select “Go to:” and an element from
the pop-up button to have tab automatically take you to the next desired element
(inserting a new line automatically). Select “Insert” and type characters in the text
field to have the tab key insert a character sequence. In the example above, hitting tab
after typing something in a Scene Heading element automatically inserts a hyphen
surrounded by spaces, which emulates the behaviour in Final Draft.
168
19.2.4
CHAPTER 19. SCRIPTWRITING
Auto-Complete
The Auto-Complete tab allows you to set a custom list of words that will appear for
auto-completion for the current element.
Use the “+” and “-” buttons below the list to add or remove new words to the
auto-complete list, and double-click on words to edit them. When typing your script,
hit opt-Escape or cmd-period to bring up the auto-complete list (or select “Automatically show completions” in the Text Editing pane of the Preferences). Note that
the auto-complete list only appears after you start typing a word. Checking Append
project auto-complete list will add any words set in the project auto-complete list
(Edit >Auto-Complete List) to the current script auto-complete list. This way, script
element completion lists can include character names set at the project level.
Important note: Creating a script format is a static process. That is to say that
if you create a script format and then use it to write a script, if you then go back
and edit the script format in the Script Settings panel, the elements of the script you
created using the older script format will no longer be recognised as anything other
than “General Text” (until you click into each element in your text and select the
correct element from the script elements pop-up menu to update the text). Thus, to
save yourself lots of painful reformatting later, it is strongly recommended that you
ensure you get your script format right before you start using it widely.
19.3
Importing a Script from Final Draft and
Other Programs
NOTE: Final Draft 8 users should refer to the section (section 19.7) on exchanging
files with Final Draft 8. For users of Final Draft 7 and earlier, you can import scripts
created in Final Draft by using “Save As” in Final Draft to save your script in “File
Converter” (FCF) format, then import the resulting .fcf file. Scrivener will try to
match the elements in the FCF script to the elements in the current script format.
For projects that use the basic screenplay formats, this should be all you need to do to
import a script with all of its elements recognised.
Because Scrivener is not a dedicated scriptwriting program, the way it handles
script elements is different from, say, Final Draft or Movie Magic Screenwriter. Dedicated scriptwriting programs generally assign meta-data to each text element that tell
the program that, for instance, this line of text is a scene heading, that paragraph is a
piece of dialogue and so on. Scrivener does little more than automate the process you
would have to use yourself were you to use a standard word processor to format your
script; that is, it just sets up the necessary paragraph formatting for each element and
auto-capitalises if necessary. Scrivener recognises elements by their paragraph formatting - for instance, if a paragraph has a three-inch left indent and single line spacing,
Scrivener will look up this formatting in the list of script elements, and if an element
19.4. EXPORT THE SCRIPT FROM FINAL DRAFT AS AN RTF FILE.
169
is found with matching formatting its name will be selected in the elements pop-up
button in the footer view. If no elements match, “General Text” will be selected.
This means that if you import a script into Scrivener from another program and
want to continue working on it, the script format mode selected in Scrivener must
exactly match the formatting of the script you have imported.
For convenience, when you install the Extras that come with Scrivener, an extra
script format entitled “Screenplay (Final Draft)” is installed. This has been set up to
match the elements of a standard screenplay created in Final Draft 7. Assuming you
have used the standard screenplay template of Final Draft to create your script, then,
to import the script from Final Draft into Scrivener, this is the process you would
follow:
19.4
Export the script from Final Draft as an RTF
file.
Import the script either by dragging the RTF file from the Finder into Scrivener’s
binder or by using File > Import > Files. . . Select “Screenplay (Final Draft)” from
the Text > Scriptwriting menu (note that you must have installed the Extras from
the Scrivener DMG for this to be available). Ensuring that the script is visible in the
editor and that the editor has the keyboard focus (by clicking into it if necessary), go to
Text > Scriptwriting > Re-capitalize Script to capitalise scene heading and character
elements. The script should now look right in Scrivener, and clicking into different
parts of the text should cause the pop-up button in the editor’s footer view to update
to display the element in which the cursor has been placed (e.g. “Character” if you
have clicked in a character element).
If the pop-up button in the right of the footer view displays only “General Text”
when you click into different areas of your script, or if “Re-capitalize Script” did not
work properly, then this is because the format mode you selected (“Screenplay (Final
Draft)” in this example) does not exactly match the format of the script you imported.
If your script formatting was not recognised properly, or if you imported a script
that has no matching format mode in Scrivener, you will need to create your own
format mode that matches the script using the Text > Scriptwriting > Script Settings
panel. Here’s how:
Export the script from your scriptwriting program as an RTF file. Import the
script either by dragging the RTF file from the Finder into Scrivener’s binder or by
using File > Import > Files. . . Ensuring that the script is visible in the editor, click
into a line of text that represents one of the elements you want to be recognised (for
instance, by clicking into a line of text that should be a scene heading). Open the
Script Settings panel (Text > Scriptwriting > Script Settings. . . ). Enter a title for
your new format in the “Format Title” text field. Select the first element in the list
170
CHAPTER 19. SCRIPTWRITING
and give it the name you require (i.e. the name of the element in which you placed
the cursor in step 3) by double-clicking into it and editing it if necessary. From the
“Manage. . . ” pop-up button in the Script Settings panel, select “Use current font &
paragraph settings”. This will copy the font and paragraph information from the line
of text in which the cursor has been placed in the editor into the Font and Paragraph
panes of the Script Settings sheet. Repeat this process, matching the settings for the
elements in the Script Settings panel with the text in the editor for each element in
your script. Be sure to save your script format for use with other projects using the
“Manage. . . ” pop-up button at the bottom of the Script Settings panel. You can then
use your new format with all projects in the future for any scripts you import. Once
you have successfully created your own script format mode, all of the elements in
your imported script should be recognised in the pop-up button in the footer view
of the editor, and you should be able to use the script mode to continue editing your
script. Note that more complicated script formats may require a little more tweaking
to be recognised, but the above process should work for most.
If you do create a script format mode that recognises elements from an imported
script, please use “Save to file. . . ” in the “Manage. . . ” pop-up menu from the Script
Settings panel to save your format as an XML file somewhere safe on your hard drive
so that you can back it up and load it on other machines or following a hard drive
reformat if necessary. Also, please feel free to upload such format files on the forums,
where other Scrivener users may find them useful - or from where you can always
download them again should you lose them!
19.5
Printing a Script
You can use the Compile Draft sheet from the File menu to print your script (or
to turn it into a PDF file). For examples of how to do this - including providing
a title page - install the Extras that come with Scrivener (by double-clicking on the
Extras Installer on the DMG from which you installed Scrivener), and then take a
look at one of the scriptwriting project templates by going to File > New Project and
selecting a project template such as the Screenplay template. Read the instructions
that come with the template to see how to set up your project so that it is formatted
properly when printed (or exported). Note that if you install the extras, you can also
use the “Load” button in the Compile Draft sheet to load preset options that have
been optimised for use with various script types.
Note that Scrivener is not intended as a final formatting solution, however. In the
majority of cases, just as you would with many other types of writing in Scrivener,
you will want to export your script from Scrivener so that you can do all the final
formatting in a dedicated formatting program - such as Final Draft, in the case of
scriptwriting.
19.6. EXPORTING A SCRIPT
19.6
171
Exporting a Script
To get a screenplay out of Scrivener and into Final Draft, export your draft to Final
Draft 8 (FDX) format if you are using Final Draft 8, or to Final Draft 5-7 File Converter (FCF) format for earlier versions, and then open it in Final Draft. Elements
such as scene heading, action, character name, parenthesis, dialogue and tranition
should all be recognised automatically. Alternatively, you can create the whole script
in Scrivener and export it as an RTF or DOC file and tweak it in your word processor
of choice.
19.7
Final Draft 8
Note that this information is only relevant to Final Draft 8 users. Users of previous
versions of Final Draft should use the more basic FCF format for importing and
exporting their work.
Preparing the script format in Scrivener Importing FDX Files Exporting Individual
Documents to Final Draft Compiling the Whole Draft to an FDX File 1. Preparing
the script format in Scrivener
NOTE: For basic scripts or those that will use Final Draft’s standard screenplay
formatting - indeed, for most screenplays - this step can be omitted, as it is mainly
concerned with setting up the formatting for custom scripts.
Whenever you import a script from Final Draft into Scrivener, all of its elements
will use the formatting specified in Scrivener’s script settings. These can be set up by
selecting “Script Settings. . . ” from the Scriptwriting submenu of the Text menu. The
Script Settings panel should be familiar to anyone who uses Final Draft, as it is set up
to be very similar, allowing users to create custom script formats.
Because a Scrivener project comprises multiple documents, it is important that the
script settings are set up as the user desires before importing or creating any script
documents in the project.
If you are writing a screenplay using standard formatting, you don’t really need to
do anything here. However, if you are using a custom format, or if you have an FDX
script that uses a custom format which you wish to retain after import into Scrivener,
you need to set up Scrivener to use that custom format first.
Fortunately, this is very easy to do, as Scrivener can read the formatting directly
from an FDX file, but you must do this before importing the script itself. (Remember, Scrivener can hold many different script documents but can only use one script
format in a project at a time; this is why setting up the format must be done separately
from importing a script.)
To import the formatting from an FDX file:
Open the Script Settings panel by going to Text > Scriptwriting > Script Settings. . .
In the Script Settings panel, click on the “Manage. . . ” pop-up button in the bottom-
172
CHAPTER 19. SCRIPTWRITING
left. Select “Load from Final Draft FDX. . . ” In the open panel that appears, select
the FDX file that contains the elements and formatting you want to use and then
click “OK” and “OK” again on the Script Settings panel to accept the changes. This
doesn’t import the actual script - it just imports its elements and formatting for use in
the current project.
To test the new format, create a new document, choose scriptwriting format (Text
> Scriptwriting > Script Mode - FDX Script Settings or cmd-3) and start typing
(changing elements using tab and enter or using the pop-up menu in the footer view
beneath the editor). You will see that the script uses the formatting of the FDX file.
Now that this is set up, you are ready to import the contents of the FDX file.
1. Importing FDX Files
You can import FDX files into Scrivener in one of two ways:
Drag an FDX file into the binder. Go to File > Import > Files. . . and select the
FDX file that you want to import. Note that many features are retained - script notes
become Scrivener footnotes, revisions are marked up in red, highlighting is retained
and so on.
If you wish the FDX file to be part of the script that will eventually be exported,
be sure to import it into the “Draft” folder, or drag it there after importing.
1. Exporting Individual Documents to Final Draft
To export individual documents to Final Draft, just select the documents you want
to export in the binder and then go to File > Export > Files. . . Select “Final Draft 8
(FDX)” as the export format.
The exported file should open in Final Draft 8 with all features intact.
1. Compiling the Whole Draft to an FDX File
To combine all of the scenes in the Draft folder of your project into one FDX file,
do the following:
Go to File > Compile Draft. Select “Final Draft 8 (FDX)” as the file format. You
may need to tweak the various settings of the Compile Draft sheet to get the script formatted correctly, just as you would with any Scrivener project. Click on “Export. . . ”
and choose a filename. Open the exported file in Final Draft 8. You should see that
most elements are retained - footnotes become script notes, coloured text becomes revised text, and so on. The header shows whatever is set in Scrivener’s Compile Draft
panel.
If for some reason you want the exported file to use Final Draft’s default screenplay
formatting and not to use the script formatting of the Scrivener project, you can select
19.7. FINAL DRAFT 8
173
“Use default Final Draft script element formatting for FDX export” in the General
pane of Scrivener’s Preferences.
That covers the basics of importing from and exporting to the FDX format using
Scrivener.
Chapter 20
Bibliography Management
Scrivener offers simple integration with your favourite a bibliography or citations
manager such as Bookends, EndNote or Sente for academic work. To set it up, visit
the General preferences pane (section B.1) Click on Choose to choose your citations
manager (usually from the Applications folder). If you set a citations manager here,
you can hit – Y (or Format Bibliography \ Citations...) to launch your bibliography application and bring it to the front automatically. You can then use your bibliography/citations application to paste a citation placeholder into Scrivener. After
compiling to RTF, you will need to use your manager to convert these placeholders
into final print form.
174
Chapter 21
Transcribing Media
(Material not finished)
175
Chapter 22
Page View
(Material not finished)
176
Chapter 23
The Name Generator
(Material not finished)
177
Part IV
Final Phases
178
Chapter 24
Creating a Table of Contents
While there is no support for inserting a dynamic table of contents into your draft,
there is a way to produce a static list of items, cross-referenced to page numbers during
Compile, and utilising Scrivener Links internally to make the list useful for the author
as well.
Note that this feature, while it can be created in any Scrivener project, is mainly
useful in conjunction with the PDF/Printing workflow, and the RTF format when
compiled.
§ For the ePub format, use the built-in Table of Contents generator, which is
dynamic.
§ With MultiMarkdown XHTML compile, specify xhtml-toc.xslt in the XHTML
XSLT meta-data field.
§ Table of contents for MultiMarkdown to LaTeX is handled by the specific XSLT
in use, but in most cases it will be included automatically and dynamically when
you typeset the .tex file.
Creating a table of contents is a simple process, but because it is a static list, you
will probably want to save it for one of your final steps, as any changes in outline
order, addition, or removal of sections will not be reflected in the list. The first step
you will need to take is to select, in either the binder or the outliner (you could use
the corkboard as well, but since that only shows one level of depth at a time, it would
be less useful for a large book), all of the items you wish to have represented in the
contents. The easiest way to do this is using the outliner.
1. Select the Draft item in the binder, and change the view mode to outliner
2. Reset the disclosure states by selecting all ( – A), and pressing
LeftArrow.
3. At this point you need to decide what depth you wish to have available in the
ToC. Repeatedly press RightArrow followed by – A until the desired depth is
reached.
4. Press
– A once again if necessary.
179
180
CHAPTER 24. CREATING A TABLE OF CONTENTS
5. Select the menu item, Edit Copy Special Copy Documents as ToC.
6. Create a new text document in the Binder, near the top of your book, and paste
the ToC data into this file.
Pro Tip: If you need to create a mini-ToC in the preface for each part of a book, as
is common with technical guides, you can follow these instructions to produce a
smaller scale list of sections. You will just want to select the relevant section instead
of the entire Draft, and paste the ToC copy into the preface area for each part.
The resulting list will be formatted with the name of the section on the left, and
a special token on the right, with an amount of indenting applied to each line, in
accordance with its outline depth relative to the highest level item that was copied (if
the portion of the book is at level 3, then a level 5 item will be indented only twice,
not five times). An additional left tab stop will be inserted into each line, allowing
you to make use of a tab in the Scrivener Link prefix compile setting, if you wish to
offset numbering from the standard title.
The token, <$p>, will be calculated and expanded during Compile to produce
page number references. In addition to page numbering, Compile will examine the
final title output and update it in the list, accordingly. In conjunction with counter
tokens in the title, and use of the title suffix and/or prefix, the resulting title could
end up looking completely different from how it appears in the list in Scrivener.
You also can create your own table of contents by hand, if you need custom formatting. There is nothing special about the “Copy Documents as ToC” command
that cannot be replicated manually. So if you do not like the default look, you can
either adjust the formatting after pasting, or generate your own from scratch by using
the <$p> token and linking it to the section you wish to reference with Scrivener
Links. The title should be linked as well, if you wish for it to acquire any prefix or
suffix information. Read Scrivener Links (section 9.5) for more information.
Using this feature with PDFs is more portable, since page numbers are baked into
the file and do not rely on features that only a few readers support. However since the
PDFs are generated via the OS X Print Preview feature, they will not have a dedicated
PDF ToC embedded in them, and are thus better for producing a printed copy rather
than a digital PDF with hyperlinks and a ToC.
Some things to watch for:
§ When first opened in Word, you will need to generate the ToC numbers by
running a test print preview once, they will appear as question marks until
doing so. Nisus Writer Pro will format the list correctly as soon as you open it.
§ The RTF feature requires word processors capable of understanding the RTF
PAGEREF command. Page numbers will appear as question marks in the list
if they do not.
181
§ If you are not using title generation in compile, and are instead relying on a
formatted title within the draft text itself, you may find this feature less useful,
and might wish to create your own from scratch using the above tips for doing
so.
§ The dot fill used between the title and the page number is an OS X text engine
underlining feature which may not be visible in all word processors.
See Also:
§ Compiling the Draft (chapter 25), Printing and PDFs (subsection 25.4.3)
§ Scrivener Links (section 9.5)
§ Creating an eBook (subsection 25.4.5)
Chapter 25
Compiling the Draft
The main purpose of Scrivener is to gather together material that will help you write
a long piece of text (whether novel, thesis or factual book), which may be structured
as individual files in the binder but which can easily be output as one large file. Thus,
you write, gather and organise the material for your manuscript in the Draft folder,
and when you are ready to export or print the manuscript as a whole, you use Compile Draft (
– E) in the File menu, which takes the contents of that folder, formats
it as you specify, and outputs (or prints) it as a single document. Using the various
settings available in these panes, you can export or print your manuscript however
you like - and regardless of how the files are formatted in Scrivener itself.
Compile settings are an intrinsic part of your project. They will be saved with the
project and travel with it if you move it to another machine. The available presets are
global, however, and can be applied to any of your projects. You can also save custom
setups as your own presets to be used in this same fashion.
Select from a number of handy presets using the Format As: drop-down menu, and
then supply a target format using the Compile For: drop-down menu. If you require
more detailed control of the exported file, you can click the expansion arrow to the
right of the preset selection menu to reveal the full Compile interface. From here it
is possible to control practically every element of your draft as it is processed into a
single file.
25.1
Basic Presets
In many cases, you may not need to look any further than the supplied presets that
have been bundled with Scrivener. They have been designed to conform to industry
standards in terms of manuscript submission and working with agents and editors.
The available presets are:
§ Novel: Formats your book using standard Courier 12pt type and a number
of common conventions such as scene separators, page numbers, and so forth.
Note to get the full benefit of this preset, you will want to use one of the rich
text formats, such as RTF.
§ Novel (with parts): Same as above, but will format top-level folders to operate
as parts in the book, instead of chapters.
182
25.2. EXPANDED COMPILE INTERFACE
25.2
183
Expanded Compile Interface
The expanded Compile interface (accessed by clicking the expansion arrow to the
right of the Format As drop-down) is where fine-grained tweaks can be made to the
compile process. With some formats, like ePub, you’ll need to use this interface to
properly configure your book for devices.
The Compile panel is arranged into two main sections. On the left is a list of options pertaining to the currently selected export format, at the bottom of the window.
Clicking on the options in this list will reveal an associated pane on the right side.
Below that are two buttons which let you save your current settings to presets.
Note that all changes you make here will be automatically saved with the project.
These buttons are only necessary if you wish to share settings between projects. The
Load button lets you import saved settings that you may have downloaded from the
Internet. Ordinarily, you can access saved templates via the Format As drop-down.
At any point, you can hold down the Option key. This will convert the Cancel
and Compile buttons to Reset and Save, respectively. Reset will revert all changes
you have made back to the last saved version (or preset default if you have never used
compile for your project before). The Save button will dismiss the Compile sheet, but
save your settings before doing so. This is useful when you want to make a change to
your export settings, but do not want to actually compile the document yet.
25.3
Option Panes
Each export format has a variety of features available for customisation. Some of
the tabs will be available to all formats, but some are only available to certain types,
and others only appear for single specialised formats. Since there is a good deal of
duplication, this section will go over each of the available tabs. It will be noted in
each section which formats the tab is relevant to.
25.3.1
Contents Pane
This option pane is a core feature available to all export formats.
The Contents pane is where you define which parts of the Draft Scrivener will use
to create your exported file. To accomplish this, it provides several tools of varying
scope. The method with the most immediate impact is the drop-down menu at the
very top of the pane, marked as 1 (Figure 25.1). Ordinarily this will have the Draft
selected (which might be called something else if you have renamed it, or started with
a template).
In cases where you wish to proof only a portion of the book, or are working in a
project that includes several editions located in the Draft, you can use this drop-down
to select only a portion of the manuscript. Whatever container you select will include
everything from that point downward, in outliner terminology, its descendants. You
184
CHAPTER 25. COMPILING THE DRAFT
Figure 25.1: Compile—Contents Pane
could, for example, select the folder called “Chapter 1”. All of the scene files included
in the folder will be used in the Compile, including the chapter folder itself, but
nothing outside of that folder will be used.
In addition to folder selection, you can also select a Collection to be used the content source. When Collections are in use, there are two important things to consider:
1. The rule of thumb in which only items within the Draft can be compiled will
be temporarily dismissed. Items placed into a collection from outside of the
Draft will be included in the compile. However, only text and folder items will
be used.
2. Since Collections have no inner hierarchy, the compile will always result in a
flat list of documents. Book parts will be on the same level as sub-sections, to
put it into practical terms. Since the final result will always be a flattened file
anyway, the main thing to note here is that only those formatting stylesheets
relating to Level 1 will apply.
25.3. OPTION PANES
185
Content Item List
The item list is the large display in the middle of the pane, listing the contents of
whatever has been selected in the top drop-down menu. In the case of the illustrated
example, marked as 2 (Figure 25.1), the Draft has been selected, and so the entire Draft
contents are revealed in the list below it. The items in this list will be indented in the
same fashion that they are indented within the binder, representing their hierarchy.
If you wish to use Collections but still retain hierarchy, read the next section on
filtering.
There are four columns in this list. It is usually a good idea to briefly scan these
columns to make sure everything will act in the manner you expect it to. On any of
the checkbox columns, you can Option-click the header to toggle checkmarks for all
visible items.
Include Linked to the Inspector option, “Include in Compile”, if unchecked the item
will not be visible in the final product. See below for an exception to this.
Title The visible name of the item in the Binder. This might be altered in subsequent
compile option panes, or updated with a counter if it includes a token.
Page Break Before Linked to the Inspector option, “Page Break Before”.
Inserts a page break control before the checked document. A common usage
for this is to use folders to contain the chapters of your book.
Compile As-Is Linked to the Inspector option, “Compile As-Is”.
All options set in the formatting pane (subsection 25.3.2) will be ignored for the
checked document. This means no extra material will be added, including titles,
and no reformatting of the text will be done. Text will always be included, even
if it would otherwise be excluded.
In the lower-right corner (marked as 3) is an override which can reverse the settings
of the “Include in Draft” checkmark. By default, the behaviour follows the logic of
the document settings. You can however inverse the logic and only export those items
marked to not be exported—or just ignore the flags altogether and export everything.
Filtering
Filtering is an advanced feature, marked as 41 which uses the selected contents list
above and applies additional criteria to filter the list down further. This works in a
similar manner to searching for items: only those items which match the criteria will
be included in the compile.
1
compile-contents.png
186
CHAPTER 25. COMPILING THE DRAFT
As with the content drop-down menu, the changes you make here will impact what
you can see in the list. If when you first load up compile and are puzzled by an empty
list, check the Filter options and make sure nothing has been left set there from a
prior session.
Filters can be defined in two ways, set with the first drop-down menu:
§ Include: Everything matching the rest of the filter will be included in the compile, non-matching items will be removed. This is the default setting.
§ Exclude: Everything matching will be removed from the compile.
The second drop-down specifies which attribute you wish to filter by. There are
three options:
§ Documents with label: Documents matching the Label specified in the third
drop-down menu will be matched and handled according to the logic in the
first drop-down menu. This is the default setting.
§ Documents with status: As above, only using the Status meta-data field instead
of the Label field.
§ Documents in collection: Will provide a list of available Collections for you in
the third drop-down. Items found in that collection will be included or excluded
depending on the setting in the first drop-down.
Applied Example: Meta-data Filtering
In the provided example (Figure 25.2), the Contents pane has been simplified to
only show relevant interface elements. Additionally, the option to show label colour
(here, renamed to “PoV”) has been enabled in View Use Label Color In Icons.
Example 1 has the Filter checkbox disabled. The list is thus a pure depiction of
whatever container has been selected for compilation, in this case the top-level Draft.
We have labelled scenes a, d, and e with the “Joseph” character colour, and scenes b,
c, and f with another character. The other items have no colour label.
Example 2 shows the Filter option enabled, set to include all documents with PoV
(label) of Joseph. The resulting list has been filtered to only show the items which
have had the “Joseph” label set. What you cannot see here is that it is only selecting
items within the current compile group. If other documents in the project are labelled “Joseph”, but outside of the current compile group, they will not be included.
Filtering only adjusts the current contents of the compile group.
Example 3 is more subtle. In this case we have left the second two options alone,
but changed the first option to exclude all documents with PoV of Joseph. Note that
not only have the scenes from the PoV of the other character been selected, but all of
the items with no label set at all.
25.3. OPTION PANES
Figure 25.2: Sample filtering options
187
188
CHAPTER 25. COMPILING THE DRAFT
The manner in which the status meta-data filter works is identical to the label metadata, so we will move on to the next example.
Notes on Collection Filtering
The basic premise behind Collection filtering is the same as when using meta-data
fields. Items which match the criteria will be included, or if exclude has been set,
everything except those matching items will be included. Also as we demonstrated
with meta-data, the candidate items available for filtering must originally appear in
the unfiltered compile group list. Even though Collections can contain items from
anywhere in the project, they will not be selected for compile unless they originally
fell within the compile group scope.
Contrary to the method of selecting a Collection as your compile group, using
a Collection as a filter will preserve any existing hierarchy within the original list.
Of course, if the original list was itself the product of a Collection, there will be
none. Thus, filtering by Collections can often produce a similar result to selecting a
Collection group, while retaining outline structure.
The one other major difference between the two methods is based on the concept
described above: filters can only modify the contents of the list they have been provided with. The items listed within a Collection will be used to match against the
given compile group list, and they will never produce new results outside of the original list. So if you wish to include items from a Collection that do not exist in the
original compile group, you will need to use that Collection for your compile group.
Collections are an effective way to arbitrarily focus your Draft for special purposes,
without adjusting the “Include in Draft” checkbox for these items, but do note that
this feature is secondary to the Include checkbox. The checkbox will always have
priority over any filter settings. Filters adjust the item list, they do not dictate the
terms of compile.
25.3.2
Formatting
The Formatting pane is where you will design the look and structure of your document. It is separated into two main areas, each of which we will gradually introduce:
1. Structure and Content Table: A table for assigning content to the various Binder
item types available, and the creation of level specific content and formatting
rules.
2. Formatting Editor: A format editing and live preview area.
In the supplied example (Figure 25.3), the manuscript will print all folder titles
(including any text within that folder item itself), and only text for file groups and
files. It will also override the formatting to Courier 12pt, with a large right margin
for writing notes down by hand, and adds extra information to the folder titles, one
25.3. OPTION PANES
189
Figure 25.3: Compile—Formatting Pane
of which warns readers that they are holding a proof copy. All of this might seem
like black magic right now, even if it gives you a taste of what the compiler is capable
of, so let’s take a look at the provided features. By the time you are done with this
section, you should be able to see how all of this fits together, and in no time you’ll
be designing your own documents.
Structure and Content Table
The structure table, by default, has three rows which correspond to the three binder
item types: folders, file groups (text files that have subdocuments), and text files. For
a moment ignore the “Level 1+” labels, we’ll get to that in a moment. In the columns
to the left of each type you will find a checkbox for each content element that can
be optionally included by the compiler. Think of these as optional material you can
include from your project, for each item in the Draft. As Scrivener proceeds down the
list of items it has been set up to compile, it will consult this table for instructions on
how to handle it. If that item is a folder, it will look at the folder row and if “Title” and
“Text” have been checked, will add the binder title for that item into the manuscript,
190
CHAPTER 25. COMPILING THE DRAFT
Figure 25.4: Example multi-level formatting rule.
followed by any text that is in that folder file. If the next item is a text file, it checks
the text file row. If that row says only “Text” is exported, then it will print just the
text content of that file into the manuscript.
Using these checkboxes you can control the flow of information and produce a
manuscript to your requirements. Creative use of this feature can produce outlines
(Titles only for all types), a document with only your notes and no manuscript text,
chapter break items that do not export their text, and so forth. Note that as you
toggle elements on and off, you’ll see a live preview of how they will be inserted into
the compile, in the Formatting Editor below the table. We’ll get into how to change
the look and feel of this in the next section.
Pro Tips: You can enable (or disable) elements for all rows by Option-clicking on
any of the checkboxes. If you want to apply settings to only certain rows, you can
use the standard Copy and Paste functions to copy settings from one row and paste
them into another. This action will also paste any custom formatting settings as
well.
Things get more interesting when these rules are applied to levels of hierarchy.
This ability is best demonstrated with an example. Try selecting the Folder row in
the table, and then click the “Add formatting level” button, indicated with an arrow
(Figure 25.4). The label for the row that was previously selected will now be titled,
“Level 1”, and the new indented folder row will be called “Level 2+”. As you might
guess, this means you now have two rules for handling folders. The first rule will
25.3. OPTION PANES
191
apply to level one folders only, the second rule will apply to level two folders, and
anything deeper in the hierarchy than that. Note that when you do this, any configuration from the original row will be carried over into the new row to help you get
started in customising it. This holds true for formatting as well as the options we’ve
already discussed.
What do these levels correspond with? They are matched with outliner depth in
your binder. An example binder structure has been inset in the example, with the
items named to indicate how they correlate to “levels” in the Formatting pane. Items
directly beneath the Draft are considered to be “Level 1”, a child item beneath one of
those is “Level 2” and so on. The way Scrivener’s formatting engine works is by apply
a format to the maximum depth in your draft outline. Inserting rules will thus only
apply to those levels which it states in the label. In the provided example, I’ve added
a checkbox to insert Meta-Data (creation and modification dates, labels, and so forth)
to any folders at level two or deeper. Folders directly descended from the Draft will
only print their titles in the compiled document, but all folders at level two or greater
will also print their meta-data.
To remove a level-based row, you can select it and click the - button to the right of
the “Add formatting level” button.
There are other buttons and options in this table, but before we take a look at them,
let’s examine the formatting editor.
Formatting Editor
The formatting editor view is linked with the structure table above it. When you
select a row in that table, you are also editing the format for that row as well. Thus,
each type of binder item can have its own formatting rules, and further levels of depth
in the binder can have their own formatting rules.
The first thing you need to do when editing the formatting for the manuscript is
to enable the global override. In the header for the structure table, click the checkbox
labelled, “Override text and notes formatting”. When this option is engaged, your
entire manuscript will be given a uniform appearance which can, if you choose, be
radically different from how it looks in Scrivener. In a moment, we’ll discuss just
how much can be reformatted, but for now assume the entire look and feel will be
altered.
This area of the pane has a condensed Format Bar, a Ruler, some special options at
the top, and a large text preview area. This cannot be typed in, it shows you what
elements have been selected in the structure table, and how they will be formatted in
the manuscript. You can otherwise treat it just like an ordinary editor. If you click in
the “Title” area, you should see the formatting controls adjust to represent whatever
formatting has been applied to the title. Try clicking the Underline button. Unlike
with standard text, you are editing “areas” of text, so there is no need to select the entire title, you can just place your cursor anywhere within the title and click Underline.
192
CHAPTER 25. COMPILING THE DRAFT
Refer to the documentation on using the The Format Bar (subsection 14.4.2) if you
are unsure of what these various buttons do.
Title Prefix & Suffix
The Title Prefix & Suffix button provides the option to input text before and after
the title itself. This is text that will only appear when you compile, it will not be
added to the binder items’ titles, and is thus useful for keeping clutter out of the
binder. Rather than putting “Chapter <$n>:” into every single chapter folder in the
binder, you can simply add that to the Prefix and be done with it. This means you
can also more easily use casual titles for proofing prints, and more formal titles when
submitting your manuscript. It is possible to type carriage returns, tabs, and other
such characters into these fields, allowing you to create multi-line titles if you wish.
Click the purple “Help” button in this sheet for some useful examples of title prefixes and suffixes.
For MultiMarkdown users, by default, the title prefix and suffix will be placed
within the hash marks that Scrivener generates to indicate title depth. If you prefer,
you can disable the Place prefix suffix inside hashes options to allow text entry outside of the header line itself. Note that to allow compatibility with the other compile
formats, you will need to manually type in carriage returns to separate lines. Placing
characters before or after the hashmarks on a title line will at best cause it to no longer
render as a title correctly.
One important thing to consider is that the title prefix and suffix entries will be
printed even if Titles are disabled for that row. This can prove very useful in some
cases. It could for example let you use casual titles in the binder, and standard generic
titles in the manuscript.
Formatting for the prefix and suffix can be handled independently. It is possible
to have three different styles affixed to each of the three components: prefix + title
+ suffix. If you wish to maintain a uniform look, use the mouse to select all of the
visible title elements before styling.
The Page padding control to the right of the Title Prefix & Suffix button controls
how much padding will be added to the top of the page, if it happens to fall on a page
break. Use this to offset your titles from the top of the printable margins if you prefer
that look. This option will not be previewed in the formatting editor.
Special Formatting Options
Returning to the structure table, the Options... button will open a sheet which
lets you set just how much of your custom formatting will actually be applied to the
compiled manuscript, as well as a few other options.
Selective Opt-Out: You can always set specific parts of the Draft to ignore all formatting, no matter what settings you choose in the compiler, by using the Compile
As-Is Inspector option. Note that this will even ignore selected elements from the
25.3. OPTION PANES
193
structure table. Only the text of such items will be output (even if it otherwise
would not output text), and it will be output precisely as shown in the main editor.
While there is no formatting to override in the MultiMarkdown workflow, this
option will still inhibit the generation of automatic titling, even if the document
would otherwise be titled by the compiler.
Insert subtitles between text elements When either Synopsis or Notes elements
are enabled, Scrivener will insert a subtitle to help set apart these sections from
the main text, which will also be titled. These titles can be formatted like everything else in the formatting editor.
Place notes after main text The default is to place any Inspector notes above the
main text for the item being compiled. When checked, notes will be placed
below the main text area instead.
The Text Override Formatting Options section of this sheet lets you specify
just how much formatting should be changed in the source documents. Note that
if you use these, any applicable styling you’ve done in the formatting editor will be
ignored. If you set the option to preserve line-spacing, then adding double-spacing in
the formatting editor will do nothing.
§ Override font only: If all you want to change is the base font family, checking off
this box will disable the other options and inhibit the compiler from changing
alignment and ruler styles.
§ Preserve alignment: Left, centre, right, and full justification settings will be preserved throughout the manuscript.
§ Preserve tabs and indents: Actual tab characters will always be preserved. This
option merely inhibits the compiler from changing the ruler based tab stops
and indent markers. If you use blockquote indenting in your book and wish to
retain that formatting globally, use this option.
§ Preserve line spacing: All of the spacing options, including paragraph spacing,
will be left alone.
§ Remove first paragraph indents: When checked will use the common typesetting standard which only indents paragraphs subsequent to the first paragraph,
relieving you of the burden of having to do that by hand throughout your
manuscript.
§ On new pages only: Narrows the above option down so that it only applies to
first paragraphs following a page break.
194
CHAPTER 25. COMPILING THE DRAFT
Figure 25.5: Compile—Processing Options Pane
The Preserve Formatting only preserves section adjusts how the Format Formatting Preserve Formattingfeature works (subsection 14.4.5). By default
this feature will block all compile attempts to change formatting within the range
of text it has been applied to. Using these options, you can selectively weaken that
feature to allow some types of formatting to be overridden anyway:
§ Alignment: Left, centre, right, and full justification will be passed through to
the preserved block.
§ Tabs and indents: Tab stops and ruler indents will not be preserved in the block.
§ Font size: The size of the font will be made uniform with the text around it, but
not the font family.
25.3.3
Processing Options
The Processing Options pane controls provide three options which alter various behaviours in the compile process.
25.3. OPTION PANES
195
Compile ignoring levels outside of the current compile group This becomes useful when the compile group has been set to anything other than the Draft. Ordinarily when a portion of the Draft is selected for compile, the formatting
treatment and counter numbering will be displayed as though the rest of the
manuscript existed. When this option is enabled, the smaller section of the
Draft will be treated as though it were the entire manuscript. Counters will
start at 1, and the immediate children of the items of the selected compile group
container will be treated as level 1 items in terms of formatting styles.
This option is disabled when compiling Collections, or when the entire Draft
has been selected, as neither of these compile methods are relevant to external
numbering.
Ignore Title Prefix and Suffix For. . . Specific documents can be set to ignore the
prefix and suffix settings, enabled in the Formatting pane (subsection 25.3.2).
Common examples would be the Table of Contents, Acknowledgements, and
various Appendicies. Note that the Inspector option, “Compile As-Is” can also
be used to inhibit title prefix and suffix, but also at the expense of dropping the
title itself.
Update Scrivener links containing titles to include prefix/suffix When
Scrivener links directly reference a binder item title, the compiler will be
instructed to update the text of the link to match the final, altered, title. Since
the prefix and suffix field can contain special whitespace characters, such as tabs
and carriage returns, these will be stripped out of the result. Consequently you
may wish to provide a separator using the Title prefix separator for inline
links. The value placed into this field will be inserted between the title and
the prefix, in replacement of whatever punctuation and special characters were
used in the title prefix.
The Processing Options pane is available to all export formats.
25.3.4
Separators
Separators are used to automatically insert space, breaks, or custom symbols between
the various elements in the list which will be compiled. The important aspect to note
is that by the time Compile gets to this point, your document is being considered as
a flat list of files. It doesn’t matter if a text file is four layers deep, if the next item in
the list is a folder, it will still use the Text and Folder Separator rule.
There are four types of possible combinations in a compile, and each has its own
rule. You can supply the same rule for all of them if you do not need any special
differences between types. The types are:
§ Text separator: inserted between any two adjacent text documents
196
CHAPTER 25. COMPILING THE DRAFT
Figure 25.6: Compile—Separators Pane
§ Folder separator: inserted between any two folders
§ Folder and text separator: inserted at the top of any file that directly follows a
folder
§ Text and folder separator: inserted at the top of any folder that directly follows a
text file
Each individual rule has four options, some of which change their behaviour depending on the compile format. Most of the options are as follows:
§ Single return: A single paragraph break will be inserted, causing the final appearance to run from one document to the next with no visible “seam”.
§ Empty line: Two paragraph breaks will be inserted, causing a visible space between the items
25.3. OPTION PANES
197
§ Page break: A page break character2 will be inserted, causing the next section to
move to the next page of the manuscript
§ Custom: Anything entered into the adjacent text field will be placed between
the two items. Note that the text or symbols entered here will be buffered by
a single return on each side, forcing it to fall on its own line. The value will be
centre aligned.
The following formats have different options and behaviours from those listed
above:
HTML, WebArchive, and ePub formats The “single return” and “empty line” options will be replaced by suitable alternatives to produce the same appearance
of actual paragraph breaks.
Since page breaks have no meaning in Web publishing, a horizontal rule will be
inserted. The option will be renamed to “Section break”.
MultiMarkdown, and MMD HTML formats In most cases the “empty line” option should be used to retain clean paragraph breaks between blocks. The “single line” type will cause the last paragraph of one section to flow directly into
the next paragraph of the next section.
Page breaks are replaced by “section breaks”, which emit a series of hyphens on
their own line. This will be converted to a horizontal rule using the HTML
converter.
MultiMarkdown LATEXformat As with the other MMD formats, use of the “empty
line” type will produce the best result in most cases.
The LATEXcode for a pagebreak, \pagebreak, will be inserted for the “page
break” option. Note that this will be enclosed in an HTML comment, which
is the preferred method for passing LATEXcodes straight through the MMD system. This ability is disabled by default, and will need to be enabled by hand in
the MMD sub-system (chapter 28).
The Separators pane is available to all formats except FCF and FDX.
25.3.5
Text Options
The Text Options pane provides a number of useful text and format conversions, as
well as a few presentation options. Since many of the available formats have their
own unique strengths and weaknesses, not all of the options listed will be available
for every format.
2
In the case of plain-text files, the Unicode break character will be used. While support for this is
not common, the character can still be useful as a search-and-replace anchor. TextEdit will treat this
character appropriately when the file is viewed in Page Wrap mode.
198
CHAPTER 25. COMPILING THE DRAFT
Plain Text Conversions
These are useful conversion tools for translating special characters and some ruler
styles to plain-text variants. These options are made available to the rich text formats
as well.
Straighten smart quotes Typographic quotes will be substituted with straightened
variants. In versions of Mac OS X Leopard and greater, the system language
settings will be used to determine the proper substitutions.
Convert em-dashes to double hyphens The ‘—’ character will be converted to –. If
this option does not appear to be working, ensure that you have used em dashes
(
-) and not en dashes ( -) in your manuscript.
The MultiMarkdown formats will convert em-dashes to triple hyphens instead,
as the double hyphen is used to input an en-dash.
Convert ellipses to triple periods The ‘. . . ’ character will be converted to three full
stops.
Convert indents and paragraph spacing to plain text Actual spaces and carriage
returns will be inserted into the document to emulate indents and paragraph
spacing (line spacing will be ignored). This function determines spacing by
rounding off the supplied value. If the base font is 12pt, and paragraph spacing is set to 28pt (factor of 2.3) will be converted to two empty lines between
paragraphs.
This option is not relevant to the FDX and FCF formats, and will be removed
from the pane when they are selected.
Rich Text Conversions
This provides options for automatically converting a few rich text conventions from
one standard to another.
Convert italics to underlines If the submission process requires underscoring to be
used instead of italics, this feature will let you write in italics but produce a
properly underscored manuscript.
This option is not available to any formats which produce a plain-text document.
Convert underlines to italics Use when you have produced a document with underlines, but need an italic version for compile.
This option is not available to any formats which produce a plain-text document.
25.3. OPTION PANES
199
Convert linked images to embedded images If you have used linked images in
your project text, use of this function will find the original resources and embed
them directly into the compiled document. You will nearly always want to use
this option when producing a file that will be sent to other people.
See also: Linked Inline Images (section 14.4.6).
Only available with the RTFD format.
Presentation Options
Disable auto-numbering Scrivener’s token counter system will be disabled (the tokens will remain visible). Note this only impacts the counter system. Other
document tokens and replacements will still be expanded.
Use hyphenation By default, hyphenation will not be used. When full justification
is in use, this option can substantially improve the compiled result. If you intend to use a word processor to handle the compiled file, it is often better to let
it handle hyphenation.
Only available to RTF, Printing/PDF, and the word processor formats.
Avoid widows and orphans When used with a compatible word processor, this will
enable widow and orphan protection for your paragraphs.
Only available with the RTF format, and the DOC format when Import &
Export preferences have been set to export DOC files as RTF-based documents.
End of Text
If you require the end of the document to be marked with a sequence of characters,
you can use the Mark end of text with field to specify that sequence. Simply enable
the checkbox and type in the character sequence you wish.
This option is not available to the FDX, FCF, and ePub formats.
25.3.6
HTML Options
HTML Options control a few specific features in relation to the Web Page (but not
.webarchive files) and ePub formats.
Convert Scrivener links to HTML links When enabled, Scrivener will insert the
necessary HTML framework to allow for links to cross-reference to internal
parts of the Scrivener outline. If the linked element is outside of the scope of the
current compile group, the link will be removed from the compiled document,
rather than produce a broken link.
Footnotes will always use internal links to cross-reference from the marker to
the footnote text.
200
CHAPTER 25. COMPILING THE DRAFT
Underline internal links By default, Scrivener links are styled so that they are not
underlined in the web page. If you wish underlining to be retained, use this
option to disable the stylesheet.
Use centered table to restrict body text width The entire document will be enclosed in a div which will keep the width of the document within a certain limit
and centred in the browser. The precise width can be specified in the provided
text field, using pixels.
This option is not available to the ePub format.
If you wish to adjust the HTML DocType specifications for exported HTML files,
the technical details for how CSS is included (or not), and whether or not most ruler
styles will be converted to style, see the Import & Export preference pane.
25.3.7
Replacements
Replacements are a way for you to set up your own substitutions, which works in a
manner very similar to Search and Replace, though without changing the underlying
documents in Scrivener. A table with three columns has been provided:
§ Replace: The text which you wish to instruct the compiler to look for.
§ With: Whatever has been supplied in the Replace column will be replaced with
what you type into this column.
§ Case-Sensitive?: When checked, the letter case in the Replace column must precisely match, otherwise it will be ignored by the compiler.
Some example usages would be to replace an abbreviated version with a full proper
name, to make typing it in freqently easier, or inserting common editing notes.
Table 25.1: Example replacements
Replace
With
AdT
myprotagonist
<$needCite>
figCapt
Arc de Triomphe
Amy Holmes
(Needs Citation)
Figure 1.
Case-Sensative?
X
X
§ These sequences will be replaced wherever they occur. You shouldn’t choose
replacements that might fall within other words in typical usage.
§ Use of case-sensitive replacement can often help reduce accidental occurences.
25.3. OPTION PANES
201
Figure 25.7: Compile—Footnotes/Comments Pane (RTF)
§ If you wish to make sure a replacement is always an isolated word, put spaces
around the letters in the “Replace” column.
§ Replacements can contain other tokens, as demonstrated (Table 25.1) in the
fourth row, which will produce a numbered figure caption prefix. Since replacements are evaluated simultaneously, they cannot refer to other replacements,
however.
This option pane is a core feature available to all export formats.
25.3.8
Footnotes/Comments
The Footnotes and Comments pane controls how these two forms of notation will
be handled in the compile process, or whether they should even appear at all. Since
there are two ways to add notes to documents (linked or inline notes), it is possible
to treat the four of them differently, with most formats. As with other areas of the
application and documentation, the usage of the term “footnote” is equally applicable
to “endnote”, if the options to use endnotes have been applied.
202
CHAPTER 25. COMPILING THE DRAFT
The first section concerns itself with how footnotes should be arranged in the
manuscript, and the second section deals with inline annotations and linked comments. Since not all of the available export formats support all available options,
some variants of the pane will appear differently than shown (Figure 25.7).
This option pane is a core feature available to all export formats except for FDX
and FCF.
Footnote Options
Some formats do not support real footnotes or endnotes. When using these formats,
Scrivener will create the appearance of endnotes by embedding plain-text representations for both the marker and the footnote itself. Since most of these formats also
do not have a concept of a “page”, it will be impossible for them to generate true
footnotes. Consequently, they will nearly always be inserted at the very end of the
document, becoming in effect, endnotes.
The HTML based formats, including ePub, will insert hyperlink references leading
from the footnote marker to the footnote text. This will allow readers to click on
the marker in the text and jump directly to the footnote. With ePub, most e-book
readers have a “back” button which will let readers navigate back to the place there
were before referencing the footnote.
Remove footnotes The exported manuscript will have all footnotes (inline or
linked) stripped from it. When this option is enabled, the rest of the footnote
section will be disabled.
Include footnotes in word and character counts This will impact only counters
which have been inserted into the document, such as <$wc>, which prints the
precise word count of the project. It does not impact the rest of the interface,
such as project statistics and targets.
Export inspector footnotes as endnotes When enabled, this will export all linked
inspector footnotes as endnotes. If the next option is not set as well, this will
require using a word process that can handle both endnotes and footnotes in the
same document.
Export inline footnotes as endnotes Similar to above, but only exports inline footnotes as endnotes. If you only wish one type of notation to be used in your
manuscript, make sure to check both of these options one way or the other.
Footnote numbering restarts on each page Instead of keeping a running tally
throughout the manuscript, each page’s footnotes will restart according to the
numbering methods available.
25.3. OPTION PANES
203
Footnote format Using the drop-down menu, you can select how footnotes should
be numbered in the final manuscript. For formats which support real footnotes,
this will set an instruction in the manuscript file which word processors need
to read and understand in order for the setting to have an effect. For formats
which do not support footnotes (such as RTFD and TXT), this option will
impact how Scrivener numbers items itself, as it creates plain-text footnotes.
Endnote format All of the notes above pertain to endnote numbering as well. If
you document has both footnotes and endnotes, Scrivener will set two different
numbering hints within the manuscript file; it is up to the word processor to
handle them correctly.
Override font If you wish to use a separate font to print footnotes, this can be set
here. Note that many word processors have their own special stylesheets for
handling footnote appearance, so this option may not always be necessary.
Group footnotes before page breaks This feature is available to most formats that
cannot generate true footnotes, but still support some form of page break. It
will toggle the default behaviour whereby all footnotes are attached to the very
end of the manuscript, and will instead insert them at the nearest subsequent
page break, becoming in most cases, chapter-based endnotes.
Comments and Annotations Options
As with footnotes, it is possible to use both inline annotations and linked comments
in the same project, and selectively handle them during compile. You may wish, for
example, to use inline annotations for simple editing notes, and linked comments
for references to source material. It might then be useful for collaborators to see the
source material references, but not the simple inline editing comments.
Most of the compile formats have the same options available, but will handle the export of annotations and comments in different ways, depending on what is supported
within that format.
§ RTF/DOC3 : Provide additional options for utilising RTF’s comment syntax.
Unfortunately this syntax is not widely supported. If comments refuse to show
up in your word processor, try using one of the other methods.
§ Other rich text and word processor formats: In all of the formats that support the
ability to set font colours, annotations and comments will be inserted as actual
text in the document, enclosed in square brackets, and then coloured according
to the annotation text colour, or linked comment background colour, in the
project. For the purposes of this definition, HTML, WebArchive, and ePub are
considered “rich text”.
3
So long as the DOC format has been set to use RTF internally (section B.9).
204
CHAPTER 25. COMPILING THE DRAFT
§ Text based formats: For formats, like plain-text, FCF, and MultiMarkdown
(when the HTML method is disabled), annotations and comments will be simply wrapped in square brackets and placed into the text where they originally
appeared in the project.
The following options are available:
Remove inspector comments Only inspector comments will be stripped from the
resulting manuscript.
Remove inline annotations Only inline annotations will be stripped from the text.
If you wish for all comments to be removed from the manuscript, make sure
both this and the above options are checked.
Include in character and word counts As with the analogous option above, for
footnotes, when checked this will include the text in all comments and annotations in any word count and character count tokens that are placed into the
manuscript. Also as with the footnotes option, this will have no impact on the
other counting features in the application.
Export to RTF as Several options are available for handling all annotations and comments.
This drop-down menu is only available to RTF, and the DOC format when
export preferences have been set to use RTF internally with the DOC format
(this is the default).
§ Margin comments: When using a word processor that can read RTF comments, it is most often a good idea to use this option, as comments will be
placed out of the way and not be regarded as part of the actual text.
§ Inline comments: If comments are not showing up for you using the above
option, this method will produce comments using the method described
above for other rich text formats. This method is the safest to use, but will
embed the content of comments directly into the manuscript text, and is
thus only useful for proofing scenarios and scattered other workflows.
§ Footnotes: All annotations and comments will be inserted into the footnote stream along with any other footnotes (if any exist). This option
shouldn’t be used unless it doesn’t matter if commentary and footnotes
comingle. For purposes of ordering, they will be inserted into the stream
relative to the position of the footnotes/endnotes around them.
§ Endnotes: This works the same as with footnotes, only they will be inserted into the endnote stream.
25.3. OPTION PANES
205
Footnotes and Comments with MultiMarkdown
The MultiMarkdown compile formats handle footnotes uniquely from the other formatters. Scrivener will, by default, automatically generate and ID the necessary footnote syntax for you. An MMD marker will be inserted wherever the footnote has
been placed in the document, and the appropriately matching footnote text syntax
will be inserted elsewhere in the compiled MMD file.
Whenever Scrivener is set up to work in this fashion, linked inspector footnotes
will use a different ID prefix than inline footnotes. In ordinary MMD usage, this will
make no visual difference to you. MMD does not care what the footnote ID is, so long
as it is unique to the document. However, using a distinct prefix for linked footnotes
gives you the option to write an advanced XSLT file to handle them differently (such
as mixing endnotes with footnotes), if you wish to.
Inline footnotes will be prefixed with “fn”, followed by a serial number. Linked
footnotes will be prefixed with “cf”, again followed by a serial number.
The following extra options are available to MultiMarkdown users:
Convert footnotes to MultiMarkdown syntax This is the default behaviour as described above. When disabled, Scrivener’s footnote generation will mimic that
of plain-text.
Convert to HTML-styled text Since MultiMarkdown has no good analogue syntax
for comments, by default Scrivener will insert a styled HTML container around
the comment. Both inline annotations and linked comments will be treated
identically in this fashion. Since MMD will pass HTML straight through its
engine, the result will be a range of text coloured with whatever colour the
annotation text or comment background was set to. The appearance, sans the
bubble around the text, will thus be identical.
When this option is disabled, annotations and linked comments will be exported in the same fashion they are for plain-text files; enclosed in brackets.
TIPBOX: Pro Tip: In cases where an annotation falls entirely on its own paragraph, Scrivener will use a styled <div> instead of a styled <span> to wrap the comment in. This means you can use complex MultiMarkdown within annotations that
are on their own. Annotations embedded within a paragraph of otherwise normal
text, in any way, will use spans in order to preserve the original document flow, and
thus cannot contain complex syntax. They can however utilise inline formatting such
as bold, italic, footnotes, and so forth.
25.3.9
Page Settings
Various print settings can be set up with the Page Settings pane, such as margins,
paper size, and headers and footers. Only formats that support page settings can use
206
CHAPTER 25. COMPILING THE DRAFT
Figure 25.8: Compile—Page Settings (RTF)
this pane, and amonst those not all support headers and footers. For these, that part
of the pane will be removed.
Use project Page Setup settings The Page Setup settings (
– P) will be used to determine the paper size and printable area. You can also click the Page Setup...
button to access these settings from this pane (section 27.5).
The Page Settings button will not be available for the FDX format, as it does
not store paper size in the document.
Margins Margins set how far from the edge of the paper stock the text container will
extend to. This measurement does not include the non-printable area, which is
printer specific, so when using very low values it is a good idea to check how
close to the edge of the paper your printer can go, to avoid truncating the text.
RTFD, DOCX, and ODT format cannot access the following controls, as their
exporters or formats do not support headers and footers. Additionally, if the DOC
25.3. OPTION PANES
207
format has been set to use the standard OS X .doc exporter, it will not have access to
these controls.
The header and footer area is divided into two tabs, the first tab “Headers/Footers”
will control these settings for the entire document. The second tab, “Options”
will control how the first page is considered for page counting and secondary
header/footer settings.
Each line has three fields which allow you to enter different information at three
different points of alignment: left, centre, and right, respectively. It is possible to have
all three in use at once, or only one or two. Scrivener does not support recto/verso
page treatment. Consult your word processor for setting this up after compiling.
The tab titled, “Options” contains an identical set of fields for header and footer,
which, if the Different first page header/footer option is checked, will allow you to
supply an alternate header and/or footer for the first page. Leave these fields blank to
produce no headers or footers on the first page.
Page numbers count first page This option will cause the page counter token to
start counting at the first page, rather than skipping it. If you are not including
a title page in your manuscript, this option may be useful.
Formatting can be done in these fields using mark-up. You can choose between
using simple BBCode, or Markdown, to indicate bold, underscore and italic ranges.
Examples have been provided in the placeholder text for these fields. You can also use
tokens in the header and footer fields, some of which are only available to these fields.
The three tokens (Table 25.2) listed as available only to headers and footers only,
have an alternate usage whereby if the token name is typed in using all-caps, the final
result will be transformed to all-caps as well. For example, if the title of the Draft
folder is “My Novel”, and the token MANUAL is used in the header, it will be printed
as, “MY NOVEL” in the manuscript.
25.3.10
Cover & TOC
Available only to the ePub exporter, the Cover & ToC pane sets various options and
material which will give your e-book a professional finish. The cover image will be
placed at the very beginning of the e-book (opposing the table of contents), and can
optionally be included as the thumbnail image that will appear when the book is
viewed on the “shelf” in the iTunes library and within iBooks mobile.
Cover Image Cover images can be selected from resources within the current
project. If you have a cover that you wish to use with your book, make sure you
have imported into the binder first. All images will be listed in this drop-down
menu, and will displayed in the grey preview area in the middle of the pane.
208
CHAPTER 25. COMPILING THE DRAFT
Table 25.2: Some useful header and footer tokens
Token
Description
Available to Header and Footer fields
The current compile group. If you wish for this
to be more descriptive than “Draft”, you can
change the name of the Draft in the Binder to
be the name of your book.
<$surname>
The surname from the current user’s Address
Book entry.
<$username>
The full name from the current user’s Address
Book entry.
Some useful global replacement tokens
<$p>
Prints the current page number
<$pagecount>
The total page count for the entire manuscript.
This is a static number that is primarily useful
in conjunction with the page number token. A
value of “<$p> / <$pagecount>”, will produce,
“73 / 258” on page 73 of a 258 page manuscript.
<$shortdate>
The current date, according to the system short
date settings.
<$mediumdate>
As above, using the system medium date settings.
<$longdate>
As above, using the system medium date settings.
<$compilegroup>
There are no hard and fast rules for image size and aspect ratio. Within iBooks,
the book shape will be determined by the cover art. If you give the compiler a
wide design, the book will appear like a wide format coffee table book in the
shelf, for example. Generally speaking, a design which is taller is better suited
for most devices.
Include iTunes cover art file for iBooks Once a cover image has been selected, this
option will be made available. It will include additional information that iTunes
needs to set the shelf cover art in iBooks. In most cases you should keep this
enabled.
Cover page title You do not need to supply the name of your book here. This is
what will be used in the table of contents internally. The standard “Cover” has
been provided as a default.
Table of Contents
Table of contents are often handled by the device using a special interface which lets
the reader jump directly to a designated spot in the book like a hyperlink. You will
rarely need to create your own table of contents by hand. Scrivener will generate a
25.3. OPTION PANES
209
Figure 25.9: Compile—Cover & ToC
table of contents based on items which have their “Page Break Before” option set in
the inspector.
Use flat list for table of contents By default, the list will be nested according to the
depth of the items in the binder. To produce a flat list of items instead, enable
this option.
Endnotes title You can provide a custom section title where your footnotes will be
stored. This will be automatically generated and placed at the end of the book.
The chosen title is what will appear in the formatting for the page, as well as
the table of contents.
Continuous When enabled, all notes within the book will be displayed in a single
section with linear number from start to finish. When disabled, notes will be
broken apart into sections based on the ToC break points, and numbering will
restart for each section.
210
CHAPTER 25. COMPILING THE DRAFT
For more information and helpful tips on creating e-books, read Creating an eBook
(subsection 25.4.5).
SVG
This is an advanced feature which will allow you to insert SVG code instead of using
a bitmap image. If you have been provided with SVG artwork code by a designer,
or have created one yourself, use the SVG button to access the sheet. The text area
labelled, “SVG Code” is where you will paste the vector format code.
You will need to manually specify a default view box size. Get this information
from your designer, the graphics program you used to create the SVG code, or from
the XML itself. The actual size used is less important than maintaining the original
aspect ratio. Incorrect aspect ratio values (the factor between height and width) will
cause the graphic to become either too squat, or squashed.
You will need to research which SVG standard your target readers will be using.
Most readers are capable of understanding SVG 1.0 and SVG 1.1 (including SVG 1.1
Basic). When copying the XML code, make sure not to include the XML declaration
and doctype lines. Only paste the SVG element and its contents. This will be the line
starting with:
<svg version="1.1" id="Layer_1"...
And typically going to the very end of the XML file. Pasting the entire XML file
will likely produce an invalid e-book.
An iTunes compatible cover graphic will not be produced when using SVG covers.
25.3.11
Meta-Data
Meta-data is used to add properties to your manuscript, which many applications
will display in a document properties viewer, and with some formats, will be used to
add searchable criteria to the Spotlight database. There are three primary meta-data
interfaces available to different formats. The general meta-data interface will appear
for all formats which support the standard set of property fields, such as RTF &
RTFD, the word processor formats, and HTML & WebArchive. The other two metadata panes will only appear along with the specific formats they have been tailored for,
MultiMarkdown and ePub.
Since, with the exception of MultiMarkdown, meta-data is not meant to appear in
the content of the manuscript itself, none of the plain-text formats, or any formats
that do not support auxiliary properties, will show the Meta-Data pane.
25.3. OPTION PANES
211
Figure 25.10: Compile—Meta-Data (General)
General
With the exception of the Keywords field, the provided fields are all free-form, though
keep in mind that in some cases, like Spotlight searching, the content for the field
should match its intended purpose in order to keep searches logical. The Keywords
field takes values separated by commas, which will be shown as “pills” in the interface
as you enter them.
The Background field will let you set a paper colour for the manuscript. This is, by
and large, ignored by most word processors, and is primarily useful for the HTML
and WebArchive formats.
MMD
The Meta-Data pane for MultiMarkdown compilations provides a front-end to the
preliminary meta-data block at the top of any MMD file. A few examples are inserted
into new projects by default. Note that what you type into the text area below the
field will be printed into the compiled document verbatim. Thus, all rules pertaining
to the meta-data syntax should be followed. Empty lines in this area will cause the
212
CHAPTER 25. COMPILING THE DRAFT
Figure 25.11: Compile—Meta-Data (MMD)
meta-data block to prematurely abort, and special characters should be converted to
HTML entities. Scrivener will automatically insert the Format: complete meta-data
field for you, so there is no need to specify that by hand.
This interface, being project-based, is useful for creating a general meta-data block.
If your project is actually comprised of multiple documents, or if you simply prefer
to type in the meta-data block by hand, you can use documents titled “Meta-Data”
in the binder. Whenever a document so titled is the first document in the included
compile group, it will be appended to the meta-data provided in this pane. Due to
the rules of how meta-data is parsed, duplication is okay. Whatever field is stated last
will override any prior declarations. Thus a Title value in the compile pane will be
overridden by any Title fields declared in Meta-Data documents in the binder.
When using this method, the Format: complete code will not be automatically
inserted. Be sure to add it yourself if you require it. For further information on the
available MultiMarkdown meta-data fields, refer to the online documentation4 .
4
http://fletcherpenney.net/multimarkdown/users_guide/multimarkdown_syntax_guide/
25.3. OPTION PANES
213
Figure 25.12: Compile—Meta-Data (ePub)
ePub
Use of the ePub meta-data pane is similar to the general meta-data pane in that most
of the fields are free-form. They will be inserted into the appropriate book description fields, which will be available to e-readers to display in whatever manner they
provide. Most of the simpler e-readers, such as those embedded into specific purpose
devices, will only use Title and Author, but many desktop readers such as Adobe
Digital Editions and Calibre will make use of as much meta-data as you can throw at
it.
The two fields which you will want to be more careful with are Language Code,
and the custom unique identifier. Make sure you use the correct ISO two-letter abbreviation for the language the book is written in. If you do not wish to provide a
custom identifier, Scrivener will generate one for you based on the author, title, and
date. If your publisher has provided a unique identifier for you, then you can check
the box and type in your own.
214
25.4
CHAPTER 25. COMPILING THE DRAFT
Available Compile Formats
The table below shows all the formats supported by Scrivener, with commentary on
their usage.
For most word processor-based workflows, including Microsoft Word, RTF is the
best option. Nearly every word processor provides solid RTF import and export
capabilities, and some use RTF as their native file format. The one major exception
to this is Pages, which has limited RTF support. (Note that if you double-click on
RTF files in the Finder, they will most likely be opened in TextEdit by default, which
doesn’t support all RTF features—to open an RTF file in your desired word processor,
you should open the word processor first and use File Open.)
25.4.1
Rich Text Formats
The following table shows which file format constitutes the best option when exporting for use with several popular applications, and which features are supported by
those programs.
Explanation of features and how compatibility is determined:
§ Comments: RTF comments are an optional way to export Scrivener’s comments and annotations. Compatible word processors will display these comments in their own fashion, usually in the margins. If annotations are exported
as inline comments then they will be supported by all editors, as they just become ordinary text at that point. This is the recommended setting if your word
processor does not support RTF comments, but you need to export annotations.
§ Footnotes: For compatibility, so long as a word processor supports footnotes
and/or endnotes, it is considered compatible. Not all word processors support
some of the more advanced footnote appearance features, such as custom numbering styles and restarting numbering on each page.
§ Lists: Compatibility is considered to be simple bullet and enumeration list
transfer. Specific bullet styles and custom enumeration styles may not be
equally supported by all programs.
§ Tables: Only basic table support is required to be considered compatible. Custom styling and other advanced features are not taken into consideration. Most
word processors do not support nested RTF tables, but do support cell background colour and border options.
§ Images: Inclusion of inline images is required for compatibility.
§ Headers/Footers: Page headers and footers; custom first-page settings are not
considered for compatibility.
25.4. AVAILABLE COMPILE FORMATS
Format
Printing/PDF
Rich Text
Rich Text with
Attachments
Plain Text
Microsoft Word
Microsoft Word
XML
Open Office
Extension
Description
General Purpose Formats
N/A
Use to print the compiled draft, or to save it as a
PDF using the Print dialogue’s PDF features.
.rtf
General purpose rich text format supporting
multiple fonts, images, tables, bullet points, footnotes and comments. Almost always the best option when exporting for use in a general-purpose
word processor, including Microsoft Word.
.rtfd
Apple’s proprietary extended RTF format. Useful mainly for exporting to other Apple Cocoa
applications such as TextEdit, especially if image
support is needed. Incompatible with most word
processors and all other computing platforms.
.txt
UTF-8 (Unicode) plain-text file. Plain text contains no formatting but can be opened almost
anywhere, on all platforms.
.doc
Simple Word format exporter. It is usually better
to export using RTF format—see the note below
on exporting to Word .doc format.
.docx
Simple Word DOCX exporter. This uses Apple’s default exporter, which loses much of the
formatting, including indents and line spacing.
It is always better to use RTF if possible.
.odt
Simple ODT exporter. This uses Apple’s default
exporter, which loses much of the formatting, including indents and line spacing. It is always better to use RTF if possible.
Final Draft 8
.fdx
Final Draft 5–7
Converter
.fcf
Scriptwriting Formats
For transferring your script to Final Draft, this
is the best option unless you have an older version of Final Draft than version 8. Maintains
synopses (as scene summaries), scene titles and
custom script element formatting.
Use the FCF converter when working with an
older copy of Final Draft. Supports only basic
screenplay formatting.
215
216
CHAPTER 25. COMPILING THE DRAFT
Format
Extension
ePub eBook
.epub
HTML
.html
Web Archives
.webarchive
Description
E-book & Web Support
Generate feature-rich eBooks for use in portable
reading devices that support the ePub format,
such as the Sony Reader or iPad (ePub files can be
dragged into the iTunes Library to import them
into iBooks).
Creates a single HTML file suitable for webpublishing.
Much like HTML, but conveniently packages exported image files into a single bundle, using Apple’s webarchive format, which can be opened
by Safari (including the Windows version) and
various Mac OS X applications. Not compatible
with most other browsers.
MultiMarkdown Post-processing
Export a plain-text MultiMarkdown file, useful
for archiving, or further custom post-processing.
MultiMarkdown .tex
Exports a LaTeX format file with full Multi-> LaTeX
Markdown parsing. Note that if you are intending to export a LaTeX file that has been
handwritten in Scrivener (without MMD), you
should use the plain-text exporter, above.
MultiMarkdown .rtf
Export an HTML-derived RTF file with partial
-> RTF
MultiMarkdown support. Note that the RTF
files generated in this fashion will be limited in
features and formatting support in the same way
as HTML, and is not equivalent to Scrivener’s
standard RTF exporter in the word processor
compatibility tables.
MultiMarkdown .html
Generates a W3C compliant XHTML file, suit-> HTML
able for web-publishing or further XML postprocessing.
MultiMarkdown .md
25.4. AVAILABLE COMPILE FORMATS
217
Supported Features
Application
Microsoft Word
Nisus Writer Pro
OpenOffice.org
RedleX Mellel
Papyrus
Apple Pages
TextEdit (Cocoa Misc.)
a
b
Best Format
Comments
Footnotes
Lists
Images
Headers/Footers
ToC
RTF
RTF
RTF
RTF
RTF
RTFD
RTFD
X
X
X
X
X
X
Xb
X
X
X
X
X
X
X
X
X
X
X
X
X
X
X
X
X
X
X
X
X
Endnotes are not recognised, and will be lost with Papyrus. Always use footnotes.
Endnotes are not recognised, and will be lost with Papyrus. Always use footnotes.
§ ToC: Support for Scrivener’s Table of Contents feature, including RTF Bookmarks. While technically two different features, word processors that support
one will usually support the other, so they have been combined.
§ Note on RTFD Support: Since the two applications for which RTFD format
is recommended do not support these RTF features anyway, it often better to
use RTFD with them, as they will benefit from a few extra features that would
otherwise be dropped. RTFD will “flatten” some of the features it does not
support, such as annotations and footnotes.
Not included in the table are basic formatting features. Most word processors support these with only a few exceptions, as listed below (if the word processor is listed
next to the formatting feature, it does not support it):
§ Text Highlights: OpenOffice.org
§ Background colour: OpenOffice.org; Nisus Writer Pro; Mellel; Papyrus
§ Custom underline styles (dotted, dashed, etc): Nisus Writer Pro; Papyrus
§ Kerning: Mellel
Note on Exporting to Word .doc Format: Because RTF is preferred, the Word
.doc exporter uses RTF internally, meaning that .doc files exported from Scrivener
are essentially just renamed RTF files which will open in Word by default. This is
useful when you need to send .doc files to someone who is not aware that Word
fully supports RTF. If you require native .doc support, then you should adjust the
application preferences in the Import & Export tab (section B.9) for “Microsoft
.doc export”. This will force the export process to use Apple’s more basic exporter,
which will produce a native .doc file, but at the expense of dropped features and
218
CHAPTER 25. COMPILING THE DRAFT
altered formatting (in particular, indents and line-spacing will be lost). Only use
this option if you absolutely need native .doc files and RTF does not work with the
target word processor.
25.4.2
Special Note on Pages
Pages is a unique word processor in that it has limited RTF support. Compounding
this, its proprietary .pages format is unpublished, and has no officially supported
mechanisms for allowing applications to read and save to the format. However there
is one loophole that can be used to get information from Scrivener to Pages with
minimal loss of formatting: its support of Microsoft Word’s .doc and .docx formats.
Unfortunately, as noted in the previous section, Scrivener does not actually produce native .doc files as this is a proprietary format for which only basic exporters
are available to most Mac programs, and for the same reasons its .docx export is very
basic and involves the loss of certain formatting. So while Scrivener allows access to
these basic exporters, they will not suffice for what most people need.
This means that if you use the RTF format for exporting to Pages, formatting will
be lost because Pages does not fully support RTF; but if you use .doc or .docx, formatting will be lost because Scrivener only has basic exporters for these formats.
The preferred method for getting data from Scrivener to Pages thus takes three
steps:
1. Produce a quality RTF file from Scrivener.
2. Open the RTF file in a word processor which can both read RTF well, and
produce a good .doc or .docx file. This limits your choices to Word itself or,
in most cases, OpenOffice.org. You’ll want to be careful with the latter if you
rely on bullet lists, as OOo has difficulty reading RTF bullets, but it is free,
and thus a good solution when you don’t have a lot of lists in your work. RTF
comments will also be dropped using this word processor.
3. Once you’ve produced a .doc or .docx file from one of the above applications,
this can then be opened in Pages. Since Pages does a relatively good job of
opening .doc and .docx files, you’ll have much more success using this method
than trying to use RTF or .doc/x directly from Scrivener.
It can, however, be beneficial to give plain RTF a try first. While Pages doesn’t fully
support the RTF specification, for many authors this won’t be a problem in practice.
With the exception of page breaks, the features it omits are features not often used
in works of fiction, such as images and footnotes. Another option, as recommended
above, is to use RTFD. This will give you images, but no true footnotes (which will
be flattened into pure text endnotes, and so will require further formatting in Pages if
you wish to convert them into real footnotes).
25.4. AVAILABLE COMPILE FORMATS
25.4.3
Printing and PDFs
25.4.4
Exporting Scripts
219
The following table shows which file format constitutes the best option when exporting for use with several popular scriptwriting applications.
Application
Best Format
Notes
Final Draft 8
FDX
Final Draft 5–7
FCF
Supports comments and footnotes (as script
notes), synopses (which become scene summaries), titles, dual dialogue (dialogue marked
using “Preserve Style” in Scrivener becomes dual
dialogue in Final Draft), revision marks, custom
element formats.
FDX is always better, so only use this if you
don’t have access to Final Draft 8. FCF is essentially a plain text format and so any formatting
such as bold or italics will be lost. Also note that
it only supports the basic script elements—Scene
Heading, Action, Character, Dialogue, Parenthetical and Transition. See below for important
tips which will help avoid strange characters appearing in the export.
Movie
Magic
Screenwriter
TXT
CeltX
Montage
TXT
RTF or TXT
See below for important tips which will help
avoid strange characters appearing in the export,
and ensure proper element conversion.
As for Movie Magic Screenwriter.
Montage will do a decent job of importing script
files saved in either the RTF or TXT formats (if
you use TXT, follow the same rules as for Movie
Magic Screenwriter and CeltX).
The guidelines below should be followed when exporting to the FCF or TXT formats for use with scriptwriting programs:
To avoid strange characters appearing in the export, the following preferences
should be enabled in the Text Options compile pane:
§ Straighten smart quotes
§ Convert em-dashes to double-hyphens
§ Convert ellipses to triple periods
In the Separators pane:
§ Set all separator types to “Single return”.
220
CHAPTER 25. COMPILING THE DRAFT
When using the TXT format, along with the above settings, “Convert indents and
paragraph spacing to plain text” should be enabled when exporting to scriptwriting
programs such as Movie Magic Screenwriter and CeltX. This ensures that they will
recognise the elements correctly, as these programs read the whitespace and use it to
convert the text to the relevant script types.
25.4.5
Creating an eBook
Scrivener will dutifully attempt to replicate your formatting preferences in the ePub
stylesheets to the same degree that it will format HTML files. However, many ereaders will substitute the fonts for their own internal fonts, since many of the fonts
available to your computer will not be available to e-readers. Text sizes and other
styles will be set, though, base size is often determined by the device and the reader’s
preferences within that device or application. Additionally, since many e-readers handle text flow, your justification hints will often be ignored. Most will honour centre
and right alignment.
Since many e-readers use greyscale technology, colour should be used sparingly.
In general, try to format your e-books with these limitations in mind, doing so will
produce an e-book that can be comfortably read on a wide variety of devices.
25.4.6
Web Formats
25.4.7
MultiMarkdown Formats
Chapter 26
Exporting
221
Chapter 27
Printing
(Material not finished)
27.1
Document Printing
(Material not finished)
27.2
Printing Index Cards
(Material not finished)
27.3
Printing Outlines
(Material not finished)
27.4
Compile and Print
(Material not finished)
27.5
Page Setup
(Material not finished)
222
Part V
Advanced
223
Chapter 28
Using MultiMarkdown
For those who prefer structural writing solutions to rich text (and if this means nothing to you, you can happily skip this section), Scrivener allows you to import and
export using Fletcher T. Penney’s MultiMarkdown syntax. MultiMarkdown makes
it easy to generate documents in any number of formats - for instance, LaTeX and
XHTML - using a basic markup syntax (for instance, using asterisks to define bold
and italics).
It is important to note that if you have happily used normal word processors (such
as Microsoft Word or Mellel) and rich text for years and have never heard of MultiMarkdown, structural writing or been bothered by such formats as LaTeX, you can
ignore this aspect of Scrivener. Scrivener was designed primarily as a rich text application; MultiMarkdown is implemented in such a way that those who want it can access
it easily but those who have no need of it need never be bothered by it.
28.1
What is Markdown?
The MultiMarkdown syntax is actually based on the “Markdown” syntax created by
John Gruber, and the best description of what Markdown is comes from his Markdown web site, Daring Fireball:
“Markdown is a text-to-HTML conversion tool for web writers. Markdown allows
you to write using an easy-to-read, easy-to-write plain text format, then convert it to
structurally valid XHTML (or HTML).
“Thus, ‘Markdown’ is two things: (1) a plain text formatting syntax; and (2) a
software tool, written in Perl, that converts the plain text formatting to HTML. See
the Syntax page for details pertaining to Markdown’s formatting syntax. You can try
it out, right now, using the online Dingus.
“The overriding design goal for Markdown’s formatting syntax is to make it as
readable as possible. The idea is that a Markdown-formatted document should be
publishable as-is, as plain text, without looking like it’s been marked up with tags
or formatting instructions. While Markdown’s syntax has been influenced by several
existing text-to-HTML filters, the single biggest source of inspiration for Markdown’s
syntax is the format of plain text email.”
224
28.2. WHAT IS MULTIMARKDOWN?
28.2
225
What is MultiMarkdown?
The following is Fletcher T. Penney’s description of MultiMarkdown:
“Markdown is great, but it lacked a few features that would allow it to work with
documents, rather than just pieces of a web page.
“I wrote MultiMarkdown in order to leverage Markdown’s syntax, but to extend it
to work with complete documents that could ultimately be converted from text into
other formats, including complete XHTML documents, LaTeX, PDF, RTF, or even
(shudder) Microsoft Word documents.
“In addition to the ability to work with complete documents and conversion to
other formats, the Markdown syntax was lacking a few things. Michel Fortin added a
few additional syntax tools when writing [PHP Markdown Extra]. Some of his ideas
were implemented and expanded on in MultiMarkdown.
“John Gruber may disagree with me, but I really did try to stick with his proclaimed vision whenever I added a new syntax format to MultiMarkdown. The quality that attracted me to Markdown the most was its clean format. Reading a plain
text document written in Markdown is easy. It makes sense, and it looks like it was
designed for people, not computers. To the extent possible, I tried to keep this same
concept in mind when working on MultiMarkdown.
“I may or may not have succeeded in this. . . ”
For comprehensive information about MultiMarkdown and how to use it, see
Fletcher’s website.
28.3
MultiMarkdown and Scrivener
The first thing to note when using MultiMarkdown in Scrivener is that because
Scrivener is a rich text editor, it has no plain text mode. This means that you can
add bold, italics, images and so forth to your text, but when you export to a MultiMarkdown format (which requires the text to be converted to plain text), all rich text
attributes - bold, italics, images and so forth - will be lost. The format of the exported
text is defined entirely by the MultiMarkdown syntax you use. For instance, the text
“this is some text” in Scrivener would be exported via MultiMarkdown as “this is
some text”.
Note that you can convert rich text bold and italic attributes to MultiMarkdown
syntax by using Convert > Bold and Italics to MultiMarkdown Syntax in the Text
menu. However, because rich text allows more flexibility in its use of bold and italics
than MultiMarkdown - for instance, MultiMarkdown does not support the italicisation of partial words - this command may or may not produce completely valid
MultiMarkdown syntax; it is up to the user to check this.
Tip: Users who prefer plain text may wish to set their default font and paragraph
settings in the “Text Editing” pane of Preferences to something that emulates a plain
226
CHAPTER 28. USING MULTIMARKDOWN
text “feel”. For instance, you could set the font to Monaco 10-point (Monaco does
not draw bold or italics) and set the paragraph formatting so that there are no indents
and no inter-line spacing.
28.4
Importing MultiMarkdown Files
You can import any existing MultiMarkdown files into Scrivener using File > Import
> MultiMarkdown File. This will parse the file you select and break it up so that it is
imported into the binder with its hierarchy intact, taking document names from the
headers defined in the file.
28.5
Exporting MultiMarkdown Files
You export to MultiMarkdown format the same way you export to any other format using Compile Draft under the File menu. In the menu of the Export Format pop-up
button you will find several options for exporting to MultiMarkdown format:
MultiMarkdown: Exports the draft as a plain text file, creating headers from document titles based on the hierarchy in the binder (i.e. a document on the third level
under the Draft folder would be have its title generated as: “### title ###”). Note that
structural titles will not be created for documents that have “Preserve Formatting”
checked. This really just gets a clean MultiMarkdown file out of Scrivener, created
from the whole of the draft.
MultiMarkdown -> LaTeX: First parses the draft into MultiMarkdown format (as
above) and then pipes the text through MultiMarkdown (the program, built into
Scrivener) to generate a .tex file. By default, this uses a version of the Memoir class to
create the LaTeX file.
MultiMarkdown -> RTF: Parses the draft into MultiMarkdown format and then
pipes it through MultiMarkdown to create an RTF file. It is unlikely you will use
this much, given that most MultiMarkdown users are likely to want to use formats
other than RTF. If RTF is your ultimate aim, you would be better off not using
MultiMarkdown, and instead using Scrivener’s built in (OS X) rich text engine, which
supports many more features of RTF, including footnotes, comments and images.
MultiMarkdown -> RTF relies solely on OS X’s TextUtil command-line tool, which
does not support such features.
MultiMarkdown -> HTML: Parses the draft into MultiMarkdown format and then
pipes it through MultiMarkdown to generate an HTML file.
Note that when exporting via MultiMarkdown using any of the above methods, all
rich text formatting is lost (because MultiMarkdown expects plain text input).
28.6. UPDATING MULTIMARKDOWN
28.6
227
Updating MultiMarkdown
Scrivener comes with MultiMarkdown support built in, so you don’t have to worry
about installing anything extra. However, there may be times when Fletcher updates MultiMarkdown between Scrivener versions, in which case you may want to
ensure that you have the latest version of MultiMarkdown installed. To ensure that
Scrivener uses the most recent version of MultiMarkdown rather than the version
built into Scrivener, you just have to install the new version of MultiMarkdown into
either ∼/Library/Application Support/MultiMarkdown or /Library/Application
Support/MultiMarkdown. (Fletcher provides an installer that will install MultiMarkdown to one of these locations over at his website.)
28.7
Further Information
Fletcher T. Penney, the creator of MultiMarkdown, is actively involved in supporting
MultiMarkdown in Scrivener. He has generously contributed time and effort in writing tutorials and answering users’ questions on the forums. His own tutorials are by
far the best places to go to learn about using Scrivener with MultiMarkdown. See his
website and the Scrivener forums for more information. Thank you, Fletcher!
Appendices
228
Appendix A
Menus and Keyboard Shortcuts
This chapter will address each item in every menu, and will display the keyboard
shortcut for it when applicable. It is intended to be a quick, exhaustive reference of
the menus, and will attempt to point you in the right direction for more thorough
discussion and analysis of various features when necessary.
A.1
Scrivener Menu
Much like the application menu in any other Mac OS X program, this provides access
to application level information, features, and system integration, such as Services.
About Scrivener Displays the credits and version number of the application. If you
are experiencing problems and wish to contact customer support regarding
them, you can provide version information using this dialogue. Simply click
anywhere outside of the scrolling text area to dismiss it.
Preferences. . . ( – ,) Accesses the main application menu dialogue. For a complete
list of all available options, see Preferences (Appendix B).
Registration. . . When you purchase the application, use this menu item to copy and
paste your registration information from the e-mail that you will receive from
Literature & Latte. In case you have lost the original e-mail or never received it,
you can use the Retrieve Lost Serial... button which will take you to a web page
with further instructions on how to retrieve it.
Check for Updates. . . You can use the Check for Updates menu item to check to see
if there is a newer version of Scrivener available for download (2.x updates are
free). Scrivener uses the Sparkle1 framework to check for updates. This means
that you can check for updates and then download and install them all without
leaving the application.
Services The items in this menu are provided by the core system, and other thirdparty applications. They will let you perform various functions, mostly based
on selected text. Scrivener provides its own services which are also available
1
http://sparkle.andymatuschak.org/
229
230
APPENDIX A. MENUS AND KEYBOARD SHORTCUTS
in this menu, and from other applications as well. See Scrivener Services (section 11.2) for further documentation.
Quit Scrivener Leaves the program. Any projects that are currently open will be
saved to the disk if necessary, automatically. Under the default preferences,
these projects will be marked and opened automatically the next time you run
Scrivener.
A.2
File Menu
The File menu contains everything that handles creating files on your computer, including creating new projects, saving, backing up, importing and exporting. It also
deals with printing and project-specific settings.
New Project. . . (
– N) New Project creates a new Scrivener project. This will
bring up the Assistant panel (see Quick Tour (chapter 6)) which will walk you
through creating a new project, which will be saved as a .scriv file in the directory on disk that you specify.
Open. . . ( – O) Open allows you to open a pre-existing .scriv file on your hard disk.
Note that Scrivener cannot open read-only files directly (such as those that have
been backed up to a CD-ROM) and will give you the opportunity to save the
project to an area where you have permission to save files.
Recent Projects Here you can select and open projects that have recently been
opened in Scrivener (unless you specify otherwise in the General Preferences
(section B.1), Scrivener will reopen all projects that were open in a previous
session when it is launched).
Close Project (
– W)
Closes the current project and all of its associated windows.
Close Window ( – W) Closes the currently active window, HUD, QuickReference,
or dialogue box. However if the project window has focus, the entire project
will be closed instead. Full screen mode must be exited explicitly, it does not
respond to – W.
Save ( – S) Scrivener auto-saves your work so that you never have to worry about
losing your writings. Projects are also saved automatically whenever they are
closed. However, you can use Save to force an immediate save whenever you
want.
Optionally, if you hold down the Opt key (
– S) you can manually rebuild the
search index. This is sometimes useful in cases where you suspect the project has
A.2. FILE MENU
231
lost synchronisation with search index. There is generally no need to do this as
Scrivener will automatically rebuild indexes if something appears to have gone
awry since the last session.
Save As. . . (
– S) Will prompt you for a new project name and/or location. When
you submit this dialogue box, Scrivener will immediately start working off of
the new copy. If instead you want to generate a backup copy and keep working
off of the original, use File Back Up Back Up To... instead.
For more information on managing your project files, see Project Management
(chapter 7).
Import Allows you to import a variety of existing information, from your drive or
even from the Internet, into your active project. For full documentation on importing information into Scrivener, refer to Gathering Material (section 11.1).
Files. . . (
– I) Import files from the file system into Scrivener. Supported
formats are .doc, .rtf, .rtfd, .txt, and other text formats; all major image
and QuickTime file forms; .pdf files; .htm, .html, and .webarchive files.
Web Page. . . (
– W) Import a web page from the Internet by supplying
Scrivener with its URL.
MultiMarkdown File. . . Takes a plain-text MultiMarkdown formatted document and will convert its header structure into a binder outline structure.
Plain Text Formatted Screenplay. . . Import a plain text screenplay, optionally splitting sections into separate binder documents. This works best
with scripts that have been exported from CeltX and Movie Magic Screenwriter.
From SimpleText.ws Integrate with the SimpleText.ws service. You will need
to provide your account log-in information. This will allow you to retrieve files you have created in SimpleText aware applications, such as
WriteRoom for the iPhone.
Scrivener Project. . . Import an entire Scrivener project into the current
project. Most meta-data, keywords, references, and notes will be transferred.
Import and Split. . . Takes a standard text file and allows you to supply a character sequence (such as “###”) which will be used to split the document
into sections.
Export Provides tools for exporting elements of the binder to the file system. For
more information on exporting your work, see Exporting (chapter 26).
232
APPENDIX A. MENUS AND KEYBOARD SHORTCUTS
Files. . . (
– E) Allows selected contents of a project to be exported as files
and folders onto the hard drive. This feature should primarily be used to
create a hard copy backup, or to share resources with someone not using
Scrivener. Generally speaking, you will want to use Compile to export
your book.
Comments and Annotations. . . Exports just the comments and annotations
from the project into a single file. Optionally you can choose to export
only the selected binder items.
Sync Tools for linking parts of your project to external applications, mobile devices, or disk-based files and folders. Read more about syncing in Cloud Integration and Sharing (chapter 13).
with External Folder. . . Method for creating folders with plain-text, rich
text, or Final Draft files on your system. This export location can be
anywhere, including network mounted or monitor drives, such as iDisk,
Dropbox, SugarSync, and so on. Read more in Synchronised Folders (section 13.2).
with Simplenote. . . Method for synchronising individual files or folder content as plain-text to the Simplenote server, which can be used with a variety of applications and devices. Read more in Simplenote (section 13.1).
with Index Card for iPad. . . Index Card2 for iPad is an application which
lets you view items on a corkboard in a manner similar to Scrivener’s
corkboard. Using this tool, you can sync a collection (section 8.3) from
Scrivener to a special .plist file that Index Card can use to import your
material. Read more in Index Card for iPad (section 13.4).
Back Up Functions for managing backup copies of the current project. For more
information on back up strategies, see Backing Up Your Work (section 7.6).
Back Up To. . . Generates a backup copy of the project to a specified location.
Backup copies, unlike Save As, will simply be created and then ignored
by Scrivener, you will keep working in the current version of the project.
Optionally, you can choose to compress the backup in a zip archive, which
takes longer, but is the recommended method for storage of backups on
network drives.
Back Up Now Triggers the automatic backup system to produce a backup immediately, using the preferences for backup location and rotation scheme.
Customise how this works in the Backup preferences pane (section B.10).
2
http://www.denvog.com/iphone/IndexCard/
A.3. EDIT MENU
233
Exclude From Automatic Backups Removes the current project from the automated backup system. This is useful when the current project is very
large, and is causing you to have to wait for long intervals while the automatic system performs backups. Note that when this option is engaged,
Scrivener’s backup protection will be completely ignored for this project.
Take care to manually back up excluded projects from time to time.
Save As Template. . . Saves the current project as a template. This will add it to the
New Project window for use as a basis for future projects. For more information on creating templates, see Templates (section 7.5).
Page Setup. . . (
– P) Accesses the standard page layout setup pane. Additionally
accesses Scrivener specific features from the Settings drop-down menu. For full
documentation of the printing process, see Document Printing (section 27.1).
Note, these settings do not adjust Compile printing, only current document
printing, though Compile can be optionally configured to use your Page Setup
paper dimensions.
Print Current Document. . . ( – P) Prints the current editor view. How this will
be printed depends on the view mode, and all of the settings for this can be
accessed with File Page Setup... above. For more information, see Document
Printing (section 27.1).
Compile. . . (
– E) Compile is the standard method for producing a manuscript
out of all the pieces in the Draft. This feature provides an immense degree of
flexibility, and is fully documented in Compiling the Draft (chapter 25).
A.3
Edit Menu
The Edit menu contains options related to editing. All of the standard Mac Edit
menu items (with which you will be familiar from such programs as TextEdit) can
be found here, including cut, copy, paste and find, along with a large complement of
Scrivener-specific features.
Undo & Redo ( – Z &
– Z) Undoes or redoes the last change. Undo and Redo
work mainly for edits made to text, but they do work for some basic outlining
changes too, where that change does not cause the current document to change
in the editor. Each document has its own Undo history, which means you can
easily go back to another document and revert changes independently of other
documents.
234
APPENDIX A. MENUS AND KEYBOARD SHORTCUTS
Cut, Copy, and Paste ( – X, – C, and – V) Cut, copy and paste act exactly as
they do in other applications. Note that they only operate in a text editing
context, and not on binder documents or meta-data. See Documents Menu
(section A.6) for document management commands.
Scrivener also supplies additional tools for text management:
Copy Special This menu allows you to copy text or binder items in a variety of
ways which can apply or remove data depending on the specific menu command.
§ Copy as HTML: Reproduces most formatting as HTML codes using inline
CSS. The resulting HTML should look very similar to the text you copied
in Scrivener, including some ruler settings, colour, highlight, and so on.
§ Copy as HTML (Basic using <p> and <span>): Applies minimal inline CSS
formatting. Ruler styles and some types of formatting will be lost. This is
often the best choice for pasting into blogging and Content Management
Systems, which provide their own stylesheets.
§ Copy as HTML (Basic using <br>): Applies very basic, HTML 4.01 compliant code. When constructing HTML e-mails, or working with an older
website, this is what you will want to use.
§ Copy as BBCode: Translates most basic formatting into BBCode, suitable
for forum posts. Because BBCode does not support as many formatting
features as full HTML+CSS, some elements will be lost.
§ Copying without Inline Annotations or Footnotes: (
– C) will strip out
all inline annotation and footnote text, but retain all other formatting.
Most often this is useful for producing “clean” snapshots (section 14.10).
The following menu commands operate on selected documents, not text:
§ Copy Documents as Scrivener Links: Ordinarily, when you copy a selection
of documents, pasting them will just list the names of the documents. This
command will also build links back to each of the respective documents.
§ Copy Documents as ToC: Will create a basic Table of Contents out of the selected documents, which is meant to be pasted into a Scrivener document.
See Creating a Table of Contents (chapter 24) for further information.
– V) This pastes the contents of the clipboard without
Paste and Match Style (
any of its existing fonts and styles. Useful for when you have copied a range of
formatted text but want to paste it using the style of the text into which you are
placing it.
A.3. EDIT MENU
235
Delete ( – Delete) Moves the selected binder items to the Trash. Scrivener works in
the same fashion that the Finder does. Items are not directly deleted, but first
moved to a Trash folder, located in the binder. Periodically, you can review the
contents of this and empty the trash to clear up space.
Select All ( – A) Selects all of the content of the current text, outliner view, table
view or corkboard.
Select Current Text (
– A) When holding down the Option key, this alternate
method will be displayed. It is useful for selecting on the current text in a
Scrivenings session, rather than the entire session.
Complete ( Esc) Manually calls up the word-completion service, regardless of word
auto-completion settings. Can optionally be invoked with – . or simply Esc
by itself on some keyboard layouts.
Complete Document Title ( K) If you start typing in a document title from the
same Scrivener project, you can use K to cause Scrivener to search your project
for matching titles, based on what you have typed thus far, and suggest alternatives. This is very useful in conjunction with the auto-correction option (section B.8)] to automatically detect Scrivener links typed in with [[Document Title]] bracketing.
Add Selection to Auto-Complete List Adds the currently word to the project’s
auto-complete list. If more than one word is selected, nothing will be added
to the auto-complete list.
Insert The Insert sub-menu provides a wide variety of elements that you can
insert into text fields. These will be placed at the current cursor position.
Note that some of these insert invisible characters which control the flow
of your document, you may not see anything happen unless you have Format Options Show Invisibles enabled.
Image From File. . . Allows you to select an image file from disk to insert into
the current text document (note that inserted images can be resized by
double-clicking on them).
Image Linked to File As with the above, but the inserted image file will be
linked to the original file on your hard disk, rather than copying it into
the text document. This allows you to keep image files separate, and easily
apply updates to images later on if necessary.
236
APPENDIX A. MENUS AND KEYBOARD SHORTCUTS
Read Inline Images (subsection 14.4.6) for more information on inserting
images into your text.
– Return) Inserts a soft-break instead of a full paragraph break.
Line Break (
Use this when you need to create a list within a single paragraph.
Page Break Inserts a page break within the current text. Note that, as in
TextEdit’s “Wrap to Window” mode, page breaks are invisible and will
only show up when printing or exporting to a fully-featured word processor, or if you have “Show Invisibles” enabled. Typically, it is best to
let Scrivener handle page breaks by section, using the “Page Break Before”
option in the inspector. See Using Meta-data (chapter 10) for more information on dynamic document control.
Non-Breaking Space Inserts an space character which will prohibit wordwrap from dividing two or more words from each other. For the purposes of word-wrap, it will consider a sequence of words separated with
non-breaking spaces as a single word.
Word Joiner Inserts an invisible Unicode character which has zero-width, but
otherwise acts just as a non-breaking space.
Auto-number Scrivener has a number of internal counters which are represented as tokens in the text. These will be computed and printed in the
desired format when compiling.
Draft Word Count Inserts a token which will be calculated during Compile
which indicates the word count for the entire manuscript. There are a
number of rounding options available, for cases where precise counts are
less important.
Draft Character Count As with “Manual Word Count”, inserts a token for
the total character count. Again, rounding options are available.
Bookmark Annotations (
– B) Inserts a special inline annotation at the beginning of the current line used to populate a document’s bookmark
menu. See Text Bookmarks (section 14.12).
Inserts a special inline annotation at the beginning of the current line.
This will start a new section in a document’s bookmark menu. See Text
Bookmarks (section 14.12) for more information.
Current Date & Time (
– D) Inserts a plain-text date-stamp based on
your system’s Long Date format.
A.3. EDIT MENU
237
Append Selection to Document Provides a sub-menu populated with all of the
text documents in your project. By selecting one of these, the text currently
selected will be added to the end of that document. If it is your intention to
move the text instead of copying it, after issuing this command, you can simply
press the Delete key.
Use the New... sub-menu choice to create a new document containing the selected text. You will be asked where to place this new document in a subsequent
sheet.
Edit/Add Link. . . For use with hyperlinks.
If the cursor is currently placed inside of a link, this command will let you
edit the destination for that link. If the cursor is not placed within a link, you
can use this command to make a new one. It will be inserted into the current
document at the cursor position, automatically selecting the nearest word if
necessary. The sheet will provide you with several common prefix options, or
optionally no prefix.
Scrivener Link Creates a new Scrivener Link to a chosen document at the current
cursor position. Note you can also create a link to a document that doesn’t
exist yet. The New Link... command ( – L) will ask you for the title of the new
document, and where to place it; or which existing document to link to, in the
second tab. After providing this information, a link to this document will be
placed into the current editor.
Read more about Scrivener Links (section 9.5).
Unlink If the cursor is placed in the text of a link, this command will destroy it. If
you select a range of text, all links within that range will be destroyed. Useful
when pasting text from the Web, when you want to get rid of all the links that
are brought over.
Find As with many OS X applications, you will find familiar tools for finding things
both in individual documents, with some additional things Scrivener provides,
including tools for searching your entire project. This list briefly explains the
various functions. For full documentation on how to use Scrivener’s extensive
searching features, see Searching and Replacing (section 14.5).
Find. . . ( – F) The standard find and replace panel. This panel only works
within a single editing window. Most often this means one document,
but in the case of a combined text view, it might mean many documents.
238
APPENDIX A. MENUS AND KEYBOARD SHORTCUTS
Find Next / Previous ( – G /
– G) Jumps to the next or last matching
text based on the criteria supplied in the Find panel. Note these can be
used even if the find panel is closed.
Use Selection for Find ( – E) Sets the selected text as the current find term,
copying it into the “Find” text field if the find panel is closed.
Jump to Selection ( – J) Will scroll the editor view so that your cursor position is centred on the page. Useful if you have used the scrollbar, or
PageUp/PageDown to briefly check other areas of the text.
Project Replace. . . Shows the Project Replace sheet, which allows you to replace text throughout the whole project. This operation cannot be undone, use with care.
– F) Provides a shortcut for the toolbar Project Find
Project Search. . . (
tool. If the toolbar has been hidden, a separate window will be opened
up for your convenience.
Both of these tools are quite powerful and have a wide range of options.
Please read Searching and Replacing (section 14.5) for more information on
how to use them.
If you are looking for the old menu commands to “Find Annotation” and
“Find Highlight”, these operations have been rolled into the new “Find by Formatting” tool, which now also allows a much wider range of formatting that
can be searched for.
– F) Opens the Find by Formatting panel. This
Find by Formatting. . . (
tool is quite powerful and has a wide range of options, please see Searching
and Replacing (section 14.5) for full documentation.
–G /
Find Next / Previous Formatting (
– G) As with Find Next
and Find Previous, will let you jump from match to match within a single
document, even without the “Find by Formatting” panel open.
Spelling and Grammar Accesses OS X’s spelling and grammar tools. Note that
most of these can be set to different defaults, in the Auto-Correction tab (section B.8).
§ Show Spelling and Grammar: ( – :) Opens the standard Spelling and
Grammar panel. If you wish to change the base language the spelling and
grammar checker uses, you can set that here.
§ Check Document Now: ( – ;) Will start checking for misspellings from the
current cursor position downward.
A.4. VIEW MENU
239
§ Check Spelling While Typing: ( – \) Turns on the automatic spell checker
which will underline in red, unrecognised and misspelled words as you
type.
§ Check Grammar With Spelling: Also turns on grammar checking, which
will look for poor style or grammatical errors as you type and underline
them in green.
Speech Controls for OS X’s built-in text-to-speech synthesis. Two menu controls
are provided to start and stop speaking. The active text editor will be used as
source text with these commands.
Writing Tools Provides a few OS X writing tools, as well as some custom utilities.
§ Look Up in Dictionary and Thesaurus: Sends the currently selected word,
or the word that the cursor is currently located within, to Apple’s Dictionary application. You can also use
– D to do quick spot-checks
§ Search in Spotlight/Google/Wikipedia: Uses the currently selected text
or active word to search the selected resource for results. Google and
Wikipedia searching requires an active Internet connection.
§ Name Generator: A unique Scrivener tool which will generate names based
on a wide variety of criteria. Read more in The Name Generator (chapter 23).
A.4
View Menu
The View menu contains all of the commands related to changing the way documents
are viewed, allowing you to show and hide various elements, navigate between views
and customise the way information in the current project is displayed.
View Modes represent various ways in which you can view the presentation of
multiple items in the editor. For and overview of how view modes work, see View
Modes (section 5.2).
Document/Scrivenings ( – 1) If multiple items are selected in the editor, displays
the current editor as a Scrivenings text editing session, showing the text of each
document as if they were a single file. Also sets your preferred collection view
mode to Scrivenings. See also, Editing Multiple Documents (section 14.13).
Note this option is only useful if the editor is displaying documents, media will
not be mixed into an Scrivenings session.
If a single item is selected in the editor, this menu item will be labeled Document,
and switch the editor focus to its text or media view.
240
APPENDIX A. MENUS AND KEYBOARD SHORTCUTS
Corkboard ( – 2) Display the current editor as a corkboard. If the selection is a
container, its children will be shown as index cards. Also sets your preferred
collection view mode to Corkboard. See also, The Corkboard (section 12.1).
Outline ( – 3) Display the current editor as an outline. Also sets your preferred
collection view mode to Outliner. See also, the Outliner (section 12.2).
Enter Full Screen (
– F) Enters the full screen writing environment, switching to
text editing mode if necessary. In the case of Combined Text mode, the entire
session will be opened in full screen. Note this option is not available to media
and web pages.
Full Screen Backdrop Choose a background image for your full screen environment, rather than just using the plain background colour. The image will be
stretched vertically to fit the screen. For your convenience, all of the image
resources in the project will be listed in this menu, or you can select Choose...
to select an image from your computer. To remove the selected image, select
None.
The menu items, Go To and Text Bookmarks are also available from the header bar
icon menu.
Zoom Provides shortcuts to the zoom menu, located in the footer bar for text
documents. Temporarily zooms the display of the font up or down to increase
legibility, without adjusting the underlying font size.
§ Zoom In: (
§ Zoom Out: (
– <) makes the text larger.
– >) makes the text smaller.
Go To Offers an alternate way to jump to a specific binder item without using the
binder. If the binder is hidden, a collection is selected, or a sectino is hoisted,
for instance, will let you navigate to other areas of the project without having
to alter your work environment. The contents of this menu will be populated
by the binder, or by the current Scrivenings session. Also provided are some
contextual navigation and focus functions which will let you move around in
the binder, from the editor itself.
§ Previous Document: (
– UpArrow) Jumps to the previous document in
the binder, according to strict outline order (ignore hierarchy).
– DownArrow) As with Previous Document, but se§ Next Document: (
lects the next document in the strict outline order.
A.4. VIEW MENU
241
§ Enclosing Group: (
– R) Will display the currently edited item in context
with its siblings using the current view mode. In most cases, this will select
the immediate parent of the document, selecting the document’s index
card or outliner row that you came from, for your convenience.
§ Editor Selection: ( – 4) jumps directly to the text component of any selected item. This works as an isolation feature in Scrivenings, or can also
be used to quickly open selected item(s) from Corkboard or Outliner as
text (even if they are containers). The difference between this command
and
– O or
– O is that these latter two will respect the typical view
load priority setting. In other words, if the selection is a container, these
commands will load that item in a view. – 4 will always load the selected
item as a text file. When more than one item is selected, they will be loaded
as a composite Scrivening in Multiple Selection mode.
Text Bookmarks Jump to places in the current document which have been bookmarked. To insert bookmarks, see Edit Insert . The contents of this
menu will be populated by existing bookmarks from the current document
or Scrivening session.
QuickReference Similar to the Go To menu, except that the selected item will be
opened in a QuickReference window, rather than replacing the contents of the
editor. The contents of this menu will be populated by the binderbinder in all
cases.
Collections Provides commands for setting visibility and options of the Collections feature. For documentation on how to use Collections, see Using Collections (section 8.3).
Show/Hide Collections Reveals or hides the collection interface which will
appear above the binder. Note the sidebar will need to be visible for this
menu option to be available.
Convert to Standard Collection When a Search Result Collection is active,
this command will “freeze” the results and turn it into a regular collection
that is no longer dynamically updated.
Next Collection Select the next Collection tab in the stack
Previous Collection Select the previous Collection tab in the stack
242
APPENDIX A. MENUS AND KEYBOARD SHORTCUTS
The rest of this menu will be populated by the existing available collections
in the reverse order that they appear in tabs. It will always include an entry
for the binder and Search Results. Selecting an entry will switch the sidebar to
viewing that collection, making this menu useful when the tabs are not visible,
or for assigning keyboard shortcuts to oft-used collections.
Layout The commands in the Layout Sub-menu affect the main window elements.
Show/Hide Binder (
– B) Toggles whether or not the binder (subsection 5.1.2) sidebar is visible on the left of the main window. You can hide
the binder to concentrate on editing or composing the current document
if you so wish.
Show/Hide Inspector (
– I) Toggles whether or not the Inspector (subsection 5.1.5) is visible on the right of the main window. The inspector
displays all meta-data for the current document, including synopsis and
notes. The inspector is hidden by default.
No Split ( – ’); Split Horizontally (’
– =); Split Vertically ( Command-")
These commands allow you to choose how to view the main editor in
the main window. For more information on using splits, see Splitting the
Editor (section 14.9).
Swap Editors Only available when Split Horizontally or Split Vertically is selected (see above). This commands swaps the position of the two split
panes, so that the view on the top will become the view on the bottom
and vice versa.
Show/Hide Header & Footer View Toggles the visibility of the header and
footer bar. Both are elements of the editor and can be toggled independently for each split. See Writing and Editing (chapter 14) for more information on what these do.
Show/Hide Layouts (
– )) Toggles the Layouts panel, which allows you to
manage view settings by saving the current settings, or retrieving other
settings you’ve saved in the past. See Layouts Panel (section 9.7).
All Layouts / This Sub-menu is populated by the saved layouts you’ve created with the Layouts panel. It allows easy access to switching these sets
of view configurations.
This menu will not appear if no layouts have been saved on your computer.
Editor Options and commands for controlling the main editor.
A.4. VIEW MENU
243
Lock in Place (
– L) Locks the editor (or split) so that no binder clicks will
affect it. When an editor is locked, its header bar will turn a shade of red.
Show Titles in Scrivenings When enabled, editable titles of documents will
be placed in the editing session along with their associated texts. Titles
can be independently styled to set them apart in the Formatting tab (section B.7). These will only appear in Scrivenings mode.
Forward/Backward in Document History ( – [ and – ]) Like
a
Web
browser, the editor keeps track of everything you’ve visited. Using these
commands you can navigate back and forth in the history. Note you can
also use the Forward and Backward buttons in the header bar. Each split
keeps its own history.
When selecting a number of documents in the binder prior to entering
Full Screen mode, the history queue for full screen will be pre-stocked
with these selected items.
Other Editor Provides controls to manipulate whichever split is not currently active.
§ The Forward and Backward in History commands (
–] &
–
]) operate just like the above commands, only in the opposing split
without moving focus there.
§ The Scroll Up and Down commands (
– UpArrow &
–
DownArrow) act like PageUp and PageDown, only in the opposing
split, again without moving focus there.
Clear Document History Use this command to wipe out the document history for the active split.
Media Controls and options for various types of media. These commands will
only become available when viewing the appropriate type of media.
PDF Display This sub-menu controls how PDFs are displayed in the editor. Most
of these options should be familiar as they are common to many PDF viewers.
§ Automatically Resize: Keeps the PDF sized to the width and height of the
editor window.
§ Actual Size: Zooms the PDF to 100%, even if it is too large to display all
at once.
§ Size To Fit: Like “Automatically Resize”, but only resizes the document
once. If you change the size of the editor view later, it will stay at the same
view.
244
APPENDIX A. MENUS AND KEYBOARD SHORTCUTS
§ Single/Facing Pages: In single mode, will show one page per row like an
ordinary digital file. In facing mode, two pages will be placed side-by-side
in a column, more like reading a book.
§ Continuous/Page Breaks: These two scrolling modes affect how the document is handled when using the scroll wheel, arrow keys, or page up and
down keys. In Continuous mode, the pages flow by seamlessly; in page
break mode, only one (or two, if facing pages is enabled) pages will be
showed at a time, and scrolling actions flip between pages.
Play Media File ( – Return) Functionally, this acts like clicking the Play button in
the media viewer, for either audio or video files. If the editor is split between a
text document and a media file, and you are typing in the text document, this
shortcut will start and stop the media in the other split, allowing you to easily
transcribe or reference the media. When two media files are open at once, the
shortcut will affect the active split.
Fast Forward/Rewind (
–] /
– [) Will jump playback forward or backward by two seconds. This shortcut works while playback is running, or while
paused. In the latter case, it will stay paused at the new position. As with Play
Media File, will work in the opposing split while typing, providing further aid
for transcription.
Page View Accesses features and options for displaying the text editor as a virtual
page, instead of filling the entire editor. It is not intended to be used as a layout
mechanism, though it can provide a reasonable estimate of how your pages
will look under certain conditions, once printed. Read more in Page View
(chapter 22).
Show Page View (
– P)
Toggles Page View on and off.
These three options toggle between the three page size models.
Use Printed Page Size This is the most accurate model to use as it will size the
pages and margins according to your current print. The specific metrics
and orientation used can be changed to either Compile settings or the
settings from the File Page Setup... pane. This can be changed in the
Editor tab (section B.6).
Use Preferences Page Size A custom layout can be created in the Editor tab as
well, which will be used to define the size and margins of the page. These
metrics can be changed in the Editor tab (section B.6).
A.4. VIEW MENU
245
Two Pages Across When enabled, instead of displaying pages in vertical column, two will be placed beside each other as though reading a book.
Corkboard Accesses features and visual options for the corkboard. All of the settings available in this menu are project specific, and most of them will only
impact a single split, allowing you to have different view settings for each editor. For more information on using the corkboard, see The Corkboard (section 12.1). Note that further options can be accessed via the corkboard display
options button, which is located on the right-hand side of the footer bar for
each corkboard.
See also, Setting Up Meta-Data (chapter 10), for more information on the types
of meta-data that can be viewed on an index card.
Cards Across The Cards Across submenu allows you to define how many
index cards you would like to appear in each row on the corkboard. The
default is three. Auto will calculate how many cards to show, based on
the size of the editor and the size of the cards; kind of like word wrap, for
index cards.
Show/Hide Pins (
– P) Toggles whether the coloured pins are displayed on
the index cards. Pins take on the colours associated with the labels that
have been assigned to the documents represented by the index cards. If
you are using the Rounded Card theme, pins will be displayed as colour
swatches on the upper right side of the card. The appearance of pins can
be adjusted in the corkboard tab (section B.3) of preferences.
Show/Hide Stamps (
– S) Toggles whether stamps are displayed on index
cards. Stamps show the current status associated with the document represented by the index card as though it has been “stamped on” the index
card. The appearance of stamps can be adjusted in the Corkboard tab
(section B.3), and the Appearance tab (section B.2).
Show/Hide Keyword Colors (
– K) Keywords assigned to a document can
be visually indicated along the right-hand side of the index card as
coloured pieces of tape. The number of keywords that can be shown at
once can be changed using the corkboard display options button. For
more information on using keywords, see Setting Up Meta-Data (chapter 10).
Show Card Numbers Cards will be numbered according to their sequence in
the binder outline structure. Ordinarily, this will match the order in
which the cards appear, but in Freeform mode, this can be a valuable tool
246
APPENDIX A. MENUS AND KEYBOARD SHORTCUTS
as the order of cards are likely to become desynchronised with the actual
manuscript structure.
Number Per Section When more than one container has been selected, and
the corkboard is displaying cards in Multiple Selection mode, card number
will be re-started for each new section. Otherwise, cards will be numbered
in the order they appear from start to finish.
Freeform Activates the Freeform Corkboard mode, which allows you to move
cards around on the corkboard without any grid or ordering constraints.
This can also be toggled in the Footer bar.
Commit Freeform Order It is possible to instruct Scrivener to use the current freeform layout to re-order the actual manuscript outline structure.
Scrivener will provide several options for how this should be done. For
more information on how to work with Freeform Corkboards, see The
Corkboard (section 12.1).
Outliner Columns Displays a list of toggles which will reveal or hide the corresponding columns in the active Outliner view. These settings are stored by
individual editor split, letting you have custom columns for the two views, and
are saved in the project file. You can also manage columns using the “>>”
button above the scrollbar in the outliner itself.
Use Label Colour In A document’s label colour (see Setting Up Meta-Data (chapter 10) for more information on labels) can be applied as a tint to various interface elements throughout Scrivener. This menu contains a list of toggles which
will enable tinting to the corresponding elements.
§ Binder: Rows in the binder will have a background bar placed behind
items with labels in a fashion similar to how Finder applies labels to files.
§ Icons: Only the icons will be tinted throughout the project. Wherever the
icon for a binder item shows up (such as in the Header bar, next to the
title in Corkboard, in the binder, and so forth) it will be tinted using the
colour of the assigned label.
§ Index Cards: The entire background “paper” for index cards will be tinted
using the assigned label colour. This includes the index card which appears
at the top of the inspector.
§ Outliner Rows: As with binder tinting, the background for the entire row
will be filled in with the label colour.
A.4. VIEW MENU
247
Move Focus To Provides application focus navigation tools. Rather than navigating around in your project, these commands will let you quickly select different
parts of the application without using the mouse. The first lets you cycle between common elements, while the rest will jump immediately to that element
of the interface, no matter where focus is currently placed. Note that in all
cases, the elements you wish to cycle or jump to must actually already be visible. These shortcuts will not automatically reveal parts of the interface that are
currently hidden.
§ Left/Right/Top/Bottom Editor & Binder: ( Tab) This menu item follows a
chain of the three most common areas of desired focus, the primary split,
second split, and the binder. It will cycle between these three going left to
right, and the label of this menu item will be changed to indicate where
the next target will be.
– B) Moves focus to the binderbinder from anywhere in the
§ Binder: (
interface, if the binder is visible.
§ Left/Bottom Editor: (
– E) Moves focus to the Left or Bottom editor,
if the editor has been split. Otherwise selects the primary editor if there is
no split.
– R) Moves focus to the Right or Top editor, if
§ Right/Top Editor: (
the editor has been split. If it has not been split, this shortcut will not be
available.
Inspect A continuation of the navigation functions, these deal solely with the revealing and focussing of elements within the Inspector. All of them work on
the following principle: if the keyboard shortcut revealed the item (it was hidden before), then the action will simply reveal the meta-data without disturbing
your original focus. If the item is already revealed, then the shortcut will switch
focus to that meta-data area. If the Inspector is hidden, it will be opened if necessary, which counts as a “reveal” action.
§ Synopsis: (
– I) Reveals or switches to the index card in the inspector
(will use the last inspector pane coupled with the synopsis and meta-data
panes, if necessary).
§ Notes: (
tor.
– H) Reveals or switches to the notes editor within the inspec-
– N) Reveals or switches focus to the references table. *
§ References: (
Keywords: (
– J) Reveals or switches focus to the keywords table. Arrow keys can be used to navigate amongst keywords; Return can be used to
add new keywords; and Delete to remove keywords.
248
APPENDIX A. MENUS AND KEYBOARD SHORTCUTS
§ Snapshots: (
– M) Reveals or switches focus to the snapshot text area,
allowing quick copy and paste of its contents.
§ Comments and Footnotes: (
– K) Reveals or switches focus to the comment list. Arrow keys can be used to navigate amongst contents; and
expand and collapse notes.
Outline Provides navigation and disclosure commands which work in both the
outliner and in the binder, referred to below as the “active outliner”. Container
is defined as a folder by default, but if “Treat all documents with subdocuments
as folders” is enabled in Navigation preferences (section B.5), the definition of
container will be expanded to include document stacks as well.
§ Expand All: ( – 9) Expands all of the visible items recursively. When this
command is used in the binder, it will expand the entire binder (including
all non-Draft sections). When used in outliner, it only works within the
context of the currently viewed portion of the binder.
§ Collapse All: ( – 0) As with Expand All, this works the other way, closing
all visible open items recursively. Note that in both cases, you can use the
Option key in conjunction with a mouse click to selectively perform this
function on the arrow (and everything beneath it) clicked.
UpArrow) Will select the previous visible con§ Previous Container: (
tainer in active outliner, no matter what the depth. In this case, previous
means a container higher on the list than the current position. If a container is currently hidden, it will be skipped. If you only wish to select the
parent container of a the current item, you can use the LeftArrow key.
DownArrow) Works the same as Previous Container,
§ Next Container: (
only selecting the next visible container downward from the current position.
– R) This command is available from either editor split, and
Reveal in Binder (
will show the location of the currently edited file in the binder, disclosing containers as necessary to do so. This is most useful when the method you used
to arrive at the current document did not involve clicking in the binder. This
menu command is also available from the header bar icon menu.
Binder Affects Adjusts where binder clicks will be sent. By default all clicks will
be sent to the active editor (so long as it is not locked). This will adjust that
behaviour so that the clicks go to a predetermined editor in all cases, depending
on the choice made below. If the editor is not split, this menu will be deactivated
as all clicks will naturally go to the only available editor.
A.5. PROJECT MENU
249
§ Current Editor: Default behaviour as described above.
§ Other Editor: Whichever editing split is not current active.
§ Left/Top Editor: The left/top editor no matter which editor is active.
§ Right/Bottom Editor: The right/bottom editor split, no matter which editor is active.
Show/Hide Toolbar Toggles the visibility of the main application toolbar.
Customize Toolbar. . . Lets you configure the toolbar of the main window so that
it contains the commands that you most use in the order most intuitive to you.
This can also be done by right clicking on the toolbar itself.
A.5
Project Menu
The Project menu addresses commands and configuration options which are specific
to the active project, such as document format over-rides, custom meta-data, statistics,
and more. If more than one project is open, this menu will target the foremost project
window.
New Text ( – N) Creates a new text document below the current selection. When a
folder is selected, the new file will be created within the folder. Otherwise the
new file will appear as a sibling to the current selection.
– N) Creates a new folder document at the current selection. FoldNew Folder (
ers will always be created as a sibling to the current selection.
For more information on the differences between files and folders, see Project Planning (chapter 12).
New From Template > There are two management commands always available
from this menu, which let you set or remove a designated template folder. Once
a template folder is set, this menu will also be populated with the children of
that template folder, which may need to be set with Project Set Selection As
Templates Folder, below. Read more about [Document Templates][]
For tricks on how best to use text and project statistics, see [Goals and Tracking
Tools][].
Text Statistics (
– S) Brings down a sheet displaying statistics for the current
document (and thus only available when a text document or Scrivenings are
focussed).
250
APPENDIX A. MENUS AND KEYBOARD SHORTCUTS
Project Statistics (
– S) Brings down a sheet displaying the statistics for the current project, including the word and character count for the draft and for the
current binder selection.
Show/Hide Project Targets (
– T) Toggles visibility of the targets panel, which
lets you track a few simple metrics in real-time as you type and edit.
Meta-Data Settings. . . (
– ,) Displays a sheet which lets you adjust the two main
document meta-data fields (Label and Status by default, but these can be renamed), as well as the custom meta-data columns for this project. For further
information on using this panel, see Setting Up Meta-Data (chapter 10).
Set as Templates Folder / Clear Templates Folder Will convert the selected
binder item into a special template folder (though note it could also be a
document stack). Each project can only have one template folder at a time. If
more than one item is selected in the binder, this menu item will be disabled.
When a Templates folder has already been set in the project, this menu item
will changed to “Clear Templates Folder”, removing its designation, but not it
or its contents.
Text Preferences. . . Displays a sheet which presents a configuration pane very similar to the one found in the Formatting tab (section B.7) of application preferences. Changes made to this panel will override the application level settings. It
works in the same way as the application defaults, affecting all new documents,
but not existing ones.
Edit Auto-Complete List. . . Displays a sheet which lets you manually add and remove terms to the project’s auto-complete list. Depending on your autocompletion settings, this will let you add custom names, places, and workflow
indicators to assist in typing out repetitive items. Modify how agressive autocomplete should behave in the Auto-Correction preference pane (section B.8).
Empty Trash. . . Permanently discards the current contents of the project trash can.
You will be warned before this is done. Once contents have been deleted, there
is no way to undo that action. This can also be done by right-clicking on the
Trash itself in the binder.
A.6
Documents Menu
The Documents menu contains all commands relating directly to documents, such
as duplicating and splitting documents, viewing them in combination and moving
them, and hoisting the binder to view isolated parts of the draft.
A.6. DOCUMENTS MENU
251
Open The Open sub-menu provides you with a number of ways in which to open
a selected item. These menu items are relevant from the binder or collection
views, as well as corkboard and outliner views, but note that in most cases, a
single click will open a file all by itself. How it does that is dictated by the
settings available in the View Binder Affects... sub-menu. The corkboard and
outliner can be configured to immediately open clicked files too.
The first two menu items open the selected documents in either the current
editor or the other split. To open an item in the current split (and replace the
existing view), use
– O. To open selected item(s) in the other split, use
–
O. This will open a new split if necessary, using the previous split orientation.
The actual labels of these menu items will change, depending upon the current
editor that is active, and whether or not split orientation is horizontal or vertical. For example, if the focus is in the bottom editor of a horizontal split, the
label for
– O will be “in Bottom Editor”.
as QuickReference Opens the selected document in a QuickReference Window, rather than any active or inactive splits.
in QuickLook This menu command is only available for types of files which
Scrivener does not recognise. It will hook into the Mac’s QuickLook system and display that file according to its QuickLook settings.
With All Subdocuments If the selected item has sub-documents (this can be
determined on the corkboard if the index card appears as a stack of cards;
and in the outliner if it has an arrow beside it’s name) you can choose to
open it as a corkboard either in the current editor or the other split.
– O) Replaces the current editor view
§ On Editor Corkboard: (
with the selected item’s contents. This is similar to pressing –
DownArrow in the Finder.
§ On Other Editor Corkboard: As with above, but uses the split editor
to open the item, instead of replacing the current view.
in External Editor (
– O) This command is available on any type of item
that is not a text or folder document. It will open the file using the default
editor for that type of file. An example would be opening a picture in
Preview. Opening items this way allows them to be edited in their native
applications, and the results of those edits (if Scrivener can display the file
type) will be visible upon saving that file, if Scrivener can display that file
type in the editor.
252
APPENDIX A. MENUS AND KEYBOARD SHORTCUTS
Snapshots Provides commands to manage a document’s snapshots, make new
ones, and commit large-scale snapshot actions on selected items or even the entire project. For more information on how to use snapshots, see [Snapshots][].
Note that in some cases these shortcuts will not be available. Generally this
happens when the selection includes items which are not text items, or the text
of the item(s) are empty.
Take Snapshot ( – 5) Available when viewing any text or folder document,
this command will take a snapshot of the current text and store it for later
use.
When more than one item is selected, the title of this item will change
to “Take Snapshots of Selected Documents”. All selected items will be
snapshot.
Take Snapshot With Title (
– 5) As above, but will prompt you for a descriptive title prior to taking the snapshot, which will be displayed next to
it for future reference.
When more than one item is selected, the title of this item will change to
“Take Titled Snapshots of Documents”. The supplied title will be applied
to each snapshot taken for all selected items.
Show Snapshots Will reveal the Snapshots pane in the inspector, revealing it
if necessary. While this menu item does not have a shortcut, an identical
function in View Inspect Snapshots provides the shortcut key,
–
M.
Show Changes When a snapshot is selected from the snapshot list, it is possible to view the changes between that snapshot and the current document.
Note these features are also accessible from the snapshot pane itself, in a
button at the top of the inspector. If two snapshots are selected, these two
snapshots will be compared between each other, using the oldest snapshot
as the exemplar.
§ Compare/Original: Toggles visibility of the change tracking mode.
§ Comparison Granularity: These options can be toggled on and off
individually to determine how closely changes will be tracked, with
the finest level selected being the used method. By Paragraph will only
mark changes at the paragraph level; By Clause only marks changes
made at the phrase level; By Word is the most detailed level of change
tracking available. Use these settings to fine-tune the results if what
you are getting is too precise or vague to be useful.
§ Next Change: (
in texts.
– ])
Scrolls the view to the next available difference
A.6. DOCUMENTS MENU
§ Previous Change: (
253
– [) Scrolls the view to the previous difference.
Roll Back When a snapshot is selected, this will roll back that selection to the
main editor. The option to snapshot the current editor before making this
revision will be given.
Delete Permanently removes the selected snapshot from the disk.
Duplicate There are two different methods you can use to duplicate the selected
item(s).
§ with Subdocuments and Unique Title: ( – D) This is the default method
in most application. The entire item (including all of its children if it
has any) will be duplicated, and it will be provided with a unique name
automatically.
§ without Subdocuments: (
– D) Also referred to as “Simple Duplicate” in
prior versions of Scrivener, this is most useful when you only want to
duplicate the container of an item by itself, such as a chapter folder, but
not all of the scenes within it. In this case, a unique name will not be
provided.
– T) Available when text has been selected in the main
Set Selection as Title (
editor, the title for the current document will be replaced with whatever text
has been selected.
Split Provides two methods for splitting the current document into two different
documents. In both cases, everything below the current cursor position will
be moved into a new document below the current one. Everything above the
cursor will remain unchanged. This action cannot be undone (except via the
Merge command).
§ at Selection: ( – K) Simply create a new document with all text below the
current caret position. In cases where text has been selected, the caret
position will be considered as the start of the selection range.
§ with Selection as Title: (
– K) Works the same as above, but in this case
the currently selected text will be used to title the new document that is
created, rather than requesting a new document name after pressing the
shortcut.
254
APPENDIX A. MENUS AND KEYBOARD SHORTCUTS
Merge (
– M) The opposite of splitting, merge will take two or more documents
and combine them all together into a single document, using the top-most document in the selection as the “template” for the merged document’s meta-data.
This action cannot be undone (except via the split command). Note that in
those fields where combination makes sense, such as notes and keywords, all of
the documents will be used to create a combined meta-data result.
How documents get merged together can be controled in the General preferences pane (section B.1), under Separators.
Group (
– G) Takes one or more selected items and creates a new folder, placing
the selection within that folder. You will be given the option to name that
folder after invoking the command.
Ungroup (
– U) The opposite of grouping, ungroup will move the contents of the
selected container up one level so that they become siblings of that container.
This action will not destroy the original container, allowing you to move the
items back in, if it was made in error.
Move Provides keyboard shortcuts for moving the item around in the outline
in two dimensions, as well as completely displacing it to another spot in the
binder.
§ To: This menu will be populated with all of the items in the binder. The
selected item(s) will be moved beneath the selected item as children. Note
that if you select a document as the target, it will become a document stack
as it now contains children.
§ Left/Right/Up/Down: Use – with the appropriate keyboard arrow
key to move items around in the outline. Left and Right will promote
or demote the item in the hierarchy; Up and Down will change its order
in context with its siblings.
Sort Sort acts on the children of a selected container, and sorts items alphanumerically, either in Ascending or Descending order. Note that this a permanent
change that cannot be undone. Additionally, you can choose to shuffle all of
the children randomly. If you wish to just temporarily sort a list of items by a
criteria, use the outliner.
Hoist Binder Mimics the behaviour of traditional outlining software, allowing you
to temporarily obscure the full binder and focus on only one portion of it.
A.6. DOCUMENTS MENU
255
Hoisting will display the selected container all by itself in the binder sidebar. Unlike collections, hoisting the binder retains all of the binder’s abilities.
Changes made to ordering and structure while hoisting will be made to the
book outline itself. If you want a non-destructive way of viewing portions of
the binder, it is recommended you use Collections (section 8.3) instead.
Unhoist Binder Returns the binder to its full display.
Favorites Provides commands to manage your favourite documents. Favourites
will be displayed in various places around the interface, particularly in item
selection menus, at the top of the list, such as “Go To”, “QuickReference”,
“Scrivener Link”, and more.
Add to Favorites Adds the selected item(s) to the favorite list.
Remove from Favorites Will remove the selected item(s) from the favorite
list, ignoring those selections which are not already there.
Clear Favorites Wipe out the entire favourite list with one command.
Manage Favorites. . . Displays the Favorite Management Palette wherein you
can change the order in which they will appear in the interface, remove
one or more selected items, or drag new items into the palette to add them
to the list.
Convert Provides tools for converting the document’s type, writing mode, or format defaults.
§ to Folder/File: Converts the selected item(s) to folders or files. Note that
these two types are very similar in Scrivener, so this tool makes it easy
to change your mind later about whether or not something should be a
folder or a file.
§ Web Archive to Text: Activates when viewing a WebArchive item. Will
analyse the archived page for its text content and create a rich text alternative that is editable and considered a text document from that point onward. Note this cannot be undone, create a duplicate of the web archive,
first, if you wish to retain a copy with its full layout.
§ Formatting to Default Text Style: If the font and ruler styles of the document do not conform to the application or project defaults, you can use
this command to use those to reset its appearance. For more information
on conforming document styles, see [Homogenising Format Styles][].
256
APPENDIX A. MENUS AND KEYBOARD SHORTCUTS
§ Script Format. . . : Useful when you need to switch from one scripting standard to another. Note that if all you wish to do is change the current document writing mode, you can press – 8 to do so. This function is strictly
for converting between pre-existing scripts to bring them up to spec. For
more information on scriptwriting, see Scriptwriting (chapter 19).
Auto-Generate Synopsis For single items, you can click the button in the upper
right-hand side of the index card in the Inspector. When you wish to perform
this automated function on many items at once, use this menu command. The
command will work in the same fashion as imported text documents, taking
the first 500 characters of text in the document. Note this cannot be undone;
do not run this command on cards you’ve already manually entered synopses
for, unless you are sure you want to replace them. Scrivener will warn you if it
looks like you are about to overwrite custom synopses.
Change Icon Provides access to existing icons and lets you change the document
icon to a custom icon for the selected item(s). Icons can also be managed either
globally, or by project, from here. Your custom icons will be available, as well
as many built-in icons that you are free to use in any of your works.
§ Reset Icon to Default: Removes custom icons from the selected item(s). If
no custom icons are in place, this menu item will do nothing.
§ Manage Icons. . . : Reveals the Manage Icons Palette, where you can add or
remove your own custom icons either to the project, or make them available globally to all Scrivener projects. For more information on managing
and creating icons, see Custom Icons (section 12.5).
A.7
Format Menu
The Format menu contains all commands that deal with formatting the text of an
individual document. It contains all of the usual OS X commands (previously found
in the Text menu in older versions of Scrivener) for changing the font, setting line
spacing, creating tables and lists and controlling the ruler, along with commands for
highlighting and setting the current text mode. Additional Scrivener specific tools for
formatting the text can be found here as well, including various forms of notation,
text conversion utilities, and bibliography software integration.
Font Displays the standard OS X Font submenu, which contains useful tools for
controlling the character-level appearance of your text. Fonts family, variant,
and size can also be controlled with the The Format Bar (subsection 14.4.2).
§ Show Fonts: ( – T) Access the system-wide standard font palette, which will
change the font you type in from that point forward, or alter the existing
font of a selected range of text.
A.7. FORMAT MENU
257
§ Bold/Italic/Strikethrough: All of these operate in the same fashion by either modifying the behaviour of typing if there is no selection, or toggling
the selected text between the various styles. Note that not all fonts support these styles. If it appears that one of these is not working, check your
font for proper variant support.
§ Underline: Has been expanded from the system default menu item to provide additional support for underlining styles, including dotted, dashed,
and by word.
§ Remember Typing Style: Use to set up fonts and ruler styles in blank documents. Ordinarily, if you change formatting settings on a blank document, these settings will be removed to optimise the RTF file. Use this
command to force these settings to be retained. Generally you will only
need this when setting up Document Templates (section 8.4).
§ Outline: Changes the style of the font to outlined instead of filled.
§ Bigger: (
– =) Increases the size of the font by one point.
§ Smaller: ( – -) Decreases the size of the font by one point.
§ Kern: Supplies access to the OS X typographic kerning engine.
§ Ligature: If the font family supports typographic ligatures, they can be
enabled or disabled here.
§ Baseline: Adjust the baseline height of the text, most commonly referred
to as superscripting and subscripting.
§ Character Shape: If the font family supports typographic shape alternates,
they can be adjusted here, such as Old Style Numerals.
§ Show Colors: (
– C) Toggles the visibility of the colour selection palette.
Note that Scrivener uses this palette in a number of different places, not
strictly related to text colour.
§ Copy/Paste Font: (
–C /
– V) Copies the font settings from the current cursor position. Use Paste Font to applies these settings to other
selections of text.
Text Displays the standard OS X Text submenu, which contains useful tools for
controlling the paragraph-level formatting of your text. Paragraph alignment
and spacing can also be controlled with the The Format Bar (subsection 14.4.2).
§ Align Left/Center/Justify/Right: Controls the text alignment of the current paragraph, or all paragraphs falling within a selection range.
§ Keep with Next: Inserts an invisible character which will keep this paragraph together with the next paragraph, so that they will not become separated by a page break.
258
APPENDIX A. MENUS AND KEYBOARD SHORTCUTS
§ Writing Direction: Toggle between Left-to-Right and Right-to-Left writing styles.
§ Copy/Paste Ruler: (
–C /
– V) Copies the ruler and paragraph format settings from the current paragraph. Use Paste Ruler to apply these
settings to other selections of text.
Table Provides tools for adding and manipulating tabular data in the text editor.
Tables can be set up with a given number of rows and columns, but using the
options in this menu, you can add or remove either to fit the constraints of your
data later on. You can also normalise the width and height of columns and rows
respectively with the Distribute functions.
Lists Supplies basic list styles, and few advanced controls for bullet and enumerated
list management. Unless you need custom list styles, you can generally make
do with the list button supplied on The Format Bar (subsection 14.4.2).
§ List. . . : Build your own custom list type using the standard OS X tool for
doing so.
– RightArrow /
– LeftArrow) Selects the next
§ Next/Previous List Style: (
or previous built-in list style available and converts the current list to that
style.
Formatting Provides tools for creating and applying ruler and font presets3 to
your text. For more information on using the presets system, see Formatting
Presets (Styles) (subsection 14.4.3).
Scriptwriting Although Scrivener is not a dedicated script writing application
such as Final Draft or Montage, the Scriptwriting submenu does make it relatively straightforward to create first drafts which can be later fine-tuned in these
applications. For full documentation on this, see Scriptwriting (chapter 19).
Show/Hide Ruler ( – R) Toggles the visibility of the tab-stop and page margin ruler
for the active editor. Note that all formatting tools have been moved from this
ruler to the format bar.
Show/Hide Format Bar (
– R) Toggles the visibility of the character and paragraph formatting bar, which provides quick access to many of the most common types of formatting tools.
3
Note that Scrivener does not supply word processor stylesheets. Styles are strictly saved formats
which can be applied to your text. Once applied they are static changes to the text and will not be
updated later if you change that favourite style.
A.7. FORMAT MENU
259
Highlight The highlight menu lets you place a background highlight behind the
selected text, much like using a highlighter marker on paper. In addition to the
five provided presets, this menu also displays any favourite colours that have
been set on your system. For more information on how to use highlights, see
[Highlights][].
Revision Mode Revision modes force anything you type to be displayed in a provided colour until you disable the revision mode. This menu provides access
to these levels. For more information on using this, see Marking Revisions
(section 16.4).
For more information on annotating and footnoting your text, see Annotating and
Marking Your Text (chapter 16). Note that while the menu system refers to these as
footnotes, it is possible to export them as endnotes during compile.
– 8) Attaches a comment to the selected text (or previous word), makComment (
ing a new linked comment in the inspector pane. Useful for keeping notation
text out of the editor.
Footnote As with Comments, adds a linked footnote style comment to the inspector
pane. Useful for keeping footnote information out of the editor.
Inline Annotation (
– A) Converts the selected text into an inline annotation, or
toggles the writing mode to annotation mode. Useful for placing notes right in
the editor, alongside the relevant text.
Inline Footnote (
– F) Converts the selected text into a footnote, or toggles the
writing mode to footnote mode. Useful for keeping footnotes directly in the
editor session.
Convert The convert submenu provides useful tools for the manipulation of text
and notation features.
To Uppercase Converts the selected text to all uppercase characters.
To Lowercase Converts the selected text to all lowercase characters.
To Title Case Converts the selected text to title case, which takes into account
common English grammar conventions.
260
APPENDIX A. MENUS AND KEYBOARD SHORTCUTS
To Small Caps If the current font supports proper small caps, the text will be
converted to that variant. However it will fake the results using font sizes
otherwise. If your workflow requires true small caps, be certain the font
you are using can handle them.
Quotes to Smart/Straight Quotes Converts between typographic “curly”
quotes and straight inch and foot marks.
Multiples Spaces to Space Useful for cleaning up a document that has been
typed up with multiple spaces in between sentences and so forth.
Bold and Italics to MultiMarkdown Syntax Converts rich text bold and
italic formatting codes into respective MMD syntax. Note that in some
cases this can produce odd results; be sure to proof the results before sending off to the printer.
Inline to Inspector and Inspector to Inline Conversions These four commands allow you to convert inline annotations to linked Inspector comments, vice versa, and footnotes. These commands work on the entire
current document.
Options Provides options which impact the display or behaviour or the text editor.
§ Show/Hide Invisibles: Toggles visibility of hidden control characters, such
as paragraph breaks, tabs, spaces, page breaks, and so on. A few control
characters do not have associated special characters.
– T) Toggle a feature which keeps the currently
§ Typewriter Scrolling: (
edited line of text in the middle of the screen, vertically centred. This setting is global, but will impact full screen or the regular editors depending
upon the current mode.
Bibliography/Citations. . . ( – Y) If a citation manager has been set up in the General tab (section B.1) of Scrivener’s preferences, this command will launch or
activate the set manager, allowing you to select a citation and paste it back into
Scrivener using whatever system that application provides.
A.8. WINDOW MENU
A.8
261
Window Menu
The Window menu contains commands for controlling windows and panels along
with a list of all open window
Minimize ( – M) Minimises the window to the Dock (the same as the yellow button
in the top-left of the window). Hold down the Option key to minimise all.
Zoom (
– -) Zooms the window in or out (the same as the green button in the
top-left of the window). Scrivener will try to zoom intelligently to best fit the
contents of the window, taking into account your preferred editor width. Hold
down the Option key to change to Zoom All.
Zoom to Fit Screen (
– =) Zooms the window in and out, so that it takes up the
whole of the screen.
Float Window “Floats” the project window above other application windows, so
that you can have it visible at all times should you wish, even when switching
to other programs. Be sure not to use this in conjunction with Zoom to Fit
Screen.
Project Notes (
– P) Displays the project notebook in a separate window. For
more information on using project notes, see Project Notes (section 12.3).
Show/Hide Scratch Pad ( – ) Displays or closes the floating Scratch Pad Panel
(section 11.3); useful for collecting information while using other applications.
Show Keywords HUD (
tion 10.2).
– H)
Displays or closes the Keywords HUD (sec-
Bring All to Front Brings all Scrivener windows to the front. Hold down the Option key to change to Arrange in Front.
Window List The rest of this menu will be populated by all of the windows (excluding panels, like the Keywords HUD) that are currently open in Scrivener.
Selecting from this list will bring that window to the front.
A.9
Help Menu
Appendix B
Preferences
Because Scrivener is a multi-project application, preferences are split up in different
areas so that you can supply new projects with some starting preferences. Once these
projects have been created, they will maintain their own individual settings from that
point forward. One step beyond that, there are a sub-set of preferences which apply at
the document level, and each document will diverge from the project and application
preferences.
Not all preferences work in this “cascading” fashion. The ones that do will be
indicated as such in their notes. Many of the preferences which are wholly project
specific and make no appearance in the application preference system at all. A good
example of this is whether or not pins are displayed on index cards. By default they
are, but you can turn them off for a project—and it will remember that setting. There
is, however, no way to change that behaviour globally.
All of the project specific preferences are located in menus, and most of these are in
either the Project menu or the View menu. This section will not cover these specifically, though some might be mentioned in passing where applicable. Instead, this
section strictly focusses on the application preferences dialog. For information on specific menu options, see the appendix, Menus and Keyboard Shortcuts (Appendix A).
B.1
B.1.1
General
Startup options
Reopen recent projects on program launch Reopens recently-opened projects
whenever Scrivener is launched—thus saving you the effort of opening what
you were last working on.
Show start panel when there are no projects open Toggles the display of the start
panel, which lets you create new projects, open existing projects on your drive,
or select from a list of recently worked on projects.
Automatically check for updates If this is checked, whenever Scrivener is launched
it will check the website to see if there is a newer version available, and if so will
ask you if you want to update. Note that if you do not have this checked, you
262
B.1. GENERAL
263
can still check for updates by choosing “Check for Updates. . . ” from the Automatically check for updates: if this is checked, whenever Scrivener is launched
it will check the website to see if there is a newer version available and, if so,
will ask you if you want to update. Note that if you do not have this checked,
you can still check for updates by choosing “Check for Updates. . . ” from the
application (Scrivener) menu.
B.1.2
Saving
Auto-save after n seconds of inactivity Sets how long Scrivener waits to save
changes after it becomes inactive. Scrivener automatically saves changes made
to projects. So that it is not constantly saving - and to avoid any slowdown this
might cause - when any changes are made to a project, Scrivener takes note and
waits for a suitable time to save them. It then waits until the user stops interacting with the program for more than than two seconds (by default). If the user
makes no edits after this period, Scrivener deems it a good time to auto-save the
project without the save process interrupting what the user is doing. You can
change the period Scrivener waits to auto-save with this preference. If you increase the period significantly, be sure to use Save from the File menu regularly
to force saves to your project.
Enable Subversion/CVS-compatible saving Advanced If this is checked, the
binder data saved inside your .scriv files get saved in XML format instead of binary format. This makes saving slower, but makes your .scriv files compatible
with Subversion and CVS for versioning. If you have no idea what Subversion
or CVS is, just leave this unchecked and don’t worry about it. See [Version
Tracking][] for more information.
Automatically name untitled text documents upon saving When enabled, text
documents that have been left untitled will acquire the first few words from
the document.
B.1.3
Separators
This table lets you configure how Scrivener will separate texts from one another in
various situations. In all cases, you have three choices available:
1. Single Return: Inserts a single carriage return between selections. If two paragraphs appear together, there will be no whitespace between them, save for any
style-based paragraph spacing.
2. Empty Line: A full empty space will be inserted between selections. If you
prefer or require working with double-spaced paragraphs, this is the option you
will want to use.
264
APPENDIX B. PREFERENCES
3. Custom: Lets you type in a custom separator. Some default common examples
have been provided. If you wish to insert carriage returns, use Return to do so.
The four different types of selections you can separate are as follows:
1. Merged Documents: Determines how documents will be merged when using the
Merge command from the Documents menu. Note that this setting only affects
the main text - the notes of merged documents will always be separated by a
double newline.
2. Append clippings service: When using the global Append Clipping Scrivener
service, clippings will be separated from any existing text by this option.
3. Append selection: When selecting text and using the Edit Append Selection to
Document command, the selection will be separated from the existing text by
this option.
4. Scratch pad notes: When appending text to documents from the scratch pad,
incoming text will be separated from existing text by this option.
B.1.4
Scratch Pad
Hot key Sets the global hot key for showing or hiding the Scratch Pad. Since this
key will be accessible from any application on your Mac, it would be wise to
choose something that would likely not conflict with any other hot keys in
other applications.
Notes location In Scrivener 2, your scratch pad notes are now stored on the hard
drive using RTF files. This option lets you choose the location for where those
files will be automatically saved. By default, they will be stored in your Documents folder, under a special folder that Scrivener will create for them.
Note that in secured working environments, you might wish to alter the location of this to also reside in the encrypted area of your drive.
B.1.5
Warnings
When you first start using Scrivener, actions which have a destructive nature (such as
importing in such a way that original formatting might be lost) will produce a warning dialogue. You can choose to disable these as you see them. The Reset button will
clear all of these dismissals and make them appear again the next time it is appropriate.
Bibliography/Citations Manager Scrivener can integrate with several popular bibliography management programs. Use this option to select your favourite from
the Applications folder. The reset button will clear your choice.
B.2. APPEARANCE
B.2
265
Appearance
Most preferences relating to the appearance of Scrivener can be modified here. In
a few cases, things which modify appearance, but are more related to the specific
function they fall within, will be located in the special section for them. A good
example is the background texture for corkboards, which is located in the Corkboard
section.
B.2.1
Options
General and miscellaneous appearance options.
Binder uses source list style If this checked, the highlight bar in the binder takes
on the gradient that it does in programs such as the Finder and iPhoto - that
is, it will have a blue (or silvery if the Graphite theme is selected in System
Preferences) gradient when it has the focus or a grey gradient when it doesn’t.
The colour of the binder will be set to a light blue, as is standard for source lists
(although you can change the colour again after checking this option if you so
wish). If this option is not checked, the binder’s selection highlight is drawn
based on the system highlight colour - although it is still drawn as a gradient, in
contrast to most other programs. If your system uses the standard Aqua theme
and blue highlighting, you will notice very little difference between this option
being turned on and off.
Show subdocument counts in the binder Beside each container in the binder, a
number will be displayed showing how many documents it contains. This number is recursive, meaning that it will count not only its immediate children, but
all of the descendents beneath those children as well, if applicable.
Keep text on lines in index cards and notes When enabled, Scrivener will adjust
the ruling beneath lines to match the current font size. In most cases, this will
produce the most pleasant result, but if your notes have a lot of different font
sizes, it might look nicer to keep the rules uniform, regardless of font size.
Show notepad lines in documents notes Turns on notepad style ruling for document notes, giving it the appearance of a pad of paper.
Show notepad lines in project notes As with the above, will toggle whether or not
notepad style ruling is used in the project notes pane. This also will apply to
the project note window.
Label colour tint opacity Define how much blending Scrivener should use between
label colour and the underlying icon. Moving the slider right, to “High” will
cause icons to be coloured more vividly; moving the slider left to “Low” will
cause the effect to be more subtle.
266
B.2.2
APPENDIX B. PREFERENCES
Outliner
Options for adjusting the appearance of the Outliner view mode.
Uses alternate row colours Draw alternative background colours behind rows in
the outliner. When this is turned off, the background will be a solid shade.
You can define the actual colours used in the section below.
Has horizontal grid lines Draw seperators between rows in the outliner.
Has vertical grid lines Draw seperators between columns in the outliner.
B.2.3
Fonts
Options for setting application fonts. If you wish to adjust the editor fonts, visit the
Formatting tab (section B.7).
Binder font Choose the font which will be used to display the text labels of items
in the binder, and Collections. Note that some font choices will not allow all
of the checkbox options available, because they do not have the proper font
variant. The default font choice, Lucida Grande, for instance, does not have
an italic variant. If you wish to use these options, make sure to choose a font
which has the proper variants available to it.
Outliner font Sets the display font in the outliner.
You can also select font variants to be used to alter the appearance of items in the
binder. The font variants you wish to apply must be available to the font you have
selected. Folders and document containers can be treated separately, if you wish.
B.2.4
Customisable Colours
The number of interface elements you can customise has been dramatically increased
in Scrivener 2. Consequently, interface colours are now chosen using a selection tree,
as it would take many pages of preferences to display them all together. To alter the
default colour for the desired interface element, first select the major category in the
left-most column, and then the item itself from the centre column. Click on the
colour well at the right to assign a new colour, or click Use Default Color to reset the
option to the system default.
B.3
Corkboard
Provides options and settings which will impact the way the corkboard functions and
appears.
B.3. CORKBOARD
267
Category
Interface Element
Description
Views
Binder Background
Background colour for the
Binder
Background colour for the
search results collection and its
tab
Background colour for the Outliner
Colour displayed around images, PDFs, movie clips, etc
Background colour for margin
and footnote comments in the
inspector
Main editing background, or
“paper colour”
Background colour behind titles when enabled in combined
scrivenings mode
Colour displayed around the
pseudo-page in fixed width
mode
Notes editing background, or
“paper colour”
As above, but for project notes
Highlight used to accentuate
search results in the editor
Text colour used to draw special
symbols depicting invisible characters
The “paper colour” for index
cards. Will be blended with the
label colour when View Use
Label Color Index Cards is
enabled, so it is often best to
choose a subtle shade
Text colour used to draw status
stamps on index cards in corkboard view.
Search Results Background
Outliner Background
Media Background
Comments Pane
Editor
Text Background
Combined Titles BG
Fixed Width Background
Notes Background
Project Notes Background
Search Highlights
Invisible Characters
Index Cards
Index Card Background
Index Card Status Stamps
268
APPENDIX B. PREFERENCES
Full Screen
Paper
Combined Titles BG
Background
Text Selection
QuickReference
Paper
Notes Background
Text Selection
Comments Background
Snapshots
Background
Deleted Text
New Text
Revision Colours
All elements
Target Progress Bars
Start Colour
End Colour
Midway Colour
The “paper colour” for the editing area in full screen
Background colour behind titles
in full screen, when enabled in
scrivenings mode
Colour displayed around the
pseudo-page in full screen
Choose an alternate text highlight colour for selection. Often the system defaults are too
bright.
The “paper colour” for the editing area of the QuickReference
window
Alternate “paper colour” used
behind the notes section
Choose an alternate text highlight colour for selection.
Choose an alternate background
colour for margin comments
and footnotes display
The “paper colour” for the snapshot text area. Note this will apply both to snapshots shown in
the inspector, and snapshots being displayed in the main editor
Text colour to use when indicating text that has been deleted in
the difference between the snapshot and the current version
Text colour to use when indicating text that has been added in
the difference between the snapshot and the current version
Set individual colours for the revision level text tool.
Progress bars blend between
three colours, this is the colour
the progress bar will be when it
is at its lowest
The final colour that the
progress bar will appear as
If you don’t like the way
the progress bar looks when
blended between Start and End,
use the Midway option to set a
third blend
B.3. CORKBOARD
B.3.1
269
Appearance
Draw lines in index cards Determines whether lines should be drawn in the text
area of index cards (affects both the corkboard and the index card in the inspector).
Display images as photographs Media files such as QuickTime movies and images
can be displayed as “Polaroids”. Disabling this option will show a standard
synopsis index card to represent the image, instead.
Arrange cards from right to left Will cause index cards be ordered from right to
left, top to bottom. If you are accustomed to working in right-to-left languages,
this will make the Corkboard more intuitive.
Status stamp opacity Allows you to set the opacity of stamps on the corkboard.
Corkboard shadows Sets the intensity of the shadows around the cards and borders
of the corkboard view.
Position pins Allows you to choose whether pins on the corkboard (if displayed)
should be drawn in the centre of the title area of each index card (which looks
more authentic but can partially obscure the actual title) or in the top-right
corner. If using the rounded card theme, this option will have no effect.
Index card theme Lets you choose the line colours used in the index card. “Red
and blue” divides the title area from the text with a pinkish-red line and draws
blue lines in the text area; “Blue and black” divides the title area from the text
area with a blue line and draws black lines between the text. These represent
the most common colours of index cards in the real world. The rounded card
theme displays cards in a more stylistic fashion. Cards will have rounded edges;
labels will be represented as a colour block instead of a pin; and lines will be
drawn in grey. This setting will also impact the index card in the Inspector
(though it will always have square corners).
Corkboard background Lets you customise the corkboard background. Select
“Corkboard pattern” to use the default corkboard background; “Custom color”
allows you to choose a background colour from the colour well on the right of
the pop-up button; “Custom background. . . ” lets you select an image file from
disk to use as the background image.
B.3.2
Fonts
The options in this section let you alter the fonts used to draw index cards. To change
the font, click the Select... button to the right of the option you wish to adjust. This
will present the standard font selection palette and any choices you make here will be
applied to the preview immediately.
270
APPENDIX B. PREFERENCES
Index cards title font Lets you set the font used in the title area of index cards (this
affects the index cards both in corkboard mode and in the inspector).
Photographs title font If you have enabled “Display images as photographs” option,
the title of the image will be drawn below the thumbnail using this font choice.
Index cards text font Lets you set the font used in the text area of index cards (affects
index cards both in corkboard mode and in the inspector).
Status stamp font Lets you set the font (and whether or not it should use bold face)
of the stamps that can be drawn diagonally over index cards in corkboard mode
to show the status.
B.3.3
Dragging and Double-Clicking
Options for how index cards react to click-and-drag events, as well as double-clicks.
Allow drop ons When enabled, lets you drop index cards on top of other cards to
store them as children beneath that card. This action is similar to dragging
items beneath other items in the binder.
Double-clicking on the corkboard background Adjust the behaviour of what
should happen when double-clicking in a blank area of the corkboard.
“Opens the parent corkboard” will select the parent of the current corkboard.
If the corkboard you are viewing is already at the top of the binder, it has no
parent and nothing will happen.
“Creates a new card” follows a common behaviour amongst diagramming applications. When in linear mode, the new card will appear at the end of the list.
In free-form mode, the new card will appear beneath the mouse pointer.
“Do nothing” ignores all double-clicking on the corkboard background.
B.4
Full Screen
These options affect the appearance of the full screen mode.
B.4.1
Text Color
If this is unchecked, the text in full screen mode will use the actual text colour - that
is, the colour it is normally, in the main editor. If this option is checked, you can
choose a different colour for the text in full screen using the colour palette. Note
that the real colour of the text remains unchanged - if it is black in the main editor,
underneath it remains black, even if you have chosen to override the text colour with
green in full screen mode - it will merely be displayed in green. This colour can have
B.4. FULL SCREEN
271
an opacity assigned to it, which will allow you to blend the text colour with the page
background.
This uses OS X’s built-in “temporary text attributes” feature, which allows text to
be drawn using a different colour without affecting its real, underlying colour1 .
B.4.2
Options
Highlight current line Enabling this will place a background highlight colour beneath the current virtual line (not paragraph), making it easier to see where you
are in your text. The colour of this will be determined depending on your Text
Color settings. If overriden, it will use a lighter shade of this colour behind the
text. Otherwise, it will use the preference for Current Line Highlight, under
the Editor section, in the Appearance tab (section B.2).
Fade between modes Gracefully fades the screen between full screen and regular
editing mode.
Close full screen when the Escape key is pressed When disabled, you will need to
use the keyboard shortcut for full-screen mode (Opt-Cmd-F by default) to toggle between modes.
Hide main window when entering full screen mode Check this to hide the main
window during full screen sessions. If this is unchecked, you can see the main
window beneath the translucent areas of the full screen background (unless you
have set the opacity to opaque using the slider in the full screen control panel),
and you can also have the main window visible on another screen if you have a
multi-screen set up. Checking this so that the window is hidden means that you
could use the translucent areas of the full screen window to look at the contents
of the windows of other applications. Note that in some circumstances, having
the main window visible during full screen mode can slow down typing, so it is
usually best to leave this checked as it is by default.
Open full screen window on secondary screen when available If this is checked
and you have more than one display, the full screen window will be opened
on the secondary screen.
Scroller type Allows you to customise how the scroll bar looks in full screen mode.
1
Note that temporary attributes can only affect colour - it is not possible to choose a different font
in full screen, for instance. Some other plain text applications do allow you to change the font in full
screen. They can do this because the whole of the text only ever uses one font at a time - plain text
doesn’t hold any font information, fonts are used only for display. However, because Scrivener is a rich
text application, it is possible for a single piece of text to use multiple fonts. It is therefore impossible
to change these fonts to one font temporarily, edit the text and then change the font back.
272
APPENDIX B. PREFERENCES
“Standard full screen scroller”: The scroller will look like the ones you would
see in the full screen modes of iPhoto or other iApps (the translucent greywhite against black). This scroller will always be visible if there is enough text
to warrant a scroller and disappear when there is not.
“Auto-hiding scrollbar (uses text color)”: The scroller will take on the colour
of the text (as set using “Override text color” - see above), and will only appear
when the cursor is over it. Move the cursor to the edge of the paper area to get
this scroller to appear. This is an unobtrusive scroll bar that gets out of your
way when you don’t need it, and fits in with the the retro green-on-black full
screen look that a lot of users like.
“No scroller”: Full screen mode will not feature a scroll bar under any circumstances if this is selected.
B.4.3
Insertion Point (Caret)
Adjust the behaviour of the insertion point to increase visibility.
Disable insertion point blinking When enabled, the cursor will be always visible
on the screen.
Use block insertion point of n pixels Adjust the width of the insertion point from
its default of 1 pixel. This will dramatically increase the visibility of it, however
with variable-width fonts (like Optima), this setting can produce odd results. It
is best used with a fixed-width font like Courier.
B.4.4
Margins
Sets the margin spacing between the text and the “paper” edge. You can select a different distance for horizontal and vertical margins. The top and bottom margin will
only affect the very top and bottom of the document on the page.
B.4.5
Default Settings for New Projects
You can dynamically adjust all of the following options while in Full Screen, using the
HUD. These options will not impact any open projects, but will set the defaults
for all future projects that you create.
Default Text Zoom Dynamically scale the size of the text font for full screen mode.
This will not impact the underlying font settings, letting you use a larger or
smaller font only while in full screen.
Paper position There are three possible choices, “Left”, “Center”, and “Right”. Generally this is useful in conjunction with a high amount of Background fade, so
that you can place reference material alongside the full screen page.
B.5. NAVIGATION
273
For the next two options you can use the Use Current button to grab the settings
from the active project. Often it is easier to visually arrange things how you like them
using the HUD. These buttons let you do that and then transfer the settings to your
defaults.
Paper width Adjusts how much width the virtual page should take up (not including
the margin space). Move the slider all the way to the right to take up the entire
screen, or all the way to the left to use only a narrow column.
Background fade Lets you adjust the blend between the background and the chosen
background color. All the way to the right means no blending at all, it will be
completely opaque. All the way to the left means no blend will be used and
you’ll see the windows behind Scrivener as if there were no background at all.
B.5
Navigation
The navigation settings provide settings to alter how Scrivener reacts to the various
actions you can take to navigate around in your project. There are numerous ways
of doing so, from clicking directly on items, to using buttons to scroll through documents like a flip-book, to using menus to jump directly to a specific place in your
book, and more.
In nearly all cases, unless otherwise indicated, navigation options are globally applied; that is, no matter how you select an item, these options will apply.
If you are coming to Scrivener 2.0 from older versions, you may note that a lot
of the preferences pertaining to default group modes have been removed. This is because they have been replaced with a smarter, dynamic system that no longer requires
maintaining preferences.
B.5.1
Folders and Files
Treat all documents with children as folders When this is checked, any document
that has subdocuments will act like a folder - that is, the options selected
above will affect any document that has “children” (subdocuments). If this isn’t
checked, a normal text document or image file that has subdocuments (any type
of document can act as a “container” for other documents in Scrivener) will be
opened in editor mode when it is selected. If this is selected, it will be opened
in whatever mode folders are set to open in above.
Include enclosing group in Scrivenings When clicking on a folder (or document
stack, if “Treat all documents with children as folders” is enabled), by default
the text contents of that container will be included in the Scrivenings session at
the very top. If you never use folder text, or document stack text, then disabling
this will remove the empty entry at the top of the Scrivenings session.
274
APPENDIX B. PREFERENCES
Open all documents (files and folders) in editor view in search results list
Overrides default behaviour of opening folders (and if “Treat all documents
with children as folders” is set, document stacks as well). When this is enabled,
all container style search results will reveal their text when clicked on in the
search results, rather than revealing their children in accordance with the
selected view mode. This option is enabled by default, because generally
speaking, most search results are based on the text of the matching item, and so
the reason the item is in the search list at all is because of its text.
Collapse auto-expanded outline items after drag and drop When dragging items
into containers if you pause over the container Scrivener will helpfully reveal
the contents (if hidden) allowing you to drop items several layers deeper than
you could initially see. This option will close all automatically opened containers for you, after dropping the items. This setting impacts both the binder and
the outliner view.
B.5.2
Return Key Behavior
Return ends editing synopsis in corkboard and outliner By default, the Return
key will submit the edits being made to the synopsis in index cards and the
synopsis outliner field. To add carriage returns to the synopsis, use Return. If
this is unchecked you will need to use the Esc key to submit changes, and the
Return key will add carriage returns.
Return creates new item in list, outline, and corkboard views If this is checked, a
new item is created whenever you hit the return key in the outliner, binder,
corkboard or certain list views (such as the keywords list). Note that if you are
editing the title of an item, return ends the editing, hitting return again will
then create a new item.
B.5.3
Corkboard and Outliner Space Key Behavior
Space key opens selected document in. . . The spacebar can be used to quickly
open selected items in Corkboard or Outliner. By default this opens the item
in the editor, replacing the current view. If you would prefer it to match the
binder behaviour, change this to “QuickReference Panel”.
B.5.4
Scrivener Links
There are two conditions relating to Scrivener Links which both have the same set of
three options. You can choose to handle them by opening the link in a QuickReference Panel which will preserve the current editing session, the Current Editor, which
will replace the current editing session (this was the default behaviour in Scrivener
B.6. EDITOR
275
1.x), or the Other Editor, which will open the link in the other split, creating a new
one if necessary.
Newly created Scrivener Links refers to the creation of new links with the
shortcut, or the menu command Edit Scrivener Link New Link.
–L
If the item which is being linked to is not a document, full screen will ignore this
setting and always open it in a QuickReference Panel. This is because full screen can
only display text, and there is no split view in full screen.
B.6
Editor
The options for the main text editor control how text is displayed within the editor itself. For options pertaining to fonts, see the Formatting tab (section B.7); and options
pertaining to text input and typography in the Auto-Correction tab (section B.8).
B.6.1
Editing Options
Smart copy/paste Unknown.
Typing clears search highlights When using the Project Search feature, Scrivener
will highlight the matching search results for you. If this is enabled, the highlights in the current editor will be temporarily removed as soon as you start
typing. To restore them, select another document from the search result list
and then use the Back button ( – [) to return.
Use hyphenation When full justification is turned on, it can increase readability to
use hyphenation at the expense of not being as “pure” to the actual text you
have keyed in. Consequently this is off by default.
Highlight current line Enabling this will place a background highlight colour beneath the current virtual line (not paragraph), making it easier to see where you
are in your text. To change the colour of this highlight, use the Appearance tab
(section B.2), in the Editor section, under Current Line Highlight. This setting
will also impact full screen, unless text colour override is enabled.
Disable insertion point blinking When enabled, the cursor will be always visible
on the screen.
Use block insertion point of n pixels Adjust the width of the insertion point from
its default of 1 pixel. This will dramatically increase the visibility of it, however
with variable-width fonts (like Optima), this setting can produce odd results. It
is best used with a fixed-width font like Courier.
Default Text Zoom Dynamically scale the size of the text font in the editor. This
will not impact the underlying font settings, letting you use a larger or smaller
276
APPENDIX B. PREFERENCES
font while editing. Note this only sets the default. Each editor split can have
its own settings and these settings will be preserved between editing sessions.
Ruler Units Lets you choose the units (centimetres, inches, picas, or points) that
should be used in the main editor’s ruler (available by hitting – R when the
editor has the focus or by selecting Show Ruler in the Edit menu.
B.6.2
Wrap to Editor Mode
There are two primary editor modes in Scrivener 2. Wrap to Editor is the method that
most will be familiar with, coming from Scrivener 1. In this mode, text is wrapped
according to the width of the editor view, or an artificial limit when Fixed width is
enabled. Wrap to Page mode is a new method which emulates a printed page much
like in many word processors.
Margins Sets the margin spacing between the text and the edge of the view. You
can select a different distance for horizontal and vertical margins. The top and
bottom margin will only affect the very top and bottom of the document in the
editor.
Default Editor Width This value, in pixels, is used to determine the overall width
of the project window when using the menu command, Window Zoom.
Scrivener will attempt to scale the window so that your preferred editor width
fits in with the binder, and optionally, the Inspector if it is open. Click the User
Current button to capture the current width from the active project. Setting this
to 0 (zero) will cause the editor to always take up as much space as possible (in
effect, making Zoom act like Window Zoom to Fit Screen).
Use fixed width When this is enabled, Scrivener will also use the above setting to
artificially restrict the width of the editing “page” no matter how wide you
make the editor itself. The area not used by this page will be filled in with a
background colour, which you can set in the Editor section, under Fixed Width
Background, in the Appearance tab (section B.2).
B.6.3
Wrap to Page Mode
Show page layout in new projects By default, Wrap to Editor mode is the default.
Enabling this will force Wrap to Page mode in all new projects.
Draw shadow around pages Add a shadow around the virtual page, offsetting it
from the background colour.
Center pages horizontally Instead of always pegging the virtual page at the left side
of the editor, no matter how wide, Scrivener will place the page in the middle
of the editing view.
B.7. FORMATTING
277
Show margin guides Will draw a border around the printable are of the virtual page.
Spacing between pages When more than one page of text is displayed, the number
of pixels entered here will buffer the pages from one another.
If you enter a value of 1 (one), a single line will separate pages vertically.
If you enter a value of 0 (zero) pages will flow from one to the next (but will
still have top/bottom margins separated them).
The following two options are used when “Use Printed Page Size” from the
View Page Layout menu is set to off. This will let you work in a different layout
configuration than what will eventually be printed.
Margins Sets the margin spacing between the text and the edge of the view. You
can select a different distance for horizontal and vertical margins. The top and
bottom margin will only affect the very top and bottom of the document in the
editor.
Page Size Using pixels, define a custom page size. Scrivener already provides for a
3x5 card custom page size, for those wishing to work in a smaller format, and a
page size that will conform to your print settings. This will let you set up a third
display page which, like the 3x5 setting, does not impact your print output.
Base printed page size on: There are two ways to print from Scrivener. “Document
printing Page Setup settings” will use the settings provided in the standard Mac
application Page Setup window, in the File menu. The other choice is to use
the “Compile Draft settings”, which is how you will most likely be publishing
your work. If page proportions are important to your workflow (such as in
screenplays), be sure to choose the option which you will be using to distribute
copies of your script.
B.7
B.7.1
Formatting
Main Text Style
These settings determine how new documents will be configured. They will not
adjust the formatting of documents you have already created, in any projects, so you
needn’t worry about these settings destroying your formatting.
Further, these settings can be adjusted per project. To change the settings for each
project, select the menu command Project Text Formatting Preferences. These will
always be set to the application defaults shown here, when you make a new project.
If you change the settings in the project formatting preferences, changes made to this
tab will not impact that project.
It is best to visualise default formatting settings in the following order of precedence, starting with the “weakest” and ending with the “strongest”:
278
APPENDIX B. PREFERENCES
§ Application preferences as set in this tab
§ Project preferences as set in Project Text Formatting Preferences
§ The document itself will always override either of the above.
To reset a document to either the project preferences (if changed) or the application preferences, use the menu command, Documents Convert Formatting to Default Text Style.
The top half of the tab is dedicated to setting up the default settings for new text
documents (files and folders). You will have access to the full standard ruler settings,
as well as font controls via the Show Fonts... button. All changes you make here will
be immediately previewed against the provided sample quotation.
If you already have a document set up the way you would like all future documents
to appear, make sure that editor (and not the other split, if one is open) is active before
clicking the Use Current button.
Footnotes font When enabled, the font within an in-line footnote will be changed
to this setting. It will still conform to the ruler settings of the text around it.
Also note this setting does not impact Inspector Footnotes.
Scriptwriting font When the editor is set to Scriptwriting mode, this font will be
used instead.
Notes font The default font for all notes. This setting impacts Project Notes and
Document Notes alike. Note that both of these are rich text fields and can
be changed from this default. As with the main text editor, if you change this
setting later on, old notes will remain as they were.
Writing direction In most cases, you will want to use the “Natural” setting, which is
set up depending on your default system language. This should go from right to
left, or left to right, automatically. If however, you do most of your writing in a
language that is different from your system settings, you can manually override
this here. Note you can also manually override individual documents as well in
Format Text Writing Direction, this only sets the default. Authors working in
both Arabic and German, for example, will probably want to leave this setting
at Natural and change each document according to the language it contains.
B.7.2
Edit Scrivenings Titles Style
When View Editor Display Titles for Edit Scrivenings is enabled, this font setting will
adjust the appearance of the text used to show titles in the edit scrivenings session.
You can also choose to centre the titles in the editor instead of the default left alignment.
B.8. AUTO-CORRECTION
B.8
279
Auto-Correction
The Auto-Correction tab contains many of the options that were previously found in
the Typography section in Scrivener 1.
B.8.1
Spelling
Check spelling as you type in new projects Displays red underlining for words
that are not found in the built-in dictionary, as you type. This setting only
impacts future projects. To change the behaviour of existing projects, toggle
this feature on in the Edit Spelling and Grammar menu.
Correct spelling errors as you type Will correct common spelling errors and typos
automatically. For example, “teh” will be corrected to “the”.
With grammar check Displays green underlining for words and phrases which the
built-in grammar checker deems to be in poor style or in violation of grammar
rules.
B.8.2
Auto-Capitalization
Fix capitalization of sentences Will fix letter case issues if a lowercase letter follows
a period and a space.
Capitalize ‘i’ If the letter ‘i’ is found by itself, will automatically capitalise it.
B.8.3
Word Auto-Complete
Word auto-completion is usually used to speed up the entry of places and names and
other common project specific terminology. However, it can be set up to use the
entire language dictionary and attempt to auto-complete every word you start typing.
By default this is not enabled as most users find it too intrusive.
Suggest completions as you type Enables auto-completion in general. When this is
unchecked, no auto-completion will every be dynamically performed, but you
can always manually request word-completion by pressing the Esc key.
In script mode only Disable the auto-completion feature unless the editor has been
set to script mode.
Only suggest completions from custom auto-complete lists Will restrict the
auto-completion list to only those words that you have specified in Project Edit
Auto-Complete List.... When disabled, will attempt to find words using the
exhaustive built-in language dictionary.
280
APPENDIX B. PREFERENCES
B.8.4
Substitutions
Enables a wide array of commonly used symbols and typographic conventions, by
detecting when their use is appropriate. Not all text entry areas are capable of using
substitutions, but they will always be available in the main text editors.
Note that if you are using the MultiMarkdown export system, it is best to leave
typographic substitutions disabled, as it will handle all of that automatically after
export, and in some cases special characters can confuse the exporter.
§ Use smart quotes: will convert inch and foot characters into typographic quotes
(also referred to as “curly” quotes) as you type, according to your system language settings. To customise these, click the System Text Preferences... button
that is provided at the bottom of the window.
§ Replace double hyphens with em-dashes
§ Replace triple periods with ellipses
§ Disable smart quote, em-dash and ellipsis substitution in script mode. The
above three options will be ignored in script mode.
§ Superscript ordinals. When numbers are typed with a following ordinal, the
ordinal will be superscripted and set to a smaller font.
§ Automatically detect web addresses and [[Scrivener links]]. If you start typing in
a web address, Scrivener will automatically generate a web link for it so you can
click on it and open the link in your web browser. Scrivener document titles
can be linked to by surrounding the title in brackets. For more information on
this feature, see Scrivener Links (section 9.5).
§ Symbol and text substitution. Accesses the system level substitution engine
for OS X Snow Leopard and higher. To modify the list, click the System Text
Preferences... button.
B.9
Import and Export
Scrivener supports a wide variety of file formats, both for import into a project and
exporting and compiling. The options in this tab adjust how these functions operate.
B.9.1
Import Options
Import supported file types only By default, Scrivener will only allow you to drag
file types into the binder2 if it can internally display them. When this is enabled,
Scrivener will store unsupported files with the rest of the project, but will not
2
You can only ever drag text files into the Draft
B.9. IMPORT AND EXPORT
281
be able to display them. You will still be able to load them using their default
applications.
HTML Import You can set how HTML files will be handled if you drag them into
Scrivener. The WebArchive option will package the document into Apple’s WebArchive format, which is viewable in many Macintosh applications. Do note
that if you plan to work with colleagues using the Windows version, or wish
to share project resources universally, you should use the Text option instead.
Text will preserve basic formatting, but complex page formatting will be lost.
Optionally, you can also choose to convert dropped WebArchives or imported
web pages directly from the Internet to text as well.
OPML Import When OPML files are dropped into the binder, Scrivener will attempt to convert these outlines into Scrivener outlines. This can be useful if
you do your initial brainstorming in a dedicated outliner application. Some of
these applications support attached notes to each outliner header. If notes exist,
Scrivener can be instructed to apply these notes either to the Synopsis alone,
the main text, or the document notes for that heading in the outline. Note that
in the case of the last two options, the synopsis will still be set automatically.
If you want dropped OPML structures to be generated inside of a special folder,
rather than directly into your existing Binder structure, enable the “Create
folder to hold imported OPML items” option.
Plain Text Import When importing plain-text files (usually they have a .txt file extension), you can have Scrivener either apply the current default styling preferences, or optionally use a special font for these files.
Import Final Draft FDX script notes as. . . Final Draft’s export format saves your
commentation notes. Scrivener can convert them to linked Inspector Comments, inline annotations, or footnotes.
Import RTF comments as inline annotations If this is unchecked, RTF comments
will be converted to linked Inspector Comments.
Import RTF footnotes and endnotes as inline footnotes If unchecked will convert RTF footnotes and endnotes to linked Inspector Comments.
B.9.2
Export Options
Microsoft .doc export In most cases, you will want to leave this set to the default,
RTF-based .doc file. Scrivener’s enhanced RTF export engine supports a great
many features that OS X’s built-in exporter does not.
This setting will affect the manner in which compile produces .doc files, as well.
282
APPENDIX B. PREFERENCES
HTML Export Document type refers to the web standard that should be used during export. If you are unfamiliar with web standards, chances are the default
setting of the older “HTML 4.01 Strict” will suffice. If you intend to publish
your writings within a modern blogging system, however, in most cases using
one of the XHTML formats will be more compatible.
Styling can be set to three levels. Embedded styling will declare CSS styles
at the top of the exported file, allowing you to easily adjust them with your
own custom stylesheets. Inline CSS puts the styling directly into the HTML
elements themselves, and so is useful in situations where you wish to override
default stylesheets. Finally, “No CSS” will export devoid of any styling. In
many blogging and content management systems, all presentation formatting
is already handled for you, and this will be the best option.
“Preserve white space” will attempt to convert your ruler settings into the appropriate CSS style codes.
This setting will affect the manner in which compile produces .html and .webarchive files, as well.
MultiMarkdown export SmartyPants language The MultiMarkdown exports run
the compiled draft through the SmartyPants document cleaners. These are language specific, so choose the language converter most appropriate to what you
are writing in.
B.10
Backup
Scrivener 2 has a fully automated backup system. The options in this tab will control
the various aspects of it.
Turn on automatic backups Enables the automated backup system. It is best to
leave this turned on, unless for performance or security reasons you wish to
control the process manually.
Back up on project open Whenever a project is opened, a backup will be created
before you can begin working.
Back up on project close Whenever a project is closed (either directly or via application shutdown), a backup will be created.
Back up on each manual save Will create a backup copy whenever you manually
save a project with – S. Note this is not the same as Scrivener’s auto-save feature, which by default is triggered after every two seconds of idling. Backups
will only be triggered if you select the menu command manually.
B.10. BACKUP
283
Back up every n minutes In addition to the event-based backups above, you can set
Scrivener to create a new backup while you work. In the case of very large
project, this can be the setting that most adversely impacts your writing experience, as Scrivener will restrict you from editing during the backup.
Compress automatic backups as zip files If you are storing your backups on a network drive, or Internet syncronised service like DropBox, this option will not
only save space but will protect the project format from the sorts of damages
which can occur when lots of files are transferred over the Internet. However,
it will adversely affect the performance of your backups, as Scrivener not only
has to collect and assemble a copy of the project, but compress it as well, before
letting you return to your work. With very large projects, this can take many
minutes to complete.
Only keep n most recent backups To avoid the proliferation of hundreds of copies,
use this option to have Scrivener restrict the number of backups to a defined
amount. Once this amount is reached, it will rotate through the copies, overwriting the oldest available copy.
Backup location The default location stores your backups in your user Library
folder, under Application Support/Scrivener. If you would prefer these backups be kept somewhere more visible, or on a synchronized, external drive, or
secured area, click the Choose... button and use the folder navigator to select
the destination folder. If you choose a location that later becomes invalid (a
common example is external drives), Scrivener will immediately warn you as
soon as it tries to back anything up.
As a convenience, you can quickly access the backup folder by clicking the
Open backup folder... button.
Appendix C
Replacement Tokens
(Material not finished; See help menu for a handy list).
284
Appendix D
Tips and Tricks
D.1
Bookmarks or Small Files
Scrivener 2.0 introduces a new feature called text bookmarks, which make it possible to
insert markers into your files which can be used to populate a menu in the header bar
for rapid navigation within a document. In the past, the best way to go about breaking
apart a large section of a book was to split it up into separate files in the binder and use
Scrivenings to view them all together when necessary. Bookmarks makes it possible
to avoid that in cases where you deem it is appropriate, and provides flexibility for
those who prefer to work in longer sections rather than lots of short sections.
There are a few things to consider when deciding between the two methods.
Scrivener still retains all of its prior power when it comes to managing lots of small
pieces of text. In fact, if anything this level of power has been dramatically increased
in the new version. So if you are already used to working in that method, there is no
reason to switch to using bookmarks.
Small portions of text will still remain more useful in terms of search results. When
you have your text broken down into smaller pieces, project searches produce more
relevant search results because only the context of the returned items is displayed;
no scrolling through ten pages wondering why a particular document matched your
search criteria.
So a good rule of thumb to follow could be: if the overall theme or context of
a file is similar enough to be represented as a single piece, but still large enough to
require navigational assistance, bookmarks could be a good strategy for approaching
it. If however the section of the book covers a number of separate topics which would
benefit from outlining flexibility, more relevant search context, and fine-grained metadata handling, splitting it up into separate pieces is probably a better move.
D.2
D.2.1
Hidden Preferences
Adjust Table of Contents Indent
The ability to copy binder items and paste them as a rough Table of Contents can be
adjusted by setting the default indent, in points. By default, items relative to the top
level of the ToC will be indented half an inch (36 points) for each level. To change
this, copy and paste the following into Terminal:
285
286
APPENDIX D. TIPS AND TRICKS
defaults write com.literatureandlatte.scrivener2 SCRToCIndentLevel 18
Where the final value is the number of points you wish to indent by for each level.
This setting will also impact the offset of the secondary tab, which can be used in the
link prefix to offset numbering from the title.
D.2.2
Use Thick Dividers
Since Leopard, the use of single-pixel dividers between interface elements has become
the visual standard. Some prefer the older look where the divider is an element that
can be grabbed along any point easily, rather than hunting for the pixel, or using the
drag strip at the bottom. To set Scrivener to use thicker dividers, paste this command
into the Terminal:
defaults write com.literatureandlatte.scrivener2 SCRNoSinglePixelSplits 1
To remove this setting:
defaults delete com.literatureandlatte.scrivener2 SCRNoSinglePixelSplits
You will need to restart Scrivener after executing either of these.