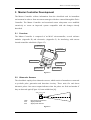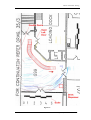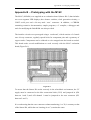
1
DEVELOPMENT OF A ROBOTIC
WHEELCHAIR
TIMOTHY BOURKE
NOVEMBER 2001
SUPERVISOR: DR. G.W. TROTT
CO-SUPERVISOR: PROF. V. GOSBELL
Abstract
Abstract
Robotic wheelchairs extend the capabilities of traditional powered devices by
introducing control and navigational intelligence. These devices can ease the lives of
many disabled people, particularly those with severe impairments, by increasing their
range of mobility.
A robotic wheelchair has been under development at the University of Wollongong for
some years. This thesis describes ongoing work towards the ultimate aim of an
intelligent and useful device.
ii
Development of a Robotic Wheelchair
Contents
Contents
Development of a Robotic Wheelchair........................................................................... i
Abstract............................................................................................................................ ii
Contents ..........................................................................................................................iii
Acknowledgements ........................................................................................................ vi
Symbol List.................................................................................................................... vii
1
Introduction............................................................................................................. 1
1.1 THE UOW ROBOTIC WHEELCHAIR........................................................................ 1
1.2 SYSTEMS OVERVIEW ............................................................................................. 3
1.3 ONGOING PROJECT ................................................................................................ 3
1.4 AIMS ...................................................................................................................... 4
1.5 STRUCTURE OF REPORT ......................................................................................... 4
2
Literature Review ................................................................................................... 5
2.1 PLATFORM ROBOTS ............................................................................................... 5
2.2 ROBOTIC WHEELCHAIRS ........................................................................................ 5
2.3 INTELLIGENT MACHINES...................................................................................... 10
2.4 SUMMARY ............................................................................................................ 12
3
Drive Controller Development ............................................................................ 13
3.1 INTRODUCTION .................................................................................................... 13
3.2 RATIONALE .......................................................................................................... 13
3.3 INTERFACE CIRCUITRY ........................................................................................ 13
3.4 CONTROL ALGORITHM......................................................................................... 15
3.5 SUMMARY ............................................................................................................ 17
4
Drive Controller Tuning and Testing ................................................................. 18
4.1 CONTROL TECHNIQUES ........................................................................................ 18
4.2 DATA LOGGING AND ANALYSIS ........................................................................... 19
4.3 TUNING THE VELOCITY RESPONSE ...................................................................... 19
iii
Development of a Robotic Wheelchair
Contents
4.4 TUNING THE DIRECTION RESPONSE ..................................................................... 22
4.5 OTHER OBSERVATIONS AND ADJUSTMENTS ........................................................ 24
4.6 SUMMARY ............................................................................................................ 27
5
Master Controller Development.......................................................................... 28
5.1 OVERVIEW ........................................................................................................... 28
5.2 ULTRASONIC SENSORS ......................................................................................... 28
5.3 INFRARED SENSORS ............................................................................................. 30
5.4 JOYSTICK INPUT ................................................................................................... 30
5.5 COMMUNICATIONS WITH THE DRIVE CONTROLLER ............................................. 30
5.6 DIAGNOSTICS ....................................................................................................... 32
5.7 SUMMARY ............................................................................................................ 32
6
Master Controller Testing.................................................................................... 33
6.1 TECHNIQUE .......................................................................................................... 33
6.2 ODOMETRY .......................................................................................................... 34
6.3 MODELLING ......................................................................................................... 34
6.4 RESULTS .............................................................................................................. 35
6.5 OTHER OBSERVATIONS ........................................................................................ 37
6.6 SUMMARY ............................................................................................................ 38
7
Conclusions and Recommendations.................................................................... 39
7.1 SYNOPSIS ............................................................................................................. 39
7.2 RECOMMENDATIONS ............................................................................................ 39
BIBLIOGRAPHY ............................................................................................................ 41
Appendix A – Drive Controller Interface Circuit...................................................... 45
A.1 JOYSTICK INPUTS ................................................................................................. 46
A.2 POWER INPUTS ..................................................................................................... 46
A.3 POWER ELECTRONIC OUTPUTS ............................................................................ 46
A.4 POSITION ENCODER INPUTS ................................................................................. 47
A.5 WATCHDOG CIRCUIT ........................................................................................... 47
Appendix B – Prototyping with the M16C ................................................................. 48
Appendix C – Additional Serial Port .......................................................................... 49
iv
Development of a Robotic Wheelchair
Contents
C.1 REQUIRED PARTS ................................................................................................. 49
C.2 INSTRUCTIONS ..................................................................................................... 49
C.3 ADDITIONAL ........................................................................................................ 53
C.4 REFERENCES ........................................................................................................ 53
Appendix D – Drive Controller Program ................................................................... 54
D.1 MODULES ............................................................................................................ 54
D.2 DIAGNOSTICS AND TESTING................................................................................. 56
D.3 LOGGING.............................................................................................................. 58
D.4 COMPILATION AND DEBUGGING .......................................................................... 59
Appendix E – PC Terminal Program ......................................................................... 60
E.1 ARCHITECTURE .................................................................................................... 60
E.2 OPERATION .......................................................................................................... 61
E.3 REFERENCES ........................................................................................................ 62
Appendix F – Matlab Drive Controller Functions .................................................... 63
F.1
WHCHTESTSELECT FUNCTION ............................................................................... 63
F.2
WHCHGUI FUNCTION ............................................................................................ 64
F.3
WHCHREALPARAMS FUNCTION ............................................................................. 67
Appendix G – Master Controller Interface Circuit................................................... 68
Appendix H – Master Controller Program ................................................................ 69
H.1 MODULES ............................................................................................................ 69
H.2 DIAGNOSTICS AND TESTING................................................................................. 71
H.3 COMPILATION AND DEBUGGING .......................................................................... 73
Appendix I – Matlab Master Controller Functions ................................................... 74
I.1
WHCHSHOWSENSOR FUNCTION............................................................................. 74
Appendix J– PC Mapping Program ........................................................................... 75
7.3 CLASS HIERARCHY .............................................................................................. 75
7.4 OPERATION .......................................................................................................... 76
7.5 REFERENCES ........................................................................................................ 76
v
Development of a Robotic Wheelchair
Acknowledgements
Acknowledgements
The work described herein was completed under the insightful and patient guidance of
Dr. G.W. Trott.
The author is also indebted to Mr S. Petrou, Mr F. Mikk, Mr J. Tiziano and Mr C. Giusti
of the school’s electrical workshop for their patient explanations and high standard of
work. Mr F. Mikk is directly responsible for the printed circuit board version of the
Drive Controller interface.
Mr B. Webb of the engineering workshop assisted amicably with aspects of the sensor
and Drive Controller mountings. Mr J. Moscrop’s thorough commenting of the initial
literature review was also most helpful.
Ms. R. Causer-Temby and Ms. T. O’Keefe deserve thanks for their friendly assistance
with retrieving many past theses and for supplying the faculty floor plans used in
Section 6.4.
The author’s parents, as always, provided encouragement and support. And Mirjam
endured a preoccupation that lasted some months.
vi
Development of a Robotic Wheelchair
Symbol List
Symbol List
The following abbreviations and symbols are used in this report;
A-D
Analog-to-Digital
ADSM
Asynchronous Delta Sigma Modulation
AGV
Automated Guided Vehicle
API
Application Programming Interface
CRC
Cyclic Redundancy Check
D-A
Digital-to-Analog
DC
Direct Current
EEG
Electroencephalograph
FIR
Finite Impulse Response
GPS
Global Positioning System
HSO
High Speed Output
I/O
Input/Output
IR
Infra-red
M/S
Metres per Second
PID
Proportional-Integral-Derivative
PWM
Pulse Width Modulated
TA2
Mitsubishi m16c/62 Timer A2
TA3
Mitsubishi m16c/62 Timer A3
UART
Universal Asynchronous Receiver Transmitter
UOW
University of Wollongong
8n2
8 data bits, no parity, and 2 stop bits.
vii
Development of a Robotic Wheelchair
Introduction
1 Introduction
Robotic technologies have the potential to improve the lifestyles of people suffering
from one or more disabilities [1]. Related developments are often grouped under the
terms Rehabilitation Technologies or Assistive Technologies. They attempt to restore
human abilities that have been reduced or lost by disease, accident, or old age. Mobility
is one such function.
There are many reasons why a person may not be able to travel freely, including motor
control problems, spinal injuries, and amputation. A wheelchair is a mechanical device
that can often assist. It effectively uses wheels and mechanical support to overcome a
loss of legs or leg control. Manual wheelchairs can be operated by persons who have the
use of their upper body or someone available to assist. Powered wheelchairs have been
developed for when either of these cases does not apply. However, these devices
typically require a high level of user control and this is something precluded by many
severe forms of disablement. In recent decades many groups have researched the
possibilities of robotic wheelchairs. These endeavours are aimed at creating ‘intelligent’
devices that can sense information from their environment and respond in useful ways.
1.1
The UOW Robotic Wheelchair
A robotic wheelchair has been under development at the University of Wollongong
since 1989.
Figure 1
1
Development of a Robotic Wheelchair
Introduction
The UOW Robotic Wheelchair (illustrated in Figure 1) was developed from scratch. It
consists of a car seat, two pneumatic tyres and two castor wheels mounted on a metal
chassis. The system is powered by two 12V batteries stowed beneath the seat. An
unusual feature of this design is that the drive wheels are located at the front and the
supporting castor wheels are at the rear. Most similar designs use a contrary placement
of wheels. This configuration allows the chair to cross more obstacles than would
otherwise be possible, but it also complicates the system dynamics and makes control
more difficult.
Optical position encoders are installed in the wheelchair motor casings. These sensors
provide feedback for speed and position control. Four ultrasonic sensors, two at the
front and one on each side, provide information for navigation and obstacle avoidance.
The electronic subsystems are mounted behind the chair on a metal platform. There are
circuits for power supply filtering, motor operation, feedback control, sensor operation
and autonomous control.
The UOW Robotic Wheelchair is distinguished from most other similar projects in its
attempts to produce practical results using a minimum of equipment and computing
power. These aims can be further defined through three distinct criteria;
1. Cost Effectiveness
A robotic wheelchair will benefit the most individuals if the cost is not
prohibitive. This factor currently precludes certain types of sensor, such as
laser range finders and GPS units.
2. It must use practical components.
Components should consider total system weight and dimensions. They
should seek to maximise on-board battery life through power efficiency and
minimise maintenance concerns through simplicity and durability.
3. It must respond smoothly in real-time.
The wheelchair should not require any offline processing, nor should it halt to
evaluate information whilst operationally engaged.
2
Development of a Robotic Wheelchair
Introduction
1.2
Systems Overview
The wheelchair control system is composed of Power Electronics, a Drive Controller
and a Master Controller. These subsystems are interconnected (Figure 2).
Side-Left
Ultrasonic
Sensor
Front-Left
Ultrasonic
Sensor
Left DC Motor & Gear
Box
Left Position
Encoder
Master
Controller
Drive
Controller
Power
Electronics
Right Position
Encoder
Right DC Motor &
Gear Box
Analog
Joystick
Side-Right
Ultrasonic
Sensor
Front-Right
Ultrasonic
Sensor
Figure 2
The Power Electronics controls current to both DC motors in order to create the torque
requested by the Drive Controller.
The Drive Controller receives input from either an analogue joystick or the Master
Controller. It combines this information with position and velocity feedback from
position encoders by way of two control loops to determine appropriate signals for the
Power Electronics. It aims to move the wheelchair in a specified direction at a given
speed.
The Master Controller receives environmental information from four ultrasonic sensors
and movement information from the Drive Controller. It is able to instruct the Drive
Controller via a serial connection.
1.3
Ongoing Project
The UOW Robotic Wheelchair has been under development for several years. Early
work was concerned with the mechanics, power electronics, speed measurement and
digital control systems [2, 3, 4, 5]. Later work has concentrated on implementing
aspects of intelligent control such as sonar ranging sensors, Master Controller serial
communications, obstacle avoidance and autonomous navigation [6, 7, 8].
3
Development of a Robotic Wheelchair
Introduction
1.4
Aims
This report documents work aimed at simplifying and consolidating the existing robotic
wheelchair. Specifically, existing microprocessors will be exchanged for newer more
powerful versions. New programs and interface electronics will be developed and
tested.
1.5
Structure of Report
This report began with an introduction to Assistive Technologies and the UOW Robotic
wheelchair project. A review of existing robotic wheelchair literature and several related
areas of research follows. The updated Drive Controller unit is described before
techniques used to tune and test it are presented. Aspects of the updated Master
Controller are detailed, followed by a chapter describing the testing approach employed
and its results. The report closes with a summary and recommendations for future work.
4
Development of a Robotic Wheelchair
Literature Review
2 Literature Review
This review describes several existing robotic wheelchairs. It seeks to place such
designs in the broader context of Robotics and examine the concepts and techniques
pertaining to Intelligent Machines.
2.1
Platform Robots
Robotic wheelchairs are a specialised form of platform robot in contrast to manipulators
(robotic arms). Platform robots can be further classified as either AGVs or mobile
robots [9].
AGVs are machines with very limited sensing abilities and little, if any, autonomous
intelligence. They are designed to follow pre-planned paths. In some applications these
paths are defined physically within the environment. Lines may be formed by paint or
strips of a magnetic or reflective material. An AGV uses sensors to keep to the path.
More advanced AGVs may be able to leave the path temporarily to avoid obstacles, but
must return to it for normal operation. The necessary environmental modifications make
this approach unattractive for use in a robotic wheelchair.
Mobile robots are more flexible, but also more complex. These devices rely heavily on
different types of sensors, coupled with significant processing power to direct their
actions with respect to the environment and their agenda. Nearly all robotic wheelchairs
would be classified as mobile robots.
The navigation of mobile robots is an area of study that applies directly to robotic
wheelchairs. The previous thesis on the UOW robotic wheelchair [8] and several books
[10, 11] cover this area in detail.
2.2
Robotic Wheelchairs
Many groups have proposed or developed robotic wheelchairs. A multitude of different
techniques and ideas have been implemented or discussed. Each group has proceeded
according to their focus or interest and these factors have varied widely. This section
summarises the main areas of variance between these projects. Such a survey of existing
robotic wheelchairs serves to isolate and demonstrate fundamental design issues.
5
Development of a Robotic Wheelchair
Literature Review
2.2.1 Mechanics
Most robotic wheelchairs are implemented by modifying existing Powered Wheelchair
systems. Examples include the Bremen Autonomous Wheelchair [12] and the Maid
(Mobility Aid for Elderly and Disabled people) robotic vehicle [13]. These approaches
arrange sensors and computing hardware around an existing infrastructure. They are
able to take advantage of pre-built control and motor systems. One such project, the Tin
Man wheelchair [14], uses servomotors to control the host chair through an unmodified
joystick.
Wheelchair equipment has also been designed from scratch. These devices enhance
traditional designs in order to increase the possibilities of travel in challenging
environments. They present complex control problems but can yield impressive results.
One such project [15] proposes four hydraulic, wheeled, robotic legs. It aims to produce
a device capable of ascending multiple stairs and lifting itself into vehicles. Another
model [16], being developed by a commercial concern, can reputedly raise and balance
itself on its rear wheels alone through the use of sophisticated gyroscopes and multiple
Pentium processors.
2.2.2 Sensor Systems
Whilst some wheelchairs have utilised such specialised sensor systems as laser range
finders and optical fibre gyroscopes [13], most rely heavily on ultrasonic sensors and
wheel or drive based position encoders.
Ultrasonic range sensors are often used in collision avoidance systems. Typically, more
than twenty sensors are placed in a half ring around the front of the wheelchair [12, 13,
17, 18]. Special firing strategies have been designed to coordinate the sensors and
reduce the effects of sonar cross-talk [12, 17]. Whilst these designs are capable of
providing a wealth of environmental information, the effect on wheelchair users is not
often considered. Issues such as appearance [17] and ease of daily use (transferring
persons from the wheelchair to a bed or bath, for instance) are of utmost importance to
the design of a robotic wheelchair.
Designs that utilise fewer sensors exist. The Tin Man wheelchair [14] uses six
ultrasonic sensors in conjunction with four infra-red proximity sensors and eight simple
6
Development of a Robotic Wheelchair
Literature Review
contact switches. These configurations can potentially lower the overall system cost and
complexity, but innovative schemes are required to function with the reduced level of
environmental information.
Position encoders have been employed in several systems [13, 14, 19, 20]. These
devices can be used for approximate localisation (a technique known as ‘dead
reckoning’). However, wheelchair designs present ‘kinematic constraints’ [14] because
their form is the consequence of design issues other than robotic motion. In addition,
most implementations make use of standard drive mechanisms and pneumatic tyres,
both of which further reduce the accuracy of such odometry [21].
Vision sensing techniques are not widely used for robotic wheelchairs. A wheelchair
must be able to sense and move in real-time; stopping to process information is
unacceptable. Some projects, however, have been successful. One project [18] uses a
camera for goal selection and tracking. The camera is mounted above the wheelchair
and is able to pan and tilt. Its image is displayed on a chair mounted screen so that users
can select a feature with a pointing device. The system uses template matching vision
techniques to track towards the selected goal. Sonar sensors are retained for local
sensing and obstacle avoidance. This approach avoids problems associated with
platform localisation without sacrificing reliability or safety.
Another robotic wheelchair [22] employs vision techniques through two cameras. One
is pointed inwards and monitors occupant head movements, which are used to steer the
wheelchair. The other camera is pointed outwards and serves two functions. The first is
to ensure that the device travels in a straight line using target identification and tracking
techniques. The second is a remote control feature. If the system is able to identify the
operator's face outside the chair, it will move in response to their hand gestures. Sonar
sensors are still retained for obstacle avoidance.
2.2.3 Human-Robot Interaction
The last example leads into an area of study known as Human-Robot Interaction.
Robotic wheelchairs, by their nature, demand specialised user interfaces. Whilst many
projects do not address this issue directly, invariably using joysticks [12, 13, 15, 16],
others do.
7
Development of a Robotic Wheelchair
Literature Review
One wheelchair [17] uses a visual display that shows a sequential scanning of
commands (left, right, increase speed, stop, and etcetera). A highlighted command can
be selected by pushing a button.
Another design [19] uses natural language commands, such as “move forward” or
“move left”, though a headset microphone. More ambitious groups [14] have proposed
commands such as “go to the kitchen” or “stop at the next door on the left”. Other
groups [20] have opted for voice recognition based on a user defined vocabulary and
voice print techniques.
The use of EEG measurements and signal processing to form a direct brain-computer
interface for those suffering severe motor-related impairments have been suggested as a
means of controlling a wheelchair [23]. However, this research is still far from practical
application.
2.2.4 Level of Autonomy
The level of autonomy provided by a robotic wheelchair is an important evaluation
criterion. At one extreme are manual designs that do not provide any control assistance
to the operator. It may be argued that these are not robotic wheelchairs at all. However,
they can still involve sophisticated processing, require specialised hardware and present
complex control problems [15].
In contrast, some robotic wheelchairs can be considered fully-autonomous. Operators
may only be involved initially to issue a command [20] or select a goal [18]. Typically
these devices can be interrupted and given new goals before task completion.
The Maid wheelchair [13] is highly autonomous. Its speciality is movement through
crowded, changing environments. In one test the device crossed the floor of a busy
railway station without colliding with anyone or anything.
Autonomy may consist of more than obstacle avoidance on course to a goal. Some form
of path planning from a given or learned map may be required [20]. This approach
presents problems. For instance, environmental maps may not be available for all
8
Development of a Robotic Wheelchair
Literature Review
operating locations beforehand. In addition, a robotic wheelchair with a live occupant
cannot learn an environment by exploration in the same way as many experimental
robots. Lastly, path planning may require considerable computational effort and time.
This may not be practical in a system of limited resources where a constant response is
required.
Between these extremes of autonomy are devices described as semi-autonomous or
shared control systems. These devices must fuse input from a human operator with that
of a computer control system. Some works [12] view this interaction as that of a
technical system that monitors user commands and only intervenes if an intended action
endangers the vehicle. Others prefer the analogy of a rider on horseback [24]. The horse
(wheelchair) handles fundamental tasks such as obstacle avoidance and the provision of
power and speed, whilst the rider (occupant) provides global planning and can override
the horse’s behaviour if required.
Obstacle avoidance is a feature invariably present in semi-autonomous systems. There
are several ways that it can be implemented. Some devices automatically correct
steering angles to avoid imminent collision [17], whilst others reduce the maximum
allowable speed in proportion to the proximity of objects [12]. Designs that use internal
representations (maps) to plan paths around objects also exist.
Wall following is another frequently used semi-autonomous technique. The wheelchair
control system judges when a user is attempting to travel in parallel with walls on one
or both sides. If this happens, the system removes the burden of navigation from the
operator by maintaining a constant separation from the wall. Side mounted sonar
sensors [14] and computer vision [22] have been used to realise this feature.
Other possible uses of shared-control are docking manoeuvres [19] (i.e. approaching
tables or desks), door/intersection counting [14] (for localisation and high-level
command execution) and door way navigation [14] (negotiating narrow door openings
through fine sensing and adjustment).
Robotic wheelchairs that can operate at two or three distinct levels of autonomy also
exist [19, 20].
9
Development of a Robotic Wheelchair
Literature Review
2.2.5 Implementation of Autonomy
Specialised techniques are used to support higher levels of autonomy.
Some robotic wheelchairs make decisions based on internal occupancy grids [12, 13].
These data structures organise sensor information into a coarse map, which is then used
to inform speed and direction decisions. Other systems utilise fuzzy logic and a
specialised rule base [17, 19]. Often intelligence is broken down into a hierarchy, such
as distinctions between global and local planning [18, 20].
It is significant that most sophisticated ‘intelligence’ implementations require extensive
processing power (PC486DX2 [17], Pentium 133 [12], Pentium 166 [13], Macintosh
Powerbook [14]). This requirement affects system dimensions, weight and battery
range. There may also be an adverse effect on system reliability and maintainability.
2.3
Intelligent Machines
An intelligent machine is a mechanical device capable of processing information
received from internal and external sensors, before using actuators to perform useful
tasks within its environment [25]. A robotic wheelchair is, by definition, an intelligent
machine.
Machine intelligence is typically implemented using the techniques of Soft Computing,
including Expert Control, Fuzzy Logic, Neural Networks and Genetic Algorithms.
These methods may also be combined to form hybrid systems. Fuzzy Logic and Neural
Networks are briefly described in Sections 2.3.2 and 2.3.3 respectively.
2.3.1 Intelligent Control
There are two general approaches to intelligent control [25]. One is direct control,
where an intelligent controller processes an error signal and provides an input directly to
a plant (Figure 3). The other is supervisory control; in this case an intelligent controller
monitors the entire system and enforces its commands through a conventional controller
(Figure 4).
Reference
Inputs
+
-
Intelligent
Controller
Machine
(System)
Response
Figure 3
10
Development of a Robotic Wheelchair
Literature Review
Intelligent
Controller
Reference
Inputs
+
-
Conventional
Controller
Machine
(System)
Response
Figure 4
2.3.2 Fuzzy Logic
Fuzzy Logic is composed of theory and practical techniques that facilitate the
application of rule-based logic to uncertain situations. Whilst traditional logic uses strict
definitions to determine set membership, Fuzzy Logic uses more gradual membership
functions. Further, linguistic variables are associated with set membership and can be
combined using modified logic operators (AND, OR, NOT) to allow the definition of
intuitive ‘fuzzy rules’. Results are obtained by combining the weighted inference of
each rule. ‘Defuzzification’ techniques can be applied, if required, to yield a crisp
output.
Fuzzy Logic is appealing for the control of sensor based robots, and hence robotic
wheelchairs, due to its simplicity (small number of required rules), extensibility (for
instance, the easy incorporation of additional sensors) and intuitiveness (behaviours are
defined in linguistic terms) [26]. The inherent imprecision of data from sonar based
range sensors and wheel based position encoders can be factored by fuzzy set
representation. In addition, techniques of fuzzy inference and combination allow
systems to balance competing goals and requests, a necessity for the shared-control
environment of a robotic wheelchair. On the other hand, it may be difficult or
impossible to prove such a system as correct or optimum. Extensive tuning of set
parameters may be required and fuzzy systems are less suitable for situations where a
high level of precision is required.
2.3.3 Neural Networks
Neural Computing techniques attempt to apply known principles of the human brain to
computer systems [27]. It is hoped that the resulting system will exhibit properties of
parallelism, memory, fault tolerance, and adaptability. A neural network is composed of
perceptrons; singular units that produce a threshold function after summing weighted
11
Development of a Robotic Wheelchair
Literature Review
inputs. Perceptrons can be connected together in a variety of ways (back propagation,
Kohenen and Hopfield networks, Boltzmann machines). These networks are tuned to a
particular application by successively applying test inputs and modifying the weighted
connections between perceptrons (relative to the difference between actual and desired
outputs).
One example of an applied neural network is the control of a mobile robot that cannot
rotate in place [28]. This particular system implements navigation and obstacle
avoidance based on information from ultrasonic sensors. Separate ‘neuro-controllers’
have been developed and trained to implement each required behaviour; wall following,
obstacle avoidance and turning at crossroads. Another neural network decides which
controller is applicable at each point in time (based on navigational aims, sensor inputs,
and map location). This system was implemented in simulation only. The results,
however, can be related to robotic wheelchair navigation. That is, planning the
movements of a device with significant kinematic constraints in a complex environment
with limited sensory information.
2.3.4 Architectural Choices
Intelligent machine research has typically separated decision making systems from the
hardware being operated [29]. This class of machine creates an internal representation
of its environment from sensor information, before forming and then enacting a plan.
This scheme isolates information processing, or artificial intelligence, from the
underlying robotics.
The Subsumption Architecture [30] offers an interesting alternative to traditional
paradigms. It seeks to produce sophisticated intelligence by combining simple reflexive
behaviours in such a way that some behaviours can temporarily suppress others. This
model implicitly fuses the data from multiple sensors and operates without a global
world model [31].
2.4
Summary
There are many existing robotic wheelchair designs. Each addresses a subset of the
general requirements. Development of these devices involves the considered application
of techniques from Robotics, Soft Computing, and Assistive Technologies.
12
Development of a Robotic Wheelchair
Drive Controller Development
3 Drive Controller Development
3.1
Introduction
The replacement of an existing Drive Controller processor was a key component of
recent work on the wheelchair.
3.2
Rationale
The Drive Controller was previously implemented using an Intel 80C196KB
microcontroller. It was suggested [8] that the Drive and Master Controllers be
implemented on a single faster processor with more memory and I/O ports. This project
has preferred to keep the two functions physically separate, but has thoroughly revisited
the microcontroller choice and associated interface circuitry.
The M16C was chosen for both practical and technical reasons. A number of these
devices have become available at no cost as Mitsubishi seeks to increase their
popularity. The technical advantages to this project of the M16C will become clear as
this chapter develops.
3.3
Interface Circuitry
3.3.1 Joystick Input
The wheelchair is fitted with an analog joystick that allows occupants to specify
velocity and rate of rotation. This project does not investigate alternative interfaces. The
joystick x-axis is interpreted as the desired rate of rotation and the y-axis as the desired
velocity.
3.3.2 Position and Velocity Feedback
Position and velocity feedback is provided by optical incremental encoders, mounted on
the drive motor shafts. They produce 1000 pulses per revolution [4] and are connected
through a 25:1 gearbox to the drive wheels. There are, therefore, 25000 pulses per
wheel revolution. The motors have a maximum speed of 3000 rpm [4]. Two streams of
pulses are produced. The phase difference between the streams indicates the direction of
motion.
13
Development of a Robotic Wheelchair
Drive Controller Development
The Drive Controller uses two M16C timers in ‘2-phase pulse signal event counter
mode’ [32]. Essentially, this means that the encoders can be connected directly to the
microcontroller and the current position of each wheel read from an internal register.
This feature renders the previous interface circuitry redundant, along with associated
limits of synchronisation and external address cycles.
3.3.3 Velocity Calculation
The angular velocity of each drive wheel is calculated by subtracting delayed position
values from current ones. This, the standard difference equation, is frequently used to
implement differentiation in digital systems. The use of alternative speed calculation
techniques, such as measuring the time between consecutive position pulses, was
investigated and decided against by earlier works [2].
The delay period and bit size of the velocity variable influence the maximum recordable
angular velocity and its resolution. The resolution determines the minimum consistently
measurable velocity. New velocity values are calculated each iteration of the control
loop, making the delay period equal to the control sampling period of 3.4 milliseconds.
3.3.4 Power Electronic Outputs
The Drive Controller provides the Power Electronics with a signal for each motor.
These signals range between negative ten volts (maximum reverse torque) and positive
ten volts (maximum forward torque).
This is done by scaling and offsetting the output of two digital-to-analog converters.
The output values are held constant between control iterations (zero-order hold).
A timer operated relay is inserted between the Drive Controller motor outputs and the
Power Electronics. This relay remains closed so long as the timer circuit is continuously
triggered by pulses from the control software, ensuring that the motors are only driven
when the control loop is executing properly.
14
Development of a Robotic Wheelchair
Drive Controller Development
3.4
Control Algorithm
VDES
-
VERR
+
P
Controller
IVEL
ILEFT
+
LEFT
+
GL(s)
+
Z-1
VACTUAL
+
-
+
Speed Calculation
DDES +
-
DERR
PI
Controller
+
+
-
IDIR
IRIGHT
-
+
GR(s)
Z-1
-
RIGHT
DACTUAL
Figure 5
Two control loops are implemented within the Drive Controller; one for speed and one
for direction. The loops are illustrated in Figure 5, which, although being a useful
depiction, is an oversimplification. The two transfer functions, GL(s) and GR(s),
represent the left and right motors respectively. The input to these blocks is a required
torque and the output is a position value. These transfer functions are interrelated and
imply the effects of digital-to-analogue conversion, Power Electronics and motor
characteristics, noise, the incremental encoders and mechanical dynamics (several
sources of friction, castor wheel positions, momentum, etcetera [33]).
Theoretically, the actual velocity of the wheelchair is calculated as the mean of both
wheel velocities.
VACTUAL
=
ω LEFT + ω RIGHT
2
( 3.1 )
In practice, the division by two is not performed before VERR is calculated, but can be
considered to occur within the Proportional Controller. This means that the desired
velocity, VDES, must be adjusted appropriately and an extra factor of two must be
accounted for when specifying the controller constant.
The previous convention of using the term ‘direction’ to mean the wheelchair’s rate of
rotation is maintained in this report. The actual direction is calculated as the difference
between the wheel velocities multiplied by a constant;
DACTUAL
= k(ω LEFT − ω RIGHT )
15
( 3.2 )
Development of a Robotic Wheelchair
Drive Controller Development
A constant of 0.5 is assumed [5]. In a similar manner to VACTUAL, this multiplication is
not performed before DERR is calculated and therefore must be considered as affecting
the desired direction, DDES, value and the proportional-integral constant.
The error values, VERR and DERR, are calculated by subtracting the actual values from
the desired values;
VERR
= VDES − VACTUAL
( 3.3 )
DERR
= D DES − D ACTUAL
( 3.4 )
The velocity error (VERR) is processed by a proportional controller to yield the output
current (IVEL) required of the Power Electronics and hence the motor torque.
IVEL(t)
= K PVEL ⋅ VERR (t)
( 3.5 )
In practice, the proportional constant (KPVEL) is chosen as a power of two so that a bit
shift operation can be used instead of a multiplication.
The directional error (DERR) is processed by a proportional-integral controller to yield
its contribution to the output torque (IDIR);
IDIR(t)
= K PDIR ⋅ D ERR (t) + K IDIR ⋅ ∫ D ERR (t).dt
( 3.6 )
The Drive Controller approximates integration by adding consecutive error values.
IDIR(nT)
n
= K PDIR ⋅ D ERR (nT) + K IDIR ⋅ ∑ D ERR (m)
( 3.7 )
m =0
In practice, the two constants (KPDIR and KIDIR) are powers of two so that bit shift
operations can be used. The running integral sum is stored in a variable and
incremented, each control iteration, by the latest direction error value.
The two torque values (IVEL and IDIR) are used to calculate individual torques for each
motor (ILEFT and IRIGHT) by addition and subtraction;
ILEFT
= I VEL + I DIR
( 3.8 )
IRIGHT
= I VEL − I DIR
( 3.9 )
These outputs are manually limited to a range suitable for the digital-to-analogue
converters. The finite torque available at the motors is responsible for this non-linearity.
16
Development of a Robotic Wheelchair
Drive Controller Development
3.5
Summary
The fundamental operation of the Drive Controller has been described. Precise details of
the interface circuitry are given in Appendix A. The system is summarised in Figure 6.
C Program;
*Maintain desired speed and direction with minimum
error against load variation.
D-A
Serial 0
Serial 1
Two A-D conversions
required (one for x, one
for y)
x
L
R
Voltages between
-10V and +10V
Scale
Voltages
L
R
Watchdog
Drive Controller
I/O port
(Mitsubishi M16C/62)
A-D
Voltages between
0V and 5V
Voltages between
0V and 5V
TA3
HEF4047B Multivibrator,
triggered by I/O port transition.
Holds DPST relay on for 8.2ms
TA2
y
L
R
Power
Electronics
LMotor
Shaft
Encoder
RMotor
Shaft
Encoder
Scale Voltages
Voltages between
4.0V and 6.2V
x
y
Two-Phase pulse signals.
Joystick
Figure 6
17
Development of a Robotic Wheelchair
Drive Controller Tuning and Testing
4 Drive Controller Tuning and Testing
Wheelchair operation and performance are significantly affected by the three controller
constants. This chapter is concerned with their choice amongst other factors important
to Drive Controller response.
4.1
Control Techniques
Conventional control theory relates a system output to an input through a transfer
function. This approach models a system in the frequency domain with Laplace
transformed differential equations, allowing Controller characteristics to be determined
analytically. Although the wheelchair dynamics can be approximated using differential
equations, the inter-relatedness of key variables precludes using the Laplace transform
[33] and hence conventional techniques such as the Root-Locus method .
Modern state-space techniques operate in the time domain without requiring Laplace
transformations. Unfortunately, the wheelchair’s significant non-linear characteristics,
notably the slip-stick friction of several components [33] and its dependency on load
position and weight, reduce the applicability of these techniques.
Frequency response techniques are applied directly to a plant and do not require
mathematical models. They can provide insight into the response and relative stability
of a system. However, wheelchair performance is strongly affected by load – i.e. the
occupant – and terrain, thus frequency response parameters arrived at experimentally
would not be generally applicable.
Robust control involves tuning standard controller forms to provide satisfactory, though
not normally optimal, results. The P and PI controllers used within the wheelchair are
two such standard forms. The Ziegler-Nichols rules are one widely known technique for
choosing P and PI controller constants. They involve either measuring the output of an
open loop plant when a step input is applied, or increasing the controller proportional
constant until the closed-loop system oscillates continuously. This technique typically
give an average overshoot of 25% [34], a response not necessarily desirable for the
wheelchair. Instead, a more specialised approach is taken.
18
Development of a Robotic Wheelchair
Drive Controller Tuning and Testing
4.2
Data Logging and Analysis
In order to tune the Drive Controller it is useful to understand how its performance
changes with different constants and under different conditions. Careful observation and
note taking can reveal some information, but it is difficult to make accurate
comparisons and to communicate results. A data logging solution was developed to
overcome these limitations.
Firstly, hardware for a second serial port was added to the Drive Controller (Appendix
C). This addition made it possible to debug the controller communication functions
whilst they were being developed. Diagnostics and logging features were then added to
the control program (Appendix D), a specialised PC terminal program was written
(Appendix E), and lastly, several graphical analysis functions were created in Matlab
(Appendix F).
As a result, Drive Controller statistics are logged across the serial port each control
period. They can be captured and saved to disk by the PC terminal program (Figure 7).
When a logging sequence is complete, the terminal program processes the raw data to
remove errors and create a log file suitable for the Matlab functions. The log file
contains a row of statistics for each sample period.
com1
uart0
com2
uart1
PC or Laptop
Drive Controller
Figure 7
The diagnostics program can log the wheelchair’s response to either specific input
signals, composed of combinations of square or trapezoidal pulses, or to instructions
from the joystick or Master Controller. It is able to automatically loop through varied
combinations of the three controller constants. The detailed graphs which result from
this process appear in the sections that follow.
4.3
Tuning the Velocity Response
Initially, the velocity and direction control loops are, for the purposes of tuning,
considered independently. A proportional controller is employed to minimise velocity
errors, and a single proportional constant must be chosen.
19
Development of a Robotic Wheelchair
Drive Controller Tuning and Testing
Proportional controllers produce a control signal only when the measured quantity
deviates from a desired value. Therefore, an error must exist to produce a constant
control signal at steady-state. Increasing the proportional constant reduces this steadystate error but leads to an increasingly oscillatory and eventually unstable response [35].
4.3.1 Testing Procedure
To determine a suitable proportional constant, the response of the wheelchair to a fixed
input signal was logged whilst the constant was changed between tests.
Each test was performed over the same, reasonably flat and smooth, stretch of bitumen.
The wheelchair carried a load of approximately 78kg; the author and a laptop. The tests
were run in direct sequence to minimise variances in battery level and tyre pressure. The
rear castor wheels were straightened before each test. Test data was logged using a
filename convention that included a unique test number and the value of each controller
constant. Broad observations were recorded immediately after each run.
The test input was a pulse with ramped edges and a duration of 10 seconds (Figure 8).
The velocity represents the sum of both wheel speeds (encoder pulse count per sample
period). Several different velocity magnitudes were used. The desired direction was a
constant zero. The direction controller constants were 4 and 2 for proportional and
integral respectively.
1
Desired Velocity
0.8
0.6
0.4
0.2
0
0
2
4
6
8
10
12
14
Time (seconds)
Figure 8
20
Development of a Robotic Wheelchair
Drive Controller Tuning and Testing
4.3.2 Test Results
Velocity Response (vkp=32 dkp=4 dki= 2)
3 00
Velocity Response (vkp=16 dkp=4 dki= 2)
3 00
2 50
2 50
2 00
2 00
1 50
1 50
2 7 0
2 6 5
Velocity
Velocity
2 6 0
1 00
2 5 5
2 5 0
1 00
2 4 5
2 4 0
6 . 3 5
50
50
0
0
6 . 4
6 . 4 5
6 . 5
Inset B
Tr
-50
2
4
6
8
10
-50
12
2
4
Time ( seconds)
1 0
8
6
8
10
12
Time ( seconds)
Velocity Response (vkp=8 dkp= 4 dki=2)
3 00
6
4
2
0
2 50
- 2
- 4
- 6
Desired Velocity
Actual Velocity
- 8
- 1 0
0 . 4 6
0 . 4 8
0 . 5
0 . 5 2
0 . 5 4
0 . 5 6
2 00
0 . 5 8
Inset A
Velocity
1 50
1 00
50
0
-50
2
4
6
8
10
12
Time ( seconds)
Figure 9
Figure 9 summarises the results of testing at high velocity (260, or 1.4 m/s). The
constants used, clockwise from top left, are 32, 16 and 8. The three tests show identical
rise times of 3 seconds, resulting from output saturation. The steady-state errors (Table
1 and Figure 9 Inset B) conform to expectation by varying proportionally to the
controller constant under identical load and set point conditions.
Proportional Constant
Steady-State Error
32
0.68%
16
1.30%
8
2.63%
Table 1
The graph of the highest constant, 32, shows oscillations before and after the input
pulse, and also at steady-state (Inset A). This instability can be felt and heard as a fast
rattling of both drive wheels and is unacceptable. There is little difference in response
between the other two constants.
21
Development of a Robotic Wheelchair
Drive Controller Tuning and Testing
Velocity Response ( vkp=8 dkp= 4 dki=2)
10
10
8
8
6
6
Velocity
Velocity
Velocity Response ( vkp=16 dkp=4 dki= 2)
4
4
2
2
0
0
-2
2
4
6
8
10
-2
12
2
4
Time ( seconds)
6
8
10
12
Time ( seconds)
10
9.5
9
8.5
Desired Velocity
Actual Velocity
8
7.5
7
6.5
6
5.5
5
4.8
4.9
5
5.1
5.2
5.3
5.4
Inset A
Figure 10
The choice between a proportional constant of 16 or 8 becomes clearer at low speeds
(10, or 0.1m/s). Figure 10 summarises the results. The higher constant provides better
results at low speed because of the smaller offset at steady-state (Table 2).
Proportional Constant
Steady-State Error
16
33%
8
69%
Table 2
A proportional constant of 16 provides a good velocity response, i.e. stability and a
minimum offset at steady-state.
4.4
Tuning the Direction Response
The accuracy of the wheelchair’s directional response is important. For this reason a PI
controller is used and two constants, one proportional and one integral, must be chosen.
The integral component of a proportional-integral controller increases until the steadystate error is zero. It provides the control output at steady-state when the offset and
therefore the proportional contribution are zero. Both constants influence a controller’s
response and they cannot be considered separately.
22
Development of a Robotic Wheelchair
Drive Controller Tuning and Testing
4.4.1 Testing Procedure
Tests to determine the direction constants proceeded in a similar manner to those for the
velocity constant. Four particular cases were examined; moving and turning
simultaneously when under motion, rotating on the spot, simultaneous movement and
rotation from standstill, and performance when travelling in a straight line. The first and
last cases proved to be the most useful.
4.4.2 Test Results
Generating results from the direction controller required cycling through various
combinations of the two controller constants for each test case. A proportional constant
of 4 and an integral multiplier of 2 were found to be the most suitable (Figure 11).
Velocity Response ( vkp= 16 dkp=4 dki= 2)
180
Dir ection R esponse ( vkp=16 dkp=4 dki=2)
50
De s ire d Di re ction
Ac tua l D ire c ti on
Ru n ning Integ ral Su m (/10 )
De s ire d Ve l oc ity
Ac tua l V el o ci ty
160
40
140
(d)
(b)
30
(e)
120
(c)
20
(d)
80
Dir ection
Velocity
100
(f)
(a)
60
(f)
10
0
40
-10
(g)
20
(a)
(b)
(e)
(c)
(g)
-20
0
-20
-30
2
4
6
8
10
12
14
16
2
4
6
8
10
12
14
16
Time ( seconds)
Time ( seconds)
Wheel Outputs (vkp=16 dkp=4 dki=2)
Left Outp ut
Ri g ht Ou tpu t
100
Magnitude
50
(a)
0
(b)
(d)
-50
(g)
(e)
(c)
-100
2
4
6
8
10
(f)
12
14
16
Time ( seconds)
Figure 11
The graphs, clockwise from top left, show the velocity response, the direction response
and the output to both wheels as the wheelchair turns under motion with the chosen
controller constants. The response when velocity is applied initially (a) is discussed in
Section 4.5.1, it is worth noting that the wheelchair does not oscillate significantly. The
direction controller also maintains a straight heading under constant velocity (b). The
start of rotation (c) is marked by saturation at the outputs and an overshoot that mirrors
23
Development of a Robotic Wheelchair
Drive Controller Tuning and Testing
the integral sum. This overshoot can be felt as a slight jerk, but its presence serves to
make the chair more responsive. Velocity is reduced slightly as the output saturates but
this is not easily perceived by the occupant. The rate of rotation settles down quickly to
give a smooth response with an obvious difference in torque between the motors (d).
Another disturbance occurs when rotation stops (e), but it is less drastic than the initial
change. Neither is direction affected significantly as the chair slows to a stop (f). The
response after stopping (g) is less than perfect but can only be perceived as a slight
tension in both wheels. This effect can be largely reduced by using a lower velocity
constant, but at the cost of reduced response.
Higher integral multipliers (8 and above), or proportional constants (32 and above)
produce an unstable response. As the integral multiplier is reduced the response tends to
become slower and more oscillatory with higher running integral sums and more lag
between request and response. Similar, though less striking, results can be seen by
lowering the proportional constant.
Other testing confirms the comparative suitability of the chosen constants. It is worth
noting, however, that the wheelchair’s response to simultaneous velocity and direction
inputs, and to requests for stationary rotation, is less than perfect. Experimentation has
shown that performance in these cases is strongly dependent on front tire pressure,
castor wheel aspect, occupant mass and battery level.
4.5
Other Observations and Adjustments
4.5.1 Output Saturation
The torque that can be produced by both drive motors is limited and also shared
between two control loops. If the controller outputs are combined and then limited
problems can occur when one of the controllers saturates the output. For example, when
a large velocity request is made of the wheelchair both motors are set to the maximum
torque until the velocity error is much reduced. This makes it difficult for the direction
controller to make the slight corrections necessary to account for differences in motor
response and terrain when attempting to travel in a straight line.
24
Development of a Robotic Wheelchair
Drive Controller Tuning and Testing
Velocity Response ( vkp= 8 dkp=4 dki=2)
2 00
Dir ection R esponse ( vkp=8 dkp= 4 dki= 2)
50
Des ire d Ve loc ity
Ac tua l V elo city
(b)
1 60
Des ire d Direction
Ac tua l D i re c tio n
Run ning Integ ral Su m (/10 )
(b)
40
1 80
(c)
30
1 40
20
(d)
1 20
Dir ection
Velocity
10
1 00
80
0
-10
60
(d)
-20
40
20
(b)
(b)
-30
(c)
0
1
2
3
4
5
6
7
8
-40
9
1
2
3
4
Time ( seconds)
5
6
7
8
9
Time ( seconds)
Wheel Outputs ( vkp=8 dkp= 4 dki= 2)
L eft Outp ut
Rig ht Ou tpu t
1 00
(a)
50
Magnitude
(c)
0
(e)
(c)
-50
-10 0
(a)
1
2
3
4
5
6
7
8
9
Time ( seconds)
Figure 12
This situation is illustrated in Figure 12. The graphs, clockwise from top left, show the
velocity response to a step input, the corresponding direction response (as the
wheelchair attempts to maintain a straight line) and the motor outputs for each wheel.
The saturated output response to the velocity request is evident at the points labelled a.
The requested wheel torques change almost instantaneously and cause the disturbances
labelled b as both motors react. These disturbances cause the growth of the integral sum
until it is large enough to affect the output (points c). The swinging integral introduces a
noticeable wobble in direction response (points d).
A large integral sum is undesirable because it tends to influence wheelchair behaviour
long after a command has been given and the response observed, typically the chair
continues to rotate for seconds after the joystick has been released. The wobble is less
of a problem but is, nevertheless, also unwanted. It was found that the response could be
improved by limiting the velocity controller output before summing with the direction
controller output.
25
Development of a Robotic Wheelchair
Drive Controller Tuning and Testing
Velocity Response ( vkp=8 dkp= 4 dki=2)
Dir ection R esponse ( vkp=8 dkp=4 dki= 2)
50
2 00
De s ire d Ve loc ity
Ac tual V elo city
De s ire d Dire ction
Ac tual D i re c tio n
Ru nning Integral Su m (/10 )
40
1 80
(b)
1 60
30
1 40
(b)
20
(d)
1 20
1 00
Dir ection
Velocity
10
80
(d)
(c)
-10
60
(b)
-20
40
20
(c)
0
(b)
-30
0
1
2
3
4
5
6
7
8
-40
9
Time ( seconds)
1
2
3
4
5
6
7
8
9
Time ( seconds)
Wheel Outputs ( vkp=8 dkp=4 dki= 2)
L eft Output
Rig ht Ou tpu t
1 00
(a)
50
Magnitude
(c)
0
(e)
-50
(c)
-10 0
(a)
1
2
3
4
5
6
7
8
9
Time ( seconds)
Figure 13
The results of the modified algorithm are shown in Figure 13. These graphs show the
maximum velocity controller contribution limited to ±100 (of a maximum ±127);
higher limits reduce the method’s effectiveness whilst lower values increase the velocity
rise time. The limited velocity contribution allows the direction controller to vary the
difference in torque between both wheels (points a). As a result the disturbances
resulting from rapid torque changes are reduced (points b), as is the range of integral
fluctuation (points c) and the size of the wobbles (points d). The cost of this change is a
longer velocity rise time, though only slightly, and a lower maximum top speed.
The results given in Sections 4.3.2 and 4.4.2 were produced with the modified
algorithm.
4.5.2 Joystick Ramping
Velocity and direction inputs from the joystick are only allowed to change in steps of
one each sample period. This ramping was ostensibly employed to limit the
wheelchair’s acceleration and deceleration to produce smoother operation and longer
battery life [7]. This scheme, however, has little effect at velocities of reasonable size
where the response is shaped by torque limits and system damping (Figure 9).
26
Development of a Robotic Wheelchair
Drive Controller Tuning and Testing
Instead, testing has shown that joystick ramping is necessary to filter noise from the
input signal. Significant noise can be detected in the joystick interface circuit whenever
the Power Electronics are connected to the battery. Additional capacitors were unable to
remove spikes detected by the analogue-to-digital converters. The effect of these spikes
is amplified by the integral component of the direction controller to negative effect
(Figure 14).
Effect of Joystick Noise on Integral
50
De s ire d Di re ction
Ac tua l Di re c ti o n
Ru n ning Integ ral Su m (/10 )
Direction Value & Integral Sum
0
-50
-10 0
0
0 .5
1
1 .5
2
2 .5
3
3 .5
Time (seconds)
Figure 14
A short order FIR filter was able to reduce the effect of noise spikes but was too
computationally intensive for the short controller sample period. Ramping for both
inputs, velocity and direction, has thus been maintained with a better understanding of
its impact.
4.6
Summary
Data logging has enabled the Drive Controller’s performance to be analysed and tuned.
Although there is still room for further improvement, satisfactory results have been
obtained and can be demonstrated.
27
Development of a Robotic Wheelchair
Master Controller Development
5 Master Controller Development
The Master Controller collects information from the wheelchair and its immediate
environment in order to form movement strategies which are enacted through the Drive
Controller. The Master Controller and associated sensor subsystems were modified
extensively to create an improved system compatible with the changes already
described.
5.1
Overview
The Master Controller is composed of an M16C microcontroller, several software
modules (Appendix H) and electronics (Appendix G) for interfacing with sensors
located around the wheelchair (Figure 15).
Front-Left
Ultrasonic Sensor
Front-Right
Ultrasonic Sensor
Master Controller
Side-Right
Infrared Sensor
Side-Left
Ultrasonic Sensor
Side-Right
Ultrasonic Sensor
Figure 15
5.2
Ultrasonic Sensors
The wheelchair employs four ultrasonic sensors, which consist of transducers connected
to pre-built pulse generation and detection circuitry. These units fire and detect
ultrasonic pulses. One sensor output indicates when the pulses are fired and another if
they are detected again (Figure 16, beam width from [8]).
VSW FLG XLG
16°
VSW
FLG
XLG
Request pulse generation.
Signal pulse fired.
Signal pulse returned.
Figure 16
28
Development of a Robotic Wheelchair
Master Controller Development
By timing the difference between the output signals, and using Equation 5.1, it is
possible to estimate the distance to obstructions in the direction of each sensor.
d = 0.5tv
(v = speed of sound in air, t = round trip time)
( 5.1 )
Interface circuitry (Appendix G) prepares and combines the outputs of each ultrasonic
unit before sending them to the Master Controller. The controller software (Appendix
H) uses a free running timer and multiple interrupts to measure the time of flight of the
first reflected pulse and ignore any others. Timing with interrupts is less
computationally wasteful then the alternative polling technique.
5.2.1 Firing Sequence
The ultrasonic sensors are not fired simultaneously for two reasons. Firstly, each sensor
can draw two amperes when generating pulses [36], firing four at once may sharply
draw eight amperes from the supply. Secondly, pulses from one sensor can be
incorrectly detected by another in a phenomenon known as cross-talk.
The front and side left sensors are fired simultaneously, as are the front and side right
sensors. Currently, the pairs are fired 50ms apart increasing the potential range of the
front sensors from 3 metres [7] to 8 metres (Equation 5.1). The sensors are clocked
directly from the Master Controller board and the separation interval is determined by
software.
5.2.2 Sensor Mounting
The ultrasonic transducers are extremely sensitive and have specific mounting
requirements [37]. To protect the sensors from foreign matter they have been enclosed
in a solid plastic container. Holes have been drilled in the container to allow pressure
equalisation (Figure 17).
Figure 17
29
Development of a Robotic Wheelchair
Master Controller Development
5.3
Infrared Sensors
Software was developed and tested for a popular type of Infrared sensor (Sharp
GP2D02). Although this type of sensor has a shorter range than the ultrasonic sensors it
possesses a smaller beam width, can be fired more frequently, is smaller and easier to
mount, and is less expensive. These sensors provide an eight-bit digital result across a
serial line in response to a defined clock signal [38]. The Master Controller uses
interrupts to produce this signal and read the results.
5.4
Joystick Input
The joystick interface allows an occupant to direct the wheelchair. Connecting the
joystick to the Drive Controller allows the chair to be operated as a powered wheelchair
if the Master Controller fails or is not installed. However, implementing obstacle
avoidance or other shared-control features requires a fusing of operator and robotic
influences.
In previous wheelchair incarnations, the Master Controller has communicated upper and
lower velocity and direction limits to the Drive Controller where they have been fused
with the joystick input [7]. The current implementation achieves greater efficiency and
flexibility by connecting the scaled joystick signals to both controllers (Figure 18).
Drive
Controller
Serial Link
Master
Controller
Interface
Circuit
Figure 18
5.5
Communications with the Drive Controller
The Master Controller needs to pass commands to the Drive Controller, it may also be
useful to communicate odometry readings in the opposite direction.
The M16C microcontrollers provide two immediate possibilities. A basic version of the
proprietary I2C bus is implemented in hardware. This protocol provides high speed (up
to 400 kilobits/second) clock synchronous serial communications using two signal wires
[39].
30
Development of a Robotic Wheelchair
Master Controller Development
The three inbuilt asynchronous serial channels present a second possibility. These
channels operate at a lower speed and typically through an RS-232 driver chip. The
additional serial port developed for testing the Drive Controller (Appendix C) was
reused to provide a serial link with the Master Controller.
Whilst the serial ports are slower (maximum 115200bps) than the I2C bus, they are fast
enough for the protocol employed. The advantage of using the serial port is that the
technology is established and open; diagnostics equipment is readily available and there
is the potential for other devices besides the Master Controller to interface with the
Drive Controller.
5.5.1 Link Protocol
A simple protocol is used between the two controllers. The Drive Controller sends six
byte Driver Frames which contain the left and right wheel position counts and a 16-bit
CRC code. The error checksum is generated by specialised hardware within the
microcontroller. The Master Controller sends six byte Master Frames which contain the
desired velocity, the desired direction, and a CRC code.
Frame synchronisation is achieved by taking advantage of operational detail, rather than
through an elaborate protocol, synchronisation characters, or additional control
channels. The Drive Controller resets its receive buffer and begins sending a Driver
Frame after each control iteration (every 3.4ms). When the Master Controller receives
the first byte of a Driver Frame it begins transmitting a Master Frame. If the Master
Controller detects a CRC error it resets its receive buffer and ceases receiving for a brief
time period (1.2ms using 11 bits per byte, 8n2, and 57600bps), it is then poised to
receive the next frame without loss of synchronisation. Since transmission of a Master
Frame occurs in response to the first byte of a Driver Frame, a CRC error at the Master
Controller does not necessarily interrupt a command being sent to the Drive Controller.
Serial transmits and receives are handled via interrupts and buffers, allowing control
and diagnostics subroutines to issue a send request and then continue with other
processing.
31
Development of a Robotic Wheelchair
Master Controller Development
5.5.2 Current Operation
The current wheelchair implementation does not contain any robotic algorithms.
Joystick inputs are simply passed from the Master Controller to the Drive Controller
across the serial link. The Drive Controller maintains an age count on commands sent
across the link. The count is incremented each control iteration and reset upon
successful receipt of a Master Frame (i.e. six bytes with a valid CRC). If the age count
reaches a defined limit the Drive Controller begins taking commands from the local
joystick connection until a Master Frame is received. This limit is currently set to one
second. The Drive Controller LEDs indicate whether commands are being taken from
the Master Controller, ‘Co’, or the joystick, ‘Jo’.
Testing has shown this scheme to be both robust and effective. If the Master Controller
is reset, or the serial cable unplugged, the wheelchair continues on its existing heading
for one second before resuming operation from the local joystick. When the controllers
are reconnected, the LEDs on the Drive Controller change as it takes commands from
the Master again.
The Master Controller does not yet act on Driver Frames. However, it can be instructed
to log the contents of these frames, along with sensor data, to the diagnostics serial port
as will be shown in Chapter 6.
5.6
Diagnostics
The Drive Controller diagnostics program has been adapted for the Master Controller. It
is possible to connect to the Master Controller from a PC (as per Section 4.2).
Commands can be issued and data logged to disk. Details are given in Section H.2.
5.7
Summary
The Master Controller has been implemented on an M16C microcontroller. Whilst
neither previously developed robotic algorithms [7, 8], nor any new ones, have been
ported, several essential low-level subsystems have been re-developed. These
subsystems handle sensors, communications and diagnostics.
32
Development of a Robotic Wheelchair
Master Controller Testing
6 Master Controller Testing
The logging features of both the Drive and Master Controllers provide data that is
eminently suitable for graphical representation. As will be seen, these representations
reveal interesting details about the system and demonstrate the effectiveness of recent
work.
6.1
Technique
Data on wheelchair movements and sensor range scans are sent from the Wheelchair to
a PC, where are a mapping program plots the results.
(1)
(3)
(4)
uart0
uart1
(5)
com1
(6)
terminal
program
Master Controller
(7)
(8)
PC or Laptop
(2)
uart1
mapping
program
file on
disk
uart0
Drive Controller
Figure 19
Figure 19 depicts this process in detail. The Master Controller takes commands from the
joystick (1), and sends them across a serial link to the Drive Controller whilst receiving
wheel position data (2). The sensors are regularly polled to collect range data (3). The
Master Controller sends both position and sensor data across another serial link to a PC
or laptop (4). A specialised terminal program running on the PC collects this data (5)
and either sends it directly to a mapping program (6), or saves it to disk (7) for later
processing (8).
The terminal program is a modified version of the software used to collect data from the
Drive Controller. The mapping program is a specially developed graphical application
(Appendix J). The two can communicate directly using Mailslots, a technique for
sending blocks of data from one application to another. Named pipes is a faster
technique to achieve the same end, but it is not provided on all versions of Windows.
This direct communication was intended to produce a map as the wheelchair was
33
Development of a Robotic Wheelchair
Master Controller Testing
operated, however it required too much processing power and was not effective.
Instead, data is logged directly to disk and used to generate a map afterwards.
6.2
Odometry
The mapping program must interpret consecutive wheel position values as changes in
displacement and orientation. This is achieved using measurements from the wheelchair
and equations developed from first principles, a full account of which is given in [8].
To verify these equations, data was logged from the wheelchair as it was driven and
rotated over measured areas. One interesting revelation from these tests was that
although the drive wheels have a nominal radius of 15cm, this changes to an effective
14.5cm when a load is carried. Such inaccuracies can have a significant effect on results
over multiple calculations.
6.3
Modelling
The mapping program uses a mathematical model to track the wheelchair and relate
sensor range readings to distances (Figure 20).
Figure 20
The wheelchair and each sensor are represented as objects with a two dimensional
position and an angular orientation. The wheelchair co-ordinates are given relative to an
origin at the bottom left of an assumed flat plane. The sensor co-ordinates are relative to
the front centre of the wheelchair. Each sensor reading is plotted as a horizontal line at
the end of a cone opening from the sensor position, and in the direction of its relative
orientation, as a beam of angle 16˚. A different colour is used for each sensor. A red
rectangle, representing the wheelchair position and orientation, is plotted at regular
intervals.
34
Development of a Robotic Wheelchair
Master Controller Testing
6.4
Results
As an initial test the wheelchair was driven very slowly down a corridor and around a
corner. An image produced from this data has been superimposed onto a building floor
plan in Figure 21. To improve clarity, readings from the front sensors are not shown.
Figure 21
The two pairs of rectangles show magnified versions of the image. The top rectangle
shows that the sensors were able to detect two closed doors and a fire hose alcove. The
bottom rectangle shows the results from readings against a support pylon and an open
door. The wider image reveals the effect of odometry inaccuracies, resulting from both
the calculations and the position sensor data, as they are compounded over time.
35
Development of a Robotic Wheelchair
Master Controller Testing
Figure 22
36
Development of a Robotic Wheelchair
Master Controller Testing
Figure 22 shows the results of testing in an open area. The generated bitmap was
transformed by matching its reference grid to the floor plan scale. The two images were
then superimposed and labelled without further modification. This map indicates that
the response of the front sensors (the blue strokes) could be improved to reduce false
measurements, whilst the side sensors (the brown and yellow strokes) provide
reasonably accurate readings. The accurate detection of walls at close range suggests the
potential effectiveness of wall following behaviours.
6.5
Other Observations
6.5.1 Sensor Polling Period
Currently, range readings are taken from all sonar sensors every 300 milliseconds. At
best, readings could occur every 200ms. As the wheelchair travels faster, range readings
are spread over a wider distance. At a high speed, coupled with a relatively long polling
period, features such as doorways or pylons may not be registered. At the very least
there are fewer readings to filter or average.
This concept is portrayed in Figure 23, which was produced by travelling slowly down a
corridor and plotting the readings as points. It shows the detection of two closed doors
on the upper side, one with three readings and the other with two, and the recognition of
a deeper alcove with three readings on the other side.
Figure 23
6.5.2 Inaccuracies
The current Master Controller logs sensor data at the end of each polling period, rather
than when each reading is taken. In the meantime, position readings are continuously
logged. The result is that sensor readings do not exactly correspond with calculated
position and orientation values. This could be changed, but at the risk of affecting the
system’s stability.
37
Development of a Robotic Wheelchair
Master Controller Testing
Additionally, the mapping program makes no attempt to adjust for false range readings
caused by well understood sources of error (refer [10]).
6.6
Summary
A mapping technique has been developed to test the Master Controller’s several
subsystems, including ultrasonic sensors, communications with the Drive Controller and
data logging capabilities. The results show the effectiveness of the system and suggest
areas for improvement.
38
Development of a Robotic Wheelchair
Conclusions and Recommendations
7 Conclusions and Recommendations
7.1
Synopsis
This thesis began with a survey of existing robotic wheelchair literature and attempted
to establish a place for the UOW device within established research.
Whilst the wheelchair has existed for more than a decade, this thesis represents a major
re-evaluation and development of its operational capabilities. The initial aim of porting
the Drive Controller to a Mitsubishi processor is largely complete. The interface
electronics have been greatly simplified and the controller algorithm has been recast in
C with additional features. It is now possible to capture real performance statistics from
the control subsystem and to analyse them graphically on a PC using custom software.
This functionality has been used to tune and verify the wheelchairs controllability. Such
insight has not been previously available.
Major portions of the Master Controller have been ported to a second Mitsubishi
controller. Software and circuitry have been developed to interface with ultrasonic
sensors, infrared sensors, the joystick and the Drive Controller. Regrettably, existing
control algorithms have not yet been modified to work with the new system. However,
an extensible architecture with defined interfaces into the low-level hardware exists and
has been tested.
Software components developed for the Drive Controller were extended to allow data
logging from the Master Controller. An application was created to represent and display
this data graphically using basic odometry and vector mathematics. These estimations
possess a pleasing correlation with real world observations and serve to provide insight
into the information available to the Master Controller, and to the limitations of this
data.
7.2
Recommendations
If wheelchair development were to continue, the most obvious next step would be to
implement intelligent algorithms on the Master Controller. One could adapt the existing
obstacle avoidance algorithm before continuing along similar lines as the previous
39
Development of a Robotic Wheelchair
Conclusions and Recommendations
thesis. The author believes, however, that a more suitable approach would be to ignore
the problems of high-level localisation and path planning, and to focus instead on
creating a behaviour based device. Significantly, it is claimed that this approach uses
less computing power than more traditional hierarchical approaches. These behaviours
could be aimed at achieving one or more of the almost standard robotic wheelchair
features outlined in Chapter 2.
Whilst a strategy employing internal maps may not be applicable to wheelchair motion
planning, insights gained from using the mapping program may prove useful. If this is
so, there is, somewhat regrettably, much room for improvement within the PC based
software. Adapting existing serial communications modules for the mapping program,
reducing the frequency of odometry data transmission and using a faster graphics
library (Direct X, for example) may make real-time mapping possible.
The Drive Controller is functioning well, but the author believes there to be room for
further improvement. The M16C and Matlab software developed for this project could
provide a basis for further investigation and experimentation. There is an added
advantage of being able to graphically compare the performance of different
modifications or implementations. The time available for executing the control
algorithm could be increased by reducing the amount of data logged and augmenting the
Matlab analysis functions appropriately.
Finally, the modules developed by this project for the M16C microcontroller (notably
those related to the additional serial port and buffered I/O) could prove useful to other
projects.
40
Development of a Robotic Wheelchair
Conclusions and Recommendations
Bibliography
[1] R. Jackson, ‘Robotics and its role in helping disabled people’, Engineering Science and Education
Journal, Vol. 2, Issue 6, 267-272, December 1993.
[2] S. On, Wheelchair Speed Sensors and Modulation Investigation, ECTE457 Thesis, Department of
Electrical, Computer, and Telecommunications Engineering, University of Wollongong, November 1991.
[3] K. Ali, Mobile Robot Platform - Wheelchair, ECTE457 Thesis, Department of Electrical, Computer,
and Telecommunications Engineering, University of Wollongong, November 1992.
[4] J. Bowers, Digital Control of Electric Wheelchair, ECTE457 Thesis, Department of Electrical,
Computer, and Telecommunications Engineering, University of Wollongong, November 1993.
[5] M. Mikleus, Navigation of an Electric Wheelchair, ECTE457 Thesis, Department of Electrical,
Computer, and Telecommunications Engineering, University of Wollongong, November 1996.
[6] G. Biernat, Intelligent Control of an Electric Wheelchair, ECTE457 Thesis, Department of Electrical,
Computer, and Telecommunications Engineering, University of Wollongong, November 1998.
[7] M. Illes, Intelligent Control of an Electric Wheelchair, ECTE457 Thesis, Department of Electrical,
Computer, and Telecommunications Engineering, University of Wollongong, November 1999.
[8] M. Hassani, Navigation of an Electric Wheelchair, ECTE457 Thesis, Department of Electrical,
Computer, and Telecommunications Engineering, University of Wollongong, November 2000.
[9] H. Poole, Fundamentals of Robotics Engineering, van Nostrand Reinhold, New York, 1989.
[10] P. McKerrow, Introduction to Robotics, Addison-Wesley, Singapore, 1991.
[11] J. Borenstein, H. Everett, & L. Feng, Navigating Mobile Robots: Systems and Techniques, A K
Peters, Massachusetts, 1996.
[12]T. Röfer, & A. Lankenau. ‘Ensuring Safe Obstacle Avoidance in a Shared-Control System’,
Proceedings of the IEEE/RSJ/GI International Conference on Emerging Technologies and Factory
Automation 1999, Vol. 2, 1405-1414, October 1999.
41
Development of a Robotic Wheelchair
Conclusions and Recommendations
[13] E. Prassler, J. Scholz, M. Strobel, & P. Fiorini, ‘An Intelligent (Semi-)Autonomous Passenger
Transportation System’, Proceedings of the IEEE/IEEJ/JSAI International Conference on Intelligent
Transportation Systems Proceedings 1999, 374-379, October 1999.
[14] D. Miller, & M. Slack, ‘Increasing Access with a low-cost Robotic Wheelchair’, Proceedings of the
IEEE/RSJ/GI International Conference on Intelligent Robots and Systems ’94, Vol. 3, 1663-1667,
September 1994.
[15] M. Lawn, & T. Takeda, ‘Design of a robotic-hybrid wheelchair for operation in barrier present
environments’, Proceedings of the 20th Annual International Conference of the IEEE Engineering in
Medicine and Biology Society, Vol. 20, No 5,
[16]
J.
Hockenberry,
(cited
20-May-2001)
‘A
revolutionary
new
wheelchair’,
NBC
http://www.msnbc.com/news/285231.asp, June 2000.
[17] S. Fioretti, T. Leo, & S. Longhi, ‘A Navigation System for Increasing the Autonomy and the
Security of Powered Wheelchairs’, IEEE Transactions on Rehabilitation Engineering, Vol. 8, No. 4, 490498, Dec 2000.
[18] P. Trahanias, M. Lourakis, S. Argyros, & S. Orphanoudakis, ‘Navigational support for robotic
wheelchair platforms: an approach that combines vision and range sensors’, International Conference on
Robotics and Automation 1997, Vol. 2, 1265-1270, April 1997.
[19] G. Pires, R. Araujo, U. Nunes, & A. Almeida, ‘RobChair-a powered wheelchair using a behaviourbased navigation’, International Workshop on Advanced Motion Control 1998, 536-541, June 1998.
[20] N. Katevas, N. Sgouros, S. Tzafestas, G. Papakonstantinou, P. Beattie, J. Bishop, P. Tsanakas, & D.
Koutsouris, ‘The Autonomous Mobile Robot SENARIO: A Sensor-Aided Intelligent Navigation System
for Powered Wheelchairs’, IEEE Robotics & Automation Magazine, Vol. 4, Issue 4, 60-70, December
1997.
[21] J. Borenstein, H. Everett, & L. Feng, Navigating Mobile Robots: Systems and Techniques, A K
Peters, Massachusetts, 1996.
[22] S. Nakanishi, Y. Kuno, N. Shimada, & Y. Shirai, ‘Robotic Wheelchair Based on Observations of
Both User and Environment’, Proceedings of the 1999 IEEE/RSJ International Conference on Intelligent
Robots and Systems, Vol. 2, 912-917, October 1999.
42
Development of a Robotic Wheelchair
Conclusions and Recommendations
[23] G. Birch, & S. Mason, ‘Brain-Computer Interface Research at the Neil Squire Foundation’, IEEE
Transactions on Rehabilitation Engineering, Vol. 8, No 2, 193-195, June 2000.
[24] K. Tahboub, & H. Asada, ‘A Semi-Autonomous Control Architecture Applied to Robotic
Wheelchairs’, Proceedings of the IEEE/RSJ International Conference on Intelligent Robots and Systems
1999, Vol. 2, 906-911, October 1999.
[25] A. Poo, & P. Tang, ‘Intelligent Control of Machines’, Intelligent Machines: Myths and Realities, C.
de Silva (ed.), CRC Press, Washington D.C., 2000.
[26] J. Yen, & R. Langari, Fuzzy Logic: Intelligence, Control, and Information, Prentice-Hall, New
Jersey, 1999.
[27] R. Beale, & T. Jackson, Neural Computing: An Introduction, Institute of Physics Publishing, Bristol
and Philadelphia, 1990.
[28] R. Biewald, ‘A Neural Net Controller for Navigation and Obstacle Avoidance for Non-Holonomic
Mobile Robots Using Sensory Information’, Techniques and Application of Neural Networks, M. Taylor
& P. Lisboa, Ellis Horwood (eds), West Sussex, 1993.
[29] C. Malcolm, T. Smithers, & J. Hallam, ‘An emerging Paradigm in Robot Architecture’, Intelligent
Autonomous Systems 2, Vol. 2, 546-560, December 1989.
[30] R. Brooks, ‘A Robot that Walks; Emergent Behaviors from a Carefully Evolved Network’,
Proceedings of the 1989 IEEE International Conference on Robotics and Automation, Vol. 2, 692-696,
May 1989.
[31] J. Jones, A. Flynn, Mobile Robots; Inspiration to Implementation, A K Peters Ltd., Massachusetts,
1993.
[32] M16C/62 Group User’s Manual (62eum.pdf), Mitsubishi Electric, February 2001.
[33] M. Lesha, Simulation of a Mobile Robotic Trolley or Wheelchair, ECTE457 Thesis, Department of
Electrical, Computer, and Telecommunications Engineering, University of Wollongong, December 1990.
[34] K. Ogata, ‘PID Controls and Introduction to Robust Control’, in Modern Control Engineering, 3rd
Edition, Prentice-Hall Inc., New Jersey, 1997.
43
Development of a Robotic Wheelchair
Conclusions and Recommendations
[35] J. Golten, & A. Verwer, Control System Design and Simulation, McGraw-Hill Book Company,
Berkshire, 1991.
[36] Technical Specifications for 6500 Series Sonar Ranging Module, Polaroid OEM Components Group,
1999.
[37] Technical Specifications for 600 Series Instrument Grade Electrostatic Transducers, Polaroid OEM
Components Group, 1999.
[38] Sharp GP2D02 Technical Specification, Sharp, date unknown.
[39] M16C/62 Group Application Note <Simple I2C Bus>, Mitsubishi Electric Corporation, 1998.
44
Development of a Robotic Wheelchair
Appendix A – Drive Controller Interface Circuit
Appendix A – Drive Controller Interface Circuit
The Drive Controller interface circuit (Figure A-1) allows the M16C to interact with the
wheelchair hardware.
a
b
c
32
31
GND
DA1
DA0
30
29
28
27
26
25
TA3in TA2out
TA3out
TA2in
24
23...11
…
…
…
10
9
P1_4
P1_3
P1_2
8
7
6
5
4
3
2
AN0
1
AN1
+5V
96-way female euro connector
10-pin IDC
TA3OUT
TA3IN TA2OUT
TA2IN
AN0
AN1
+5V
GND
P1_3
DA1 DA0
1
1
1
RPOS
10mm
2x dip switches or jumpers
P1_4
2
JOUT
LPOS
4-pin molex
+12V
+12V
68nF
10k
10k
JIN
8k2
5k6
82k
22k
10k
10k
MR
+
+
-12V
+12V
Vcc +
+12V
Vcc -
+
-
-12V
+12V
-12V
+12V
source
PIN
0.01 F
JY
-12V
source
+
-
10k
JX
22k
10k
82k
TL074CN
10k
ML
5k6
68nF
-12V
10k
-12V
PEOUT
P1_2
3-pin molex
8k2
10 or 20 turn trimpot
PCB labels
0.01 F
nc
0.1 F
nc
3k9
+
nc
330k
nc
BC549
HEF4047B
(monostable)
W171DIP-25
(14-pin DIL)
3k3
Figure A-1
45
Development of a Robotic Wheelchair
Appendix A – Drive Controller Interface Circuit
A.1 Joystick Inputs
The wheelchair’s analog joystick attaches to a 4-pin Molex connector (Labelled JIN on
Figure A-1). The joystick is supplied with 12 volts. An output for each joystick axis is
fed into an op-amp circuit for scaling and offset adjustment (Figure A-2).
+12V
Vout = −
10k
10k
68nF
RF
RF
⋅ Vin −
⋅ VR
Ri
1× 10 4
Scaling
Offset
RF
-12V
Ri
Vin
Vout
+
Figure A-2
Suitable choices of Ri, RF, and VR (8.2kΩ, 22KΩ, and -6.786V respectively) change the
joystick voltage from one that ranges between 4.52V and 6.78V to one ranging between
0V and 5V. Each output voltage is wired to one of the M16C A-D channels. The 68nF
capacitor lends a low pass characteristic to the circuit to reduce the effects of noise
( ω0 =
1
).
R F ⋅ 68nF
A.2 Power Inputs
Power from the wheelchair batteries is fed into the interface circuit through a 4-pin
Molex connector (Labelled PIN in Figure A-1). A ceramic capacitor (0.01µF) attached
to each voltage input provides a path to ground for high frequency noise.
A.3 Power Electronic Outputs
A similar amplification circuit to that of Figure A-2 scales the M16C D-A channel
outputs to voltages suitable for driving the Power Electronics (Labelled PEOUT on
Figure A-1).
The M16C D-A channels can produce voltages between 0 and 5 volts. However, when
connected to the interface circuit these voltages range between 0 and 1.4 volts (though
still linearly) and must then be scaled to between –10 and +10 volts for the Power
46
Development of a Robotic Wheelchair
Appendix A – Drive Controller Interface Circuit
Electronics (Ri = 5.6kΩ, RF = 82kΩ, VR = -1.2V). The 68nF noise reduction capacitor is
not included in this circuit.
A.4 Position Encoder Inputs
The position encoding sensors are supplied with 5V from the M16C supply. The pulse
trains for each wheel are fed directly into the TA2 (Timer A2), and TA3 (Timer A3)
inputs of the M16C.
A.5 Watchdog Circuit
The HEF4047B operates as a retriggerable one-shot timer whose period is determined
by Rt and Ct;
t = 2.48 ⋅ Rt ⋅ C t
Using Rt = 330kΩ and Ct = 0.01µF gives a period of 8.18ms. This time period is double
that employed in previous wheelchair implementations. This means that the control loop
need only invert the triggering output once every cycle.
47
Development of a Robotic Wheelchair
Appendix B – Prototyping with the M16C
Appendix B – Prototyping with the M16C
The M16C (M30624) was supplied on an evaluation board (Starter Kit 2) that includes
two seven segment LED displays, three bounce switches, clock generation circuitry, a
UART serial port and a 96-way male ‘euro’ connector. In addition, a CDROM
containing extensive documentation, sample programs, a C compiler, a debugger and
tools for modifying the flash ROM was also provided.
The interface circuits were prototyped using a ‘euroboard’, which consists of a female
euro 96-way connector, regularly spaced holes for component pins and a geometry of
copper tracks. Components can be soldered or wire wrapped onto the board as needed.
This board needs several modifications to work correctly with the M16C evaluation
board (Figure B-1).
Figure B-1
To ensure that the Starter Kit works correctly in the wheelchair environment, the 5V
supply must be connected to the blue connection block (CN3) and jumpered in (JP8
between 1 and 2) and A-D channel 1 must be jumpered to the euro connector (JP3
between 2 and 3).
It is worth noting that the euro connector column numbering (1 to 32) is contrary to that
of the Starter Kit, whilst the row lettering (A to C) remains the same.
48
Development of a Robotic Wheelchair
Appendix C – Additional Serial Port
Appendix C – Additional Serial Port
The Mitsubishi M16C has three built-in UART ports. The Starter Kit 2 board has a
serial connector wired to one of these ports. This connection is effected through an RS232 Driver/Receiver chip; only one of this chip's two channels is used. This appendix
describes modifications that allow the addition of a second serial port with minimum
extra hardware.
C.1 Required Parts
Quantity
Description
1
Mitsubishi MSA0654 Starter Kit 2 Circuit Board
1
150mm Shielded Computer Cabling (minimum 3 WAY)
2
90mm breadboard jumper wire
1
D Connector, 9-pin Female Solder.
1
9-pin Plastic D Backshell
C.2 Instructions
These instructions describe how another DCE serial port may be added to the Starter Kit
2 board. An additional serial port allows serial I/O programs to be debugged using the
KD30 monitor (which communicates over the existing serial port). This design takes
advantage of the unused RS-232 channel on the MAX232 Driver/Receiver chip.
49
Development of a Robotic Wheelchair
Appendix C – Additional Serial Port
C.2.1 Hardware Modifications
The underside of the Starter Kit 2 board is shown in Figure C-1, the 96-way external
connector is at the top. Relevant pins are labelled, and the female serial port connector
appears as an inset.
Figure C-1
To prepare the serial port connector;
1) Link pins 7 (RTS) and 8 (CTS) by soldering a wire between.
2) Link pins 4 (DTR), 5 (SG), and 6 (DSR) by soldering wires between.
3) Remove 3cm of the computer cable’s plastic sheath.
4) Join one of the exposed wires to pin 2 (DCE TX), one to pin 3 (DCE RX), and
another to pin 5 (SG). Make a note of each wire’s colour against the pin to
which it connects.
5) Cover these connections with the backshell.
6) Remove 8cm of plastic sheath from the other end of the computer cable.
7) Place the connector and cable on the upper side of the Starter Kit 2 board (near
the existing serial connector), feed the three connected and exposed wires to the
underside of the board via the Right-Side Hole (see Figure C-1).
To modify the Starter Kit 2 board underside;
50
Development of a Robotic Wheelchair
Appendix C – Additional Serial Port
1) Solder the serial connector ground wire to a grounded point on the Starter Kit 2
board (the point labelled Ground in Figure C-1 is convenient).
2) Solder the serial connector Tx wire to pin 7 of the MAX232 chip (marked as Tout
in Figure C-1).
3) Solder the serial connector Rx wire to pin 8 of the MAX232 chip (marked as Rin
in Figure C-1).
4) Join pin 9 of the MAX232 chip to pin 22B of the 96-way external connector
(Rout to Pin 22B in Figure C-1) with one of the breadboard jumper wires.
5) Join pin 10 of the MAX232 chip to pin 22A of the 96-way external connector
(Tin to Pin 22A in Figure C-1) with the other breadboard jumper wire.
C.2.2 Software Modifications
After completing the hardware modifications, UART0 can be used to communicate
through the new serial connector. Note that hardware handshaking cannot be used and
that the connector is wired as a DCE.
Chapter 7 of the NC30 User’s Manual [C-1] describes how the Standard Library may be
changed to use UART0 in place of UART1 for the stdio.h routines. However, further
modifications are required for two reasons;
1) The device.c file assumes a 10MHz clock for the m16c. The Starter Kit 2 board was
supplied with a 16MHz crystal.
2) The device.c file uses CTS/RTS handshaking, which is not possible using the
modifications described in this document.
The following changes should be made to a copy of the device.c file (found in the
SRC30/LIB subdirectories of the knc30wa installation);
1) Add these two lines to the beginning of the file;
#define UART0
#define CLOCK_16
2) Underneath the #ifdef M16C section add the following lines;
#ifdef UART0
#pragma EQU _porta
=
0x3E8
/* port 4
51
*/
Development of a Robotic Wheelchair
Appendix C – Additional Serial Port
#pragma EQU _pa_vct =
0x3EA
/* port 4 dir
*/
#pragma EQU _portb
=
0x3E9
/* port 5
*/
#pragma EQU _pb_vct =
0x3EB
/* port 5 dir
*/
#pragma EQU _mode1
=
0x3A0
/* UART0 trans&recv mode reg. */
#pragma EQU _brg1
=
0x3A1
/* transfer speed reg.
*/
#pragma EQU _sbuf1
=
0x3A2
/* transfer buffer reg.
*/
#pragma EQU _cntr1_l =
0x3A4
/* control reg(L).
*/
#pragma EQU _cntr1_h =
0x3A5
/* control reg(H).
*/
#pragma EQU _rbuf1
0x3A6
/* receive buffer reg.
*/
=
#else
/* UART1 : default */
3) Then, after the UART1 definitions, add an;
#endif
4) Add the following lines before the #define BRG192 31… line;
#ifdef CLOCK_16
#define
BRG192 51
/* f1(16Mhz/1) / 16 / 19200 - 1 = 51
#define CNTR192 16
/* f1 with no CTRS/RTS
#define
103
/* f1(16Mhz/1) / 16 /
#define CNTR96
16
/* f1 with no CTS/RTS
#define
207
/* f1(16Mhz/1) / 16 /
#define CNTR48
16
/* f1 with no CTS/RTS
#define
BRG24
51
/* f8(16Mhz/8) / 16 /
#define CNTR24
17
/* f8 with no CTS/RTS
#define
103
/* f8(16Mhz/8) / 16 /
17
/* f8 with no CTS/RTS
BRG96
BRG48
BRG12
#define CNTR12
*/
*/
9600 - 1 = 103
*/
*/
4800 - 1 = 207
*/
*/
2400 - 1 = 51
*/
*/
1200 - 1 = 103
*/
*/
#else
5) Then, after the 10MHz definitions, add an;
#endif
Note that these modifications leave port 4 and port 5 as parallel ports, rather than ports 6
and 7 as might be expected. This is done because port 6 has the potential to interfere
with the UART0 Tx and Rx pins (the init_prn() function sets the Rx0 pin direction to
output). Also note that the CNTRx definitions are modified by setting bit 4, this disables
CTS/RTS handshaking.
52
Development of a Robotic Wheelchair
Appendix C – Additional Serial Port
Typically, these modifications would be compiled into nc30lib.lib. This is not possible
using the knc30 compiler supplied with the Starter Kit 2 due to the 500 line source code
limit. Many of the library source files exceed this line limit. Instead the modified
device.c file can be included explicitly into projects (or make files). The lower level I/O
routines will then be linked in preference to those of the library file. Other programs
need only include stdio.h and proceed normally.
C.3 Additional
The m16c/62 Users’ Manual [C-2] contains a table of baud rate settings (page 349), this
table can be extended as follows;
Baud rate
BRG’s
System Clock: 16MHz
(bps)
count
BRG’s set
source
value: n
57600
f1
16 (1016)
115200
f1
8 (0816)
System Clock: 7.3728MHz
Actual time (bps)
BRG’s set
Actual time
value: n
(bps)
58823
n/a
n/a
111111
n/a
n/a
These higher baud rates are possible over either of the serial ports (built-in or
additional), but it may be advisable to make use of software interrupts and buffering
depending on the application.
These instructions can be used to provide a male DTE interface by reversing the
connection of Tx and Rx in the inset of Figure C-1.
C.4 References
[C-1] NC30 V.3.00 C Compiler for M16C Family User’s Manual (nc30ue.pdf), Mitsubishi, February
1998.
[C-2] M16C/62 Group User’s Manual (62eum.pdf), Rev.C1, Mitsubishi, December 1999.
[C-3]
Elum,
C.,
(updated
22
Feb
1995,
cited
1
July
2001)
‘serial.txt’,
http://www.cs.cmu.edu/~vaschelp/Misc/Serial/serial.txt.
[C-4] MAX220-MAX249 Multichannel RS-232 Drivers/Receivers Data Sheet, Maxim, Revision 9, May
2000.
[C-5] MSA0654-MEAUST Development Board Processor Module Diagram (M16Dev-Sch2.pdf),
Mitsubishi, September 1999.
53
Development of a Robotic Wheelchair
Appendix D – Drive Controller Program
Appendix D – Drive Controller Program
The Drive Controller program implements the control algorithm described in Section
3.4. It also contains modules for diagnostics, testing, and communications with the
Master Controller.
D.1 Modules
The Drive Controller program consists of ten interrelated modules. The main three are
whchcont, whchdiag and whchtest. The first implements the control loop. The second
allows a terminal program to connect, issue diagnostic commands and receive data over
a serial link. The last allows the wheelchair to be tested by cycling through different
combinations of controller constants. All of the modules and their dependencies are
shown in Figure D-1.
driver01
leddisplay
whchcont*
wait
comms
joystick
whchdiag*
input
whchtest*
* indicates a dependency on stdio.
+ indicates a dependency on string.
parser+
Figure D-1
The modules and related source files are detailed in Table D-1. The modules are fully
described by comments within the header files.
54
Development of a Robotic Wheelchair
Appendix D – Drive Controller Program
Module
Files
Description
driver01
driver01.c
Contains main(). Initialises all subsystems.
whchcont
whchcont.h
Implements the wheelchair control algorithm.
whchcont.c
comms
comms.h
Provides frame based serial communications.
comms.c
commscallbacks.h
Implements serial communications code specific to the Drive
Controller for communications with the Master Controller.
joystick
joystick.h
Interfaces with the analogue joystick.
joystick.c
leddisplay
leddisplay.h
Interfaces with the Starter Kit 2 seven-segment LED displays.
leddata.h
leddisplay.c
leddata.c
whchdiag
whchdiag.h
Implements diagnostics commands.
whchdiag.c
parser
parser.h
Receives and parses user input strings.
parser.c
parserdata.h
Contains a list of commands that the parser should understand. This
file is specific to the Diagnostics Module.
wait
wait.h
Provides a blocking wait function.
wait.c
whchtest
input
whchtest.h
Implements a loop for cycling through a specified range of controller
whchtest.c
constants under given test inputs.
input.h
Provides routines and data structures for specifying test inputs.
input.c
Miscellaneous
adjust.h
Contains macros used for adjusting raw M16C data values.
structs.h
Contains frequently used data structures.
sfr62.h
Contains definitions for accessing M16C hardware. Modified only
slightly from the original version provided with the Starter Kit 2
(logic is provided to prevent compilation problems due to multiple
includes).
ncrt0.a30
The C startup program. Prepares the M16C environment before
passing control onto main(). This file is modified only slightly from
the version provided with the Starter Kit 2 (I/O initialisation is
uncommented).
sect30.inc
Define memory sections. Includes the interrupt vectors.
device.c
Declares low-level I/O routines. This file was modified from the
version compiled into nc30lib.lib according to the instructions given
in Section C.2.2. A simple _inputready() function was also added.
nc30lib.lib
The standard library provided with the NC30 compiler.
Table D-1
55
Development of a Robotic Wheelchair
Appendix D – Drive Controller Program
D.2 Diagnostics and Testing
The Drive Controller provides diagnostics functions over the built-in M16C serial port.
The following steps describe how to connect;
1. Connect a 9 pin serial cable from a PC to the Drive Controller serial port.
2. Open a terminal program on the PC.
3. Connect from the PC at 115200bps using 8 data bits, no parity and two stop bits.
4. Start the Drive Controller.
Standard terminal programs provide only limited functionality. A custom terminal
program that provides the ability to download and parse data from the Drive Controller
has been written (Appendix E).
Typing ‘help’ at the command prompt displays a list of available commands. Other
features are described in Sections D.2.1 through D.2.3.
D.2.1 Drive Controller Properties
The Drive Controller properties listed in Table D-2 can be displayed using the show
command, e.g. show leftpos. The track command repeatedly shows a value at a
specified interval until a key is preseed, e.g. track joyvel 100. Those properties marked
with an asterisk can also be changed using the set command. e.g. set rightmotor –110.
leftpos
left wheel position value.
rightpos
right wheel position value.
joyvel
velocity value from the joystick y-axis.
joydir
direction value from the joystick x-axis.
leftmotor*
left motor value.
rightmotor*
right motor value.
baudrate*
connection speed (1=9600bps, 2=57600bps, 3=115200bps)
control
control parameters
logging*
logging status (0=no logging, 1=logging on)
recv_frames*
frames successfully received (saturates at 65535).
recv_errors*
frames received with errors (saturates at 65535).
Table D-2
The command ‘show control’ shows a list of controller parameters. The individual
parameters listed in Table D-3 can be changed with the set command.
56
Development of a Robotic Wheelchair
Appendix D – Drive Controller Program
The controller constants are represented by integers using the scheme described in
Section F.3. Changed values do not persist through system resets.
control_period
control loop period (in 2 microsecond units).
velocity_kp
velocity controller proportional constant.
direction_kp
direction controller proportional constant.
direction_ki
direction controller integral constant.
max_comm_age
maximum Master Controller frame age (in numbers of cycles).
dir_intmax
maximum absolute integral value.
Table D-3
D.2.2 Drive Controller Operation
The control loop can be stopped and started with the commands ‘stop’ and ‘start’
respectively. Starting the control loop with the logging property set to 1 initiates a
download, during which bytes describing the Drive Controller operation are sent at each
iteration of the control loop. The custom terminal program saves this data directly to
disk and is able to later convert it to a format acceptable by the Matlab analysis
functions (Appendix F).
D.2.3 Testing
Typing ‘test’ begins a testing loop. A number of questions are asked before testing
begins.
The program asks for a test sequence number, which is incremented after each test and
exists as a convenience for documenting chair behaviour. Logged data is given a
filename that consists of the test number and the three controller constants in a format
suitable for use by the Matlab whchtestselect function (Section F.1).
Multiple step inputs can be entered as commands for both velocity and direction. Each
input requires three parameters; start, end and value. The first and second specify when
the step input should begin and end respectively. These parameters are specified in units
of control loop iterations. With a control loop period of 3.4 milliseconds, 294 control
loop iterations approximates one second. The last parameter specifies the value that
should be requested between start and end. Step inputs must be entered in order of start
57
Development of a Robotic Wheelchair
Appendix D – Drive Controller Program
time and should not overlap. The sides of step inputs can also be ‘ramped’ if required.
Figures D-2 and D-3 show an examples of these options.
100
50
0
-50
start
end
294
882
value
50
882
1029
100
1029 1323
-80
ramp = 0
-100
0
200
400
600
800
1000
1200
1400
1000
1200
1400
Figure D-2
100
50
0
start
end
294
882
50
882
1029
100
-50
value
1029 1323 -80
ramp = 1
-100
0
200
400
600
800
Figure D-3
The test program asks for ranges of each controller constant. The first value must be
less than the second. The two values can be equal if required. The test program then
iterates through the specified inputs for each combination of controller constants and
sends the logged results to the terminal program.
D.3 Logging
The Drive Controller program logs the statistics shown in Table D-4.
Statistic
Size
frame synchronization character.
1 byte
Desired Velocity.
2 bytes
Desired Direction.
2 bytes
Actual Velocity (not divided by two)
2 bytes
Actual Direction (not divided by two)
2 bytes
Left Output
1 byte
Right Output
1 byte
Direction Integral
4 bytes
Previous Left Wheel Position
2 bytes
Previous Right Wheel Position
2 bytes
58
Development of a Robotic Wheelchair
Appendix D – Drive Controller Program
With 11 bits (8n2) sent per byte at 115200bps, logging these 19 bytes takes, at best,
1.8ms. This is a significant fraction of the 3.4ms allowed the control loop. Whilst the
current program executes correctly, future changes may cause problems.
The only absolutely essential data items are the Desired Velocity and Direction and the
Previous Left and Right Wheel Positions. The remainder can be calculated with a
knowledge of the algorithm employed and its initial conditions. That said, the frame
synchronization character is a simple way of preventing single errors from spoiling
multiple frames and the Direction Integral value lessens the importance of initial values,
and the impact of lost frames due to possible transmission errors.
The current program logs all the data items for simplicity and safety. There is less
chance of mistakes in calculation, and the resulting necessity of repeated tests.
D.4 Compilation and Debugging
Under normal conditions the Drive Controller program communicates with the Master
Controller over UART0 and provides diagnostics over UART1. This makes debugging
difficult. Whilst it is true that the program could be reconfigured to utilize UART2, this
would require additional hardware and complexity. Instead, a simpler solution is
provided to enable limited debugging.
When the program is built with the option DEBUG_UART=1, Communications with
the Master Controller over UART0 are disabled and this port is used by the diagnostics
program. The standard monitor program can then be used via UART1. This is best
effected by running nc30 and as30, against all files, with the command line option –
DDEBUG_UART=1.
59
Development of a Robotic Wheelchair
Appendix E – PC Terminal Program
Appendix E – PC Terminal Program
A PC program (pcterm.exe) was written to communicate with the M16C using an RS232 serial link. This program was written in C using the Microsoft Windows API. It
provides features specific to the wheelchair that are not available in standard terminal
programs such as HyperTerminal.
An attempt was made to implement this functionality within Matlab. Some progress was
made, but the synchronous nature of Matlab serial functions combined with an inherent
lack of true parallelism made the resulting program inflexible and unstable.
E.1 Architecture
The program opens a PC serial port and then forks into two threads. One thread handles
port output and keyboard input, the other processes port input. This architecture is based
on that of an example program described in [E-1].
The port output thread typically sends each character entered at the keyboard directly to
the serial port, but it is also able to send data directly from files. The port input thread
usually displays each received character on the console. However, it can also direct data
toward a file on disk or another application.
7.2.1 Modules
The terminal program is broken into modules for comprehensibility rather than for
future reuse (Table E-1).
Module
Files
Description
pcterm
pcterm.c
Contains main(). Initialises all subsystems and contains functions for
both threads.
console
console.h
Functions for displaying and colouring output on the text console.
console.c
ioport
ioport.h
Functions for opening, closing and configuring a PC serial port.
ioport.c
maplink
maplink.h
Implements communications with a mapping program (Appendix J).
maplink.c
parser
transfer
parser.h
Enables the conversion and manipulation of incoming and outgoing
parser.c
data from files and serial ports
transfer.h
Provides a buffer for the transfer of data from one thread to another.
transfer.c
60
Development of a Robotic Wheelchair
Appendix E – PC Terminal Program
Miscellaneous
Windows.h
Declarations of Windows functions and macros.
kernel32.lib
Interfaces with the Windows system.
msvcrt.lib
Provides the C runtime library.
Table E-1
E.2 Operation
All characters typed between square brackets are parsed directly by the program.
Several commands can be given;
[help]
Show a list of commands.
[parse]
Parse a recently downloaded binary file to a text file.
[ascii]
Received characters can be displayed directly or as hexadecimal
values. This command toggles between the two.
[send path]
Opens the binary file specified by path and sends it, byte by byte,
out the serial port.
[log path]
Logs all subsequent incoming bytes to the file specified by path.
[stop]
Closes a previously opened log file.
[quit]
Terminates both threads, closes the serial port, and exits.
The remote program can also communicate with the terminal program by sending
command strings between square brackets;
[download]
Send subsequent bytes directly to a file on disk until a string of 20
consecutive exclamation marks is received.
[filename]
Specify the filename for storing a subsequent download.
[newbaudrateX]
Change the port speed to X which must be one of 9600, 57600 or
115200.
[datadef:X]
Change the block definition used by the parse command. X is a
string of characters that describe how binary data should be
interpreted. The following characters are valid; c – 1 unsigned
byte, d – 1 signed byte, i – 2 signed bytes, u – 2 unsigned bytes, l
– 4 signed bytes, and v – 4 unsigned bytes.
[parse]
Parse a recently downloaded binary file to a text file.
[send]
Break subsequent bytes into packets and send them to a mapping
application until a packet containing five ‘z’ characters is
received.
61
Development of a Robotic Wheelchair
Appendix E – PC Terminal Program
E.2.1 Parsing
When a parse command is given, by the user or the remote device, the program opens
the binary file used for the last download and converts it to a text file of the same name
but with a ‘.log’ extension. This text file is suitable for upload into Matlab using the
whchtestselect or whchgui functions [Appendix F].
The parser looks for blocks of data separated by new-line (0x0a) characters. If it fails to
find such a character when expected, it sends a line consisting of ‘–128’ strings to the
text file and ignores subsequent bytes until the next new-line character is read. This
form of synchronisation sacrifices accuracy for download speed and yields good results
when used to capture logging data; where trends are more important then particular
values.
Blocks are defined by the remote device using the [blockdef:X] command. The parser
uses this definition to produce a line of strings representing integers, each separated by
white space. Lines are terminated by a new-line character. Each line in the resulting text
file thus represents one block, or sample, sent from the remote device.
E.3 References
[E-1] A. Denver, Serial Communications in Win32, Microsoft Windows Developer
Support, December 1995.
62
Development of a Robotic Wheelchair
Appendix F – Matlab Drive Controller Functions
Appendix F – Matlab Drive Controller Functions
Three Matlab functions were developed to assist with analysis and visualisation of data
collected from the wheelchair Drive Controller;
1. whchtestselect
Allows logged results to be easily selected and compared.
2. whchgui
Displays logged results graphically.
3. whchrealparams
Used by whchtestselect and whchgui to convert constants.
F.1 whchtestselect function
The whchtestselect function organizes test results that have been downloaded from the
Drive Controller into tables based on the constants that were employed for each test. It
displays these tables in a window and allows particular tests to be viewed in whchgui by
clicking a button. A screenshot is shown in Figure F-1.
Velocity Proportional
Constant drop down list.
Title taken from
directory name.
Direction Integral Constants
Direction Proportional Constants
Test Selection Buttons
Figure F-1
This function takes a directory path as an argument or, if none is given, uses the current
directory. It looks for files named after the format; test%d_vkp%d_dkp%d_dki%d.log.
The ‘%d’ symbols are placeholders for integers. The first specifies a test number, the
second a velocity proportional constant, the third a direction proportional constant and
the fourth a direction integral constant. The controller constants must be in the raw
63
Development of a Robotic Wheelchair
Appendix F – Matlab Drive Controller Functions
format used by the Drive Controller diagnostics program (see Section F.3). The test
numbers should be unique for a given directory, as should each combination of the three
constants.
The files are organised into tables by the two directional constants. There is a separate
table for each velocity constant. Only one of these tables can be displayed at a time by
selecting a constant value from a drop down menu.
F.2 whchgui function
The whchgui function displays logged data from an individual test file. This file can be
specified as an argument to the function. A screenshot is shown in Figure F-2.
Wheelchair Menu
File Path
Graph Title
Graph Selection Buttons
Controller Constants
Extra Information
Figure F-2
It is possible to display several different graphs using either the Graph Selection Buttons
or certain keys (Shown in round brackets on each of the buttons).
The mouse can be used to zoom into a particular region of the graph. By default the
graph only zooms in along the x-axis. The Extra Information field relates to the
currently displayed portion of the graph, it typically changes with the zoom level.
64
Development of a Robotic Wheelchair
Appendix F – Matlab Drive Controller Functions
Several custom options are available from the Wheelchair menu;
1. New
Create a new, empty whchgui window.
2. Open…
Open a different results file.
3. Save to workspace…
Save the displayed data to the Matlab workspace.
4. Zoom Out
Display the graph at 100%.
5. Make X-Axis Global
Store the current x-axis range to a global variable.
6. Take Global X-Axis
Use the stored x-axis range for this graph.
7. Show Real Parameters
Toggle the controller constant display type.
8. Allow Y-Axis Zoom
Allow zooming along the Y-Axis.
9. Show Grid
Show a grid behind the graph.
The ‘Make X-Axis Global’ and ‘Take Global X-Axis’ options allow x-axis zoom
settings to be shared between whchgui windows. This is useful for comparing the same
section across different sets of test results.
F.2.1 Velocity Graph
The velocity graph displays the desired and actual wheelchair speeds versus time in
seconds (one second is equivalent to approximately 294 samples, using a controller
period of 3.4ms). The speed values are equivalent to the sum of both wheel speeds
without dividing by two. They are logged directly by the Drive Controller.
The Extra Information area shows the average error between the two speeds for a given
zoom level. The average steady-state error can be displayed by zooming into an
appropriate section of the graph, i.e. with constant desired velocity after the actual
velocity has become relatively constant.
F.2.2 Direction Graph
The direction graph shows the desired and actual wheelchair rates of rotation versus
time. The direction values are equivalent to the difference between left and right wheel
speed values without dividing by two. They are logged directly by the Drive Controller.
The Extra Information area shows the average error between the two values.
65
Development of a Robotic Wheelchair
Appendix F – Matlab Drive Controller Functions
F.2.3 Output Graph
The output graph displays the controller outputs for both wheels over time. These
values range between ±127. They are logged directly by the Drive Controller.
The Extra Information area shows the average left and right wheel outputs. The average
outputs required for a given velocity or rate of rotation can be found by zooming in on
either of the Velocity or Direction graphs and then switching to the output graph.
F.2.4 Integral Graph
The integral graph shows the direction integral sum over time. Scaled versions of the
desired and actual direction values (from the direction graph) are also shown. The
integral sum is logged at each instant by the Drive Controller.
The average integral value is shown in the Extra Information area.
F.2.5 Control Graph
The control graph is an extension of the output graph. It uses the known controller
constants and logged data to calculate the output of both the velocity P controller and
the direction PI controller. It then calculates the sum and difference of both controller
values to give the left and right wheel output values, before range limiting, respectively.
These values are all plotted against time.
Dashed yellow lines are drawn at ±127 to indicate where the outputs normally saturate.
The graphs of left and right values between these lines should be almost identical to
those shown on the output graph. Note, however, that this graph does not consider the
effect of the Output Saturation algorithm (Section 4.5.1).
The output graph is useful for examining the contributions of each controller to final
output values and for seeing how these output values behave beyond their normal range
limits.
F.2.6 Error Graph
The error graph shows the velocity and direction errors. Both quantities are calculated
from the difference between actual and desired values.
66
Development of a Robotic Wheelchair
Appendix F – Matlab Drive Controller Functions
F.2.7 Wheels Graph
The wheels graph uses logged position data to calculate left and right wheel speeds by
taking the difference of adjacent samples. It adapts for position overflow by simulating
16-bit unsigned integers. The mean of both values, the wheelchairs velocity, is also
calculated and displayed.
F.2.8 Odometry Graph
The odometry graph plots the encoder position counter values over time. Approximate
totals of distance travelled and change in orientation, over the displayed time period, are
calculated and displayed in the Extra Information area.
This graph is useful for analysing short tests that seek to move the wheelchair in a
particular way. In this way expectations can be compared with actualities.
F.3 whchrealparams function
The whchrealparams function is used by both whchtestselect and whchgui. It converts
controller parameters between the form used within the Drive Controller and that
expected by theory. It can produce results as integers or strings.
The Drive Controller program uses bit shifting to perform multiplication and division.
The controller constants are represented by signed integers, their magnitude represents
the number of positions to shift whilst their sign represents the shift direction. Negative
values specify a left shift (multiplication), positive values a right shift (division). In
addition, the velocity and direction values are not explicitly divided by two, rather this
done within the controllers. Equation F-1 gives the ‘theoretical’ controller constant, K,
from the integer representation used within the control program, n.
K = 21-n
( F-1 )
whchrealparams performs this conversion.
67
Development of a Robotic Wheelchair
p2_1
1k
1k
2-pin m olex
68
5K6
BC549
5K6
BC549
p2_0
31
29
6-pin molex
27
560
4k 7
560
560
5K6
BC549
5K6
15
P3_0
IRSR
5V
4k7
1k
1k
BC549
4-pin molex
P3_1
26
4k7
U SFR
U SFL
0.01µF (tantalum,
1 or more)
4k 7
560
28
NB: This 5V supply must
not come from the M16C
board! (The US sensors
draw 2A each when firing).
30
470µF (elec trolytic)
5IN
+5V GND
GND
32
13
12
11
U SSR
U SSL
12K
12K
nc
10nF
10nF
NB: The Vin connection to
a GP2D02 sensor must
never go above 3V.
IN4148
14
nc
JOYIN
nc
AN1
AN1
10nF
12K
5V
12K
5V
0.1uF
10 nF
0.1uF
nc
8… 5
HEF4528BP
HEF4528BP
AN0
10
HCF4093BE
0.1uF
5V
INT2 INT3
96- way fem ale e uro connector
+5V
INT0 INT1
AN0
Appendix G – Master Controller Interface Circuit
Appendix G – Master Controller Interface Circuit
The Master Controller interface circuit is detailed in Figure G-1.
Figure G-1
Note: Better ultrasonic readings at very short ranges could be obtained by replacing the
retriggerable HEF4528BP monostables with non-retriggerable devices, and changing
the time period appropriately.
Development of a Robotic Wheelchair
Appendix H – Master Controller Program
Appendix H – Master Controller Program
The Master Controller program contains modules for diagnostics, testing, firing the
sensors, and communications with the Drive Controller. Intelligent algorithms for
behaviours such as obstacle avoidance and wall following have not yet been adapted.
H.1 Modules
The Master Controller program consists of fourteen interrelated modules. The main
three are sensor, mastdiag and testsens. The first regularly fires the sensors and collects
results. The second allows a terminal program to connect, issue diagnostic commands
and receive data over a serial link. The last allows individual sensors to be tested by
logging object detection results over varying distances. All of the modules and their
dependencies are shown in Figure H-1.
master01
leddisplay
mapdata
sensor
maplog
circbuffer
wait
comms
infrared
testsens*
usonic
mastdiag*
* indicates a dependency on stdio.
+ indicates a dependency on string.
joystick
parser+
Figure H-1
69
Development of a Robotic Wheelchair
Appendix H – Master Controller Program
The program is structured similarly to the Drive Controller Program (Section D.1). In
fact, several modules are shared between the two with no, or only minor, differences
(Table H-1).
Module
Files
Differences between Driver01 and Master01
comms
comms.h
Compiled with USE_TIMEOUTS=1.
comms.c
No difference.
commscallbacks.h
Contains communications functions specific to
the Master
Controller.
joystick
joystick.h
No difference.
joystick.c
leddisplay
leddisplay.h
No difference.
leddata.h
leddisplay.c
leddata.c
parser
parser.h
No difference.
parser.c
wait
parserdata.h
Contains definitions specific to the mastdiag module.
wait.h
No difference.
wait.c
Miscellaneous
adjust.h
No difference.
structs.h
sfr62.h
ncrt0.a30
device.c
nc30lib.lib
Table H-1
The other modules and related source files are detailed in Table H-2. The modules are
fully described by comments within the header files.
70
Development of a Robotic Wheelchair
Appendix H – Master Controller Program
Module
Files
Description
master01
master01.c
Contains main(). Initialises all subsystems.
sensor
sensor.h
Contains a regularly occurring interrupt that fires the sensors.
sensor.c
Presently this interrupt simply logs sensor data, future versions may
choose to implement a control algorithm here.
mastdiag
mastdiag.h
Implements diagnostics commands.
mastdiag.c
testsens
infrared
usonic
mapdata
testsens.h
Provides a program that can test an individual sensor and produce a
testsens.c
file of data that characterises the sensors response.
infrared.h
Interfaces with Sharp GP2D02 sensors. This module does not yet
infrared.c
contain code for making readings for particular sensors linear.
usonic.h
Interfaces with the Polaroid ultrasonic ranging modules to provide
usonic.s
distance measurements.
mapdata.h
Contains definitions and data structures for logging sensor and
odometry data.
maplog
circbuff
maplog.h
Allows the logging of sensor and odometry data over a serial link
maplog.c
using buffered interrupts.
circbuff.h
Provides a circular buffer for the maplog module.
circbuff.c
Table H-2
H.2 Diagnostics and Testing
The Master Controller provides diagnostics functions almost identically to the Drive
Controller (D.2).
H.2.1 Master Controller Properties
The Master Controller properties listed in Table H-3 can be displayed using show and
track commands. Values marked with an asterisk can also be changed via the set
command.
sensor_period*
The period of the sensor firing loop; actual time =
(sensor_period+1)*25ms. This value must be greater than 9
(250ms).
usonic_fl
Front-Left ultrasonic sensor range reading.
usonic_fr
Front-Right ultrasonic sensor range reading.
usonic_sl
Side-Left ultrasonic sensor range reading.
usonic_sr
Side-Right ultrasonic sensor range reading.
infrared_sr
Side-Right infrared sensor range reading.
all
All of the sensor range readings.
joyvel
velocity value from the joystick y-axis.
joydir
direction value from the joystick x-axis.
baudrate*
connection speed (1=9600bps, 2=57600bps, 3=115200bps)
71
Development of a Robotic Wheelchair
Appendix H – Master Controller Program
control
control parameters
logging*
logging status (0=no logging, 1=logging on)
recv_frames*
frames successfully received (saturates at 65535).
recv_errors*
frames received with errors (saturates at 65535).
logpos
logging position values (0=off, 1=on).
mapsend
send map data (0=download, 1=send via mailslots).
Table H-3
H.2.2 Master Controller Operation
The sensor polling loop can be stopped and started with the commands ‘stop’ and ‘start’
respectively. Starting the polling loop with the logging property set to 1 initiates a
download or send of sensor range data and Drive Controller position values to the
custom terminal program.
If the sensor polling loop is not running the sensors can be fired once, and the results
displayed, with the ‘fire’ command.
H.2.3 Testing
Typing ‘test’ begins a sensor testing loop. The program presents a choice of sensors
(only one can be tested at a time) and then asks how many iterations are required. The
value entered specifies how many times the sensor should be fired for each test. Firing
multiple times takes slightly longer but allows a better average value to be calculated.
Minimum, maximum and increment range values can be entered, or defaults accepted.
These values specify the range and resolution of sensor tests.
The testing loop works from the minimum range to the maximum range in steps of
increment. At each iteration the operator is prompted to provide an obstacle at the given
distance; the sensor is then fired the requested number of times.
When testing is complete the results are sent as text values to the serial port. The custom
terminal program will save these results to disk. The first column of the resulting file
contains a range value, in centimetres. The remaining columns contain the sensor
readings at the given range. The Matlab whchshowsensor function is able to open this
file and plot the results (Appendix I).
72
Development of a Robotic Wheelchair
Appendix H – Master Controller Program
H.3 Compilation and Debugging
Under normal conditions the Master Controller program communicates with the Drive
Controller over UART0 and provides diagnostics over UART1. This makes debugging
difficult. To reduce this inconvenience the Master Controller program can be built with
one of two compilation options (in a manner similar to that described in Section D.4).
These options are shown in Table H-4.
DEBUG_MAST=1
UART0 is used for communications with the Drive Controller. UART1 is
used for monitoring and debugging. The diagnostics module is disabled.
DEBUG_DIAG=1
UART0 is used for diagnostics I/O. UART1 is used for monitoring and
debugging. Communications with the Drive Controller are not possible.
Table H-4
73
Development of a Robotic Wheelchair
Appendix I – Matlab Master Controller Functions
Appendix I – Matlab Master Controller Functions
A Matlab function, whchshowsensor, was developed to plot sensor response data
produced by the Master Controller test loop (Section H.2.3).
I.1
whchshowsensor function
The whchshowsensor function plots test results that have been downloaded from the
Master Controller. It produces graphs similar to those shown in Figure I-1.
Figure I-1
The whchshowsensor function must be supplied with a filename, it can also be supplied
with a sensor type argument of ‘ir’ for an infrared sensor and ‘us’ or ‘usc’ for an
ultrasonic sensor. The ‘usc’ type causes the function to estimate and plot distances
based on the range reading and the speed of sound, rather than to simply plot the range
reading versus the distance. A type argument need not be supplied if the file name
includes the text ‘infrared’ or ‘usonic’.
The red points plotted on the graph represent individual readings, the blue line is
linearly interpolated between the mean of readings at each measured distance.
74
Development of a Robotic Wheelchair
Appendix J – PC Mapping Program
Appendix J – PC Mapping Program
The PC mapping program was developed later in the project and is less refined and
documented than the other programs. Nevertheless, it is usefully functional as the
results in Section 6.4 attest. Figure J-1 shows a screen shot from this program.
Figure J-1
7.3
Class Hierarchy
The mapping program is written in C++. The class hierarchy is shown in Figure J-2.
CError
CMap
*
1
CMapWindow
1
CVector
CLoaderLink
CCommandLink
CMapObject
CMapSettings
CSensor
CRobot
*
1
CWheelchair
1
Figure J-2
75
Development of a Robotic Wheelchair
Appendix J – PC Mapping Program
Table J-1 provides brief descriptions of the classes.
Class
Description
CMapWindow
Implements a window with menus and the ability to scroll over a CMap bitmap.
CMap
Contains a bitmap representing the flat plane with an origin in the bottom left corner.
CVector
Represents a point on a CMap.
CMapObject
Represents an object composed of a point and orientation.
CSensor
Specialisation of CMapObject for placing and plotting sensor range data.
CRobot
Specialisation of CMapObject for placing and plotting a robotic platform.
CWheelchair
Specialisation of CRobot containing details specific for plotting and moving a
wheelchair model on a plane.
CLoaderLink
Utility class for processing logged data from both the Master and Drive Controllers.
CCommandLink
Utility class for processing data sent by the PC terminal program through mail slots.
CMapSettings
Utility class for loading and interpreting an ini file from disk.
pcmap
Initialises the system and implements the main windows event loop.
Table J-1
7.4
Operation
When the program is started it looks, in its directory, for a file named pcmap.ini. The
contents of this file resemble;
mapwidth=2000
;width of the map in pixels.
mapheight=2000
;height of the map in pixels.
mapscale=100
;the number of pixels per metre.
wheelchair_x=10
;initial wheelchair position in metres.
wheelchair_y=5
wheelchair_rot=4
;initial wheelchair rotation (2*pi/n).
draw_freq=200
;frequency of chair plotting (control counts)
batch_process=294
;performance setting for mailslots
show_count=1
;status display for mailslots
The program can produce a map from a raw Master Controller log file, or a parsed
Drive Controller log file (without sensor data). It can save the resulting bitmap to disk
in EMF (extended meta-file) format, or copy it to the clipboard for pasting into another
application.
7.5
References
[J-1] C. Petzold, Programming Windows 95, Microsoft Press, 1996.
[J-2] A. LaMothe, Tricks of the Windows Game Programming Gurus; Fundamentals of
2D and 3D Game Programming, SAMS, 1999.
76
Development of a Robotic Wheelchair