1
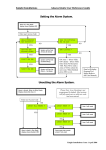
Connecting to External Devices
OAS - Connecting to External Devices
INTRODUCTION
Often, at the WERSI Direct Ltd offices we get enquiries about how to connect WERSI OAS instruments to external devices such
as Audio Mixers, Amplifiers, Loud Speakers, MIDI Devices and Expanders.
For many people this information and practice of connecting your instrument to external devices is second nature, but of course
for every person who may be confident on such practices, there will be many who are not.
This manual is here to help you and to teach you about how to connect your instrument and control the digital mixer for your
specific requirements.
The first thing that all customers need to know is that all OpenArt-System 7 instruments have the same main Audio Output,
Input and MIDI connections. The exception being the WERSI Scala GS700 and WERSI Louvre GS1000, which have expanded connections. The expanded connections will be explained later in this manual for Scala and Louvre owners.
OK, let us look at the standard connections:
ABACUS, VEGAS, VERONA
1. Pull down the rear panel of your instrument (Abacus,Vegas and Verona).
SCALA and LOUVRE:
2. Using a Phillips screw driver, undo the two screws on the rear of the instrument. Once the screws are removed, you can open
the top of your instrument, which is opened on a piano hinge.
To the far left of your instrument is the connection panel, connected to your instruments EA board (master Audio / Input and
Output controller board).
You will notice that the schematic diagram below corresponds with the picture directly above:
The image shown is in fact a WERSI Verona GS500 instrument, but the connections are identical. Scala and Louvre customers
will notice that their instruments have a number of cables plugged into a host of the connections. These are merely extension
cables that flow down the legs of the WERSI Scala and Louvre instruments to the additional connections located near the Pedal
Boards.
OAS - Connecting to External Devices
MIDI 1 & MIDI 2 Ports
This is where you connect MIDI In Cables, MIDI Out Cables
or MIDI Cables to connect through instruments in the event
of setting up a MIDI chain of instruments.
MIDI In 1
Equipment connected to Midi In 1, act like the manuals & pedals on your OAS instrument, in that you can still control
what happens on your instrument, even though you are using a separate keyboard or pedal board.
MIDI In 2
Equipment connected to Midi In 2 has full and independent control of your OAS instrument, and so it is ideal for external sequencers such as Cubase.
Midi In 2: No settings within the OAS 7 MIDI Settings are available here, as everything is controlled by
the externally connected Midi equipment.
Example 1: Turning an Abacus into a Duo for Synth or Piano players
1. You purchase a Midi keyboard and Midi Pedal board which has no sound system on-board.
•
NOTE: Piano Players can choose an 88 note Hammer Action keyboard, and Synth Players can choose a light action 61 note
keyboard (Providing it has Midi Out, any type of keyboard can be used).
2. You connect the Midi Out connector of the Pedal board to the Midi In connection of the Midi keyboard and then
connect the Midi Out of the Midi keyboard to Midi in 1 of the Abacus.
NOTE: You will need to adjust the Midi Keyboard to allow the Midi In from the Pedal board, to pass through its
information to the Midi Out of the keyboard (If your external keyboard does not allow this).
3. From the Operating Manual of the Midi Pedal and keyboard,You find out what channel they transmit on (Most can
also be altered so that the channels don’t clash) and set these channels in the Abacus Midi in 1 settings for Lower
& Pedal.
4. Un-tick the controller boxes for the items that you do not want the external Pedal board/Keyboard to control, and
then return to the main screen.
5. You can now use your Abacus as if it was the Duo version, with whatever size and type of Midi Pedal board/Key
-board you want. (Piano, Synth etc.)
Example 2: You add an additional arranger keyboard to our OAS Instrument:
1. Connect the Midi out of your Arranger Keyboard to the Midi In 1 of your instrument, and the Audio out of your
arranger keyboard to Audio In 1 of your OAS instrument.
NOTE: You will need to set the mixer settings of your arranger keyboard and OAS instrument to match. (You will need to look
in both instruments operating manuals for this information, however normally it just requires matching of volume levels.)
2.
3.
4.
5.
6.
Find out from the manual what channels the arranger keyboards right and left hand keyboard sections transmit
on.
Set your Midi in 1 Upper to the right hand channel number, and the Lower to the Left hand channel number, and
activate Midi Out on your arranger keyboard.
Un-tick the controller boxes for any items you do not wish the arranger keyboard to control.
Setup your OAS instrument how you wish, and do the same for the arranger keyboard.
Play your OAS instrument and you will have the glorious OAS sound, however play your arranger keyboard and
you will hear both the sound of your OAS instrument and the arranger keyboard, thus giving you the best of both
worlds. (More advanced uses are beyond this basic introduction.)
OAS - Connecting to External Devices
MIDI Out 1 & 2 Ports
There are many MIDI Out options for your OAS instrument. We will go through all options in turn. Let us start with the ‘Man
Out Ext 1 & Man Out Ext 2’ buttons. These buttons allow you to access the MIDI Settings for sending Keyboard Manual MIDI
data to the MIDI out ports. (Please note that Man Out Ext 2 functions and possibilities are identical to Man Out Ext 2, explained
below. There is no need to duplicate the information).
MIDI Thru Ports 1 & 2
Some knowledge of MIDI Systems and creating MIDI instrument setups / chains is required to use the MIDI Thru ports and
functionality of the respective MIDI Thru 1 and 2 Ports. There are many excellent resources / books available on the internet or
at any good bookshop with a music technology specialist section.
Pedal and Swell Input Ports
These connections are literally as they are labelled. The Upper Port is for connecting a WERSI OAS
13, 17 or 25 note pedalboard to Ikarus X-1, Xenios XE-20, Abacus KS-1 or Vegas CS-70.
ABACUS KS-1 DUO PRO / Deluxe / Showtime models - For customers who have any
of the Abacus variations, the 76 note Lower Manual (WERSI Z-Manual) Output connects to the Pedal
Input.
Additionally, the WERSI OAS 13,17 or 25 note pedal boards connect to the Input of the WERSI ZManual, and then the separate cable connects the Output of the WERSI Z-Manual to the Pedal Input
on the OAS instrument (Abacus in this case).
Swell Pedal - For customers who wish to connect a WERSI OAS Swell Pedal, connect the cable to the Swell Input.
PLEASE NOTE: Some variants of the WERSI Scala and Louvre do not require these connections are connected elsewhere
internally.
Audio Output Connections
The Audio Output of your Instruments provide you with three stereo output
options.
OUTPUT MAIN: Left and Right connection for connecting to external
devices. The General Volume control of your instrument also controls this
Output.
OUTPUT 1: Left and Right connection for connecting to external devices.
(Please note that on instruments with internal speaker systems in the base
cabinet (Verona, Scala and Louvre), Output 1 controls the speakers of the
cabinet.
OUTPUT 2: Left and Right connection for connecting to external devices.
This Output is freely connectable at all times.
PLEASE NOTE: WIthin the Digital Mixer (See your User Manual) you can freely assign separate sections of your Instruments
sound generators to different (or all) outputs. For example, you can assign the Drawbars so that they only play on Output 2, or
the Drums only play on Output 1 for example.
You can mix and match this to your liking. This can be particularly helpful for live recording from your instrument, allowing you to
potentially record up to six audio signals simultaneously and then mix your live recording on a computer sequencer for example
to the perfect mixdown. This is just one example.You may wish to run a complex stage speaker / PA setup for a truly sonic stereo panorama of sound. The choice that WERSI OAS instruments present are out of this world.
OAS - Connecting to External Devices
Microphone Inputs 1 and 2
The Audio Output of your Instruments provide you with three stereo output options.
Microphone Inputs 1 and 2: The two Microphone Inputs allow you to connect a standard dynamic
Microphone that has a standard 1/4” Jack.
SPECIAL NOTE: For customers who have the Vocoder hardware option installed and activated, please
note that Microphones must be connected to Microphone Input 1 in order to ensure that the Vocoder
works correctly.
Gain Controls: Each of the two Microphone Inputs have a professional microphone Gain Control.
Please be careful to ensure that you do not set the Gain too high as it will cause feedback or distortion.
Audio Input Connections
The Audio Inputs of your Instruments provide you with two stereo input options.
INPUT 1: Left and Right connection for connecting external devices to your instrument.
INPUT 2: Left and Right connection for connecting external devices to your instrument.
What would you connect your instrument when it’s so fabulous anyway? Well, you may have
more than one instrument, or perhaps a MIDI Expander that you want to integrate into your instrument (and control it as if was an internal sound generator). Once MIDI was connected from
your OAS instruments MIDI Output to the MIDI devices MIDI Input, you’d also need to connect
the MIDI Devices Audio Outputs to your OAS Instrument via connecting to either Audio Inputs
1 or 2. Naturally it’s your choice.
Don’t forget to set up your DIGITAL MIXER settings (and make sure that the Audio Inputs are
not muted, turned down or routed to a strange Audio Output choice!).
As standard, the Audio Inputs should be assigned to the correct Audio Outputs!
OAS - Connecting to External Devices
WERSI SCALA & LOUVRE - Expanded Connection Options
When we designed the WERSI Scala and Louvre models we had the idea of stage presence and stylish presentation at the fore of
our design development. On stage, you do not want to see unsightly cables, especially when many are required for stage use.
The WERSI Scala and Louvre instruments have the additional Power, Audio and MIDI connections at the bottom right next to
their respective pedal boards:
Micro : Easy Access Microphone 1 Input.
MIDI In / Thru / Out : Easy Access MIDI Inputs for WERSI Scala and Louvre.
Audio Input 1 Left and Right : Easy Access Audio Stereo Inputs
Audio Output Main Left and Right : Easy Access Audio Outputs for Main Audio Outputs. Ideal for connecting to stereo
loud speakers such as the WERSI Vocalis 120 HD speakers.
OAS - Connecting to External Devices
The OAS 7 Digital Mixer and How It Corresponds to the Physical
Connection Panel
The WERSI OAS instrument range features a comprehensive Digital Audio Mixer. Please see the ‘easy’ diagram below to see how
the Digital Mixer corresponds with the Physical connections.
WERSI Direct Ltd - 0800 084 2013 - www.wersidirect.com - [email protected]