1
User Manual
Copyright and Trademark Statement
The information contained in this work is the exclusive property of Summation
Technology, LLC, and any respective copyright owners. This work is protected under
United States copyright law and other international copyright treaties and
conventions. No part of this work may be reproduced or transmitted for commercial
purposes, in any form or by any means, electronic or mechanical, including
photocopying and recording, or by any information storage or retrieval system,
except as expressly permitted in writing.
Disclaimer--This document has been produced for informational purposes only and
as a service to our customers. The systems intended use is for copying and editing
of personal audio and video data. Any attempted use of this equipment for the
duplication of copy-protected materials is a criminal act and the manufacturer is not
responsible for such illegal recordings.
Warranty and Limitation of Liability--THE INFORMATION AND/OR MATERIALS
CONTAINED HEREIN ARE PROVIDED “AS IS,” WITHOUT WARRANTY OF ANY
KIND, EITHER EXPRESS OR IMPLIED, INCLUDING, BUT NOT LIMITED TO, THE
IMPLIED WARRANTIES OF MERCHANTABILITY AND FITNESS FOR A
PARTICULAR PURPOSE.
The Company shall not be liable for direct, indirect, special, incidental, or
consequential damages related to your decision document, even if
we are advised of the possibility of such damage.
The information in this document is subject to change without notice.
Summation Technology and the Summation Technology logo are the legal properties
of Summation Technology, LLC.
Table of Contents:
I.
II.
III.
IV.
V.
VI.
VII.
Introduction
Basic Operation
HDD Functions (SummitPro™ Only)
Setup Mode
Advanced Setup
Error Codes
Troubleshooting
1
3
10
14
16
20
21
I. Introduction
Thank you for purchasing the Summation Technology Summit™ Series Duplicator.
Your Duplicator Tower is capable of providing superior quality DVD and CD copies. It
can be used for quick data backups and supports various blank disc formats. Its
robust operating functions can be easily performed through a simple two button
user-friendly interface. With the SummitPro™ Series you can store master discs to
the Tower's internal hard drive for later retrieval or create custom music CDs.
Features of the Summit™ Series Duplicator.
1.
2.
3.
4.
5.
6.
7.
8.
9.
10.
11.
12.
13.
14.
This duplicator is a “Standalone” unit and does not require a PC connection
to control any of its CD/DVD functions. All functions are controlled using the
simple two- button controls on the front of the unit.
All DVD burners are allowed to run at full speed both independently and
simultaneously.
Users can chose and set different Read/Write speeds to improve copy
quality.
Up to 128MB buffer RAM. A sufficient amount of RAM insures efficient flow
of data from the reader to the burner, increasing the chances of a
successful high-speed burn.
Controller supports and differentiates most types of discs.
Support various writing methods such as TAO, SAO/DAO, RAW (for
CD+G) and INC (Incremental) to meet users’ needs and increase DVD
burner compatibility.
Using the appropriate writing methods will result in improved compatibility
between DVD burner and media type.
Controller provides users with main functions such as TEST(Simulate
Duplication), COPY, VERIFY,COMPARE, and ERASE.
The “Automatic Check” function provides detailed information on the
source disk.
The duplicator display also provides information about blank disks.
All sectors and tracks of the source disc are inspected prior to the
duplication in order to avoid any failed copies.
Error codes are provided and will be displayed on the duplicator's display
screen.
The system provides a “VERIFY” function to check source discs for
bad sectors.
The system can count the number of copied and failed discs.
1
SummitPro™ Series offers additional optional features:
1.
2.
3.
4.
5.
6.
A built-in Hard Drive Disk (HDD) will allow storage of master disc files.
Ability to format & name HDD partitions.
With a built-in HDD, the user can use “Load” function to load source discs
to a preset or assigned location.
Because HDDs perform better than ROM drives, a data transfer from the
HDD to the DVD burner(s) is less prone to error and copy speeds are
greatly improved.
Music CDs can be edited on the HDD using the menus.
Create custom music CDs by copying individual music tracks to a single
HDD partition. Then burn a single album containing all your preselected
tracks disc-at-once.
2
II. Basic Operation
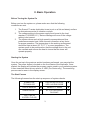
Before Turning the System On
Before you turn the system on, please make sure that the following
conditions are met.
1.
2.
3.
The Summit™ series duplication tower is put on a flat and steady surface
to eliminate errors due to vibration or slope.
The voltage setting to the power supply must be set to the local
standard (115/230V A.C.). Serious damage will occur if the voltage
setting is not correct.
The system drives work at high speed to access data and thus
produces excessive heat. Heat removal is therefore a key factor
for proper operation. The temperature in the working environment
should be kept at about 25° C/ 77° F or room temperature. The
system needs to be positioned so that the multiple fans in the unit
can ventilate and remove the heat to insure that the tower will
operate properly.
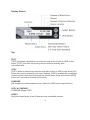
Starting the System
Once the set up in the previous section has been performed, you may start the
system. The power button is located on the front fascia of the duplicator. Once
started, the display will indicate the program version used in your particular system.
It then searches linked drives, writers, or HDD (Pro Series only). The searching
process can be seen in the display screen.
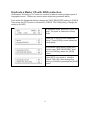
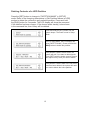
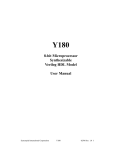
The Start Frames
The following frames show the start-up sequence of system checks.
SUMMATION
TECHNOLOGY
DVD165 DUPLICATOR
VER1.84S ENG.0329B
CHECK MEMORY
MEMORY = 128MB
Search Devices...
#1: LITE-ON DVDRW
DH-20A4P
TEST 0 /M/ 8S
0 OPSD 0 FLD 000
3
Display Screen
Operation Mode Menu
TEST
{TEST} simulates a duplication run either through a disc-to-disc or HDD-to disc
mode. {TEST} just does the burning test but does not actually write
to the blank disc.
COPY
{COPY} does an actual burn either through disc-to-disc or HDD-to-disc mode (Pro
Series only) and is decided by the user's settings. {COPY} enables the compilation
of data or audio discs directly through the source discs. Press and hold the [RUN]
button for 3 seconds to execute this function.
COMPARE
Will compare the data between source (Optical or HDD) and a copied disc(s).
COPY & COMPARE
COMPARE follows COPY.
VERIFY
Verify the copied discs to see if there are any unreadable sectors.
4
Operation Mode Menu (Continued)
ERASE
This mode erases the data on discs and is available under +R/RW writers
and -R/RW media. The default setting is {Quick Erase}. Pressing and
holding the [RUN] button for 3 seconds will do a {Full Erase}. The system
display will be the same but the process will take longer.
LOAD (SummitPro™ only)
If the system has a built-in HDD, you can execute {LOAD}. You can load
data from the source disc to HDD partitions. The original data in the
partition will be over written. Users do not have to reset the partitions if
the load is for a one-time copy since it just needs to use the partition once.
If you are loading various sources to the HDD, change to {PARTITION
NAME} to set the partition after each load is finished. This avoids
overwriting the original data in the partition. {LOAD} enables the audio tracks in the
source disc to be added to HDD partition. Press and hold the [RUN] button for 3
seconds to execute this mode.
5
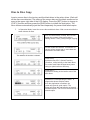
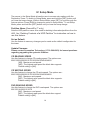
Disc to Disc Copy
Insert a source disc in the top tray and the blank discs in the writer drives. Wait until
all the discs are detected. The status of the source disc and the blank media can be
seen in the upper right side of the LCD display. Press the [SET] button to change to
{COPY} function and then press the [RUN] button to initiate the duplication. The
drive devices automatically eject the discs separately for passed and failed copies.
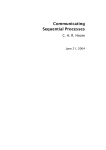
1.
In Operation Mode, Insert the source disc and blank discs. Wait a moment while the
tower detects all discs.
Once the source disc is ready, the LCD will
display the content of the source disc in
flashing letters. Press [RUN] to begin copying.
The disc maker info screen. This session of
copying will be closed and no more data can
be burned to the blank discs.
[LONG OPC]
Duplicator uses OPC, Optical Proximity
Correction, while burning to the blank discs.
The control card finds the best laser power
setting to optimized burn efficiency.
[LONG WRT]
Duplicator is writing in the lead-in area of the
blank discs.
Duplicator is now duplicating the discs . A
progress bar shows relative status.
Once the duplication is finished, the
system will eject all good copies. The
display will show the total number of passed
and failed copies. The LCD on the left shows 7
passed copies.
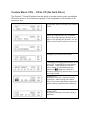
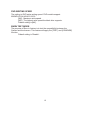
Custom Music CDs - CD to CD (No Hard Drive)
The Summit™ Series Duplicator has the ability to create custom music compilation
CDs track-at-once. The maximum capacity of the compilation is 99 minutes or 99
tracks per disc.
In operation mode, press [SET] to switch to
COPY.
Insert the original music disc and blank
discs. Wait until duplicator detects all the
discs. Press [RUN] until the beep. You are
able to select music tracks from drive now.
Press [SET] to select music tracks.
The display now shows all the tracks on the
music CD. Press [SET] to move through
the tracks. Press [RUN] to select the
music tracks. The selected tracks are
marked as █ █. When the selection is
finished, press [SET] until the beep to start
the copy process.
[LONG OPC]
Duplicator uses OPC, Optical Proximity
Correction, while burning to the blank
discs. The control card finds the best laser
power setting to optimized burn efficiency.
[LONG WRT]
Duplicator is writing in the lead-in area of
blank disc.
7
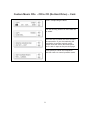
Custom Music CDs - CD to CD (No Hard Drive) – Cont.
Tower is duplicating the discs.
The disc is being closed. No more data can
be added.
Once the disc is closed, the drive will eject
the source disc. If you are continuing the
compilation to another musical record,
please insert the source disc and repeat
the 2nd and 4th steps on the previous page.
Press [RUN] to cancel the compilation
and then return to normal operation mode.
8
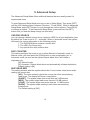
Duplicate a Master CD with RING protection.
(Summation Technology, LLC does not condone or advise creating illegal copies of
copyrighted music. Please use caution when duplicating protected discs.)
From within the Advanced settings change the {SKIP READ ERR} setting to [LONG].
Then press the [SET] button to access the {CHECK TRK LEN] setting. Change the
setting to [LONG].
In operation mode, press [SET] until the
beep. The tower is switched to Setup
Mode.
Press [SET] until you see “Advanced
Setup.” Press [RUN] to enter Advanced
Setup Mode.
In Advanced Setup Mode, press [SET]
until you see “SKIP READ ERR.” then
set it to [LONG] by press the [RUN]
button. .
Press [SET] once more to switch to
“Check TRK LEN.” Now change the
setting to [LONG] by pressing the [RUN]
button.
9
III. Hard Disk Drive Functions (SummitPro™ only)
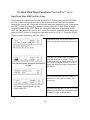
Hard Drive Disc (HDD) to Disc Copy
This function is available only on the SummitPro™ Series tower with an HDD Addon. First, insert a source disc in any of the writers and then wait until the system
detects the source disc. Once the source disc has been detected by the Tower press
the [SET] button to change the operation mode to {LOAD}. Press [RUN] to begin
transferring data to the HDD. Once the information has been downloaded to the
HDD you can remove the source disc. Insert the number of desired blank discs and
press the [SET] button to change the operation mode to {COPY}.. Press the [RUN]
button to begin duplicating from the HDD.
In operation mode, insert the source disc.
Wait until duplicator detects the source disc.
Press the [SET] button until the operation
mode has changed to {LOAD}. Press
[RUN] to load the data from the source disc
The transfer speed, progress and amount to the HDD. During the transfer, the LCD
display will display the status and speed of
of data.
the transfer.
Once the information has been loaded to
the hard drive, the system will eject the
source disc.
Notice the #H symbol on the LCD. This
indicates the HDD has information and
is ready to copy to blank discs.
10
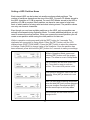
Setting a HDD Partition Name
Each internal HDD can be broken into smaller sections called partitions. The
number of partitions depends on the size of the HDD. For each CD Master stored to
the HDD a partition of 1 GB is required. For each DVD Master stored to the HDD a
partition of 9 GB is required. Each partition can have its own name to help keep
track of which partition is being used and what is being stored. The partition names
can only use numeric characters.
Even though you can have multiple partitions on the HDD, only one partition can
actively be accessed during Operation Mode. To create additional partitions you will
need to rename the active partition. When you rename the current partition you will
create a new partition while saving the older partition for later use.
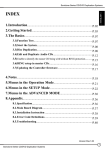
While in operation mode press and hold the [SET] button for 3 seconds. The
duplicator will now switch to Setup Mode. Press the [SET] button until the LCD
display shows {PARTITION NAME}. Press the [SET] button to select the character
to change. Press [RUN] to change value of the character. Once the partition has
been renamed, press and hold the [SET] button for 3 seconds to save your settings.
While in Operation Mode, press and
hold the [SET] button until the system
beeps. The tower is now in Setup Mode.
The LCD display will now show {PARTION
NA}. The system is ready to name the
partition. The current HDD partition is 000.
Press [RUN] to change the value of the first
character. Press [SET] to switch to the next
character.
When you have finished naming the partition
press and hold [SET] until you hear a beep to
save your changes. Press and hold [SET]
until the tower beeps to exit Setup Mode.
In this example the HDD name has been
changed to 001
11
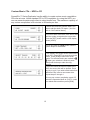
Custom Music CDs – HDD to CD
SummitPro™ Series Duplicator has the ability to create custom music compilation
CDs disc-at-once. Unlike standard CD to CD compilation, by using the HDD, you
can use several master audio discs to select tracks from. The maximum capacity of
any custom compilation is 99 minutes or 99 tracks per disc.
1.Select the Hard Disc partition where you
want to edit the Audio CD tracks. (You can
refer to “Set Partition Name”)
2.Put the master music disc in the tower. Wait
until the system recognizes the source disc.
Press the [SET] button until the LCD display
shows {LOAD}
3.Push and hold the [RUN] button until the
system beeps to load tracks.
4.The display now shows all the tracks on the
music CD. Press [SET] to move through the
tracks. Press [RUN] to select the music
tracks. The selected tracks are marked as █
█. When your selection is finished, press
[RUN] until the beep to start the copy
process.
5.Once the tracks have been copied to the
HDD, the source disc will be ejected. Press
any key to exit. If you wish to add tracks from
additional CDs, insert a new master disc.
Repeat steps 2 through 4.
To burn your custom compilation music CD,
switch the Operation Mode to {COPY}. Load
your blanks discs and then press [RUN].
12
Deleting Contents of a HDD Partition
Press the [SET] button to change to “PARTITION NAME” in {SETUP}
mode. Refer to the foregoing descriptions in [Set Partition Names in HDD]
section to delete the contents in any particular partition. Press and hold
the [RUN] button for 3 seconds. The LCD display will show the command
if the deletion has been chosen. If the chosen audio track(s) is/are shown
in the command line, then it/they will be deleted.
Press and hold the [SET] button until the
system beeps. The tower is now in Setup
Mode.
Once in Setup Mode, the LCD display will
show {PARTITION NA.}. Press and hold the
[RUN] button to delete the partition.
If the partition contains music tracks, the
system will ask if you want to delete tracks.
Press [SET] button to delete a track. Repeat
this step for every track you want to delete.
If the partition contains data or the last music
track has been deleted, the system will ask if
you want to delete the entire partition.
13
IV. Setup Mode
The menus in the Setup Mode allows the user to access extra options with the
Duplication Tower. To switch to Setup Mode, press and hold the [SET] button until
you hear the beep change. While in Setup Mode, press [SET] to cycle through the
various options. Press [RUN] to change an option in Setup Mode. To exit Setup
Mode, press and hold the [SET] button until you hear the beep change.
Partition Name (SummitPro™ only)
Sets the HDD partition name. Also used for deleting information/partitions from the
HDD. See “Deleting Contents of a HDD Partition” for instruction on how to
use this feature.
Set as Default
Use the feature to save any changes you've made as the default configuration for
the tower.
Update Firmware
Please contact Summation Technology (1-719-590-6063) for issues/questions
regarding upgrading the system's firmware.
CD READING SPEED
Use this feature to change CD reading speed. The options are:
MX/01/02/04/06/08/10/12/16/20/24/32/40/46/48/52
[MX] : Maximum read speed.
[MD] : The highest read speed the blank disc supports.
Default setting is [MX].
CD WRITING SPEED
Use this feature to change the CD write speed. The options are :
MX/01/02/04/06/08/10/12/16/20/24/32/40/46/48/52
[MX] : Maximum write speed.
[MD] : The highest write speed the blank disc supports.
Default setting is [MX].
DVD READING SPEED
Use this feature to change the DVD read speed. The options are:
MX/1/2/2.4/4/6/8/12/16/18
[MX] : Maximum read speed
[MD] : The highest read speed the blank disc support.
Default setting is [MX].
14
DVD WRITING SPEED
The setting to DVD writer writing speed. DVD models support :
MX/MD/1/2/2.4/4/6/8/12/16/18
[MX] : Maximum write speed.
[MD] : The highest write speed the blank disc supports.
Default setting is [MX].
BURN TEST MODE
The purpose of Burn-in feature is to test the compatibility between the
System and the burners. This feature will apply the {TEST} and {COMPARE}
function.
Default setting is ‘Disable’.
15
V. Advanced Setup
The Advanced Setup Mode offers additional features that are usually meant for
experienced users.
To enter Advanced Setup Mode be sure you are in Setup Mode. Then press [SET]
until the LCD display shows 'Advance Functions.” Press [RUN]. While in Advanced
Setup Mode, press [SET] button to cycle through the various options. Press [RUN]
to change an option. To exit Advanced Setup Mode, press and hold the [SET]
button until you hear the beep change (do this twice).
CHOOSE SOURCE
You can choose a default source driver (optical or HDD) for all your duplication jobs.
By default the Tower is set to “A” - automatic. When in automatic mode, the system
will search for source information in the following priority.
1. The DVD-ROM drive contains a source disc.
2. The HDD (Pro Series only)
3. Any optical drive with a source disc.
DISC COUNTER
This setting configure the tower to run in either Manual or Automatic mode. In
Manual mode, you must press the [RUN] button to start a duplication job. In
Automatic mode, as soon as the system detects blank disc it will initiate a
duplication job.
[M]: Manual mode.
[A]: Automatic. Detects blank discs and automatically initiates duplication.
Default setting is [M].
SKIP READ ERR
This setting dictates what the system should do if it encounters a bad sector while
reading the source disc.
[NO] : The drive instantly rejects the source disc when encountering
read errors. The display will show a copy failure.
[SHORT] : The system skips read errors that are 2-KB sectors
[MED] : The system skips read errors that are 100-KB sectors.
[LONG] : The system skips read errors that are 1-2 MB sectors.
[SKIPA] : The system skips reading a track when encountering
a bad sector.
The Default setting is [NO]
16
CD WRITING WAY
The system allows three different writing modes.
[DAO] : Disc at Once – Information is written to disc and the session is
closed. Most common format.
[TAO] : Track at Once – Used for writing information in tracks. A gap is
inserted between tracks of data. This mode is rarely used.
[RAW] : Used for CD+G and other Data+Audio hybrid formats.
Default setting is [DAO].
DVD WRITING WAY
This system allows two different DVD writing modes.
[DAO] : Disc at Once – Most common, universal mode.
[INC] : INC – Used for older type DVD player. This mode is rarely used.
Default setting is [DAO].
CHECK TRK LEN
Different methods used for checking for bad sectors.
[NO] : Read as GAP = 0.
[AUTO] : Read by standard GAP.
[SHORT] : Read by short GAP.
[LONG] : Read by long GAP.
Default setting is [SHORT].
SHOW DISC INFO.
Used to show information on the source disc.
For CDs : It shows ATAPI CODE
For DVDs : It shows Manufacturer CODE
SHOW SYSTEM INFO.
Shows hardware information about the controller, drive, writer, and HDD.
SHOW EXE. TIME
Shows the time used to complete a job (TEST, COPY, etc.). Once the job is finished,
the system will show you how much time elapsed.
Default Setting is [Disable].
AUTO EXE. TIME
If the system is set to automatic start, this is the time setting before the system
actually begins duplicating.
Default Setting is [60sec].
17
ENABLE SEND OPC
Optical Proximity Correction. Adjusts laser power to the blank discs to optimize diskburning process to determine the best level of power
from the laser to be applied to the particular target discs you are using.
This will help lower errors.
Default Setting is [Enable].
SUPPORT UPC/ISRC
Copy the UPC code of music CDs and the ISRC code tracks. The system
will copy all of the ISRC code information. It records information such as the artist,
album title, the date, the title of each track…etc.
Default Setting is [Disable].
REGION FREE SET
Removes DVD movie region coding and automatically sets the region code to free .
Please note that the DVD movies must first be non-CSS.
Default Setting is [Disable].
PARTITION SIZE (SummitPro™ only)
Change the size of the DVD partitions. The default is 9 GB, useful for dual layer
DVDs. You can increase the number of available partitions by reducing the default
partition size.
Default Setting is [9GB].
DISABLE L0 CHANGE
This feature produces a quicker write time for Dual Layer DVDs.
Default Setting is [ ]. This indicates L0 Change is Enabled.
BOOT DELAY TIME
Some 16X writers take more time to initiate and can cause delays in
the time it takes the system to boot. If the writers cannot support a quick initiation,
the feature will allow the user to change this parameter to lengthen the boot time,
giving more time for certain writers to initialize.
Default Setting is [0].
FAST CLOSE DISC
This feature works only with DVD+R discs with data of less than 1G.
This feature does not work for all writers, unless the writer supports this
function. If this feature is available, it will shorten the time it takes to close and finish
a disc.
Default Setting is [Disable].
18
DISABLE POWER REC.
Enable Power Rec. allows the duplicator to recognize the disc quality and the best
optimal writing speed for those particular discs. However, this feature is only
supported for some writers.
Default Setting is [Enable].
AUTO CLOSE TRAY
When the user inserts a master disk in the ROM tray, and presses the
[RUN] button, the system will automatically load the information on master
disc onto the hard drive.
Default Setting is [Enable].
19
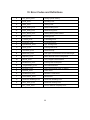
VI. Error Codes and Definitions
S
Set_Speed_Error
Wrong Speed Setting
r
Read_Error
Reading Error
w
Write_Error
Writing Error
R
Read_DMA_Error
DMA Reading Error
W
Write_DMA_Error
DMA Writing Error
U
CUE_Sheet_Error
Writing Wrong CUE-SHEET
E
Erase_Error
Erasing Error
F
Format_Error
Formatting Error
C
Compare_Error
Comparing Error
Z
Synchronize_Error
Syn. Writing Error
O
Close_Error
Closing Disk Error
T
Terminate_Error
Data Interrupt
B
Blankmed_Error
Disk type error between source and target
A
Atipcode_Error
Blank disk can not be recognized
M
Mcode_Error
Only Support Ritek Medium
D
Readdiscinf_Error
Closing Disk Incomplete
N
Targnotempty_Error
Non Blank Medium
P
Plusrtest_Error
Doing test function with +R Media
K
Unknow_Error
Other Error
D
Readdiscinf_Error
Medium Format Error
J
CDDVDDisc_Error
Media Error
G
Hard-Disk Reading Error
Hard-Disk Reading Error
H
HDD_Write_Error
Hard-Disk Writing Error
I
Rev_Track_Error
DVD-R Medium Capacity Error
20
VII. Troubleshooting
The duplication tower will not start or start with a blank LCD display.
Check if the power setting in the rear of the system is set to the local voltage
standards.
Open the case to see if the power cables are connected.
Open the case to see if the cable to the LCD Display is
connected.
The System is unable to duplicate CDs.
First check to see if the system detects all the devices. If there are any
missing devices, please open the case to check if all the flat cables and
power cables are firmly connected.
Check to see if there are any scrapes or other visual damage on the source
CD.
Try some other blank CD media.
Check if the master CD is not copy protected and ready for duplication.
Check if the source devices are in good condition.
Deceleration or Unstable Burning.
Try to use other blank CD media brands. Some blank media is questionable
and you may get poor results.
Enter Advanced Setup Mode and adjust [Enable Send OPC] function.
Try loading the data to the internal HDD (Pro Series Only). Using an HDD as
your source will greatly improve duplication stability and success rates.
Any single defective device will affect the writing performance of the system
as a whole. Try to locate a possible defective drive.
If any blank disk does not support high-speed reading or writing, the system
speed may become unstable. If this happens, try to slow down the writing
speed. Use the [CD Write Speed] or [CD Read Speed] functions located in
the Setup Mode.
Music CDs have interference noise or VCD have blocks.
Check the source quality to see if it has noise or blocks.
Slow down the writing speed.
21