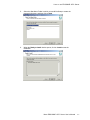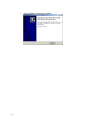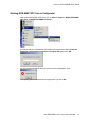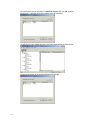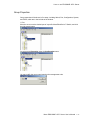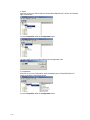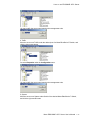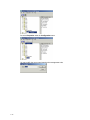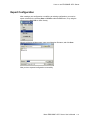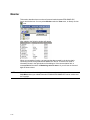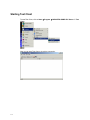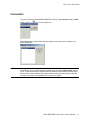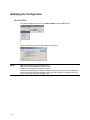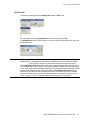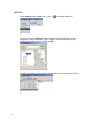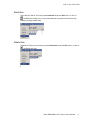
1
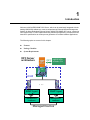
Moxa EDS-SNMP OPC Server User’s Manual First Edition, May 2003 Moxa Technologies Co., Ltd. Tel: +866-2-8919-1230 Fax: +886-2-8919-1231 www.moxa.com [email protected] MOXA EDS-SNMP OPC Server User’s Manual The software described in this manual is furnished under a license agreement and may be used only in accordance with the terms of that agreement. Copyright Notice Copyright © 2003 Moxa Technologies Co., Ltd. All rights reserved. Reproduction without permission is prohibited. Trademarks MOXA is a registered trademark of Moxa Technologies Co., Ltd. All other trademarks or registered marks in this manual belong to their respective manufacturers. Disclaimer Information in this document is subject to change without notice and does not represent a commitment on the part of Moxa. Moxa provides this document “as is,” without warranty of any kind, either expressed or implied, including, but not limited to, its particular purpose. Moxa reserves the right to make improvements and/or changes to this manual, or to the products and/or the programs described in this manual, at any time. Information provided in this manual is intended to be accurate and reliable. However, Moxa Technologies assumes no responsibility for its use, or for any infringements on the rights of third parties that may result from its use. This product might include unintentional technical or typographical errors. Changes are periodically made to the information herein to correct such errors, and these changes are incorporated into new editions of the publication. Table of Contents Chapter 1 Introduction ..........................................................................................................1-1 Features ..................................................................................................................1-2 Package Checklist...................................................................................................1-3 System Requirements .............................................................................................1-4 Chapter 2 How to use Moxa EDS-SNMP OPC Server .........................................................2-1 Installation ...............................................................................................................2-2 Starting EDS-SNMP OPC Server Configurator.......................................................2-5 Broadcast Search....................................................................................................2-7 Dedicated IP ..........................................................................................................2-10 Modifying Properties.............................................................................................. 2-11 New Configuration.................................................................................................2-19 Import Configuration..............................................................................................2-20 Export Configuration..............................................................................................2-21 Monitor...................................................................................................................2-22 Exit.........................................................................................................................2-23 Chapter 3 How to use Test Client .........................................................................................3-1 Starting Test Client..................................................................................................3-2 Connection ..............................................................................................................3-3 Modifying the Configuration.....................................................................................3-4 Exit...........................................................................................................................3-8 Appendix A MIB Value Descriptions for MOXA EDS-SNMP OPC Server TAG ................... A-1 Port ......................................................................................................................... A-1 Switch ..................................................................................................................... A-3 Appendix B Contact Information ........................................................................................... B-1 MOXA Internet Services......................................................................................... B-1 Problem Report Form............................................................................................. B-2 Product Return Procedure...................................................................................... B-3 1 1. Introduction Welcome to MOXA EDS-SNMP OPC Server, which can be seamlessly integrated with the leading HMI/SCADA software to create a comprehensive Ethernet Network Management Solution for Moxa Redundant Ethernet Switch. MOXA EDS-SNMP OPC server, supporting OPC Data Access 2.0, was implemented using advanced programming concepts from the latest OPC specifications to develop a new generation of industrial software applications. The following topics are covered in this chapter: Features Package Checklist System Requirements OPC Server architecture OPC HMI/SCADA, InTouch, iFix OI SNMP … SNMP Agent NMS Management Database SNMP Agent NMS NMS Management database Managed Devices Features Easy to Broadcast Search the network for ED6008 Series products GUI interface to search for devices Automatically create EDS Device Group and Tag Supports multiple Moxa EtherDevice™ Switches Change variables with meaningful aliases Supports standard SNMP TAG data types—grouped by Configuration, System, and Traffic—based on Port and Switch Utilizes the concept of Groups for easy configuration and manageability Ensure correct configuration with on-line monitoring ability Provides on-line data monitoring to check if the configuration is correct or not. Test in advance with bundled simple Test client test program Advanced OPC data Quality and data conversion to client's request Test Client for rapid testing of your OPC data connections Internally simulated for configuration and testing 1-2 Introduction Package Checklist MOXA EDS-SNMP OPC Server is shipped with the following items. If any of these items is missing or damaged, please contact your customer service representative for assistance. CD Cover Software CD Quick Installation Guide Moxa EDS-SNMP OPC Server User’s Manual 1-3 System Requirements Computer/Processor: 133 MHz or higher Pentium-compatible CPU Memory: at least 128 MB OS: Windows XP, Windows 2000 (Professional or Server version) with Administrator privileges Disk space: 20 MB for basic installation and system usage. Product Support MOXA EDS-SNMP OPC Servers support data acquisition modules for Moxa Ethernet Device Switches. All series of ED6008, ED6008-M-SC, ED6008-S-SC, ED6008-MM-SC, ED6008-SS-SC are supported by this software. 1-4 2 2. How to use Moxa EDS-SNMP OPC Server This chapter includes information about how to install and use MOXA EDS-SNMP OPC Servers. For users who wish to start this program right after reading the Quick Installation Guide, skip the Installation section of this chapter. If you would like to gain a full understanding of MOXA EDS-SNMP OPC Server’s management functions, we suggest that you read this chapter thoroughly. The following topics are covered in this chapter: Installation Starting EDS-SNMP OPC Server Configurator Broadcast Search Dedicated IP Modified Properties New Configuration Export Configuration Import Configuration Monitor Exit Installation 1. 2-2 2. Insert the MOXA EDS-SNMP OPC Server CD into your computer’s CD drive, and run Setup.exe. When the Setup window opens, click on Y to install. 3. Click on Next to start the Setup Wizard. 4. Read through the license agreement, select ‘I accept the agreement’, and then click on Next. How to use EDS-SNMP OPC Server 5. Select the Start Menu Folder in which you would like Setup to create the program’s shortcuts, and then click on Next. 6. When the Ready to Install window opens, click on Install to start the installation. Moxa EDS-SNMP OPC Server User’s Manual 2-3 7. 2-4 Click on Finish to complete the installation. How to use EDS-SNMP OPC Server Starting EDS-SNMP OPC Server Configurator After installing EDS-SNMP OPC Server, click on Start OPC Server MOXA EDS-SNMP OPC Server. Program MOXA EDS-SNMP For first time start up, a Registration Code window will open as shown below. Enter the Registration Code shown on the surface of program CD and then click OK. An error message will appear when you enter an incorrect Registration Code. The operating system will shut down the program after you click on OK. Moxa EDS-SNMP OPC Server User’s Manual 2-5 At this point, you can start to configure the program as needed. 2-6 How to use EDS-SNMP OPC Server Broadcast Search This function helps to search for Moxa EtherDevice™ Switch in the current LAN. You may , the toolbar Broadcast click Broadcast Search at Add of menu bar, or click on Search icon. You may also type the shortcut <Ctrl>-<D> to activate the Broadcast Search function. After automatically searching for devices on the LAN, a window as shown below will open listing the Moxa EtherDevice™ Switches which are currently online. Moxa EDS-SNMP OPC Server User’s Manual 2-7 You may directly click the check box of Select All Devices and click OK. All Moxa EtherDevice Switches which are currently online will be added. You will see the newly added Switches in the managerial window as shown below. Or click the check box of the desired switches and click OK. 2-8 How to use EDS-SNMP OPC Server The EtherDevice Switches you select will be added as shown below. If you do not click any check box, no device will be added to this program. NOTE IP Addr: the IP address of online Moxa EtherDevice Switch Model: the Model of Moxa EtherDevice Switch Device Count: the count of the device which has used this IP. Generally speaking, the administrator may need to use different software to collect device’s data in industrial control system. Thus, it’s common to use a different device name for each kind of software. Device Count helps administrator to recognize how many times this IP has been used for different device name. Select All Devices: this function helps administrator easily and rapidly add all devices into managerial window. This check box will start to work when the notice texts show searching finish Total count=N. N is a digit. Stop: this button is used to terminate the searching. When this button is clicked, all searching processes will be terminated, and the Stop button will become gray. Moxa EDS-SNMP OPC Server User’s Manual 2-9 Dedicated IP This function can be used to add the Moxa EtherDevice™ Switch’s IP address, regardless of whether it is online or offline. Select Dedicated IP under the Add menu, or click on You may also use the shortcut keys <Ctrl>-<G> directly. , the toolbar Dedicated IP icon. Enter the IP address of a specified MOXA EtherDevice™ Switch directly and select the correct model in this dialog box, then click OK. A new EtherDevice™ Switch will be added to the above-shown window in this monitoring program. NOTE 2-10 IP Addr: the IP address of specified Moxa EtherDevice™ Switch. It is usually used for offline device, and administrator knows the network management much better. The default value is 192.168.127.253. EDS Model: it is shown as a scrolled window to have administrator select Model of Moxa EtherDevice Switch. How to use EDS-SNMP OPC Server Modifying Properties When you add a Moxa EtherDevice™ Switch in this monitoring program, you may modify the properties of all objects and give new definitions. First select one of the Moxa EtherDevice™ Switches, and then the system will create all of the tags automatically. There are three kinds of properties. E.g., Device, Group, and Tag, in the OPC hierarchy architecture. The MOXA EDS-SNMP OPC Server will automatically create the device, all of the related groups, and the related tags. You do not have to create it manually. Device Properties Move the cursor over the desired Moxa EtherDevice™ Switch, click the right mouse button, and select Properties…. Moxa EDS-SNMP OPC Server User’s Manual 2-11 Or, select Properties under the Configuration menu. You can now start modifying the device name, IP address, Timeout value, and SNMP Community, and then click OK. NOTE 2-12 Name: device name for managing and connecting by Test Client, up to 12 alphanumeric characters. Device Type: MOXA EtherDevice™ Switch model, cannot be modified. IP Address: EDS IP Address Timeout: Communication Timeout interval by ms, 1 to 65535. Community: default value is “public” for SNMP. You can change it as needed. How to use EDS-SNMP OPC Server Group Properties Group properties will be shown in five ways, including Switch, Port, Configuration, System, and Traffic, which are in the left side of the window. 1. Port Move the cursor over the desired port of a specific Moxa EtherDevice™ Switch, and click the right mouse button. Or, select press Properties under the Configuration menu. You may modify the group name based on the management rules. Moxa EDS-SNMP OPC Server User’s Manual 2-13 2. Switch Move the cursor over Switch under the desired Moxa EtherDevice™ Switch, and click the right mouse button. Or, select Properties under the Configuration menu. You may modify the group name based on the management rules. 3. Configuration Move the cursor over Configuration under the desired port of a Moxa EtherDevice™ Switch, and click the right mouse button. Or, select Properties under the Configuration menu. 2-14 How to use EDS-SNMP OPC Server You may modify the group name based on the management rules. 4. Traffic Move the cursor over Traffic under the desired port of a Moxa EtherDevice™ Switch, and click the right mouse button. Or, select Properties under the Configuration menu. You may modify the group name based on the management rules. 5. System Move the cursor over System under Switch of the desired Moxa EtherDevice™ Switch, and click the right mouse button Moxa EDS-SNMP OPC Server User’s Manual 2-15 Or, select Properties under the Configuration menu. You may modify the group name based on the management rules. 2-16 How to use EDS-SNMP OPC Server Tag Properties Move the cursor over any MIB II parameter in the right side of the window and click the right mouse button. Or, select Properties under the Configuration menu. You can now see the detail of tag properties, e.g., MIB II parameter name, Monitoring value of return, Parameter Definition, and Description. NOTE MIB II Parameter Name: the mapping OPC TAG name Parameter Definition: MIB II Parameter type Description: describes how this parameter works Object ID: SNMP TAG Object ID Data Type: converted from SNMP TAG Data type within OPC Data Type v2.0 Number of Bytes: length of OPC TAG, consistent with SNMP Moxa EDS-SNMP OPC Server User’s Manual 2-17 TIPS Changing Items in the Tree Browser After modifying devices, groups, or tags in the OPC Server Tool, changes will take effect immediately on the I/O Server and will be displayed automatically in the Tree Browser. Collapsing and Expanding the Tree Browser You can collapse or expand the tree of certain items by double-clicking. Navigating in the Tree Browser You may use the mouse or keyboard to navigate through the Tree Browser, in the left side of the window. Use the up or left arrow keys to move up, and use the down or right arrow keys to move down in the Tree Browser. You can also press a letter key to jump to the nearest item that begins with that letter. Additional Tree Browser Features Connection lines show the relationship between devices, groups, and tags by displaying which devices are on a channel and which tags belong to a device. The plus and minus buttons indicate whether items are fully expanded or collapsed. The plus button shows the item is collapsed and the minus buttons indicates that the item is expanded. For example, a device with a plus sign next to it means that there are groups and possibly tags configured on that device. 2-18 How to use EDS-SNMP OPC Server New Configuration When you start OPC Server, you can create a new configuration file. It can be done by clicking on File of menu bar, and then select New, or using shortcut keys <Ctrl>-<N> directly. A system window will open as shown below. You can now start a new configuration. Moxa EDS-SNMP OPC Server User’s Manual 2-19 Import Configuration When you want to modify an existing configuration with TDB file type, select Open under the File menu bar, and then select New to start it. Or use shortcut keys <Ctrl>-<O> directly. A window will open. Select the desired configuration file and click Open. The following window indicates that you’ve imported configuration successfully. 2-20 How to use EDS-SNMP OPC Server Export Configuration After creating a new configuration or modifying an existing configuration, you need to export revised files by selecting Save or Save As under the File menu, or by using the shortcut keys <Ctrl>-<S> to ‘save’ directly. When the following window opens, enter a configuration file name, and click Save. Now you have exported configuration successfully. Moxa EDS-SNMP OPC Server User’s Manual 2-21 Monitor This section describes how to monitor all communication between EDS-SNMP OPC Server and the devices. You may select Monitor under the View menu, or directly click on icon. After updating, the following window will appear. When you use monitor function, you may see the data returned by the device that is connecting to EDS through Moxa EDS-SNMP OPC Server. There are four kinds of information shown in the right window of the dialogue. If the communication fails, a message Bad will be shown in Monitoring value of return. Or you will see the returned digits as shown above. NOTE 2-22 Status Bar is used for disabling or enabling the status bar on the bottom of the screen. Help Menu shows you related information of MOXA EDS-SNMP OPC server version and the copyright. How to use EDS-SNMP OPC Server Exit To quit the program, select Exit under the File menu. Moxa EDS-SNMP OPC Server User’s Manual 2-23 3 3. How to use Test Client This chapter includes information about Test Client, provided by the MOXA EDS-SNMP OPC Server, with quick connection to OPC Server. The Test Client is able to browse the registered OPC Servers in the same server hardware. It also provides real live data feedback and OPC Server browsing capabilities. The Test Client is also helpful for connecting and testing other 3rd party OPC applications located on the same server hardware. The following topics are covered in this chapter: Starting Test Client Connection Modifying the Configuration Exit Starting Test Client To start Test Client, click on Start Client. Program MOXA EDS-SNMP OPC Server Now you can start Test client to check the connection. 3-2 Test How to use Test Client Connection To connect Test Client to MOXA EDS-SNMP OPC Server, select Connect under the OPC menu, or click on , the Connect toolbar icon. A window will open, listing all OPC Servers located on the same server hardware, e.g., MOXA.SNMPOPC. NOTE When your Test client connects to MOXA EDS-SNMP OPC Server, it will execute automatically. You may disconnect the selected server by selecting Disconnect from the menu. This command will un-register the devise interface, and release the Group object, and the Server object. Releasing an object means that the client has nothing to do with the object, the object can be deleted from the server by system. Moxa EDS-SNMP OPC Server User’s Manual 3-3 Modifying the Configuration Server Status You see the status of the Server, select Server Status under the OPC menu. The current Server status of selected server is as follows. NOTE 3-4 Start Time: the time the server starts running Last Time: the last update time from the server Current Time: the current time from the server. The Server status dialog periodically queries the Server object for status and displays the results. When OPC TAG was updated, OPC Server will advise the connecting clients. So that ‘Last’ in client can show the update time. How to use Test Client Update rate To modify the update rate, select Update rate under the OPC menu. You may adjust the digit of Update Rate to fit requirement, and click OK. The Update Rate must be a big number if you want to read item. Otherwise you can never see the difference. NOTE Active: active state for OPCGroups Update Rate: the update rate (in millisecond) for OPCGroups is 10 ms minimum. Default value is 100 ms. It’s the time interval that Test client access OPC Server. The Group Parameters dialog queries the group state and displays the results. When you click the OK button in this dialog box, the system will write the parameters from the dialog to the Group object and send the parameters back. This function helps to efficiently control scanning and updating of data. The Update Rate in the Group Parameters dialog box specifies the rate at which data notifications should be sent back to the client if the data has been changed. This is also the rate by which items are scanned in this client. Once a group is inactive, it will not send data notifications to the client and scan items. Moxa EDS-SNMP OPC Server User’s Manual 3-5 Add Item Select Add Item under the OPC menu or click on , the Add Item toolbar icon. Test Client will open the Add Item window. Expand the list in left window, and click any group name, such as Configuration, Traffic, or System. Select the tags shown in right window that you wish to monitor, and then click OK. You will now be able to see the connection and monitor the return value from OPC Server. 3-6 How to use Test Client Read Item To see the OPC Server TAG value, select Read Item under the OPC menu, or click on , the Read Item toolbar icon. It is recommended that you perform this function after modifying a longer Update Rate. Delete Item To delete the TAG you are monitoring, select Delete Item under the OPC menu, or click on , the Delete Item icon. Moxa EDS-SNMP OPC Server User’s Manual 3-7 Exit To exit the program, select Exit under the File menu. 3-8 A A. MIB Value Descriptions for MOXA EDS-SNMP OPC Server TAG MOXA EDS-SNMP OPC Server supports mapping TAGs, corresponding to MIB values. These TAGs, which are grouped by port and switch, are given below. Parts of them are based on a private enterprise’s MIB, “enterprises.moxa.industrialEthernet.etherDevice”. Port General Configuration for all ports TAG IfDescr IfSpeed MonitorAutoMDI MonitorLinkStatus MonitorSpeed MonitorTraffic PortEnable SetDevIpCurrentIpofDevice SetDevIpDedicatedIp SetDevIpPresentBy SpanningTreePortCost Description A textual string containing information about the interface. An estimate of the interface's current bandwidth in bits per second. The MDI status of the Port in this EDS. The link status of Monitored port in this EDS. The speed status of Monitored port in this EDS. Port traffic of this EDS. Percentage of the port's bandwidth is currently used by that port. For example, if the port is set at 100 Mbps and 15 Mbps are transmitted during a certain second, then the Traffic=15%. The port status of this EDS. The Enable status means that the EDS allow data transmission through this port. The Disable status means that the EDS shut off port access. Auto detected IP addresses of this device attached to this port of EDS. The dedicated IP address of this port set to device attached to EDS. The way of port IP set by EDS, e.g., DhcpClient, Rarp, Bootp. Setup Spanning Tree cost for this port. A higher cost means this port is less suitable as a node for the Spanning Tree topology if all ports’ priority is the same. SpanningTreePortEnable SpanningTreePortIndex SpanningTreePortPriority SpanningTreePortStatus TrafficOverload TrafficThreshold Enable or disable this port as a node on the Spanning Tree topology. The index of the port in EDS on the Spanning Tree topology. Set up Spanning Tree priority. A lower value means higher port priority, which is more suitable as a node for the Spanning Tree topology. Port status of this EDS on the Spanning Tree topology. The status of port traffic overload events for EDS auto warning. 'Enable' means auto warning function about this port traffic overload events work. The threshold value of port traffic overload events for EDS auto warning. Dedicated Configuration for port5 and port6 TAG TurboRingCouplingPortIndex TurboRingCouplingPortStatus Description The index of the port in EDS on the Turbo Ring Coupling. The status of the port in EDS on the Turbo Ring Coupling. Dedicated Configuration for port7 and port8 TAG TurboRingPortIndex TurboRingPortStatus Description The index of the port in EDS on the Turbo Ring topology. The status of the port in EDS on the Turbo Ring topology. Traffic TAG IfInDiscards IfInErrors IfInNUcastPkts IfInOctets IfInUcastPkts IfOutDiscards A-2 Description The number of inbound packets which were chosen to be discarded. The number of inbound packets that contained errors preventing them from being deliverable to a higher-layer protocol. The number of non-unicast packets delivered to a higher-layer protocol. The total number of octets received on the interface. The number of subnetwork-unicast packets delivered to a higher-layer protocol. The number of outbound packets which were chosen to be discarded even though no errors had been detected to prevent their being transmitted. MIB Value Description IfOutErrors IfOutNUcastPkts IfOutOctets IfOutUcastPkts The number of outbound packets that could not be transmitted because of errors. The total number of packets that higher-level protocols requested be transmitted to a non-unicast address including those that were discarded or not sent. The total number of octets transmitted out of the interface The total number of packets that higher-level protocols requested be transmitted to a subnetwork-unicast address including those that were discarded or not sent. Switch Configuration TAG DefaultGateway DnsServerIpAddr EnableDhcpClient EnableTelnetConsole EnableWebConfig LineSwapRecovery Description The router's IP address if your LAN connects to an outside network. The IP address of the DNS Server which is used in your network The DHCP-Client function status of EDS. 'Enable' means the IP address of the EDS can be automatically assigned by your network's DHCP server. 'Disable' means the IP address of the EDS must be set up manually. Telnet-console status of the EDS. 'Enable' means it will provide console interface to make modifications to its configuration and to access the built-in monitoring and network administration functions. You may use Telnet over a network or some serial console tools over the serial port to access the EDS's console utility. But you cannot connect to EDS simultaneously through the serial console and via Telnet. Web-configuration status of the EDS. 'Enable' means it will provide a web browser interface to make modifications to its configuration and to access the built-in monitoring and network administration functions. You may use either Internet Explorer or Netscape to access EDS. Line-Swap Fast Recovery status of this EDS. 'Enable' means it will return to normal operation extremely fast when devices are unplugged and then re-plugged into different ports. The recovery time is on the order of a few milliseconds. Moxa EDS-SNMP OPC Server User’s Manual A-3 MailServerIpAddr Power1InputStatus Power2InputStatus ProtocolOfRedundancySetup ServerIpAddress The IP address of the mail server set up in this EDS The power1 status of this EDS The power2 status of this EDS Set up the redundant protocol for this EDS. The IP address of this EDS. The type of network which this EDS is connected to. For example, 255.255.0.0 means that the EDS is connected to a Class B network, and 255.255.255.0 is for a Class C network. ServerIpMask Provides some added managerial security for SNMP servers. Servers with the same SNMP Community can read the EDS's MIB values. SnmpCommunityName The bridge priority of the EDS in Spanning Tree topology. Higher bridge priority has a greater chance of being established as the root of the Spanning Tree topology SpanningTreeBridgePriority The time interval that EDS waits for checking to SpanningTreeForwardingDelay change to a different state. The time interval that root waits for sending hello messages in Spanning Tree topology. The root of the Spanning Tree topology periodically sends out a hello message to other devices on the network to check if the topology is healthy. SpanningTreeHelloTime The max. time interval EDS waits for reconfiguring itself as a root. If the EDS is not the root and it has not received a hello message from the root in an amount of time equal to Max Age then this EDS will reconfigure itself as a root. SpanningTreeMaxAge The role of this EDS in Spanning Tree topology. Root is SpanningTreeRoot determined automatically. The IP address of the Trap Server which is used in TrapServerIpAddr your network. TurboRingEnableCoupling Enable Turbo Ring Coupling in this EDS. The role of this EDS on the Turbo Ring topology. The TurboRingMaster role may be a Master or a Slave. The role of this EDS on the Turbo Ring topology is set TurboRingMasterSetup as a Master. A-4 MIB Value Description System TAG EdPortsNumber FirmwareVersion ServerModel SysContact SysLocation SysName SysUpTime Description The total number of ports that are provided by EDS. The firmware version of this EDS. The model of this EDS. The textual identification of the contact person for this managed node. The physical location of this node. An administratively-assigned name for this managed node. The time since the system was last re-initialized. Moxa EDS-SNMP OPC Server User’s Manual A-5 B B. Contact Information MOXA Internet Services Customer satisfaction is our number one concern, and to ensure that customers receive the full benefit of our products, Moxa Internet Services has been set up to provide technical support, driver updates, product information, and user’s manual updates. The following services are provided E-mail for technical support [email protected] World Wide Web (WWW) Site for product information: http://www.moxa.com or http://www.moxa.com.tw Problem Report Form MOXA EDS-SNMP OPC Server Customer name: Company: Tel: Email: Fax: Date: 1. Moxa Product: MOXA EDS-SNMP OPC Server 2. Serial Number: _________________ Problem Description: Please describe the symptoms of the problem as clearly as possible, including any error messages you see. We may need to follow your description to reproduce the symptoms, so please give a complete description of the problem. B-2 Contact Information Product Return Procedure For product exchange, or refund, the customer must: Provide evidence of original purchase. Obtain a Product Return Agreement (PRA) from the sales representative or dealer. Carefully pack the product in an anti-static package, and send it, pre-paid, to the dealer. The PRA should be visible on the outside of the package, and include a description of the problem, along with the return address and telephone number of a technical contact. Moxa EDS-SNMP OPC Server User’s Manual B-3