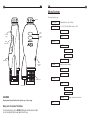
1
1-YEAR LIMITED WARRANTY
The iGen NV20/20 is warranted against defects in materials and
workmanship under normal use for one year from the date of purchase
to the original owner.
Damage due to neglect, accidental damage or misuse of this product is
not covered under this warranty. Decisions regarding abuse or misuse of
the product are made solely at the discretion of the manufacturer.
Proof of Purchase is required to
make a claim under this warranty.
Liability under this Warranty is limited to replacing or repairing, at our
option, the product returned, shipping cost prepaid to Night Owl Optics.
Shipping cost to Night Owl Optics is the responsibility of the consumer.
To return product for service, please first contact Night Owl Optics for a
Return Authorization (RA) Number. Ask for Night Vision customer service.
Reference the RA number on your package and return the product within
15 days of calling to:
NIGHT VISION VIEWER
Night Owl Optics
1465-H Henry Brennan Dr.
El Paso, TX 79936
Phone: 915-633-8354
Warranty coverage does not include the cost of transporting the product
back to an owner who is located outside of the United States of
America.
O W N E R ’ S
M A N U A L
2
11
Menu System
The menu selections are:
Eye Piece
EXPOSURE
(Adjustable from 2fps to 30fps)
AUTO OFF
(1.2.3.4.5.10,15,20,30,45 minutes or OFF)
IR
Power
Button
Three-Way
Switch
MAIN
Infrared
Button
DISPLAY
Battery
Compartment
ON-OFF
ON
OFF
BRIGHTNESS
Tripod Mount
Video
Composite
Output
COLOR
(1,2,3,4)
(white, red, green, amber)
IMAGE
TEXT
Objective Lens
SYSTEM
VIDEO
Infrared Emitter
NTSC
PAL
CAUTION:
VERSION
Do not point Infrared Emitter directly into eye at close range.
EXIT
Keep out of reach of children.
The infrared emitter emits a BRIGHT, although invisible, beam of light.
As with any bright light, do not point into the eye.
displays software revision level
3
10
Other Features
Power-Savings Features
Display Off
When using the iGen connected to an external recording device, and you do not
need to view the scene through the eyepiece, you may turn the display off. This
will greatly improve battery life.
To turn the display off, choose “Display”, then “On-Off”. When you toggle down
to the “Off” setting, the display will immediately turn off. After the display turns
off, you must then push the 3-way switch up to save this setting. If you do not
accept the off-setting by pushing up after the display turns off, the display will
turn back on after ten seconds.
To turn the display back on, turn power off and then turn power back on with
the On/Off Button.
Auto-Off
The menu selection “Auto Off” allows you to program the time interval after
which the device, or the IR, automatically turns off. Each user input (press of a
button) resets the auto-off timer.
Time selections are 1,2,3,4,5,10,15,20,30,45 minutes and OFF.
The OFF setting disables the auto-off power down feature.
To save the setting, remember to push the 3-way switch up after selection.
The infrared and operating power-down timers are set separately. If the IR
auto-off time is less than the main time, the IR will shut off first, and the device
will then power off after the main time has elapsed.
Daytime Use
To use in daylight conditions, leave the lens cap attached and operate at low gain settings
Tripod Adaptor
The tripod fitting is located on the underside of the device, and fits to all standard tripod
mounts with a fitting size of 1/4 - 20.
Tripod mount is recommended for exposures of less than 10fps for image stabilization.
Introduction
T
he iGen Night Vision Viewer is the leading edge of the new tubeless
night vision technology. Traditional night vision devices employ
electron bombardment vacuum tube technology to amplify ambient
light. iGen technology uses image processing techniques, special optics, and
low-light sensing technology to bring night vision into the digital age.
The iGen advantage is:
• Better image quality with high, 30-line-pair per millimeter, edge-to-edge display
resolution
• Better image quality with no image distortion from photocathode or
phosphorescent screen blemishes
• Easier diopter focusing
• Two-times the sensitivity to infrared light, useful in total darkness with the aid of
the infrared emitter
• Intelligent infrared emitter. Microprocessor automatically adjusts infrared intensity
and electronic gain to optimize image to changing ambient light conditions.
• Undistorted infrared emitter – bright clear scene illumination with no dark spots
and no uneven light patterns
• Ambient light amplification capability higher than Generation-1 technology at
default exposure. Light amplification capability superior to Generation-2 with the
use of exposure control.
• Easy-connect image capture capability through composite video output
• Programmability
• Bright-light see-through capability. No bright-spot blooming or halo-effect typical
with conventional night vision.
• More robust. No risk of damage from bright light exposure. No fragile vacuum
tubes.
Batteries
Requires 4 AA alkaline batteries
Typical battery life from one set of batteries is 4.5 hours in continuous use, or 2.3 hours in
continuous use with the infrared emitter at maximum intensity.
To improve battery life, reduce brightness or program the auto-off feature to cause the device
to automatically shut down after specified intervals.
4
1st Time Operation
To best understand operation, for first-time use, test the device in a lighted room with the
lens cap attached.
The small amount of light entering through the pin-hole in the lens cap will simulate a
night-time environment.
Press the power button to turn on.
Push up on the three-way switch located on the bottom.
Focus eyepiece.
1. A menu will appear. Use this menu to focus the eye piece.
2. Rotate the eyepiece rubber cup until the menu letters are sharp and in focus.
If the menu disappears, push up again to see the menu again.
3. Use the menu as a focusing target. This adjustment focuses your individual eye
sight on to the display screen.
4. After the eyepiece focus (technically called the diopter lens) is adjusted, do not
change this adjustment. After you set the eyepiece adjustment, use the front
lens to focus on objects in the distance.
Get comfortable with the gain control.
Push the three-way switch to the left and to the right.
As you push the switch left or right (but not up), you are manually adjusting the electronic
gain (light amplification) of the internal computer circuit.
Notice the following as you increase gain (push to the right):
1. At very high gain settings, the image gets “nosier”.
Notice a “snowy” image at high gain settings.
2. As you increase the gain quickly, you may notice a momentary very bright image
which quickly darkens itself back to normal intensity. This behavior is the device
sensing that the image is overexposed, and automatically reducing internal gain
and/or exposure to compensate. In an actual dark environment, iGen would not
throttle back the gain in this manner.
If the “overexposed image” message appears, it is prompting you to reduce
gain. If this message disappears automatically, then the internal processor was
able to automatically reduce the gain or exposure.
Notice that rotating the objective lens (large lens on front of iGen) has little effect on the
focus of the image. The pin-hole on the lens cap lets in only a narrow beam of light which
requires little mechanical focusing to align. If the scene is out of focus, you may need to
rotate the lens many degrees to achieve a small amount of optical focusing. This
characteristic will not be apparent when using the iGen with the lens cap removed.
Press the Infrared Button several times.
Notice that it has 3 different modes: AUTOMATIC, OFF, and MAXIMUM
9
Adjustments (continued)
Exposure (continued)
While light-gathering capability improves with longer exposure times, at exposure settings
below 15fps, the image will appear unnatural. Longer exposure settings (lower fps
numbers) present fewer and fewer image “snapshots” which are presented to you just as
a movie is a collection of frames repeated at 30 frames per second. Below 15fps, a
moving image may appear to move unevenly. Likewise, below 12fps, the image may
shake as a person is unable to hold the iGen completely still. If you concentrate on
holding the device still, you should find the device very useful down to 10 or 12fps.
At very long exposure times, down to 2fps, the light-gathering capability of the iGen is
truly remarkable. However, to be useful at such long exposure times the device must be
positioned on a stable surface. You may rest it on a flat surface suitable for viewing, or
connect to a tripod mount. The tripod adaptor fitting located at the base of the device will
connect to all standard tripod mounts, with a fitting size of 1/4 - 20.
8. Video Format
When recording on an external device using the Video Composite Output, select the
format compatible to your recording device.
Selections are:
NTSC (for devices sold in the U.S. This is the default setting)
PAL (European standard)
To record to an external device, remove the rubber plug on the left side of the device, and
connect with a composite video cable (RCA cable). With the iGen powered on and
focused, no other iGen settings are necessary. If use of the eyepiece display is not
required, extend battery life by turning off the display with the “display on/off” function.
8
Adjustments (continued)
4. Gain
The 3-way switch adjusts the internal or electronic gain. There are a total of 10 different
gain settings. These settings are preprogrammed and cannot be changed. Push to the right
and the image becomes brighter. At the highest gain settings, you will notice a “noisy” or
“snowy” image. As is the case with any night vision device, in very low light conditions
users will sacrifice image quality for light amplification. In order to recognize an object or
target, it is preferable to see a lower resolution image than to see no image at all.
5. Color
Both the color of the image and the color of the menu text can be changed. Image color
choices are white, red, green, and blue. Text color choices are black & white, green, red,
and amber. The color green is typically used in night vision applications because the rod
cells in the human eye are most sensitive to the green wavelengths of light, 550nm. You
are better able to distinguish details when displayed in the color green. The color red can
be useful when you want to maintain your unassisted vision in the dark when you look
away from the viewer.
6. Brightness
The display brightness has 4 settings. The default setting is 3. The darkest is 1; the
brightest is 4. As the display is a major consumer of battery power, darker brightness
settings will prolong battery life.
Access the brightness control by first choosing “display” from the menu and then
choosing the brightness option.
7. Exposure
The most effective way to increase the low light sensitivity of the iGen is to increase the
exposure time of the system. In its default setting, the iGen collects light from the lens at
a rate of 30 times per second for processing. If this exposure time is increased, more
photons of light energy are collected, resulting in greater night-vision sensitivity. At the
default setting, the “shutter” remains open for 1/30th of a second and then closes and
passes the collected light on for processing. If we allow the “shutter” to remain open for
a longer period of time, we collect more photons and thus can “see” at lower light levels.
The abbreviation “fps” means “frames per second.”
In a lighted indoor environment, you may notice a pulsing or strobe effect at varying
exposure settings. In the U.S., or other countries with 60hertz electrical systems, exposure
rates other than 30fps and 15fps will be unsynchronized with the lighting system. The
iGen is designed for outdoor use and for use in dark environments so this characteristic
does not affect the device’s performance; such a pulsing effect will only be evident when
testing or practicing with the iGen in a lighted environment.
In countries with 50 hertz electrical systems, indoor pulsing will be apparent at all frame rates.
5
Infrared Emitter
The basic principle employed by iGen is light amplification. In very dark conditions, where you
cannot see, and your eye cannot detect the small amount of light that is available, the iGen
detects and amplifies very small amounts of available light. But in the absence of any
available light, use the infrared emitter.
To understand how much light is available in different environments, review the following
table. Light intensity is measured in lux. One lux is roughly the amount of light created by a
candle at a distance of one meter.
The number of lux existing in different environments is:
Condition
Sunny Day
Overcast Day
Indoor Lighting
Street lighting at night
Full Moon
Quarter Moon
Clear night with no moon
Dark Cloudy Night
Number of Lux
100,000+
100 to 10,000
80 to 300
1 to 10
0.1
0.01
0.001
0.0001
iGen Function.
Too bright. Keep lens cap on.
Too bright. Keep lens cap on.
Keep lens cap on.
No IR(infrared emitter) needed.
No IR needed.
IR might be needed.
IR necessary at distance.
IR absolutely necessary.
Night Vision technology works by amplifying the small amounts of light energy available in
most dark environments. If you are in an environment where there is NO LIGHT available to
amplify, then the mathematical formula:
zero times any number = zero (0 x N = 0)
describes what you can see without assistance from an infrared emitter – nothing.
For this reason, the iGen is equipped with an active infrared emitter. iGen emits an invisible
beam of near-infrared light. The beam of light exiting the emitter is not visible to human or
animal eyes but is detected by the iGen and reproduced on the display. In most
environments, you do not need the infrared emitter, but in complete darkness, turn the IR on
to the AUTO or MAX settings. The default setting of the IR at start-up is the AUTO mode.
Also notice that while the light emitting from the IR is invisible, the diode does glow a bright
red inside the emitter and can be detected from a distance. If you wish to remain completely
concealed, then do not use the infrared emitter.
CAUTION:
Do not point INFRARED directly into eye at close range
Keep out of reach of children
The infrared emitter emits a BRIGHT, although invisible, beam of light. It is not a laser, but
like any bright light, you do not want to point it directly into your eye.
The infrared light emission is produced by a light emitting diode, similar to those used in
modern flashlights.
6
7
Controls
Adjustments
1. On/Off Button
On top side, closest to your eye
Press to turn on. Press to turn off
1. Eyepiece (technically referred to as the diopter focal lens in front of the microdisplay)
The iGen has two different focus adjustments. The eyepiece lens adjusts to focus the
display to your individual eyesight. The objective lens focuses on objects in the distance.
To adjust the eyepiece, do the following:
a. Push up on the three-way switch located on the bottom.
b. The menu will appear. Use this menu as a target to focus the eye piece.
c. Rotate the eyepiece rubber cup until the menu letters are sharp and in focus.
If the menu disappears, push up again to see the menu again.
d. Use the menu as a focusing target. This adjustment focuses your individual
eye sight on to the display screen.
e. After the eyepiece focus is adjusted, do not change this adjustment, even if
the image is out of focus. After you set the eyepiece adjustment, use the
objective (front) lens to focus on objects in the distance.
2. Infrared Button:
On top side, closest to the large front lens
Pressing button activates one of three different modes:
IR AUTO: the infrared emitter will measure the amount of ambient available, and
emit a calculated amount of light to illuminate the scene as required. This
setting will conserve battery life and is usually the preferred setting if you
have decided that the environment is so dark that you cannot see well
without its assistance.
IR MAX: the infrared emitter will output the maximum amount of infrared light
possible for maximum illumination at all times. Constant use at this setting
will minimize battery life.
IR OFF: no infrared light is emitted
3. Three-Way Switch
Located on the underside of unit, rear of battery door, near your thumb as you hold
the device
Push left to decrease electronic gain
The image will darken with each press of the switch
Push right to increase electronic gain
The image will brighten with each press of the switch
Push up to activate the menu and program the iGen.
The programming function works as follows:
1. After menu activation, the menu will time-out in ten seconds if you do not
make a selection.
2. To move through the menu selections, push the 3-way switch left or right.
3. To choose a menu selection for programming, push up on the 3-way switch.
You will choose the selection indicated by the arrow.
4. To program a setting, move the 3-way switch left or right.
See the settings change.
5. To accept a setting after programming, push the 3-way switch up.
6. When a setting is entered using the left/right control, the setting becomes active
immediately, but you must push the 3-way switch up to permanently accept the
setting. If you do not accept a setting after 10 seconds, the menu will time-out
and the previous setting will return as the permanent setting.
2. Objective Lens (large lens in metal housing on front of device)
This lens must be manually rotated to bring objects into focus. As you aim at different
objects at different distances, you may need to rotate the lens to bring the objects into
focus. This operates just like a pair of binoculars.
Lens Specifications are as follows:
Minimal Focal Distance: 16” (41cm)
Maximum Focal Distance: infinity.
Ability to see objects at a distance depends on object size and
ambient light conditions.
Angle of View: 12°
Field of View: 70’at 330’ distance (21 meters at 70 meter distance)
Magnification: 2.6 times
3. Infrared Emitter
You cannot adjust the intensity or light angle of the infrared emitter. The emitter casts a
12° angle of light, equal to that of the iGen’s angle of view. Because the emitter is
positioned to the side of the objective lens, at short distances you will notice a shadow
due to this offset. The infrared produces a round beam of light; at close distance, the
circle of light will clip the corners of the rectangular display. At very close range, you may
see a half-circle of bright light, while the rest of the scene is darker. You cannot control
the intensity of the infrared light, other than to set it in automatic mode. In automatic
mode, the output of the emitter is adjusted to provide the correct amount of infrared
required for optimum illumination. Since the device is very sensitive to infrared light, high
intensity infrared at close range causes the device to reduce internal gain and increase
exposure time, resulting in rapid battery discharge. Use of the IR MAX settings is only
recommended in a very dark outdoor environment.