1
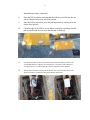
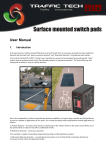
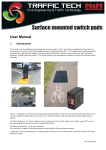
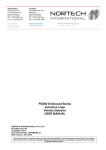
1 EzyLoops systems Pedestrian Switch Pad. Installation Instructions EzyLoops Systems, Surface mounted Pedestrian Activated Switch Pads (PSP) are a pressure activated electronic method of detection that provides both “passive presence detection” and “directional detection” of pedestrians and vehicles. This is done by the censors that are built inside the buttons. The information is then passed through the multi strand cable to the “Tactile Mat Interface” located in an in-ground or in-post junction box and onto the controller. The controller should be located in an above ground control box. Used with the Nortech PD134TLC Tactile Loop Controller the system has been designed to provide specific “logic” outputs from the patented tactile Switch Pad intended primarily for pedestrian detection. The Switch Pad may also incorporate an inductive loop for vehicle detection. Pre-installation check list 1. 2. 3. 4. 5. Pack EzyLoops PSP of required size and lead wire length for job. Petrol powered air-blower. Dry-cut construction saw or Offhand Grinder. Hand-broom. Tool box, (check contents,) Trowels, Masking tape, Wire cutters, Screwdrivers, Pliers, Hammer, Chisel, Knife. 2 Installation procedure. 1. Determine location to install PSP, making sure area is flat and without any stone or pebble protrusions. These can be repaired using the recommended adhesive, SekaFlex 521 UV. 2. Lay loop pad onto pavement and mark-out using masking tape or similar. This will help to keep the surrounding pavement clean of adhesive. 3. Mark location that “lead wire” exits the EDGE of the loop mat and then measure 100mm / 4” in from edge of mat to determine where lead wire exits the underside of the mat. 4. Using a small off-hand grinder, grind a rebate (1” by 1” and ½” deep) to accommodate the wires as they exit the underside of the pad. Then cut a slot or install a conduit and feed the lead wires to the nearest junction box. 3 Installation procedure, continued:- 5. Clean loop area using broom or air-blower. When using an adhesive to secure pad, area MUST be free of dust and moisture. 6. Apply SekaFlex 521 UV adhesive or similar to underside of PSP, using a “flat” trowel at first then a “saw-tooth” or “Etched” trowel to ensure that the adhesive is applied thin and even and ensuring that all edges and covered without to pavement. 7. To reduce the possibility of the corners of the rubber pad from creating a trip hazard, it is suggested to cut a small curved segment off each corner of the PSP before installation. 4 Installation procedure, continued:8. 9. Place the PSP in position ensuring that the lead wires and fed into the cutslot or conduit as the pad in placed in position. Once the PSP is in position, press the pad in position by working from the center of the pad out. 10. Clean the edge of the PSP of excess adhesive and place sand bags onto the pad to hold the pad down in areas that the pad is sitting up. 11. Feed lead wires (Brown) into the junction box and connect the multi pin cable to the “Tactile Mat Interface” and place in watertight box. Use silent to ensure that box is watertight. Be sure to avoid touching the exposed components of the interface. 12. Then feed the main cable (Grey) from the junction box to the controller. Refer to the “PSP User manual” for detailed wiring and controller instructions.