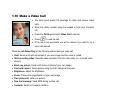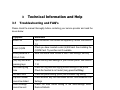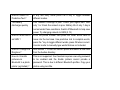
1
ZTE F158 Ruggedised HSDPA 3G Mobile Phone User Manual 1 PC Software Requirements Join Me PC Software included supports Microsoft Vista, Windows 2000 with Service Pack 4 or Windows XP with Service Pack 2 only. 64 bit systems or MAC OS are not supported. Warnings and Safety Notices Please read all the safety notices before using this device Copyright © 2007 ZTE Corporation All Rights Reserved. st 1 Edition February 2007 No part of this publication may be excerpted, reproduced, translated or utilized in any form or by any means, electronic or mechanical, including photocopying and microfilm, without the prior written permission of ZTE Corporation. ZTE Corporation operates a policy of continuous development. ZTE Corporation reserves the right to make changes and improvements to any of the products described in this document without prior notice. Limitation of Liability ZTE shall not be liable for any loss of profits or indirect, special, incidental or consequential damages resulting from or arising out of or in connection with using this product, whether or not ZTE had been advised, knew or should have known the possibility of such damages. The user should refer to the enclosed warranty card for full warranty and service information. 2 Contents RF Safety Information.................................................................................................... 5 General Safety Information ........................................................................................... 8 Support Information .................................................................................................... 10 Key Layout.................................................................................................................... 11 Key Layout.................................................................................................................... 12 Getting Started ............................................................................................................. 14 1.1 1.2 1.3 1.4 1.5 1.6 1.7 1.8 1.9 1.10 1.11 1.12 1.13 1.14 1.15 1.16 1.17 1.18 1.19 Install the (U)SIM Card .....................................................................................14 Insert the Battery..............................................................................................15 Switch the Phone on and Connect the Charger................................................16 Charging and Battery Life.................................................................................17 Basic Navigation ..............................................................................................18 Enter Your Contacts .........................................................................................20 Edit Your Contacts to Change Ringtones and Groups ......................................22 Set Speed Dials................................................................................................23 Make a Call ......................................................................................................24 Receive a Call ..................................................................................................26 Send an SMS (Text Message)..........................................................................27 Emergency Calls ..............................................................................................28 Notes on Text Modes, Predictive Text and Special Characters .........................29 Personalise Your Phone ...................................................................................31 Using File Manager ..........................................................................................36 Make a Video Call ............................................................................................37 Receive a Video Call ........................................................................................38 Set Alarms and Appointments ..........................................................................39 Send an E-mail.................................................................................................41 3 1.20 1.21 1.22 1.23 1.24 1.25 1.26 2 Advanced Operation ...........................................................................................50 2.1 2.2 2.3 2.4 2.5 2.6 2.7 2.8 2.9 2.10 2.11 2.12 3 Use Join Me to Connect your Phone to your PC .............................................. 50 Installing Join Me ............................................................................................. 51 Use Join Me to Copy your Pictures to your PC................................................. 52 Use Join Me to Copy Music Files from your PC to your Phone ........................ 54 Enter your Contacts using Join Me................................................................... 56 Import your Contacts from Microsoft Outlook ................................................... 58 Use Join Me to Connect your PC to the Internet .............................................. 59 Connect to a Bluetooth Device ......................................................................... 61 Other Facilities ................................................................................................. 65 Advanced Message Settings............................................................................ 70 Advanced Handset Settings ............................................................................. 73 Advanced Call Settings .................................................................................... 75 Technical Information and Help.........................................................................77 3.1 3.2 3.3 4 5 Take Pictures and Videos.................................................................................42 Send a Multimedia Message (MMS) ................................................................ 44 Receive a Multimedia Message........................................................................ 45 Browse the Internet using Telstra My Place...................................................... 45 Download Music, Pictures, Ringtones and Games........................................... 46 Use your Phone as a Music Player (MP3 Player)............................................. 47 Synchronize with a Network Server (SyncML).................................................. 49 Troubleshooting and FAQ’s .............................................................................. 77 Glossary of Terms ............................................................................................ 79 Technical Parameters....................................................................................... 80 Environmental Statement ...................................................................................81 Menu Listing ........................................................................................................83 4 How to use your belt clip Please Note The handset will only fit one way into the belt clip. It clips in gently and does not need to be forced. The screen faces inwards to provide protection and to prevent the screen getting scratched. Do not force the handset the wrong way into the clip as this will mark the handset casing. How to insert your phone into the belt clip Hold the handset upright with the screen facing the inside of the belt clip. Insert the bottom of the handset into the bottom of the belt clip. Gently push the handset in towards the top clip to secure the handset. How to remove your phone from the belt clip Gently push the top lever towards the back of the belt clip. The handset will be released. 5 Insert the handset with 1 the screen facing towards the back of the belt clip. 1 Remove the handset by gently pressing the top lever. 6 RF Safety Information The handset has an internal antenna located under the bottom of the keypad. For optimum performance with minimum power consumption do not cover the antenna area with your hand. Covering the antenna affects call quality, may cause the handset to operate at higher power level than needed, and may shorten talk and idle times. Radio Frequency Energy Your handset is a low-power radio transmitter and receiver. When switched on it intermittently transmits radio frequency (RF) energy (radio waves). The transmit power level is optimized for best performance and automatically reduces when there is good quality reception. Maximum power is only used at the edge of network coverage so under most circumstances the power output is very low. Under poor network conditions the phone will transmit at a higher power, may get hot and will have a significantly shorter battery life. Declaration of Conformity We declare under our sole responsibility that the product(s) detailed in this manual, and in combination with our accessories, conform with the essential requirements of The Radio Communications Standard (Electromagnetic Radiation Human Exposure) 2003 and the Australian Communications and Media Authority Section 376 of the Telecommunications Act 1997. Liquid Damage - Important Note The handset is compliant with IP54 which gives limited protection against dust and liquid ingress. It is not waterproof and should not be immersed in any liquid. The handset contains liquid detecting stickers and any liquid damage will be warranty void. To ensure water resistance the battery cover, antenna port and USB port covers must be properly closed. 7 General Safety Information The handset contains delicate electronic circuitry, magnets and battery systems. You should treat it with care and pay attention to the following points: • Handle the handset with care. Do not drop or throw the handset down roughly. • Do not immerse in any liquid. The handset contains a liquid detection sticker and the warranty will be voided by any liquid damage. • Do not place the handset near computer disks, credit cards, and other magnetic media. The information contained on disks or cards may be erased or damaged. • Do not leave the handset or battery in direct sunlight or near other heat sources where the temperature could exceed 45 °C. • Keep the handset, battery, charger and any other accessories away from children. • In the unlikely event of a battery leak avoid contact with your eyes or skin. In • • • • • • • • 8 the event of contact please flush thoroughly with water and consult a doctor. Observe and obey warning signs at petrol stations, airports and hospitals. The operation of some medical electronic devices, such as hearing aids and pacemakers, may be affected by the handset. Take care not to allow metal objects such as coins or keys to come into contact with the battery. Do not dispose of batteries in a fire. Do not throw used batteries into household rubbish, return them to a recycling point. (see Chapter 4) Do not connect the handset to any other chargers or cigarette lighter chargers. Only use the supplied charger. Be careful not to pierce the battery with • • • • • • • • • • in progress. • Switch your phone off when boarding aircraft. • Do not leave your handset at the bottom of a bag where it may be damaged by sharp objects. • Do not leave the handset discharged or disconnected for a long time, otherwise your personal data may be lost. • Remember to make backup copies of all important data on your handset • Take care when your phone is in your pocket. Sitting down may damage the handset. • It is normal for the handset to become warm while the battery is being charged. • Under poor network conditions battery life is considerably reduced • When the battery is thrown away cover the terminals with insulating tape. • Please recycle the packaging and all parts as stated in Chapter 4. sharp objects and do not use damaged batteries. Do not disassemble or modify the battery. Stop using the battery if abnormal heat, odour, discolouration, deformation, or abnormal condition is detected during use, charge, or storage. Do not put the battery in your mouth. Only use original batteries. Using any unauthorized battery may affect your handset performance or may cause danger of explosion, etc. Only use original replacement batteries. Do not attempt to dismantle the handset or any of its accessories. Do not place the handset close to the edge of a table in case it moves when set on vibrate mode. Do not put the handset into a microwave oven, dryer, or high-pressure container. Do not use your handset while driving or operating other machinery. Do not use the handset where blasting is 9 Support Information • For technical support please consult this manual and search our web site and FAQ section at www.zte.com.au. For Warranty Service in the event of a fault please call 1800 670 796. • Please do not call the warranty service line for general support enquiries. • All calls for PIN number enquiries, Network problems, Telstra Next G Services, BigPond account information, Web Access, Account and Billing Information, USIM card registration and general enquiries should be directed to Telstra on 125 111. Warranty Information The warranty does not apply to defects or errors in the product caused by: (a) Reasonable abrasion (b) Misuse including mishandling, physical damage, improper installation, unauthorized disassembly of the product (c) Water or any other liquid damage (d) Any unauthorized repair or modification (e) Power surges, lightning damage, fire, flood or other events outside ZTE’s reasonable control (f) Use of the product with any unauthorized third party products such as generic chargers (g) Any other cause beyond the range of normal usage for products. The End User shall have no right to reject, return, or receive a refund for any product from ZTE under the above-mentioned situations. 10 Key Layout Camera Earpiece LCD Arrow Keys (Left/Right/Up/Down/OK) Right Select Key Left Select Key Back key Clear key Call key End / Exit and ON/OFF Long press the * Key to activate the key lock Long press the # Key to activate Meeting mode with vibrate Microphone 11 Key Layout Charger/USB port Volume Key & Headset jack Camera Top Button (Speed dial key) Left view Top and Back view Notes • Key lock is enabled by holding down the * Key. • Long press the # Key to activate Meeting mode with vibrate. • 12 Right view Display Icons Signal Strength of the Battery Level Indicator GPRS Network Signal Strength of the 3G Network Missed Call New SMS or Multimedia Message Missed Video Call New E-mail Divert All Calls is activated New Wap Push Message Silent Mode SMS or Multimedia Memory is Full Vibrate mode enabled E-mail Memory is Full Headset Mode Wap Push Message Memory is Full Headset and Vibrate Mode Roaming GPRS Attach Signal Strength of the EDGE PDP Context Established (Data Network Alarm is set Bluetooth ON 13 Getting Started 1.1 Install the (U)SIM Card The (U)SIM card (Universal Subscriber Interface Module) is the small plastic chip with gold contacts supplied by Telstra. This contains your phone number and acts as a store for your contacts. It can be moved between different phones if required. Insert this face down into the carrier inside the back panel of the phone. Make sure it is pushed all the way down as shown below: 14 1.2 Insert the Battery Insert the battery carefully with the contacts located against the gold springs. The battery will only fit one way. Close the case by locating the top of the plastic cover into the grooves and gently pushing the cover down to close it. 15 1.3 Switch the Phone on and Connect the Charger Press and hold the key for two seconds to switch your phone on. The phone takes about 20 seconds to initialize. Enter the PIN number supplied by Telstra with your (U)SIM card. The start up screen below is referred to throughout the manual as the Idle Screen: Charge Your Phone Insert the charger lead carefully with the arrow on the top. The lead only fits one way. Do NOT use excessive force to insert the lead. Check it is the right way round and lined up correctly. You can also charge your phone by connecting it to your PC using the USB data lead supplied. Please see the Advanced Section for more details on PC applications. 16 1.4 Charging and Battery Life • Only use the charger supplied. • Normal charge time is 4-5 hours. • When not using the phone for a long period, remove the battery and store it in a cool dry place. • Do not leave the phone connected to the charger for extended periods of time eg > 24 hrs. • If the battery is not fully charged after 3 hours please stop charging. • Charge the battery between 0°C~50°C. If the temperature of the handset is too high, switch it off and let it cool. • Battery life can be maximized by regularly allowing the phone to fully discharge before recharging the battery. • Charge the battery promptly when flat. • Under poor network conditions (less than 2 bars) it is normal for the battery to only last 1 day. • To maximize battery life, turn off Bluetooth and reduce the back lighting to 10 seconds (see Section 1.14 - ‘Personalise your Phone’). 17 1.5 Basic Navigation From the Idle Screen press the OK Key to access the Main Menu: The icons are described at the bottom of the screen. Idle Screen Main Menu Arrow Keys Use the Arrow Keys for shortcuts to menus, to move around the Main Menu and to move the cursor Up (Shortcut to My Place) Left (Shortcut to E-mail) Right (Shortcut to SMS Messages) Down (Shortcut to Contacts) 18 Select Keys The two keys at the top of the keypad are called the Select Keys. The left and right Select Keys are used to choose the options from the bottom of the screen. In the above example the Left Select Key opens FOXTEL and the Right Select Key launches BigPond. Back and Exit Keys Press the key to go back one step or the Idle Screen. 19 key to Exit to the Main Menu or the 1.6 Enter Your Contacts There are several methods available to enter contacts into your phone. The Getting Started Section deals with adding your contacts manually and copying contacts from a previous SIM card. See the Advanced Section for adding contacts from your PC and importing contacts from Microsoft Outlook. All contacts can be stored in Groups for easy management. Adding Your Contacts Manually • At the Idle Screen enter the phone number on the keypad and then press the Left Select Key to Save. • Press the OK Key to Create New Contact. • Add the persons name using the abc keys (see notes on entering text in section 1.13). • Press the OK Key to Save. • You can use the arrow keys to change the Contact type and Saving Location Copy Contacts from a previous SIM Card • Insert your old SIM card. Switch the phone on and press the Down Arrow Key to enter Contacts • Press the Right Arrow key once for USIM to show the list of Contacts from your old SIM card. • Press Options, More, Copy all to phone, press OK to Select and then press Yes to confirm. 20 Add a Contact from a Received or Dialled Call Number You can save a new contact from an incoming or dialled call number: • Press the key to bring up your All calls list. • The last call will be at the top of the list. • Press the Right Select Key to Save the number. • Enter the contact name, select the saving location and press the OK Key to Save. Add a Contact from a Received SMS (Text Message) You can save a Contact from a received SMS: • Press the OK Key and access your Messages Menu, and then go to your Inbox • View the required message and select Options. Press Use highlight object to save the number. • Choose New Contact to create a new contact from the received SMS number. Searching Contacts You can search your contacts by pressing the letter keys that correspond to your contact name. • Press OK Key and access Contacts menu (or press the Down Arrow Key) • From the contacts list press the initial letter key to bring up the contacts associated with that letter. 21 1.7 Edit Your Contacts to Change Ringtones and Groups Once you have added some contacts you can edit them to change the Group and to set a personalised Ring Tone. • Contacts are normally stored in the default Group, Unclassified. • You can move your contacts into other Groups: Mates, Family, Friends, Work, and VIP. • Regardless of Group, all your contacts are displayed under All records. • From the Idle Screen go to your Contacts list by pressing the OK Key—Contacts or just press the Down Arrow Key • Use the arrow keys to search and press OK to View the required Contact. • Press OK to Edit the Contact. • When you are in Edit mode you can assign a specific Group and change the Ringtone if desired. • Use the Down Arrow key to navigate through the menu. • Use the Right Select Key to Modify the incoming Ringtone. • Use the Left or Right Arrow keys to change Groups. • Changing the Ringtone to a personalised tune will let you recognise key callers instantly by their unique tune. 22 1.8 Set Speed Dials Once you have entered some contacts you can assign speed dial keys to your chosen contacts: • Press OK Key and enter the Contacts menu. • Use the Arrow Keys to scroll to the contact you wish to assign a Speed Dial Number. • Press the Left Select Key for Options. • Press 3 or scroll down to item 3 to Set speed dial. • Assign your chosen contact to the next available number (1, 2 and 3 are preset and cannot be changed). • You can set the Top Button to be your favourite speed dial for easy access • Press the OK Key to Setup the speed dial (or to Cancel an existing speed dial). • Press the key to exit when finished or the Back Key to choose another contact. Make a Call Using Speed Dial • From the Idle Screen press and hold the required Speed Dial Key to make a call to that contact. • E.g. A long press on the 1 key will automatically dial your voicemail number. 23 1.9 Make a Call Dial the number manually • If required press the * key twice for the International Prefix ‘+’. • Enter the number on the keypad and press the key to make the call. • When the call is connected you can press the OK Key for Handsfree mode. • Press the key to end the call. Choose a number from your Contacts list • Press OK Key and enter the Contacts menu. • Use the Up/Down Arrow Keys to scroll to your chosen contact. • Press the key to make the call. • When the call is connected you can press the OK Key for Handsfree mode. • Press the key to end the call. 24 Choose a number from your call list (received, dialled and missed calls) • Press the key to bring up your All Calls list. • Use the Up and Down Arrow Keys to scroll to the desired number (for last number redial select the top number). • Press the key to make the call. • When the call is connected you can press the OK Key for Handsfree mode. • Press the key to end the call. Notes • You can adjust the volume using the side Volume Keys. • The microphone is at the bottom of the handset. Be careful not to block it with your hands. • Press the Left Select Key for further options during a voice call. Use the Back key to return to the call menu. • Hold: Puts the current call on hold. You can dial a third party. Press hold again to switch your two calls. • End call: End the current call. • Record: Record the current call. The audio file will save to Tools-File Manager-Audios-My Audios. • DTMF Off/On: Enable or disable sending DTMF tones. Default is ON. • SMS: Switch to SMS interface during a call. • Contacts: Switch to Contacts interface during a call. 25 1.10 Receive a Call When you receive a voice call, the ring tone, illumination and vibrate function will activate (depending on your current profile setting). • Press the key or the OK key to answer. • Press the Right Select Key or the to reject the call • Press any other key to mute the incoming call (The ring is muted but the call is not answered) • When an incoming call has been muted you can press the key or the OK key to answer. Note: • When the headset is connected pressing the headset switch will answer the call. 26 1.11 Send an SMS (Text Message) From the Idle Screen press the Right Arrow Key to open the Messages menu: • Press the OK Key to select New Message. Press the OK Key to select Text Message. • Press the OK Key to select from your Contacts list or enter the number manually • Select the chosen contact and press the OK Key twice to enter your contact. • Press the Down Arrow key twice to move the cursor into the text field. • The default text mode is Predictive Text indicated by the En symbol for English (see 1.13) • Enter your text by pressing the corresponding keys once for each letter you require eg 43556 for hello. • Press Options to access My Words to add your own words to the Dictionary (see 1.13) • To change into conventional abc text mode press the # key to toggle between En, 123, ABC and abc modes. • When completed, press the Right Select Key to Send your message. 27 1.12 Emergency Calls To make an emergency call during normal use 1 Ensure that your handset is switched on and in service. 2 Press the key repeatedly to clear the display and return to the Idle Screen. 3 Enter the emergency number for your present location using the keypad, (eg 000) 4 Press key to call the number. Follow instructions received and do not end the call until told to do so. To make an emergency call without a (U)SIM Card When the (U)SIM card is not inserted, enter the emergency number and press or to make the call. Notes • Tell the operator which service you require. Give your position and remain stationary to get the best coverage. • Due to the nature of the cellular system, the connection of emergency calls cannot be guaranteed. • Never rely solely on any wireless device for essential communications like medical emergencies. 28 1.13 Notes on Text Modes, Predictive Text and Special Characters • Your current text mode is indicated by En (predictive text), 123, ABC or abc displayed directly beneath the battery symbol. • Use the # key to switch between different text modes En, 123, ABC and abc. • In ABC or abc mode press the key with the required letter once for the first letter, twice for the second letter etc. • Press and hold the key to enter the corresponding number. • To insert a space press the “0” key. To delete letters press the Clear key. • If the next letter is on the same key, wait until the cursor appears or press the Right arrow key to move the cursor on. • Press the 1 key for common punctuation marks. • Press the * key for special characters. • Predictive text (En) is based on a built-in dictionary and generates words from the combination of letters pressed. • In En mode press the letter keys once for each letter. For example to write “set”, press 738. • In En mode when you finish writing the word and it is correct, press OK to confirm • If the word is not correct use the * key to toggle between different available words and press OK to confirm or use My Words to add your own words to the dictionary • In text input modes (eg SMS, MMS and E-Mail) you can add your own words to the built-in Dictionary which is called My Words. Press the Options key to access My Words 29 My Words • • • • From the text entry mode press the Options key and press OK for My Words (The first time you use My Words press OK to add a new word) Press Right Select Key to Add a new word then press Ok to Save it. In My Words you can press the Options key to Edit or Delete words Unicode Characters and SMS Message Length The underlined characters in the above chart are Unicode Characters. This means that they are not part of the standard SMS character set and they require 2 SMS characters to transmit them. Normal SMS message length is 160 characters. If you exceed this the message will be sent by 2 SMS Messages. If you use any of the underlined characters in your message the message length is limited to 70 characters. If you exceed 70 characters then the message will be sent using 2 SMS messages. 30 1.14 Personalise Your Phone There are many ways to change the look and feel of your handset such as changing the background screen (wallpaper) and choosing your own ring tone etc. Advanced options such as downloading your own music and picture files are dealt with in the Advanced Section of the manual and generally require a PC. Advanced users will be able to explore the menus and set their preferred options as all the menus are intuitive and self explanatory. Change the Background Screen (Wallpaper) • • • • From the Idle Screen press the OK Key for the Main Menu. Press the Down Arrow then the Left Arrow for Settings, press the OK Key. Press OK Key to select Wallpaper. This opens the File Manager area of the phone. Press OK Key to open the Photos folder, scroll down and press OK to open the Wallpapers folder. • Choose a background screen from the available list and press Setting to confirm. • Once you have your own pictures saved on the phone you can select these from the My Pictures folder, see the Advanced Section for more details. 31 Change your Ringtone • • • • • • • From the Idle Screen press the OK Key for the Main Menu. Press the Down Arrow then the Left Arrow for Settings, press OK. Press the Right Arrow key twice to get to Profiles. Press the Right Select Key to Edit your current profile. Press the OK Key to modify the Ringtone. Browse to Audios, Ring to see the available built in tones. In the advanced section you can download and choose your own music files as the ringtone. Lock the Handset From the idle screen press and hold the * key then press the Right Select Key to lock the handset. To unlock press the * key followed by the Right Select Key. Switch on Vibrate Mode - Long press the # Key to enable Meeting Mode • • • • • • From the Idle Screen press the OK Key for the Main Menu. Press the Down Arrow then the Left Arrow for Settings, press the OK Key. Press the Right Arrow key twice to get to Profiles. Press the Right Select Key to Edit the profile. Go to item 4 - Ring Mode and press the OK Key to modify. Select the required mode and press the OK Key to confirm. 32 Switch the Key Tones off • • • • • From the Idle Screen press the OK Key for the Main Menu. Press the Down Arrow then the Left Arrow for Settings, press OK. Press the Right Arrow key twice to get to Profiles. Press the Right Select Key to Edit the profile. Go to item 6 - Keytones and switch them off if you prefer to have silent keys. Change the Screen Brightness • • • • From the Idle Screen press the OK Key for the Main Menu. Press the Down Arrow then the Left Arrow for Settings, press OK. Go to item 3 - for Brightness. Use the Up and Down arrows to set your desired level. Mute the Handset with a Single Key Press • You can mute your handset and switch it to Meeting mode with vibrate by pressing and holding the # key. • Press and hold the # key to engage and disengage this mode. Change the Backlight Duration Reducing the backlight duration to 10 seconds can improve battery life. • From the Idle Screen press the OK Key for the Main Menu. • Press the Down Arrow then the Left Arrow for Settings, press OK. • Go to item 2 for Backlight duration. • Set the desired time out for the backlight. 33 Set the Owner name The owner name is displayed on the Idle Screen. • From the Idle Screen press the OK Key for the Main Menu. • Press the Down Arrow then the Left Arrow for Settings, press OK. • Go to 4) for Owner name. • Type your name and press the OK Key to save. Disable or change the PIN Number • • • • • • • • From the idle screen press the OK key for the Main Menu. Press the Down Arrow then the Left Arrow for Settings, Press the OK Key. Press the Right Arrow Key Three times for Security. Press OK to Select Activate Security Codes. Press OK to Select PIN code. Switch On or Off and enter the PIN number to confirm. To change the PIN Number select Change Security Codes. Press OK to Select PIN code. Notes on PIN Codes • • • • PIN Code 1 is provided by Telstra. PIN2 Code is an additional PIN associated with your USIM card and is not normally used. Handset Lock is an additional PIN code used when you switch on the phone. If you forget your Handset Lock code your handset will need to repaired and you will lose your content. It cannot be reset after it is locked. 34 Customise the Shortcut Keys From the Idle Screen you can press the Arrow Keys to access various menus. It is possible to change the shortcut keys to your own preference. The default options are shown below. Up (Shortcut to My Place) Left (Shortcut to E-mail) ) Right (Shortcut to SMS Messages) Down (Shortcut to Contacts) To change the shortcut keys • • • • • From the Idle Screen press the OK Key for the Main Menu. Press the Down Arrow then the Left Arrow key for Settings, press the OK Key. Press the Right key for Handset Settings. Go to 5) for Shortcut Keys and make your preferred choices from the available list. You cannot change the My Place shortcut key as this is pre-defined by Telstra. This is just a small section of what can be customized. We encourage users to play with the phone to explore all the available menu choices. See the Menu Listing in the Advanced Section for the complete menu structure. 35 1.15 Using File Manager All user files and downloaded content are stored in the File Manager section of the handset. Browse the folders to find all the user accessible files that are stored on the phone. From the Idle Screen press OK for the Main Menu then press 1 or go to Tools and press OK • Press the OK Key to open the Phone File Manager menu. • The Phone File Manager folder structure is: • Photos ¾ Pictures Link to BigPond Photos ¾ My Pictures Default directory for pictures taken on the handset ¾ Wallpapers Contains background screens for the handset • Audios ¾ Audios Link to BigPond Music ¾ Ring Contains the pre-loaded Ring Tones ¾ My Audios Storage for your own Audio files (MP3 etc) ¾ BigpondMusic Link to BigPond Music • Videos ¾ Videos Link to BigPond Videos ¾ My Videos Default directory for videos you take on the handset • Others Downloaded Internet files, Bluetooth and MMS files 36 1.16 Make a Video Call • You need good quality 3G coverage to make and receive video calls. • Enter the phone number using the keypad or from your Contacts list. • Press the OK Key and select Video Call to dial out. • Press to end the call. • If the call is not successful you will be asked if you want to try a voice call instead. Press the Left Select Key for the following options during a video call: • Hold: Sends a still picture instead of your own image and the voice is muted. • Start recording video: Records video reception from the other party (i.e. received video stream). • Block my picture: Send a still picture instead of your own image. • Use back camera: Take a picture using the main camera at the back. • Brightness: Adjust the brightness. • Zoom: Change the magnification of your own image. • Own picture off: Hide your picture. • New text message: Send SMS during a video call. • Contacts: Switch to Contacts interface. 37 1.17 Receive a Video Call You will only be able to receive a video call when you have good 3G coverage with at least 3 signal bars. If you are browsing or playing video or audio files then the browser or media player will be suspended in the background while you answer the video call. When the call has terminated you can resume your previous operation. When you receive an incoming Video call • You will receive an incoming video call notification. • Press the Call Key • Press End Key to receive the video call. to end the video call. 38 1.18 Set Alarms and Appointments Set Alarms From the main menu select Tools then scroll down to the Alarm menu. Press Add to create a new alarm • • • • • • In the Setup alarm screen configure your alarm as required Daily Alarm goes off every day. Workday alarm goes off Mon – Fri only. Weekly alarm will go off at the same time each week. Once Alarm will only go off once. Set your desired Ringtone by choosing the Edit button or selecting Edit alarm of Options in the Alarm screen above. • Workdays are Mon – Fri and can be changed by selecting Set rest days under Options in the Alarm screen above. • If the Alarm time has passed you will not be able to save it. 39 Set Appointments through the Calendar If you use the Calendar function frequently we advise you to configure your short cut keys to enable quick access to the Calendar. See the Section 1.14 to change your shortcut keys. Otherwise you need to access the Calendar through the Tools menu. • • • • • • • • From the Idle Screen press OK for the main menu. Go to Tools then press the Down Arrow Key to the Calendar menu Press OK to open it. Press the Right Select Key to Add. You can add a Meeting, Memo or Anniversary. The Memo function does not allow you to set an alarm. Follow the prompts on screen to configure your appointment reminder If the Alarm time has passed or is before the event time you will not be able to save the appointment. 40 1.19 Send an E-mail • • • • • • • • From the Idle Screen press the Left Arrow Key to get to the E-Mail menu. Press Select to create a new E-mail. Enter the sender address e.g. [email protected] Press the down arrow to access the Copy To Field. Press the down arrow to access the Title Field. Press the down arrow to enter the Text field. Press the OK Key to Insert attachments. When you are finished press the Right Select Key to Send. Email Settings • Under Settings you should configure your own Email parameters. See the Advanced Section on how to do this. • The default Email client is connected through BigPond. • You can configure other Mailboxes (e.g. Gmail, Yahoo etc) to receive Emails from external addresses. • See your E-mail provider for the POP Server details etc and see the Advanced Section for more information. 41 1.20 Take Pictures and Videos Your phone has two cameras for still and video pictures. The main camera is on the back and the video camera is on the front to face you when make a video call. Take Still Pictures • • • • • From the Main menu select Multimedia then Camera You can choose the front or back cameras under Options Press the OK Key take a picture. Use the Up and Down arrows to control the zoom* Press the Options button to: ¾ Change the Photo Size* and orientation ¾ Change the Quality ¾ Change the Brightness ¾ Change the Contrast ¾ Apply an effect (black and white or sepia) ¾ Change the camera shutter sound ¾ Camera change (front to back) ¾ Go to other options (Video Camera, etc.) * The default photo size is small to enable easy sending by MMS and Email. If you wish to view your pictures on a PC then change the picture size Max.1024 x 1280 by going into Camera, Options, Photo Size. Zoom is not available on 1280 x 960 as the screen is already at maximum resolution. 42 Make Videos From the Main Menu go down to Multimedia and press OK to select. • Go down to option 2) for Video Camera. Press OK to Record your video. • Press Options to change any of the following settings: ¾ Video size (The default length of the video is only 15 seconds. Change this if required.) ¾ Video Quality ¾ Brightness ¾ Contrast ¾ Effect (normal, black and white or sepia) ¾ Video sound ¾ Video format, MP4 or 3GP ¾ Camera change (Use the front / back camera) ¾ Switch to Camera (for still shots) 43 1.21 Send a Multimedia Message (MMS) When you send a Multimedia Message you can attach a picture, music or video file. • • • • • • • From the Idle Screen press the Right Arrow Key to access the messages menu. Press OK to create a new message. Press the down arrow to access Multimedia message and press OK to Select. Enter the phone number or use Contacts to select a number. Enter text in the title field if required. Press the down arrow to enter the text field. When you are in the text field you can press the OK Key to Insert an Image, Audio or Video file. • Browse to your photos, audios or video folder and select the file. 44 1.22 Receive a Multimedia Message When you receive an MMS you get a standard message alert. Press OK to View the message. If required press Retrieve to download the message. When the message has downloaded press the Left Select Key for Options. Choose Use Highlight Object to Save the file. 1.23 Browse the Internet using Telstra My Place The internet enables you to search and find useful and fun information and to enhance your phone by downloading ringtones, pictures, movie clips, videos and games. Press OK key twice to access the My Place menu. See your Telstra Next G Guide and the advanced section for more details. Telstra My Place Menu Listing 45 1.24 Download Music, Pictures, Ringtones and Games There are various ways to enhance your phone by downloading content from the internet. The Bigpond Downloads section is free to look at so you can easily see what is on offer. The downloads are regularly updated by Telstra. • • • • • Press the OK Key to access the Main Menu, select Games & apps. Go to Downloads and press the OK Key to Select. After updating you can see the choices available to download content to your phone. You can choose Tones, Pictures, Games, Music Videos etc. Use the BigPond Music Player application in the same menu to play music and to see your available tunes. • See the advanced section for more details and for alternatives ways to import music (using a PC). 46 1.25 Use your Phone as a Music Player (MP3 Player) Once you have downloaded music or imported it from your PC (see 2.4) you can play your own music on your phone. Method 1, Using the BigPond Music Player • • • • From the Main Menu go to Games & Apps. Select the BigPond Music Player. Press the Down Arrow key for My MUSIC, press Options and Scan for New Files All your downloaded and imported music will be displayed in the list and you can create a playlist under Options. Method 2, Use File Manager • From the Main Menu select Tools. • Press the OK Key for File Manager. • Go to the Audios directory, My Audios and open the desired music file. 47 Method 3, Create a new Playlist and Operate your Music Player When you have some music files stored on your phone you can create a playlist to play your songs in the preferred order, this also enables you to use the side keys to access your music files. • • • • • • • • Go to the Main Menu and choose Multimedia. Use the Right Arrow key to go to Favorites and select Playlist. Choose Add to create a new Playlist. Browse through the File Manager directory structure to get to your chosen files. Use the Mark button to select multiple tracks to create your playlist. Make sure you Save the playlist. Access your Playlist and Play your songs. Long press the Volume keys to step through your chosen tracks, or use Pause and then the volume key to skip. 48 1.26 Synchronize with a Network Server (SyncML) You can use SyncML to enhance your Personal Information Management by synchronizing the contacts and calendar information on your handset with those on a network server. • From the Main Menu, go to Tools. • Press the Down Arrow Key to get to SyncML. • Complete the Sync settings before synchronizing the contacts and calendar. Contact your service provider for more details • You can select to use Two-way fast sync or Two-way slow sync. • You can use Query log to view the Syncml info. 49 2 2.1 Advanced Operation Use Join Me to Connect your Phone to your PC Join Me is a PC application that enables you to connect your phone to your PC. Once you have installed it you can connect your PC to the internet, copy music and picture files from your personal collection, and use your PC to enter and back up your contacts. Compatibility • The software is only compatible with Windows XP Service Pack 2 and Windows 2000 SP 4 and Windows Vista but cannot be guaranteed to run on these systems. • It is not compatible with Microsoft Vista 64 bit, ME, 98 or 95 or with any MAC OS. • The software may not run in all PC environments, or in conjunction with other software. • Multi-boot systems are not supported • The software should be installed and run under the Administrator login Installation • Please follow the installation steps carefully. • If the installation fails please see the ReadMe file on the CD or consult our web site for more help. www.zte.com.au *Windows 2000, Vista and Windows XP are registered trademarks of the Microsoft Corporation. 50 2.2 Installing Join Me Please install Join Me from the CD before connecting your phone to your PC. • Insert the CD provided into your PC. • The CD should auto-start after a few seconds. • The installation shield will launch and guide you through the install set up. • Please follow the prompts to install the software. • When the installation is complete plug your handset into your PC using the USB lead supplied. • The USB lead is unique and should not be used for other devices (It is not the same as digital camera leads). • When you plug in the handset the PC will automatically install the drivers. If this fails consult our website for more help or access Windows Device Manager to update the drivers. See www.zte.com.au for instructions. • If you have plugged your phone into your PC before installing the CD then the drivers will not be installed correctly. • Unplug your phone, un-install then re-install Join Me. • Plug your phone back in and see if the drivers install. See www.zte.com.au for full instructions. 51 2.3 Use Join Me to Copy your Pictures to your PC If you have taken some photos on your phone you can transfer them onto your PC using Join Me: • Make sure your phone is switched on and connected to your PC, and Join Me has been installed. • Double click the Join Me icon on the desktop. • Select the phone type and press Connect. • Press OK to download your Contacts and Messages (you can switch this off under Tools, Settings). • Go to the Media tab as shown in the picture on the next page. • Double click on My Phone in the bottom left hand corner. • Double click on Photos to expand the folder structure. • Double click on My Pictures to see your picture files on the right hand side. • Drag* the required file from the file list and Drop* it into the required destination folder on the PC. • The file will be copied to your destination folder (Desktop in the example below). • You can only drop files into Folders. • The default picture size is very small when viewed on the PC. See section 1.20 to change the image size. Tip: * Drag and Drop is a method of copying files. Click on the file, hold down the left mouse button, move the mouse pointer to your required destination and release the left mouse button to Drop the file to that location. 52 1. 2. 3. 53 Open the Media Tab in Join Me Open the My Pictures folder on My Phone down the bottom of the screen. Drag the picture from the file list up to a folder on your PC. 2.4 Use Join Me to Copy Music Files from your PC to your Phone If you have MP3 files on your PC you can transfer them onto your phone using Join Me. • Make sure your phone is switched on and connected to your PC, and Join Me has been installed. • Double click the Join Me icon on the desktop. • Select the phone type and press Connect. • Choose OK to download your Contacts and Messages (you can switch this off under Tools, Settings). • Go to the Media tab as shown in the picture on the next page. • Double click on My Phone in the bottom left hand corner. • Double click on Audios to open up the Audio folders. • Find the MP3 files on your PC by browsing through the Windows file structure in Join Me. • Drag the required file from the top half (on your PC) and drop it into My Audios on the phone. • The file will be copied to your destination folder (as shown below). You can only Drop files into Folders. • You can also Right Click on the file to choose Copy, and then go to your destination folder and Paste. • MP3, WAV and MIDI Files are supported but MP3 is preferable due to smaller file size. • Long file names are NOT supported. If the music file has more than 39 bytes it will need to be renamed. • You can use a program such as Free RIP (available free on the internet) to convert your CD’s into MP3 files. 54 Copy your selected MP3 File from your PC to the My Audios folder on your handset. Use drag and drop or Right click on the file, select Copy and then paste it into the correct destination. 55 2.5 Enter your Contacts using Join Me You can use Join Me to enter new contacts into your phone. . On the phone book tab you can enter your contacts directly using the PC. Select “New Contact” then complete the details. Select the Save Position; Local, Phone or (U)SIM 56 Select All by checking this box. Drag and drop the complete list to Local 57 2.6 Import your Contacts from Microsoft Outlook • Launch Outlook and have Join Me running and connected your handset • Note At the end of the import process Outlook can shut down. Please save any information beforehand • On the Phonebook tab in Join Me right click and select Import From Microsoft Outlook • The following fields are imported from Outlook to Join Me as below: Outlook Full Name Mobile Telephone Number Home Telephone Number Business Telephone Number Company Main Telephone Number Other Telephone Number Company Name Profession Email Address Web Page JoinMe Name Home mobile Home phone Work mobile Work phone Other mobile Company Notes Email Web 58 2.7 Use Join Me to Connect your PC to the Internet You can use your mobile phone as a dial up modem to connect your PC to the internet. The latest HSDPA wireless network technology achieves broadband speeds. Please see Telstra for a list of applicable data charges. • • • • Install and run the Join Me program as above and connect your phone In Join Me go to Tools, Settings on the top menu bar Select the Modem Setting tab as shown below Enter “telstra.internet” in the APN setting as below. Make sure it is all in lower case 59 • • • • The user name and password fields should be blank Press OK to save your changes You can now access the internet by going to the Internet tab and pressing Connect. Once you are connected launch Internet Explorer to browse the internet in the usual way. Notes: • Data charges can be quite high. Consult Telstra and connect to a plan if you require regular access. • Telstra.Internet is the default setting that will always work. If you subscribe to a data plan then change this to Telstra.pcpack or Telstra.datapack as instructed by Telstra. 60 2.8 Connect to a Bluetooth Device Your mobile includes Bluetooth which can be used to connect your handset to wireless headsets and hands free car kits. You can also transfer files between your phone and other Bluetooth devices such as another phone or a laptop. Not all applications or devices can be supported as Bluetooth is an open forum and different manufacturers adopt different standards and implementation. As a guide we support Bluetooth 1.2 with Handsfree and Headset Profiles. We also support FTP for file transfer to a PC or to another device. All manufacturers use different methods of implementation so it is best to consult your device manufacturer for compatibility and connection issues. Please follow the process carefully as it can seem tricky to connect to a Bluetooth device first time around. Once you have paired up and connected to a device the process becomes more automatic. 61 Connect to a Bluetooth Mobile or Laptop Device • From the Main Menu select Tools. Scroll down to Bluetooth and press OK to select. • Press OK for the Bluetooth Manager then press the Left or Right Arrow Key to switch Bluetooth on. • Go down then press the Left or Right Arrow Key to Show. Press OK to confirm. • Go down to My Devices and press OK. Press Search to look for Bluetooth devices. • Your chosen device must be switched on and in pairing mode. • You should see the required device listed in the Device List, Press OK to Connect. • You will be asked to submit a password. Usually 0000 or 1234, consult your device for more information. • If you are connecting to a PC or another mobile enter the same password when requested by that device. • Once the password has been shared and accepted by both devices they are paired and connected. 62 Use Bluetooth to Transfer Files to a PC or another mobile device • • • • • • • From the main menu go to Tools-- File Manager Browse through the folders to your chosen file Press the Left Select Key for Options. Choose Send then Select Bluetooth and press the OK Key If no devices are shown press Search. Select the device you wish to send your file to. Enter a pass code (if requested) and use the same pass code on the other device (eg 0000) Note: The files in the folder Wallpapers, and Ring can’t be sent via Bluetooth. Receiving Files from Another Device If another paired device tries to send a file to your phone this dialogue will appear. Press Yes to accept the incoming file transfer. 63 Connecting to a Bluetooth Car Kit or Personal Headset Please follow the manufacturers’ instructions carefully regarding getting your Bluetooth device into Pairing Mode. You cannot connect your phone to the far end device unless Pairing Mode is enabled. Usually the device will flash rapidly to indicate pairing mode. After finding the device you need to share a password and press Connect. • Make sure Bluetooth is on and in Show mode and the other device in is Pairing Mode. • From your handset go to the Bluetooth menu and press the OK Key to open My Devices. • Press the Right Select Key to Search. • From the list of available devices move the cursor to the required device and press OK to Connect. • Enter the pass code specified in the user guide of your far end device (Usually 0000 or 1234). • The far end device will acknowledge the connection and your handset will report the device has been added. • In My Devices go to your new device and press the OK Key to Connect. • The devices are now paired. • When you get an incoming call this will be sent to your Bluetooth device automatically, press the call button to answer. • Use the Call button on your Bluetooth device to activate Last Number redial. The phone will automatically dial out the last number. 64 2.9 Other Facilities Stopwatch The phone has a built in stopwatch accessible through the Tools menu. • • • • Press OK Key to start timing. Press OK Key to stop timing. The screen will show the event time. Press OK Key to continue timing. Press Right Select Key to reset. Calculator The phone provides a simple calculator accessible through the Tools menu. • Press 0~9 key to enter numbers, Decimal to enter the decimal point. • Press Up/Down/Left/Right key to choose +, –, ×, ÷. • Press the Clear key to clear last digit and results. • Press OK Key to Calculate. Press End key or Back to exit the calculator. 65 World Time World Time is accessible through the Tools menu. • The world time function provides time information on major cities worldwide. • You can scroll to the desired city by using the Left/Right arrow keys. • Select your city and then press the OK Key to save the selected city as your home time zone. • Note changing time zones changes the current time setting. Pocket News Pocket News is accessible through the Tools menu. • This service is provided by Telstra and incurs charges for use. • Please contact Telstra for more information. • Up to date news, finance, weather information etc are sent to you via SMS when activated. 66 Java Games • You can download games from your service provider or other specialist portals. • Your handset supports Java Midlet 2.0 • You can also download files onto your PC and use Join Me to copy them over • Copy Games into the Other directory then select Open to install the game • Games are installed in the Games & Apps location on the handset Browser • • • • • You can access a generic Browser through the main menu The home page is Telstra BigPond You can enter your own URL using the Go To option You can view your internet History and connection records You can create a new connection profile under Connect Setting in Options. • You can erase and set Cookies and other options under Options 67 WAP Push Messages • WAP Push Messages are indicated by the Icon on the main display • Use the Browser to view your Push Messages • Push Messages are usually advertising or spam. • They cost money in data charges to retrieve the messages • You can set Refuse to Receive under Browser, Options, Push Settings Voice Recorder • • • • • Access the Voice Recorder function from the Multimedia directory. Press OK Key to Start recording your voice memo. Press OK Key to Pause/Contin. recording. Press Right Select Key to stop recording. You can save by pressing the OK Key. The file will be saved to My Audio folder. • Press Right Select Key to Discard the voice memo. • Press Left Select Key to Send the memo via MMS or E-mail or Bluetooth. 68 Slide Show • • • • • Access the Slide Show function from Multimedia, Favorites Add pictures by pressing Add Browse to My Pictures and Mark the pictures you want. Press OK to finish, press Edit and then Save. Use Options to Create new slide, Rename, Delete, Delete all, and view the image Info. Streaming URL Streaming URL are links to audio or video streaming content available through the browser. The streaming content is only available while you are connected to the server and depends on your network provider. • Press Add to add a new streaming URL. Enter title and URL address etc. Press Options for the submenu: • New Bookmark: Create a new bookmark. • Send: Send the URL address as a message or E-mail. • Delete: Delete the address etc. • Delete all: Delete all URL addresses. • Info: View title and URL address. 69 2.10 Advanced Message Settings You can configure your SMS, MMS and Email Settings. From the Main Menu, go to Messages and Settings. Multimedia Message Settings • • • • • • • • • • • Retrieval Settings: Manual, Automatic or Manual when roaming Delivery mode: You can set immediate delivery or defer. Delivery time: You can set delivery time of deferring for a specified period of time. Time per page: Set MMS time per page. Delivery reports: You receive a confirmation from the network when the message is delivered to the recipient. Validity: Messages are saved on the network for this period or until the message is delivered. Anonymous msg: You can choose to accept or refuse anonymous messages. APN: Access Point Name. Preset by your network provider.* Server address: Set the server address for MMS.* Proxy server address: Set the proxy server address. Preset by your network provider.* Proxy server port: Set the proxy server port. Preset by your network provider.* Tips: *Changing these settings will affect your receiving and sending multimedia messages. 70 Text Message Settings • SMS centre number: The default is +61418706700 • Expired Time: Select the period over which the message centre will attempt to deliver the message. • Status report: The network informs you when your message has been delivered. • Cell name display: On or Off. E-mail • From the Main Menu go to Messages then press the Right Arrow key to go to the Email tab. • Go to 7) for Settings, press the OK Key. • Press OK key again for Mailbox Settings. • Press the Right Select key to Edit the BigPond settings. • Add your username, password, full E-mail address, Display name etc. for your Bigpond Account. • To create your own mail box settings use Add from the Mailbox Settings menu. • See the table on the next page for some common examples. • Consult your E-mail service provider for more details. 71 Example Alternative Email Provider Settings Google Netspace Mailbox Name Gmail Netspace Username [email protected] [email protected] Password Xxxxxx Xxxxxx My E-mail address [email protected] [email protected] Display name Google Netspace Outgoing server smtp.gmail.com mail.netspace.net.au Outgoing port 465 25 Sending options Foreground Foreground SMTP Authentication OFF OFF Automatic signature Optional Optional Signature Add if required Add if required Incoming Server pop.gmail.com pop.netspace.net.au Incoming Port 995 110 Mail to retrieve 500K 500K Save to server Save Save APN Telstra Internet Telstra Internet 72 2.11 Advanced Handset Settings From the Main Menu go to Settings then press the Right Arrow Key for Handset Settings. Network • Preferred mode: You can lock your handset to GSM.or UMTS (3G) Networks • Preferred Band: You can lock the handset to certain bands, U = UMTS, G = GSM • Preferred selection*: You can specify which network to register with from a list of available networks. Preferred Selection will override the Preferred Mode setting. * If you make a Manual Network Selection this will override the automatic settings in Preferred Mode and the handset will stay on your chosen network and related band. ie If you choose Telstra GSM the Preferred Mode will switch to GSM and remain in GSM-only mode, select 3G network, Preferred Mode will be 3G Only. Further searches performed under the Preferred Selection>Manual mode will only detect networks from respective band (GSM or 3G only depending on selected network). To return back to normal mode set Preferred Mode and Preferred band to Automatic. Restore default settings • If your handset is not working as normal you can restore the handset to its default factory settings. The Handset Lock Code is 0000. User content will not be erased. Network time • The Time and Date automatically updates from the Network. Switch this off if not required or if your time zone is not updated correctly (eg Interstate border areas). 73 Access Point Settings • The default Access point is Telstra Internet and Telstra MMS. Only change this setting if instructed by Telstra. • The Username and Passwords are usually blank and are not required to connect 74 2.12 Advanced Call Settings From the Main Menu go to Settings then press the Right Arrow Key 4 times for Call settings VideoPhone Setting • • • • • The following fields are preset by Telstra The VIG Number is +61418707888 The UUS Type is Email The UUS String is blank Contact Telstra for more details Voice Mail • Your Voice mail number is preset to +61101. You can access your Voicemail by using the Speed dial 1 key. • From the Idle Screen long press the 1 key to access your Voice mail Video Mail • Your Video mail number is preset to +61101. You can access your Video mail by using the Speed dial 2 key. Call Divert This service enables you to divert incoming calls to other numbers. Use the menus to choose which diverts you want activated and to check the status of your diverts. 75 Call Waiting If Call Waiting is active on your account and you are on the phone you will hear some pips when you get another incoming call. Press the button to switch between calls. Call Barring You may need to contact Telstra to get this enabled on your account and you will need the network password. This is provided with your (U)SIM card documentation, usually 1234. • Bar all outgoing calls: Calls cannot be made. • Bar outgoing calls (international): International calls cannot be made. • Outgoing international calls except for calls to the home country: When abroad international calls can only be made to numbers to your home country. • Bar all incoming calls: Calls cannot be received. • Bar incoming calls when international roaming: Calls cannot be received when you are overseas • Cancel all call barring: Cancel all the previous call barring settings. • Change password: Change the barring password. It is needed when you activate or erase call barring. • Select Activate/Deactivate to enable/disable the function • Select Check status to query the current status of the function. Send my Number This function allows you to send or hide your number when making calls. You can choose to have it set by the network or switch it on or off. 76 3 3.1 Technical Information and Help Troubleshooting and FAQ’s Please check the manual thoroughly before contacting your service provider and read the issues below: Symptom Resolution Enter PIN Input the correct PIN number as supplied by Telstra. See section 1.3 Check you have inserted a valid (U)SIM card. See Installing the (U)SIM Card. Try another card if available. Insert (U)SIM Enter password or Unlock Code Enter the unlock code. Default is 0000. See Settings, Security (No) key tone when pressing keys Check the key tone settings in your current profile. See section 1.14 No incoming ring tone Check the ring tone and ringing volume settings in the profile. Check the handset is not muted (Long press the # Key) No alarm tone Check the profile setting (silent) and the alarm ring setting A phone number cannot be dialled Check whether any call restrictions are set. See Advanced Call Settings Short message cannot be sent Check the SMS centre setting in the SMS-Settings menu. Restore Defaults 77 How do I switch off Predictive Text ? In any text entry mode press the # key to toggle between different modes. The battery discharges quickly Your Network coverage is poor. Check your signal bars. With only 1 or 2 bars the network is poor. Battery life of only 1 day is normal under these conditions. Switch off Bluetooth to help save power. Try changing network to GSM (2.12) How do I enter text in an SMS ? From the phone number field press the Down arrow twice to move into the text area. Use predictive text to complete words, press the * key to toggle different words, press OK when correct. Use abc mode to manually type words that are not included. How do I change the Ringtone ? See Section 1.13 Edit the current profile and select a new tune from the Audios directory. How do I transfer pictures via Bluetooth to a photo printer (eg Kodak) ? This is not supported. Your handset requires a security password to be enabled and the Kodak printers cannot provide a password. This is due to different Bluetooth profiles. Copy your photos using Join Me. 78 3.2 Glossary of Terms 2G or GSM Second Generation wireless communication system. 3G Third Generation wireless communication system. 3G offers video services and high speed packet-data service. APN Access Point Name. This is the gateway to Internet Services Avatar is a small bit-map cartoon style picture Bluetooth is a wireless standard to allow devices to connect and share information without using any cables HSDPA High Speed Digital Packet Access. Wireless data rates up to 14.4Mbps MMS Multimedia Message Service. Send videos, pictures, audio files and text to phones and e-mail addresses. Next G Also called 3.5G. Next G offers enhanced data rates and features using HSDPA technology Pairing Mode is a Bluetooth facility to connect two devices together Roaming Use of your phone overseas. (U)SIM Universal Subscriber Identity Module provided by Telstra. Can be used to copy Contacts between handsets. UMTS Universal Mobile Telecommunications System Video Call Allows users to communicate by video instead of normal voice calling. Only available on 3G. Voice/Video Mail An answering service that automatically answers your calls when you are not available. 79 3.3 Technical Parameters Handset Standards WCDMA 850MHz, 2100 MHz with HSDPA data 900MHz GSM, 1800 MHz GSM and 1900 MHz GSM Dimensions W×L×H Approx 51mm ×123mm × 23mm Weight Approx 160g (Including standard battery) Features MP4 video, MP3 audio, 1.3MPixel camera, Video Phone, USB connectivity, MIDP 2.0 JAVA 225MHz Processor, 262K Colour Screen, MMS Video and Picture, E-mail, Calendar, Speakerphone, Voice Recorder, Bluetooth. Battery 1700mA hours, Lithium ion (Li-ion) Continuous idle time* 400 hours in GSM mode, 350 hours in WCDMA mode. Continuous talk time* 360 minutes on GSM network, 300 minutes on WCDMA network, Video call 150 minutes Charge time Approximately 5 hours Battery Life Approximately 400 charge cycles. Note: * The phone’s talk time and idle time are based on ideal working environments. The use of extended backlighting, browser, and network conditions can reduce battery life and talk/idle time. 80 4 Environmental Statement Your ZTE handset is made using the latest manufacturing techniques and environmental standards to reduce waste and hazards to the environment. However at the end of life of the equipment the manufacturer recommends that you return the handset and accessories to your nearest re-cycling depot or send it to our recycling agent below. Valuable materials such as gold, silver, and copper can be recovered from the handset. Any toxic materials will be prevented from entering the environment and the waste materials will be recycled. At the end of life of the equipment please send your handset, batteries and charger to: MRI (Australia) Pty Ltd or 20-24 Dennis St MRI Sydney 1 – 4 Bentley Street Campbellfield Wetherill Park VIC 3061 NSW 2164 www.mri.com.au MRI Australia recycles every part of the equipment and diverts over 90% of the materials from landfill for re-use. 81 Character Chart Key Corresponding Characters 1 1 and some common punctuation characters eg . , ? ! @ ‘ 2 ABCabc2 3 DEFdef3 4 GHIghi4 5 JKLjkl5 6 MNOmno6 7 PQRSpqrs7 8 TUVtuv8 9 WXYZwxyz9 0 Space 0 * key # key Press * key for character set. Press twice for International Prefix ”+” Toggle different text modes. Long press to activate Silent Mode Up/Down key Move the cursor up/down. Move along Tabs Left/Right key Move the cursor left/right. Toggle various options End key Exit 82 5 1) Tools 1. File Manager 2. Alarm 3. Calendar 4. Stopwatch 5. Calculator 6. World Time 7. Bluetooth 8. SyncML 9. PocketNews Menu Listing 2) Messages B. E-mail 1. New Email 2. Inbox (0/0) 3. Outbox (0) 4. Drafts (0) 5. Sent (0) 6. User Folders 7. Settings 2) Messages A. Message 1. New Message 2. Inbox (0/0) 3. Outbox (0) 4. Drafts (0) 5. Sent (0) 6. User folders 7. (U)SIM Inbox 8. Settings 1 - Mailbox settings 1 - Mult. Msg. Settings settings 3 - Templates Settings 3 - Automatic 9. Memory info. 4) Contacts All Records (U)SIM Mates Family Friends, Work, VIP Unclassified 2 - Template 2 - Text Msg. Settings retrieval 5) My Place BigPond, FOXTEL Yellow search, BigPond Music, My Email, Call 1234 info, BigBlogs&Photos Whereis maps, Downloads, My Account 83 8. Memory info. 6) Calls A. Call log 1. All calls 2. Missed calls 3. Received calls 4. Dialled calls B. Calls Info. 1. Call duration 3) Games & apps Applications Downloaded applications Downloads BigPond Music Player Settings 1. Bookmarks 2. Proxy Settings 7) Settings C. Profiles 8) Multimedia 9) Browser 1. General A. Digi.Eq 1. Home 1. Wallpaper 2. Meeting 1. Camera 2. Go to 2. Backlight 3. Outdoor 2. Video camera 3. Bookmarks 4. Silent 3. Media player 4. History 4. Voice recorder 5. Page memo A. Screen duration 3. Brightness D. Security 4. Owner name 1. Activate security codes B. Favourites 6. Push messages 5. Greeting 2. Change security codes 1. Playlist 7. Options B. Handset 3. Fixed dial numbers 2. Slide show 4. FDN list 1. Connect Setting 1. Language 3. Streaming URL 2. View 2. Time and date E. Call 3. Network 1. Videophone setting 4. Own phone 2. Voice mail number 3. Video mail 5. Shortcut keys 4. Call divert 6. Connection 5. Call Waiting 7. Access point 6. Call Barring Settings 3. Cache 4. Cookies 5. Certificates 6. Push settings 7. Background music 8. Reset 9. About browser 7. Send my number 8. Restore default settings 9. Keylock 10. Network time 84 Index Advanced Operation ...48 Charger ...................... 14 Modem Settings ..........71 Appointments ..............37 Charging..................... 15 MP3 Player .................45 Background.................29 Contacts ......... 18, 19, 20 Multimedia Message ...42 Backlight Duration .......31 Dictionary ................... 27 Music Player ...............45 Battery ..................13, 15 Download Music ......... 44 Mute............................31 Bigpond.......................44 E-Mail ......................... 39 My Place .....................43 BigPond Music Player .45 Emergency Calls ........ 26 My Words....................28 Bluetooth.........59, 60, 61 En............................... 25 Network time...............71 Bluetooth Car Kit.........62 Environmental............. 78 Owner name ...............32 Browse the Internet .....43 FAQ’s ......................... 74 PC............. 49, 50, 52, 57 Browser.......................65 Games........................ 44 PIN Codes ..................32 Calculator....................63 Glossary ..................... 76 Predictive Text.............27 Calendar .....................38 Groups........................ 20 Preferred mode ...........71 Call........................22, 24 Handsfree....... 22, 23, 59 Preferred selection......71 Call Barring .................73 Idle Screen ................. 16 Push Messages ..........66 Call Divert ...................72 Java Games ............... 65 RF Energy.....................5 Call Waiting.................73 Join Me................. 48, 49 RF Safety Information ...5 CD...............................49 Key Tones................... 31 Ringtone .....................30 Change Ringtones ......20 Make Videos............... 41 Ringtones....................44 Change PIN Numbers .32 Menu Listing ............... 80 Safety Information.........6 Character Chart ..........79 Microsoft Outlook........ 56 Screen Brightness.......31 85 Select Keys.................17 SyncML ...................... 47 Video Mail................... 72 Set Alarms ..................37 Take Pictures.............. 40 Voice Mail ................... 72 Shortcut Keys .............33 Technical Parameters . 77 Voice Recorder ........... 66 Silent Mode..... 11, 30, 79 Troubleshooting.......... 74 Wallpaper.................... 29 SMS............................25 USB............................ 14 WAP ........................... 66 Speed Dial ..................21 USIM card .................. 12 Warranty .......................8 Stopwatch ...................63 Vibrate Mode .............. 30 Workdays.................... 37 Streaming URL ...........67 Video Call................... 35 World Time.................. 64 86