1
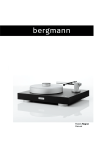
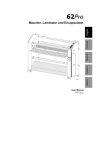
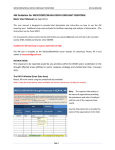
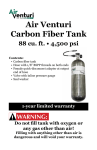
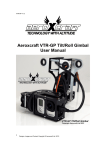
instruction manual
highpressure handpump manual
In t r o d uc tion
The FX pump is designed, manufactured and tested by FX Airguns AB in
Sweden. There are two patented systems. The first of them is the 3 stage
handpump that is capable of pressures up to 250 bar (3600 psi) with ease.
The latest invention is a 4 stage turbo handpump. It has an unique gearing
system that gives you the opportunity to gear down when it gets tough.
It allows the user to choose if they want high volume (300 cc) with lower
pressure or low volume (200 cc) with higher pressure. Both are equipped
with a exceptional two stage filtration system that ensures that both moisture
and and particles are eliminated from the compressed air. Please visit our
website www.fxairguns.com to check out the complete fx range of products.
Safety instructions and warnings
• For use only with precharged airguns.
• The pump requires a reasonable amount of physical exertion, If you have any
existing medical conditions please check with your doctor prior to use.
• Never exceed the manufacturer’s stated filling pressure.
• The maximum fill pressure for this pump is 250 bar (3600 psi).
• Attempting to disassemble, abuse or modification of the pump will immediately
Invalidate the warranty.
• Never dismantle the pump, in the event of a problem - Contact your dealer.
• Follow the operational instructions of both your airgun and the fx pump before use. • Do not lubricate it with oil.
• Lubricate with FUCHS RENOLIT RHF1 or similar.
• Never operate the pump for over 5 minutes at a time, Overheating may occur.
Keep hands and other sensitive parts of your body away from the ventilation hole and make sure that other people are not in the way of the ventilation hole when
bleeding the moisture trap.
• Continuously bleed the moisture trap when filling larger airtubes.
Make sure that threads on the pump, adaptors and airtubes are in good shape
and not worn before use.
2
3
assembly
Operating instructions
DIN 18 adaptor:
1 Attach your airgun adaptor in accordance with your airgun
manufacturers Instruction manual.
2 Unscrew adaptor (H) from the pump base and attach this to your Airtube adaptor.
3 Close ventilation screw (I)
4 Attach your air tube with adaptor(s) to the connector thread (H).
F
5
Charge your air tube to wanted pressure (see 5:5 For hints)
Note: Some airguns (steyr, Walther etc.) have cylinders that must not suffer
pressure loss when being disconnected after charging. To ensure this does not happen please jump to instructions at point 8. Otherwise proceed to point 6.
6 Open ventilation screw (I) quickly. This both releases the air lock between.
The pump and air tube as well as draining the moisture trap of moisture.
H
H
D
C
B
B
A
A
E
2
I
Mount footplate (A) at the pump base at point (C). Tool required: 19 mm (B) from beneath with the enclosed wrench/spanner (not included).
allen screws (F). Tool required: 5 If a hose is included with the pump Enclosed 3mm Hex Key (allenkey).
mount it at point (C) or (D) if
If the pump is equipped with a DIN18 External moisture trap is fitted. Use a (H) Adaptor jump to page 5 otherwise monkey wrench or a 14 mm’s key.
move on to 3.
Tool required: 14 mm wrench/spanner Make sure that seals are attached to (not included)
3
all connections.
6 Fit whatever connector your rifle is 4 If the pump is equipped with an
equipped with, make sure that it’s
external moisture trap (D) you should Threaded with 1/8“ connection mount this now to the pump base (B) before wmounting.
4
8 Carefully open the ventilation screw (I) for a short time only to allow water to escape.
9 If air pressure is lost, recharge your airtube with further pumping.
I
1
7 Disconnect your airtube from the pump base then your adaptor from the airtube.
Your are now ready to use your airtube.
10 Disconnect the airtube from the adaptor which should remain within the DIN Connnection (H). Your are now ready to use your airtube.
Hose with 1/8” connection:
1 Close ventilation screw (I)
2 Charge your air tube to wanted pressure (see 5:5 for hints)
3 Open ventilation screw (I) quickly! This releases built up moisture from the moisture trap as well as removing the overpressure in the hose so that you will be able to remove the filling adaptor from your airgun.
5
3-4 stage switch:
Fourstage pumps only!
Close the valve on the handle to obtain low volume mode (200 cc), You will feel
less resistance when operating but it will take longer to get to wanted pressure.
Open the valve on the handle to achieve high volume mode (300 cc), You will feel
slightly more resistance when operating but you will get to wanted pressure faster.
Trouble shooting
Problem
Solution
When I start pumping the manometer
does not move?
Check that the ventilation screw is
fully tightened.
The ventilation screw is tightened but
the manometer does not move.
Bad seals in connection between pump
and airtube, if so switch to new ones.
It requires much force to move the
pump handle both up and down.
(feels like it’s sucked down)
Probably the high pressure seal that’s
worn and needs replacement.
The manometer is going up when I push
down but goes straight back down
when I pull the handle upwards, (feels
like the handle pushes up by itself)
Probably the none return valve seal
that’s worn and needs replacement.
Service
If the tube surface (visible in extended position) should be dry you shall apply a thin
layer of Fuchs Renolit RHF-1 grease or a standard multipurpose grease.
The pump is equipped with a particle filter that might need replacement after a long
period of use.
Location
DIN 18 Connection:
Unscrew the Adaptor (H) and the filter is located in the threaded end.
Hose with 1/8” connection:
Filter is located in the end of the hose (E) between the hose and and the filterhousing.
If you use a FX Fillprobe you can aply the filter directly between the fillprobe and
the hose/filterhousing.
Hints and tips
Pull the pump handle all the way up while your feet rest at the foot plate (A). Then
push it down until your arms are straight down, use your body weight to push the
pump all the way down with arms straight and don’t forget to bend your knees!
6
We use regular 4,5 (.177) cleaning pellets as particle filter so you can easily get
hold of them.
The FX pumps are (other than above) maintenance free. Keep clean and make sure
you bleed the moisture trap properly.
7
ACCE S S OR I E S
Scopemounts
Sport Utility Rings have a unique wrap around
design, are available in 1 inch diameters, fits any
scope size (low, medium or high) and comes in
matte black.
Muzzle Flip
Suits all FX Rifles with
½” thread on the muzzle.
Mounted as standard on
the Verminator
FX optics 3-12x44 ir/ao
Objective Lens Diameter
Diopter Adjustment Range
Reticle
Parallax
Body Tube Diamater
Total Length
Total Weight
Lens Coating
44 mm
-2.0 / +2.0
Illuminated Red
30 yds-infinity
25.4 mm
412 mm
500 g
Fully Multi-coated
Addition
Shrouded barrel and barrelsupport.
Available as addition on some of the
FX rifles.
Single Scoped Rifle Case
Contoured recessed latches. Padlock tabs for added security Strong and ribbed construction.
Inner dimension: 121x27x7 cm.
9
FX HANDPUMPS
NEW!
Gauge assembly
This gauge suits all our front airtubes.
You can use it with or without barrel support.
NEW!
Four stage turbopump
The new Turbo Pump is equipped with a
patented 4 stage system. It has a unique
gearing system that gives you the opportunity to gear down when it gets rough. It
allows the user to choose if they want high
volume (300 cc) with lower pressure
Or low volume (200 cc) with higher pressure.
Features: Pressure gauge, moisture trap,
particle filter (replaceable), and bleed valve.
Unique Gearing system.
Three stage pump
The easiest most convenient and affordable way to charge your airguns Patented
three way system gives you 200 bar with
ease. Maximum fill pressure 250 bar.
Features: Pressure gauge, moisture
trap, particle filter (replaceable), and
bleed valve.
Connections: DIN or Kevlar hose 0,5 m
with 1/8” thread.
Tube clamp
Allows easy addition of a sling,
strap, bipod or other accessory
without any modification to the
fore end of the stock. Suitable
for all airtubess with a diameter
of 33 mm.
Barrel support
Requires newer version air
cylinder with raised section on
end cap. Available for standard
(14 mm). barrel and shrouded
versions (16 mm). Replacement
end cap is required if an older
version of cylinder. Is to be used
with barrel support.
Charging kit
Complete charging device for your scuba tank.
Features: Pressure gauge, particle filter (replaceable), and bleed valve. Connections: Kevlar hose
0,5 m with 1/8” thread / FX Fill probe and DIN in
scuba end.
Tube extension
Add this to your existing airtube
for additional volume.
Approximately 5 - 10 more shots
at high power. 45cc - 100 mm.
Pump accessories
Various adapters DIN to 1/8”. External
moisture trap, easy to service and clean,
1/8” connections.
FX Pellets
High performance domed (round tip) air rifle
pellets. Recommended for all FX products.
Calibre:
5,52 (.22)
weight 1,030 grams
(16 grains)
Calibre: 4,52 (.177)
weight 0,547 grams
(8,44 grains)
10
FX Airtubes
Available for all guns with removable airtube.
Front tubes
240cc - 500 mm • 185 cc - 390 mm
150cc - 320 mm • 65cc - 140 mm
45cc - 100 mm
Rear bottles:
500 cc and 400 cc
Maximum fill pressure 220 bar.
Cleaning pellets
Recommended for all FX guns.
Outstanding cleaning without
damage to the barrel. Available
in 4,5 (.177) and 5,5 (.22).
FX Magazines
Spare magazines in calibre 4,5 (.177) and 5,5
(.22). State type of gun when ordering.
11
com
airgun
s.
s.
n
c
rg
u
o
m
www.fxai
fx
w.
w
f
x
w
ww
.
ai
rg
w
uns.
com
FAG ERL ID • S E-548 92 H O VA • S WE D E N
I N F O@ FXA IRG UNS .CO M • WWW. FXA I R G U N S . C O M