1
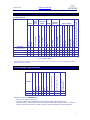
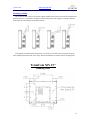
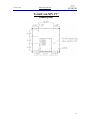
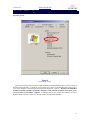
TermiCom XPe 15” and 19” User Manual Documentation Version: 26-09-2012 WEB site: www.symcod.com E-mail: [email protected] TermiCom XPe Warranty Symcod warrants its products to be free from defects in material and workmanship during one year from the purchase date. If a product proves to be defective in material or workmanship during the warranty period, Symcod will, at its choice, repair or replace the product with a similar product. Replacement Product or parts may include remanufactured or refurbished parts or components. The replacement unit will be covered by the balance of the time remaining on the customer's original limited warranty. Symcod provides no warranty for the third-party software included with the product or installed by the reseller, distributor, customer or any other party. Warranty does not include: Any product on which the serial number has been defaced, modified or removed. Damage, deterioration or malfunction resulting from: Accident, misuse, neglect, fire, water (except for waterproof units), lightning, or other acts of nature, unauthorized product modification, or failure to follow instructions supplied with the product. Repair or attempted repair by anyone not authorized by Symcod. Damage to or loss of any programs, data or removable storage media. Software or data loss occurring during repair or replacement. Any damage of the product due to installation of the product. Causes external to the product, such as electric power fluctuations or failure. Use of supplies or parts not meeting Symcod specifications. Failure of owner to perform periodic product maintenance as stated in documents supplied. Any other cause which does not relate to a product defect. Damage caused by static. Removal, installation, freight and set-up service charges. WWW.SYMCOD.COM Warning Safety & reliability, page 3 Powering, page 9 Earth ground, page 9 Fixation & handling, page 11 Cleaning, page 15 Disclaimer The material on this document* is intended for end user, distributor and/or reseller use. Although downloading and printing documents is allowed, Symcod will not be responsible for any modification or any other use of any content in the displayed/downloaded material. Please note that all documents* are subject to change without notice and are occasionally revised to specify, correct or revise the content or for other purposes. Therefore, the version displayed on the site may differ from your original printed copy. Please contact us if you require assistance. Symcod Inc. assumes no liability for damage incurred directly or indirectly, errors, omissions or discrepancies between the device and the manuals or documents supplied. Symcod is not responsible for any loss or damage (Including data corruption, interruption of operation, lost business information, lost production, etc.) caused by use, non-use or misuse of any of the information contained in this document*. Symcod Inc is not responsible of the content or validity of the links gave as references for other products not manufactured by Symcod Inc. *Documents include instruction book, user guide, operating instructions, manuals, safety precautions / instructions, data sheets or any other documents supplied by Symcod. 2 TermiCom XPe WWW.SYMCOD.COM IMPORTANT Read me first By carrying out the installation and the use of this equipment you accept the rules and limitations described in this document or any other document relating to this product. By carrying out the installation and the use of this equipment you are presumed having read all the safety warnings ( ). WARNING: Safety and reliability SYMCOD Inc will not be responsible for the use of this equipment for other purpose then data collection. This equipment is designed and intended for an industrial and commercial use only. The TermiCom XPe is not for a residential use. 3 TermiCom XPe WWW.SYMCOD.COM Content TermiCom XPe ............................................................................................... 5 Main characteristics ........................................................................................ 6 Environmental specifications .......................................................................... 6 Power .............................................................................................................. 9 Options description ......................................................................................... 9 Using modes.................................................................................................. 10 Desktop or wall mount, side view ............................................................. 10 Desktop, back view ................................................................................... 10 How to install your TermiCom XPE ............................................................ 11 Detailed Specifications ................................................................................. 14 Power connector..................................................................................... 14 TermiCom XPE configuration ...................................................................... 15 Recommendations ......................................................................................... 17 TermiCom XPE maintenance ....................................................................... 17 Certification .................................................................................................. 17 Troubleshooting ............................................................................................ 17 Accessories & options .................................................................................. 18 Dictionnary ................................................................................................... 19 Service and support ....................................................................................... 19 Support ................................................................................................... 19 Return Merchandise Authorisation (RMA) ........................................... 19 4 TermiCom XPe WWW.SYMCOD.COM TermiCom XPe TermiCom XPE is microcomputer specifically designed for dusty industrial environment without watering. The casing of the XPe is made of aluminum witch give it is lightness and resistance. Basic TermiCom XPe is provided with a Atom 1,6 GHZ, a 15" tactile color screen (LCD TFT resistive) and with a solid aluminum stand which allows desktop or wall mount installation in a few minutes. Several inputs and outputs make possible the addition of peripherals such as industrial keyboard, bar code scanner or any other peripherals. The "flash" disk included with the basic version can be completely protected. This feature is used to prevent any modification made by the user that could put in danger the application or the operating system. The basic operating system included in TermiCom XPE is Windows XP Embedded; it is directly installed on the flash disk. For users who wish to have a complete version of Windows XP Pro, a version of TermiCom XPe including this operating system is available. In that case, the operating system will be installed on a hard disk. The Ultra-Resistant touch screen option is offered when the TermiCom will be used in environment in which there is particularly abrasive dust. Contrary to the standard touch screens that are covered with a polymer, this one is covered with a thin layer of tempered glass, which makes it much more resistant to the abrasives and even allows it to function with deep scratches. You can also use the wireless version of TermiCom XPe by including the WiFi 802.11b/g option. 5 TermiCom XPe WWW.SYMCOD.COM Main characteristics TermiCom XPe 15” X 004-01865-3200 X 004-01866-3200 X O X X X Power requirement without peripheral (max.) X O SVGA port O X Audio output X Parallel Port 004-01863B-3200 Serial Port X X X Hard disk 80 GIG X Flash 2 gig O 2 gig XPe (XP Embeded) X 2 4 3 O 1 1 37W Stockage Memory RAM XP PRO French 15" Ultra resistant1 004-01863B-2200 XP PRO English # Product 802.11B system USB Ports operating Ethernet Comm. Ethernet Port 1Gbit Windows Color touch screen Inputs / Outputs X X 2 4 3 O 1 1 37W X X 2 4 3 O 1 1 37W X X 2 4 3 O 1 1 37W O = Available Option 1 Recommended for environments with very abrasive dust, screen covered with a fine layer of tempered glass, allows operation with deep scratches. 1 X X X X Water Dust Exterior Interior X X Humidity (without Condensation) % Xpe opt RF Storage temperature C° Xpe Mobile Fix Product Operating temperature C°1 Environmental specifications 5° to 40° -20° to 60° 20 to 80 5° to 40° -20°to 60° 20 to 80 Maximum temperature, IMPORTANT: * Do not cover while the unit is ON. * The back of the TermiCom should not be placed flat on a table while the unit is ON. * Keep the surfaces of the TermiCom free of any material and respect a minimum area of 2” between the back of TermiCom and of any surface in order to allow the dissipation of the internal heat. 6 TermiCom XPe WWW.SYMCOD.COM Main characteristics TermiCom XPe 19” X 004-01896-3200 X 004-01895-3200 X O X X X Power requirement without peripheral (max.) X O SVGA port O X Audio output X Parallel Port 004-01891-3200 Serial Port X X X Hard disk 80 GIG X Flash 2 gig O 2 gig XPe (XP Embeded) X 2 4 3 O 1 1 56W Stockage Memory RAM XP PRO French 19" Ultra resistant1 004-01891-2200 XP PRO English # Product 802.11B system USB Ports operating Ethernet Comm. Ethernet Port 1Gbit Windows Color touch screen Inputs / Outputs X X 2 4 3 O 1 1 56W X X 2 4 3 O 1 1 56W X X 2 4 3 O 1 1 56W O = Available Option 1 Recommended for environments with very abrasive dust, screen covered with a fine layer of tempered glass, allows operation with deep scratches. 1 X X X X Water Dust Exterior Interior X X Humidity (without Condensation) % Xpe opt RF Storage temperature C° Xpe Mobile Fix Product Operating temperature C°1 Environmental specifications 5° to 40° -20° to 60° 20 to 80 5° to 40° -20°to 60° 20 to 80 Maximum temperature, IMPORTANT: * Do not cover while the unit is ON. * The back of the TermiCom should not be placed flat on a table while the unit is ON. * Keep the surfaces of the TermiCom free of any material and respect a minimum area of 2” between the back of TermiCom and of any surface in order to allow the dissipation of the internal heat. 7 TermiCom XPe WWW.SYMCOD.COM Desktop and wall mount position (in inches) for the 15” and 19” 8 TermiCom XPe WWW.SYMCOD.COM Power TermiCom XPe is powered through an external 12 VDC power supply which connects to a 120/240VAC power network. (Power cable and power supply are provided with the unit) WARNING: powering Before installation, please turn off powering source. completed. Plug the unit only when the installation is WARNING: earth ground Make sure that the TermiCom case is properly grounded. Options description RF option RF option (# OPT-802XPE) makes possible the use of TermiCom XPE without wire. The communication type Wi-Fi 802.11a/b/g supports the 802.11B. A minimum 802.11B Wi-Fi infrastructure is required. Orientation of Connectors Because every installation is different from another and to provide more flexibility the orientation of the connectors can be configured during assembly at our facility. By default, the connectors will be oriented downwards. If specified on order, the connectors can be oriented upwards. VESA Mounting The VESA mounting is not included with the standard TermiCom XPe but is available as an option. 9 TermiCom XPe WWW.SYMCOD.COM Using modes Desktop or wall mount, side view Side view Wall mount version Side view Desktop version Desktop, back view Back view Back view With Wifi option 10 TermiCom XPe WWW.SYMCOD.COM How to install your TermiCom XPE The support provided with TermiCom XPE permit to install the unit on a wall or on a table. Once fixed, the angle of TermiCom XPE can be easily adapted to the needs of each user, no need to do a new adjustment of the screws (see TermiCom fixation/handling) IMPORTANT: The TermiCom should not be cover while ON. The back of the TermiCom should not be placed flat on a table (or other surfaces), the back of the unit is acting as a heat dissipater. Respect a minimum of 2” between the bottom of TermiCom XPE and any surface. How to install TermiCom XPE Desktop position Wallmount position (D) Base support (A) Wallmount screw Partially unscrew (C) OR Completely unscrew (B) Desktop screw Figure 1 Base support TermiCom XPe Side view 1. Determine the appropriate emplacement (plane & motionless surface). Be sure to choose a fixed and solid plane surface able to support the weight of the TermiCom. 2. 3. On the base support (D), completely unscrew screw A (wall mount) or the screw B (desk top). Partially unscrew the screw C (see figure 1). Separate the base support (D) from the TermiCom XPe. Fix the base support (D) at the chosen emplacement. Replace XPe TermiCom on its base support in the desired position (Wall mount or desktop) and fixed the corresponding screw, A for wall mount, B for desktop. Tighten the screws on each side of the base support. WARNING: fixation & handling Choose a fixed and solid plane surface able to support the weight of the TermiCom (approximately 10 Pounds/4.54Kg). Handle the TermiCom safely in order to avoid any back wound. 11 TermiCom XPe WWW.SYMCOD.COM Mounting variants The TermiCom XPe is always sent with its support installed at the bottom of the unit and in Wall mount position. However, it is possible to change the location and position of the support to respond to different needs. Here are some examples of mounting variants: If the support provided with the unit doesn't fit your needs you can make your own support using the same mounting holes at the back of the casing. Here are dimensions for location of these mounting holes: TermiCom XPe 15" Mounting Holes 12 TermiCom XPe WWW.SYMCOD.COM TermiCom XPe 19" Mounting Holes 13 TermiCom XPe WWW.SYMCOD.COM Detailed Specifications TermiCom XPE is provided with several ports allowing the connection of various types of peripherals according to needs, for example: printers, electronic scales, bar code scanners, sensors… The default orientation of the connectors is downwards but it is also possible to have them upwards if specified on order. Figure 2 TermiCom XPE bottom view Power button The power button (figure 2) allows the TermiCom XPe to be powered on or off. Connectors Audio output USB 1, 2, 3 and 4 SVGA COM 2 Keyboard Mouse Ethernet2 Ethernet1 COM 3 COM 1 Figure 3 TermiCom XPe connectors Power in: Allow to connect to a 120 or 240VAC power network (external power supply) Audio output: Allow to plug an external audio output Port SVGA : Allow to plug a screen COM 1-2-3 (serial port): Allow to connect peripherals like printers, electronic scales, automats… with a 9 pins female cable (not included) USB1, USB2, USB3, USB4 connectors: Allow to connect USB peripherals, make for “A” type USB connectors. 2 Ethernet connector : Allow to communicate through an Ethernet 1Gbit connection with a standard RJ45 connector. As any equipment Ethernet that uses cable UTP Cat5, a maximum of 300feet (91.44 meters) of cable is allowed between the "hub" and/or the "switch" and the TermiCom. For more details concerning wiring, please download the document "WIRING AND EXAMPLE OF CONFIGURATION TCPIP" available on www.symcod.com . 14 TermiCom XPe WWW.SYMCOD.COM TermiCom XPE configuration Operating system X Figure 4 Service pack version The basic operating system of TermiCom XPE is Windows XP Embedded which is a reduced version of Windows XP Professional. To check the version of the service pack of your Windows XPe, please refer to your system properties (Start/setting/Control panel/system/general - figure 4). Windows XP Embedded included in TermiCom XPE is specifically designed to work with the TermiCom and cannot in any case be transferred on another computer. TermiCom XPe can also support the complete version of Windows XP Professional. In this case, the XPe will be provided with a hard disk. 15 TermiCom XPe WWW.SYMCOD.COM ADMINISTRATOR authentification By default, the XPe TermiCom is authenticated as a user without privileges. To authenticate yourself as an administrator, you must at start (when the desktop background of Windows appears with the cursor) hold the "Shift" key of your keyboard until the window of authentification appears. Then, enter the term "Administrator" in the "user name" and "Password" field (You must respect lower and upper case). * If you do not want to restart your computer, log off while holding inserted the button "Shift". Software or driver addition To add a driver or software to the XPe TermiCom it is necessary to be authenticated as administrator (see ADMINISTRATOR authentification section). The file transfer can be easily done. You can use any peripheral connected on one of the XPe USB port (CD reader, disk drive, USB "Flash" disk) or use the Ethernet network. Since Windows XP Embedded does not contain all the components and drivers of Windows XP Professional, it is possible that your software requires a missing component; this will generate an operating error in the software. If it is the case, please address an email request to [email protected] . A Symcod technician will be able to help you to identify the missing component. Starting with "Safe Mode" In certain cases, it can be necessary to start Windows in "Safe Mode". To do so, let the computer start normally and type “MSCONFIG” in the field "Run..." of the Start menu. Select "Startup Diagnosis" and click on "ok". After a few seconds, you will be asked to start again, press "Restart". After the restarting, the system informs you that it is in diagnosis mode (being equivalent of "Safe Mode"). To return to "normal" mode, still use order “MSCONFIG” but select "Normal Startup" then start again. 16 TermiCom XPe WWW.SYMCOD.COM Recommendations Ethernet: Before proceeding with the wiring installation, please consult “Ethernet wiring and recommendations TCPIP” (available at www.symcod.com) Installation: Do not cover while the unit is ON. The back of the TermiCom should not be placed flat on a table while the unit is ON. Keep the surfaces of the TermiCom free of any material and respect a minimum area of 2” between the back of TermiCom and of any surface in order to allow the dissipation of internal heat. TermiCom XPE maintenance Cleaning: Painted aluminium may react to some chemical agents, in particular with ammonia and with products containing hydroxide or certain acids. Clean it with a soft soap to prevent the damage of the case. Once in a while, use air blast to remove dust. Certification This equipment has been found compliant to class A Part 15 of FCC Rules. These limits are intended to get a reasonable protection against dangerous interferences when the equipment is used in an industrial or commercial environment. This equipment emits uses and can generate radiations of radio frequencies and can cause dangerous interference for radio communications if it is not used in accordance with the instruction manual. The use of this equipment is not planned for a residential use. Troubleshooting Problems Solutions I am unable to reach or modify the system options At start, the XPe TermiCom is authenticated as a user without privileges. To authenticate you as an administrator, refer to the “ADMINISTRATO R authentification” section. I saw the LED lights but there is no screen display Unplug the 120V power for 10 seconds, plug the XPe. If there is no improvement, sent a request including the serial number and the detailed description of the problem to technical support at [email protected]. "DLL missing", error displayed at software or driver installation Extract a DLL file from another computer working with Windows 2000 or XP. Copy this file in the repertory specified in the error message (usually on C:\windows\system32\) 17 TermiCom XPe WWW.SYMCOD.COM Accessories & options Figure 5 1- Tool balancer 2- Powerscan scanner Figure 6 SKT silicone keyboard Sealed rigid casing # product OPT-802XPE Description RF option, 802.11b, 5.5 dBi antenna 504-00048B Power supply for TermiCom XPe (for replacement, one cable provided) 008-01820B SKM Keyboard, USB, sealed, silicone (See figure 6) 201-58064 PSC Powerscan scanner, industrial, standard range, with USB cable (See figure 5-2) 508-58001 Tool balancer for scanner (See figure 5-1) 203-01001 Aluminium touch pen, Teflon tip, wire & holder 18 TermiCom XPe WWW.SYMCOD.COM Dictionnary Authentification Resistive (screen) Flash disk Peripheral Pilot Operating system Procedure that allows checking or validating the identity of a person or the identification of any other entity, during an electronic exchange, to control network access, system information processing or software. Can function with finger or object pressure (pencil…) Data storage piece made without any mobile hardware element. Can store data over several years without being powered by electricity. External device connected to the central processing unit. Can ensure the entry or the exit of data. Control program which translates the orders of a software in order to make possible the communication between the computer and a peripheral. Computer basic software intended to order the execution of programs by ensuring the work management, the input-output operations on peripherals, the resource allocation to the various processes, the access to program libraries and files, as well as the accountancy of work. Service and support Support Please use EMAIL for your requests. For technical questions (hardware and software), email at [email protected] Provide a detail description of the problem and/or questions (intermittent problem happens when…) Please indicate model number and serial number (if applicable). For all other questions, please use [email protected] or Symcod Inc. at 1171 Notre-Dame O., Victoriaville, Qc, G6P 7L1 Phone: 1-800-203-9421, 1-819-751-0095 Fax: 819-751-1292 Return Merchandise Authorisation (RMA) All return request must be authorized by SYMCOD Inc. To do so please refer to the following: http://www.symcod.com/rma You will receive a formal confirmation number (# RMA) The RMA number must be printed on each box. All freight charges are at the customer expense and responsibility. Please take note that “collect” package will be refused. 19