1
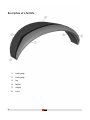
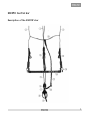
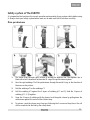
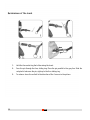
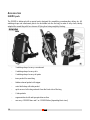
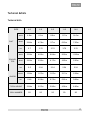
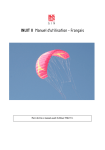
ESKIMO 07 User manual - English
Please read this user manual carefully before you use the ESKIMO.
Welcome to GIN Kiteboarding…
Thank you for choosing a GIN kite.
Our R&D team has invested a lot of time, passion and experience into creating the ESKIMO.
We hope you will enjoy this kite as much as us, and we wish you many wonderful sessions with your
new ESKIMO !
For more information and to keep in touch with the fantastic evolution of our sport, visit our website:
www.ginkites.com
Please pass on this manual to the new owner if you ever resell your wing.
Enjoy riding GIN,
The GIN Kiteboarding Team
Information about safety
Aimed at customers with a good knowledge of kiting, this manual principally provides technical
information about the ESKIMO. This manual cannot replace training from an approved kite school.
Kiting is a magnificent sport, but certain rules do apply and these must never be neglected. As an
“ambassador” of our sport, please respect these rules and always keep safety in mind :
Respect :
the other riders
the kite launch and landing zones
the riding locations
the rules of riding and of the air
the public and their safety
the natural elements
Familiarize yourself with :
your equipment
your safety equipment
Make sure that you have adequate personal and third party liability insurance for kiting.
The manufacturer as well as the distributors and agents of GIN Kiteboarding products cannot be held
liable for death, personal injury or material damage resulting from any use of this equipment.
2
Table of contents
Welcome to GIN Kiteboarding ................................................................................................ 2
Information about safety...................................................................................................... 2
Table of contents .................................................................................................................. 3
Gin Kiteboarding ................................................................................................................... 4
History of the ESKIMO............................................................................................................ 5
For which level of rider... ….............................................................................................................. 5
Construction .................................................................................................................................... 5
Description of a foil kite......................................................................................................... 6
ESKIMO Control bar................................................................................................................ 7
Description of the ESKIMO's bar ....................................................................................................... 7
Swivel System ................................................................................................................................. 9
Adjusters......................................................................................................................................... 9
Depower line .................................................................................................................................... 9
Streamer ......................................................................................................................................... 9
Leash line connector ........................................................................................................................ 9
Flying lines ...................................................................................................................................... 9
Adjustment of the bar.....................................................................................................................10
Safety system of the ESKIMO................................................................................................ 11
Main quickrelease ..........................................................................................................................11
Quickrelease of the leash ...............................................................................................................12
To connect a kite leash (for un-hooked riding).................................................................................13
To connect a "suicide leash" (for un-hooked riding without safety)..................................................13
Accessories......................................................................................................................... 14
ESKIMO pack ...................................................................................................................................14
Flying lines .....................................................................................................................................15
Looking after your kite ........................................................................................................ 16
Control bar set-up and safety system ............................................................................................16
Warning ..........................................................................................................................................16
Technical details.................................................................................................................. 17
Technical data.................................................................................................................................17
Windrange ......................................................................................................................................18
Lineplan .........................................................................................................................................19
Depower system .............................................................................................................................20
Acknowledgements............................................................................................................. 22
3
Gin Kiteboarding
GIN Kiteboarding is a rider’s company. For us kiteboarding stays a priority and a style of life. Our
philosophy is to develop products of high quality that are able to provide us maximum satisfaction. We
are stoked afterwards to share these sensations with all the users of our products, to be close to our
customers and their needs.
The designer Robert Graham is proud to be working together with Marc Ramseier, Cedric Joubert,
Claude Thurnheer and Fabienne Kaufmann, which all belong to the R&D team of GIN Kiteboarding.
Robert Graham
4
History of the ESKIMO
People of the Canadian Far North, Alsaka , Greenland and other Arctic coastal regions, Eskimo (more
correctly called the Inuit) are hard experts of specific climatic conditions due to their environment;
snow and wind belong to their life. It is in all modesty and as a sign of admiration for these peole that
we have baptized our snowkite : the ESKIMO. Our ESKIMO is also an expert in the demanding
conditions found snowkiting; it is at ease and perfectly adapted.
For which level of rider…
The ESKIMO is a high performance kite for experienced riders. On the other hand, its stability, smooth
handling and it’s safety system also make the ESKIMO suitable for beginners.
With the ESKIMO, the GIN Kiteboarding Development Team have created a foil kite which benefits
from the same characteristics as a tube kite :
- fast and precise turning
- great lift
- large depower range
The ESKIMO surprises with its fast and easy turn. It flies without any effort on the bar and it's lift is
powerful and energic.
The ESKIMO is very useable in low wind, as well as medium or strong wind. Its windrange is
impressive.
The control bar setting of ESKIMO was thought 100% snowkite, with a finish and a wish of well done
details.
The ESKIMO is also very easy to use for riding with mountainboard or buggy.
Construction
A highly skilled workforce take extreme care during the entire manufacturing process of our kites.
Every piece of fabric, reinforcement and detail has been carefully designed, refined and crafted from
the most suitable, selected materials. Everything is then assembled in a finely controlled process to
create this kite.
After several hours of use, you will still discover small details that simplify your kiting life as a result
of the thought GIN put into the design for you.
5
Description of a foil kite
6
1.
leading edge
2.
trailing edge
3.
top
4.
bottom
5.
wingtip
6.
inlets
ESKIMO Control bar
Description of the ESKIMO's bar
7
1.
front pre-line
2.
left rear pre-line
3.
right rear pre-line
4.
streamer
5.
depower line
6.
main safety system (sleeve)
7.
swivel (swivel system)
8.
chicken-loop
9.
stoosh
10. quickrelease of the leash
11. leash
12. leash line connector (plastic covered grey line)
13. rear line adjusters
14. elastic for holding wound lines
15. carbon bar (47 / 56 cm)
8
Swivel System
The swivel of the chicken-loop (swivel system) allows you to cancel any twists on the front flying
lines and on the leash. To cancel the twists after a jump with one or more rotation(s), simply spin the
bar first to cancel the twist on the rear flying lines, then to pull down the bar. The act of pulling down
the bar relieves pressure on the swivel and allows it to automatically rotate, cancelling any twists in
the front lines and the leash.
Adjusters
The adjusters of the rear pre-lines allow a quick and precise adjustment of the line lengths.
Depower line
The depower line can be changed easily without tools. You just need to make a bowline knot to each
end of the depower line on the metal D-ring of the streamer, then to fix the D-ring of the safety
system with a lark's head knot. The original depower line delivered with the bar is specially designed
to resist wear.
Streamer
For better safety, the streamer is reinforced with a second webbing.
Leash line connector
The leash is connected to the plastic covered grey line. Pulling on the leach line connector makes it
possible to neutralize (de-power) the kite on the ground. This action also allows a relaunch when the
ESKIMO is leading edge down on the ground.
Flying lines
The ESKIMO is delivered with 4 25m flying lines.
9
Adjustment of the bar
The neutral position of the bar allows easy adjustment of the 4 lines. The streamer must be
completely released and the bar must be pushed up, away from you. Then, hold the chicken-loop and
hold all 4 lines taut : the knots of the front and rear pre-lines must be at the same level.
At the bar end, all 4 lines must end at the same level.
Neutral position of the bar
10
Safety system of the ESKIMO
It is imperative that you know the correct operation and assembly of your system safety before using
it. Always check your safety system before each use to make sure that it functions correctly.
Main quickrelease
1.
The sleeve from the main quick release is around the depower line. The depower line is
fixed with a lark's head knot on the metal D- ring of the quick release system.
2.
Pass the rigid webbing n°2 of the quickrelease through the metal D-ring, in the direction of
the arrow on the picture.
3.
Fold the webbing n°2 on the webbing n°1.
4.
Fold the webbing n°3 against the 2 layers of webbing (n°1 and 2). Hold the 3 layers of
webbing (n°1, 2, 3) together.
5.
Cover the 3 layers of webbing with the sleeve. Lock the quick release by pulling down the
solid sleeve against the swivel of the chicken loop.
6.
To release : push the sleeve away from you, following the 2 arrows on the picture. You will
still be connected to the kite by the safety leash.
11
Quickrelease of the leash
12
1.
Hold the free metal ring that slides along the leash.
2.
Pass the pin through the free, sliding ring. Place the pin parallel to the grey line. Slide the
red plastic tube over the pin, right up to the free sliding ring.
3.
To release : draw the red ball in the direction of the 2 arrows in the picture.
To connect a kite leash (for un-hooked riding)
1.
Hold the connector of your kite leash.
2.
Connect the kite leash to the fixed metal leash ring. That's all ! No need to release the
safety leash.
To connect a "suicide leash" (for un-hooked riding without safety)
1.
Hold the connector of your kite leash.
2.
Connect the kite leash to the metal D-ring of the chicken-loop.
3.
Ready to ride un-hooked with "suicide leash". This situation doesn't give you optimum
safety : if you let go of the bar, you will still be connected to the kite, which will remain
powered up.
13
Accessories
ESKIMO pack
The ESKIMO is delivered with a special pack, designed for snowkiting, snowboarding, skiing, etc. All
webbing straps and attachment points can be hidden into the the bag, to make it very clean, ideally
adapted for snowkiting with less chance of flying lines being caught by the bag.
14
-
3 webbing straps to carry a snowboard
-
2 webbing straps to carry skis
-
2 webbing straps to carry ski poles
-
inner pocket for camel bag
-
hidden external pocket with zipper
-
waist belt strap with side pocket
-
quick access to the bag contents from the front side of the bag
-
2 side pockets
-
ergonomic back with anti-perspiration surface
-
can carry 2 ESKIMO bars and 1 or 2 ESKIMO kites (depending their sizes)
Flying lines
The flying lines are delivered in 2 colours : red for the front and blue for the rear.
Fabric : Dyneema
Length : 25m
Strength : 220 kg, after stretching and stitching
Unique stretching process : Mechanically pre-stretching the lines to 80 % of the theorical breaking
strength maximises the line stability over time. This process ensures optimal quality, and significantly
reduces the risk of line length change with use.
Connect the loop with the label to the pigtails of the kite (pict 3). This label allows you to disconnect
the lines more easily, even after high tension on the lines.
Always connect all the lines with lark's head knots :
15
Looking after your kite
- Do not leave your kite out in the sun or flapping in the wind if you are not using it, the cloth will
prematurely age.
- Never store a wet kite for a long time. Make sure it is completely dry.
- Never use any sort of chemical cleaner or your kite. Only use normal water.
- Store your kite in a dark and dry place leaving the bag open.
- Do not walk on the lines or on the kite.
Control bar set-up and safety system
- Check your control bar set-up and safety system before each use to make sure that it works
correctly.
- Check for wear and tear on each part, also check all knots and lines, making sure that the neoprene
protectors are in place where appropriate.
- Take care to clean your control bar set-up and your safety system of all sand, mud and dust, snow
and ice.
Warning
- Your safety and the safety of others depend upon the correct use of this equipment. You are solely
responsible for ensuring that you only use this equipment in situations and conditions suitable for
your level of competence and in a way that will not endanger third parties.
- Safety does not only depend on the safety systems of the kite, it is also the result of training and of
the correct evaluation of the situation and all conditions; the location, potential hazards, other people,
the weather, etc
- It is extremely important to receive proper training before using this product and to fully familiarise
yourself with all emergency procedures in safe conditions, before having to resort to them in an
emergency. The safest place to obtain the necessary skills is from a suitably qualified and competent
kite instructor or school. Do not attempt to fly this kite without the necessary skills.
- Your kite and safety systems must be regularly checked and properly maintained.
- The ESKIMO is a kite adapted for riding on snow or land. Unlike a paraglider or a speedflying wing,
the ESKIMO is NOT designed for free flight and does NOT meet the specific safety requirements of
free flight.
16
Technical details
Technical data
SIZE
4.0
6.0
8.5
11.5
14.0
AREA
4.0m
6.1m
8.6m
11.7m
14.0m
SPAN
3.86m
4.79m
5.7m
6.63m
7.25m
A.R
3.7
3.76
3.76
3.76
3.76
AREA
3.20m
4.83m
6.84m
9.26m
11.80m
SPAN
2.82m
3.50m
4.17m
4.85m
5.30m
A.R
2.5
2.54
2.54
2.54
2.54
ROOT
1.28m
1.57m
1.87m
2.17m
2.38m
TIP
0.48
0.58m
0.70m
0.81m
0.89m
TOTAL HEIGHT
2.68m
3.27m
3.90m
4.54m
4.96m
CELL NUMBER
20
20
20
20
20
FLAT
PROJEC
TED
CHORD
17
Windrange
Size ESKIMO (m")
knots
WARNING : This table should be used as an approximate guide only.
To make it accurate you would have to consider all variables that can modify the windrange, eg :
- the weight of the rider
- the level of the rider
- the performance of the snowboard or skis
- the quality of the snow
- the altitude and conditions specific to each location
- etc...
18
Lineplan
19
Depower system
Left side
20
right side
1.
front flying line (red)
2.
rear flying line (blue)
3.
rear pigtail (blue)
4.
front pigtail (red)
5.
brake depower line
6.
brake line
7.
C lines
8.
B lines
9.
A lines
10. A depower line
11. B depower line
12. C depower line
13. pulleys
21
Acknowledgements
GIN Kiteboarding would like to thank the riders who contributed to the development of the ESKIMO.
Their effectiveness, their optimism and their ideas brought much to the result that is the ESKIMO.
Thank you also to all the impassioned people who have given their energy and time for the ESKIMO.
22