1
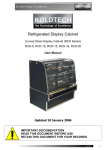
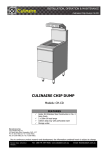
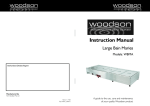
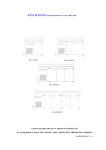
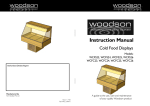
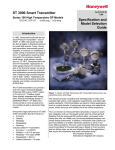
Sandwich Preparation Bench
WSM.914, WSM.1330, WSM.1885, WSM.2286
User Manual
Updated 13 July 2006
IMPORTANT DOCUMENTATION
READ THIS DOCUMENT BEFORE USE
RETAIN THIS DOCUMENT FOR YOUR RECORDS
INTRODUCTION
1
About Koldtech
Thank you for choosing our KOLDTECH product. With over 30 years of experience in refrigeration
manufacturing we are confident that our product will provide you with years of trouble-free operation.
Our products are fully engineered to be amongst the best available. We are continually improving our
product designs to ensure we are taking advantage of latest concepts, designs and technological
advancements. Every unit is fully tested in our calibrated laboratory prior to leaving our factory.
As with other precision equipment, proper care, maintenance and operation will ensure years of
trouble-free service. Please take time to thoroughly read this manual before using the unit to
familiarize yourself with our product.
We thank you again for choosing KOLDTECH. If you have any further questions please feel free to
call the dealer from whom you purchased the unit.
Koldtech in Australia
Koldtech products are imported into Australia by STODDART (Tom Stoddart Pty Ltd) as the sole
Australasian agent. Stoddart are one of Australia’s largest commercial kitchen companies, with a 45
year history of manufacturing and importing a range of products for the food service industry.
Stoddart has a network of quality distributors and service agents throughout Australasia who service
the catering and food service market. Stoddart administer the after sales service and spare parts for
all Koldtech products in Australia.
Our contact details can be found under the “Warranty, Service and Repair” information section of this
manual.
2
INSTALLATION AND START UP
Please follow these instructions carefully on receipt of your Koldtech product and follow the
instructions.
Receipt
Your Koldtech product is supplied with extra heavy duty packaging to minimize potential damage
caused in transport. On receipt of your product please check for any signs of damage to the crate.
Should the crate show significant signs of damage, please note this prior to opening and uncrating
the product. Also please sign the delivery docket from the transport company indicating that
the product has been received damaged.
Uncrating
While unpacking, take note of any damage to the unit. If damage is found, do not
discard the packing materials and notify your dealer or the freight company as soon
as possible. Do not proceed to install the unit. If no damage is found, the unit should
be left on a skid or pallet until placed in the desired location. Clear away any packing
material that may be used to secure the unit during transit.
Settling
Precaution has been taken to ship the unit in an upright position. If the unit is tilted
during transit, lubricating oil may have shifted from the reservoir. If this has happened
operating the unit may cause excessive wear or damage to the compressor’s moving
parts. It is recommended that the unit be left standing for 24 hours before
operation.
Positioning
Position the unit in a dry, well-ventilated place away from heat sources or any vibration. The unit
should be set on a level and firm surface. The rear of the cabinet has special vents to enable the
refrigeration unit to get appropriate air-flows. Do not block these vents as these may cause the
unit to malfunction and void warranty. Ideally for optimum performance, we recommend
installation in air-conditioned premises. In the event of high relative humidity, condensation may form
on the cabinet. This will not impact on the ability of the cabinet to maintain internal temperature.
However, should ambient temperature exceed 38oC we cannot guarantee the maintenance of
internal temperature to required standards.
Draining
All standard models are supplied with a condensate evaporator tray. No drain is required for these
units. Special models may require a drainpipe for condensate water; in such instances this is the
responsibility of the operator.
Ventilation
Ventilating grills or louvers must not be obstructed for correct operation. Do not block these vents
as these may cause the unit to malfunction and void warranty.
3
Doors
The unit is supplied with sliding rear doors which are usually taped in position to the main cabinet.
Sometimes they may be packed separately within the main cabinet. Should the doors be wrapped
separately carefully unwrap these doors and check for any damage. Any damage should be reported
immediately to the company from whom you bought the product or your transport company.
To fit the doors, position them correctly outside the cabinet. The door handle faces outwards and
flush with the end of the unit, the roller wheels are situated at the bottom of the door. When the door
is correctly aligned, lift it up and put into position by placed the top of the door into the top track,
adjusting the door so it sits vertically over the bottom track. Gradually lower the door so it sits in the
bottom track. Check it is correctly position by sliding the door. If the door slides smoothly in its track it
is correctly positioned, otherwise lift the door and repositioning correctly in the track.
Electrical Work Preparation
For safety reasons, the unit must be properly earthed. Check and make sure that the outlet is
properly grounded. If a grounded plug is not available, a separate earth ground must be installed to
prevent any electrical hazard. A properly rated circuit breaker should be installed to the supply outlet.
Check for proper supply voltage before plugging in the unit. Please refer to voltage requirements on
the nameplate of the unit. Plug the unit into the wall outlet. Turn the power point on.
Starting the cabinet for the first time
At the lower rear of the unit of the main body are mounted the unit controls. These include switches for the
refrigerator, lights and a controller for the refrigeration.
Switch on the refrigeration first and check if there are any unusually strong odours, heat, smoke or
vibration. If any of these are present, immediately turn off immediately and unplug the unit and call for a
service technician. Should none of these problems arise leave the refrigeration to run for about thirty
minutes and monitor the digital thermostat read-out to ensure the temperature is dropping.
Once it becomes clear that the temperature is dropping turn on the lights by flicking on the separate light
switch. Check all fluorescent lights are illuminated (one per shelf). If not, turn off the lights. It is possible for
some light contacts to work slightly loose during transit and can be corrected by disconnecting the unit from
the mains power and simply ensuring the tube is correctly in position. If the lights still do not work contact
your dealer. The unit should be closely monitored during the first full hour of operation to ensure the
temperature drops to a suitable temperature.
Product Loading
The thermostat is set at the factory for optimum operating temperature. The time taken to attain the
operating temperature depends on the temperature of the food being loaded, the frequency of the
door opening, ambient temperature etc. The unit should reach operating temperature during the first
two hours of operation
Machine Performance
To prevent compressor damage, the unit is equipped with a Time Delay Circuit, which shall activate
the compressor within 3 minutes after turning on the power or after restarting.
4
ONGOING USE AND OPERATION
General guidelines for use
This cabinet is designed for displaying products in optimal conditions for as long as acceptable food
standards are maintained. The unit is designed and manufactured for commercial use. The lifespan
of products stored in the cabinet will vary in depending on the type of food, the storage temperature,
the number of times doors are opened, the ambient temperature and so on. It utilizes unique
refrigeration design principles to help maximise the shelf life of the product.
As an operator it is vital to continue to monitor the core temperature of foods and the amount of time
foods have been kept.
Display Lighting
The fluorescent lighting in the cabinet is designed to improve the display area and maximize visibility
of your food products. Whilst the lighting has little effect on the product, food will generally last longer
with lights turned off, because the refrigerator will not have to counter the small amount of heat that
the lights give off. Therefore we recommend turning the lights off during non-service times.
All lighting is fitted with special PVC diffusers. These diffusers improve the light in the cabinet whilst
protecting the tubes and fittings against accidental damage. These diffusers are designed especially
for display refrigeration whilst the fridge is operating.
Do not run the lighting without the refrigeration being turned on as this will damage the diffusers.
Product storage
Your products can be left overnight in the refrigerated cabinet if you choose. Any
product not originally packaged in a box or container are best removed and refrigerated
overnight as the defrost cycle will kick in and may spoil products containing fresh
ingredients i.e. Cream. If you choose to leave product in the cabinet ensure the lights
are turned off overnight. Products will last longer if they are covered or boxed during
non-service times.
5
Daily Operating Procedures
If the unit is not used for storage turn the refrigeration unit on for approximately 30 minutes prior to
use to enable the temperature to get to the right setting. Do not fill the cabinet until it has reached
the correct temperature. Also note that placing several warm or unrefrigerated products in the
cabinet at one time will increase the time it takes for the products to meet the appropriate
temperature. Ideally, products placed in the cabinet should come directly from a refrigerator, blast
chiller or coldroom. Frozen product can also be placed in the cabinet, however, the product should
obviously left to thaw prior to serving. We recommend that you clean your cabinet no less than daily.
Ideally keep the cabinet clean throughout the day and have one major clean at the end of the day
after use to prevent soiling and the growth of bacteria. Ensure all items are fitted to the cabinet
including doors. Doors should be left on at all times to ensure standards are met and to prevent
potential problems with the refrigeration system icing up.
Defrosting
The cabinet features an automatic defrost cycle which occurs at various times during the day.
Automatic defrosting is set by the factory for optimum operation. Do not attempt to alter the setting.
During the defrost cycle the temperature displayed on the controller will rise slightly for a short period.
This is not a fault and no action is necessary during this period.
Cabinet Cleaning
To ensure proper maintenance of your unit and longevity there is a simple four step process that
should be followed when cleaning Stainless Steel surfaces, P.V.C. Surfaces and Display Glass. This
process is as follows:
Step One: Ensure that the unit is switched off at the power point and unplugged.
Step Two: The end-user should wash the unit using lukewarm, soapy water or suitable cleaner.
Step Three: Thoroughly rinse or wipe all surfaces with water or a dampened soft, clean cloth (or
sponge) respectively.
Step Four: Finally, polish with dry soft cloth
CAUTION:
Do not use solvents or other aggressive liquids for cleaning e.g. with mixture of chlorine or
detergent etc.
Do not use wire brush, steel wool or grainy wiping pad such as Scotchbrite.
In some areas, particularly in beach locations, stainless steel can be subject to surface
discoloration or “tea staining”. This can be removed with an appropriate cleaning agent that
contains 10% Sodium citrate. Ask your supplier of cleaning chemicals for a suitable brand.
6
MAINTAINANCE
The maintenance instructions below are for basic maintenance that should be done on a regular
basis by the owner/operator.
IMPORTANT NOTE
THE ELECTRICAL AND REFRIGERATION COMPONENTS OF THIS PRODUCT
SHOULD ONLY BE ACCESSED BY A SUITABLY QUALIFIED AND EXPERIENCE
TRADESPERSON. DO NOT ATTEMPT TO DISASSEMBLE THE UNIT IN ANY WAY.
ANY UNAUTHORISED DISSASSEMBLY, ALTERATIONS OR ACCESS TO PARTS
WILL VOID YOUR WARRANTY.
•
•
•
•
•
Observe safe practice by disconnecting all electrical supply before performing any kind of maintenance.
Do not use sharp instruments or cleaning agents on the unit. Clean (interior and exterior surfaces)
using a damp cloth and warm water. Food particles and spillage should be removed as soon as
possible to avoid build-up and odour.
To ensure efficiency and reliability it is important that the condenser coil be kept clear of accumulated
dirt and duct. It is recommended to use a non-metallic brush, vacuum cleaner or air blower to dislodge
dust from the condenser fins. The frequency of cleaning depends on the amount of dust in the
surrounding area of the installation. The condenser should be inspected and cleaned at least once
every month. The evaporator fan and the areas below the grilles inside the unit need to be checked
weekly for food stuffs and removed if found. Failure to undertake routine maintenance such as cleaning
the condenser coil will void the product’s warranty.
Do not expose any electrical components to moisture or water. If the unit gets wet, turn it off and
unplug it from the wall outlet immediately. Do not turn it on again until the unit is completely dry or after
inspection by a qualified service technician.
Should the unit be left unused for an extended period, all food items should be removed. The interior
surface and shelves should be cleaned thoroughly. Unplug the unit from the power source and leave
the doors slightly opened.
RECOMMENDED MAINTENANCE SCHEDULE
Please ensure you follow the schedule below to maintain the appropriate storage conditions for your
food and to prolong the life of your cabinet.
Maintenance List
Clean interior and exterior surfaces
Check operating temperature
Check control panel alarm
Check compressor for vibration
Check compressor temperature
Check condenser fan
Clean condenser coil*
Daily
X
X
X
Frequency
Weekly Monthly
X
X
X
X
*We recommend that you include your refrigerated display case in a regular maintenance
schedule for all commercial food equipment. Cleaning of condenser coils is best done by trained
and qualified technicians. Failure to undertake routine maintenance such as cleaning the
condenser coil will void the product’s warranty.
7
TEMPERATURE SETTING
General Information
Your KOLDTECH product is equipped with an electronic thermostat with off cycle designed for
refrigeration applications at normal temperature. It provides a relay output to drive the compressor
and a probe input. An internal timer manages the off cycle defrost. This temperature does
NOT indicate the temperature of the food product or the storage
temperature in the actual display case.
Temperature Readout (IMPORTANT INFORMATION)
Your Koldtech fridge is fitted with a digital thermostat controller. On this controller is
clearly displayed a temperature setting in Celcius (oC). This readout is indicative of
the temperature being read by a probe in the warmest section of the cabinet
(where the air return into the refrigeration and not a storage area) and is used to
ensure that the fridge performs to the optimum level. This temperature does
NOT indicate the temperature of the food product or the
storage temperature in the actual display case.
For compliance to food hygiene standards you must measure the core temperature of the food
product using a suitable calibrated device. Similarly the storage temperature in the cabinet should be
measured in the storage area not by relying on the digital readout.
Before making any adjustments to the preset temperature ensure you have fully tested the actual
cabinet temperature. By adjusting the temperature on the thermostat to a setting that is either
too hot or too cold you will either reduce the product shelf life or risk food borne bacteria.
Recommended Temperature Settings
See the table below for recommended preset temperatures for specialized use.
Item Being Stored
Sandwich
Cakes
Recommended Preset Temperatures
2 to 5 deg C
4 to 8 Deg C
Note: (Consult factory when needed, self-adjustment may void the given warranty)
8
Front Panel Commands
Refer to these instructions to adjust the thermostat control settings (please read note about
temperature readout prior to altering the settings).
SET: refers to display target set point, in programming mode it selects a parameter or confirms an
operation.
Presses for more 2 seconds to start a manual defrost.
(UP)
Press to see the maximum stored temperature.
(DOWN) Press to see the minimum stored temperature.
Key Combinations:
+
Lock and unlock the keyboard.
SET +
To enter in programming mode.
SET +
To return to the room temperature display.
Use of LEDS
Each LED function is described in the following table
Changing the Set Point
Press the SET key for more than 2 seconds to change the Set point value.
The value of the set point will be displayed and the LED starts blinking.
To change the Set value, pushing the
or arrows within 10 sec.
To memorize the new set point value, pressing the SET keys again or wait 15 sec.
9
Alarm Signals
Display
"EE"
"P1"
"HA"
"LA"
"EA"
"CA"
Cause
Data or memory failure
Room probe failure
Maximum temp. alarm
Minimum temp. alarm
External alarm
Serious external alarm
Output
Output according to par. "Con" and "COF"
Output unchanged.
Output unchanged.
Output unchanged.
Output OFF.
Note:
The setting of operating temperature (and defrost for freezer) is already factory set.
End-user self- adjustment may void the given warranty unless consulted by the authorized
persons to do so. The parameter-setting table above is for the purpose of the reference only. The
Manufacturer, importer and distributors cannot guarantee that these settings will work in all
environments and with different food stuffs. Proper tests should be conducted on site to ensure
compliance to standards is achieved.
10
WARRANTY, SERVICE & REPAIR
KOLDTECH warrants equipment sold against defects in material and workmanship for a period of
twelve (12) months from the date of invoice. You will need to provide proof of purchase (an invoice)
to prove the warranty period. Access to warranty is conditional on the equipment being correctly
installed, cared for and operated under normal conditions.
The warranty does not cover:
• Any consequential loss, damages or expenses directly or indirectly arising from use or
attempted use or from any other cause.
• Any part of the product which has been subject to misuse, neglect, alteration, incorrect
installation, accident, use of inappropriate chemicals, flooding, fire or acts of God.
• Damage caused during transportation.
• Breakage of glass, bulbs, elements, lamps or plastic components or the replacement of
gaskets or fluorescent tubes.
• Penalty or additional labour costs for installation, removal or repair of the product outside
normal working hours. Normal working hours are considered to be 8:00 AM til 4:30 PM
Monday to Friday (Australian Eastern Standard Time)
• Warranty is also voided if unauthorized service or repairs are carried out to items during the
warranty period, however common sense prevails, if in an emergency situation occurs suitably
qualified personnel must carry out all work. Eg. Electrician, Gas fitter etc. We will not incur
costs for works carried out by others, without our prior approval.
All warranty parts requested will be charged to the customer’s account unless a warranty claim is
approved. Standard credit policies will be applied.
Claiming Warranty
If your KOLDTECH product is not working while still under warranty and has not been subject to
improper use or treatment, follow the procedure listed below to obtain repairs:
• Locate the rating plate sticker on your KOLDTECH product to enable you to complete the
details on the Warranty Request Form.
• Complete the form with all requested details and fax a copy to the number shown, along with
proof of purchase of the product.
• Manufacturer and the importer reserve the right to reject warranty calls where circumstances
fail to meet their warranty conditions.
Service & Spare Parts
To arrange service on your KOLDTECH product in Australasia please contact your local distributor or
the following:
STODDART
Tom Stoddart Pty Ltd
39 Faisal Hatia Way, Karawatha, Qld 4117 Australia
Ph: 07 3440 7600 (int: +61 7 3440 7600
Fax: 07 3344 1000 (int: +61 7 3344 1000
Email: [email protected]
11