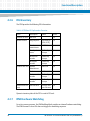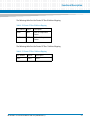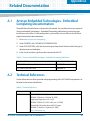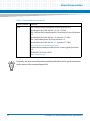
1
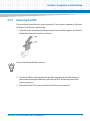
ARTM-9405 16x10GbE Installation and Use P/N: 6806800P45F May 2014 © Copyright 2014 Artesyn Embedded Technologies, Inc. All rights reserved. Trademarks Artesyn Embedded Technologies, Artesyn and the Artesyn Embedded Technologies logo are trademarks and service marks of Artesyn Embedded Technologies, Inc.© 2014 Artesyn Embedded Technologies, Inc. All other product or service names are the property of their respective owners. Intel® is a trademark or registered trademark of Intel Corporation or its subsidiaries in the United States and other countries. Java™ and all other Java-based marks are trademarks or registered trademarks of Oracle America, Inc. in the U.S. and other countries. Microsoft®, Windows® and Windows Me® are registered trademarks of Microsoft Corporation; and Windows XP™ is a trademark of Microsoft Corporation. PICMG®, CompactPCI®, AdvancedTCA™ and the PICMG, CompactPCI and AdvancedTCA logos are registered trademarks of the PCI Industrial Computer Manufacturers Group. UNIX® is a registered trademark of The Open Group in the United States and other countries. Notice While reasonable efforts have been made to assure the accuracy of this document, Artesyn assumes no liability resulting from any omissions in this document, or from the use of the information obtained therein. Artesyn reserves the right to revise this document and to make changes from time to time in the content hereof without obligation of Artesyn to notify any person of such revision or changes. Electronic versions of this material may be read online, downloaded for personal use, or referenced in another document as a URL to an Artesyn website. The text itself may not be published commercially in print or electronic form, edited, translated, or otherwise altered without the permission of Artesyn. It is possible that this publication may contain reference to or information about Artesyn products (machines and programs), programming, or services that are not available in your country. Such references or information must not be construed to mean that Artesyn intends to announce such Artesyn products, programming, or services in your country. Limited and Restricted Rights Legend If the documentation contained herein is supplied, directly or indirectly, to the U.S. Government, the following notice shall apply unless otherwise agreed to in writing by Artesyn. Use, duplication, or disclosure by the Government is subject to restrictions as set forth in subparagraph (b)(3) of the Rights in Technical Data clause at DFARS 252.227-7013 (Nov. 1995) and of the Rights in Noncommercial Computer Software and Documentation clause at DFARS 252.227-7014 (Jun. 1995). Contact Address Artesyn Embedded Technologies Artesyn Embedded Technologies Marketing Communications Lilienthalstr. 17-19 2900 S. Diablo Way, Suite 190 85579 Neubiberg/Munich Tempe, Arizona 85282 Germany Contents About this Manual . . . . . . . . . . . . . . . . . . . . . . . . . . . . . . . . . . . . . . . . . . . . . . . . . . . . . . . . . . . . . . . . . . . . . . . . 9 1 Introduction . . . . . . . . . . . . . . . . . . . . . . . . . . . . . . . . . . . . . . . . . . . . . . . . . . . . . . . . . . . . . . . . . . . . . . . . . 13 1.1 1.2 1.3 1.4 1.5 2 Hardware Preparation and Installation . . . . . . . . . . . . . . . . . . . . . . . . . . . . . . . . . . . . . . . . . . . . . . . . . 15 2.1 2.2 2.3 2.4 2.5 3 Overview . . . . . . . . . . . . . . . . . . . . . . . . . . . . . . . . . . . . . . . . . . . . . . . . . . . . . . . . . . . . . . . . . . . . . . . . . . 15 Unpacking and Inspecting the Board . . . . . . . . . . . . . . . . . . . . . . . . . . . . . . . . . . . . . . . . . . . . . . . . . . 15 Environmental Requirements . . . . . . . . . . . . . . . . . . . . . . . . . . . . . . . . . . . . . . . . . . . . . . . . . . . . . . . . 15 Power Requirements . . . . . . . . . . . . . . . . . . . . . . . . . . . . . . . . . . . . . . . . . . . . . . . . . . . . . . . . . . . . . . . . 18 Installing and Removing the RTM . . . . . . . . . . . . . . . . . . . . . . . . . . . . . . . . . . . . . . . . . . . . . . . . . . . . . 18 2.5.1 Installing the RTM . . . . . . . . . . . . . . . . . . . . . . . . . . . . . . . . . . . . . . . . . . . . . . . . . . . . . . . . . . . . 18 2.5.1.1 Front Blade is Installed . . . . . . . . . . . . . . . . . . . . . . . . . . . . . . . . . . . . . . . . . . . . . . . 19 2.5.1.2 Front Blade is not Installed . . . . . . . . . . . . . . . . . . . . . . . . . . . . . . . . . . . . . . . . . . . 21 2.5.2 Removing the RTM . . . . . . . . . . . . . . . . . . . . . . . . . . . . . . . . . . . . . . . . . . . . . . . . . . . . . . . . . . . 23 LEDs and I/O Interfaces . . . . . . . . . . . . . . . . . . . . . . . . . . . . . . . . . . . . . . . . . . . . . . . . . . . . . . . . . . . . . . . . 25 3.1 3.2 3.3 3.4 3.5 4 Overview . . . . . . . . . . . . . . . . . . . . . . . . . . . . . . . . . . . . . . . . . . . . . . . . . . . . . . . . . . . . . . . . . . . . . . . . . . 13 Features . . . . . . . . . . . . . . . . . . . . . . . . . . . . . . . . . . . . . . . . . . . . . . . . . . . . . . . . . . . . . . . . . . . . . . . . . . . 13 Standard Compliances . . . . . . . . . . . . . . . . . . . . . . . . . . . . . . . . . . . . . . . . . . . . . . . . . . . . . . . . . . . . . . 13 Mechanical Data . . . . . . . . . . . . . . . . . . . . . . . . . . . . . . . . . . . . . . . . . . . . . . . . . . . . . . . . . . . . . . . . . . . 14 Ordering Information . . . . . . . . . . . . . . . . . . . . . . . . . . . . . . . . . . . . . . . . . . . . . . . . . . . . . . . . . . . . . . . 14 ARTM-9405 Top View . . . . . . . . . . . . . . . . . . . . . . . . . . . . . . . . . . . . . . . . . . . . . . . . . . . . . . . . . . . . . . . 25 Faceplate Layout . . . . . . . . . . . . . . . . . . . . . . . . . . . . . . . . . . . . . . . . . . . . . . . . . . . . . . . . . . . . . . . . . . . 26 Keying . . . . . . . . . . . . . . . . . . . . . . . . . . . . . . . . . . . . . . . . . . . . . . . . . . . . . . . . . . . . . . . . . . . . . . . . . . . . 27 Heat Sinks . . . . . . . . . . . . . . . . . . . . . . . . . . . . . . . . . . . . . . . . . . . . . . . . . . . . . . . . . . . . . . . . . . . . . . . . . 27 Port Pin Assignments . . . . . . . . . . . . . . . . . . . . . . . . . . . . . . . . . . . . . . . . . . . . . . . . . . . . . . . . . . . . . . . 27 3.5.1 SFP+ Connector . . . . . . . . . . . . . . . . . . . . . . . . . . . . . . . . . . . . . . . . . . . . . . . . . . . . . . . . . . . . . . 27 3.5.2 QSFP Connector . . . . . . . . . . . . . . . . . . . . . . . . . . . . . . . . . . . . . . . . . . . . . . . . . . . . . . . . . . . . . 28 3.5.3 Serial Console Connector . . . . . . . . . . . . . . . . . . . . . . . . . . . . . . . . . . . . . . . . . . . . . . . . . . . . . 30 3.5.4 Status LEDs. . . . . . . . . . . . . . . . . . . . . . . . . . . . . . . . . . . . . . . . . . . . . . . . . . . . . . . . . . . . . . . . . . 31 Functional Description . . . . . . . . . . . . . . . . . . . . . . . . . . . . . . . . . . . . . . . . . . . . . . . . . . . . . . . . . . . . . . . . 33 4.1 Block Diagram of ARTM-9405 16X10GbE . . . . . . . . . . . . . . . . . . . . . . . . . . . . . . . . . . . . . . . . . . . . . . 33 ARTM-9405 16x10GbE Installation and Use (6806800P45F) 3 Contents Contents 4.2 4.3 4.4 A Module Management Controller . . . . . . . . . . . . . . . . . . . . . . . . . . . . . . . . . . . . . . . . . . . . . . . . . . . . . 34 4.2.1 Functional Overview. . . . . . . . . . . . . . . . . . . . . . . . . . . . . . . . . . . . . . . . . . . . . . . . . . . . . . . . . . 35 4.2.2 Firmware Architecture . . . . . . . . . . . . . . . . . . . . . . . . . . . . . . . . . . . . . . . . . . . . . . . . . . . . . . . . 36 4.2.3 HPM.1 Firmware Upgrade and Crisis Recovery . . . . . . . . . . . . . . . . . . . . . . . . . . . . . . . . . . . 37 4.2.4 Sensors . . . . . . . . . . . . . . . . . . . . . . . . . . . . . . . . . . . . . . . . . . . . . . . . . . . . . . . . . . . . . . . . . . . . . 38 4.2.4.1 (Q) SFP Device Inserted Sensors . . . . . . . . . . . . . . . . . . . . . . . . . . . . . . . . . . . . . . 41 4.2.4.2 SFP TXFAULT Sensors . . . . . . . . . . . . . . . . . . . . . . . . . . . . . . . . . . . . . . . . . . . . . . . . 42 4.2.4.3 Voltage and Temperature Sensors . . . . . . . . . . . . . . . . . . . . . . . . . . . . . . . . . . . . 42 4.2.5 Accessing SFP EEPROMs. . . . . . . . . . . . . . . . . . . . . . . . . . . . . . . . . . . . . . . . . . . . . . . . . . . . . . . 43 4.2.6 FRU Inventory . . . . . . . . . . . . . . . . . . . . . . . . . . . . . . . . . . . . . . . . . . . . . . . . . . . . . . . . . . . . . . . 44 4.2.7 IPMI Hardware Watchdog . . . . . . . . . . . . . . . . . . . . . . . . . . . . . . . . . . . . . . . . . . . . . . . . . . . . . 44 4.2.8 SFP I2C Selection. . . . . . . . . . . . . . . . . . . . . . . . . . . . . . . . . . . . . . . . . . . . . . . . . . . . . . . . . . . . . 45 4.2.9 Power Configuration . . . . . . . . . . . . . . . . . . . . . . . . . . . . . . . . . . . . . . . . . . . . . . . . . . . . . . . . . 45 PHY . . . . . . . . . . . . . . . . . . . . . . . . . . . . . . . . . . . . . . . . . . . . . . . . . . . . . . . . . . . . . . . . . . . . . . . . . . . . . . . 46 4.3.1 Management Interface . . . . . . . . . . . . . . . . . . . . . . . . . . . . . . . . . . . . . . . . . . . . . . . . . . . . . . . 46 Private I2C Bus . . . . . . . . . . . . . . . . . . . . . . . . . . . . . . . . . . . . . . . . . . . . . . . . . . . . . . . . . . . . . . . . . . . . . 46 Related Documentation . . . . . . . . . . . . . . . . . . . . . . . . . . . . . . . . . . . . . . . . . . . . . . . . . . . . . . . . . . . . . . . 49 A.1 A.2 Artesyn Embedded Technologies - Embedded Computing Documentation . . . . . . . . . . . . . . . . 49 Technical References . . . . . . . . . . . . . . . . . . . . . . . . . . . . . . . . . . . . . . . . . . . . . . . . . . . . . . . . . . . . . . . 49 Safety Notes . . . . . . . . . . . . . . . . . . . . . . . . . . . . . . . . . . . . . . . . . . . . . . . . . . . . . . . . . . . . . . . . . . . . . . . . . . . . . 51 Sicherheitshinweise . . . . . . . . . . . . . . . . . . . . . . . . . . . . . . . . . . . . . . . . . . . . . . . . . . . . . . . . . . . . . . . . . . . . . . 57 4 ARTM-9405 16x10GbE Installation and Use (6806800P45F) List of Tables Table 1-1 Table 1-2 Table 2-1 Table 2-2 Table 3-1 Table 3-2 Table 3-3 Table 3-4 Table 4-1 Table 4-2 Table 4-3 Table 4-4 Table 4-5 Table 4-6 Table 4-7 Table 4-8 Table 4-9 Table 4-10 Table 4-11 Table A-1 Table A-2 Standard Compliances . . . . . . . . . . . . . . . . . . . . . . . . . . . . . . . . . . . . . . . . . . . . . . . . . . . . . . . . . . 13 Mechanical Data . . . . . . . . . . . . . . . . . . . . . . . . . . . . . . . . . . . . . . . . . . . . . . . . . . . . . . . . . . . . . . . 14 Environmental Requirements . . . . . . . . . . . . . . . . . . . . . . . . . . . . . . . . . . . . . . . . . . . . . . . . . . . . 16 Power Dissipation . . . . . . . . . . . . . . . . . . . . . . . . . . . . . . . . . . . . . . . . . . . . . . . . . . . . . . . . . . . . . . 18 SFP+ Connector Pin Assignment . . . . . . . . . . . . . . . . . . . . . . . . . . . . . . . . . . . . . . . . . . . . . . . . . 27 QSFP Connector Pin Assignments . . . . . . . . . . . . . . . . . . . . . . . . . . . . . . . . . . . . . . . . . . . . . . . . 28 Serial Console Connector Pin-out (Cisco Style) . . . . . . . . . . . . . . . . . . . . . . . . . . . . . . . . . . . . . 30 PICMG 3.0 LEDs . . . . . . . . . . . . . . . . . . . . . . . . . . . . . . . . . . . . . . . . . . . . . . . . . . . . . . . . . . . . . . . 31 ARTM-9405 Specific Sensors . . . . . . . . . . . . . . . . . . . . . . . . . . . . . . . . . . . . . . . . . . . . . . . . . . . . 38 (Q) SFP Device Inserted Sensor . . . . . . . . . . . . . . . . . . . . . . . . . . . . . . . . . . . . . . . . . . . . . . . . . . 41 SFP TXFAULT Sensor . . . . . . . . . . . . . . . . . . . . . . . . . . . . . . . . . . . . . . . . . . . . . . . . . . . . . . . . . . . . 42 Voltage and Temperature Sensor Devices . . . . . . . . . . . . . . . . . . . . . . . . . . . . . . . . . . . . . . . . . 42 Bus ID specified for SFP EEPROMs . . . . . . . . . . . . . . . . . . . . . . . . . . . . . . . . . . . . . . . . . . . . . . . . 43 RTM Base FRU Information Overview . . . . . . . . . . . . . . . . . . . . . . . . . . . . . . . . . . . . . . . . . . . . . 44 MasterWriteReadI2C Request Data Byte 1 Used for SFP I2C Selection . . . . . . . . . . . . . . . . . 45 Power Configuration . . . . . . . . . . . . . . . . . . . . . . . . . . . . . . . . . . . . . . . . . . . . . . . . . . . . . . . . . . . 45 Private I2C Port . . . . . . . . . . . . . . . . . . . . . . . . . . . . . . . . . . . . . . . . . . . . . . . . . . . . . . . . . . . . . . . . 46 Private I2C Bus 0 Address Mapping . . . . . . . . . . . . . . . . . . . . . . . . . . . . . . . . . . . . . . . . . . . . . . . 47 Private I2C Bus 1 Address Mapping . . . . . . . . . . . . . . . . . . . . . . . . . . . . . . . . . . . . . . . . . . . . . . . 47 Artesyn Embedded Technologies - Embedded Computing Publications . . . . . . . . . . . . . . 49 Technical References . . . . . . . . . . . . . . . . . . . . . . . . . . . . . . . . . . . . . . . . . . . . . . . . . . . . . . . . . . . 49 ARTM-9405 16x10GbE Installation and Use (6806800P45F) 5 List of Tables 6 ARTM-9405 16x10GbE Installation and Use (6806800P45F) List of Figures Figure 3-1 Figure 3-2 Figure 4-1 Figure 4-2 Figure 4-3 ARTM-9405 Top View . . . . . . . . . . . . . . . . . . . . . . . . . . . . . . . . . . . . . . . . . . . . . . . . . . . . ARTM-9405 Faceplate . . . . . . . . . . . . . . . . . . . . . . . . . . . . . . . . . . . . . . . . . . . . . . . . . . . Block Diagram of ARTM-9405 16X10GbE . . . . . . . . . . . . . . . . . . . . . . . . . . . . . . . . . . MMC Block Diagram of the ARTM-9405 . . . . . . . . . . . . . . . . . . . . . . . . . . . . . . . . . . . . Firmware Architecture . . . . . . . . . . . . . . . . . . . . . . . . . . . . . . . . . . . . . . . . . . . . . . . . . . . ARTM-9405 16x10GbE Installation and Use (6806800P45F) 25 26 33 35 36 7 List of Figures 8 ARTM-9405 16x10GbE Installation and Use (6806800P45F) About this Manual Overview of Contents This manual is divided into the following chapters and appendix: 1. Safety Notes, provides the safety notes that should be observed while operating the product. 2. Sicherheitshinweise, provides the German translation of the Safety notes. 3. Introduction, provides an overview of the features of the product, including mechanical, label, and ordering information. 4. Hardware Preparation and Installation, provides information on the environmental and power requirements, as well as procedures for the installation and removal of the product. 5. LEDs and I/O Interfaces, describes the LEDs, I/O interfaces and pin assignments, as well as the board layout. 6. Functional Description, describes the main components found on the board. 7. Related Documentation, provides a list of related Artesyn documentation, including specifications related to the product. Abbreviations This document uses the following abbreviations: Abbreviation Definition ATCA Advanced Telecommunications Computing Architecture CSA Canadian Standards Association EMC Electromagnetic Compatibility ETSI European Telecommunications Standards Institute FCC Feder Communications Commission GbE Gigabit Ethernet IEC International Electrotechnical Commission IPMB Intelligent Platform Management Bus IPMC Intelligent Platform Management Controller IPMI Intelligent Platform Management Interface ARTM-9405 16x10GbE Installation and Use (6806800P45F) 9 About this Manual About this Manual Abbreviation Definition NEBS Network Equipment-Building System PCIe PCI Express PICMG PCI Industrial Computer Manufacturers Group RoHS Restriction of Hazardous Substances RTM Rear Transition Module SFP/SFP+ Small Form Factor Optical Transceiver Module SGMII Serial Gigabit Media Independent Interface UL Underwriters Laboratories Inc. WEEE Waste Electrical and Electronic Equipment XAUI 10 GbE Attachment Unit Interface Conventions The following table describes the conventions used throughout this manual. 10 Notation Description 0x00000000 Typical notation for hexadecimal numbers (digits are 0 through F), for example used for addresses and offsets 0b0000 Same for binary numbers (digits are 0 and 1) bold Used to emphasize a word Screen Used for on-screen output and code related elements or commands in body text Courier + Bold Used to characterize user input and to separate it from system output Reference Used for references and for table and figure descriptions File > Exit Notation for selecting a submenu <text> Notation for variables and keys [text] Notation for software buttons to click on the screen and parameter description ARTM-9405 16x10GbE Installation and Use (6806800P45F) About this Manual Notation Description ... Repeated item for example node 1, node 2, ..., node 12 . Omission of information from example/command that is not necessary at the time being . . .. Ranges, for example: 0..4 means one of the integers 0,1,2,3, and 4 (used in registers) | Logical OR Indicates a hazardous situation which, if not avoided, could result in death or serious injury Indicates a hazardous situation which, if not avoided, may result in minor or moderate injury Indicates a property damage message No danger encountered. Pay attention to important information ARTM-9405 16x10GbE Installation and Use (6806800P45F) 11 About this Manual About this Manual Summary of Changes The summary of the changes is as follows: 12 Part Number Publication Date Description 6806800P45A June, 2012 Initial version 6806800P45B December, 2012 GA version 6806800P45C January, 2013 Updated Mechanical Data on page 14 and Private I2C Bus on page 46. 6806800P45D August, 2013 Updated Table 4-1 on page 38 and modified the section SFP TXFAULT Sensors on page 42. 6806800P45E November, 2013 Updated Mechanical Data on page 14. 6806800P45F May, 2014 Re- branded to Artesyn template. ARTM-9405 16x10GbE Installation and Use (6806800P45F) Chapter 1 Introduction 1.1 Overview ARTM-9405 is a rear transition module specifically designed for the use in combination with the ATCA-9405 front board. The design of ARTM-9405 follows the standards of PICMG 3.0 Revision 1.0 AdvancedTCA Base Specification and PICMG 3.1 Revision 1.0 Specification Ethernet/Fiber Channel for Advanced TCA Systems. 1.2 Features The ARTM-9405 16x10GbE features are: 1.3 Base PCB Eight 10Gb Ethernet interfaces via SFP+ pluggable transceivers Two 40Gb Ethernet interfaces via QSFP pluggable transceivers Standard Compliances The product meets the standards listed below. Table 1-1 Standard Compliances Standard Description UL 60950-1 Legal safety requirements EN 60950-1 IEC 60950-1 CAN/CSA C22.2 No 60950-1 CISPR 22 EMC requirements (legal) on system level (predefined CISPR 24 Artesyn system) EN 55022 EN 55024 FCC Part 15 Industry Canada ICES-003 VCCI Japan AS/NZS CISPR 22 EN 300 386 ARTM-9405 16x10GbE Installation and Use (6806800P45F) 13 Introduction 1.4 Mechanical Data This section lists the physical dimensions and weight of the RTM. Table 1-2 Mechanical Data 1.5 Feature Value Physical dimension of ARTM-9405 16x10GbE 8U x 88.43mmx 6 HP Weight of ARTM-9405 16x10GbE 0.690 Kg Ordering Information Consult your local Artesyn sales representative for available ARTM-9405 variants and their order numbers. 14 ARTM-9405 16x10GbE Installation and Use (6806800P45F) Chapter 2 Hardware Preparation and Installation 2.1 Overview This chapter describes applicable environmental and power requirements and the installation and removal procedures of the RTM. 2.2 Unpacking and Inspecting the Board Damage of Circuits Electrostatic discharge and incorrect installation and removal of the product can damage circuits or shorten their life. Before touching the product make sure that your are working in an ESD-safe environment or wear an ESD wrist strap or ESD shoes. Hold the product by its edges and do not touch any components or circuits. 1. Make sure that you have received all the items of your shipment. 2. Check for damage and report any damage or differences to the customer service. The product is thoroughly inspected before shipment. If any damage occurred during transportation or any items are missing, contact customer service immediately. 3. Remove the desiccant bag that is shipped with the module, and then dispose of it according to your country's legislation. 2.3 Environmental Requirements Make sure that the board, when operated in your particular system configuration, meets the ARTM-9405 16x10GbE Installation and Use (6806800P45F) 15 Hardware Preparation and Installation environmental requirements specified below. Operating temperatures refer to the temperature of the air circulating around the RTM, and not to the component temperatures. If you integrate the RTM in your own non-Artesyn system, contact your local sales representative for further safety information. Table 2-1 Environmental Requirements Requirement Operating Non-Operating Temperature +5 ºC (+41 °F) to +40 ºC (+104 °F) -40 ºC (-40 °F) to +70 ºC (+158 °F) (normal operation) according to NEBS (may be further limited by installed accessories) Standard GR-63-CORE -5 ºC (+23 °F) to +55 ºC (+131 °F) (exceptional operation) according to NEBS Standard GR-63-CORE Airflow The blade is designed to operate in a - chassis that provides 35 CFM across the blade for the stated temperature range. Temp. change +/- 0.5 ºC/min according to NEBS +/- 0.5 ºC/min Standard GR-63-CORE Rel. humidity 5% to 90% non-condensing according to 5% to 95% non-condensing Artesyn-internal environmental environmental requirements according to Artesyn-internal requirements Vibration Shock 16 1 g from 5 to 100 Hz and back to 5 Hz at 5-20 Hz at 0.1 g2/Hz a rate of 0.1 octave/minute Random 20-200 Hz at -3 m/Sec2 Half-sine, 11 m/Sec, 30 mSec/sec2 Blade level packaging 20-200 Hz at -3.0 dB/octave Half-sine, 6 mSec at 180 m/Sec2 ARTM-9405 16x10GbE Installation and Use (6806800P45F) Hardware Preparation and Installation Table 2-1 Environmental Requirements (continued) Requirement Operating Free fall Non-Operating 1,200 mm/all edges and corners 1.0 m (packaged) 100 mm (unpacked) Product Damage High humidity and condensation on the surfaces cause short circuits. Do not operate the product outside the specified environmental limits. Make sure the product is completely dry and there is no moisture on any surface before applying power. ARTM-9405 16x10GbE Installation and Use (6806800P45F) 17 Hardware Preparation and Installation 2.4 Power Requirements Table 2-2 Power Dissipation 2.5 Characterstic Value Maximum power dissipation of ARTM-9405 16x10GbE 36 W Installing and Removing the RTM Damage of RTM and Front Blade The RTM can be installed into a powered or non-powered system. Installing the RTM with other blade than ATCA-9405 may damage the RTM and the front blade. Install the RTM with only Artesyn ATCA-9405 blade. Damage of Circuits Electrostatic discharge and incorrect installation and removal of the product can damage circuits or shorten their life. Before touching the product, make sure that you are working in an ESD-safe environment or wear an ESD wrist strap or ESD shoes. Hold the product by its edges and do not touch any components or circuits. 2.5.1 Installing the RTM You can install the RTM whether or not the front blade is installed. 18 ARTM-9405 16x10GbE Installation and Use (6806800P45F) Hardware Preparation and Installation 2.5.1.1 Front Blade is Installed Use the following procedure to install the RTM when the front blade is installed. This procedure assumes that your system is powered. If your system is unpowered, disregard the blue LED and skip the respective step. 1. Locate the slot where the RTM is to be installed in the shelfs rear, which must be the same as that of the front blade. 2. Open the lower handle of the front blade to power down its payload. The blue LED on the front blade starts to flash. This indicates that the front blade is informing the shelf manager that it wants to power down its payload. 3. Wait until the blue LED on the front blade is lit. When the blue LED is lit, the payload is powered down. 4. Make sure that the top and bottom handles of the RTM are in an outward position by squeezing the lever and latch together. 5. Insert the RTM into the shelf by placing the top and bottom edges in the card guides of the slot. 6. Slide the RTM into the slot. 7. Apply equal and steady pressure to the RTM to carefully slide it into the shelf until you feel resistance. 8. Continue to gently push the RTM until the RTM connectors engage. 9. Squeeze the lever and latch together, and then hook the lower and upper handle into the shelf rail recesses. ARTM-9405 16x10GbE Installation and Use (6806800P45F) 19 Hardware Preparation and Installation 10. Fully insert the RTM and lock it to the shelf by pressing the two components of the lower and upper handles together, and then turning the handles toward the face plate. If your shelf is powered, as soon as the RTM is connected to the front blade, the blue LED lights up and remains lit until the lower handle of the RTM and the lower handle of the front blade are closed. 11. Close the lower handle of the front blade so that the payloads of the RTM and front blade are powered up. The blue LEDs on both the front blade and RTM start flashing. This indicates that the front blade is informing the shelf manager that it wants to power up the payload of front blade and RTM. 12. Tighten the face plate screws on the RTM. 13. Wait until the blue LEDs on the front blade and the RTM are not lit. A blue LED that is not lit indicates that the payload of the front blade and the RTM has been powered up and is active. 14. Plug the interface cable into the face plate connectors, if applicable. 20 ARTM-9405 16x10GbE Installation and Use (6806800P45F) Hardware Preparation and Installation 2.5.1.2 Front Blade is not Installed Use this procedure to install the RTM when the front blade is not installed. 1. Locate the slot where the RTM is to be installed into the shelfs rear, which must be the same as that of the front blade. 2. Make sure that the top and bottom handles of the RTM are in an outward position by squeezing the lever and latch together. 3. Insert the RTM into the shelf by placing the top and bottom edges in the card guides of the slot. 4. Slide the RTM into the slot. 5. Apply equal and steady pressure to the RTM to carefully slide it into the shelf until you feel resistance. 6. Continue to gently push the RTM until the RTM connectors engage. 7. Squeeze the lever and latch together, and then hook the lower and upper handle into the shelf rail recesses. 8. Fully insert the RTM and lock it to the shelf by pressing the two components of the lower and upper handles together, and then turn the handles toward the face plate. ARTM-9405 16x10GbE Installation and Use (6806800P45F) 21 Hardware Preparation and Installation 9. Tighten the face plate screws on the RTM. 10. Insert the front blade on the system's front, into the same slot as the RTM. For more information on installing the front blade, see ATCA-9405 User's Manual. As soon as the front blade is connected to the backplane, the blue LEDs on the front blade and the RTM light up permanently. This indicates that the IPMC of the front blade and the MMC of the RTM are powered up. 11. Close the handles of the front blade. The blue LEDs on the front blade and the RTM start flashing. This indicates that the front blade is informing the shelf manager that it wants to power up the payload of both the front blade and the RTM. 12. Tighten the face plate screws on the front blade. 13. Wait until the blue LEDs on the front blade and the RTM are not lit. The blue LED that is not lit indicates that the payload of the front blade and the RTM has been powered up and is active. 14. Plug the interface cable into the face plate connectors, if applicable. 22 ARTM-9405 16x10GbE Installation and Use (6806800P45F) Hardware Preparation and Installation 2.5.2 Removing the RTM This procedure assumes that your system is powered. If your system is unpowered, disregard the blue LED and skip the respective step. 1. Unlatch the lower handle outward by squeezing the lever and latch together, and then turn the handle outward until you feel a resistance. Do not rotate the handle fully outwards. 2. The blue LED blinks indicating that the front blade has informed the shelfmanager to power down the payload of both the front blade and RTM, and that the power-down process is going-on. 3. Wait until the blue LEDs on the front blade and RTM are permanently lit. ARTM-9405 16x10GbE Installation and Use (6806800P45F) 23 Hardware Preparation and Installation A permanently lit LED indicates that the payload of both the front blade and RTM has been powered down. Data Loss Removing the product with the blue LED still blinking causes data loss. Wait until the blue LED is permanently illuminated before removing the product. Product Damage Installing or removing the product while power is applied damages the product. Before removing the RTM from a powered system, power down the slot and the front blade’s payload by opening the lower handle of the front blade and wait until the blue LED is permanently ON. 4. Unlatch the upper handle, and then rotate both handles fully outward. 5. Remove the interface cables from the face plate connectors, if applicable. 6. Loosen the screws on the RTM face plate. 7. Remove the RTM from the slot. 24 ARTM-9405 16x10GbE Installation and Use (6806800P45F) Chapter 3 LEDs and I/O Interfaces 3.1 ARTM-9405 Top View Figure 3-1 ARTM-9405 Top View ARTM-9405 16x10GbE Installation and Use (6806800P45F) 25 LEDs and I/O Interfaces 3.2 Faceplate Layout Figure 3-2 26 ARTM-9405 Faceplate ARTM-9405 16x10GbE Installation and Use (6806800P45F) LEDs and I/O Interfaces The faceplate of the blade provides the following interfaces and control elements: Eight SFP+ Bays Two QSFP Bays Serial Console Status LEDs according to PICMG3.0 Recessed Push Button Reset The blade design provides the possibility to cover unused faceplate elements like LEDs or push buttons behind a custom overlay foil. 3.3 Keying Mechanical keying is provided according to ATCA 3.0 Base specification. 3.4 Heat Sinks Passive heat sinks are required for Netlogic NLP10142 PHYs. 3.5 Port Pin Assignments 3.5.1 SFP+ Connector The SFP+ connector resides inside the SFP+ cage and is only accessible via an SFP+ module. Table 3-1 SFP+ Connector Pin Assignment Pin Description 1 GND 2 TxFAULT 3 TxDIS ARTM-9405 16x10GbE Installation and Use (6806800P45F) 27 LEDs and I/O Interfaces Table 3-1 SFP+ Connector Pin Assignment 3.5.2 Pin Description 4 I2C_SDA 5 I2C_SCL 6 MOD_ABS 7 RATE_SEL_0 8 LOS 9 RATE_SEL_1 10 GND 11 GND 12 RxD+ 13 RxD- 14 GND 15 +3.3V 16 +3.3V 17 GND 18 TxD+ 19 TxD- 20 GND QSFP Connector Table 3-2 QSFP Connector Pin Assignments 28 Pin Signal 1 GND 2 Tx2n 3 Tx2p 4 GND ARTM-9405 16x10GbE Installation and Use (6806800P45F) LEDs and I/O Interfaces Table 3-2 QSFP Connector Pin Assignments Pin Signal 5 Tx4n 6 Tx4p 7 GND 8 ModSetL 9 ResetL 10 Vcc Rx 11 SCL 12 SDA 13 GND 14 Rx3p 15 Rx3n 16 GND 17 Rx1p 18 Rx1n 19 GND 20 GND 21 Rx2n 22 Rx2p 23 GND 24 Rx4n 25 Rx4p 26 GND 27 ModPrsL 28 INTL 29 Vcc Tx 30 Vcc1 31 LPMode ARTM-9405 16x10GbE Installation and Use (6806800P45F) 29 LEDs and I/O Interfaces Table 3-2 QSFP Connector Pin Assignments 3.5.3 Pin Signal 32 GND 33 Tx3p 34 Tx3n 35 GND 36 Tx1p 37 Tx1n 38 GND Serial Console Connector The ARTM-9405 provides an RJ-45 based serial interface connector at its face plate. Refer to the ATCA-9405 Installation and Use Guide for the detailed information to the routing of the serial interface. The pinout of the serial interface connector at the ATCA-9405s face plate is as follows: Table 3-3 Serial Console Connector Pin-out (Cisco Style) 30 Pin Signal Direction 1 RTS# IN 2 NC 3 TXD 4 GND 5 GND 6 RXD 7 NC 8 CTS# OUT IN OUT ARTM-9405 16x10GbE Installation and Use (6806800P45F) LEDs and I/O Interfaces 3.5.4 Status LEDs This section describes the status indicated by the LEDs. Table 3-4 PICMG 3.0 LEDs LED Color Signal Description Blue Hot Swap (H/S) Red Out of Service (OOS) Green In Service (IS) Amber Attention (ATN) ARTM-9405 16x10GbE Installation and Use (6806800P45F) 31 LEDs and I/O Interfaces 32 ARTM-9405 16x10GbE Installation and Use (6806800P45F) Chapter 4 Functional Description 4.1 Block Diagram of ARTM-9405 16X10GbE The Figure 4-1 on page 33 shows the main functional blocks of the ARTM-9405 16x10GbE. Figure 4-1 Block Diagram of ARTM-9405 16X10GbE ARTM-9405 16x10GbE Installation and Use (6806800P45F) 33 Functional Description 4.2 Module Management Controller The ARTM-9405 provides an intelligent hardware management system, as defined in the AdvancedTCA® Base Specification (PICMG® 3.0; AMC.0). This system incorporates a Module Management Controller (MMC) based on the BMR-AVR-AMCm® reference design from Pigeon Point Systems. 34 ARTM-9405 16x10GbE Installation and Use (6806800P45F) Functional Description 4.2.1 Functional Overview The ARTM-9405 implements all the standard Intelligent Platform Management Interface (IPMI) commands and provides hardware interfaces for other system management features such as Hot Swap control, LED control, power control, and temperature and voltage monitoring. A functional block diagram of the ARTM-9405 MMC system is shown in Figure 4-2 on page 35. Figure 4-2 MMC Block Diagram of the ARTM-9405 ARTM-9405 16x10GbE Installation and Use (6806800P45F) 35 Functional Description Pigeon Point Systems IPM Sentry products are consistent with all current PICMG specifications and IPMI v1.5 compliant with specific 2.0 extensions. 4.2.2 Firmware Architecture Figure 4-3 Firmware Architecture The IPMC and MMC firmware basically consists of three major parts: Boot loader Hardware Abstraction Layer (HAL) Application Layer The boot loader maintains redundant copies of the firmware in flash. Each time the IPMI firmware is upgraded, a redundant copy of the current IPMI firmware is made in flash. The Hardware Abstraction Layer (HAL) is responsible for initializing the ATMEL and making all preparations necessary for running code written in C. The time management facility of the HAL is responsible for providing a means for measuring time and detecting timeout conditions. The device drivers are responsible for implementing high-level interfaces to the hardware. 36 ARTM-9405 16x10GbE Installation and Use (6806800P45F) Functional Description The Application layer is implemented as a multi threaded application. The main thread reads incoming messages/events from various inbound queues, processes these messages/events, and produces outgoing traffic to appropriate hardware interfaces. The Application layer also can operate in standalone mode intended to debug the payload without requiring a shelf manager. 4.2.3 HPM.1 Firmware Upgrade and Crisis Recovery The IPMI firmware of the MMC is fully HPM.1 compliant and provides the following components: Boot Loader Active IPMI firmware Backup IPMI firmware The boot loader maintains redundant copies of the firmware in flash. Each time the IPMI firmware is upgraded, a redundant copy of the current IPMI firmware is made in flash. Once the new IPMI firmware is programmed, the IPMI controller will reset itself to boot from the new image. The boot loader also validates new IPMI firmware images. Provided the IPMI controller can power up successfully the actual image is made active and the previously active image is made backup. In case of power up fails, the boot loader will automatically recover from crisis and boots from the image before. You can upgrade the MMC via JTAG or via its IPMB-L interface. To ensure that the payload is not interrupted during IPMI firmware upgrade, the IPMI controller stores all operational information, such as e-keying, hot-swap state, last events to be queued, graceful shutdown timeout, latest pin settings, and so on in non-volatile storage. ARTM-9405 16x10GbE Installation and Use (6806800P45F) 37 Functional Description 4.2.4 Sensors This section provides a description of all analog and discrete Sensors available at the ARTM9405. The Table 4-1 on page 38, lists the sensor identification numbers and information regarding the sensor type, name, supported thresholds, assertion and deassertion information, and a brief description of the sensor purpose. Table 4-1 ARTM-9405 Specific Sensors Event Data Byte 2 Event Data Byte 3 Event Threshold/ Description Sensor Type Event/ Reading Type +12V RTM Voltage 0x02 Threshold 0x01 reading threshold unr uc lnr lc Assertion/ Deassertion Auto 58 1.8V RTM Voltage 0x02 Threshold 0x01 reading threshold unr uc lnr lc Assertion/ Deassertion Auto 59 0.9V RTM Voltage 0x02 Threshold 0x01 reading threshold unr uc lnr lc Assertion/ Deassertion Auto 60 +3.3V RTM Voltage 0x02 Threshold 0x01 reading threshold unr uc lnr lc Assertion/ Deassertion Auto 61 INLET temp RTM Temp 0x01 Threshold 0x01 reading threshold unr uc unc Assertion/ Deassertion Auto 62 OUTLET temp RTM Temp 0x01 Threshold 0x01 reading threshold unr uc unc Assertion/ Deassertion Auto 63 QSFP #1 Ins Other FRU 0x1A digital Discrete 0x08 0x0 0x1 0xFF 0xFF 0x0: Device Removed / Device Absent 0x1: Device Inserted / Device Present Assertion Auto 64 QSFP #2 Ins Other FRU 0x1A digital Discrete 0x08 0x0 0x1 0xFF 0xFF 0x0: Device Removed / Device Absent 0x1: Device Inserted / Device Present Assertion Auto 65 SFP+ #1 Ins Module / Board 0x15 digital Discrete 0x08 0x0 0x1 0xFF 0xFF 0x0: Device Removed / Device Absent 0x1: Device Inserted / Device Present Assertion Auto Nr Sensor Name 57 38 Event Data Byte 1 Assertion Deassertion Rearm ARTM-9405 16x10GbE Installation and Use (6806800P45F) Functional Description Table 4-1 ARTM-9405 Specific Sensors (continued) Sensor Type Event/ Reading Type SFP+ #2 Ins Module / Board 0x15 digital Discrete 0x08 0x0 0x1 0xFF 0xFF 67 SFP+ #3 Ins Module / Board 0x15 digital Discrete 0x08 0x0 0x1 0xFF 68 SFP+ #4 Ins Module / Board 0x15 digital Discrete 0x08 0x0 0x1 69 SFP+ #5 Ins Module / Board 0x15 digital Discrete 0x08 70 SFP+ #6 Ins Module / Board 0x15 71 SFP+ #7 Ins 72 73 Event Data Byte 1 Event Data Byte 2 Event Data Byte 3 Event Threshold/ Description Assertion Deassertion Rearm 0x0: Device Removed / Device Absent 0x1: Device Inserted / Device Present Assertion Auto 0xFF 0x0: Device Removed / Device Absent 0x1: Device Inserted / Device Present Assertion Auto 0xFF 0xFF 0x0: Device Removed / Device Absent 0x1: Device Inserted / Device Present Assertion Auto 0x0 0x1 0xFF 0xFF 0x0: Device Removed / Device Absent 0x1: Device Inserted / Device Present Assertion Auto digital Discrete 0x08 0x0 0x1 0xFF 0xFF 0x0: Device Removed / Device Absent 0x1: Device Inserted / Device Present Assertion Auto Module / Board 0x15 digital Discrete 0x08 0x0 0x1 0xFF 0xFF 0x0: Device Removed / Device Absent 0x1: Device Inserted / Device Present Assertion Auto SFP+ #8 Ins Module / Board 0x15 digital Discrete 0x08 0x0 0x1 0xFF 0xFF 0x0: Device Removed / Device Absent 0x1: Device Inserted / Device Present Assertion Auto SFP+ #1 TXFAULT Module / Board 0x15 digital Discrete 0x04 0x0 0x1 0xFF 0xFF 0x0: Predictive Failure deasserted 0x1: Predictive Failure asserted Assertion Auto Nr Sensor Name 66 ARTM-9405 16x10GbE Installation and Use (6806800P45F) 39 Functional Description Table 4-1 ARTM-9405 Specific Sensors (continued) Nr Sensor Name Sensor Type Event/ Reading Type Event Data Byte 1 Event Data Byte 2 Event Data Byte 3 Event Threshold/ Description Assertion Deassertion Rearm 74 SFP+ #2 TXFAULT Module / Board 0x15 digital Discrete 0x04 0x0 0x1 0xFF 0xFF 0x0: Predictive Failure deasserted 0x1: Predictive Failure asserted Assertion Auto 75 SFP+ #3 TXFAULT Module / Board 0x15 digital Discrete 0x04 0x0 0x1 0xFF 0xFF 0x0: Predictive Failure deasserted 0x1: Predictive Failure asserted Assertion Auto 76 SFP+ #4 TXFAULT Module / Board 0x15 digital Discrete 0x04 0x0 0x1 0xFF 0xFF 0x0: Predictive Failure deasserted 0x1: Predictive Failure asserted Assertion Auto 77 SFP+ #5 TXFAULT Module / Board 0x15 digital Discrete 0x04 0x0 0x1 0xFF 0xFF 0x0: Predictive Failure deasserted 0x1: Predictive Failure asserted Assertion Auto 78 SFP+ #6 TXFAULT Module / Board 0x15 digital Discrete 0x04 0x0 0x1 0xFF 0xFF 0x0: Predictive Failure deasserted 0x1: Predictive Failure asserted Assertion Auto 79 SFP+ #7 TXFAULT Module / Board 0x15 digital Discrete 0x04 0x0 0x1 0xFF 0xFF 0x0: Predictive Failure deasserted 0x1: Predictive Failure asserted Assertion Auto 80 SFP+ #8 TXFAULT Module / Board 0x15 digital Discrete 0x04 0x0 0x1 0xFF 0xFF 0x0: Predictive Failure deasserted 0x1: Predictive Failure asserted Assertion Auto 81 Ver change RTM Version Change 0x2B Sensorspecific discrete 0x6F 0x7 Change type 0xFF 0x7: Software or F/W change successful Assertion Auto 40 ARTM-9405 16x10GbE Installation and Use (6806800P45F) Functional Description 4.2.4.1 (Q) SFP Device Inserted Sensors There is a digital discrete generic device inserted sensor implemented for each (Q) SFP inserted. Table 4-2 (Q) SFP Device Inserted Sensor Feature Raw value Description Entity ID 0xC0 PICMG Rear Transition Board Entity Instance 0x60 - Sensor Type 0x15/0x1A Board/other FRU Event Reading Type 0x08 Digital discrete (generic) Assertion Event Mask (Byte 15) 0x03 - Assertion Event Mask (Byte 16) 0x00 - Deassertion Event Mask (Byte 17) 0x00 - Deassertion Event Mask (Byte 18) 0x00 - Threshold/Reading Mask (Byte 19) 0x03 - Threshold/Reading Mask (Byte 20) 0x00 - Sensor Name SFP #<ID> Ins - Rearm Mode 1 Auto Hysteresis Support 0x00 No hysteresis Threshold Access Support 0x00 No thresholds Event Message Control 0x00 Per threshold /Discrete state Reading Definition - - The ARTM-9405 provides two QSFPs and 8 SFP Presence sensors. ARTM-9405 16x10GbE Installation and Use (6806800P45F) 41 Functional Description 4.2.4.2 SFP TXFAULT Sensors There is a digital discrete generic TXFAULT sensor implemented for each SFP inserted. Table 4-3 SFP TXFAULT Sensor 4.2.4.3 Feature Raw Value Description Entity ID 0xC0 PICMG Rear Transition Board Entity Instance 0x60 - Sensor Type 0x15/0x1A Board/ other FRU Event Reading Type 0x04 Digital discrete (generic) Assertion Event Mask (Byte 15) 0x03 - Assertion Event Mask (Byte 16) 0x00 - Deassertion Event Mask (Byte 17) 0x00 - Deassertion Event Mask (Byte 18) 0x00 - Threshold/Reading Mask (Byte 19) 0x03 - Threshold/Reading Mask (Byte 20) 0x00 - Sensor Name SFP #<ID> TXFault - Rearm Mode 1 Auto Hysteresis Support 0x00 No hysteresis Threshold Access Support 0x00 No thresholds Event Message Control 0x00 Per threshold /discrete state Reading Definition - - Voltage and Temperature Sensors The MMC provides the following voltage and temperature sensors: Table 4-4 Voltage and Temperature Sensor Devices 42 I2C address Purpose Device 0x90 INLET temp RTM LM75 0x92 OUTLET temp RTM LM75 ARTM-9405 16x10GbE Installation and Use (6806800P45F) Functional Description Table 4-4 Voltage and Temperature Sensor Devices 4.2.5 I2C address Purpose Device 0x94 Mezz temp RTM MAX1617 +12V RTM ADC +3.3V RTM ADC +1.8V RTM ADC +0.9V RTM ADC Accessing SFP EEPROMs Memory of SFP EEPROMs can be accessed via MMC with using the IPMI command "Master Write-Read". Using the following table, you can set the bus ID parameters. Table 4-5 Bus ID specified for SFP EEPROMs bus type channel number bus ID SFP #1 private 0 3 SFP #2 private 0 4 SFP #3 private 0 5 SFP #4 private 0 6 SFP #5 private 0 7 SFP #6 private 1 0 SFP #7 private 1 1 SFP #8 private 1 2 QSFP #1 private 1 3 QSFP #2 Private 1 4 ARTM-9405 16x10GbE Installation and Use (6806800P45F) 43 Functional Description 4.2.6 FRU Inventory The RTM provides the following FRU information: Table 4-6 RTM Base FRU Information Overview Area Description Internal use area Not used Board info area Mfg date/time According to [FRU, V1.0] r/w Board manufacturer ARTESYN r/w Board product name Defined by Artesyn r/w Board serial number Defined by Artesyn r/w Board part number Defined by Artesyn r/w Product Manufacturer ARTESYN r/w Product name ARTM-9405 r/w Product serial number Defined by Artesyn r/w Product part number Defined by Artesyn r/w User Info Area Artesyn OEM user info area r/w Product info area Multi record info area Value Access r/w Dynamic inventory data of the SFPs is read at OS level. 4.2.7 IPMI Hardware Watchdog For crisis recovery purpose, the IPMI building block provides an internal hardware watchdog. The IPMI firmware is reset if it does not trigger the watchdog anymore. 44 ARTM-9405 16x10GbE Installation and Use (6806800P45F) Functional Description 4.2.8 SFP I2C Selection The SFPs I2C EEPROM data can be accessed via the MMCs private I2C bus using the IPMI command MasterWriteReadI2C. The first parameter of the command specific request data called bus ID is used to select the SFP to be accessed. For details on how to select the parameter, see Table 4-7 on page 45. Table 4-7 MasterWriteReadI2C Request Data Byte 1 Used for SFP I2C Selection 4.2.9 SFP instance Bus type (bit [0] of bus ID) Bus Id (bit [3-1] of bus ID) Channel (bit [7-4] of bus ID) 1 1 3 0 2 1 4 0 3 1 5 0 4 1 6 0 5 1 7 0 6 1 0 1 7 1 1 1 8 1 2 1 9 1 3 1 10 1 4 1 Power Configuration Table 4-8 Power Configuration Item Value Description Dynamic power reconfiguration No While the RTM is powered, it supports only one power level Dynamic power configuration No The power level is fixed and does not change ARTM-9405 16x10GbE Installation and Use (6806800P45F) 45 Functional Description Table 4-8 Power Configuration (continued) 4.3 Item Value Description Number of power draw levels 1 The amount of possible power levels Early Power Draw Levels, Watt - Complete early power level including MMC Steady state Power Draw Levels, Watt ? Complete steady power consumption including IPMC and RTM Transition from early to steady levels, sec 0s - PHY The ARTM-9405 uses four NetLogic NLP10142 to provide 2x QSFP interfaces and 8x SFP+ interfaces on the face plate. 4.3.1 Management Interface The Netlogic NLP10142 supports IEEE802.3 Clause 45 station management interface. The MDC/MDIO signals are connected to Marvell switch device of the ATCA-9405 front board. 4.4 Private I2C Bus Two private I2C bus on the ARTM-9405 16x10GbE are implemented as a bit banging interface at the MMC. Table 4-9 Private I2C Port 46 MMC Port Private I2C Signal PG.4 RTM_PVT_I2C_0_SCL PG.2 RTM_PVT_I2C_0_SDA PA.7 RTM_PVT_I2C_1_SCL PA.1 RTM_PVT_I2C_1_SDA ARTM-9405 16x10GbE Installation and Use (6806800P45F) Functional Description The following table lists the Private I2C Bus 0 Address Mapping. Table 4-10 Private I2C Bus 0 Address Mapping I2C Address Device Description 0x90 LM75 Inlet Air Temperature Sensor 0x92 LM75 Outlet Air Temperature Sensor The following table lists the Private I2C Bus 1 Address Mapping. Table 4-11 Private I2C Bus 1 Address Mapping I2C Address Device Description 0xFE LM75 FPGA ARTM-9405 16x10GbE Installation and Use (6806800P45F) 47 Functional Description 48 ARTM-9405 16x10GbE Installation and Use (6806800P45F) Appendix A A Related Documentation A.1 Artesyn Embedded Technologies - Embedded Computing Documentation The publications listed below are referenced in this manual. You can obtain electronic copies of Artesyn Embedded Technologies - Embedded Computing publications by contacting your local Artesyn sales office. For released products, you can also visit our Web site for the latest copies of our product documentation. 1. Go to www.artesyn.com/computing. 2. Under SUPPORT, click TECHNICAL DOCUMENTATION. 3. Under FILTER OPTIONS, click the Document types drop-down list box to select the type of document you are looking for. 4. In the Search text box, type the product name and click GO. Table A-1 Artesyn Embedded Technologies - Embedded Computing Publications A.2 Document Title Publication Number ATCA-9405 Installation and Use 6806800M71 ATCA-9405 Quick Start Guide 6806800N10 Technical References Further information on basic operation and programming of the ATCA-9405 components can be found in documents listed below. Table A-2 Technical References Device / Interface Document 1 ATCA AdvancedTCA® Base Specification (PICMG® 3.0 Revision 2.0 March 18, 2005) Engineering Change Notice 3.0-1.0-001 (PICMG® 3.0 R2.0: ECN 3.0-2.0-001 June 15, 2005) Ethernet/Fibre Channel for AdvancedTCA™ Systems (PICMG® 3.1 Revision 1.0 January 22, 2003) http://www.picmg.org ARTM-9405 16x10GbE Installation and Use (6806800P45F) 49 Related Documentation Table A-2 Technical References (continued) Device / Interface Document 1 IPMI IPMI – Intelligent Platform Management Interface Specification v2.0 (Intel Hewlett-Packard NEC Dell, Rev. 1.0, Feb. 12, 2004) IPMI – Intelligent Platform Management Bus Communications Protocol Specification v1.0 (Intel Hewlett-Packard NEC Dell, Rev. 1.0, November 15, 1999) IPMI – Platform Management FRU Storage Definition v1.0 (Intel Hewlett-Packard NEC Dell, Rev. 1.1, September 27, 1999) http://www.intel.com/design/servers/ipmi/ Hardware Platform Management IPM Controller Firmware Upgrade Specification v1.0 (PICMG HPM.1 R1.0 May 4, 2007) http://www.picmg.org Frequently, the most current information regarding addenda/errata for specific documents may be found on the corresponding web site. 50 ARTM-9405 16x10GbE Installation and Use (6806800P45F) Safety Notes This section provides warnings that precede potentially dangerous procedures throughout this manual. Instructions contained in the warnings must be followed during all phases of operation, service, and repair of this equipment. You should also employ all other safety precautions necessary for the operation of the equipment in your operating environment. Failure to comply with these precautions or with specific warnings elsewhere in this manual could result in personal injury or damage to the equipment. Artesyn intends to provide all necessary information to install and handle the product in this manual. Because of the complexity of this product and its various uses, we do not guarantee that the given information is complete. If you need additional information, ask your Artesyn representative. The product has been designed to meet the standard industrial safety requirements. It must not be used except in its specific area of office telecommunication industry and industrial control. Only personnel trained by Artesyn or persons qualified in electronics or electrical engineering are authorized to install, remove or maintain the product. The information given in this manual is meant to complete the knowledge of a specialist and must not be used as replacement for qualified personnel. Keep away from live circuits inside the equipment. Operating personnel must not remove equipment covers. Only factory authorized service personnel or other qualified service personnel may remove equipment covers for internal subassembly or component replacement or any internal adjustment. Do not install substitute parts or perform any unauthorized modification of the equipment or the warranty may be voided. Contact your local Artesyn representative for service and repair to make sure that all safety features are maintained. EMC This equipment has been tested and found to comply with the limits for a Class A digital device, pursuant to Part 15 of the FCC Rules. These limits are designed to provide reasonable protection against harmful interference when the equipment is operated in a commercial environment. This equipment generates, uses, and can radiate radio frequency energy and, if not installed and used in accordance with the instruction manual, may cause harmful interference to radio communications. ARTM-9405 16x10GbE Installation and Use (6806800P45F) 51 Safety Notes Operation of this equipment in a residential area is likely to cause harmful interference in which case the user will be required to correct the interference at his own expense. Changes or modifications not expressly approved by Artesyn could void the user's authority to operate the equipment. Board products are tested in a representative system to show compliance with the above mentioned requirements. A proper installation in a compliant system will maintain the required performance. Use only shielded cables when connecting peripherals to assure that appropriate radio frequency emissions compliance is maintained. Installation Before installing the board make sure the requirements listed in section "Board Exchange" are met. Restricted access area - This board is only to be installed in a restricted access area. Data Loss Removing the board with the blue LED still blinking causes data loss. Wait until the blue LED is permanently illuminated, before removing the board. Damage of Circuits Electrostatic discharge and incorrect board installation and removal can damage circuits or shorten their life. Before touching the board or electronic components, make sure that you are working in an ESD-safe environment or wear ESD wrist straps. Board Malfunctioning Incorrect board installation and removal can result in board malfunctioning. Make sure that the board is connected to the system backplane via all assembled connectors and that power is available on all zone 1 power pins. Damage of the Product Incorrect installation of the product can cause damage of the product, Only use handles when installing/removing the product to avoid damage/deformation to the face plate and/or PCB. 52 ARTM-9405 16x10GbE Installation and Use (6806800P45F) Safety Notes Damage of the Product and Additional Devices and Modules Incorrect installation or removal of additional devices or modules may damage the product or the additional devices or modules. Before installing or removing additional devices or modules, read the respective documentation. Operation Board Damage Board surface High humidity and condensation on the board surface causes short circuits. Do not operate the board outside the specified environmental limits. Make sure the board is completely dry and there is no moisture on any surface before applying power. Board Overheating and Board Damage Operating the board without forced air cooling may lead to board overheating and thus board damage. When operating the board, make sure that forced air cooling is available in the shelf. Injuries or Short Circuits Board or power supply In case the ORing diodes of the board fail, the board may trigger a short circuit between input line A and input line B so that line A remains powered even if it is disconnected from the power supply circuit (and vice versa). To avoid damage or injuries, always check that there is no more voltage on the line that has been disconnected before continuing your work. Hot Swap Installing the board into or removing it from a powered system not supporting hot swap or high availability causes board damage and data loss. Therefore, only install it in or remove it from a powered system if the system itself supports hot swap or high availability and if the system documentation explicitly includes guidelines. ARTM-9405 16x10GbE Installation and Use (6806800P45F) 53 Safety Notes SFP/SFP+/QSFP+ Modules Personal Injury and Damage of the RTM and SFP/SFP+/QSFP+ Modules Installing and using SFP/SFP+/QSFP+ modules which are not fully certified and which do not meet all relevant safety standards may damage the RTM and the SFP/SFP+/QSFP+ modules and may lead to personal injury. Only use and install SFP/SFP+/QSFP+ modules which are fully certified and which meet all relevant safety standards. Personal Injury Optical SFP/SFP+/QSFP+ modules may be classified as laser products. When installing and using any of these SFP/SFP+/QSFP+ modules, the regulations which correspond to the respective laser class apply to the whole RTM. Not complying to these regulations may lead to personal injury. When installing and using optical SFP/SFP+/QSFP+ modules which are classified as laser products, make sure to comply to the respective regulations. Eye Damage Optical SFP/SFP+/QSFP+ modules may emit laser radiation when no cable is connected. This laser radiation is harmful to your eyes. Do not look into the optical lens at any time. SFP/SFP+/QSFP+ Module Damage The optical port plug protects the optical fibres against dirt and damage. Dirt and damage can render the SFP/SFP+/QSFP+ module inoperable. Only remove the optical plug when you are ready to connect a cable to the SFP/SFP+/QSFP+ module. When no cable is connected, cover the port with an optical port plug. 54 ARTM-9405 16x10GbE Installation and Use (6806800P45F) Safety Notes RJ-45 Connectors The RJ-45 connectors on the face plate must only be used for serial console connections. Connecting a telephone to such a connector may destroy your telephone as well as your board. Therefore: Clearly mark TPE connectors near your working area as network connectors. Only connect TPE bushing of the system to safety extra low voltage (SELV) circuits. Make sure that the length of the electric cable connected to a TPE bushing does not exceed 100 m. If you have further questions, ask your system administrator. Replacement/Expansion Only replace or expand components or system parts with those recommended by Artesyn. Otherwise, you are fully responsible for the impact on EMC or any possible malfunction of the product. Check the total power consumption of all components installed (see the technical specification of the respective components). Ensure that any individual output current of any source stays within its acceptable limits (see the technical specification of the respective source). Environment Always dispose of used products according to your country’s legislation and manufacturer’s instructions. ARTM-9405 16x10GbE Installation and Use (6806800P45F) 55 Safety Notes 56 ARTM-9405 16x10GbE Installation and Use (6806800P45F) Sicherheitshinweise Dieses Kapitel enthält Hinweise, die potentiell gefährlichen Prozeduren innerhalb dieses Handbuchs vorangestellt sind. Beachten Sie unbedingt in allen Phasen des Betriebs, der Wartung und der Reparatur des Systems die Anweisungen, die diesen Hinweisen enthalten sind. Sie sollten außerdem alle anderen Vorsichtsmaßnahmen treffen, die für den Betrieb des Produktes innerhalb Ihrer Betriebsumgebung notwendig sind. Wenn Sie diese Vorsichtsmaßnahmen oder Sicherheitshinweise, die an anderer Stelle dieses Handbuchs enthalten sind, nicht beachten, kann das Verletzungen oder Schäden am Produkt zur Folge haben. Artesyn ist darauf bedacht, alle notwendigen Informationen zum Einbau und zum Umgang mit dem Produkt in diesem Handbuch bereit zu stellen. Da es sich jedoch um ein komplexes Produkt mit vielfältigen Einsatzmöglichkeiten handelt, können wir die Vollständigkeit der im Handbuch enthaltenen Informationen nicht garantieren. Falls Sie weitere Informationen benötigen sollten, wenden Sie sich bitte an die für Sie zuständige Geschäftsstelle von Artesyn. Das System erfüllt die für die Industrie geforderten Sicherheitsvorschriften und darf ausschließlich für Anwendungen in der Telekommunikationsindustrie und im Zusammenhang mit Industriesteuerungen verwendet werden. Einbau, Wartung und Betrieb dürfen nur von durch Artesyn ausgebildetem oder im Bereich Elektronik oder Elektrotechnik qualifiziertem Personal durchgeführt werden. Die in diesem Handbuch enthaltenen Informationen dienen ausschließlich dazu, das Wissen von Fachpersonal zu ergänzen, können dieses jedoch nicht ersetzen. Halten Sie sich von stromführenden Leitungen innerhalb des Produktes fern. Entfernen Sie auf keinen Fall Abdeckungen am Produkt. Nur werksseitig zugelassenes Wartungspersonal oder anderweitig qualifiziertes Wartungspersonal darf Abdeckungen entfernen, um Komponenten zu ersetzen oder andere Anpassungen vorzunehmen. Installieren Sie keine Ersatzteile oder führen Sie keine unerlaubten Veränderungen am Produkt durch, sonst verfällt die Garantie. Wenden Sie sich für Wartung oder Reparatur bitte an die für Sie zuständige Geschäftsstelle von Artesyn. So stellen Sie sicher, dass alle sicherheitsrelevanten Aspekte beachtet werden. ARTM-9405 16x10GbE Installation and Use (6806800P45F) 57 Sicherheitshinweise EMV Das Produkt wurde in einem Artesyn Standardsystem getestet. Es erfüllt die für digitale Geräte der Klasse A gültigen Grenzwerte in einem solchen System gemäß den FCC-Richtlinien Abschnitt 15 bzw. EN 55022 Klasse A. Diese Grenzwerte sollen einen angemessenen Schutz vor Störstrahlung beim Betrieb des Produktes in Gewerbe- sowie Industriegebieten gewährleisten. Das Produkt arbeitet im Hochfrequenzbereich und erzeugt Störstrahlung. Bei unsachgemäßem Einbau und anderem als in diesem Handbuch beschriebenen Betrieb können Störungen im Hochfrequenzbereich auftreten. Wird das Produkt in einem Wohngebiet betrieben, so kann dies mit großer Wahrscheinlichkeit zu starken Störungen führen, welche dann auf Kosten des Produktanwenders beseitigt werden müssen. Änderungen oder Modifikationen am Produkt, welche ohne ausdrückliche Genehmigung von Artesyn durchgeführt werden, können dazu führen, dass der Anwender die Genehmigung zum Betrieb des Produktes verliert. Boardprodukte werden in einem repräsentativen System getestet, um zu zeigen, dass das Board den oben aufgeführten EMVRichtlinien entspricht. Eine ordnungsgemäße Installation in einem System, welches die EMVRichtlinien erfüllt, stellt sicher, dass das Produkt gemäß den EMV-Richtlinien betrieben wird. Verwenden Sie nur abgeschirmte Kabel zum Anschluss von Zusatzmodulen. So ist sichergestellt, dass sich die Aussendung von Hochfrequenzstrahlung im Rahmen der erlaubten Grenzwerte bewegt. Warnung! Dies ist eine Einrichtung der Klasse A. Diese Einrichtung kann im Wohnbereich Funkstörungen verursachen. In diesem Fall kann vom Betreiber verlangt werden, angemessene Maßnahmen durchzuführen. Board Installation Bevor Sie das Board in einem System installieren, überprüfen Sie, ob die im Kapitel "Board Exchange" aufgeführten Anforderungen erfüllt werden. Bereich mit eingeschränktem Zugang - Installieren Sie das Board in ein System nur in Bereichen mit eingeschränktem Zugang. 58 ARTM-9405 16x10GbE Installation and Use (6806800P45F) Sicherheitshinweise Datenverlust Ziehen Sie das Board im laufenden Betrieb heraus, obwohl die Hot-Swap LED noch nicht leuchtet, führt das zu Datenverlust. Warten Sie deshalb bis die Hot-Swap LED blau leuchtet, bevor Sie das Board herausziehen. Beschädigung von Schaltkreisen Elektrostatische Entladung und unsachgemäßer Ein- und Ausbau des Produktes kann Schaltkreise beschädigen oder ihre Lebensdauer verkürzen. Bevor Sie das Produkt oder elektronische Komponenten berühren, vergewissern Sie sich, dass Sie in einem ESD-geschützten Bereich arbeiten. Fehlfunktion des Produktes Fehlerhafter Ein- und Ausbau des Produktes kann zur Beschädigung des Produktes führen. Stellen Sie deshalb sicher, dass das Produkt mit allen Steckern mit der Systembackplane verbunden ist und über alle Zone-1-Anschlüsse mit Spannung versorgt wird. Beschädigung des Produktes Fehlerhafte Installation des Produktes kann zu einer Beschädigung des Produktes führen. Verwenden Sie die Handles, um das Produkt zu installieren/deinstallieren. Auf diese Weise vermeiden Sie, dass das Face Plate oder die Platine deformiert oder zerstört wird. Beschädigung des Produktes und von Zusatzmodulen Fehlerhafte Installation von Zusatzmodulen, kann zur Beschädigung des Produktes und der Zusatzmodule führen. Lesen Sie daher vor der Installation von Zusatzmodulen die zugehörige Dokumentation. Betrieb Beschädigung des Boards Hohe Luftfeuchtigkeit und Kondensat auf der Oberfläche des Boards können zu Kurzschlüssen führen. Betreiben Sie das Board nur innerhalb der angegebenen Grenzwerte für die relative Luftfeuchtigkeit und Temperatur. Stellen Sie vor dem Einschalten des Stroms sicher, dass sich auf dem Board kein Kondensat befindet. ARTM-9405 16x10GbE Installation and Use (6806800P45F) 59 Sicherheitshinweise Überhitzung und Beschädigung des Boards Betreiben Sie das Board ohne Zwangsbelüftung, kann das Board überhitzt und schließlich beschädigt werden. Bevor Sie das Board betreiben, müssen Sie sicher stellen, dass das Shelf über eine Zwangskühlung verfügt. Verletzungen oder Kurzschlüsse Board oder Stromversorgung Falls die ORing Dioden des Boards durchbrennen, kann das Board einen Kurzschluss zwischen den Eingangsleitungen A und B verursachen. In diesem Fall ist Leitung A immer noch unter Spannung, auch wenn sie vom Versorgungskreislauf getrennt ist (und umgekehrt). Prüfen Sie deshalb immer, ob die Leitung spannungsfrei ist, bevor Sie Ihre Arbeit fortsetzen, um Schäden oder Verletzungen zu vermeiden. Hot Swap Wenn Sie das Board im laufenden Betrieb in ein System, das weder Hot Swap noch High Availability unterstützt, installieren bzw. herausziehen, wird das Board beschädigt und es gehen Daten verloren. Installieren/entfernen Sie das Board nur im laufenden Betrieb, wenn das System Hot Swap oder High-Availability unterstützt und wenn die Systembeschreibung dies ausdrücklich erlaubt. SFP/SFP+ Modules Gefahr von Verletzungen sowie von Beschädigung des RTMs und SFP/SFP+-Modulen Die Installation und der Betrieb von SFP/SFP+-Modulen, welche nicht zertifiziert sind und welche nicht den Sicherheitsstandards entsprechen, kann Verletzungen zur Folge haben sowie zur Beschädigung des RTMs und von SFP/SFP+-Modulen führen. Verwenden Sie daher nur SFP/SFP+-Module, die zertifiziert sind und die den Sicherheitsstandards entsprechen. 60 ARTM-9405 16x10GbE Installation and Use (6806800P45F) Sicherheitshinweise Verletzungsgefahr Optische SFP/SFP+-Module können als Laserprodukte klassifiziert sein. Wenn Sie solche SFP/SFP+-Module installieren und betreiben, so gelten die entsprechenden Bestimmungen für Laserprodukte für das gesamte RTM. Werden diese Bestimmungen nicht eingehalten, so können Verletzungen die Folge sein. Wenn Sie SFP/SFP+-Module betreiben, die als Laserprodukte klassifiziert sind, stellen Sie sicher, dass die entsprechenden Bestimmungen für Laserprodukte eingehalten werden. Verletzungsgefahr der Augen Optische SFP/SFP+-Module können Laserstrahlen aussenden, wenn kein Kabel angeschlossen ist. Blicken Sie daher nicht direkt in die Öffnung eines SFP/SFP+-Moduls, um Verletzungen der Augen zu vermeiden. Beschädigung von SFP/SFP+-Modulen Die Schutzkappe eines SFP/SFP+-Modules dient dazu, die sensible Optik des SFP/SFP+Modules gegen Staub und Schmutz zu schützen. Entfernen Sie die Schutzkappe nur dann, wenn Sie beabsichtigen, ein Kabel anzuschließen. Andernfalls belassen Sie die Schutzkappe auf dem SFP/SFP+-Modul. RJ-45 Stecker Die RJ-45 Stecker auf der Frontblende dürfen nur für Twisted-Pair-Ethernet (TPE)Verbindungen verwendet werden. Beachten Sie, dass ein versehentliches Anschließen einer Telefonleitung an einen solchen TPE Stecker sowohl das Telefon als auch das Board zerstören kann. Beachten Sie deshalb die folgenden Hinweise: Kennzeichnen Sie TPE-Anschlüsse in der Nähe Ihres Arbeitsplatzes deutlich als Netzwerkanschlüsse. Schließen Sie an TPE-Buchsen ausschließlich SELV-Kreise (Sicherheitskleinspannungsstromkreise) an. Die Länge des mit dem Board verbundenen Twisted-Pair Ethernet-Kabels darf 100 m nicht überschreiten. Falls Sie Fragen haben, wenden Sie sich bitte an Ihren Systemadministrator. ARTM-9405 16x10GbE Installation and Use (6806800P45F) 61 Sicherheitshinweise Austausch/Erweiterung Verwenden Sie bei Austausch oder Erweiterung nur von Artesyn empfohlene Komponenten und Systemteile. Andernfalls sind Sie für mögliche Auswirkungen auf EMV oder Fehlfunktionen des Produktes voll verantwortlich. Überprüfen Sie die gesamte aufgenomme Leistung aller eingebauten Komponenten (siehe die technischen Daten der entsprechenden Komponente). Stellen Sie sicher, dass die Stromaufnahme jedes Verbrauchers innerhalb der zulässigen Grenzwerte liegt (siehe die technischen Daten des entsprechenden Verbrauchers). Umweltschutz Entsorgen Sie alte Batterien und/oder Produkte stets gemäß der in Ihrem Land gültigen Gesetzgebung und den Empfehlungen des Herstellers. 62 ARTM-9405 16x10GbE Installation and Use (6806800P45F) Artesyn Embedded Technologies, Artesyn and the Artesyn Embedded Technologies logo are trademarks and service marks of Artesyn Embedded Technologies, Inc. All other product or service names are the property of their respective owners. © 2014 Artesyn Embedded Technologies, Inc.