1
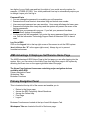
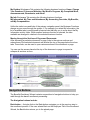
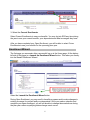
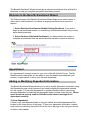
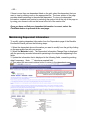
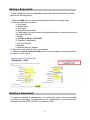
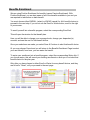
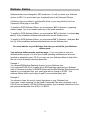
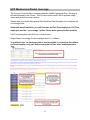
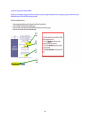
Employee Self Service Table of Contents AMS Advantage Employee Self Service (ESS) ......................................................................................... 2 Employee Self-Service (ESS ) Open Enrollment Instructions ................................................................... 2 AMS Advantage ® Employee Self Service Home Page ............................................................................ 3 Primary Navigation Panel ........................................................................................................................... 3 Navigation Buttons ..................................................................................................................................... 4 Your Current Benefits ................................................................................................................................. 5 Enrollment Wizard ...................................................................................................................................... 6 Welcome to the Benefits Enrollment Wizard ............................................................................................. 7 Appointment ............................................................................................................................................... 7 Adding or Modifying Dependent Information. ........................................................................................... 7 Maintaining Dependent Information: ......................................................................................................... 8 Adding a Dependent: .................................................................................................................................. 9 Deleting a Dependent:................................................................................................................................. 9 Benefits Enrollment ...................................................................................................................................10 Wellness Dollars .......................................................................................................................................11 HPP Medical and Dental Coverage ...........................................................................................................12 HPP Vision.................................................................................................................................................13 Safeguard Dental Coverage .......................................................................................................................13 Minnesota Life Insurance. .........................................................................................................................14 Employee Life Insurance ...........................................................................................................................14 Spouse Life Insurance ................................................................................................................................14 Child Life Insurance ..................................................................................................................................15 Cancer Insurance ........................................................................................................................................16 Critical Illness Insurance............................................................................................................................16 Heart Care Insurance..................................................................................................................................17 EBS Flexible Spending Accounts ..............................................................................................................17 Enrollment Summary .................................................................................................................................19 Downloadable Forms .................................................................................................................................21 1 AMS Advantage Employee Self Service (ESS) ESS Introduction Welcome to Volusia County’s Employee Self Service (ESS). ESS is a website where employees can view their own payroll and personal information and update certain information online such as benefit enrollments during the annual Open Enrollment period. This information is intended for the sole use of the individual employee. All information entered/submitted into ESS may require additional approval by Personnel before taking effect. Please contact Personnel at (386) 736-5951 if you have any questions. Unauthorized access of an employee's information is prohibited. ESS User Name and Password All employees have an ESS user name which is typically the same as their KRONOS user name (Sheriff Office employees add “SO” after user name). If you need additional assistance with your ESS user name and/or password, contact the Information Technology Support Desk at extension 5222 or [email protected]. Personnel Division Support If you have any questions concerning using AMS Advantage ESS that are not password/user name related, contact Personnel at (386) 736-5951 (ext. 5951) and ask for a Human Resource/Payroll Representative. An ESS User Manual is available for download on Personnel’s ENN site at http:/enn/personnel (scroll down to Training section). Employee Self-Service (ESS ) Open Enrollment Instructions Accessing ESS ESS can be accessed two ways: From the County’s ENN Intranet site at http://enn or from the County’s Internet site at http://www.Volusia.org/Personnel. Click on the Advantage ESS link on either page to begin. Log In to ESS 1. Click in the user name field and type in your User Name 2. Click in the password field and type your Password 3. Click on Login (Note: The Reset button next to Login isn’t operational) Changing My Password 1. Select the My Desktop workspace tab on the left of screen 2. Select the Change Password tab at the top of screen 3. Under the Change Password section, click in the Old Password field and enter your old password 4. Click in the New Password field and enter your new password 5. Click in the Verify New Password field and enter your new password 6. Click on the Change User Password button NOTE: If you have never logged into ESS before, then your initial Password is the last 2 two digits of your of birth year and last four digits of your social security number; for example, YYSSSS (671245). Your initial password is set up to automatically require you to change it upon your first log in. Password Facts You can change the password to something you will remember. Password must be at least six characters long and include one number. User name and password are case sensitive. User name will always be lower case. Password will expire after ninety days and the system will prevent the reuse of the last ten passwords. NEVER give your password to anyone. If you feel your password has been compromised, change it immediately. Your account will be suspended if you enter the wrong password three times in a row. Call the Information Technology Support Desk at extension 5222 to have it reset. Log Out of ESS Click on the Logout link in the top right corner of the screen to exit the ESS system (don’t click on the “X” in the upper-right corner). Always log out to prevent unauthorized access. AMS Advantage ® Employee Self Service Home Page The AMS Advantage ® ESS Home Page is the first page you see after logging into the system. Also, you can return to the Home Page from any other page in the system by selecting the Home icon on the upper right-hand side of the page. The Home Page features three areas containing major navigation devices available within ESS: Primary Navigation Panel Workspace Tabs Business Functions Primary Navigation Panel This is located at the top left of the screen and enables you to: Return to the Home page. Access the ESS Frequently Asked Questions. Access the Online Help. Print Page Logout Business Functions are located at the top of each Workspace Tab. Workspace Tabs are located at the left of the home page. 3 My Desktop Workspace Tab contains the following business functions: Home, Change Your Password, Forms and Websites, My Work in Progress, My Completed Work, Announcements, Broadcasts, and Alerts. My Info Workspace Tab contains the following business functions: My Information, My Time and Attendance, My Accounting Overrides, My Benefits, and My Compensation. Unlike the static icons and links of the primary navigation panel, the Business Functions change as you move through the system. If, for example, you select My Information, the list of available tabs is reconfigured to feature links that help you to move about the My Information activity folder. When another business function is selected, the tabs available are changed in relation to the selected business function. Moving through the Sections of Pages and Documents: After accessing a particular document or page, links to the various sections and subsections of the selected document are listed at the top of the page below the show tabs. These links, can be used to open various sections of the document or page. You can use the arrows placed at the top of the document or page to expand or collapse all sections at once. Navigation Buttons The Benefits Enrollment Wizard contains a special set of navigation buttons to help you walk through the benefit enrollment processing. The Navigation buttons include: Back button – A single click on the Back button navigates you to the previous step in the enrollment process. If the user selects Back on the Employee Tab of the Enrollment Wizard, the Back button returns you to the splash page. 4 Continue button – A single click on the Continue button navigates you to the next step in the enrollment process. Within the Benefits Enrollment Wizard, the Continue button also denotes that a user has “Accepted” the information that has been entered. Save & Exit - The Save & Exit button saves your changes, closes the Benefit Enrollment Wizard and returns you to the ESS Welcome Page. Reset button – The Reset button will undo, or “reset”, any data changes that you made on that step of the Benefit Enrollment Wizard. Cancel button – The Cancel button allows you to close the Benefit Enrollment Wizard at the beginning stages of the process. Since no actual benefit enrollment information has been entered at the points that the Cancel button exist, no information needs to be saved. Finish button – The Finish button completes the benefit enrollment process and submits your changes to Personnel. This button can only be selected when the Agreement checkbox has been checked. Your Current Benefits After successfully logging into the system, the My Benefits (MYBENF) activity folder enables you to view details pertaining to your dependents, benefits, and deductions recorded in the system. To see what coverage you currently have: 1. Select the My Info Workspace Tab at the left hand side of the home page. Select and expand the My Info workspace tab from the left hand side of your window. My Info enables you to view and update basic information about yourself recorded in the system. 2. Select the My Benefits Tab. Select My Benefits business function located at the top of your window. The My Benefits (MYBENF) page is opened with various tabs of the activity folder displayed to help you move about the activity folder. You will then see a variety of tabs with information on you, your dependents and your current coverage. 5 3: Select the Current Enrollments. Select Current Enrollments to see your benefits. You may log into ESS any time during the year to see your current benefits, your dependents and what coverages they have. After you have completed your Open Enrollment, you will be able to select Future Enrollments to see your benefits for the upcoming plan year. Enrollment Wizard The first page you encounter after a successful log on is the Home page. At the bottom left side of this page is a Launch the Enrollment Wizard button. This takes you directly into the Benefit Enrollment Wizard. Select the Launch the Enrollment Wizard button. During Open Enrollment, you may enroll in benefits programs and/or make changes to existing coverage for yourself and your dependents. Once you make a selection and complete your open enrollment, you will not be able to change these selections during the plan year unless a qualifying status change event occurs. 6 The Benefits Enrollment Wizard is basically an electronic enrollment form with built-in resources to help you complete the benefits enrollment process. Welcome to the Benefits Enrollment Wizard The Welcome page of the Benefits Enrollment Wizard features two radio buttons to either start a new enrollment or continue an ongoing enrollment from a previous session. 1. Select Start New Enrollment or Modify Existing Enrollment, if you wish to begin a new enrollment session or override any unfinished enrollment that you may have started previously. 2. Select Continue Unfinished Enrollment if you have entered the system to complete an enrollment that was started and then saved in a previous session. Appointment An “appointment” is simply a term for your role or title with Volusia County. The My Benefits activity folder gives you the ability to view the details associated with your position, or appointment, such as your title and department. Adding or Modifying Dependent Information. The Benefit Enrollment Wizard allows you to add or modify dependent information using the Dependents page, which features a grid used to display the dependents entered into the system. You can add dependents or update information about a previously recorded dependent by selecting the appropriate button located under the grid. Please check the social security number, birthdate and/or date of marriage for all dependents carefully. To View Dependents: If there is only one dependent listed on the grid, details about that dependent will be located on the lower portion of the page. To view your dependent information, expand each section by selecting the section link at the top of the page or by using your mouse to click on each header. 7 – OR – If there is more than one dependent listed on the grid, select the dependent that you want to view by clicking once on the appropriate line. The lower portion of the page provides details pertaining to the selected dependent. To view your dependent information, expand each section by selecting the section link at the top of the page or by using your mouse to click on the arrow to the left of the section title. Once you have verified your dependent information is correct, select the Continue button to proceed to the next page. Maintaining Dependent Information: To modify existing dependent information from the Dependents page of the Benefits Enrollment Wizard, perform the following steps: 1. Select the dependent whose information you want to modify from the grid by clicking on the appropriate line with your mouse. 2. Select the Maintain button. The Dependent Information Change Page is displayed with the previously recorded information pertaining to the dependent appearing in the fields. 3. Update the information that is displayed in the following fields, overwriting existing data if necessary. Note: “ * ” denotes a required field. 4. Then select the save and continue button to return to the dependents page. 8 Adding a Dependent: To add a dependent from the Dependents page of the Benefits Enrollment Wizard, perform the following steps: 1. Select the Add button to open the Dependent Information Change Page. 2. Enter the following information. a. First Name b. Middle Name c. Last Name d. Social Security Number e. Relationship, you may access the relationship table by selecting the arrow to the right of the field. f. Gender g. To Date is always 12/31/9999 h. Disability (if applicable) i. Full Time Student j. Birthdate k. Wedding Date for Spouse 3. Select the copy button to insert your address. 4. Select the Save & Continue button (at the top of the page) to record dependent information in the system. Deleting a Dependent: To cancel any benefits of a dependent, you unselect their name on the actual benefit coverage on a later page. To completely remove a dependent, you must contact the Personnel Division at 386-736-5951 (or extension 5951). 9 Benefits Enrollment We are using Positive Enrollment for benefits (versus Passive Enrollment). With Positive Enrollment, you are kept aware of all of the benefits available to you and you are required to take action on each benefit. You must choose either ENROLL (select) or WAIVE (cancel) for ALL benefit choices to proceed to the next step. If you do not see the Enroll or Waive button, scroll to the right of your screen. To enroll yourself into a benefits program, select the corresponding Enroll link. This will open the window for that benefit plan. Here you will be able to change your coverage levels, change your dependent(s) covered, and see the cost for that benefit choice. Once your selections are made, you select Save & Continue to elect that benefit choice. Or you may choose Cancel and you will return to the Benefits Enrollment Page to select your next benefit; from here, you can waive the benefit. To waive your enrollment into a benefit program, select the corresponding Waive link. If you choose waive, this will cancel your existing enrollment or allow you to not elect that benefit choice for the plan year. Only after you have chosen to either Enroll or Waive for every benefit choice, and they are all set to “Reset”, will you proceed to the next page. 10 Wellness Dollars Wellness dollars have changed for ESS enrollment. You will not select your Wellness choices in ESS. You must submit your completed form to the Personnel Division. A Wellness form is provided in your Benefits Guide, or you may print the form from Personnel’s ENN page or from ESS. To qualify for $100 Wellness Dollars, you must answer “N0” to Question 1 regarding tobacco usage. You do not need to pass any of the health questions. To qualify for $200 Wellness Dollars, you must answer “N0” to Question 1 and pass any two (2) of the established wellness standards listed on the Wellness form. To qualify for $300 Wellness Dollars, you must answer“N0” to Question 1 and pass ALL four (4) of the established wellness standards listed on the Wellness form. You must indicate on your Wellness form how you would like your Wellness dollars spent. Your wellness dollars may be used two ways: (1) you may select to use your Wellness dollars as part of or all of your flexible spending reimbursement accounts (medical or dependent care), OR (2) you may use your Wellness dollars to help offset the cost of your bi-weekly insurance premiums. Example 1: You choose EBS Medical Spending Account on your Wellness form. If you selected $1000.00 for a yearly goal in ESS and then submitted your Wellness form to Personnel to qualify for $300.00 dollars with the EBS Medical Spending Account marked on your wellness form, your yearly goal will not change to $1300. Your wellness dollars will be used to pay for part of your selected yearly goal. Example 2: You choose to lower the cost of current insurances on your Wellness form. If you have “couple coverage” for the Health Partnership Plan with a bi-weekly cost of $104.61 and you qualify for $300.00 Wellness dollars, your bi-weekly deductions for the plan year would decrease from $104.61 to $93.07. 11 HPP Medical and Dental Coverage The County of Volusia offers coverage under the Health Partnership Plan. The plan is self-administered by the County. The County contracts with FSAI to process health claims and provide customer service. Please read your Health Partnership Plan Summary Plan Discription for a complete list of coverage rules. Under this benefit selection, you will find rates for Part Time employees, Full Time employees and the “no coverage” option. Please make your selection carefully. Part Time employees work 29 hours or less a week. Single Parent is coverage for the employee and 1 to 2 children. To qualify for the “no Coverage option” and be eligible to receive the flex dollars, you must reapply every year and provide proof of your other health insurance. 12 HPP Vision Re-Enrollment of Coverage: If an employee chooses to drop vision coverage for one’s self or dependents, the employee and/or dependents will not be able to re-enroll in the vision plan for a minimum of five (5) years. If after five (5) years, they choose to re-enroll in the plan or add dependents formerly on the plan, a one (1) year pre-existing condition/waiting period will be imposed. Safeguard Dental Coverage This is an additional HMO dental plan and you must use their dentists. Remember, dental coverage is included with your health plan. Thus, this dental option is primarily for dependents not covered by the County health plan and for employees who opt out of the health coverage. To enroll, change, or cancel these benefits, you must to complete the form located in your Benefits Guide or also found on ESS under Downloadable Forms. For additional information on this plan, please refer to your Benefits Guide. . 13 Minnesota Life Insurance. Additional Term Life Insurance coverage is available through Minnesota Life. You cannot use your County Flex Dollars for these premiums. Application for new or any changes of this plan is not a guaranteed issue. Minnesota Life must approve acceptable evidence of your good health, which may include a paramedical exam or physician’s statement. You do not need to enter a rate into ESS for your Life Insurance; it is automatically calculated by the payroll system based on your age. Life insurance is a not guaranteed issue. To enroll, change, or cancel these benefits, you must complete the form located in your Benefits Guide or also found on ESS under Downloadable Forms. For additional information on this plan, please refer to your Benefits Guide. Employee Life Insurance Spouse Life Insurance Spouse Life Insurance is set as a value based deduction. You must enter an override amount in the provided field. This value will be the amount that is deducted for each paycheck. These are required fields for this type of deduction, so they must be entered. If you are currently enrolled in this deduction, the page will pre-populate with your current deduction. Spouse coverage terminates at age 70. You may purchase Term Life Insurance on your spouse in $10,000 increments to a maximum of 50% of the Employee’s Voluntary Term Life coverage you have purchased for yourself. 14 Life insurance is a not guaranteed issue. To enroll, change, or cancel these benefits, you must complete the form located in your Benefits Guide or also located on ESS under Downloadable Forms. Child Life Insurance You may purchase Term Life Insurance on your eligible child(ren) in $2,000 increments to a maximum of $10,000. You must also purchase Term life insurance for yourself. Life insurance is a not guaranteed issue. To enroll, change, or cancel these benefits, you must complete the form located in your Benefits Guide or also found on ESS under Downloadable Forms. 15 Cancer Insurance Cancer insurance is a not guaranteed issue. To enroll, change, or cancel these benefits, you must complete the form located in your Benefits Guide or also found on ESS under Downloadable Forms. For additional information on this plan, please refer to your Benefits Guide. Critical Illness Insurance You may select coverage from $5,000.00 to $50,000.00. The cost for this coverage is listed in your Benefits Guide and on ESS Down Loadable Forms. Your premium is based on your age at issue, your tobacco usage status, and basic benefit amount you select. Your premium does not increase with age. Critical Illness insurance is a not guaranteed issue. To enroll, change, or cancel these benefits, you must complete the form located in your Benefits Guide or also found ESS under Downloadable Forms. Critical Illness is set up a value based deduction. You must enter an override amount in the provided field. This value will be the amount that is deducted for each paycheck. These are required fields for this type of deduction, so they must be entered. If you are currently enrolled under Critical Illness, enter your current amount and rate listed. For additional information on this plan, please refer to your Benefits Guide. 16 Heart Care Insurance You may elect coverage for Heart Care or Critical Illness coverage; you may not elect coverage under both plans. Heart Care insurance is a not guaranteed issue. To enroll, change, or cancel these benefits, you must complete the form located in your Benefits Guide or also found ESS under Downloadable Forms. For additional information on this plan, please refer to your Benefits Guide. EBS Flexible Spending Accounts You may choose to establish a medical and/or dependent care spending account. If you have not used all of the County flex dollars, this amount will need to be spent in one of these options. Remember to enter the TOTAL amount you want in this account, including any leftover flex dollars or Wellness dollars. You must re-select this coverage each year. EBS Medical and Dependent Care Reimbursement accounts are set up as a Goal Based Deduction. You must enter the yearly goal amount in the required field. Then, select Calculate. Once Calculate is selected, the deduction amount that will be taken each pay period is determined. Select the radio button to select the coverage. Select Save & Continue. 17 18 Miscellaneous Deductions Page – This page is currently not in use Enrollment Summary You have three steps remaining to completing your enrollment: Agreement -- At the bottom of the Enrollment Summary page, under the statement, “In order to submit your changes, you must confirm that you agree to security terms by checking the following box”. Selecting this serves as your electronic signature and submission of your Benefits Enrollment changes. Finish -- At the very bottom of the page, you will find the Finish button, which completes the benefit enrollment process and submits your changes to the Personnel Division for processing. This button can only be selected when the Agreement checkbox has been checked (described above). Make sure you receive this message -- You will receive a message at the top of your screen: “Submitted Successfully, Pending Approval.” If you do not get this message after hitting the “Finish” button, please try to go back one page and try again. If still unsuccessful, call Personnel. You may only complete your ESS Open Enrollment one time. Please check your selections carefully. The Enrollment Summary features several grids summarizing the dependents, dependent coverage, benefit enrollments, and miscellaneous deductions information that you entered into the system for your review. Make sure that all of your dependents are listed and are enrolled in the type of coverages you want. You may print the Enrollment Summary page or log back into ESS at any time to see your benefit choices. 19 20 Downloadable Forms In addition to enrolling or waiving benefits using ESS, a form may be required from the benefits vendor for any policy changes, cancellations, or additions. For example, if an employee wishes to enroll or cancel coverage with Minnesota Life, the supplemental insurance vendor, a form is required. Forms are located in your Benefits Guide or can be downloaded in ESS under the Downloadable Forms tab. It is the employee’s responsibility to obtain and complete the necessary form(S) and submit all completed and needed forms to the Personnel Division. Personnel will no longer automatically send out the form. Downloading Change Forms and Policy Information Employees must submit, when applicable, a completed policy enrollment, change, or cancellation form(s) for the applicable benefit plan. If you are unsure about which form is needed, please contact Personnel at (386) 7365951 or extension 5951. To download the policy form or policy information: Click on the Home tab near the top of the screen Click on the Downloadable Forms tab hear the top of the screen Click on the name of the form or policy needed (e.g. MINN LIFE ENROLL) - NOTE: Click the Next button to go to the next page of forms if applicable. Click on the form document PDF file under Form Attachments section Click Open (or Save) Click File Click Print Click OK 21