1
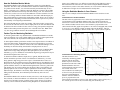
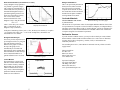
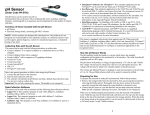
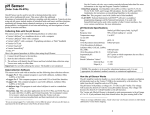
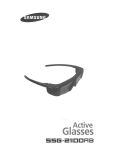
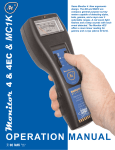
Using the Radiation Monitor Digital Radiation Monitor (Order Code DRM-BTD) The Digital Radiation Monitor is used to monitor alpha, beta, and gamma radiation. It can be used with a number of interfaces to measure the total number of counts per specified timing interval. Since it has its own display, it can also be used independent of interfaces in the field to measure radiation levels. The Radiation Monitor allows students to Detect the presence of a source of radiation. Monitor counts/interval (rate) as different thicknesses of a particular type of shielding are placed between the Geiger-Mueller tube of the Radiation Monitor and a beta or gamma source. Compare the effect of different types of materials to shield beta or gamma radiation. Set up a histogram with a very long run time to show students how initial randomness of data develops into a Gaussian distribution curve. Measure radiation of common radioactive materials, such as lantern mantels or old Fiestaware. Monitor variation in background radiation at different elevations. Monitor radioactivity in the environment over long periods of time. Monitor counts per interval (rate) from a beta or gamma radiation source as a function of the distance between the source and the Radiation Monitor. Here is the general procedure to follow when using the Digital Radiation Monitor: 1. Connect the Digital Radiation Monitor to the interface. 2. Start the data-collection software. 3. The software will identify the Digital Radiation Monitor and load a default datacollection setup.1 You are now ready to collect data. The Digital Radiation Monitor is compatible with the following data-collection interfaces: Vernier LabQuest® 2 or original LabQuest® as a standalone device or with a computer Vernier LabPro® Vernier LabQuest® Mini Texas Instruments CBL 2™ Vernier SensorDAQ® TI-Nspire™ Lab Cradle Specifications Sensor Power The Digital Radiation Monitor includes a cable (RCD-BTD) that allows the monitor to be connected to a data-collection interface. Accuracy The cable that accompanies the DRM-BTD Radiation Monitor has a small 3.5 mm (micro-miniature) stereo jack on one end and a white rectangular digital British Telecom (BT) plug on the other end. This cable is used to directly connect the DRM-BTD to the Vernier LabQuest®, LabQuest® Mini, LabPro®, or SensorDAQ®, or to the Texas Instruments CBL 2TM. Dimensions Weight Energy sensitivity Audio output Extended User Manual LND 712 (or equivalent) halogenquenched GM tube with a 1.5 to 2.0 mg/cm2 mica end window. Rated at 1000 counts per minute using a Cesium-137 laboratory standard. One 9-volt alkaline battery provides a battery life of 2000 hours at normal background radiation levels ±10% typical, ±15% max. (mR/hr and µSv/hr modes) 150 x 80 x 30 mm (5.9" x 3.2" x 1.2") 225 g (8 oz) with battery installed 1000 CPM/mR/hr referenced to Cs-137 Chirps for each count (operational in audio mode only—can be muted) –20°C to 50°C Temperature range Operating range mR/hr CPM Total µSv/hr CPS A more extensive user manual can be viewed from the Digital Radiation Monitor page of the Vernier website www.vernier.com/probes/drm-btd.html NOTE: Vernier products are designed for educational use. Our products are not designed nor are they recommended for any industrial, medical, or commercial process such as life support, patient diagnosis, control of a manufacturing process, or industrial testing of any kind. 1 0.001 to 110 0 to 350,000 1 to 9,999,000 counts 0.01 to 1100 1 to 3,500 If you are using a LabPro or CBL 2 for data collection, the sensor will not auto-ID. Open an experiment file in Logger Pro or manually set up the sensor. 2 How the Radiation Monitor Works The Radiation Monitor senses ionizing radiation by means of a Geiger-Mueller (GM) tube. The tube is fully enclosed inside the instrument. When ionizing radiation or a particle strikes the tube, it is sensed electronically and monitored by its own display, a computer, or by a flashing count light. When the switch is in the AUDIO position, the instrument will also beep with each ionizing event. It is calibrated for Cesium-137, but also serves as an excellent indicator of relative intensities for other sources of ionizing radiation. Gamma radiation is measured in milli-Roentgens per hour. Alpha and beta are measured in counts/minute (CPM). About 5 to 25 counts at random intervals (depending on location and altitude) can be expected every minute from naturally occurring background radiation. The end of the GM tube has a thin mica window. This mica window is protected by the screen at the end of the sensor. It allows alpha particles to reach the GM tube and be detected. The mica window will also sense low energy beta particles and gamma radiation that cannot penetrate the plastic case or the side of the tube. Note: Some very low energy radiation cannot be detected through the mica window. Some types of radiation are very difficult or impossible for this GM tube to detect. Beta emissions from tritium are too weak to detect using the Radiation Monitor. Americium-241, used in some smoke detectors, can overexcite the GM tube and give an indication of a higher level of radiation than is actually there. Using the Radiation Monitor in Your Classes Here are some examples of how the Radiation Monitor can be used in a science class. Counts/Interval vs. Distance Studies The data in the two graphs below were collected by monitoring gamma radiation at various distances from a Radiation Monitor. Data were collected with the run intervals set at 100 seconds. After each 100 second interval, the source was moved one centimeter further from the source. Since distance is proportional to time (300 seconds in the first graph corresponds to 3 cm in the second graph; 400 seconds to 4 cm, etc.), a new distance column was made using time divided by 100. The curved fit shown corresponds to distance raised to the –2 power (inverse squared). Further Tips for Monitoring Radiation To measure gamma and X-rays, hold the back of the Radiation Monitor toward the source of radiation. Low-energy gamma radiation (10–40 KeV) cannot penetrate the side of the GM tube, but may be detected through the end window. To detect alpha radiation, position the monitor so the suspected source of radiation is next to the GM window. Alpha radiation will not travel far through air, so put the source as close as possible (within 1/4 inch) to the screen without touching it. Even a humid day can limit the already short distance an alpha particle can travel. To detect beta radiation, point the end window toward the source of radiation. Beta radiation has a longer range through air than alpha particles, but can usually be shielded (e.g., by a few millimeters of aluminum). High energy beta particles may be monitored through the back of the case. To determine whether radiation is alpha, beta, or gamma, hold the back of the monitor toward the specimen. If there is an indication of radioactivity, it is most likely gamma or high energy beta. Place a piece of aluminum about 3 mm (1/8") thick between the case and the specimen. If the indication stops, the radiation is most likely beta. (To some degree, most common radioactive isotopes emit both beta and gamma radiation.) If there is no indication through the back of the case, position the end window close to, but not touching, the specimen. If there is an indication, it is probably alpha or beta. If a sheet of paper is placed between the window, and the indication stops, the radiation is most likely alpha. (Note: In order to avoid particles falling into the instrument, do not hold the specimen directly above the end window.) The Radiation Monitor does not detect neutron, microwave, radio frequency (RF), laser, infrared, or ultraviolet radiation. It is calibrated for Cesium-137, and is most accurate for it and other isotopes of similar energies. Some isotopes it will detect relatively well are cobalt-60, technicium-99m, phosphorus-32, and strontium-90. 3 Counts/interval vs. time and distance Counts/Interval vs. Shielding Studies The data shown here were collected by monitoring gamma radiation with an increasing number of pieces of silver foil placed between the source and a Radiation Monitor. Data was collected with the run interval set at 100 seconds. After each 100-second interval, another piece of silver foil was placed between the source and the Radiation Counts/interval vs. thickness of filter Monitor. Since the number of pieces is proportional to time (300 seconds corresponds to 3 pieces of foil, 400 seconds to 4 pieces of foil, etc.), a new column, pieces of silver foil, was made using time divided by 100. 4 Half-Life Determination (counts/interval vs. time) Background Radiation Using a daughter isotope generator, it is possible to generate isotopes with a relatively short half-life. A solution that selectively dissolves a short half-life daughter isotope is passed through the generator. The linear plot of natural log of decay rate vs. time can be used to determine the half-life of the daughter isotope, using the formula ln 2 t1/ 2 where λ is the decay rate constant and t1/2 is the half-life of the daughter isotope (in minutes). Here is an experiment performed in the days before airlines insisted that you turn off your personal computer before takeoff. It shows the counts/interval between takeoff and the time the plane reached its cruising altitude of 39,000 ft. Curricular Materials Nuclear Radiation with Vernier by John Gastineau Half-life determination In the plot of natural log of decay rate vs. time, the decay rate constant, λ, is equal to –m. Using the slope value of m = –0.217 in the example here, the half-life was calculated to be 3.19 minutes. Radiation during an airline flight This book has six experiments written for the Digital Radiation Monitor. Each of the six experiments has a computer version (for LabPro, LabQuest, or LabQuest Mini), a calculator version (for LabPro or CBL 2), and a LabQuest version (for LabQuest as a standalone device). The Nuclear Radiation CD included with the book contains the word-processing files for all student experiments. Radioactive Sources If you do not have radiation sources, you may be able to obtain pre-1990 Coleman lantern mantles or other brands of lantern mantles (for a weak source of Thorium). You may also be able to find pottery, watches, clocks, or minerals that are moderately radioactive. Histogram Data Analysis For an easy in-class experiment, set up a histogram with a very long run time and start data collection. Whenever the graph “overflows” the top of the graph, it will automatically be rescaled. This data collection shows students how initial randomness of data develops into a Gaussian distribution. A gamma radiation source was used. For something more active, order radioactive minerals from any of these scientific supply houses: A distribution graph Lantern Mantles Flinn Scientific Inc. P.O. Box 219 Batavia, IL 60510 Phone (800) 452-1261 www.flinnsci.com Spectrum Techniques 106 Union Valley Road Oak Ridge, TN 37830 Phone (865) 482-9937 www.spectrumtechniques.com This graph shows a study of old and new Coleman mantle lanterns. These mantles formerly contained thorium and were often used for radiation demonstrations. In the early 1990s, Coleman changed the production methods and now the mantles are not radioactive. New and old lantern mantles 5 6 Warranty The Vernier Digital Radiation Monitor is manufactured by a third party and is subject to their warranty. This product is warranted to the original owner to be free from defects in materials and workmanship for five years from the date of purchase with the exception of the Geiger-Mueller tube, which is warranted for 90 days, and with the exception of the battery, which is not included in this warranty. Vernier will, at its own discretion, repair or replace this instrument if it fails to operate properly within this warranty period unless the warranty has been voided by any of the following circumstances: misuse, abuse, or neglect of this instrument voids this warranty; modification or repair of this instrument by anyone other than Vernier voids this warranty; contamination of this instrument with radioactive materials voids this warranty. Contaminated instruments will not be accepted for servicing at our repair facility. The user is responsible for determining the suitability of this product for his or her intended application. The user assumes all risk and liability connected with such use. Vernier is not responsible for incidental or consequential damages arising from the use of this instrument. Vernier Software & Technology 13979 S.W. Millikan Way Beaverton, OR 97005-2886 Toll Free (888) 837-6437 (503) 277-2299 FAX (503) 277-2440 [email protected] www.vernier.com Rev. 6/23/2014 Logger Pro, Vernier LabQuest 2, Vernier LabQuest, Vernier LabQuest Mini, Vernier LabPro, and other marks shown are our trademarks or registered trademarks in the United States. TI-Nspire, CBL 2, TI-GRAPH LINK, and TI Connect are trademarks of Texas Instruments. All other marks not owned by us that appear herein are the property of their respective owners, who may or may not be affiliated with, connected to, or sponsored by us. Printed on recycled paper. 7 8