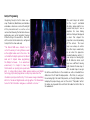
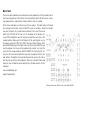
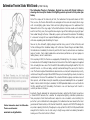
1
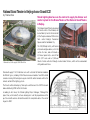
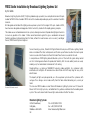
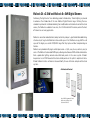
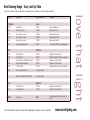
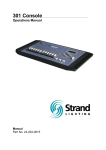
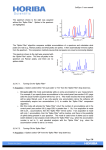
Strand e.News
Spring 2006
Broadway’s Longest Running Show
EC21 for National Grand Theatre
in Beijing
ALSO IN THIS ISSUE....
EC21 / C21 / SLD /Sinewave
Reference sites
Gulbenkian Theatre choose Strand
again
Dealers Open Days
First Wallrack Installation at Bradford
Girls School, UK
Rocky Horror Puppet Show
NEW
Wallrack Dimmers
Broadcast Lighting Systems and PBDS
A London studio with world-class
facilities
3pack and 6pack Dimmers
New Dimming Products Lookup Table
Console Programming Tips
www.strandlighting.com
Phantom of the Opera - Broadway’s Longest Running Show
by Bobby Harrell
On January 9, 2006, Phantom of the Opera passed Cats as the longest running
show in the history of Broadway with its 7,486th performance.
This was symbolized that night during the curtain call as a dancer in a skintight cat suit appeared on
stage at the Majestic Theatre and placed a rose in the hand of the Phantom while the orchestra played
the theme from Cats. And the show shows no sign of slowing down.
It was a very different world technologically 18 years ago, when the show started. The console
was a Strand Light Palette – Full Speed / Full Backup console that was built by Four Star specifically
compacted to fit the booth at the Majestic and had a second floppy drive added. At that time, the
show was stored on multiple floppies and they had to load a new floppy…not just at intermission but
during the first act! There was a specific moment where they found time to load the second disk.
There was even enough time to load again if the first load didn’t take. The production electrician,
Bobby Joe Fehribach, says that at one time the show even had a 5 disk floppy changer. The original
Light Palette had a capacity of 500 channels and 8 submasters with 50% over-range capability. How
far we have come in the world of theatrical lighting control!
Phantom’s first console…The Light Palette
In 1995, the show decided to upgrade components of the lighting system. This included upgrading
their scrollers and their console but they didn’t change the dimmers or the interface. With the
Light Palette being retired, they chose the Light Palette 90. Now they had a capacity of 1536
channels, 1536 dimmers, an average of 600 memories per show (no more multiple floppies!),
8 timed or manual playbacks, up to 128 simultaneous fades, DMX protocol, programmable
macros, up to 999 effects, a notepad display for messages and reminders, function keys, full
proportional dimmer patching with up to 64 user-definable dimmer names, remote monitor
capability, up to 2 handheld remotes and an off-line editor.
The Strand Light Palette 90 in the booth at the Majestic Theatre in
New York
The interface from the console to the dimmers is a sample and hold card that converts
AMX to 0 – 10 VDC. For dimmers there are 3 96 way Dilor 2.4kw racks, 1 “tall box” custom
Strand CD80 rack and a smaller 8 x 12k dimmer rack. They use 3 universes of DMX which
include wireless dimming and a non-dim relay rack.
The electrician that has been on the show all these years is Alan Lampel. He says,
“I appreciate how the language of the console is consistent with all LP consoles. It’s a
simple machine with rock solid connections that I can service after 11 years of non-stop
performance.”
Many companies of the show have come and gone but both Broadway and the current road
company are on LP90s. Another touring company ran 8 years on the LP90 while the San
Francisco company ran on the Light Palette 2.
By today’s standards the show is rather small with only 200 cues and 15 effects but that
doesn’t stop it from being on top of Broadway with no end in sight.
Here’s wishing them another 18 years!
National Grand Theatre in Beijing choose Strand EC21
by Thomas Chan
Strand Lighting Asia has won the contract to supply the dimmer and
control system for the Drama Theatre of the National Grand Theatre
in Beijing.
The National Grand Theatre, designed
by French architect Paul Andrea, will
be built directly next to the Great Hall
of the People and about 500 metres
from central Beijing’s Tiananmen
Square and the Forbidden City.
Estimated cost of the project: USD 345 million
The 165,000sqm facility will feature
a titanium and glass-dome, set in the
centre of a lake, and will include a
2,416-seat opera hall, a concert hall
with 2,017 seats and a 1,040-seat
theatre. Visitors will enter through a tunnel under the lake, which will be surrounded
with gardens and trees.
Strand will supply 11 EC21 dimmer racks with a total of 661 dimmer modules
of different types, including 20 3kW dual sinewave modules. Two 550i control
consoles running full tracking backup plus two 520i control consoles will be the
remote control of the lighting system.
The theatre will be linked up by fibre optics and there are 53 x SN110 network
nodes distributing DMX within the theatre.
According to Eric Kwan, the Strand Lighting Project Manager, “Although the
project has just kicked off, we have already put in a lot of preparation over the
past few months and we all look forward to the completion date at the end of
August in 2006.”
The Rocky Horror Puppet Show by Bobby Harrell
What do you get when you cross Muppets, giant puppets and the musical that
has the largest cult-following at the midnight movies?
You get Collin County Community College’s production of “The Rocky Horror Puppet Show”. Yes…
puppet show. Now this is no ordinary puppet show. The Muppet-style puppets were the hecklers
(a roll traditionally filled by the movie going audience) while certain characters took on an “otherworldly” feel by incorporating body parts as puppets.
The director, Brad Baker, says “Rocky Horror is, at its essence, the story of young innocents who
enter a demented world and emerged changed by the experience. We chose to extend the world
of transvestitism to a world that featured transvestite puppets (hand-operated cloth puppets, stick
puppets, marionettes, rag puppets and large-scale Bun-Raku puppets).”
Rocky himself, was an 11 foot tall puppet that was controlled by 5 puppeteers. In addition to that,
there were several life sized marionettes that were controlled by puppeteers from catwalks above
the stage for additional onlookers and “chorus” members.
Faculty designer, Craig Erickson, usually designs the set and lighting for most shows. This time,
he asked me to light the show and teach the process of designing a musical on their Strand 520i
console while I was there. This would function as a very detailed master class over 2 weeks of
production. Here’s what Craig had to say about the desk.
“The 520 with its user friendly syntax and macro capabilities made the programming and cueing
process for Rocky Horror fast and efficient and provided us with many creative options. One of the
things that really made this board fast was the ability for our operator to configure many aspects of
the console in a way that made sense to him.”
Craig is talking about the flexible and editable ATC Page. We needed to setup the console to talk
about that but first; here is the equipment available for the production.
Shop Order
The house equipment inventory that they have is quite impressive. 12 - VL1000TS, 3 VL2201 Spots, 2 - VL2412 Washes, 1 - Catalyst Media Pro Server, 8 - Advanced Lighting
Live LED 100 fixtures, 4 - GAM SX4 Gobo Changers, 2 - GAM Twin Spin 2s, 2 - GAM Film/
FX loops, 1 - GAM Scene Machine, 14 - Wybron Forerunner Scrollers, 2 - Strong Super
Troopers and 250 conventional fixtures with Strand CD80 dimmer racks.
Control was on a Strand 520i console with a Wacom 12” x 12” macro tablet for moving
light programming, an iPaq wireless focus remote and xConnect software for remote
video.
“The Strand 520i was a fantastic
tool to control the variety of moving
fixtures as well as the digital media
used in the show”, Tom Hull
Console Setup
First, the fixture library…
[MORE](Notes Display)(Load File)(Fixture Library). Console syntax is represented with
[Display Keys] and (Soft Keys).
When using multiple types of fixtures, I often adjust the fixtures from the library to make
them more compatible with each other. For example, if the VL1000 gobo wheel is assigned
to attribute 9 (RGobo) and the VL2201’s gobo wheel is assigned to attribute 8 (Gobo), I
change the VL1000s attribute to match the other fixture. This allows me to configure the
desk to only worry about one attribute (8) for the gobo wheel of two different fixtures.
I then follow this logic throughout for any additional attributes that co-exist on multiple
fixtures. Anyone needing to know how to edit the fixture library should view the tutorial
on automated luminaires that is on the Strand website at www.strandlighting.com Go to
Support and Tutorials.
Once the fixture library was set and the fixtures were patched, I moved on to the ATC
Page. This is where attribute filters, display order and encoder assignments are made.
[MORE](Notes Display)(Load File)(ATC Page).
The first section is the attribute filters.
Attribute filters allow you to filter out all but the assigned attributes. Below you see
the filters set here. Filter 1 is for Position and filters out all but 3 (Pan) and 4 (Tilt). The
filters appear on the soft keys when the @ATT key is pressed. These filters are used for
programming preset focus groups. Typical syntax for recording channels 1 thru 6’s position
information to group 101 would be…
1 THRU 6 RECORD GROUP 101 @ATT (Position) TEXT DC ENTER
ATC Page: Attribute Filters
The second section is the display order. Here you can list the attributes numerically that
will display in the order that makes sense to you. Under D1 (Display 1) just text in the
attributes in the order that you want to display. For example, 1, 3, 4, 2, 11>13. This will
set the order for 1 (intensity), 3 (pan), 4 (tilt), 2 (color wheel), 11>13 (cyan, magenta and
yellow). After that, just type 5 > 126. 5 is the first attribute not specified while 126 is the
last available attribute. Once here, just press (Save File). The software will do the math
for you and fix the entry line. Now go to the LIVE screen. In fact, press LIVE twice to
refresh
the moving light screen and you’ll see your new attribute order. Press LAST SCREEN to
go back to
the ATC Page and continue fine tuning your preferred order. That’s all there is to it!
ATC Page: Display Order and Encoder Assignments
You’ll notice there is a setup for D2. This is display 2 and it’s for the second user. This was
my xConnect setup. This means that the designer can have a different display order than
the programmer. Just set it up any way you want and use xConnect in Login mode…not
Monitor mode.
The last section in the ATC Page is the encoder assignment. Each two line
grouping is an ATC map that assigns the attributes listed to the console’s devises.
There are 7 entries of numerical data that correspond to the 6 hardware items
on the desk. The first attribute (1 – Intensity) is assigned to the intensity wheel,
the second and third attributes (3 – Pan and 4 – Tilt) to the trackball, then the
next 4 attributes are assigned to the encoder wheels from top (white) to bottom
(purple). Just edit and change the attribute number assignment as well as the
labeling as you need.
I always start with ATC Maps 51 thru 56. These will show up on the softkeys
when the center teal key is pressed and held. Just hold it down and then select
the proper softkey. Any ATC Maps that you don’t need just delete.
Strand 520i with a Wacom Macro Tablet for programming
Catalyst Programming
We used 3 layers of control
for this. Layer 1 controlled
all slides, videos and the live
camera feed, layer 2 was a
duplicate for cross fading
abilities while layer 3 displayed
a mask that shaped the
projection screen by rounding
off the corners. The mask
layer was always on where
“The Strand 520i was a fantastic tool to
the other layers would only
control the variety of moving fixtures as well
be on when the projectors
as the digital media used in the show. We
needed to display content. It
controlled the Catalyst system via the Strand
was setup as a moving light
desk and it helped make programming
of 40 attributes where each
the Catalyst a breeze. In an educational
layer was a different moving
environment, it is helpful to have tools
light channel. We also setup 2
that students can quickly pick up and work
ATC encoder maps to assign
with. In using a Wacom macro tablet, wireless remotes, and digital
the often used attributes to the encoders as well as included those
technology, my student programmer could pick up and retain the
attributes in the D1 and D2 display orders. After that, its cueing just
information quickly and efficiently. This show was a large undertaking like a moving light. Pan and tilt for position, set the right folder and file
with lots of visual and digital media coming together. The Strand desk to display the proper image, even set the correct “Playmode” so that
took all of that information and gave us a fantastic outcome. “
the video can play audio that went from the Audio Out on the Mac to
the audio desk.
Integrating Catalyst into this show was a
snap. The director, Brad Baker, wanted slides
and videos shown on screens left and right
of the proscenium arch as well as a live
camera feed showing the Narrator who was
portrayed as our current president, George
W Bush sitting in the oval office. Tom Hull,
staff assistant technical director, configured
Catalyst for the show and said,
Macro Tablet
The macro tablet enabled me to communicate easily and quickly with the student master
electrician / programmer, Chris Mears. We structured the tablet with the fixtures, a focus
map, gobo palettes, color palettes and any shortcuts that we needed.
All the macro table does is reference preset focus groups. The tablet connects through
the serial port on the desk. Go to the SETUP screen to configure. Under the Console
area, pick the tablet size, (I used a Wacom Intous2 12x12 so set the macro
tablet to be INTOUS A4 OS) next set the resolution of the button size.
(I use LOW resolution because the macros are about the same size as the
console buttons). Make sure the Net Node is LOCAL, and the port is set to
the proper serial port (COM1 or COM2). Then go to Macro Display. With
your AutoCAD drawing on the tablet, just press the macro button that you
want to program, the macro will be automatically created. Just type the
syntax for the macro and press MACRO MACRO to finish or better yet,
just press the next macro button that you want to program with the pen
and continue. Strand has the macro tablet layouts for you to start with so
that they line up with the tablet properly. Some are in AutoCAD form and
some are even in Word for easier editing! Go to Strand’s website for the
templates.
www.strandlighting.com
Happy Programming!
Automated Luminaire Tablet Layout created with AutoCAD
SLD / EC21 / C21 Sinewave Reference Sites
as of 24 March 2006
EC21 Sinewave
C21 Sinewave
Amsterdam Concert Hall, The Netherlands, 36 channels
to be installed 2006
Dongguan Arts Center, Dongguan, China (70 dimmers out of 24 racks)
Not installed yet
Birmingham Town Hall UK x 2 racks, 24 channels
to be installed 2006
Toronto Opera House, Toronto, Canada (16 racks all Sinewave)
EC21 Non Sinewave
Marcus Center, Madison, WI (36 dimmers in 7 racks)
to be installed 2006
St David Hall, Cardiff, UK x 2 racks
Exeter University, UK x 2 racks
Devonshire Park Theatre, UK x 2 racks
Czech TV, Prague, Czech Republic x 2 racks
Nashville Symphony Hall, Nashville, TN (6 racks all Sinewave)
to be installed 2006
San Francisco Conservatory of Music, USA (1 rack all Sinewave)
Installs in May 2006
CBC Toronto Radio Studio, Canada (2 racks all Sinewave)
to be installed 2006
TV Centre, Moscow, Russia x 2 racks
Kuwait TV, Kuwait x 2 racks
SLD Sinewave
2 x NOB studios, The Netherlands x 4 Racks
Georgetown University - Washington DC (30 dimmers out of 8 racks)
2 x ITN Television Studios, UK x12 racks
Fairfield Performing Arts Center Fairfield OH (20 dimmers out 3 racks)
Courtyard Theatre for Royal Shakespeare Company, Stratford, UK x 6 racks
Newton Auditorium Denver CO (80 dimmers out of 9 racks)
Gradsky Culture Centre, Moscow, Russia x 2 racks
Tschechisches Fernsehen (1 rack, 30 dimmers 3kW reporting)
Studio 1 Almaty Kasachstan (2 racks, 76 dimmers 3kW, 20 dimmers 5kW
Bad Füssing (2 racks, 10 dimmers 5kW/RCD, 38 dimmers 3kW/RCD)
to be installed 2006
Stadttheater Schaffhausen (2 racks, 75 dimmers 3kW/RCD, 24 dimmers
5kW/RCD) to be installed 2006
Gulbenkian Theatre Sticks With Strand by Rob Halliday
The Gulbenkian Theatre in Canterbury, England has stuck with Strand Lighting in
choosing what is only the theatre’s third lighting control system in its thirty-seven year
history.
Part of the campus of the University of Kent, the Gulbenkian first opened its doors in 1969.
Then, as now, the theatre offered 343 seats arranged on three sides of a deeply thrust stage
with a fixed lighting grid at about 5.6m and two lighting bridges over the auditorium that
followed the line of the stage edge. To the mild frustration of all who would use the building
over the next thirty years, the stage offered a wing on stage left but nothing on stage right apart
from a door through to the bar - followed by a quick sprint around the outside of the building
if a crossover to stage-left was required! Building work in late 2005 has finally corrected this,
while also expanding and refurbishing the foyers.
Now run by Dee Ashworth, lighting designer and for many years its Technical Director, and
Technical Manager Pam Hardiman along with technicians Shaun Weager and Adam Webb,
the Gulbenkian is funded by the University and the Arts Council, and welcomes an enormous
range of visitors, from student productions and amateur performances by local groups to
touring shows, concerts and lectures.
On its opening in 1969, the theatre was equipped by Strand Lighting - the company celebrating
its involvement with the delightful advertisement shown here! Much of the equipment supplied
then - including the now-classic Patt 23 and Patt 263 and 264 profile spotlights and Patt 123, 223
and 243 fresnels - is still in use today, carefully maintained through the years by the theatre’s
crew. The theatre’s original Strand dimmers also remain in use. And, until comparatively recently,
control was through the original Strand SP60 three-preset manual lighting console, located in a
control room at the rear of the auditorium. This console offered two groups common across all
three presets, with all faders being the beautifully engineered and delightful to use ‘quadrant’
faders. Constructed to the highest standards, the SP60 provided reliable service until well into
the 90s, and still hasn’t left the building: the theatre’s crew can’t bear to part with it and it is
currently on show in the foyer.
Further information about the Gulbenkian
Theatre can be found at
www.kent.ac.uk/gulbenkian.
Eventually, though, demands for computerised memory control led the theatre to purchase
a Strand LBX75 console after a number of computerised lighting controllers promised as
final year projects from theatre-enthusiast computer science students came to nothing! As
part of last year’s refurbishments and upgrades, the Gulbenkian has now moved to the latest
generation of Strand control, a 250 channel Strand 520i, complete with WYSIWYG dongle for
any visitors requiring that facility. Though quite a step up from the LBX, the 520i proved familiar
enough for the theatre’s crew to start using it straight away, and all were looking forward to
making use of the extra facilities it offered.
European Exhibitions, Open Days & Events
AFIAL, Madrid, Spain
Spanish dealer, Sadilsa, displayed a full range of
Strand Lighting products at the AFIAL exhibition in
Madrid in February.
First Wallrack Installation
by John Anderton, White Light North
The Bradford Girls Grammar School came to White
Light with a request to upgrade their hall lighting,
within a certain budget, and with heavy time restraints
on the availability of the hall. Their main concern was
safety, as one of the girls had received a shock from
the main isolator and rcd board.
After a time spent on spreadsheets, weighing up the
pros and cons of differing dimmers, we all decided
that the LD24 was the way forward.
Imagine our surprise and delight when Mr David
Cusworth of Strand Lighting places his call with John
Anderton of White Light, to announce that White
Light will not be using LD24’s but will be the first
people ever, to receive the new Strand Wallracks.
Open Day at the Vienna Opera House hosted by LDDE
New dealer in Austria, LDDE, hosted a very well attended Open Day at the Vienna Opera
House in February. Visitors were invited to see the new range of Strand dimmers, including
EC21, Wallrack 3pack and 6pack.
Price compatibility with the LD24 was important, but
more so was the new streamlined look, more features
such as dmx merge with offset, for houselights using
Accent controls, the 8 contact closures for presets,
Ethernet and USB ports, curves, min and max levels
per channel, and even a panic input for cleaners or
emergency systems to cut in. RCD’s are an easy
fitted option. Easy install wiring, a nice cable duct top
to bottom, and a clever removable panel on the top to
make the trunking interface easy. White Light gives
this rack the thumbs up, even our Service Department
says ‘Its not bad’.
White Light North Ltd
Corporation Street
Sowerby Bridge
West Yorkshire HX6 2QQ
UK
Tel: +44 (0)1422 839651
Fax: +44 (0)1422 839773
PBDS Studio Installation by Broadcast Lighting Systems Ltd
by Vic Gibbs
Broadcast Lighting Systems (BLS), TV lighting studio design specialists, have completed two more 50 sq.m
studios for PBDS in West London. PBDS rent out the studios and provides play out for a number of satellite
channels.
BLS designed and installed the lighting and suspension system for the original 120 sq.m. studio in 2002,
have have now designed and equipped a further two facility studios for the rapidly growing complex.
The studios use an extruded aluminum track system, allowing movement of production lighting instruments
to cover any position in the studio. “Unlike conventional matrix grids this gives considerable increased
flexibility and allows full positioning from the floor, without the need to move sets or scenery”, said Roger
Davies, PBDS Senior Systems Engineer.
Recessed 300 series console
Vic Gibbs, Broadcast Lighting Systems
To match existing systems, Strand LD24 Digital Dimmer Racks plus a 300 Series Lighting Control
desk are included. The latter control panels are fitted in special frames to allow the master panel
to be recessed within the desk shelf and the Fader Panel to be recessed into the wall.
A comprehensive DMX lighting data distribution system is fitted with all signals being routed
via the Central Apparatus Room for production flexibility. BLS ‘no site solder’ panels are used,
enabling very fast and reliable termination of Cat5 cabling.
Studio lighting is a mixture of BAMBINO tungsten studio spotlights, Iris cyclorama Lights
and fluorescent softlights. All luminaires have been fitted with BLS Lamp Tags for easy circuit
identification.
The majority of lights are pole operated, as is the suspension system and the cyclorama cloth
carriages. Thus changes can be made swiftly from the floor without disturbing sets, scenery or
talent.
The two new PBDS studios are also fitted with Broadcast Lighting Systems new PLC based Hi
Power LED On Air light systems, controlled from the galleries and linked into the building alarm
system. These units also interlock house lights and a number of other functions.
Broadcast Lighting Systems
8 Old School Road,
Hillingdon,
Middlesex UB8 3WE
UK
Tel: +44 (0)1895 811393
Fax: +44 (0)1895 811395
Email: [email protected]
NEW PRODUCTS ∙ NEW PRODUCTS ∙ NEW PRODUCTS ∙ NEW PRODUCTS ∙ NEW PRODUCTS ∙ NEW PRODU
Wallrack 24 x 2.5kW and Wallrack 6 x 5kW Digital Dimmers
Continuing the high level of new dimming product introductions, Strand Lighting is pleased
to announce the introduction of the new Wallrack Digital Dimmer range. Defining the new
standard in permanent installation dimming for small/medium entertainment and architectural
venues, the Wallrack is available in two sizes, 24 x 2.5kW and 6 x 5kW versions, and with a host
of features to suit every application.
Wallrack is convection cooled (no fans) and yet extremely compact – great for distributed dimming
schemes or just to get a lot of dimmers into a small space. In fact Wallracks occupy half the wall
space of the hugely successful LD90/LD24 range that they replace without compromising on
features.
Wallracks are provided with plug-in control processors – stylish, easy to use, and very easy to
service.The Wallracks feature dual DMX inputs, allowing simultaneous DMX control combinations
from a production lighting console and architectural panels in the same system. Strand’s
inexpensive Accent DMX based architectural control panels are the perfect complement but a
Strand Outlook interface will also be released shortly for use with more complex architectural
systems.
Architectural Control
Accent DMX Programmable Preset
Architectural Lighting Control
Stations and Remote
W PRODUCTS ∙ NEW PRODUCTS ∙ NEW PRODUCTS ∙ NEW PRODUCTS ∙ NEW PRODUCTS ∙ NEW PRODUCT
W PRODUCTS ∙ NEW PRODUCTS ∙ NEW PRODUCTS ∙ NEW PRODUCTS ∙ NEW PRODUCTS NEW PRODUCTS
6pack and 3pack Digital Dimmers Now Shipping
Strand Lighting is pleased to announce the launch of the new 6pack and
3pack digital dimming products. Perfect for portable, rack and wall-mounting
applications, these handy 4U high 19” packs are DMX controlled, convection
cooled and equipped with neutral-disconnect DIN circuit breakers as standard.
Wall mount plates, single-phase link bar and a cable gland are included in the
package as standard.
Ideal for use in small to medium size installations such as schools, colleges and
small stages they are also perfect for rental applications and for portable use.
The 6pack and 3pack dimmer family will prove cost effective and flexible with a
wide range of features and socket options to suit all users.
The simple control interface enables users to set DMX address, minimum /
maximum levels and dimmer curves channel by channel. Full LED displays are
complemented by a built in DMX 512 terminator switch as well. The sliding
electronics tray gives easy service access even after installation.
Versions include 15A, CEE17, Schuko, French and terminal versions
Dealers report that initial stocks are already
flying off the shelves and the dimmers are a
perfect complement to Strand’s popular 100
series desk (12/24 channels) and
200 series desk (12/24 and 24/48 channels)
W PRODUCTS ∙ NEW PRODUCTS ∙ NEW PRODUCTS ∙ NEW PRODUCTS ∙ NEW PRODUCTS ∙ NEW PRODUCT
New Dimming Range - Easy Look Up Table
Here is an table to help you identify the equivalent new dimmer to our previous models.
Product
Version
Replaced with
6pack
Act 6 Digital
75420
Hardwired
75301
75421
Dual 15A socket
75302
75422
Dual schuko socket
75303
75423
Dual CEE17 socket
75304
75424
64311
Dual French socket
6 channel fader panel
75305
61313
6pack hardwired
6pack dual 15A
6pack dual Schuko
6pack dual CEE17
6pack dual French
12 channel 100 series lighting desk
Wallrack
LD90
74102
74103
74104
74105
74106
74108
Version
24x2.5kw SP
12 x 5Kw SP
24x2.5kw SP with ND terminals
24x2.5kw ND breakers
12x 5kw (DP)
24x 2.5kw Delta (DP)
75356
75357
75356
75356
75357
Consult Strand
Outlook and SWC with LD90
Consult Strand
Wallrack 24x2.5kw ND
Wallrack 6x5kw ND (two required)
Wallrack 24x2.5kw ND
Wallrack 24x2.5kw ND
Wallrack 6x5kw ND (two required)
Wallrack
LD24
74112
74115
24x2.5Kw SP
24x2.5Kw ND
75356
75356
Wallrack 24x2.5kw ND
Wallrack 24x2.5kw ND
SLD96
all versions
EC21
Consult Strand for Quotations for
EC21
For technical date sheets on our dimming products please visit our website:
www.strandlighting.com
Console Programming Tips, Spring 2006 by Rob Halliday
Partitioning
One of the arguably under-used strengths of the
500-series consoles is their ability to connect
together into multi-user, multi-console systems that
allow many operators to share the programming
of complex shows, dividing up the work between
them. ‘i’-series consoles can support up to five
users - one main console plus up to four additional
consoles connected to it. The main console does
all of the work, outputs the data to the lights and
actually stores the show; the other consoles are
remote control surfaces for the main console.
Why would you want to do this? Well, imagine
working on a big show: for programming speed you
might want to have one person dealing with the
conventional lights and a second dealing with the
moving lights. You could, of course, just use two
separate consoles. But then you’d have to run two
completely separate sets of control cables, would
have to manage saving the show from two places,
would have to provide backup for two consoles and,
once the show was running, would still have two
consoles and so would either need two operators
or some way of linking them together so that one
triggered the other. With the multi-user Strand
system all of the ‘show management’ (saving,
archiving) would take place from the main console;
one backup console would backup the entire system
- and once you’d finished plotting you’d just reconfigure the main console to single user operation
and one person could run the entire show.
Of course, this would be less than useful if all of the
consoles had to work on the same cue
or the same lights at the same time.
This is where ‘Partitioning’ comes in
- dividing up who’s allowed to control
which part of the rig, and then which
lights get affected when cues are
played back. Strand consoles do this
division in two separate ways, both of
which are found under the [REPORT]
{ADV SETUP>} {SHOW SETUP} setup
screen: Channel Partitioning and
Playback Partitioning.
Console Programming Tips - Partitioning
Channel Partitioning
Channel Partitioning allows you to decide who (ie. which console in a multi-console system) is allowed to have
control of which channels. On a one-console system you would normally leave this turned off to ensure that you
could control every light in the rig. But in the example above, you might want Console 1 to be able to control
just channels 1 to 10 (the moving lights), while Console 2 could just control channels 21-30 (the conventional
lights).
In the first instance, you would configure your second console as a Remote console (see the user manual for
details of how to do this as it varies depending on whether your console has the Server software installed or
not), connect it to the Main console via Ethernet and switch both on. After they started up you should find that
you can select and control any channel on either console, the last person to select the channel being the person
who has control. You’ll also notice that channels selected by the Main console turn red, as you’re probably used
to; channels selected by the Remote console appear green to indicate that they’ve been selected by a Remote
console.
On either console, you now need to edit some of the ‘Special’ groups that live at the end of the console’s group
list: type
[GROUP] [998.1] [GROUP DISPLAY] - Group Display being the ‘Group’ button at the top of the console rather
than the one next to the numeric keypad.
This will show group 998.1 on screen; this will either be called *Partition (if you’re looking at it in an off-line editor
or single console) or *Partition ConsoleName if you have multiple consoles connected together. There are then
four more groups, 998.2-998.5, called *Partition 2-*Partition 5 or *Partition plus a console name in multi-console
systems. These groups control which channel is controlled by which console when Channel Partitioning is turned
on. So, in the case above, in group 998.1 you’d remove all of the channels
[1] [THRU] [LAST] [@] [.]
Then just add the channels for the moving lights that you wanted to be controlled by console 1:
[1] [THRU] [10] [*]
You’d then go down to group 998.2 and just add the channels you wanted controlled by console 2:
[1] [THRU] [LAST] [@] [.]
[21] [THRU] [30] [*]
At the moment, when you switch back to Live you’ll find that any console can still control any channel. But now
go to the Show Setup screen and turn Channel Partitioning ON.
Now console 1 can control channels 1 thru 10 but not 21 thru 30. Conversely, console 2 can control channels
21 thru 30 but not 1 thru 10.
Console Programming Tips - Partitioning
This applies in every part of the console - live and all of the preview displays. More importantly, it also applies
when you use the RECORD, RECORD-SUB or UPDATE commands: only the channels you’re allowed to control
will be stored when you use any of these commands.
So, if both users turn all their lights off then put them at 50:
on console 1: [1] [THRU] [10] [@] [5]
on console 2: [21] [THRU] [30] [@] [5]
but then only console 1 records a new cue 2:
on console 1: [CUE] [2] [RECORD]
now if you look at cue 2 in preview you will see that it only contains channels 1 thru 10 at 50; 21 thru 30 will
either be at 0 or will be tracking through from the previous cue, depending on whether you have the console in
TRACKING OFF or TRACKING mode.
Now console 1 adjusts its levels:
on console 1: [1] [THRU] [10] [@] [9]
Then console 2 records cue 2:
on console 2: [CUE] [2] [RECORD] [RECORD]
User 2 has to press record twice to confirm because cue 2 does already exist this time. But if you now look at
cue 2 in preview (on either console) you will see that only console 2’s channels were recorded - 21 thru 30 are
now in the cue at 50%, but 1 thru 10 are still at 50% despite the fact that they’re currently at 90% live.
This means that either user can change levels and record cues independently of the other user. But - and this
is an important difference to other consoles that have multiple cuelists - both users are actually recording to
the same cue (cue 2 in the case above), but are only storing their channels into that cue This means that if one
user changes fade, wait or delay time or the text on a cue it will affect the other user, too. This is usually a good
thing (if the lighting designer changes cue 2 to five seconds, they probably want it to change for all of the lights);
if users want to make their lights happen in different times they can use parts to achieve that, and it’s usually
a good thing to lay out some ‘ground rules’ about which user uses which part numbers early on in plotting the
show.
Beware of deleting cues since you will delete the whole cue - the other person’s lights as well as yours (to work
around this, in tracking mode just remove all of your channels from the cue: in blind, [1] [THRU] [LAST] [@] [.]
- partitioning will ensure that only your channels are removed. In Tracking off, set your channels to be the same
as in the previous cue: in blind, [1] [THRU] [LAST] [@] [CUE] [LAST] [*])
Console Programming Tips - Partitioning
Playback Partitioning
Channel partitioning only solves half of the problem, however. In the scenario above: cue 2 now contains all of
the channels at 50%, but 1 thru 10 are at 90% in live.
At the moment, if either user runs cue 2, all of the channels, 1-30, will go to 50% since they will go to the level
plotted in cue 2. If user 1 had been working on a different cue he or she would now understandably be quite
grumpy since their lights would have gone to a different level before they’d had a chance to record their new
look.
Playback partitioning allows you to control this. It allows you to define which channels can be controlled by which
playback. In Group Preview, scroll down to groups 999.3 and 999.4, called *X Playback 1 and *X Playback 2. In
this case, we’re going to want user 1 to use playback 1, and user 2 to use playback 2 - so effectively we want
to make group 999.3 the same as group 998.1, and group 999.4 the same as group 998.2. To do this, on either
console:
- turn channel partitioning off (since channel partitioning applies everywhere, with it turned on one console won’t
be able to control the other’s channels when setting these groups!)
- in GROUP PREVIEW, go to group 999.3 and type:
[1] [THRU] [LAST] [@] [.]
[1] [THRU] [LAST] [@] [GROUP] [998.1] [*]
then go to group 999.4 and type:
[1] [THRU] [LAST] [@] [.]
[1] [THRU] [LAST] [@] [GROUP] [998.2] [*]
Now go back to Show Setup and turn Channel Partitioning to ‘On’ and Playback Partitioning to ‘X1/X2’; this
means that there are two playbacks across an entire multi-console system regardless of how many consoles
there are. The other alternative, ‘User’, means that each console has two independent playbacks. The setting
you choose will depend on how you want to work; in a two console system the advantage of choosing X1/X2
is that each user can see which cue the other is in on their own console’s playback LCD display and, if needbe,
can run the other user’s cues from their console. On a bigger system you need to use User so that each user
can have their own playback.
In Show Setup you’ll also have to tell the console that you want to use two playbacks - go up to Playbacks and
set it to either Dual LTP or Dual HTP (doesn’t matter which since each is being used for a completely separate
set of channels).
Console Programming Tips - Partitioning
Now go back to live. Change the level of the channels:
on console 1: [1] [THRU] [10] [@] [1] - to set those channels to 10%
on console 2: [21] [THRU] [30] [@] [7] - to set those channels to 70%
Cue 2 still has all of the channels recorded at 50%. So now:
- on console 1 playback 1, run cue 2: [CUE] [2] [GOx1]
those lights - 1 thru 10 - go to 50%. The other lights stay at 70.
Change the level of those lights again: [1] [THRU] [10] [@] [3]
Then on console 2 playback 2, run cue 2: [CUE] [2] [GOx2]
now console 2’s lights - 21 thru 30 - go to 50%, while 1 thru 10 stay at 30.
This means that each user can now go to any cue, adjust their lights, and store the changes into any cue (using
record or update) without affecting anything the other user is doing.
And because Channel Partitioning and Playback Partitioning can be switched on and off independently of each
other, you can also vary how you work according to circumstance. For example, during rehearsals you might
want each user to have to press their own ‘Go’ button when a cue is called (so they can delay the go if they’re
still working on the cue). But during previews you might want one operator to run the show so that everything
starts at the same time, but each user to fix their own lights - so turn playback partitioning off, go back to a single
playback and have one person run the show, but leave channel partitioning on so each user can only alter their
channels. Then, once the show is done, turn channel partitioning off, take the second console away and one
person can run and edit the entire show. You can always bring the second console back later if more complex
plotting is required again.
Console Programming Tips - Partitioning
Other Tricks
Having two programmers working on a show can be useful, but having each limited to a specific set of lights
can be wasteful. For example, if user 1 has finished his work on a cue but user 2 is still busy with the lighting
designer, user 1 might want to help, perhaps by diving in to preview to sort out when user 2’s scrollers are
setting themselves. Which Channel Partitioning set to ‘On’, user 1 can’t do this - they’re not allowed to touch
user 2’s channels anywhere. But Channel partitioning can also be set to ‘Live’. This means that in live users can’t
alter each others channels as before, and record and update only act on a user’s own channels as before. But
in any of the preview displays, each user can control any channel. This means that you end up with two users
collaborating on one large system when required rather than just two users working on two smaller systems,
and can be invaluable.
The special ‘Display’ groups, which govern which channels appear on your channel screen, can also be useful in
multi-user setups, since you can decide whether you just want to see your lights, want to see your lights and the
lights controlled by other users (so you can see what they’re up to!), or some combination thereof. Groups 994.1994.5 are called *Display 1-5 (or *Display plus the names of the consoles in your system if they are connected)
and, as with the *Partition groups, a channel that is in *Display 2 will appear on console 2’s screen, though to
make this happen you’ll have to go to [SETUP] and set ‘Channel Formatting’ to ‘Display Group’
Things to Note
There are a couple of things to note. Firstly, a channel can only be in one *Partition group at a time - ie. you can’t
have a channel that you can control using more than one console when Channel Partitioning is on. However,
you can have channels in one or more *Display groups, and in one or more *Playback groups. It is therefore
possible to have a channel that will playback regardless of which playback is used, which is usually not useful
and is usually a result of the group being set up incorrectly; if you run cues on one playback and the wrong lights
change level this is the first thing to check.
Also, beware that it’s possible to have a light not be in any *Partition, *Display or *Playback group - which means
that you may not be able to control it, see it or have it follow the levels of any cues! This can lead to a situation
where you have a rogue light on that you can’t see on the screen and stays on regardless of what cues you run
(though cue 0 overrides partitioning and should turn it off).
Finally, you can split lights with multiple attributes across different channel or playback partition groups - so
you could have one person controlling the intensity of a light and the other person its colour. Usually this is not
something you’d do deliberately, but if you don’t have control of some of a light’s attributes, check they they’re
all in the right *Partition group.
Console Programming Tips - Partitioning
Partitioning and the Single Console
Usually if it’s just you and a single console, you should make sure that both Channel Partitioning and Playback
partitioning are turned off. In the worst case, if Channel Partitioning was on but all of the channels were assigned
to *Partition 2, you’d wonder why you couldn’t turn any lights on!
However, you don’t necessarily need a ‘real’ console to have remote users: with Strand’s xConnect dongle, you
can turn your Mac or PC into a ‘remote console’ which can log in as any of the users 1-5; partitioning works with
users logged in like this just as it does with ‘real’ consoles; channel partitioning can be useful here, perhaps to
allow a designer using xConnect to view and label cues but not to accidentally change any plotted levels.
Like many features of the 500-series consoles, Channel and Playback partitioning, especially when combined
with a multi-user setup, are immensely powerful and incredibly useful tools. But, as with all powerful things,
they can be a little risky if you use them without quite understanding what they do (or use them by accident if
someone else has left them turned on!). If you don’t need these facilities, make sure they’re turned off. If you
do, play before you get into the lighting session for your show!
Corporate / Staff News
New Dealers in Europe
FINLAND
OY LAFOY Ltd
Veneentekjantie 18
PL 117
00210 Helsinki
Finland
Tel: +358 (0) 44 3555 782
Fax: + 358 (0) 9 698 9994
Contact: Hans Karlsson
HUNGARY
Zaj Discotechnika Kft.
1066 Budapest
Jókai u. 11.
Hungary
Tel: +36 1 332 7105
Fax: +36 1 312 2487
www: www.zaj.hu
Exhibitions & Events
Visit the Strand Lighting booth at exhibitions around the world and see what’s
new:
ABTT, London
(June 15 - 16, 2006)
PLASA, London
(September 10 - 13, 2006)
Visit our website for details of Open Days, Dealer Events
and Strand Academy training courses
www.strandlighting.com
The Strand Newsletter is published electronically four times a year. If you received this copy from an associate and would like
to receive a copy directly please email us at:
[email protected]