1
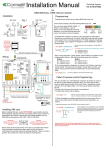
RAZAIR‐01‐54AAA‐1 RAZBAM FLIGHT MANUAL NAVY MODELS Convair F/A-201A Kestrel AIRCRAFT RAZAIR‐01‐54AAA‐1 Introduction Thank you for your purchase of RAZBAM’s Convair F/A‐201A Kestrel aircraft model. We at RAZBAM have worked to deliver to you the most accurate model of this fascinating aircraft and we promise you that you will enjoy flying it. In 1974, the US Navy issued a request for proposals for a lightweight multi‐role aircraft that could serve as both a fighter and as an attack aircraft. The aim was to replace both the F‐4 Phantom II an the A‐7 Corsair II with an aircraft that had a lower cost than either the F‐14 or the F‐111. The Convair F/ A‐201 was the proposal put forward by Convair. It was based on an earlier proposal for an “Advanced F‐ 106”. It was designed with a single Pratt & Whitney JTF22A‐30A/F100‐PW‐220 engine and its most striking feature was the inclusion of canard fins. There were to be both land‐based and carrier‐based aircraft. Also they proposed to make a VSTOL version with two lift engines and a vectored nozzle for the main one. In another first, this aircraft was designed with a fly‐by‐wire system to help control it. In 1975 the U.S. Navy decided to select a derivative of the YF‐17, the loser of the U.S: Air Force Lightweight Fighter (LWF) Aircraft competition which resulted in the F‐16. The YF‐17 was converted into the F/A‐18 Hornet and the Convair proposal never went beyond the model stage. We at RAZBAM decided to bring to life this interesting aircraft that never flew as the first in our “What‐If” line. Aircraft that never made from the model stage but that were radical designs and held great promise in their design. The package that you have purchased contains the carrier‐based attack version. We have included the markings for several US Navy squadrons and include a JSDF export version. RAZAIR‐01‐54AAA‐1 CONTROL CONFIGURATION Since the Convair A‐201A is a military airplane capable of dropping ordnance the following controls must be mapped. Weapons Release (Trigger) The airplane armament release function is dependent of the setting of certain switches. Unfortunately FSX does not provide support for that feature. In order to be able to drop ordnance in both free flight and missions the following key map must be used: Joystick Button 01: Cabin alert – Seatbelts (on/off). (See figure below) If you do not have a joystick, set any keyboard combination to this event. Note: The default keyboard combination for dropping objects still works in missions, but it won’t trigger the weapons animation. RAZAIR‐01‐54AAA‐1 SWITCHES NAVIGATION TheA‐201’s cockpit instruments have several types of switches, pushbuttons, knobs and levers. Usually you only have to click with your left mouse‐button on the switch to have it change its position, but there are several that have multiple positions that move back and forth. For these multiple position switches and knobs you have to left‐click to go forward and right‐click to go backwards. The following is a chart of the different switches and knobs found on the cockpit and how to navigate them. Switch Type 2‐Position Switch Navigation Left‐Click changes the position. 3‐Position Switch Left Click moves forward. Right Click moves backwards. Example: Left Click: BOTH‐OFF‐UPPER. Right Click: UPPER‐OFF‐BOTH. Left Click moves forward. Right Click moves backwards. Multi‐position Knob Pushbutton Left Click changes the position. Thumbwheel Left Click moves forward. Right Click moves backwards. Center wheel moves forward fast. Rotating knob Left Click moves forward. Right Click moves backwards. Center when moves both forward and backwards faster. RAZAIR‐01‐54AAA‐1 AIRCRAFT The ConvairF/A‐201 is a single‐place, carrier‐land‐based, light attack aircraft. It incorporates advanced radar, navigation, and weapons system. It has a flight‐by‐wire control system and also has a First generation glass cockpit. NOTE: This aircraft never left the drawing board. All instruments panels and gauges are educated guesses based on available public information. There are no NATOPS or Dash‐One manuals for this aircraft. PRINCIPAL DIMENSIONS Area Incidence (root and tip) Sweep Dihedral WING 403 sq ft 2.50⁰ 60⁰ ‐3⁰ HORIZONTAL STABILIZER Area 285 sq ft Sweep 60⁰ VERTICAL STABILIZER Area 136 sq ft Sweep 45⁰ Dihedral 0⁰ ENGINE The A‐201A was designed to use the JTF22A‐30A/F401‐PW‐400 afterburning turbofan engine. It is the same engine that powers both the F‐15 Eagle and the F‐16 Fighting Falcon. The engine has 17,800 lbf of military thrust and 29,160 lbf of afterburning thrust at sea level. RAZAIR‐01‐54AAA‐1 AIRCRAFT CONTROLS The F/A‐201 has a first generation glass cockpit with a LED based Multi Function Display that display the information of several gauges Multifunction Display (MFD) It has 5 mode buttons and 12 function buttons. The MFD has five Master Modes: DTS/ES: (Shown here) This is the General Mode. It allows the pilot to monitor/control several aircraft functions. The Radar is in NAV/Beacon mode. This is the default mode. AAM: This is the Air‐to‐Air Mode. The MFD displays all AA weaponry and sets the Radar to Air Intercept Mode. AG: This is the Air‐to‐Ground Mode. The MFD displays all attack ordnance and sets the radar to Ground Track Mode. GUN: It is a special mode. It enables the 20 mm Vulcan Cannon functions. The pilot can select gun modes and firing rate. The radar display keeps the selected mode. The function buttons are numbered 1 thru 12 in the order shown in the image at the left. This is the nomenclature that will be used in this manual. You only have to click once on the button to activate a given function. RAZAIR‐01‐54AAA‐1 DTS/ES Mode: This is the default mode for the MFD. In this mode the pilot has access to a function menu that allows him to access most of the aircraft’s functions and data. The function menu has the following items: FCR: Fire Control Radar Panel. WPN: Weapons Panel STATS: Display Status Information for several aircraft systems. IFF: IFF Panel COMM: Radio Panel NAV: Displays Navigation Information. AFC: Displays Autopilot information. FUEL: Displays Fuel information. ENG: Displays engine data. FCR Sub mode (Button 1): The FCR sub‐mode allows the pilot to access the Fire Control Radar panel. To access this mode you have to press Button 1 while on the DTS/ES main page. Button 1: Allows the pilot to change the Radar mode: Navigation Beacon, Air Intercept, Ground Track and Ground Map. The other buttons are for information only. Button2: Indicates the Radar sub mode. Button4: Indicates radar scanning mode. Button6: Inop. Button7: Inop. RAZAIR‐01‐54AAA‐1 WPN Sub mode (Button 2): The WPN sub mode allows the pilot to access the weapons load information panel. This mode is for information purposes only; all buttons are inop in this mode. Weapons selection and control are handled by the AAM, AG and GUN Modes. Note: All missiles have the prefix M before their Mark number. STATS Sub mode (Button 3): The STATS sub mode allows the pilot to check the status of several aircraft systems. This mode is for information purposes only; all buttons are inop in this mode. The Systems are: ENG (Engine) = FIRE/FAIL/OK/OFF CTRLS (Flaps/Fly‐By‐Wire System) = FLAPS/FBW/OK AVNCS (Avionics) = FAIL/OK HYDR (Hydraulic System) = % Operating OIL (Oil Qty) = % Quantity FUEL (Fuel Status) = DUMP/JKER/BINGO/EMPTY/OK RAZAIR‐01‐54AAA‐1 IFF Sub mode (Button 5): The IFF Sub mode allows the pilot to interact with the aircraft’s IFF system. There is a secondary IFF panel in the left instrument panel, but you can interact with the system here as well. Note: There is no IFF in FSX. In this case we have made use of the Transponder to mimic this instrument. The following buttons are active: Button5: Changes the 1st IFF Code number. Button6: Changes the 2nd IFF Code number. Button8: Changes the 3rd IFF Code number. Button7: Changes the 4th IFF Code number. Button10: Changes IFF Mode. COMM Sub mode (Button 6): The COMM Sub mode allows the pilot to watch the setting of all the radio based instruments. The main RADIO panel is located at the top of the left instrument panel. This mode is for information purposes only; all the buttons are inop in this sub mode. RAZAIR‐01‐54AAA‐1 ENG Sub mode (Button 7): The ENG sub mode allows the pilot to watch several engine parameters. This mode is for informational purposes only, all buttons are inop in this mode. The information available is: ENG (Engine Throttle Setting): IDLE/MIL/AB (Afterburner) INLET: Turbine Inlet Temperature in Celsius. N2: Engine N2 RPM in percent. THRST: Engine Thrust in Pounds. O.PRS: Engine Oil Pressure in PSI O.TMP: Engine Oil Temperature in Celsius. FUEL Sub mode (Button 8): FUEL sub mode allows the pilot to check the aircraft’s fuel status. It also allows the pilot to set the BINGO and JOKER fuel values. All fuel values are in pounds. The information displayed is as follows: Button1: Internal Fuel. Button2: Centerline Auxiliary External Tank. Button3: Left (Station 2) Auxiliary External Tank. Button4: Right (Station 4) Auxiliary External Tank. Button7: BINGO Fuel level. Button8: JOKER Fuel level. Button9: Indicates if the dump valve is open. Button10: Indicates if the refuel probe is extended. Button11: Estimated flight time at current fuel consumption. Button12: Fuel consumption in Pounds Per Hour. More information is available at the FUEL CONTROL section. RAZAIR‐01‐54AAA‐1 AFCS Sub mode: AFCS Sub mode allows the pilot to interact with the Automatic Flight Control System (Auto Pilot). The information displayed is as follows: Button1/Button12: Altitude Hold Status + Selected Altitude (feet MSL). Button2/Button11: Heading Hold Status + Selected Heading (Degrees). Button3/Button10: Pitch Hold + Pitch Angle Selected (Degrees). Positive is Up, Negative is Down. Button7: Automatic Pilot Status: OFF/ENGD NAV Sub mode: NAV sub mode allows the pilot to interact with the Flight Plan stored in the Tactical Computer. It also interacts with the AFCS allowing the aircraft to auto‐steer when the system is engaged. Information Displayed: Button1: Bearing to next Steer Point. Button2: Distance to next Steer Point (Nautical Miles). Button3: Latitude of next Steer Point. Button4: Longitude of next Steer Point. Button7: Auto Steering System Status: OFF/ON Button10: Total Flight Time (hours/min). Button11: Estimated Flight Time until reaching next Steer Point (hours/min). Button12: Next Steer Point Index. RAZAIR‐01‐54AAA‐1 AUXILIARY ENGINE/FUEL PANEL On the Upper Right section of the main instrument panel, just besides the HUD control panel an Auxiliary ENGINE/FUEL Panel can be seen. ENGINE: Engine N2 RPM as percentage. Turbine Inlet Temperature in Celsius Engine Fuel Flow in Pounds Per Hour. Engine Oil Presure in PSI FUEL: Internal Tanks Quantity in Pounds. External Tanks Qnatity (all of them) in Pounds BINGO/JOKER Status: BINGO/JOKER/Off Estimated Flight Time at current fuel level and consumption. Estimated Distance in nautical miles at current fuel level and consumption. The buttons between the two readouts are inop. FUEL CONTROLS The Fuel System is managed from two places. From the MFD FUEL sub mode and from the FUEL Panel located at the left Instruments panel. The MFD FUEL sub mode displays all available fuel status. The information displayed is as follows: Button1: Internal Fuel. Button2: Centerline Auxiliary External Tank. Button3: Left (Station 2) Auxiliary External Tank. Button4: Right (Station 4) Auxiliary External Tank. Button7: BINGO Fuel level. Button8: JOKER Fuel level. Button9: Indicates if the dump valve is open. Button10: Indicates if the refuel probe is extended. Button11: Estimated flight time at current fuel consumption. Button12: Fuel consumption in Pounds Per Hour. Functions Available: RAZAIR‐01‐54AAA‐1 Button7 and Button8 allow the pilot to set the BINGO and JOKER fuel levels. The increments are in 100 pounds per click. The limit is 3000 pounds of fuel for each value. Button9: Open/Closes the Fuel Dump valve. Button10: Extend/Retracts the refueling probe. GLOSSARY: BINGO Fuel: The minimum amount of fuel necessary to return to base. JOKER Fuel: A level above BINGO where current operation should terminated before returning to base. Note: Due to FSX limitations, the tanks are identified by the simulator as follows: Fuselage Tanks: Center 1 Center External Tank (station 3): Center2 Left External Tank (Station 2): External1 Right External Tank (Station 4): External2 Attention: The external Aero 1‐D auxiliary tanks will be automatically displayed if there is any fuel in their FSX assigned tanks overriding any ordnance installed. Fig. 2: Fuel Control Panel Fuel Control Panel The fuel control panel is located in the left hand instrument panel (see figure 3). The Fuel Control Panel has three switches and a knob. From Right to Left: 1. MASTER: Master fuel cut‐off. Default Position (OPEN). This switch controls the engine fuel shut‐off valve. Clicking on it will close the valve and the engine will shut‐down. 2. FUEL DUMP: Fuel Dump switch. Clicking on it will open the fuel dump valve. The valve will automatically close when fuel level reaches either the Joker or Bingo status. If no Joker or Bingo status are set (both values read 0) it will automatically close when it reaches 300 pounds internal fuel. 3. ENG FEED: 3 position knob. It controls the tanks used by the fuel system. NORM (Default): The External Tanks (if present) will be used first before switching to internal. INT: The internal Main Fuel tank will be used, RAZAIR‐01‐54AAA‐1 isolating the external tanks (if present). EXT: The external tanks will be used, isolating the internal. NOTE: External tanks usage is as follows: Wing Tanks, followed by Center External Tank. 4. AIR REFUEL EXTENDS: Extends/Retracts Air Refueling Probe. Fig 3: Fuel Control Panel Location ELECTRICAL SYSTEM CONTROLS Fig 1: Electrical System Panel Electrical System Control Panel The Electrical System Control Panel is located on the left‐ hand instrument panel (see figure 2). The panel is marked by the words ELEC in the left hand. It has 3 switches. 1. GEN (Yellow): This is the Master Generator switch. It connects/ disconnects the engine alternator/generator. Its default status is ON. 2. AUX (white): This is the Auxiliary power switch. 3. GND PWR: It selects the power source while the aircraft is in the ground with the engine off. Default position is OFF . RAZAIR‐01‐54AAA‐1 Fig 2: Electrical System Panel Location Note: We hit several FSX limitations while implementing this panel. One of them is the way that FSX distributes electrical power to all subsystems, so we were unable to precisely simulate the F/A‐201’s real electrical subsystems. RAZAIR‐01‐54AAA‐1 HYDRAULIC POWER SYSTEMS Hydraulic power is supplied by three independent systems: PC‐1, PC‐2 and PC‐3. Each system is operated by an independent pump and operates at 3,100 psi.. The HYD PRESS Caution Light will turn on when the hydraulic pressure in the PC‐1, PC‐2 or PC‐3 systems falls below 1,500 psi. Fig 1. STAT MFD Panel. Fig 2: Hydraulic Panel The Hydraulic System Control Panel can only be accessed through the Main MFD. At the DTS/ES Menu press the STAT Button (Button 3) to bring the Status Panel (See fig. 1) At the panel press either Button 4 or Button 9 to call the Hydraulic System Panel (See fig. 2) PC‐1, PC‐2 and PC‐3 indicate the hydraulic pressure of each system in PSI. PC‐1Q, PC‐2Q and PC‐3Q indicate the amount of hydraulic fluid available to each system. The values are: FULL = The system reservoir level is over 75% NORMAL = The system reservoir level is between 51 and 74% LOW = The system reservoir level is between 25% and 50% CRIT (Critical) = The system reservoir level is below 25%. To leave the Hydraulic Power panel, you only need to click on any button in the MFD. RAZAIR‐01‐54AAA‐1 Note: The hydraulic system works as close as the real one as FSX allows us. The changes are as follows: PC‐1 operates from the engine pump. PC‐2 and PC‐3 each operates from its own auxiliary electrical pump. Electrical failure will bring down hydraulic pressure to these systems. FLIGHT CONTROLS SYSTEMS (FLAPS AND TRIM) Fig 1. STAT MFD Panel. The Flight Controls System panel can only be accessed through the MFD. At the DTS/ES Menu press the STAT Button (Button 3) to bring the Status Panel (See fig. 1) At the panel press either Button 2 or Button 11 to call the Flight Controls System Panel (See fig. 2) The MFD will display the information regarding the status of the Flaps System and the TRIM Controls. TRIM: The trim information is displayed as follows: ROLL: Roll trim (in degrees). PITCH: Pitch trim (in degrees). YAW: Rudder trim (in degrees). The TRIM Controls are located at the rear of the left instrument panel (see fig. 3). FLAPS: Four flaps are installed across the wing leading edge and two single‐slotted flaps across the trailing edge of the wing canard center section. All flaps have two positions: Full Up or Full Down. The flaps are controlled by the onboard flight computer If the system is engaged, the flaps will automatically deploy whenever the air speed falls below 240 KIA. They will be retracted when the air speed is above 250 KIA. The flaps system can be engaged/disconnected by clicking on the FLAPS switch located in the left instrument console (see Fig. 3). The MPD will display Flaps status as follows: DOWN/UP/DISC (If the system is disconnected). RAZAIR‐01‐54AAA‐1 Fig 2: Flight Controls Panel Fig 4. TRIM Panel 1. ROLL TRIM. 2. YAW (RUDDER) TRIM. 3. PITCH TRIM. To change the trim you must left‐click or right click on the corresponding switch. Fig 3: Autoflaps and Trim Control Location. FLY‐BY‐WIRE CONTROL SYSTEM (FBW) The F/A‐201 was designed to use a Fly‐By‐Wire system. It would have been the first aircraft to use one, since its design predated the F‐16 by at least two years. The Fly‐By‐Wire Control Panel (Fig 1) is located at the rear of the left instrument panel (Fig. 2). Swtiches Description: 1. FAC Switch: The FAC switch connects the Flight Augmentation Computer. (Default position: ON) 2. SEC Switch: The SEC switch enables the computer to control the Spoilers and Elevators. (Default position: OFF). 3. ELAC Switch: The ELAC switch enables the computer to control the Elevators and Ailerons. (Default Position ON). Note: THE SEC Switch must be always in the OFF position if you want to control the aircraft. When it is in the ON position, the Autopilot Engages and you won’t be able to change altitude nor heading. Fig 1: FBW Control Panel. Status Lights Description: The lights are ON when the status is normal. OFF if there is RAZAIR‐01‐54AAA‐1 a problem or a function is disconnected. a. FBW System status is Normal: FAC and ELAC swtiches are ON, SEC Switchis OFF. b. FBW Systems is Active: There are no problems with the FAC, ELAC and SEC systems. c. SEC System is engaged: The SEC switchis in the ON position. d. FAC System is engaged: The FAC swtich is in the ON position. e. ELAC System is engaged: The ELAC switchis in the ON position. The aircraft can fly with the FBW system disconnected, but the control’s response will be sluggish. Fig 2: FBW Control Panel Location. ATTENTION If there is a problem with the FBW system, both the MASTER CAUTION and FLIGHT CONTROL lights will turn on. AUTOMATIC FLIGHT CONTROL SYSTEM (AFCS) The automatic flight control system (AFCS) is a three axis autopilot. There are basically five operational modes provided by the AFCS. 1. 2. 3. 4. 5. Attitude Hold Airspeed Hold Altitude Hold Heading Hold Heading Select Mode MODES OF OPERATION Attitude Hold Mode: In attitude hold mode, the aircraft maintains the current pitch (rate of climb or descent). The wing leveler is automatically engaged and current heading is maintained. Airspeed Hold Mode: In airspeed hold mode, the aircraft maintains the current airspeed. Altitude Hold Mode: In altitude hold mode, the aircraft maintains the current barometric altitude. RAZAIR‐01‐54AAA‐1 Heading Hold Mode: In heading hold mode, the aircraft maintains the current heading. The wing leveler is automatically engaged disabling any kind of maneuvering. Pitch movements are not affected. Heading Select Mode: This is a special version of heading hold mode. When the heading select mode is enabled, the aircraft will automatically turn to and maintain the heading selected with the Horizontal Situation Indicator (HSI) HEADING SET knob. Note: Due to limitations within FSX the following modes are completely exclusive. When Attitude Hold mode is engaged the Heading Hold/Heading Select modes will disconnect and vice versa. Sometimes one or both mode switches will start cycling between their ON and OFF positions: If this happens, disconnect the AFCS. This will reset the switches to their OFF position. Fig 1: AFCS Panel Switches description: 1. AFCS Master Swtich: Connects/Disconnects the AFCS (Default Position OFF). 2. Attitude Hold Swtich: (Default Position OFF). 3. Airspeed Hold Swtich: (Default Position OFF). 4. Altitude Hold Switch: (Automatically turns ON when the AFCS is connected). 5. Heading Hold Switch: (Automatically turns ON when the AFCS is connected). 6. Heading Select Mode: (Default Position OFF). Status Light description: The lights are ON when a system is connected/enabled. a. AFCS Connected. b. Attitude Hold Engaged. c. Yaw Damper Engaged. d. Airspeed Hold Engaged. e. Altitude Hold Engaged. f. Heading Hold Engaged. g. Heading Select Mode Connected. RAZAIR‐01‐54AAA‐1 The AFCS Status can be checked in the MFD. While int DTS/ES mode, select Button 11. The AFCS Panel will appear (Fig 2). Button 1: Indicates the status of the Altitude Hold Mode (ON/OFF). Button 12 indicates the selected barometric altitude. Button 2: Indicates the status of the Heading Hold Mode (ON/OFF). Button 11 indicates the selected heading in degrees. Button 3: Indicates the status of the Attiude Hold Mode (ON/OFF). Button 10 Indicates the pitch angle in degrees. Positive numbers are up, negative are down. Button 7: Indicates the status of the AFCS (ENGD/DISC). Clicking on Button 7 can engage/disconnect the AFCS. Fig 2: MFD AFCS Status Panel The AFCS Panel is located in the rear of the left instrument panel (see Fig 3), just before the FBW Panel. Fig 3: AFCS Panel Location. RAZAIR‐01‐54AAA‐1 SPEED BRAKE SYSTEM The speed brake, located on the tail of the aircraft, can be extended and held in any position between fully closed and fully open. The brake will automatically retract when the aircraft enters into a stall. Fig 1: Air brake panel. To Activate the Air Brake all you have to do is click on the switch. A SPD BRK warning light will appear in the cockpit frame indicating that the Air brake has been deployed (Fig. 3). The Air brake panel is located in the left instrument panel (See Fig 2). Fig. 3: Air brake Warning Light. Fig 2: Air Brake Panel location. Fig 4: Air brake deployed. RAZAIR‐01‐54AAA‐1 LANDING GEAR PANEL The tricycle landing gear consists of an aft‐retracting nose gear and a forward‐retracting main gear. Dual nose gear wheels are independently mounted on a common axle. Catapulting provisions are built into the nose gear. The landing gear position indicators are operated by the landing gear. Fig 1. Landgin Gear Panel Fig 2: Landing Gear Panel Location LANDING GEAR SYSTEM 1. Landing Gear Lever: Raises/Lowers the landing gear. 2. WHEELS Annunciator Light: Lights up when the landing gear is down. WHEEL BRAKE SYSTEM The aircraft contains a wheel brake system with an anti‐ skid system. Normal braking is obtained by pressing the assigned keyboard combination (default is the “.” key). Anti‐Skid system The wheel brakes are equipped with an electrically controlled anti‐skid system. Use of anti‐skid minimizes tire‐ skid damage, and stopping distances are reduced under all runway surface conditions. 3. ANTI SKID Switch: Activates/Deactivates the Anti‐Skid system (Default OFF). CATAPULTING SYSTEM The F/A‐201 have a launch bar on the forward side of the nose gear outer cylinder and it can be extended and retracted from the cockpit. Extension or retraction of the launch bar is accomplished either by clicking on the LAUNCH BAR switch or by pressing the assigned keyboard combination (default is “Ctrl+I”) 4. LAUNCH BAR Switch: Extends/Retracts the Catapult Launch Bar (Default OFF). 5. LDG/TAXI LIGHT Switch: Turns ON/OFF the landing gear/taxi lights. (Default OFF). The Landing Gear Panel (Fig 1) can be located at the lower left corner of the Main Instrument Panel (Fig 2). RAZAIR‐01‐54AAA‐1 ARRESTING HOOK SYSTEM The aircraft has an arresting hook for use with an arresting cable system, both for carrier operations and for short landing operations. The arresting hook can be extended or retracted by clicking on the arresting hook handle or by pressing the assigned keyboard combination (default is “Shift+Q”). 1. The Arresting Hook lever: You only need to click on it to deploy. (Fig. 1). 2. HOOK Annunciator Light: It lights up when the Arresting Hook is deployed. The Arresting Hook lever is located in the lower right of the Main Instrument Panel (See Fig 2). Fig 2: Arresting Hook Lever Location Fig 1: Arresting Hook Lever 3. RAZAIR‐01‐54AAA‐1 INTERIOR AND EXTERIOR LIGHTS Interior Lights. The interior lighting system consists of flight and non‐flight instrument panel lights and console lights. They can be independently turned on and off by clicking on their respective switches. 1. Non Flight Instruments Lights 2. Flight Instruments Lights: Turns ON/OFF Lights for the Insutrments Panel 3. Cockpit Lights: Turns ON/OFF the cockpit lights All other switches are INOP. Fig 1: Internal Lights Panel Exterior Lights. The exterior lighting system consists of Landing, anti‐collision (at the top and bottom of the fuselage), formation (fuselage and wings) and position (wing and tail) lights. Each exterior light is independent from each other. 1. Position Lights Switch. 2. Tail Lights Switch. 3. Wings Lights Switch. 4. Fuselage Lights Switch. 5. Collision Lights Switch. 6. Master Lights Switch: Turns all Internal y External Fig 2: External Lights Panel lights ON/OFF. RAZAIR‐01‐54AAA‐1 Fig 3: External Lights Panel Location Fig 4: Internal Lights Panel Location. WARNING, CAUTION AND ADVISORY LIGHTS Abnormal operation conditions of any of the aircraft systems are alerted to the pilot by means of warning, caution and advisory lights. Warning lights are installed near the applicable system control and indicators, while most caution and advisory lights are grouped on panels as an aid in monitoring. Warning Lights. Warning lights come on to attract attention to a condition that requires immediate attention. Fig 1: Caution/Warning/Advisory Lights Console. 1. APU Fire Caution Light. 2. Engine Fire Caution Light 3. Oil Pressure Caution Light: Turns on when Oil Pressure fall below normal. 4. Hydraulic Pressure Caution Light: Turns On when there is a problem with the Hydraulic System. 5. FCS FAIL Caution Light: Turns On when there is a problem with the FBW System. 6. MASTER CAUTION Light: Turns On whenever an abnormal condition appears. It can be reset by clicking on the light surface. 7. SPD BRK Advisory Light: Tursn On whenever the Air brake is deployed. 8. WHL BRK Advisory Light: Turns ON whenever the Parking Brakes are engaged. 9. F‐ACK Warning Light: Turns ON when the FBW SEC system is engaged. 10. IR COOL Warning Light 11. RDR OFF Warning Light: Turns ON when the MFD is either in A‐A or A‐G mode and the radar is OFF. 12. IFF IDENT Warning Light: Turns ON when the IFF transponder is not engaged. RAZAIR‐01‐54AAA‐1 Fig 2: Caution Lights Panel. Fig 3: Master Caution Switch. A Master Caution light on the instrument panel and system caution lights mounted on the Caution Lights Panel on the right console (see figure to the left) come on to attract attention to a malfunction or an abnormal operation condition. A malfunction, or abnormal condition, will cause the Master Caution light to flash, to light six slanted lines on the HUD, and to turn the applicable system caution light. The Master Caution light may be turned off and reset to monitor subsequent malfunctions by clicking on the lens cover. The system light will remain on until the condition that caused the malfunction no longer exists. Caution Light ENG OIL HYD PRESS ENG HOT FUEL LOW CMPTR HUD FAIL GEN OFF APU FIRE PLATFORM FUEL PRESS ANTI SKID HUD HOT Malfunction or Abnormal Condition Engine Oil Pressure below 15 psi Hydraulic Pressure is below 2,000 psi Engine Turbine Intlet Temperature is high. Fuel quantity in fuselage tanks is below 1350 gallons. Tactical Computer is damaged. HUD is nonfunctional Main generator is Offline The APU is on fire Inertial Management System is damaged No Fuel pressure in the tanks Anti Skid system is not working. Not implemented (only turns on when the test switch is used) RAZAIR‐01‐54AAA‐1 ANGLE‐OF‐ATTACK SYSTEM The angle‐of‐attack indicating system and the approach lights provide the pilot with visual indications of angle of attack. Indications are presented on the angle‐of‐attack indicator under all flight conditions and may be used to establish various flight altitudes. For convenience in controlling airspeed in landing approaches, indicator readings are supplemented by lights on the angle‐of‐attack indexer mounted on the windshield frame. ANGLE‐OF‐ATTACK INDICATIONS SLOW Approach speed more than 5 knots slow. Nose‐Down correction needed. MODERATELY SLOW Approach speed 3 to 5 knots slow. Slight Nose‐Down correction needed. OPTIMUM Angle of attack and approach speed at optimum. No correction needed. MODERATELY FAST Approach speed 3 to 5 knots fast. Slight Nose‐Up correction needed. FAST Approach speed more than 5 knots fast. Nose‐Up correction needed. RAZAIR‐01‐54AAA‐1 FLIGHT INSTRUMENTS Accelerometer Vertical Velocity Mach/Airspeed Altimeter Attitude Indicator COMMUNICATIONS, ILS, TACAN AND AUTOMATIC DIRECTION FINDING (ADF) The RAZBAM model of F/A‐201 differs from the real airplane in the workings of the communication equipment. Real aircrafts had a command radio, sometimes with an auxiliary receiver (not implemented), and a VHF/FM radio for tactical communications. These radios have 3,500 frequencies available but unfortunately FSX does not have that many, forcing us to alter the operation to fit FSXs limitations. The F/A Communication’s equipment is an All‐In‐One device. It controls All radio equipment and radio based navaids. RAZAIR‐01‐54AAA‐1 Fig 1. Tactical Communications Console 1. Radio Selector Knob OFF: Turns ON/OFF all radioemitters. (DEFAULT) MAIN: Selects the Main Radio for Transmit/Receive BOTH: Selects the Second Radio for Transmit (Both Radios receive). ADF: Sets the Equipment to ADF Mode. 2. Preset Selector Knob NML: Selects the Radio Function (DEFAULT) NAV: Sets the radio to Nav Aid (TACAN and ILS).. 3. Frequency Selector Knob Changes the radio/navaid frequencies. 4. Preset Channel Selector TACAN Only: Selects the TACAN Channel to be used. Although FSX does not have a TACAN system, we at RAZBAM have created one for the A‐7 Corsair II by using existing VOR stations thanks to a conversion table. There is one caveat, the TACAN system has 126 channels but FSX does not have that many VORs so there are several TACAN channels with invalid VOR frequencies. Otherwise, the TACAN system is fully operational and is able to provide navigational aid to the pilot. You can find the TACAN to VOR conversion table in the Appendix. The invalid TACAN channels are identified in that table. How to Operate: The Radio always start in the OFF position. In this position you cannot make use of any radio transmission or radio based navigational aids (TACAN , ADF and ILS). The radio functionality is set by the Preset Selector Knob. By the default it is set for radio communications. 1. To turn ON, click on the Radio Selector Knob. 2. The MAIN Positions selects the following: a. If the Preset Selector is in the NML position: Selects the Main (COM1) radio for transmit/reception. b. If the Preset Selector is in the NAV position: Selects the TACAN receiver. 3. The BOTH Position selects the following a. If the Preset Selector is in the NML position: Selects the Auxiliary (COM2) radio for transmit/reception b. If the Preset Selector is in the NAV position: Selects the ILS receiver. 4. The ADF Position selects the ADF receiver regardless of the Preset Selector Position. To change radio frequencies, click on any of the Frequency Selector Buttons to select each frequency digit independently. The Frequency Selector Knobs handles the following frequencies bands, from left to right: 100 Mhz (1000 Khz for ADF), 10 Mhz (100 Khz for ADF), 1 Mhz (10 Khz for ADF), 0.1 Mhz (1 Khz for ADF), 0.01 Mhz (0.1 Khz for ADF). RAZAIR‐01‐54AAA‐1 NOTE: FSX Radio frequencies are limited as follows: COM1 and COM2 range is from 118.00 to 136.975 Mhz TACAN and ILS range is from 108.00 to 117.975 Mhz ADF range is from 100.0 to 1799.9 Khz. The Frequency display will be affected by these limitations. Radio Display (Fig 2) 1. Radio Mode (COM1 and COM2 for radio; TACAN and ILS for Navaid). Selected device is boxed. 2. COM1 and COM2 selected frequencies. 3. TACAN and ILS selected frequencies. The aural symbol nex to the MHZ indicates that the audio Identifier output is enabled. The last numbers indicate signal strength (0 means No Signal). 4. Frequency of selected device. 5. ADF selected frequency. If the aural symbol is visible the ADF station Ident will be heard. 6. TACAN Channel. Audio Panel 1 1. COM 1 Audio Switch: COM1 audio is received. (DEFAULT ON) 2. COM 2 Audio Switch: COM2 audio is received. (DEFAULT OFF). Other buttons are INOP. Fig 2: Radio Display. Fig 3. Audio Panel 1 Fig 4. Audio Panel 2 Audio Panel 2 1. TACAN Audio Switch: The IDENT signal from the TACAN (VOR) station will be heard. (DEFAULT OFF). 2. ILS Audio Switch: The IDENT signal from the selected ILS station will be heard (DEFAULT OFF). Other buttons are INOP RAZAIR‐01‐54AAA‐1 The radio and the audio panels are located at the top of the left instruments panel (See Fig. 5) Fig 5: Radio and Audio Panels location. AIRBORNE TRANSPONDER (IFF/SIF) AN/APX‐72 The RAZBAM model of A‐7 Corsair II IFF set differs from the original one due to limitations of FSX. Unlike the real aircraft, this model’s IFF transponder works only as a General Aviation Transponder so any special IFF/SIF settings are unavailable. Fig 1: IFF Panel 1. IFF Master Selector Knob (Default OFF). 2. IFF Mode Switch. 3. IFF M3/M5 Selector Switch. All other switches INOP. To change IFF/Transponder Codes you must use the IFF Panel in the MFD. (fig 2) To select the IFF Panel, click on Button 5 while the MFD is in the DTS/ES menu. To change the IFF code, you have to click on the following button: 1. Button 5: Changes the First Code Digit. The code value is displayed as N000X, where N is the selected code number. 2. Button 6: Changes the Second Code Digit. The code value is displayed as N00X, where N is the selected code number. RAZAIR‐01‐54AAA‐1 3. Button 8: Changes the Third Code Digit. The code value is displayed as N0X, where N is the selected code number. 4. Button 7: Changes the Fourth Code Digit. The code value is displayed as NX, where N is the selected code number. To change any code digit, all you have to do is repeatedly click on the selected button until the code you want appears. The IFF Panel can be located in the left instrument panel (fig. 3). Fig 2: IFF MFD Panel Fig 3: IFF Panel Location RAZAIR‐01‐54AAA‐1 AIRCRAFT OPERATING LIMITATIONS Since the Convair F/A‐201 never left the drawing board, there are no real life operating limitations. We have created a basic one using the known limitations for the engine and of other Carrier based aircraft. Keep in mind these limitations to avoid crashing and burning. Note: The flight model is as close as possible to what the real one would have been. Do not exceed these limitations or you will find yourself in real trouble real fast. MAXIMUM PERMISSIBLE AIRSPEEDS Flaps Normal actuation (in transit) Extended Landing Gear Normal actuation (in transit) Extended F‐100‐PW‐220 OPERATIONAL LIMITS Airspeed Oil Pressure Hydraulic Pressure Engine speed Turbine Inlet Temperature (TIT) Normal (maximum continuous) Military (30 minutes) 240 KIAS 250 KIAS 220 KIAS 244 KIAS 1,333 KIAS (Mach 2.0) 40 PSI 3100 PSI 101% RPM for 6 seconds only. 96.8% RMP continuous. 970⁰C 990⁰C MAXIMUM OPERATING WEIGHTS Field Operations Take off 42,000 lbs Landing 33,800 lbs Arrested landing 33,800 lbs Carrier Operations Catapult 38,000 lbs Arrested Landing 25,300 lbs Maximum internal fuel 1,000 lbs CAUTION: Follow these limitations, especially when landing. The aircraft can and will depart from controlled flight if you don’t follow them. RAZAIR‐01‐54AAA‐1 NAVIGATION/WEAPONS DELIVERY SYSTEM The Navigation/Weapons Delivery system assists the pilot in navigation to the target, release of armament on the target and return. The system determines the geographic position of the aircraft. The instruments here detailed work as close as possible to the originals. Note: Several instruments panels are “hidden” by other elements like the throttle, pilot’s joystick and levers. To “clear the clutter” we have set up a switch in the HUD panel to make these elements appear/disappear. Camera Switch. (2 Positions) CAMERA. Hides several elements like Joystick, throttle, etc. for an easier reading of several instruments OFF – Shows the hidden elements (default position). TACTICAL COMPUTER SET The Tactical Computer is capable of computing precise enroute navigation functions without ground‐based navigation aids. The computer provides readouts to the pilot on the Tactical Computer control panel, the HUD and the horizontal situation indicator (HSI). The Tactical Computer is coupled with the AFCS to provide Auto Steering capability when the AFCS is engaged, enabling the aircraft to automatically fly to its destination. It can store a 10 waypoint flight plan and also has another 10 memory for storing previously flown point of interest. Flight Plans:‐ The Tactical Computer can create a flight plan with up to 10 waypoints for the aircraft to follow. You can also use any flight plan created using FSX Flight Planner. The only requirement is that the flight plan is loaded with the flight before it can be read by the Tactical Computer. RAZAIR‐01‐54AAA‐1 Fig 1: Tactical Computer 1. 2. 3. 4. 5. 6. 7. 8. 9. Tactical Computer Power ON/OFF Switch. Tactical Computer Mode Selector Knob: a. Present Position. b. Destination c. Mark Memory d. Target Offset Position: INOP e. Target Elevation/Distance: INOP f. Wind Data (Speed/Direction): READ ONLY g. Data Input NAV Heading Mode Selector switch: a. AUTO: The Tactical Computer takes aircraft control and navigation. b. MAN (Manual): Enables the use of TACAN for navigation. Waypoint Change Button: Allows the editing of the Lat/Lon data of the selected waypoint. CLEAR Button: Clears the screen of any unsaved data. Enabled only when in edit mode. Numeric Keyboard: Used to input numeric information into the Tactical Computer Delete Button: Deletes Lat/Lon data of the selected waypoint. Battery Button: Two States ON/OFF (Default ON). If ON, the Computer steers the aircraft when the AFCS is engaged and a flight plan is loaded. Alert Button: ON/OFF (Default OFF). When ON it prevents the Auto Steer system to change the aircraft heading. RAZAIR‐01‐54AAA‐1 10. 11. 12. 13. MARK Button: Stores the Lat/Lon coordinates of the position being over flown into a special memory. Insert Button: Saves any data into the Tactical Computer. Change Var Button: INOP Hold Button: ON/OFF (Default OFF). When ON, it prevents the Auto Steer system to select the next waypoint when the distance to the current one is less than 3 nautical miles. 14. Memory Button: It allows the pilot to select the Waypoint/Mark Memory register where the lat/lon coordinates are stored. 15. Tactical Computer Display. Fig 2: Tactical Computer Display 1. 2. 3. 4. 5. 6. 7. 8. 9. 10. 11. Main Data Display Current Waypoint/Mark Tactical Computer Mode Hold Mode is ON Battery Mode is ON AFCS is ON Alert Mode is ON Terrain Following Mode is ON Landing Mode is ON ILS is Active Current Heading Mode (AUTO/MANUAL). Present position, ground track, range and bearing to selected destination, and lateral steering are continuously computed and presented as follows: Present Position – displayed in LAT‐LONG windows on Tactical Computer control panel when the rotary switch is in PRES POS. RAZAIR‐01‐54AAA‐1 Ground track, range and bearing – displayed on the HSI when the Heading Mode switch is in AUTO. Lateral Steering – displayed on the HUD when the Heading Mode switch is in AUTO. OPERATION The Tactical Computer control panel is located on the right console. It is turned on by placing the Computer switch in the PWR position. Present Position: The aircraft’s present position will be displayed when the rotary mode selector switch is in the PRES POS position. The upper row displays the Latitude and the bottom row the Longitude.. Destination: Up to 10 different (1 through 10) destinations can be saved in the computer. The rotary mode selector switch must be in the DEST position before you are able to view or update the destination. To select a destination memory you must click on the MEMORY Button. The display will show 00⁰00⁰00⁰ if the selected memory is empty. To enter the destination coordinates you must click the WYPT CHG button and enter the coordinates using the keyboard. Click on INSERT when you have finished so the coordinates will be stored in the selected memory space. How To Enter Data: To enter data into the computer you must click on the WYPT CHG button which will illuminate to indicate that the keyboard is active. Clicking again on the WYPT CHG button will deactivate the keyboard and erase any non stored value. Positional coordinates are entered Latitude first, followed by Longitude. LATITUDE: You must first select the hemispheric position by clicking on the 2 button if North or the 8 button if south. Then you enter the information in a single continuous number. The computer will assume that the two first digits are degrees, the following two are minutes and the last two are seconds. Seven digits must be entered for the computer to accept the coordinates. Example: N48⁰ 5’ 9” must be entered as: 2 (N) – 480509. S07⁰42’34” ‐> 8 (S) – 074234. LONGITUDE: s with the latitude coordinate, you must select East or West by clicking either on the 4 or 6 buttons followed by the coordinates in degrees, minutes and seconds. The computer will assume that the first three digits are degrees, the following two are minutes and the last two are seconds. Eight digits must be entered for the computer to accept the coordinates. Example: W122⁰14’5” ‐> 4 (W) – 1221405; E15⁰2’29” ‐> 6 (E) – 0150229. When you have entered both coordinates, click on the INSERT button to store the data in the selected memory. Note: If for any reason you have made an error while entering the information, you can delete it by clicking on the CLEAR button before you click on the INSERT button. The entered information will be erased. RAZAIR‐01‐54AAA‐1 Mark: Mark coordinates are locations previously flown by the aircraft in which you have found anything interesting to report. To store the coordinates all you have to do is to select a MARK memory space by clicking on the MEMORY buttons and then clicking on the MARK button. To review the stored MARK coordinates you must put the rotary mode switch on the MARK position and click on the MEMORY button until you get the position that you want to review. Target Offset: In this mode, the Tactical Computer will display the Lat/Lon coordinates if they are offset from the main flight path. The mode is not available at this time. Target Elevation/Distance: In this mode, the target elevation and distance is displayed. The mode is not available at this time. Wind Velocity and Direction: To review the information regarding the present position wind direction and velocity, you must put the rotary mode switch in the WIND position. The top row will display the wind velocity in knots while the bottom row will show direction in degrees. For example 30 knots will appear as 000030 and 240 degrees will appear as 2400000. The information is Read‐Only, It cannot be updated. Data Input: In this mode, the Tactical Computer can read a flight plan created by using FSX’s flight planner. All you have to do is load your selected flight plan into the current flight session. The computer will display the number of waypoints available in the loaded flight plan. Please be advised that it can only load the first 10 waypoints. If you have created more than 10, only the first 10 will be loaded and saved. To load the flight plan into the computer all you have to do is click on the INSERT button. NAVIGATION The Tactical Computer will permanently calculate bearing and distance to any FLY TO selected destination. This information will be displayed in both the HUD and in the HSI. For the information to be displayed in the HSI and the HUD the heading mode (HDG MODE) must be in the AUTO position. The HSI will display both range and bearing. Range in miles will be displayed in the upper left counter. Bearing to destination will be indicated by the HSI’s No. 1 pointer (No. 2 pointer will be in a fixed position in this mode). To navigate to your selected destination all you have to do is keep the No. 1 pointer under the Lubber line. Note: In Great Circle navigation bearing to a destination is not constant. The No. 1 pointer will drift from its position since the bearing will change with the aircraft’s position. The bearing information will be displayed on the HUD in the form of a steering cue (see figure below). If you keep the cue centered on the HUD you will be flying towards your destination. RAZAIR‐01‐54AAA‐1 Fig. 1: The Horizontal Situation Indicator (HSI) Fig2: HUD with navigation Steering Cue. AVIONICS PANEL The Avionics Panel is where the Power switches enabling some subsystems are located. You can find it above the Tactical Computer Keyboard Panel 1. 2. 3. 4. Tactical Computer Power Switch. (Default OFF) ILS System Power Switch. (Default OFF). Landing System Power Switch. (Default OFF). Terrain Following (TF) System Power Switch (INOP). (Default OFF). Note: The Landing System and the Terrain Following System are mutually exclusive. Only one of them can be ON at any given time. TACAN SYSTEM AN/ARN‐52 (V) Although FSX does not have a TACAN system, we at RAZBAM have created one for the F/A‐201A Kestrel by using existing VOR stations thanks to a conversion table. There is one caveat, the TACAN system has 126 channels but FSX does not have that many VORs so there are several TACAN channels with invalid VOR frequencies. Otherwise, the TACAN system is fully operational and is able to provide navigational aid to the pilot RAZAIR‐01‐54AAA‐1 How to operate 1. The Tactical Computer NAV Heading Mode switch must be in the MAN position. 2. Select a TACAN Channel in the Radio: a. Place the PRESET SELECTOR KNOB in the NAV Position. The words TACAN and ILS should appear at the left side the frequency display. b. Place the RADIO SELECTOR KNOB in the MAIN Position. The words TACAN should be boxed. c. Select the TACAN frequency either by using the CHANNEL SELECT KNOB or by using the FREQUENCY CHANGE KNOBS. Note: Remember that the frequency you are selecting is actually a VOR Station. 3. You can check if you have the correct TACAN channel by clicking on the TACAN Audio signal in the AUDIO 2 PANEL. 4. You can check if you are receiving a signal from the selected TACAN Channel by viewing the signal strength in the Radio Display. ILS SYSTEM The ILS system is not available unless the POWER switch is in the POWER position. How to operate: 1. The Tactical Computer NAV Heading Mode switch must be in the MAN position. 2. Select a ILS frequency on the Radio Panel: a. Place the PRESET SELECTOR KNOB in the NAV Position. The words TACAN and ILS should appear at the left side of the frequency display. b. Place the RADIO SEELCTOR KNOB in the BOTH Position. The words ILS should be boxed. c. Select the ILS frequency by using the FREQUENCY SELECTOR KNOBS. 3. You can check if you have the correct ILS frequency by clicking on the ILS Audio signal switch in the AUDIO 2 PANEL. 4. You can check if you are receiving a signal from the selected ILS Station by viewing the signal strength in the Radio Display. To view the landing information you must click the LANDING MODE Switch to the ON position. RADAR SET, AN/APQ‐126(V) Unfortunately FSX does not have a true Radar. Nevertheless we at RAZBAM managed to recreate the functionality of the A‐7’s AN/APQ‐126 Radar. The functions of the radar set are ground mapping, air‐to‐ground ranging (within FSXs limitations). It also has terrain avoidance capability to permit maneuvering from terrain obstacles during low‐level flight. The radar has 5 working ranges: 5, 10, 20, 40 and 80 miles. The available ranges depend on the radar mode selected. The functional radar modes are: RAZAIR‐01‐54AAA‐1 NAV Beacon mode: Displays all radio based navigational aids (Default Mode) Air‐Intercept mode RAZAIR‐01‐54AAA‐1 Air‐to‐Ground Ranging. Ground Map Shaped Mode RAZAIR‐01‐54AAA‐1 Ground Map Pencil (TF) Mode OPERATION Modes of operation are selected by clicking on the pushbutton type switches on the radar control panel. To activate the radar, the POWER switch must be on the POWER setting. At first the radarscope screen will remain blank until a mode of operation is selected. RAZAIR‐01‐54AAA‐1 RADAR ALTIMETER AN/APN‐194(V) The radar altimeter provides a continuous, highly accurate indication of absolute altitude from 0 to 5,000 feet above water or terrain. A control knob, located on the height indicator, is rotated clockwise to set a low‐altitude limit index marker. If you fly below the altitude selected a warning light on the instrument panel comes on. The instrument has an OFF flag that comes into view when the altitude is higher than 5,000 feet. 1. CONTROL knob Turned clockwise (left mouse button): Increases the low‐altitude limit index marker. Turned counter clockwise (right mouse button) decreases the low‐ altitude limit index marker. 2. LOW‐ALTITUDE LIMIT INDEX MARKER Indicates selected reference height. 3. OFF flag In view, the aircraft is above 5,000 AGL 3. 1. 2. HEAD‐UP DISPLAY (HUD), The Head‐Up Display (HUD) is an optical and electronic device that projects attack and flight information in symbolic form into the pilot’s field of view on a combiner glass somewhat similar to a standard gunsight. A standby gunsight reticle is provided as a backup in case of HUD failure. OPERATION Power is applied to the HUD when you click on the HUD rotary button. The brightness control has not been implemented. RAZAIR‐01‐54AAA‐1 Fig 1: HUD standard display. SYMBOLOGY The various elements available on the HUD are explained in the next figure. RAZAIR‐01‐54AAA‐1 Fig 2: HUD Symbology (NAV Mode). 1. 2. 3. 4. 5. 6. 7. 8. 9. 10. Indicated Airspeed Ruler (Knots) Current G Force load. Pitch Ladder Bank Indicator Flight Path Marker Horizon Line Angle of Attack (Degrees) Vertical Velocity Indicator (feet per minute). Barometric Altitud Ruler (feet). Steer Point Bearing Marker RAZAIR‐01‐54AAA‐1 11. 12. 13. 14. 15. 16. 17. 18. 19. Altitude Above Ground (feet). Distance to Steer Point (nautical miles) / Steer Point. Estimated Time On Transit to Steer Point. Bearing to Steer Point. Aircraft Heading Marker (degrees). HUD Mode Max G Force Load experienced. Current Mach Number Master Arm State. HORIZON AND FLIGHTPATH ANGLE (PITCH) LINES The horizon and flightpath angle (pitch) lines represent the horizon and each 5 degrees of pitch angle between plus and minus 90 degrees. No less than two or more than three lines are displayed at the same time. Positive pitch lines are solid and above the horizon. Negative pitch lines are dashed and below the horizon. The outer segments of the negative pitch lines point towards the horizon. Each line is numbered except the horizon line. Negative pitch numbers are preceded by a minus sign. FLIGHT DIRECTOR The flight director indicates horizontal steering error in enroute navigation with respect to the flight path marker. In enroute navigation, the computer places the flight director horizontally indicating steering error. ALTITUDE INDICATOR AND SCALE The barometric altitude is displayed using a vertical bar indicator read against a moving scale on the right side of the HUD. A number is displayed at the right side of the scale which indicates aircraft altitude. A minus sign precedes the number for altitudes below sea level. The radar altitude is displayed at the bottom of the scale in a box prefixed by the letter R. BANK INDICATOR The Bank Indicator is displayed only when the HUD is in NAV mode. It indicates the degrees of bank the aircraft is up to a maximum of 60 degrees. The bank indicator is slaved to the FPM and will move alongside it. NAVIGATIONAL INFORMATION DISPLAY The HUD will display in the lower right corner all navigation information as indicated by the flight plan loaded into the Tactical Computer. RAZAIR‐01‐54AAA‐1 ATTITUDE DIRECTOR INDICATOR (ADI), ID‐1329/A The Attitude Director Indicator is part of the integrated display system for navigation, weapons delivery and aircraft attitude information. OPERATION As the various modes of operation are selected by the Heading Mode switch, information appropriate to the mode is displayed on the HIS, HUD and ADI. HORIZONTAL SITUATION INDICATOR (HSI), ID‐1013/A The horizontal situation indicator (HSI) is one of four integrated navigational displays. The others are the ADI, HUD and Projected Map Display Set (PMDS). The HSI presents the aircraft’s geographical relationship to some outside reference point. This reference point can be a preselected set of coordinates in the Tactical Computer, a selected TACAN station, or a selected ADF station, depending on the guidance mode selected through the Master Function Selectors or the Heading Mode switch. RAZAIR‐01‐54AAA‐1 1. Bearing Pointer No. 1 Indicates bearing to Tactical Computer destination when the HDG MODE switch is in AUTO NAV. Indicates TACAN bearing when HDG MODE switch is in TACAN/MANUAL. 2. Bearing Pointer No. 2 Indicates bearing to selected ADF station with HDG MODE switch in TACAN or MANUAL. Indicates ground track when HDG MODE switch is in AUTO NAV. 3. Selected Course arrow. Indicates course selected with COURSE SET knob. 4. Lubber line Indicates aircraft heading on compass card. 5. Heading marker. Indicates heading selected with HEADING SET knob. 6. Course deviation bar and dots. Indicates amount (each dots equals 5°) and direction deviation from selected TACAN radial when HDG MODE switch is in TACAN/MANUAL. Inoperative and zeroed in all other modes. 7. To From arrows. Indicates whether selected course is to or from TACAN station in relation to aircraft position. Out of view RAZAIR‐01‐54AAA‐1 8. 9. 10. 11. 12. 13. 14. except when HDG MODE switch is in the TACAN/MANUAL position. Course deviation bar alarm flag. Word NAV appears if bearing signal is not adequate for correct bearing indication on No. 1 pointer. Word NAV appears when TACAN channel is invalid. Operative only when the HDG MODE switch is in the TACAN/MANUAL position. Miles (distance) indicator. Indicates distance to destination when HDG MODE switch is in AUTO NAV. Indicates distance to TACAN station when HDG MODE switch is in TACAN/MANUAL positions. Course indicator. Indicates course selected with COURSE SELECT knob. Bearing pointer No. 2 Mode words. ADF illuminated when HDG MODE switch is in TACAN/MANUAL position. Other words not used. Bearing pointer No.1 Mode words TAC illuminated when HDG MODE switch is in TACAN/MANUAL position. Other words not used. HEADING SET knob. Positions heading marker. When the AFCS (Autopilot) is engaged (YAW STAB switch is in YAW STAB) and the Lateral Path switch is in NAV, by turning this knob you give heading commands to the AFCS system. COURSE SET knob. Sets course arrow and selected course indicator. RAZAIR‐01‐54AAA‐1 ARMAMENT STATION CONTROL UNIT (ASCU) The Armament Station Control Unit (ASCU), which in the real aircraft is located in the fuselage’s avionics bay, provides the control for loading weapons and external fuel tanks into the aircraft eight pylons. RAZAIR‐01‐54AAA‐1 OPERATION The ASCU panel can be viewed by using FSXs view instruments menu. The ASCU is only operational under the following conditions: Aircraft is on the ground, Parking brakes are set and engine is completely shutdown (0 % RPM). The point is that only ground personnel have access to the ASCU panel and they won’t work if the airplane is hot. The ASCU panel is divided in several areas: The top left area has a box indicating the aircraft’s payload weight information: MAX GROSS WEIGHT: The maximum weight of the aircraft when fully loaded. EMPTY WEIGHT: The aircraft’s weight without ordnance and fuel ORDNANCE LOAD: The weight of the aircraft’s ordnance (including gun ammunition). FUEL LOAD (lbs): The weight of the fuel load in pounds. TOTAL WEIGHT: The total current weight of the aircraft including ordnance and fuel. You will also find the individual weight of each pylon, which will help you in balancing the aircraft. The top right area has a box indicating the aircraft’s fuel load (in pounds). MAIN TANK: The fuel load of the internal tank (Max. Capacity 7000 pounds). CENTER AUX TANK: The fuel load of the external auxiliary tank (if installed). LEFT AUX TANK: The fuel load of the external auxiliary tank in the left wing (if installed). RIGHT AUX TANK: The fuel load of the external auxiliary tank in the right wing (if installed). The Red box located below the Aircraft Weight indicator is used to load the 20 mm Vulcan ammunition. Just click on it and 500 rounds will be loaded in the aircraft (you will see the ammo weight). RAZAIR‐01‐54AAA‐1 The Purple box located below the Aircraft Fuel Load indicator is used to refuel the aircraft. Just click on it and all the fuel tanks will be filled to capacity. Note: The auxiliary external tanks will be filled only if they are installed in the aircraft. The middle area contains an aircraft silhouette with several windows in which the aircraft weight load can be checked for balance. Note: The auxiliary external tanks also have a weight penalty. Each empty tank weights 500 pounds. If you load it the total weight in the station will be the weight of the empty tank plus the weight of the fuel itself. The bottom area contains the switches that are used to load/unload the aircraft stations. Each station, excepting stations 1 and 5 which only have one switch, has two switches. These switches provide info regarding weapon type and quantity. Note: Stations 2, 3, and 4 are “wet”. That means that they can carry external auxiliary fuel tanks. Because of the limitations of FSX we had to assign a fuel tank to these external tanks. These fuel tanks are able to take on fuel whether their assigned external tank is visible or not. If the fuel load for any fuel tank assigned to an external auxiliary tank is not 0, the external auxiliary tank will become visible and will override any weapons load for that station. The airplane can carry full fuel or full weapons load, but not both. The opposite is not true. You may carry an external fuel tank visible even if its associated FSX fuel tank is empty. The fuel tank assignment is as follow: External 1 = Station 2 Center2 = Station 3 External 2 = Station 4 ATTENTION: It is possible to refuel the aircraft by using the ASCU. You only have to click on the purple box to replenish the internal and external (if installed) fuel tanks. Note: Stations 1 and 5 can carry only a single type of weapons: the AIM9 Sidewinder. Therefore they only have a single switch to indicate whether a single Sidewinder is being loaded in the station or not. The first switch selects the weapon to be loaded. The weapon are as follows: AIM‐9 Sidewinder IR Air‐to‐Air missile (192 lbs). AIM‐7 Sparrow SARH Air‐to‐Air missile (510 lbs). MK‐82 General Purpose bomb, also known as iron bombs. (500 lbs) MK‐83 General Purpose bomb, also known as iron bombs. (1014 lbs) MK‐84 General Purpose bomb, also known as iron bombs. (2039 lbs) Mk 20 Rockeye cluster bomb. (490 lbs) AGM‐65 Air‐to‐Ground Missile. AGM‐84 Harpoon Anti‐Ship missile. AGM‐45 Shrike Missile (390 lbs) RAZAIR‐01‐54AAA‐1 AGM‐88 HARM Missile (780 lbs) MK 32 Zuni Rockets in LAU‐10 pods of four each. (48.4 lbs each rocket). Aero 1D auxiliary fuel tanks. (2010 lbs of fuel plus 500 lbs for the empty tank). Note: Not all weapons are available on all stations. The last switch sets the quantity of the selected weapon for the selected station. The maximum number depends on weapon type and station selected. The following is a chart of weapons type and maximum number allowed: Station 1 and 5 2 and 4 3 Weapon AIM‐9 Sidewinder AIM‐9 AIM‐73 MK‐82 MK‐83 MK‐84 MK‐20 LAU‐10 AGM‐65 AGM‐84 AGM‐45 AGM‐88 Aero 1‐D auxiliary fuel tank AIM‐7 MK‐82 MK‐83 MK‐84 MK‐20 LAU‐10 AGM‐84 Aero 1‐D auxiliary fuel tank Max Load 1 1 1 6 1 1 3 2 pods (with 4 rockets each pod) 1 1 1 (TA7C only) 1 (TA‐7C only) 1 2 6 1 1 1 2 pods (with 4 rockets each pod) 1 1 WARNING: It is recommended that you use the ASCU for loading/unloading the aircraft, including the fuel. Using the FSX Aircraft Fuel/Payload menu can create problems with the module. RAZAIR‐01‐54AAA‐1 ARMAMENT SYSTEM Weapons delivery (i.e.: dropping bombs) is controlled by the F/A‐201A’s MFD. The MFD Mode buttons select eh weapons available for release. The available modes are: 1. AAM: Air‐To‐Air mode. The Radar is changed to Air Intercept Mode and all available Air‐to‐Air weapons are displayed. 2. AG: Air‐to‐Ground mode. The radar is changed to Air‐Ground‐Tracking mode and all available Air‐to‐Ground weapons are displayed. 3. GUN Mode. The Gun is selected and the MFD displays the 200 mm cannon status. Weapons delivery is accomplished by either pressing the trigger button on your joystick (usually button 01) or by using the assigned keyboard combination. ATTENTION This model uses the CABIN ALERT – SEATBELTS (ON/OFF) event to send a weapons release signal. The actual RELEASE DROPPABLE OBJECT event is not used although it still is active. Please map your joystick trigger button and assigna keyboard combination to the CABIN ALERT – SEATBELTS (ON/OFF) event. Failure to do so will prevent the activation of the weapons release animations. OPERATION 1. Air‐to‐Air Mode: To engage Air‐to‐Air Mode, click on the AAM mode button in the MFD. The MFD display will show all air‐toair weapons available and the radar will automatically change to Air Intercept Mode. MFD in AAM Mode. The MFD gives the following Information: Button 1: Selects AIM 9 Sidewinder Infrared Guided missiles. Button 2: Selects AIM 7 Sparrow Semi Homing Radar Guided missiles. Button 12: Clicking on it will select the nearest aircraft as a target. Radar in Air Intercept Mode RAZAIR‐01‐54AAA‐1 Button 11: Will cycle to the next one. Button 10: Will cycle to the previous one. Button 9: Displays bearing to selected target. Button 8: Displays Distance to selected target. Button 7: Displays Selected Target’s altitude. To fire any missile, select it by clicking on the corresponding button and pressing the trigger. Air‐to‐Air weapons do not need arming. The position of the Master Arm Switch is irrelevant. To fire AIM‐9 Sidewinders, it is necessary to “cool” the warheads. The missile will not fire unless the IR Cool Switch is in the ON position. Fig 1: IR Cool Switch. Fig 2. IR Cool Switch Location Note: Both the AIM‐9 and AIM‐7 can be fired but are not guided. They won’t track and intercept any selected target. 2. Attack Mode (Air‐to‐Ground). To enter into Attack mode, you must click on the AG Mode MFD button. The MFD will display all Air‐to‐Ground weapons, including missiles, and the radar will change to Air‐to‐Ground Ranging mode. MFD in AG Mode. Radar in Air –to‐Ground Ranging Mode RAZAIR‐01‐54AAA‐1 The MFD will show the following information Button 1: Master Arm Switch Position Button 3: Station2 load Button 4: Station 3 (center) load. Button 5: Station 4 load. Button 6: Select all stations. Button 7: Indicates which station has been selected. 0 means no selection. Button 8: Indicates Distance between each release. Button 9: Indicates the number of bombs to release each time the trigger is pressed. Button 10: Indicates whether the release will be single, in pairs or all at the same time. Button 12: Indicates what aiming point is being used. Fig 1: Master Arm Switch. Fig 2. Master Arm Switch Location To select any station you only have to click on the corresponding button. The information in Button 7 will update accordingly. You can select all stations in two ways: By individually clicking on each station button, or by clicking on Button 6. To deselect a station, click on its button again. Note: To select multiple stations, they must carry the same ordnance type. How to Operate: 1. Select the AG Mode button in the MFD. 2. Select the weapons station that you want to use. 3. Click on Button 12 to select the type of target reticle that you want to use, there are three of them: a. CCIP: Constantly Computed Impact Point. This is the default selection. This is used for releasing iron (dumb) bombs. b. H‐LOS: HUD – Line‐Of‐Sight. An aiming cross will appear at the center of HUD. This aiming cross will move depending on the aicraft’s movement and the ordnance launch speed. This mode is used for rocket, missile launch. c. CCRP: Constantly Computed Release Point. This mode is not implemented. RAZAIR‐01‐54AAA‐1 4. Click on Button 10 to select the Release Mode: Single (Default), Pairs or Simul (All bombs are released at the same time). 5. Click on Button 9 to select the release quantity. This setting is ignored if the release mode is SIMUL. 6. Click on Button 8 to select the distance interval between releases. Not implemented. 7. Click on the Master Arm switch. The info on Button 1 should say ARMED. 8. Line up with the target and press the trigger Bombing Modes There are three bombing modes detailed in the Armament Panel, but only two of them are implemented. CCIP: Acronym for Constantly Computed Impact Point. In this mode the HUD will display two items: A vertical line that will slant with aircraft bank, which is called the Bomb Fall Line (BFL). This line is the estimated flight path of the bomb when it is released. A diamond shaped targeting reticle, which is where the computer predicts the bomb will hit the ground. The diamond reticle will wander all over the HUD, indicating where the bomb could hit depending on aircraft pitch, bank, altitude and speed. If you cannot see the reticle, it means that the impact point is below the aircraft. You will have to change the aircraft aspect (pitch, altitude, etc) before attempting to place the reticle in your target. To hit your target, you have to place the diamond reticle in the target and try to align it with the BFL. You will hit your target when both the diamond reticle and the BFL are aligned. H‐LOS: Acronym for HUD Line‐Of‐Sight. In this mode the HUD will display an aiming cross at its center. This cross will move depending on aircraft aspect and the known speed of the weapon selected. This mode is used for releasing rockets and missiles, since you fire them by basically pointing the aircraft at your target. It is highly inaccurate when used with bombs. CCRP: Acronym for Constantly Computed Release Point. This mode is not implemented. In this mode the pilot selects a target with the radar and press the trigger. The computer stores the target lat/lon coordinates and give steering cues to the release point. When the aircraft reaches the release point, the computer automatically releases the bomb. It is the most accurate mode. Unfortunately we didn’t have the time to correctly implement it. 3. Gun Mode: To enter into GUN Mode you have to click the GUN Mode button in the MFD. The MFD will change into the GUN Panel. The radar mode is not affected and will remain in whichever mode was selected. In GUN mode, the HUD will display a targeting reticle at its center. The reticle will move depending on the aircraft pitch, bank and speed, and in the engagement mode. RAZAIR‐01‐54AAA‐1 HUD Gun Reticle in A‐A Mode HUD Gun Reticle in A‐G Mode Button 1: Indicates that the MFD is in GUN mode. Button 3: Indicates the 20 mm rounds available. Button 6: Indicates the firing rate: LOW (20 rounds at a time)/HIGH (50 rounds at a time). Default is LOW. Button 8: Indicates targeting mode: H‐LOS/CCIP (Default is H‐LOS). CCIP is not implemented. Button 10: Indicates engagement mode. A‐A (Air‐to‐Air) / A‐G (Air‐to‐Ground). Default is A‐A Button 12: Arms/Safe the gun. MFD in GUN Mode. How to Operate: 1. Select the GUN Mode button in the MFD 2. Select the firing rate, either LOW (20 rounds) or HIGH (50 rounds), by clicking on Button 6. 3. Select the engagement mode, Air‐to‐Air (A‐A) or Air‐to‐Ground (A‐G), by clicking on Button 10. 4. Select targeting mode, H‐LOS or CCIP (Not implemented, available only in A‐G Mode), by clicking on Button 8. 5. Arm the gun by clicking on Button 12 6. Press the trigger. RAZAIR‐01‐54AAA‐1 ATTENTION This model releases a bomb each time the trigger is pressed. The bomb release is available in both free flight and mission mode. In free flight, no destruction of scenery will occur although you will be able to see a smoke column if the bomb hits dry land. All released weapons are free falling non guided. Your ability to get the target into the CCIP will determine whether you hit it or not. There are no guided weapons in this model. JETTISONING The aircraft has a jettison circuits. When jettisoning store from the wing pylons, everything below the parent rack is jettisoned. To Select the Jettison Panel in the MFD, click on the SEL JETT Button (the white one). The Master Arm switch will jump to the OFF position. Only Air‐to‐Ground Ordnance can be jettisoned. All Air‐ to‐Air weapons remain on the aircraft. Button 1: Station 2 weapons load. Button 2: Station 3 (Center) weapons load. Button 3: Station 4 weapons load. Button 6: Select‐All switch. Button 7: Indicates which station has been selected for jettisoning. Fig 1. Jettison Panel OPERATION 1. Place the MFD in JETT Mode by clicking on the SEL JETT button. The Master Arm switch will move to the OFF position. 2. Select the station to be jettisoned by clicking in its associated button. 3. Click on the PUSH TO JETT button. The store will disappear from the wing. SELECT JETTISON CIRCUIT The select jettison circuit, jettison stores only from selected wing stations. With the aircraft in the air, clicking on the PUSH TO JETT switch will jettison the stores from the selected station. If among the stores are auxiliary fuel tanks, the fuel associated with those tanks will be lost as well. RAZAIR‐01‐54AAA‐1 APENDIX TACAN to VOR Conversion chart TACAN CH VOR Freq TACAN CH VOR Freq 01 02 03 04 05 06 07 08 09 10 11 12 13 14 15 16 17 18 19 20 21 22 23 24 25 26 27 28 29 30 31 32 33 34 35 36 37 38 134.4 134.5 134.6 134.7 134.8 134.9 135.0 135.1 135.2 135.3 135.4 135.5 135.6 135.7 135.8 135.9 108.0 108.1 108.2 108.3 108.4 108.5 108.6 108.7 108.8 108.9 109.0 109.1 109.2 109.3 109.4 109.5 109.6 109.7 109.8 109.9 110.0 110.1 64 65 66 67 68 69 70 71 72 73 74 75 76 77 78 79 80 81 82 83 84 85 86 87 88 89 90 91 92 93 94 95 96 97 98 99 100 101 133.7 133.8 133.9 134.0 134.1 134.2 112.3 112.4 112.5 112.6 112.7 112.8 112.9 113.0 113.1 113.2 113.3 113.4 113.5 113.6 113.7 113.8 113.9 114.0 114.1 114.2 114.3 114.4 114.5 114.6 114.7 114.8 114.9 115.0 115.1 115.2 115.3 115.4 RAZAIR‐01‐54AAA‐1 TACAN CH VOR Freq TACAN CH VOR Freq 39 40 41 42 43 44 45 46 47 48 49 50 51 52 53 54 55 56 57 58 59 60 61 62 63 110.2 110.3 110.4 110.5 110.6 110.7 110.8 110.9 111.0 111.1 111.2 111.3 111.4 111.5 111.6 111.7 111.8 111.9 112.0 112.1 112.2 133.3 133.4 133.5 133.6 102 103 104 105 106 107 108 109 110 111 112 113 114 115 116 117 118 119 120 121 122 123 124 125 126 115.5 115.6 115.7 115.8 115.9 116.0 116.1 116.2 116.3 116.4 116.5 116.6 116.7 116.8 116.9 117.0 117.1 117.2 117.3 117.4 117.5 117.6 117.7 117.8 117.9