1
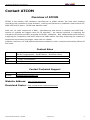
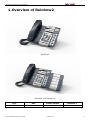
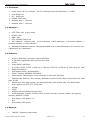
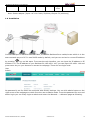
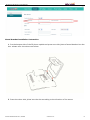
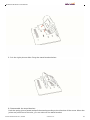
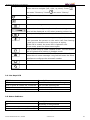
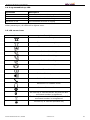
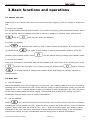
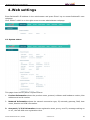
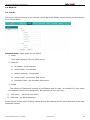
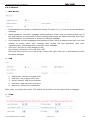
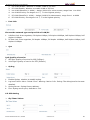
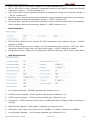
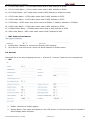
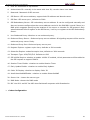
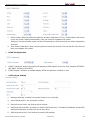
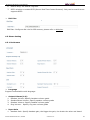
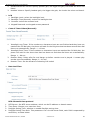
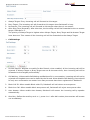
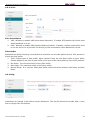
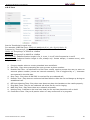
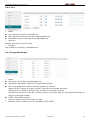
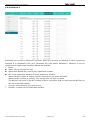
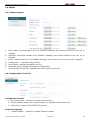
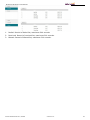
Rainbow2 IP Phone User Manual Version: 1.2 2014-06-23 Rainbow2 IP Phone User Manual Content CONTACT ATCOM ............................................................................................................................................................ 4 OVERVIEW OF ATCOM ................................................................................................................................................. 4 1. OVERVIEW OF RAINBOW2 ............................................................................................................................................... 5 1.1 INTERFACES ................................................................................................................................................................................... 6 1.2 HARDWARE ................................................................................................................................................................................... 6 1.3 SOFTWARE .................................................................................................................................................................................... 6 1.4 NETWORK .................................................................................................................................................................................... 6 1.5 MANAGEMENT AND MAINTENANCE .................................................................................................................................................. 7 1.6 PROTOCOL .................................................................................................................................................................................... 7 1.7 COMPLIANT AND CERTIFIED STANDARD .............................................................................................................................................. 7 1.8 PACKING LIST ................................................................................................................................................................................ 7 1.9 INSTALLATION ................................................................................................................................................................................ 8 2. KEYPAD OF IP PHONE ..................................................................................................................................................... 14 2.1DESCRIBE OF THE BUTTONS AND SCREEN ........................................................................................................................................... 14 2.2 LINE KEYS LED ............................................................................................................................................................................. 15 2.3 STATUS INDICATOR ....................................................................................................................................................................... 15 2.4 PROGRAMMABLE KEYS LED ........................................................................................................................................................... 16 2.5 LCD SCREEN ICONS....................................................................................................................................................................... 16 3. BASIC FUNCTIONS AND OPERATIONS ............................................................................................................................. 17 3.1 ANSWER THE CALLS ...................................................................................................................................................................... 17 3.2 MAKE CALL................................................................................................................................................................................. 17 3.3 PRE‐DIAL .................................................................................................................................................................................... 18 3.4 MULTIPLE LINE DIAL‐UP ................................................................................................................................................................. 18 3.5 HANG UP THE PHONE .................................................................................................................................................................... 19 3.6 CALL TRANSFER ........................................................................................................................................................................... 19 3.7 VOICEMAIL ................................................................................................................................................................................. 19 3.8 MUTE CALLS ............................................................................................................................................................................... 19 3.9 CALL HOLD ................................................................................................................................................................................. 20 3.10 3‐WAY CONFERENCE CALL ........................................................................................................................................................... 20 3.11 CALL HISTORY ........................................................................................................................................................................... 20 3.12 DEFAULT PASSWORD ................................................................................................................................................................... 21 3.13 CHECK THE PHONE’S IP ADDRESS .................................................................................................................................................. 21 3.14 DIAL PLAN ................................................................................................................................................................................ 21 4. WEB SETTINGS............................................................................................................................................................... 23 4.1 SYSTEM STATUS ............................................................................................................................................................................ 23 4.2 NETWORK .................................................................................................................................................................................. 24 4.2.1 Basic ................................................................................................................................................................................. 24 4.2.2 Advance ........................................................................................................................................................................... 25 4.3 SIP SETTING ............................................................................................................................................................................... 26 4.4 ACCOUNT ................................................................................................................................................................................... 28 4.5 PHONE SETTING........................................................................................................................................................................... 31 ATCOM TECHNOLOGY CO., LIMITED www.atcom.cn 2 Rainbow2 IP Phone User Manual 4.5.1 Preference........................................................................................................................................................................ 31 4.5.2 Features ........................................................................................................................................................................... 33 4.5.3 Voice ................................................................................................................................................................................ 35 4.5.4 Ring .................................................................................................................................................................................. 35 4.5.5 Tone ................................................................................................................................................................................. 36 4.5.6 Line ................................................................................................................................................................................... 37 4.5.7 Programmable key ........................................................................................................................................................... 37 4.5.8 Rainbow E ........................................................................................................................................................................ 38 4.6 UPDATE ...................................................................................................................................................................................... 39 4.6.1 Manual Update ................................................................................................................................................................ 39 4.6.2 Update/Auto Provision .................................................................................................................................................... 39 4.6.3 Reset & Reboot ................................................................................................................................................................ 40 4.7 PHONE BOOK .............................................................................................................................................................................. 40 4.8 CALL LOG ................................................................................................................................................................................... 40 5. FAQ & TROUBLE SHOOTING ........................................................................................................................................... 42 5.1 How to make a factory reset ............................................................................................................................................... 42 5.2 Upgrade firmware under safe mode ................................................................................................................................... 42 5.3 How to make direct IP call .................................................................................................................................................. 42 6. TROUBLE SHOOTING ...................................................................................................................................................... 43 6.1 The phone can’t register successfully ................................................................................................................................. 43 6.2 The phone can’t obtain IP address ..................................................................................................................................... 43 6.3 Only one part can hear the voice during the call ................................................................................................................ 43 7. ABBREVIATIONS ............................................................................................................................................................ 44 ATCOM TECHNOLOGY CO., LIMITED www.atcom.cn 3 Rainbow2 IP Phone User Manual Contact ATCOM Overview of ATCOM ATCOM is the leading VoIP hardware manufacturer in global market. We have been keeping innovating with customer’s needs oriented , working with partners to establish a total solution for SMB VoIP with IP phone , IP PBX and Asterisk cards With over 10 years’ experience of R&D , manufacturing and service in network and VoIP filed ; mission of creating the biggest value for IP terminals , we commit ourselves in supplying the competitive IP phone and other terminals for IP PBX , softswitch , IMS , NGN providers and carriers; supplying the competitive total VoIP solution for SMB market. We keep improving the customer’s experience and creating the bigger value with our reliable products. Until now, our VoIP products have been available in 100+ countries and used by millions of end users. Contact Sales Address Area C, A2F , Block 3 ,Huangguan Technology Park , #21 Tairan 9th Rd, Chegongmiao , Futian District , Shenzhen China Tel + (86) 755-83018618-8806 Fax + (86) 755-83018319 E-mail [email protected] Contact Technical Support Tel E-mail + (86) 755-83018618-8008 [email protected] Website Address: http://www.atcom.cn/ Download Center: http://www.atcom.cn/download.html ATCOM TECHNOLOGY CO., LIMITED www.atcom.cn 4 Rainbow2 IP Phone User Manual 1.Overview of Rainbow2 Rainbow2 Rainbow2 with Rainbow E Type POE Power adapter Rainbow E Rainbow2 Yes Optional accessory Optional accessory ATCOM TECHNOLOGY CO., LIMITED www.atcom.cn 5 Rainbow2 IP Phone User Manual 1.1 Interfaces ¾ Power input: DC 5V, 1000mA (DC 5V, 2000mA when with Rainbow E)or POE ¾ ¾ ¾ ¾ ¾ LAN: RJ45 port PC: RJ45 port EXPAN: RJ45 port Headset jack 1 : RJ9 port Handset jack 1 : RJ9 port 1.2 Hardware ¾ LCD: 224×128 4-gray scale ¾ FLASH: 16M ¾ RAM: 32M ¾ CPU: 262MHz Dual Core ¾ LED indicator: 1 Status Light , 4 line indicators, 8 BLF indicators, 1 voicemail indicator, 1 headset indicator, 1 mute indicator ¾ Rainbow E expansion module: 16 programmable keys on each Rainbow E, can connect up to 5 Rainbow E on a Rainbow2. 1.3 Software ¾ ¾ ¾ ¾ ¾ ¾ ¾ ¾ Sip 2.0 (RFC3261) and other related SIP RFCs 4 SIP lines registration with 8 concurrent calls STUN Jitter Buffer, VAD,CNG G.711A/u, G722, G.723, G.726-16, G.726-24, G.726-32, G.726-40, G.729, Lin16-16, iLBC Echo Cancellation SIP Domain name, Authentication DTMF(Inband, RFC2833, SIP INFO) ¾ Call transfer, Call forward, 3-way conference, Call hold, Call back ¾ DND(Do Not Disturb), Auto answer, Blacklists, Block Call-ID, Block Anonymous call, Dial plan, IP call ¾ Phone book with 200 records, 200 answered calls, 200 missed calls, 200 dialed calls ¾ Auto update via HTTP, FTP, TFTP, PNP ¾ Syslog ¾ SNTP ¾ WEB access with different login level ¾ Multi-language: English, Chinese, Farsi, French, German, Hebrew, Italian, Portuguese, Russian, Spanish, Turkish ¾ Soft button: soft button * 4 ¾ BLF ¾ Redundancy SIP server 1.4 Network ¾ LAN/PC:Support bridge mode ATCOM TECHNOLOGY CO., LIMITED www.atcom.cn 6 Rainbow2 IP Phone User Manual ¾ Support PPPoE(ADSL,cable modem used for Internet connecting) ¾ Support VLAN(DATA VLAN and VOICE VLAN) ¾ ¾ ¾ ¾ Support L2TP VPN LAN support Primary and Secondary DNS LAN support DHCP Client Support QoS 1.5 Management and Maintenance ¾ ¾ ¾ ¾ ¾ ¾ Support safe mode and firmware updating under safe mode Support different level user management Configuration via web , keyboard Support multi-language Firmware and configuration file auto provision Support system log and call log 1.6 Protocol ¾ IEEE 802.3 /802.3 u 10 Base T / 100Base TX ¾ PPPoE: PPP over Ethernet ¾ DHCP: Dynamic Host Configuration Protocol ¾ SIP RFC3261, RFC3262, RFC3263, RFC3264, RFC3265, RFC2543, RFC3489, RFC3842, RFC3515, RFC2976, RFC3428, RFC2327, RFC2782, RFC1889 ¾ TCP/IP: Transfer Control Protocol/Internet Protocol ¾ RTP: Real-time Transport Protocol ¾ RTCP:RTP Control Protocol ¾ DNS: Domain Name Server ¾ TFTP: Trivial File Transfer Protocol ¾ HTTP:Hypertext Transfer Protocol ¾ FTP:File Transfer Protocol 1.7 Compliant and Certified Standard ¾ CE: AGC01180140201E2,AGC01180140202E2 ¾ ¾ Comply with ROHS in EU Comply with ROHS in China ¾ ¾ ¾ ¾ Operation temperature: lower than 60° C Storage temperature: lower than 60° C Humidity: 10 to 90% no dew 1.8 Packing List Model Phone ATCOM TECHNOLOGY CO., LIMITED Handset Handset line Stand bracket www.atcom.cn Ethernet Cable User Manual CD 7 Rainbow2 IP Phone User Manual Rainbow2 1 1 1 1 1pcs 1 1.5m Note: Power adapter (Input: AC 100~240V, 50/60Hz; Output: 5V,1000mA;) 1.9 Installation Connect LAN port to PC with Ethernet cable, or connect Rainbow2 to a switch/router which is in the same network as your PC. It uses DHCP mode by default, and you can review its current IP address by pressing key on idle state. To access the web interface, you can input the IP address in IE browser. E.G. The IP address of your Rainbow2 is 192.168.1.100, you can input 192.168.1.100 and press enter key on your browser to access its webpage. There are two login level: User Admin No password is set for those two accounts with factory settings. You can click admin button on the right corner of the webpage to switch from the user to admin mode. To set the password for user and admin login you can firstly login as admin and enter the Network--->Advance page as following. ATCOM TECHNOLOGY CO., LIMITED www.atcom.cn 8 Rainbow2 IP Phone User Manual Stand bracket installation instruction A. Put the bottom side of the IP phone upside and press one-side joints of stand bracket into the slot, please refer the picture as below: B. Press the other side joints into the slot according to the direction of the arrow: ATCOM TECHNOLOGY CO., LIMITED www.atcom.cn 9 Rainbow2 IP Phone User Manual C. It is the right picture after fixing the stand bracket below: D. Disassemble the stand bracket: Push the spring joint of stand and pull the stand according to the direction of the arrow. When the joints are pulled out of the slot, you can take off the stand bracket ATCOM TECHNOLOGY CO., LIMITED www.atcom.cn 10 Rainbow2 IP Phone User Manual Wiring instruction Plug in the power adapter, cable and handset or headset to the corresponding ports as below picture and press them to the slots on the stand bracket. Programmable keys’ paster using instruction ATCOM TECHNOLOGY CO., LIMITED www.atcom.cn 11 Rainbow2 IP Phone User Manual Step1. Use needle or some other tools to insert into the hole of the plastic sheet, hog the plastic sheet. Step2. Lift out the plastic sheet Step3. Take off the plastic sheet Step4. Use needle or some other tools to insert into the edge of the paster, hog and lift out the paster Step5. Write down the identification of each programmable key on the paster after taking off the paster Step6. Put back the paster Step7. Insert the plastic sheet into the slot Step8. Push the other side of the plastic sheet into the other slot Rainbow E’s paster using instruction Steps to use Rainbow E’s paster are the same as programmable keys’ as below: ATCOM TECHNOLOGY CO., LIMITED www.atcom.cn 12 Rainbow2 IP Phone User Manual ATCOM TECHNOLOGY CO., LIMITED www.atcom.cn 13 Rainbow2 IP Phone User Manual 2.Keypad of IP Phone Line key LCD Status Indicator Navigation OK Cancel Soft Key Menu Programmable Key VoiceMail Mute Dial pad Headset Hold Redial Volume Speaker 2.1Describe of the buttons and Screen Soft Keys Press to select a function which displayed at the softkey zone of screen Display all optional functions at the last line of LCD screen. Status Indicator Indicates the phone’s status. LCD Screen All information such as date, time, phone number, incoming caller’s ID(if available),line/call status, extension numbers and the soft key features are displayed on it. Line Key Show extension status and choose corresponding line. Long hold the line key will enter the editor interface. Dial pad Entering numbers or characters. Programmable Keys All the programmable keys can be defined as BLF key, Redial key etc. Long hold the programmable key will enter the editor interface if the programmable key has been already defined as the BLF/SpeedDail/DTMF key. Short hold the programmable key will enter the editor interface immediately if the programmable has not been defined. ATCOM TECHNOLOGY CO., LIMITED www.atcom.cn 14 Rainbow2 IP Phone User Manual Navigation keys Allow users to navigate (left, right, up, down). Press can enter “Directory”. Press can enter “History”. Confirm users’ operation and show status when Rainbow2 is idle. Cancel users’ operation. Enter menu settings. Adjust the volume (speaker/handset/headset/ring). Volume level will be displayed on LCD when pressing volume key. Pick up and hung up under the speaker mode. Mute the mic in a conversation by pressing the Mute button; this prevents the person on the active call from hearing what you or someone else in the room is saying. If the call is muted, the mute LED is lighted in red. To un-mute, press the Mute button again. Pick up and hung up under headset mode. The LED button will be lighted when talking in headset mode. Check the Voicemail status. The LED button will be lighted when there is a new message. Long hold will enter the editor interface to configure the voicemail number. Hold the current call. Redial the last dialed number. 2.2 Line keys LED LED Status Description Off The line is idle or disabled for register Blink in green at 120ms off, 120ms on The line has incoming call Green The line is talking Blink in red at 600ms off, 600ms on The line is held Table1 Line keys LED Status and Description 2.3 Status Indicator LED Status Description On Rainbow2 is being started Off Rainbow2 is standby Blink in red at 120ms on, 120ms off There is incoming call Table2 Status Indicator LED Status and Description ATCOM TECHNOLOGY CO., LIMITED www.atcom.cn 15 Rainbow2 IP Phone User Manual 2.4 Programmable keys LED LED Status Description Off The monitored account is unregistered Green The monitored account is idle Red The monitored account is talking Fast blink in red The monitored account is ringing Table3 Programmable keys LED Status and Description When powering on, all LEDs will be lighted once. 2.5 LCD screen icons Icon Description The extension is registered The extension is unregistered There is a new voice mail Rainbow2 is dialing Rainbow2 is talking Rainbow2 is calling There is an incoming call The call is held Rainbow2 is in speaker mode Rainbow2 is in handset mode Rainbow2 is in headset mode Rainbow2 is in conference The line key is used as the BLF key and the BLF monitored number is registered The line key is used as the BLF key and the BLF monitored number is unregistered The line key is used as SpeedDial key Table4 LED Screen Icons Description ATCOM TECHNOLOGY CO., LIMITED www.atcom.cn 16 Rainbow2 IP Phone User Manual 3.Basic functions and operations 3.1 Answer the calls When there is an incoming call, phone will remind user with ringing. There are 3 ways to answer the call: A. Answer by handset Pick up the handset and talk with the caller. If you want to hang up, just put back the handset. When you are talking with the handset and want to switch to speaker or headset mode, please press key or key,then put down the handset. B. Answer by speaker key and talk with callers by built-in Micro-phone and Speaker. If you want to hang Press up, please press key again. Switch calling or talking into handset mode by lifting the handset under speaker mode. Press key will switch calling or talking into headset mode. C. Answer by headset Keep your microphone connected with the RJ9 headset jack, when there is an incoming call, press and talk with the caller. If you want to hang up, please press again. Pressing can change calling or talking into speaker mode, and lifting the handset switches to handset mode. 3.2 Make Call A. Use the handset Pickup the handset, the LCD will show the current lines (user is able to switch from line1 to line4 by pressing the line key beside the LCD). Press soft key "Send" to dial the number. When you hear the tones of “du~~du~~” and the phone number your dialed is being displayed on the LCD, the phone at the side of being called should be ringing. If the called party answers this calling, the call is established and the calling timer is started immediately. B. Use the speaker Press key, the LCD will show the current lines (user is able to switch from line1 to line4 by pressing the line key beside the LCD). Input the phone number and press soft key "Send" to dial the number. When caller hear the tones of “du~~du~~” and the phone number your dialed is being displayed on the LCD, the phone at the side of being called should be ringing. If the called party answers this calling, the call is established and the calling timer is started immediately. ATCOM TECHNOLOGY CO., LIMITED www.atcom.cn 17 Rainbow2 IP Phone User Manual C. Use the headset Press Key, the LCD will show the current lines (user is able to switch from line1 to line4 by pressing the line key beside the LCD). Input the phone number and press soft key "Send" to dial the number. When caller hear the tones of “du~~du~~” and the phone number your dialed is being displayed on the LCD, the phone at the side of being called should be ringing. If the called party answers this calling, the call is established and the calling timer is started immediately. D. Dial from phone book 1. Press 2. 3. key and input the keypad password 123 to enter the menu and choose “Directory” option. Press "Select" soft key and then find the contact person by navigation keys. When the certain contact person is highlighted, press "Dial" or just pick up the handset to call this number. Pick up the handset, press "Directory" soft key, then select the contact person and press "Dial" soft key. Pick up the handset, press and enter “Directory”, then select the contact person and press “Dial” soft key. E. Dial from call history 1. Press 2. 3. key and input the keypad password 123 to enter the menu and choose “History” option, then enter sub-directory “Dialed Calls”, “Received Calls” or ” Missed Calls” to select one of call history entry, and press "Dial" soft key or pickup the handset to call this number. Pickup the handset, press "History” soft key, then select one of call history entry, and press "Dial" soft key to call this number. Pickup the handset, press and enter “Call History” ,then select one of call history entry, and press "Dial" soft key to call this number. 3.3 Pre-dial It’s a method to dial a phone number immediacy at standby mode.. The method is as below: A、Dial-up the phone number at standby mode B、Press soft key "Dial" to send out the number 3.4 Multiple line dial-up Rainbow2 supports 4 SIP lines. That means user can register on 4 different sip accounts simultaneity. User is able to choose line1, line2, line 3 or line 4 by pressing corresponding line key. Line1 is the priority line. Rainbow2 maximum supports 8 concurrent calls. When there is an incoming call to another line, LCD will show the incoming telephone number and line LED will be blinking in green. User is able to press the corresponding line key or press soft key "Hold" the current line on which you’re talking then press ATCOM TECHNOLOGY CO., LIMITED www.atcom.cn 18 Rainbow2 IP Phone User Manual “Answer” to receive the incoming call from another line. 3.5 Hang up the phone 1. Handset hang up Put back the handset at handset mode, the current calling will be hung up. 2. Speaker hang up Press 3. key at speaker model, the current calling will be hung up. Headset Hang up key at headset model, the current calling will be hung up. Press 4. Hang up one line call Press the hook to hang up the current calling when 2 calls happened simultaneously. 3.6 Call Transfer 1. Attended call transfer The attended transfer allows user to call a third-party before transferring the calling. While calling, press the "Transfer" soft key to hold the current call and phone the third party. Then dial the target number you want to transfer to on the activated line and press “Send” soft key to call that number. After the target party answers the call, press "Transfer" soft key again to complete the transfer. 2. Blind call transfer The blind transfer allows user to transfer a call without speaking to the third party. On the user side, the call will be ended as soon as the target phone number is dialed. Operating steps: Press “More” soft key to get more option, then press “Bxfer” soft key, input the transfer target number and press “Send” soft key. 3.7 Voicemail Rainbow2 has a key for entering voicemail box and indicating new voicemail. Press key to enter the menu to configure voicemail number if you have never configured it previously. Otherwise, the voicemail number will be called after pressing it. If you want to modify it after configured it, please go to the Account webpage to modify voicemail number. 3.8 Mute calls The input audio will be not transmitted to peer phone after pressing key, and the phone will be muted even switched among different modes of speaker, handset and headset. To un-mute, just press key again. ATCOM TECHNOLOGY CO., LIMITED www.atcom.cn 19 Rainbow2 IP Phone User Manual 3.9 Call Hold The current calling will be hold by pressing soft key “Hold” or resumed after pressing soft key “Resume” or . And the held call will be or the corresponding line key. Even on 3-way conference calling, the conference will be held after pressing “Hold” key, and be resumed to 3-way conference after pressing “Hold” Key again. Remember the conversation is still on hold without being ended even if hung up under the status of hold. 3.10 3-Way Conference Call To initiate a conference call: Press “More” soft key on calling to get more options, then press “Conf” soft key to start a conference call. Enter the phone number of the third party and press “Send” soft key to send it out. 1. After the third party answers the call, pressing "Conf" key again to establish the 3-way conference. 2. 3-way conference initiator can press "Exit" soft key to quit from the conference and leave the other two parties still in the conversation. 3. If the initiator hangs up the call or press the “End Conf” soft key, the conference will be ended and the calling between the other two parties will be hung up. 3.11 Call History Rainbow2 supports 200 missed calls, 200 incoming calls and 200 dialed calls. When the storage is full, the old record will be erased by the new one. Press "History" soft key or key when Rainbow2 is standby, all the incoming(->), outgoing(<-) and missed calls(!) will be listed. There is another way to check them: A. Missed call 1. Press key. 2. Press key and key to select “Call History” then press “Select” soft key. 3. Press key and key to select “Missed Calls” then press “Select” soft key. 4. Press key and key to browse the missed call record. If there is no record, the LCD display will be indicated “List is Empty”. B. Answered call 1. Press 2. Press key . key and ATCOM TECHNOLOGY CO., LIMITED key to choose “Call History” and then press “Select” soft key. www.atcom.cn 20 Rainbow2 IP Phone User Manual 3. Press key and key to choose “Answered Calls” and then press “Select” soft key. 4. Press key and key to browse the answered call records. If there is no record, the LCD display will be indicated “List is Empty”. C. Dialed call 1) Press key. 2) Press key and key to select "Call History" and then press “Select” soft key. 3) Press key and key to select “Dialed Calls” and then press “OK” soft key. 4) Press key and key to browse the dialed call records. If there is no record, the LCD display will be indicated “List is Empty”. 3.12 Default Password Password is needed to access menu and web. The default password for accessing menu is 123. There are 2 modes to access web: User mode and Admin mode. All the parameters can be visible at Admin mode while part of them can be visible at User mode. ¾ User Mode Username:user no default Password ¾ Admin Mode: Username:admin no default Password 3.13 Check the Phone’s IP address Press key, then the status o of the phone will be displayed on the screen and you will see the current IP address of the phone. 3.14 Dial Plan Dial plan specify the rule to dial number. The Rainbow2 syntax for the dial plan closely resembles the corresponding syntax specified by MGCP and MEGACO. Dial plan is stipulated by the below configurable parameters: y Interdigit Long Timer——refer to Interdigit long timer for more detail description y Interdigit Short Timer——refer to Interdigit short timer for more detail description y Dial Plan Dial plan contains a series of digit sequences, separated by the ‘|’ character. The collection of sequences is enclosed in parentheses ‘(‘ and ‘)’. Default: (*xx.|xxxxxxxxxxxx.) When user dials a series of digits, Rainbow2 will response in below way: ATCOM TECHNOLOGY CO., LIMITED www.atcom.cn 21 Rainbow2 IP Phone User Manual • No candidate sequences matched, the number will be rejected and display “call ended” on the screen. For instance, the default dial plan only supports digits. And ‘*’ character or letters will be rejected when input them. z More than one candidate sequences matched, Rainbow2 will wait for more digits input. z When input timeout occurs, Rainbow2 will dial the input digits. z When input ‘#’ character, Rainbow2 will dial the input digits. Digit Sequence Syntax: ‘x’: Matches any one numeric digit (‘0’ ... ‘9’) ‘[]’: Numeric ranges are allowed within ‘[]’. For example, [389] means ‘3’ or ‘8’ or ‘9’, [3-6] means ‘3’ or ‘4’ or ‘5’ or ‘6’ , [235-8*] means ‘2’ or ‘3’ or ‘5’ or ‘6’ or ‘7’ or ‘8’ or ‘*’. ‘.’ :Any element can be repeated zero or more times by appending a ‘.’ Character. For example, 01. matches 01,011,0111,01111,...,011111111...etc. ‘<>’: subsequence substitution. For example, ‘<8:1650>xxxxxxx’ would match ‘85551212’ and the first digit ‘8’ will be replaced by ‘1650’ and ‘16505551212’ will be dialed. ‘,’: An “outside line” dial tone can be generated within a sequence by appending a ‘,’ character between digits. Thus, the sequence “9, 1xxxxxxxxxx” sounds an “outside line” dial tone after the user presses ‘9’, until the ‘1’ is pressed. ‘!’: A sequence can be barred (rejected) by placing a ‘!’ character at the end of the sequence. For example, “137xxxxxxxx!” will forbid numbers which have 11 digits and start by 137 to be dialed. Example: (xxxxxxx|[*#]xxxx|9,1xxxxxxxxxx|00xxx!) contains 4 subsequences: 1. Allow to dial numbers with 7 digits 2. Allow to dial numbers with 4 digits and start by ‘*’ or ‘#’ 3. Allow to play an “outside line” dial tone after pressing ‘9’ and dial numbers with 11 digits and start by 1 4. Forbid to dial numbers with 5 digits and start by 00 ATCOM TECHNOLOGY CO., LIMITED www.atcom.cn 22 Rainbow2 IP Phone User Manual 4.Web settings Enter Rainbow2’s IP address in the web browser and press ‘Enter’ key to access Rainbow2's user webpage. Click "admin" which is on the right corner to enter administrator webpage. 4.1 System status This page shows the IP phone's system status. 1. Product Information shows the product name, protocol, software and hardware version, Mac address and serial number. 2. Network Information shows the network connection type, IP, netmask, gateway, DNS, host name, domain and VPN information. 3. Account 1/2/3/4 Information shows registration state, proxy, user ID, message waiting on or off , the last and next registration time. ATCOM TECHNOLOGY CO., LIMITED www.atcom.cn 23 Rainbow2 IP Phone User Manual 4.2 Network 4.2.1 Basic There are 3 ways to connect to the internet: DHCP, Static and PPPoE, please choose one according to your own situation. Network mode: DHCP, Static IP and PPPoE 1. DHCP Auto obtain dynamic IP from DHCP server. 2. Static IP a) IP Address: set IP address b) Subnet Mask:set netmask c) Default Gateway:set gateway d) Primary DNS:set primary DNS server e) Secondary DNS:set secondary DNS server 3. PPPoE The LAN port of Rainbow2 connects to the Ethenet port of mode. You should fill in user name and password which were assigned by ISP (internet service provider). a) User name: set PPPoE user name b) Password:set PPPoE password Press ‘Submit’ button after finishing setting and all the settings will be saved and take effect after Rainbow2 reboots. ATCOM TECHNOLOGY CO., LIMITED www.atcom.cn 24 Rainbow2 IP Phone User Manual 4.2.2 Advance ¾ Web Server 9 Enable Web Server: enable or disable web access. If choose "no", you can not access Rainbow2’s webpage. Admin password: set admin webpage access password. Enter ‘http://ip-address/index.asp’ in the web browser to access admin’s login webpage after seting the admin password, then input username(admin) and password to access the admin’s webpage. User password: set user webpage access password. Enter ‘http://ip-address/user.asp’ in the web browser to access user’s login webpage after setting the user password, then input username(user) and password to access the user’s webpage. HTTP port: set port for HTTP(defaults to 80) For example, Rainbow2's IP is 192.168.1.223 HTTP port was set as 100, you have to type "http://192.168.1.223:100" in web browser to enter Rainbow2 webpage. 9 9 9 VPN 1. 2. 3. 4. 5. VPN Enable: whether to enable VPN VPN Type: only support L2TP VPN Server address: VPN server address Username: VPN account's username Password: VPN account's password After apply, the phone will reboot. The VPN IP will be shown on the System Status webpage. VLAN ATCOM TECHNOLOGY CO., LIMITED www.atcom.cn 25 Rainbow2 IP Phone User Manual 1. Lan VLAN Enable: Whether to enable VLAN of Lan Port 2. PC VLAN Enable: Whether to enable VLAN of PC Port 3. Lan VLAN Identifier(1..4094) : Assign VLAN id for voice stream, range from 1 to 4094 4. Lan VLAN Priority: the degree is 0-7, 7 is the highest priority. 5. PC VLAN Identifier(1..4094) : Assign VLAN id for data stream, range from 1 to 4094 6. PC VLAN Priority: the degree is 0-7, 7 is the highest priority. ¾ Port Link Choose the network type and port link of LAN/PC 1. LAN Port Link: Auto negotiate, full duplex 10Mbps, full duplex 100Mbps, half duplex 10Mbps, half duplex 100Mbps. 2. PC Port Link: Auto negotiate, full duplex 10Mbps, full duplex 100Mbps, half duplex 10Mbps, half duplex 100Mbps. ¾ Qos QoS: Quality of service 1. SIP Qos: Quality of service for SIP (Diffserv) 2. Voice Qos: Quality of service for RTP (Diffserv) ¾ Syslog 1. 2. Enable Syslog: whether to enable syslog. Log level: None,Alert,Critical,Error,Warning,Notice,Info,Debug. The debug level is the most 3. 4. detailed. Syslog Server: Syslog Server address. Port: Syslog server port, defaults to 514. 4.3 SIP Setting ¾ Sip Timer Values ATCOM TECHNOLOGY CO., LIMITED www.atcom.cn 26 Rainbow2 IP Phone User Manual 1. Sip T1: RFC 3261 T1 value (RTT). Range: 0 – 64 sec, defaults to 0.5 2. Sip T2: RFC 3261 T2 value (Maximum retransmit interval for non-INVITE requests and INVITE responses). Range: 0 – 64 sec, defaults to 4 3. Sip T4: RFC 3261 T4 value (Maximum duration a message will remain in the network). Range: 0 – 64 sec, defaults to 5 4. Reg Retry Intvl: Interval to wait before the phone retries registration again after encountering a failure condition during last registration. Range: 0 –65535, defaults to 8 5. Sub Retry Intvl: Interval to wait before the phone retries subscriber again after encountering a failure condition during last subscriber. Range: 0 –65535, defaults to 10 ¾ RTP Parameters 1. 3. RTP Port Min: Minimum port number for RTP transmission and reception. Range: 1–65535, defaults to 16384 RTP Port Max: Maximum port number for RTP transmission and reception. <RTP Port Max> should be at least 2 larger than <RTP port Min>.Range: 1–65535, defaults to 16482 RTP Packet Size(ms): Packet size in milliseconds, which can be 10ms, 20ms, 30ms, 40ms, 60ms ¾ SDP Payload Types 1. AVT Dynamic Payload---RFC2833 payload type. Defaults to 101 2. G729b Dynamic Payload---G729b dynamic payload type. Defaults to 18 3. G726 Dynamic Payload ---G726 dynamic payload type. Defaults to 108 4. G726 Mode ---G726 codec rate, which can be 16 kBit/s,24 kBit/s,32 kBit/s,40 kBit/s. Defaults to 32kBit/s 5. iLBC Dynamic Payload---iLBC dynamic payload type. Defaults to 98 6. iLBC Mode---iLBC codec rate, which can be 13.3kBit/s, 15.2kBit/s. Defaults to 13.3kBit/s 7. Lin16 Dynamic Payload ---Lin16 dynamic payload type, defaults to 102 2. ATCOM TECHNOLOGY CO., LIMITED www.atcom.cn 27 Rainbow2 IP Phone User Manual 8. G711a Codec Name---G711a codec name used in SDP, defaults to PCMA 9. G711u Codec Name---G711u codec name used in SDP, defaults to PCMU 10. AVT Codec Name---AVT codec name used in SDP, defaults to telephone-event 11. G722 Codec Name---G722 codec name used in SDP, defaults to G722 12. G723 Codec Name---G723 codec name used in SDP, defaults to G723 13. G723 Mode---G723 codec rate, which can be 6.3kBit/s, 5.3kBit/s, defaults to 5.3kBit/s 14. G726 Codec Name---G726 codec name used in SDP, defaults to G726 15. G729ab Codec Name---G729ab codec name used in SDP, defaults to G729 16. iLBC Codec Name---iLBC codec name used in SDP, defaults to iLBC ¾ NAT Support Parameters 1. 2. Enable Stun: Whether to use stun to discover NAT mapping. Stun Server: Set stun server, which can be IP address or domain name. 4.4 Account Rainbow2 has 4 line keys mapping Account 1、Account 2、Account 3 and Account 4 respectively. ¾ SIP 1. Enable: whether to enable register. 2. Display Name: This name will display on the LCD screen. It will show the User ID instead if leave Display Name as blank. ATCOM TECHNOLOGY CO., LIMITED www.atcom.cn 28 Rainbow2 IP Phone User Manual 3. User ID: Username of sip account. 4. Authenticate ID: normally is the same with User ID, can also leave it as blank. 5. Password: Password of SIP account. 6. SIP Server: SIP server address, support both IP address and domain name. 7. SIP Port: SIP server port , defaults to 5060. 8. SIP Redundancy Server: SIP redundancy server address. It can be configured manually and also can be auto configured as the server address carried in the DNS SRV record if there is a DNS which supports specifying the location of the server or domain for SIP protocol. Only when Rainbow2 fails to register to the SIP Server, it will try to register to the SIP Redundancy Server. 9. Use Outbound Proxy: Whether to use outbound proxy. 10. Outbound Proxy Server:Outbound proxy server address. All signaling request will be send to outbound proxy server firstly. 11. Outbound Proxy Port: Outbound proxy server port. 12. Register Expires: register expire time, defaults to 300 seconds. 13. Subscribe Expires: subscribe expire time, defaults to 3600 seconds. 14. Transport Type: UDP/TCP/TLS. Defaults to UDP. 15. SIP 100Rel Require: whether to enable 100Rel. If enabled, 100rel parameters will be added to the SIP request to support PRACK. 16. Session Timer Enable:whether to enable Session Timer. 17. Early Update Enable:whether to enable Early Update. 18. Caller ID Display: whether to display Caller ID 19. AutoSubscribeMWIEnable:whether to enable SubscribeMWI 20. Server List:choose the server type. 21. DNS Mode: choose the DNS mode 22. BLF List URI: set BLF list URI when Rainbow2 cooperate with Broadworks. ¾ Codec Configuration ATCOM TECHNOLOGY CO., LIMITED www.atcom.cn 29 Rainbow2 IP Phone User Manual 1. 2. Prefer Codec: Select a preferred codec for all calls. Defaults to G711u. Conversation will be set up by the prefer codec preferentially if the far end also supports this codec. However, the actual codec used in a call still depends on the outcome of the codec negotiation protocol. User Prefer Codec Only: Only use the preferred codec for all calls. The call will fail if the far end does not support this codec. ¾ DTMF Configuration 1. 2. DTMF Tx Method: Select the method to transmit DTMF signals to the far end: Inband, RFC2833, SIP INFO. Default to RFC2833. DTMF Display: Whether to enable display DTMF as plaintext. Default to Yes. ¾ Call Feature Setting 1. Message Waiting: whether to prompt if there is a voicemail. 2. Voice Mail Number: set voicemail number. 3. Pickup Service Code: set Pickup Service Code. 4. UDP Keep Alive Enable: whether to enable UDP keep alive. If enabled, Rainbow2 sends UDP packets periodically to keep the server port alive. 5. UDP Keep Alive Intvl: Set interval to send UDP packets. ATCOM TECHNOLOGY CO., LIMITED www.atcom.cn 30 Rainbow2 IP Phone User Manual 6. Default Ring: set default ring tone. 7. ¾ SRTP: whether to enable SRTP (Secure Real Time Control Protocol). Only can be used if server supports SRTP. Dial Plan Dial Plan: Configure dial rule for SIP account, please refer to dial plan. 4.5 Phone Setting 4.5.1 Preference ¾ Language Support customizable multi-language. ¾ Output Volume(1~8) 1. Handset Volume: Specify handset volume grade 2. SpeakerPhone Volume: Specify speaker volume grade 3. Headset Volume: Specify headset volume grade 4. Ring Volume: Specify ring tone volume grade ¾ Input Gain 1. Handset Gain: Specify handset gain, the bigger the gain, the louder the other end heard. ATCOM TECHNOLOGY CO., LIMITED www.atcom.cn 31 Rainbow2 IP Phone User Manual 2. SpeakerPhone Mic Volume: Specify speaker gain, the bigger the gain, the louder the other end heard. 3. Headset Volume: Specify headset gain, the bigger the gain, the louder the other end heard. ¾ LCD 1. Backlight Level: select the backlight level 2. Backlight Time(Seconds): select the backlight time 3. Contrast: select the contrast level 4. Keypad Password: set keypad access password ¾ Control Timer Values(Seconds) 1. 2. 3. 4. Interdigit Long Timer: If the numbers or characters input are not finished and they have not matched the full dial plan, the phone will wait for the long time that has been set and then dial them out automatically. Range: 1 – 64 sec Interdigit Short Timer: If the numbers or characters input are matched the full dial plan, the phone will wait for the short time that has been set and then dial them out automatically. Range: 1 – 64 sec Reorder Delay: Delay after far end hangs up before reorder tone is played. 0 means play reorder tone immediately. Range: 0 – 60 sec Reorder Time: Set the duration of showing Call ended ¾ Date And Time 1. 2. 3. 4. NTP: Network time protocol NTP Server: Set NTP server address, which can be IP address or domain name. Time Zone: Choose your own time zone. Daylight Saving Time: whether to enable Daylight saving time. Daylight Saving Time Rule: This parameter is a rule with three fields, each field is separated by semicolon; as show below: ATCOM TECHNOLOGY CO., LIMITED www.atcom.cn 32 Rainbow2 IP Phone User Manual Start=<start-time>; end=<end-time>; save=<save-time> <start-time> and <end-time> specify the start and end date of daylight saving time, month/date/week and <save-time> is the amount of hour/min/sec to add to the current time during daylight saving period. The <save-time> value can be preceded by a negative (-) sign if subtraction is desired instead of addition. If <weekday > is 0, it means the date to start or end daylight saving is at exactly the given date. In that case, the <day> value must not be negative. If<weekday >is not zero, then the daylight saving starts or ends on the <weekday >on or after the given date if <day> is positive, or on or before the given date if <day> is negative. If <day> is -1, it means the <weekday> on or before the end-of-the –month (in other words the last occurrence of <weekday> in that month) Optional values inside [] are assumed to be 0 if they are not specified. Midnight means 0:0:0 of the given date. E.G. start=4/1/7/8:00:00;end=10/1/7/9:00:00; save=-1Start time is 1st April, Sunday, 8:00:00 am. End time is 1st October, Sunday, 9:00:00 am. The display time will be one hour early than the standard time. Manual 1. Set Local Date(YYYY/mm/dd): manually set local date or click year/month/day. to choose local date .Format: 2. Set Local Time(HH:mm:ss) : manually set local time or click to adjust local time. Format: hour/minute/second. e.g. 12:00:00. 4.5.2 Features ¾ Speed Dial Set speed dial for 2-9. For example, set Speed Dial 2: 123456789, then if you press 2, 123456789 will be dialed immediately. 3/4/5.../9 also can be set as speed dial. ¾ Call Forward ATCOM TECHNOLOGY CO., LIMITED www.atcom.cn 33 Rainbow2 IP Phone User Manual 1. 2. 3. 4. Always Target: Every incoming call will forward to this target. Busy Target: The incoming call will forward to this target when Rainbow2 is busy. No Answer: The incoming call will forward to this target when there is no answer. After Ring Time (Seconds): After this time, the incoming call will be forwarded to the no answer target. Defaults to 5. The priority of Always Target is highest when Always Target, Busy Target and No Answer Target have been set. This means all the incoming call will be forwarded to the Always Target. ¾ Call Settings 1. Do Not Disturb: Whether to enable Do Not Disturb, when enabled, all the incoming call will be rejected. If Always Target or Busy Target was set at the same time, then incoming call will be forwarded to the targets preferentially. 2. Call Waiting:When enable Call Waiting and Rainbow2 is in conversation, incoming call will not be rejected and ringback tone can be heard by the far end. When disable Call Waiting, there should be only one conversation no matter how many accounts have been registered on Rainbow2. 3. Block Call ID: When enable Block caller ID, Rainbow2 will call others as anonymous. 4. Block Anc Call: When enable block anonymous call, Rainbow2 will reject anonymous caller. 5. Auto Answer: When enable Auto Answer, Rainbow2 will answer the incoming call by speaker automatically. 6. Send key: Define the send key as # or *, press # or * after dial number, then number will be sent out immediately. ATCOM TECHNOLOGY CO., LIMITED www.atcom.cn 34 Rainbow2 IP Phone User Manual 4.5.3 Voice Echo Cancellation 1. VAD:Whether to enable VAD(Voice Active Detection). If enable, RTP packets will not be send 2. when Rainbow2 is mute. CNG:Whether to enable CNG(Comfort Noise Generator). If enable, comfort noise will be send to the far end to let it perceive the activity of the conversation when Rainbow2 is mute. Jitter Buffer Rainbow2 can buffer incoming voice packets to minimize out-of-order packet arrival. This process is known as jitter buffer. 1. Type: Choose type of jitter buffer. When choose Fixed, the size jitter buffer is fixed. When choose Adaptive, the size of jitter buffer is the sum of Min Delay and the size of RTP packets. 2. Min Delay: The minimum delay of the jitter buffer. 3. Max Delay: The maximum delay of the jitter buffer. 4. Normal Delay: It is used for fixed jitter buffer which should be between Min Delay and Max Delay. 4.5.4 Ring Administer can upload 2 user define ring for Rainbow2. The ring file should be wav(8k, 8bit, u-law) and no larger than 200 KBytes. ATCOM TECHNOLOGY CO., LIMITED www.atcom.cn 35 Rainbow2 IP Phone User Manual 4.5.5 Tone Set the ToneScript for each tone. For example, MWI Dial Tone: 350@-19,440@-19;2(.1/,1/1=2);10(*/0/1+2) Frequency1, Frequency2 ;Cadence Section1;Cadence Section2 350@-19: Frequency1 is 350HZ at -19dBm 440@-19: Frequency2 is 440HZ at -19dBm 2(.1/,1/1=2): Cadence Section length is 2s, 0.1s on, 0.1s off, with frequencies 1 and 2 10(*/0/1+2): Cadence Section length is 10s, always on(* means always, 0 means never), with frequencies 1 and 2. 1. 2. 3. Country stands: select a country standard tone as default. Dial Tone:Play when prompting the user to enter a phone number. Outside Dial Tone:An alternative to Dial Tone usually used to prompt the user to enter an 4. 5. external phone number (versus an internal extension). This is triggered by a “,” character encountered in the dial plan. Busy Tone:Play when a 486 RSC is received for an outbound call. Reorder Tone:Play when an outbound call has failed or after the far end hangs up during an established call. 6. Off Hook Warning Tone: Play when user does not place the handset on the cradle properly. 7. Ring Back Tone:Play for an outbound call when the far end is ringing. 8. MWI Dial Tone:Play when there are unheard voicemails. 9. Holding Tone:Indicate to the local user that the far end has placed the call on hold. 10. Conference Tone:Play to all parties when a 3 way conference is in progress. ATCOM TECHNOLOGY CO., LIMITED www.atcom.cn 36 Rainbow2 IP Phone User Manual 4.5.6 Line 9 Mode: Line: Set the Line Key as the SIP line BLF: Set the Line Key as the BLF programmable key SpeedDial: Set the Line Key as the SpeedDail key 9 Account: Specify account for each Line Key 9 Number: Set number for the BLF or SpeedDial key. 4.5.7 Programmable key Mode: None: Do not use this programmable key SpeedDial: SpeedDial, need to fill a speed dial number. BLF: Busy lamp field, need to fill a BLF number to monitor. When the BLF number is ringing, the BLF key will turn to green and blink. When the BLF number is during a call, the BLF key will stay for green. The BLF key will be off, if the BLF number is idle or not online. And you can press the BLF Key to call the monitored number. DTMF:Send DTMF number 9 9 Account: which account you want to used. Number: which number to set for SpeedDial, BLF, DTMF. 9 ATCOM TECHNOLOGY CO., LIMITED www.atcom.cn 37 Rainbow2 IP Phone User Manual 4.5.8 Rainbow E Rainbow2 can connect 5 Rainbow E at most. There are 16 keys on Rainbow E. After connecting Rainbow E to Rainbow2's EXT port, Rainbow2 will auto detect Rainbow E. Rainbow E can be configured to support two functions: Speed dial and BLF. 9 Event: None: Do not use this BLF key Speed dial: Speed dial, need to fill a speed dial number. BLF: Busy lamp field, need to fill a BLF number to monitor. When the BLF number is ringing, the BLF key will turn to green and blink. When the BLF number is during a call, the BLF key will stay for green. The BLF key will be off, if the BLF number is idle or not online. And you can press the BLF Key to call the monitored number. 9 Account: which account you want to use. 9 Number: number set for Speed dial and BLF. ATCOM TECHNOLOGY CO., LIMITED www.atcom.cn 38 Rainbow2 IP Phone User Manual 4.6 Update 4.6.1 Manual Update 1. 2. 3. 4. 5. 6. 7. Boot Loader: Download Boot file from ATCOM's webpage, then select the file from your PC to upgrade. Software: Download software from ATCOM's webpage, then select software from your PC to upgrade. Driver: Download driver from ATCOM’s webpage, then select driver from your PC to upgrade. Configuration: Upgrade config.xml file. Phone Book: Upgrade phonebook.xml file Attendant Keys: Upgrade Rainbow E’s configuration Audio Quality Control File: Upgrade the Audio quality control file 4.6.2 Update/Auto Provision Configuration Profile 1. Provision Enable: whether to enable auto provision 2. Resync Random Delay: set a random delay for upgrade configuration files. 3. Profile Rule: support FTP/TFTP/HTTP protocol Firmware Upgrade 1. Update Enable: whether to enable firmware update ATCOM TECHNOLOGY CO., LIMITED www.atcom.cn 39 Rainbow2 IP Phone User Manual 2. Error Retry Delay: set interval to retry update after encountering failed update 3. Upgrade Rule: the same as Profile Rule, the suffix of the firmware name should be ‘.fw’ or ‘.FW’ and the firmware name should not contain blank character or Chinese characters. 4.6.3 Reset & Reboot 1. Reboot Reboot will terminate all active calls, and cost a little time to restart. 2. Reset Reset will set Rainbow2 to factory default, please backup the config.xml, phonebook.xml and attendant_keypad.xml before reset. 4.7 Phone Book 1. 2. 3. 4. 5. 6. 7. 8. New Contact: Add a new phonebook record. Delete All: Delete all the phonebook records. Mode: Directory or Blacklist. Numbers in Blacklist will be rejected when calling. Name: name of a number, when the call of this number comes in the LCD will show the name. Number: phone number. Submit: Submit to apply the change. Reset: Cancel the inputting. Delete: Delete this record. Notice:The maximum of records in the phone book is 200. 4.8 Call Log ATCOM TECHNOLOGY CO., LIMITED www.atcom.cn 40 Rainbow2 IP Phone User Manual 1. 2. 3. Redial: Record of dialed list, maximum 200 records. Received: Record of received list, maximum 200 records. Missed: Record of Missed list, maximum 200 records. ATCOM TECHNOLOGY CO., LIMITED www.atcom.cn 41 Rainbow2 IP Phone User Manual 5.FAQ & Trouble Shooting Frequently Asked Questions 5.1 How to make a factory reset There are three ways to make a factory reset: 1. Factory reset from keyboard, steps are: a) Press and input password 123. b) Find and select ‘12 Factory Reset’. c) Press ‘OK’, then the phone will restart automatically and factory reset. 2. Factory reset through web, please refer to Reset & Reboot; 3. Factory reset during rebooting, steps are: a) Keep pressing ‘*’ and ‘#’ key. b) Plug in the power adapter. c) Wait for about 5 seconds and Rainbow2 will reset to factory after rebooted. 5.2 Upgrade firmware under safe mode If the phone could not start up normally, upgrade firmware under safe mode. Steps are: 1. Build a TFTP server and set its IP address as 192.168.1.200. 2. Copy the firmware to the root directory of the TFTP server and modify the file name as Rainbow2.FW. 3. Make sure the TFTP server and the phone are connecting with the same switch and reachable to each other; 4. Keep pressing ‘#’ key and start up the phone until the LCD displays ‘Upgrading…’; 5. The phone will download the firmware from the TFTP server; 6. After the download is done, the phone will upgrade automatically; 7. After the update is finished, the phone will start up with the factory configuration. 5.3 How to make direct IP call When hook off/ pressing speaker or headset key, 1. Press soft key ‘Num’ until it switch to ‘IP’. 2. Using ‘*’ key to input ‘.’. If user wants to dial 192.168.1.100, then press 192*168*1*100. 3. After inputting the IP address, press dial key to dial it out. ATCOM TECHNOLOGY CO., LIMITED www.atcom.cn 42 Rainbow2 IP Phone User Manual 6.Trouble Shooting 6.1 The phone can’t register successfully 1. Check the IP address, and if the mode of WAN port is DHCP, please make sure the DHCP server is in service. 2. Check the gateway. 3. Check the DNS. 4. Make sure the information of the account is consistent with which offered by the service supplier. 5. Make sure the SIP server is on. 6. Check the port of the SIP server whose default value is 5060. 6.2 The phone can’t obtain IP address 1. Make sure the cable has been connected to the LAN port of the phone. 2. Make sure the cable and the switch’s port that connected with the cable is available. 3. Make sure the DHCP server is on and there are some assignable IP addresses in the address pool. 4. Try to change the LAN port mode as Static. 6.3 Only one part can hear the voice during the call 1. Make an IP dial-up call to make sure the telephone receiver 2. Enable STUN on web page. 3. Set STUN server as stun.sipgate.com. 4. Click ‘submit’ and wait for the phone to restart. 5. Try to make calls again. ATCOM TECHNOLOGY CO., LIMITED www.atcom.cn and microphone are normal. 43 Rainbow2 IP Phone User Manual 7.Abbreviations DND : Do Not Disturb CFWD : Call Forward Bxfer : Blind Transfer Conf : Conference Num : Number DelChr : Delete Char Y/N : Yes/No SIP:Session Initiate Protocol RTP:Real-time Transport Protocol SDP:Session Description Protocol VPN:Virtual Private Network VLAN:Virtual Local Area Network QoS:Quality of Service Syslog : System log UDP:User Data Protocol TCP:Transmission Control Protocol TLS:Transport Layer Security Protocol BLF:Busy Lamp Field DNS:Domain Name System SRTP:Secure Real-time Transport Protocol NTP:Network Time Protocol VAD:Voice Activity Detection CNG:Comfort Noise Generator ATCOM TECHNOLOGY CO., LIMITED www.atcom.cn 44