1
www.CARiD.com
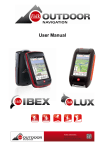
Magellan eXplorist GC Receiver
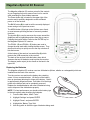
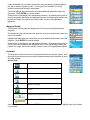
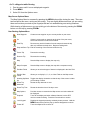
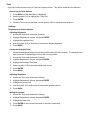
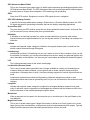
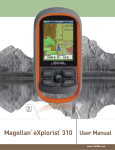
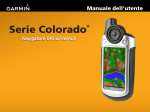
The Magellan eXplorist GC receiver puts all of the controls
at your fingertips not just for ease-of-use, but for comfort
while searching for those hidden treasures.
A
The Power button (A) is located in the upper right of the
receiver and is specially designed to avoid accidental
power on of the receiver.
The BACK button (B) is used to exit the currently displayed
screen and go to the previous screen.
The MENU button (C) brings up the Options menu found
on most screens providing access to commonly needed
functions.
The joystick (D) is used to maneuver the cursor around the
display as well as highlighting options from lists or menus.
Pressing the joystick down is used as the ENTER key for
the Magellan eXplorist GC receiver.
The ZOOM - (E) and ZOOM + (F) buttons are used to
change the map scale while viewing the Map screen. They
also provide a way to quickly move to the top or bottom of
lists and menus.
C
B
D
E
F
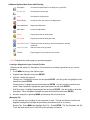
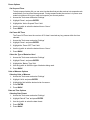
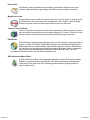
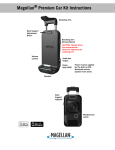
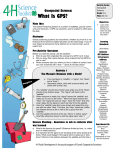
At the bottom of the receiver is a sealed flap (G) which
protects the USB connection to the receiver.
The back of the receiver holds the battery door which
accesses the two AA batteries used to power the receiver.
The beeper (audio output) is also found on the back in the
upper left.
G
Replacing the Batteries
The Magellan eXplorist GC receiver uses two AA batteries (lithium, alkaline or rechargeable) which are
installed from the back of the receiver.
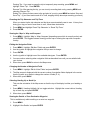
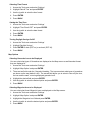
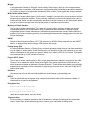
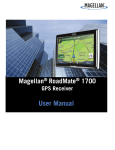
Turn the receiver over and turn the battery door retaining
screw 1/4 turn counterclockwise. Lift the top of the battery
door up (as shown) allowing it to hinge at the bottom. Once it
is approximately hinged as shown, it will slide off of the hinge
points at the bottom and can be completely removed.
Replace the installed batteries with new AA batteries being
sure to dispose of the old batteries properly.
NOTE: For best performance you should set the battery type
in the tools options when changing the batteries.
1. From the Main Menu, select “Tools”.
2. Highlight ‘Settings’ and press ENTER.
3. Highlight ‘Power’ and press ENTER.
4. Highlight the ‘Battery Type’ field.
5. Use the joystick to select the type of batteries being used.
Make sure that the seal around the battery door is clean and free of debris before replacing the door.
Replace the battery door by first aligning the hinge points at the bottom and then swinging the battery
door down until it is in place. Turn the battery door retaining screw 1/4 turn clockwise to lock it in place
and the Magellan eXplorist GC receiver is ready to go.
Maintenance
The only maintenance required is to clean the screen with a soft cloth occasionally. Also using a screen
protector is a great way to avoid scratches while out trekking. Clear screen protectors are available at
most electronic stores or anywhere cell phone accessories are sold. The ideal size screen protector for
the Magellan eXplorist GC receiver would be 1” x 2” but larger sizes can be cut down.
Magellan eXplorist GC Screens
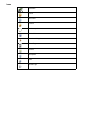
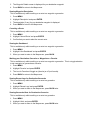
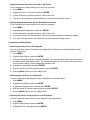
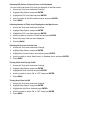
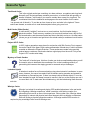
Status Bar
The Status bar appears on every screen in the receiver and provides information on the ‘inner workings’
of the Magellan eXplorist GC receiver.
Battery
Life
All green indicates full battery life.
Backlight
Status
Backlight is on when light bulb icon
is displayed. (Having the backlight
off will increase the battery life
significantly.)
Time of
Day
Displayed in 12-hour AM/PM or 24hour Military time.
Route
Status
Hiking man icon is displayed
whenever you are on a route.
Satellite
Status
Four blue bars indicates strong
satellite signal strength. “W”
indicates WAAS signals are being
received.
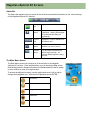
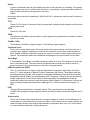
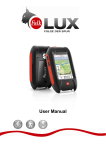
The Main Menu Screen
The Main Menu screen is the hub for all of the activities in the Magellan
eXplorist GC receiver. From the Main Menu you can access the Map screen,
Geocaching functions, Waypoint functions, the Dashboard and Tools for setting
up your receiver to meet your requirements.
To access the different functions, use the joystick and move it left or right to
change the highlighted icon. With the icon highlighted, press ENTER.
Geocaches
Map Screen
Waypoints
Dashboard
Tools
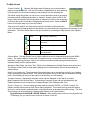
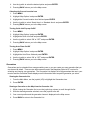
The Map Screen
Current Location
. Normally the Map screen will display your current location
against a map background. Your current location is displayed as an arrow pointing
in the direction of your current heading or last heading if you are standing still.
Pan Mode. Using the joystick you can move a cursor around the map to get pop-up
information about a displayed geocache or waypoint, visually select a point on the
map to create a waypoint, select a geocache or waypoint to route to, and view areas
of the map that may not normally be displayed due to map scale. Press the BACK
button to return the map to your current location.
Smart Arrow. By default, the Smart Arrow feature is activated, which means the
color of the arrow will change based on the direction you are heading in comparison to the bearing of your
destination. The Smart Arrow features can be turned off by accessing the Map Options in the Options
Menu.
Blue
Not routing or stationary.
Green
On course (heading and bearing are
the same)
Yellow
Off course. Left or right of course
line.
Red
Moving in the opposite direction from
your destination.
Options Menu. The Map Screen has an Options Menu that can be displayed by pressing the MENU
button. The Options Menu's contexts will vary based on your current action, such as routing to a
destination or panning the map. Most of the common functions needed while geocaching can be
accessed easily from the Options Menu.
Navigation Data Fields. Up to four "Nav" Fields can be displayed on the Map Screen at any given time.
The number of Nav Fields and the data to display can be customized by the user by accessing the
Options Menu.
North Up or Heading Up. The orientation of the map screen can be customized to North Up or Heading
Up by accessing the Options Menu. With North Up selected, the top of the map will always be pointing
north, with Heading Up the top of the map is in the direction you are heading.
Compass Overlay. A transparent compass overlay can be displayed on the map if you select
Map+Compass in the Options Menu. A stand alone Compass Screen can be activated within the
Dashboard and you can customize the Compass Design in the Settings under Tools.
Zoom in / Zoom out. You can change the map scale by using the ZOOM + or ZOOM - buttons. By
default, the Map Screen has the Auto Zoom feature activated. This means the map scale will always
show your current location and destination on the Map Screen at the same time while routing. The Auto
Zoom feature can be turned off by accessing Map Options in the Options Menu.
Special Feature of the ZOOM +/ZOOM - Buttons: While viewing menu screens or the keyboard, the
ZOOM keys give you quick access to the top or bottom of the list.
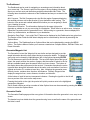
The Dashboard
The Dashboard can be used for navigating or accessing more information about
your current trip. The Screen is split into two regions, the top displays information
about your current route and the bottom provides customizable Nav Fields. The
following items describe the elements of the Dashboard and ways to customize the
screen.
Mini Compass. The Mini Compass works just like the regular Compass displaying
the cardinal points as well as the direction of your destination while routing. The
behavior of the arrow and cardinal labels differ whether you are navigating in North
Up or Heading Up mode.
Destination Information. The information displayed in the upper right portion
depends on whether or not you are routing to a destination. When there is no active route, it displays
Signal the Frog and number of geocaches found. While routing to a geocache, the area displays the
name, key characteristics, and distance to your destination.
Navigation Data Fields. Up to eight "Nav" Fields can be displayed on the Dashboard at any given time.
The number of Nav Fields and the data to display can be customized by the user by accessing the
Options Menu.
Options Menu. The Dashboard has an Options Menu that can be displayed by pressing the MENU
button. The Options Menu will allow you to access a stand-alone Compass Screen, Edit Nav Fields, and
Reset Odometer.
Geocache/Waypoint List
The Geocache List and the Waypoint List are similar and are designed to provide
ample information about the item without having to access the details. The details of
each point can be viewed by highlighting an item in the light and pressing ENTER.
The List Screens are split into two sections. The top of the display shows the type of
object, the search criteria, the number of pages, and the number of points in the list
that are available based upon the search criteria you have chosen. The bottom of
the display shows the points saved to the receiver. Geocaches lists show the cache
type and name along with information about the cache, such as whether it has been
marked as found or if it contains a travel bug. Also, it displays the geocache name,
difficulty, terrain, container size, direction, and distance. Similarly, Waypoint lists
display the waypoint icon, name, distance, elevation, and direction.
At the bottom of each list are two transparent indicators. Pressing the joystick to the left will
show a preview of the route on the map screen.
Pressing the joystick to the right, the product will quickly create a route to the highlighted
geocache or waypoint.
Sort & Search criteria as well as a number of other Options items can be accessed by pressing the MENU
button to access the Options Menu.
Geocache Details
The Geocache Details page provides every piece of information about the geocache in one, easy-to-use
screen.
The header bar gives details about the geocache using icons as well as the name of the geocache and
the hider’s name.
Under the header bar is a details section that uses star ratings to indicate difficulty
and terrain and a bar graph for size. To the right is the Geocache ID (GCID)
identifier number and the date it was hidden.
Scroll and highlight the buttons below to access additional information about the
geocache. Press ENTER to view the details.
At the bottom of the page are two transparent indicators. By pressing the joystick to
the left, the product will display the highlighted point on the map and by pressing the
joystick to the right, the product will quickly create a route to the highlighted
geocache.
Waypoint Details
The Waypoint Details page also displays all of the known information about the
waypoint.
The header bar gives details about the waypoint using icons as well as the date and
time it was created.
Highlight the fields below the header bar to access additional information about the
waypoint. Press ENTER to view the details.
At the bottom of the page are two transparent indicators. By pressing the joystick to
the left, the receiver displays the highlighted point on the map and by pressing the
joystick to the right, the receiver quickly creates a route to the highlighted waypoint.
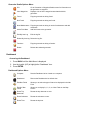
Keyboard
The keyboard is used to enter text or coordinate information using the joystick. With
the joystick you can maneuver around the keyboard selecting the character or value
you want entered.
Special keys:
Backspace
Shift
Space bar
Moves cursor left
Moves cursor right
Accept
Emoticons and geocaching acronyms
Press and hold ENTER for special characters
Also remember that the ZOOM + and ZOOM - buttons can quickly move the highlight from top to bottom
or visa versa.
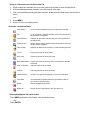
Icons
Geocache
Found
Not Found
Favorite
Not Attempted
Needs Maintenance
Associated Waypoints
Travel Bug
Pictures
Description
Hints
Recent Logs
Navigating the Magellan eXplorist GC Receiver
In this chapter you will be asked to press ENTER. This is done by pressing down on the joystick.
The Main Menu
The Main Menu screen provides access to the five functional areas of the eXplorist
GC receiver. These are:
Geocaches - View, sort & search, and activate routes to
the geocaches loaded onto the receiver.
Map - View your current location, pan to view your
surrounding area, and navigate to a geocache
Tools - Customize the Magellan eXplorist GC receiver to
your personal needs
Dashboard - Another navigational aid, combines a
compass, multiple navigation data fields, and
destination information into a single, easy to read
screen.
Waypoints - View, sort & search, and activate routes to
the waypoints loaded onto the receiver.
Accessing the Main Menu
Power On: When turning the Magellan eXplorist GC receiver on, the Main Menu is the first screen
displayed.
Normal Operation: The Main Menu is the starting point for all operations. After entering a function
(Map, Tools, etc.) press the BACK button to return to the previous screen. You may need to press
the BACK button more then once, depending upon how far in to a function you are.
Selecting an Function
1. With the Main Menu displayed, move the joystick left or right to change which icon is highlighted.
The bottom of the screen displays the name of the function selected.
2. Press ENTER to select the highlighted icon.
The Map Screen
The Map screen is a commonly used screen while searching for a geocache. This
screen will show you the direct line to the geocache, provide visual indications of
your heading towards the geocache and can be modified to display different
navigational fields of data.
Accessing the Map Screen
1. From the Main Menu use the joystick to highlight the Map icon.
2. Press ENTER.
Zooming In and Zooming Out
Pressing ZOOM- (zoom out) or ZOOM+ (zoom in) changes the map scale, which allows you to see
greater detail at your cursor or displays more of the map.
The Magellan eXplorist GC receiver also has a feature that is called Auto Zoom. When Auto Zoom is
turned on and you are travelling to a geocache or a waypoint, the map scale is automatically set to the
scale that will display your current position as well as your destination. (This feature can be turned on
or off in Map Options.) If you use the zoom buttons while Auto Zoom is setting the map scale, the
display will zoom in or out for a set period of time and then reset to display your current position and
the destination.
Panning Around the Map
While the map is displayed, you can use the joystick to pan around the map.
This enables you to visually create a waypoint or go to a point on the map. As
you pan over detailed features, a Quick Info pop-up is displayed with some
information about the point on the map or geocache that the cursor is over. The
Quick Info pop-up can be turned off or on under Map Options. The top of the
display shows the distance from your current position to the pan cursor.
Exiting Map Pan Mode
1. Press the BACK button to exit panning and return the map to your current
location.
Creating a Waypoint at the Pan Cursor Position
1. Press MENU to bring up the Options menu.
2. Select “New Waypoint”.
3. Optional: Use the joystick to select an icon, change the waypoint name, or add a description.
Changing Icon -- Highlight the icon and press ENTER. Select the desired icon and press ENTER.
Changing Name -- Highlight the Name field and press ENTER. Use the joystick to select the
letters for the name. When the name is complete, highlight the green checkmark and press
ENTER.
Adding Description -- Highlight the Description field and press ENTER. Use the joystick to enter
the text for the description. When the description is complete, highlight the green checkmark and
press ENTER.
4. When done, press the MENU button to bring up the Options menu. Select the desired option.
Save -- Saves the waypoint and returns to the Map screen.
Preview on Map -- Displays the waypoint on the map screen. Press BACK to return to the
Waypoint details screen.
5. Alternatively, to save or cancel the waypoint creation, press the BACK button and a window is
displayed with the option of saving or not saving the waypoint.
6. After the waypoint is saved, either by the Options menu or by pressing BACK, the Map screen is
displayed.
Creating a Waypoint at the Pan Cursor Position - Quick Method
1. Press and hold the joystick down for a few seconds. A new waypoint is created with a default
name applied.
Go To a Waypoint while Panning
1. Pan the cursor until it is over a displayed waypoint.
2. Press MENU.
3. Select GO from the Options menu.
Map Screen Options Menu
The Map Options Menu is accessed by pressing the MENU button while viewing the map. There are
two formats for this menu; routing and not routing. They are slightly different as when you are routing
there are functions you need at your fingertips that are not needed during non-routing situations.
While viewing a Options menu you can quickly go to the bottom of the menu by pressing the ZOOMbutton or to the top by pressing ZOOM+.
Non-Routing Options Menu
New Waypoint
Creates a new waypoint at your current position or pan cursor.
Go
If there is a geocache or waypoint at the point of the pan cursor,
select GO to create a route to that location.
Start Trip
Removes any track information from the map and resets the trip
data, trip odometer and trip timer. Begins recording track.
Stop and Save Trip End the recording of the track and saves the trip.
Pause Trip
Pauses the recording.
Resume Trip
Resumes the recording.
Map
Sets the Map screen to display the map only.
Map+Compass
Sets the Map screen to display the map with a compass overlay.
Edit Nav Fields
Allows you to select the type of data to be displayed in the Nav Field.
Edit # of Nav
Fields
Allows you to display 0,1, 2, 3, or 4 Nav Fields on the Map screen.
Heading Up/North
Up
Toggles the display orientation so that the top of the screen is either
your heading or North.
Reset Trip
Odometer
Resets the trip odometer to zero.
Reset Trip Time
Resets the duration time of the trip to zero.
Map Options
Provides access to customize the Map screen and select what will
be displayed.
Suspend
Turns off the display and other software features, but the GPS
receiver remains tracking. Press the Power button to resume.
Lock Keypad
Disables the keypad preventing accidently button presses. Hold the
MENU button down until the pop-up window disappears to unlock.
Power Off
Turns the eXplorist GC receiver off.
Additional Options Menu Items while Routing
Description
View the Description field for the waypoint or geocache.
Recent Logs
View geocache recent logs.
Hints
View hints for the geocache.
Cancel Route
Cancel the route and return to the Map screen.
View Dashboard
Display the Dashboard.
Main Menu
Access the Main Menu.
Found
Flag the geocache as being found.
Not Found
Flag the geocache as being not found.
Need Maintenance Flag the geocache as being in need of maintenance and add
comments.
Add a Field Note
Add field notes to the geocache.
Favorite
Flags waypoint or geocache as user favorite.
Red: Displayed only when going to a geocache waypoint.
Creating a Waypoint for your Current Position
(Please read the section on “Geocaches” for information on creating a geocache for your current
position.)
1. Press MENU to bring up the Options menu.
2. Highlight ‘New Waypoint’ and press ENTER.
3. Optional: Modify the waypoint.
Change Icon: Highlight the current icon and press ENTER. Use the joystick to highlight the icon
desired and press ENTER.
Change Name: Highlight the name field and press ENTER. Use the joystick to enter the new
name. When completed, highlight the green checkmark box and press ENTER.
Add Description: Highlight the description field and press ENTER. Use the joystick to enter the
description. When completed, highlight the green checkmark box and press ENTER.
4. Save the waypoint by pressing MENU and selecting Save from the menu.
Managing Trip
A trip is defined as a recording of your movement or track. This trip can then be viewed in the
Magellan VantagePoint software and provides a permanent record of your travel.
Starting Trip: Press MENU and highlight ‘Start Trip’. Press ENTER. The Trip Odometer and Trip
Timer are reset to zero and, if turned off, track recording is turned on.
Pausing Trip: If you want to pause the trip to temporarily stop recording, press MENU and
highlight ‘Pause Trip’. Press ENTER.
Resume Trip: After pausing the trip, you can turn trip recording back on by pressing MENU and
selecting ‘Resume Trip’.
Ending Trip: When you have come to the end point of your trip, press MENU and select ‘Stop and
Save Trip’. (If you have track turned off in Tools, stopping the trip also stops recording your track.)
Resetting the Trip Odometer and Trip Timer
When you start a trip the trip odometer and trip timer are automatically reset to zero. If at any time
during your trip you want to reset them to zero, follow these instructions.
1. Press MENU and highlight ‘Reset Trip Odometer’ or ‘Reset Trip Timer’.
2. Press ENTER.
Viewing the ‘Map’ or ‘Map and Compass’
1. Press MENU. Highlight ‘Map’ or ‘Map+Compass’ (depending upon which is currently active) and
press ENTER. This toggles between viewing just the map or viewing the map with a compass
overlay.
Editing the Navigation Fields
1. Press MENU. Highlight ‘Edit Nav Fields’ and press ENTER.
2. Use the joystick to highlight the navigation field you want to change.
3. Press ENTER.
4. Use the joystick to highlight one of the available data types. Press ENTER.
5. You can continue selecting other navigation fields as described here until you are satisfied with
your choices.
6. When done, press BACK to return to the Map screen.
Changing the Number of Navigation Fields
1. Press MENU. Highlight ‘Edit # of Nav Fields’ and press ENTER.
2. The Map screen is displayed with the current number of navigation fields displayed in the center.
Use the joystick up or down to change the number of fields (0 - 4).
3. When done, press BACK.
Selecting Heading Up or North Up
This sets the orientation of the Map screen so that the top of the display is either your heading or
north.
1. Press MENU. Heading Up/North Up is a toggle selection. Highlight the current choice, Heading
Up or North Up, and press ENTER.
2. When done, press BACK.
Viewing the Details of Your Destination Waypoint
This is available only while travelling on a route to a waypoint.
1. Press MENU.
2. Highlight ‘View Details’ and press ENTER.
3. The Waypoint Details screen is displayed for your destination waypoint.
4. Press BACK to return to the Map screen.
Viewing Waypoint Description
This is available only while travelling on a route to a waypoint or geocache.
1. Press MENU.
2. Highlight ‘Description’ and press ENTER.
3. The description (if any) for your destination waypoint is displayed.
4. Press BACK to return to the Map screen.
Canceling a Route
This is available only while travelling on a route to a waypoint or geocache.
1. Press MENU.
2. Highlight ‘Cancel Route’ and press ENTER.
3. Confirm that you want to abort the current route.
Viewing the Dashboard
This is available only while travelling on a route to a waypoint or geocache.
1. Press MENU.
2. Highlight ‘View Dashboard’ and press ENTER.
3. When you want to return to the Map screen, press BACK.
Marking your Destination Geocache or Waypoint as a Favorite
This is available only while travelling on a route to a waypoint or geocache. This is a toggle selection
to set a waypoint or geocache as a favorite.
1. Press MENU.
2. Highlight ‘Favorite’ and press ENTER.
3. The icon for Favorite will toggle on (favorite) or off (not favorite).
4. Press BACK to return to the Map screen.
Viewing Recent Logs for Destination Geocache
This is available only while travelling on a route to a geocache.
1. Press MENU.
2. Highlight ‘Recent Logs’ and press ENTER.
3. When you want to return to the Map screen, press BACK twice.
Viewing Geocache Hints for Destination Geocache
This is available only while travelling on a route to a geocache.
1. Press MENU.
2. Highlight ‘Hints’ and press ENTER.
3. When you want to return to the Map screen, press BACK twice.
Setting Destination Geocache as Found or Not Found
This is available only while travelling on a route to a geocache.
1. Press MENU.
2. Highlight ‘Found’ or ‘Not Found’ and press ENTER.
3. You will be asked if you add comments. Select Yes or No.
4. The route to the geocache is cancelled and you are returned to the Map screen.
Entering ‘Needs Maintenance’ Note to Destination Geocache
This is available only while travelling on a route to a geocache.
1. Press MENU.
2. Highlight ‘Needs Maintenance’ and press ENTER.
3. You will be asked if you add comments. Select Yes or No.
4. If you selected Yes, use the keyboard to enter the note describing the maintenance needed.
5. The route to the geocache is cancelled and you are returned to the Map screen.
Customizing the Map Display
Selecting Geocache Icons to be Displayed
You can select what types of Geocaches are displayed on the Map screen as well has what format
they are displayed in.
1. Press MENU.
2. Highlight ‘Map Options’ and press ENTER.
3. There are two fields under the ‘Geocache’ heading. The top one selects what types of geocaches
are shown on the map (default is All). The second field allows you to select to view only the icon,
the icon and the name, or turning displayed geocache’s off.
4. Highlight the desired field and press ENTER.
5. Use the joystick to select the desired option and press ENTER.
6. Pressing BACK returns you to the Map screen.
Selecting Waypoint Icons to be Displayed
You can select what format Waypoint icons are displayed on the Map screen.
1. Press MENU.
2. Highlight ‘Map Options’ and press ENTER.
3. Highlight the Waypoints icon field and press ENTER.
4. Use the joystick to select the desired option and press ENTER.
5. Pressing BACK returns you to the Map screen.
Selecting POI (Points of Interest) Icons to be Displayed
You can select what format POI icons are displayed on the Map screen.
1. Press MENU.
2. Highlight ‘Map Options’ and press ENTER.
3. Highlight the POI Icons field and press ENTER.
4. Use the joystick to select the desired option and press ENTER.
5. Pressing BACK returns you to the Map screen.
Selecting the Current Location Icon
1. Press MENU.
2. Highlight ‘Map Options’ and press ENTER.
3. Highlight the Current Location Icon field and press ENTER.
4. Use the joystick to select ‘Smart Arrow’ or ‘Standard Arrow’ and press ENTER.
5. Pressing BACK returns you to the Map screen.
Turning Quick Info Pop-up On/Off
1. Press MENU.
2. Highlight ‘Map Options’ and press ENTER.
3. Highlight the Quick Info field and press ENTER.
4. Use the joystick to select ‘ON’ or ‘OFF’ and press ENTER.
5. Pressing BACK returns you to the Map screen.
Turning Auto Zoom On/Off
1. Press MENU.
2. Highlight ‘Map Options’ and press ENTER.
3. Highlight the Auto Zoom field and press ENTER.
4. Use the joystick to select ‘ON’ or ‘OFF’ and press ENTER.
5. Pressing BACK returns you to the Map screen.
Geocaches
Geocaches can be uploaded from www.geocaching.com or you can create your own geocache that you
can share with others. There are two basic screens used in the Magellan eXplorist GC receiver for
selecting and viewing your geocaches. The Geocache List displays all of the geocaches that are in your
receiver and the Geocache Details displays useful information about a specific geocache you select.
Viewing the Geocache List
1. From the Main Menu, use the joystick (L/R) to highlight the Geocaches icon.
2. Press ENTER.
Viewing a Geocache on the Map from the Geocache List
1. While viewing the Geocache List, move the joystick up or down to scroll through the list.
2. With the desired geocache selected, move the joystick to the left.
3. Your current position and the geocache chosen is displayed on the Map screen.
4. Press BACK to return to the Geocache List.
Going to a Geocache from the Geocache List
1. While viewing the Geocache List, move the joystick up or down to scroll through the list.
2. With the desired geocache selected, move the joystick to the right.
3. Your current position and the geocache chosen is displayed on the Map screen and a route is
active.
<or>
1. Press MENU.
2. Select ‘Go’ from the Options menu.
Geocache List Options Menu
View Details
Go to Geocache Details screen for the geocache selected.
GO
Go to Geocache or Waypoint Details screen for information on
the geocache or waypoint.
Preview Route
Displays the geocache selected and your current position on
the Map screen.
Sort & Search
Used to set the sorting method used and the search criteria for
the geocaches displayed.
View on Map
Displays the Map screen zoomed in on the selected geocache.
Found
Flag the geocache as being found.
Not Found
Flag the geocache as being not found.
Need Maintenance Flag the geocache as being in need of maintenance and add
comments.
Post a Field Note
Add field notes to the geocache.
Favorite
Flag the geocache as being a favorite.
Add Geocache
Create a new geocache waypoint for your current position.
View Stats
View statistical information about the geocaches loaded in
your receiver and their status.
Delete
Deletes highlighted geocache.
Delete All
Deletes all of the geocaches in the Geocache List.
Viewing Highlighted Geocache Details
Press MENU and select ‘View Details’ from the Options menu.
<or>
Press ENTER.
Sorting Geocaches in the Geocache List
1. Press MENU and select ‘Sort & Search’ from the Options menu.
2. Use the joystick to highlight the “Sort By” button and press ENTER.
3. Use the joystick to highlight the criteria that you want the geocache list sorted by.
4. Press ENTER.
5. Press BACK.
6. Press BACK.
7. The Geocache List is displayed using the selected sort criteria.
Selecting Geocaches Types
1. Press MENU and select ‘Sort & Search’ from the Options menu.
2. Use the joystick to highlight one of the five different option fields (Status, Type, Size, Difficulty, or
Terrain) and press ENTER.
3. Use the joystick to highlight those options that you want to view.
4. Press ENTER to check (display) or uncheck (hide).
5. Press BACK.
6. Press BACK.
7. The Geocache List is displayed using the criteria you defined.
Searching Geocaches by Name or ID
1. Press MENU and select ‘Sort & Search’ from the Options menu.
2. Use the joystick to highlight ‘Search by Name or ID’ and press ENTER.
3. Use the keyboard to enter in the name (or partial name) or the ID of the geocache you are looking
for.
4. The Geocache List is displayed with the search results.
Adding a Geocache
1. Press MENU and select ‘Add Geocache’ from the Options menu.
2. Wait approximately 2 minutes while the receiver uses ‘waypoint averaging’ to calculate an
accurate position. The bottom of the “Add Geocache” screen will display the estimated accuracy
when it is done averaging.
3. To change the name, highlight the Name field and press ENTER. Use the keyboard to enter the
desired name.
4. To change the Difficulty, Terrain, or Size move the highlight to the desired field. Use the joystick
left or right to change the setting.
5. Press MENU and select ‘Save’ to save the geocache.
Geocache Details Options Menu
GO
Go to Geocache or Waypoint Details screen for information on
the geocache or waypoint.
View Waypoints
Displays a list of all the waypoints associated with this
geocache.
Found
Flag the geocache as being found.
Not Found
Flag the geocache as being not found.
Need Maintenance Flag the geocache as being in need of maintenance and add
comments.
Add a Field Note
Add field notes to the geocache.
Edit My Last Log
Edit the log file.
Delete My Last Log Delete the log file.
Favorites
Flag the geocache as being a favorite.
Delete
Deletes the selected geocache.
Dashboard
Accessing the Dashboard
1. Press BACK until the Main Menu is displayed.
2. Use the joystick (L/R) to highlight the ‘Dashboard’ icon.
3. Press ENTER.
Dashboard Options Menu
Compass
Sets the Dashboard to be viewed as a compass.
Dashboard
Returns the Dashboard to its default view.
Edit Nav Fields
Allows you to select the type of data to be displayed in the Nav
Field.
Edit # of Nav
Fields
Allows you to display 0,1, 2, 3, or 4 Nav Fields on the Map
screen.
Reset Trip
Odometer
Resets the trip odometer to zero.
Reset Odometer
Resets the odometer to zero.
Reset Time
Resets the trip time.
Tools
Only some of the functions found in Tools have Options menus. They will be noted here for reference.
Accessing the Tools Options
1. Press BACK until the Main Menu is displayed.
2. Use the joystick (L/R) to highlight the ‘Tools’ icon.
3. Press ENTER.
4. Once the Tools menu is displayed, use the joystick (U/D) to select the desired option.
Settings
Brightness and Volume Options
Adjusting Brightness
1. Access the Tools menu and select ‘Settings’.
2. Highlight ‘Brightness & Volume’ and press ENTER.
3. Highlight the brightness icon.
4. Use the joystick (L/R) to decrease or increase the display brightness.
5. Press BACK.
Setting the Backlight Timer
Having the backlight on all the time will diminish the battery life of the receiver. The backlight timer
sets a time limit for the backlight to be on with no key presses.
1. Access the Tools menu and select ‘Settings’.
2. Highlight ‘Brightness & Volume’ and press ENTER.
3. Highlight the Backlight Timer field.
4. Use the joystick (U/D) to set the backlight time on limit.
5. Press ENTER.
6. Press BACK.
Adjusting Brightness
1. Access the Tools menu and select ‘Settings’.
2. Highlight ‘Brightness & Volume’ and press ENTER.
3. Highlight the volume icon.
4. Use the joystick (L/R) to decrease or increase the speaker volume.
5. Press BACK.
Muting the Speaker
1. Access the Tools menu and select ‘Settings’.
2. Highlight ‘Brightness & Volume’ and press ENTER.
3. Highlight the Mute field.
4. Press ENTER to select muted (checked) or unmuted (unchecked).
5. Press BACK.
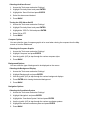
Power Options
Set Suspend Timer
To help conserve battery life you can set a time duration that puts the receiver into suspend mode
automatically if no keys have been pressed. During suspend mode the receiver is in power save
mode but continues to log your track and compute your current position.
1. Access the Tools menu and select ‘Settings’.
2. Highlight ‘Power’ and press ENTER.
3. Highlight the ‘Active Suspend Timer’ field.
4. Use the joystick to select the desired time or ‘Never’.
5. Press BACK.
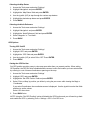
Set Power Off Timer
The Power Off Timer turns the receiver off if it hasn’t received any key presses within the time
selected.
1. Access the Tools menu and select ‘Settings’.
2. Highlight ‘Power’ and press ENTER.
3. Highlight the ‘Power OFF Timer’ field.
4. Use the joystick to select the desired time or ‘Never’.
5. Press BACK.
Select the Type of Batteries Used
1. Access the Tools menu and select ‘Settings’.
2. Highlight ‘Power’ and press ENTER.
3. Highlight the ‘Battery Type’ field.
4. Use the joystick to select the type of batteries being used.
5. Press BACK.
Units of Measure Options
Selecting Units of Measure
1. Access the Tools menu and select ‘Settings’.
2. Highlight ‘Units’ and press ENTER.
3. Highlight the field with the desired units of measure.
4. Press ENTER.
5. Press BACK.
Date and Time Options
Selecting Date Format
1. Access the Tools menu and select ‘Settings’.
2. Highlight ‘Date & Time’ and press ENTER.
3. Use the joystick to select the date format.
4. Press ENTER.
5. Press BACK.
Selecting Time Format
1. Access the Tools menu and select ‘Settings’.
2. Highlight ‘Date & Time’ and press ENTER.
3. Use the joystick to select the time format.
4. Press ENTER.
5. Press BACK.
Setting the Time Zone
1. Access the Tools menu and select ‘Settings’.
2. Highlight ‘Time Zone & DST’ and press ENTER.
3. Use the joystick to select the date format.
4. Press ENTER.
5. Press BACK.
Turning Daylight Savings On/Off
1. Access the Tools menu and select ‘Settings’.
2. Highlight ‘Daylight Savings’.
3. Press ENTER to check (DST on) or uncheck (DST off).
4. Press BACK.
Map Options
Selecting Geocache Icons to be Displayed
You can select what types of Geocaches are displayed on the Map screen as well has what format
they are displayed in.
1. Access the Tools menu and select ‘Settings’.
2. Highlight ‘Map Options’ and press ENTER.
3. There are two fields under the ‘Geocache’ heading. The top one selects what types of geocaches
are shown on the map (default is All). The second field allows you to select to view only the icon,
the icon and the name, or turning displayed geocache’s off.
4. Highlight the desired field and press ENTER.
5. Use the joystick to select the desired option and press ENTER.
6. Press BACK.
Selecting Waypoint Icons to be Displayed
You can select what format Waypoint icons are displayed on the Map screen.
1. Access the Tools menu and select ‘Settings’.
2. Highlight ‘Map Options’ and press ENTER.
3. Highlight the Waypoints icon field and press ENTER.
4. Use the joystick to select the desired option and press ENTER.
5. Press BACK.
Selecting POI (Points of Interest) Icons to be Displayed
You can select what format POI icons are displayed on the Map screen.
1. Access the Tools menu and select ‘Settings’.
2. Highlight ‘Map Options’ and press ENTER.
3. Highlight the POI Icons field and press ENTER.
4. Use the joystick to select the desired option and press ENTER.
5. Press BACK.
Selecting Number of Fields to be Displayed on the Map Screen
1. Access the Tools menu and select ‘Settings’.
2. Highlight ‘Map Options’ and press ENTER.
3. Highlight the POI Icons field and press ENTER.
4. Use the joystick to select the ‘Fields’ field and press ENTER.
5. Select how many fields you want displayed.
6. Pressing BACK.
Selecting the Current Location Icon
1. Access the Tools menu and select ‘Settings’.
2. Highlight ‘Map Options’ and press ENTER.
3. Highlight the Current Location Icon field and press ENTER.
4. Use the joystick to select ‘Smart Arrow’ or ‘Standard Arrow’ and press ENTER.
5. Press BACK.
Turning Quick Info Pop-up On/Off
1. Access the Tools menu and select ‘Settings’.
2. Highlight ‘Map Options’ and press ENTER.
3. Highlight the Quick Info field and press ENTER.
4. Use the joystick to select ‘ON’ or ‘OFF’ and press ENTER.
5. Press BACK.
Turning Auto Zoom On/Off
1. Access the Tools menu and select ‘Settings’.
2. Highlight ‘Map Options’ and press ENTER.
3. Highlight the Auto Zoom field and press ENTER.
4. Use the joystick to select ‘ON’ or ‘OFF’ and press ENTER.
5. Press BACK.
Track Options
Turning Tracking On/Off
You can turn tracking off but if you set the receiver to begin recording a trip, the track will be turned on
until you stop the trip.
1. Access the Tools menu and select ‘Settings’.
2. Highlight ‘Track’ and press ENTER.
3. Highlight the ‘Tracking ON’ field.
4. Press ENTER to select on (checked) or off (unchecked).
5. Press BACK.
Displaying the Track on the Map
1. Access the Tools menu and select ‘Settings’.
2. Highlight ‘Track’ and press ENTER.
3. Highlight the ‘Display on Map’ field.
4. Press ENTER to select on (checked) or off (unchecked).
5. Press BACK.
Setting the Track Logging Intervals
1. Access the Tools menu and select ‘Settings’.
2. Highlight ‘Track’ and press ENTER.
3. Highlight the ‘Interval Between Points’ field and press ENTER.
4. Use the joystick to select time interval and press ENTER.
5. Press BACK.
Clearing Tracks Displayed on Map
1. Access the Tools menu and select ‘Settings’.
2. Highlight ‘Track’ and press ENTER.
3. Highlight the ‘Clear All Tracks’ field.
4. Select Yes or No from the pop-up window.
5. Press BACK.
Proximity Alarm Options
You can choose to have an audible alarm to play when you are near your destination or when you lose
the GPS fix.
Setting the Proximity Distance for Alarm
1. Access the Tools menu and select ‘Settings’.
2. Highlight ‘Proximity Alarm’ and press ENTER.
3. Highlight the ‘On Arrival’ field and press ENTER.
4. Select the distance to sound the alarm or OFF.
5. Press BACK.
Selecting the Alarm Sound
1. Access the Tools menu and select ‘Settings’.
2. Highlight ‘Proximity Alarm’ and press ENTER.
3. Highlight the ‘Sound’ field and press ENTER.
4. Select the alarm sound desired.
5. Press BACK.
Turning the GPS Alarm On/Off
1. Access the Tools menu and select ‘Settings’.
2. Highlight ‘Proximity Alarm’ and press ENTER.
3. Highlight the ‘GPS Fix’ field and press ENTER.
4. Select ON or OFF.
5. Press BACK.
Compass Options
You can select the type of compass graphic to be used when viewing the compass from the Map
screen or from the Dashboard.
Selecting the Compass Graphic
1. Access the Tools menu and select ‘Settings’.
2. Highlight ‘Compass’ and press ENTER.
3. Use the joystick (L/R) to step through the various compass styles.
4. Press BACK.
Background Options
You can select the type of background to be displayed on the menus.
Selecting the Background Display
1. Access the Tools menu and select ‘Settings’.
2. Highlight ‘Background’ and press ENTER.
3. Use the joystick (L/R) to step through the various background displays.
4. Press ENTER while viewing the desired background.
5. Press BACK.
Navigation Options
Selecting the Coordinate System
1. Access the Tools menu and select ‘Settings’.
2. Highlight ‘Navigation’ and press ENTER.
3. Highlight the ‘Coordinate System’ field and press ENTER.
4. Use the joystick (L/R) to step through the various coordinate systems.
5. Highlight the desired coordinate system and press ENTER.
6. Press BACK.
Selecting the Map Datum
1. Access the Tools menu and select ‘Settings’.
2. Highlight ‘Navigation’ and press ENTER.
3. Highlight the ‘Map Datum’ field and press ENTER.
4. Use the joystick (L/R) to step through the various map datums.
5. Highlight the desired map datum and press ENTER.
6. Press BACK.
Selecting the North Reference
1. Access the Tools menu and select ‘Settings’.
2. Highlight ‘Navigation’ and press ENTER.
3. Highlight the ‘North Reference’ field and press ENTER.
4. Select ‘Magnetic’ or ‘True North’.
5. Press BACK.
GPS Options
Turning GPS On/Off
1. Access the Tools menu and select ‘Settings’.
2. Highlight ‘GPS’ and press ENTER.
3. Highlight the ‘GPS’ field and press ENTER.
4. Use the joystick (L/R) to select ON or OFF. Press ENTER.
5. Press BACK.
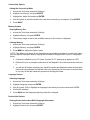
Setting the GPS Position
Set GPS position provides a way to view map areas other then you present position. When setting
GPS position, the GPS Sirf chip is disabled and the screen is set to the location you have select either
by entering in a set of known coordinates or panning on the map.
1. Access the Tools menu and select ‘Settings’.
2. Highlight ‘GPS’ and press ENTER.
3. Highlight the ‘Set GPS Position’ field and press ENTER.
4. Select ‘Point on Map’ (a position you define by using the pan cursor while viewing the Map) or
‘Coordinates’
If you select Coordinates, the coordinates screen is displayed. Use the joystick to select the fields
and then to set the values.
Select ‘OK’ when done.
5. Press BACK twice.
NOTE: Using the "Set GPS Position” option will disable the GPS function and you will need to go back
and enable the GPS by selecting Tools > Settings > GPS > Set GPS to on
Connectivity Options
Setting the Connectivity Mode
1. Access the Tools menu and select ‘Settings’.
2. Highlight ‘Connectivity’ and press ENTER.
3. Highlight the ‘Mode’ field and press ENTER.
4. Use the joystick to select the mode to be used when connecting to a computer. Press ENTER.
5. Press BACK.
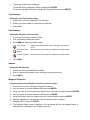
Memory Options
Viewing Memory Use
1. Access the Tools menu and select ‘Settings’.
2. Highlight ‘Memory’ and press ENTER.
3. The memory usage as well as the available memory for the receiver is displayed.
Clearing Memory
1. Access the Tools menu and select ‘Settings’.
2. Highlight ‘Memory’ and press ENTER.
3. Press MENU to display the Options menu.
NOTE: Clear Memory will erase all user Waypoints and preloaded Geocaches if you select this option
you may want to backup the data by copying the Geocache or Waypoint files to you PC using steps
below
1. Connect the eXplorist to your PC select "Connect To PC" when pop up appears on GPS
2. Double click onto my computer and browse to the "Magellan" drive letter and double click onto
it
3. You will see the folders containing your saved Geocaches and Waypoints select the Geocache
folder and copy and paste the Geocache file to my documents You may want to create a folder
so it is easy to find later repeat this process for the Waypoint folder
Language Options
Selecting Language
1. Access the Tools menu and select ‘Settings’.
2. Highlight ‘Language’ and press ENTER.
3. Use the joystick (U/D) to highlight the language to be used by the receiver and press ENTER.
4. Confirm the selection.
5. Press BACK and the language beginning used will be changed.
Product Info Options
Viewing Product Information/EULA/Copyright Information
1. Access the Tools menu and select ‘Settings’.
2. Highlight ‘Product Info’ and press ENTER.
3. The product information is displayed.
To view the EULA, highlight the EULA field and press ENTER.
To view the copyright information, highlight the Copyright filed and press ENTER.
Trip Summary
Viewing the Last Trip Summary Page
1. Access the Tools menu and select ‘Trip Summary’.
2. Details of your last saved or current trip are displayed.
3. Press BACK.
Stat Summary
Viewing the Statistics Summary Page
1. Access the Tools menu and select ‘Stats’.
2. Your geocaching statistics are shown.
3. Press MENU to display the Options menu.
View Awards
Displays geocache awards, merits, and types of geocaches
found.
Reset Geocache
History
Removes the Favorites flag from waypoints and geocaches.
Clear All Favorites Removes the Favorites flag from waypoints and geocaches.
4. Press BACK.
Awards
Viewing the Awards Page
1. Access the Tools menu and select ‘Awards’.
2. See your geocaching awards, merits, and types of geocaches found.
3. Press BACK.
Waypoint Projection
Projecting and Saving a Waypoint from Your Current Location
1. Access the Tools menu and select ‘Waypoint Projection’.
2. Use the joystick to select the Bearing field and press ENTER.
3. Using the joystick, enter the bearing in degrees from your current location and press ENTER.
4. Use the joystick to select the Distance field and press ENTER.
5. Using the joystick, enter the distance from your current location and press ENTER.
6. Optional: highlight the units field and select the desired units of measure.
7. Highlight ‘Next >’ and press ENTER.
8. The Waypoint Details screen is displayed. You can change the icon, the waypoint name, or
description as is explained in the ‘Waypoints’ section.
9. Press MENU.
10. Select ‘Save’.
Getting Started
Viewing the Getting Started with Geocaching Page
1. Access the Tools menu and select ‘Getting Started’.
2. The “Getting Started with Geocaching” page is displayed.
3. Press BACK.
Glossary of Terms
Viewing the Glossary of Terms Page
1. Access the Tools menu and select ‘Getting Started’.
2. The “Glossary of Terms” page is displayed.
3. Press BACK.
Geocaching Types
Viewing the Geocaching Types Page
1. Access the Tools menu and select ‘Geocaching Types’.
2. The “Geocaching Types” page is displayed.
3. Press BACK.
Geocaching FAQs
Viewing Geocaching FAQs
1. Access the Tools menu and select ‘Geocaching FAQs’.
2. The “Geocaching FAQs” page is displayed.
3. Press BACK.
Product Demo
The Product Demo is a series of images that describes the product. The Product Demo will be
temporarily discontinued with any key stroke. While the Product Demo is active, the receiver will
revert back to the slide show after two minutes without any key strokes.
Playing the Product Demo
1. Access the Tools menu and select ‘Play Product Demo’.
2. Confirm that the receiver is now ‘Playing the Demo’.
3. To stop the demo, press any key and go to the Main Menu. Select Tools icon. Select ‘Stop
Product Demo’.
Satellite Status
Viewing the Satellite Status Screen
1. Access the Tools menu and select ‘Satellite’.
2. The Satellite Status screen is displayed.
3. Press BACK when done.
Screen Capture
Turning Screen Capture On/Off
1. Access the Tools menu and select ‘Screen Capture’.
2. Highlight the ‘Screen Capture’ field and press ENTER.
3. Select ON or OFF.
4. Press BACK when done.
Capturing Screens
1. Turn on screen capturing as described above.
2. Press the Power button to capture the screen. (The screen will dim for a second, confirming the
capture.)
Viewing Saved Screen Captures
1. Access the Tools menu and select ‘Screen Capture’.
2. Highlight the ‘View Saved Screen Captures’ field and press ENTER.
3. The saved screen captures are displayed one screen at a time. Use the joystick (L/R) to step
through the saved captured screens.
4. Press BACK when done.
Diagnostics
Testing the Magellan eXplorist GC receiver
1. Access the Tools menu and select ‘Diagnostics’.
2. Use the joystick to select the diagnostic test to be run (audio, video or keypad).
3. Press BACK when done.
Owner Information
Entering Owner Details
1. Access the Tools menu and select ‘Owner Information’.
2. Use the joystick to highlight the desired field (full name, address, phone, or e-mail). Press
ENTER.
3. Use the keyboard to enter the information. Highlight the green checkmark and press ENTER
when done.
4. Press BACK when done.
Working with Geocaches
The Magellan eXplorist GC receiver is designed to connect with millions of passionate adventure seekers
website for organizing the world’s geocaches.
Whether you want to learn about geocaching, hide or seek a cache, log your experiences, or find out
about a local geocaching event, site is your one-stop shop for all things geocaching! No
need to worry about clumsy data conversion as the eXplorist GC receiver connects seamlessly with the
website for popular features such as Send to GPS, Upload Field Notes, and transfer Pocket Queries.
Installing Geocaches (Send to GPS)
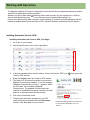
Installing Geocaches with ‘Send to GPS’ (List Page)
1. Go to site on your browser.
2. Use the search tools to view a list of geocaches.
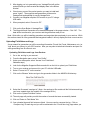
3. In the row indicated above with the red box, click on the ‘Send to GPS’ icon
“Send to GPS” window.
which opens the
4. Select the Magellan tab in the “Send to GPS” window.
5. The Send to GPS function first detects if you have the
Magellan Communicator installed. If not, the message
“Magellan Communicator not found...” appears. Select
the “click here” link to install the Magellan
Communicator. The Magellan Communicator only
needs to be installed the first time a connection is made
between an internet browser and the receiver.
6. Click on the “Download” button.
7. The geocache selected is uploaded to your GPS
receiver and can be accessed from the Geocaches
function of the Main Menu on your receiver.
If these buttons are greyed out, check to see
if your browser is requesting you to run
Active X.
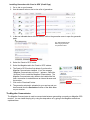
Installing Geocaches with ‘Send to GPS’ (Detail Page)
1. Go to site on your browser.
2. Use the search tools on site to view a list of geocaches.
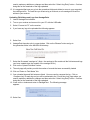
3. In the row indicated above with the red box, click on the geocache name to open the geocache
page.
The ‘GPX eXchange File
button is greyed out for
non-premium users.
4. Select the “Send to GPS” button.
5. Select the Magellan tab in the “Send to GPS” window.
6. The Send to GPS function first detects if you have the
Magellan Communicator installed. If not, the message
“Magellan Communicator not found...” appears. Select the
“click here” link to install the Magellan Communicator. The
Magellan Communicator only needs to be installed the first
time a connection is made between an internet browser and
the receiver.
7. Click on the “Download” button.
8. The geocache selected is uploaded to your receiver and can
be accessed from the Geocaches function of the Main Menu
on your receiver.
The Magellan Communicator
The Magellan Communicator is used to communicate between geocaching.com and your Magellan GPS
receiver. You can install the plug-in by using the steps above or by going to the Magellan web site as
explained here.
Go to site and click on the “Products” tab.
Select “Maps & Software”.
In the software section, select “Magellan Communicator”.
When the download is complete, run the Magellan Communicator file to install the drivers. (If you
get a Security Warning, press ‘Run’ to continue.)
When the Installation Wizard is done installing the files, select ‘Finish’ to complete the installation.
Installing Geocaches (Drag n Drop)
Users of site who are not premium members will have the ‘GPX eXchange File’ button
greyed out. It is recommended that non-premium members use the “Send to GPS” button but it is also
possible to save the geocache as a LOC Waypoint File. However, please note that LOC Waypoint Files
need to go into the Waypoints folder, not the Geocaches folder in the receiver.
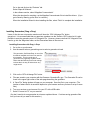
Installing Geocaches with Drag ‘n Drop
1. Go to site on your browser.
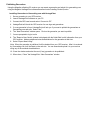
2. Use the search tools on geocaching.com to select a geocache to load.
This geocache, San Dimas Easy, is one of the
thousands available and is the one used for
this example. This is a good type of
geocache for a beginning ‘treasure hunter’.
Notice that the Difficulty and Terrain ratings
indicate that it is easy to find and not very
rough terrain.
3. Click on the “GPX eXchange File” button.
4. Files are saved to your computer with the filename <GeocacheID>.gpx. The Geocache ID can be
found in the upper right corner of the web page describing the geocache.
5. A “Save File” dialog window will open on your computer. Save the file to your computer. (The
location of where the file is saved will depend on your browser and how you have it set up to save
files.)
6. Turn your receiver on and connect if to your PC with a USB cable.
7. Select “Connect to PC” on your receiver.
(You don’t need to do one geocache at a time as explained above. Continue saving geocache files
until you have all you want for this session.)
8. Open the “MAGELLAN” device that has been installed on
your computer.
9. Open the “Geocaches” folder in the MAGELLAN
directory.
10. Drag the GPX file (GC1FGDZ.gpx in this example) to the
Geocaches folder in your receiver.
11. The geocache (or geocaches) are loaded in your
receiver and can be found from the Geocaches menu
option in the Main Menu. (You need to disconnect or
reboot the receiver to exit the “Connect to PC” screen.)
Installing Pocket Queries
Installing Pocket Queries from E-mail
1. After getting the e-mail with your pocket query results, save the attached zip file to your computer.
2. Unzip the pocket query file. There will be two extracted files, one with a xxxxxxx.gpx filename and
one with a xxxxxxx-wpts.gpx filename.
3. Connect your Magellan eXplorist GC receiver to your PC using a USB cable.
4. When prompted, select “Connect to PC”.
5. On your PC, open the MAGELLAN directory.
6. Drag the file xxxxxxx.gpx to the ‘Geocaches’ folder and the file xxxxxxx-wpt.gpx to the ‘Waypoints’
folder.
7. The data will be transferred to your receiver and the geocaches are ready to use. (You need to
disconnect or reboot the receiver to exit the “Connect to PC” screen.)
Installing Pocket Queries from VantagePoint
VantagePoint is a software package from Magellan that is the perfect add-on for Magellan
eXplorist GC receiver users that want to get the most from their receiver.
Follow the instructions to install VantagePoint.
1. Launch VantagePoint and select Pocket Queries from the Geocache
menu.
2. Enter your User Name and Password for www.geocaching.com and
select “Login”.
3. After logging you in to geocaching.com, VantagePoint will get the
pocket queries you have created and display them in the bottom
window.
4. Check one or more of the pocket queries you want to install and
press “Install”. The waypoints and geocaches will be sent to
VantagePoint and selected for use by VantagePoint.
5. Connect your Magellan eXplorist GC receiver to your PC using a
USB cable.
6. When prompted, select “Connect to PC”.
7. Click on the Sync Button in VantagePoint.
8. The Waypoints and Geocaches to be transferred appear in the popup window. Click “OK”. The
data will be transferred to your receiver and the geocaches ready to use.
Note: Quite often you will be installing geocaches and waypoints that are already in your receiver. While
the receiver stores all of the geocaches and waypoints loaded, it will only display the most current version.
Uploading Field Notes and Logs
As you search for geocaches you will be recording information (Found, Not Found, Maintenance, etc.) or
‘logs’ about your journey in your GPS receiver. Now you may want to take that information and post it to
www.geocaching.com for others to use.
Uploading Field Notes and Logs from Receiver
1. Go to site and log in your account.
2. From the Navigation pane, select “Your Profile”.
3. Under your status pane, select “Access Your Field Notes”.
fieldnotes.aspx)
4. Look for the Magellan Supported Devices and click on the link to upload your Field Notes.
5. Turn on your receiver and connect it to your PC with the USB cable.
6. Select “Connect to PC” on the receiver.
7. Click on the “Browse” button and go to the geocaches folder in the MAGELLAN directory.
8. Select the file named “newlogs.txt”. (Note: the newlogs.txt file contains all the field notes and logs
your have created since the creation of the newlogs.txt file.)
9. Click on the “Upload Field Note” button.
10. The web page will provide you with the number of records that were successfully loaded.
11. Click on “Return to Field Notes” link.
12. Your uploaded logs and field notes are listed. You now need to compose the log. Click on
“Compose Log” for each log and you will be redirected to the “Post a New Log” page where you
need to make any additions or changes and then select the “Submit Log Entry” button. Continue
doing this for the remainder of the logs uploaded.
13. It is suggested that now you go into the geocaches folder and delete (or move to your computer)
the newlogs.txt file. The next time you create a log or field note, a new newlogs.txt file will be
written to your receiver.
Uploading Field Notes and Logs from VantagePoint
1. Launch VantagePoint software.
2. Turn on your receiver and connect it to your PC with the USB cable.
3. Select “Connect to PC” on the receiver.
4. If you have any logs to be uploaded the following appears:
5. Select Yes
6. VantagePoint launches site in a new window. Click on the “Browse” button and go to
the geocaches folder in the MAGELLAN directory.
7. Select the file named “newlogs.txt”. (Note: the newlogs.txt file contains all the field notes and logs
your have created since the creation of the newlogs.txt file.)
8. Click on the “Upload Field Note” button.
9. The web page will provide you with the number of records that were successfully loaded
10. Click on “Return to Field Notes” link.
11. Your uploaded logs and field notes are listed. You now need to compose the log. Click on
“Compose Log” for each log and you will be redirected to the “Post a New Log” page where you
need to make any additions or changes and then select the “Submit Log Entry” button. Continue
doing this for the remainder of the logs uploaded.
12. Close out the window and return to VantagePoint. The following message
appears:
13. Select Yes.
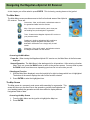
Publishing Geocaches
Using the Magellan eXplorist GC receiver you can create a geocache and submit it to geocaching.com
using the Magellan VantagePoint software described under Installing Pocket Queries.
Installing Geocaches to Geocaching.com with VantagePoint
1. Save a geocache to your GPS receiver.
2. Launch VantagePoint software on your PC.
3. Connect the GPS receiver and select “Connect to PC”.
4. VantagePoint will check the GPS receiver for new logs and geocaches.
5. If a new geocache is found, VantagePoint will ask you if you want to publish the geocaches on
Geocaching.com web site. Select “Yes”.
6. The “New Geocaches” window opens. Click on the geocache you want to publish.
7. You are prompted to log in to site
8. The “Report a New Cache” window is displayed with the fields filled in with information from your
GPS receiver. Add any additional notes and attributes for the geocache at this time.
9. Select “Report New Listing”.
Note: When the geocache is published it will be deleted from your GPS receiver. After it is reviewed
by Geocaching.com it will be listed on the web site. You can search and upload it to your receiver
using any of the methods described here.
10. Close the window and select the next (if any) geocache to be published.
11. When done, “Close” the VantagePoint “New Geocaches” window.
Glossary of Terms
Archive
Archiving a cache removes the listing from public view on Geocaching.com. This action is usually
taken when a cache owner does not intend to replace a cache after it has been removed. As an
alternative to archiving, the cache owner can temporarily disable their cache if they plan to provide
maintenance on the cache or replace the container within one month.
Attribute
These are icons on a cache detail intended to provide helpful information to geocachers who wish to
find specific types of caches. These icons represent unique cache characteristics, including size,
whether the cache is kid friendly, if it is available 24 hours a day, if you need special equipment and
more. Attributes are also a tool to help you filter the types of caches you would like to search for when
building a Pocket Query.
Benchmark
Using your GPS receiver and/or written directions provided by NOAA's National Geodetic Survey
(NGS), you can seek out NGS survey markers and other items that have been marked in the USA.
See benchmark hunting for more details.
Bookmark List
A Premium Member feature that can be used to group cache listings in whatever way you like. You
may want a bookmark list of caches you intend to find this weekend, or perhaps an "all-time favorite"
list you can share with friends.
BYOP
Bring Your Own Pen/Pencil. An acronym often used by cache owners to communicate to other
geocachers that you will need to bring your writing utensil in order to sign the cache logbook.
Bureau of Land Management (BLM)
The Bureau of Land Management (BLM), an agency within the U.S. Department of the Interior,
administers millions of acres of America's public lands, located primarily in 12 Western States. The
BLM sustains the health, diversity, and productivity of the public lands for the use and enjoyment of
present and future generations.
Cache
A shortened version of the word geocache.
Caches along a Route
A Premium Member feature that allows you to identify caches along a specific route for quick and easy
geocaching. You can choose from routes already created by other geocachers or use Google Earth to
build your own unique trip.
Datum
A datum is something used as a basis for calculating and measuring. In the case of GPS, datums are
different calculations for determining longitude and latitude for a given location.
Currently, Geocaching uses the WGS84 datum for all caches. Many maps still use NAD27, which can
cause confusion if your GPS receiver is set to NAD27. Always check your GPS to ensure that WGS84
is the datum before entering a cache coordinate into your receiver.
DNF
Did Not Find. An acronym used by geocachers to state that they did not find a cache. This is also a
type of online log on Geocaching.com and is useful for alerting cache owners of potential issues.
Cache owners who repeatedly receive "Did Not Find" logs should check to see that there cache has
not been removed.
D/T
Geocaches are rated in two categories, each designated on a 5-point scale. Difficulty relates to the
mental challenge of finding a cache and terrain describes the physical environment. A 1/1 difficulty/
terrain rating would the easiest cache to find, while a 5/5 difficulty/terrain rating would be the most
difficult.
EarthCache
This is one of several unique cache types. An EarthCache is a cache that promotes geoscience
education. Visitors to EarthCaches can see how our planet has been shaped by geological processes,
how we manage the resources and how scientists gather evidence to learn about the Earth.
Event Cache
This is one of several unique cache types. Events are gatherings set up by local geocachers and
geocaching organizations to meet players and to discuss geocaching.
FTF
First to Find. An acronym written by geocachers in physical cache logbooks or online when logging
cache finds to denote being the first to find a new geocache.
GC Code
A unique identifier associated with every geocache listing. The GC Code starts with the letters "GC"
and is followed by other alphanumeric characters.
Geocache
A container hidden that includes, at minimum, a logbook for geocachers to sign.
Geocaching
Geocaching is a worldwide game of hiding and seeking treasure. A geocacher can place a geocache
in the world, pinpoint its location using GPS technology and then share the geocache's existence and
location online. Anyone with a GPS receiver can then try to locate the geocache.
Geocoin
Geocoins work similarly to Groundspeak Travel Bugs® in that they are trackable and can travel the
world, picking up stories from geocache to geocache. Geocoins are often created as signature items
by geocachers and can also be used as collectibles.
GPS
GPS stands for Global Positioning System. It is a system of satellites that work with a GPS receiver to
determine your location on the planet.
GPS Adventures Maze Exhibit
This is one of several unique cache types. An exhibit cache represents geocaching participation at the
GPS Adventures Maze Exhibit. The GPS Adventures Maze is a traveling educational exhibit designed
to teach people of all ages about navigation, GPS technology and geocaching.
GPSr
Slang for a GPS receiver. Equipment to receive GPS signals for use in navigation.
GPX (GPS eXchange Format)
A specific file format available when creating a Pocket Query. A Premium Member feature, the GPX
file format has specific geocaching information that can be used by supporting applications.
Ground Zero (GZ)
The point where your GPS receiver shows that you have reached the cache location. At Ground Zero,
you are zero feet (or zero meters) away from your destination.
Hitchhiker
A hitchhiker is an item that is placed in a cache, and has instructions to travel to other caches.
Sometimes they have logbooks attached so you can log their travels. A Travel Bug is an example of a
hitchhiker.
Latitude
Latitude and longitude create a waypoint. Latitude is the angular distance north or south from the
earth's equator measured through 90 degrees.
Letterbox(ing)
Letterboxing is similar to Geocaching, but you use a series of clues to find a container. Once you find
the container (or letterbox), you use the carved stamp from the box, stamp your personal logbook and
return that stamp to the letterbox. You then use your carved stamp and stamp the letterbox's logbook.
LOC
The original download format for the search results page
Locationless (Reverse) Cache
This is one of several cache types which are no longer available for creation on Geocaching.com.
Instead of finding a hidden container, you are given a task to locate a specific object and log its
coordinates. A scavenger hunt of sorts, it involves collecting waypoints of various objects around the
world.
Locationless caches have evolved into Waymarking. Waymark categories are similar to how
locationless caches were listed on geocaching.com, but you can now search for the locations in each
category.
Longitude
Latitude and longitude create a waypoint. Longitude is the angular distance measured on a great
circle of reference from the intersection of the adopted zero meridian with this reference circle to the
similar intersection of the meridian passing through the object.
Markwelled
When a response to a new post in the forums points you to a similar topic in the past. Based on the
user Markwell.
Mega-Event Cache
This is one of several cache types. A Mega-Event cache is similar to an Event Cache but it is much
larger. Among other considerations, a Mega-event cache must be attended by 500+ people. Typically,
Mega Events are annual events and attract geocachers from all over the world.
Muggle
A non-geocacher. Based on "Muggle" from the Harry Potter series, which is a non-magical person.
Usually this term is used after a non geocacher looks puzzled after befriending a geocacher searching
for a cache, or when a non-geocacher accidentally finds a cache. Geomuggles are mostly harmless.
Multi-Cache (offset Cache)
This is one of several cache types. A multi-cache ("multiple") involves two or more locations, the final
location being a physical container. There are many variations, but most multi-caches have a hint to
find the second cache, and the second cache has hints to the third, and so on. An offset cache (where
you go to a location and get hints to the actual cache) is considered a multi-cache.
Mystery or Puzzle Caches
This is one of several cache types. The "catch-all" of cache types, this form of cache can involve
complicated puzzles you will first need to solve to determine the coordinates. Examples include
complicated ciphers, simple substitutions, arithmetical quizzes and clues cleverly hidden within the
graphics, Due to the increasing creativity of geocaching this becomes the staging ground for new and
unique challenges.
NAD27
Stands for North American Datum 1927. The precursor to WGS84. Many maps still use the NAD27
datum, so always check before using a GPS receiver with a map.
Pocket Query (PQ)
A Premium Member feature, a Pocket Query is custom geocache search that you can have emailed to
you on a daily or weekly basis. Pocket Queries give you the ability to filter your searches so you only
receive information on the caches you want to search for in either a GPX of LOC format. This feature
lets you download up to 500 caches at one time.
Project A.P.E. Cache
This is one of several cache types. In 2001, twelve geocaches were placed in conjunction with 20th
Century Fox to support the movie Planet of the Apes. Each cache represented a fictional story in
which scientists revealed an Alternative Primate Evolution. These caches were made using specially
marked ammo containers. Each cache had an original prop from the movie. Only two Project A.P.E.
caches exist today.
Reviewer
Volunteers from all over the world who publish the cache listings on geocaching.com.
ROT13
Hints for geocaches are encrypted using a simple format where each of the letters are rotated 13
characters up or down in the alphabet.
Decryption Key
A|B|C|D|E|F|G|H|I|J|K|L|M
------------------------N|O|P|Q|R|S|T|U|V|W|X|Y|Z
(letter above equals below, and vice versa)
Signature Item
An item unique to a specific geocacher that is left behind in caches to signify that they visited that
cache. These often include personal geocoins, tokens, pins, craft items or calling cards.
Spoiler
A spoiler is information that can give details away and ruin the experience of something. For example,
telling someone the end of a movie before they see it. In geocaching, a spoiler gives away details of a
cache location and can ruin the experience of the find.
SWAG
An acronym often referred to as standing for 'Stuff We All Get." It includes the trade items left in caches by
geocachers.
TFTC
Thanks For The Cache. An acronym written by geocachers in physical cache logbooks or online when
logging cache finds.
TFTH
Thanks For The Hide
TNLN
Took Nothing. Left Nothing. Usually written in cache logbooks by geocachers do not trade for material
contents in a cache.
TNLNSL / TNSL
Took Nothing. Left Nothing. Signed Logbook / Took Nothing. Signed Logbook.
Traditional Cache
This is one of several cache types. This is the original cache type consisting, at a bare minimum, a
container and a logbook. Normally you will find a clear container or ammo box containing items for
trade. Smaller containers, called micro caches are usually too small to contain anything except for a
logbook. The coordinates listed on the traditional cache page are the exact location for the cache.
Travel Bug®
A Groundspeak Travel Bug is a trackable tag that you attach to an item. This allows you to track your
item on Geocaching.com. The item becomes a hitchhiker that is carried from cache to cache (or
person to person) in the real world and you can follow its progress online.
USDA Forest Service (USFS)
The U.S. Forest Service, an agency within the Department of Agriculture, administers 191 million
acres (77.3 million hectares) of National Forests, Grasslands, and Prairies. These public lands are
generally geocaching-friendly, with exceptions of designated Wilderness Areas, and other specially
designated botanical, wildlife, and archaeological sites. The phrase "Caring for the land and serving
people" captures the Forest Service mission of achieving quality land management under the
sustainable multiple-use concept to meet the diverse needs of people. The Information Center in the
agency's national headquarters has been a Washington D.C. Virtual Geocache since August 12,
2001.
UTM
"Universal Transverse Mercator" coordinate system. This is an alternative to the standard
WGS84.UTM uses grids overlaying specific areas of the Earth's surface and divides the Earth into 60
zones.
Virtual (cache)
This is one of several cache types which are no longer available for creation on Geocaching.com. A
virtual cache is a cache that exists in a form of a location. Virtual caches have no cache container; the
reward for these caches is the location itself and sharing information about your visit. Virtual caches
are now considered waymarks on Waymarking.com.
WAAS
WAAS stands for Wide Area Augmentation System, but that doesn't really describe what it is.
Watch List
A watchlist is a list of users that are watching a specific travel bug or cache. Each user receives a copy
of each posted log via email.
Waypoint
A waypoint is a reference point for a physical location on Earth. Waypoints are defined by a set of
coordinates that typically include longitude, latitude and sometimes altitude.
Every geocache listed on our website is a waypoint. Geocaching.com generates a unique "GC Code"
associated with every geocache listing.
Webcam Cache
This is one of several cache types which are no longer available for creation on Geocaching.com.
These are caches that use existing web cameras placed by individuals or agencies that monitor
various areas like parks or road conditions. The idea is to get yourself in front of the camera to log your
visit. The challenging part, however, is that you need to call a friend to look up the web site that
displays the camera image. You will need to have them to save the picture to log the cache. If you are
a tech savvy, you can also use a wireless modem and save the image yourself on a laptop.
WGS84
The most current geodetic datum used for GPS is the World Geodetic System of 1984 (WGS84). The
significance of WGS84 comes about because GPS receivers rely on WGS84. Geocaching uses the
WGS84 datum by default. We also use the format HDDD MM.MM, which is a standard for GPS
receivers. HDD means Hemisphere and degrees. MM.MM are minutes in decimal format. It is critical
that the format be correct, otherwise geocachers will be unable to find your cache!
Wherigo™ Cache
This is one of several cache types. Wherigo is a toolset for creating and playing GPS-enabled
adventures in the real world. By integrating a Wherigo experience, called a cartridge, with finding a
cache, the geocaching hunt can be an even richer experience. Among other uses, Wherigo allows
geocachers to interact with physical and virtual elements such as objects or characters while still
finding a physical geocache container. A Wherigo-enabled GPS receiver is required to play a
cartridge.
Copyright © 2000-2010 Groundspeak, Inc. All Rights Reserved.
Geocache Types
Traditional Cache
This is the original cache type consisting, at a bare minimum, a container and a log book.
Normally you'll find a tupperware container, ammo box, or bucket filled with goodies, or
smaller container ("micro cache") too small to contain items except for a log book. The
coordinates listed on the traditional cache page are the exact location for the cache.
The general rule of thumb is, "If you take an item, leave an item, and write in the logbook." Some
caches are themed, so make sure to read the description before going on a hunt.
Multi-Cache (Offset Cache)
A multi-cache ("multiple") involves two or more locations, the final location being a
physical container. There are many variations, but most multi-caches have a hint to find
the second cache, and the second cache has hints to the third, and so on. An offset cache
(where you go to a location and get hints to the actual cache) is considered a multi-cache.
Project A.P.E. Cache
In 2001, twelve geocaches were placed in conjunction with 20th Century Fox to support
the movie Planet of the Apes. Each cache represented a fictional story in which scientists
revealed an Alternative Primate Evolution. These caches were made using specially
marked ammo containers. Each cache had an original prop from the movie. Only a few
Project A.P.E. caches exist today.
Mystery or Puzzle Caches
The "catch-all" of cache types, this form of cache can involve complicated puzzles you will
first need to solve to determine the coordinates. Due to the increasing creativity of
geocaching this becomes the staging ground for new and unique challenges.
Letterbox Hybrid
A letterbox is another form of treasure hunting using clues instead of coordinates. In some
cases, however, the owner has made it both a letterbox and a geocache and posted its
coordinates on Geocaching.com. If there is a stamp inside a letterbox hybrid, it is not an
item intended for trade; the stamp is meant to remain in the box so that visitors can use it
to record their visit.To read more about letterboxing, visit the Letterboxing North America
web site.
Wherigo Cache
Wherigo is a toolset for creating and playing GPS-enabled adventures in the real world.
By integrating a Wherigo experience, called a cartridge, with finding a cache, the
geocaching hunt can be an even richer experience. Among other uses, Wherigo allows
geocachers to interact with physical and virtual elements such as objects or characters
while still finding a physical geocache container. A Wherigo-enabled GPS receiver is
required to play a cartridge. Learn more at Wherigo.com.
Event Cache
Occasionally, local geocachers and geocaching organizations designate a time and
location to meet and discuss geocaching. After the event the caches are archived.
Mega-Event Cache
A Mega-Event cache is similar to an Event Cache but it is much larger. In order to qualify
as a Mega Event, the event cache must be attended by 500+ people. Typically, Mega
Events are annual events and attract geocachers from all over the world.
Cache In Trash Out Event
Cache In Trash Out is an activity intimately tied to geocaching. While out there on a cache
hunt, we collect litter along the trails and properly dispose of it. Cache In Trash Out Events
are much larger clean-up events that involve and benefit the larger community.
EarthCache
An EarthCache is a special place that people can visit to learn about a unique geoscience
feature or aspect of our Earth. EarthCaches include a set of educational notes and the
details about where to find the location (latitude and longitude). Visitors to EarthCaches
can see how our planet has been shaped by geological processes, how we manage the
resources and how scientists gather evidence to learn about the Earth. For more
information about EarthCaches, visit http://www.earthcache.org/.
GPS Adventures Maze Exhibit
A GPS Adventures Exhibit Cache represents attendance at the GPS Adventures Maze
Exhibit or a regional variation of this Exhibit. GPS Adventures Mazes are designed to
teach people of all ages about GPS technology and geocaching through interactive
science experiences.
MAGELAN GPS
GPS SYSTEMS