1
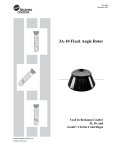
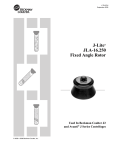
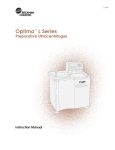
Instructions For Use
J-Lite
JLA-8.1000 and JLA-9.1000
Fixed-Angle Rotor Assemblies
For Use in Beckman Coulter
Avanti J Series Centrifuges
PN J-TB-073GC
February 2014
Beckman Coulter, Inc.
250 S. Kraemer Blvd.
Brea, CA 92821 U.S.A.
J-Lite JLA-8.1000 and JLA-9.1000
Fixed-Angle Rotor Assemblies
PN J-TB-073GC (February 2014)
Copyright 1997–2014 Beckman Coulter, Inc.
All rights reserved
No part of this document may be reproduced or
transmitted in any form or by any means,
electronic, mechanical, photocopying, recording, or
otherwise, without prior written permission from
Beckman Coulter, Inc.
Avanti, Beckman Coulter, the stylized logo, and
HarvestLine are trademarks of Beckman Coulter, Inc. and
are registered in the USPTO.
All other trademarks, service marks, products, or services
are trademarks or registered trademarks of their
respective holders.
Find us on the World Wide Web at:
www.beckmancoulter.com
Printed in the USA
Safety Notice
Read all product manuals and consult with Beckman Coulter-trained personnel before attempting
to use this equipment. Do not attempt to perform any procedure before carefully reading all
instructions. Always follow product labeling and manufacturer’s recommendations. If in doubt as
to how to proceed in any situation, contact your Beckman Coulter Representative.
Alerts for Warning, Caution, Important, and Note
WARNING
WARNING indicates a potentially hazardous situation which, if not avoided,
could result in death or serious injury.
CAUTION
CAUTION indicates a potentially hazardous situation, which, if not avoided,
may result in minor or moderate injury.
NOTE NOTE is used to call attention to notable information that should be followed during installation, use,
or servicing of this equipment.
Safety Information for the J-Lite JLA-8.1000 and JLA-9.1000 Fixed-Angle
Rotor Assemblies
These rotors were developed, manufactured, and tested for safety and reliability as part of a
Beckman Coulter centrifuge/rotor system. Their safety or reliability cannot be assured if used in a
centrifuge not of Beckman Coulter’s manufacture or in a Beckman Coulter centrifuge that has been
modified without Beckman Coulter’s approval.
Handle body fluids with care because they can transmit disease. No known test offers complete
assurance that such fluids are free of micro-organisms. Some of the most virulent—Hepatitis (B and
C) viruses, HIV (I–V), atypical mycobacteria, and certain systemic fungi—further emphasize the
need for aerosol protection. Handle other infectious samples according to good laboratory
procedures and methods to prevent spread of disease. Because spills may generate aerosols,
observe proper safety precautions for aerosol containment. Do not run toxic, pathogenic, or
radioactive materials in this rotor without taking appropriate safety precautions. Biosafe
containment should be used when Risk Group II materials (as identified in the World Health
Organization Laboratory Biosafety Manual) are handled; materials of a higher group require more
than one level of protection.
The rotor s and accessories are not designed for use with materials capable of developing flammable
or explosive vapors. Do not centrifuge such materials in nor handle or store them near the
centrifuge.
PN J-TB-073GC
iii
Safety Notice
Safety Information for the J-Lite JLA-8.1000 and JLA-9.1000 Fixed-Angle Rotor Assemblies
If disassembly reveals evidence of leakage, you should assume that some fluid escaped the rotor.
Apply appropriate decontamination procedures to the centrifuge and accessories as required.
Never exceed the maximum rated speed of the rotor and labware in use. Refer to the section on
Run Speeds.
Do not use sharp tools on these rotors that could cause scratches in the rotor surface. Corrosion
begins in scratches and may open fissures in the rotor with continued use.
iv
PN J-TB-073GC
Safety Notice
Safety Information for the J-Lite JLA-8.1000 and JLA-9.1000 Fixed-Angle Rotor Assemblies
Additional information for the safe use of the J-Lite JLA-8.1000 and JLA-1.000 rotor assemblies.
Please read before use.
• Use all rotor components during each run, as shown. Six canisters must be run at all times in
the JLA-8.1000, and four in the JLA-9.1000, whether loaded or empty. Do not place cap/ closures
on top of empty canisters.
• NEVER load sample directly into a canister.
Load sample into a bottle, seal the bottle
with a plug and a cap/closure as described
in this manual, and place the sealed bottle
inside a canister.
Tie Down Knob
Lid
• NEVER place a bottle directly into a rotor
cavity. Place filled, sealed labware
assemblies in canisters, previously
installed in the rotor body.
Cap/Closure
Cap/Closure
O-ring *
AutoVent
Plug O-ring
• Check cap/closures, plugs, and their O-rings
before each run to ensure that they are in
good condition. The cap/closures must be
free of crazing or other defects. The plug
and cap/closure O-rings* must be free of
defects, and must be dry and unlubricated
to ensure seal integrity.
Plug
Plug O-ring
Bottle
• Before each use, inspect each bottle,
cap/closure, and plug for cracks or
damage. Do not use damaged components.
Canister Sleeve Washer
Canister
• Place filled canisters in at least two opposing
cavities; place empty canisters in the other
cavities. Make sure that filled canisters are
loaded symmetrically into the rotor and that
opposing containers are filled to the same
level with liquid of the same density.
• Place the rotor lid on top of the rotor
body and securely fasten the round
tie-down knob.
Labware
Assembly
Rotor Body
Windshield
Rotor Cavities
• Opposing filled canisters, plus labware and sample, must weigh within 30 grams of
each other.
• Although rotor components and accessories made by other manufacturers may fit in the
JLA-8.1000 and JLA-9.1000 rotors, their safety in these rotors cannot be ascertained by
Beckman Coulter. Use of other manufacturers’ components or accessories in these rotors
may void the rotor warranty and should be prohibited by your laboratory safety officer. Use
only the components and accessories listed in this publication in these rotors.
* Cap/closure O-ring included only with bottle assemblies 363676 and 363678.
PN J-TB-073GC
v
Safety Notice
Safety Information for the J-Lite JLA-8.1000 and JLA-9.1000 Fixed-Angle Rotor Assemblies
vi
PN J-TB-073GC
Contents
Safety Notice, iii
Alerts for Warning, Caution, Important, and Note, iii
Safety Information for the J-Lite JLA-8.1000 and JLA-9.1000 Fixed-Angle Rotor
Assemblies, iii
J-Lite JLA-8.1000 and JLA-9.1000
Fixed-Angle Rotor Assemblies, 1
Specifications for the JLA-8.1000 Fixed-Angle Rotor Assembly, 1
Specifications for the JLA-9.1000 Fixed-Angle Rotor Assembly, 2
Description, 3
Preparation and Use, 4
Bottles and Tubes, 5
HarvestLine System Liners, 9
Prerun Safety Checks, 9
Rotor Preparation, 10
Installing the Rotor, 11
Loading the Canisters, 11
Temperature, 16
Removal and Sample Recovery, 16
Run Times, 17
Run Speeds, 18
Care and Maintenance, 20
Cap/Closure and Plug Inspection and Maintenance, 20
Canister Inspection and Maintenance, 20
About Composite Canisters, 21
Rotor Body Inspection and Maintenance, 22
Cleaning, 23
Decontamination, 24
Sterilization and Disinfection, 25
Returning a Rotor, 26
Supply List, 27
Replacement Rotor Parts and Labware, 27
Supplies, 30
vii
Contents
Beckman Coulter, Inc.
JLA-8.1000 and JLA-9.1000 Rotor Warranty
Related Documents
viii
Illustrations
Illustrations
1
The JLA-8.1000 Fixed-Angle, 3
2
The JLA-9.1000 Fixed-Angle Rotor, 4
3
1 000-mL Bottle Assemblies Used in the JLA-8.1000 and JLA9.1000 Rotor Assemblies, 8
4
The 500-mL Adapter for the JLA-8.1000 and JLA-9.1000 Rotors, 9
5
Installing the Rotor (JLA-9.1000 shown), 11
6
canister Sleeve Washer, 21
7
canister Dome Area, 22
8
Lubricating the Lid Stem, 23
ix
Tables
Tables
x
1
Bottles and Tubes Used in the JLA-8.1000 and JLA-9.1000
Rotors, 5
2
Relative Centrifugal Fields for the JLA-8.1000 and JLA-9.1000
Rotors, 19
J-Lite JLA-8.1000 and JLA-9.1000
Fixed-Angle Rotor Assemblies
Specifications for the JLA-8.1000 Fixed-Angle Rotor Assembly
NOTE The JLA-8.1000 rotor can be used in Avanti JXN-26, J-26S XP series, Avanti J-26 XP series, and in
discontinued Avanti J-20 series and Avanti J-20 XP series centrifuges only.
Maximum speed . . . . . . . . . . . . . . . . . . . . . . . . . . . . . . . . . . . . . . . . . . . . . . . . . . . . 8000 RPM
20°
rmin
rav
rmax
1
1. Axis of Rotation
Critical speed rangea. . . . . . . . . . . . . . . . . . . . . . . . . . . . . . . . . . . . . . . . . . . 200 to 400 RPM
Maximum solution density . . . . . . . . . . . . . . . . . . . . . . . . . . . . . . . . . . . . . . . . . . . . 1.2 g/mL
Relative Centrifugal Fieldb at maximum speed
At rmax (222.8 mm) . . . . . . . . . . . . . . . . . . . . . . . . . . . . . . . . . . . . . . . . . 15,970 ´ g
At rav (171 mm) . . . . . . . . . . . . . . . . . . . . . . . . . . . . . . . . . . . . . . . . . . . . . 12,300 ´ g
At rmins (119 mm) . . . . . . . . . . . . . . . . . . . . . . . . . . . . . . . . . . . . . . . . . . . . 8530 ´ g
k factor at maximum speed (full 1000-ml bottle) . . . . . . . . . . . . . . . . . . . . . . . . . . . . 2482
Conditions requiring speed reductions . . . . . . . . . . . . . . . . . . . . . . . . . . . see Run Speeds
Number of removable canisters . . . . . . . . . . . . . . . . . . . . . . . . . . . . . . . . . . . . . . . . . . . . . . 6
Available bottle and tubes . . . . . . . . . . . . . . . . . . . . . . . . . . . . . . . . . . . . . . . . . . see Table 1
Nominal dimensions of largest bottle . . . . . . . . . . . . . . . . . . . . . . . . . . . . . . . 95 ´ 191 mm
Nominal bottle capacity. . . . . . . . . . . . . . . . . . . . . . . . . . . . . . . . . . . . . . . . . . . . . . . 1000 mL
Nominal rotor capacity . . . . . . . . . . . . . . . . . . . . . . . . . . . . . . . . . . . . . . . . . . . . . . . . 6 liters
Weight of fully loaded rotor (with lid) . . . . . . . . . . . . . . . . . . . . . . . . . . . . . 34.6 kg (76 lb)
Minimum installation weight (rotor body and windshield . . . . . . . . . . . 16.8 kg (37 lb)
Weight of single empty canister . . . . . . . . . . . . . . . . . . . . . . . . . . . . . . . 630 gams (1.4 lb)
Maximum sample load for each canister at rated speed
(including bottle, plug, cap/closure, and sample) . . . . . . . . . . . . 1500 grams (3.3 lb)
Approximate acceleration time to maximum speed
(rotor fully loaded) . . . . . . . . . . . . . . . . . . . . . . . . . . . . . . . . . . . . . . . . . . . . . . . . . . . . 6 min
Approximate deceleration time from maximum speed
(rotor fully loaded, max. brake). . . . . . . . . . . . . . . . . . . . . . . . . . . . . . . . . . . . . . . . . 3 min
Maximum allowable imbalance of opposing loads. . . . . . . . . . . . . . . . . . . . . . . 30 grams
Rotor body material . . . . . . . . . . . . . . . . . . . . . . . . . . . . . . . . . . . . . . . . . . . . . . . . aluminum
Canister material. . . . . . . . . . . . . . . . . . . . . . . . . . . . . . . . . . carbon fiber epoxy composite
Plug material . . . . . . . . . . . . . . . . . . . . . . . . . . . . . polycarbonate or polyetherimide (PEI)
Cap/closure material . . . . polyphenylsulfone (PPSU) or polyphenylene sulfide (PPS)
a. The critical speed range is the range of speeds over which the rotor shifts so as to rotate about its center of mass. Passing through the critical
speed range is characterized by some vibration.
PN J-TB-073GC
1
J-Lite JLA-8.1000 and JLA-9.1000 Fixed-Angle Rotor Assemblies
Specifications for the JLA-9.1000 Fixed-Angle Rotor Assembly
Specifications for the JLA-9.1000 Fixed-Angle Rotor Assembly
NOTE Before the JLA-9.1000 rotor can be used in an Avanti J series centrifuge shipped before January 1998,
a field upgrade of the centrifuge is required. Contact Beckman Coulter Field Service for information.
Maximum speed. . . . . . . . . . . . . . . . . . . . . . . . . . . . . . . . . . . . . . . . . . . . . . . . . . . . . 9000 RPM
20°
Critical speed rangea . . . . . . . . . . . . . . . . . . . . . . . . . . . . . . . . . . . . . . . . . . . . 200 to 400 RPM
Maximum solution density . . . . . . . . . . . . . . . . . . . . . . . . . . . . . . . . . . . . . . . . . . . . 1.2 g/mL
Relative Centrifugal Fieldb at maximum speed
At rmax (185 mm). . . . . . . . . . . . . . . . . . . . . . . . . . . . . . . . . . . . . . . . . . . .
16,800 ´ g
At rav (143 mm) . . . . . . . . . . . . . . . . . . . . . . . . . . . . . . . . . . . . . . . . . . . . . . 12,200 ´ g
At rmins (82 mm) . . . . . . . . . . . . . . . . . . . . . . . . . . . . . . . . . . . . . . . . . . . . . . 7440 ´ g
k factor at maximum speed (full 1000-ml bottle) . . . . . . . . . . . . . . . . . . . . . . . . . . . . . 2544
Conditions requiring speed reductions. . . . . . . . . . . . . . . . . . . . . . . . . . . . . see Run Speeds
Number of removable canisters . . . . . . . . . . . . . . . . . . . . . . . . . . . . . . . . . . . . . . . . . . . . . . . 4
Available bottle and tubes . . . . . . . . . . . . . . . . . . . . . . . . . . . . . . . . . . . . . . . . . . see Table 1
rmin
rav
rmax
Nominal dimensions of largest bottle . . . . . . . . . . . . . . . . . . . . . . . . . . . . . . . 95 ´ 191 mm
Nominal bottle capacity . . . . . . . . . . . . . . . . . . . . . . . . . . . . . . . . . . . . . . . . . . . . . . .
1000 mL
Nominal rotor capacity. . . . . . . . . . . . . . . . . . . . . . . . . . . . . . . . . . . . . . . . . . . . . . . . . . 4 liters
Weight of fully loaded rotor (with lid) . . . . . . . . . . . . . . . . . . . . . . . . . . . . 20.8 kg (45.9 lb)
Minimum installation weight (rotor body and windshield. . . . . . . . . . . 10.8 kg (23.9 lb)
Weight of single empty canister. . . . . . . . . . . . . . . . . . . . . . . . . . . . . . . . . 630 gams (1.4 lb)
1
1. Axis of Rotation
Maximum sample load for each canister at rated speed
(including bottle, plug, cap/closure, and sample)) . . . . . . . . . . . . 1500 grams (3.3 lb)
Approximate acceleration time to maximum speed
(rotor fully loaded) . . . . . . . . . . . . . . . . . . . . . . . . . . . . . . . . . . . . . . . . . . . . . . . . . 2 1/2 min
Approximate deceleration time from maximum speed
(rotor fully loaded, max. brake) . . . . . . . . . . . . . . . . . . . . . . . . . . . . . . . . . . . . . . . . . 3 min
Maximum allowable imbalance of opposing loads . . . . . . . . . . . . . . . . . . . . . . . . 30 grams
Rotor body material . . . . . . . . . . . . . . . . . . . . . . . . . . . . . . . . . . . . . . . . . . . . . . . . . aluminum
Canister material . . . . . . . . . . . . . . . . . . . . . . . . . . . . . . . . . . carbon fiber epoxy composite
Plug material . . . . . . . . . . . . . . . . . . . . . . . . . . . . . polycarbonate or polyetherimide (PEI)
Cap/closure material . . . . . polyphenylsulfone (PPSU) or polyphenylene sulfide (PPS)
a. The critical speed range is the range of speeds over which the rotor shifts so as to rotate about its center of mass. Passing through the critical
speed range is characterized by some vibration.
b. Relative Centrifugal Field (RCF) is the ratio of the centrifugal acceleration at a specified radius and speed (rw2) to the standard acceleration of
gravity (g) according to the following formula: RCF = rw2/g — where r is the radius in millimeters, w is the angular velocity in radians per second
(2 p RPM /60), and g is the standard acceleration of gravity (9807 mm/s2). After substitution: RCF = 1.12r (RPM/1000)2
2
PN J-TB-073GC
J-Lite JLA-8.1000 and JLA-9.1000 Fixed-Angle Rotor Assemblies
Description
Description
These rotors have been manufactured in a facility that maintains certifications to both ISO 9001:2008 and
ISO 13485:2003. They are for use in the specified Beckman Coulter centrifuges.
The J-Lite JLA-8.1000 fixed-angle rotor assembly, rated for 8000 RPM, has a tube angle of 20 degrees
from the axis of rotation and is used in Beckman Coulter Avanti JXN-26, J-26S XP series, Avanti J-26
XP series, and discontinued Avanti J-20 series and Avanti J-20 XP series centrifuges. The J-Lite
JLA-9.1000 fixed-angle rotor assembly, rated for 9000 RPM, also has a tube angle of 20 degrees from
the axis of rotation and is used in all Beckman Coulter Avanti J series centrifuges. These rotors
develop centrifugal forces that can efficiently pellet cells from large volumes of culture media, cell
particles from tissue homogenates, or subcellular organelles.
The JLA-8.1000 and 9.1000 rotor assemblies consist of a rotor body with attached windshield, a rotor
lid and lid knob, and six (JLA-8.1000) or four (JLA-9.1000) removable carbon fiber composite
canisters (see Figure 1 and Figure 2). The canisters are interchangeable, allowing the use of multiple
sets of canisters with a single rotor body
Figure 1 The JLA-8.1000 Fixed-Angle
6
5
1
4
2
1. Lid
2. Windshield
3. Rotor Body
3
4. Canister
5. Bottle
6. Cap/Closure
The rotor body, windshield, and lid are made of anodized aluminum. The canisters are made of
carbon fiber epoxy composite, with a nickel-plated aluminum sleeve. Two pins in the rotor drive
hole seat alongside the centrifuge drive hub teeth, preventing the rotor from slipping during
centrifugation. The lid tie-down knob assembly secures the rotor to the centrifuge drive hub.
PN J-TB-073GC
3
J-Lite JLA-8.1000 and JLA-9.1000 Fixed-Angle Rotor Assemblies
Preparation and Use
Figure 2 The JLA-9.1000 Fixed-Angle Rotor
6
5
1
4
2
1. Lid
2. Windshield
3. Rotor Body
3
4. Canister
5. Bottle
6. Cap/Clousure
The rotors, with bottle assemblies 363676, 363678, A98812, and A98813 have been tested*with and
without HarvestLine System liners (369256) to demonstrate containment of microbiological
aerosols under normal conditions of the associated Beckman Coulter centrifuge when used and
maintained as instructed.
For warranty information, see the Warranty at the back of this manual. Each canister is marked
with an individual serial number and expiration date; do not use a canister after the expiration date.
Preparation and Use
Specific information about the JLA-8.1000 and JLA-9.1000 rotor assemblies is given here.
Information common to these and other rotors is contained in the manual Rotors and Tubes for
J Series Centrifuges (publication JR-IM-10), which should be used together with this manual for
complete rotor and accessory information.
NOTE Although rotor components and accessories made by other manufacturers may fit in the JLA-8.1000
and JLA-9.1000 rotors, their safety in these rotors cannot be ascertained by Beckman Coulter. Use of other
manufacturers’ components or accessories in these rotors may void the rotor warranty and should be
prohibited by your laboratory safety officer. Use only the components and accessories listed in this
publication in these rotors.
* Validation of microbiological containment was done at an independent third-party testing facility (CAMR, Porton Down,
UK, or USAMRIID, Ft. Detrick, MD, U.S.A.). Improper use or maintenance may affect seal integrity and thus containment.
4
PN J-TB-073GC
J-Lite JLA-8.1000 and JLA-9.1000 Fixed-Angle Rotor Assemblies
Preparation and Use
Bottles and Tubes
The JLA-8.1000 and JLA-9.1000 rotor assemblies use the bottles and tubes listed in Table 1. Be sure
to use only those items listed and to observe the maximum fill volumes and speed limits shown.
Refer to Chemical Resistances (publication IN-175) for information on the chemical compatibilities
of bottle and accessory materials.
Table 1 Bottles and Tubes Used in the JLA-8.1000 and JLA-9.1000 Rotors
Bottle or Tube
Dimensions
and Volume
Description
Required Accessory
Part
Number
Max Fill
Volume
(mL)
Description
Part
Number
Max No.
Tubes
per
Adapter
Max
Speeda/
RCF/
k factor
in JLA9.1000
Max
Speeda/
RCF/
k factor
in JLA8.1000
95 ´ 191 mm
1000 mL
polycarbonate
bottle with cap/
closure and plug
made with USP
Class VI material
A98812
1000b
none
—
—
9000/
16,800/
2544
8000/
15,970/
2482
95 ´ 191 mm
1000 mL
polypropylene
bottle with
polyphenylsulfone
cap/closure and
plug made with
USP Class VI
material
A98813
1000b
none
—
—
9000/
16,800/
2544
8000/
15,970/
2482
95 ´ 191 mm
1000 mL
polypropylene
bottle with
polyphenylene
sulfide cap/closure
and plug made
with USP class VI
material
B29896
1000b
none
—
—
9000/
16,800/
2544
8000/
15,970/
2482
95 ´ 191 mm
1000 mL
polycarbonate
bottle with cap/
closure and plug
363676
1000b
none
—
—
9000/
16,800/
2544
8000/
15,970/
2482
95 ´ 191 mm
1000 mL
polypropylene
bottle with cap/
closure and plug
363678
1000b
none
—
—
8000/
13,300/
3220
7000/
12,200/
3242
69 ´ 160 mm
500 mL
polycarbonate
bottle w/cap assy
355605
465
adapter
363683c
1
9000
—
8000
—
69 ´ 160 mm
500 mL
polypropylene
bottle w/cap assy
355607
445
adapter
363683c
1
8000
—
8000
—
PN J-TB-073GC
5
J-Lite JLA-8.1000 and JLA-9.1000 Fixed-Angle Rotor Assemblies
Preparation and Use
Table 1 Bottles and Tubes Used in the JLA-8.1000 and JLA-9.1000 Rotors (Continued)
Bottle or Tube
Dimensions
and Volume
6
Description
Required Accessory
Max No.
Tubes
per
Adapter
Max
Speeda/
RCF/
k factor
in JLA9.1000
Max
Speeda/
RCF/
k factor
in JLA8.1000
362750c in
363683c
1
9000
8000
—
362750c in
363683c
1
356996d in
363683c
1
356996d in
363683c
1
356996d in
363683c
1
adapters
356996d in
363683c
1
natural
29-mm cap
red
29-mm cap
green
29-mm cap
yellow
29-mm cap
blue
29-mm cap
356264e
Part
Number
Max Fill
Volume
(mL)
Description
250
adapters
62 ´ 120 mm
250 mL
polypropylene
wide-mouth bottle
w/cap assy
356011
62 ´ 120 mm
250 mL
polycarbonate
wide-mouth bottle
w/cap assy
356013
29 ´ 104 mm
50 mL
polycarbonate
bottle w/
liquid-tight cap
assy
357000
29 ´ 104 mm
50 mL
polypropylene
bottle w/
liquid-tight cap
assy
357001
29 ´ 104 mm
50 mL
polypropylene
bottle w/screw cap
357003
29 ´ 104 mm
50 mL
polypropylene
thickwall tube
w/snap-on cap
357005
29 ´ 104 mm
50 mL
polypropylene
thickwall tube,
no cap
357007
29 ´ 104 mm
50 mL
polycarbonate
open-top tube
363647
29 ´ 104 mm
50 mL
polycarbonate
tube w/snap-on
cap
363664
250
45
45
40
36.5
50
40
40
adapters
adapters
adapters
adapters
adapters
adapters
adapters
Part
Number
—
9000
—
9000
—
9000
—
9000
—
9000
—
8000
—
8000
—
8000
—
8000
—
8000
—
357369e
357360e
357361e
357362e
356996d in
363683c
1
356996d in
363683c
1
356996d in
363683c
1
9000
—
9000
—
9000
—
8000
—
8000
—
8000
—
PN J-TB-073GC
J-Lite JLA-8.1000 and JLA-9.1000 Fixed-Angle Rotor Assemblies
Preparation and Use
Table 1 Bottles and Tubes Used in the JLA-8.1000 and JLA-9.1000 Rotors (Continued)
Bottle or Tube
Dimensions
and Volume
Description
Required Accessory
Part
Number
Max Fill
Volume
(mL)
Description
15
adapters
17 ´ 119 mm
15 mL
conical
polypropylene
open-top tube
355663
Bio-Vials
14 ´ 55 mm
4 mL
polypropylene,
capped
566353
4
adapters
Max No.
Tubes
per
Adapter
Max
Speeda/
RCF/
k factor
in JLA9.1000
Max
Speeda/
RCF/
k factor
in JLA8.1000
356960d in
363683c
5
6500
—
6500
—
342098f in
362750c in
363683c
1
9000
—
8000
—
Part
Number
a. Maximum speeds listed are guidelines only. These speeds have been achieved in reliability tests at Beckman Coulter, but, because of
manufacturing variances, no guarantee of performance is expressed or implied
b. Do not fill above the maximum fill line marked on the bottle. Minimum fill volume for bottles 363676 and A98812 is 500 mL; minimum fill volume
for bottles 363678, A98813, and B29896 is 1000 mL.
c. Polyethylene terephthalate (PET).
d. Polypropylene.
e. Polypropylene, package of 25.
f. Acetal.
The specially designed Beckman Coulter 1000-mL bottles are sealed using attached plugs and
patented cap/closures (see Figure 3).
Silicone O-rings on the plug and the cap/closure* create the seals (the O-rings must be free of defects,
dry, properly seated, and unlubricated to ensure sealing).
Bottles may be centrifuged at normal operating temperatures (from 2 to 25°C; bottle A98813 can be
centrifuged up to 40°C), but should be tested under simulated conditions first when working at
temperatures below 2°C or above 25°C.
NOTE The useful life of plastic bottles varies slightly between lots, but will largely depend on handling and
usage. We highly recommend that you pretest labware in the rotor using water samples to determine
your optimal operating conditions.
The manufacturing process can cause small cosmetic flaws on polycarbonate and polypropylene bottles.
These flaws, which may appear as irregular or scraped surface areas, are cosmetic only. They do not
affect the function nor shorten the life of the bottle.
* Applies to bottle assemblies 363676 and 363678 only.
PN J-TB-073GC
7
J-Lite JLA-8.1000 and JLA-9.1000 Fixed-Angle Rotor Assemblies
Preparation and Use
Figure 3 1 000-mL Bottle Assemblies Used in the JLA-8.1000 and JLA-9.1000 Rotor Assemblies*
1
2
1. Cap/Closure
[polyphenylsufone (PPSU) or polyphenylene sulfide (PPS)]
3
4
2. Cap/Closure O-ringa
3. AutoVent Plug O-ring
5
4. AutoVent Plug
MAX FILL LINE
1000mL
5. Plug O-ring
750mL
6
500mL
6. Bottle, 1000 mL
(polycarbonate or polypropylene)
a. Applies to bottle assemblies 363676 and 363678 only.
A six-place rack (974627) for carrying the bottles is provided with labware kit 392574. Extra racks
may be ordered.
Bottle Rack (974627)
The 500-mL adapter (363683, see Figure 4) enables the use of 500-mL, 250-mL, 50-mL, and 15-mL
bottles and tubes, and Bio-Vials. Labware smaller than 500 mL must be placed in another adapter,
or in more than one other adapter, before being placed in the 500-mL adapter. See Table 1 for a list
of bottles, tubes, and adapters that can be used.
* See the Supply List for part numbrs.
8
PN J-TB-073GC
J-Lite JLA-8.1000 and JLA-9.1000 Fixed-Angle Rotor Assemblies
Preparation and Use
Figure 4 The 500-mL Adapter for the JLA-8.1000 and JLA-9.1000 Rotors
1
1. Adapter Cap
2
2. Adapter O-rings (970883)
3
3. Adapter Body
HarvestLine System Liners
The HarvestLine System (369264), consisting of nonsterile polyetherurethane liners that are placed
inside the rotor bottles, is available for use with the JLA-8.1000 and JLA-9.1000 rotors. The
HarvestLine System provides a convenient method of loading, recovering, and storing samples.
The liners are loaded with sample through a funnel or fermentor hose. A valve in the liner neck is
sealed, and the liner necks are folded to fit inside the 1000-mL bottles. The bottles are sealed with
rotor plugs and cap/closures, and the sealed bottles are placed into the rotor canisters for
centrifugation. After centrifugation, the liner valves are cut off and the supernatant is decanted,
either for storage or disposal. The liners can then be heat-sealed for pellet storage or disposal.
This rotor manual does not contain instructions for use of the HarvestLine System. HarvestLine
System instructions are contained in Litpak 369263, which contains document J-TB-093, HarvestLine
System Liner Kit 369264.
Prerun Safety Checks
Read the Safety Notice section at the front of this manual before using the rotor.
1
Make sure that the rotor and lid are clean and show no signs of corrosion or cracking.
2
Inspect the canisters for damage (see About Composite Canisters, later in this manual).
3
Before each use, inspect each bottle, cap/closure, and plug for cracks or damage.
Do not use damaged components.
PN J-TB-073GC
9
J-Lite JLA-8.1000 and JLA-9.1000 Fixed-Angle Rotor Assemblies
Preparation and Use
4
Check the chemical compatibilities of all materials used.
Refer to Chemical Resistances (publication IN-175), included in the Rotors and Tubes CD.
5
Use only the bottles, tubes, and adapters listed in Table 1
Rotor Preparation
1
2
Before each run, make sure the rotor is seated on the centrifuge drive hub, with the rotor drive
pins alongside the teeth on the top surface of the hub, and that the lid knob is tight.
If you run less than a full load, arrange the loaded canisters opposite each other in the rotor and
place empty canisters in the other cavities.
a. Fill opposing bottles to the same level with liquid of the same density.
b. Place a canister, loaded or empty, in each rotor position during a run.
3
Make sure that the plug and cap/closure O-rings* are in good condition, are properly installed,
and that they are completely dry and unlubricated.
If the O-rings or the sealing area are wet, bottle leakage may result.
4
For low-temperature runs (from approximately 2 to 10°C), precool the rotor, canisters, labware,
and sample in the centrifuge or in a refrigerator before use, especially before short runs.
A suggested rotor precooling cycle is a minimum of 30 minutes at 2000 RPM at the required
temperature.
5
After high-temperature runs (40°C), the cap/closure may be difficult to remove.
a. To prevent sticking, spray a light coating of polytetrafluoroethylene (PTFE) spray (366772)
on the top surface only of the plug.
b. Allow the plug to dry completely before use.
* Applies to bottle assemblies 363676 and 363678 only.
10
PN J-TB-073GC
J-Lite JLA-8.1000 and JLA-9.1000 Fixed-Angle Rotor Assemblies
Preparation and Use
Installing the Rotor
1
Hold the rotor by the scalloped areas between the canister cavities and carefully lower the rotor
straight down onto the centrifuge drive hub (see Figure 5).
Do not hold the rotor by the windshield during installation
NOTE Do not drop the rotor onto the hub or the hub could be damaged.
WARNING
If the rotor is left in the centrifuge between runs, make sure the rotor is seated on
the drive hub and the tie-down knob is tight before each run.
Figure 5 Installing the Rotor (JLA-9.1000 shown)
1. Rotor Scallop
(four total on JLA-9.1000
six on JLA-8.1000)
2. Windshield
2
1
2
3
Turn the rotor slightly around the centrifuge drive hub to ensure that the rotor is properly
seated.
After canisters are installed, place the lid on the rotor and tighten the lid tie-down knob to
secure the rotor to the centrifuge drive hub.
Loading the Canisters
NOTE canisters run in opposite positions in the rotor must balance to within 30 grams of each other. Load
opposing canisters with the same type of labware containing the same amounts of fluid of equal density.
Do not exceed the rated maximum sample load for any single canister, which is 1500 grams (3.3 lb),
including bottle, sample, plug, and cap/closure.
PN J-TB-073GC
11
J-Lite JLA-8.1000 and JLA-9.1000 Fixed-Angle Rotor Assemblies
Preparation and Use
Working with Physiological Fluids
WARNING
Handle body fluids with care because they can transmit disease. No known test
offers complete assurance that they are free of micro-organisms. Some of the
most virulent — Hepatitis (B and C) viruses, HIV (I–V), atypical mycobacteria, and
certain systemic fungi — further emphasize the need for aerosol protection. Take
appropriate safety precautions when handling toxic, pathogenic, or other
hazardous materials.
When working with potentially hazardous materials, always fill and open containers in an
appropriate hood or biological safety cabinet. In addition, it is strongly recommended that all
containers carrying physiological fluids be capped to prevent leakage.
Loading the 1000-mL Bottle and Labware Assemblies
1
Inspect the bottles that you will be using, especially in the areas shown in the illustration.
Do not use bottles that are cracked or deformed.
2
Fill a bottle with sample.
Do not fill above the maximum fill line marked on the bottle.
See Table 1 for complete fill volume and run speed information.
2
1
MAX FILL LINE
1000mL
750mL
1. Do not fill above this line
500mL
2. Inspect here
2
3
Regularly inspect the cap/closure you will be using.
7
1
1. Cap/Closure
5. Plug/Bottle Interface
2
2. O-ringa
6. Inspect here
3. Plug
7. AutoVent Plug O-ring
3
4
6
5
4. O-ring
a. Applies to bottle assemblies 363676 and 363678 only.
12
PN J-TB-073GC
J-Lite JLA-8.1000 and JLA-9.1000 Fixed-Angle Rotor Assemblies
Preparation and Use
a. Inspect the O-ring groove* threaded areas, inside and out, for cracking.
b. Regularly inspect the plug in the areas behind the O-ring for cracking.
c. Make sure that the O-rings are in place and in good condition, and that for the plug, both
the O-ring and the plug/bottle interface are completely dry.
d. Make sure that the large and small plug O-rings are in place.
e. For the cap/closure, make sure that the area around the O-ring is completely dry.*
f.
4
Do not lubricate the O-rings.
Place a plug on the bottle.
a. Then place a cap/closure over the plug and tighten firmly by hand, to where the scribe
mark is as closely as possible aligned with the vent line on the bottle, or beyond the line if
possible.
You cannot over tighten the closure by hand.
Tools are available to assist in tightening and loosening cap/closures.
See Bottle Grip and Wrench (Kit 36670) below.
1
1. Tighten the cap/closure until this mark is as closely
as possible aligned with the bottle vent line
*
MAX FILL LINE
1000mL
2. Vent Line
2
5
Place the filled, sealed labware assembly into an empty canister, using a twisting motion to
ensure proper seating.
a. Place the canister into a cavity in the installed rotor.
CAUTION
Bottles MUST be placed into canisters. NEVER place a bottle directly into a
rotor cavity.
6
7
Repeat steps 1 through 5 for all of the bottles to be run.
Make sure that a canister is installed in every rotor position (run empty canisters without
cap/closures).
Opposing filled canisters, plus labware and sample, must weigh within 30 grams of each other.
* Applies to bottle assemblies 363676 and 363678 only.
PN J-TB-073GC
13
J-Lite JLA-8.1000 and JLA-9.1000 Fixed-Angle Rotor Assemblies
Preparation and Use
Bottle Grip and Wrench (Kit 36670)
It is very important that bottles be tightly sealed before a run to
prevent leakage. Some users may find it difficult to hand-tighten the
parts adequately. Kit 366770, provided with labware kit 392574,
contains a bottle grip and a wrench that are designed to simplify
tightening and loosening cap/closures to seal and unseal bottles.
Using the Bottle Grip
The bottle grip seats on any flat surface and holds the bottle snugly
in place, leaving both hands free for loading and sealing. It is not
necessary to affix the grip to the surface; pressing down as you turn
the cap/closure prevents the grip from moving.
1
2
Inspect all parts as described in Loading the 1000-mL Bottle and
Labware Assemblies, above.
Place an empty bottle in the grip, with the bottle vent line toward you.
a. Push down until the bottle is seated.
1. Scribe Mark
1
2
14
3
Fill the bottle.
4
Place a plug on the bottle.
5
Place a cap/closure over the plug.
2. Vent Line
PN J-TB-073GC
J-Lite JLA-8.1000 and JLA-9.1000 Fixed-Angle Rotor Assemblies
Preparation and Use
6
Tighten the cap/closure.
Without the Wrench
Grasp the cap/closure with both hands, push down for leverage, and turn the cap/closure to
the right (clockwise) until the scribe mark on the cap/closure is as closely as possible aligned
with the bottle vent line, or beyond the mark if possible.
Using the Wrench
NOTE The wrench provides additional leverage for tightening and loosening the cap/closure.
Hold the narrow end of the wrench in one hand and insert the two prongs in any position in the
top of the cap/closure. Place your other palm on the flat textured area over the prongs. Press
down with your palm and tighten the cap/closure until the scribe mark on the cap/closure is
as closely as possible aligned with the vent line on the bottle, or beyond the mark if possible.
Loosen sealed bottles by pressing down and turning the wrench to the left (counterclockwise.
7
Remove the bottle from the bottle grip, load it into a canister, and then into the rotor.
Loading the 500-mL Adapters
1
Prepare the 500-mL adapter by making sure that the two O-rings are in place as shown
in Figure 4.
Do not lubricate the O-rings.
2
Fill and seal the bottles or tubes to be used in the 500-mL adapters.
3
If 500-mL bottles are used, place each bottle directly into a 500-mL adapter.
a. For bottles of different sizes, first load the bottles into the adapters listed in Table 1 and
then place the filled bottle/adapter assembly into the 500-mL adapters.
Do not load sample directly into the 500-mL adapter.
4
Place the adapter cap on the adapter, push down, and twist.
The bottom edge of the adapter cap will not touch the top of the adapter, but the assembly is
sealed by the O-rings and will seal completely during centrifugation.
PN J-TB-073GC
15
J-Lite JLA-8.1000 and JLA-9.1000 Fixed-Angle Rotor Assemblies
Preparation and Use
5
Hold the adapter by the adapter body, not by the adapter cap, and place the filled adapter into a
canister.
No special orientation of the adapter in the canister is required.
Make sure that six canisters are loaded into the JLA-8.1000 rotor, or four canisters in the
JLA-9.1000 rotor, prior to centrifugation.
Temperature
Enter the run temperature according to the instructions in your centrifuge instruction manual.
NOTE To ensure that the rotor assembly reaches the required temperature during the run, precool or
prewarm the rotor, canisters, labware, and sample to the required run temperature before starting
the run.
Removal and Sample Recovery
CAUTION
If disassembly reveals evidence of leakage, you should assume that some fluid
escaped the rotor. Apply appropriate decontamination procedures to the
ultracentrifuge and accessories.
Removing 1000-mL Bottles
1
Unscrew the rotor lid knob.
Remove the lid and set it aside.
2
Grasp the metal handle on top of each cap/closure and, using a lifting and twisting motion, lift
the sealed bottle assemblies out of each canister.
If required, place the sealed bottles under a safety hood before removing the cap/closures
and plugs.
Use caution when opening the sealed assemblies.
Tools are available to assist in tightening and loosening cap/closures.
See Bottle Grip and Wrench (Kit 36670), above.
16
PN J-TB-073GC
J-Lite JLA-8.1000 and JLA-9.1000 Fixed-Angle Rotor Assemblies
Preparation and Use
Removing Pellets from 1000-mL Bottles
1
Use the spatula provided to remove pellet from the bottle.
Do not use a metal tool to remove pellet, as metal could scratch or damage the bottle and
shorten the bottle’s useful life.
36
36
46
Spatula for removing pellets (363646)
Removing 500-mL Adapters
1
After centrifugation, remove the 500-mL adapters from the canisters by grasping each adapter
cap top and pulling up until you can grasp the adapter body.
Then, holding the adapter body, remove the adapter completely and set it on a flat surface.
2
To remove the adapter cap, hold the adapter firmly in one hand and, with the other hand, twist
and lift off the cap.
Placing your fingers in the indentations in the adapter may help you to grip the adapter tightly.
Some users may find the adapter caps difficult to remove.
To facilitate removal, use the bottle grip tool described above.
Run Times
The k factor of the rotor is a measure of the rotor’s pelleting efficiency. Beckman Coulter has
calculated the k factors for all of its rotors, at maximum rated speed with full tubes or bottles, using
the following formula:
ln ( rmax ⁄ rmin ) 10 13
- × -----------k = ---------------------------------3600
ω2
EQ 1
where w is the angular velocity of the rotor in radians per second (w = 0.105 ´ RPM), rmax is the
maximum radius, and rmin is the minimum radius.
After substitution:
(2.533 × 10 11) ln ( rmax ⁄ rmin )
k = ----------------------------------------------------------------------RPM 2
PN J-TB-073GC
EQ 2
17
J-Lite JLA-8.1000 and JLA-9.1000 Fixed-Angle Rotor Assemblies
Preparation and Use
In the JLA-8.1000 rotor, the k factor is 2482 for full 1000-mL bottles at 8000 rpm. In the JLA-9.1000
rotor, the k factor is 2544 for full 1000-mL bottles at 9000 RPM. At reduced speeds, the k factors
will be different. Calculate k factors for these containers using EQ 2.
Use the k factor in the following equation to estimate the run time t (in hours) required to pellet
particles of known sedimentation coefficient s (in Svedberg units, S).
EQ 3
t = k--s
Run times can be estimated for centrifugation at less than maximum speed by adjusting the k factor
as follows:
8000*
k adj = k ⎛---------------------------------------- ⎞
⎝actual run speed ⎠
2
EQ 4
*for the JLA-8.1000 rotor; 9000 for the JLA-9.1000 rotor.
Run times can also be estimated from data established in prior experiments using a different rotor
if the k factor of the previous rotor is known. For any two rotors, a and b:
EQ 5
ka
t
----a- = -----tb
kb
Run Speeds
The centrifugal force at a given radius in a rotor is a function of speed. Comparisons of forces
between different rotors are made by comparing the rotors’ relative centrifugal fields (RCF). When
rotational speed is adjusted so that identical samples are subjected to the same RCF in two different
rotors, the samples are subjected to the same force. The RCF at a number of rotor speeds is provided
in Table 2.
Do not select rotational speeds that exceed the limits in Table 1.
When solutions more dense than 1.2 g/mL are centrifuged in the JLA-8.1000 rotor, use EQ 6 to
calculate the reduced maximum allowable rotor speed. Use EQ 7 to calculate the reduced maximum
allowable rotor speed for the JLA-9.1000 rotor.
reduced maximum speed = (8000 RPM*)
1.2 g/mL
---------------------------------------------------------density of tube contents
EQ 6
reduced maximum speed = (9000 RPM*)
1.2 g/mL
---------------------------------------------------------density of tube contents
EQ 7
*The maximum speed for 1000-mL polypropylene bottles (363678)
is 7000 RPM in the JLA-8.1000 and 8000 RPM in the JLA-9.1000.
18
PN J-TB-073GC
J-Lite JLA-8.1000 and JLA-9.1000 Fixed-Angle Rotor Assemblies
Preparation and Use
Table 2 Relative Centrifugal Fields for the JLA-8.1000 and JLA-9.1000 Rotorsa
JLA-8.1000 Rotor
JLA-9.1000 Rotor
Relative Centrifugal Field (´ g)
Rotor
Speed
(RPM)
At rmax
(222.8 mm)
At rav
(171 mm)
8000
7000
6000
15,970b
12,200
8950
5000
4000
3000
2000
1000
500
Relative Centrifugal Field (´ g)
At rmin
(119 mm)
Rotor
Speed
(RPM)
At rmax
(185 mm)
At rav
(134 mm)
At rmin
(82 mm)
12,300
9380
6900
8530
6530
4800
9000
8000
7000
6000
16,800
13,300
10,200
7460
12,200
9610
7350
5400
7440
5880
4500
3310
6220
3980
2240
4790
3060
1720
3330
2130
1200
5000
4000
3000
5180
3320
1870
3750
2400
1350
2300
1470
830
995
249
62
766
192
48
533
133
33
2000
1000
500
829
207
52
600
150
38
370
92
23
a. Entries in this table are calculated from the formula RCF = 1.12r (RPM/1000)2 and then rounded to three significant digits.
b. Not rounded.
Relative Centrifugal Fields for the JLA-8.1000 Rotor
16,000
14,000
RCF (x g)
12,000
10,000
rmax
rav
8000
rmin
6000
4000
2000
0
0
1000
2000
3000
4000
5000
6000
7000
8000
Speed (RPM)
Relative Centrifugal Fields for the JLA-9.1000 Rotor
18,000
16,000
RCF (x g)
14,000
12,000
10,000
rmax
8000
rav
rmin
6000
4000
2000
0 0
1000
2000
3000
4000
5000
6000
7000
8000
9000
Speed (RPM)
PN J-TB-073GC
19
J-Lite JLA-8.1000 and JLA-9.1000 Fixed-Angle Rotor Assemblies
Care and Maintenance
Care and Maintenance
Cap/Closure and Plug Inspection and Maintenance
Plug and cap/closure performance depend on proper use and maintenance.
1
Check the O-rings before each use to make sure that they are in good condition and are
completely dry.
Replace the O-rings if they are damaged, torn, or dirty.
O-ring integrity is the key to successful function of cap/closure* and plug assemblies.
2
Do not lubricate the cap/closure O-rings* or plug O-rings.
If they are lubricated, they will cause the assembly to seal too tightly during centrifugation.
3
If crazing or cracks appear on or in a cap/closure or plug, replace the cap/closure and plug
immediately with a new cap/closure and plug assembly.
Do not continue to use damaged or suspect cap/closures, plugs, or other assembly components.
Replace labware assemblies at the first sign of damage to any of the components.
Canister Inspection and Maintenance
Regularly inspect each canister as described below.
1
Before each use, inspect the canisters (363686) for deep cracks.
If any cracking or other damage is visible on the outside wall, do not use the canister.
Contact Beckman Coulter Field Service.†
2
If a crack or blemish appears after a canister is dropped from a height of several feet, or after it
strikes a sharp edge of a bench or table, autoclave the canister and then return it to
Beckman Coulter for inspection.
Include a written explanation of the reason for the return.
* Applies to bottle assemblies 363676 and 363678 only.
† Call 1-800-742-2345 (U.S.A. or Canada) outside the U.S., contact your local Beckman Coulter office, or visit us on the
web at www.beckmancoulter.com.
20
PN J-TB-073GC
J-Lite JLA-8.1000 and JLA-9.1000 Fixed-Angle Rotor Assemblies
Care and Maintenance
3
Each canister has an expiration date, which is engraved on the aluminum sleeve around the top
of the canister (see Figure 6). Do not use the canister after this date.
Figure 6 canister Sleeve Washer
1. Aluminum Sleeve
1
2. Sleeve Washer (363601)
2
New canisters can be used with the same rotor body.
See the Warranty at the back of this manual for more information.
4
Each canister has a polyetherimide (PEI) sleeve washer (363601) beneath the aluminum sleeve
(see Figure 6), which acts as a cushion between the canister and the rotor body.
Before each use, make sure that the sleeve washer is securely in place.
If the canister is exposed to high temperatures and/or autoclaving, the washer may loosen;
if this happens, press it back into place with your finger.
If the washer becomes deformed so that it no longer stays on the canister, replace it.
About Composite Canisters
The carbon fiber epoxy composite material used in the JLA-8.1000 and JLA-9.1000 canisters is
extremely strong and ideally suited to the high stresses produced by centrifugal force. The canisters
will retain their strength throughout their 7-year life, but will exhibit certain cosmetic changes
with time. The canisters also require different inspection and handling procedures than all-metal
rotor components.
After several thousand centrifuge run cycles, surface cracks may appear in the canister dome area
(see Figure 7) and may increase in number with continued use. Surface cracks are not uncommon
in carbon fiber components, and do not affect the structural integrity of the canister. However, cracks
or other damage on the outside wall should be inspected by a Beckman Coulter representative.
Repeated autoclaving of the canisters may cause the following conditions, all of which are cosmetic
in nature during the 7-year warranty period:
• an increase in the number of surface cracks in the dome area,
• increased visibility of existing surface cracks,
• a change in canister color due to oxidation of the epoxy, and
• formation of a white, powdery residue on the outside wall of the canister; this residue can be
wiped off with a soft, damp cloth.
PN J-TB-073GC
21
J-Lite JLA-8.1000 and JLA-9.1000 Fixed-Angle Rotor Assemblies
Care and Maintenance
Repeated autoclaving may also cause the sleeve washer (363601) to deform so that it no longer stays
on the canister. If this happens, replace the washer.
Figure 7 canister Dome Area
1. Outside Wall
2. Dome Area
1
2
Rotor Body Inspection and Maintenance
1
Periodically (at least monthly) inspect the rotor body for rough spots, pitting, or heavy
discoloration.
If any of these signs are evident, do not use the rotor.
Contact Beckman Coulter Field Service for information about the Field Rotor Inspection
Program (FRIP) and the rotor repair center.*
2
Before using the rotor, inspect the rotor drive pins to ensure that they are not damaged.
Damaged drive pins can prevent the rotor from seating properly on the centrifuge drive hub
(Avanti J series centrifuges only).
To inspect the drive pins, turn the rotor upside down and look into the drive hole in the center
of the rotor.
If the drive pins appear damaged, contact Beckman Coulter Field Service.
3
Do not use sharp tools on the aluminum rotor body, as corrosion begins in scratches and may
open fissures in the metal with repeated use.
If the rotor body is scratched, contact Beckman Coulter Field Service about having it
re-anodized.
Do not use sharp objects or tools on the composite canisters, as the composite material is easily
damaged.
* Call 1-800-742-2345 (U.S.A. or Canada) outside the U.S., contact your local Beckman Coulter office, or visit us on the
web at www.beckmancoulter.com.
22
PN J-TB-073GC
J-Lite JLA-8.1000 and JLA-9.1000 Fixed-Angle Rotor Assemblies
Care and Maintenance
4
To prevent corrosion of the aluminum rotor body, store the rotor in a dry environment with
the lid removed.
Do not store the rotor in the centrifuge.
5
To prevent abrasion of the metal rotor tie-down components, place the rotor lid upside down
on a flat surface and put two or three drops of Tri-Flow* oil (392645) between the lid adapter
and the lid stem (see Figure 8).
This area should be lubricated every few weeks or after each autoclave cycle.
Figure 8 Lubricating the Lid Stem
1
1. Lubrication Area (Spinkote)
2. Lid Stem
2
3. Lubricaton Points (Tri-Flow)
4
6
7
3
4. Lid Adapter
To provide lubrication between the rotor and the centrifuge drive hub, apply a thin coat of
Spinkote lubricant (306812) to the threads of the rotor tie-down knob before each run.
If the rotor is left in the centrifuge between runs, leave the centrifuge power off and the
door open.
Refer to Chemical Resistances (In-175) for chemical compatibilities of rotor and accessory materials.
Your Beckman Coulter representative provides contact with the Field Rotor Inspection Program
and the rotor repair center.
Cleaning
Wash the rotor and rotor components immediately if salts or other corrosive materials are used or if
spillage has occurred. Do not allow corrosive materials to dry on the rotor.
Under normal use, wash the rotor frequently (at least weekly) to prevent buildup of residues.
* Manufactured by Thompson & Formby, Inc., 10136 Magnolia Drive, Olive Branch, MS 38654, U.S.A.
PN J-TB-073GC
23
J-Lite JLA-8.1000 and JLA-9.1000 Fixed-Angle Rotor Assemblies
Care and Maintenance
1
Wash the rotor, canisters, plugs, cap/closures, and 500-mL adapters and adapter caps in a mild
detergent, such as Solution 555 (339555), that will not damage the rotor and components.
Dilute the detergent with water (10 parts water to 1 part detergent).
The Rotor Cleaning Kit (339558) contains two special plastic-coated brushes and two quarts of
Solution 555 for use with rotors and accessories.
2
O-rings on the 500-mL adapters can be left in place during cleaning unless spillage has occurred.
To remove them, use fingers or a tool that will not damage the O-rings.
Thoroughly wash and dry them before replacing them on the adapter.
Do not lubricate adapter O-rings.
3
Thoroughly rinse the cleaned rotor and components with distilled water.
4
Air-dry the rotor, lid, and canisters upside down.
Do not use acetone to dry rotor components.
CAUTION
Do not wash the rotor components or accessories in a dishwasher. Do not soak
components in detergent solution for long periods of time, such as overnight.
Do not use acetone, methylethyl ketone (MEK), chloroform, cyclohexane, or
organic solvents on the canisters at any time. These substances will damage the
epoxy resin surface material.
Decontamination
If the anodized aluminum rotor body becomes contaminated with radioactive material, it should be
decontaminated using a solution that will not damage the anodized surfaces. Beckman Coulter has
tested a number of solutions and found several that do not harm anodized aluminum: RadCon
Surface Spray or IsoClean Solution (for soaking),* and Radiacwash.†
* In the United States, contact Nuclear Associates (New York); in Eastern Europe and Commonwealth States, contact
Victoreen GmbH (Munich); in South Pacific, contact Gammasonics Pty. Ltd. (Australia); in Japan, contact Toyo Medic Co.
Ltd. (Tokyo).
† In the United States, contact Biodex Medical Systems (Shirley, NY); internationally, contact the U.S. office to find the
dealer nearest you.
24
PN J-TB-073GC
J-Lite JLA-8.1000 and JLA-9.1000 Fixed-Angle Rotor Assemblies
Care and Maintenance
CAUTION
IsoClean can cause fading of colored anodized surfaces. Use it only when
necessary and remove it promptly from rotor surfaces.
For radioactive decontamination of the canisters, RadCon Surface Spray and Radiacwash can be
used. Do not soak the canisters in these solutions for long periods; use the minimum immersion times
specified by the solution manufacturers.
While Beckman Coulter has tested these methods and found that they do not damage components,
no guarantee of sterility or disinfection is expressed or implied. Consult your laboratory safety
officer regarding the proper decontamination methods to use.
If the rotor or other components are contaminated with toxic or pathogenic materials, follow
appropriate decontamination procedures as outlined by your laboratory safety officer. Refer to
Chemical Resistances (IN-175) to evaluate your rotor’s ability to withstand a given chemical solution.
CAUTION
Strongly alkaline solutions will damage the rotor body.
Sterilization and Disinfection
The rotor body, canisters, cap/closures, polypropylene bottles, and polyetherimide (PEI) plugs
can be autoclaved at 121°C for up to 20 minutes. Remove canisters from the rotor body during
autoclaving. Place polypropylene bottles into the autoclave upside down to prevent bottle
deformation.
The 500-mL adapter, adapter cap, and O-rings can be autoclaved at 121°C for 15 minutes. Repeated
autoclaving will reduce the life of these components. For this reason, cold sterilization methods are
recommended.
Do not autoclave polycarbonate bottles, bottle plugs, or the polyethylene bottle rack (974627) or spatula
(363646). Use cold sterilization methods as described below.
Low concentrations of hydrogen peroxide (less than 6%) and bleach (less than 10%) may be used on
all rotor components, bottles, and accessories. Ethanol (70%) may be used on all rotor components
except the polycarbonate bottles and plugs. Hydrogen peroxide and bleach may cause discoloration
and corrosion of the anodized rotor surfaces. Use the minimum exposure time for each solution,
rinse thoroughly with distilled water, and dry with a soft cloth, per laboratory standards.
CAUTION
Ethanol is a flammability hazard. Do not use it in or near operating centrifuges.
No guarantee of sterility or disinfection is expressed or implied through the use of these
disinfection methods.
When sterilization or disinfection is a concern, consult your laboratory safety officer regarding
proper methods to use.
PN J-TB-073GC
25
J-Lite JLA-8.1000 and JLA-9.1000 Fixed-Angle Rotor Assemblies
Returning a Rotor
Refer to publication IN-192 (included with each box of tubes) for tube sterilization and disinfection
procedures.
Returning a Rotor
Before returning a rotor or accessory for any reason, prior permission must be obtained from
Beckman Coulter, Inc. A return authorization form may be obtained from your local
Beckman Coulter sales office. The return form should contain the following information:
• rotor type and serial number,
• history of use (approximate frequency of use),
• reason for the return,
• original purchase order number, billing number, and shipping number, if possible,
• name and email address of the person to be notified upon receipt of the rotor or accessory at
the factory,
• name and email address of the person to be notified about repair costs, etc.
To protect our personnel, it is the customer’s responsibility to ensure that all parts are free from
pathogens and/or radioactivity. Sterilization and decontamination must be done before returning
the parts. Smaller items (such as tubes, bottles, etc.) should be enclosed in a sealed plastic bag.
All parts must be accompanied by a note, plainly visible on the outside of the box or bag, stating that they
are safe to handle and that they are not contaminated with pathogens or radioactivity. Failure to attach
this notification will result in return or disposal of the items without review of the reported problem.
Use the address label printed on the return form when mailing the rotor and/or accessories.
Customers located outside the United States should contact their local Beckman Coulter office.
26
PN J-TB-073GC
J-Lite JLA-8.1000 and JLA-9.1000 Fixed-Angle Rotor Assemblies
Supply List
Supply List
See the Beckman Coulter High Performance, High Speed, High Capacity Rotors, Tubes & Accessories
catalog (BR-8102) available at www.beckmancoulter.com, call Beckman Coulter Customer Service
at 1-800-742-2345 (U.S.A. or Canada), or contact your local Beckman Coulter Representative for
detailed information about ordering parts and supplies For your convenience, a partial list is given
below.
Replacement Rotor Parts and Labware
NOTE In the kits and assemblies listed below, cap/closures, plugs, and adapters are shipped with the O-rings
installed and one spare of each O-ring is provided.
Description
Bottle assembly, 1000-mL polycarbonate made from USP Class VI material, set of two
includes:
Part
Number
A98812
• 1000-mL polycarbonate bottles, set of two (366751)
• Cap/closure and plug assemblies, set of two (A99028)
Bottle assembly, 1000-mL polypropylene made from USP Class VI material, set of two
includes:
A98813
• 1000-mL polypropylene bottles, set of two (A98814)
• Cap/closure and plug assemblies, set of two (A99028)
Bottle assembly, 1000-mL polypropylene made from USP Class VI material with
polyphenylene sulfide cap/closure, set of two includes:
B29896
• 1000-mL polypropylene bottles, set of two (A98814)
• Cap/closure and plug assemblies, set of two (B29895)
Bottle assembly, 1000-mL polycarbonate, set of two
includes:
363676
• Two 1000-mL polycarbonate bottles (366751)
• Two cap/closure and plug assemblies (363680)
Bottle assembly, 1000-mL polypropylene, set of two
includes:
363678
• Two 1000-mL polypropylene bottles (366752)
• Two cap/closure and plug assemblies (363680)
Labware Kit
includes:
392574
• One six-place bottle rack (974627)
• One spatula (363646)
• One tool kit (366770)
PN J-TB-073GC
27
J-Lite JLA-8.1000 and JLA-9.1000 Fixed-Angle Rotor Assemblies
Supply List
Description
HarvestLine System liner kit
includes:
•
•
•
•
Part
Number
369264
120 HarvestLine System liners (nonsterile polyetherurethene, USP 23 class VI) (369256)
One stainless steel filling rack (368740)
One funnel (977472)
Instructional CD (369367)
Bottle rack (polyethylene, holds six 1000-mL bottles
974627
Canisters, set of two
363686
Canister sleeve washer, set of six
363601
Lid assembly, JLA-8.1000
363563
Lid assembly, JLA-9.1000
363583
Tool Kit
includes:
366770
• One bottle grip (366763)
• One wrench (367309)
500-mL Adapter assembly
includes:
363683
• Adapter, polyethylene teraphthalate (PET)
• One adapter cap, polycarbonate
• One adapter O-rings, silicone, set of two (replacement part number 970883)
Labware Replacement Part Numbers for Bottle Assemblies 363676 and 363678
Cap/closure and plug assembly, set of two
includes:
•
•
•
•
•
363680
Two cap/closures with O-rings
Two AutoVent polycarbonate plugs with O-rings
Two additional cap/closure O-rings
Two additional large plug O-rings
Two additional AutoVent plug O-rings
Plug assembly, AutoVent polycarbonate, set of two
includes:
366748
• Two polycarbonate AutoVent plugs with O-rings
• Two additional large plug O-rings
• Two additional AutoVent plug O-rings
Plug assembly, AutoVent polyetherimide (PEI), set of two
includes:
366749
• Two polyetherimide (PEI) AutoVent plugs with O-rings
• Two additional large plug O-rings
• Two additional AutoVent plug O-rings
28
PN J-TB-073GC
J-Lite JLA-8.1000 and JLA-9.1000 Fixed-Angle Rotor Assemblies
Supply List
Description
Part
Number
Bottles, 1000-mL polycarbonate, set of two
366751
Bottles, 1000-mL polypropylene, set of two
366752
Cap/closure replacement assembly, set of six
366768
Cap/closure replacement O-rings, set of six
366769
AutoVent plug replacement O-rings, set of six
includes:
366767
• Six large plug O-rings
• Six AutoVent plug O-rings
Labware Replacement Part Numbers for Bottle Assemblies A98812 and A98813
Cap/closure and plug assembly, set of two
includes:
•
•
•
•
A99028
Two cap/closures
Two AutoVent polypropylene plugs with O-rings
Two additional large plug O-rings
Two additional AutoVent plug O-rings
Plug assembly, AutoVent polypropylene, set of two
includes:
393898
• Two polypropylene AutoVent plugs with O-rings
• Two additional large plug O-rings
• Two additional AutoVent plug O-rings
Bottles, 1000-mL polycarbonate made from USP Class VI material, set of two
366751
Bottles, 1000-mL polypropylene made from USP Class VI material, set of two
A98814
Cap/closure replacement assembly made from USP Class VI material, set of six
B10317
AutoVent plug replacement O-rings made from USP Class VI material, set of six
includes:
B10320
• Six large plug O-rings (A98818)
• Six AutoVent plug O-rings (A98816)
Labware Replacement Part Numbers for Bottle Assemblies B29896
Cap/closure and plug assembly, set of two
includes:
•
•
•
•
PN J-TB-073GC
B29895
Two cap/closures
Two AutoVent polypropylene plugs with O-rings
Two additional large plug O-rings
Two additional AutoVent plug O-rings
29
J-Lite JLA-8.1000 and JLA-9.1000 Fixed-Angle Rotor Assemblies
Supply List
Part
Number
Description
393898
Plug assembly, AutoVent polypropylene, set of two
includes:
• Two polypropylene AutoVent plugs with O-rings
• Two additional large plug O-rings
• Two additional AutoVent plug O-rings
Bottles, 1000-mL polypropylene made from USP Class VI material, set of two
A98814
Cap/closure replacement assembly made from USP Class VI material, set of six
B29894
AutoVent plug replacement O-rings made from USP Class VI material, set of six
includes:
B10320
• Six large plug O-rings (A98818)
• Six AutoVent plug O-rings (A98816)
Supplies
NOTE For MSDS information, go to the Beckman Coulter website at www.beckmancoulter.com.
Description
Part
Number
Rotor Cleaning Kit
339558
Solution 555 (1 qt)
339555
Spinkote lubricant (2 oz)
306812
Spatula, polyethylene (for removing pellet from 1000-mL bottles)
363646
Polytetrafluorethylene (PTFE) spray
366772
Tri-flow lubricant (2 oz)
392645
NOTE Suggested Permanent Marking Pens: Sanford Laundry Marking Pen, item #31161, black; Sanford
Permanent Metallic Marker, item #76115, gold; Sanford Permanent Metallic Marker, item #68820, silver.
30
PN J-TB-073GC
Beckman Coulter, Inc.
JLA-8.1000 and JLA-9.1000 Rotor Warranty
Subject to the conditions specified below and the warranty clause of the Beckman Coulter terms
and conditions of sale in effect at the time of sale, Beckman Coulter, Inc., agrees to correct either by
repair, or, at its election, by replacement, any defects of material or workmanship which develop
within seven (7) years after delivery of the JLA-8.1000 or JLA-9.1000 rotor to the original buyer by
Beckman Coulter or by an authorized representative, provided that investigation and factory
inspection by Beckman Coulter discloses that such defect developed under normal and proper use.
Should a Beckman Coulter centrifuge be damaged due to a failure of a rotor covered by this
warranty, Beckman Coulter will supply free of charge all centrifuge parts required for repair.
Replacement
Any product claimed to be defective must, if requested by Beckman Coulter, be returned to the
factory, transportation charges prepaid, and will be returned to Buyer with the transportation
charges collect unless the product is found to be defective, in which case Beckman Coulter will pay
all transportation charges.
A defective rotor will be replaced by Beckman Coulter at its then current list price less a credit based
upon the age of the rotor (years since date of purchase). The Buyer shall not receive credit until the
claimed defective rotor is returned to Beckman Coulter’s Indianapolis, Indiana facility, or delivered
to a Beckman Coulter Field Service representative.
The replacement price (cost to Buyer) for the respective rotor shall be calculated as follows:
years
Replacement price = Current rotor list price × -------------7
Conditions
1. Except as otherwise specifically provided herein, this warranty covers the JLA-8.1000 and the
JLA-9.1000 rotor only and Beckman Coulter shall not be liable for damage to accessories or
ancillary supplies including but not limited to (i) bottles, (ii) bottle contents, (iii) cap/closures,
or (iv) plugs.
2. This warranty is void if the rotor has been subjected to customer misuse such as operation or
maintenance contrary to the instructions in the Beckman Coulter rotor or centrifuge manual.
3. This warranty is void if the JLA-8.1000 or JLA-9.1000 rotor is operated with a rotor drive unit or
in a centrifuge unmatched to the rotor characteristics, or is operated in a Beckman Coulter
centrifuge that has been improperly disassembled, repaired, or modified.
4. Each canister, whether purchased with a complete rotor assembly or purchased separately, is
covered by this warranty for seven (7) years from the date of purchase, and will be replaced or
repaired during such period according to the terms and conditions of this warranty.
5. A canister should not be used after the expiration date marked on the canister. If the marked
date is fewer than 7 years from the date of purchase, the expiration date becomes the date of
purchase plus 7 years. Use of a canister after such expiration date voids Beckman Coulter’s
warranty obligations with respect to any rotor and/or centrifuge in which such a canister
is used.
PN J-TB-073GC
Warranty-1
Beckman Coulter, Inc. JLA-8.1000 and JLA-9.1000 Rotor Warranty
Disclaimer
IT IS EXPRESSLY AGREED THAT THE ABOVE WARRANTY SHALL BE IN LIEU OF ALL
WARRANTIES OF FITNESS AND OF THE WARRANTY OF MERCHANTABILITY AND THAT
BECKMAN COULTER INC., SHALL HAVE NO LIABILITY FOR SPECIAL OR CONSEQUENTIAL
DAMAGES OF ANY KIND WHATSOEVER ARISING OUT OF THE MANUFACTURE, USE, SALE,
HANDLING, REPAIR, MAINTENANCE, OR REPLACEMENT OF THE PRODUCT.
Warranty-2
PN J-TB-073GC
Related Documents
Rotors and Tubes for J2, J6, and Avanti J Series
Centrifuges (JR-IM-10)
•
Rotors
•
Tubes, Bottles, and Accessories
•
Using Tubes, Bottles, and Accessories
•
Using Fixed-Angle Rotors
•
Using Swinging-Bucket Rotors
•
Using Vertical-Tube and Rack-Type Rotors
•
Care and Maintenance
•
Chemical Resistances for Beckman Coulter
Centrifugation Products
•
Temperature Compensation Tables
•
Gradient Materials
•
Blood Component Separation
•
References
•
Glossary
Additional References
•
Chemical Resistances for Beckman Coulter
Centrifugation Products (IN-175)
•
Beckman Coulter High Performance, High
Speed, High Capacity Rotors, Tubes &
Accessories catalog (BR-8102)
•
HarvestLine System Liner Kit 369264
(J-TB-093)
•
Use and Care of Centrifuge Tubes and
Bottles (IN-192)
Available in hard copy or electronic pdf by
request, also available at
www.beckmancoulter.com
Available in hard copy or electronic pdf by
request.
Rotors and Tubes CD (369668)
•
Rotors and Tubes for Tabletop Preparative
Ultracentrifuges
•
Rotors and Tubes for J2, J6, Avanti J Series
Centrifuges
•
Rotors and Tubes for Preparative
Ultracentrifuges
•
Rotor Safety Bulletin
•
Chemical Resistances for Beckman Coulter
Centrifugation Products
Included with shipment of instrument.
www.beckmancoulter.com
© 2014 Beckman Coulter, Inc.
All Rights Reserved