1
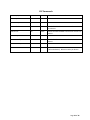
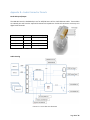
HSW-‐602 HDMI Matrix Switch Installation and User Manual USL Inc. Page 1 of 26 1.0 Overview Introduction The HSW-‐602 is the USL solution for multiple HDMI source playback in movie theaters and large venue presentations. The HSW-‐602 is a 6-‐in-‐2-‐out HDMI switching device, with S/PDIF audio output over TOSLINK and Coaxial connections. The HSW-‐602 can also overlay audio from an XLR or TLR 3.5mm source onto the AES/EBU audio output for expanded presentation functionality. The HSW-‐602 is designed specifically to interface with today’s Digital Cinema Projectors and Media Servers, providing ICP blanking for clean transitions, Ethernet automation commands for seamless integration, and AES/EBU audio output to cinema audio processors. Note: Page 2 of 26 Table of Contents 1.0 OVERVIEW .................................................................................................... 2 INTRODUCTION ............................................................................................................................................ 2 TABLE OF CONTENTS ..................................................................................................................................... 3 CONFORMANCE DECLARATIONS ...................................................................................................................... 4 Europe Union (CISPR 22) ....................................................................................................................... 4 FCC ........................................................................................................................................................ 4 Canada ................................................................................................................................................. 4 IMPORTANT SAFETY INSTRUCTIONS .................................................................................................................. 5 Product End of Life Information ............................................................................................................ 5 PRODUCT CONTENTS ..................................................................................................................................... 5 PRODUCT SPECIFICATIONS .............................................................................................................................. 6 HDMI Compliance Specifications .......................................................................................................... 7 Front Panel Descriptions ....................................................................................................................... 8 Rear Panel Descriptions ........................................................................................................................ 9 2.0 SETUP ......................................................................................................... 10 INSTALLATION ............................................................................................................................................ 10 LOCATE ON NETWORK ................................................................................................................................. 10 3.0 OPERATION ................................................................................................ 11 FRONT PANEL CONTROLS ............................................................................................................................. 11 AUTOMATION ............................................................................................................................................ 11 4.0 WEB INTERFACE .......................................................................................... 13 INPUT CONTROL ......................................................................................................................................... 14 AES AUDIO MIXING .................................................................................................................................... 14 SETTINGS .................................................................................................................................................. 15 Labels .................................................................................................................................................. 15 Network .............................................................................................................................................. 16 Projector ............................................................................................................................................. 17 Update ................................................................................................................................................ 18 Restore Factory Settings ..................................................................................................................... 19 5.0 PRODUCT SUPPORT .................................................................................... 19 LIVE LOGGING ............................................................................................................................................ 19 CONTACT USL ........................................................................................................................................... 19 USL ONE YEAR LIMITED WARRANTY .............................................................................................................. 20 APPENDIX A – AUTOMATION COMMANDS ....................................................... 21 APPENDIX B – AUDIO CONNECTOR PINOUTS .................................................... 24 APPENDIX C – GPIO PINOUT ............................................................................. 25 Page 3 of 26 Conformance Declarations Europe Union (CISPR 22) The USL HSW-‐602 complies with the EMC requirement of EN55022 and EN55024 when operated in accordance with this manual. Warning: This is a class A product. In a domestic environment, this product may cause radio interference in which case the user may be required to take adequate measures. FCC This equipment has been tested and found to comply with the limits for a Class A digital device, pursuant to Part 15 of the FCC Rules. These limits are designed to provide reasonable protection against harmful interference when the equipment is operated in a commercial environment. This equipment generates, uses, and can radiate radio frequency energy and, if not installed and used in accordance with this instruction manual, may cause harmful interference to radio communications. Operation of this equipment in a residential area is likely to cause harmful interference in which case the user will be required to correct the interference at their own expense. Canada This Class A digital apparatus complies with Canadian ICES-‐003. Cet appareil de la classe A est conforme à la norme NMB-‐003 de Canada. Page 4 of 26 Important Safety Instructions 1. 2. 3. 4. 5. 6. Read and keep these instructions. Do not use this apparatus near water. To reduce the risk of fire or electric shock, do not expose this apparatus to rain or moisture. Clean only with dry cloth. Only use attachments/accessories specified by the manufacturer. Refer all servicing to qualified service personnel. Servicing is required when the apparatus has been damaged in any way. 7. This equipment is intended for installation in a restricted access location. Caution: Troubleshooting must be performed by a trained technician. To reduce the risk of electric shock, do not attempt to service this equipment unless you are qualified Product End of Life Information Figure 2-‐1 This product was designed and built by USL to provide many years of service, and is backed by our commitment to provide high-‐quality support. When it eventually reaches the end of its serviceable life, it should be disposed of in accordance with local or national legislation. Product Contents ¨ HSW-‐602 HDMI Switch ¨ HSW-‐602 Power Supply • • • • Type UL Plug (USA/CA) Type VDE Plug (EU) Type SAA Plug (AUS/NZ/CN) Type UK Plug (UK) ¨ Documentation • Installation and User Manual Page 5 of 26 Product Specifications The HSW-‐602 is a 1U 19-‐inch rack mount device. It is a steel chassis with chassis grounding. The device is connected with: • • • • • • • • • • 1 12V 1.0A DC power input (AC adapter provided) 6 HDMI inputs 2 HDMI outputs 1 RJ45 Ethernet Connector 1 RJ45 Digital AES/EBU 8 channel input 1 RJ45 Digital AES/EBU 8 channel output 1 RCA Coaxial audio output (S/PDIF) 2 TOSLINK optical audio output (S/PDIF) 1 TRS/XLR-‐3 combo input jack (Mic) 1 TLR 3.5mm stereo input (Line-‐in) • 1 RJ45 GPIO Connector Ethernet connection provides access the HSW-‐602 Web Interface for control, setup and updating of the HDMI switch. TCP/IP commands are accepted through port 10001 on the Ethernet interface, and Telnet connections to port 23 are supported for live logging of operations. AES output includes channel mixing of the Mic and Line-‐in inputs, with 0 centered gain control for each input, to support overlay of microphones and alternative sources with the audio playback. TOSLINK and Coaxial audio supports 2 channel S/PDIF audio output and pass through of bitstream audio data. Microphone input supports passive balanced audio sources. No phantom power is supplied. Line-‐in supports stereo 2 channel audio, 300mV peak unbalanced. Page 6 of 26 HDMI Compliance Specifications All HDMI connections comply with HDMI 1.4b and HDCP 1.2 specification. All feature support for HDMI spec 1.4b and outlined in the table below. HDMI video is not scaled by the HSW-‐602. Feature 1.4b Support sRGB YCbCr 4:2:2/4:4:4 8 channel LPCM, 192 kHz, 24-‐bit audio capability Blu-‐ray Disc and HD DVD video and audio at full resolution Consumer Electronic Control (CEC) DVD-‐Audio Super Audio CD (DSD) Deep color xvYCC Auto lip-‐sync Dolby TrueHD bitstream capable DTS-‐HD Master Audio bitstream capable Updated list of CEC commands 3D over HDMI Ethernet channel Audio return channel (ARC) 4K resolution at 30 fps 4K resolution at 60 fps Rec. 2020 color space YCbCr 4:2:0 32 channel audio 1536 kHz audio 4 audio streams 2 video streams (Dual View) 21:9 aspect ratio Yes Yes Yes Yes Yes Yes Yes Yes Yes Yes Yes Yes Yes Yes Yes Yes Yes No No No No No No No No T ABLE 1 -‐ H MDI 1 .4 B F EATURE S UPPORT Page 7 of 26 Front Panel Descriptions 1 2 3 4 8 7 6 5 F IGURE 1 -‐ HWS-‐602 FRONT PANEL 9 10 11 12 1 XLR/TRS Combo Jack Insert microphone to overlay voice onto live HDMI Source. (AES Output Only) 2 Line In 3.5 mm line level feed to overlay onto live HDMI Source. (AES Output Only) 3-‐4 HMDI Source Input HDMI 1.4b compliant connector for input source. 5-‐10 HMDI Output Control Manual control buttons for Preview/Live output selection. 11 Power LED The power LED light is on when main power is applied and the power switch is ON. 12 Power Switch Toggles power to the device. Page 8 of 26 Rear Panel Descriptions 1 1 2 3 6 7 8 9 10 5 FIGURE 2 -‐ HSW -‐ 602 R EAR P ANEL 4 11 12 13 14 Digital AES/EBU Input Accepts an AES/EBU Input that’s routed to the AES/EBU Output (2) when powered down or in bypass mode. If the device is on and AES/EBU Input is desired, disable the AES Audio option in the Web Interface. 2 Digital AES/EBU Output Will pass-‐thru the AES/EBU Input (1) when powered down or in bypass mode. Outputs the Live HDMI (10) source audio if powered on and AES Audio enabled through web interface. 3 CMSA/GPIO Automation A future automation control port. Not currently supported. 4 Power Receptical Accepts 12 Volt, 1 Amp DC power supply. 5 Network Connection Ethernet port for network control of device from the Web Interface. TCP/IP commands are accepted through port 10001 on the Ethernet interface, and Telnet connections to port 23 are supported for live logging of operations 6 Preview S/PDIF Output Two channel PCM audio or multi-‐channel bitstream audio S/PDIF output of the Preview source. 7 Live S/PDIF Output Two channel PCM audio or multi-‐channel bitstream audio S/PDIF output of the Live source. 8 Preview/Live COAX Output Two channel PCM audio or multi-‐channel S/PDIF over COAX output of the Preview source. (Preview/Live toggle support not currently supported) 9 Preview HDMI Output 10 HDMI output of the currently selected Preview source Live HDMI Output HDMI output of the currently selected Live source 11-‐14 HMDI Source Input Additional HDMI 1.4b compliant connector for input source Page 9 of 26 2.0 Setup Installation The HSW-‐602 is a 1U rack mount device. The chassis is made to fit a 19-‐inch standard rack. The vent holes are located on the sides and should be provide 1 inch of clearance and airflow for proper cooling. It is designed to be stacked with other equipment in the rack. o Attach the HSW into a 1U rack slot with the 4 mounting screws. Please make sure the rack is fully grounded to avoid excess electrical noise. o Attach the HDMI output cables to the HDMI sink devices. The Live output is intended to connect directly to the main presentation device (projector), and the Preview output is intended to connect to a preview/check display. o Connect HDMI input cables to appropriate channels. There are 4 HDMI inputs on the back of the HSW, and 2 on the front for quick connections. Note that channels 1 and 2 are on the front, and the HSW will automatically connect to these on boot. o Connect AES audio cable from the output on the HSW to a digital input on the sound processor. o Connect AES Output of your Digital Cinema Server to AES input on the HSW-‐602 o Connect TOSLINK or Coaxial audio cables if they are to be used. o Connect the XLR and Line In cables if they are to be used. o Connect the provided power adapter and plug in to an outlet. The included power adapter has multiple plug configurations for different electrical standards. Locate on Network The IP address of the HSW-‐602 will default to “169.254.***.0”, where *** is the last number of the S/N + 1. For example: the HSW with S/N “HSW-‐602-‐1223-‐6” will have a default IP address of 169.254.7.0. If this IP address is not available, the HSW will increment the last octet until finding a free IP address. You can put this IP into a web browser to view the Web Interface. Note: The device must be powered and booted (15-‐30 seconds) to be accessible on the network. Page 10 of 26 The Ethernet Discover program will also be able to discover the HSW on your network. This program is available for download on USL’s website (ftp.uslinc.com). Open the Ethernet Discoverer program and it will begin to scan for USL devices. Double click a discovered device to load its Web Interface in your default browser. Some router configurations and Windows computers might not route to the defaul address automatically. If you cannot access the Web Interface using this IP address, you can use the Windows command line to add the routing needed (substitute your computers actual IP address in for “IP_of_your_computer” ): 1. Open the start menu and enter Command Prompt in the search field. 2. Right click the Command Prompt icon that appears and select Run as Administrator. 3. On the command line enter the command: route add 169.254.0.0 mask 255.255.0.0 IP_of_your_computer 4. Press enter and the command line will respond OK. 3.0 Operation Turn on the device with the power switch on the front panel. When powered on, all lights on the front panel will turn on for several seconds. Afterward, the power light will remain on as the HSW boots. The HSW-‐602 will be now ready to use, with Live output defaulting to Input 1 and Preview defaulting to Input 2 on startup. The Ethernet and web services will be available several seconds after the device has finished booting. Front Panel Controls Pressing the corresponding buttons on the front panel of the HSW-‐602 can control the Live and Preview output sources. Note that both outputs cannot be set to the same input. Setting the Live output to a channel that the Preview is currently on will switch the two output’s sources. An input cannot be assigned to the Live and Preview outputs at the same time. Automation The HSW-‐602 accepts Ethernet automation commands on TCP/IP communication on port 10001. The Ethernet commands can be used to automate HSW functionality with a digital cinema server that supports Ethernet automation. Source settings, status queries, and a limited number of CEC commands are available through these commands. Delineate individual messages with a carriage-‐return line-‐feed character after each. This is commonly represented as “\r\n” or “\x0A\x0D” at the end of each line. Page 11 of 26 There are 2 types of HSW TCP/IP commands: queries and assignments. One command can be used for either type, with an “=” designating an assignment command and requiring a value after. The HSW-‐602 commands formatting can be seen below. hsw.subsystem.command=value If a value is not present, the HSW-‐602 will return the current state of command. Examples: To find the currently selected Live channel, send the HSW the following command: hsw.live.source\x0a\x0D This will return a value from 0-‐5 indicating which input is currently being passed to the Live output. To set the Live output to a different source, send the command: hsw.live.source=3\x0a\x0D This will set the live source to channel 4. Note that source channels in the Ethernet commands are 0 referenced. The full listing of TCP/IP automation commands is available in Appendix A Page 12 of 26 4.0 Web Interface The HSW-‐602 Web interface provides expanded control of the device as well as setup and configuration. With the HSW powered on and connected to your computer or network, access the device directly using a web browser. Enter the IP address of the HSW-‐602 into the address line of the web browser to show the web interface. The web interface will show in full or mobile mode based on the size of the window it is displayed in. http://ip_address_of_the_switch F IGURE 3 -‐ W EB I NTERFACE Page 13 of 26 Input Control The HSW-‐602 Web Interface home page allows for controlling the channel selection for both the Live and Preview outputs. To change the channel, simply click the button you wish each output to display. When using the web interface, click the USL logo in the upper left corner to return to this home page. In Figure 4 shown below, HDMI Input 2 (Source 2) will be fed to the Live HDMI Output and HDMI Input 4 (Source 4) will be routed to the Preview HDMI Output. FIGURE 4 -‐ S OURCE S ELECTION CONTROL AES Audio Mixing AES audio output is controlled from third set of buttons on the home page. When the Enable button is unselected, audio from the AES input is passed through to the AES output. The device defaults to this setting on boot and when powered off. Selecting the Enable button will activate the AES mixer in the HSW-‐602 and disable any audio coming in from the AES/EBU RJ45 input port. The HDMI, Microphone, and Line-‐In buttons configure how audio is mixed by the HSW-‐602. When enabled, the audio from the Live HDMI source routed to the AES output. Selecting Microphone or Line-‐In will overlay audio from that selection onto the HDMI Live audio to the AES output. Gain control sliders allow for level control of that input. Clicking HDMI will turn off the overlay and return to only HDMI audio. Note that only one overlay source (Microphone or Line In) can exist at a time. For more detail on audio routing in the HSW-‐602, refer to Figure 10 in Appendix B. FIGURE 5 -‐ M IC OVERLAY ON HDMI Page 14 of 26 Settings Select the gear icon in the upper right corner of the Web Interface to access the settings pages. Labels The Labels page under the settings allows for renaming the buttons for each input channel on the Web Interface. Change these names to more easily identify sources while switching. The save button at the bottom will show confirmation when the changes are saved to memory. F IGURE 6 -‐ M AKING LABELS Page 15 of 26 Network The Network settings menu is available to the user if the device needs additional configuration to work on the network. Choosing Yes to DHCP will allow the device to be dynamically assigned an IP address by the network DHCP server. Note that IP addresses assigned by a DHCP server may not be static and could unexpectedly change. Choosing No will allow the user to pick an IP address, subnet mask, and default gateway appropriate to the network’s configuration. Press the save button and the web page will confirm when settings have been saved to memory. IP address changes will take affect after the next reboot of the device. FIGURE 7 -‐ N ETWORK CONFIGURATION Page 16 of 26 Projector These settings allow the HSW-‐602 to communicate with a digital cinema projector. If the projector is accessible through the network, the HSW-‐602 will enable ICP blanking, showing a blank screen when the HSW is switching between HDMI outputs. To enable or disable the projector blanking, click Yes or No for the Enabled setting. Enter the IP address of your projector once enabled, and set the number of seconds Duration you want the image to blank during each switch. Press the Save button and the Web Interface will confirm when the settings have been saved to the memory of the HSW-‐602. The blanking can be configured to make clean transitions between content during presentations. Please note that projector blanking will be done every time the Live output on the HSW-‐602 is switched between different channels. The blanking done by the HSW is with the ICP of the projector, and not the dowser. The HSW can still blank the projector image when a different input on the projector is being used, such as a Media Block. If the HSW is moved between auditoriums, it can still blank the image on the previous projector until the projector IP setting on the HSW has been reconfigured, or blanking disabled. To find the best blanking time: 1. Disable Projector blanking on the HSW. 2. Setup 2 inputs on the HSW with different types of connections, such as a 1080p 60Hz source with 5.1 audio, and a 720p 24Hz source with 2 channel audio. 3. With the projector showing the image on screen from the Live output, switch the source between the two. 4. Time how long it takes from button push until good stable image shows on screen. 5. Round up to the next whole number and set the Duration to that many seconds. F IGURE 8 -‐ PROJECTOR C ONFIGURATION Page 17 of 26 Update Current firmware revisions are listed at the top of the Update page. When a newer firmware version is available, follow the update procedure: 1. 2. 3. 4. 5. 6. Download the update file from USL to your computer. Click the Choose File… button to open a file dialog. On the file dialog find the saved file and click Open. The Web Interface will show the name of the selected file. Click Update. Wait for all the steps of the update process to complete. Once all steps have turned green, the HSW-‐602 is ready to use. Refresh the Web Page to see the new firmware version. FIGURE 9 -‐ F IRMWARE U PDATE Page 18 of 26 Restore Factory Settings The HSW-‐602 can be returned to factory settings. To reset the settings: 1. 2. 3. 4. Turn off the HSW. Hold both the HDMI 6 Live and HDMI 6 Preview buttons down. Turn on the HSW. All the LEDs will light, then the red and yellow LEDs will begin flashing alternately. You can now release the HDMI 6 buttons. 5. The HSW will boot as normal, with the configuration reverted. The firmware version will remain the same. Link Local dynamic IP address will be restored, and revert to the default IP. 5.0 Product Support Live Logging The HSW-‐602 has a live log available for access. To view the non-‐interactive live logs, open a terminal program and connect via telnet to port 23. The HSW will display information that can be forwarded to USL to help diagnosing any issues encountered. Contact USL USL proudly stands behind its products. We are ready to answer questions about the installation or operation of the HSW-‐602. The manual, application notes and other documents are available on our website. You may contact USL by: Phone: +1 (805) 549-‐0161 Email: [email protected] File a support ticket electronically at: www.uslinc.com/support Please check the USL website for the latest software updates for the HSW-‐602. www.uslinc.com USL is interested in your comments. Please feel free to contact us with any comments or suggestions. Page 19 of 26 USL One Year Limited Warranty USL, INC. warrants that each product manufactured by it will be free from defects in material and workmanship under normal usage over a period of one (1) year after its purchase new from and authorized dealer. Our obligation under this warranty is limited to repairing or replacing any product or component which we are satisfied does not conform with the foregoing warrantee and which is returned to our factory freight paid, or serviced by one of our authorized contractors. The forgoing warranty is exclusive and in lieu of all other warranties, whether expressed or implied. Such warranty shall not apply to any product or component (A) repaired or altered by anyone other than USL, Inc. or an authorized service contractor; (B) tampered with or altered in any way or subjected to misuse, negligence or accident or (C) which has been improperly connected, installed or adjusted other than in accordance with USL, Inc.’s instruction. Page 20 of 26 Appendix A – Automation Commands The following commands can be sent to the device by TCP/IP ASCII strings on port 10001 or through a telnet session to the same port. Individual commands should be terminated with a carriage return line character, often shown as “\r\n” or “\x0A\x0D”. The terminal will accept commands in the communication format: hsw.sys.subsystem.command=value System Commands Command Assign/Query Value Description hsw.sys.store Yes 1 Saves current configuration to flash storage on the HSW. Both hsw.sys.store and hsw.sys.store=1 will execute the save. hsw.sys.source0.name Yes String Query or assign the channel name for HDMI inputs 0-‐5. Inputs are 0 referenced. The names will be shown in the Web Interface. hsw.sys.source1.name hsw.sys.source2.name hsw.sys.source3.name hsw.sys.source4.name hsw.sys.source5.name Switching Commands hsw.live.source Yes 0-‐5 Assign the Live output to the specified input channel. Inputs are 0 referenced (assigning 0 will activate input 1). hsw.preview.source Yes 0-‐5 Assign the Preview output to the specified input channel. Inputs are 0 referenced (assigning 0 will activate input 1). Audio Commands hsw.audio.source Yes 0-‐2 Select the source to mix to the AES audio output. Assign or query values: 0 – None 1 – Microphone 2 – Line In hsw.audio.outputen Yes 0 or 1 Enable the AES audio output. Assign to 1 to set HDMI audio to play on AES Out and mix the assigned audio source. Set to 0 to have the AES audio pass through the AES In audio. Page 21 of 26 System Information Commands hsw.sys.board.revision Query Only String Returns current HSW-‐602 hardware revision version. hsw.sys.board.tempurature Query Only Float Current board temperature in degress Celsius. hsw.sys.sw.version String Returns the current HSW-‐602 software revision version. Query Only Network Configuration Commands hsw.sys.ip.dhcp Yes 0 or 1 Enable or disable use of Dynamic Host Configuration Protocol. When enabled, if no DHCP server is found within 5 seconds of boot an IPV4 link local address will be assigned. hsw.sys.ip.address Yes IP String Assign or Query the static IPv4 address to be used when DHCP is disabled. hsw.sys.ip.subnet Yes IP String Assign or Query the IPv4 subnet mast to be used when DHCP is disabled. hsw.sys.ip.gateway Yes IP String Assign or Query the IPv4 default gateway to be used when DHCP is disabled. Projector Configuration Commands hsw.sys.projector.enable Yes 0 or 1 Enable or disable digital cinema projector communication. hsw.sys.projector.address Yes IP String Assign or query the IPv4 address of the projector the HSW-‐602 will communicate with. hsw.sys.projector.duration Yes Integer Number of seconds the HSW-‐602 will blank the projector output during a Live output channel switch. hsw.sys.projector.blank Yes 0 or 1 Manual send the command to blank the projector output. 0 – Disable blanking (show image). 1 – Enable blanking (mute image). Page 22 of 26 CEC Commands hsw.cec.play Yes None Sends CEC PLAY command to current Live Source hsw.cec.pause Yes None Sends CEC STILL command to current Live Source hsw.cec.stop Yes None Sends CEC STOP command to current Live Source hsw.cec.fwd Yes None Sends CEC SEEK FORWARD command to current Live Source hsw.cec.rev Yes None Sends CEC SEEK REWIND command to current Live Source hsw.cec.eject Yes None Sends CEC EJECT command to current Live Source hsw.cec.standby Yes None Sends CEC STANDBY command to current Live Source hsw.cec.standbyall Yes None Broadcasts CEC STANDBY command to CEC bus hsw.cec.resume Yes None Sends CEC PLAY command to current Live Source (will wake device). Behavior varies per device. Page 23 of 26 Appendix B – Audio Connector Pinouts RJ-‐45 AES Input/Output The HSW-‐602 uses the StudioHub pin out for AES/EBU over CAT5 or CAT6 Ethernet cable. These cables are twisted pair and have the required characteristic impedance. Each RJ-‐45 connector carries up to 8 digital audio channels. Audio Channels AES Pair Top RJ-‐45 Pins ( +, -‐ ) 1, 2 1 1, 2 3, 4 2 3, 6 5, 6 3 4, 5 7, 8 4 7, 8 T ABLE 2 -‐ R J45 A ES P INOUT Audio Routing F IGURE 1 0 -‐ A UDIO R OUTING D IAGRAM Page 24 of 26 Appendix C – GPIO Pinout GPIO implementation planned for future use. Page 25 of 26 Page 26 of 26