1
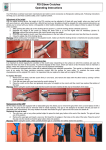
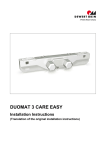
Q chassis Q chassis + ThevoSeat Q chassis + EASyS Q chassis + tRide (1) (2) (3) (5) (6) (4a) (4b) Dear user, in order to make the operation of the Q chassis safe, practical, and comfortable for you and especially for your child, please read this user manual completely before use. Contents 8 Page Safety-related checks and maintenance intervals .............................................................................................. 9 General safety instructions ............................................................................................................................... 9 Purpose and use .............................................................................................................................................. 10 Risks and contraindications .............................................................................................................................. 10 Technical data ................................................................................................................................................. 10 Setting up and assembly .................................................................................................................................. 10 Installing the seat unit ...................................................................................................................................... 10 Folding ............................................................................................................................................................ 10 Seat height adjustment ..................................................................................................................................... 10 Seat tilt-in-space adjustment............................................................................................................................. 11 Parking brake function ..................................................................................................................................... 11 Cleaning, disinfecting, and care instructions..................................................................................................... 11 Terms of guarantee / CE mark .......................................................................................................................... 11 Safety-related checks and maintenance intervals All operating elements and fastening screws should be checked every month. The telescopic sliding plate should remain free of dirt and sand. Please bear in mind that the screws and release handles (hip angle adjustment) should be secured after each adjustment. Please observe the following general safety instructions: When handling Q chassis, especially when setting up, please observe the recommendations in the user manual. Please keep packaging material away from children to avoid the risk of choking. We recommend that you adjust the seat depth and lower leg length according to the current body size of your child at least every 3 months. If necessary, ask your therapist / orthopaedist for assistance. Please bear in mind to engage the locking device after adjusting the seat height, seat angle, and hip angle. Please be careful not to catch your fingers when carrying out adjustments. Be careful not to harm yourself when folding up the footrest or adjusting the seat height. IMPORTANT: Use the attached Allen key for all adjustments (Allen screw 3mm/0.1”). If you have doubts about the correct use of Q chassis consult your local dealer to avoid incorrect adjustments. For safety reasons accessories not mentioned in this user manual should be mounted by specialists only. Please do not overload your Q chassis and observe the maximum load capacity (see technical data). Only one child should be seated in Q chassis. Do not leave your child unattended when getting in or off Q chassis. Excessive load of the footrest may lead to slipping off or tipping. We recommend that you always secure your child with the 2-point pelvic belt (standard equipment) or another retention belt (available as an accessory), and never leave the child unattended in Q chassis. Always lock the brake before placing or removing the child from Q chassis. Always lock the brake when the chair is stationary to avoid rolling. Avoid any obstacles in the way of the chair, do not push the chair into them. ATTENTION: Wet wheels may affect the braking action. When stopping or halting for a longer period of time you should apply the foot brake to prevent inadvertent rolling. When lifting Q chassis make sure to hold it at tightly welded or tightly screwed component parts only (frame tube at front and rear wheels). Please avoid uneven ground, as this may cause Q chassis to tip over. Ground beams should be passed over only when the base frame is tilted to stand on the rear wheels (going upwards – pull backwards, going downwards – lowering slowly). Stairs must only be taken with the aid of an accompanying person. If available, elevators or similar equipment should be used. If such equipment is unavailable, the obstacle should be passed with the chair being carried by two persons, without the child sitting in it. Please be careful when pushing on slopes to avoid Q chassis tipping over or rolling away, or your child falling out of the chair. Parking Q chassis on slopes should be avoided. From time to time you should wipe off the dirt from the wheels. Use a damp cloth and make sure you dry thoroughly. Do not use strong solvent. High solar radiation may lead to high surface temperature on the dark upholstery material. Do not expose the gas springs to high pressure or temperatures. Do not loosen or remove any screws unless otherwise stated. Keep Q chassis away from naked flames. Tip: You may find additional information at our web site www.thomashilfen.com 9 Purpose and use The chassis is, in association with a compatible / convenient seat-system for egonomic transfer of disabled children, suitable for indoor use. Risks and contraindications Proper handling may avoid any use-related risks. No contraindications are known. Technical data Seat tilt-in-space Seat height with seat unit Total dimensions (l x w x h) Adapter height Size of swivel wheels (front) Size of swivel wheels (rear with brake) Weight (without seat unit) Carrying capacity -7 to +31° 29 - 69 cm / 11.4 – 27.2" 76 x 54 x 25 - 62 cm / 29.9 x 21.3 x 9.8 - 24.4" 21 - 60 cm / 8.3 – 23.6" 100 mm / 3.9" 100 mm / 3.9" 13.5 kg / 29.8 lb 50 kg / 110.2 lb Setting up and assembly The base frame is supplied already fully mounted and folded together. Loosen the locking pin at the foot pedal and lock it by doing a quarter turn. You can now adjust the seat height and, if necessary, the seat tilt-in-space. (fig. 1-3) Installing the seat unit size 1 The seat unit must be positioned centrally between the spacers. (Fig. 4a) Installing the seat unit size 2 Before installing seat unit size 2 on the Q chassis, the four spacers on the seat adapter must be moved into the outer holes. (Fig. 4b) Folding Bring the backrest to the maximum horizontal position, loosen the knee angles and swivel the footrest over and down onto the seat unit (fig. 5). Move the seat tilt adjustment to a horizontal position and lower the seat unit down to the ground (see seat height adjustment). CAUTION: Hold the frame with one hand when folding to avoid it tipping over. Be careful not to catch your fingers. Seat height adjustment The seat unit can be lowered down to the ground. Apply the right foot pedal at the back of the base frame (fig. 1-3). Now push the seat unit down (at the back, the armrests or the push bar, if available) or pull it upwards until the desired height is reached. To keep the height, simply remove your foot from the pedal. The seat height can also be adjusted during use of the chair. It may then be necessary for two people to lift the seat to the desired height. For safety reasons the seat height adjustment can be locked. The adjustment is locked when the locking pin to the left of the pedal is engaged (fig. 2). To unlock, pull out the locking pin and do a quarter turn. 10 Seat tilt-in-space adjustment To adjust the seat tilt-in-space, use the pedal on the left side of the rear frame (fig. 2-3). First, engage the brakes. Now either push the seat unit forwards (at the back, the armrests or the push bar, if available) or pull it backwards until the desired angle is reached. To keep the angle, remove your foot from the pedal. The seat tilt-in-space can also be adjusted during use of the chair. It may then be necessary for two people to adjust the desired seat angle. For safety reasons the seat tilt-in-space adjustment can be locked. The adjustment is locked when the locking pin to the left of the pedal is engaged (fig. 2). To unlock, pull out the locking pin and do a quarter turn. IMPORTANT: The seat height adjustment and seat tilt-in-space adjustment should always be locked during use of the chair. CAUTION: When adjusting the seat height or seat tilt-in-space one person must secure the seating systems with both hands to avoid sudden changes of the child’s position. We recommend carrying out this setting without the child in the seat unit. Parking brake function Locking / releasing the castors The rear castors are equipped with easily accessible and easy to use brakes. To lock the castors press the locking device down. By pushing the locking device up again the castors become flexible. The brakes prevent the castors both from turning and from swivelling, so that the base frame can be safely parked via the rear wheels alone (fig. 6). Cleaning, disinfecting and care instructions The Q chassis is manufactured from high-quality steel and aluminium tubing which is coated with a robust heat-enamel finish; and can be cleaned using commercially available no-toxic soap (neutral soap). Terms of guarantee / CE mark Thomashilfen offers you a guarantee of 3 years for all frame parts, commencing on the date of purchase. This guarantee incorporates all claims which influence functionality. Damages due to improper use (e.g. overloading), and natural wear and tear are excluded. Q chassis meets the requirements of the European standards EN 12182 and 12183 and is provided with a CE marking. Enjoy your Q chassis! 11 Item code: 95526, status: 06/2014, subject to technical alterations Member of the International Support Association for the Rehabilitation of Children and Youths e.V.