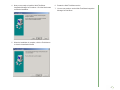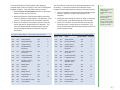
1
TOP
Copyright © 2004-2005 Replicon, Inc. All rights reserved.
All parts of this manual are the property of Replicon, Inc.
No parts of this manual may be reproduced in any manner
whatsoever including mechanical or electronic media such
as disk or tape. No part of this manual may be transmitted
in any form by any means without the written permission of
Replicon, Inc.
Web TimeSheet is a registered trademark of Replicon, Inc.
All other products are registered trademarks or trademarks
of the respective companies.
Contact Information
Replicon, Inc.
830, 910 - 7th Ave. S.W.
Calgary, Canada T2P 3N8
Direct:
1-403-262-6519
Toll Free in North America:*
1-877-737-5420
Toll Free in Europe:*
00-800-7375-4266
Toll Free in Australasia:*
011-800-7375-4266
Fax:
1-403-233-8046
http://www.replicon.com
[email protected]
*The international toll free numbers
may not work in some countries. If you
experience problems, use the direct line
to contact Replicon.
Contents
Chapter 1 - What is WTS Integration Manager?
1
Introduction ........................................................................ 1
Technical Requirements ..................................................... 1
Constraints ......................................................................... 1
Chapter 2 - Installing the WTS Integration
Manager
2
Before You Install ............................................................... 2
Running the Installation ...................................................... 2
Chapter 3 - Using the WTS Integration Manager
4
Accessing WTS Integration Manager ................................. 4
Preparing for the Export ..................................................... 4
Running the Export ............................................................ 6
Accessing the Exported Data ............................................. 6
Web TimeSheet to Peachtree Complete Accounting
(Time Ticket Mapping) ................................................. 7
Chapter 4 - Field Relationships
7
Web TimeSheet to Peachtree Complete Accounting
(Expense Ticket Mapping) .................................................. 8
Chapter 1 - What is WTS Integration Manager?
Introduction
Constraints
The Web Timesheet Integration Manager for Peachtree allows
users to export time and/or expense data from Web TimeSheet
to Peachtree Complete Accounting.
•
The date format for the user running the export must be
dd/mm/yyyy for International installations and mm/dd/yyyy
for installations within the United States and Canada. The
same date format must also be set up in the Windows
regional settings on the machine where Peachtree
Complete Accounting is installed.
•
The information for specific Web TimeSheet fields must
match existing fields in Peachtree Complete Accounting, as
noted below.
Initially, a user must define templates within Peachtree
Complete Accounting. The templates will ensure that data is
imported from Web TimeSheet in the proper format. Setting up
the templates is a one-time process. Refer to Chapter 3 - Using
Web TimeSheet Peachtree Link for further information about
setting up templates.
Technical Requirements
The following applications are required to successfully export
data from Web TimeSheet to Peachtree Complete Accounting
using the Web TimeSheet Peachtree Link:
•
Peachtree Complete Accounting 2003
•
Web Timesheet (SQL or Access)
•
Microsoft Internet Explorer 5.5 or higher
•
Netscape Navigator 7.1 or higher
•
Mozilla Firefox 1.0
Web Timesheet Field
Peachtree Field
Task Code
Activity Item Id
Client Code
Customer Id
Employee Id
Employee Id
Expense Code
Charge Item Id
1
Chapter 2 - Installing the WTS Integration Manager
Note ...
Make sure you install
Web TimeSheet before
installing the Web
TimeSheet Integration
Manager for Peachtree.
Before You Install
Before installing Web TimeSheet Integration Manager for
Peachtree version 6.1, you must have Web TimeSheet installed.
The Integration Manager for Peachtree must then be installed in
the root directory of Web TimeSheet.
Running the Installation
This section explains how to complete the installation of the
Web TimeSheet Integration Manager for Peachtree.
You will need to purchase Web TimeSheet Integration Manager
for Peachtree and obtain the WTS61PeachtreeLink.exe file from
Replicon Customer Support. You will also need to obtain a valid
license key for the Integration Manager.
The Installation Wizard will guide you through the installation
process.
1. Stop the service associated with Web TimeSheet and
back up the Web TimeSheet database.
2. Launch the WTS61PeachtreeLink.exe file. The Welcome
screen is displayed.
2
3. Next you will need to specify the directory where the Web
TimeSheet Integration Manager for Peachtree should be
installed.
The Integration Manager for Peachtree must be installed
in the root of the Web TimeSheet directory. Use the
Browse button to locate the Web TimeSheet directory.
4. Now you are ready to install the Web TimeSheet
Integration Manager for Peachtree. Click the Next button
to start the installation.
6. Restart the Web TimeSheet service.
7. You are now ready to use the Web TimeSheet Integration
Manager for Peachtree.
5. When the installation is complete, click the Finish button
to close the Installation Wizard.
3
Chapter 3 - Using the WTS Integration Manager
Note ...
You must have
appropriate Web
TimeSheet permissions
to access the Peachtree
Link reports.
Refer to the Web
TimeSheet User Manual
for further information
about permissions.
Accessing WTS Integration Manager
Show
Title
Field
Column Break
Column #
Yes
Yes
Ticket Number
Yes
1
Yes
Yes
Employee/Vendor
Yes
2
1. Log in to Web TimeSheet and click on the Reports button
at the top of the screen.
Yes
Yes
Duration
Yes
3
Yes
Yes
Billing Type
Yes
4
2. Select one of the following reports under the Peachtree
heading in the side menu:
Yes
Yes
Manual/Timed Option
Yes
5
Yes
Yes
Has Been Used In
Payroll
Yes
6
• Peachtree Expense
Yes
Yes
Pay Level
Yes
7
• Peachtree Expense Rate
Yes
Yes
Customer/Job/Adm
Yes
8
Yes
Yes
Completed For ID
Yes
9
Yes
Yes
Activity Item ID
Yes
10
Yes
Yes
Has Been Used in
Sales Invoicing
Yes
11
Yes
Yes
Billing Status
Yes
12
Yes
Yes
Billing Rate
Yes
13
Yes
Yes
Recorded By ID
Yes
14
You will need to set up Time Ticket Register and Expense Ticket
Register import templates.
Yes
Yes
Ticket Date
Yes
15
No
Yes
Invoice Number Used
Yes
To set up the Time Ticket Register import template:
No
Yes
Start Time
Yes
1. Open Peachtree Complete Accounting. In the File menu,
click on Select Import/Export.
No
Yes
End Time
Yes
No
Yes
Break
Yes
2. Select Time/Expense from the list of available imports.
No
Yes
Internal Memo
Yes
3. Select Time Ticket Register and click on the Import
button to modify the import format.
No
Yes
Unit Duration
Yes
4. Modify the Time Ticket Register fields as outlined in Table
2-1: Time Ticket Register (Field Format).
No
Yes
Billing Amount
Yes
No
Yes
Ticket Description
for Invoice
Yes
The Web TimeSheet Integration Manager for Peachtree is
accessible as multiple reports from within Web TimeSheet. You
can access these report as follows:
• Peachtree Time
Preparing for the Export
Before exporting Web TimeSheet data to Peachtree Complete
Accounting, you must set up the import format templates within
Peachtree Complete Accounting. These templates will ensure a
smooth data transfer from Web TimeSheet to Peachtree
Complete Accounting.
4
2-1: Time Ticket Register (Field Format)
5. When you’re finished, click the Save button and enter a
unique name for the template. This name will differentiate
the modified template from the system template provided
by Peachtree Complete Accounting.
To set up the Expense Ticket Register import template,
complete Steps 1 and 2 for setting up the Time Ticket Register
template on Page 4. Then follow the instructions below:
You must also set up the format for rate-based expenses, such
as mileage. To set up the Expense Ticket Register import
template for rate-based expenses, follow the instructions below:
1. Select Expense Ticket Register and click on the Import
button to modify the import format.
1. Open the template for flat expenses (the template may still
be open, unless you closed it after saving the new
template).
2. Modify the Expense Ticket Register fields as outlined in
Table 2-2: Expense Ticket Register - Flat Expenses (Field
Format). This format will be for flat amount expenses.
3. When you’re finished, click the Save button to save this
format and enter a unique name for the template. This
name will differentiate the modified template from the
system template provided by Peachtree Complete
Accounting.
2. Modify the import format as outlined in Table 2-3: Expense
Ticket Register - Rate-Based Expenses (Field Format).
3. When you’re finished, click the Save button to save this
format and enter a unique name for the template. This
name will differentiate the rate-based expense format from
the flat expense format.
2-2: Expense Ticket Register - Flat Expenses (Field Format)
2-3: Expense Ticket Register - Rate-Based Expenses (Field Format)
Show
Title
Field
Yes
Yes
Yes
Column Break
Column #
Show
Title
Field
Column Break
Column #
Ticket Number
Yes
1
Yes
Yes
Ticket Number
Yes
1
Yes
Employee/Vendor
Yes
2
Yes
Yes
Employee/Vendor
Yes
2
Yes
Yes
Charge Item ID
Yes
3
Yes
Yes
Charge Item ID
Yes
3
Yes
Yes
Reimbursable to
Employee
Yes
4
Yes
Yes
Reimbursable to
Employee
Yes
4
Yes
Yes
Ticket Description
for Invoice
Yes
5
Yes
Yes
Ticket Description
for Invoice
Yes
5
Yes
Yes
Custmer/Job/Adm
Yes
6
Yes
Yes
Custmer/Job/Adm
Yes
6
Yes
Yes
Completed For ID
Yes
7
Yes
Yes
Completed For ID
Yes
7
Yes
Yes
Has Been Used in
Sales/Invoicing
Yes
8
Yes
Yes
Has Been Used in
Sales/Invoicing
Yes
8
Yes
Yes
Billing Status
Yes
9
Yes
Yes
Billing Status
Yes
9
No
Yes
Unit Price
Yes
Yes
Yes
Unit Price
Yes
10
No
Yes
Quantity
Yes
Yes
Yes
Quantity
Yes
11
Yes
Yes
Billing Amount
Yes
10
No
Yes
Billing Amount
Yes
Yes
Yes
Recorded By ID
Yes
11
Yes
Yes
Recorded By ID
Yes
12
Yes
Yes
Ticket Date
Yes
12
Yes
Yes
Ticket Date
Yes
13
No
Yes
Invoice Number Used
Yes
No
Yes
Invoice Number Used
Yes
No
Yes
Internal Memo
Yes
No
Yes
Internal Memo
Yes
Note ...
Make sure you save the
modified import
template with a unique
name.
DO NOT overwrite the
existing system
template, as you may
want to use this generic
template to set up other
imports in the future.
5
Note ...
Peachtree Complete
Accounting will prompt
you to back up your
Peachtree installation
before importing time or
expense data. It is
recommended that you
perform this backup to
prevent possible data
corruption.
Only data for approved
timesheets/expense
sheets will be included
in the export.
Running the Export
Accessing the Exported Data
Now that you have set up the import format within Peachtree
Complete Accounting, you can export the data from Web
TimeSheet.
When you export time/expense data, Web TimeSheet creates a
.csv file that can be opened in Peachtree Complete Accounting.
To export the data:
1. Click on the Reports button at the top of the Web
TimeSheet screen.
2. Select one of the following reports under the Peachtree
heading in the side menu:
• Peachtree Time
• Peachtree Expense Rate
• Peachtree Expense
3. Select the timesheet period or date range for which you
want to export time or expense information.
4. If you would like to review the data before exporting it to
Peachtree Complete Accounting, click on the Generate
button to generate the report for the time period you
specified.
5. Click on the Peachtree button to export the data to a .csv
file that can be opened in Peachtree Complete
Accounting.
6
Peachtree Complete Accounting will import the data in the .csv
file ONLY IF the fields are properly set up. Refer to Chapter 1 What is Web TimeSheet Peachtree Link? for further information
about the field constraints between Web TimeSheet and
Peachtree Complete Accounting.
To open the .csv file in Peachtree:
1. Open Peachtree Complete Accounting. In the File menu,
click on Select Import/Export.
2. Select Time/Expense from the list of available imports.
3. To import time information, select the Time import you set
up previously and click on the Import button. For expense
imports, select the appropriate expense import format (flat
amount or rate-based).
4. On the Options tab, make sure you specify the location
where you saved the export file.
5. Select the First Row Contains Headings check box.
6. When you are ready, click the OK button to continue with
the import. It is recommended that you back up your
Peachtree company data to prevent data corruption.
Chapter 4 - Field Relationships
Web TimeSheet to Peachtree Complete Accounting (Time Ticket Mapping)
Web Timesheet (source)
Peachtree (target)
Constraints
Timesheet Entry ID
Ticket Number
The Timesheet Entry ID is an auto-generated key created within the Web
TimeSheet database. Timesheet Entry ID cannot be modified from within Web
TimeSheet.
N/A
Employee/Vendor
Web TimeSheet does not differentiate between employees and vendors.
Therefore, Web TimeSheet always uses a value of “0” to indicate that the
exported time has been entered by an employee.
Duration
Duration
none
N/A
Billing Type
Constant value of ‘2’ to indicate the rate is included in the export.
N/A
Manual/Timed Option
Constant value of ‘1’ to indicate that the duration calculation is manual
completed within Web TimeSheet.
N/A
Has Been Used in Payroll
Constant value of ‘FALSE’ to indicate that payroll information is not generated
from within Web TimeSheet.
N/A
Customer/Job/Adm
Constant of ‘1’ indicating expense entry for customer
Client Code
Completed For ID
This field must match an existing Customer Id within Peachtree Complete
Accounting
Task Code
Activity Item ID
The task code associated with a specific project/task in Web TimeSheet. This
field must match an existing Activity Item ID in Peachtree Complete Accounting.
N/A
Has Been Used in
Sales/Invoicing
Constant value of ‘FALSE’ since time entry cannot be invoiced directly from Web
Timesheet
Billable
Billing Status
‘1’ for billable and ‘2’ for non-billable time
Employee Id
Recorded By ID
none
Entry Date
Ticket Date
Incursion date of time. Must be exported in format dd/mm/yyyy for
International Customers and mm/dd/yyyy for American and Canadian customers.
unused
Invoice Number Used
N/A
unused
Start Time
N/A
unused
End Time
N/A
unused
Break
N/A
unused
Internal Memo
N/A
unused
Unit Duration
N/A
unused
Billing Amount
N/A
unused
Ticket Description
for Invoice
N/A
Note ...
The data in the .csv file
will imported into
Peachtree Complete
Accounting ONLY IF the
fields are properly set
up. Refer to Chapter 1 What is WTS Integration
Manager? for further
information about the
field constraints
between Web
TimeSheet and
Peachtree Complete
Accounting.
7
Note ...
The data in the .csv file
will imported into
Peachtree Complete
Accounting ONLY IF the
fields are properly set
up. Refer to Chapter 1 What is WTS Integration
Manager? for further
information about the
field constraints
between Web
TimeSheet and
Peachtree Complete
Accounting.
Web TimeSheet to Peachtree Complete Accounting (Expense Ticket Mapping)
Web Timesheet (source)
Peachtree (target)
Constraints
Expense Entry ID
Ticket Number
The Expense Entry ID is an auto-generated key created within the Web
TimeSheet database. Expense Entry ID cannot be modified from within Web
TimeSheet.
N/A
Employee/Vendor
Web TimeSheet does not differentiate between employees and vendors.
Therefore, Web TimeSheet always uses a value of “0” to indicate that the
exported expenses have been entered by an employee.
Expense Type Code
Charge Item ID
Expense type code associated with a specific expense type.
Reimburse
Reimbursable to Employee
TRUE or FALSE depending on the value within Web Timesheet
Expense Entry Description
Ticket Description for
Invoice
none
N/A
Customer/Job/Adm
Constant of ‘1’ indicating expense entry for customer
Client Code
Completed For ID
This field must match an existing Customer Id within Peachtree Complete
Accounting
N/A
Has Been Used in
Sales/Invoicing
Constant value of ‘FALSE’ since time entry cannot be invoiced directly from Web
Timesheet
Billable
Billing Status
‘1’ for billable and ‘2’ for non-billable expenses
Rate
Unit Price
none
Quantity
Quantity
none
Expense Amount
Billing Amount
none
Employee Id
Recorded By ID
none
Entry Date
Ticket Date
Incursion date of expense. Must be exported in format dd/mm/yyyy for
International Customers and mm/dd/yyyy for American and Canadian customers.
unused
Invoice Number Used
n/a
unused
Internal Memo
n/a
© 2004-2005 by Replicon Inc. All rights reserved.
8