1
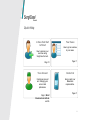
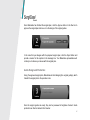
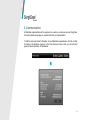
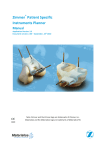
User Manual SurgiCase Connect 1.01 Document version 1.3, September 29, 2011 Indications for Use SurgiCase Connect is intended for use as a software interface for the transfer of medical data from a medical scanner and as pre-operative software for simulating / evaluating implant placement and surgical treatment options.SurgiCase Guides are intended for single use only. 1 Quick Help A Case from Start to Finish How to process your next case using SurgiCase Connect. Page 13. Your Cases How to get an overview of your cases. Page 11. Your Account Contact Us Creating an account and changing your account and preferences. How to reach your Materialise representative. Page 21. Page 3, Error! Bookmark not defined. and 24. 2 Contents .................................................................................................................................................1 Indications for Use ...................................................................................................................1 Quick Help................................................................................................................................2 Contents ...................................................................................................................................3 1. Introduction .......................................................................................................................4 2. Installing SurgiCase Connect ............................................................................................6 3. Creating an Account .........................................................................................................7 4. Logging In .........................................................................................................................9 5. The Welcome Screen .....................................................................................................10 6. Your Cases .....................................................................................................................11 7. A Case from Start to Finish .............................................................................................13 8. Viewing the 3D Model .....................................................................................................19 9. Communication ...............................................................................................................21 10. Preferences .................................................................................................................24 11. Mouse and Keyboard Control ......................................................................................25 12. System Requirements .................................................................................................26 13. Troubleshooting ...........................................................................................................27 14. Instructions for Use of SurgiCase Guides and Models ................................................30 15. Contact Information .....................................................................................................32 3 1. Introduction SurgiCase Connect is your window to the CMF and Orthopedic services provided by Materialise. SurgiCase Connect allows you to upload CT/MRI images which Materialise uses to reconstruct a 3D model. We then collaborate with you for the surgical plan and communicate the results through SurgiCase Connect. Finally, Materialise designs and produces surgical guides to transfer the surgical plan to the operation room. This entire workflow can be tracked in SurgiCase Connect. 4 Upload CT/MRI images Reconstruct 3D model Surgical Planning 5 2. Installing SurgiCase Connect First, go to the SurgiCase Connect website and click the Install button. Your browser will offer to download the setup.exe installer file: click accept and run the installer. The Application Install Window will then appear. Confirm the installation by clicking Install. SurgiCase Connect should now be installed on your computer and will start automatically. If it doesn’t, click the SurgiCase Connect icon on your desktop to start the application. The first time the program starts, the End User License Agreement (EULA) is shown. SurgiCase Connect can only be used after the EULA is accepted. Always up to date SurgiCase Connect will always be up-to-date. Upon starting, SurgiCase Connect first checks whether an update is available and if this is the case, the latest version is downloaded and installed automatically. 6 3. Creating an Account In order to use SurgiCase Connect, a user account needs to be created. To do this, start SurgiCase Connect and click Create A New Account. 7 In the new account panel that pops up, fill in your contact and login information. All fields are mandatory. Your login credentials will be your email address and your chosen password. You can change this password later on if you like. The email address you provide will also be used for correspondence. Click Submit to register your account. An email will be send to the given email address to verify your account. 8 4. Logging In Type the email address and password that you registered in your SurgiCase Connect account. ! SurgiCase Connect is an online tool; internet access is required in order to log in and see your cases. 9 5. The Welcome Screen After signing in, the Welcome Screen provides directions for finding your way in SurgiCase Connect. In this screen you can: Add a new case. Go to the Case Overview screen and view all your cases. Find the contact information for your Materialise representative. Get help: includingthis help document and more. Edit your account information. Sign out. 10 6. Your Cases Your cases are sorted in the Case Overview screen. By default, upcoming cases that require your attention the most are displayed at the top. Your account information and the contact information for your Materialise representative are available in the Case Overview screen. ! SurgiCase Connect is an online tool; internet access is required to see your cases. 11 Search Use the search field at the top right to instantly search for a specific case in your list. The list is automatically adjusted according to your search term. To discard the search results, simply remove the search term or click the x-button. 12 7. A Case from Start to Finish SurgiCase Connect takes you through the process in just a few easy steps: 1. 2. 3. 4. Image Upload and 3D Reconstruction Surgical Planning Guide Design and Production Shipment Creating a Case To create a new case, click the Add Case button in the Welcome screen or the Case Overview screen. Click the Create Case button. The new case will be created online and you will be transferred to the Case Details screen where you can upload the CT/MRI images. 13 Uploading your CT/MRI Images Click the Upload Images button in the flow bar at the bottom of the screen. In the next panel, click the Add Folder button and select the folder containing the CT/MRI images. CT/MRI images are usually delivered on a CD. After the CT/MRI images are loaded into SurgiCase Connect, you can exclude certain images or entire folders from the dataset. Multiple folders can be added by clicking the Add Folder button again. 14 Click Upload to start uploading the images to our server. Depending on the size of the image set and your internet connection speed, this may take a while. Once the images are uploaded, you can go back to the Case Overview screen and continue working. Meanwhile, Materialise will review the images and start reconstructing the 3D model. You will be notified once the 3D model is ready. 15 The 3D Reconstruction The 3D model is a reconstruction (segmentation) based on the uploaded CT/MRI images. See page 19 for more details about controlling the view for the 3D model. Discussing the Surgical Plan The surgical planning will happen in our advanced planning products via personal or webbased meetings and the results will be available in SurgiCase Connect for inspection. SurgiCase Connect provides several tools for communicating about the surgical plan visually. Angle measurement Select/Edit Distance measurement Eraser Show/Hide objects Text annotation These tools stay active until you click them again. To edit a measurement or annotation, press the mouse arrow tool in the top left corner. Alternatively, the Esc button can be used to deactivate the current tool. 16 Once Materialise has finished the surgical plan, click the Approve button in the flow bar to approve the surgical plan and move on to the design of the surgical guides. In the case that you disagree with the proposed surgical plan, click the Reject button and provide a reason for the rejection in the message box. Your Materialise representative will contact you to discuss your issues with the surgical plan. Guide Design and Production Using the approved surgical plan, Materialise will start designing the surgical guide(s), which transfer the surgical plan to the operation room. Once the surgical guides are ready, they can be previewed in SurgiCase Connect. Guide production can then be tracked in the flow bar. 17 Shipment Once the guides are produced, we prepare them for shipment. As soon as the guides are shipped, the flow bar in SurgiCase Connect will show this. Package tracking information can be found in the messages panel. 18 8. Viewing the 3D Model SurgiCase Connect provides intuitive controls for viewing the 3D model from different angles. To the right of the 3D model, three circular controls provide ways to rotate, move, and zoom the 3D model. The longer you press the arrows, the faster the model will rotate, move, or zoom. The buttons in the middle will bring you back to the default viewing angle, position, or zoom level. Alternatively, the mouse can be used to rotate, move, or zoom the 3D model. To do this, place the mouse cursor on the 3D model. Press the right mouse button and drag the mouse to rotate the 3D model. Press the middle mouse button and drag the mouse to move the 3D model. Use the scroll wheel to zoom into or out of the 3D model. To view the model sideways, click the arrow pointing to the corresponding side of the cube. 19 Show / Hide Parts The 3D model usually consists of several parts such as different bones, implants, guides et cetera. These parts can be shown or hidden individually by clicking the eye button. 20 9. Communication A Materialise representative will be assigned to you when you create an account. SurgiCase Connect provides several ways to communicate with your representative. To find the name and contact information of your Materialise representative, click the Contact Us button in the Welcome screen or in the Case Overview screen. Here, you can also find general contact information for Materialise. 21 Messages SurgiCase Connect allows you to exchange messages concerning your case. Click the Messages button in the Case Details screen to view the messages sent between you and your Materialise representative. The messages panel allows you to send new messages to your Materialise representative. In addition, this messages transcript also logs events such as rejecting a surgical plan and shipment information. 22 E-mail During the workflow, e-mail messages will automatically be sent to inform you about important changes or to inform you about cases requiring attention. Web Meetings While SurgiCase Connect offers tools to communicate about the surgical plan, the actual surgical planning is done in our advanced planning software SurgiCase CMF or SurgiCase Orthopaedics by your Materialise representative. During web meetings, you’ll connect to your Materialise representative, who will share their screen to collaborate on the surgical plan. 23 10. Preferences To change your SurgiCase Connect preferences, click the Account button in the Welcome or Case Overview screen. Immediately view cases after sign in Skip the Welcome screen after signing in and go directly to the Case Overview screen. Hide patient information Hide private patient information. Always show help annotations Show tips indicating important elements in the workflow of SurgiCase Connect. 24 11. Mouse and Keyboard Control In most SurgiCase Connect screens, the mouse buttons behave the same as in other software applications (e.g. browsers, email…). However, when viewing the 3D model of a specific case, extra functionality is added to be able to move, rotate, and zoom the 3D model. Likewise, there are some keyboard shortcuts.. Mouse Button Left Mouse Button Right Mouse Button Middle Mouse Button Scroll Wheel Action Behavior is dependent on the selected tool (see page 19) Rotates the 3D model Moves the 3D model Zooms in or out the 3D model Keyboard Key Esc Enter Ctrl+Enter Action Deselects the current tool Sends the message, Accepts the text annotation Creates a new text line 25 12. System Requirements To run SurgiCase Connect, you need at least the following system requirements: Intel Pentium 4 2.4GHZ or equivalent 512 MB RAM 1 GB of free disk space Graphics card & screen supporting at least 1024x768 resolution with true color visual (24 or 32 bit) and 256MB of memory Three-button optical mouse with scroll wheel 1.5MBit/s internet connection Microsoft Windows 7, Vista or XP Service Pack 2 or higher .NET 3.5 SP1 Adobe Reader 7.0 or higher 26 13. Troubleshooting If you run into trouble while using the software, refer to the list of solutions below. If you cannot find an appropriate answer, contact your Materialise representative. I cannot log in. Double check your email address and password. Verify that you activated your account by clicking the link in the activation mail sent right after creating your account Verify you are connected to the internet. My email address is/will not be valid anymore. Contact your Materialise representative. He/she will change your email address. I don’t know the surgery date yet. Estimate a possible surgery date anyway. This date can be changed once you know the exact date. The surgery date needs to be changed. Open the specific case and click the Patient Information button. Click Edit Case Details and adjust the surgery date. Even though your Materialise representative will automatically be notified, you might want to call them when the surgery is set to a much earlier date to ensure the surgical guides will be delivered in time. 27 I don’t know which CT/MRI images I need to upload. CT/MRI images are usually DICOM images (.dcm) made available on a CD. You can select the top folder on the CD to upload. Uploading CT/MRI images is slow. The size of the images can addd up to a high volume and this can take a while to upload depending on your internet connection. When the total size exceeds 1 GB, consider sending Materialise a hard copy (CD) by mail. I cannot open or save a case. Verify you are connected to the internet. SurgiCase Connect stores your cases online. I can’t see a 3D model. Verify that “3D Reconstruction done” is checked in step 1 of the bottom bar in the Case Details screen. If not, Materialise hasn’t completed the reconstruction yet. The 3D model may lie out of view. Click the central button of the move buttons (see page 19). This will centralize the model again. Check the Show/Hide panel (see page 20). Make sure at least one item has an active eye icon. If no items are listed, there’s no 3D model available. I received an email telling me the status of a case has changed, but I see no difference in SurgiCase Connect. Try logging out and in again. The case list should then refresh. 28 Not all my cases are shown in the case list. Verify you haven’t entered any text in the search field. Remove the text to view all cases. How do I know what action in a step needs to be completed? You can browse through the different steps. Completed actions are marked with a checkmark for each step. The most current action is the first white item without a checkmark. I see an issue in either the uploaded images, the 3D model, the surgical plan or the designed guide(s). Contact your Materialise representative as soon as possible. Small issues can be communicated via the messages panel in SurgiCase Connect. For important issues, call your Materialise representative to take immediate action. 29 14. Instructions for Use of SurgiCase Guides and Models The following information is related to SurgiCase Guides and SurgiCase Models which are considered as an accessory to the software; these components together make one package. Contraindications Do not use in the case of active infection of the surgical area where the surgery will be performed. Warnings The user should be aware of possible allergic reactions to materials used in the guide or model. The patient should be informed about this matter by the user. These are patient-specific, single use, disposable guides or models. Do not attempt to reuse or recondition the guides or models. Do not alter the guides or models in any way. SurgiCase Guides are to be used by a trained physician in the performance of a surgery. Be aware that these patient-specific guides and models have been manufactured based on CT/MRI scans of the patient. If the patient’s anatomy has changed significantly since the time of the CT/MRI scan, the guides or models should not be used. The guides and models should be properly cleaned before sterilization. Do not use if the guides are broken, cracked, or are visibly contaminated, or if the stainless steel tubes (if present) are not tightly secured. 30 The guides and models provided are non-sterile. The guides and models must be sterilized prior to use. Precautions It is advised to use the guide or model within 6 months after performing the CT/MRI scans on which they are based. If the patient’s anatomy has changed significantly since the time of the CT/MRI-scan, the guide or model should not be used, even if the 6 months have not expired. Do not apply excessive force on the guides or place heavy objects on top of them. Markings on guides used for indicating anatomical references and case information must be legible. These include lines indicating anatomical directions and identifiers with case information, such as a case identifier (see below). Notify your Materialise representative if the markings are not legible or if the identifiers do not correspond to the intended patient or surgeon. Possible Adverse Effects Infection following the surgical procedure. Introduction of foreign materials can result in an inflammatory response or allergic reaction. 31 15. Contact Information www.materialise.com/SurgiCase Europe (Headquarters) USA Manufactured by: Materialise NV Technologielaan 15 3001 Leuven Belgium Materialise 44650 Helm Court, Plymouth MI 48170, United States Phone +32 16 39 66 11 Phone +1 734 259-6669 [email protected] [email protected] [email protected] [email protected] 32 Disclaimer SurgiCase, Materialise, and other names mentioned in this document are registered trademarks and/or trade names either owned by or licensed to Materialise. No user has any right, title, or interest in those marks or names not previously expressly granted in writing to such user by Materialise. 33