1
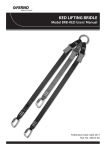
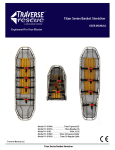
FERNO When It’s Critical ® TRAVERSE VERTICAL RESCUE STRETCHER Users’ Manual Publication Date: January 2013 Pub. No. 00130.V02-AU Traverse Vertical Rescue Stretcher Disclaimer This manual contains general instructions for the use, operation and care of this product. The instructions are not all-inclusive. Safe and proper use of this product is solely at the discretion of the user. Safety information is included as a service to the user. All other safety measures taken by the user should be within and under consideration of applicable regulations. It is recommended that training on the proper use of this product be provided before using this product in an actual situation. Retain this manual for future reference. Include it with the product in the event of transfer to new users. Additional free copies are available upon request from Customer Service. Proprietary Notice The information disclosed in this manual is the property of Ferno Australia, Brisbane, Queensland, Australia and Traverse Rescue, Mississauga, Ontario, Canada. Ferno Australia and Traverse Rescue reserve all patent rights, proprietary design rights, manufacturing rights, reproduction use rights, and sales use rights thereto, and to any article disclosed therein except to the extent those rights are expressly granted to others or where not applicable to vendor proprietary parts. © Copyright Ferno Australia Pty Ltd. and Traverse Rescue All Rights Reserved. Ferno Australia Head Office: 11 Johnstone Road Brendale Queensland 4500 Australia Traverse Rescue Head Office: 755 The Queensway East Suite #12 Mississauga, ON, Canada L4Y IE7 Telephone (Australia) .................Toll free.1800 804 647 Telephone (Canada) ................. ................ 800.543.3766 Telephone (USA).......................................1.800.733.3766 Telephone (Worldwide).........................1.937.382.1451 Fax (Australia)..........................................+61 7 3881 1125 Internet................................................ www.ferno.com.au 2 © Ferno Australia/ Traverse Rescue DOC ID: 00130.V02 January 2013 Traverse Vertical Rescue Stretcher TABLE OF CONTENTS 1 - SAFETY INFORMATION......................... 4 1.1Warning.............................................................4 1.2Important..........................................................4 1.3 Bloodborne Disease Notice........................4 1.4 Safety Labels....................................................4 2 - OPERATOR SKILLS AND TRAINING...... 5 2.1Skills....................................................................5 6 - PREPARING THE STRETCHER FOR APPLICATION & USE................................... 9 6.1 Preparing for application............................9 6.2 Patient Placement....................................... 10 6.3 Methods of Extraction............................... 11 6.3.1 Carry Handle Method................................. 11 6.3.2 Integrated lifting bridle method .......... 11 Horizontal Lifting Method..................... 11 2.2Training..............................................................5 Vertical Lifting Method ......................... 12 3 - ABOUT THE STRETCHER........................ 6 7 - STORING THE STRETCHER................... 13 8 - USING HIGH-ANGLE RESCUE.............. 14 3.1Description.......................................................6 3.3 Stretcher Components.................................6 8.1Procedures..................................................... 14 9 - MAINTAINING THE STRETCHER.......... 15 Horizontal Lifting Load Limit.....................6 9.1 Maintenance Schedule............................. 15 Vertical Lifting Load Limit...........................6 9.2 Stretcher Longevity.................................... 15 3.2 General Specifications....................... 6 9.2 Disinfecting & Cleaning............................ 15 4 - STRETCHER FEATURES.......................... 7 4.1 Removal from bag.........................................7 4.2 Before placing into service.........................7 4.3Restraints .........................................................8. Adjusting restraints.......................................8 Attaching the restraints...............................8 9.3 Inspecting the Stretcher........................... 15 10 - FERNO CUSTOMER SERVICE............. 16 TRAINING RECORD................................................ 17 MAINTENANCE RECORD..................................... 18 5 - GUIDELINES FOR USE............................ 9 © Ferno Australia/ Traverse Rescue DOC ID: 00130.V02 January 2013 3 Safety Information Traverse Vertical Rescue Stretcher 1 - SAFETY INFORMATION 1.1Warning 1.2Important The following warnings appear in this manual. Boxes like the one below emphasize important information. ! WARNING Untrained operators can cause injury or be injured. Permit only trained personnel to operate the stretcher. Improper use of the stretcher can cause injury. Use the bridle only for the purpose described in this manual. Improper operation can cause injury. Operate the stretcher only as described in this manual. An unrestrained or improperly restrained patient can be injured. Secure the patient in the stretcher with a restraint system suitable to the rescue situation. Modifying the stretcher can cause injury and damage. Use the stretcher only as manufactured and sold by Ferno & Traverse Rescue. Improper maintenance can cause injury or damage. Maintain the stretcher only as described in this manual. Improper parts and service can cause injury. Use only Ferno Australia & Traverse Rescue approved parts and service on the stretcher. An unattended patient can be injured. Stay with the patient at all times. Attaching improper or inappropriate items to the stretcher can cause injury. Use only Ferno and Traverse Rescue-approved items on the stretcher. Important Rescue procedures using ropes, harnesses, bridles and other Personal Protective Equipment require special skills and are potentially hazardous activities. No rescue personnel should attempt such rescue procedures unless he or she has received professional instruction and training. Important Ensure all straps are fastened and tensioned. DO NOT over tension. Allow for at least one ‘flat’ hand space between the strap and the patient’s body. 1.3 Bloodborne Disease Notice To reduce the risk of exposure to bloodborne diseases such as HIV-1 and hepatitis when using the stretcher, follow the disinfecting and cleaning instructions in this manual. 1.4 Safety Labels Labels place important information from the Users’ Manual on the stretcher. Read and follow label instructions. Replace worn or damaged labels immediately. The information label is affixed to the middle carry handle and contains important information regarding the unit and date of manufacture. A sample of the identification tag is illustrated below: WLL: 315kg Colour: RED Date of Manufacture: Size:STD 07/2011 Batch No:9312 Date of Retirement: Serial:000038 07/2021 WARNING EXPERT USE ONLY You must be trained in the use of this stretcher. Refer to the instructions provided before use. Check stretcher for wear and tear before every use and retire if you find any visible signs of damage 4 © Ferno Australia/ Traverse Rescue DOC ID: 00130.V02 January 2013 Operator Skills and Training Traverse Vertical Rescue Stretcher 2 - OPERATOR SKILLS AND TRAINING 2.1Skills 2.2Training 1. Operators using the stretcher need: Trainees need to: • a working knowledge of emergency patienthandling procedures. • follow a training program designed or approved by their training officer. • the ability to assist the patient. • • a complete understanding of the procedures described in this manual. read this manual. For additional free users’ manuals, contact Ferno or Traverse Rescue Customer Service. • follow local protocols and guidelines as set down by your organisation • practice with the stretcher before using it in regular service. • be evaluated and tested on their understanding of the stretcher. • record their training information. A form is provided on page 17. ! WARNING Untrained operators can cause injury or be injured. Permit only trained personnel to operate the stretcher. Important Rescue procedures using ropes, harnesses, bridles and other Personal Protective Equipment require special skills and are potentially hazardous activities. No rescue personnel should attempt such rescue procedures unless he or she has received professional instruction and training. © Ferno Australia/ Traverse Rescue DOC ID: 00130.V02 January 2013 5 About the Bridle Traverse Vertical Rescue Stretcher 3 - ABOUT THE STRETCHER 3.2 General Specifications 3.1Description The Traverse Vertical Rescue Stretcher (referred to as the stretcher throughout this manual) is designed for high angle, confined space, horizontal and vertical rescue. ! WARNING Product Code FERNO TRAVERSE RESCUE 19-0100 Length 201 cm/ 79 inches Width (widest point) 82 cm/ 32 inches Width (foot end) 45 cm/ 18 inches Weight 7.7 kg/ 17 lbs Rated Load Limit Horizontal: 350 kg/ 770 lb Vertical: 250 kg/ 550 lb Untrained Operators can cause injury or be injured. Permit only trained personnel to operate the stretcher. Round Lifting Slings 32kN Carry-Lifting Handles/Points 30kN à 3059 kgBF Ferno and manufacturers of components reserve the right to change specifications without notice. 350 kg 770 lb HORIZONTAL LIFTING LOAD LIMIT General specifications are rounded to the nearest whole number. Metric conversions are calculated before rounding the English measurements. For more information, contact Ferno or Traverse Rescue Customer Service or your local distributor. USERS’ MANUAL 250 kg 550 lb VERTICAL LIFTING LOAD LIMIT For additional free Users’ Manuals, please call Customer Service or contact your local distributor. 3.3 Stretcher Components Blue Black Adjustable Round Sling Sling Red Round Sling Adjustable Restraint Straps Vertical Lifting Eyes Lower Handle Head Support Foot Adjustable Strap ‘Built In’ Internal Harness Carry/ Lifting Handles 6 © Ferno Australia/ Traverse Rescue DOC ID: 00130.V02 January 2013 Bridle Features Traverse Vertical Rescue Stretcher 4 - STRETCHER FEATURES 4.1 Removal from bag To remove the stretcher from the carry bag that has a built-in back pack system (Fig 1): 1. Release top bag closure by releasing the small quick connect buckles (Fig 2) and unrolling bag lid to gain access to stretcher and remove. 2. Once stretcher is removed from bag, release the strap that keeps the stretcher in a rolled form by unclipping the quick connect buckle (Fig 3) 3. Lay the stretcher on the ground and unroll to its full length and restraints are exposed Figure 1 - Stretcher carry bag backpack 4.2 Before placing into service • Remove stretcher from bag and record serial numbers and other relevant information • thoroughly inspect stretcher and ensure it is damage free Before and after each use, inspect the stretcher buckles, materials and webbing components. If there are any signs of damage, DO NOT use stretcher and remove it from service immediately. Figure 2 - Release buckle to undo bag ! WARNING Untrained operators can cause injury or be injured. Permit only trained personnel to operate the stretcher. Important Rescue procedures using ropes, harnesses, bridles and other Personal Protective Equipment require special skills and are potentially hazardous activities. No rescue personnel should attempt such rescue procedures unless he or she has received professional instruction and training. © Ferno Australia/ Traverse Rescue DOC ID: 00130.V02 January 2013 Figure 3 -Undo buckle to unroll stretcher 7 Traverse Vertical Rescue Stretcher 4.3Restraints A total of 6 external restraints are integrated into the stretcher. A built-in harness system that is integral to the unit is supplied within the stretcher. These restraints supplement equipment you will typically use to tie in a patient in a high-angle scenario. The restraints have been made to an appropriate strength for both horizontal and vertical applications. The restraints are only for securing the patient into the stretcher and are not to be used for lifting or for any other purpose. Figure 4 - Quick Connect Buckle - connected ! WARNING An unrestrained or improperly restrained patient can suffer injuries. Always secure the patient in the stretcher with a restraint system suitable to the rescue operation. ADJUSTING RESTRAINTS Restraint straps are fitted with Quick Connect buckles which are plastic buckles comprising male and female interlocking halves. Figure 5 - To tighten, pull strap tails away from buckle 1. To connect straps, slot the male half into the female buckle half on the corresponding strap (Fig 4) 2. To tighten or shorten the restraint, grasp the tail end of strap and gently pull strap’s tail-end away from the buckle (Fig 5) 3. To loosen or lengthen restraint straps, lift the buckle away from the stretcher at an angle of 30° - 40° to release tension between the strap and buckle (Fig 6) 4. To disconnect strap, depress and squeeze the buckle’s side tabs inwards. This unlocks and releases the buckle’s two halves (Fig 6A). Figure 6 - To loose straps, lift buckle away from stretcher ATTACHING THE RESTRAINTS The resraints and straps are part of the integral construction of the stretcher. Select attachment points that will appropriately secure the patient. This is achieved by securing the patient into the internal harness as well as the external strap system Figure 6A - Depress & squeeze side tabs inwards to release buckle 8 © Ferno Australia/ Traverse Rescue DOC ID: 00130.V02 January 2013 Using the Bridle Traverse Vertical Rescue Stretcher 5 - GUIDELINES FOR USE • Using the stretcher requires a minimum of two trained operators. In most situations, operators will want or need additional help. For information about placement and direction of helpers, see Carrying the Stretcher in this manual. • Follow standard emergency patient-handling procedures when using the stretcher. • Stay with the patient at all times.Always use the patient restraints provided, as well as a supplementary restraining system as per your training and team protocols, and the situation. • Personnel using the stretcher in high-angle environments are responsible for learning the proper techniques involved, and for selecting the equipment and procedures best suited to the rescue situation. 6 - PREPARING THE STRETCHER FOR APPLICATION & USE 6.1 Preparing for application Once the stretcher has been removed from the carry bag and has been laid out flat, the following procedure must be followed: 1. At the stretcher’s head end, locate the small strap that forms the head section of the stretcher. Pull on the tail end of the strap and tighten the strap. (Fig 7 & 8) Figure 7 Figure 8 2. Lay out Blue, Red and Black lifting straps to the outer parameters of the stretcher (Fig 9) 3. Release all the Black restraint straps and lay them flat, towards the outside of the stretcher (Fig 10) 4. Release Blue chest strap buckle and yellow leg and shoulder straps and place to the outside of stretcher (Fig 11) 5. Loosen red foot strap and extend. Loosen Velcro head strap and lay out flat (Fig 11) Figure 11 Figure 10 © Ferno Australia/ Traverse Rescue Figure 9 DOC ID: 00130.V02 January 2013 9 Using the Bridle Traverse Vertical Rescue Stretcher 6.2 Patient Placement Place the patient within the stretcher ensuring the patient’s shoulders are approximately at the level of the upper lifting eye. Once the patient is placed into the stretcher using your local protocols and guidelines, the following method of restraint should be used. 1. Place and secure Velcro head strap to patient’s forehead (Fig 12). 2. Place yellow shoulder straps over the shoulder and adjust Blue chest strap into desired position by sliding plastic black tabs up or down yellow shoulder strap. Connect blue plastic buckle on blue chest strap (Fig 13). Figure 12 3. Feed yellow leg strap under each leg through the groin area and connect to yellow shoulder strap. Adjust and tighten yellow leg straps (Fig 14). 4. Feed red leg strap under the hollow of the foot or boot and tighten strap by pulling gently on the tail end of the strap(Fig 15). Figure 13 5. Take centre black restraint strap and connect the plastic quick connect buckle together. Gently tighten the straps. This will cause the stretcher sides to move towards each other (Fig 16). 6. Continue connecting all the black straps until all are fastened (Fig 17). Important Figure 14 Ensure all straps are fastened and tensioned. DO NOT over tension. Allow for at least one ‘flat’ hand space between the strap and the patient’s body. Figure 15 Figure 16 10 Figure 17 © Ferno Australia/ Traverse Rescue DOC ID: 00130.V02 January 2013 Traverse Vertical Rescue Stretcher 6.3 Methods of Extraction 6.3.2 Integrated lifting bridle use NOTE: All orange webbing within the stretcher are lifting points. The stretcher is supplied with the following slings for Horizontal and Vertical rescue lift operations. There are 4 possible methods of extraction: To be able to use this function, a rigging plate and 3 karabiners are required (NOT supplied with stretcher). 1. Carry handle method 2. Integrated lifting bridle method 1 3. Fabricated lifting Bridle (BRB-VRS) method 5 4. Sliding the stretcher method 2 6.3.1 Carry Handle Method The stretcher is fitted with six carry handles. There should be a minimum of four people carrying the stretcher. Each operator to grasp carry handle in palm of hand and close hand securely for a good safe grip. In a coordinated action, lift stretcher and carry to required place of evacuation (Fig 18). Head End 3 Foot End 4 1) Rigging Plate 2) 50kN Large ‘D’ Triple-action Karabiner 3) Blue Sling 4) Adjustable Black Sling 5) Red Sling Lifting Point 1 Rigging Plate (not supplied) Figure 18 Important Refer to local protocols and Guidelines regarding manual handling and lifting of persons or objects. 3 Large ‘D’ 50kN Triple-action Karabiners (not supplied) Carrying the stretcher requires a minimum of four operators - one on each handle. Additional personnel will be helpful or even needed in most situations. Use an even number of personnel and position them to keep the stretcher as even as possible. Vertical Rescue Stretcher is supplied with slings Using additional help: Operators should maintain control of the stretcher and direct any helpers or assistants. © Ferno Australia/ Traverse Rescue DOC ID: 00130.V02 January 2013 11 Traverse Vertical Rescue Stretcher VERTICAL LIFTING APPLICATION 6.3.3 Fabricated lifting Bridle (BRB-VRS) Ferno & Traverse Rescue recommend the following items be used for this application: This is a lifting bridle designed specifically for use with the Traverse Vertical Rescue Stretcher (Fig 19). The bridle is available as an optional accessory. • 1 Rigging Plate (VCT L6370503) • 2 Triple-action Karabiners These items are purchased as optional extras and are not provided with the Traverse Vertical Rescue Stretcher. Refer to the User’s Manual for detailed instructions on the TVRS Bridle’s use. Rigging Plate 2 x 50kN Large ‘D’ Triple-action Karabiners HEAD END Blue slings provided with stretcher Figure 19 6.3.4 Sliding the Stretcher Only slide the stretcher on its material cover over smooth surfaces. Avoid rock, stumps, branches, asphalt, exposed concrete or other hazards that could penetrate or damage the outer material of the stretcher. This method should only be used over very short distances as this method may damage outer material on the stretcher. Choke blue sling through orange lifting eye FOOT END Place tag line (not supplied) through Orange Handle at Foot End of the stretcher to guide the stretcher during the lift operation 12 © Ferno Australia/ Traverse Rescue DOC ID: 00130.V02 January 2013 Traverse Vertical Rescue Stretcher 7 - STORING THE STRETCHER 1. Lay the stretcher on the ground and roll it out so the entire stretcher and its restraints are exposed. Ensure the restraints are buckled but not tensioned (Fig 20) 2. Tightly roll the stretcher starting from the HEAD end towards the Foot end (Fig 21) 3. Once the stretcher is rolled up, secure it by wrapping the retaining strap around the rolled stretcher, fastening the buckle and tightening the retaining strap (Fig 22) Figure 20 4. Insert the rolled stretcher into its carry bag (Fig 23) 5. Once the stretcher is securely in the bag, seal the bag by folding the lid over several times. To keep the lid closed, secure the two buckles as shown (Fig 24 - 25)) Figure 21 Figure 22 Figure 23 Figure 24 Figure 23 © Ferno Australia/ Traverse Rescue DOC ID: 00130.V02 January 2013 13 Traverse Vertical Rescue Stretcher 8 - USING HIGH-ANGLE RESCUE 8.1Procedures High angle and rope-access rescue can involve any combination of ropes, winches, pulleys, litter bridles, belay devices and many other specialised items and devices. Proper and safe use of these tools requires professional instruction and training. When using high-angle or rope-access equipment with the stretcher, ensure the equipment has an adequate load-rating, and that it is at least as great as that of the stretcher. During a high-angle rescue, the stretcher may be oriented vertically or horizontally. Secure the patient in the stretcher so that he/she does not slip in any direction, or accidentally come out of the stretcher. ! WARNING An unattended patient can be injured. Stay with the patient at all times. ! WARNING An unrestrained or improperly restrained patient can suffer injuries. Always secure the patient in the stretcher with a restraint system suitable to the rescue operation. Important Personnel using the stretcher in high-angle rescue situations are responsible for knowing the techniques involved and for selecting the equipment and procedures best suited to each rescue situation. 14 © Ferno Australia/ Traverse Rescue DOC ID: 00130.V02 January 2013 Traverse Vertical Rescue Stretcher 9 - MAINTAINING THE STRETCHER 9.1 Maintenance Schedule 9.2 Disinfecting and Cleaning The stretcher requires regular maintenance. Set up and follow a maintenance schedule. A form is provided on page 18. The schedule below represents minimum maintenance and you should modify your own program based on your needs. Remove the inner rigid PVC liner within the stretcher. To access this PVC inner, loosen the Velcro material at the head end of the stretcher. This will expose the liner. • Disinfecting (this page) Cleaning (this page) • Inspecting (this page) Each Month As Needed Each Use Over and above an inspection prior to and after each use, the stretcher must be inspected by a competent person every 6 months and must be recorded in the equipment inspection manual for this device. • When using maintenance products, follow the manufacturers’ directions and read the manufacturers’ material safety data sheets. ! WARNING Improper maintenance can cause injury. Maintain the stretcher only as described in this manual. Important Disinfectants and cleaners containing bleach, phenolics, or iodines can cause damage. Disinfect and clean only with products that do not contain these chemicals. 9.2 Stretcher Longevity The stretcher has a 10 year life span and must be removed from service after this time, if no damage has been sustained prior to the 10 year period. © Ferno Australia/ Traverse Rescue DOC ID: 00130.V02 January 2013 1. Carefully remove the PVC liner from the stretcher. 2. Hand wash the stretcher in warm water with a mild soap (Ferno & Traverse Rescue recommend Rope & Harness Wash). Once stains are removed, rinse in clear water. DO NOT use excessive force or abrasive items in the cleaning process. Do not use cleaners that contain bleach, Phenolics or iodines. 3. Once the stretcher is clean, hang to dry in a warm, well ventilated area away from direct sunlight. or heat source and air dry via natural means. Do not tumble dry. 4. Once completely dry, inspect the entire stretcher and ensure all components are operational and in good condition. 5. Re-insert the PVC lining into the stretcher, roll it up and pack the stretcher into its bag. For storage instructions, refer to STORING THE STRETCHER on page 13. 9.3 Inspecting the Stretcher After each use, check the stretcher for the following: Are all components present? Is all webbing in good condition with no cuts or frayed edges? Is webbing stitching in good condition with no frayed or broken threads? Are the adjustment buckles operational and do they insert and release smoothly? Is the material of the stretcher intact and not torn or excessively worn? Are the lifting attachment points (orange webbing) in a good condition and free from any wear, tear or fraying? If inspection shows damage or excessive wear, remove the stretcher from service and retire it. Do not attempt to repair or replace any materials or components. 15 Warranty, Customer Relations Traverse Vertical Rescue Stretcher 10 - CUSTOMER SERVICE Customer relations and product support are important aspects of each Ferno product. For assistance with the stretcher please contact your local distributor, Ferno or Traverse Rescue Customer Service as listed below: Australia (Toll Free) 1800 804 647 +61 7 3881 4999 Canada800.543.3766 USA1.800.733.3766 Telephone (Worldwide) 1.937.382.1451 Internetwww.ferno.com.au www.traverserescue.com 16 © Ferno Australia/ Traverse Rescue DOC ID: 00130.V02 January 2013 Training Record Traverse Vertical Rescue Stretcher TRAINING RECORD Date © Ferno Australia/ Traverse Rescue Name DOC ID: 00130.V02 January 2013 Training Method 17 Maintenance Record Traverse Vertical Rescue Stretcher MAINTENANCE RECORD Date 18 Maintenance Performed © Ferno Australia/ Traverse Rescue By DOC ID: 00130.V02 January 2013