1
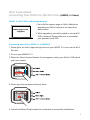
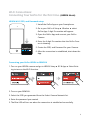
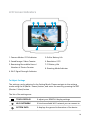
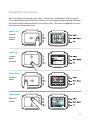
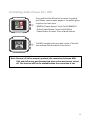
Turn your GoPro® LCD Touch BacPac
into a Wi-Fi Live Viewer
USER MANUAL
Table of Contents
1. Understanding This User Manual
3
2. Product Components and Features
4
3. U
sing REMOVU P1
5
Charging the Battery
5
How to Assemble
5
Turning Your Device On and OFF
6
Wi-Fi Connection: Connecting Your GoPro for the first time (HERO3, 3+)
7
Wi-Fi Connection: Connecting Your GoPro for the first time (HERO4)
8
Wi-Fi Connection: Connection Failure / Reconnect
9
LCD Screen Indicators
10
Navigating Your Device
11
Controlling GoPro (Power On / Off)
12
4-1. Modes and Settings - HERO3, 3+ Series
13
4-2. Modes and Settings - HERO4 Series
18
5. Firmware Upgrade
21
6. Product Specification
22
7. Trouble Shooting Guide
23
8. Warranty Information
24
1. Understanding This User Manual
Thank you for purchasing our Wireless GoPro Live Viewing Device, REMOVU P1
(hereinafter referred to as “P1”).
This Operator’s Guide describes how to handle and operate the P1.
Before using the P1, be sure to read this manual thoroughly for proper operation.
To enhance the performance of the product, the contents of this instruction manual
may be changed without prior notice.
Safety Precautions
(1) In accordance with Personal Information Security Law & related legislation, essel-t
Co., Ltd. will not be held responsible for any problem due to illegal use of this
product.
(2) Any defects or damage resulting from accident, misuse, abnormal use, abnormal
conditions, and improper storage will not be covered by the warranty.
(3) The warranty shall cover a period of 1 year. Please refer to Pg. 24 for more details.
(4) Use only a dry soft cloth or clean wipe when cleaning the LCD panel surface. Do
not use other cleaning substances. It may cause discoloration or damage to the
surface of the product.
(5) Keep away from children and pets. Store your devices out of the reach of children.
(6) REMOVU is the registered trademark of essel-t Co., Ltd. essel-t Co., Ltd. reserves
the rights regarding all works related to the REMOVU brand such as product design, trademarks, and product-promotional videos. It is prohibited to reproduce,
copy, modify, or use related works without permission. Any violation may be
penalized in accordance with the relevant regulations.
(7) GoPro, HERO, the GoPro logo, and the GoPro Be a HERO logo are trademarks or
registered trademarks of GoPro, Inc.
3
2. Product Components and Features
Package Component
Please make sure your package includes all of the following items.
SET
WRISTBAND
USB CABLE
QUICK GUIDE
Names of Each Part
1
6
2
7
3
5
4
1. Shutter / Select
5. Charging Status LED
2. Power / Mode / Next
6. Reset
3. ESC / Previous
7. USB Connector
4. Status LED
4
3. Using the REMOVU P1
Charging the Battery
*The battery should be fully charged before using P1 the first time.
1. Connect the device to a computer
USB port using the micro USB
cable included in the package.
2. P1 can also be charged with a
USB power adapter.
(Adaptor’s not included)
We recommend using GoPro, or
Apple iphone adaptors.
How to Assemble
P1 Cover
GoPro® LCD
Touch BacPac
P1 Body
1. Open the cover and detach it from the body.
2. Place the LCD Bacpac into the slot as below.
3. Attach the cover and lock the clamp.
5
Turning Your Device On and OFF
Turning it on
1. Press the M (Mode / Power) button for about 1
second to turn on the power.
2. The REMOVU logo will appear. After short loading,
Wi-Fi network list will pop up.
Turning it off
1. Press the M (Mode / Power) button for about 2
seconds to turn off the device. REMOVU Power off
logo will appear then the device will be turned off
with the red LED blinking three times.
2. If no input is made for 30 seconds in the Live View
Mode, the screen will shut off to save power.
POWER OFF
6
Wi-Fi Connections:
Connecting Your GoPro for the first time. (HERO3, 3+ Users)
HERO3, 3+ Wi-Fi SSID, and Password setup
www.gopro.com
/support
1. Go to GoPro support page on GoPro Website to
upgrade your GoPro Camera to the latest firmware version.
2. While upgrading, you will be asked to set up Wi-Fi
SSID, Password. Please make sure to remember
your password and SSID.
Connecting your GoPro HERO3, 3+ to REMOVU
1. Please go to the GoPro App settings menu on your HERO3, 3+ to turn on the Wi-Fi
function.
2. Turn on your REMOVU P1.
3. When the Select Camera Network Screen appears, select your GoPro’s SSID which
you have created.
4. Please type the password and press enter.
5. You will see Blue LED light when the connection is successfully established.
7
Wi-Fi Connections:
Connecting Your GoPro for the first time. (HERO4 Users)
HERO4 Wi-Fi SSID, and Password setup
1. Install the GoPro App on your Smartphone.
2. Go to your GoPro 4 Setup ► Wireless ► select
GoPro App. 6 digit Pin number will appear.
3. Open the GoPro App and connect your GoPro
Camera.
4. Enter the 6 digit Pin number that the GoPro Camera is showing.
5. Create the SSID, and Password for your Camera.
6. After the connection is established, shut down the
App.
Connecting your GoPro HERO4 to REMOVU
1. Turn on your HERO4 camera and go to HERO4 Setup ► RC & App ► Select Existing to turn on the Wi-Fi function.
2. Turn on your REMOVU.
3. Select the SSID you generated from the Select Camera Network list.
4. Enter the password you created.
5. The Blue LED will turn on when the connection is established successfully.
8
Wi-Fi Connection: Connection Failure / Reconnect
1. Flashing red LED and Wi-Fi Network Not Connected message will appear if Wi-Fi
fails to connect or lose its signal.
2. Type in your password again and try reconnecting the device.
3. If the connection is restored, blue LED will flash and the Live View will appear.
4. When reusing the device, P1 will try to connect to last device it was connected to
using the information saved from previous use.
5. Switching between different cameras can be done in the Settings mode ► Camera Network menu. Please choose the camera you wish to switch to.
Tips: W
hen the Wi-Fi signal gets weaker, it may cause lags or the screen
may not display the screen.
9
LCD Screen Indicators
1
2
3
4
5
8
6
7
1. Camera Modes / FOV Indicator
5. GoPro Battery Life
2. Saved Image / Video Counter
6. Resolution / FPS
3. Remaining Recordable Hours /
Number of Photos Counter
7. P1 Battery Life
8. Shooting Mode Indicator
4. Wi-Fi Signal Strength Indicator
To Adjust Settings
The settings can be adjusted in the Setting Mode. Please navigate to the settings
mode using the M (Mode / Power) button, and enter the menu by pressing the REC
(Shutter / Select) button
The list of the settings are:
TOUCH DISPLAY
It adjust your REMOVU display settings
Wi-Fi NETWORK
It lists the available Wi-Fi network you can connect to
SYSTEM INFO
It displays the general information of the device
10
Navigating Your Device
After the device is powered on and Wi-Fi connection is established, it goes into the
Live View mode automatically. From there, you can simply navigate through different
functions using the Back button or the touch screen. The order of appearance of the
functions are illustrated below.
Swipe Left
Display
Camera
Modes
Swipe Up
Camera
Mode
Settings
Swipe Right
Playback
Mode
Swipe Down
REMOVU
Modes
11
Controlling GoPro (Power On / Off)
Press and hold the M button for about 2 seconds
until Power control menu appears. You will be given
3 options to chose from.
- REMOVU Power Button: Turns On/Off REMOVU
- GoPro Power Button: Turns On/Off GoPro
- Power Button for both: Turns of both devices
The RED triangle at the top-right corner of the buttons indicate that the device is turned on.
Note: B
ecause of GoPro camera’s protocol, the connection between REMOVU and GoPro may get disconnected when either devices are turned
off. This function will not be available when the connection is lost.
12
4-1. Modes and Settings - HERO3, 3+ Series
Menu Tree
Menu Rotation Sequence
VIDEO
Record Video
PHOTO
Capture a single Photo
BURST PHOTO
Capture up to 30 Photos in one second
TIME LAPSE
Capture a series of Photos at timed intervals
SETTINGS
Adjust camera Settings
13
VIDEO
To record video, please swipe from right to left or tap the arrow on the right side of
the screen or using the M button on the side of the device to change modes. Video
icon appears at the top left corner of the Live View OSD.
To start recording:
Press the REC (Shutter / Select) button. The red LED Lights will flash while recording.
To stop recording:
Press the REC (Shutter / Select) Button while recording. The red LED light will flash
three times and stops recording.
Tips: T
he Live View may not work some resolution settings. When you
start recording in resolutions that are not supported, the message
“PREVIEW NOT SUPPORTED” will appear on the screen. When you stop
recording, the live view will be displayed again.
PHOTO
To capture a Photo, select the photo mode on the touch screen, or press the M button
repeatedly until the Photo icon appears at the top left corner of the Live View OSD.
To take a photo:
Press and release the REC (Shutter / Select) Button. The red Camera Status Lights
flash when photos are taken.
BURST PHOTO
In Burst Photo mode your camera takes multiple photos in short time intervals.
Please select the mode using the touch screen menu or press the M button repeatedly until the photo icon appears at the top left corner of the Live View OSD.
To take a burst photo:
Press the REC (Shutter / Select) Button. The red Camera Status Lights flash and the
camera captures photos multiple times.
Available interval options:
3 photos / 1 second, 5 photos / 1 second, 10 photos / 2seconds, 30 photos / 1 second, 30 photos / 2 seconds or 30 photos / 3 seconds.
Tips: S
ometimes 30 photos / 1 second can be too fast. Try a slower BURST
PHOTO setting to get better results.
14
TIME LAPSE
Time Lapse mode automatically captures a series of photos at 0.5, 1, 2, 5, 10, 30 or
60 second intervals.
To capture a Time Lapse series, select the photo mode on the touch screen, or
please press the M button repeatedly until the Time Lapse icon appears at the top
left corner of the Live View OSD.
To take time lapse photos:
Press the REC (Shutter / Select) Button. The camera initiates countdown and the red
Camera Status Lights flash each time a Photo is taken.
To stop time lapse photos:
Press the REC (Shutter / Select) Button. The red Camera Status Lights flash three
times to indicate that Time Lapse has stopped.
How to Change Camera Settings
The camera settings can be adjusted in the Setting Mode. Please navigate to the Settings mode using the touch menu or pressing M (Mode / Power) button repeatedly
until above screen appears.
Settings Menu
VIDEO RESOLUTION
Adjust the video resolution
PHOTO RESOLUTION
Adjust the photo resolution
CONTINUOUS PHOTO
Adjust the number of shots
BURST PHOTO
Adjust the speed
TIME LAPSE
Adjust the interval
15
VIDEO RESOLUTION / FPS / FOV MODES
The Resolution, fps (frames per second) and FOV (field of view) can be changed in
the Video mode menu. You can also turn Auto Low Light mode ON / OFF.
To change Video Mode settings:
1. Press the REC (Shutter / Select) Button to enter
(VIDEO RESOLUTION / FPS / FOV MODES).
2. Use the M (Mode / Power) to navigate through options or by touch.
3. Press the REC (Shutter / Select) button to enter desired menu.
4. Use the M (Mode / Power) Button to cycle through each sub-menu option and the
REC (Shutter / Select) button to select it.
5. To change additional options, repeat step 4.
6. When all settings are adjusted, press the Back button to exit.
Note: The modes may vary across different models.
PHOTO RESOLUTION SETTINGS
The photo resolution can be adjusted here. The changes are applied to Photo, PhotoBurst, Time Lapse modes.
Photo Resolution / Field of View (FOV)
12MP / Wide
7MP / Wide
7MP / Medium
5MP / Medium
Note: The options may vary across different models.
16
CONTINUOUS PHOTO
Continuous Photo mode allows you to capture a series of 3 Photos by pressing the
REC (Shutter / Select) button.
Speed Options:
SINGLE
Takes 3 photos in 1 second
Takes 3 photos at speed of 5 photos/sec
Takes 3 photos at speed of 10 photos/sec
Tips: Y
our camera will remain in Continuous Photo mode until you change it
back to single Photo capture mode.
BURST PHOTO OPTIONS
Burst Photo mode captures a series of Photos when the REC (Shutter / Select) Button
is pressed.
Photos can be captured at the following rates:
3 photos in 1 second
5 photos in 1 second
10 photos in 1 second
10 photos in 2 seconds
30 photos in 1 second
30 photos in 2 seconds
30 photos in 3 seconds
Tips: The options may vary across different models.
TIME LAPSE SETTINGS
Several time interval options are available for Time Lapse mode, including 0.5, 1, 2, 5,
10, 30 and 60 seconds.
Additional Note:
The sub-menus are structured identical to GoPro. Please refer to GoPro manual for
details.
REMOVU’s Back buttons works the same way as GoPro’s Exit button.
The options may vary across different models.
17
4-2. Modes and Settings - HERO4 Series
Menu Tree
Menu Rotation Sequence
Please select the mode using the touch screen menu or M (Mode / Power)
button to navigate across different modes.
VIDEO
Record Video
PHOTO
Capture a single Photo
MULTI-SHOT
Capture a series of photos (Time Lapse, Burst, etc)
SETTINGS
Adjust general camera settings
18
Sub Menu Tree
Please select the mode using the touch screen menu or long-press REC (Shutter
/ Select) button while in the desired Camara Mode to change the capture mode
in the order listed of above.
VIDEO MODE
Video
Captures video.
Video + Photo
Simultaneously captures both video and photos. You can set
the camera to capture a photo at selected intervals while
you record video. For details, see Video + Photo Intervals in
this section.
Looping
Lets you continuously record and save only the best moments, which helps to conserve space on your microSD
card. You must select an interval.
PHOTO MODE
Single Photo
Captures single photo.
Continuous
Photos
Captures multiple photos continously.
Night Photo
Captures single photo in low light environments.
19
MULTI-SHOT MODE
Burst
Captures up to 30 photos in 1 second. Perfect for capturing
the definitive moment in fast-action sports.
Time Lapse
Captures a series of photos at specified intervals. You can
use Time Lapse to capture photos of any activity, so you can
choose the best ones later.
Night Lapse
Captures a series of photos at specific intervals and exposure times. Use Night Lapse in low light environments,
such as when capturing the night sky over a period of time.
For available exposure times and examples of when to use
them, see Shutter in Mult-Shot Settings.
20
5. Firmware Upgrade
1. Please visit www.removu.com/firmware page to download the latest firmware.
2. Download the firmware file and unzip the file on your PC or Mac.
3. Turn on the REMOVU P1.
4. When “Select Camera Network” list appears on the REMOVU screen, connect the
device to your PC or Mac using the USB cable included in the package.
5. Copy and paste the firmware files to the root of REMOVU storage drive.
6. When the files are successfully copied into the root of REMOVU, disconnect the
device from your PC or Mac.
7. Restart your REMOVU.
8. The REMOVU logo will appear then upgrade will begin.
9. You are ready to go extreme with the latest firmware.
21
6. Product Specification
Display
Not built-in (using GoPro LCD Touch BacPac, GoPro LCD Touch
BacPac is not included.)
Video Streaming
HLS | 432×240 @ 30fps
Wi-Fi
IEEE 802.11b/g/n
Distance: 20m ~ 60m (Max)
Antenna
Well designed built-in PCB antenna
Power
and Battery
2.5 hours of continuous video streaming
Built-in Rechargeable Li-polymer Battery 1,050mA
Interface
Micro USB (Charging & F/W update)
Weight and
Dimensions
Height: 2.0 inches (52 mm)
Width: 2.8 inches (72 mm)
Depth: 1.0 inches (26 mm)
Weight: appx. 2.1 ounces (60 grams)
(without LCD Touch BacPac weight)
Available Camera
GoPro HERO3, HERO3+ & HERO4
Certificates
CE, FCC, KC, ROHS
22
7. Trouble Shooting Guide
1. If “No firmware to update” message appears after firmware update,
Solution: Connect your device to a PC and delete all files stored in the storage.
Then copy the .bin firmware file to the memory and reboot.
2. If “Low firmware versions” message appears after firmware update,
Solution: Connect your device to a PC and delete all files in the storage. Reboot to
check the version of the firmware.
3. I f you can’t see your on the camera network list,
Solution: In order to establish Wi-Fi connection between P1 and GoPro, the GoPro
needs to have its SSID. The SSID can be generated through the GoPro App. Before
using with P1, please establish connection between GoPro HERO4 and GoPro App
to generate the SSID.
4. I f the diplay gets darker or backlight goes off,
Solution: It means that the battery is running low, so please recharge the device.
5. I f your device freezes while using,
Solution: Press the reset button located next to the charging port. If the problem
persists, please constact customer support.
6. I f the device does not boot, or shuts down automatically while booting,
Solution: Please connect your device to your PC, and have all files deleted in the
storage. If there aren’t any files, please contact customer support.
23
8. Warranty Information
Standard Limited Warranty
Essel-t Co., LTD. (“essel-t”) warrants that essel-t’s devices and accessories (“Products”)
are free from defects in material and workmanship under normal use and service for
the period commencing upon the date of purchase by the first consumer purchaser
and continuing for 1 year period of time after that date.
Exclusions and Limitations
This Limited Warranty is conditioned upon proper use of Product by Purchaser. This
Limited Warranty does not cover:
(a) Defects or damage resulting from accident, misuse, abnormal use, abnormal
conditions, improper storage, exposure to liquid, moisture, dampness, sand or
dirt, neglect, or unusual physical, electrical or electromechanical stress;
(b) Scratches, dents and cosmetic damage, unless caused by essel-t;
( c ) Defects or damage resulting from excessive force or use of a metallic object
when pressing on a touch screen;
(d) Equipment that has the serial number or the enhancement data code removed,
defaced, damaged, altered or made illegible;
(e) Ordinary wear and tear;
( f ) Defects or damage resulting from the use of Product in conjunction or connection with accessories, products, or ancillary/peripheral equipment not furnished
or approved by essel-t;
(g) Defects or damage resulting from improper testing, operation, maintenance,
installation, service, or adjustment not furnished or approved by essel-t;
(h) Defects or damage resulting from external causes such as collision with an
object, fire, flooding, dirt, windstorm, lightning, earthquake, exposure to weather
conditions, theft, blown fuse, or improper use of any electrical source;
( i ) The battery has been charged by a battery charger not specified or approved by
essel-t for charging the battery;
24
Obtaining Warranty Service
For more information, please visit our website at www.removu.com and find out
everything regarding our product. For additional assistance or questions regarding
the product, please contact our C/S center, or the place of purchase. We will try our
best to provide you with the highest possible standard of service.
www.removu.com
REMOVU® by essel-t co., ltd.
Copyright 2015 essel-t co., ltd. All Rights Reserved. Patents Pending.
REMOVU® is a trademark of essel-t co., ltd. registered in the U.S. and other countries.
GoPro® is a trademark of GoPro Inc., registered in the U.S. and other countries.
25