1
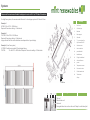
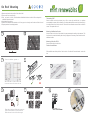
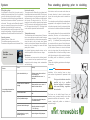
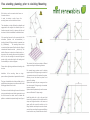
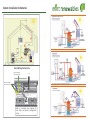
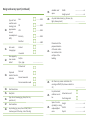
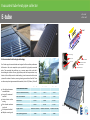
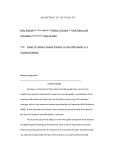
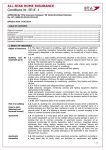
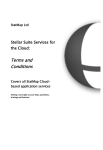
mint
E-tube
Evacuated tube collector
System Manual
mint renewables
Table of contents
General Terms and Conditions............................................................ 3
Safety Precautions...............................................................................4
System Planning.................................................................................. 5
System Installation.............................................................................. 7
Installation Schematic......................................................................... 11
General Information............................................................................12
Design and Survey Report.....................................................................14
System Commissioning Checklist.........................................................16
Technical & Dimensions...................................................................... 18
Warranty & Solar Key Mark ................................................................19
General Terms and Conditions
Installation and commissioning should be undertaken by an MCS Certified
Solar Installer Company.
General terms and conditions of warranty
state that all installations must completed
by a MCS certified and qualified solar
installer company who is currently on the
live MCS register of installers.
Structure
All installer companies should work to the Building
Regulations in force at the time of installation..
The collectors may only be mounted on sufficiently
loadbearing roof surfaces and substructures. The
structural load- bearing capacity of the roof and the
substructure must be
assessed on- site, by a suitably experienced
professional before mounting the collectors.
The manufacturer’s warranty will only apply if these
installation instructions are followed. The warranty does
not cover any damage caused by non- observance of this
manual.
Particular attention should be paid to the quality
of the timber substructure in terms of the stability
of the screw joints necessary for installing the
collectors.
The correct functionality of the system is only
guaranteed if the installation instructions are followed.
In particular, it is essential to have the entire collector
structure verified at the installation site by a qualified
engineer in regions with high wind speeds.
The end client should be informed at system handover
that system should be checked visually once pre year and
the heat exchange fluid changed once every four years.
This document is part of the warranty and should be
kept in a safe place and handed over to the end user
client on completion of works.
Instructions for installation and transport
Mint Solar Collectors kits are delivered on pallets.
Never store outside in water logged conditions.
Always store on a flat surface with glass facing upwards
maximum 8 collectors per stack., or vertical with glass
facing outwards.
The use of a carrying strap is recommended for
transporting the collector. The collector must not be
lifted at the connections.
Avoidimpactsandmechanicalactionsonthesolarcollector.
Mint Solar Collectors should only be used in professionally
designed systems with all system
components and materials being appropriately rated for
use in solar water heating systems and properly installed.
The assessment should also take into account any
special
features of the particular site that could lead to
increased loads (high wind speeds, snow loads etc).
Lightning protection / Potential bonding of the
building
It is not necessary to connect collector arrays to the
lightning protection of the building (please observe the
specific electrical regulations). For installations on metal
substructures at the installation site, authorised lightning
protection specialists must be consulted.
The metal tubes of the solar circuit must be connected to the
main potential equalization bus by means of a conductor
(green/yellow) with a cross- section of at least
16mm² CU (H07V- U or R). It is possible to ground the
collectors to a ground rod. The grounding line must be laid
outside the house. The ground rod must also be connected to
the main potential equalization bus by a line with the same
crosssection as above.
Connections (compression connection fittings)
Connect the collectors using the certified solar compression
connections supplied with your kit.
Precautions must be taken to protect the connection pipes
against temperature fluctuations caused by heat expansion
(expansion bends/flexible piping). In this case, no more than
6 collectors may be connected in series.
Larger collector arrays must be assembled with expansion
bends or flexible members inserted in the links
(IMPORTANT: check the pump design). When tightening
the connections, always apply counter pressure with a
wrench or another spanner to prevent damage to the
manifold connections.
Collector inclination / General notes
The collector is suitable for installation at an angle of
between 15° - 75° Steps must be taken to ensure that
water and other contaminants such as dust, etc. are
prevented from getting into the collector connections and
ventilation holes.
Warranty
Warranty claims can only be made if an appropriate
specification of antifreeze is used and maintenance is carried
out correctly.
Ladder and scaffolding assembly
Safety Precautions
Before commencing mounting work on roofs,
it must be ensured in all cases that the non
personal fall protection and fall- arrest systems
required by DIN 18338 (Roof Covering and
Roof Sealing Works) and DIN 18451
(Scaffolding Works) are in place. See also
Builders’ Protection Ordinance
If non- personal fall protection or fall- arrest
systems cannot be installed for technical reasons,
all personnel must be secured by means of
suitable safety harnesses!
Only use safety harnesses (safety belts, lanyards
and straps, shock absorbers, fall arresters) that
were tested and certified by authorized testing
bodies.
If non- personal fall protection or fall- arrest
systems are not provided, working without the use
of suitable safety harnesses may lead to falls from
heights and therefore cause serious or lethal
injuries!
Ladders not properly secured against sinking in,
sliding or falling over may lead to danger- ous falls!
Whenever you are near live overhead electric
cables where contact is possible, only work if:
- it is ensured that they are voltage- free and this
is secured for the duration of work.
The live parts are secured by the ESB by covering
them or cordoning them off. And are deemed safe
by ESB transmission supervisor. Or advised
safety distances are maintained.
Voltage radius:
1m with .......................voltages up to 1000V 3m
with ........voltages from 1000V to 11000V 4m with
......voltages from 11000V to 22000V 5m with
......voltages from 22000V to 38000V
> 5m in case of unknown voltages
The manufacturer hereby guarantees to take
back products identified with an eco- label and to
recycle the materials used.
Only the heat transfer medium specified may be
used!
Safety harnesses should be fixed above the users
whenever possible. Safety harnesses
should only be fastened to sufficiently load bearing
structures or fixing points!
Never use damaged ladders (e.g., wooden ladders
with split runners or rungs, or bent
or buckled metal ladders). Never try to repair broken
runners, rungs or steps on wooden Ladders!
Ensure that ladders are put up safely. Ob- serve the
correct leaning angle (68° - 75°).
Prevent ladders from sliding, falling over or sinking into
the ground (e.g. using wider feet, feet suited to the
ground or hooking devices).
Only lean ladders against secure points. Secure
ladders in traffic areas by suitable Cordoning.
Contact with live electric overhead cables can be lethal.
Wear protective goggles when drilling and handling
solar collectors evacuated tube collectors have a
danger if damaged of implosion !
Wear safety shoes when carrying out installa- tion
Work!
Wear cut- proof safety gloves when mounting
collectors and handling evacuated tube collectors
(danger of implosion)!
Wear a helmet
Prior to installation
Check the proposed collector siting is suitable. The
collector is suitable for flat roof, tiled roof, cement
and concrete roof structures. The installation should
be carried out by able and qualified persons only. Its
is the responsibility of the end user to adhere to local
planning and conservation regulations.
The collectors must be fixed only to a load bearing
roof structure and substructures. A structural survey
may be required to calculate the permitted load. Do
not mount the collector if you are unsure the
structure will carry the load.
The location of the collector should be positioned at
least 1 meter from any edge or ridge. A pre
assessment of the location should take into account
any additional factors that could lead to additional
loads, ie, wind, air jets and snow. The collector
arrays must be mounted in a way as to avoid snow
piles reaching the collectors.
Use the correct mountings. The collector can be
sup- plied with the correct fixings for both slopping
roof and flat roof types. Not using the recommended
fixings as outlined in this manual will invalidate any
warranty. Please note - metal straps are not a
recommended method of fixing.
Lightening protection
Non metal structures
Lightening protection is not required for collector
arrays mounted to non metal structures, although it
is recommended that protection diodes for the
temperature sensors are installed. Lightening
protection diodes protect the control unit from over
voltage in the event of a lightening strike.
Metal structures
For installations mounted and fixed to metal
structures a lightening protection specialist must
be consulted.
Connection of collectors in series
The collector manifold inlet and outlet is 3/4” male.
Soldering onto the collector manifold is not
permitted and will invalidate any warranty claim.
Connections can be of either copper tube or
flexible metal pipe. When using copper tube
precautions must be taken to account for
temperature fluctuations caused by heat
expansion. Do not connect more than 6 collectors
(SZ10-20) or 4 collectors (SZ30) in series without
the use of expansion connectors.
a
f
Series
c
72
g
d
<
b
The Heat pipe condenser can become very hot at the top end from diffused sun radiation
(>200 °C). Therefore, the pipes should be covered before assembly and also to be
protected against impact.
With
Transport and Handling
the
manifold
upside
down. Align the pre drilled
holes on the front leg over the
All Micoe SZ series collectors are packed in
cartons, are easy to assemble and can be
transported to the site before any assembly is
required.
Extreme caution should be adhered to when
transporting evacuated tubes. Tubes are made
from very strong glass, but will break if handled
incorrectly.
All cartons must be stored on a flat level surface.
Cartons must not be stacked more than 5 high.
Cartons must not be stored upright. Due to their
weight and fragile nature two people are required
to lift all cartons. Please dispose of all packaging
sensibly. Cardboard can be recycled.
Unscrew the tail stock end
1
cap. If this is done on the
7
roof care should be taken
bolts attached to the manifold.
to prevent it rolling off.
Insert the two bolts on the
Slide the tube through the tail
manifold through the holes on
2
the leg. Secure them together
stock up to the manifold.
8
Pull the heat pipe from the
using 2x M8 nuts provided.
glass tube to expose 200mm
Repeat steps 1& 2 to
Smear heat transfer paste
mount the left & right leg
Following
this
turn
the
3
manifold right side up.
evenly over the condenser
9 surface. Insert the condenser
firmly into the manifold.
Place the tail stock over the
Apply a covering of soapy
bottom of the legs. Align the
4
holes and secure tightly using
10
water
onto
the
end
100mm of the glass tube
x4 M8 nuts and bolts.
Align the horizontal cross bars
Using a twisting motion
against the holes on the legs
and attach securely using the 5
Solar collector carton contents
a) Manifold
1x per collector
b) Tail stock
1x per collector
c) Front leg
2x per collector
d) Horizontal bar
As per collector
e) Evacuated tubes
As per collector +1
f) Anti dust circle
1x per tube opening
g) Nuts / bolts
Supplied quantity
as per mounting
h) Heat transfer paste
1x per collector
h
11
M8 nuts and bolts.
One seal per opening
the manifold.
Replace the end cap
Insert the silicon sealing rings
into the manifold openings.
insert the tube firmly into
6
12
onto the tail stock.
Repeat steps 7 - 12 for
the remaining tubes
It is advisable to mount the collector onto the roof &fill and flush the system
(see page 7) before continuing to point 7 - installing the evacuated tubes
System
Please note the maximum allowable heat pipes in series is 90 = to ( 3*E-tube 30 modules)
For high flow systems, the recommended flow rate for a heat pipe system is 60 litres/m2 /hour
Descript
Example 1
HP 65-30 =3.m2*60 = 180Ltr/hour
Required Flow meter setting = 3 litre/minute
Example 2
3*HP 65-30 =9m2*60 = 540Ltr/hour
Required Flow meter setting = 9 litre/minute
Large collector field flow rate calculations are dependent on layout design
Example 3 (Low flow system)
6 *HP65-30 collectors mounted 3+3as diagram below
3*HP 6530 =9m2*60 = 540Ltr/hour Required Flow meter setting = 9 litre/minute
1
Roof hook
2
Collector pipe
3
Brackets
4
Base support
5
Side rails
6
T- or cross piece (6a,
7
6b) Screws M8 x 25
8
Wooden screw
9
Heat conductive
10
paste Manifold
11
Manifold case
12
Fitting for additional
13
collectors Sensor
14
pocket
15
Temperature sensor
16
De- aeration valve
17
Flexible metal tube
18
Tube holder
Clamp
Tile roof
Natural slate roof
Slate roof
Corrugated sheet iron roof or slate roof Clamp for rolled steel joist
Mounting and assembly
Heat pipe
Manifold
Mechanical data
Working pressure
Recommended flow rate
Manifold tails
Max. 6bar
3.5 - 8 Litres/M²h
3/4” tapered thread
Tube size
58mm x 1800mm
Wall thickness of tube
1.8mm
Glass material
High quality
borosilicate glass
Vacuum tube
QB-AL-N/AL metalic
Stagnation Temperature
200.3°C
Emission co-efficiency
<0.06 for 80°C
Solar absorptions
94% to 96%
Heat output
69W per tube @
solar radiant intensity 1000w/m²
Manifold Powder coated aluminium
alloy Frame
On Roof Mounting
1. Measure and mark out the position of the collector field
2. Remove roof tiles to expose rafter
3. Offer up bracket to rafter. Reinforce rafter with additional timbers to a width of 90 mm always bolt
additional timbers Never nail.
4. Note bracket fixing position
5. Mark the tile underside with chalk and cut a 6- 8 mm groove to sit neatly over tile when re fixed to the roof
6. Repeat procedure for remaining brackets
Mounting of additional roof hooks:
Mount the other 3 roof hooks of the module in the same manner and ac cording to the measures. The
hooks must be mounted horizontally and vertically in alignment. If necessary, mount further hooks for
additional modules.
2
1
1
Tile mounting FIG 7
Select the rafters so that the collector juts out 30 cm at the right and left side. It is therefore
recommended to measure first the distance of the rafters and determine a centre line before fitting in
the collector. Start with roof hook - above left. Take out tile from rafter and screw roof hook to rafter with
screws. Then replace tile to roof.
Mounting of side rails: FIG 10
Screw the side rails at the roof hooks.
Fixation of manifold case
Slide manifold case with the profile rail into the hook of the side rail. Screw the bracket on the side
bar.
3
3
Screw in additional grounds to
4
4
8
7
-
9
Locate and remove tiles where the roof
5
6
5
Ensure the roof bracket is fitted to the lowest point
of the tile to assist drain off of rain from the roof.
Relieve the rear of each roof tile with an angle
10
11
Free standing planning prior to deciding
System
Filling the system
It is advisable to fill and flush the system prior to
installing the evacuated tubes. If this is not possible
cover over the tubes to block out the sunlight.
The system should be filled with a glycol based antifreeze with anti corrosion inhibitors. Tap water must
not be used. The system can be filled with a hand fill
pump or a pressure fill pump and must be bled to
eradicate any air bubbles from the solar circuit.
Do not operate the air vent if the system is hot. There
is a high risk of scalding. Only bleed the system if the
temperature of the heat transfer fluid is less than 55°c
Operating pressure
Operating pressure 1.5bar cold.
The maximum operating pressure is 6 bar.
The maximum test pressure must not exceed 10 bar.
Good tube
Silver base. Vacuum
present.
Problem
Low working performance from
heat pipe solar collector
Heat transfer media
The system must be filled with a glycol based antifreeze with added corrosion inhibitors. The fluid must
be checked once in every two years in respect to its
antifreeze and ph value. Antifreeze is to be checked
with a tester. The target value to be -20°c. If the
target level is not reached, replace the heat transfer
fluid. Ph levels are to be checked with a pH indicator
rod. The target value to be pH7.5. If the target level
is not reached, replace the heat transfer fluid.
Temperature sensor
The collector has a built in sensor sleeve. If there are
two or more collectors mounted in series the sensor
is to be inserted into the collector sleeve nearest the
return flow back to the hot water store. Optimal
contact can be achieved between the manifold and
sensor by way of smearing the sensor with heat
paste prior to insertion.
An optional lightening protection device can be
istalled to protect the sensor from over voltage.
Maintenance
The collector and arrays must be checked periodically. An annual close up inspection must be performed to check for damage, leaks, contamination
and tube failures.
Cause
Remedy
a) less solar isolation in you
Calculate correct collector size & adjust accordingly, or
install additional heat source. i.e.
Gas boiler.
b) solar collector is shaded from
sunlight.
Where possible re- move source of
shade or relocate collector.
c) Failed vacuum tube
Replace failed vac- uum tube with
new.
d) Poorly installed heat pipe
Refit the heat pipe. Apply heat paste
to condenser surface.
e) Incorrect instal- lation angle
Reposition collector to an angle 51°
+/- 10% (UK only)
f) High heat loss due to poorly
insulated pipe lines.
Insulate all pipes with high tempera-
Wind load on roofs can create suction forces on
the solar collectors. In order to minimize suction
forces, the mounting frame must be installed as
follows.
The subsurface must be sufficiently sustainable and
appropriate for the weights to be installed. Upon it
is therefore important to verify in advance that the
roof structure is suitable to withstand the distributed
load.
If the mounting frame will not be connected with the
subsurface (structure, roof sub-construction), a
loading of at least 200 kg per collector is required
(see fig
1). Additionally, the mounting frame can
be connected with wire ropes at fixed hold points.
Support elements and fasteners must be provided
by the installer. Moreover, in order to avoid wind
noise to a large extent, the mounting frame must
be installed at least 1 m from the roof edge. In areas
with high wind speed or high construction heights,
the loading must be calculated by a structural
engineer.
Please refer to lightning protection and bonding to
the structure.
Installation of the mounting frame on large
open surfaces of galvanised or trapezoidal sheet
roofs.
This types of installation should be
specified only by a qualified
structural engineer in accordance
with current building regulations
for such roofs.
The frame can be bolted through these roof
structures using oversized washers and rubber
grommets to seal the roof however the
sheets
mustbe loaded with pebbles or substrate to
equivalent weight.
Free standing planning prior to deciding Mounting
Wind load on roofs can create suction forces on
the solar collectors.
In order to minimize suction forces, the
mounting frame must be installed as follows.
The subsurface must be sufficiently sustainable and
appropriate for the weights to be installed. Upon it is
therefore important to verify in advance that the roof
structure is suitable to withstand the distributed load.
If the mounting frame will not be connected with the
subsurface (structure, roof sub-construction), a
loading of at least 200 kg per collector is required (see
fig 1). Additionally,
the mounting frame can be
connected with wire ropes at fixed hold points. Support
elements and fasteners must be
provided by the
installer. Moreover, in order to avoid wind noise to a
large extent, the mounting frame must be installed at
least 1 m from the roof edge. In areas with high wind
speed or high construction heights, the loading must
be calculated by a structural engineer.
Please refer to lightning protection and bonding to the
structure.
Installation of the mounting frame on large
open surfaces of galvanised or trapezoidal sheet roofs.
This types of installation should be specified only by a
qualified structural engineer in accordance with current
building regulations for such roofs.
The frame can be bolted through these roof structures
using oversized washers and rubber grommets to seal
the roof however the sheets must be loaded with
pebbles or substrate to equivalent weight as in figure 1
Fig 1 Loading per collector
The collector field can be mounted at different
angles according to individual applications.
For example larger systems used for heating
support require a 60 degree angle in winter time
, to maximise solar gain, this reduces the system
efficiency in sum- mer when the system is not
required for heating.
Systems that require all year coverage such as
hot water require 45 degree angle to maximise
summer winter gain.
Systems that are predominantly used in summer
are most efficient at 30 degree angle.
Install the profile rails in the in the pre drilled
holes in the hypotenuse of the bracket insert the
clamp and hanger brackets on the lower and
upper profile rails mount the collector on the
hanger brackets and clamp down each collector
one at a time connecting the compression fittings
to each collector as you install the next collector.
System Installation Schematics
Steca Wiring Connections
Pump connections
Live, Neutral, Earth
T1 T2
Power connections
Live, Neutral, Earth
Refer to controller user manual for
time, date, and system configuration
set up
General
Installing the temperature sensor
The solar collector temperature sensor should be installed in the sensor sleeve nearest to the collector array flow. To ensure
optimal contact between the temperature sensor and the surrounding environment, the gap between the sensor sleeve and the
sensor element should be filled with a suitable conducting compound. All materials used for installing temperature sensors
(sensor element, conducting compound, cables, sealing and insulating materials ) must be suitably temperature resistant (up to
250oc).
Operating pressure
The maximum operating pressure is 10 bar.
Removal of air from the system (bleeding)
The system should be properly bled at commissioning to remove as much air as possible from the system. We would recommend that after 2 to 4 weeks of operation the system is bled again .
Warning! - When bleeding the system there is a risk of scalding due to steam and hot transfer fluid and appropriate care must
be taken.
Only operate the bleeding valve if the temperature of the heat transfer fluid is below 60oc. When bleeding the system the
collectors must not be hot! Cover the collectors and, if possible, bleed the system in the morning.
Checking heat transfer fluid
The heat transfer fluid must be checked at least every four years with regard to its antifreeze content and pH value.
Check the antifreeze with an antifreeze tester and replace or refill if necessary. We would recommend a target protection
of -25oc.
Check the pH value with a pH indicator rod. If the limit pH value is less than 7.0 then replace the heat transfer fluid.
Collector maintenance
The solar collectors should be inspected visually, once a year, for any signs of damage, leaks or contamination.
Design and survey report
Date:
Domestic hot water
(DHW)
1.
System type:
Reference:
Swimming pool heating
Completed by:
Surveyor contact no.:
Client details:
DHW plus space heating
2.
Name:
Building type (if
house record
whether
detached, semidetached or
terraced):
House
Block of flats
Sheltered housing
Commercial (describe)
Address:
...................
....................
Tel.:
3.
Number of storeys
....................
Mobile:
4.
Approximate age of building
....................
E-mail:
5.
Is building listed?
Yes/No
6.
Is building in conservation area?
Yes/No
7.
Solar fraction:
Low (circa 50%)
Medium (circa 60%)
High (circa 70%)
8.
No. of occupants:
9.
Approximate
daily hot water
usage (at 50oc)
per occupant:
Low (30 litres)
Medium (50 litres)
High (70 litres)
Design and survey report (continued)
10.
11.
12.
Type of fuel
used for water
heating (and
approximate
annual
consumption in
kWh)
Hot water
storage type
Does property
have combiboiler?
19.
Gas
............kWh
Oil
............kWh
LPG
............kWh
Electricty
............kWh
Solid fuel
............kWh
20.
Vented
21.
Unvented
Yes/No
If yes, type:
Available roof
space
Width
Height up roof
Any roof obstructions (e.g. Dormer, skylight, chimney stack)
..........................m
..........................m
..............................
Please sketch the
proposed location
of the solar collectors relative to the
roof plan of the
building
..............................
Pitched roof
13.
Flat roof
Proposed
location for solar
Ground mounted
collectors
Frame mounted on wall
14.
15.
Roof orientation
16.
Type of roof covering (eg. Slate, flat tile,
pan-tile etc.)
17.
18.
Roof condition
Roof pitch
Any shading (eg. none, from a tree, from a
structure, part of the day, a lot of the day)
22.
23.
24.
Are there any access restrictions for
erecting scaffold? (if so, draw on sketch in
21)
For pitched roof,
collectors are to
be:
..............................
Mounted on-roof
Roof-integrated
Space for solar
Height
cylinder(s) in airing
Width
cupboard/plant
room
Depth
..........................m
..........................m
..........................m
Design and survey report (continued)
Volume
25.
Proposed solar
cylinder type
Number of coils
Additional information for swimming pools
....................litres
.............................
31.
Pool dimensions
Vented
.............................
Width
.............................
Average depth
.............................
Indoors
Unvented
32.
Please note and special cylinder fittings
required (e.g. shower fitting, pumped
secondary fittings)
.............................
26.
Proposed number of Asis One collectors
.............................
27.
Proposed
mounting
configuration
28.
Proposed solar
circuit type
29.
Approximate distance between proposed
solar collector location and solar cylinder(s) ..........................m
26.
Length
Outdoors
Pool location
In-ground
Above ground
33.
Is a pool cover used when pool is not in use? Yes/No
Portrait/vertical
Gas
Landscape/horizontal
Oil
Fully filled, pressurised
34.
Drainback
Type of fuel used
to heat the pool
LPG
Electricity
Solid fuel
None
30.
Please note recommendations for solar
circuit pipe-route and note any
complications or special features
35.
.............................
If pool room (where appropriate) roof has
not been described in 14 to 20, please provide dimensions and notes on structure
System commissioning checklist:
Customer details:
Name:
Commissioning date:
Solar collector serial numbers
Address:
Telephone number:
Mobile number:
E-mail address:
Installer details:
Company name:
Address:
Telephone number:
Mobile number:
E-mail address:
Web-site:
MCS number:
Solar collector mounting brackets and clips inspected
and secure
Solar collector connections inspected and properly
fitted and tightened
Type of weatherproofing of roof penetrations (for inlet and outlet pipe-work and sensor cable)
.....................................
Penetration weatherproofing inspected and properly
fitted
Collector sensor probe securely fitted into collector
sensor pocket
Primary pressure limit of weakest component
................................bar
System pressure when cold
................................bar
Fuse rating for fused-spur supply to controller and
pump
.....................................
Controls and sensors checked and operating correctly
..................................0c
System summary:
Number of Asis One 1A collectors
Type and volume of cylinder
Type of pump-station and
controller
Type of solar circuit fitted
..................................0c
Maximum cylinder temperature setting in controller
..................................0c
Cylinder temperature sensors secured and sensor
cable tied neatly
Expansion vessel capacity
..............................litres
Expansion vessel pre-charge pressure
................................bar
System commissioning checklist (continued:
Declaration (to be completed by the commissioning engineer):
Volume of drain-back vessel (if drainback circuit):
used)
..........................litres
System flow-rate
...................litres/min
Primary circuit volume
..........................litres
Type of heat transfer fluid used
...................................
I confirm that the system described in this commissioning checklist has been
installed at the address stated.
Earth bonding present
The system design is in line with best practice and the system has been
installed to comply with the Microgeneration Certification Scheme Standard
MIS3001 and with all legal requirements. All notifiable works have been
carried out by suitably qualified personnel and have been notified to the
relevant authorities.
Direction of non-return valve checked
Signed:
Position and type of air-vents used
Air-vent(s) isolated after commissioning
Type and thickness of insulation used
...................................
Yes/No
...................................
Pipe-work all insulated (apart from tee off to
expansion vessel and air-vent)
Pump operation and checked and pump running
quietly
Pump speed setting
...................................
Method of anti-scalding in DHW circulation
...................................
Location of fused isolation switch
...................................
Location of pressure gauge
...................................
System explained to customer
System documentation provided to customer
Date of commissioning:
Print name:
Evacuated tube heat pipe collector
E-tube
• On roof
• Flat roof
Heat
Selective Coating
Outer Tube
E-tube evacuated tube heat pipe technology
Silver Braised Header
Inner Tube
Our E-tube range of evacuated tubes are designed to offer excellent performance
efficiencies at the most competitive prices possible for high quality evacuated
tubes. The evacuated tube collectors use a vacuum space within each tube’s
borosilicate glass shell to offer very high efficiency and heat loss protection in any
climate. In the unlikely event of a tube breaking, it can be removed and the entire
system will continue to function, ensuring a heating source that will not fail. There
are three unique heat pipe evacuated tube models; E-tube 15 (15 tubes), E-tube 20
Ultra-high performance
evacuated tubes
Low profile contoured
manifold
Latest selective surface
coating
Silver brazed condenser
riser head
Solar keymark certified
Multiple mounting and
Internal Reflector
Double wall Glass Tube
E-tube 15
E-tube 20
E-tube 30
Zero loss collector efficiency
73.4%
73.4%
73.4%
Heat loss coefficient
1.529
1.529
1.529
Overall area
2.42m2
3.18m2
4.70m2
Aperture area
1.40m2
1.87m2
2.79m2
E-tube technical data
Length x width
Max. operating pressure
1950mm x 1242mm 1950mm x 1632mm 1950mm x 2412mm
10 bar
Glass Wool Insulation
10 bar
10 bar
Warranty
Conditions for Eco pipe Vacuum tube and flat plate collectors.
All deliveries and services are carried out according to our general terms and conditions of sale.
1. The warranty period for the collector function amounts to 5 years for vacuum tubes and 10years for Manifold
& plates. Within that period, all parts proven to be useless or considerably reduced in their usability due to
production or material defects are repaired or replaced ex works, at expiration of the legal warranty period, we
have the choice between rectification or replacement.
2. The warranty begins with the delivery of the collectors to the end user and under condition, that the system
has been installed and setup by a specialised company according to our installation and operating instructions
as well as the locally valid current building regulations.
Further, the warranty is dependent on a carefully completed installation and maintenance record which must
be filled out by the installer and kept by the system owner.
3. The guaranteeing implies that
- The collectors are transported, installed, operated and maintained according to our installation and operating
instructions,
- the collector system is exclusively operated with our solar liquid. (or approved equivalent product)
4. The guaranteeing does not refer to damages due to- wear and tear , excessive wear, inappropriate operation or inappropriate use,
- use of and unsuitable solar fluid or results of corrosion caused by a solar fluid, chemical or electro-chemical
influences, incorrect system layout.
5. Moreover, the warranty does not apply for damages as a result of an inappropriate storage of the collectors
prior to installation and damages that are ascribed to force adjure, The warranty regarding the safety glass
refers to its condition, and here only to manufacturing and material defects. The cover security is examined in
the context of the inspection requirements for collectors and ensured only according to these requirements.
6. The warranty expires
- if arising and obvious defects are not notified in writing within 10 days after receipt or hidden defects
immediately after emerging. In case of hidden defects it is only valid for the warranty exceeding the legal
warranty period,
- if the collectors are changed or maintained by not-specialised persons or companies or undertaken without
or prior agreement,
- if the possibility to inspect the entire system is not guaranteed or if the collector are removed without or
agreement - if original components are exchanged by other components or if inappropriate installation
material and system components as well as non authorized solar fluid are used,
- if the annual inspection is not realized within the time limit. The proper execution is to be documented by the
specialized company in the appropriate page is this manual
7. Transport damages are to be notified immediately, stipulated on the delivery note and signed by the subcontractor.
8. After the expiration of the legal warranty period, the warrantee must provide the necessary aid in case of
reparation work and is obliged to assume the necessary services like transport, installation etc. In the event
of warranty, we recompense
- for on-roof installation max. 200,00€ + VAT for the first collector and max. 80,00€ + VAT for each additional
collector, incl. All consumables.
- for in-roof installation max. 300,00€ + VAT for the first collector and max. 90,00€ + VAT for each additional
collector, incl. All consumables.
9. This warranty does not justify claims exceeding the legal liability for physical or personal injuries that have
been caused
by
the defects
of
the
purchased object.
Retrospective actions and
abatements
exceeding
legal regulations are not
justified either.
10. Other legal claims for warranty and damages in respect of bad installation remain untouched by this
warranty. 11. The exchange or rectification of the collectors or other parts of the solar system must be carried
out by the installer and only after having consulted Eco pipe Otherwise an entitlement to compensation does
not exist.
12. Notifications of claim are to be announced in writing to H2 Solar Shop Limited and by presenting
the installation and maintenance record as well as
the respective proofs immediately after the damage has occurred. 13. Solar accessories are subject to the
warranty as specified by their Manufacturer.
A reliable hand for expert advice and support
2012
Mint Renewables Limited
3 Kelham Court
Kelham Street
Doncaster
DN1 3RF
Tel: 01302 325000
Email - [email protected]