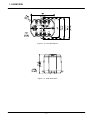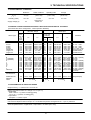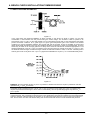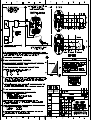
1
STT 3000 Smart Temperature Transmitter Model STT350 Operator Manual Issue 13 September 2010 EN1I-6162 TABLE OF CONTENTS 1 1.1 OVERVIEW . . . . INTRODUCTION ................................................... ................................................... 1-1 1-1 2 2.1 2.2 2.3 2.4 2.5 2.5.1 2.5.2 2.5.3 TECHNICAL SPECIFICATIONS . . . . . . . . . . . . . . . . . . . . . . . . . . . . . . . . . . . . . . . . . . ENVIRONMENTAL CONDITIONS . . . . . . . . . . . . . . . . . . . . . . . . . . . . . . . . . . . . . . . . . SENSOR TYPES/STANDARDS/OPERATING LIMITS AND RANGES/DIGITAL ACCURACY . . . . . . . PERFORMANCE IN OPERATING RANGE . . . . . . . . . . . . . . . . . . . . . . . . . . . . . . . . . . . . FUNCTIONAL SPECIFICATIONS . . . . . . . . . . . . . . . . . . . . . . . . . . . . . . . . . . . . . . . . . PHYSICAL SPECIFICATIONS. . . . . . . . . . . . . . . . . . . . . . . . . . . . . . . . . . . . . . . . . . . . STT350 module protection . . . . . . . . . . . . . . . . . . . . . . . . . . . . . . . . . . . . . . . . . . . . DIN rail mounting . . . . . . . . . . . . . . . . . . . . . . . . . . . . . . . . . . . . . . . . . . . . . . . . . Field mounting in EP housing . . . . . . . . . . . . . . . . . . . . . . . . . . . . . . . . . . . . . . . . . . 2-1 2-1 2-1 2-1 2-2 2-2 2-2 2-3 2-3 3 3.1 3.2 3.3 3.4 THEORY OF OPERATION . . . . BASIC OPERATION. . . . . . . . SFC COMMUNICATIONS . . . . INTRINSIC SAFETY BARRIERS SFC OPERATION . . . . . . . . . .......................................... .......................................... .......................................... .......................................... .......................................... 3-1 3-1 3-2 3-2 3-2 4 4.1 4.2 4.3 4.4 4.5 4.5.1 4.5.2 4.6 4.7 4.8 4.9 4.10 BENCH CHECK INSTALLATION/COMMISSIONING. . . . . . . . . . . . . . . . . . . . . . . . . . . . . . UNPACKING . . . . . . . . . . . . . . . . . . . . . . . . . . . . . . . . . . . . . . . . . . . . . . . . . . . . . . EQUIPMENT . . . . . . . . . . . . . . . . . . . . . . . . . . . . . . . . . . . . . . . . . . . . . . . . . . . . . . INSTALLATION . . . . . . . . . . . . . . . . . . . . . . . . . . . . . . . . . . . . . . . . . . . . . . . . . . . . GROUNDING AND SHIELDING TECHNIQUES . . . . . . . . . . . . . . . . . . . . . . . . . . . . . . . . . STT350 CONFIGURATION . . . . . . . . . . . . . . . . . . . . . . . . . . . . . . . . . . . . . . . . . . . . . 4-20 mA Analog Output Configuration (based on STS102) . . . . . . . . . . . . . . . . . . . . . . . . . DE Digital Output Configuration . . . . . . . . . . . . . . . . . . . . . . . . . . . . . . . . . . . . . . . . . ELECTRICAL AND MECHANICAL CONNECTIONS. . . . . . . . . . . . . . . . . . . . . . . . . . . . . . . MOUNTING . . . . . . . . . . . . . . . . . . . . . . . . . . . . . . . . . . . . . . . . . . . . . . . . . . . . . . DIRECT MOUNTING INFORMATION . . . . . . . . . . . . . . . . . . . . . . . . . . . . . . . . . . . . . . . COMMISSIONING. . . . . . . . . . . . . . . . . . . . . . . . . . . . . . . . . . . . . . . . . . . . . . . . . . . START UP . . . . . . . . . . . . . . . . . . . . . . . . . . . . . . . . . . . . . . . . . . . . . . . . . . . . . . . 4-1 4-1 4-1 4-1 4-3 4-4 4-4 4-6 4-7 4-7 4-8 4-9 4-9 5 5.1 5.2 5.3 MAINTENANCE/TROUBLESHOOTING . MAINTENANCE . . . . . . . . . . . . . . . TROUBLESHOOTING . . . . . . . . . . . RECOMMENDED SPARES . . . . . . . . ..................................... ..................................... ..................................... ..................................... 5-1 5-1 5-1 5-3 6 6.1 6.2 6.3 6.3.1 6.3.2 6.3.3 6.4 INDICATION METERS . . . . . . . . . . . . . . . . . . . . . . . . . . . . . . . . . . . . . . . . . . . . . . . . INTRODUCTION . . . . . . . . . . . . . . . . . . . . . . . . . . . . . . . . . . . . . . . . . . . . . . . . . . . CONNECTION INFORMATION . . . . . . . . . . . . . . . . . . . . . . . . . . . . . . . . . . . . . . . . . . . INSTALLATION / COMMISSIONING . . . . . . . . . . . . . . . . . . . . . . . . . . . . . . . . . . . . . . . . Transmitter operating in 6 byte output mode . . . . . . . . . . . . . . . . . . . . . . . . . . . . . . . . . Transmitter operating in 4 byte digital output mode or in analog 4-20 mA . . . . . . . . . . . . . . . . Transmitter operating in 4-20 mA analog output mode . . . . . . . . . . . . . . . . . . . . . . . . . . . DIAGNOSTIC AND TROUBLESHOOTING . . . . . . . . . . . . . . . . . . . . . . . . . . . . . . . . . . . . 6-1 6-1 6-1 6-1 6-2 6-2 6-2 6-2 1 TABLE OF CONTENTS 6 INDICATION METERS 6.4.1 Moving coil meter . . . . . . . . . . 6.4.2 Smart Meter . . . . . . . . . . . . . 6.4.3 4-20 mA analog mode calibration . ....................................... ....................................... ....................................... 6-2 6-3 6-4 APPENDIX . . . . . . . . . . . . . . . . . . . . . . . . . . . . . . . . . . . . . . . . . . . . . . . . . . . . . . . EXTERNAL LIGHTNING PROTECTION . . . . . . . . . . . . . . . . . . . . . . . . . . . . . . . . . . . . . . Wiring reference . . . . . . . . . . . . . . . . . . . . . . . . . . . . . . . . . . . . . . . . . . . . . . . . . . Installation procedure . . . . . . . . . . . . . . . . . . . . . . . . . . . . . . . . . . . . . . . . . . . . . . . INTERNAL SURGE PROTECTION . . . . . . . . . . . . . . . . . . . . . . . . . . . . . . . . . . . . . . . . . Introduction . . . . . . . . . . . . . . . . . . . . . . . . . . . . . . . . . . . . . . . . . . . . . . . . . . . . Installation . . . . . . . . . . . . . . . . . . . . . . . . . . . . . . . . . . . . . . . . . . . . . . . . . . . . . Maintenance . . . . . . . . . . . . . . . . . . . . . . . . . . . . . . . . . . . . . . . . . . . . . . . . . . . . Control drawings, CSA and FM . . . . . . . . . . . . . . . . . . . . . . . . . . . . . . . . . . . . . . .. . . . . . . . Control Drawing, CSA . . . . . . . . . . . . . . . . . . . . . . . . . . . . . . . . . . . . . . . . . . . . . . . . . . . Control Drawing, FM . . . . . . . . . . . . . . . . . . . . . . . . . . . . . . . . . . . . . . . . . . . . . . . . . . . . 7-1 7-1 7-1 7-1 7-2 7-2 7-3 7-4 7-5 7-10 7-10 Product cerifications . . . . . . . . . . . . . . . . . . . . . . . . . . . . . . . . . . . . . . .. . . . . . . . . . . . . . . . . . . . 7-13 7 7.1 7.1.1 7.1.2 7.2 7.2.1 7.2.2 7.2.3 7.3 7.3.1 7.3.2 Addendum A-3 2 CE Conformity (Europe) Notice About conformity and special conditions This product is in conformity with the protection requirements of 2004/108/EC , the EMC Directive. Conformity of this product with any other “CE Mark” Directive(s) not referenced in this manual shall not be assumed. Deviation from the installation conditions specified in this manual, and the following special conditions, may invalidate this product’s conformity with the EMC Directive. • You must use shielded, twisted-pair cable such as Belden 9318 for all signal/power wiring. • You must connect the shield to ground at the power supply side of the wiring only and leave it insulated at the transmitter side. ATTENTION ATTENTION The emission limits of IEC 61000-6-4, Electromagnetic Compatibility – Generic Emission Standard for Industrial Environments, are designed to pr ovide reasonable pro tection against har mful inte rference w hen this equipment is op erated in an industrial environment. Operation of this eq uipment in a residential area may cau se h armful in terference. This e quipment g enerates, use s and ca n r adiate radio frequency energy and may cau se inte rference to ra dio and te levision reception when th e e quipment is used closer than 3 0 mete rs (9 8 fe et) to the antenna(e). In spe cial c ases, when hig hly susc eptible appa ratus is used in close proximity, the u ser may have to employ a dditional mitigating measures to further reduce the electromagnetic emissions of this equipment. 3 4 1. OVERVIEW 1.1 INTRODUCTION The STT 3000 Smart Temperature Transmitter is a microprocessor based unit suitable for accepting a wide variety of thermocouple, resistance temperature bulb or millivolt inputs and providing a 2 wire 4-20 mA analog or digital "DE" proportional output. The transmitter offers high accuracy and stability together with wide flexibility to suit a wide range of applications. All adjustments and operational settings are implemented through the Smart Field Communicator (SFC) which accesses the transmitter by connecting across the 4-20 mA wiring in parallel with the STT 3000 anywhere along the wiring up to 1,500 meters from the transmitter (Figure 1-1). This manual covers the functionalities of the STT350 model. Adjustments and facilities available through the SFC include: - Selection of input sensor type. - If the sensor type is a thermocouple then internal or external cold junction compensation at an isothermal block can be selected. - Thermocouple and resistance bulb inputs can be programmed to give an output either linear to temperature or to the millivolt/resistance input. - Highest and lowest input readings are held in memory and available for checking. - Range settings are entered in engineering units and extend over the range limits of the sensor type. Note: The minimum allowed span is 1 engineering unit e.g. 1 degree celsius. - Configuration as an analog 4-20 mA or digital "DE" protocol output. - All the traditional smart transmitter capabilities for diagnostics, verifying tag number, damping, calibration, reading inputs and outputs etc. - Changes to the transmitter through the SFC can be prevented by the write protect link. Additional features of the STT350 which do not necessarily require an SFC are: - 4, 3 or 2 wire PT100 operation. - Fault detection on all wires for open circuit inputs can be programmed for upscale or downscale failsafe output drive. (Burnout). - Write protection prohibits changes to the transmitter configuration. - Redundant sensor operation for thermocouples. In case the first thermocouple burns out the transmitter switches automatically over to the back-up one. - True differential temperature measurement. In this mode, both inputs are measured, linearized and then subtracted. The STT350 is based on a rugged housing with encapsulated electronics for high reliability (Figures 1-2 and 1-3) which is available either for DIN rail mounting or supplied in an explosionproof enclosure. The enclosure is suitable for wall mounting or can be supplied with a 50 mm pipe mount bracket. Figure 1-1 Model STT350/SFC/Loop connections 1-1 1. OVERVIEW Figure 1-2 Front dimensions Figure 1-3 Side dimensions 1-2 2. TECHNICAL SPECIFICATIONS 2.1 ENVIRONMENTAL CONDITIONS Reference Rated conditions Operating limits Storage Temperature + C (+ F) 23 (73) -40 to 85 (-40 to 185) -40 to 85 (-40 to 185) -50 to 100 (-58 to 212) Humidity (%RH) 10 to 55 5 to 95 5 to 100 5 to 100 Supply Voltage (V) 24 See Figure in section 2.4 2.2 SENSOR TYPES/STANDARDS/OPERATING LIMITS AND RANGES/DIGITAL ACCURACY (Accuracies with sensor configuration - without operator calibration) Min./Max. Range Digital Accuracy % of max. span oC oF 0.01 0.01 0.02 0.01 0.04 0.37 0.19 -200 to 850 -200 to 850 -200 to 850 -200 to 640 -80 to 150 -20 to 250 -20 to 250 0.14 0.03 0.03 0.04 0.04 0.04 0.06 0.09 0.08 0.14 0.03 Radiamatic RH 0.6 Millivolts Ohms 0.01 0.01 Sensor type Rated Span Eng. Unit Accuracy Standard oC oF oC oF -328 to 1562 -328 to 1562 -328 to 1562 -328 to 1184 -112 to 302 -4 to 482 -4 to 482 0.1 0.1 0.1 0.1 0.1 1.0 0.5 0.18 0.18 0.18 0.18 0.18 1.8 0.9 -200 to 450 -200 to 450 -200 to 450 -200 to 450 -50 to 150 -20 to 250 -20 to 250 -328 to 842 -328 to 842 -328 to 842 -328 to 842 -58 to 302 -4 to 482 -4 to 482 IEC 751 : 1986 IEC 751 : 1986 IEC 751 : 1986 JIS C 1604 - 1981 Honeywell type A General Electric General Electric 200 to 1820 0 to 2300 0 to 2300 -200 to 1000 -200 to 1200 -200 to 1370 -200 to 1300 -50 to 1760 -50 to 1760 -250 to 400 0 to 1300 392 to 3308 32 to 4172 32 to 4172 -328 to 1832 -328 to 2192 -328 to 2498 -328 to 2372 -58 to 3200 -58 to 3200 -418 to 752 32 to 2372 1.0 0.6 0.6 0.2 0.2 0.3 0.3 0.5 0.5 0.2 0.3 1.8 1.08 1.08 0.36 0.36 0.54 0.54 0.9 0.9 0.36 0.54 550 to 1820 0 to 1650 330 to 1370 0 to 1000 0 to 800 -120 to 1370 0 to 1300 500 to 1760 500 to 1760 -100 to 400 780 to 1300 1022 to 3308 32 to 3002 626 to 2498 32 to 1832 32 to 1472 -184 to 2498 32 to 2372 932 to 3200 932 to 3200 -148 to 752 1436 to 2372 IEC 584-1 (ITS90) IPTS-68 IPTS-68 IEC 584-1 (ITS90) IEC 584-1 (ITS90) IEC 584-1 (ITS90) IEC 584-1 (ITS90) IEC 584-1 (ITS90) IEC 584-1 (ITS90) IEC 584-1 (ITS90) General Electric (IPTS-68) 420 to 1800 788 to 3272 0.3 0.54 780 to 1800 1436 to 3272 Honeywell (RH) Resistance bulbs : PT100 PT200 PT500 PT100J Nickel-500 Copper-10 Copper-25 Thermocouples : B C (W5W26) D (W3W25) E J K N R S T NiNi Moly Miscellaneous : -20 to 120 mV 0 to 2000 W 8 mV 0.15 W -10 to 45 mV 0 to 2000 W 2.3 PERFORMANCE IN OPERATING RANGE Output accuracy: +/- 0,025% from 4 mA to 20 mA Ambient temperature effect for a change of 10 oC (18 oF): - Digital effect RTD or Ohms: +/- (0,029% of reading) [ohms] T/C or mV: +/- (0,042% of reading) [mV] - Output effect All inputs: +/- 0,045% of span Cold junction accuracy: +/- 0.25 oC (0.45 oF) Cold Junction Rejection Effect at Output: 60: 1 for ambient temperature changes from 23 Total Accuracy = Linearization Accuracy + Output Accuracy Total Temperature Effect = Digital Effect + Output Effect + CJ Effect (T/C's only) 2-1 oC (73 oF) reference 2. TECHNICAL SPECIFICATIONS NOTE: Output accuracy and output temperature effects should not be included if the STT350 is used in the "DE" digital output mode. Power Supply Effects: +/- 0.005% of span per volt CE MARK compliance: In compliance with EMC directive 89/336/EEC Common Mode Noise Rejection: 120 db (1 million: 1) 50/60 Hz Series Mode Noise Rejection: 40 db (100: 1) at 50/60 Hz +/- 0.5 Hz Long term Stability (1 year): 0.05 % of maximum span. 2.4 FUNCTIONAL SPECIFICATIONS Output: 2 wire 4-20 mA, or digital "DE" Extreme Output Limits: < 3,8 mA - max. 21.8 mA Output Update Time: 0.25 seconds Output Rise Time: 1.5 seconds to 90 % of Final Step Value Input/Output Galvanic Isolation: depending on local safety standards Withstands dielectrical strength test of 1500 Vac for 1 minute Extended working range: 3.8 - 20.8 mA Load Resistance Limits: 0 to 1440 ohms as in this figure 2.5 PHYSICAL SPECIFICATIONS The STT350 is available in 3 physical variations to meet installation and safety requirements. The features common to all variations are included in this section. Features specific to each variation are given in following sections. 2.5.1 STT350 module protection Enclosure: Electronics encapsulated against moisture penetration Electrical connections: Screw Terminals accepting 1.5 mm (12AWG) wiring Safety approval: Intrinsic safety EEx ia IIC T6 Tamb. -20 to 40 oC (-4 to 104 oF) T5 Tamb. -20 to 50 oC (-4 to 122 oF) T4 Tamb. -20 to 80 oC (-4 to 170 oF) Materials of construction: - Electronic Module case: Aluminium alloy with baked polyester paint - Electronic Module terminal block: Black Noryl - Electronic Module screws: Triple plated brass Net weight (module): 0.5 kg 2-2 30 V, 100 mA, 1.2 W 2. TECHNICAL SPECIFICATIONS 2.5.2 DIN rail mounting DIN rail mount: Top hat or G type rail. 2.5.2.1 Top hat rail mounting dimensions 2.5.2.2 G type rail mounting dimensions 2.5.3 Field mounting in EP housing Safety approval: EEx d IIC T6 explosionproof Conduit/Cable Gland/Sensor Sheath Entry: 1/2" NPT (2 entries) Optional M20 x 1.5 inch NPT adaptors (EEx d), 316SS Materials of construction: Low copper aluminium with HYBRID epoxy-polyester paint coating or epoxy paint coating. Net weight: 1.6 kg (3.6 pounds) Enclosure specification: IP66 2-3 2. TECHNICAL SPECIFICATIONS 2.5.3.1 Wall mounting dimensions 100 [3.94] 160 [6.30] 2.5.3.2 50 mm Pipe mounting dimensions 100 [3.94] 160 [6.30] 2-4 2. TECHNICAL SPECIFICATIONS 2.5.3.3 Meter Option 2-5 3. THEORY OF OPERATION 3.1 BASIC OPERATION As shown in the block diagram, Figure 3-1, the transmitter is powered via the 2 wire 4-20 mA signal connected to terminals 5 and 6 in the output side of the unit. Inputs are sampled at a rate of 4 times per second, digitised by the A/D converter, compensated for cold junction or resistance lead length and transferred across the galvanic isolation interface. Both power and signal are galvanically isolated between input and output circuits. Before signal transfer across this galvanic isolation it is post read validated for sensor wiring and signal integrity against reference values. On the ouput side of the isolation, the digital data is linearized and ranged to the lower and upper range values held in non volatile memory and converted back to an analog signal. Any changes to customer settings are held in non volatile memory so that they are secured against loss of power. On receipt the data in non volatile memory is the default shipping data programmed into the unit at the manufacturing location if no customer configuration was specified. This shipping data is: Tag I.D. Sensor type Fault detection Line filter Output type CJ Compensation Damping : xxxxxxxx : mV : ON : 50 Hz : Linear : Internal : 0 Second LRV: 0 mV URV: 45 mV Output mode DE conf. : Analog : 6 byte / Single rng.-S V Connecting an SFC across the 4-20 mA wiring allows changing this data. The jumper selector Failsafe (FS) determines where the output will drive in case of the STT350 detects an open circuit sensor or internal failure. In the position U it will be driven upscale, when D downscale. The jumper selector Write Protect (WP) allows the protection of the transmitters configuration database. In the position Y(es) the database is write protected and any configuration change will be prohibited. Position N(o) allows configuration changes. The shipping positions of the jumpers are: U for FS and N for WP. The output of the STT350 can be selected from the SFC to be either 4-20 mA analog or digital DE protocol. The DE output is used primarily with Honeywell's TDC3000 x distributed control system where it improves performance by avoiding conversion to/from an analog signal and offers full database integration of field transmitters with the central control system. Figure 3-1 Block diagram 3-1 3. THEORY OF OPERATION 3.2 SFC COMMUNICATIONS As previously indicated the SFC communicates by connecting across the 4-20 mA wiring. Communication is by 16 mA pulses which disturb the output signal, so ensure receiving instruments are not on automatic control. The SFC does not feed 16 mA pulses into the loop but instead merely uses the power on the 4-20 mA wires and switches it through a field effect transistor output switch. The SFC always acts as master and the transmitter as slave. When the transmitter is operating in the digital DE mode, there is no wake-up pulse required and the SFC communication does not disturb the PV signal. Consequently, there is no need to put the loop on manual control when operating in the DE mode. 3.3 INTRINSIC SAFETY BARRIERS Specific safety barriers which have approval to Cenelec Standards, allow bi-directional communications, supports SFC on either side, and have been confirmed by Honeywell to operate satisfactorily with STT350. See table below. Barrier reference Safety description Line Resistance/ Supply Requirements MTL 706 Current Loop Barrier Current Loop Barrier 28 V/300 ohms/93 mA 130 ohms 22 to 30 Vdc Elcon CS-I-7021/IS/ST-H Galvanically Isolated Repeater 28 V/300 ohms/93 mA 130 ohms 24 Vdc or 220/110 Vac MTL 3046 Repeater Power Supply 28 V/300 ohms/93 mA 130 ohms 20 to 35 Vdc Pepperl + Fuchs KHD3-IST/Ex1 28 V/93 mA 190 ohms 20 to 35 Vdc 3.4 SFC OPERATION Details on SFC operation are covered in the SFC users manual, however a summary of operations is included in Section 4. It is important that the SFC is the model STS102 or STS103 which is suitable for, not only temperature transmitters, but also for pressure, level, flow (DP) and magnetic flowmeter smart transmitters, both for 4-20 mA analog and DE digital output selections. NOTE: We recommend you to use an SFC (STS103) with software version 4.2 or higher to obtain enhanced messages for the STT350. Some enhanced messages for the STT350 will be displayed as "UNKNOWN STATUS" if the SFC software version is lower than 4.2. (The SFC software can be upgraded by contacting your nearest Service Center.) 3-2 4. BENCH CHECK INSTALLATION/COMMISSIONING 4.1 UNPACKING Unpack the unit and verify the contents are as ordered i.e. this users manual, either the STT350 Module or the STT350 Module in a field mounting housing and accessories such as Din Rail mounting clips and 50 mm pipe mount bracket are included. 4.2 EQUIPMENT If a bench check is intended the equipment needed is: - An input sensor equivalent to the required application or an equivalent calibrator which can simulate millivolts, resistance temperature detector, thermocouple or resistance inputs. - Nominal 24 Vdc power supply with less than 100 mV peak to peak ripple and able to supply at least 40 mA. - Smart field communicator. - Connection wiring and 250 ohms resistor. - Digital voltmeter with range covering 0-5 Vdc. Note that if a high speed sampling DVM is used, a 1 Hz (160 m sec) averaging filter is recommended. NOTE: If you are going to check calibration in the thermocouple mode, ensure that the cold junction temperature is stabilised. After connecting and powering up all equipment including the transmitter, protect the transmitter from air draughts and allow at least 1 hour before taking readings. 4.3 INSTALLATION Connect the equipment as in Figures 4-1 and 4-2. The sensor input connections are indicated on the terminal block for the most common wirings. The following sensor or input types require a special wiring: - 2-wire resistance: a strap should be wired between terminals 3 and 4, the 2-wire resistance should now be connected between terminals 2 and 3. - 4-wire resistance: like 3-wire resistance, but the fourth wire to terminal 1. - Millivolt input: the positive side of the millivolt source should be connected to terminal 3 and the negative to terminal 4. - Differential RTD (Only PT100D, PT100J, PT200, PT500, Ni500): a strap should be wired between terminals 4 and 1. RTD 1 should be wired between terminals 4 and 3, RTD 2 should be wired between 4 and 2. The output is RTD 1 - RTD 2. Figure 4-1 4-1 4. BENCH CHECK INSTALLATION/COMMISSIONING Figure 4-2 - Differential T/C: a strap should be wired between terminal 4 and 1. T/C 1 should be wired between terminals 4 and 3, T/C 2 should be wired between 4 and 2. The output is T/C 1 - T/C 2. - Redundant T/C: T/C 1 should be wired between terminals 4 and 3, T/C 2 (back-up) should be wired between 4 and 2. When "sensor fault detection" is active (See figure 4-3), the analysis of TC1 and TC2 is done continuously. The measurement is made with the best of TC1 and TC2. Resistance temperature detector (RTD) measurements use the 3 or 4 wire approach. The transmitter determines by itself if a 3 or 4 wire RTD is connected when powered up. In case a 3 wire RTD is used, the current leading wires are connected between 2 and 4 and the compensating wire to 3. In case a 4 wire RTD is used, the current carrying wires are connected between 1 and 4 and the compensating wires to 2 and 3. 4-2 4. BENCH CHECK INSTALLATION/COMMISSIONING NOTE: The mode of operation (T/C single, T/C redundant, RTD single, ...) is automatically selected by the transmitter when the sensor type is changed and saved in a non-volatile memory. Therefore it is important to have the carrying wires correctly connected before a sensor type is changed. At each power up, if the STT350 is in RTD single, a wire analysis is done to select between 3 wires or 4 wires modes. MODE OF OPERATION SFC MESSAGE S E N S O R 1 T/C redundant T/C differential "STATUS CHECK "Redundant T/C" = O.K." "Delta Temp" RTD single (2, 3, 4 wires) If 4 wire mode, "4 wire RTD", otherwise "STATUS CHECK = O.K." RTD differential "Delta Temp" mV Available Not available Not available Not available Not available 0-2000 ohms Cu 10, Cu 25 Not available Not available Not available Available Not available T/C (B, C, ..) Available Available Available Not available Not available Not available Not available Not available Available Available T Y RTD P E (Pt100, Pt200, ...) 1 T/C single For STS103 version 4.2 or higher. Otherwise the SFC message is "UNKNOWN STATUS" (See section 5.2, "TROUBLESHOOTING"). TABLE 4-1 EMITTENCE CONFIGURATION FOR RADIAMATIC RH SENSOR: The emittence for RH sensor must be entered as follows: Configure the cold junction compensation as External (See figure 4-3) and key in the emittence value (min.: 0.1, max.: 10.0) instead of the external cold junction compensation temperature. 4.4 GROUNDING AND SHIELDING TECHNIQUES The current output signal will operate in either a floating or grounded system. If the signal appears noisy or erratic it is recommended to ground the loop at the negative terminal of the power supply. In case the transmitter can be disturbed by strong electromagnetic interference it is recommended to connect the transmitter ground terminal to a local ground by a short, large size wire. When a shielded sensor is used, this shield can be connected to the ground terminal. The current loop shielding can be grounded either at the power supply or at the transmitter. Shielding should only be connected at one point to avoid ground loops. 4-3 4. BENCH CHECK INSTALLATION/COMMISSIONING 4.5 STT350 CONFIGURATION 4.5.1 4-20 mA Analog Output Configuration (based on STS102) Switch on the power supply and the SFC. On power up the SFC will display "self check" for a few seconds then having verified proper working gives the reminder "put loop in manual". Press I.D. button and the transmitter will respond with a display of its name, typically "STT xxxxxxxx". The STT cannot be changed since it identifies the type of transmitter. The current name xxxxxxxx has a cursor under the first letter showing it can be changed to an 8 character Alpha-numeric tag number by using number and letter keys. NOTE: Even though the transmitter is working properly, the SFC may display at this point "CRITICAL STATUS" and an error message if you press "STATUS". These messages are e.g.: "INPUT OPEN" "UNCERTAIN RDING" "I/P OUT OF SPEC". The cause is probably one of the following: - You have not connected a sensor to the input - There is an open circuit in the sensor, connecting wiring or terminal connections. - You have connected a T/C or other millivolt source to the T/C terminals and the transmitter is configured for RTD input (or vice versa). - You have connected a T/C or millivolt source to the input and the unit is configured properly. However, you subsequently tried to reconfigure for an RTD input with the RTD terminals open (or vice versa). If your SFC is model STS102/103 you may now connect the appropriate sensor, press "STATUS" (in the SFC) OR connect the appropriate sensor, and then reconfigure. This will clear the # sign. However, if your SFC is model STS101 with software revision 5.0, it will not let you proceed. First, connect a T/C to the input terminals (or short the terminals with a wire or paper clip). Second, turn the SFC switch to "OFF". Third, turn the SFC switch to "ON", press "ID" and proceed. If the transmitter is still in "CRITICAL STATUS", it is probably configured for an RTD input. Connect an RTD (or 100-350 ohm resistor) to terminals 2, 3 and 4 and repeat the above procedure. Press status to verify "status check = OK" is displayed. Press "shift" then "units" to access the transmitter database and configure it as required. As mentioned earlier the default shipping mode for units is mV input, 0 - 45 mV range etc. You can now customise the unit to your specific application. The flow chart in Figure 4-3 gives simplified overview of selections and key strokes. ] In summary pressing "Menu Item" scrolls through the selections of any one category whilst "next" (or the next category. Equally "prev" (or ) steps back to the previous category. [ ) steps on to When a desired configuration item appears on the SFC display this item may be configured in the SFC "Hold" memory by pressing "Enter". When you have completed configuring all items accessible via the "STT Conf" Key, or you try to exit via the "CLR" Key, the SFC will ask "Download Change ?". Press "Yes" (Enter) and the changes will be down loaded from the SFC to the transmitter, or press "No" (CLR) and the SFC hold memory will be erased. Having now configured the input type etc., press "LRV" and key in the required temperature for 4 mA output e.g. 100 (212 oF). Press "Enter" to load this into the transmitter and repeat with "URV" for the 20mA output e.g. 500 oC (932 oF) . oC Note that if the input type is changed or the output type is changed from linear to non-linear (or vice versa), the LRV and URV values will default to factory set values and the oC / oF selection will default to oC . Your STT350 is now configured for your applications. You can check out the performance by varying the input and observing the output response on the DVM. Operating card data included with the STS102/103 covers other smart transmitter functions included in the STT350 e.g. damping, calibration, output mode etc. In addition the SFC users manual supplied with the STS102 covers its full operations and capabilities in detail. 4-4 A CONF B DE READ H CHANGE CONF Enter iii iii iii iii iii iii iii iii iii iii iii iii iii iii iii iii iii iii iii iii iii iii iii iii iii iii iii iii iii iii iii iii iii iii iii Menu 1 Menu 2 H Enter iii ii iii ii iii ii iii ii iii ii iii ii iii ii iii ii iii ii iii ii iii ii iii iiiii ii NEXT MENU ITEM OUTPUT CORRECT PREV --> 7 8 9 <-4 5 6 STAT 1 2 3 SPAN READ LOWEST/ HIGHEST INPUT RESET PV (5) SER # H Lo Enter J G Hi A <--> DE F/S DIR SW VER URL ii ii ii ii ii ii ii ii ii 0 iii ii iiii ii ii ii iii ii ii ii ii ii ii iii ii ii ii ii ii ii iii ii ii ii ii ii ii iii ii ii ii ii ii ii iii ii ii ii ii ii ii iii ii ii ii ii ii ii iii ii ii ii ii ii ii iii ii ii ii ii ii ii iii ii ii ii ii ii ii iii ii ii ii ii ii ii ii ii ii iii ii ii iiiiiiiiiiiiiii ii SET READ CJ ii ii ii ii ii ii ii ii ii ii ii ii ii ii ii iiii ii URV LRL ii ii ii ii ii ii ii ii ii LRV C D E F G H I J K L M N O P Q R S T U V W X Y Z -> CHG LATCHING CFG? (4) ii ii ii ii ii ii ii ii ii UNITS H Enter (1) (2) (3) ii ii ii ii ii ii ii ii ii ii ii ii ii ii ii iiii ii DAMP PROBE (J, K, etc) CJ Ext/Int Line Filter Inp Fqult Det O/P Linear Next LATCHING CONFIG? ii ii ii ii iiii iii ii ii ii ii iiii iii ii ii ii ii iiii iii ii ii ii ii iiii iii ii ii ii ii iiii iii ii ii ii ii iiii iii ii ii ii ii iiii iii ii ii ii ii iiii iii ii ii ii ii iiii iii ii ii ii ii iiii iii ii ii ii ii iiii iii iiii iii ii ii ii ii iiii iii ii ii ii ii iiii iii ii ii ii ii iiiii iiii iii iiiii iiii iii iiiii iiii iii iiiii iiii iii iiiii iiii iii iiiii iiii iii iiiii iii iii iiiiiiiii iiii ID ii ii ii ii ii ii ii ii ii Shift Keys Keys iiii iiii iiii iiii iiii iiii iiii iiii iiii iiii iiii iiii iiii iii iii iii iii iii iii iii iii iii 4. BENCH CHECK INSTALLATION/COMMISSIONING . +/- SCR PAD NUM / ALPHA CLR (NO) ENTER (YES) ii ii ii ii ii ii ii ii ii SHIFT NON-VOL Figure 4-3 Flow chart (Apply to STS101) Additional Notes 1 This series mode filter should match the local A.C. supply frequency and is set to 50 Hz for Europe, 60 Hz for North America. 2 Sensor fault detection "on" will drive the output upscale or downscale as selected by the jumper in the event of an input open condition or in response to most electronic malfunctions. Sensor fault detection "off" will give an indeterminate output with an input open condition. 3 "O/P linear" will always read in degrees (C, F, R or K as selected) for T/C and RTD inputs. "O/P non linear" will read in millivolts for T/C inputs and in ohms for RTD inputs. 4 Configuration of LATCHED mode (critical alarms) The LATCHED mode requires an acknowledgment by using the "STAT" key. The NOT-LATCHED mode does not require any acknowledgment. 5 These are the highest and lowest values since the last time they were accessed. 4-5 4. BENCH CHECK INSTALLATION/COMMISSIONING 4.5.2 DE Digital Output Configuration The STT350 transmitter can operate in either an analog or a digital DE communications mode using the same protocol as other Smartline transmitters - ST3000 and MagneW3000. You can use the Smart Field Communicator (SFC) model STS101 or higher to set transmitter operation mode as analog or digital DE communications. Note that STT350 transmitters are factory set for analog communications operation. This addendum outlines additional steps for the Configuration Flow Chart in Figure 4-3 of this Operator Manual to configure parameters for DE communications mode and change transmitter operation from analog to digital DE communications. The DE configuration parameters are: - Type of transmitter operation - Message format - Failsafe mode for the digital control system STT350 Configuration Flow Chart: Use the following flow chart to supplement in Figure 4-3 if you want to set your STT350 for DE communications operation. Be sure that the SFC, power supply, and sensor are connected to the STT350 as shown in Figures 4-1 and 4-2 of the Operator Manual. Note that DVM (shown in Figure 4-1) readings will fluctuate when STT350 is put into the DE communications mode. ACTION Continued from Figure 4-3 DISPLAY RESPONSE Ready Press "SHIFT" + "MENU ITEM" Single Range Press "MENU ITEM" Dual Range ST/DC Press "MENU ITEM" Single Range W/SV Continued pressing of "MENU ITEM" cycles through these selections for the type of transmitter operation. Press "NEXT" or "PREV" to view another configuration parameter without changing present selection ; otherwise, continue by pressing "ENTER" to make selection. ENTERED IN SFC Press "ENTER" W/O DB (4 Byte) Press "MENU ITEM" W/DB (6 Byte) Continued pressing of "MENU ITEM" cycles through these two selections for the message format with or without database information. Press "NEXT" or "PREV" to view another configuration parameter without changing present selection ; otherwise, continue by pressing "ENTER" to make selection. ENTERED IN SFC Press "ENTER" F/S = B/O Lo Press "MENU ITEM" F/S = B/O Hi (Note 1) Continued pressing of "MENU ITEM" cycles through the library of failsafe mode selections ; i.e., F/S = B/O Lo - F/S = LKG - F/S = FSO, B/O Lo - F/S = FSO, B/O Hi - F/S = FSO, LKG... Press "NEXT" or "PREV" to view another configuration parameter without changing present selection ; otherwise, continue by pressing "ENTER" to make selection. ENTERED IN SFC Press "ENTER" Download Change ? Press "ENTER" Ready Press "SHIFT" + "RESTORE" CHNG TO DE ? (Notes 2, 3) Press "ENTER" DE XMTR Transmitter operation has been changed from analog to digital DE Communications mode. DE XMTR xxxxxxx Press "ID" TABLE 4-2 4-6 4. BENCH CHECK INSTALLATION/COMMISSIONING ADDITIONAL NOTES 1 Not all failsafe mode selections apply for given type of transmitter operation 2 Total DE mode accuracy = digital accuracy 3 Total temperature effect DE mode output in degrees per 10 oC (18 oF) change = digital effect + CJ effect (for thermocouples only). 4.6 ELECTRICAL AND MECHANICAL CONNECTIONS If the STT350 is to be installed on DIN Rails then the main considerations are electrical connections and mechanical fixing. Electrical connections are identical to the bench test instructions except that for thermocouples compensation cable is likely to be used. Mechanical fixing of the module is by means of the snap in DIN Rail Clips which have to be screwed to the bottom lugs of the module. 4.7 MOUNTING The STT350 unit with the explosionproof or general purpose housing can be installed in 3 different approaches: Wall mounted / 50 mm pipe mounted / Direct mounted on the sensor If wall or pipe mounting is preferred then ensure the selected situation is suitable. Remember local temperature at the site may be significantly higher than ambient due to heat transfer from the process. Situations with excessive vibration should also be avoided since although the STT350 is highly rated, problems can occur on connecting wiring. Connections are as detailed earlier. Since the low level input to the STT350 is designed to reject common and series mode noise no special screening techniques are required but best results are still provided by adopting the standard practice of screening the sensor signal or using conduit or metal covered mineral insulated cable. At the STT350 the cable entries are 1/2" NPT. The 4-20 mA wiring should conform to normal practice. Screened twisted wire pairs are recommended but are not essential. The 4-20 mA signal has been adopted as an international standard with high noise immunity and the STT350 digital communications uses 16 mA pulses for the same purpose. Wiring from STT350 units can be run in multicore cabling without cross-talk during communications due to slew rate limiting of pulse rise and fall times and the slow secure communication rate of approx. 220 baud. Galvanic isolation of input/output circuits in the STT350 enables use with grounded or ungrounded probes. The STT350 electronic circuits are completely isolated from ground and so permit the 4-20 mA loop also to be grounded at one point. Normally this is the negative of the power supply connected to instrument earth or safety barrier earth. 4-7 4. BENCH CHECK INSTALLATION/COMMISSIONING 4.8 DIRECT MOUNTING INFORMATION Figure 4-4 In the case where the preferred installation is direct mounted on the sensor as shown in Figure 4-4, the main consideration is heat transfer from the process along the sensor fittings. The STT350 is rated to operate in an environment of 85 oC (185 oF) but heat transfer from an uninsulated process with a short thermowell could easily produce excessive conditions. As a guide Figure 4-5 gives typical temperature gain at the STT350 over ambient conditions for various separations between the process wall and the STT350. These are qualified as typical since thicker thermowells will transfer more heat and sheltered situations could lead to higher local temperatures. Thus this should only be taken as an average guide and a safety factor should be included as considered appropriate. For an ambient temperature of say 35 oC (95 oF) maximum and a process which can operate at say 800 oC (1472 oF), then the absolute minimum length of extension length outside the wall and insulation if used, is 105 mm. Increasing this to 150mm gives a rise of only about 23 oC (41.4 oF) against the allowable 50 oC (90 oF) i.e. a comfortable safety factor. Figure 4-5 EXAMPLE: Process operates at 800 oC (1472 oF) maximum. Ambient can reach 35 oC (95 oF) maximum. STT350 operated at 85 oC (185 oF) maximum. Permissible housing temperature rise = 85-35 = 50 oC (90 oF) maximum. From graph 50 oC (90 oF) maximum rise requires exposed thermowell length of about 105 mm. Alternatively 150 mm exposed length gives only about 23 oC (41.4 oF) rise. Another consideration in direct mounting is selection of accessories to provide spring loading of the sensor against the end of the thermowell. This is required for fast response in some applications and must be included in the sensor/thermowell/ extension assembly. With this fitted to the STT350, 15 cm wire length should be left to connect to the input terminals i.e. from the end of the 1/2" NPT male thread. Wiring and connections should conform to local standards and practices. 4-8 4. BENCH CHECK INSTALLATION/COMMISSIONING 4.9 COMMISSIONING Commissioning is carried out after installation and wiring have been completed. Power up the STT350 transmitter and verify via the SFC that it is configured as required. If a bench check and configuration was carried out then the procedure will be clear. If no bench check and configuration was done then refer to section 4.4 and carry it out now. Verify also that the receiving device is actually receiving the output signal and use the SFC in output mode to vary the output signal and verify loop calibration. If small errors exist in the loop then they should be identified and the out of specification device calibrated. For calibration of the STT350 refer to the SFC Operating Guide 34-ST-11-XX. If however no adjustment is possible e.g. with voltage developing resistors or active barriers then the STT350 output can be recalibrated to compensate for loop zero and span errors. Check also the loop failsafe requirement. STT350 includes a jumper which gives a high (21.8 mA) or low (3.7 mA) output if an internal failure or open circuit sensor is identified. The open circuit sensor detection (selection "TC FAULT_DET" on the SFC) can be programmed via the SFC either "ON" or "OFF". Open circuit sensor detection operates by inspecting current pulses into the input wiring. If the sensor is also connected to other receiving devices, they could be disturbed by these pulses. Select T/C fault det. "OFF" for these applications. 4.10 START UP Start up the process, check the STT350 environment is still as expected i.e. local temperature and vibration are not excessive, housing cover is tightly sealed and mountings are secure. If the process operates at a slightly different condition from expected then the range of the STT350 can be easily changed by keying in new URV/LRV setting via the SFC but remember also to rescale the receiving device. 4-9 4. BENCH CHECK INSTALLATION/COMMISSIONING 4-10 5. MAINTENANCE/TROUBLESHOOTING 5.1 MAINTENANCE Maintenance of the STT350 is limited to ensuring that connections, seals and mounting are tight and secure. There are no moving parts or adjustments and hence no reason to open the field housing except to inspect for corrosion or conductive dust entry which could later affect reliable operation. The transmitter module itself should never be opened. 5.2 TROUBLESHOOTING Troubleshooting on the STT350 loop is greatly simplified by use of the SFC connected in the termination area near the receiving instrument. Use also a DVM at the termination area for the receiving instrument to confirm a similar signal is coming from the field and power is available on the two wires to the STT350. This isolates the problem to either field loop or receiving instrument/power supply/wiring/safety barriers etc. If the original symptom was an unstable input it could be loose connection on the receiving side. Assuming the above confirms a field loop problem, the likely causes/actions are given below: For any step the first action is to hook up the SFC to the transmitter and press "ID", then "STATUS". SYMPTOM SFC MESSAGE/DISPLAY No input or low input "INPUT OPEN" (with downscale failsafe) "I/P OUT OF SPEC" (indicates that the input is below LRL) "HI RES/LO VOLTS" which indicates an open circuit loop High input "INPUT OPEN" (with upscale failsafe) "I/P OUT OF SPEC" (indicates that the input is above URL) "FAILED COMM CHK" or "INVALID COMM" which indicates no or improper communications with STT350. Unstable onscale "STATUS CHECK = O.K." input since any identified problem would give upscale or downscale failsafe. POSSIBLE CAUSE Bad sensor wire connection Incorrect operating voltage Bad sensor wire connection Incorrect operating voltage Bad sensor wire connection Imminent open circuit of sensor Calibrating device disturbed by the periodical sensor current detection Wiring disturbed by strong electromagnetic interference Failsafe output signal "CRITICAL STATUS" Extreme negative "INPUT OUT OF SPEC" or differential temperature CURE Check out field wiring and connections. Ensure that the transmitter is in its voltage operating area. Verify that the 250 ohms resistor is in loop. Check fied wiring and connections for partial short circuit. Check STT350 connections are correct polarity. Check that the transmitter is in its voltage operating area and line resistance is not excessive. Check connection and wiring for intermittent connections Check that sensor fault detection is "ON", this allows detection of a bad sensor Turn the fault detection "OFF" when performing a bench check for accurate measurement. Protect wiring by using appropriate grounding, shielding, etc. A failsafe output signal (critical status) is latched for safety and can be caused by several reasons. Latched means the alarm will only disappear when the cause has disappeared and a power cycle or status request is performed. The SFC will indicate the source of the problem by displaying the appropriate error message. During bench checking of RTD's with decade box or resistance simulator, it can happen that the output generates negative temperature. Check that the resistance between terminal 1 and 4 is always greater than 15 ohms. Remember that differential RTD is restricted to PT100D, PT100J, PT200, PT500, Ni500 and ohms probe type is not supported, the minimum value of the resistance bulbs is never below this. Transmitter is seeing 0 ohm between terminals 1 and 4 as a shorting link. Incorrect output "STATUS CHECK = O.K.", The most common error is Check the appropriate sensor wiring and signal with but does not correspond to changing the sensor wiring power cycle when it is correct. simulating device value set by simulating device. after probe type selection or after power-up. 5-1 5. MAINTENANCE/TROUBLESHOOTING SYMPTOM SFC MESSAGE/DISPLAY No break detection on RTD lead to terminal 1 "Unknown status" (non-critical message) "Unknown status" For SFC version lower than 4.2 POSSIBLE CAUSE CURE The transmitter checks during Power cycle will recover from the power-up if the RTD/Ohms problem. lead to terminal 1 is connected to determine operation in 3 or 4 wire mode and ignores the fourth wire in case of 3 wire RTD. This message can appear in the following cases: single T/C operation: HTheInthermocouple resistance Replace T/C at next maintenance operation. is measured periodically and if it exceeds a value of approx. 500 ohms, this warning signal will be set. The message should be interpreted as "T/C Res. Drift". Note that this is not the sensor break detection alarm which is a critical status message. In differential T/C or RTD Hoperation: No problem The message should be interpreted as "Delta Temp" mode active. In redundant T/C Hoperation: No problem The message should be interpreted as "Redundant T/C" mode active. If more than one "Unknown Replace T/C at next maintenance status" is displayed, then the operation. message should be interpreted as "Backup T/C ACT." or/and "T/C Res. Drift" (T/C1, T/C2 or both). In 4 wire RTD HOHM operation: or 4 wire The message should be interpreted as "4 wire RTD" mode active. "INVALID "INVALID REQUEST" REQUEST" when changing LRV or URV If the LRV is changed, the Reduce the URV or SPAN before URV tries to change by the changing the LRV. same amount to maintain the same SPAN. If this new URV exceeds the URL then this message appears. Non-critical status "USER CORR ACTIVE" message, without # sign Transmitter has been trimmed When performing a Reset Correct for particular sensor range. command or a sensor type change the This can be done by keying in transmitter will lose this sensor LRV/URV, CORRECT, correction and fall back to the original ENTER with exact LRV and factory calibration. URV input values to enable improved accuracy over the specifications. Remember that successfull communications to the STT350 gives many useful pieces of data even just with the initial I.D. response: 1 Transmitter is powered. 2 Line resistance is correct. 3 The wires run to the correct unit or if not then identify the tag number of the unit connected. 5-2 5. MAINTENANCE/TROUBLESHOOTING 5.3 RECOMMENDED SPARES GENERAL DESCRIPTION: Reference STT350 Electronics Module Order from Price Book Section 3 to include options as required. European Explosionproof Housing 30749634-002 Carbon Steel Mounting Bracket Kit 30755905-501 Stainless Steel Mounting Bracket Kit 30671907-501 STT350 Accessories Kit (8 terminal screws, 2 jumpers, 1 plastic hole cover, 2 module fixing screws, 2 DIN rail adaptors) 46188055-501 Smart Meter 30757178-501 Analog Meter 30756997-501 Meter Mounting Bracket 46188056-501 Meter Cap for Housing 46188066-501 M20 Adaptor (flameproof Ex) 46188203-501 2 DIN clips and 2 screws kit 46188055-502 Diode for Analog Meter 46188067-501 Stick-on engineering unit labels 30756918-001 5-3 5. MAINTENANCE/TROUBLESHOOTING 5-4 6. INDICATION METERS 6.1 INTRODUCTION These meters are supplied already installed by the factory and provide a display of the transmitter output. Selection ME gives a 4-20 mA analog output moving coil meter display to &2% accuracy. A diode is supplied fitted across the meter to enable loop continuity in the event of moving coil failure. To ensure adequate loop power availability in this event add 0.7 V to the transmitter 10.8 V loop requirement i.e. 11.5 V minimum supply Volts. Selection SM gives the Smart Meter display which can accept either the Digital DE output or the 4-20mA analog signal. With both of these signal types the Smart Meter displays a large bargraph accurate to &3% and visible from 10 meters away together with a 4 1/2 digit display either in % of span or in engineering units. For the 4-20 mA signal this digital display is &0.5% of span accurate whilst for the Digital DE signal it has no error, displaying the digital output exactly within it's resolution of &0.05 for a &199.9 reading range, &0.5 for a &1999 reading range and &5 for a &19990 reading range. The Smart Meter includes various status message and engineering unit information on the LCD screen. The Smart Meter obtains its power in series with the transmitter and requires 2.25 V which should be added to the transmitter 10.8 V i.e. 13.05 V minimum supply Volts. The minimum loop operating current is <3.8 mA. 6.2 CONNECTION INFORMATION The addition of either of these meters changes the user wiring connections, because both require a serial connection of the meter in the negative 4-20 mA signal line from the transmitter. With a meter added, the user connections are now Terminal 6 (+4-20 mA) and Terminal 8 (-4-20 mA) as shown below in Figures 6-1 and 6-2. Figure 6-2 SELECTION SM CONNECTIONS Figure 6-1 SELECTION ME CONNECTIONS 6.3 INSTALLATION / COMMISSIONING After connecting up as in Figures 6-1 and 6-2 above and powering up the transmitter loop verify the display operates as expected. The Smart Meter may require access to its configuration push button which is accessible via a hole in the bottom/centre of the indicator meter body. This push button enables configuration of the preferred engineering units and meter zero/span calibration for a 4-20 mA signal. When the loop power is applied the Smart Meter runs a self test diagnostic for about 10 seconds to determine correct loop operation and, if a digital DE signal is present, whether it is a 4 or 6 byte PV signal. Since most transmitters supplied with the Smart Meter operate in 6 byte digital DE output mode, this approach is covered first. If diagnostic displays are present on the meter (e.g. "OUTPUT MODE", "BAD XMTR STATUS" or "FAULT-LAST KNOWN VALUE") refer to Diagnostic and Troubleshooting section 6.4. 6.3.1 Transmitter operating in 6 byte output mode Press button on bottom/centre of the meter body to scroll through the display codes to the preferred engineering unit selection. The display codes are EU1, EU2, ...EUF (and CAL). 6-1 6. INDICATION METERS For the STT350 EU1 gives oC displayed on the LCD screen EU2 gives oF displayed on the LCD screen EU3 converts to oK (add on the stick-on label) EU4 converts to oR (add on the stick-on label) EU5 converts to mV (add on the stick-on label) EU6 converts to Volts (add on the stick-on label) EU7 converts to Ohms (add on the stick-on label) EU8 to EUF gives % (of span) displayed on the LCD screen. Ignore "CAL" at this stage: it is described in Section 6.4.3. Press and hold the button until the desired display code appears. Release button and display reverts to selected unit display. The Smart Meter is now configured for use, replace the end cap. 6.3.2 Transmitter operating in 4 byte digital output mode or in analog 4-20 mA In these cases the output signal does not include the transmitter database, only the % of span output signal. Part of this database e.g. LRV/URV, is required to enable an engineering unit display. Accordingly press the "ID" key on the SFC. If the transmitter responds "DE XMTR XXXXXXXX" then also press the "SHIFT", "ID" keys. This enables the Smart Meter to recognise that the temperature units should be used and the necessary part of the database to convert to the preferred engineering units. Now configure the required engineering units as in section 6.3.1 above. 6.3.3 Transmitter operating in 4-20 mA analog output mode The Smart Meter is factory calibrated to convert a 4-20 mA signal being received to a 0 to 100% of span display. If it displays a 0.0% output regardless of the transmitter's actual PV output then it requires recalibration. Refer to Section 6.4, Diagnostic and Troubleshooting for the recalibration procedure. 6.4 DIAGNOSTIC AND TROUBLESHOOTING 6.4.1 Moving coil meter The moving coil meter is a non repairable item. If it reads at bottom of the scale with a known input, check that the connections are good and that the Voltage across the meter/diode terminals is 0.5 to 0.7 V. This reading confirms that the delicate moving coil connections have been damaged and the meter should be replaced. 6-2 6. INDICATION METERS 6.4.2 Smart Meter Every time power is cycled to the transmitter/meter combination, the Smart Meter runs a self test to check internal operations and switch on all display segments as shown in Figure 6-3 for up to 10 seconds. This enables confirmation of their operation. Figure 6-3 Horizontal Style Bargraph 6.4.2.1 Failed self test If the self test fails, the display will go blank i.e. revert to the unpowered display showing only the basic bargraph outline. Note that some of the temporarily switched on segments should only be seen with an STT350 in this initial self check e.g. "K" for a 1,000 engineering unit multiplier (only for readings over 20,000), "GPH", "GPM", "mmHg", "PSI", "%", "FLOW" and "inH 20" (only used for flow and pressure transmitters). "ANALOG" is switched on the LCD if the transmitter output signal is 4-20 mA analog. The "Normal" display should have a partially switched on bargraph corresponding to the transmitter % of span output signal and the corresponding digital display in % or the selected units. 6-3 6. INDICATION METERS 6.4.2.2 Fault conditions The various possible fault conditions are: A. At power up the LCD screen stays completely blank. Either the self check failed or the meter is not receiving power. Check the connections. Note that the Smart Meter requires 2.25 Volts supply in addition to the minimum 10.8 Volts for the STT350 i.e. minimum of 13.05 V across the meter/transmitter terminals. Verify adequate loop power is available. B. At power up, after showing all LCD segments the screen shows "BAD XMTR STATUS" and "__ __ __" instead of the digital engineering unit display. This means that the meter received a critical status diagnostic messsage from the transmitter at power up. Use the SFC to determine the critical status cause and correct. C. After successful power up, the screen shows "BAD XMTR STATUS" and the bargraph/digital displays are flashing. This means that a critical status condition has occurred during operation, the display value may not be correct and again use the SFC to determine the cause and correct. D. After successful power up, the screen shows "FAULT-LAST KNOWN VALUE" and the bargraph/digital displays are flashing. This means that the on-going self diagnostics of the meter has detected an internal fault or that communications from the transmitter has been lost or that 5 or more corrupted messages have been received from the transmitter operating in the digital output mode. E. After successful power up, the screen shows "OUTPUT MODE" and the bargraph flashes whilst the digital display flashes a value 0.0% to 100.0%. This means that the transmitter has been instructed to go to fixed output mode whilst operating as a digital output device. Connect an SFC and press "OUTPUT", "CLEAR" to revert to normal operation. F. The screen shows "ANALOG", "0.0%" digital display and no bargraph segments are switched on. This means that the Smart Meter requires calibration to the transmitter operating in 4-20 mA analog output mode. See below. 6.4.3 4-20 mA analog mode calibration Calibration is only of benefit to ensure display accuracy with a 4-20 mA analog signal. As all Smart Meters are factory calibrated before shipment it should not be required and the facility is included in case recalibration for time drift or transmitter end point offsets are required. Basically, accurate 4 and 20 mA signals are provided to the meter whilst the configuration button selects the "CAL" display. When used with the STT350 these 4 and 20 mA signals can be conveniently provided by using the SFC to switch the transmitter to "OUTPUT MODE". The full calibration procedure steps are: 1 Step 1 - Put control loop to Manual and use the SFC to establish communications and put transmitter into 0% output mode (key in "OUTPUT", "0", "ENTER" for "0.0%"). 1 Step 2 - Press and hold bottom button on meter body until "CAL" appears in the display - release button. The meter will now carry out a zero (LRV) calibration and revert to normal operation (key in "OUTPUT", "CLEAR" to revert transmitter to continuous output operation). 1 Step 3 - Change output mode value to 100% (key in "OUTPUT", "1", "0", "0", "ENTER" for 100%). 1 Step 4 - Press and hold bottom button on meter body until "CAL" appears in the display - release button. The meter will now carry out a span (URV) calibration and revert to normal operation (key in "OUTPUT", "CLEAR" to revert transmitter to continuous output operation). Return loop to Automatic operation. ATTENTION - If "bAd" appears in the meter display either after Step 2 or Step 4 then either the 4 mA or the 20 mA signal is not within the meter's acceptable accuracy range and calibration was aborted. Check the mA values and repeat calibration steps as required. 6-4 7. APPENDIX 7.1 EXTERNAL LIGHTNING PROTECTION yyyyy yyyyy yyyyy yyyyy yyyyy yyyyy 7.1.1 Wiring reference Figure 7-1 shows a typical wiring scheme of a transient protector to the STT 3000 Model STT350 transmitter. Figure 7-1 Typical transient protector to STT 3000 transmitter wiring 7.1.2 Installation procedure The procedure in table 7-1 outlines the steps to install a transient protector on an STT 3000 Model STT350 transmitter. STEP ACTION 1 2 Unscrew housing cap. Apply pipe joint tape or compound suitable for operating environment to threads on transient protector - leave first two threads clean. 3 Hold transient protector so end with three wires points toward the right-hand conduit connection in transmitter's housing. 4 5 Feed three wires through conduit connection and screw protector into connection. Connect red wire to positive (+) terminal 6. 6 Connect black wire to negative (-) terminal 5. 7 8 Connect green wire to ground terminal inside housing. ATTENTION: be sure to keep green wire short and straight. Replace cap. 9 Connect the housing to a suitable earth ground using a #6 or larger Nickel-clad copper wire. 10 Observing polarity, connect field wiring to two wires on other end of transient protector - red wire is positive (+) and black wire is negative (-). TABLE 7-1 Transient protector installation 7-1 7. APPENDIX 7.2 INTERNAL SURGE PROTECTION 7.2.1 Introduction CAUTION: In hazardous area/location applications where explosive gases may be present the following instructions MUST be followed: EEx d / explosion-proof: in explosion-proof / flame-proof applications the loop must be isolated before any EEx d / explosion-proof covers are removed. EEx i / intrinsic safety: in intrinsically-safe circuits use only IS certified test equipment. The HW48 can be installed within the housing of a Honeywell STT350 Smart Transmitter to give protection against surges such as those generated by lightning. The unit mounts against the side of the STT350 and fits inside a Honeywell EP housing. Loop wiring is made to the terminal block on the HW48, with connection to the transmitter being made by the HW48 spade terminals. Other connections are made directly to the Honeywell STT350. The HW48 adds 36 ohms to the loop resistance and so it might be necessary to increase the voltage of the loop supply to compensate, to allow the transmitter to function correctly. The HW48 diverts any surge safely away from the STT350 to the housing, which acts as an equipotential point for the transmitter. The transmitter housing should be bonded to the plant earth by as short a length of wire as possible, using wire of at least 4 mm2 cross-section. Used in conjunction with the EP housing, the HW48 does not affect the EEx d / explosion-proof certification of the enclosure. In Zone 2 / Div 2 applications, introducing an HW48, when used in the EP housing, will not adversely affect the safety of the system. In intrinsically safe circuits, the HW48 can be classified as non-energy storing apparatus (<1.2V, <0.1A, <20mJ, <25mW, Ceq = 0, Leq = 0). NOTE: This surge protection device (SPD) is designed to limit the voltage that can occur both line-line and line-earth and, therefore, this unit will not pass a 500V insulation test. Any system insulation test should be carried out before the HW48 is installed. 7-2 7. APPENDIX 7.2.2 Installation Refer to figure 7-2 for guidance in installing the HW48, using the following instructions. (If a Smart Meter or Analog Meter is being used on the transmitter, cut off the link wire from the side of HW48 before installing it on the transmitter (see figure 7-2). The meter can then be installed onto the transmitter, as shown in figure 7-3. 1. Remove the cover of the transmitter housing (if applicable). The HW48 fits on the side of the STT350 transmitter adjacent to terminals 5, 6, 7 & 8. 2. Remove the retaining screw at the base of the STT350 transmitter on the side of the transmitter by terminals 5, 6, 7 & 8 and loosen the screws on terminals 5, 6 & 8. 3. Replace the fixing screw removed in (2), using it to attach the bonding ring to the housing at the same time, this is the surge bond for the HW48. (This operation can be done with the green/yellow bonding wire uncoiled from the HW48). When the screw is tightened, ensure that the ring terminal does not rotate to such an extent that it will interfere with the replacement of the transmitter housing cover. 4. Mount the HW48 against the side of the STT350. In doing this, the green/yellow wire must be guided into the channel in the side of the HW48. The transmitter retaining screw head will fit into the recess in the base of the HW48 and the terminals of the HW48 will slide into the STT350 terminals 5, 6 & 8. Before tightening the terminal screws, ensure that the HW48 is pressed tightly against the side of the STT350, and hold it in place while tightening the terminals. 5. Attach the wires for the 4-20 mA loop to the terminals marked + and - on the HW48. If there is a screen, it should be connected to the central terminal on the HW48. 6. Replace the transmitter housing cover. Figure 7-2 Mounting of the HW48 on a transmitter 7-3 7. APPENDIX a) STT350 with Smart Meter b) STT350 with Analog Meter c) STT350 without Meter Figure 7-3 Wiring to the HW48 and transmitter 7.2.3 Maintenance The unit is designed to give a long "normal" service life. However, if exposed to a large number of high energy transients beyond the capability of the unit, it may fail. The unit has been designed so that, under excessive surge conditions, it should failsafe, protecting the transmitter. If the unit has failed, it can be replaced in the field - the process for removal is the reverse of that for installing the unit. If a replacement HW48 is not immediately available, it is possible to bypass the unit by wiring directly to the transmitter; however, it should be remembered that, in this case, the transmitter will be unprotected from surges. 7-4 7. APPENDIX 7.3 IS Control Drawings, CSA and FM 7.3.1 IS Control Drawing, STT350 Smart Temperature Transmitter – CSA Certified 46188070-201. 7-5 7. APPENDIX 7.3.2 IS Control Drawing, STT350 Smart Temperature Transmitter – CSA Certified 46188070-201. 7-10 7. APPENDIX PRODUCT CERTIFICATIONS United States of America: FM Approvals FM Approvals is accredited by OSHA as a Nationally Recognized Testing Laboratory (NRTL) to test and certify hazardous location equipment to applicable U.S. standards. FM Approvals certification assures customers that a product or service has been objectively tested and conforms to the highest national and international standards. Canada: CSA Certification in North America In Canada CSA is accredited by the Standards Council of Canada (SCC) to test and certify to applicable Canadian standards including the CSA C22.2 Series standards and the IEC based CSA E79 Series standards. In the U.S. CSA is accredited by OSHA as a Nationally Recognized Testing Laboratory (NRTL) to test and certify to applicable U.S. standards. The CSAC/US marking will be accompanied by specific hazardous locations markings. European Union (EU): ATEX Directive 94/6/EC The ATEX (ATmospheres EXplosibles) Directive 94/6/EC is a European CE Mark directive concerning products that are designed for use in potentially explosive environments. This “New Approach” directive is based on, and is an expansion of, European Norms (EN/IEC, CENELEC standards). Only products with the ATEX certification and with ATEX labeling will be approved for free movement in the EU (European Union) and EFTA (European Free Trade Association) countries. As defined in the directive, “free movement” refers to: placing a product on the market, and/or placing a product into service. The ATEX Directive 94/6/EC is a living (set of) document(s), subject to further change and refinement. Further information can be obtained in the Official Journal of the European Union. International: IECEx Certification IECEx is a single global certification Framework based on the International Electrotechnical Commission's international standards. It caters to countries whose national standards are either identical to those of the IEC or else very close to IEC standards. The IECEx is truly global in concept and practice, reduces trade barriers caused by different conformity assessment criteria in various countries, and helps industry to open up new markets. The goal is to help manufacturers reduce costs and time while developing and maintaining uniform product evaluation to protect users against products that are not in line with the required level of safety. The aim of the IECEx Scheme and its Programs is to ease international trade of Explosion Protected Equipment (termed Ex equipment) by eliminating the need for duplication of testing and certification, while preserving safety. IECEx operates as an International Certification System covering products and services associated with the Ex industries. South Africa: SAEx Certified Equipment This Honeywell equipment is certified as Explosion Protected Apparatus (EPA) to be installed in South Africa and must be certified by a South African ATL (Approved Test Laboratory). In South Africa, all EPA used in Group II shall be covered by an IA certificate (certificate issued by an ATL). IA certificates based on overseas certification are valid for a period of one year. Brazil: INMETRO Certification The National Institute of Metrology, Standardization and Industrial Quality - INMETRO - is a federal agency under the Ministry of Development, Industry and Foreign Trade, which acts as Executive Secretary of the National Council of Metrology, Standardization and Industrial Quality (Conmetro), inter-collegiate, which is the regulatory body of the National System of Metrology, Standardization and Industrial Quality (Sinmetro). Compulsory Product Certifications for Equipment in Potentially Explosive Atmospheres to INMETRO requirements are performed by various accredited laboratories such as CERTUSP, Product Certification is based on the IEC 60601 family of standards and ATEX Product Certification is based on the IEC 60079 family of standards 7-13 51452735, Revision C DECLARATION OF CONFORMITY ATEX 0344 We declare under our sole responsibility that the following products, STT 3000 –Smart Temperature Transmitters, Models STT350 and STT35F to which this declaration relates, are in conformity with the protection requirements of Council Directive: 94/9/EC (ATEX Directive) on the approximation of the laws of the Member States concerning equipment and protective systems intended for use in potentially explosive atmospheres, and 89/336/EEC (EMC Directive) as amended by 92/31/EEC,93/68/EEC and 2004/108/EC on the approximation of the laws of the Member States relating to Electromagnetic Compatibility. The models covered by this Declaration and evidence of conformity with the ATEX Directive are listed below. Conformity to the ATEX Directive is in accordance with the following European standards. EN 60079-0-2004 Electrical Apparatus for Potentially Explosive Atmospheres - General Requirements EN 60079-1-2004 Electrical Apparatus for Potentially Explosive Atmospheres - Flameproof Enclosure “d” EN 60079-11-2007 Electrical Apparatus for Potentially Explosive Atmospheres -Part11-Intrinsic Safety "i" EN 60079-26-2004 Special Requirements for Construction, Test and Marking of Electrical Apparatus of Equipment Group II, Category 1 G EN 61010-1-2001 Safety Requirements for Electrical Equipment for Measurement, Control & Laboratory Use, Part1: General Requirements EN 61326-1997+A1+A2 Electrical Equipment for Measurement, Control and Laboratory Use – EMC Requirements Notified Bodies: EC Type Examination Certificates Production Quality Assurance Notification LCIE – Groupe Bureau Veritas – 0081 33, Avenue du Général Leclerc 92260 Fontenay-aux-Roses France KEMA Quality B. V. – 0344 Utrechtseweg 310 6812 AR Arnhem The Netherlands Certificate Protec tion Description LCIE 02 ATEX 6167 X ,Ex d IIC, T6 or T5 Model STT350, 4-20 mA/DE & STT35F FOUNDATION™ Fieldbus LCIE 02 ATEX 6168 X , Ex ia IIC, T6 to T4 Model STT350, 4-20 mA/DE LCIE 02 ATEX 6169 X , Ex ia IIB or IIC, T6 to T4 Model STT35F FOUNDATION™ Fieldbus communications protocol Manufacturer: Honeywell Automation India Ltd. 56 & 57 Hadapsar Industrial Estate Pune 411013 India The authorized signatory to this declaration, on behalf of the manufacturer, and the Responsible Person is identified below. Honeywell International Inc. Honeywell Field Solutions 512 Virginia Drive Fort Washington, PA 19034 USA Frederick M. Kent Standards & Approvals Engineer, (ATEX Authorized Person) Issue Date: 8 of 9 EN1I-6162-A2 (Addendum to EN1I-6162) 28 Sept 2007 51452736, Revision D Certificate of Manufacturer II 3 G Ex nA IIC/IIB ATEX This certificate applies to the following equipment: STT 3000 – Smart Temperature Transmitters, Models STT350 and STT35F This equipment has no arcing or sparking parts and no ignition-capable hot surfaces, and therefore conforms to Clause 6.3.1.3 of VDE 0165/2.91 and EN 60079-14 for operation in Zone 2 hazardous areas, providing that the following conditions are observed. The equipment contains no intrinsically safe or energy-limiting components. The Model STT350 is a 2-wire device that receives its power and signal carrier from the same 4-20 mA signal current. Model STT350 supports thermocouple and 2-, 3-, and 4-wire RTD sensor inputs. In normal operation, the maximum current is 23 mA. The STT35F is a 2-wire device that receives its power and signal carrier from the same Fieldbus™ circuit. Conditions for the application of the above equipment in Zone 2 hazardous areas: 1. The installation of this equipment in Zone 2 hazardous areas must comply with VDE specification 0165, EN 60079-14, EN 60079-15 and/or valid national standards for installation and operation. 2. Before commissioning this equipment, it must be verified that the power supply voltage cannot exceed the 30 Vdc maximum for the STT350 transmitters, or 32 Vdc maximum for the STT35F transmitters. 3. The temperature transmitter is a non-repairable item, and if faulty, must be replaced. The electrical power supply must be switched off before any replacement and during any time that the wiring terminations are being connected or disconnected. 4. The technical data supplied by the manufacturer must be adhered to. Install per Operator manual EN1I-6162 for STT350 and EN1I-6169 for STT35F. 5. The temperature transmitter module shall be installed in enclosure IP 54 minimum. Certificate Prote ction Description LCIE 02 ATEX 6168 X , Ex ia IIC Model STT350, 4-20 mA/DE LCIE 02 ATEX 6169 X , Ex ia IIC Model STT35F Fieldbus™ communications protocol Specifications for Use in Zone 2 Parameters STT350 Supply Voltage: Supply Current: Ambient Temperate Limits: Temperature Classification: Manufacturer: STT35F, Ex nA IIC 11-30 Vdc ≤23 mA -40oC to 85oC T6 at Ta ≤ 80oC T5 at Ta ≤ 85oC 9-32 Vdc ≤100 mA -40oC to 85oC T6 at Ta ≤ 80oC T5 at Ta ≤ 85oC STT35F, Ex nA IIB 9-24 Vdc ≤250 mA -40oC to 85oC T6 at Ta ≤ 80oC T5 at Ta ≤ 85oC Honeywell Automation India Ltd. 56 & 57 Hadapsar Industrial Estate Pune 411013 India Honeywell International Inc. Honeywell Field Solutions 512 Virginia Drive Fort Washington, PA 19034 USA Frederick M. Kent Standards & Approvals Engineer, (ATEX Authorized Person) Issue Date: EN1I-6162-A2 (Addendum to EN1I-6162) 28 Sept 2007 9 of 9 EN1I-6162-A3 3/08 STT 3000 Smart Temperature Transmitter Model STT350 Overview Addendum (to Operator Manual EN1I-6162) ATEX Directive 94/9/EC The ATEX Directive 94/9/EC is a European CE Mark directive concerning products that are designed for use in potentially explosive environments. This “New Approach” directive is based on, and is an expansion of, European Norms (EN, CENELEC standards). On June 30, 2003, the ATEX (ATmospheres EXplosibles) directive will replace directives currently in effect, and from that time, only products with the ATEX certification and with ATEX labeling will be approved for free movement in the EU (European Union) and EFTA (European Free Trade Association) countries. As defined in the directive, “free movement” refers to: − placing a product on the market, and/or − placing a product into service. The ATEX Directive 94/9/EC is a living (set of) document(s), subject to further change and refinement, whose details are beyond the scope of this addendum. Further information can be obtained in the Official Journal of the European Communities No L100/1, and in related publications such as Guidelines on the Application of Directive 94/9/EC. Both of these items are available at: http://europa.eu.int/comm/enterprise/atex/index.htm Products that have been previously certified under the EN and CENELEC European Norms, and which comply fully with all standards in the New Approach directive have, by application, received certification under ATEX Directive 94/9/EC. The Honeywell STT 3000, STT350 Smart Temperature Transmitter is now ATEX certified, and all units manufactured currently and in the future will include labeling that includes all markings required under the ATEX directive. Inclusions 3/08 To ensure that all required information will be available to the user, the following items are included with this Addendum for reference: 1. Declaration of Conformity – ATEX CE0344 (Honeywell document number 51453795 Revision A). 2. Certificate of Manufacturer II 3 G Ex nA ATEX CE (Honeywell document number 51453789 Revision A). EN1I-6162-A3 (Addendum to EN1I-6162) 1 of 10 Purpose and Content of this Addendum This Addendum includes information required under the ATEX Directive regarding: 1. The appearance and meaning of each certification mark (CE Mark) that appears on the label(s) affixed to the product. 2. Instructions for installation and use of the product. Information required for installation and use of this product is given in EN1I-6162 STT 3000 – Series 350 Smart Transmitter Operator Manual of which this Addendum is a part. Details regarding certification marks that appear in labeling for this product are given in this addendum. Attention The publication cited above and the functioning and construction (except for labeling) of the devices described therein are essentially unchanged. The purpose of this addendum is to provide details on the purpose and appearance of the labels attached to each device under ATEX Directive 94/9/EC. Attention Before installing the equipment in a potentially explosive atmosphere, please read the information provided in this Addendum, which supports the ATEX certifications for this product. CE Conformity The STT 3000 Smart Temperature Transmitter, Model STT350, is in conformity with the protection requirements of the following European Council Directives: 94/9/EC, the Explosive Atmospheres (ATEX) Directive, and 2004/108/EC, the Electromagnetic Compatibility (EMC) Directive. In conformity with the ATEX directive, the CE mark on the certification nameplate includes the Notified Body identification number 0344 (KEMA 01ATEXQ3199) adjacent to the EC Type Examination Certificate number. Deviation from the installation conditions in this manual may invalidate this product’s conformity with the Explosive Atmospheres, Pressure Equipment, and EMC Directives. Conformity of this product with any other “CE Mark” Directive(s) shall not be assumed. 2 of 10 EN1I-6162-A3(Addendum to EN1I-6162) 3/08 Marking, ATEX Directive Honeywell’s Model STT350 Smart Temperature Transmitter, with the following nameplates attached, has been certified to comply with Directive 94/9/EC of the European Parliament and the Council as published in the Official Journal of the European Communities No. L 100/1 on 19-April-1994. The following information is provided as part of the labeling of the transmitter: • Name and Address of the manufacturer: Honeywell, Phoenix, AZ 85053 USA. • Notified Body identification: KEMA Quality B.V., Arnhem, the Netherlands • For complete model number, see the Model Selection Guide 34-44-16-02 for the particular model of temperature transmitter. • The serial number of the transmitter is located on the module label. For models STT350, the serial number is 10 characters (0 through 9) long. The last two characters are fixed 37. The first character (0) is a B. Characters 2 and 3 are the week of manufacture and the single character 4 is the year of manufacture. The serial number consists of characters 1, 5, 6, and 7. Apparatus Marked with Multiple Types of Protection The user must determine the type of protection required for installation the equipment. The user shall then check the box [D] adjacent to the type of protection used on the equipment certification nameplate. Once a type of protection has been checked on the nameplate, the equipment shall not then be reinstalled using any of the other certification types. Labels 50030786-001and 50030807-001 are attached to the module. 3/08 EN1I-6162-A3 (Addendum to EN1I-6162) 3 of 10 Label 50030808-001 is used for non-sparking (Ex nA) installations. Nameplate 50030788-001 is used for intrinsically safe (Ex ia) 4–20 mA installations. Nameplate 50030790-001 is used for flameproof (Ex d) 4–20 mA installations. Nameplate 50030789-001 is used for non-sparking (Ex nA) installations. 4 of 10 EN1I-6162-A3(Addendum to EN1I-6162) 3/08 Multiple certification nameplate 50030791-001, STT350. Multiple certification nameplate 50030802-001, STT350. 3/08 EN1I-6162-A3 (Addendum to EN1I-6162) 5 of 10 Specific Parameters for Intrinsic Safety Field wiring terminals, (+ , –): Ui ≤ 30 V, Ii ≤ 100 mA, Without local analog meter, ME: Ci ≤ 21 nF, Li ≤ 2.2 µH With local analog meter, ME: Ci ≤ 21 nF, Li ≤ 152 µH With local smart digital meter, SM: Ci ≤ 21 nF, Li ≤ 2.2 µH Uo ≤ 8 V, Io ≤ 25 mA, Ci ≤ 7.8 µF Li ≤ 55 mH Sensor entry terminals (1, 2, 3 & 4) Pi ≤ 1.2 W Po ≤ 0.2 W Special conditions for safe use, The Smart Temperature Transmitter is an intrinsically safe apparatus that can be installed in potentially explosive atmospheres. Intrinsic Safety (X) The supply terminals (5 and 6) must be connected only to a certified associated intrinsically safe apparatus. The sensor entry terminals (1, 2, 3, and 4) must be connected only to certified intrinsically safe equipment or according to paragraph 5.4 of standard EN 50020. The electrical parameters (U, I, and P) of the associated apparatus connected to the power terminals (5 and 6) must not exceed the following values: Ui ≤ 30V Ii ≤ 100 mA Pi ≤ 1,2 W The electrical parameters (L and C) of the apparatus connected to the sensor entry terminals (1, 2, 3, and 4) (cabling parameters included) must not exceed the following values: Cext ≤ 7.8 µF Lext ≤ 55 mH o o Certification ambient operating temperature : –50 C to 85 C o o Standard specification ambient limits : –40 C to 85 C. Temperature classifications: IS (ia) 4 – 20 mA / DE Flameproof (d) T6 up to Ta ≤ 40ºC T6 up to Ta ≤ 80ºC T5 up to Ta ≤ 55ºC T5 up to Ta ≤ 85ºC T4 up to Ta ≤ 85ºC Enclosure classification: IP 66/67, Type 4X Specific Parameters for Flameproof Installation Power supply to field wiring terminals, (+, –): Ucc ≤ 35 V Output Signal: 4–20 mA Ambient operating temperature –50 to +85°C. 6 of 10 EN1I-6162-A3(Addendum to EN1I-6162) 3/08 Specific Parameters for Non-Sparking Zone 2 Installation (Honeywell certified) Supply Voltage: 11-30 Vdc Supply Current: 23 mA Ambient Temperate Limits: -40oC to 85oC Temperature Classification: T6 at Ta ≤ 80 C o o T5 at Ta ≤ 85 C Special Conditions for Safe Use, Non-Sparking Zone 2 Installation (Honeywell certified) • The installation of this equipment in Zone 2 hazardous areas must comply with VDE specification 0165, EN 60079-14, EN 60079-15 and/or valid national standards for installation and operation. • Before commissioning of this equipment, it must be verified that the power supply voltage cannot exceed the 35 Vdc maximum for 4-20 mA analog, DE equipment. • The electronic assemblies in these units are non-repairable items, and if faulty, must be replaced. The electrical power supply must be switched off before any replacement and during any time that the wiring terminations are being connected or disconnected. 3/08 EN1I-6162-A3 (Addendum to EN1I-6162) 7 of 10 51453795, Revision A DECLARATION OF CONFORMITY ATEX 0344 We declare under our sole responsibility that the following products, STT 3000 –Smart Temperature Transmitters, Models STT350 and STT35F to which this declaration relates, are in conformity with the protection requirements of Council Directive: 94/9/EC (ATEX Directive) on the approximation of the laws of the Member States concerning equipment and protective systems intended for use in potentially explosive atmospheres, and 89/336/EEC (EMC Directive) as amended by 92/31/EEC,93/68/EEC and 2004/108/EC on the approximation of the laws of the Member States relating to Electromagnetic Compatibility. The models covered by this Declaration and evidence of conformity with the ATEX Directive are listed below. Conformity to the ATEX Directive is in accordance with the following European standards. EN 60079-0-2004 Electrical Apparatus for Potentially Explosive Atmospheres - General Requirements EN 60079-1-2004 Electrical Apparatus for Potentially Explosive Atmospheres - Flameproof Enclosure “d” EN 60079-11-2007 Electrical Apparatus for Potentially Explosive Atmospheres -Part11-Intrinsic Safety "i" EN 60079-26-2004 Special Requirements for Construction, Test and Marking of Electrical Apparatus of Equipment Group II, Category 1 G EN 61010-1-2001 Safety Requirements for Electrical Equipment for Measurement, Control & Laboratory Use, Part1: General Requirements EN 61326-1997+A1+A2 Electrical Equipment for Measurement, Control and Laboratory Use – EMC Requirements Notified Bodies: EC Type Examination Certificates LCIE – Groupe Bureau Veritas – 0081 33, Avenue du Général Leclerc 92260 Fontenay-aux-Roses France Certificate Prot KEMA Quality B. V. – 0344 Utrechtseweg 310 6812 AR Arnhem The Netherlands Description LCIE 08ATEX 6041 X ,Ex d IIC, T6 or T5 Model STT350, 4-20 mA/DE & STT35F FOUNDATION™ Fieldbus LCIE 08 ATEX 6042 X , Ex ia IIC, T6 to T4 Model STT350, 4-20 mA/DE LCIE 08 ATEX 6043 X , Ex ia IIB or IIC, T6 to T4 Model STT35F FOUNDATION™ Fieldbus communications protocol Manufacturer: 8 of 10 ection Production Quality Assurance Notification Honeywell Automation India Ltd. 56 & 57 Hadapsar Industrial Estate Pune 411 013 , India EN1I-6162-A3(Addendum to EN1I-6162) 3/08 The authorized signatory to this declaration, on behalf of the manufacturer, and the Responsible Person is identified below. Honeywell Automation India Ltd. 56 & 57 Hadapsar Industrial Estate , Bhavesh Varia ( Product Safety and Approval Engineer) Pune 411013 , India Issue Date: 3/08 EN1I-6162-A3 (Addendum to EN1I-6162) 30 April 2008 9 of 10 51453789, Revision A Certificate of Manufacturer II 3 G Ex nA IIC/IIB ATEX This certificate applies to the following equipment: STT 3000 – Smart Temperature Transmitters, Models STT350 and STT35F This equipment has no arcing or sparking parts and no ignition-capable hot surfaces, and therefore conforms to Clause 6.3.1.3 of VDE 0165/2.91 and EN 60079-14 for operation in Zone 2 hazardous areas, providing that the following conditions are observed. The equipment contains no intrinsically safe or energy-limiting components. The Model STT350 is a 2-wire device that receives its power and signal carrier from the same 4-20 mA signal current. Model STT350 supports thermocouple and 2-, 3-, and 4-wire RTD sensor inputs. In normal operation, the maximum current is 23 mA. The STT35F is a 2-wire device that receives its power and signal carrier from the same Fieldbus™ circuit. Conditions for the application of the above equipment in Zone 2 hazardous areas: 1. The installation of this equipment in Zone 2 hazardous areas must comply with VDE specification 0165, EN 60079-14, EN 6007915 and/or valid national standards for installation and operation. 2. Before commissioning this equipment, it must be verified that the power supply voltage cannot exceed the 30 Vdc maximum for the STT350 transmitters, or 32 Vdc maximum for the STT35F transmitters. 3. The temperature transmitter is a non-repairable item, and if faulty, must be replaced. The electrical power supply must be switched off before any replacement and during any time that the wiring terminations are being connected or disconnected. 4. The technical data supplied by the manufacturer must be adhered to. Install per Operator manual EN1I-6162 for STT350 and EN1I-6169 for STT35F. 5. The temperature transmitter module shall be installed in enclosure IP 54 minimum. Certificate Pr otection Description LCIE 08 ATEX 6042 X , Ex ia IIC Model STT350, 4-20 mA/DE LCIE 08 ATEX 6043 X , Ex ia IIC Model STT35F Fieldbus™ communications protocol Specifications for Use in Zone 2 Parameters Supply Voltage: Supply Current: Ambient Temperate Limits: Temperature Classification: Manufacturer: STT350 11-30 Vdc ≤23 mA -40oC to 85oC T6 at Ta ≤ 80oC T5 at Ta ≤ 85oC STT35F, Ex nA IIC 9-32 Vdc ≤100 mA -40oC to 85oC T6 at Ta ≤ 80oC T5 at Ta ≤ 85oC STT35F, Ex nA IIB 9-24 Vdc ≤250 mA -40oC to 85oC T6 at Ta ≤ 80oC T5 at Ta ≤ 85oC Honeywell Automation India Ltd. 56 & 57 Hadapsar Industrial Estate, Pune 411013, India Honeywell Automation India Ltd. Bhavesh Varia Product Safety and Approval Engineer 56 & 57 Hadapsar Industrial Estate, Pune 411013, India Issue Date: 10 of 10 EN1I-6162-A3(Addendum to EN1I-6162) 30 April 2008 3/08 STT350 EQUIPMENT: IECEx LCI 08.0054X Equipment and systems covered by this certificate are as follows: Temperature is measured with an externals sensor (thermocouple or resistor (RTD) sensor. The output from the transmitter is a 4-20 mA signal via the two-wire field connections. The process variable can be observed locally when the ME, or SM indicators are installed. The transmitter module may also be installed in a stainless steel or aluminum enclosure. CONDITIONS OF CERTIFICATION: YES as shown below: For the intrinsic safety model: • The temperature transmitter is an intrinsically safe apparatus; it can be placed in potentially explosive atmosphere. • C onnection of equipment: - the power terminal blocks( 4 and5 ) shall only be connected to a certified associated intrinsically safe equipment - the sensor entry terminal blocks (1,2 , 3 and 4) shall only be connected to a certified intrinsically safe equipment or according to paragraph 5.7 of IEC 60079-1 (Ed.5) standard • These combinations shall be compatible regarding the intrinsic safety rules • The electrical parameters of the apparatus connected to the power terminal blocks (4 and 5) shall not exceed the following values: Ui ≤ 30 V; li ≤ 100m A; Pi ≤ 1.2 W I • • ndicator Without indicator With indicator ME With indicator SM Li 2.2 µH 152 µH 2.2 µH Ci 21 nF 21 nF 21 nF The electrical parameters of the apparatus connected to the sensor entry terminal blocks (1, 2, 3 and 4) shall not exceed the following values: Uo ≤ 8.0 V; lo ≤ 25 mA; Po ≤ 0.2 W; Co ≤ 7.8 µF; Lo ≤ 55 mH; Cext ≤ 4 µF; Lext ≤ 2 mH. The aluminum enclosure shall be protected against any impact or friction to be used in zone 0 (according to IEC 60079-0 requirements) Sales and Service For application assistance, current specifications, pricing, or name of the nearest Authorized Distributor, contact one of the offices below. ASIA PACIFIC Control Products Asia Pacific Headquarters Phone: +(65) 6355-2828 Fax: +(65) 6445-3033 Asia Pacific Global Technical Support Field Instruments Phone: +65 6580 3156 Fax: +65 6445-3033 Process Instruments Phone: (603) 76950 4777 Fax: (603) 7958 8922 Australia Honeywell Limited Phone: +(61) 7-3846 1255 FAX: +(61) 7-3840 6481 Toll Free 1300-36-39-36 Toll Free Fax: 1300-36-04-70 China – PRC - Beijing Honeywell China Inc. Phone: +(86-10) 84583280 Fax: +(86-10) 8458-4650 China – PRC - Shanghai Honeywell China Inc. Phone: (86-21) 5257-4568 Fax: (86-21) 6237-2826 China – PRC - Chengdu Honeywell China Inc. Phone: +(86-28) 86786348 Fax: +(86-28) 8678-7061 China – PRC - Xi’an Honeywell China Ltd Xi’an. Phone: +(86-29) 88337490 Fax: +(86-29) 8833-7489 China – PRC - ShenzhenHoneywell China Inc. Phone: +(86) 755-25181226 Fax: +(86) 755-2518-1221 Indonesia PT Honeywell Indonesia Phone: +(62) 21-535-8833 FAX: +(62) 21-5367 1008 India Automation India Ltd. Honeywell Ltd. Phone:+(91) 5603-9400 Fax: +(91) 5603-9600 Japan Honeywell Inc. Phone: +(81) 3 6730 7150 Fax: +(81) 3 6730 7228 Malaysia Honeywell Engineering Sdn Bhd Phone: +(60-3) 7950-4776 Fax: +(60-3) 7958-8922 New Zealand Honeywell Limited Phone: +(64-9) 623-5052 Fax: +(64-9) 623-5060 Toll Free (0800) 202-088 Philippines Honeywell Systems (Philippines) Inc. Phone: +(63-2) 633-283031/ 636 1661-62 Fax: +(63-2) 638-4013 Singapore Honeywell Pte Ltd. Phone: +(65) 6580 3278 Fax: +(65) 6445-3033 South Korea Honeywell Korea Co Ltd Phone: +(822) 799 6315 Fax: +(822) 792 9015 Thailand Honeywell Systems (Thailand) Ltd. Phone: +(662) 693-3099 FAX: +(662) 693-3089 Taiwan R.O.C. Honeywell Taiwan Ltd. Phone: +(886-2) 22451000 FAX: +(886-2) 2245-3241 SE Asia Countries see Honeywell Pte Ltd (Singapore) for: Pakistan, Cambodia, Guam, Laos, Myanmar, Vietnam, East Timor SE Asia Countries Bulgaria Honeywell EOOD Phone: +(359) 2 40 20 900 FAX: +(359) 2 40 20 990 Slovak Republic Honeywell s.r.o. Phone: +421-2-58247 410 FAX: +421-2-58247 415 Czech Republic Honeywell spol. s.r.o. Phone: +420 242 442 232 FAX: +420 242 442 131 Spain Honeywell S.A. Phone: +34 (0)91313 61 00 FAX: +34 (0)91313 61 30 Denmark Honeywell A/S Phone: +(45) 39 55 55 55 FAX: +(45) 39 55 55 58 Finland Honeywell OY Phone: +358 (0)20752 2753 FAX: +358 (0) 20752 2751 Turkey Honeywell Turkey A.S. Phone: +90 216 578 71 00 FAX: +90 216 575 66 35 Germany Honeywell AG Phone: +49 (69)8064-299 FAX: +49 (69)806497336 Ukraine Honeywell Tel: +380-44-201 44 74 Fax: +380-44-201-44-75 Hungary Honeywell Kft. Phone: +36-1-451 4300 FAX: +36-1-451 4343 United Kingdom Honeywell Control Systems Ltd. Phone: +44 (0)1344 655251 FAX: +44 (0) 1344 655554 Italy Honeywell S.p.A. Phone:+390292146307 FAX: +39 0292146377 Abu Dhabi U A E Middle East Headquarters Honeywell Middle East Ltd. Phone: +971 2 4041246 FAX: +971 2 4432536 Norway Honeywell A/S Phone: (45) 39 55 55 55 Sultanate of Oman Honeywell & Co Oman LLC Phone: +968 24 701153/ Ext.33 FAX +968 24 787351 EUROPE Portugal Honeywell Portugal Lda Phone: +351 21 424 5000 FAX: +351 21 424 50 99 Honeywell Process Solutions Honeywell 1860 West Rose Garden Lane Phoenix, Arizona 85027 www.honeywell.com/ps MIDDLE EAST The Netherlands Honeywell B.V. Phone: +31 (0) 20 5656200 FAX: +31 (0) 20 5656210 Poland Honeywell Sp. zo.o Phone: +48-22-6060900 FAX: +48-22-6060901 Belgium Honeywell SA/NV Phone: +32 (0) 2 728 24 07 FAX: +32 (0) 2 728 22 45 Switzerland Honeywell AG Phone: +41 18552448 FAX: +(41) 1 855 24 45 France Honeywell SA Phone: +33 (0)1 60198075 FAX: +33 (0)1 60198201 see Honeywell Automation India Ltd for: Bangladesh Nepal Sri Lanka Austria Honeywell Austria GmbH Phone: +43 (316)400123 FAX: +43 (316)40017 Sweden Honeywell AB Phone: +(46) 8 775 55 00 FAX: +(46) 8 775 56 00 Romania Honeywell Bucharest Phone: +40 (0) 21 2316437 FAX: +40 (0) 21 2316439 Russian Federation (RF), ZAO "Honeywell" Phone: +7 (095) 796 98 00 FAX: +7 (495) 797 99 64 Saudia Arabia Honeywell Turki Arabia Ltd Jubail Office Phone: +966-3-341-0140 Fax: +966-3-341-0216 Honeywell - ATCO Dammam Office Phone: 0096638304584 Fax: 0096638338059 Kuwait Honeywell Kuwait KSC Phone: +965 242 1327 to 30 Fax: +965 242 8315 and Phone: +965 326 2934/1821 Fax: +965 326 1714 EN1I-6162 September 2010 ©2009-10 Honeywell International Inc. AFRICA Mediterranean & African Distributors Honeywell SpA Phone: +39 (02) 250 10 604 FAX: +39 (02) 250 10 659 South Africa (Republic of) and sub saharan Honeywell Southern Africa Honeywell S.A. Pty. Ltd. Phone: +27 11 6958000 FAX +27 118051504 NORTH AMERICA Canada Honeywell LTD Phone: 1-800-737-3360 FAX: 1-800-565-4130 USA Honeywell Process Solutions, Phone: 1-800-343-0228 Or 1-800-423-9883 Email:ask-ssc@honeywell. com SOUTH AMERICA Argentina Honeywell S.A.I.C. Phone: +(54-11) 43833637 FAX: +(54-11) 4325-6470 Brazil Honeywell do Brasil & Cia Phone: +(55-11) 72661900 FAX: +(55-11) 7266-1905 Chile Honeywell Chile, S.A. Phone: +(56-2) 233-0688 FAX: +(56-2) 231-6679 Mexico Honeywell S.A. de C.V. Phone: +(52) 55 52591966 FAX: +(52) 55 5570-2985 Puerto Rico Honeywell Inc. Phone: +(809) 792-7075 FAX: +(809) 792-0053 Trinidad Honeywell Inc. Phone: +(868) 624-3964 FAX: +(868) 624-3969 Venezuela Honeywell CA Phone: +(58-2) 238-0211 FAX: +(58-2) 238-3391