1
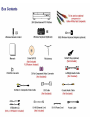
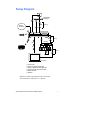
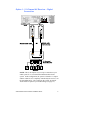
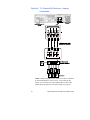
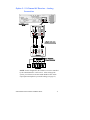
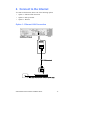
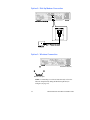
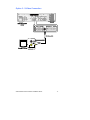
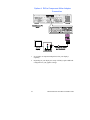
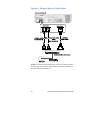
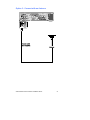
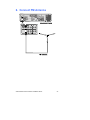
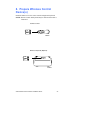
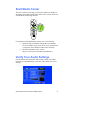
2005 Entertainment PC Platform
Installation Guide
C93965-001
Table of Contents
Box Contents ........................................................................... 2
Before Getting Started ................................................................. 4
System Overview ......................................................................... 5
Setup Diagram ........................................................................... 7
Installation Overview .................................................................... 8
1. Connect Audio......................................................................... 8
2. Connect to the Internet ......................................................... 13
3. Connect Video....................................................................... 15
4. Connect the TV Signal Source.............................................. 19
5. Connect the IR Blaster (Required if using a Set-Top Box) ... 22
6. Connect FM Antenna ............................................................ 23
7. Connect Power and Power On ............................................. 24
8. Prepare Wireless Control Device(s)...................................... 25
Start Media Center ..................................................................... 27
Verify Your Audio Settings ......................................................... 27
2005 Entertainment PC Platform Installation Guide
3
Before Getting Started
CAUTION
Confirm the voltage setting before turning the power on the 2005
Entertainment PC Platform. The voltage selection switch located
on the back panel of the entertainment PC should match the
voltage settings for your area. If you set the voltage selection
switch incorrectly, your system will be damaged.
North America typically uses 115V. Europe typically uses 230V.
115V
230V
Voltage Selector
CAUTION
Place the system where there is proper ventilation. Do not block
system vents and do not place a device directly on top of the
entertainment PC. If placed in a cabinet, make sure there is
adequate ventilation in the cabinet back and front panels. Place
the entertainment PC at the bottom of the cabinet.
Additional Cables Needed for Some Connections
There are cables that you may need that are not provided in the box.
These cables are:
Additional audio (left/right) cables
Optical audio cable
VGA cable
Component cable
* Other names and brands may be claimed as the property of others.
4
2005 Entertainment PC Platform Installation Guide
System Overview
Front Panel
1
2
4
3
Standby-ON button
Emergency eject
pinhole
Disc tray
2
3
4
5
6
7
8
6
8
7
1
5
IR sensor
Display
I/O access door
Skip back
9 10 11 12 13 14
Rewind
Stop
11 Play
12 Pause
9
13
10
14
Fast forward
Skip forward
Front Panel (with I/O Door Open)
1
2
3
17
4
5
6
7
8
9
12 14 16
10 11
18
13 15
1
2
3
4
5
SmartMedia card
MMC/SD card
CompactFlash I/II card
MS/MS pro card
S-video in
6
7
8
9
10
Composite video
Audio in (left & right)
Headphone
Microphone
USB 2.0 ports
11
12
13
14
15
2005 Entertainment PC Platform Installation Guide
IEEE-1394
Left
OK
Down
Up
16
17
18
Right
Home
Back
5
Rear Panel
5
2
1
3
6
9
4
7
10
11
8
12
14 15
17
19
16
18
21
23
20
13
22
21 Back surround out
1
TV in
8
DVI out
15 Digital audio optical out
2
FM in radio antenna
9
IR blaster 1
16 Digital audio coaxial out
3
S-video in
10 IR blaster 2
17 Front audio out (left & right)
22 Voltage selector
4
Composite video-in
11 IEEE-1394
18 Subwoofer out
23 AC power connector
5
Audio in (left & right)
12 Modem
19 Center channel out
6
VGA out
13 USB 2.0
20 Side surround out
7
S-video out
14 10/100 LAN
(left & right)
(left & right)
NOTE: For a larger view of the back panel, please look at the 2005
Entertainment PC Platform User’s Manual.
6
2005 Entertainment PC Platform Installation Guide
Setup Diagram
A
Cable/satellite
set-top box
A
B
AND
Internet
connection
F
(optional)
C
Entertainment PC
B
B
OR
C
(optional)
D
Receiver
OR
D
1
2
3
F11
Esc
F1
F2
F3
F4
F5
F6
F7
F8
@
#
$
^
&
1
2
3
4
5
6
7
Q
W
E
R
T
Y
U
!
%
F9
7
F12
(
8
9
9
I
O
5
Prt Scr
SysRq
Num
Lock
F10
8
*
4
)
-
+
0
-
=
Scrol
Lock
Back
Space
P
6
A
S
D
F
G
H
J
1
K
2
L
:
3
Enter
;
Z
X
Shift
C
V
B
N
M
0
Alt
OR
Page
Down
?
.
,
Ctrl
Home
+
CapsLock
Fn
Pause
Break
Page
Up
Tab
Alt
Shift
Ins
End
Del
E
B
(optional)
OR
(optional)
D
Speakers
TV or monitor
A. Coaxial cable
B. S-video or composite video cable
C. Analog or digital audio (left/right) cable
D. Component video cable (not provided)
E. VGA or DVI cable
F. IR blaster
NOTE: For other setup options, please see the 2005
Entertainment PC Platform User’s Manual.
2005 Entertainment PC Platform Installation Guide
7
Installation Overview
This guide shows you how to setup the entertainment PC by:
•
Connecting audio
•
Connecting to the Internet
•
Connecting video
•
Connecting the TV signal source
•
Connecting FM antenna
•
Connecting power and turning power on
•
Preparing wireless control device(s)
•
Starting Media Center
•
Verifying audio settings
1. Connect Audio
For connecting audio, choose one of the following options:
Option 1: 5.1-channel AV receiver digital connection
Option 2: 7.1-channel AV receiver analog connection
Option 3: 5.1-channel AV receiver analog connection
Option 4: 2-channel AV receiver analog connection
You may connect a powered PC speaker set without a receiver.
8
2005 Entertainment PC Platform Installation Guide
Option 1: 5.1-Channel AV Receiver – Digital
Connection
NOTE: This is the simplest way to setup a connection to your
audio system for 5.1 surround sound and the default for the
system. In this configuration, the system is limited to 5.1 output
and the volume level is completely controlled by the receiver, not
the entertainment PC. After setting up the system, use Intel®
Audio Studio to optimize your audio settings (see page 27).
2005 Entertainment PC Platform Installation Guide
9
Option 2: 7.1-Channel AV Receiver – Analog
Connection
NOTE: In this configuration, the volume level can be controlled
by the entertainment PC or the receiver. After setting up the
system, you will need to use Intel Audio Studio to turn on this
output option and optimize your audio settings (see page 27).
10
2005 Entertainment PC Platform Installation Guide
Option 3: 5.1-Channel AV Receiver – Analog
Connection
NOTE: In this configuration, the volume level can be controlled
by the entertainment PC or the receiver. After setting up the
system, you will need to use Intel Audio Studio to turn on this
output option and optimize your audio settings (see page 27).
2005 Entertainment PC Platform Installation Guide
11
Option 4: 2-Channel Audio – Analog Connection
NOTE: In this configuration, the volume level can be controlled
by the entertainment PC or the receiver/TV. After setting up the
system, you will need to use Intel Audio Studio to turn on this
output option and optimize your audio settings (see page 27).
12
2005 Entertainment PC Platform Installation Guide
2. Connect to the Internet
To connect to the Internet, choose one of the following options:
Option 1: Ethernet LAN connection
Option 2: Dial-up modem
Option 3: Wireless
Option 1: Ethernet LAN Connection
2005 Entertainment PC Platform Installation Guide
13
Option 2: Dial-Up Modem Connection
Option 3: Wireless Connection
Entertainment PC (back)
Wireless access point
NOTE: If connecting to a wireless home network, refer to the
Network Setup Wizard, during the MCE Setup Wizard, to
configure (see page 27).
14
2005 Entertainment PC Platform Installation Guide
3. Connect Video
To connect video, choose from the preferred connections listed below in
descending order, starting with highest quality:
Option 1: DVI (recommended)
Option 2: VGA
Option 3: S-video
Option 4: DVI to component video
Option 1: DVI Connection (Recommended)
2005 Entertainment PC Platform Installation Guide
15
Option 2: VGA Connection
16
2005 Entertainment PC Platform Installation Guide
Option 3: S-Video Connection
2005 Entertainment PC Platform Installation Guide
17
Option 4: DVI to Component Video Adapter
Connection
1.
Set switches on component adapter based on your display’s
capability.
2.
Depending on your display, this setup will likely require additional
configuration of your graphics settings.
18
2005 Entertainment PC Platform Installation Guide
4. Connect the TV Signal Source
To connect the TV signal source, choose one of the following options:
Option 1: TV In coaxial cable
Option 2: S-video cable
Option 3: TV antenna
Option 1: Connect with a TV In Coaxial Cable
Do this setup option if you do not have a set-top box.
2005 Entertainment PC Platform Installation Guide
19
Option 2: Connect with an S-Video Cable
NOTE: You must also plug audio cables from your set top box into the
audio in right (red) connector and the audio in left (white) connector on
the back of the entertainment PC.
20
2005 Entertainment PC Platform Installation Guide
Option 3: Connect with an Antenna
2005 Entertainment PC Platform Installation Guide
21
5. Connect the IR Blaster
(Required if using a Set-Top Box)
You will need to follow the Microsoft* Windows* XP Media Center
Edition 2005 TV Setup Wizard to configure the entertainment PC’s
remote to control the set-top box.
22
2005 Entertainment PC Platform Installation Guide
6. Connect FM Antenna
2005 Entertainment PC Platform Installation Guide
23
7. Connect Power and Power On
CAUTION
Confirm the voltage setting before turning the power on the 2005
Entertainment PC Platform. The voltage selection switch located on the
back panel of the entertainment PC should match the voltage settings for
your area. If you set the voltage selection switch incorrectly, your
system will be damaged.
See page 4 for the illustration showing voltage settings.
NOTE: A popping sound may be heard through the speakers when you
first power up. This is normal and does not mean a device malfunction.
Surge protector
(Recommended)
Speakers
24
2005 Entertainment PC Platform Installation Guide
8. Prepare Wireless Control
Device(s)
Install the batteries in to the remote control and optional keyboard.
NOTE: Remote control and keyboard may be different from what is
illustrated.
Remote Control
AA
AA
bottom
Wireless Keyboard (Optional)
AA
AA
bottom
2005 Entertainment PC Platform Installation Guide
25
Set the ID Button for the Keyboard (optional)
The following steps should be completed within one minute:
1.
Press the ID button on the wireless keyboard adapter.
2.
Press the ID button, located inside the back of the keyboard where
the batteries are located, once.
See the 2005 Entertainment PC Platform User’s Manual for more
information about setting the ID button.
26
2005 Entertainment PC Platform Installation Guide
Start Media Center
After the system has booted up, press the green Microsoft* Windows*
XP Media Center Edition 2005 button on the remote control which will
start the Media Center Setup Wizard.
START
For information about Main Menu options, refer to the following:
• Windows Help (for Windows XP Media Center Edition)
To access Windows Help, press the F1 key on the keyboard
or click Start on the Windows taskbar, then click Help
• The Microsoft Media Center website:
http//www.microsoft.com/windowsxp/mediacenter
Verify Your Audio Settings
For information about the Intel® Audio Studio settings, select More
Programs from the Main Menu, select Intel Audio Studio, then select
Settings.
2005 Entertainment PC Platform Installation Guide
27
READ
THIS
FIRST
28
2005 Entertainment PC Platform Installation Guide