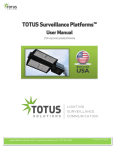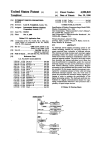
1
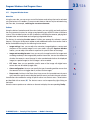
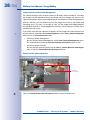
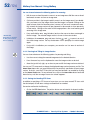
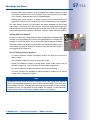
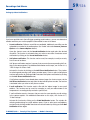
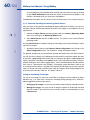
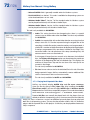
32/126 MxEasy User Manual: Using MxEasy 3 Using MxEasy 3.1 Program Windows And Program Views Live camera images are shown once you have completed the MxEasy Wizard. Up to four cameras integrated to MxEasy are displayed simultaneously. The picture can be displayed in the Standard or Panorama view of the MxEasy program window, which is divided into the following areas: Default View Of The MxEasy Program Window Menu bar Info bar 1 Toolbars Image bar with camera/ event windows Tooltips for MxEasy elements Info bar 2 Dynamic toolbar Status bar Main window Note The program window is shown in the Default View when MxEasy is launched for the first time. However, if at least half of the integrated cameras are Hemispheric models, for which the Panorama image view was selected in the Wizard, then the program window is shown in the Panorama view. © MOBOTIX AG • Security Vision Systems • Made in Germany www.mobotix.com • [email protected] Program Windows And Program Views 33/126 3.1.1 Program Window Areas Menu Bar Using the menu bar, you can access most of the features and settings that can be activated using the buttons in the toolbars. There are certain features that can only be activated using the menu bar, for example, switching the current environment. Toolbars Using the buttons located around the main window, you can quickly and easily perform the most important functions for setting up and operating your MOBOTIX video surveillance system. These include functions for live surveillance, controlling the cameras, playing back recorded video and audio data and configuring integrated cameras. The buttons for activating function areas of MxEasy are among the software's special features. Clicking on the dynamic toolbar reveals additional buttons that can be used to define the detailed settings for the following function areas: • Image settings: Here, you can adjust the saturation, image brightness, contrast and sharpness of the camera images to suit your needs. Using the Exposure Window feature, you can adjust the camera's exposure for specific areas of the image. • Image and recording formats: Here, you can set the image format for live images and recordings and adjust the image quality and the frame rate. You can also determine whether the camera's sound channel is to be recorded and whether the displayed image (or a partial image) or the full image is to be recorded. • PTZ views: Here you can predefine specific areas of the image with digital zoom actions that can be called up again later. • Alarm configuration: Here you can specify the type of recording and the sensors that the cameras will use to trigger alarms, actions and messages. • Player mode: Switches to the Player View. Here you can limit recorded events by event type, search for specific events and play back the events you find in the main window. Some buttons also enable the setting of specific values in a shortcut menu. These buttons are identified with an arrow (▼). The shortcut menus can be opened by right-clicking on the button. Hover the mouse pointer over a button or element to display the corresponding Tooltip. © MOBOTIX AG • Security Vision Systems • Made in Germany www.mobotix.com • [email protected] 33 34/126 MxEasy User Manual: Using MxEasy Main Window Depending on the view you have selected, this area of the program window displays the live image of a camera, the recorded video sequences of a camera or the camera overview. When MxEasy is launched for the first time, the program window opens in Default View and displays the live image of the first camera. Image Bar Depending on the current view, the image bar contains the live images or recorded event images of up to four cameras. Live images are displayed with a camera icon and event images are displayed with a cassette icon in the upper right corner of the image. Note There are no event images available because the integrated cameras have not yet recorded any event images when you launch MxEasy for the first time. In this case, a placeholder image is displayed in the lower right corner in the event image area. Because the image bar is filled dynamically according to the number of integrated cameras, MxEasy may display this image multiple times. Status Bar The status bar displays information on elements whenever the mouse pointer hovers over the corresponding elements. For example, this shows camera names or a short description. Information Bars There are two information bars located above and below the main window. The information bars display specific information about the current view (e.g., the camera's recording target). © MOBOTIX AG • Security Vision Systems • Made in Germany www.mobotix.com • [email protected] Program Windows And Program Views 35/126 3.1.2 Program Views Default View The main window is filled with the live image of the first integrated camera. The image for the latest event of this camera is displayed in the image bar at the bottom. The three other windows in the image bar are filled with live images from other cameras. If there are fewer than four cameras in the system or fewer than four cameras have been activated for Default View (see the “Camera Overview And Camera Management“ on page 38 ), the empty windows in the image bar are filled with additional event images from the main camera. Elements Of The Default View: Icon for live image Camera name Live image in main window Date/time of the main camera Live frame rate of the main camera Live images from up to three additional cameras Latest event image of the main camera (if available) Icon for recording target © MOBOTIX AG • Security Vision Systems • Made in Germany www.mobotix.com • [email protected] 35 36/126 MxEasy User Manual: Using MxEasy Panorama View When displaying images from wall-mounted MOBOTIX Hemispheric cameras (e.g., Q24M), MxEasy can be switched to the “Panorama“ view, which displays the images with an aspect ration of 8:3 (instead of the standard 4:3). In this mode, the image bar is located below the window of the main camera. The images in the image bar are arranged from left to right instead of from top to bottom. The window on the lower right is used to display the latest event image. You activate the Panorama view in a shortcut menu that you can open with the Camera Overview and Layouts button or via the Views | Layout menu. Elements Of The Panorama View: Icon for live image Camera name Live image in main window Date/time of the main camera Live frame rate of the main camera Live images from up to three additional cameras Latest event image of the main camera (if available) Time since the last event Icon for recording target Date/time of the latest event of the main camera Panorama view is particularly suited for Hemispheric cameras (e.g., Q24M), which record images in Panorama mode with an aspect ratio of 8:3. If the Panorama view is selected, this aspect ratio is retained, even when a camera image with an aspect ratio of 4:3 (e.g., VGA) is displayed in the main window. © MOBOTIX AG • Security Vision Systems • Made in Germany www.mobotix.com • [email protected] 37/126 Program Windows And Program Views Player View This view permits searching and playback of recorded data while the main window displays the image of the latest event recorded by the main camera. The image bar displays the live images of the first four integrated cameras. The buttons displayed below the main window enable playback and navigation within the recorded audio and video data. You activate the Player View via the Cameras | Player Mode menu or via the Player Mode button. Click on the Player Mode button to return to Default View. Elements Of The Player View: Icon for recording Camera name Event image in main window Date/time of the MxEasy computer Three live cameras in image bar Last Image Live image of the current camera Player controls First image Recording start Icon for recording target Current image Recording end Slider bar for event search © MOBOTIX AG • Security Vision Systems • Made in Germany www.mobotix.com • [email protected] 37 38/126 MxEasy User Manual: Using MxEasy Camera Overview And Camera Management The Camera Overview offers a quick overview of all areas under surveillance. It includes live images from all selected cameras. You decide which live images are shown in the Camera Overview by selecting live image display for the cameras in Camera Management. With this selection, you also determine which live images are shown in the Default and Panorama views. This way, it is possible to “lock“ the live images and image playback for individual cameras in certain application scenarios without having to remove these cameras from the system. If you select more than four cameras for display, the live images from these cameras will only be shown if you activate the Camera Sequencer (via the Views | Camera Sequencer menu) or click on the Next Camera button. • Activating Camera Management: You can activate Camera Management via the View | Camera Management menu. This automatically activates the Camera Overview and Layouts button as well. • Activating Camera Overview: You can activate Camera Overview via the Views | Camera Overview and Layouts menu or with the Camera Overview and Layouts button. Elements Of The Camera Overview: Camera live images Click on the Camera Overview and Layouts button to return to Default View. © MOBOTIX AG • Security Vision Systems • Made in Germany www.mobotix.com • [email protected] Program Windows And Program Views 39/126 Mini Viewer The Mini Viewer mode is used to manage door cameras. In this view, the program window is minimized and only those functions that are required for a remote station of a door camera are available. You can activate the Mini Viewer view via the Views | Mini Viewer menu or via the Switch to Mini Viewer button. Click on the Switch from Mini Viewer button in the Mini Viewer mode to return to Default View. Elements Of The Mini Viewer View: Camera name Camera live image Switch from Mini Viewer Toolbar Next camera 3.1.3 Program Window Size The Default, Panorama, Overview and Player views determine the arrangement and format of the elements used for displaying images (main window, image bar). Furthermore, there are also various options for setting the size of the MxEasy program window and the display windows inside of it. The program window can be expanded and reduced with the mouse. MxEasy saves the window size upon closing and using this setting when it launches again. There is also the option of setting the program window's size in such a way that the camera images are displayed in optimal quality. Program Window Modes For all views described above, MxEasy can be switched to two special modes that optimize the available monitor space when displaying the camera in the main window or the Camera Overview. For this, the View menu contains the items Full Screen and Maximize. • Full screen: This setting resizes the main window or the camera overview as well as the surrounding toolbars to cover the entire screen. If the toolbars were previously hidden, the entire screen is now available for displaying camera images. You activate this setting in the View | Full Screen menu or by pressing the Full Screen button. The © MOBOTIX AG • Security Vision Systems • Made in Germany www.mobotix.com • [email protected] 39 40/126 MxEasy User Manual: Using MxEasy frame of the program window and the Windows taskbar are now no longer visible. This mode can be deactivated by clicking on the Full Screen button or by pressing the ESC key. • Maximize: The entire program window is expanded to fill the screen to display the main window and/or Camera Overview together with the toolbars. The frame of the program window with the title bar, the menu bar and the status bar and the Windows taskbar remain visible. You activate this setting in the View | Maximize menu or with the Maximize icon in the Windows title bar. This mode can be deactivated by pressing the ESC key or the Minimize button in the Windows title bar. Size Settings The adjustable sizes, VGA (640 pixels) to MEGA (1280 pixels), refer to the size of the main window. The size of the image bar is automatically adjusted to the new size of the main window. If the size set here is identical to the size of the camera image, this will result in the best image quality You activate the size settings in a shortcut menu via the View | Layout menu or the Camera Overview and Layouts button. When you select Original Size, MxEasy automatically adjust the size of the image. This option is no longer shown in the selection menu because manual PTZ actions can lead to the same result and be changed again • Original size setting: This option ensures that the live image of the current camera in the main window remains unscaled and with the original image resolution from the camera. The main window is set (among the sizes VGA, SVGA, XGA and MEGA) to the next size, which is either exactly the same size as the camera image or smaller. © MOBOTIX AG • Security Vision Systems • Made in Germany www.mobotix.com • [email protected] Live Video Surveillance 41/126 If this size is too small because, for example, the camera displays a QXGA image of 2048 x 1536 pixels or provides an image with a resolution that does not correspond to the four available resolution settings, the main window will display only a centered section of the image instead of the entire camera image. In this case, you can use the digital PTZ commands to see the image areas that are hidden from view. You can find more details on this in “3.4 Image Sections And Virtual PTZ Features“. • The Do Not Scale Up setting: This setting ensures that camera images that are smaller than the main window are not enlarged (scaled up). These images are displayed in their original size, centered in the main window. This option enables you to avoid the lower image quality that can occur when scaling up images. • The Image bar option: You can use the selection menu to either hide or display the image bar. If the camera in the main window records images in Panorama mode (aspect ratio 8 : 3), MxEasy automatically activates the Panorama view after a prompt 3.2 Live Video Surveillance The Default and Panorama views are used for the display and surveillance of live camera images. The Speaker button can activate playback of live audio data from a camera in the main window. This is only possible, though if the microphone is activated for this camera. If this is not the case, this button is grayed out. 3.2.1 Displaying And Switching Cameras Use the mouse to drag the desired camera into the main window (or double-click on the desired camera) to display a different camera from the image bar in the main window. The cameras then switch places. Manually Cycling Through Cameras Up to four live images can be displayed in Default View. In the Camera Management, however, you can activate up to 16 cameras for live display. Using the Next Camera button, you can cycle through to the next camera in the list of activated cameras. The current camera is removed from the main window and the top camera in the image bar is displayed in the main window. The other two cameras in the image bar move upwards and a new camera from the list of activated cameras is added in the bottom position in the image bar. © MOBOTIX AG • Security Vision Systems • Made in Germany www.mobotix.com • [email protected] 41 42/126 MxEasy User Manual: Using MxEasy Automatic Cycling Through Cameras Cycling to the next camera can be automated. This means that the software switches automatically every five seconds to the next camera that has been activated in the Overview. You can select this setting with the Sequencer button. You can also set the frequency of cycling under Tools | Preferences in the “Behavior“ tab. You can switch to the previous camera or the next camera before the set time interval has elapsed using the arrow keys on your keyboard (Ctrl+ or Ctrl+ ). You can stop or restart the automatic cycle through the images by pressing Ctrl+Spacebar. This gives you more time to review a specific situation, for example. ← ← Note Camera Sequence The activated cameras will normally be displayed in the same sequence as they appear in the Camera Management. If a camera in the main window is replaced by a camera in the image bar as described above, this will change the sequence accordingly. Each change in the Camera Overview (activation or deactivation of cameras, switching the sequence of the cameras) changes the display sequence to match the current sequence in the Camera Overview. 3.2.2 Detection Of Alarms If a camera has triggered an alarm, it will be displayed with a flashing red lightning symbol in the live image. This symbol is displayed until you acknowledge the alarm by clicking in the image. This applies to both the main window and the image bar. You can specify in detail how the system reacts to an alarm under Tools | Preferences in the “Behavior“ tab (see “4.4.3 Alarm And Doorbell Notification Behavior“). You can find details on how to set up alarms and alarm notification in “3.5 Recordings And Alarms“. © MOBOTIX AG • Security Vision Systems • Made in Germany www.mobotix.com • [email protected] Camera Views And Image Settings 43/126 3.3 Camera Views And Image Settings 3.3.1 Selecting Camera Views To show live camera images, you can select different camera views (e.g., full image or surround mode) in a shortcut menu that opens via the Image Formats and Views button. Camera Views (All Cameras Except Hemispheric Models) • Full image: The entire live image from the camera is displayed. • Lens correction: MxEasy displays a portion of the live camera image (with lens correction). This option is only available for L22 lenses if the camera configuration is adjusted accordingly. • Picture-in-Picture: This option displays a small image from one camera sensor inset in the large image of the other. This setting is available on MOBOTIX Dual models only. • Picture in Zoom: MxEasy displays a small version of the entire live camera image in the lower right corner of the large live camera image. This way, the entire image is visible even when the live image is zoomed. • Event in Picture: MxEasy displays a small version of the latest event image in the lower right corner of the large live camera image. For more information on the different views available for MOBOTIX cameras, see the General Image Settings section in the Software Manual. Camera Views (Hemispheric Models) • Full image: The entire (distorted) full image of the image sensor is displayed. • Normal: A corrected image is displayed. This image can be panned and tilted. This is the factory default image setting for the Hemispheric camera models. • Surround: Partial images from each of the four directions are shown in an allround view. All four views can be changed independently of each other using PTZ commands. • Panorama: The corrected image of an entire room (corrected 180° panorama) from the left to the right wall is shown. The aspect ratio (width to height) is 8:3. This view is only available for Hemispheric models, such as the Q24M. The D14-Sec-180 is an exception among the Dual models. Instead of a right and left image delivered by the right and left sensors on the camera, this model can be configured with a Panorama view that stretches seamlessly over both sensors. Use the Image Formats and Views to open the Panorama installation and configure the Panorama view. For more information, see “3.3.2 Editing The Image Settings“. © MOBOTIX AG • Security Vision Systems • Made in Germany www.mobotix.com • [email protected] 43 44/126 MxEasy User Manual: Using MxEasy • Panorama focus : This view is a combination of the Panorama view (8:3) and two smaller individual views (each 4:3) in a single image. This is available for Hemispheric models. • Double panorama: A 180° panorama view of the Northern half of the image is shown together with a panorama view of the Southern half of the image with an aspect ratio of 4:3 (width to height). This view only makes sense for the ceiling-mounted MOBOTIX Hemispheric model. Both partial views (North and South) can be changed independently of each other using PTZ commands. Q24 view “Normal“ Q24 view “Surround“ Zoomed image section Q24 view “Full Image“ In the Surround, Panorama Focus and Double Panorama camera views, the images that are delivered by the sensors are displayed as partial views of the entire image. This makes it possible to focus the window view on just one of these partial views. Different displays of the partial views is possible, depending on the camera view. In Surround view, for example, you can focus on the upper left, upper right, lower left and lower right partial views. This applies for Hemispheric and Dual models. To select a partial view, use the Image Formats and Views button to open the shortcut menu and select a partial view. For more information on the views available for MOBOTIX Hemispheric models, see the section First Images And The Most Important Settings In The Browser in the Camera Manual. © MOBOTIX AG • Security Vision Systems • Made in Germany www.mobotix.com • [email protected] Camera Views And Image Settings 45/126 3.3.2 Editing The Image Settings Use the Image Formats and Views button to edit the image settings. More buttons open at the lower edge of the program window, and they can be used to adjust the properties: • Resolution: You can set the resolution of the camera image here. The resolution you set may be different from the resolution displayed in the main window. Regardless of the current resolution of the camera, the camera image in the main window is always displayed with the resolution set here (VGA, SVGA, XGA or MEGA). You can change the image resolution of a camera by using a zoom tool. You activate the zoom tool by clicking on the Resolution button. A magnifying glass appears in the camera image. Click on the plus or minus button on the magnifying glass to change the image resolution on the camera. The image area in the magnifying glass always shows the camera's original resolution. This means that if the image resolution of the camera is set to a value higher than the resolution of the main window, the magnifying glass area will show an enlarged image (for example, 2 times or 4 times the size). This function allows you to accurately judge the image detail provided by the camera and used for the recording. You can also select the desired resolution in a shortcut menu that you open with the Resolution button. • Custom size: You can create a camera image with a custom resolution and size with this option. This function can be used if only certain areas of the camera image are allowed to be monitored. When monitoring pumps at a gas station, for example, it may be useful to resize the image to display only the horizontal strip in the middle that is of possible interest. This means that the images take up less memory and require less bandwidth for live display. © MOBOTIX AG • Security Vision Systems • Made in Germany www.mobotix.com • [email protected] 45 46/126 MxEasy User Manual: Using MxEasy You create a camera image of a user-defined size when you use your mouse to draw a box directly in the camera image. You can move this defined area with the mouse, change its size or delete it. Deactivating the button automatically saves the defined area. The box is drawn separately for the left and right images for dual models. A Panorama view can be created for the D14 Sec 180 that stretches seamlessly over both images (the camera’s right and left sensors). This allows you to draw a box within the entire image without any problems. • Image quality: The three values (Fast, Normal, High) that can be set using this button influence the image quality in which the image sensor is to be read. Increasing the image quality improves the camera image but also decreases the maximum available frame rate. The Normal option offers a good compromise between the High and Fast options. For more information, see the sections “General Image Settings“ and “Image Programs In The Software Manual.“ • Obscure area: If certain areas in the image are meant to remain unrecognizable, you can use this button to obscure these areas with the camera (e. g., workstations or public areas). To do so, use your mouse to draw one or more boxes directly in the camera image. Windows set up in this manner will be automatically saved and activated once you deactivate this button. The box is drawn separately for the left and right images for dual models. A Panorama view can be created for the D14 Sec 180 that stretches seamlessly over both images (the camera’s right and left sensors). • Camera frame rate: From the shortcut menu of this button (right-click), you can set the frame rate provided by the camera (options: No Limitation, 25 fps, 16 fps, 12 fps, 8 fps or 4 fps). This function can be used as a way to manage bandwidth. The lower the frame rate, the less bandwidth is required to transfer the video data. Note, however, that you should primarily use the functions outlined in Section 4.4.2, “Setting Connections“. © MOBOTIX AG • Security Vision Systems • Made in Germany www.mobotix.com • [email protected] 47/126 Camera Views And Image Settings • Mounting position: You can set the mounting position of a MOBOTIX Hemispheric camera (Ceiling or Wall ) from the shortcut menu of this button. If ceiling mounting is enabled, you can also specify the North direction of the camera. Activate the button and turn the image to the right or left using the symbols that are displayed. The North direction set in this manner will be saved automatically once you deactivate this button. Adjusting the North direction also changes the Surround and Double Panorama camera views. For additional information, see the section “First Images And The Most Important Settings“ in the Q24M Camera Manual. • Panorama installation: If a D14 Sec 180 is integrated in MxEasy, then the Panorama Installation button will be shown instead of the Mounting Position button. This enables setup of the panorama image for the D14 Sec 180. As for all dual models, the live image of this camera consists of a combination of a right and left image, which are provided by the camera’s right and left sensors. The D14 Sec 180 can produce a Panorama view that stretches seamlessly over both images. Move the controls until both images are positioned in such a way that the windows merge seamlessly. Clicking on the Panorama Installation button ends the setup and saves the view. Selecting image elements: left image, both, right image The length of the bars determines the subtlety of the movement Panning and tilting the selected image (select left or right image) Combine or move both images away from each other (select both images) Zooming of selected image Correcting the camera’s imbalance • Mounting correction: Corrects the pitch of a camera mounted to a wall. Activate the button and correct the pitch by clicking on the icons that appear. • Panorama correction: If the Panorama view is not centered, this may cause trapezoidshaped distortion. Panorama correction enables this distortion to be adjusted so that the selected image section looks as natural as possible. Activate the button and correct the distortion by clicking on the icons that appear. © MOBOTIX AG • Security Vision Systems • Made in Germany www.mobotix.com • [email protected] 47 48/126 MxEasy User Manual: Using MxEasy • Recorded image: This option is important for all cameras for which a zoomed section of the live image (PTZ) is shown instead of the full camera image. Only this section will be recorded when this kind of live image is recorded. You can avoid this by activating the Recorded Image button. This guarantees that a full camera image is always recorded ‑ regardless of the live image that is visible or its settings. Note Note that any subsequent search of the full camera image (PTZ functions) is only possible with the Recorded Image (= full image recording) option. • Record audio: If this button is activated, the sound from the camera microphone will be included in the recording. If the button is deactivated, the video sequences will be recorded without sound. Note These settings apply for all recordings. You cannot make separate settings for each recording time range. 3.3.3 Adjusting Additional Image And Exposure Settings You can adjust other settings for color saturation, brightness, backlight and sharpness . To do this, click on the Image Settings button. More buttons open at the lower edge of the program window, and they can be used to adjust the properties: • Saturation: This function increases or decreases the saturation of an image. The higher the value, the more color displayed in the image. • Brightness: This setting allows you to adjust the image brightness. Make sure that the exposure windows are being used effectively before you make any adjustments. • Backlight: This setting improves the display of a camera image that contain overexposed or underexposed areas. A typical example of this is a room that is illuminated only by daylight from the windows. Objects located around the edges are displayed too dark and with too little contrast. Increasing the value will increase overall illumination to properly display the dark areas in the image. This setting is particularly useful for high-contrast (color) night images. • Sharpness: This setting allows you to display sharper camera images. Make sure not to set the sharpness too high since doing so may result in poorer image quality (for example, for high-contrast and finely detailed images). © MOBOTIX AG • Security Vision Systems • Made in Germany www.mobotix.com • [email protected] Camera Views And Image Settings 49/126 • Exposure windows: The MOBOTIX camera sets the exposure window to ensure the proper exposure/brightness for the live camera image. You can select a predefined set of exposure windows from the shortcut menu of this button. These windows are shown in the live image and can be set there. You can specify whether or not the exposure window will be visible in the camera image (green box) using the Show Exposure Windows option. • Default settings: Click on this button to restore the default values for all settings. Notes On Predefined Exposure Windows • The content of predefined exposure windows is decisive for the camera's exposure control and therefore for the overall appearance of the image. • The predefined and custom exposure windows are particularly suited for use with full image recording because the recorded full image of MOBOTIX cameras is not affected by PTZ commands. • If the camera is used primarily as a live camera, meaning that is must display high quality images even when PTZ commands are used, we recommend using the Automatic (Visible Area) setting. With this setting, the current visible image section is used as the exposure window. As long as no digital zoom is performed in the camera, this area is identical to the full image displayed by the image sensor. When you perform a digital zoom, the visible area becomes smaller than the full image. This setting optimizes the exposure of the live image, even when you are performing PTZ commands. With the Automatic Exposure (PTZ) setting, images recorded using full image recording are affected by the PTZ commands ‑ whenever the PTZ commands affect the exposure of the image. Image settings are done for each lens for Dual cameras, with the exception of D14-180° models. Click on the Image Settings button to open the shortcut menu and select the lens. © MOBOTIX AG • Security Vision Systems • Made in Germany www.mobotix.com • [email protected] 49 50/126 MxEasy User Manual: Using MxEasy Creating Custom Exposure Windows The Custom option (from the shortcut menu of the button) allows you to create and edit individual exposure windows using your mouse. • Creating exposure windows: Use the mouse to draw a frame within the camera image in the main window. • Moving exposure windows: Use the mouse to drag the window to the desired position. If you move the mouse over the window, it automatically turns into a hand cursor. • Modifying exposure windows: Drag the edge of the window using your mouse to increase or decrease the size of a window. If you move the mouse in the edge of the window, it automatically turns into a resize cursor. • Deleting exposure windows: To delete a window, click on the X button in the upper right-hand corner of the window or press the Delete key on your keyboard. The exposure windows for Dual models are drawn separately for the left and right image. A Panorama view that stretches seamlessly across both images (the right and left sensors of the camera) can be created for the D14 Sec 180. This enables the desired exposure windows to be drawn within this image without a problem. Defining Exclusion Windows Exclusion windows exclude unwanted light sources within the exposure windows from exposure control. In the example image, the lamp in the upper right corner of the image is excluded (the red area). Tips For Defining Exclusion Windows • To create an exclusion window, hold down the Alt key and use the mouse to draw a frame. • Always position the exclusion windows within exposure windows (exclusion windows have no effect outside of exposure windows). The same functions are available for editing exclusion windows as for exposure windows (move, change size, delete). Notes The custom exposure windows – like the predefined exposure windows – are defined as “global“ for the entire sensor image. These windows do not affect the exposure of the image, even when PTZ commands are performed. Exposure and exclusion windows for Hemispheric cameras and cameras with distortion correction are shown as polygons if the image is panned or tilted, or if the camera image is switched from Normal to Full Image. © MOBOTIX AG • Security Vision Systems • Made in Germany www.mobotix.com • [email protected] Image Sections And Virtual PTZ Features 51/126 3.4 Image Sections And Virtual PTZ Features You can use virtual (digital) zoom to scale the displayed image up or down and pan the modified image area from side to side or tilt it up and down. These functions are called PTZ features (Pan/Tilt/Zoom). 3.4.1 Zooming In On An Image Section The camera image is often delivered in a larger resolution (e.g., MEGA 1280 x 960 pixels) than is displayed in the main window (e.g., VGA 640 x 480 pixels). When you zoom, the local application zoom is automatically activated. This means that only a section of the image supplied by the camera is displayed in the main window instead of the entire image. All further PTZ commands take place within the displayed area. These PTZ commands do not influence the recording of camera-generated images. This allows specific image areas to be focused on while the entire camera image continues to be recorded. If the application zoom is active, you will see a small rectangle in the upper right-hand corner of the image. The rectangle indicates the position of the zoomed area within the overall camera image, and PTZ commands are visible in the movement of the rectangle within the frame. If further zooming in on the image makes the selected section of the camera image exactly as large as it can be displayed in the main window (until the pixels are no longer reduced), then the camera zoom is activated automatically. This means that zooming is now carried out by the camera. PTZ commands take place in the complete image delivered by the camera. PTZ commands change the live image of the camera and, if the full image is currently not being recorded, these commands affect the recording as well. Activate full image recording by pressing the Recorded Image button in the Image | Image Formats and Views or the Image Formats and Views button. PTZ commands performed in the camera are also indicated in the upper right-hand corner: a hash symbol that changes with PTZ commands. Caution The camera zoom is only activated if the camera PTZ is already activated. To do so, click on the Activate PTZ button. Otherwise, PTZ commands are only carried out within the application zoom. If all zoom commands should occur exclusively on the camera, then deactivate the application zoom. To do this, open the shortcut menu of the Activate PTZ button. In this shortcut menu, you can also activate the Zoom On Click option. By clicking on an image area, you then zoom into it and move it to the center. © MOBOTIX AG • Security Vision Systems • Made in Germany www.mobotix.com • [email protected] 51 52/126 MxEasy User Manual: Using MxEasy You can choose between the following options for zooming: • Roll the mouse wheel forwards to zoom in on an image area. Roll the mouse wheel backwards to zoom out from an image area. • Click on a position in the image to quickly zoom in on the image area. If you doubleclick, you zoom out of the image section and the image is centered. Clicking on the upper or lower third of a Panorama view, however, will not result in automatic zooming; instead, the image section will pan upwards or downwards to show previously unseen areas. Clicking on the center of the image performs the usual zooming and centering of this image area. * MOBOTIX Hemispheric cameras do not perform this kind of zooming • Press and hold the Alt key (Windows) and use the mouse to draw a rectangle in the live image.* The selected image section is shown in the main window. and • Hold down the Command key and press the keys to zoom in or out of the visible image section. The key combination Ctrl-# displays the entire image again. • If a joystick is installed on your computer, you can also use it to zoom in and out of the image. 3.4.2 Panning And Tilting An Image Section You can choose between the following options for panning and tilting: • Use the mouse to drag the zoomed image area in the desired direction. • Press the arrow keys on the keyboard to move the image section as desired. • Move the joystick left, right, up or down to pan and tilt the image section as desired. You can use PTZ commands to change the displayed image section however you like. The Home View feature lets you jump back quickly to a previously specified or chosen image section. To do this, save the PTZ view that you want and activate it as needed by clicking on the Home View button. To save a home view, click on the Home View button and hold down the key until the message “Home view stored“ appears. 3.4.3 Storing And Loading PTZ Views In addition to specifying a PTZ view as a home view, you can store several PTZ views with the desired pan, tilt and zoom settings and load them as needed. Proceed as outlined in the following: • Click on the PTZ Views button. The position buttons are activated in the dynamic toolbar. © MOBOTIX AG • Security Vision Systems • Made in Germany www.mobotix.com • [email protected] Image Sections And Virtual PTZ Features 53/126 • Click on one of the numbered position buttons, e.g., Position 2, and hold down the mouse button (about three seconds) until you see the message View 2 stored. The PTZ view is stored on position button 2. The position button is bolded so that you know it has a view stored in it. • The number keys on your computer can also be used to store positions: When you press and hold down a number key (for example, 2), this view is stored (View 10 is stored by pressing 0). • To load a stored position, click briefly on the corresponding button or briefly press the corresponding key (e.g., 2 for position 2). The corresponding view is shown (0 is used to call up position 10). • If you have a joystick with buttons installed on your computer, you can also use these buttons to save frequently-used views. You can use this feature to save up to ten preset views for each camera and activate them as needed. For MOBOTIX Hemispheric models with an L11 lens (360° allround view), you can select additional options in the shortcut menu of the Activate PTZ button. These additional options are only available for Hemispheric cameras. © MOBOTIX AG • Security Vision Systems • Made in Germany www.mobotix.com • [email protected] 53 54/126 MxEasy User Manual: Using MxEasy 3.5 Recordings And Alarms The recording and alarm functions are an important component in MxEasy. You determine whether and when video sequences are recorded, which events trigger alarms and how you will be notified in case of an alarm. Different operation modes enable you to adapt to a variety of application scenarios: • Switched Off Mode: No recording, transmission of live images only • Normal: Recordings and alarm notifications at any given time according to the alarm configuration settings in the camera • Alarm Planner: Recordings and alarm notifications according to the settings in the alarm planner for the time ranges specified there In the event of an alarm, the Manual Alarm can also be triggered. All cameras will then record video and audio data for a specific period of time. Different recording targets are available for recording. The cameras can save sound and video data, depending on the model and version, to internal storage media (SD cards) or file servers. New cameras (Q24M, D24M, M24M, T24M, D14, with the exception of basic and web models) and R models are equipped with SD cards and preconfigured for recording. If you want to set a recording target other than the preconfigured SD card, open the “Recording“ tab under the Camera | Camera Options menu. 3.5.1 Manual Recording You can trigger a Manual Alarm at any time, for example if you notice a suspicious situation that should be recorded. The images are recorded as you watch the situation in live images. Activate the manual alarm by pressing the Manual Alarm button. You can set the recording time either in the shortcut menu opened by this button or by the number of mouse clicks. One click records one minute, another click records five minutes and more clicking activates the continuous manual alarm. You can end the manual alarm by selecting Manual Alarm Off in the shortcut menu. © MOBOTIX AG • Security Vision Systems • Made in Germany www.mobotix.com • [email protected] Recordings And Alarms 55/126 3.5.2 Automatic Recording And Alarming (General) Regardless of time considerations, you set the general recording and alarming behavior of the cameras. In particular, you choose when and how recordings take place and which events lead to which notifications. The alarm configuration in the Normal Mode of operation is available for this purpose: 1. Activate the operating mode under Camera | Operating Mode or with the Operating Mode button . 2. Select Normal Mode and click on OK to confirm. The system is now in normal operating mode. Use the alarm configuration to establish settings for recordings, events and notifications: 1. Activate the alarm configuration under Camera | Alarm Configuration or with the Alarm Configuration button. The dynamic toolbar opens at the lower edge of the program window, and it can be used to adjust properties. Properties are set in shortcut menus that you open either by clicking on the button's arrow (▼) or by right-clicking on the button. Select A Recording Mode • Off: No recordings. Choose this option if, for example, in case of an alarm, a notification should be sent to you or another person, but should not trigger recording. • Continuous recording: The camera records continuously. • Event recording: Records when an event is triggered, such as movement. You must have selected at least one event for event recording. © MOBOTIX AG • Security Vision Systems • Made in Germany www.mobotix.com • [email protected] 55 56/126 MxEasy User Manual: Using MxEasy Open the shortcut menu via the Recording Mode button and select the desire recording mode. Hint: The corresponding recording mode is displayed on the left side of the upper information bar, while the recording target is indicated in the lower information bar. If you hover the mouse over an element, you will see tooltips that explain the recording status and recording targets. Note A special advantage of MOBOTIX digital camera technology with integrated buffers is the recording of pre-alarm images. This means that when an event is recorded, the two seconds before the actual event begins are also included in the recording. Selecting Events Select an event or the events that should trigger an alarm and lead to recording and/or notification: • Video motion sensor: Changes in the live image trigger alarms. Video motion windows are used to detect these changes. You can choose from a predefined set of video motion windows or define your own. To do this, open the shortcut menu by clicking on the Video Motion Sensor button and choosing the desired option. You can specify whether the video motion windows should be visible all the time or only when an alarm is triggered with the Always Show VM Windows and Show VM Windows On Event options. Creating And Editing Custom Windows Open the shortcut menu via the Video Motion Sensor button and select “Custom Windows.“ –Creating video motion windows: Use the mouse to draw a frame within the camera image in the main window (see illustration). –Moving video motion windows: Use the mouse to drag the window to the desired position. If you move the mouse over the window, it automatically turns into a hand cursor. © MOBOTIX AG • Security Vision Systems • Made in Germany www.mobotix.com • [email protected] 57/126 Recordings And Alarms – Resizing video motion windows: Drag the edge of the window using your mouse to increase or decrease the size of a window. If you move the mouse in the edge of the window, it automatically turns into a resize cursor. – Deleting video motion windows: To delete a window, click on the X button in the upper right-hand corner of the window or press the Delete key on your keyboard. The video motion windows for Dual models are drawn separately for the left and right image. A Panorama view that stretches seamlessly across both images (the right and left sensors of the camera) can be created for the D14 Sec 180. This enables the desired video motion windows to be drawn within this image without a problem. Defining Reference Windows Reference windows are used to avoid false alarms triggered by unwanted image changes. If there is lightning, for instance, the sudden brightness changes all of the pixels in the defined motion sensors and would trigger an alarm accordingly. Reference windows can avoid these false alarms to a great extent because the camera does not report an alarm if the motion sensors and reference windows are triggered at the same time. Tips For Defining Exclusion Windows – To create a reference window, hold down the Alt key and use the mouse to draw a frame. – One reference window per camera will normally suffice. – Position the reference windows in image areas whose visible contents do not normally change (e.g., next to windows or inaccessible image areas). – Ensure that reference windows and motion sensors do not overlap. – The same functions are available for editing reference windows as for motion sensors (move, change size, delete). Note The detection of such events as “passive infrared,“ “noise,“ and “signal input“ requires sensors that are already integrated in some MOBOTIX camera models. These events are also available in MxEasy. To enable these events for camera models that do not have integrated sensors, use the MOBOTIX ExtIO module. This module is to be connected to the cameras and must be configured before being used in MxEasy. © MOBOTIX AG • Security Vision Systems • Made in Germany www.mobotix.com • [email protected] 57 58/126 MxEasy User Manual: Using MxEasy • Passive infrared: A PIR sensor (passive infrared sensor) is either installed standard in MOBOTIX camera models or the PIR of a connected MOBOTIX ExtIO can be used. The PIR sensor enables motion detection even in the dark. Open the shortcut menu via the Passive Infrared Detection button and select the desired recording mode. The lower the selected trigger level, the more sensitive the detection. • Noises: Noises can trigger alarms. Noise detection is done by the integrated camera microphone or by the microphone of a connected and activated expansion module. Open the shortcut menu via the Noise Detection button and select the desired trigger level. The lower the selected trigger level, the more sensitive the detection. • Signal input: An external device – such as a light barrier, for example – can deliver an electric impulse to the camera that qualifies as an event and triggers an alarm. Such devices can be connected to the existing signal input (SI) on the camera or that of a connected expansion module. Open the shortcut menu via the Signal Input Detection button and select the desired status or status transition in the SI signal to trigger an event. • Door Station: If a T24 Door Station is connected in MxEasy, then the Door Station Events button will be shown instead of the Signal Input Detection button. This enables the triggering of alarms when the doorbell is rung, for example. Open the shortcut menu via the Door Station Events button and select the desired option. Different options will be available, depending on the Door Station model. If, for example, you use a Door Station with a keypad, then you can set the system up to trigger an alarm and even a notification if someone enters an invalid PIN code or an invalid RFID. • Temperature: Temperature changes that can be registered by the camera's internal temperature sensor trigger alarms. Open the shortcut menu via the Temperature Detection button and select the desired temperature range. • Illumination: Changes in the brightness of a live image can trigger alarms. The camera's image sensor performs illumination detection. Open the shortcut menu via the Illumination Detection button and select the desired trigger level. For additional information, see the section “Events“ in the Software Manual. © MOBOTIX AG • Security Vision Systems • Made in Germany www.mobotix.com • [email protected] Recordings And Alarms 59/126 Setting Up Alarm Notifications If you have specified events that will trigger recordings and/or alarms, you can now determine whether and how you or other people will be notified in case of an alarm: • Sound notification: Different sound files are available. Additional sound files can be uploaded or recorded in the audio options (the “Audio“ tab under Camera | Camera Options or the Camera Options button). Open the shortcut menu via the Sound Notification button and select the desired sound file. The function is activated when you select a sound file. Deactivate sound notification by clicking on the Sound Notification button. • VoIP phone notification: This function can be used, for example, to notify a security firm in case of an alarm. VoIP phone notification requires, however, that you enter the corresponding VoIP settings in the camera options. For additional information on this topic, see Section 4.3.4, “VoIP Settings For Phone Calls“. Activate this function by clicking on the VoIP Phone Notification button. The window for selecting and entering a VoIP phone number opens. Enter or select a VoIP phone number and confirm by clicking on OK. Deactivate VoIP phone notification by clicking on the VoIP Phone Notification button. If VoIP phone numbers have already been entered, open the shortcut menu via the VoIP Phone Notification button and select the desired VoIP phone number. The function is activated when you select a VoIP phone number. • E-mail notification: This function sends a file with the “alarm image“ to an e-mail address. This function can be used, for example, to notify an administrator if the temperature in a cooling facility exceeds a specific limit. E-mail notification requires, however, that you enter the corresponding e-mail settings in the camera options. For additional information on this topic, see Section 4.3.5, “E-Mail Settings“. Activate this function by clicking on the E-Mail Notification button. The window for selecting and entering an e-mail address opens. Enter or select an e-mail address and confirm by clicking on OK. Deactivate e-mail notification by clicking on the E-Mail Notification button again. © MOBOTIX AG • Security Vision Systems • Made in Germany www.mobotix.com • [email protected] 59 60/126 MxEasy User Manual: Using MxEasy If e-mail addresses have already been entered, open the shortcut menu by clicking on the E-Mail Notification button and then select the desired e-mail address. The function is activated when you select an e-mail address. For additional information, see the section “Actions And Messages“ in the Software Manual. 3.5.3 Automatic Recording And Alarming (Alarm Planner) After you have set the general recording and alarming behavior of MxEasy, you can use the Alarm Planner to define the behavior for specific time ranges, in accordance with your requirements: 1. Activate the Alarm Planner operating mode under the Camera | Operating Mode menu or by clicking on the Operating Mode button . 2. Select Alarm Planner and click on OK to confirm. The system is now in Alarm Planner operating mode. Use the Alarm Planner to establish settings for recordings, events and notifications within specific time ranges: 1. Activate the Alarm Planner under Camera | Alarm Configuration or by clicking on the Alarm Configuration button. The window for setting up properties opens. The general settings that you have already entered are imported into the Alarm Planner. You can see these settings in the background colors and the small icons above the days of the week. A gray background means that no recordings take place, a red background means continuous recording, and a yellow means event-controlled recording. The icons indicate at all times which events trigger alarms, who is notified and how they are notified. Icons such as “Thermometer“ and “Speaker,“ for example, mean that alarms were set up in such away that an alarm is sounded if the temperature falls below or exceeds a specific value. As long as you have not defined any other time ranges, these settings apply for the entire time from Monday 12:00 a.m. to Sunday 12:00 a.m. Setting Up And Editing Time Ranges You set up time ranges for which you would like to configure custom recording or alarm behavior (e.g., in a sales room: continuous recording during opening hours; otherwise, alarm triggered by video motion sensor). • Setting up a time range: Use your mouse to draw a box inside the calendar window. • Moving time ranges: Use your mouse to drag the window to the desired time and day of the week. If you move the mouse over the window, it automatically turns into a hand cursor. © MOBOTIX AG • Security Vision Systems • Made in Germany www.mobotix.com • [email protected] 61/126 Recordings And Alarms • Changing time ranges: Drag the edge of the window using your mouse to increase or decrease the size of a window. A resize cursor appears automatically when the mouse pointer hovers over the edge of the window. You can also use the weekday and time fields (in the lower section of the time planner) to adjust the selected time range down to the minute. • Deleting time ranges: Select the window with the mouse and press the Delete key on the keyboard (or choose Remove in the shortcut menu). Icons for events and actions in the background Setting and editing time ranges for opening times Customization down to the minute After you have set up the time ranges, decide for each individual time range which recordings should take place and which events should lead to which notifications: 1. Highlight the relevant time range and right-click to open the shortcut menu. 2. Select the desired settings. You can find more information on the individual settings in “Automatic Recording And Alarming (General).“ 3. Click on Apply and confirm by clicking on OK. The settings are applied for the selected camera. 4. Optional: You can transfer the selected settings to all of the other cameras: Activate the Apply to all cameras checkbox and confirm by clicking on OK. After you have defined time ranges to which custom recording and alarm behavior apply, you can use the Alarm Planner at any time to select and edit the times outside of these customized time ranges. The current settings for the events and actions of this “background area“ are always represented by the icons above the days of the week. On the other hand, the settings for the custom-defined time ranges are displayed within these time ranges. © MOBOTIX AG • Security Vision Systems • Made in Germany www.mobotix.com • [email protected] 61 62/126 MxEasy User Manual: Using MxEasy 3.6 Searching For And Playing Back Recordings 3.6.1 Searching And Playing Back In Player Mode The MxEasy Player can search and play back recorded event sequences. Activate the Player by clicking on the Player Mode button or under the Camera | Player Mode menu. The view switches to Player View and the last (most recent) event image from the camera is shown in the main window instead of the live image. Additional buttons for searching and playing back recorded data open at the lower edge of the program window: Player mode button Last (most recent) event image in main window Live image of the current camera Date and time entry Player controls Player buttons Filters for search results Play buttons for playback of search results The way that you search depends on whether you want to search for specific events within the recorded event sequences, or if you want to search for events at specific times. © MOBOTIX AG • Security Vision Systems • Made in Germany www.mobotix.com • [email protected] Searching For And Playing Recordings 63/126 Searching All Recordings For Events You can filter the recordings by event type to find the events that you are looking for as quickly as possible: 1. Open the shortcut menu by clicking on the Filter Event button and select the desired event types. The event filter is activated when you select one or more event types. 2. Navigate through the recorded events with the navigation buttons: – First event and last (most recent) event: Use these buttons to jump to the first or last image of the recordings that have been filtered. The relevant event is shown in the main window. – Previous event and next event: These buttons proceed from the currently displayed event image to the previous or next event image within the recordings limited by the filter. The relevant event is shown in the main window. Searching For Events Within A Time Range If, for example, you have set up specific periods of continuous recording and would like to check whether something happened during this period of time, you can limit your search to these time ranges. 1. Click on the Search Area rotary button. “Search by time“ is activated. The navigation buttons are displayed without lightning bolts. 2. Choose one of the following procedures: • You would like to know whether something happened at a specific time, and if so, what happened. • You would like to run through the recordings forwards or backwards at a specific increment (e.g., 10 min), thereby performing “time leaps.“ © MOBOTIX AG • Security Vision Systems • Made in Germany www.mobotix.com • [email protected] 63 64/126 MxEasy User Manual: Using MxEasy 3. Searching for specific time: Enter the date and time in the middle date/time input field in the information bar. Press Enter to confirm. The current event image jumps to the event in the recordings that is closest to this date and time. 4. Performing time leaps: Set the desired increment size for navigating in the recording (the increment duration). Rotate the Search Area rotary button by using your mouse to the desired interval, e.g., 1 hour, 1 minute, 10 minutes or 4 hours. Click on the Previous Frame and/or Next Frame buttons to search for events in the recordings that are as temporally distant from the current image as you have specified. If an event that corresponds precisely to this time leap is not found in the recordings, then the closest event image will be shown. Special Function: Searching With Post Video Motion Detection MxEasy supports post video motion detection. This means that you can search through recordings in the past, looking specifically for changes within one or more camera image areas. You use video motion windows to do this. 1. Click on the Post Video Motion Detection button. 2. Use your mouse to draw one or more video motion windows inside the current main window. 3. Click on the Previous Event and/or Next Event buttons to search for changes in the video motion windows. If the system detects a change in the video motion window, it colors the video motion window red and stops the search process. Playing Back Found Event Sequences You can play back recorded event sequences with the playback buttons. All of the recorded sequences will then be played back (forwards or backwards), starting from the currently displayed event image. You can set the playback speed for event sequences with the Playback Speed rotary button. © MOBOTIX AG • Security Vision Systems • Made in Germany www.mobotix.com • [email protected] Searching For And Playing Recordings 65/126 1. Hover with your mouse over the Playback Speed rotary button and turn the button with the mouse to the right or left until the desired speed is shown in the main window (e.g., slow or fast forward or backward). The selection immediately triggers the playback of event sequences. 2. Click on the playback or rewind button (depending on your previous selection) to stop or to pause playback. Furthermore, you can specify how the recorded event sequences should be played back. This is done with clip mode. A clip contains the recording area that belongs to an event. This is normally two seconds of pre-alarm time, the event image and the post-alarm time that you specified when setting up the recording mode (see Section 3.5.2 “Automatic Recording And Alarming, Setting The Recording Mode“). During playback, you can select whether the clip for the current event sequence should be played once or continuously. Alternatively, you can decide to play back all of the clips for the found event sequences. 1. Open the shortcut menu via the Clip Replay Mode button and select the desired clip mode. If you see something during playback that you want to take a closer look at, you can switch directly to single-step mode and examine the recordings image by image: 1. A recording is played back. Click on the Playback Speed rotary button. The rotary button jumps back into output mode and single-step playback is activated. 2. Click on the playback or rewind button to play back the event images in single steps. Special Function: Event Overview And Event Histogram With OnScreen Control In Player Mode, you can search for events and look at events or event sequences by playing them back. The OnScreen Control in Player mode provides you with another option to quickly get an overview of all recorded events for one camera, see event frequency distribution and summarize multiple events and event sequences for export. © MOBOTIX AG • Security Vision Systems • Made in Germany www.mobotix.com • [email protected] 65 66/126 MxEasy User Manual: Using MxEasy When you first open the OnScreen Control, the entire time range of available recordings is shown. You can zoom in on any position inside this time range by clicking on it to view individual events. The Histogram function in the OnScreen Control shows the frequency distribution of recorded events. Within a unit, such as a day or an hour, the length of the bars shows you how often an alarm was triggered. By simply clicking and dragging you can include several time ranges that you can subsequently export. If you activate the Marker mode, then all of the replayed video sequences as of this time are automatically selected and collected for export. 1. Use your mouse to click on the arrow in the lower right part of the Player View. The OnScreen Control opens. The red mark on the scale shows the position of the currently shown event image in relation to the overall time range of all available recordings on the camera. 2. Click on the arrow again to get a more detailed view of the time ranges and to edit them. This opens a view divided into units of time (corresponding to the selected scale in months, calendar weeks or days), a bar for selecting time ranges and a scrollbar. Use the scrollbar to move the time range within the entire range of all available recordings. Select time ranges by dragging the desired time ranges in the selection bar. You can then export these periods. © MOBOTIX AG • Security Vision Systems • Made in Germany www.mobotix.com • [email protected] Searching For And Playing Recordings 67/126 3. Click on the arrow again to view the distribution of event frequency. The histogram display for existing events opens. 4. Use the zoom buttons to zoom in and out of the currently displayed time range. Use the scrollbar to move the time range of currently displayed events. 5. Activate Marker Mode to select event sequences for export during playback. If, for example, you have found an incident and play it back to the end, everything will be selected for export. You can turn off the marking function by deactivating Marker Mode. Delete marked sequences by clicking on the Delete button . 6. Click on the Export button to export the selected time ranges and event sequences. 3.6.2 Searching And Playing Back In The Recordings Browser You can use the Recordings Browser to search all of the event images stored in a number of cameras at once. You can limit the search by using different selection criteria. The events are then displayed in a browser as preview images with a camera name, the date and the type of recording resolution. You can sort the results by various criteria for a quick overview. Activate the Recordings Browser under the File | Browse Recordings menu. The Recordings Browser opens. The window is structured into the following areas: © MOBOTIX AG • Security Vision Systems • Made in Germany www.mobotix.com • [email protected] 67 68/126 MxEasy User Manual: Using MxEasy Filtering recordings Selecting a camera Filtering recordings Sorting results Note The Recordings Browser searches and displays event images. If continuous recording has been selected, there will not be any event images and therefore nothing will be shown in the browser. Toolbar • Sources: Select the cameras that should be included when searching for events. • Search mode: Limit the search results to specific event types, such as video motion sensor (VM), or activate post video motion detection (Post VM). • Time range: Limit the search to specific time ranges, such as the last 24 hours. • Display options: Specify how the results are displayed by using sort order, sort criteria or display size. Search Results The search results are shown as a list of preview images in accordance with the aforementioned selection criteria. Player Double-click on the desired event image to play back an event. The player opens in the bottom part of the Recordings Browser. To export an event or to add the event to an export list, open the shortcut menu of the event image. Select the desired option in the shortcut menu. © MOBOTIX AG • Security Vision Systems • Made in Germany www.mobotix.com • [email protected] 69/126 Saving, Printing And Exporting Note When you search for events, information on all events within the individual cameras is entered and permanently saved in an event cache that is retained after exiting the program. The more new events there have been since the last cache update, the longer the time it takes to fill the event cache. Especially when cameras of the M12 and D12 model series are concerned, cache updating can result in reduced frame rates. Cache updating is displayed on the right edge of the status bar as an activity. 3.7 Saving, Printing And Exporting Recordings 3.7.1 Saving And Printing Snapshots Saving Snapshots Click on the Snapshot button to save a snapshot. The image shown in the main window will be saved as a JPEG file on the desktop. This works for both live images and event images. The file name for the saved JPEG files is comprised of the name of the camera, the recording date and the time (e.g., mxcam 2008-11-24 15-05-13). You can select the destination folder for saved images in the “General“ tab under Tools | Preferences. Printing Snapshots Open the print function under the File | Print menu to print snapshots. This will print the live images for all currently displayed cameras. You can view a print preview before printing where you can adjust the orientation, zoom factor and number of images per page. 3.7.2 Exporting Recordings You can export recorded video data in several ways: • OnScreen Control in Player mode (specific time ranges of the recording) • Recordings Browser (no data from continuous recordings) • Menu bar (only complete recording area) © MOBOTIX AG • Security Vision Systems • Made in Germany www.mobotix.com • [email protected] 69 70/126 MxEasy User Manual: Using MxEasy Exporting From OnScreen Control You can select various time ranges of recordings for export in the selection bar in the OnScreen Control. If Marker Mode is activated, then those events or event sequences that are played back in the Player will be selected automatically for export. Click on the Export button. The export list window opens. The export list provides a list of recordings from within the selected time ranges. 1. Select the desired export format: – File server structure: The recorded data is exported as it exists in the file system. This option does not involve any recoding, which means it requires the least time to export. We recommend this option for preserving evidence for law enforcement purposes because the original files are not altered and the digital signature contained in the data is also exported. – MxPEG: The recorded data is exported as MxPEG files. Files in MxPEG format also include the audio data recorded by the camera. – AVI/MPEG4: The export (recoding) of recorded data is done in the AVI file format, with the option of including or excluding sound. Depending on the video codec used, the AVI file can be played back on different operating systems and with different programs. 2. Select the export settings. You can now specify different options for the export, including a file size limit as well as audio and video encoding options with which you can define parameters such as resolution. Additional settings can also be defined for the MxPEG and AVI/MPEG4 file formats (see Section “Setting The Export Options“). 3. Click on Export. Save the recordings under the desired file name in the desired location. 4. Click on Save. The recordings are exported. © MOBOTIX AG • Security Vision Systems • Made in Germany www.mobotix.com • [email protected] 71/126 Saving, Printing And Exporting Exporting From The Recordings Browser You can add recorded events to the export list or export them directly in the Recordings Browser. Select the desired event and open the shortcut menu. 1. Select Export sequence to export. Save the recording under the desired file name in the desired location. Click on Save. The recorded event is exported. 2. Select Add to export list to add a sequence to the export list. The export list opens, and the recorded event is added to the list. Proceed as described above to export the list. Exporting Using The Menu Bar You can also open the export list in the menu bar directly by going to File | Export recordings. Proceed as described above to export the list. Note When opening the export list via the menu bar, the list only contains one entry for the entire recording period. This gives you the option to quickly export a camera's entire recording. The individual time ranges selected for export in the OnScreen Control are not used here. Setting Export Options When exporting audio/video data, there are different export format settings available, depending on the export format (MxPEG and AVI/MPEG4) (no settings are possible for file server structure). The predefined options ensure maximum compatibility for exported data on different operating systems (Windows, Mac OS X). • Encoder: Most of these settings are only changed whenever there are special reasons to do so (for example, if a fixed resolution or specific frame rate has to be used). Selecting a codec, however, has a significant influence on determining which operating systems can play back the exported data: – Motion-JPEG: This codec saves full JPEG images and can usually be used on all operating systems. Files created with this codec offer the highest quality because the original files from the camera are used as full JPEG images; this means, however, that they also have the highest storage space requirements (approx. factor of 4–6 versus FFMPEG MPEG-4). – FFMPEG MPEG-4 (standard): This default codec is used by VLC and is also available for Windows and Mac OS X operating systems if other playback software is used. This codec offers the optimal combination of quality and minimal storage space. © MOBOTIX AG • Security Vision Systems • Made in Germany www.mobotix.com • [email protected] 71 72/126 MxEasy User Manual: Using MxEasy – Microsoft MPEG-4 V2: A generally useable codec for Windows systems. – DivX V3 MPEG-4 (Low Motion): This codec is available for all operating systems as a free download (www.divx.com). – Windows Media Video 7: Version 7 of the standard codec for Windows system can be played back directly with Windows Media Player. – Windows Media Video 8: Version 8 of the standard codec for Windows system can be played back directly with Windows Media Player. This tab is only available for AVI/MPEG4. • Audio: This setting should not be changed unless there is a special reason to use an audio codec other than PCM. This tab is only available for AVI/MPEG4. • Subtitle: An exported clip with audio/video data has a running time that always starts with “0.“ In order to prevent losing the original time of the recording, a subtitle file can be created or overlays can be generated. A subtitle file is saved as a SubRip file and can be displayed during playback. If overlays are generated, they are always included in the image. They cannot be hidden. You can produce a time stamp (recording time), the camera name or even a customized text. If a time gap of longer than ten seconds exists between the individual clips, the Display recording gaps option can be activated to provide an overview of the beginning and end of individual clips. This displays the end time of the previous clip and the start time of the next clip for ten seconds in the image. This tab is only available for AVI/MPEG4. • File size: You can select a size for the individual files in this tab. If the data being exported is larger, MxEasy automatically creates additional files with the same names and a consecutive number. This tab is only available for MxPEG and AVI/MPEG4. 3.7.3 Playing Back Exported Video Data MxEasy can directly display MxPEG clips and file server structures. Open the files by going to File | Open clip. After installing the MxPEG DirectShow codecs, you can also play MxPEG clips in Windows Media Player and other DirectShow-compatible programs (free codec download at www.mobotix.com under Support > Software Downloads). Exported AVI files can normally be played back with the players that are already installed in the operating system. We recommend the free VideoLAN Player (VLC, www.videolan.org) as an additional universal player that can play back AVI files on all operating systems, yet can also play all other codecs. Both VLC and other players add the exported files to their playlists so that they can be played back automatically in sequence. © MOBOTIX AG • Security Vision Systems • Made in Germany www.mobotix.com • [email protected]