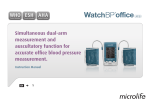
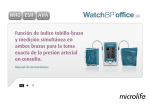
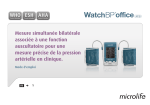
1
Ankle-brachial index and
simultaneous dual arm
measurement function for
accurate office blood pressure
measurement.
Instruction Manual
EN
1
WatchBP Office ABI is a professional automatic office blood pressure measurement device
Table of Contents
which can determine the ankle brachial index (ABI) and inter arm difference (IAD) fast
and accurately. The ABI is a measure for the assessment of peripheral arterial disease. The
WatchBP Office ABI can perform automated dual-arm measurements for the most reliable
IAD. In addition, the WatchBP office ABI can detect atrial fibrillation1,2 with high reliability.
ABI, IAD and Afib are all important prognostic indicators for cardiovascular risk which make
the WatchBP office ABI an important tool in the screening for cardiovascular risks.
1 Joseph Wiesel, Lorenzo Fitzig, Yehuda Herschman and Frank C. Messineo. Detection of Atrial Fibrillation Using a Modified Microlife
Blood Pressure Monitor. American Journal of Hypertension 2009, 22, 848–852.
2 G S Stergiou, N Karpettas, A Protogerou, E G Nasothimiou and M Kyriakidis. Diagnostic accuracy of a home blood pressure monitor to
detect atrial fibrillationHome monitor for atrial fibrillation. Journal of Human Hypertension 2009, 23, 654-658.
Product description
Name of parts and display.................................. 3–4
Components and accessories.............................. 5–6
Before using WatchBP Office ABI
Selecting and fitting the correct cuff................... 7–8
Application of the ankle cuff................................... 9
Three operation modes
«ABI» Mode........................................................... 10
«ROUTINE» Mode.................................................. 11
«SCREEN» Mode...............................................12-13
Inter-arm difference (IAD).................................... 13
Taking measurements using WatchBP Office ABI
«SCREEN» Mode.............................................. 14–16
«ROUTINE» Mode............................................ 17–19
«ABI» Mode..................................................... 20–21
Special Functions
Hiding measurement values................................. 22
Mean arterial pressure and pulse pressure .......... 23
Atrial fibrillation detection...............................24-25
ABI (Ankle Brachial Index) ................................... 26
Taking less than two measurements ................... 27
Skipping the countdown time............................... 27
Setting measurement intervals............................ 28
Viewing, deleting and transferring Measurements
«SCREEN» and «ROUTINE» Mode.......................... 29
«ABI» Mode .......................................................... 30
Appendix
Rechargeable battery and power adaptor . ......... 31
Troubleshooting.................................................... 32
Error messages................................................ 33–34
Safety, care, accuracy test and disposal.......... 35–36
Technical specifications........................................ 37
EN
Product description
Name of parts
Display
I/O switch
Main Adaptor Socket
L
Cuff Socket (R)
DC 7.5V 2.0A
DC 7.5V 2.0A
Battery Compartment
Mean Arterial Pressure (MAP)
Pulse Pressure (PP)
ABI
Mode Indication
ROUTINE
External Power
SCREEN
R
Rest and Arm Position Reminder
Serial Port
IAD
MAP
Battery Symbol
Recharge Indicator
Hide Display
Display
Memory Mode
M Button (Memory)
Start/Stop Button
Systolic Value
INDEX
Diastolic Value
ABI indicator and Pulse Rate
Mode Switch
3
Value for Right Arm
AUSCULT.
SCREEN
Diastolic Value
Inter-arm Difference
Supine Position Reminder
ROUTINE
Systolic Value
IAD
Atrial Fibrillation Detection
Cuff Socket (L)
Value for Left Arm
Heart Beat
ABI ROUTINE SCREEN
L/R Cuff
4
EN
WatchBP Office ABI and components
22 - 32 cm
8.7 - 16.5 inches
M size
Selective Cuffs for upper arm and ankle
Serial Port Connecting Cable
M (Medium size,
standard delivered)
22 - 32 cm (8.7 - 12.6 inches)
With air tube 130 cm
32 - 42 cm
12.6 - 16.5 inches
L size
L (Large size, standard delivered)
32-42 cm (12.6-16.5 inches)
With air tube 130 cm
OK
ARTERY
MARK
P
WatchB
22-32 cm s
inche
8.7-12.6
M size
2-3cm
IND
SCREEN
E
EX LIN
NE
ABI ROUTI
32 - 42 cm
12.6 - 16.5 inches
L size
Blood Pressure Device
22 - 32 cm
8.7 - 16.5 inches
M size
(Input: 100-240V~50/60Hz 0.48A
Output: +7.5V 2A)
WatchBP Office ABI
IAD
MAP
22 - 32 cm
8.7 - 16.5 inches
M size
ROUTINE
T.
AUSCUL
SCREEN
For upper arm
2-3cm
L-XL (Large to extra arge size,
to be ordered)
32-52 cm (12.6-20.5 inches)
With air tube 130 cm
32 - 52 cm
12.6 - 20.5 inches
L-XL size
AC Adaptor X1
RIGHT
LEFT
I/O switch
Main Adaptor Socket
Cuff Socket (R)
32 - 52 cm
12.6 - 20.5 inches
L-XL size
32 - 42 cm
12.6 - 16.5 inches
L size
Product description
DC 7.5V 2.0A
Battery Compartment
OK
R
Cuff Socket (L)
Artery Mark
AUSCULT.
MARK
ROUTINE AUSCULT. IAD
ABI ROUTINE SCREEN
LINE
INDEX
ARTERY
E
IAD
MAP
2-3cm
2-3cm
ABI ROUTINE SCREEN
2-3cm
RIGHT
LEFT
MARK
cm
32 - 42
inches
12.6 - 16.5
L size
X LIN
OK
WatchBP
22-32 cm
inches
8.7-12.6
M size
2-3cm
SCREEN
ARTERY
BP
Watch
IN DE
Artery Mark
M Button (Memory)
OK
MARK
22-32 cm s
inche
8.7-12.6
M size
IAD
MAP
ROUTINE
AUSCULT.
E
Start/Stop Button
Mode Switch
Cuff Connector
SCREEN
Simultaneous dual-arm
measurement and
ankle-brachial index function
for accurate office blood
pressure measurement.
EX LIN
Recharge Indicator
ARTERY
P
WatchB
ROUTINE
IND
M size (22cm~32cm) X2
L size (32cm~42cm) X2
Quick start guide
L
Cuff for upper arm
For ankle
2-3cm
RIGHT
2-3cm
RIGHT
LEFT
LEFT
Instruction Manual
Flip over the quick start guide to see ‘How to take blood pressure measurement in three different modes’.
Printed 2009 August
1
M (Medium size, standard delivered)
22 - 32 cm (8.7 - 12.6 inches)
With air tube 200 cm
OK
BP
Watch
cm
32 - 42
inches
12.6 - 16.5
L size
E
M size (22cm~32cm) X1
Instruction Manual
Quick Start Guide
X LIN
Cuff for ankle
IN DE
8
LEF
32 - 52 cm
12.6 - 20.5 inches
L-XL size
EN
2-3cm
ARTERY
MARK
L (Medium size, to be ordered)
32 - 42 cm (12.6 - 16.5 inches)
With air tube 200 cm
2-3cm
RIGHT
IN DE X
LIN E
LEFT
*Please contact Microlife or its distributor to purchase L-XL size or other size cuffs.
5
6
EN
Before using WatchBP Office ABI
Selecting the correct cuff
Fitting the cuff properly
3) Wrap and tighten the cuff around the arm.
Two different sizes of cuffs for upper arms are provided
with the WatchBP Office ABI: Medium and Large. Use
the cuff marker to select the cuff size that best matches
the circumference of the patient’s upper arm.
1) Place the cuff over the left (or right) upper
arm so that the air tube and artery mark
arrow point toward the lower arm.
4) Leave a little free space between the arm of
the patient and the cuff. Two fingers should fit
between the arm and the cuff. Clothing must not
constrict the arm. Remove all clothing covering or
constricting the measurement arm.
M (Medium size)
22 - 32 cm (8.7 - 12.6 inches)
2) Lay the cuff on the arm. Make sure that the
lower edge of the cuff lies approximately 2 to
3cm ( ¾ to 1 inch) above the elbow.
5) It may result in incorrect blood pressure readings
if the cuffs are not fitted properly. Use a different
size cuff if the range Index at the end of the cuff
does not fall into the range specified by the
range stripes.
6) Apply the same steps to the other arm if a double
arm measurement is required.
With air tube 130 cm
L (Large size)
32-42 cm (12.6 - 16.5 inches)
*The range index of cuff should
fall into this range.
With air tube 130 cm
Connect the cuff to the device by inserting the cuff
connector into the cuff connector socket.
2-3 cm
(3/4 to 1 inch)
R
R
7
8
EN
Three operation modes
2) Place the ankle cuff on the leg. Make sure the
edge of the ankle cuff lies approximately 2 to 3cm
( ¾ to 1 inch) above the ankle and notice that the
artery mark is on the posterior tibial artery.
Select an operation mode
«ABI» Mode
4) Leave a little free space between the leg of
the patient and the cuff. Two fingers should fit
between the leg and the cuff.
IAD
The WatchBP Office ABI
MAP device includes three
operation modes: «ABI», «ROUTINE», and «SCREEN»
(Inter-arm difference). Use the Mode Switch to select
the desired mode.
Select «ABI» Mode for Ankle-Brachial
measurement. Select the arm with the higher
blood pressure value as determined with the
«SCREEN» Mode
2-3 cm
LEF
1) The patient has to lie down in supine position.
ROUTINE
3) Wrap and tighten the cuff around the leg.
8
Application of the ankle cuff
(in ABI mode)
AUSCULT.
SCREEN
(3/4 to 1 inch)
LEF
8
INDE X LINE
ABI ROUTINE SCREEN
LEF
8
INDEX LINE
LEF
LEF
8
8
INDE X LINE
posterior tibial artery.
ABI ROUTINE SCREEN
ABI ROUTINE SCREEN
ABI ROUTINE SCREEN
ABI ROU
INDEX LINE
INDE X LINE
9
ABI ROUTINE SCREEN
10
EN
Three operation modes (cont.)
«SCREEN» Mode
«ROUTINE» Mode
Automated triple measurements
Select «ROUTINE» Mode to perform automated
duplicate measurements on the preferred arm for
prompt and accurate office measurements.
In «ROUTINE» Mode, the WatchBP Office ABI device
automatically takes three consecutive measurements
at 15 second intervals on default. The readings of
these two measurements are averaged to produce
the routine visit blood pressure measurement.
1
15 sec.
2
Select «SCREEN» Mode to complete fullyautomated triple measurements on both arms
according to recommended ESH/AHA blood
pressure measurement protocols for a patient’s
first office visit.
Simultaneous dual-arm measurements
In «SCREEN» Mode, the WatchBP Office ABI device
measures the patient’s blood pressure on both
arms simultaneously, which helps to determine
the arm with the highest blood pressure value and
reveals other potential cardiovascular risks.
3
15 sec.
*The user can manually set measurement intervals of
INE SCREEN
11
ABI ROUTINE SCREEN
15, 30, 45 or
seconds SCREEN
in ROUTINE Mode. (Please
ABI60ROUTINE
ABI ROUTINE SCREEN
refer to special functions section page 19 “Setting
ABI ROUTINE SCREEN
measurement intervals”).
ABI ROUTINE SCREEN
12
EN
Taking measurements using WatchBP Office ABI
Automated triple measurements
In «SCREEN» Mode, the WatchBP Office ABI
device automatically takes three consecutive
measurements on both arms at fixed one minute*
intervals. The results of these three measurements
are then averaged to conclude the blood pressure
measurement.
1
60 sec.
2
3
60 sec.
«SCREEN» Mode
Determine the proper arm and inter-arm
difference
If the difference of blood pressure readings between
two arms is more than 20mmHg for Systolic or
10mmHg for Diastolic at all three measurements,
the device indicates the arm with the higher blood
pressure value by showing L or R and the “IAD” icon.
The “IAD” icon and readings of the higher arm flash to
indicate that more attention is needed.
IAD
SCREEN
IAD
1) Turn on the power – Turn on the device by
switching the I/O switch at the back of the device
to the ON position.
DC 7.5V 2.0A
3) Switch to «SCREEN» Mode – Slide the Mode
Switch to «SCREEN» Mode.
DC 7.5V 2.0A
ABI ROUTINE SCREEN
ABI ROUTINE SCREEN
2) Apply the cuff – Properly fit one cuff to each of
the patient’s arms.
L
ABI ROUTINE SCREEN
4) Inflation by fuzzy logic – The device will adjust
inflation pressure by fuzzy logic technology.
*The measuring intervals are fixed at one minute in
SCREEN mode.
*The arm with the higher blood pressure value should
be taken for ABI measurement or future blood pressure
measurements.
13
*Additional visual instruction can be found on the cuff
14
EN
Taking measurements using WatchBP Office ABI (cont.)
5) Start measurements – Press the Start/Stop
Button to start the measurement sequence.
7) The average value of the measurements –
The average value will be displayed after the
measurements.
If one of the three measurements failed, a
fourth measurement will be conducted.
*A 60-second countdown will proceed the first
measurement .
«ROUTINE» Mode
1) Turn on the power – Turn on the device by
switching the I/O switch at the back of the device
to the ON position.
3) Switch to «ROUTINE» Mode – Slide the Mode
Switch to «ROUTINE» Mode.
SCREEN
SCREEN
SCREEN
SCREEN
60-second
countdown...
DC 7.5V 2.0A
DC 7.5V 2.0A
ABI ROUTINE SCREEN
6) Three consecutive measurements – The device
will take three consecutive measurements with
one minute intervals between measurements.
1
15
60
seconds
2
60
seconds
3
*When the measurements are completed, the blood
pressure measurement corresponding with the
consistently higher arm will blink continuously for
5 seconds. If no significant difference (20 mmHg for
systolic and/or 10 mmHg for diastolic blood pressure)
exists between the two arms, neither measurement
will blink.
2) Apply the cuff – Properly fit one cuff to the
preferred measurement arm.
ABI ROUTINE SCREEN
ABI RO
4) Select the inflation cuff – Set the device to the
preffered measurement side (left or right). Press
and hold the M Button for 3 seconds.
Press and hold
for 3 seconds...
*Additional visual instruction can be found on the cuff
16
EN
Taking measurements using WatchBP Office ABI (cont.)
5) Press the M Button to switch between left(L) and
right(R). Press the Start/Stop Button to save the
setting.
ROUTINE
7) Three consecutive measurements –
The device will take three consecutive
measurements with 15 second intervals in
between on default.
ROUTINE
1
6) Start measurements – Press the Start/Stop
Button to start the measurements.
ROUTINE
15-second
countdown...
17
15
seconds
2
15
seconds
3
8) Inflation by fuzzy logic – The device will
adjust inflation pressure by fuzzy logic
technology.
9) The average value of the measurements–
The average values will be displayed when
the measurements are completed and will be
saved to the memory automatically.
*The user can manually set the measurement intervals
of 15, 30, 45 or 60 seconds in ROUTINE Mode. (Please
refer to special functions section page 19 “Setting up
measurement intervals”).
Skipping the countdown time
Taking less than three measurements
The 60 seconds countdown before measurement in
«SCREEN» Mode and 15 seconds in «ROUTINE» Mode
can be skipped by pushing the Start/Stop Button.
While the Start/Stop Button is pushed, the device will
immediately begin the next measurement.
The measurement sequence can be stopped
at anytime by pushing the Start/Stop Button
«SCREEN» Mode or «ROUTINE» Mode. The device
enters stand-by and the remaining measurements
are cancelled. Average of the measurements is
saved and can be viewed by pushing the M Button.
Skip the countdown time
and begin measurement.
*The device can be set into Stand-by Mode by pressing
the Start/Stop Button after the completion of
measurements. The device will automatically switch to
Stand-by Mode if left unattended for five minutes.
Cancel remaining
measurements at
anytime during
the measurement
sequence.
Stand by mode
18
EN
«ABI» Mode
1) Turn on the power – Turn on the device by
switching the I/O switch at the back of the
device into the ON position.
1) Pressing and holding the Start/Stop Button for 3
seconds.
Press and hold
for 3 seconds...
2) Press the M Button to adjust the measurement
interval, then press the Start/Stop Button to
confirm, the device will go back to stand-by
Mode.
AUSCULT
DC 7.5V 2.0A
3) The patient has to lie down in supine position.
4) Apply the cuff* – Properly fit the arm cuff to the
upper arm and the ankle cuff to the leg of the
preferred measurement side of the body. The
preferred side is determined in «SCREEN» Mode.
5) Make sure the upper arm cuff is connected to the
left cuff socket and the ankle cuff is connected to
the right cuff socket.
DC 7.5V 2.0A
2) Switch to «ABI» Mode – Slide the Mode Switch
to «ABI» Mode. The supine position reminder will
display.
L
Setting measuring intervals in «ROUTINE»
Mode
ABI
LEF
8
15 30
45 60
R
INDEX LINE
*The default measuring interval is 15 seconds. The
interval can be set as 15, 30, 45 or 60 seconds.
ABI ROUTINE SCREEN
ABI ROUTINE SCREEN
ROUTINE SCREEN
Additional
visual instruction can be found on the cuff.
*ABI
19
F
8
20
EN
Special Functions
6) Start measurements – Press the Start/Stop
Button to start the measurement.
ABI
8) Display of the measurement values–
The measurement values will be displayed
and the Ankle-brachial index is automatically
calculated when the measurement is completed.
The Ankle-brachial index and the blood pressure
value display first, the brachial index value is
replaced by the pulse value for 3 seconds.
All the values are saved automatically.
ABI
Hiding measurement values
The WatchBP Office ABI device features a Hide
function in order to prevent unnecessary elevated
blood pressure in patients due to nervousness
triggered by visible blood pressure values.
L or R flashes...
Press and hold
for 7 seconds...
2) Select ON or OFF – Press the M Button again to
turn the “Hide” function ON or OFF.
ABI
7) Inflation by fuzzy logic – The device will
adjust inflation pressure automatically by fuzzy
logic technology.
3) Confirm – Press Start/Stop to confirm the setting.
INDEX
*This feature is only available in ROUTINE mode
*When the «Hide» function is ON, the countdown
between each measurement and the Hide icon will
display.
21
1) Activate the «Hide» Function – Press M button;
L or R flashes; keep pressing and holding the M
Button for 7 more seconds until On or Off flashes.
*The default setting of “Hide” in «SCREEN» Mode is set
to “ON” and cannot be set to “OFF”.
22
EN
Special Function (cont.)
MAP (Mean Arterial Pressure)
PP (Pulse Pressure)
The WatchBP Office ABI device measures the true
mean arterial pressure (MAP) of the patient. Each
measurement includes a single MAP value. The
average measurement will display the average MAP
value. When viewing in Memory mode, the MAP
value will be displayed with the systolic and diastolic
pressure once every 5 seconds.
The WatchBP Office ABI device provides the pulse
pressure (PP) of the patient: pulse pressure = systolic
- diastolic pressure. Each measurement includes
the calculation of a single PP value. The average
measurement will display the average PP value.
When viewing in Memory mode, the PP value will be
displayed with the systolic/diastolic pressure once
every 5 seconds.
ROUTINE
ROUTINE
Appearance of the atrial fibrillation
indicator for early detection
* Joseph Wiesel, Lorenzo Fitzig, Yehuda Herschman and Frank C.
Messineo. Detection of Atrial Fibrillation Using a Modified Microlife
Blood Pressure Monitor.
American Journal of Hypertension 2009; 22, 848–852.
*The Mean Arterial Pressure (MAP) in this device is determined
from the maximum peak of the oscillometric envelope curve.
23
SCREEN
The WatchBP Office ABI is designed to detect
asymptomatic atrial fibrillation during blood pressure
measurements in the «SCREEN» Mode. If two out of
three measurements in the «SCREEN» Mode detect
atrial fibrillation, the Afib icon is displayed. This device
is able to detect atrial fibrillation with high accuracy: a
sensitivity of 97% and a specificity of 89%.* If the atrial
fibrillation icon is displayed after the measurement, it is
recommended to visit a doctor.
* G S Stergiou, N Karpettas, A Protogerou, E G Nasothimiou and M
Kyriakidis. Diagnostic accuracy of a home blood pressure monitor
to detect atrial fibrillationHome monitor for atrial fibrillation.
Journal of Human Hypertension 2009, 23, 654-658.
*This device detects atrial fibrillation, a major cause of
stroke. Not all risk factors for stroke, including atrial
flutter, may be detected by this device.
*This device may not detect atrial fibrillation in people
with pacemakers or defibrillators.
24
EN
Special Function (cont.)
ABI (Ankle Brachial Index)
About Atrial Fibrillation
Atrial fibrillation is a common heart rhythm
problem. It affects more than 2 million people in
North America. It is more common in older age and
it is found in 18% individuals aged 85 years and
older. It is a common cause of major strokes. About
15% of all strokes are caused by atrial fibrillation.
The elderly, or those with high blood pressure,
diabetes or heart disease are more likely to get a
stroke if they have atrial fibrillation.
Atrial fibrillation is a rhythm problem that can last
from a few minutes, to days or weeks and even
years. Atrial fibrillation can cause blood clots in the
upper chambers of the heart (the atria). These clots
can break off and flow to the brain causing a stroke.
The use of blood thinners, such as warfarin, can
lower the risk of a stroke in patients with atrial
fibrillation.
The systolic blood pressure values of a person’s arm
and leg need to be measured In order to determine
ABI (Ankle Brachial Index).
A doctor can confirm the presence of Afib by using
an ECG. Sometimes Afib is present incidentally.
Therefore, a doctor may not see it on regularly
scheduled visits.
The ankle-brachial index (ABI) is then calculated
using the quotient of the systolic pressure from the
leg measurement and the systolic pressure from the
arm measurement.
One method of detecting Afib is by mean of
palpations. This method is not very reliable. Failure
of detecting Afib may lead to the occurrence of a
stoke in the end; whereas early detection may lead
to early treatment that can significantly reduce the
chances of a stroke.
A low ankle-brachial index (ABI) is indicative of
systemic vascular disease, and should place a patient
in the high-risk category.
ABI
INDEX
25
26
EN
Viewing, deleting and transferring measurement readings
Memory
Viewing measurements
Total of 30 measurement readings in three modes
can be stored in memory automatically.
1) Press the M button, the total number of
measurements stored is displayed, e.g. 12; then
the readings of the measurement is displayed
afterward.
30
Measurements
2) Pressing the M button repeatedly to view the
measurement values in memory one by one.
ABI
View the values of three measurements in
«SCREEN» Mode – When the measurements of
«SCREEN» mode are performed, the results of
the three individual measurements can be seen
by pressing the M Button for 3 seconds when the
average value is being displayed. The values of the
three measurements are displayed one by one.
View the values of three measurements in
«ROUTINE» Mode – When the measurements of
«ROUTINE» mode are performed, the results of
the three individual measurements can be seen
by pressing the M Button for 3 seconds when the
average value is being displayed. The values of the
three measurements are displayed one by one.
Press and hold for 3 seconds
when the average is being
displayed...
Press and hold for 3 seconds
when the average is being
displayed...
ABI
1
*When the memory of the device is full, each new
measurement will automatically overwrite the first
measurement.
27
2
3
1
2
3
INDEX
*The individual readings in «SCREEN» Mode and
«ROUTINE» Mode will not be saved when the device is
turned off. Only the average value will be saved.
28
EN
Viewing, deleting and transferring Measurements (cont.)
Viewing MAP and PP values –
Ten seconds after display of the average blood
pressure value, the values for Pulse Pressure (PP)
and Mean Arterial Pressure (MAP) are displayed.
SCREEN
SCREEN
10
seconds...
Deleting measurements
Transferring measurements
1) All the data in different modes can be deleted.
Installation of the software program
Transferring data to the computer
2) Press the M Button and hold it for 12 seconds
until the he “CL” symbol is displayed; then
release the M Button
1) Put the CD in the CD-ROM drive of your
computer or click on «setup.exe» in the CD’s
directory alternatively.
1) Start the software program and connect
the device to the computer using the cable
supplied.
3) Press the M Button again while the “CL” symbol
is flashing. The deleting is confirmed by the beep
sound.
2) Follow the instructions provided in the
installation window on the computer screen.
2) A successful connection is displayed by
«Connected» on the computer screen.
3) When installation is finished, be sure to
restart the computer before you start working
with the program.
3) Enter identity number, Patient Name and
Surname to create a new record.
Press and hold for 12
seconds...
Install CD
System Requirements: 550MHz CPU. 256MB Memory, 1024x768
pixel resolution, 256 color, CD-ROM drive, 1 free USB port, 40MB
free hard disk space, Microsoft Windows 2000 / XP / Vista.
29
e d.
serv
t Re
l l R i gh
© 20
1 0 M i c ro l
ife Corporation. A
Version 2.0.0.2
R
WatchBP Analyzer Office ABI
550MHz CPU. 256MB Memory,
1024x768 pixel resolution,
256 color, CD-ROM drive, 1
free USB port, 40MB free hard
disk space, Microsoft Windows
2000 / XP / Vista.
R
*System Requirements:
30
EN
Rechargeable battery and power adaptor
Software commands
Refer to the software user manual for detailed information and instructions.
Perform a measurement
Click «Measure»
Stop a measurement
Click «Stop»
Store data
Click «Save»
View data
Click «View Memory»
Close
Click «Close»
Rechargeable Battery
Using a power adaptor
WatchBP Office ABI equips with a built-in,
rechargeable Ni-MH battery pack which delivers up to
400~500 measurement cycles. The batteries can be
recharged while the power adaptor is plugged in. It
doesn’t affect the measurement.
Please only use the Microlife adaptor supplied with
the WatchBP Office ABI to recharge the device.
*First time use , charge
* Please read the software menual to know more details of the software operation commands.
1) Plug the adapter cable into the Power Plug of the
WatchBP Office ABI device.
2) Plug the adaptor plug into the wall socket. When
the power adaptor is connected, no battery
power is consumed.
the batteries until the
recharge indicator turns
to green
ROUTINE
AUSCULT.
SCREEN
IAD
MAP
*An orange recharge
indicator means recharge
in progress.
DC 7.5V 2.0A
*A green recharge
DC 7.5V 2.0A
indicator means recharge
is completed.
31
32
EN
Troubleshooting
Problem
Possible cause
How to make correction
No power(No LCD display) Power supply is not
Plug power supply into wall socket.
properly plugged in
Battery is fully discharged Recharge the rechargeable battery by plugging in
the power supply.
Cuff does not inflate
Loose connection of the
Make sure the tube of the cuff is securely
properly
tube
connected to the device.
Leakage of the tube or
Check for cracks on the tube or the bladder. Please
bladder
contact Microlife customer service for this issue.
No result displayed
The Hide function is
Disable “hide” function, or use «ROUTINE» mode to
between measurements activated
measure the blood pressure.
Error messages
If an error occurs during measurement, the
measurement is interrupted and an error
message «Err» is displayed.
ROURINE
• Please contact your local
Microlife service center if the
error persists.
• If you think the results
are unusual, please read
through the information
in this instruction manual
carefully.
33
Error
Description
Potential cause and
remedy
«Err 1»
Signal too
weak
The pulse signals
on the cuff are too
weak. Re-position the
cuff and repeat the
measurement.
«Err 2»
Error signal
During the
measurement,
error signals were
detected by the cuff,
caused for instance by
movement or muscle
tension. Repeat the
measurement, keeping
your arm still.
34
EN
Safety, care, accuracy test and disposal
«Err 3»
«Err 5»
No pressure
in the cuff
Abnormal
result
An adequate pressure
cannot be generated
in the cuff. A leak
may have occurred.
Replace the batteries if
necessary. Repeat the
measurement.
The measuring signals
are inaccurate and no
result can therefore
be displayed. Read
through the checklist
for performing reliable
measurements and
then repeat the
measurement.
«HI»
«LO»
Pulse or cuff
pressure too
high
Pulse too
low
The pressure in the
cuff is too high (over
300 mmHg) OR the
pulse is too high
(over 200 beats per
minute). Relax for 5
minutes and repeat the
measurement.
The pulse is too low
(less than 40 beats per
minute). Repeat the
measurement.
Safety and protection
This device may be used only for the purpose
described in this booklet. The device comprises of
sensitive components and must be treated with
caution. The manufacturer cannot be held liable for
damage caused by incorrect application.
•Ensure that children do not use the device
unsupervised; some parts are small enough to be
swallowed.
•Only activate the pump when cuff is installed.
•Do not use the device if you think it is damaged or
if anything appears unusual.
Observe the storage and operating conditions
described in the “Technical specifications” section
of this manual.
Protect the device from water and moisture
Protect the device from direct sunlight
Protect the device from extreme heat and cold
Avoid proximity to electromagnetic fields, such
as those produced by mobile phones
•Read the further safety instructions in the
Never open device
•Do not connect the device to a computer
Protect device from impact and drops
individual sections of the instruction manual.
until prompted to do so by the computer software.
35
36
EN
Technical specifications
Device care
Cleaning the cuff
Clean the device with a soft, dry cloth.
DO NOT wash the cuff. DO NOT iron the cuff cover.
Operation temperature/
10 to 40 °C (50 to 104 °F)
humidity:
Storage temperature/
humidity:
Weight:
•
• -20 to 55 °C (-4 to 131 °F)
• 15 - 90 % relative maximum humidity
• 1100 g (including rechargeable
battery pack)
Do not wash the cuff!
Dimensions:
Measuring method:
Electromagnetic
compatibility:
ENN
SCRE
INE
ROUT
ABI
Do not iron the cuff!
Accuracy test
Disposal
We recommend the WatchBP Office ABI device
be tested for accuracy every 2 years or after
mechanical impact (e.g. being dropped). Please
contact Microlife to arrange for an accuracy test.
Batteries and electronic instruments must be
disposed of in accordance with the locally applicable
regulations, and not as domestic waste.
• 30 - 280 mmHg – blood pressure
• 40 - 200 beats per minute – pulse
• Range: 0 - 299 mmHg
• Resolution: 1 mmHg
• Static accuracy: pressure within ± 3
• Device fulfills the stipulations of the
standard IEC 60601-1-2.
The stipulations of the EU Directive 93/42/
EEC for Medical Devices Class IIa have been
fulfilled.
Korotkoff
Measurement range:
Cuff pressure display:
37
• 200 x 125 x 90 mm
• Oscillometric, corresponding to
Reference to Standards: • Device corresponds to the
requirements of the standard for noninvasive blood pressure monitor.
EN 1060-1
EN 1060-3
EN 1060-4
IEC 60601-1
IEC 60601-1-2
Type BF applied
Reference number
part
Serial number
Manufacturer
mmHg or 2% of reading > 200mmHg
• Pulse accuracy: ±5 % of the readout
value
Voltage source:
• Rechargeable battery pack;
4.8V C4000 mAh
• Mains adapter DC 7.5V, 2 A
Microlife reserves the right to alter technical
specfications without prior written notice.
38
EN
Guarantee card
This device is covered by a two-year
guarantee and accessories are cover by
a one-year guarantee from the date of
Name:
Address:
purchase. This guarantee is valid only
on presentation of the guarantee card
Date:
completed by the owner confirming date of
Telephone:
purchase or purchase receipt.
E-mail:
Product: WatchBP Office ABI
Product Number: TWIN200 ABI
Date:
UTINE
ABI RO
N
SCREE
39
40
EN
Europe / Middle-East / Africa
Asia
North / Central / South America
Microlife WatchBP AG
Espenstrasse 139
9443 Widnau, Switzerland
Tel +41 71 727 7000
Fax +41 71 727 7011
Email: [email protected]
www.watchbp.com
Microlife Corporation
9F, 431, RuiGang Road, NeiHu
Taipei, 114, Taiwan, R.O.C.
Tel +886 2 8797 1288
Fax+886 2 8797 1283
Email: [email protected]
www.watchbp.com
Microlife Medical Home Solutions, Inc.
2801 Youngfield St., Suite 241
Golden, CO 80401, USA
Tel +1 303 274 2277
Fax +1 303 274 2244
Email: [email protected]
www.watchbp.com
Read the instructions carefully before using this device.
IB WatchBP Office TWIN200 ABI 100410