1
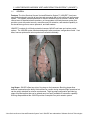
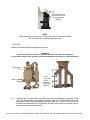
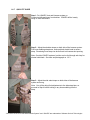
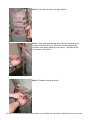
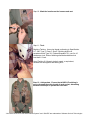
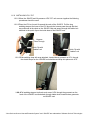
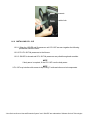
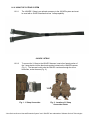
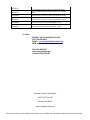
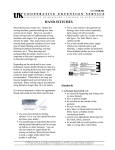
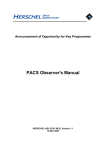
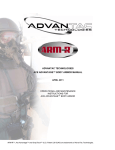
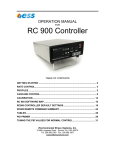
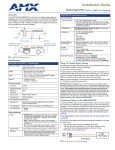
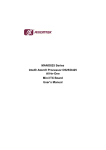
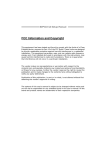
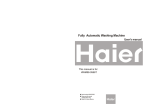
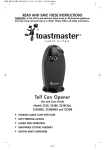
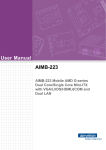
JSAVES™ MOLLE SYSTEM
USER MANUAL
April 2008
OPERATIONAL AND MAINTENANCE INSTRUCTIONS
FOR JOINT SERVICES AIRCREW VEST AND EXTRACTION SYSTEM™ (JSAVES™)
Ultimate Survival Technologies
14428 167th Ave. SE
Monroe, WA 98272
206-965-9660, 866-479-7994
Fax: 206-965-9659
www.ultimatesurvival.com
“Joint Services Aircrew Vest and Extraction System” and “JSAVES” are trademarks of Ultimate Survival Technologies
Ultimate Survival Technologies
JSAVES™ MOLLE SYSTEM USER MANUAL
TABLE OF CONTENTS
1-1 GENERAL
1-2 RECOMMENDED COMPONENTS FOR JSAVES
1-3 PREFLIGHT INSPECTIONS
1-4 PERIODIC INSPECTIONS
1-5 ACCESSORIES AND COMPONENT PLACEMENT
1-6 FITTING OF VEST AND ACCESSORIES (LPU/RETENTION STRAP)
1-7 CLEANING
1-8 MAINTENANCE
“Joint Services Aircrew Vest and Extraction System” and “JSAVES” are trademarks of Ultimate Survival Technologies
1.1 JOINT SERVICES AIRCREW VEST AND EXTRACTION SYSTEM™ (JSAVES™)
1-1
GENERAL
Features: The Joint Services Aircrew Vest and Extraction System™ (JSAVES™) has been
specifically designed to provide all services and commands with a low profile vest and harness
system. This system provides placement of mission-essential survival, evasion, medical, and
rescue items for downed aircrew members, yet incorporates a full-body harness system that
provides a vest with pocket security, rescue/recovery lift extraction, and restraint capability to
the aircraft door gunners, rescue personnel, and load masters.
JSAVES™ consists of a full body extraction harness, MOLLE vest base and various pocket
options. The JSAVES system has been designed to allow maximum configuration control. Vest
base, harness options and various pockets are all sold individually.
Leg Straps: JSAVES offers two style of leg strap on the harnesses. Back leg straps allow
backend crewmembers the ability to disconnect for comfort during extended flight operations but
can be quickly attached for mission requirements. Thigh leg strap configuration provides leg
straps for pilots/copilots that can be stowed away but easily available for extraction capability.
With leg straps attached the JSAVES provides a complete four point restraint system.
“Joint Services Aircrew Vest and Extraction System” and “JSAVES” are trademarks of Ultimate Survival Technologies
Thigh Leg Strap: Leg straps extend
Down front of thigh and wrap around
Thigh with quick-connect buckles.
Back Leg Strap: Leg straps extend
off of waist belt at the rear and come
up through legs, attaching at upper
front thigh with quick-connect buckles.
Y-Strap: Y-strap configuration allows for backend crewmembers to be secured to aircraft
attaching points or the MARS system to prevent falling from aircraft and provide a secure
restraint for mission requirements. The Y-strap can also be used for rear extraction capability.
The non Y-strap configuration is for use by pilot/copilot positions since they are restrained by
the aircraft four point seat harness. The non Y-strap configuration does not provide rear
extraction capability, however all JSAVES provide front extraction capability.
1-2
RECOMMENDED COMPONENTS FOR JSAVES
Survival components may be installed and positioned at the discretion of the Major Command.
The Major Command shall provide adequate instructions for installation and location of survival
components. JSAVES should not be overloaded and vest components should not be
duplicated with items in the survival kit without approval of the Major Command.
NOTE
AERP and CRU-80 filter/blower can integrate with JSAVES as it does with other survival vests,
i.e. Air Ace, SRU-21/P. Survival items and accessories shall not exceed established inspection
intervals in accordance with applicable Technical Order.
WARNING
JSAVES cannot be used as an extraction or parachute harness without both leg straps securely
fastened around the legs of the wearer.
1-3 PREFLIGHT INSPECTIONS
WARNING
Any restraint systems but be static weight tested to 500 pounds prior to service.
Failure to comply could result in serious injury or death.
“Joint Services Aircrew Vest and Extraction System” and “JSAVES” are trademarks of Ultimate Survival Technologies
Prior to use, the wearer will inspect the JSAVES as follows:
1-3.1 Inspect the JSAVES harness webbing for cuts, tears, fraying, seam separations, loose
stitching, and broken or distorted bar tacking. Inspect the general condition of all
hardware.
1-3.2 Inspect JSAVES vest base and pockets for fraying, cuts, tears, loose stitching and
overall condition. Surface fraying along edges is acceptable provided it does not
reduce thickness or width of webbing and does not incorporate visible cuts, tears, or
holes.
1-3.3 Inspect all snaps, slides, and hook and pile fasteners for proper operation.
1-3.4 Inspect to assure that all mission/survival components are installed.
1-4 PERIODIC INSPECTIONS
1-4.1 A periodic inspection of in-service JSAVES installed components shall be accomplished
every 180 days. JSAVES worn on a daily basis will be inspected every 90 days.
1-4.2 The periodic inspection will include those requirements outlined in Paragraph 1-3.
1-4.3 Components will be inspected in accordance with applicable Technical Orders.
1-4.4 Update inspection data records and database.
1-5
ACCESSORIES AND COMPONENT PLACEMENT
NOTE: Components will be attached in accordance with T.O. 14S1-3-51.
1-5.1 All MOLLE pockets must be attached completely and securely by weaving web straps
on pocket backs through MOLLE vest base. Weave strap through vest base, then
through subsequent loop on pocket, repeating the process until web strap easily snaps
to pocket base.
WARNING
Ensure that no web loops are skipped during this process.
Proper installation is critical for pocket and component security.
1-5.2 All pockets contain D-ring attachment loops for securing survival/vest components.
1-5.2 A small snap hook may be attached to the free end of a lanyard for securing the radio.
1-5.3 Shoulder extraction hardware can be integrated with the JSAVES.
“Joint Services Aircrew Vest and Extraction System” and “JSAVES” are trademarks of Ultimate Survival Technologies
Extraction hardware
not included, but can
be integrated with
JSAVES.
NOTE
When inserting survival mirror into vest pocket, mirror should be installed
with the reflective side facing toward the body.
1-6 FITTING
JSAVES provides multiple sizing adjustment points.
WARNING
Proper and snug fit is critical to ensure safe retention and extraction capabilities.
Ensure that all fitting points have been evaluated and adjusted for maximum comfort and safety.
Shoulders
Waist
4 Point
Sizing Slots
on the
Back for
Waist Belt of
Harness
1-6.1 Properly fitted, the waist belt is connected in the front and adjusted on each side of the
body. The belt should be comfortably positioned at belt line. The back half of the waist
belt passes through the sizing strap on the back of the survival vest. The four loops on
the back vest straps allow for a comfortable fit based upon torso size and other gear or
equipment the user may be wearing.
“Joint Services Aircrew Vest and Extraction System” and “JSAVES” are trademarks of Ultimate Survival Technologies
1-6.2 The shoulder straps should cross in the center of the back between the shoulder blades
and pass through the integrated vest loops provided.
1-6.3 The harness strap should also pass through webbing on front of vest. Mid-range sized
individuals will size the shoulder buckle as shown below. Small-stature individuals will
have to pass the buckle under the webbing channel to create a tighter and more
comfortable fit.
1-6.4 The waist belt in front should pass through the 2” slits along the bottom edge of the
vest.
Web Belt Loops
Slits for Harness
Pass-Through
1-6.5 Additional 3.5” belt loops are provided on the outside of the vest for individuals wishing
to wear the military web belt. When used together, the web belt should be positioned in
the provided belt loops and connected over the top of the harness buckle.
1-6.6 When not needed, leg straps on certain harness models can be stowed comfortably in
interior pockets located underneath exterior vest pockets. Pull snap tab open, feed leg
straps up into pocket, and re-snap.
“Joint Services Aircrew Vest and Extraction System” and “JSAVES” are trademarks of Ultimate Survival Technologies
1-6.7 QUICK FIT GUIDE
Step 1: Put JSAVES Vest and Harness system on.
Connect middle and lower front buckles. JSAVES will be loosely
fitting on most individuals.
Step 2: Adjust the shoulder straps on both side of the harness system.
Pull loose webbing strap down, and use black elastic band to secure
strap. Remaining loose strap can be fed back into harness slot opening.
Note: On older JSAVES systems, buckles can be fed through web loop for
shorter individuals. See note and photograph on 1-6.3.
Step 3: Adjust the side waist straps on both sides of the harness
system until snug.
Note: You will be doing final adjustments to the side strap later, so
proceed to Step 4 before tucking in any loose webbing from the
strap.
“Joint Services Aircrew Vest and Extraction System” and “JSAVES” are trademarks of Ultimate Survival Technologies
Step 4: Unbuckle one side of the waist buckles.
Step 5: Pass waist strap through one of the four slots that tail off
the back of the JSAVES vest. Select the slot that positions the
waist belt at the proper height for your stature. (See also section
1-6 for photo of four slots.)
Step 6: Refasten waist strap buckle.
“Joint Services Aircrew Vest and Extraction System” and “JSAVES” are trademarks of Ultimate Survival Technologies
Step 7: Tuck in any loose webbing from the waist adjustment
straps. Use black elastic band to secure strap.
Step 8: Review fit to make sure JSAVES is snug and secure
against body.
Step 9: The upper corners of the back of the JSAVES vest
base can be tacked to the harness cross piece for maximum
comfort and pocket stability. Grab a hold of the upper corner of
the back of the vest, where lower harness cross piece passes
through. Position the upper corner of the vest where it feels
most secure and comfortable.
“Joint Services Aircrew Vest and Extraction System” and “JSAVES” are trademarks of Ultimate Survival Technologies
Step 10: Mark the location on the harness and vest.
Step 11: Tack.
Machine Tacking: Use nylon thread conforming to Specification
V-T- 295, Type II, Class 1, Size E. Stitching shall be in
accordance with Type 301, Federal Standard 751, use 8 to 10
stitches per inch. Ends of stitching shall be backstitched not
less than 1/2 inch.
Hand Tacking: 8/4 thread, singled, waxed, or equivalent,
secured with a surgeons and locking knot.
Step 12: Add pockets. Ensure that all MOLLE webbing is
woven through the entire length of each pocket, alternating
between web loops on pocket and vest base.
“Joint Services Aircrew Vest and Extraction System” and “JSAVES” are trademarks of Ultimate Survival Technologies
1-6.8 INSTALLING LPU- 37/P
1-6.8.1 When the JSAVES and life preserver LPU 37/P unit are worn together the following
procedures should be used:
1-6.8.2 Place the LPU as it would lie around the neck of the JSAVES. Pull the long
webbing straps at the base of the LPU through the harness pass-through slits that
are positioned at the chest on the JSAVES vest and weave through the ladder lock
attached to the quick clip on the inside base of the JSAVES vest.
Harness
Pass-Through
Quick Clip with
Ladder Lock
Quick Clip with
Ladder Lock
1-6.8.3 Slide webbing strap with snap attached, located above grommet on LPU, through
the elastic keeper on the JSAVES front shoulder and snap into place onto LPU.
1-6.8.4 Pull webbing straps at top/back neck area of LPU through the grommets on the
back of the JSAVES vest and attach through ladder locks located below grommets
on JSAVES vest.
“Joint Services Aircrew Vest and Extraction System” and “JSAVES” are trademarks of Ultimate Survival Technologies
Grommets
Ladder Lock
1-6.9 INSTALLING LPU- 10/P
1-6.9.1 When the JSAVES and life preserver unit LPU-10/P are worn together the following
procedures should be used:
1-6.9.2 Fit LPU-10/P life preservers to the Aircrew.
1-6.9.3 JSAVES is donned and LPU-10/P life preservers are pulled through each armhole.
NOTE
If body armor is required, fit the LPU 10/P over the body armor.
NOTE
LPU-10/P may interfere with access to Aqua Lung™ bottle and other survival components.
“Joint Services Aircrew Vest and Extraction System” and “JSAVES” are trademarks of Ultimate Survival Technologies
1-6.9 USING THE Y-STRAP SYSTEM
1-6.9.1
The JSAVES Y-Strap is an optional accessory to the JSAVES system and must
be used with a JSAVES harness that has Y-strap capability.
JSAVES Y-STRAP
1-6.9.2
To connect the Y-Strap to the JSAVES Harness, insert silver female portion of
the Y-strap buckle into the black male portion located on the JSAVES harness
(Fig. 1). The harness buckle exits the JSAVES vest base through the slit on
both sides, under the arms (Fig. 2).
Fig. 1: Y-Strap Connection
Fig. 2: Location of Y-Strap
Connection Points
“Joint Services Aircrew Vest and Extraction System” and “JSAVES” are trademarks of Ultimate Survival Technologies
1-6.9.3
To release harness from Y-strap, press wings of both sides of the silver female
buckle and pull to separate.
JSAVES Y-STRAP CONFIGURATION
“Joint Services Aircrew Vest and Extraction System” and “JSAVES” are trademarks of Ultimate Survival Technologies
WITHOUT THE VEST
1
2
3
4
5
Shoulder extraction hardware not included. Thigh Strap Harness pictured.
The JSAVES harness can be worn stand-alone.
1-6.10 Proper fit is achieved by connecting the front waist buckle together first, then tightening
the waist belt (4) so that it is positioned comfortably around the waist at your belt line.
1-6.11 With the shoulder straps crossed in the back and positioned over the shoulders (1),
connect shoulder straps to the vertical chest strap (3) that extends up from the waist
belt with appropriate hardware (2).
1-6.12 The cross connecting hardware in the back should lay flat and comfortable between the
shoulder blades.
1-6.13 Leg straps (5) should be adjusted for comfort with the wearer standing upright.
1-7
CLEANING
NOTE
To retain fire retardant properties, JSAVES should not be washed more than 50 times.
Document washings on applicable forms.
1-7.1 Manufacturer recommends spot cleaning with mild soap (Ivory or equivalent).
1-7.2 Soiled JSAVES materials may be laundered by hand in warm water (never dry clean)
using mild soap (Ivory or equivalent). Close the slide fasteners to prevent damage to
the fabric. Care shall be taken to assure the garment is thoroughly rinsed free of soap.
Squeeze out excess water and hang garment up to dry in a well-ventilated area.
1-7.3 The JSAVES vest is machine washable. Separate from harness and wash in warm, not
hot, water. Tumble dry on low or hang out to dry. Do not bleach.
“Joint Services Aircrew Vest and Extraction System” and “JSAVES” are trademarks of Ultimate Survival Technologies
NOTE
Do not iron or press
1-8
MAINTENANCE
WARNING
No repairs should be made to the JSAVES harness by anyone not certified as a parachute rigger,
survival equipment specialist, or the manufacturer. Repairs made to the harness void any
written or expressed warranties of the manufacturer.
1-8.1 JSAVES that have become deteriorated through usage, mildew, and perspiration shall
be condemned.
1-8.2 Repair of JSAVES vest materials and pockets will be limited to sewing of rips, loose
stitching, seam separations, patching when necessary with like fabric, and replacing
snaps and slide fasteners. JSAVES internal pockets, holsters, and attachments can be
individually repaired or replaced if damaged.
1-8.3 All repairs requiring sewing will be done with nylon thread conforming to Specification
V-T- 295, Type II, Class 1, Size E. Stitching shall be in accordance with Type 301,
Federal Standard 751, use 8 to 10 stitches per inch. Ends of stitching shall be
backstitched not less than 1/2 inch. No repairs should be made to the JSAVES harness
by anyone not certified as a parachute rigger, survival equipment specialist, or the
manufacturer. Repairs made to the harness void any written or expressed warranties of
the manufacturer.
NOTE
A maximum of 8 (hand sewn) repairs are authorized on JSAVES,
not to exceed 4 per side.
1-8.4 Hand sewing: Holes and seam separations no larger than 1/2 inch may be repaired by
hand sewing. Sew affected area with a doubled threaded (V-T-295, Type II, Class 1,
Size E) nylon thread.
1-8.5 Holes on the webbing (mesh) section: tie ends of thread together creating a larks head
knot at the beginning of the repair. Continue with overthrow (whipstitch) stitches over
affected area. End repair with a surgeon's stitch and locking over-hand knot toward the
inside of the JSAVES.
1-8.6 Holes and seam separations on the JSAVES (solid) section: tie ends of thread together
creating a binder's knot at the beginning of the repair. Continue with overthrow
(whipstitch) stitches over affected area. End repair with a surgeon's and locking overhand knot toward the inside of the JSAVES.
1-8.7 Trim excess thread to 1/2 inch minimum.
1-8.8 When more than 8 (hand-sewn) repairs are present and/or required; remove the (old)
stitching and repair according to Paragraph 1-8.3 (machine sewn).
“Joint Services Aircrew Vest and Extraction System” and “JSAVES” are trademarks of Ultimate Survival Technologies
JSAVES Part Numbers
Vest Base and Harness Options:
Part Number
Description
1SV-IR/P-J1M
JSAVES MOLLE VEST (BASE ONLY)- BLACK (POCKET SETS SOLD
SEPARATELY)
1SV-IR/P-J2M
1SH-MA/R-JSV1
1SH-MA/R-JSV2
1SH-MA/R-JQR1
1SH-MA/R-JQR2
1SH-MA/R-JTY1
1SH-MA/R-JTY2
1SH-MA/R-JBY1
1SH-MA/R-JBY2
1SH-MA/R-JBL1
1SH-MA/R-JBL2
1SH-MA/R-JBQR1
1SH-MA/R-JBQR2
JSAVES MOLLE VEST (BASE ONLY)- TERRA (POCKET SETS SOLD
SEPARATELY)
JSAVES HARNESS- THIGH LEG STRAP- BLACK
JSAVES HARNESS- THIGH LEG STRAP- TERRA
JSAVES HARNESS- THIGH LEG STRAP- QUICK RELEASE
CONNECTION- BLACK
JSAVES HARNESS- THIGH LEG STRAP- QUICK RELEASE
CONNECTION- TERRA
JSAVES HARNESS- THIGH LEG STRAP- Y STRAP CAPABLEBLACK
JSAVES HARNESS- THIGH LEG STRAP- Y STRAP CAPABLETERRA
JSAVES HARNESS- BACK LEG STRAP- Y STRAP CAPABLE- BLACK
JSAVES HARNESS- BACK LEG STRAP- Y STRAP CAPABLETERRA
JSAVES HARNESS- BACK LEG STRAP- BLACK
JSAVES HARNESS- BACK LEG STRAP- TERRA
JSAVES HARNESS- BACK LEG STRAP- Y STRAP- BLACK
JSAVES HARNESS- BACK LEG STRAP- Y STRAP- TERRA
Pockets and Accessories
Part Number
1JSV-HYDSYS100-B
1JSV-HYDS50
1JSV-HYDS100
MP-201VB
MP-201VT
MP-211VB
MP-211VT
MP-219VB
MP-219VT
Description
100 OZ. HYDRATION SYSTEM FOR THE JSAVES, BLACK
50 OZ. HYDRATION SYSTEM FOR JSAVES- TERRA
100 OZ. HYDRATION SYSTEM FOR JSAVES- TERRA
4.5X4 UTILITY POCKET- MOLLE ATTACHMENT- BLACK
4.5X4 UTILITY POCKET- MOLLE ATTACHMENT - TERRA
FLASHLIGHT POUCH- MOLLE ATTACHMENT- BLACK
FLASHLIGHT POUCH- MOLLE ATTACHMENT- TERRA
MAGAZINE POUCH- M4/M16- HOLDS 2- MOLLE ATT. BLACK
MAGAZINE POUCH- M4/M16- HOLDS 2- MOLLE ATT. TERRA
MP-220VB
BATTERY POCKET- BATTERY FOR PRC112 RADIO- MOLLE
ATTACHMENT- BLACK
MP-220VT
BATTERY POCKET- BATTERY FOR PRC112 RADIO- MOLLE
ATTACHMENT- TERRA
MP-221VB
E2C BLOWER POCKET
MP-221VT
E2C BLOWER POCKET
MP-301VB
7X4 UTILITY POCKET- MOLLE ATTACHMENT - BLACK
MP-301VT
7X4 UTILITY POCKET- MOLLE ATTACHMENT - TERRA
“Joint Services Aircrew Vest and Extraction System” and “JSAVES” are trademarks of Ultimate Survival Technologies
MP-306VB
HOLSTER- MOLLE ATTACHMENT - BLACK
MP-306VT
HOLSTER- MOLLE ATTACHMENT - TERRA
MP-309VB
DOUBLE MAGAZINE POUCH- MOLLE ATTACHMENT - BLACKPISTOL
MP-309VT
DOUBLE MAGAZINE POUCH- MOLLE ATTACHMENT - TERRAPISTOL
MP-314HT
FLARE POCKET - MOLLE ATTACH - TERRA
MP-314VB
FLARE POCKET- MOLLE ATTACHMENT - BLACK
MP-401HB
4.5X8 UTILITY POCKET- MOLLE ATTACHMENT - BLACK
MP-401HT
4.5X8 UTILITY POCKET- MOLLE ATTACHMENT - TERRA
MP-404VB
8.5X4 UTILITY POCKET- MOLLE ATTACHMENT - BLACK
MP-404VT
8.5X4 UTILITY POCKET- MOLLE ATTACHMENT - TERRA
MP-406VB
8.5X4 UTILITY POCKET WITH KNIFE SHEATH- MOLLE
ATTACHMENT - BLACK
MP-406VT
8.5X4 UTILITY POCKET WITH KNIFE SHEATH- MOLLE
ATTACHMENT - TERRA
MP-422VB
KNIFE SHEATH POCKET WITH OUTER TRD SHEATH- MOLLE
ATTACHMENT - BLACK
MP-422VT
KNIFE SHEATH POCKET WITH OUTER TRD SHEATH- MOLLE
ATTACHMENT - TERRA
MP-422VB-X
KNIFE/TRD POCKET COMBO WITH KNIFE AND TRD- MOLLE
ATTACHMENT - BLACK
MP-422VT-X
KNIFE/TRD POCKET COMBO WITH KNIFE AND TRD- MOLLE
ATTACHMENT - TERRA
MP-421VB
VERTICAL RADIO POCKET FOR PRC-112- MOLLE ATTACHMENT BLACK
MP-421VT
VERTICAL RADIO POCKET FOR PRC-112- MOLLE ATTACHMENT TERRA
MP-421HB
HORIZONTAL RADIO POCKET FOR PRC-112- MOLLE
ATTACHMENT - BLACK
MP-421HT
HORIZONTAL RADIO POCKET FOR PRC-112- MOLLE
ATTACHMENT - TERRA
MP-423VB
SMALL POUCH- 5X5X2.75 - MOLLE ATTACHMENT - BLACK
MP-423VT
SMALL POUCH- 5X5X2.75 - MOLLE ATTACHMENT - TERRA
MP-424VB
SIDE POCKET- ACCESSORY- 7X5- MOLLE ATTACHMENT - BLACK
MP-424VT
SIDE POCKET- ACCESSORY- 7X5- MOLLE ATTACHMENT - TERRA
MP-425VB
5" X 5" POCKET- FIRST AID KIT - MOLLE ATTACHMENT - BLACK
MP-425VT
5" X 5" POCKET- FIRST AID KIT - MOLLE ATTACHMENT - TERRA
MP-426VT
CSEL RADIO POCKET- MOLLE ATTACHMENT- TERRA
MP-426VB
CSEL RADIO POCKET- MOLLE ATTACHMENT- BLACK
MP-505VB
NALGENE BOTTLE POCKET- MOLLE ATTACHMENT - BLACK
“Joint Services Aircrew Vest and Extraction System” and “JSAVES” are trademarks of Ultimate Survival Technologies
MP-505VT
NALGENE BOTTLE POCKET- MOLLE ATTACHMENT - TERRA
MP-503VT
AQUA LUNG/HEEDS BOTTLE POCKET- MOLLE ATTACHMENT TERRA
MP-504VB
LARGE POUCH- 8.5X5.75X3.5 - MOLLE ATTACHMENT - BLACK
MP-504VT
LARGE POUCH- 8.5X5.75X3.5 - MOLLE ATTACHMENT - TERRA
MP-603HB
6X8 UTILITY POCKET- MOLLE ATTACHMENT - BLACK
MP-603HT
6X8 UTILITY POCKET- MOLLE ATTACHMENT - TERRA
To Order:
PHONE: 206-965-9660/866-479-7994
FAX: 206-965-9659
EMAIL: [email protected]
WEB: www.ultimatesurvival.com
GSA ADVANTAGE
www.gsaadvantage.gov
Contract GS-07F-0566T
Ultimate Survival Technologies
14428 167th Ave. SE
Monroe, WA 98272
www.ultimatesurvival.com
“Joint Services Aircrew Vest and Extraction System” and “JSAVES” are trademarks of Ultimate Survival Technologies