1
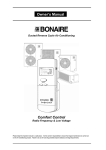
OWNER’S MANUAL
Ducted Inverter Reverse Cycle Air Conditioning
With the
Classic Wall Mounted Controller
& IR Remote
www.bonaire.com.au
Please keep this important manual in a safe place. It is the owner’s responsibility to ensure that regular
maintenance is carried out on this Air Conditioning product. Failure to do so will void all guarantees
beyond statutory and legal requirements
Page 1
CONTENTS
INTRODUCTION ......................................................................................................................................... 4
General Information ...................................................................................................................... 4
Important Notices............................................................................................................ 4
Warranty......................................................................................................................... 4
Data Location ................................................................................................................. 4
Assembly........................................................................................................................ 5
Operating Temperature Range ....................................................................................... 5
Safety............................................................................................................................................ 6
Safety & Owner’s Responsibility ..................................................................................... 6
Precautions..................................................................................................................... 6
Power Interruption .......................................................................................................... 7
CONTROL NAVIGATION ........................................................................................................................... 8
Classic Wall Mounted Control Panel ............................................................................................. 8
Button Functions............................................................................................................. 8
LCD Screen Display ....................................................................................................... 9
QUICK START .......................................................................................................................................... 10
OPERATION ............................................................................................................................................. 11
Classic Wall Control Operating Instructions................................................................................. 11
Button Functions........................................................................................................... 11
Specific Operating Instructions ..................................................................................... 14
Planning Sheets.......................................................................................................................... 16
System Reset ............................................................................................................... 17
Alarm Display ............................................................................................................... 17
Hand Held Radio Frequency Control........................................................................................... 18
Operating Instructions................................................................................................... 18
AUTO mode operating procedure ............................................................................................... 19
Temperature adjusting procedure during AUTO operation .......................................................... 19
COOL / DRY / HEAT mode operating procedure......................................................................... 20
Setting the time ........................................................................................................................... 20
TIMER operation ......................................................................................................................... 21
FAN SPEED................................................................................................................................ 21
Power-off memory function ......................................................................................................... 21
Remote controller handling procedure......................................................................................... 21
Remote controller handling ......................................................................................................... 22
Remote controller troubleshooting............................................................................................... 23
TROUBLESHOOTING .............................................................................................................................. 24
Normal Operation or Malfunction of the Air Conditioner ................................................ 24
The System Does Not Start Immediately After the ON / OFF Button is Pressed ........... 24
The System Does Not Start Immediately After Adjusting the SET TEMP...................... 24
Starting and Stopping of the Indoor Fan Automatically During Heating Operation ........ 24
Starting and Stopping of the Outdoor Unit Compressor and Fan .................................. 24
Water Flow from the Outdoor Unit ................................................................................ 24
Refrigerant Flow Sound ................................................................................................ 24
Smells from the Indoor Unit .......................................................................................... 24
Steam or Mist from the Outdoor Heat Exchanger ......................................................... 24
Your air conditioner will not operate! ............................................................................. 25
MAINTENANCE ........................................................................................................................................ 26
Air Conditioner Maintenance ....................................................................................................... 26
Electrical....................................................................................................................... 26
Cleaning your return air filter......................................................................................... 26
Outdoor Unit ................................................................................................................. 26
Indoor Unit .................................................................................................................... 26
System ......................................................................................................................... 27
Page 2
CONTENTS
COMMISSIONING..................................................................................................................................... 28
Commissioning Check List .......................................................................................................... 28
General......................................................................................................................... 28
Bonaire Ducted Inverter Reverse Cycle System ........................................................... 28
Ductwork ...................................................................................................................... 29
Site ............................................................................................................................... 29
Customer Hand Over.................................................................................................... 29
WARRANTY ............................................................................................................................................. 30
Conditions to warranty ................................................................................................................ 30
DIY Installation Warranty............................................................................................................. 31
Remote Location Warranty.......................................................................................................... 31
Exclusions to warranty. ............................................................................................................... 31
Conditions where warranty may be void...................................................................................... 32
Warranty On Replacement Parts................................................................................................. 33
Periods Of Warranty – Years....................................................................................................... 33
SERVICE................................................................................................................................................... 34
Proof of Purchase ....................................................................................................................... 34
Dealer / Product Information ......................................................................................... 34
Service Centres .......................................................................................................................... 40
Page 3
INTRODUCTION
INTRODUCTION
Congratulations on purchasing this Bonaire Ducted Inverter Reverse Cycle Air Conditioning system, an
exciting new product offered by Climate Technologies.
Bonaire Ducted Inverter Reverse Cycle Air Conditioners are designed and constructed for the harsh
Australian climate offering unsurpassed efficiency and durability.
Your air conditioning unit is supported by Climate Technologies, Australia’s most advanced manufacturer
of a complete range of climate control products.
To ensure you fully enjoy the benefits of this Ducted Inverter Reverse Cycle Air Conditioning system,
please read these instructions carefully and keep them handy for future reference.
If operated and maintained in accordance with this manual, this unit will provide you with years of comfort
and reliability. Please take the time to read this manual.
NOTE: As a responsible corporate citizen the manufacturer, being Climate Technologies, respects
the OHS&W laws of this country and abides by them. In doing so, our service providers reserve the
right to refuse service unless safety and accessibility to the unit can be guaranteed in accordance
with the installation instructions, State OH&S Policies and Australian Standards. The cost of any
extra equipment required to provide access to the unit for servicing is the responsibility of the
owner.
General Information
Important Notices
•
If an appropriately qualified and licensed person is not used to install the equipment or if it's not
installed according to the installation instructions along with State & Federal requirements, then Climate
Technologies will not accept responsibility for any problems, which occur as a result.
•
This manual should be considered as a permanent part of the air conditioning equipment and should
remain with this equipment. It should be read and understood by any persons that will be operating the
system.
NOTE: This operation manual must be carefully read before operating the air conditioner. If further
information or details and data are required, please contact your Bonaire dealer.
•
Climate Technologies pursues a policy of continual improvement in design and performance of its
products. The right is therefore reserved to vary specification without notice.
•
Climate Technologies cannot anticipate every possible circumstance that might involve a potential
hazard.
•
This air conditioner is designed for standard air conditioning use only. Do not use this air conditioner
for other purposes such as drying clothes, refrigerating foods or for any other similar heating or cooling
processes.
Warranty
Warranty service work must only be carried out by Climate Technologies service division or its authorized
service providers. See warranty section.
Data Location
Your appliance model number, serial number and model description are located on the appliance data
plate on the side of both the indoor and outdoor units. These details should also be recorded in the
warranty section of this booklet.
You will need this information, should your appliance require servicing, spare parts or just if you require
additional information about this product.
Page 4
INTRODUCTION
Assembly
There is no assembly required of this Ducted Inverter Reverse Cycle Air Conditioner. Your Dealer or
installer will carry out all assembly and commissioning upon installation.
Operating Temperature Range
If the system is used when the temperatures are outside the operating ranges shown below, safety devices
may activate causing the system to stop.
If the system is used on heating below the minimum temperature ranges in the table below, the outdoor
heat exchanger may freeze and cause the unit to malfunction and stop. If the system is to be installed in
locations where the ambient temperature falls below the minimum operating ranges stated in the table
below, supplementary BOOST heating may be required (contact your dealer for advice on this option).
the air
Although the controller will allow the operating set temperature to be adjusted between 16 to
31°C, it is important that the controller settings be maintained within the temperature ranges
shown in the table above:
The system is designed to provide comfort conditions of 18°C - 22°C for heating and 22°C 26°C for cooling
Page 5
INTRODUCTION
Safety
Safety & Owner’s Responsibility
The manufacturer and its service providers reserve the right to refuse service unless safety and accessibility
to the unit can be guaranteed in accordance with the installation instructions, State OH&S Policies and
Australian Standards. The cost of any extra equipment required to provide access to the unit for servicing is
the owner’s responsibility
Precautions
The precautions described below are WARNINGS and CAUTIONS. These are very important precautions
concerning safety. Be sure to observe all of them without fail.
Warning – These are items which, if improperly performed or ignored, could result in severe personal
injury or death
• Do not attempt to install this air conditioner yourself. This air conditioning system must be installed by
suitably qualified, certified persons in accordance with national and local codes.
• This unit contains no user-serviceable parts. Always consult authorised and qualified service personnel for
repairs.
• These products are equipped with electrical parts. Do not pour water into the indoor or outdoor unit. If
water comes in contact with electrical components it will cause a serious electrical shock.
• Do not remove any fixed covers on the indoor or outdoor unit.
• In the event of a malfunction (burning smell, etc…), switch the air conditioner OFF at the main switch, and
contact either your installer, dealer or Climate Technologies Service Department.
• Refrigerant leakage can cause difficulty with breathing due to oxygen deficiency. Do not cut, puncture,
close off, damage or break pipework in the unit(s) or the interconnecting refrigeration piping.
• Do not use any sprays such as insecticide, paint lacquer, hair spray, or other flammable gases near the air
inlets, return air (grilles or openings) or in the vicinity of the air conditioning unit.
• The air conditioning unit/s must not be installed near LPG or flammable gas or liquids in accordance with
national and local codes.
• Do not insert fingers or objects into any part or section of the air conditioning unit/s
• Do not tamper with or adjust any safety devices, electrical wiring or other components inside the indoor or
outdoor units.
Caution – These are items which, if improperly performed or ignored, could result in minor personal
injury or product or property damage
• If the circuit breaker trips repeatedly (often activated), stop the system and contact either your dealer or
Climate Technologies Service Department.
• A qualified service agent must perform services and inspections.
Page 6
INTRODUCTION
• Do not drink or let animals drink the air conditioning unit drain water (condensate). Drainage should be in
accordance with national and local codes.
• This electrical appliance was not intended for use by young children or infirm persons without supervision.
Take care to install units where children or others cannot climb on them and fall.
• Do not place articles on or against this appliance.
• Do not place articles in front of or behind the outdoor unit.
• Do not operate the air conditioner without the return air filter/s in place.
• Always turn the air conditioner off from the controller and the main switch before cleaning any part of the
unit including cleaning or changing the return air filter
• Turn OFF the main switch when the air conditioner is not in use for extended periods of time i.e. if you are
going away on holidays to prevent accidental use of the air conditioner.
• The main switch must be turned ON at least 6 hours before the air conditioner is operated after long
periods of being turned OFF.
• Ensure that the unit is stable, vertical, level (not leaning) & installed so it cannot topple over or be pushed
over by children or others.
Power Interruption
Should there be an interruption to the power supply during the operation of the air conditioning system the
unit will automatically resume operation once the power has been restored.
Text and Illustration Copyright Climate Technologies 2010
All rights reserved. No part of this document may be reproduced or transmitted in any form or by any means,
electronic or mechanical, including photocopying, recording or by any information storage and retrieval system,
without prior permission in writing from Climate Technologies
In the interest of continued product improvement Climate Technologies reserves the right to alter specifications
without notice. E.&O.E
Page 7
CONTROL NAVIGATION
CONTROL N AVIGATION
Classic Wall Mounted Control Panel
Button Functions
1) Signal Receiver
2) Power Light
3) ON/OFF
4) Timer ON
5) Confirm
6) Week
7) Multi-Day Timer
8) Temp Up
9) Mode
10) Speed
11) Temp Down
12) Check
13) Set
14) Reset
15) Minute
16) Hour
17) Timer OFF
Page 8
CONTROL NAVIGATION
LCD Screen Display
Display Descriptions
1) Auto Mode
2) Cool Mode
3) Heat Mode
4) Dehumidify Mode
5) Fan Mode
6) Fan Speed
7) Not used
8) Week: Monday - Sunday
9) Choose Cursor
10 Not used
11) Not Used
18) Test Temp Tab
Page 9
13) Set Temp
14) Timer Time
15) Timer ON/OFF mark
16) Clock Display
17) Keyboard lock
QUICK START
QUICK ST ART
To quickly set your Ducted Inverter Reverse Cycle Air Conditioner to a desired temperature with minimal
frustration, follow the steps below:
1.
Press the ON / OFF button (Button # 3)
2.
Press the MODE button (Button # 9) to set your air conditioner to the desired mode.
Repeatedly pressing the MODE button will cycle through the available modes.
Press the MODE button until the desired mode icon is highlighted on the LCD screen.
The available modes are as follows:
“AUTO” mode – This mode will automatically cool, heat or dehumidify based on the room
temperature
“COOL” mode – This mode will cool the room based on the temperature that has been set
“HEAT” mode – This mode will heat the room based on the temperature that has been set
“DEHUMIDIFY” mode – This mode will dehumidify. The temperature cannot be set whilst this
mode is enabled
“FAN ONLY” mode – This mode will operate the fan only. The temperature cannot be set
whilst this mode is enabled
3.
Whilst in COOL or HEAT mode press the TEMP UP or TEMP DOWN button (Button # 8 & #11) until
a desired temperature setting is displayed on the LCD screen.
Page 10
OPERATION
OPERAT IOPN
Classic Wall Control Operating Instructions
Button Functions
ON / OFF Button
1. When the system is off, press the ON/OFF button to turn on the wall controller. The power light will be
lit and the LCD screen will display the current system settings.
2. When the system is on, the wall controller will go to standby after pressing the ON/OFF button. The
LCD screen will display the time (if the display timer has been set). If the unit does not operate within 5
seconds, the LED backlight will switch off along with any other displays.
When the ON/OFF button is pressed to change the status from ON to OFF, the wall controller will send
a signal 5 seconds later. If the wall controller power supply is disconnected and then reconnected
again, the wall controller will resume operation based on the settings used prior to power failure.
MODE Button
When the unit is running, the MODE button on the wall controller can be pressed. The mode will then be
changed according to the following order:
AUTO
COOL
HEAT
Page 11
DEHUMIDIFY
FAN
OPERATION
SPEED button
1. The “SPEED” button is available for use if the unit is in “AUTO”, “HEAT”, “COOL”, or “FAN” mode.
2. If the unit is in any of the modes mentioned above, pressing the “SPEED” button on the wall controller
to change the air velocity as shown below:
AUTO
LOW
MEDIUM
HIGH
3. If the unit is in “DEHUMIDIFY” mode, the fan speed will be set on “AUTO”, and the “SPEED” button will
be unavailable for use.
TEMP UP Button & TEMP DOWN Button
1. During “COOL” or “HEAT” mode: the temperature can be changed by pressing the “TEMP UP” or
“TEMP DOWN” buttons.
2. During any effective mode: the user can press the “TEMP UP” or “TEMP DOWN” buttons to increase or
reduce the target temperature; the target temperature range is 18°C - 22°C for heating and 22°C - 26°C
for cooling.
3. “TIMER” operation: There are three periods of time that can be set for one day; The user can press the
“TEMP UP” button to increase the temperature or press the “TEMP DOWN” button to decrease the
temperature
4. Selecting operating modes: There are four modes of operation for this option; press the “TEMP UP” or
“TEMP DOWN” to alter the temperature as above.
MULTI-DAY TIMER” Button
“TIMER” functions: Press the “MULTI-DAY TIMER” button to activate or cancel the set timer of a certain
day which is included in the weekly multi-days timer setting.
WEEK Button
1. Calendar setting: Press the “WEEK” button to set the week, and the icon will display from Monday to
Sunday circularly on the LED display screen.
2. Timer mode: Press the “WEEK” button to choose a certain day as a target for the timer setting, and the
screen will display from Monday to Sunday
MIN Button
1. Minute settings: Press the “MIN” button, and the number will display an integer from 0 to 59. If the user
presses and holds the button, the number will increase by 10 each second.
2. Timer: Press the “MIN” button to set the time, and the number will display an integer from 0 to 59.
Page 12
OPERATION
HOUR Button
1. Hour setting: Press the “HOUR” button to set the clock, and the number will display an integer from 0 to
23.
2. Timer setting: Press the “HOUR” button to set the hour, and the corresponding number will display an
integer from 0 to 23.
CONFIRM Button
1. The Week, hour, minute and timer setting: The user can press this button to confirm operation.
2. Timer setting: user can press the button for 3 seconds continuously to go to timer setting.
TIMER ON Button & TIMER OFF Button
1. Press the “TIMER ON” button to turn on the unit at a certain time, and the LCD screen will display “ON”.
2. Press the “TIMER OFF” button to turn off the unit at a certain time, and the LCD screen will display
“OFF”.
3. To activate or cancel setting: After setting the timer, press the “TIMER ON” and “TIMER OFF” button at
the same time for 3 seconds, then the timer setting will stop working and the corresponding sign shown
on the LCD display screen will disappear. If the timer setting is switched off, the user can press the
“TIMER ON” and “TIMER OFF” button at the same time for 3 seconds to activate the latest timer
setting, and the LCD screen will display the timer.
4. Timer setting in the “multi-days” timer: press the “Multi-day timer” button to ignore a certain day.
Child Lock
Keyboard lock: When the wall controller is on, press the “CHECK” and “RESET” button at the same time
for 3 seconds. The wall controller keyboard will then be locked, and only the “ON/OFF” button is effective.
The wall controller will not receive any signals from the remote controller. Pressing the “CHECK” and
“RESET” buttons at the same time for 3 seconds again to activate the keyboard if the keyboard is locked.
SET Button
1. Calendar Week Setting: Press the “SET” button to go to the calendar week setting.
2. Hour and minute settings: Press the “SET” button twice to enable the hour and minute settings on the
calendar.
Page 13
OPERATION
Specific Operating Instructions
Original status and power-off function
When the wall controller is powered, the LCD display will illuminate all characters for 2 seconds, and then
the wall controller will initiate the latest setting before the wall controller is powered off, including the unit,
temp, set, fan, mode, time and timer settings.
Timer & Time function
1. Week & time setting:
A. Week setting: Press the “SET” button, then press the “WEEK” button to choose from Monday to
Sunday, and then press the “CONFIRM” button to confirm the setting.
B. Time setting:
Press “SET” button twice, then press the “HOUR” button, the hour number will change at
an integer from 0 to 23; when pressing the “MIN” button, the minute number will change
at an integer from 0 to 59; pressing the “CONFIRM” button will confirm the setting. Press
and hold the “HOUR” button, the hour’s number will increase by 1 every second; Press
and hold the “MIN” button, the minute number will increase by 10 every second.
2. Timer setting:
Press the “CONFIRM” button for 3 seconds to start the timer setting.
A. Confirmation on day timer:
a. Only choose a certain day of a week
Press the “WEEK” button to select a certain day from Monday to Sunday, and the LCD screen will display
the abbreviation such as “MON”, “TUE”, “WED”, “THU”, “FRI”, “SAT”, or “SUN” accordingly; These
abbreviations will flash at once per second; after choosing a certain day, press the “CONFIRM” button to
confirm the setting, and the LED will display the target setting.
b. Multi-day of the week (NB*: the timer setting between these days is same)
When “MON TUE WED THU FRI SAT SUN” is flashing, press the “MULTI-DAY TIMER” button to choose a
certain day, and then press the “MULTI-DAY TIMER” button again to choose another day; Press the “TIMER
ON” or “TIMER OFF” button to ignore certain days; After choosing a certain day, press the “MULTI-DAY
TIMER ” button again to cancel their choice; After choosing target days, press the “CONFIRM” button to
confirm their choice.
B. Timer confirmation on a period of time:
Press the “TEMP UP” or “TEMP DOWN” button to choose a different period of time e.g. 1, 2 or 3, and then
press the “CONFIRM” button to confirm the corresponding target period of time, this will then be displayed
on the LCD screen. For example, if you select a period of time “2”, the LCD will display”2” on the screen.
Page 14
OPERATION
C. Timer’s ON/OFF and time setting:
After choosing one period of time in a certain day, press the “TIMER ON” button to decide when the unit
will be turned on automatically, and the LCD screen will display “ON” and the set time; (if users have set
the timer beforehand, then the LCD screen will display the latest set); Press the “HOUR” and/or “MIN”
button to set the target time, and then press the “CONFIRM” button to confirm the hour and minute.; A
designated timer time is then confirmed and effectively saved.
Press the “TIMER OFF” button to decide when the unit will power off automatically, the LCD screen will
display “OFF” and the set time; (if users have set the timer beforehand, the LCD screen will display the
latest set); Press the “HOUR”, “MIN” button to set the target time, and then press the “CONFIRM” button
to confirm the hour and minute. A designated timer time is confirmed and effectively saved.
Press the “TEMP UP” or “TEMP DOWN” button to enable two periods of time for a certain day to be set.
After setting a target time for a certain day, press the “CONFIRM“ button to go to enable a multi-period
timer setting for other days.
During the operation, if there is no operation within 30 seconds, the wall controller will exit the timer
setting menu automatically. Press the “CONFIRM” button for 3 seconds to exit setting.
D. Normal time display
The LCD screen will show “MON”“TUE” “WED” “THU” “FRI” “SAT” “SUN”, and the cursor will point to the
current day. For example, if today is Tuesday, the cursor will be pointing to “TUE”. The clock will also be
displaying the current time.
The timer display:
For example: on a certain day - Timer 1, 8:00 ON, 10:00 OFF;
Timer 2 13:00 ON, 15:00 OFF;
Timer 3 18:00 ON, 21:00 OFF.
At 7:00, Timer’s 1, 2 & 3 along with the corresponding arrow will display “ON” and the corresponding
arrow will also be displayed.
At 9:00, Timer’s 1, 2 & 3 along with the corresponding arrow will display “OFF” and the corresponding
arrow will also be displayed.
At 11:00, Timer’s 2 & 3 along with the corresponding arrow will display “ON” and the corresponding
arrow will also be displayed.
At 14:00, Timer’s 2 & 3 along with the corresponding arrow will display “OFF” and the corresponding
arrow will also be displayed.
At 16:00, Timer 3 along with the corresponding arrow will display “ON” and the corresponding arrow will
also be displayed.
At 19:00, Timer 3 along with the corresponding arrow will display “OFF” and the corresponding arrow
will also be displayed
Between 21:00 and 0:00, Timer’s 1, 2, & 3 along with the corresponding arrow will not display, “ON” or
“OFF” and the corresponding arrow will not be displayed either.
If the timer of that day hasn’t been set, 1, 2 & 3 along with the corresponding arrow will not be displayed.
“ON” or “OFF” will not be displayed either.
Page 15
OPERATION
Planning Sheets
Example Program - Heating
Day/s
Timer 1 M,T,W,T,F,S,S
Timer 2 M,T,W,T,F,S,S
Timer 3 M,T,W,T,F,S,S
On
6:00
09:30
18:00
Your Personal Program Heating / Cooling
Day/s
On
Timer 1 M,T,W,T,F,S,S
Timer 2 M,T,W,T,F,S,S
Timer 3 M,T,W,T,F,S,S
Your Personal Program Heating / Cooling
Day/s
On
Timer 1 M,T,W,T,F,S,S
Timer 2 M,T,W,T,F,S,S
Timer 3 M,T,W,T,F,S,S
Your Personal Program Heating / Cooling
Day/s
On
Timer 1 M,T,W,T,F,S,S
Timer 2 M,T,W,T,F,S,S
Timer 3 M,T,W,T,F,S,S
Your Personal Program Heating / Cooling
Day/s
On
Timer 1 M,T,W,T,F,S,S
Timer 2 M,T,W,T,F,S,S
Timer 3 M,T,W,T,F,S,S
Temp°
18
21
21
Off
9.00
17:00
22:00
Temp°
Off
Temp°
Off
Temp°
Off
Temp°
Off
Page 16
OPERATION
E. Timer Display
If the timer has been set, but the time has not run on target, the LCD screen will display prompted
information of the timer; once it has, the wall controller will send an “ON” or “OFF” signal to the unit. The
timer setting can be removed by pressing the “TIMER ON” and “TIMER OFF” buttons together, and the
prompted information on the LED display will disappear accordingly.
If the timer setting has already been removed, it can also be recovered by pressing the “TIMER ON” and
“TIMER OFF” buttons together for 3 seconds, and the prompted information on the LCD display will be
displayed again.
Timer set from the remote control
After receiving a timer signal from the remote controller, the wall controller will work according to the timer
settings sent from remote controller. However, only that particular days timer setting of the wall controller
will be changed by the remote controller. Timer settings on the wall controller will not be changed.
System Reset
1.
When the wall controller is powered on for the first time, it will enter into original status, and the LED
will display all characters for 2 seconds.
2.
After setting the week, hour, minute on the calendar, it is unnecessary to set them again even if the
wall controller is powered off again in the future, because the calendar has a power-off (memory)
function.
3.
The wall controller has been equipped with a button battery which can provide the calendar with
power. After one to two years, it’s necessary to replace the button battery for wall controller,
otherwise the time shown on the LCD screen will reset after it is powered-off.
Alarm Display
If a failure on a certain circuit of the system occurs, the LED will display an error code; The relationship
between error codes and failures are listed as follows:
Inverter Units
Error
code
Failure description
E1
Outdoor unit protection alarm
E2
Phase sequence protection alarm
E3
Communication failure between indoor and outdoor unit
E4
Water level protection alarm
E5
E6
E7
Compressor over current alarm
Compressor discharge pipe high temperature alarm
Room temp. sensor failure
E8
Evaporator middle sensor failure
E9
Evaporator outlet sensor failure
EE
EEPROM communication error
Page 17
OPERATION
Hand Held Infra Red Control
Operating Instructions
Page 18
OPERATION
AUTO mode operating procedure
•
Operates by selecting automatically the operation mode (HEAT, DRY, COOL) depending on the room
temperature upon start-up
With the remote controller pointing toward the air
conditioner
1.
Press the ON / OFF button
When the unit is not in AUTO mode
2.
Press the MODE select button
Move the mode to
the (AUTO) position
To stop: Press the ON / OFF button
The operation of the AUTO mode can be
performed by only pressing the ON / OFF
button for the next time
•
If the AUTO mode does not meet your
needs, change to HEAT, DRY or COOL
instead of AUTO
Temperature adjusting procedure during AUTO operation
Air temperature adjustment is possible even during the automatic operation. There are 6 levels of
adjustment with
button or the
button.
•
In AUTO mode, the indicator default temperature is 24°C
•
When the
button or
button is pushed, the indicator does not change.
Page 19
OPERATION
COOL / DRY / HEAT mode operating procedure
1. Press the ON / OFF button
2. Press the MODE select button and move the
MODE to the desired operational position
COOL
HEAT
DRY
FAN
3. Press the TEMP button. To set your favourite
temperature press
or
button
Standard:
HEAT 18°C – 22°C
COOL 22°C -26°C
DRY 21°C - 24°C
•
If FAN is selected, the room temperature isn’t
controlled, operation will run continuously.
4. Press the FAN SPEED button.
Set to your desired air flow rate.
To stop: Press the ON / OFF button
Setting the time
When batteries are inserted, the present time is automatically set to 12:00 AM
1. Slide and remove the cover. Press the CLOCK
switch with the tip of a ball point pen
Now the present time can be set.
2. Press the
or
button to set the HOURS
3. Press the clock switch again
4. Press the
or
button to set the
MINUTES
5. Press the clock switch to confirm
NOTE: The timer is set on the basis of the present
time. So set the present time correctly
Page 20
OPERATION
TIMER operation
When the SLEEP operation is selected, the room temperature is automatically controlled with the elapsed
time so that the room isn’t too cool during the cooling cycle or too warm during the heating cycle.
•
•
During COOL and DRY modes: The present temperature is raised by 1°C in 1 hour (when the timer is
set) and raised 2°C in 2 hours. The temperature wil l then stabilise.
During HEAT mode: The present temperature is lowered by 1°C in 1 hour (when the timer is set) and
lowered 2°C in 2 hours. The temperature will then s tabilise.
FAN SPEED
The fan capacity of the air conditioner can be selected by your choice during the heating or cooling cycles.
Operation
Fan speed
Automatically set by the microcomputer
AUTO
Powerful operation with high capacity
HI
Standard operation
MED
Minimal Capacity
LO
Power-off memory function
When the air conditioner is disconnected from the power supply and the unit is restarted, the air conditioner
will operate at the mode it was set in prior to power failure.
Remote controller handling procedure
Battery replacement procedure
The following signifies flat batteries. Replace the dead batteries with new ones
•
•
Receiving sound is not emitted from the unit when the signal is transmitted
Indicator becomes indistinct
Page 21
OPERATION
NOTE
• Do not use an old battery with a new
one
• Remove batteries when the remote
controller is not used for a long period
of time
• The life of a battery made in
conformity to JIS or IEC is 6 – 12
months in normal use. If it is used
longer or an unspecified cell is used ,
liquid may leak from the battery
rendering the remote controller
inoperable
• The life of the batteries is printed on
the side. The battery life may be
shorter than that of the air conditioner
depending on the date of manufacture.
However, the batteries may function
normally past the expiry date.
Remote controller handling
Page 22
OPERATION
Remote controller troubleshooting
Before you request service or repairs, check the following points.
It is not possible to change the setting
Symptoms
Causes
Explanation
When the automatic mode is
selected, the air conditioner
automatically sets the fan
speed.
The fan speed cannot be
When the dry operation is
changed
selected, the air conditioner
• Check whether the mode
automatically selects the fan
indicated on the display is
speed. The fan speed can be
DRY
selected during COOL, FAN
ONLY and HEAT
The transmission indicator ”
” never comes on
• Check whether the MODE
indicated on the display is
AUTO
Symptoms
Causes
The remote control signal is
not transmitted even when the
ON / OFF button is pushed
• Check whether the batteries
in the remote controller are
flat
Explanation
The remote control signal is
not transmitted, because the
batteries are flat.
The display never comes on
Symptoms
The TEMP. indicator does not
come on
Causes
• Check whether the MODE
indicated on the display is
FAN ONLY
Page 23
Explanation
The temperature cannot be
set during the FAN ONLY
operation
TROUBLESHOOTING
TROUBLESHOOTIN G
Normal Operation or Malfunction of the Air Conditioner
The following items are not classed as abnormal operation or malfunction of the air conditioner and do not
require you contacting your authorised Climate Technologies service department or a service visit:
The System Does Not Start Immediately After the ON / OFF Button is Pressed
If the controller display is showing ON the system is in the normal operating condition. The system may
not start or restart immediately because one of its safety devices or timers has activated to prevent the
system from being overloaded. The system can start after at least 3 minutes has passed, in some cases
the safety delay may extend to 10 minutes depending on the previous operating function.
The System Does Not Start Immediately After Adjusting the SET TEMP
If the controller display is showing ON the system is in the normal operating condition. The system may
not start or restart immediately because one of its safety devices or timers has activated to prevent the
system from being overloaded. The system can start after at least 3 minutes has passed, in some cases
the safety delay may extend to 10 minutes depending on the previous operating function.
Starting and Stopping of the Indoor Fan Automatically During Heating Operation
The indoor fan may vary in speed during the initial start up period.
Starting and Stopping of the Outdoor Unit Compressor and Fan
During normal operation the outdoor unit fan may start and stop depending on the system requirements,
this may happen while the compressor is operating. The outdoor noise levels may change during the ON /
OFF operation of the outdoor fan. The compressor will start and stop as required for the heating and
cooling needs of the system.
Water Flow from the Outdoor Unit
This will most likely occur during heating operation depending on the outdoor humidity and temperature
levels. Some water may also drip from the service valves and pipe work during cooling and heating
operation.
Refrigerant Flow Sound
During starting and stopping a “shuh” sound may be heard, this is a result of the refrigerant flow.
Smells from the Indoor Unit
The unit will draw smells into the return air from furniture, rooms, cooking, etc... Ensure good ventilation
and clean the return air filter regularly to minimise smells that may result after long periods of use.
Steam or Mist from the Outdoor Heat Exchanger
During defrost operation it is likely that steam or mist may be produced off the outdoor heat exchanger
while the frost is being melted.
Page 24
TROUBLESHOOTING
Your air conditioner will not operate!
1.
2.
3.
4.
5.
6.
Question
Y/N
Solution
Has the unit been
run since
installation?
Yes
Refer to question 4
No
Check that the main switch is turned ON, Check and
replace the batteries in the controller (IR Handset
Only).
Is the unit installed
in a new home?
Yes
Refer to question 3
No
Refer to question 4
Yes
Refer to question 4
No
Check that the unit is turned ON at the main switch.
Contact your dealer to commission the unit.
Check and replace the batteries in the controller (IR
Handset Only).
Yes
Press the reset buttons or turn the unit off then on to
reset unit. If the unit still does not start call for service.
(refer to solution 6 for reset instructions) NOTE:
Remember your system is fitted with a start-up and
changeover delay timer to prevent compressor
damage.
No
Follow the instructions in ‘CONTROL NAVIGATION’
located at the beginning of this manual and set the
controller correctly.
Yes
The air conditioner may be programmed to be OFF.
To operate the air conditioner manually press the
Manual / Auto button until the MANUAL is displayed.
Adjust the room SET TEMP as desired.
No
Refer to question 4
Yes
Reset the unit. This can be done by:
Has the installer run
the unit?
Is the controller set
to operate in the
correct mode and is
the SET TEMP
higher or lower than
the room
temperature?
Is the controller in
program mode?
Is RESET showing
on the controller
display?
1. Following the RESET procedure on ‘Page 28’, or,
2. Turn the appliance Off, then ON at the unit power
isolator
No
Unit should operate normally. If not contact your
authorised Climate Technologies service provider.
THIS TROUBLE SHOOTING GUIDE IS A REFERENCE ONLY.
FOR SERVICE OR WARRANTY REQUIREMENTS PLEASE REFER TO
THE WARRANTY SECTION OF THIS BOOK
Page 25
MAINTENANCE
MAINT EN ANC E
Air Conditioner Maintenance
IMPORTANT
Warning: Before commencing any maintenance work on your unit, isolate the power by turning the
unit OFF at the main switch.
Warning: There are no user serviceable parts inside the air conditioner. DO NOT remove any access
panels or fixed covers.
Note: It is essential that your BONAIRE Ducted Reverse Cycle system be maintained in accordance
with this manual. Failure to do so will affect the life of the product and reduce the level of efficiency
and may affect your warranty. Only a qualified licensed refrigeration technician should carry out
work on the refrigeration circuit of the appliance
Electrical
No general maintenance is required to the electrical system.
ONLY a Qualified Electrician should only carry out electrical connections and maintenance.
Cleaning your return air filter
Regular and thorough cleaning of the return air filter is required to avoid lack of airflow, blocking of coil,
service faults, damage to equipment, poor performance and excess power consumption. Your filter should
be cleaned at the beginning of summer and winter, if the system is used regularly or in a location where dirt
may easily accumulate, clean the filter/s more frequently. Once every 2 to 4 weeks is recommended.
NOTE: There are many types of air filters and grilles available, some are long life and require less
cleaning, please consult your dealer on what type of filter and grille is installed, how and when to clean
them.
Outdoor Unit
Regularly inspect the outdoor unit to ensure there are no obstructions blocking the heat exchanger (e.g.
dirt, vegetation, paper, rubbish, plastic, etc…) that may restrict the airflow. Check that there are no plants
or foreign objects blocking the fan outlet from the unit. Inspect and listen for excessive and unusual fan
motor noises. Check the paintwork for scratches and signs of corrosion, apply touch up or anti-corrosion
paint as necessary.
Indoor Unit
Only authorised persons should conduct maintenance on the indoor unit. The main and safety drains
should be checked and cleaned routinely (bi-annually recommended). For systems with heavy usage this
should be checked more frequently. Fans and coils should also be checked for build up of dirt / foreign and
cleaned as necessary.
Page 26
MAINTENANCE
System
Your BONAIRE Ducted Inverter Reverse Cycle system should be serviced annually by qualified authorised
service personnel to ensure trouble free operation. A comprehensive maintenance and check of the
system should be carried out. Including but not limited to the following:
• Refrigerant charge check
• Refrigerant leak check
• Compressor and fan/s operation check
• Electrical wiring, connections components check including earth test
• Check and test controls
• Check heat exchangers for dirt build up and clean as required
• Check piping and insulation
• Check unit fixings, brackets and bolts
• Check fitment and fixings of all suspension, supports and access panels (especially electrical panels)
Page 27
COMMISSIONING
COMMISSIONING
Commissioning Check List
General
All equipment ordered by the customer is installed.
The mains and control wiring are complete and the main switch and circuit breaker turned ON.
All Controller functions for the appliance operate.
All electrical, pipe and drain connections are to manufacturer’s specifications and the relevant local and
national codes.
Operate the air conditioner for heating and cooling.
Bonaire Ducted Inverter Reverse Cycle System
Outdoor unit is installed away from flammable and corrosive materials and fumes (i.e. pool
chlorine/petrol etc).
The system has been leak tested and evacuated as per the installation instructions.
All installer settable functions have been adjusted and set correctly.
Indoor unit platform or suspension mounting is suitable as per the installation instructions.
Indoor unit is level.
Indoor unit drain/s have been checked and tested for flow and leaks.
Outdoor unit foundation / platform are suitable as per the installation instructions.
Outdoor unit is level.
All clearances around the outdoor unit are to the manufacturer’s specifications.
Check for abnormal noise or vibration during operation of both heating and cooling.
Check that the noise, condensate drainage or air flow does not disturb the neighbours.
Page 28
COMMISSIONING
Ductwork
Ductwork is sized to manufacturers specifications
All ductwork is completed to plan, correctly supported, airtight, without crushed sections or excessively
tight bends
Air distribution checked, dampers are adjusted and all outlets correctly adjusted and wiped clean.
Any roof penetrations are fully sealed and watertight.
Roof access panel cover has been refitted.
Site
All rubbish has been removed from inside and on the roof.
Customer Hand Over
The operation of the Controller is demonstrated
How and when to remove and clean the return air filter
Maintenance requirements
Commission sheet, owner’s manual and certificates of compliance given to the customer.
Page 29
WARRANTY
W ARRANT Y
ANT:
Please read this warranty information and complete the Dealer/Product information on the following page.
KEEP this with your original purchase documents for any claim under warranty.
WARRANTY PROCEDURES:
Firstly refer to your owners manual to ensure you have followed the correct operating procedures of your
product, and refer to the trouble shooting guide to assist solving any problems you may have.
1) Read this warranty statement carefully before you request warranty service as items related to
installation are not covered by this appliance warranty.
2) A proof of product purchase must be provided for warranty service, to validate the appliance is within
the manufacturer’s warranty periods.
3) This warranty is only for products and associated original controls for Climate Technologies
manufactured product.
4) Only an authorised Climate Technologies service provider must carry out warranty service.
5) Statutory warranty is 12 months from date of purchase and all additional periods are classified as
manufacturer’s voluntary warranty.
Climate Technologies provides the following Manufacturers warranty on new product additional to all
implied warranties and other statutory rights which you may have under the Trade Practices Act and
similar State & Territory Laws, subject to the following terms and conditions.
TERMS AND CONDITIONS:
Conditions to warranty
•
Subject to the exclusions noted, Climate Technologies warrant the product for the period as prescribed
in the table following this statement to be free from inherent defects in materials and workmanship for
functional and structural components.
•
Unit is well maintained and serviced on a regular basis. Maximum of 12 months between service
inspections. Service pages in this manual are to filled and signed by the appointed service agent.
•
Commissioning check list to be fully completed and returned to Climate Technologies within 30 days of
installation
•
This product is only valid if the product is operated in accordance with the manufacturers instructions.
•
The appliance must not be modified or changed in any way.
•
Your proof of purchase MUST be produced before free service will be provided.
•
Travelling time and mileage are included within 30km of either your authorised Climate Technologies
dealer or service provider’s premises. Customers in areas other than the above are responsible for any
travelling time and mileage required to carry out warranty repairs.
•
The product must be installed by a qualified person in the manner prescribed by local & statutory
regulations and to the manufacturer’s specifications.
•
Service within the terms of this warranty will be recognised where we are satisfied that the appliance or
part was supplied within the relevant time limits. Documents of purchase and Dealer/Installer
information will assist in this process.
Page 30
WARRANTY
•
Product fitness for purpose and overall system design / sizing is solely the responsibility of the dealer /
installer. This includes but is not limited to heat load calculations, air flow, system balancing, humidity,
water quality etc.
•
The product must be installed in an easily and safe accessible area for service, appliances installed in
areas not easily and safely assessable, costs will be borne by the owner for access equipment should
maintenance be required.
DIY Installation Warranty
•
If the product has been installed as a DIY, a supply part only warranty will apply. Parts only will
be supplied free of charge on the return of the faulty part and the owner will be responsible for
all labour charges incurred for the part to be fitted by a qualified person. Labour warranty as
prescribed in the following table is void in this situation.
Remote Location Warranty
•
If the product has been installed outside the Climate Technologies service network, a supply
part only warranty will apply. Parts only will be supplied free of charge on the return of the
faulty part and the owner will be responsible for all labour charges incurred for the part to be
fitted by a qualified person. Labour warranty as prescribed in the following table is void in this
situation.
General Appliance Warranty – Australia ONLY
Exclusions to warranty.
•
Consumable items subject to wear and tear such as bearings are not covered by this warranty.
•
Components used as part of the installation such as grilles filters, ducting, fittings, zone motors and
consumer services pipe work are warranted from your place of purchase and not covered by this
warranty.
•
Damage caused by elements such as wind, rain, lighting, floods etc along with power spiking and
brownouts are not considered defective material or workmanship and as such are not considered
warranty.
•
No responsibility will be accepted for outside elements such as pests, animals, pets and vermin that
may cause damage to the unit.
•
Harsh environmental situations such as salt air that may cause cabinet damage / rusting can not be
considered warranty.
•
The manufacturer does not accept liability or any claims for damage to building contents, carpet, walls,
ceilings, foundations or any other consequential loss either direct or indirect. Damage resulting from,
power spikes, incorrect operation, incorrect installation, and incorrect maintenance is also not covered.
•
All warranties are NOT transferable.
•
Consumables such as batteries in the RF remote and wall controllers are not warranted
Page 31
WARRANTY
Conditions where warranty may be void.
•
If there is no certificate of compliance for plumbing, electrical or refrigeration as required by State &
Territory Laws. Climate Technologies reserves the right to refuse service on non-compliant
installations.
•
The defective operation of the appliance that is due to failure of electricity, gas, water or refrigerant gas
supplied.
•
•
•
•
Defects are caused by neglect, incorrect application, abuse or by accidental damage of the appliance.
An unauthorised person has attempting to repair the appliance.
A situation arises referenced in the trouble-shooting guide.
A charge will be made for work done or a service call where there is nothing wrong with the appliance.
SERVI
It is important that the name of the Dealer or Retailer from whom you purchased your product and the
name of the installer are recorded on page 34. The installer is responsible for the correct installation,
start up and demonstrating the operation of this product. The Dealer or retailer is also responsible for
issuing the relevant certificates of compliance for the electrical connections. (These may differ from
state to state).
Aged New Products Warranty
For a new product warranty to apply, a product needs to be purchased and installed within 3
years of the manufacturing date by the original purchaser.
Product that is aged as the result of extended storage or being used for demonstration
purposes, the following warranty conditions will apply.
•
For a product that is greater than 3 years and less than 5 years old from date of
manufacture the statutory warranty will apply and any voluntary warranty originally
supplied will be reduced by 1 year.
•
For a product that is greater than 5 years of age from date of manufacture, the statutory
warranty will apply to electrically functioning components only. All other components
being cabinets, louvres, filters etc. will not be covered by warranty.
WARRANTY ON REPLACEMENT PARTS:
Parts replaced under warranty are warranted for the balance of the original warranty period.
General Appliance Warranty – Australia ONLY
SERVICE CENTRES:
Page 32
WARRANTY
Warranty On Replacement Parts
Parts replaced under warranty are warranted for the balance of the original warranty period.
Periods Of Warranty – Years
Unit Components
RESIDENTIAL
Parts
Labour
COMMERCIAL
Parts
Labour
Compressor
5
5
2
2
All other components
5
5
2
2
Return air filter/s and zone motors are field supplied and therefore are not covered by the above warranty
periods
When booking a service call please contact the phone number relevant to your State / Territory. Please see
pg 40 for details.
Upon calling please have the following information ready:
Page 33
Model No.
Serial No.
Date of Install
Details of fault codes
SERVICE
SER VIC E
Proof of Purchase
It is important that the name of the Dealer or Retailer from whom you purchased your product and the
name of the installer are recorded on this page. The installer is responsible for the correct installation, start
up and demonstrating the operation of this product. The Dealer or retailer is also responsible for issuing the
relevant certificates of compliance for the electrical connections. (These may differ from state to state)
Please attach your proof of purchase here. Your receipt is your warranty and will be required to validate
any warranty.
Dealer / Product Information
Dealer/Retailer:
Dealer Address:
Dealer Phone Number:
Unit Model Number:
Serial No:
Type
Dual Cycle
Date Installed:
Installed by:
Electrical Cert. No.
Plumbing Cert. No.
Date Commissioned:
Commissioned by:
Signature:
…………………………………..
Page 34
Reverse Cycle
SERVICE
Annual Service Record of Bonaire Ducted Inverter Air Conditioning System
Ensure that your Bonaire inverter ducted air conditioner is serviced by a qualified authorised Bonaire
service technician properly, regularly and punctually. Maximum interval between service inspections is
12 months to ensure the validity of your warranty. Failure of components due to a lack of preventative
maintenance by the owner will not be covered by the manufactures warranty. A preventative
maintenance service will help to ensure that your unit will perform for many years to come.
Date of service ______________________
Company name ______________________
Company contact details_______________
___________________________________
Technician _________________________
License number _____________________
Invoice number _____________________
Technician’s signature ________________
Customer’s signature _________________
□
□
□
□
□
□
□
□
□
□
Check and clean filter.
□
Check current draws after 15 minutes running time.
_________ Amps.
□
T/D over the indoor coil.
_______ R/A temp _________ S/A temp _________ T/D.
□
□
Check for air flow to all registers.
Check and test condensate drain.
Check electrical connections for tight connections.
Visual check of electrical connections for heat or burn marks.
Check pipe work for chaffing and vibration.
Ensure condenser coil is clean and free of debris.
Check for fan blade damage and security on the motor shaft.
Test run system.
Voltage. No load _______VAC. Loaded ________VAC.
Check pressures after 15 minutes running time.
HP ________ kPa, LP_________ kPa.
Ensure condenser is level and secure.
Page 35
SERVICE
Annual Service Record of Bonaire Ducted Inverter Air Conditioning System
Ensure that your Bonaire inverter ducted air conditioner is serviced by a qualified authorised Bonaire
service technician properly, regularly and punctually. Maximum interval between service inspections is
12 months to ensure the validity of your warranty. Failure of components due to a lack of preventative
maintenance by the owner will not be covered by the manufactures warranty. A preventative
maintenance service will help to ensure that your unit will perform for many years to come.
Date of service ______________________
Company name ______________________
Company contact details_______________
___________________________________
Technician _________________________
License number _____________________
Invoice number _____________________
Technician’s signature ________________
Customer’s signature _________________
□
□
□
□
□
□
□
□
□
□
Check and clean filter.
□
Check current draws after 15 minutes running time.
_________ Amps.
□
T/D over the indoor coil.
_______ R/A temp _________ S/A temp _________ T/D.
□
□
Check for air flow to all registers.
Check and test condensate drain.
Check electrical connections for tight connections.
Visual check of electrical connections for heat or burn marks.
Check pipe work for chaffing and vibration.
Ensure condenser coil is clean and free of debris.
Check for fan blade damage and security on the motor shaft.
Test run system.
Voltage. No load _______VAC. Loaded ________VAC.
Check pressures after 15 minutes running time.
HP ________ kPa, LP_________ kPa.
Ensure condenser is level and secure.
Page 36
SERVICE
Annual Service Record of Bonaire Ducted Inverter Air Conditioning System
Ensure that your Bonaire inverter ducted air conditioner is serviced by a qualified authorised Bonaire
service technician properly, regularly and punctually. Maximum interval between service inspections is
12 months to ensure the validity of your warranty. Failure of components due to a lack of preventative
maintenance by the owner will not be covered by the manufactures warranty. A preventative
maintenance service will help to ensure that your unit will perform for many years to come.
Date of service ______________________
Company name ______________________
Company contact details_______________
___________________________________
Technician _________________________
License number _____________________
Invoice number _____________________
Technician’s signature ________________
Customer’s signature _________________
□
□
□
□
□
□
□
□
□
□
Check and clean filter.
□
Check current draws after 15 minutes running time.
_________ Amps.
□
T/D over the indoor coil.
_______ R/A temp _________ S/A temp _________ T/D.
□
□
Check for air flow to all registers.
Check and test condensate drain.
Check electrical connections for tight connections.
Visual check of electrical connections for heat or burn marks.
Check pipe work for chaffing and vibration.
Ensure condenser coil is clean and free of debris.
Check for fan blade damage and security on the motor shaft.
Test run system.
Voltage. No load _______VAC. Loaded ________VAC.
Check pressures after 15 minutes running time.
HP ________ kPa, LP_________ kPa.
Ensure condenser is level and secure.
Page 37
SERVICE
Annual Service Record of Bonaire Ducted Inverter Air Conditioning System
Ensure that your Bonaire inverter ducted air conditioner is serviced by a qualified authorised Bonaire
service technician properly, regularly and punctually. Maximum interval between service inspections is
12 months to ensure the validity of your warranty. Failure of components due to a lack of preventative
maintenance by the owner will not be covered by the manufactures warranty. A preventative
maintenance service will help to ensure that your unit will perform for many years to come.
Date of service ______________________
Company name ______________________
Company contact details_______________
___________________________________
Technician _________________________
License number _____________________
Invoice number _____________________
Technician’s signature ________________
Customer’s signature _________________
□
□
□
□
□
□
□
□
□
□
Check and clean filter.
□
Check current draws after 15 minutes running time.
_________ Amps.
□
T/D over the indoor coil.
_______ R/A temp _________ S/A temp _________ T/D.
□
□
Check for air flow to all registers.
Check and test condensate drain.
Check electrical connections for tight connections.
Visual check of electrical connections for heat or burn marks.
Check pipe work for chaffing and vibration.
Ensure condenser coil is clean and free of debris.
Check for fan blade damage and security on the motor shaft.
Test run system.
Voltage. No load _______VAC. Loaded ________VAC.
Check pressures after 15 minutes running time.
HP ________ kPa, LP_________ kPa.
Ensure condenser is level and secure.
Page 38
SERVICE
Annual Service Record of Bonaire Ducted Inverter Air Conditioning System
Ensure that your Bonaire inverter ducted air conditioner is serviced by a qualified authorised Bonaire
service technician properly, regularly and punctually. Maximum interval between service inspections is
12 months to ensure the validity of your warranty. Failure of components due to a lack of preventative
maintenance by the owner will not be covered by the manufactures warranty. A preventative
maintenance service will help to ensure that your unit will perform for many years to come.
Date of service ______________________
Company name ______________________
Company contact details_______________
___________________________________
Technician _________________________
License number _____________________
Invoice number _____________________
Technician’s signature ________________
Customer’s signature _________________
□
□
□
□
□
□
□
□
□
□
Check and clean filter.
□
Check current draws after 15 minutes running time.
_________ Amps.
□
T/D over the indoor coil.
_______ R/A temp _________ S/A temp _________ T/D.
□
□
Check for air flow to all registers.
Check and test condensate drain.
Check electrical connections for tight connections.
Visual check of electrical connections for heat or burn marks.
Check pipe work for chaffing and vibration.
Ensure condenser coil is clean and free of debris.
Check for fan blade damage and security on the motor shaft.
Test run system.
Voltage. No load _______VAC. Loaded ________VAC.
Check pressures after 15 minutes running time.
HP ________ kPa, LP_________ kPa.
Ensure condenser is level and secure.
Page 39
SERVICE
Service Centres
Only qualified service personnel should conduct any service work carried out on your Bonaire Ducted
Inverter Reverse Cycle Air Conditioning system. It is important that periodical service is carried out on your
product to ensure you will receive the efficiency benefits the product provides.
An authorised Climate Technologies service provider must carry out warranty service.
For Metro Service only ring the numbers below to book a service call.
South Australia/
Northern Territory
(08) 8307 5230
New South Wales /
Australian Capital Territory
(03) 8795 2457
Western Australia
(08) 9454 1000
Victoria/Tasmania
(03) 8795 2456
Queensland
(03) 8795 2456
Outside Metro areas please contact your nearest Climate Technologies Service Provider.
Manufactured by
Climate Technologies
ABN 13 001 418 042
26 Nylex Avenue
Salisbury, SA 5108
Australia
www.climatetechnologies.com.au
Page 40