1
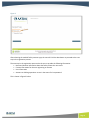
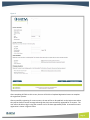
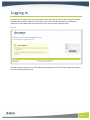
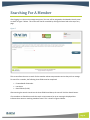
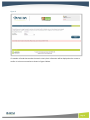
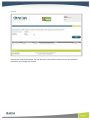
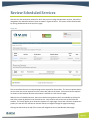
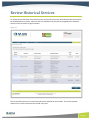
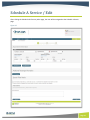
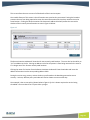
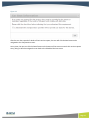
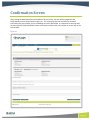
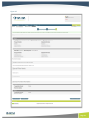
Service Management Portal
Facility User Manual
Version 1.0
Last Update 12/2013
Page 1
Table of Contents
Account Registration.......................................................................................................................................... 3
Logging In ........................................................................................................................................................... 7
Review Scheduled Services .............................................................................................................................. 11
Review Historical Services................................................................................................................................ 13
Schedule A Service / Edit ................................................................................................................................. 15
Confirmation Screen ........................................................................................................................................ 18
Service Details Screen ...................................................................................................................................... 20
Page 2
AccountRegistration
This section explains how to register for account access. If you already have an active user account, you can
skip to the next section; Logging In.
The user can register for account access by clicking the Register link as shown in figure 1 below.
Figure 1
After clicking the register link, the user will identify that they are registering a medical facility account for
access as shown in figure 2 below.
Page 3
Figure 2
After selecting the medical facility account type, the user will click the Next button to proceed to the next
step in the registration process.
The next step in the registration process asks the user to provide the following information:
• Name and location information about the facility where the user works
• Contact information for the user registering an account
• User information
• Answers to challenge questions to use in the event of a lost password
This is shown in figure 3 below.
Page 4
Figure 3
After completing all fields on this screen, the user will click the Complete Registration button to complete
the registration process.
After successfully registering for a user account, the user will be re-directed back to the Login screen where
they will be shown a success message indicating that they have successfully registered for an account. The
user will not be able to log in using their account until it has been approved by MTM. A successful account
registration is shown in figure 4 below.
Page 5
Figure 4
After the account has been approved by MTM, the user will receive an e-mail at the e-mail address they
registered with indicating their account has been approved and they can now begin using it. An account
approval e-mail is shown in figure 5 below.
Figure 5
Page 6
LoggingIn
Once the user has registered for an account and has been approved, they will be able to log in to manage
transportation services on behalf of the members who live at or attend their facility by entering their
username or email address and password into the Login screen as seen in figure 6 below.
Figure 6
After entering their username or e-mail address and password, the user will click the Login button to log in
to the service management portal.
Page 7
SearchingForAMember
After logging in to the service management portal, the user will be navigated to the Member Search screen
as shown in figure 7 below. This screen will also be accessible by clicking the Search tab at the top of any
page.
Figure 7
This screen allows the user to search for the member whose transportation services they wish to manage.
To search for a member, the following three fields must be completed:
•
•
•
ForwardHealth ID Number
Last Name
Date Of Birth (D.O.B.)
After entering the search criteria into the three fields listed above, the user will click the Search button.
If no members are found that match the search criteria entered, an error message is displayed that
indicates there were no matching members found. This is shown in Figure 8 below.
Page 8
Figure 8
If a member is found that matches the search criteria, their information will be displayed on the screen to
confirm it is the correct member as shown in Figure 9 below.
Page 9
Figure 9
If the correct member was located, the user will click on the member’s name to access that member’s
information and manage their services.
Page 10
ReviewScheduledServices
After the user has located the member for which they wish to manage transportation services, they will be
navigated to the Scheduled Services screen as shown in Figure 10 below. This screen will also be accessible
by clicking the Review tab at the top of any page.
Figure 10
This screen allows the user to review existing service requests for the member. The service requests shown
on this screen are service requests from the current day and into the future. All historical service requests
are shown on the Historical Services screen which is available as a link from this page.
Within the list of scheduled services, there are multiple sorting options which are available by clicking the
title of the column by which the user chooses to sort. Only columns with arrows next to their titles are
sortable. This list will display up to 10 service requests in a single page, if more than 10 service requests are
present, the user will click the Next or Previous buttons to navigate through the pages accordingly.
Clicking the Search tab at the top of this screen will navigate the user to the Member Search page.
Page 11
Clicking the Review tab at the top of this screen will refresh the current page.
Clicking the Schedule tab at the top of this screen will navigate the user to the Schedule A Service page.
Clicking on the request number link associated with a service will navigate the user to the Service Details
page for the corresponding service.
Page 12
ReviewHistoricalServices
To review services that have occurred in the past, the user will click on the View Historical Services link from
the Scheduled Services screen. After the user has clicked the link, they will be navigated to the Historical
Services screen as shown in Figure 11 below.
Figure 11
This screen allows the user to review historical service requests for the member. The service requests
shown on this screen are those that occurred in the past.
Page 13
Within the list of historical services, there are multiple sorting options which are available by clicking the
title of the column by which the user chooses to sort. Only columns with arrows next to their titles are
sortable. This list will display up to 10 service requests in a single page, if more than 10 service requests are
present, the user will click the Next or Previous buttons to navigate through the pages accordingly.
Clicking the Search tab at the top of this screen will navigate the user to the Member Search page.
Clicking the Review tab at the top of this screen will navigate the user to the Scheduled Services page.
Clicking the Schedule tab at the top of this screen will navigate the user to the Schedule A Service page.
Clicking on the request number link associated with a service will navigate the user to the Service Details
page for the corresponding service.
Page 14
ScheduleAService/Edit
After clicking the Schedule tab from any other page, the user will be navigated to the Schedule A Service
page.
Figure 12
Page 15
This screen allows the user to enter all of the details of their service request.
One notable feature of this screen is that all locations are saved as they are entered. Saving the locations
prevents the user from being required to enter the same information each time they need service to the
same location. Clicking the Recent Locations link above each address block will present the user with a
window of their recently visited locations as seen in figure 13 below.
Figure 13
The Recent Locations window will show the 10 most recently used locations. The user also has the ability to
“pin” an address to the list. Pinning an address to the list will prevent it from being removed in the event it
is no longer one of the 10 most recently used locations.
Clicking the name of a location from the Recent Locations window will close the window and insert the
address information into the corresponding address block.
During the service entry process, various checks are performed on the data being entered to ensure
accuracy. At times, different policy reminders will also be shown to ensure conformity.
One example is the car seat policy (shown below in figure 14); this is shown anytime the service being
scheduled is for a member that is 8 years old or younger.
Page 16
Figure 14
After the user has entered all details of their service request, the user will click the Next button to be
navigated to the Confirmation screen.
At any time, the user can click the Cancel button at the bottom of the screen to cancel their service request
entry; doing so will also navigate the user back to the Scheduled Services screen.
Page 17
ConfirmationScreen
After clicking the Next button from the Schedule A Service screen, the user will be navigated to the
Confirmation screen as shown below in figure 15. This screen gives the user the ability to review all
information they just entered, prior to scheduling the service with MTM. It is important to note that until
the user clicks the Confirm/Schedule button at the bottom of the screen, this request for service will not be
sent to MTM.
Figure 15
Page 18
At any time, the user can click the Cancel button at the bottom of the screen to cancel their service request
entry; doing so will also navigate the user back to the Scheduled Services screen.
If a correction is needed, the user can click the Edit button which will navigate them back to the Schedule A
Service screen.
If all information is correct, the user will click the Confirm/Schedule button to complete their service
request; this will also navigate the user to the Service Details page.
Page 19
ServiceDetailsScreen
After scheduling a service or clicking on the request number from the Scheduled Services screen, the user is
navigated to the Service Details screen.
This screen allows the user to review all details of a service that has already been scheduled as shown in
figure 16 below.
The service tracker on this screen allows the user to keep up with the status of a service; whether it has just
been received by MTM, assigned to a transportation provider, or has already occurred.
At any time, the user can click the Cancel button at the bottom of the screen to cancel the service request
they are currently viewing; doing so will also navigate the user back to the Scheduled Services screen.
If there are any changes that need to be made to the service that is currently being viewed, the user can
click the Edit button which will navigate them to the Edit Service screen outlined above.
Clicking the Back to service list button will navigate the user back to the Scheduled Services screen.
Page 20
Figure 16
Page 21