1
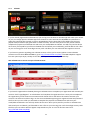
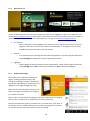
USER GUIDE FOR THE SURE TV BOX 8320HD & THE SURE TV SERVICE Issue date: 02/12/13 Introduction To get the most out of your Sure TV Box, we recommend that you: o o o Read the separate Quick Start Guide enclosed with your Sure TV Box. Read this User Guide to help understand how to use the Sure TV Service. Connect to your home network using the Ethernet cable supplied with your Sure TV Box. Connecting to your home network (and your Sure Broadband connection) is important, not only because you’ll be able to access the full Sure TV service (including extra channels, on demand and other web based catch up services), but also because we will send remote software updates periodically to your Sure TV Box to keep your Sure TV Box up to date with our latest developments and features. Contents 1. Staying Safe .....................................................................................................................................................4 2. Your Sure TV Box.............................................................................................................................................5 3. Unpacking Your Sure TV Box ..........................................................................................................................5 4. 3.1. What’s included in your Sure TV Box package.......................................................................................6 3.2. Connecting your Sure TV Box to your TV ...............................................................................................6 3.3. Setting your TV format ...........................................................................................................................6 3.4. Connecting your Sure TV Box to your home theatre system ................................................................6 3.5. Using your remote control .....................................................................................................................7 3.5.1. Installing/replacing batteries .........................................................................................................7 3.5.2. Entering text ....................................................................................................................................7 Setting Up Your Sure TV Box ..........................................................................................................................8 4.1. Setting a Parental Control PIN ................................................................................................................8 4.2. Connecting to the Internet .....................................................................................................................8 4.2.1. Using an Ethernet network cable - recommended ........................................................................8 4.2.2. Using your home’s wireless network .............................................................................................9 4.3. 5. Tuning in to digital TV .............................................................................................................................9 Using Your Sure TV Box ................................................................................................................................10 5.1. The Home screen ..................................................................................................................................10 5.2. Watching TV ..........................................................................................................................................10 5.2.1. Pause and rewind live TV..............................................................................................................10 5.2.2. 8 day Programme Guide ...............................................................................................................11 2 5.2.3. TV Channel Universe .....................................................................................................................11 5.2.4. Recording TV .................................................................................................................................11 5.2.5. My TV Recordings .........................................................................................................................13 5.2.6. Subtitles.........................................................................................................................................13 5.2.7. Audio Description .........................................................................................................................14 5.2.8. Source Selection ............................................................................................................................15 5.3. 5.3.1. My Island .......................................................................................................................................16 5.3.2. My Island On Demand ..................................................................................................................16 5.3.3. Film4oD .........................................................................................................................................17 5.3.4. Guernsey FC TV .............................................................................................................................18 5.3.5. Remote Record App ......................................................................................................................18 5.4. 6. Using The Media Centre .......................................................................................................................19 Additional Information .................................................................................................................................20 6.1. 7. Sure TV Online Features .......................................................................................................................16 Setup and Diagnostics...........................................................................................................................20 6.1.1. Information and Diagnostics ........................................................................................................20 6.1.2. Programme Setup .........................................................................................................................20 6.1.3. Parental Control ............................................................................................................................20 6.1.4. Channel Tuning-In .........................................................................................................................20 6.1.5. Audio and Video Setup .................................................................................................................20 6.1.6. Network Connection .....................................................................................................................20 6.2. Standby Mode .......................................................................................................................................21 6.3. Sleep Mode ...........................................................................................................................................21 6.4. Updates .................................................................................................................................................21 6.5. Reset Options ........................................................................................................................................21 Troubleshooting ............................................................................................................................................22 7.1. Remote control .....................................................................................................................................22 7.2. Digital TV reception ..............................................................................................................................22 7.3. Picture Quality ......................................................................................................................................23 7.4. Connectivity ..........................................................................................................................................23 7.5. The EPG .................................................................................................................................................23 7.6. Hard disk ...............................................................................................................................................23 3 1. Staying Safe For your own safety, please read the following instructions. WARRANTY WARNING: All repairs must be undertaken by a qualified Sure TV technician. Do not attempt to repair or replace any part of your Sure TV Box. Not only is it dangerous, but any attempt to open, modify or dismantle your Sure TV Box or its software will immediately invalidate your warranty. Before you set up your Sure TV Box o o o o o o o o o o o o Your Sure TV Box and its accessories are designed to be used in the British Isles, inside the home. Keep your Sure TV Box and its accessories, including any plastic, packaging and batteries, out of the reach of children. Only use accessories which are provided with or recommended for use with your Sure TV Box. Do not drop your Sure TV Box. Install your Sure TV Box on a firm and flat surface. Always allow a minimum of 5cm above and around each side of your Sure TV Box for cooling. Never expose your Sure TV Box to anything which might drip, splash or melt. Never stand objects with liquids, such as vases, on or near to your Sure TV Box. Do not place naked flame sources, such as candles, on or near to your Sure TV Box. Keep your Sure TV Box away from domestic heating equipment, direct sunlight or humidity. Always disconnect your Sure TV Box from the socket before cleaning it. Do not insert foreign objects into the openings or connection ports of your Sure TV Box. You can use an external surge protection device to protect your Sure TV Box during thunderstorms. Before you switch on your Sure TV Box o o o o Avoid connecting too many devices to the same electrical power source. Only use the power supply provided with your Sure TV Box. Before disconnecting the power supply, please switch off the power point and then pull out the power supply by the plug, never pull on the cord. Please leave your Sure TV Box in standby mode when you’re not using it. Replacing the remote control batteries o o o The batteries supplied with your Sure TV Box remote control are not rechargeable so do not attempt to recharge them. Do not dismantle old batteries or expose them to any sources of heat or moisture. Please dispose of your old batteries in a safe and environmentally friendly manner, using the appropriate disposal or recycling service. Disposing of packaging o o Please dispose of any Sure TV Box packaging or literature in an environmentally responsible manner. Your Sure TV Box is packaged in recyclable packaging so please dispose of it accordingly. 4 2. Your Sure TV Box Your Sure TV Box is a set-top-box which brings you free to air broadcast TV, and additional TV channels over Sure Broadband, that you can record and playback at your leisure. Sure TV also brings you local information, local videos, movies and TV on demand, Facebook and other great content all via your Sure broadband connection. Your Sure TV Box and Sure TV account give you access to: 3. Freeview channels in HD: o Sure TV brings you all your normal and HD channels without the need for a new TV. Additional channels: o Sure TV gives you more of the most popular free channels: Dave, Really, Yesterday, ITV3, ITV4, CITV, Film4, 5*, 5USA and Bloomberg. Great recording capabilities: o Record up to 160 hours and record multiple channels at the same time. Pause & rewind live TV: o Rewind everything you have been watching - even skip back across multiple channels. My Island: o Local information portal: news, weather, tides, flights plus local radio stations and webcams. Remote record & EPG o Remote record & Electronic Programme Guide (EPG): browse what’s on TV and set recordings either from the remote control or remotely on your phone from anywhere in the world. Full media centre o Full media centre: play a wide range of videos, music and pictures via the USB port or wirelessly via other DLNA devices. Facebook o Access your Facebook account on your TV, “like” TV shows, view friend updates pictures and make comments. Movies on demand from Film4oD o Using your existing Film4oD account you can rent a great range of premium movies from classics to new releases and best sellers on your TV screen rather than your laptop. Guernsey FC TV o Watch match highlights on demand, or login with your existing http://www.guernseyfc.tv/ subscription to watch live matches from the comfort of your own home. Multiroom o Share content between multiple Sure boxes in the home. Record a programme downstairs and watch it upstairs, even share live channels from one box to the other. Local video on demand “My Island on Demand” o Local news, local sport, Mundial weekly motor sports programmes and locally produced films. Unpacking Your Sure TV Box 5 3.1. What’s included in your Sure TV Box package Included in your Sure TV Box packaging you will find the following: o Your Sure TV Box: Model 8320HD o Power supply for your Sure TV Box o RF/Aerial cable o HDMI cable o Remote control o 2 x AAA batteries o Ethernet cable o DIN to Scart cable o Quick Start Guide 3.2. Connecting your Sure TV Box to your TV We recommend connecting your Sure TV Box to your TV using the HDMI cable provided. If your TV set does not have an HDMI port, please use the DIN to Scart cable supplied. Please be advised that the picture quality will be inferior. 3.3. Setting your TV format To enjoy the best possible picture from your Sure TV Box, please ensure that your Sure TV Box is connected to a TV using the HDMI cable, as all of the menus and screens on your Sure TV Box have been optimised for display in High Definition on widescreen 16:9 screens. If you need to connect the Sure TV Box using the DIN to Scart lead, please note that your picture quality will be less, and you may need to select the 4:3 TV Option during the on-screen set-up process. 3.4. Connecting your Sure TV Box to your home theatre system If your home Hi-Fi system accepts an HDMI input, then simply connect your Sure TV Box to the system using the HDMI cable supplied. Then, simply connect your sound system to your TV using another HDMI cable. Your Sure TV Box also has an optical S/PDIF digital audio port as well as the RCA audio connectors which you can use to connect your Sure TV Box to other home Hi-Fi systems. The digital optical cable or RCA audio cables are not included with your Sure TV Box but these are standard cables which can be purchased from any good electronics retailer. 6 3.5. Using your remote control To access the great features and services available on Sure TV, you will need to familiarise yourself with the remote control which is designed to be easy to hold and use, and most functions will involve using the UP/DOWN, LEFT/RIGHT and OK buttons. Mute Power Button Delete Digital Teletext (currently not available) Menu Programme Guide Volume up/down Up/Down/Left/Right/OK Programme Up/Down Picture in Picture “PIP” and Channel Universe Toggle Back Record Play/Pause Rewind/Stop/Fast Forward 3.5.1. Installing/replacing batteries To install or replace the AAA batteries, simply press down the top of the battery cover on the reverse of your remote control, and slide the cover down gently. Remove the cover and install or replace the batteries, making sure that they are inserted correctly. Then close the battery cover again. 3.5.2. Entering text The remote control also features “multi-tap” keys which you can use to enter text. It’s just like writing an SMS text message with a conventional mobile phone keypad: o Press the 2 to 9 keys repeatedly until you get to the letter you want. You can enter upper and lower case letters by continued presses. o Press the 1 key repeatedly to get a full stop or a comma or other punctuation marks. o Press the 0 key to enter a space. 7 4. Setting Up Your Sure TV Box The Quick Start Guide included in your Sure TV Box package will help you to connect your Sure TV Box to your TV aerial, your TV and your internet connection. The on-screen prompts are easy to follow and will help you to set up your preferences, connect to your home internet connection. You can also find your account details on the underside of your Sure TV Box. Once you’ve set up your Sure TV Box, it will check for service and software updates and install them for you. 4.1. Setting a Parental Control PIN This PIN is the Parental Control PIN which is used for locking or unlocking channels and services, and restricting certain Video On Demand content. When you are prompted to input the Parental PIN during the on-screen set up, make sure that you keep a secure record of the PIN you set, as you’ll need to unlock access to certain content based on its classification. Please note: If you lose your Parental Control PIN, you will have to reset your Sure TV Box settings. You can either reset your Sure TV Box settings by finding the reset button on the underside of your Sure TV Box and pressing and holding it for ten seconds, or you can reset your settings on the Sure TV Menu, go to “Information & Diagnostics”, select Reset, and you will find the option to Reset Settings. This will reset all settings including any future recordings set up via series link. The Parental Control functions provided are not to be used in place of adult supervision when children are using the Sure TV Box. We recommend that you be involved in what programmes your family choose to watch. 4.2. Connecting to the Internet Your Sure TV Box connects to the Internet so that you can watch a range of catch up TV, watch movies and TV on demand on Sure TV. We will also send software updates to your Sure TV Box periodically, to ensure that your Sure TV Box is always up to date. There are two ways to connect your Sure TV Box to the internet: 4.2.1. Using an Ethernet network cable - recommended To get the best speed, use the Ethernet cable provided with your Sure TV Box to connect your Sure TV Box to your home router. If your router is too far away from your Sure TV Box for you to connect the two devices using an Ethernet cable, you can purchase Powerline adaptors which will extend your home network using your home power points. Just visit your local Sure Store or online at www.sure.com. When you get to the Internet Connection on-screen instructions: o Select “Connect via Ethernet” on the screen. o Make sure that you’ve connected the Ethernet cable provided from your Sure TV Box to your home router. o Press OK when asked and wait a few seconds to activate the connection. o The connection will be confirmed on screen after a few seconds. 8 4.2.2. Using your home’s wireless network If your home router is too far away from your Sure TV Box to connect it using the Ethernet cable, you can connect via Wi-Fi. Please note that you will not benefit from the same reliable and fast connection which you would get by connecting using an Ethernet connection. When connecting your Sure TV Box to your home network via Wi-Fi, you will need to have to hand: o The name of your Wi-Fi home network, also referred to as the SSID o Your Wi-Fi password, also known as your wireless security key or passphrase (WEP or WPA) for your home network. When you get to the Internet Connection on-screen instructions: o Select the option on the screen called “Connect via Wi-Fi” and press OK. o Select your Wi-Fi network name from the list. o Enter your Wi-Fi network key or password. You will need to use the multi-tap alpha-numeric buttons on your remote control. Use the “<x” (delete) button on your remote control to delete any mistakes. Please note that your security information will be case sensitive so be sure to input upper or lower case letters as appropriate. If your Wi-Fi network is hidden, select “Other Network” from the list and then enter the name and key of your Wi-Fi network manually. Be careful not to press OK straight after typing the name, you will need to press down and enter your Wi-Fi password first. Once you have established a connection with your internet network, you can continue with the setup process. 4.3. Tuning in to digital TV You will be prompted to auto-tune your Sure TV Box to receive the digital TV channels which are available in your area. Follow the on-screen instructions and you will see the list of channels populate as your Sure TV Box’s tuners receive them. From time to time you may need to “re-scan” your channel line-up following changes made by Freeview (e.g. new channels, channel changes). To do this simply go to “Menu” – “Settings” – “Channel Tuning In” and select “Automatic Tuning In” – this will then rebuild your aerial based channel list. 9 5. Using Your Sure TV Box We’ve designed your Sure TV Box to be easy to use. The navigation, menus and screens are there to give you simple control over your settings, digital TV and Sure TV. You’ll notice a number of on-screen icons and instructions that will help you to find your way around the different features on offer. 5.1. The Home screen Pressing the MENU key on your remote control will take you to the Sure TV Home screen. From the Home screen you will be able to manage and browse your TV recordings, manage the Sure TV Box settings and access the Sure TV applications. To go back to watching live TV, just press the curly back button or the “Watch TV” menu item. 5.2. Watching TV If you want to change channels while watching TV, you can either: o Use your UP/DOWN buttons to bring up the Vertical programme guide, select a channel and press OK. o Use your LEFT/RIGHT arrow buttons to bring up the Horizontal program guide. o Enter a channel number using the 0-9 buttons on your remote control. o Use the P+ and P- buttons on your remote control. o Press the GUIDE button on your remote control to bring up the full Electronic Programme Guide (EPG). 5.2.1. Pause and rewind live TV Doorbell ringing? Need to grab a cuppa? Just press the PAUSE button on your remote control while watching live TV and you can take the dog out for a walk and come back to pick up where you left off. To continue watching TV just press the PLAY button. Once you’ve started watching TV again, you can use the REWIND/FASTFORWARD buttons to go back or skip ahead to the live broadcast. 10 5.2.2. 8 day Programme Guide Pressing GUIDE on your remote control will bring up the 8 day Electronic Programme Guide (EPG) which will show you what’s on TV over the next 8 days. Using the arrow buttons on your remote control you can move around the EPG and select individual channels or programmes. 5.2.3. TV Channel Universe Every channel has its own “Channel Universe”, which you can access by pressing the PiP button on your remote control, while you are watching the channel. The programme will move into the top right hand side of the screen and you will be able to: o View the recordings which you’ve made from that channel. o Find out about the programmes coming up on that channel. o Read the synopsis for the current programme. o See what’s on next on that channel. 5.2.4. Recording TV Only free to air digital TV programmes can be recorded to the hard drive of your Sure TV Box. To record something now: You can start to record a TV programme that you’re watching by pressing the RECORD (REC) button on your remote control. You can then either press OK to record the remainder of the programme, or change what time the recording should stop. To record something later: To set up a recording for a TV programme which is due to air later, you can use one of the following methods: o o Press the GUIDE button on your remote control and scroll through to find the correct channel using the LEFT/RIGHT arrow buttons. Browse through TV listings over the next 8 days using the UP/DOWN arrow buttons and press RECORD when you’ve found the programme which you wish to record. You can press RECORD again to bring up the Recording Options which include the ability to set repeat recordings, to modify the start and end times of a recording and to cancel the recording. On the vertical channel list, find the correct channel and browse through the scheduled programmes using the RIGHT arrow button on your remote control, until you find the programme which you wish to record. Press the RECORD button and set the recording ahead of time. 11 You can press RECORD again to bring up the Recording Options which include the ability to set repeat recordings, to modify the start and end times of a recording and to cancel the recording. o On the horizontal channel list, find the correct channel and browse through the scheduled programmes using the UP arrow button on your remote control, until you find the programme which you wish to record. You can skip ahead 24 hours by using the FAST-FORWARD button your remote control. Press the RECORD button and set the recording ahead of time. You can press RECORD again to bring up the Recording Options which include the ability to set repeat recordings, to modify the start and end times of a recording and to cancel the recording. To stop or modify a current recording: If a programme has started to record and you change your mind, you can change or stop the recording at any time by switching to the channel which you’re recording and pressing the RECORD button on your remote control. This will pull up the recording menu and you can choose to either change or stop the current recording. To modify or cancel a scheduled recording: If you’ve set a recording ahead of time and then change your mind, you can cancel or modify the recording by selecting the programme in the EPG and then pressing the RECORD button to display the recording menu and you can choose to either change or stop the recording, ahead of time. To manage and view your recordings: Press MENU at any time to go to the Home screen and select Recordings from the menu. Here you’ll see all of the recordings on your Sure TV Box, as well as all of your scheduled recordings. You can modify your scheduled recordings from this screen and you can also set new recordings from here. To resolve a recordings conflict: If you try to set too many TV programmes to record at once, you’ll see a conflict resolution screen appear. You will be presented with the options to either delete one of the scheduled recordings, or to resolve the conflict by modifying the record start and/or end times for both or one of the programmes. Setting a reminder: To set a reminder to make sure that you don’t miss your favourite programmes, go to your main Guide or vertical/horizontal EPG, or even a channel universe and find the programme which you want to watch. Press OK on the programme will set a reminder on your Sure TV Box, and later, a reminder will appear on your screen just before your programme starts. 12 5.2.5. My TV Recordings Pressing Menu at any point will take you to the Home Menu screen. Here you can select My TV recordings and where you can view and access all of your recorded Freeview TV programmes. By choosing the relevant menu option you’ll be able to see all of your completed recordings, any scheduled recordings and the remaining free space on your Sure TV Box’s hard drive. Once you have chosen the menu option you want, use the RIGHT/LEFT arrow buttons to browse through your recordings. When you want to view a recorded programme, just bring it to the front and press OK. At any point during the playback of TV recordings, you can press the OK button on your remote control to open the Play menu and Programme Options, which will give you access to: o The play counter o Subtitles, including closed captions o Language and audio modes if available o Programme display format if available Using the UP/DOWN arrow buttons to select one of the option modes, you can then use the LEFT/RIGHT arrow buttons to choose from the available options. You can also see what recordings you have per channel via the Vertical EPG by pressing UP/DOWN to select the channel of interest then press LEFT on the selected channel to browse each recording you have on that channel – then simply press OK to play. 5.2.6. Subtitles Some programmes feature Subtitles for enhanced viewing – please note this feature is only available on Freeview (over the aerial) channels and not on the Sure Broadband Channels. To access Subtitles simply: Tune to a Freeview channel Press OK on the remote to access the live channel menu Press DOWN to access the Subtitle Menu o To turn on: Press RIGHT to select “English” and press OK. o To turn off: Press RIGHT to select “None” and press OK. 13 5.2.7. Audio Description Some programmes on Freeview feature Audio Description to enhance viewing for people with sight impairment. This feature is not available on the Sure Broadband Channels. To access Audio Description you must first enable the option from the menu and then enable it on the specific channel/programme of interest. Firstly from MENU go to Settings then PROGRAMME SETUP. Select AUDIO DESCRIPTION and then ACTIVATE. Then whilst watching a programme featuring Audio Description: Press “OK” on the remote to open the live channel menu, then press UP/DOWN to access the Audio Description options, and simply select “English” to turn it on, or “None” to turn it off. 14 5.2.8. Source Selection If you live in an area that receives additional coverage due to “spillover” from UK/Ireland TV transmitters - you may find you receive some of the Sure Broadband Channels via your aerial too (Typically IOM only, North/west coasts). By default your Sure TV Box may give the broadband channel priority. Normally this is not an issue however should you wish to manually choose the Aerial Source over the broadband source simply follow the below steps: Whilst watching a live channel (that is available via Sure Broadband and through your standard aerial coverage) Press “OK” on your remote to access the live channel menu. Press UP/DOWN to scroll through the menus until you see the “Modify the source of the channel” Use LEFT/RIGHT to select the channel choice Over the aerial channels have their standard name e.g. “CITV” Broadband channels have an “@” in the name e.g “CITV @” 15 5.3. Sure TV Online Features To access the full Sure TV range of online services, your Sure TV Box must be connected to the Internet. Please note that we recommend you have at least 2Mbps of bandwidth available to enjoy a full quality service. If you are concurrently using other internet services on the same connection as Sure TV there may be some service degradation and not all features may be available if not using a Sure Broadband connection. 5.3.1. My Island “My Island” can be accessed from the Sure TV Menu – or by selecting channel “0” whilst watching Sure TV. My Island is a local information portal from Sure providing a quick and easy to use way to view local news/weather/webcams and much more. You can select to view news from Guernsey, Jersey and Isle of Man by selecting from the on screen menus - or jump straight to your own Island information with the Green button. 5.3.2. My Island On Demand Sure TV also has a growing range of locally produced and locally focused video available to watch on demand. Access My Island on Demand through the Sure TV Menu. 16 5.3.3. Film4oD If you've already registered on Film4oD.com you can log in on the Sure TV Film4oD app and watch your rentals on your TV. Simply open the Film4oD app from the Sure TV menu and use the UP/DOWN arrow buttons to select film categories like Comedy or Action, New Releases (for the latest films), Best Sellers (for the most popular titles) or Seasons (for great ideas on what to watch). The first time you rent a film you will need to complete the payment on Film4oD.com and store your credit/debit card details. You will only need to do this once. Once you've paid for your film on Film4oD.com and stored your card details, you'll be able to rent a film on your TV using your card's three digit security code. The films you rent online will also appear in Sure TV. If you have any queries regarding your Film4oD account or films you've rented, please contact Film4oD customer services here 0800 195 3080 or go to http://film4od.film4.com/help/. Film4oD telephone support lines are open 12pm-11pm, Sunday to Thursday and 12pm-12am on Friday and Saturday. New Film4oD users: How to set up a Film4oD account: If you haven't registered on Film4oD please go to Film4oD.com to complete your registration and activate your account. Click “Login/Register” as circled above and complete the registration form. Once you've completed the registration you will receive an activation email. Please click on the link on the email to activate your account. You will then be able to log in on the Sure TV Film4oD app using your registered email and password. The first time you rent a film you will need to complete the payment on Film4oD.com and store your credit/debit card details. You will only need to do this once. Once you've paid for your film on Film4oD.com and stored your card details, you'll be able to rent a film on your TV using your card's three digit security code. The films you rent online will also appear in My Rentals on your TV. You can find out more here: http://film4od.film4.com/Help/ 17 5.3.4. Guernsey FC TV Access the GFCTV app from the main Sure TV Menu to watch match highlights on demand, or login with your existing http://www.guernseyfc.tv/ subscription to watch live matches from the comfort of your own home. If you don’t already have a Guernsey FC TV subscription you can sign up at http://www.guernseyfc.tv/. Live matches: o When a live game is on press Play on the remote control to start the live feed (if you are not logged in it will ask you to enter your GFCTV account details). If a live game is not currently available the full previous match will play instead. Fixtures: o A list of Guernsey FC upcoming matches will be displayed here, scroll through the matches by using Left/Right to see when the next live game will be shown. Highlights: o Video highlight of previous matches can be watched here, simply scroll through the matches using Left/Right, press OK to view more information or Play to watch the highlights. 5.3.5. Remote Record App Sure TV also has a companion Smartphone app for viewing programme listings and setting up recordings remotely. Available for iPhone and Android devices: simply search for “Sure TV” in the Apple/Google Play stores. When you first open the app it will ask you to select your region, simply press the image of your island to continue. Then in order to setup remote recording to your Sure TV Box, press the settings button, press “Connect Box” and follow the on screen instructions. Drag the time bar left or right to view what’s on at a certain time, click “date” in the top left corner to select a different day, and tap any programme of interest to view the synopsis information and/or set up a recording. 18 5.4. Using The Media Centre Your Sure TV Box will recognise and play compatible media stored on your home network if it has been setup to support DLNA. Please note that some files which you have downloaded to your computer may have digital rights controls which will not allow you to play them back on another device. Your Sure TV Box will detect the shared Window’s Media Player (WMP) content. In order to read your files with your Sure TV Box, you will need Windows Media Player version 11 or higher. WMP11: To view files from your PC on your TV, open Window’s Media Player on your PC. Click on Library on the left side of the window and click on Media Sharing. Select the option to Share media and click Ok to save. Your Sure TV Box will be identified as Unknown Device. Select the unknown device and click “Allow” then “Ok”. WMP12: To view files from your PC on your TV, open Window’s Media Player on your PC. Click on “Stream” from the horizontal menu and Select “Automatically allow devices to play my media”. You can also use other third party UPnP Media Server software which is available for PCs and MACs, such as TVersity or EyeConnect. Please note that the presentation of the content on your networked devices are provided by your media server (e.g. Window’s Media Player) therefore your media server may not display all of your media flies. You will be able to play the following unprotected flies on your Sure TV Box: o Music: MP3, FLAC, WAV and WMA o Video: WMV, MPEG, H.264, FLV, MOV and AVI o Pictures: JPEG, GIF, PNG and TIFF You can also connect supported external storage devices to the USB port of your Sure TV Box. To be compatible, your storage device must be a standard “mass storage” device formatted in FAT, FAT32, ext3 or NTFS. This includes most USB storage devices, portable hard drives and many MP3 players and digital cameras. If you are having trouble setting up media sharing please consult the user manual of the application/operating system you are using as we cannot provide instructions on 3rd party software. However if you are using Windows 7 and Windows Media Player 12 there is a useful guide from Microsoft available here: http://blogs.msdn.com/b/e7/archive/2009/05/12/media-streaming-with-windows-7.aspx 19 6. Additional Information 6.1. Setup and Diagnostics The Setup and Diagnostics menu can be found as a menu option on the Home page, which you can access at any time by pressing Menu on your remote. 6.1.1. o o o o 6.1.2. o o o o 6.1.3. o o o o 6.1.4. o o o o 6.1.5. o o 6.1.6. o o o Information and Diagnostics Sure TV Box Information: General information regarding your Sure TV Box – you will need this information when you contact support. USB Device Information: Information about USB devices connected to your Sure TV Box. Licensing and Copyright: Software licence and copyright information. Reset: Options for resetting your Sure TV Box Programme Setup Display Format: You can set your Sure TV Box to display in the most suitable screen ratio for your TV. Default Audio Track: This is the preferred broadcast language. Subtitles Preferences: You can select the language of subtitles when available. Preferred Audio Mode: Choose from Best Fit, Dolby Digital or Stereo. Parental Control Change Parental PIN: You can modify your Parental Control PIN. Certification Restrictions: Choose to restrict TV content above a specific age rating. Channel Blocking: Select individual channels which can be PIN-protected. Application Blocking: Select individual applications which can be PIN-protected. Channel Tuning-In Edit Your Channel List: Select individual channels which you can hide. Channel Tuning-In: Select this option to start the automatic channel tuning in process. Manual Tuning-In: You can manually tune your Sure TV Box in by using these advanced settings. Reception Information: Check the signal strength and quality of each of your TV channels o If your signal strength and quality are below 50% you may experience issues and will need to review your coverage and/or aerial alignment with an aerial installation company. Audio and Video Setup TV Resolution (HDMI): Select the HDMI video resolution to match that of your HDTV. HDMI Audio Output: Enable audio out via HDMI to your HDTV screen Network Connection Network Settings: Connect the Sure TV Box to your home network, either automatically or manually. Connect Via Ethernet: This is the recommended method of connecting to your internet connection. Connect Via Wi-Fi: If your Sure TV Box is too far from your router, you can connect your Sure TV Box to the network wirelessly. 20 6.2. Standby Mode Pressing the power button on your remote control will set your Sure TV Box to standby. If you press the power button again your Sure TV Box will turn back on. Your Sure TV Box will continue to make scheduled recordings while it’s in standby mode. 6.3. Sleep Mode Sleep mode happens automatically when your box has not been used in a long time – this is primarily to reduce power consumption. To wake the box from deep sleep press the Power button on the remote and the Sure TV box will power on completely after approximately 30 seconds. Holding the power button on your remote control for a few seconds will set your Sure TV Box to Sleep Mode. Putting the box to sleep will turn off the hard disk to save power, it will still wake up to make any scheduled recordings, but remote recordings may require 24 hours notice when the box is in sleep mode. 6.4. Updates While your Sure TV Box is connected to the Internet, it will be able to receive software updates. These will automatically download and install any software upgrades as soon as they are made available. Please do not press any buttons on your remote control when your Sure TV Box is upgrading, and once the upgrade is complete your Sure TV Box will automatically re-boot. 6.5. Reset Options See section 6.1.1. Information and Diagnostics where you can find your reset options. Reset EPG: This option will clear the data from your Programme Guide – only use this if you need to force a refresh of the Programme Listings. Reset settings: This option will reset all of the settings on your Sure TV Box, including preferences, scheduled recordings and digital rights. Format hard disk: This will reset the hard drive on your Sure TV Box and erase your recorded and downloaded programmes. Check hard drive: Select this option to check the hard drive for errors. Delete all PVR recordings: This option will delete all of the contents of your Sure TV Box’s hard drive. Additionally, you can find a button on the underside of your Sure TV Box which you can use to reset the Sure TV Box if you run in to any problems. This will not wipe your hard drive. 21 7. Troubleshooting If you have encountered a problem with your Sure TV Box, we recommend restarting your Sure TV Box by pressing the button on the underside of the device. You could also switch off your Sure TV Box at the power socket, wait for 10 seconds and then switch it back on again. If you’re still having trouble, take a moment to check all of your cables and connections and ensure that all of the plugs and wires are correctly inserted into the appropriate connections. Check that your TV is plugged into the power supply, that it is switched on and that you have selected the appropriate AV/HDMI channel for your Sure TV Box. 7.1. Remote control If your Sure TV Box has stopped responding to your remote control, first try restarting your Sure TV Box. Once your Sure TV Box has restarted, check the LED on the front of the Sure TV Box – if the LED does not flash when you press a button on the remote control, then the problem lies with your remote. Try removing and reinserting the batteries. If this does not help to resolve the issue, replace the remote control batteries. Once you have tried to use your remote control with new batteries, or if the LED on the Sure TV Box flickers but the Sure TV Box doesn’t respond, please call our contact centre: Guernsey Jersey Isle of Man 01481 700 700 0808 10 15 247 07624 247 247 If your remote has been lost or broken, please visit your local Sure Store where you can purchase a replacement. 7.2. Digital TV reception The level of reception which you will receive will depend on the area in which you’re living. It is possible that an aerial upgrade will be required. You can check the reception on each of your television channels by navigating to Reception Information when you visit the Channel Tuning-In menu in the Setup and Diagnostics section of your Sure TV Box. If you’re having some problems with your digital television reception, try the following steps: o o o o Check that your aerial cable is connected to your TV aerial correctly. Go to Setup and Diagnostics and then to Channel Tuning-In. Try tuning in your Sure TV Box by starting the automatic tuning in process by going to Channel Tuning-In. Make sure that the channels which you’re having problems with, are available in your area by going to http://www.freeview.co.uk/availability and entering your postal code. Try using an aerial booster – an inexpensive small piece of equipment which you can purchase at any good electrical retailers. This may help to improve your signal. 22 7.3. Picture Quality Check that your Sure TV Box is plugged in and connected to your TV properly, using the HDMI cable supplied. Make sure that you have selected the right HDMI/AV channel to view your Sure TV Box. Make sure that the HDTV output mode of the Sure TV Box is set to one of the HD modes available. Try re-starting your Sure TV Box if you still cannot see anything on the screen, and once you’ve tried that and are sure that the Sure TV Box is powered up, connected and that your TV is on the correct HDMI/AV channel, contact support if you’re still having problems with the picture. 7.4. Connectivity If you’re having problems connecting to your home network, please start by making sure that the internet in your home is working. You can verify this by checking the connection on your PC. Once you’ve established that your internet connection is up and running, check the Ethernet connection between your Sure TV Box and your home router. If you are connected to the router using Wi-Fi, make sure that the layout of your home allows your Sure TV Box to detect the Wi-Fi network. Remember that your Wireless Security Key is case sensitive so be sure that you’ve entered it in correctly. 7.5. The EPG If you’re having problems with your programme guide and information is not loading properly, please remember that the information in the guide is provided by the broadcasters and there can be last minute schedule changes and updates. Try re-starting your Sure TV Box and wait a few minutes to see if the information loads. 7.6. Hard disk It is important to make sure that you’ve left enough space on your hard drive to use for new recordings. 23