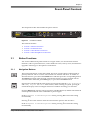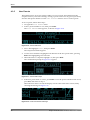
1
® Dolby LM100 Broadcast Loudness Meter User’s Manual Issue 4 Part Number 91846 Dolby Laboratories, Inc. Corporate Headquarters Dolby Laboratories, Inc. 100 Potrero Avenue San Francisco, CA 94103‐4813 USA Telephone 415‐558‐0200 Fax 415‐863‐1373 www.dolby.com European Headquarters Dolby Laboratories, Inc. Wootton Bassett Wiltshire SN4 8QJ England Telephone 44‐1793‐842100 Fax 44‐1793‐842101 DISCLAIMER OF WARRANTIES: EQUIPMENT MANUFACTURED BY DOLBY LABORATORIES IS WARRANTED AGAINST DEFECTS IN MATERIALS AND WORKMANSHIP FOR A PERIOD OF ONE YEAR FROM THE DATE OF PURCHASE. THERE ARE NO OTHER EXPRESS OR IMPLIED WARRANTIES AND NO WARRANTY OF MERCHANTABILITY OR FITNESS FOR A PARTICULAR PURPOSE, OR OF NONINFRINGEMENT OF THIRD‐PARTY RIGHTS (INCLUDING, BUT NOT LIMITED TO, COPYRIGHT AND PATENT RIGHTS). LIMITATION OF LIABILITY: IT IS UNDERSTOOD AND AGREED THAT DOLBY LABORATORIES’ LIABILITY, WHETHER IN CONTRACT, IN TORT, UNDER ANY WARRANTY, IN NEGLIGENCE, OR OTHERWISE, SHALL NOT EXCEED THE COST OF REPAIR OR REPLACEMENT OF THE DEFECTIVE COMPONENTS OR ACCUSED INFRINGING DEVICES, AND UNDER NO CIRCUMSTANCES SHALL DOLBY LABORATORIES BE LIABLE FOR INCIDENTAL, SPECIAL, DIRECT, INDIRECT, OR CONSEQUENTIAL DAMAGES (INCLUDING, BUT NOT LIMITED TO, DAMAGE TO SOFTWARE OR RECORDED AUDIO OR VISUAL MATERIAL), COST OF DEFENSE, OR LOSS OF USE, REVENUE, OR PROFIT, EVEN IF DOLBY LABORATORIES OR ITS AGENTS HAVE BEEN ADVISED, ORALLY OR IN WRITING, OF THE POSSIBILITY OF SUCH DAMAGES. . Dolby and the double‐D symbol are registered trademarks of Dolby Laboratories. Dialogue Intelligence is a trademark of Dolby Laboratories. All other trademarks remain the property of their respective owners. © 2008 Dolby Laboratories. All rights reserved. ii Part Number 91846 Issue 4 S08/17486/19783 Dolby® LM100 Broadcast Loudness Meter User’s Manual Regulatory Notices FCC NOTE: This equipment has been tested and found to comply with the limits for a Class A digital device, pursuant to Part 15 of the FCC Rules. These limits are designed to provide reasonable protection against harmful interference when the equipment is operated in a commercial environment. This equipment generates, uses, and can radiate radio frequency energy and, if not installed and used in accordance with this instruction manual, may cause harmful interference to radio communications. Operation of this equipment in a residential area is likely to cause harmful interference in which case the user will be required to correct the interference at his own expense. Canada This Class A digital apparatus complies with Canadian ICES‐003. EU/EMC This unit complies with the EMC requirement of EN55103‐1 and EN55103‐2 when operated in an E2 environment in accordance with this manual. Important Safety Instructions 1. Read these instructions. 2. Keep these instructions. 3. Heed all warnings. 4. Follow all instructions. 5. Do not use this apparatus near water. 6. WARNING: To reduce the risk of fire or electric shock, do not expose this apparatus to rain or moisture. 7. Clean only with dry cloth. 8. Do not install near any heat sources such as radiators, heat registers, stoves, or other apparatus (including amplifiers) that produce heat. 9. No naked flame sources, such as lighted candles, should be placed on the apparatus. 10. Protect the power cord from being walked on or pinched, particularly at plugs, convenience receptacles, and the point where they exit from the apparatus. 11. Only use attachments/accessories specified by the manufacturer. 12. Unplug this apparatus during lightning storms or when unused for long periods of time. 13. Refer all servicing to qualified service personnel. Servicing is required when the apparatus has been damaged in any way, such as the power‐supply cord or plug is damaged, liquid has been spilled or objects have fallen into the apparatus, the apparatus has been exposed to rain or moisture, does not operate normally, or has been dropped. 14. Do not expose the apparatus to dripping or splashing; no objects filled with liquids, such as vases, shall be placed on the apparatus. Dolby® LM100 Broadcast Loudness Meter User’s Manual iii 15. CAUTION: Troubleshooting must be performed by a trained technician. To reduce the risk of electric shock, do not attempt to service this equipment unless you are qualified to do so. 16. Do not defeat the safety purpose of the polarized or grounding‐type plug. A polarized plug has two blades with one wider than the other. A grounding type plug has two blades and a third grounding prong. The wide blade or the third prong is provided for your safety. If the provided plug does not fit into your outlet, consult an electrician for replacement of the obsolete outlet. 17. This apparatus must be earthed (grounded) by connecting to a correctly wired and earthed power outlet. 18. Ensure that your mains supply is in the correct range for the input power requirement of the unit. 19. In order to reduce the risk of electrical shock, the power cord must be disconnected when the power supply assembly is removed. 20. This equipment is designed to mount in a suitably ventilated 19‐inch rack; ensure that any ventilation slots in the unit are not blocked or covered. 21. The mains power disconnect device for this unit is the plug‐in mains cord rather than a power switch. The mains cord must remain readily accessible for disconnecting mains power. 22. The power cord with CEE7/7 plug supplied with this unit for use in Continental Europe must be connected to a polarised mains socket, or the socket must be supplied via a residual current breaker (RCD). This power cord is not suitable for use in the UK. To use the cord in the UK cut off the CEE7/7 plug and replace with an approved BS 1363 13A plug: • The green and yellow core must be connected to the terminal in the plug identified by the letter E, or by the earth symbol , or colored green, or green and yellow. • The blue core must be connected to the terminal marked with the letter N or colored black. • The brown core must be connected to the terminal marked with the letter L or colored red. 23. This apparatus must be earthed. Fuses WARNING: Check that the correct fuses have been installed. For continued protection against risk of fire, replace only with fuses of the same type and rating. For details on fuse rating and instructions on fuse replacement, see Main Fuse on page 6. WEEE PRODUCT END‐OF‐LIFE INFORMATION This product was designed and built by Dolby Laboratories to provide many years of service, and is backed by our commitment to provide high‐quality support. When it eventually reaches the end of its serviceable life, it should be disposed of in accordance with local or national legislation. For current information, please visit our website at: www.dolby.com/environment. iv Dolby® LM100 Broadcast Loudness Meter User’s Manual IMPORTANT SAFETY NOTICE This unit complies with safety standard EN60065 as appropriate. The unit shall not be exposed to dripping or splashing and no objects filled with liquids, such as coffee cups, shall be placed on the equipment. To ensure safe operation and to guard against potential shock hazard or risk of fire, the following must be observed: o Ensure that your mains supply is in the correct range for the input power requirement of the unit. o o o Ensure fuses fitted are the correct rating and type as marked on the unit. The unit must be earthed by connecting to a correctly wired and earthed power outlet. The power cord supplied with this unit must be wired as follows: Live—Brown Neutral—Blue GB Earth—Green/Yellow IMPORTANT – NOTE DE SECURITE Ce materiel est conforme à la norme EN60065. Ne pas exposer cet appareil aux éclaboussures ou aux gouttes de liquide. Ne pas poser dʹobjets remplis de liquide, tels que des tasses de café, sur lʹappareil. Pour vous assurer dʹun fonctionnement sans danger et de prévenir tout choc électrique ou tout risque dʹincendie, veillez à observer les recommandations suivantes. o Le selecteur de tension doit être placé sur la valeur correspondante à votre alimentation réseau. o Les fusibles doivent correspondre à la valeur indiquée sur le materiel. o Le materiel doit être correctement relié à la terre. o Le cordon secteur livré avec le materiel doit être cablé de la manière suivante: Phase—Brun Neutre—Bleu Terre—Vert/Jaune F WICHTIGER SICHERHEITSHINWEIS Dieses Gerät entspricht der Sicherheitsnorm EN60065. Das Gerät darf nicht mit Flüssigkeiten (Spritzwasser usw.) in Berührung kommen; stellen Sie keine Gefäße, z.B. Kaffeetassen, auf das Gerät. Für das sichere Funktionieren des Gerätes und zur Unfallverhütung (elektrischer Schlag, Feuer) sind die folgenden Regeln unbedingt einzuhalten: D o Der Spannungswähler muß auf Ihre Netzspannung eingestellt sein. o Die Sicherungen müssen in Typ und Stromwert mit den Angaben auf dem Gerät übereinstimmen. o Die Erdung des Gerätes muß über eine geerdete Steckdose gewährleistet sein. o Das mitgelieferte Netzkabel muß wie folgt verdrahtet werden: Phase—braun Nulleiter—blau Erde—grün/gelb NORME DI SICUREZZA – IMPORTANTE Questa apparecchiatura è stata costruita in accordo alle norme di sicurezza EN60065. Il prodotto non deve essere sottoposto a schizzi, spruzzi e gocciolamenti, e nessun tipo di oggetto riempito con liquidi, come ad esempio tazze di caffè, deve essere appoggiato sul dispositivo. Per una perfetta sicurezza ed al fine di evitare eventuali rischi di scossa êlettrica o dʹincendio vanno osservate le seguenti misure di sicurezza: o Assicurarsi che il selettore di cambio tensione sia posizionato sul valore corretto. I o Assicurarsi che la portata ed il tipo di fusibili siano quelli prescritti dalla casa costruttrice. o Lʹapparecchiatura deve avere un collegamento di messa a terra ben eseguito; anche la connessione rete deve avere un collegamento a terra. o Il cavo di alimentazione a corredo dellʹapparecchiatura deve essere collegato come segue: Filo tensione—Marrone Neutro—Blu Massa—Verde/Giallo AVISO IMPORTANTE DE SEGURIDAD Esta unidad cumple con la norma de seguridad EN60065. La unidad no debe ser expuesta a goteos o salpicaduras y no deben colocarse sobre el equipo recipientes con liquidos, como tazas de cafe. Para asegurarse un funcionamiento seguro y prevenir cualquier posible peligro de descarga o riesgo de incendio, se han de observar las siguientes precauciones: E o Asegúrese que el selector de tensión esté ajustado a la tensión correcta para su alimentación. o Asegúrese que los fusibles colocados son del tipo y valor correctos, tal como se marca en la unidad. o La unidad debe ser puesta a tierra, conectándola a un conector de red correctamente cableado y puesto a tierra. o El cable de red suministrado con esta unidad, debe ser cableado como sigue: Vivo—Marrón Neutro—Azul Tierra—Verde/Amarillo VIKTIGA SÄKERHETSÅTGÄRDER! Denna enhet uppfyller säkerhetsstandard EN60065. Enheten får ej utsättas för yttre åverkan samt föremål innehållande vätska, såsom kaffemuggar, får ej placeras på utrustningen. För att garantera säkerheten och gardera mot eventuell elchock eller brandrisk, måste följande observeras: o o o o Kontrollera att spänningsväljaren är inställd på korrekt nätspänning. Konrollera att säkringarna är av rätt typ och för rätt strömstyrka så som anvisningarna på enheten föreskriver. Enheten måste vara jordad genom anslutning till ett korrekt kopplat och jordat el‐uttag. El‐sladden som medföljer denna enhet måste kopplas enligt foljande: Fas—Brun Neutral—Blå Jord—Grön/Gul S BELANGRIJK VEILIGHEIDS‐VOORSCHRIFT: Deze unit voldoet aan de EN60065 veiligheids‐standaards. Dit apparaat mag niet worden blootgesteld aan vocht. Vanwege het risico dat er druppels in het apparaat vallen, dient u er geen vloeistoffen in bekers op te plaatsen. Voor een veilig gebruik en om het gevaar van electrische schokken en het risico van brand te vermijden, dienen de volgende regels in acht te worden genomen: o Controleer of de spanningscaroussel op het juiste Voltage staat. o Gebruik alleen zekeringen van de aangegeven typen en waarden. o Aansluiting van de unit alleen aan een geaarde wandcontactdoos. o De netkabel die met de unit wordt geleverd, moet als volgt worden aangesloten: Fase—Bruin Nul—Blauw Aarde—Groen/Geel NL Dolby® LM100 Broadcast Loudness Meter User’s Manual v Table of Contents Chapter 1 Introduction 1.1 LM100 Front and Rear Panels ........................................................................................................ 2 1.2 LM100 Configurations ..................................................................................................................... 2 Chapter 2 Getting Started 2.1 Unpacking and Inspection ............................................................................................................... 3 2.2 Safety Information ........................................................................................................................... 3 2.3 Mounting.......................................................................................................................................... 4 2.4 Rear-Panel Connections ................................................................................................................. 4 2.4.1 Analog Inputs .......................................................................................................................... 4 2.4.2 Analog Outputs........................................................................................................................ 4 2.4.3 Digital Inputs............................................................................................................................ 5 2.4.4 Remote RS-485....................................................................................................................... 5 2.4.5 Alarm ....................................................................................................................................... 5 2.4.6 GPI/O ...................................................................................................................................... 5 2.4.7 NTSC ...................................................................................................................................... 5 2.4.8 LTC ......................................................................................................................................... 5 2.4.9 Power ...................................................................................................................................... 5 2.5 Using the Default Measurement Display ......................................................................................... 6 2.6 Using the Dialogue and All Display ................................................................................................. 7 2.7 Installing the Remote Software........................................................................................................ 7 2.7.1 System Requirements ............................................................................................................. 8 2.7.2 Installing the Software ............................................................................................................. 8 2.7.3 Hardware Connection.............................................................................................................. 8 2.7.4 Configuring the Unit for Remote Operation ............................................................................. 8 2.7.5 Beginning and Ending Remote Operation............................................................................... 9 2.7.6 Starting the Universal Remote Software ................................................................................. 9 Chapter 3 Front-Panel Controls 3.1 Button Functions............................................................................................................................ 11 3.1.1 Navigation Buttons ................................................................................................................ 11 3.1.2 Special Function Button Combinations ................................................................................. 12 3.2 LED Indicators ............................................................................................................................... 13 3.3 The RS-232 Connection ................................................................................................................ 14 3.4 The Headphone Connection.......................................................................................................... 14 Chapter 4 Menus 4.1 Menu Basics .................................................................................................................................. 15 4.2 The Status Menus ......................................................................................................................... 15 4.2.1 Main Status Screen ............................................................................................................... 15 4.2.2 Level Meters .......................................................................................................................... 19 Dolby® LM100 Broadcast Loudness Meter User’s Manual vii 4.2.3 Metadata Status ....................................................................................................................19 4.2.4 Digital Input Status ................................................................................................................20 4.2.5 Error Statistics .......................................................................................................................20 4.2.6 Alarm Statistics......................................................................................................................20 4.2.7 System Log............................................................................................................................21 4.2.8 System Status .......................................................................................................................21 4.3 The Main Setup Menu ...................................................................................................................21 4.3.1 Measurement Control ............................................................................................................21 4.3.2 Input Control ..........................................................................................................................22 4.3.3 Monitor Control ......................................................................................................................24 4.3.4 Alarm Control.........................................................................................................................24 4.3.5 User Presets..........................................................................................................................28 4.3.6 System Log............................................................................................................................29 4.3.7 System Settings.....................................................................................................................30 Chapter 5 Features 5.1 Measuring Equivalent Loudness ...................................................................................................33 5.1.1 Measuring Digital Sources.....................................................................................................34 5.1.2 Measuring Analog Sources ...................................................................................................34 5.1.3 Measuring RF Modulated Sources .......................................................................................34 5.2 Dialogue Intelligence .....................................................................................................................34 5.3 Measurement Methods: Short Term vs. Infinite Term ...................................................................35 5.4 Channels for Measurement ...........................................................................................................38 5.5 Alarms............................................................................................................................................38 5.6 System Log....................................................................................................................................39 5.7 Serial Ports ....................................................................................................................................40 5.8 GP I/O Port ....................................................................................................................................41 5.9 NTSC Model ..................................................................................................................................41 5.10 LTC Model ...................................................................................................................................41 Appendix LM100 Specifications...................................................................................................43 viii Dolby® LM100 Broadcast Loudness Meter User’s Manual List of Figures Figure 2-1 Figure 2-2 Figure 2-3 Figure 2-4 Figure 3-1 Figure 4-1 Figure 4-2 Figure 4-3 Figure 4-4 Figure 4-5 Figure 4-6 Figure 4-7 Figure 4-8 Figure 4-9 Figure 4-10 Figure 4-11 Figure 4-12 Figure 5-1 Figure 5-2 Figure 5-3 Figure 5-4 Figure 5-5 Rear-Panel Audio and Data Ports ......................................................................................... 4 Default Measurement Display Example ................................................................................ 7 Dialogue and All Display Example......................................................................................... 7 Universal Remote Main Screen........................................................................................... 10 LM100 Front Panel .............................................................................................................. 11 Main Status Screen Receiving a Dolby Digital Stream in Default Mode ............................. 16 Main Status Screen Receiving a Dolby Digital Stream in Leq(A) Mode .............................. 16 Main Status Screen with No Input Signal ............................................................................ 16 Main Status Screen when Receiving a Dolby E Stream...................................................... 16 Main Status Screen when Receiving a PCM Signal............................................................ 17 Main Status Screen when Receiving an Analog Signal....................................................... 17 Main Status Screen when Receiving an RF Signal ............................................................. 17 Main Status Screen Displaying a Recommended Dialnorm Setting for an Analog Input .... 19 Level Meter Displaying a Dolby E 7.1 Input......................................................................... 19 Save Preset Menu ............................................................................................................... 28 Save Preset Prompt ............................................................................................................ 28 Preset Confirmation Message ............................................................................................. 28 Listening Icon Display before Dialogue Intelligence Computes........................................... 35 Short Term Measurements.................................................................................................. 36 Short Term Dialogue Level History Example Using LM100 Logging Features ................... 37 System Log Status Menu .................................................................................................... 40 System Log Entry Detail Display ......................................................................................... 40 Dolby® LM100 Broadcast Loudness Meter User’s Manual ix List of Tables Table 3-1 Table 3-2 Table 4-1 Table 4-2 Table 4-3 Table 4-4 Table 4-5 Table 5-1 Table 5-2 Table 5-3 Table 5-4 Special Function Button Combinations................................................................................. 12 Error Conditions and Indicators ............................................................................................13 Common Reference Levels ..................................................................................................23 Input Clipping Alarm Parameters.......................................................................................... 25 Over Level Alarm Parameters ..............................................................................................26 Under Level Alarm Parameters ............................................................................................26 Dialnorm Threshold Alarm Parameters ................................................................................ 27 Application Examples for Short Term and Infinite Term Measurement Methods .................37 Available Alarm Types.......................................................................................................... 38 Alarm Output Port................................................................................................................. 39 GP I/O Port ........................................................................................................................... 41 Dolby® LM100 Broadcast Loudness Meter User’s Manual xi Chapter 1 Introduction This chapter introduces the Dolby® LM100 Broadcast Loudness Meter and covers: • LM100 Front and Rear Panels • LM100 Configurations Beset by loudness discrepancies—between programs or channels of television services— the broadcast, satellite, and cable TV industries have long required a simple method for quantifying perceived audio levels. These industries have traditionally controlled their program levels using either a PPM or VU meter, neither of which measures subjective loudness. The LM100 with Dialogue Intelligence™ features a revolutionary measurement technology capable of quantifying the subjective loudness of speech in broadcast programming. This technology has been specifically developed to analyze the input signal and make measurements only when dialogue is present. Quantifying the dialogue level simplifies a crucial step in broadcasting. When switching between programs, most home listeners adjust their television volume controls in an effort to achieve consistency in dialogue levels between programs. By properly quantifying the level of dialogue, you can ensure that the Dolby Dialogue Level metadata parameter is accurate. Setting this parameter accurately standardizes the loudness for all programs, eliminating the need for home listeners to adjust the volume. For details on Dolby metadata, see A Guide to Dolby Metadata, available at www.dolby.com/assets/pdf/tech_library/18_Metadata.Guide.pdf. The LM100 measurement algorithms yield more consistent results than either PPM or VU meters with sources that primarily contain dialogue. They comply with either ITU‐R BS.1770 Annex 1 or IEC 60804. The LM100 displays measurements in an easy‐to‐understand numerical format. You can use the LM100 in applications ranging from postproduction and quality control to final transmission and program turnaround. The LM100 accepts stereo PCM, two‐channel analog (baseband), and multichannel Dolby E and Dolby Digital (AC‐3) audio inputs. For a facility working with analog or two‐channel PCM audio, the unit can accurately quantify the subjective loudness of dialogue (and therefore the overall program level), which is useful in almost any environment where audio levels must be assessed. For facilities working with Dolby Digital or Dolby E signals, the LM100 can also measure or validate the existing dialogue level (also known as dialogue normalization, or dialnorm) parameter value within a Dolby Digital or Dolby E program by making a direct, objective comparison to the actual measured dialogue level value. The LM100 can determine the unweighted true‐peak level per ITU‐R BS.1770 Annex 2. It can also display a range of other audio signal information. The unit includes a set of user‐definable alarms and monitoring functions that can inform an operator of input loss, Dolby® LM100 Broadcast Loudness Meter User’s Manual 1 Introduction signal clipping, RF overmodulation, high or low signal levels, silence, phase errors, and incorrectly set dialogue level values. A dedicated GPI/O port provides a tally of these alarm conditions, with more extensive monitoring available through the serial ports and an internal event log. 1.1 LM100 Front and Rear Panels The front panel includes: • Controls to easily select the input source, program, and/or individual channels for measurement • Dedicated controls to pause and reset the measurement function • LEDs that indicate fault, error, and audio alarm conditions • A headphone jack with volume control For detailed information on the LM100 front panel, see Chapter 3. The rear panel provides the following: • AES3 digital input connectors with loop‐through • Two balanced analog inputs on combination XLR/quarter‐inch TRS connectors • A pair of RCA connectors for confidence and signal‐presence monitoring of the selected source • GPI/O status and alarm connectors For detailed information on the LM100 rear panel, see Chapter 2. Note: 1.2 The LM100 front‐ and rear‐panel serial interfaces provide remote control, status logging, and a means for updating software. LM100 Configurations The unit is available in the following two configurations: 2 • The LM100‐LTC includes a linear timecode input that allows signal‐condition alarm events to be logged against an external timecode (LTC) input. • The LM100‐NTSC includes an RF input specifically for CATV and NTSC “off air” television measurement applications. The RF tuner also includes a composite video output. The RF input replaces the timecode input, therefore logging in this version is referenced to the internal clock. Dolby® LM100 Broadcast Loudness Meter User’s Manual Chapter 2 Getting Started This chapter gets you started using the LM100 in a basic configuration, and includes the following sections: 2.1 • Unpacking and Inspection • Safety Information • Mounting • Rear‐Panel Connections • Using the Default Measurement Display • Using the Dialogue and All Display • Installing the Remote Software Unpacking and Inspection Before unpacking the unit, inspect the outer carton for shipping damage. If the carton shows damage, inspect the unit in those areas. Several essential items are provided with the unit, including: • Power cords for use in the United States and Continental Europe • A CD‐R containing the Universal Remote application and its documentation • A bag containing 75 ohm terminators, rackmount screws and washers, and a serial connection cable for the front‐panel RS‐232 port • Safety notices • Warranty information—fill out the warranty card and return it to Dolby Laboratories Note: 2.2 To maintain your eligibility for software upgrades, register your product on the software upgrades page at www.dolbysupport.com. Safety Information Before you begin installing your LM100, refer to the Important Safety Instructions on page iii. Dolby® LM100 Broadcast Loudness Meter User’s Manual 3 Getting Started 2.3 Mounting The LM100 is a 1‐U rackmount unit that operates at ambient temperatures of up to 50°C (122°F). It ventilates through the rear and side panels. Caution: Do not mount the LM100 directly above heat‐generating equipment. Ensure adequate ventilation. The temperature inside a poorly ventilated rack can be considerably higher than ambient room temperature. 2.4 Rear-Panel Connections The rear‐panel connections include: • AES3 digital input with loop‐through • Analog inputs and outputs • Serial ports • GPI/O ports • Power supply Make all other connections before connecting the power supply. Figure 2‐1 shows the rear‐panel audio and data connections. The upper image shows the RF Input and Video Output ports available on the LM100‐NTSC, and the lower image shows the Timecode Input port available on the LM100‐LTC. All other connectors are identical on both models. Figure 2‐1 Analog Inputs PUSH Analog Outputs PUSH Left RF Input Video Output Digital Input Alarm Right Left Right Remote RS-485 Analog Inputs PUSH GP I/O Analog Outputs PUSH Left Timecode Input Digital Input Alarm Right Left Figure 2-1 2.4.1 Right Remote RS-485 GP I/O Rear-Panel Audio and Data Ports Analog Inputs Each analog audio input jack accepts either a male XLR connector or a quarter‐inch TRS connector. The maximum input signal level is +22 dBu. 2.4.2 Analog Outputs The Left and Right Analog Outputs are provided on standard RCA connectors for confidence monitoring of the active audio program. They carry a two‐channel audio signal automatically downmixed from a multichannel signal if necessary. 4 Dolby® LM100 Broadcast Loudness Meter User’s Manual Rear-Panel Connections 2.4.3 Digital Inputs The Digital Input BNC connectors are AES‐3id compliant. The unit processes Dolby® E, Dolby Digital, and PCM audio streams, with up to 24‐bit resolution. You can use the second BNC as a passive loop‐through to connect to other equipment; otherwise it must be terminated using a standard 75 ohm termination. 2.4.4 Remote RS-485 You can use the Remote RS-485 port for software upgrades, to connect to a custom‐built remote‐control software interface, or to send system log file entries to any device that can receive ASCII text strings using the RS‐485 protocol. For details, see Section 5.7. 2.4.5 Alarm Individual signal‐condition alarms trigger pins on this port. You can connect this port to any device that can detect a TTL voltage level change. For details, see Section 5.5. 2.4.6 GPI/O Specific LM100 status information and control inputs are provided through the GP I/O port. You can use a GPI/O device with the LM100 without setting it to Remote mode. For details, see Section 5.8. 2.4.7 NTSC The LM100‐NTSC includes a standard RF Input port. Use a standard 75 ohm RF cable to connect the LM100 to either a cable TV input or an antenna receiving off‐air signals. The LM100‐NTSC Video Output is a standard composite video signal available on a female BNC connector. It allows confidence monitoring of the video for the active program. 2.4.8 LTC The LM100‐LTC includes a Timecode Input port that can read linear timecode per the SMPTE 12M specification. 2.4.9 Power Warning: Before applying power, check the main fuse using the following procedure. The LM100 uses a universal switching power supply that handles the full range of nominal mains voltages between 90 and 264 VAC and any frequency between 50 and 60 Hz. Dolby® LM100 Broadcast Loudness Meter User’s Manual 5 Getting Started Main Fuse The main fuse rating is: T 1A L (1 amp, 250 V, 20 mm, time‐lag, low breaking capacity) for all operating voltages. Warning: To reduce the risk of fire, replace fuses only with the same type and rating. The power cord must be removed from the rear‐panel connection to inspect or replace the fuse. To inspect or replace the main fuse: Slide open the fuse compartment in the AC power input housing by placing the tip of a small screwdriver in the notch. Carefully pull out the fuse carrier. Either replace the fuse with a new one, or check that the current fuse has the correct rating. Slide the fuse compartment back into place, then snap the fuse compartment closed. Internal Fuse The switching power supply contains a separate fuse. Most fault conditions should be protected by the main fuse. If you find it necessary to replace the internal fuse, be certain to replace it with a fuse of the same type and rating as printed on the switching power supply board. No Power Switch There is no power switch on the LM100. To apply power, connect the power cord to a live outlet. 2.5 Using the Default Measurement Display As soon as power is applied, the LM100 is ready to measure. The unit uses Dialogue Intelligence™ to compute Infinite Term loudness for all channels measured according to ITU‐R BS.1770 Annex 1, and the loudest true‐peak level computed according to ITU‐R BS.1770 Annex 2 for any current channel. True‐peak measurements have an instant attack, a peak hold of 0.75 second, and a constant decay of 12 dB ± 2 dB per second following the peak hold. Figure 2‐2 shows an example screen. Figure 2‐2 Figure 2-2 6 Default Measurement Display Example Dolby® LM100 Broadcast Loudness Meter User’s Manual Using the Dialogue and All Display Pressing the Enter button allows you to cycle through three peak displays: • The default ITU‐R method without channel indication • The default ITU‐R method with channel indication • The existing unweighted peak measurement The LM100 is a very flexible instrument. Subsequent chapters in this manual provide the details on how to set the LM100 up for optimal measurement of any input in any environment. 2.6 Using the Dialogue and All Display When Dialogue Intelligence, Infinite Term, and ITU‐R measurement are all enabled, the LM100 allows you to compare at a glance the measured value of just the dialogue and the measured value of all the channels in the program. Figure 2‐3 shows an example screen. Figure 2‐3 Figure 2-3 Dialogue and All Display Example This is not a default behavior. You must enable it on the System Settings menu as described in Section 4.3.7. 2.7 Installing the Remote Software We strongly recommend that you continue on to install the remote management software. Universal Remote provides quick access to the LM100ʹs functions, including some that are not available from the unit front panel. Use of Universal Remote allows the LM100 to be located in another room or at a distance from the operator. While Universal Remote is in operation, the Remote button on the front panel of the unit is lit and access to the setup menu via the front‐panel buttons is disabled. Note: 2.7.1 The RS‐232 specification limits serial cable length to 50 feet. Using low capacitance cables can, however, extend this limit up to 147 feet. Refer to the specification for exact information. System Requirements Universal Remote can be run on a PC that meets these minimum requirements: • 166 MHz Pentium® processor • 32 MB RAM • 10 MB available hard drive storage • Super VGA video card with at least 800 × 600 resolution • Sun™ JRE™ 1.5 or later installed Dolby® LM100 Broadcast Loudness Meter User’s Manual 7 Getting Started Dolby provides a JRE with the Universal Remote software. You do not need to reinstall it if the JRE is already in place. 2.7.2 Installing the Software Universal Remote software is provided on the DPN 82125 LM100 Resources CD that is packed with your LM100. We recommend that you visit www.dolbysupport.com to verify that you have the most recent release. To download software, follow the instructions on the site. Once you have downloaded the software to your machine, simply double‐click the executable file labeled unirem_x.x.x-installer_xxx.exe and follow the prompts. 2.7.3 Hardware Connection To connect the LM100 to its remote control device, use a serial cable from your computer to either the front‐panel Remote RS-232 port or the rear‐panel Remote RS-485 port. Note: 2.7.4 You can use a USB‐to‐serial adapter to connect the serial cable to a laptop. However, these adapters occasionally cause enough delay to interfere with data communications. This problem is mostly likely to occur during firmware upgrades. Take care to establish the best possible connection before beginning an upgrade. Configuring the Unit for Remote Operation An LM100 arrives preconfigured to communicate with the remote application at 115,200 baud, using the unit address 8280. The remote response from the unit is fastest at 115,200 baud, so we recommend using that rate if possible. The unit does support slower communication rates. The unit address is only important when more than one LM100 is attached to the same COM port. Contact Technical Support if you need assistance with unit addressing. You can change the default remote operation settings from the unit front panel on the System Settings portion of the Setup menu. Follow these steps. 2.7.5 1. At the main status screen, press the Setup button. 2. At the main Setup menu, press until the LCD second line reads System Settings (seven times). 3. Press Enter. 4. Press . The second line reads Baud Rate. Press Enter if you need to change it. Then press until the baud rate you wish to use appears in the display. Then press Esc to return to the main system settings menu. 5. Press twice. The second line reads Unit Address. Press Enter if you need to change it. 6. Enter a new unit address. Beginning and Ending Remote Operation To begin remote operation, on the LM100 unit front panel, press and release Shift once so that the button lights up, then press . While in Remote mode, the front‐panel LED labeled 8 Dolby® LM100 Broadcast Loudness Meter User’s Manual Installing the Remote Software Remote glows green, and setup commands cannot be made from the unit front panel. The status menus continue to display accurate unit status in Remote mode. To end remote operation, press Shift then again. 2.7.6 Starting the Universal Remote Software To start the remote software in Windows™: 1. Go to Programs > Universal Remote. 2. Click Universal Remote. The machine displays the main application screen shown in Figure 2‐4. Figure 2‐4 Figure 2-4 3. Universal Remote Main Screen Connect to one of your configured devices to begin work. See the online help for detailed information on using the Universal Remote effectively. Dolby® LM100 Broadcast Loudness Meter User’s Manual 9 Chapter 3 Front-Panel Controls This chapter describes the LM100 front‐panel controls. Remote Broadcast Loudness Meter Brightness Shift Enter Status Setup Reset Esc Pause Audio Alarm Fault Error Remote RS-232 Model LM100 Figure 3‐1 Figure 3-1 LM100 Front Panel The material includes: 3.1 • Section 3.1 Button Functions • Section 3.2 LED Indicators • Section 3.3 The RS‐232 Connection • Section 3.4 The Headphone Connection Button Functions You use the LM100 front‐panel buttons to navigate menus, for measurement related functions, and for special functions, such as hardware resets, factory resets, and firmware upgrades. Following is a description of each button. 3.1.1 Shift Remote Navigation Buttons The front‐panel buttons control the LM100. The front of each button is labeled with its primary function. Above or below some buttons are alternate functions. To enable an alternate function, press the LM100 Shift button and then press the corresponding button. The Shift button lights when pressed, and remains lit until you press a button with an associated shift command, press Shift again, or press the LM100 Esc button. Pressing scrolls through the status menus. In setup menus and the Dolby E Metadata and Dolby Digital Metadata status menus, when selecting an option, pressing returns the display to the next‐higher menu level without activating your selection. Pressing Shift then activates remote operation. The button is lit, and the unit remains in remote operation until the same combination is pressed again. In the Headphone Volume or Brightness menu, pressing decreases the setting incrementally. Pressing moves the selection from the current menu option to the one above. In the Headphone Volume or Brightness menu, pressing increases the setting incrementally. Dolby® LM100 Broadcast Loudness Meter User’s Manual 11 Front-Panel Controls In the main status screen, pressing Shift, increases the RF channel number when the RF input is selected. Pressing moves your selection from the current menu item to the one below. In the Headphone Volume or Brightness menu, pressing decreases the setting incrementally. In the main status screen, pressing Shift, decreases the RF channel number when the RF input is selected. Brightness Pressing scrolls through the status menus. In setup menus and the Dolby E Metadata and Dolby Digital Metadata status menus, when a menu option is selected, pressing displays the submenu for that option. Pressing Shift, displays the Brightness menu. When you select a menu option, pressing Enter displays the submenu for that option. Enter In the Main Setup menu, when a parameter setting is selected, pressing Enter activates the selected parameter and displays the next‐higher menu level. In the main status screen, pressing Enter scrolls through the display options on the right side of the screen. Status Setup In a status menu, pressing Setup displays the last setup menu viewed. In a setup menu, pressing Setup displays the Main Setup menu. In a setup menu, pressing the Status combination (Shift then Setup) displays the last status menu viewed. In a status menu, pressing Status displays the main status screen. Esc Pressing Esc returns the display to the next‐higher menu level without activating a selected parameter. In the Headphone Volume or Brightness menu, pressing Esc returns the display to the last menu viewed. Reset and Pause are dedicated controls for measuring loudness. For details on loudness measurement functions, see Section 5.1. 3.1.2 Special Function Button Combinations In special cases, you may need to reset the LM100 or upgrade the firmware. Table 3‐1 shows the button combinations to press for each of these special functions. Table 3-1 Special Function Button Combinations Function Hardware Reset Firmware Upgrade 12 Action/Result Press Shift, Esc and simultaneously to reboot the LM100. During reboot, press and hold Setup; the status display provides you with the option of upgrading the unit firmware or completing the boot sequence. Dolby® LM100 Broadcast Loudness Meter User’s Manual LED Indicators Table 3-1 Special Function Button Combinations (continued) Function Action/Result During reboot, press and hold Enter; the status display provides you with the option of restoring factory defaults or completing the boot sequence. Factory Reset Note: Restoring factory defaults includes all presets and GPI/O configuration assignments. 3.2 LED Indicators The Audio Alarm indicator is illuminated if a user‐configurable signal‐condition alarm is triggered, as described in Section 5.5. The Error indicator is illuminated when an error prevents the unit from processing the selected input correctly (for example, if there is a loss of input signal or the input signal does not match the requirements for the selected input type). Error conditions are detailed in Table 3‐2. When the Error indicator is triggered, the Error Stats status menu provides more information regarding the source of the error, as detailed in Table 3‐2. Note: The Fault indicator is illuminated if there is an LM100 hardware fault. Figure 3‐2 Table 3-2 ( Error Conditions and Indicators Menu Display Invld Frmt (Invalid format) Error The input format does not match the selected decode format. The input is a valid PCM signal, but the sampling rate is not 32 kHz, 44.1 kHz, or 48 kHz. Invld Prog The input is a valid Dolby® E signal, but the selected Dolby E program number is not (Invalid program) present in the input stream. DE Frm Dsc The Dolby E frame count is not continuous, (Dolby E frame discontinuity) indicating a missing frame or edit. Invld AES Ch The input is a valid Dolby Digital signal, but the selected AES3 channel contains an invalid (Invalid AES channel) bitstream. Invld Bstr The digital input is selected, but the unit is receiving a bitstream that is not Dolby E or (Invalid bitstream) Dolby Digital. No Input Input is missing. Invld Rate Corrective Action Check the input signal format or change the selected decode format. Use the correct sampling rate. (Invalid rate) Select a valid program number for the input stream. Check the Dolby E stream. Select a valid AES3 channel setting. Provide a valid bitstream. Change the input selection or check the input source. Invld Ch Md The input is a valid Dolby E signal, but the Check the channel mode configuration metadata indicates more channels than exist in parameter within the selected (Invalid channel mode) the selected program. program in the Dolby E stream. Check the Dolby E stream. RF Ov Prot The Dolby E metadata RF overmodulation (RF overmodulation protection protection parameter is enabled in one or more of the programs. enabled) No DD Md (No Dolby Digital metadata) Dolby E metadata does not contain Dolby Digital metadata. Dolby® LM100 Broadcast Loudness Meter User’s Manual Check the Dolby E stream. 13 Front-Panel Controls Table 3-2 Error Conditions and Indicators (continued) Menu Display Error The unit is uncalibrated. Uncal (Uncalibrated) 3.3 Corrective Action Return the unit to the factory for calibration. The RS-232 Connection The Remote RS-232 port can be used for software upgrades, to connect to a custom‐built remote‐control software interface, or to send LM100 system log file entries to any device that can receive ASCII text strings using RS‐232 protocol. For details, see Section 5.7 Serial Ports. Note: 3.4 Connecting a cable to this port disables the rear‐panel Remote RS-485 port. The Headphone Connection You can connect headphones to the LM100 for confidence monitoring of the active program. To adjust headphone volume, press the front‐panel button combination Shift then Enter. 14 Dolby® LM100 Broadcast Loudness Meter User’s Manual Chapter 4 Menus This chapter explains how to navigate through the Dolby® LM100 menus. It also provides a detailed description of the status menus and the main setup menu. The material includes: 4.1 • Menu Basics • The Status Menus • The Main Setup Menu Menu Basics The LM100 front‐panel screen displays status menus that show the current measurement and settings, and setup menus that control the LM100 functions. The status menus and main setup menu are separate structures. To view the main setup menu when a status menu is displayed, press Setup. To view a status menu when a setup menu is displayed, press the button combination: Shift then Setup. Note: 4.2 If you do not press a front‐panel button within the interval set on the Screen Saver Timeout setup menu, the LM100 displays a screen saver that inverts the display. Pressing any front‐panel button returns the screen to normal. The Status Menus The status menus display the current measurement values and active settings for a selection of setup parameters and the condition and content of input signals. The main status screen shows the current measured loudness value and information regarding the input stream status. You can display additional input stream status information by pressing the and buttons to scroll through the other status menus. 4.2.1 Main Status Screen When you power on the LM100, the main status screen appears. It is the most important LM100 screen, as it shows the measured loudness values. This menu is usually divided into three sections, although one display option divides the screen into two sections. Examples of the main status screen appear in Figure 4‐1, Figure 4‐2, and Figure 4‐3. Dolby® LM100 Broadcast Loudness Meter User’s Manual 15 Menus Figure 4‐1 Figure 4-1 Main Status Screen Receiving a Dolby Digital Stream in Default Mode Figure 4-2 Main Status Screen Receiving a Dolby Digital Stream in Leq(A) Mode Figure 4-3 Main Status Screen with No Input Signal Figure 4‐2 Figure 4‐3 Input Identifier The input stream is identified in the upper left section of the display. When the source is Dolby Digital, the channel mode appears. If an LFE channel is included, it is indicated by an L to the right of the channel mode. Immediately next to the channel mode, the data rate in kbps appears. When the source is Dolby E, the screen displays the program configuration, the bit depth of the Dolby E stream, and the currently selected program, as shown in Figure 4‐4. Figure 4‐4 Figure 4-4 Main Status Screen when Receiving a Dolby E Stream When the source is PCM, the sample rate appears, as shown in Figure 4‐5. 16 Dolby® LM100 Broadcast Loudness Meter User’s Manual The Status Menus Figure 4‐5 Figure 4-5 Main Status Screen when Receiving a PCM Signal When the input is an analog signal, no additional information appears, as shown in Figure 4‐6. Figure 4‐6 Figure 4-6 Main Status Screen when Receiving an Analog Signal When the input is an RF signal, the channel number, tuning mode (Cable, CableHRC, CableIRC, or Off-Air), and input audio type appear, as shown in Figure 4‐7. Figure 4‐7 Figure 4-7 Main Status Screen when Receiving an RF Signal Measurement Timer If the LM100 is in Infinite measurement mode, a time counter appears in the lower left portion of the screen, as shown in Figure 4‐1. This indicates the amount of time that has elapsed since the measurement was reset. If you pause the measurement, that area flashes paused, and the Pause button also flashes. When the LM100 is in Short‐term mode with Dialogue Intelligence™ enabled, the time counter appears when dialogue is not detected, indicating the amount of time elapsed since dialogue was last detected. While dialogue remains undetected, the measurement value in the center section flashes and a second value appears at the bottom of the center section. That value shows the current non‐dialogue‐based measurement; the flashing value shows the last valid dialogue‐based measurement, and the counter shows the time elapsed since the dialogue‐based measurement stopped. When dialogue‐based measurement resumes, the time counter and the second value no longer display. Measurement Displays The remainder of the screen displays information relative to the current measurements. Dolby® LM100 Broadcast Loudness Meter User’s Manual 17 Menus In Figure 4‐4 the center number, –34, is the current measured loudness value. The letter at the top left of this portion of the display indicates whether the measurement method is Short‐term (s) or Infinite (i). For more information regarding Short‐term and Infinite term modes, see Section 5.3. The channel(s) currently being measured appears in parentheses next to the word meter. The value at the far right is the largest peak value currently being measured from any individual channel within the program. This peak meter has an instant attack, a peak hold of 0.75 second, and a constant decay of 12 dB/second ± 2 dB/second following the peak hold. The main status screen also provides different display modes. Press Enter to scroll through these different modes on the right side of the screen. When measuring Dolby Digital or Dolby E signals, the far right section of the default screen shows the setting for the dialnorm value contained in the metadata stream. If you press Enter, this section of the display shows the largest peak value. If you press Enter again, the screen displays only a single, larger magnification of the loudness measurement. Pressing Enter one more time displays the default screen where the dialnorm value appears on the far right. If the LM100 is in Infinite mode with Dialogue Intelligence enabled and dialogue is not detected, the measurement value holds and begins to flash until the unit detects dialogue again. In Short‐term mode with Dialogue Intelligence enabled, if dialogue is not detected, the measurement value flashes and a second value appears at the bottom of the center section, as previously discussed. That value shows the current non‐dialogue‐based measurement; the flashing value shows the last valid dialogue‐based measurement, and the time counter in the lower left section shows the time elapsed since the dialogue‐based measurement stopped. When dialogue‐based measurement resumes, the time counter and the second value no longer appear. When you select the Analog input, an additional display mode is now available. This additional mode displays the recommended value for setting the dialogue level parameter in downstream Dolby Digital or Dolby E encoding equipment; this recommended value allows the operator to simply calculate a dialnorm value when measuring analog sources. Figure 4‐8 shows an example of this display. 18 Dolby® LM100 Broadcast Loudness Meter User’s Manual The Status Menus Figure 4‐8 Figure 4-8 Note: Main Status Screen Displaying a Recommended Dialnorm Setting for an Analog Input The valid range for the dialnorm value is from –1 to –31 dBFS*. However, the derived analog dialnorm feature on the LM100 can, in some cases, display measured values below –31, indicating that the input levels are too low to be properly set through the dialnorm parameter in downstream Dolby Digital or Dolby E equipment. * ATSC: Digital Audio Compression Standard (AC‐3), Advanced Television Systems Committee, Washington, DC, Doc. A/52, Dec. 20, 1995. Units of Measurement Measurements in default mode are expressed in LKFS. Measurements in Leq(A) mode are expressed in dBFS. Analog measurements, by default, are expressed as dBu. Analog measurements are expressed as dBr if the analog calibration setting is not 0 dBu. RF measurements are based on a relative scale (expressed as dBr) referenced to 100 percent modulation of the monophonic sound carrier (25 kHz peak deviation). 4.2.2 Level Meters Figure 4‐9 shows a sample level meter display. This display provides a more familiar PPM‐style meter for each input channel. The meters have an instant attack time and a constant decay of 12 dB/second ± 2 dB/second. Each channel signal is identified at the bottom of the screen. The scale is displayed on the left side and represents LKFS, dBFS, dBu, or dBr, depending on the input signal type and processing mode. Figure 4‐9 Figure 4-9 Level Meter Displaying a Dolby E 7.1 Input Press Enter to zoom in on the upper portion of the scale. 4.2.3 Metadata Status The metadata status menu enables you to check the settings of key metadata parameters in either a Dolby E or Dolby Digital input stream. Dolby® LM100 Broadcast Loudness Meter User’s Manual 19 Menus 4.2.4 Digital Input Status The Digital Input Status menu indicates whether a digital input signal is locked. If it is, the menu also displays the sample rate, validity bit status, and individual channel‐status parameter values. 4.2.5 Error Statistics The Error Stats menu provides error‐related information for the LM100, its input signals, or a digital input stream. The Error Condition display provides information regarding current errors that are preventing the unit from processing the selected input correctly. Two common error conditions are a loss of input signal and an input signal that does not match the requirements for the selected input type. Press Enter to view details when an error appears. More information on specific errors is available in Table 3‐2. The other items in the Error Stats menu provide a historical count of the following error types: Dolby E CRC, Dolby Digital CRC, AES3 coding, AES3 confidence, AES3 parity, AES3 CCRC, and Dolby E discontinuity. To reset the error count on a single error type, press Enter to view the Error detail menu, then press Enter again to reset the count to zero. To reset all error counts, select Clear All Errors and press Enter. A confirmation prompt appears. Press Enter to confirm the global reset, or Esc to exit the prompt without resetting the counts. 4.2.6 Alarm Statistics You can define the configuration of each audio alarm. For details, see Section 5.5. When an alarm is triggered: • The Audio Alarm LED indicator flashes. • A pulse is sent to the global alarm pin on the GPI/O port. • A pulse is sent to the corresponding pin on the Alarm port. • An entry is generated in the system log. • The appropriate alarm statistic is incremented. There are six different signal condition alarms: Input Clipping, Over Level, Under Level, Dialnorm, Phase Error, and Digital Input Loss. For the LM100‐NTSC, there are two additional alarms: RF Overmodulation and RF Input Loss. To reset the alarm count on a single alarm type, press Enter to view the Alarm Detail menu, then Enter again to reset the count to zero. To reset all alarm counts, select Clear All Alarms and press Enter. A confirmation prompt appears. Press Enter to confirm the global reset, or Esc to exit the prompt without resetting the counts. Alarm statistics can also be sent as a text log to a device connected to a serial port. For details, see Section 5.5. 20 Dolby® LM100 Broadcast Loudness Meter User’s Manual The Main Setup Menu 4.2.7 System Log The System Log menu displays up to 480 logged events. Events such as signal‐condition alarms and errors are automatically added to the log; you can add and remove other indications through the System Log setup menu. To view the most recently logged event, press Shift, . To view the earliest logged event in the LM100 memory, press Shift, . To view any event in more detail, select the event and press Enter. If the event log is full and another event occurs, the system log discards the oldest event and registers the current event. You can clear the system log using the System Log Control menu. Each event is logged against either the time of day or (optionally) a timecode value in the LM100‐LTC. When logging against time of day, an event registered in the last 24 hours displays the time in the System Log menu; events beyond 24 hours display the date. System log entries can also be sent as ASCII text strings to a device, such as a PC running a terminal emulation application, connected to either the front‐ or rear‐panel serial port. For details, see Section 5.5. 4.2.8 System Status The System Status menu shows the current LM100 hardware and software versions and indicates whether an option card is installed. To receive LM100 software upgrade notifications, please register your unit on the Dolby support page at www.dolbysupport.com. The Latency menu displays the time it takes for audio to pass from the input connector to the analog output connectors, and is specific to the type of input stream. You can adjust PCM Latency in the Monitor Control setup menu. 4.3 The Main Setup Menu In the Main Setup menu, you can configure the LM100 to suit your needs. When viewing a status menu, or any setup menu, pressing Setup displays the Main Setup menu. If any setup menu display is unchanged for five minutes, the display reverts to the Main Setup menu. 4.3.1 Measurement Control In the Measurement Control menu you can configure the following: • Channel Select • Measurement Method • Dialogue Intelligence • Measurement Type The proper settings are determined by factors such as whether the LM100 is being used in a live or postproduction environment, for multichannel or stereo material, for quality control or off‐air monitoring, or for aligning the loudness of multiple services. It is important that you understand how to set these parameters. Dolby® LM100 Broadcast Loudness Meter User’s Manual 21 Menus Channel Select In this menu you determine which of the channels available the LM100 will monitor. Selecting the proper channel is crucial if you are monitoring material where dialogue exists in only one channel. Measurement Method Choose either Short-term or Infinite. Dialogue Intelligence Use this control to turn Dialogue Intelligence on or off. For more information, see Section 5.2. Measurement Type Choose either ITU-R BS.1770 or Leq(A). 4.3.2 Input Control In the Input Control menu, you can configure the following: • Input Source • Decode Format • Dolby E Program • AES3 Channel Select mode • Analog Input Cal (calibration) settings Input Source In the Input Source menu, you can select the input to use for a measurement. A special mode (RF/Digital) expects RF input by default, but automatically switches to digital input if a valid Dolby E or Dolby Digital signal is present on the Digital Input connector. This mode is used when the LM100‐NTSC is simultaneously connected to the digital audio and the channel 3/4 remodulated outputs of a digital cable set‐top box. Thus, when the set‐top box is tuned to an analog tiered service, the unit measures the signal directly from the RF tuner; when the set‐top box is tuned to a digitally tiered service, the unit autodetects the presence of a Dolby Digital stream from the S/PDIF output on the digital set‐top box, and measures it. Decode Format Use the Decode Format menu to select the bitstream type you want the LM100 to decode. This parameter is normally set to Autodetect. However, if required, you can override this setting and specify that the LM100 decodes only one bitstream type. 22 Dolby® LM100 Broadcast Loudness Meter User’s Manual The Main Setup Menu Dolby E Program Use the Dolby E Program menu to identify which program to measure in a Dolby E stream. Note: When the input source is a valid Dolby E signal, the selected Dolby E program number must be present in the input stream, or no measurement can be made. AES3 Channel Select Use the AES3 Channel Select menu to specify how the unit recognizes a Dolby Digital signal from the digital input. Selecting Channel 1 or Channel 2 specifies that the Dolby Digital input must be contained within that channel. Selecting Channel 1+2 requires a Dolby Digital stream in both channels. When you select Autodetect, the LM100 locks onto the first signal it recognizes. We recommend Autodetect unless there are signals present in just one channel. Analog Input Calibration Use the Analog Input Cal menu to match the LM100 to the standard operating level for your facility. For example, if 0 VU = +4 dBu (1.23 VRMS), set the analog input calibration to +4 dBu. This allows a 1 kHz line‐up level at 0 VU to display 0 dBr on the LM100. You also use this parameter to calculate the recommended dialnorm value when measuring an analog input signal. Note: When the Analog Loudness Ref setting is not zero, measurement for the analog input is expressed in dBr. When the setting is zero, the measurement is expressed in dBu, reflecting that 0 dBu = 0.775 VRMS. Figure 4‐10 Table 4-1 Common Reference Levels Reference Analog Loudness Ref Volts Digital Loudness Ref SMPTE RP155 +4 dBu 1.23 VRMS –20 dBFS EBU R68 0 dBu 0.775 VRMS –18 dBFS RF Tuning Mode This feature is available only on the LM100‐NTSC. Use the RF Tuning Mode menu to select the frequency plan (Off-Air, Cable STD, Cable HRC, or Cable IRC) used for tuning RF signals. RF Channel This feature is available only on the LM100‐NTSC. Dolby® LM100 Broadcast Loudness Meter User’s Manual 23 Menus Use the RF Channel menu to select the channel number used for tuning RF signals. Note: The channel number can also be selected from the main status screen, by pressing Shift, or . RF Second Language This feature is available only on the LM100‐NTSC. Use the RF Second Language menu to specify whether you want to measure the second language channel (if available) when receiving RF signals. 4.3.3 Monitor Control Use the Monitor Control menu to configure the Analog Outputs (headphone and rear‐panel line outputs). DAC on Non-Audio The DAC on Non-Audio menu controls whether a digital input signal flagged as non‐audio (via the AES3 Channel Status Byte 0 bit 1) is muted or sent to the headphone and Analog Outputs. PCM Latency The PCM Latency menu allows the user to set the latency from the Digital Input to the Analog Outputs for a PCM signal. 4.3.4 Alarm Control The LM100 alarm capabilities are among its most useful and versatile functions, as described in Section 5.5. Use the Alarm Control menu to set the parameters that trigger alarms. Input Clipping Use the Input Clipping menu to configure the parameters of the input clipping alarm. 24 Dolby® LM100 Broadcast Loudness Meter User’s Manual The Main Setup Menu Table 4‐2 defines the Input Clipping alarm parameters. Table 4-2 Menu Item Alarm Length Input Clipping Alarm Parameters Controls Increment Range Enables or disables the alarm. NA Enabled/Disabled The number of samples by which the input must exceed the clip threshold to trigger the alarm. The amplitude threshold for the alarm when the input is digital. 10 10 to 200 samples 0.1 0 to –20 dBFS 0.1 +22 to –20 dBr or dBu* 0.1 +10 to –20 dBr Digital Threshold The amplitude threshold for the alarm Analog when the input is analog. Threshold RF Threshold The amplitude threshold for the alarm when the input is RF.† * When the Analog Loudness Ref setting is not zero, the analog threshold is expressed in dBr. When the setting is zero, it is expressed in dBu. † Only on the LM100‐NTSC. RF Overmodulation This feature is available only on the LM100‐NTSC. Use the RF Overmodulation menu to enable or disable the overmodulation alarm for RF input signals. When enabled, any signal that modulates the aural carrier by more than 101 percent triggers the alarm. Digital Loudness Reference Use the Digital Loudness Ref menu to set the reference loudness level for digital input signals. This reference level is used by the over/under threshold alarms. Analog Loudness Reference Use the Analog Loudness Ref menu to set the reference loudness level for analog input signals. This reference level is used by the over/under threshold alarms. Note: When the Analog Loudness Ref setting is not zero, measurement for the analog input is expressed in dBr. When the setting is zero, the measurement is expressed in dBu, reflecting that 0 dBu = 0.775 VRMS. RF Loudness Reference This feature is available only on the LM100‐NTSC. Use the RF Loudness Ref menu to set the reference loudness level for RF sources. This reference level is used by the over/under threshold alarms. Dolby® LM100 Broadcast Loudness Meter User’s Manual 25 Menus Over Level The over‐level alarm is triggered when the input signal loudness level exceeds the chosen threshold relative to the selected digital or analog loudness reference level. The Over Level menu allows you to set the parameters for triggering the alarm, as shown in Table 4‐3. Table 4-3 Over Level Alarm Parameters Menu Item Alarm Threshold Time Controls Range Enables or disables the alarm. Enabled/Disabled The loudness threshold for the alarm. The alarm 1 to 31 dB triggers if the measured loudness value exceeds the loudness reference plus the threshold for the duration specified in Time. The duration of the over‐level condition required 0 to 300 seconds to trigger the alarm. Under Level The under‐level alarm is triggered when the input signal loudness level falls below the chosen threshold relative to the selected digital or analog loudness reference level. This alarm is useful for identifying silence and/or near‐silent conditions. The Under Level menu allows you to set the parameters for triggering the alarm, as shown in Table 4‐4. Table 4-4 Under Level Alarm Parameters Menu Item Alarm Threshold Time Controls Range Enables or disables the alarm. Enabled/Disabled 1 to 31 dB The loudness threshold for the alarm. The alarm triggers if the measured loudness value falls below the loudness reference minus the threshold for the duration specified in Time. The duration of the under‐level condition required 0 to 300 seconds to trigger the alarm. Dialnorm Threshold The Dialnorm Threshold alarm is triggered when the measured loudness value of the input signal deviates from the dialnorm value already carried within the Dolby E or Dolby Digital input stream. This alarm is useful for identifying Dolby E and Dolby Digital bitstreams with incorrect dialogue level values. 26 Dolby® LM100 Broadcast Loudness Meter User’s Manual The Main Setup Menu The Dialnorm Threshold menu allows you to set the parameters for triggering the alarm, as shown in Table 4‐5. Table 4-5 Dialnorm Threshold Alarm Parameters Menu Item Alarm Threshold Time Controls Range Enables or disables the alarm. Enabled/Disabled The threshold for the alarm. The alarm triggers if 1 to 20 dB the measured loudness value deviates by more than this value either above or below the dialogue level value carried in the metadata for the duration specified in Time. The duration of the dialnorm threshold condition 0 to 300 seconds required to trigger the alarm. Digital Input Loss The Digital Input Loss alarm is triggered if digital input becomes invalid or disappears. Use the menu to enable or disable the alarm. RF Input Loss This feature is available only on the LM100‐NTSC. The RF Input Loss alarm is triggered if RF input becomes invalid or disappears. Use the menu to enable or disable the alarm. Phase Error The phase error alarm is triggered when a stereo signal’s Left and Right channels are out of phase. Use the Phase Error menu to enable or disable the phase error alarm. DE RF Overmod Protect The DE RF Overmod Protect alarm is triggered when a Dolby E signal with the RF Overmod metadata field enabled is detected. Use the menu to enable or disable the alarm. Track Measurement You can control all the alarm counters using the front‐panel Reset button or the GPI/O port. If you set Track Measurement to Enabled, pressing the Reset button clears all the alarm counters simultaneously, as well as resetting the measurement. If you disable this setting, pressing Reset has no effect on the alarm counters. Alarm Output Polarity When an alarm is triggered, the LM100 generates a pulse on the associated Alarm port pin, as shown in Table 5‐3, as well as on the Alarm pin on the GP I/O port. Use the Alarm Output Polarity menu to set the polarity for the alarm outputs to either positive or negative. Dolby® LM100 Broadcast Loudness Meter User’s Manual 27 Menus 4.3.5 User Presets The LM100 can use up to four presets. When you save a preset, the LM100 stores the complete memory of all active settings. Saving a preset writes over any preset previously stored to that preset number. Use the User Presets menu to save or recall a preset. To save a preset, follow these steps: 1. Navigate the Save Preset menu. 2. Select a preset number to save, then press Enter. The Save Preset menu appears, as shown in Figure 4‐10. Figure 4‐11 Figure 4-10 Save Preset Menu 3. Press to highlight Clear, then press Enter. The old preset name disappears. 4. Use the arrow buttons to highlight each character in the new preset name, pressing Enter after highlighting each character. 5. When the name is complete, highlight OK, then press Enter. The confirmation prompt in Figure 4‐11 appears. Figure 4‐12 Figure 4-11 Save Preset Prompt 6. If the new preset name is correct, press Enter to save the preset with that name. If not, press Esc, and return to step 1. When the new name is saved, the display reverts to the main status screen, briefly showing the message in Figure 4‐12. Figure 4‐13 Figure 4-12 Preset Confirmation Message 28 Dolby® LM100 Broadcast Loudness Meter User’s Manual The Main Setup Menu To recall a preset follow these steps: 4.3.6 1. Navigate to the Recall Preset menu. 2. Select a preset to recall, then press Enter. System Log Use the System Log menu to control the characteristics of the internal system log. Time Stamp Mode When using the LM100‐LTC with a valid timecode input, the system log can use either the time of day or linear timecode as the log entry time stamp. Use the Time Stamp Mode menu to change this setting. Periodic Loudness The system log can store the current measured loudness value at regular (that is, periodic) time intervals, as set in the Periodic Loudness menu. This allows you to use the LM100 to simultaneously track and log the changes in the loudness of programs or services over many hours or days. Note: When measuring in Infinite mode, additional settings appear in the Periodic Loudness menu, which enables the measurement to automatically reset at the same time interval as the periodic measurement itself logs. For example, if you select 30 Seconds with Reset, the LM100 generates a “periodic loudness” system log entry based on the integrated level for the past 30 seconds, and then resets the infinite measurement before continuing. Metadata Log When this is enabled, the metadata parameters shown below within a Dolby E or Dolby Digital bitstream are added to the system log. This is done whenever a Dolby E or Dolby Digital bitstream is first detected, and subsequently when any of these parameters change value. Dolby Digital Channel Mode Dolby Digital LFE Channel Dolby Digital Data Rate Dolby Digital Dialogue Level Dolby E Program Configuration Dolby E Bit Depth Dolby E Frame Rate Dolby E Px Channel Mode Dolby E Px LFE Channel Dolby E Px Dialnorm Dolby® LM100 Broadcast Loudness Meter User’s Manual 29 Menus Bitstream CRC Log When this is enabled, any CRC errors in Dolby E or Dolby Digital bitstreams are logged. You can use this log to monitor and ensure that Dolby Digital or Dolby E bitstreams are not corrupted and/or do not contain errors. System OK Log When this is enabled, a System OK message is logged at hourly intervals. You can use this log to verify the ongoing correct operation of the LM100 within the system log. Track Measurement You can control the system to follow the Reset and Pause controls provided on the front‐panel buttons or through the GPI/O port. When this is enabled, pressing the Reset button clears the system log and resets the measurement; pressing Pause stops new entries from generating in the system log as well as pausing the measurement. If you disable this setting, the Reset and Pause buttons have no effect on the system log. Clear System Log When this is enabled, you can manually delete all entries in the system log. 4.3.7 System Settings The System Settings menus allow you to configure several unit behaviors. Remote Baud Rate This setting controls the speed (baud rate) of the RS‐232 and RS‐485 serial ports. Remote Mode When you select Remote, the LM100 can be controlled from a remote‐control application or device over the serial ports. When you select Logging, the serial ports output each system log entry as an ASCII text string as it is generated. This output can be displayed and stored by any standard terminal application. Unit Name You can name your unit using up to 12 characters. This is useful for identifying the LM100 from remote‐control applications. To enter a name, go to the Unit Name menu and use the procedure for text entry, as described in Section 4.3.5. Unit Address The unit address allows each LM100 to be uniquely identified when using a software remote‐control application over the serial connection, using either the RS-232 or the RS-485 30 Dolby® LM100 Broadcast Loudness Meter User’s Manual The Main Setup Menu connection. You can connect more than one LM100 to the same RS‐485 link, provided that each unit is assigned a unique address. Time/Date Use the Time/Date menu to set the internal real‐time clock. Screensaver Timeout After a defined period of inactivity, the LM100 applies a screen saver to prolong the life of the display screen. Use the Screensaver Timeout menu to set this period of inactivity. True Peak Channel ID Choose On to identify the channel in which the measured peak on the display occurred. Choose Off not to identify it. Enable Dialogue and All Display Choose Enable to display Dialogue and All measurements when the LM100 is making Infinite measurements of the ITU‐R type with Dialogue Intelligence on. Choose Disable to prevent this display. Dolby® LM100 Broadcast Loudness Meter User’s Manual 31 Menus 32 Dolby® LM100 Broadcast Loudness Meter User’s Manual Chapter 5 Features This chapter focuses on the unit’s primary functions, and the best uses for each of them. 5.1 Measuring Equivalent Loudness For years, the Dolby® LM100 Broadcast Loudness Meter has employed the use of a standardized measurement method called Leq(A) coupled with a technology (developed by Dolby) called Dialogue Intelligence™, which allows the LM100 to automatically measure only the dialogue portions of the programming. Combined, these methods are used to accurately determine the dialogue normalization metadata value for Dolby Digital, Dolby Digital Plus, and Dolby E broadcast content. The updated version of the LM100 also can use the new recommended algorithm published by the International Telecommunication Union’s Radiocommunication sector (ITU‐R) for use in estimating program loudness levels of digital broadcasting: ITU‐R Rec. BS.1770—Algorithms to Measure Audio Programme Loudness and True‐Peak Audio Level. This new algorithm also estimates loudness by computing the frequency weighted energy average over time similar to Leq(A), and produces a single value representing the overall loudness level. The core ITU‐R algorithm, however, is based on two filters in cascade1: a prefilter (a high‐frequency shelving‐type filter) followed by the revised low B‐weighting filter (a type of highpass filter): Leq(RLB). Speech‐based measurements produced with the LM100’s Dialogue Intelligence feature enabled—using either Leq(A) and ITU‐R BS.1770—have shown that, while BS.1770 is slightly more accurate than Leq(A), the average difference when measuring dialogue is fairly small. Comparison of measurements made by the two methods suggests that the average absolute error (AAE) has decreased by only 0.27 dB and the maximum absolute error (MAE) has decreased by 1.3 dB for the samples used in this comparison. Therefore engineers may be uncertain about the particular benefits of the new ITU‐R algorithm. The answer can be derived in part from the findings of an ITU study group who determined that the BS.1770 algorithm was more effective than Leq(A) in determining appropriate levels for non‐speech–based material, such as music and soundtrack material. This improvement would be most applicable in concerts and other types of music programming are common, where LM100 users typically disable Dialogue Intelligence. Within broadcast programming the dialogue levels are especially important when considering how to determine the subjective loudness of a program. Research shows that most listeners at home use their volume controls in an effort to keep the dialogue levels uniform as they switch through multiple channels and as they listen through program‐to‐program and/or program‐to‐commercial transitions. It therefore follows that if listeners at home base their loudness judgment on the level of dialogue, then a loudness meter would certainly benefit from an algorithm that mirrors this behavior. Dialogue Intelligence in the LM100 provides exactly that feature, as described in Section 5.2. 1 Leq(A) uses only a single frequency weighting filter. Dolby® LM100 Broadcast Loudness Meter User’s Manual 33 Features 5.1.1 Measuring Digital Sources When digital input is selected, and the unit is receiving a two‐channel linear PCM digital audio signal, the default main status screen indicates the measured loudness value side by side with the unweighted peak level value. The unweighted peak value indicates the largest peak value detected from all channels present on the input. When the digital input is selected and receiving a Dolby Digital or Dolby E stream, the default main status screen indicates the measured loudness value side by side with the dialnorm value contained within the input stream. Ideally, these values are nearly the same, thereby confirming the accuracy of this extremely important metadata parameter (value). If the measured loudness value is significantly different from the dialnorm value, when the program broadcasts, it will sound either louder or softer than programs with accurate dialnorm settings. You can use the loudness measurement information to make adjustments, either to the dialogue level parameter value within the Dolby Digital or Dolby E stream, or to the source audio levels. Measurements in the digital domain are referenced to digital full‐scale, and are expressed in dBFS. 5.1.2 Measuring Analog Sources When the selected input is analog, the LM100 can also provide a suggested value for dialnorm (by pressing Enter twice from the main status screen). This can be useful when setting the dialnorm parameter value prior to encoding the program for digital distribution via Dolby E or Dolby Digital. This recommended value automates the process of calculating a dialnorm value when measuring analog sources. The calculated (that is, derived) value is based on the analog input calibration. See Figure 4‐8. Analog measurements, by default, are based on the dBu scale, or on a relative scale (expressed as dBr) if the analog calibration setting is not 0 dBu. 5.1.3 Measuring RF Modulated Sources When the RF Input is selected and a particular channel is tuned, the default main status screen indicates the measured loudness value side by side with the unweighted peak value. Measurements in the RF domain are referenced to 100 percent modulation of the monophonic sound carrier (25 kHz peak deviation) and are expressed in dBr. 5.2 Dialogue Intelligence Dialogue Intelligence allows the LM100 to automatically base its measurement on the portions of the input signal that contain the characteristics of dialogue. This powerful feature provides users at all skill levels with the capability to easily quantify the level of dialogue within broadcast programs. By combining Dialogue Intelligence with extensive 34 Dolby® LM100 Broadcast Loudness Meter User’s Manual Measurement Methods: Short Term vs. Infinite Term logging and alarm capabilities, the LM100 opens up the possibility of automated measurement, QC, and control. Note: The dialnorm parameter within a Dolby Digital bitstream is, after all, also known as dialogue level, and the term dialnorm is an abbreviation of “dialogue normalization.” Thus, when the dialnorm value is properly implemented across multiple programs, the home listener can switch between programs and perceive the dialogue in each program at the same level. When you first enable Dialogue Intelligence, the LM100 takes a few moments to analyze the input signal before confirming that dialogue is or is not present. During this analysis, a “listening” icon appears, as shown in Figure 5‐1. When the analysis is complete, either No Dialogue or a dialogue‐based measurement value appears. Figure 5‐1 Figure 5-1 Listening Icon Display before Dialogue Intelligence Computes When you enable Dialogue Intelligence, the measurement is based solely on the portions of the input signal recognized as having the characteristics of speech. Portions of the input signal that do not primarily contain the characteristics of dialogue are not included in the measurement value. Note: 5.3 The Dialogue Intelligence algorithm is designed to return a dialogue‐based measurement value only when this input signal primarily contains the characteristics of dialogue. Therefore, on rare occasions, the algorithm may ignore a section of the program that contains dialogue but may also be coincident with other types of signals and spectra, such as music or effects. This behavior increases the accuracy and confidence of the dialogue‐based measurement value. Measurement Methods: Short Term vs. Infinite Term The LM100 has two methods of operation relating to the measurement period, Infinite Term and Short Term. This section describes the behavior of both. Infinite Term Method Infinite measurements cover the entire period since the measurement was reset. Both ITU‐R and Leq(A) measurements are available using the Infinite Term method. Enabling Dialogue Intelligence allows you to simply quantify all the sections of the program that contain only dialogue and use the ending measurement value for analysis and normalization. This value is also commonly used to set the dialogue normalization parameter within Dolby Digital and Dolby E bitstreams. Dolby® LM100 Broadcast Loudness Meter User’s Manual 35 Features Infinite method is typically used when it is possible to measure the entire duration of the program (for example, all 30 seconds of a commercial or the whole two hours of a movie). It provides the most accurate measurement. This method is most often used in ingest, QC, and postproduction applications where audio metadata is being authored and levels can, in most cases, be controlled and adjusted. It is also possible to use Infinite mode to measure short sections of content rather than an entire program. The LM100’s Periodic Loudness with Reset capability makes it easy for content creators to monitor program loudness during production and editing. For example, selecting 1 Minute with Reset ensures that the longest average measurement displayed will be integrated over one minute, helping the operator to more accurately assess the average program loudness when repeating the same portion of content over and over. For more details, see Periodic Loudness on page 29.This method is effective when the loudness level of the sections being measured represents the entire program. Short Term Method Short Term method displays a measurement value for the previous ten‐second period as a sliding window. For example, the first measurement value displayed corresponds to the 0–10 seconds time interval, the next to the 1–11 seconds time interval, the next to the 2–12 seconds time interval, and so forth, as shown in Figure 5‐2. Figure 5‐2 Measurement 10 Measurement 3 Measurement 2 Measurement 1 :20 :19 :18 :17 :16 :14 :13 :12 :11 :15 :10 :09 :08 :07 :06 :04 :03 :02 :01 :05 :00 Figure 5-2 Short Term Measurements As the Short Term measurement only considers the last ten seconds of program material, the measurement value has the potential (depending on the program) to be much more dynamic than that measured in Infinite mode. (Highly processed channels and programming will most likely not exhibit this type of behavior.) The benefit of this measurement method is that it allows the operator to see short‐term variations within a program in loudness level or in dialogue level when Dialogue Intelligence is enabled. Many skilled audio operators prefer to use the Short Term measurement, as they find the information on near‐term dynamics to be very useful when mixing or producing a program and they are capable of managing overall program loudness by reading the Short Term measurement. 36 Dolby® LM100 Broadcast Loudness Meter User’s Manual Measurement Methods: Short Term vs. Infinite Term Short Term mode is also very useful for measuring and logging the loudness history of a given program during the QC, postproduction process, or particular television service/channel in a cable head‐end facility. In Figure 5‐3, an LM100 with Dialogue Intelligence enabled in Logging mode, using a PC to capture the periodic loudness values, was used to help a broadcaster determine the speech level values for programs and commercials from 5:30 p.m. through midnight. Figure 5‐3 clearly reveals an hour when speech levels were elevated (~5 dB on average), whereas the programming that preceded and followed this particular program clearly had lower speech levels. Figure 5‐3 Dialogue Level Relative to 0 dBFS 0 -5 - 10 - 15 -20 -25 -30 -35 -40 Ti m e Figure 5-3 Short Term Dialogue Level History Example Using LM100 Logging Features Each data point represents an individual speech measurement. Table 5‐1 shows application examples that best utilize Short Term and Infinite Term methods. Table 5-1 Application Examples for Short Term and Infinite Term Measurement Methods Short Term Infinite Term Live broadcast event Postproduction and/or mixing with audio engineer Program ingest Postproduction to check conformance with delivery requirements, including dialnorm Quality control: measuring Short Term Quality control: measuring overall program dynamics (or the Short Term program for normalization and/or dynamics in dialogue level when dialnorm provisioning purposes Dialogue Intelligence is enabled) (dialogue‐based measurement when Dialogue Intelligence is enabled) Logging Short Term periodic loudness Logging infinite (long‐term) history loudness history Analog cable services: audio modulator deviation adjustments for cable head‐ends (dialogue‐based measurement when Dialogue Intelligence is enabled) Dolby® LM100 Broadcast Loudness Meter User’s Manual 37 Features 5.4 Channels for Measurement The LM100 can base its loudness measurement on one (Left, Center, or Right), two (Stereo), or all (All) input channels. Because dialogue is almost always mixed primarily to the Center channel, the default is Center, making it ideal for a 5.1‐channel program with dialogue. If a program without a Center channel is present on the input, the unit automatically measures the Left and Right channels by summing the individual channel powers. The channels actually being measured (as opposed to the Channel Select setting) display in parentheses next to the word meter on the main status screen. The other selections are available if you need to quantify loudness on specific channels. All measures the signal by combining the individual channel powers from each channel present on the input. Note: 5.5 A two‐channel 1 kHz sine wave with a Channel Select setting of Stereo, All, or Center displays +3 dB over the peak level, assuming both channels contain identical signals (that is, they are highly correlated). Alarms The alarm setup system provides a high level of flexibility, so you can configure alarms to trigger only for conditions that you consider important. LM100 alarm types are defined in Table 5‐2. Table 5-2 Available Alarm Types Alarm Input Clipping RF Overmod (LM100‐NTSC only) RF Input Loss (LM100‐NTSC only) Over Level Loudness above threshold Under Level Loudness below threshold Digital Input Loss Dialnorm Threshold Phase Error DE RF Ov Protect Dolby E RF overmodulation protection Definition The input signal exceeds a user‐defined clip level for a user‐defined number of samples. The RF input signal is greater than or equal to 101 percent modulation of the monophonic audio RF carrier. The RF input carrier is absent. The measured loudness level exceeds the user‐defined threshold for a user‐defined duration. The measured loudness level falls below the user‐defined threshold for a user‐defined duration. This can be used as a silence alarm. Digital AES3 input is required but missing. The dialnorm value carried within the Dolby E or Dolby Digital bitstream input differs from the user‐defined threshold for a user‐defined duration. The stereo signal’s Left and Right channels are out of phase. The DE RF Overmod metadata field is enabled. Use the Alarm Control setup menu to control the alarm parameters, as described in Section 4.3.4. 38 Dolby® LM100 Broadcast Loudness Meter User’s Manual System Log Any alarm condition triggers the Audio Alarm LED, increments the associated counter in the Alarm Stats menu, triggers the global alarm GPI/O pin, and triggers the appropriate GPI/O on the Alarm port, as shown in Table 5‐3. You can use the Alarm port to create a notification method in your studio or control room. This can alert you to specific alarms (see Table 5‐3), while recording alarms you define as less urgent in the Alarm Stats menu and the system log. Table 5-3 Alarm Output Port Connector Map 5 5.6 4 3 2 1 9 8 7 6 Pin 1 2 3 4 5 6 7 8 9 Status Parameter or Function Input clip detection counter RF overmodulation counter (LM100‐NTSC only) Loudness above threshold counter Loudness below threshold counter Digital input loss counter Dialnorm threshold counter Asserted during an error condition Asserted when hardware is faulty Signal ground System Log The system log is capable of storing 480 individual time‐stamped events. If you connect a remote interface cable to either the front‐ or rear‐panel serial ports described in Section 5.7, you can store a record of every logged event. Each alarm condition is stored in the internal system log in the following format: Date Time | Alarm ID | Description | Count The description field contains information about the alarm type, as well as the associated signal measurement when the alarm triggered. Here is a sample text log from the LM100: 19 Feb 2003 13:49:50 | 1001 | RF Overmodulation | Count: 1 19 Feb 2003 13:50:23 | 2001 | Input Format | Dolby Digital 19 Feb 2003 13:50:30 | 2002 | Measurement Pause | Peak: -3.0 dB 19 Feb 2003 13:50:32 | 2003 | Measurement Resume | 19 Feb 2003 13:51:19 | 3002 | LM100 OK | 19 Feb 2003 13:51:34 | 4000 | Dolby Digital Channel Mode | 3/2 Logged events also display on the System Log status menu. Figure 5‐4 shows a sample display of the system log. In the System Log menu, to view the most recently logged event, press Shift, . To view the earliest logged event in the LM100 memory, press Shift, . Dolby® LM100 Broadcast Loudness Meter User’s Manual 39 Features Figure 5‐4 Figure 5-4 System Log Status Menu To view details of an event on the System Log status menu, highlight that event and press Enter. Figure 5‐5 shows an entry detail display. Figure 5‐5 Figure 5-5 5.7 System Log Entry Detail Display Serial Ports You can use the rear‐panel Remote RS-485 port or the front‐panel Remote RS-232 port for software upgrades, to connect to a custom‐built remote‐control software interface, or to send system log events to any device that can receive ASCII text strings through the remote interface cable you connect to the LM100. Note: The Remote RS-485 port is deactivated if a cable is connected to the Remote RS-232 port. For any use, the settings on the System Settings menu must match the connected computer, as described in Section 4.3.7. To generate a text‐based error log to a remote device, set Remote Mode to Logging. 40 Dolby® LM100 Broadcast Loudness Meter User’s Manual GP I/O Port 5.8 GP I/O Port The GP I/O port provides the dedicated functions shown in Table 5‐4. You don’t have to be in remote mode to use a GPI/O device with the LM100; thus, you can maintain full access to all front‐panel control functions and display information. Table 5-4 GP I/O Port Connector Map 5 4 3 2 1 9 8 7 6 Pin Direction Connection 1 2 Input Input Source Select Channel Up 3 Input Channel Down 4 5 6 Input Input Output Pause Reset Alarm 7 Output 8 Output 9 — Compressed Input Measurement Running Signal Ground Note 0 = Next source, open—no action 0 = Increment channel, open—no action 0 = Decrement channel, open—no action 0 = Toggle pause/run, open—no action 0 = Reset, open—no action Programmable polarity (for details on alarm control, see Section 4.3.4) 0 = Not compressed 1 = Compressed 0 = Paused 1 = Running To be recognized, input signals must be asserted for at least 50 ms. The pin 2 and pin 3 functions are provided only on the LM100‐NTSC. Each time either of these pins is grounded, the RF channel number increases incrementally (pin 2) or decreases incrementally (pin 3) by one. If the input remains grounded for more than 500 ms, the RF channel number increases or decreases continuously until the pin is released. Pins 4, 5, and 6 duplicate the functions of the front‐panel Pause and Reset buttons and the Alarm LED, respectively. 5.9 NTSC Model The LM100‐NTSC enables you to monitor program audio from either cable or off‐air sources using the RF Input. This allows you to use the LM100 on program material in its final delivery format. 5.10 LTC Model The LM100‐LTC receives linear timecode at rates of 23.98, 24, 25, 29.97, and 30 Hz, and supports drop‐ and non‐drop‐frame modes. You can set up the system log to record events by time of day or by timecode stamp by using the System Log setup menu. Dolby® LM100 Broadcast Loudness Meter User’s Manual 41 Appendix LM100 Specifications Core Measurement Algorithms ITU‐R Rec. BS.1770 Annex 1 and 2 Leq(A) (IEC 60804) Dialogue Intelligence Algorithm Proprietary; patent pending Audio Sampling Rates 32, 44.1, and 48 kHz Digital Audio Input BNC female connector with loop‐through, 75, unbalanced, AES‐3id (SMPTE 276M) Formats supported: PCM data up to 24 bits; Dolby® E data supported in 16‐, 20‐, and 24‐bit modes at 48 kHz; Dolby Digital (AC‐3) data at 32, 44.1, and 48 kHz sample rates Analog Audio Inputs Two Neutrik® combination XLR/quarter‐inch TRS connectors, electronically balanced Maximum input level: ~ +22 dBu Input impedance: 10k ohm User‐definable nominal operating levels Analog Audio Output Two RCA‐type connectors, unbalanced, stereo Maximum output level: 2 VRMS into a 10k ohm load per IEC 61938 RF Input Only on the LM100‐NTSC F‐type female connector with internal 75 ohm termination Tuner frequency range: 55.25 to 801.25 MHz Supports BTSC‐encoded stereo signals Selectable CATV or “off‐air” modes CATV mode supports the Cable Television Channel Identification Plan per EIA 542 (User‐selectable: Standard, HRC, or IRC channel identification plans) Dolby® LM100 Broadcast Loudness Meter User’s Manual 43 Video output: composite, BNC female Headphone Output Quarter‐inch standard stereo headphone jack, level adjustable Timecode Input Only on the LM100‐LTC BNC female, unbalanced per SMPTE 12M‐1999 Supports 23.98, 24, 25, 29.97 and 30 Hz frame rates, including drop‐ and non‐drop‐frame modes Serial Remote Control Input Front: 8‐pin female mini‐DIN connector, RS‐232 Rear: 9‐pin female D‐connector, RS‐485 (SMPTE 207M) Alarm Port 9‐pin female D‐connector, 0–5 V TTL level User‐definable alarms: input clip detection, modulation overload, loudness above threshold, loudness below threshold (silence), dialnorm threshold, and AES input loss General Purpose Input/Output (GP I/O) Port 9‐pin female D‐connector, 0–5 V TTL level Measurement/Analysis System Log 480 events stored in internal nonvolatile RAM (Unlimited event storage and retrieval via serial ports) Power Requirements 90–264 VAC, 50–60 Hz, auto‐sensing, 15 W maximum; unit designed to operate from a centrally switched power source Dimensions and Weight 1‐U rackmount: 44 × 483 × 375 mm (1.75 × 19 × 14.75 inches) Net: 2.5 kg (5.5 lb) Environmental Conditions Operating: 0°C to 50°C (32°F to 122°F), natural convection cooling, 0% to 98% relative humidity (noncondensing) Nonoperating: –20°C to +70°C (–4°F to +158°F) 44 Dolby® LM100 Broadcast Loudness Meter User’s Manual