1
Review: IK Multimedia T-RackS 3 Deluxe
by Rick Paul - 6th March 2009 -
Mastering is one of those black arts generally thought of as best being left to professionals. The wizards behind that
art tend to bring years of experience and golden ears, along with specially treated rooms, high-end monitoring
systems, and equipment beyond the reach of most of us mere mortals, to the table. Furthermore, there is the benefit
of bringing in a second, often more experienced, set of ears, to offer a fresh perspective on recordings we may have
been slaving away at for days, weeks, or even longer. However, not everyone can afford professional mastering,
and, even those who may not be able to afford it for every project. This is where "mastering for the rest of us"
products come into play.
IK Multimedia was one of the pioneers in bringing user-friendly, software-based mastering tools into the home and
project studio arenas. Their original T-RackS mastering tool, which was introduced back in 1999, provided a
standalone rack of audio processors geared toward making mastering accessible enough for beginners, while
offering a fair degree of flexibility for more advanced users on a budget. Almost a decade later, T-RackS has proven
to be a popular product, which is now entering its third generation with the introduction of T-RackS 3 Deluxe, which
provides both standalone processing and operation as a plug-in for use in most popular DAW hosts. Let's take a look
at this latest incarnation.
Background
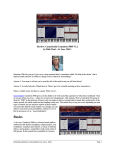
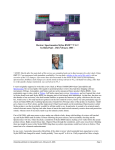
IK Multimedia's T-RackS 3 Deluxe is an analog-modeled mastering
solution provided in both standalone and plug-in form. Either way,
it provides an all-in-one processing chain, as opposed to individual
plug-in modules intended for routing at the DAW level. T-RackS
also provides significant routing flexibility within itself for mixing
and matching its modules in serial and/or parallel signal chains.
Since you can include as many or as few modules as you like within
an instance of T-RackS, and use multiple instances of the T-RackS
plug-in in your DAW, you can also mix and match T-RackS
modules with other processing modules at the DAW level.
IK bills T-RackS 3 as a modular high-end mastering/mixing suite of
Originally published on CakewalkNet.com, March 6, 2009.
Page 1
dynamics and EQ processors, including:
•
•
•
•
•
•
•
9 processors comprised of 3 new analog and vintage emulations (including models based on the Fairchild
670 and the Pultec EQP-1A), 2 new digital processors as well the 4 classic, award-winning T-RackS
processors
New configurable mastering/mixing chain – run up to 12 parallel/series processors
New complete built-in metering section with Peak, Perceived Loudness, Phase, and RMS meters, plus a
Spectrum analyzer with Peak, RMS and Averaging indicators
New standalone and plug-in versions available in the same package for use in all the most popular native
DAWs
New high-fidelity oversampling with crystal clear transparency, for high quality audio processing
throughout the entire signal path
New SCC™ technology coupled with IK’s unique DSM™ technology provides the most realistic software
emulation of vintage gear to date
Extremely easy to use, with style-based presets, full chain visualization, one-click single module or chain
bypass, “compare” function, multiple audio processing in standalone mode and much more
We'll be looking much more closely at the processors, metering, and more below. System requirements and plug-in
formats for the various platforms supported are as follows:
Power PC based Macintosh
Minimal: 866 MHz G4 processor, 512 MB of RAM, Mac OS X 10.4 or later.
Suggested: dual 1.25 GHz G4 or G5 processor, 1 GB of RAM, Mac OS X 10.4 or later.
Supported Plug-in formats: AU, VST, RTAS.
Intel based Macintosh
Minimal: 1.5 GHz Intel Core Solo processor, 512 MB of RAM, Mac OS X 10.4.4 or later.
Suggested: 1.66 GHz Intel Core Duo processor, 1 GB of RAM, Mac OS X 10.4.4 or later.
Supported Plug-in formats: AU, VST, RTAS.
Windows
Minimal: Pentium 1GHz / Athlon XP 1.33 GHz, 512 MB of RAM, Windows XP / Vista or later.
Suggested: Pentium 2.4 GHz / Athlon XP 2.4 GHz, 1 GB of RAM, Windows XP / Vista or later.
Supported Plug-in formats: VST, RTAS.
In addition to the software, the product includes an 86-page user manual and a 12-page installation and authorization
manual. The installation process is a simple matter, utilizing the standard conventions of the applicable system, such
as a Setup program under Windows. Software protection uses an on-line authorization system based on the product
serial number, a digital ID generated by the software for your hardware, and an authorization code supplied as part
of the on-line authorization process. There are also offline possibilities available via fax or snail mail, and the
product will run for 10 days after installation without authorization to provide some grace period in the event of
authorization delays.
Suggested list price for T-RackS 3 Deluxe is $499.99 (€379.99). There is also a crossgrade to T-RackS 3 Deluxe
from most other IK Multimedia products for a list price of $299.99 (€229.99). For those users looking for a lower
budget option, T-RackS 3 Standard, which includes only the original four T-RackS processors plus updated
metering, lists for $199.99 (€149.99). It probably goes without saying that street prices can be significantly lower,
and IK also has periodic promotions, such as two-for-one deals, that can make the ultimate product price paid even
lower for customers who want multiple IK products. For example, at the time of this writing, the lowest street price I
found for the full shebang, which was of the "too low to print" variety that required adding the product to a shopping
cart to see it, was $310.63. That itself would represent a pretty good savings, but there was also a "Buy 1 Get 1 Free"
sale going on at the time. That promotion allowed choosing a second IK product (the list of possibilities for
purchasers of T-RackS 3 Deluxe included SampleTank 2.5 XL, AmpliTube 2, Classic Studio Reverb, and many
Originally published on CakewalkNet.com, March 6, 2009.
Page 2
more) for free download upon registering. That deal will likely be over by the time this review is published, but it's
always worth checking IK Multimedia's web site for the latest promotions.
I tested T-RackS 3 Deluxe on a custom-built system with an Intel Core 2 Duo E6600 CPU with 4 GB of RAM and
Windows XP SP3 (fully patched to latest Windows Update levels). The audio interface was the E-MU 1820M,
running v2.0 DAS drivers and PatchMix software. The plug-in version was tested under Cakewalk's SONAR 8.0.2
Producer Edition.
Quick Tour
Those familiar with earlier versions of T-RackS will recall a user interface that looked very much like a rack of
hardware mastering processors. In fact, the name "T-RackS" would seem to be a play on words combining "T-Rex"
(i.e. Tyrannosaurus Rex, which still appears in the T-RackS logo) and the notion of a rack of gear. While there were
a few minor departures from the hardware rack module interface, the controls were, by and large, sitting there
staring at you in one multi-unit rack. There were pros and cons to that approach. On the plus side, almost all
functionality was instantly available and visible, making T-RackS easily accessible to new users. On the minus side,
this interface provided limited flexibility, with the key options being whether a module was engaged or not and
whether the compressor was routed before or after the equalizer.
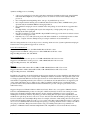
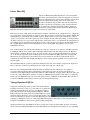
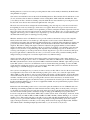
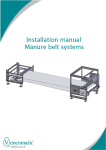
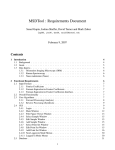
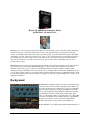
While T-RackS 3 maintains elements of a
hardware rack look, what you see is
decidedly not what you get. There is a lot
more behind the scenes, including up to
eleven additional rack modules (only one is
visible at a time), more flexible and
sophisticated module routing possibilities,
automation capabilities (under DAW
control), and additional capabilities for
configuring what is visible. Where earlier
versions of T-RackS had one multi-segment,
LED-style stereo meter plus analog-style VU
meters for some of its modules, T-RackS 3
augments any module-specific meters with a
rich assortment of helpful meters that greatly
aid the user in providing visual insights into
what the ears are hearing.
While these new capabilities greatly expand T-RackS' power and flexibility, T-RackS 3 does come with a somewhat
steeper learning curve, and requires a bit of extra effort to maneuver its interface. That is a small price to pay for the
new functionality, and a necessity when the needs of this new functionality are traded off against screen real estate
considerations. Let's take a quick look at how to get around T-RackS' new interface.
Looking at the plug-in version of T-RackS 3, there are four main interface areas. At the top of the screen is a set of
general controls, including a mini representation of the virtual rack in use at any given time. We'll look at those
controls in more detail shortly. Just below the general controls is the rack module area. This view shows one module
at a time, as selected by the general controls. Alternately, it can depict a graphic representation of the entire signal
processing chain. We will go into much more depth on the processing modules and signal chain later in this review.
Below the module area are the meters, which we will also cover in depth in a later section of the review. Finally,
down at the bottom of the plug-in's interface is another set of buttons providing access to various information and
setup screens and access to snapshots of settings. The standalone version of T-RackS adds a number of file handling
and transport functions below its interface elements that correspond to the plug-in version. We will also look at
those in more depth later in the review. For now, let's take a closer look at the general controls at the top and bottom
of the plug-in interface.
Originally published on CakewalkNet.com, March 6, 2009.
Page 3
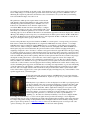
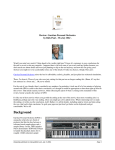
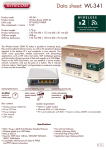
Up in the top left-hand corner are a variety of controls for dealing
with presets. T-RackS 3 ships with a rich set of presets for both the
entire processing chain and the various individual processing
modules. To select a preset for the entire processing chain, make
sure the Global button is illuminated, then click on the current preset name and choose a preset from the pop-up
menu of IK-provided and user-created presets. To pick a preset for the current hardware module, make sure the
Module button is illuminated, then pick a preset for the module you want. Note that doing this will change the
module loaded in the current slot if you choose a preset for a module other than the one that is currently loaded in
that slot. You can also scroll between Global or Module presets using arrow controls, save your changes to a preset
(including saving it with a different name), and delete presets. A separate Preset button also allows loading a preset
from a location other than the default location used by T-RackS (e.g. if you are sharing presets with another TRackS user).
While advanced users may prefer to create their processing chains and device settings based on the needs of a given
project, new users will likely appreciate the meaningfully-named starting points provided by IK in the presets. Even
experienced users will likely appreciate the ability to create and recall their own presets for loading commonly used
processing chains and for use in any batch projects with similar processing requirements.
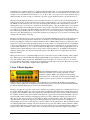
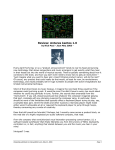
The middle top section of the T-RackS 3 interface is occupied by a block of controls that allow manipulating and
accessing the chain of processors and which partially depict its contents. There are eight squarish blocks of controls.
The first four blocks represent two four-slot processor chains, running in parallel paths labeled "A" (1A, 2A, 3A,
4A) and "B" (1B, 2B, 3B, 4B). An abbreviated processor name for either the A chain or the B chain appears in the
largest area within each block, with which one is shown at any given point depending on whether a yellow light
illuminates the "A" (e.g. 1A, 2A, etc.) selector or the "B" (e.g. 1B, 2B, etc.) selector (e.g. as in the 1B, 2B, 3B, and
4A slots in the above screen shot). A little red triangle in the lower left corner of the slot selector is used to show that
a processor is present in any blocks that are not selected (e.g. in the 1A and 2A blocks in the above screen shot). The
remaining flour blocks represent a single processor chain, which occurs after the parallel four-slot chain in the signal
flow. Any processors in those slots are always displayed in abbreviated form within those blocks. At the bottom of
each of the eight blocks is a pull-down menu to select the processor that will be in the selected slot of the processor
chain. Clicking on the processor's abbreviated name will alternately bypass and reconnect the processor in that slot.
It takes a little while to get used to reading and using this interface. This is especially true in the case of the parallel
processor chains in the first four slots, where one slot can represent two different processors, and the processors
visible at any given time may not actually be in the same chain. Nevertheless, the mechanism gets the job done, and
with a minimal amount of screen real estate, which is helpful since T-RackS 3 already consumes a fair amount of
vertical space.
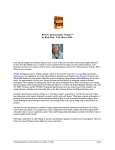
Over in the top right-hand corner, there is a Show Chain button, which makes a graphic display of the
processor chain and its contents fill the space normally occupied by the currently selected processing
module (see below in the "Chain, Chain, Chain" section). Just below that, there is a Compare button to
engage T-RackS' Compare function, which allows quickly A/B-ing the processed version of the signal
against the unprocessed version of the signal. Below the Compare button itself are two related controls. An On/Off
button toggles back and forth between comparing the processed signal (On) and the unprocessed signal (Off) when
Compare mode is engaged. To the right of that is a volume control, which is used to set the volume of the processed
or unprocessed signal, depending on whether the On/Off button is in the On or Off state, respectively. This allows
setting similar volume levels for each signal so the level difference between the two signals does not unduly cloud
your judgment as to which version of the signal sounds better. Once you've set the respective volumes, you can just
toggle the On/Off button back and forth to compare the processed and unprocessed signals.
Originally published on CakewalkNet.com, March 6, 2009.
Page 4
Down in the lower left-hand corner of the plug-in interface, there are a series
of utility buttons. The Lock button on the left provides access to registration
functions or registration information, depending on whether your copy of T-RackS 3 is already authorized. The Info
button provides typical Help/About-type information, such as the software version number. To the right of that is the
"Pref" (Preferences) button, which allows setting three important plug-in level parameters. In particular, it allows
choosing between lowest latency operation (e.g. when needed for semi-real-time monitoring), oversampling (for
higher quality processing, but also higher latency), or oversampling plus linear phase coherency (for best processing
quality, but at the expense of even higher latency -- this option is required for use of the Linear Phase Equalizer). It
also allows choosing whether or not to provide D/A Distortion detection, which is only available in the two
Oversampling modes, and which prevents implied (i.e. based on signal slopes) overloads that would appear between
samples, and whether or not to use hard clipping to clip the output signal to 0dB (i.e. even if the processing chain
prior to that point would result in a higher level signal).
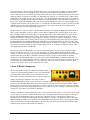
In the lower right-hand corner are a series of snapshot controls.
When the Copy To button is pressed, it makes a copy of the current
settings of all the processors in the signal chain and their position in the signal chain. There are four lettered buttons,
A through D, which will then flash. Clicking one of those buttons then associates the copied settings with that
button, so they are available for instant recall when that button is pushed later. This makes it easy to A/B (or even
A/B/C/D) multiple sets of process chain and processor settings. Note, though, that these settings aren't stored in any
saved presets or in the plug-in context saved by the DAW. Thus, they are only useful for comparing tweaks made to
settings in the course of a single session with your project.
Chain, Chain, Chain
The heart of T-RackS is its signal processing chain and the equalization and dynamics processing modules that
occupy the slots in the chain. Either a selected module in the chain or a graphic view of the processor chain itself
will be depicted just below the controls at the top of the T-RackS plug-in. The graphic view, which is engaged via
the Show Chain button, makes it easy to see at a glance the layout of the parallel and serial portions of the signal
chain, as well as which modules are in each slot within the chain. Clicking on any module brings it to the foreground
for tweaking.
Before diving into the details of those individual modules, it is worth mentioning that IK's orientation with T-RackS
is toward analog-modeled processors. They use two proprietary technologies to do this. DSM™ (Dynamic
Saturation Modeling) models the way analog circuits respond to a signal based on the content of the signal itself
over time. The new SCC™ (Sonic Character Cloning) technology analyzes the actual behavior of analog processors,
then models that behavior, erratic elements and all, mathematically with the goal of modeling what the equipment
actually does do, versus what an analysis of the schematic might suggest it should do.
Let's take a look at the processors available in T-RackS 3 Deluxe. Since CakewalkNet has not reviewed earlier
versions of T-RackS, we will include the original "classic" T-RackS processors, as well as the five new processors
introduced with T-RackS 3 Deluxe.
Originally published on CakewalkNet.com, March 6, 2009.
Page 5
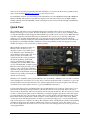
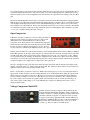
Linear Phase EQ
The new T-RackS Linear Phase Equalizer is a six-band equalizer
that offers optional linear phase coherency (engaged via a button in
the lower right-hand corner of the module's interface). Linear phase
coherency means that the timing of the various bands of the
frequency spectrum are kept in phase with each other despite the
frequency spectrum processing that is going on. This results in a
more transparent sound than a traditional equalizer, which can
slightly smear timing aspects between bands. Even when not operating in linear phase mode, the T-RackS Linear
Phase EQ will impart a minimal level of phase distortion to its output signal.
Each of the six bands of EQ, which can individually be enabled or disabled, can be configured for low- or high-pass,
low or high shelf, or band-pass/band cut operation, and is fully sweepable over the range from 10 Hz to 20 kHz. The
Gain/Res knob for each band provides ±15 dB of gain for all filter styles except low-pass and high-pass, where it
operates as a resonance control. The "Q" knob provides settings from 0.2 to 20 for the peaking (i.e. band-pass/band
cut) filters, and serves as a slope control with resonance, with a range of 0.2 to 3, in shelf mode. It is disabled in lowpass and high-pass modes. Besides using the knob controls to adjust frequency and gain for the filter bands, there is
also a graphic display that allows direct manipulation of nodes on the graph. The graph does not provide Q
manipulation, however.
Over on the left-hand side of the module's interface are controls to set the mode of operation of the EQ. It operates
in Left/Right (L/R) mode by default, with left and right channels linked such that changes made to the EQ curve
affect both stereo channels. However, it also provides separate control over left and right channels by pressing an
"L" or "R" button, respectively, then tweaking a green or red curve. Mid/Side (M/S) operation is also supported.
When this mode is engaged, the controls that were previously labeled "L" and "R" are relabeled "M" and "S",
respectively. Pressing these then tweaking the EQ curve allows setting separate equalization curves for the center
and side signals.
The Linear Phase EQ also provides a peak meter that displays the level of the module's output and an output level
knob to adjust the overall level of the EQ. Both are located on the right side of the module.
The short of it is that the Linear Phase EQ is intended for making surgical modifications to the signal it is
processing, while keeping the effects of the filtering as transparent as possible. It does that well. If there is a
downside, it is the impact using the linear phase function of this module has on plug-in latency. However, that is par
for the course with a linear phase equalizer, not unique to T-RackS. The bottom line is that, while you could pretty
much count on T-RackS flavoring your sound with earlier versions of T-RackS, the Linear Phase EQ is the first of
several new T-RackS modules that provides the option for transparent mastering.
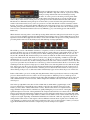
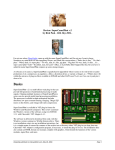
Vintage Equalizer EQP-1A
Transparent mastering may well be possible in T-RackS 3 Deluxe,
but that doesn't mean you have to go down that route or that all new
modules lean in that direction. Also new on T-RackS 3 Deluxe's
plate of EQ offerings is the Vintage Equalizer EQP-1A. T-RackS'
EQP-1A module is modeled on the classic Pultec EQP-1A program
equalizer, which is known not only for its musically pleasing sound,
but also for imparting its own flavor even when EQ settings are left flat. IK injected a bit of humor in their
modeling, by making the visual look of this vintage EQ include physical defects akin to what a unit that had been
bumped around might have. Never trust a pristine-looking vintage EQ!
On the far left-hand side of the EQP-1A are the processing mode controls for L/R or M/S operation, as described
above for the Linear Phase EQ. While the Linear Phase EQ has a visible EQ curve that keeps both of its potentially
Originally published on CakewalkNet.com, March 6, 2009.
Page 6
independent curves visible at all times (i.e. other than when in linked mode), your only clue that left and right or mid
and side may have different settings on the EQP-1A will be the status of the mode and channel selection buttons. For
example, if one of the channel modes buttons (i.e. "L" or "R" or "M" or "S") is pressed, it is a clue that there may be
different settings. To check, though, you will need to press the opposite channel's button to see if the knobs move.
Moving toward the right the first three controls encountered are the boost control for the low-end shelving filter, a
multi-position switch to set the corner frequency for the bass shelving filters to one of four fixed values (i.e. 20, 40,
60, 100 Hz), and an attenuation control for a low-end shelving filter. It might seem counter-intuitive to have two
shelving filters, one to boost and one to attenuate, at the same frequency -- after all, wouldn't any boost be canceled
out by any attenuation, thus making it more sensible to have a single control that covers the desire range of cut or
boost? However, the design of the Pultec EQ that is modeled here was such that the boost and attenuation filters
have different spans. While, in theory, one might want to boost or cut, not both, in practice, doing both has a unique
effect due to the different EQ curves. It can reduce muddiness by creating a bit of a scoop in the low mid-range, thus
lending to the "musicality" of this EQ.
Moving to the right, the next two controls on the lower level and the remaining three controls on the upper level of
the interface are for the high-end filters. Where the low-end filters are both shelving filters, the high-end filters
include a bell-shaped boost filter and a shelving attenuation filter. A Bandwidth knob narrows or widens the span of
frequencies covered by the bell-shaped high frequency boost filter. The boost and attenuation knobs work similarly
to the corresponding knobs for the low-end filters. A high frequency selector switch allows choosing between five
possible center frequencies (3, 4, 5, 8, 10, 12, 16 kHz) for the high-end boost filter. In the top right-hand corner, an
Attenuator Select switch similarly provides a choice of three corner frequencies (5, 10, 20 kHz) for the high-end
attenuator shelving filter. An output level knob with a range of ±15 dB sits in the lower right-hand corner of the
EQP-1A's interface.
Having never had access to a real Pultec EQP-1A, I can't vouch for the accuracy of IK's modeling of that equalizer
here. What I can say is that the T-RackS Vintage Equalizer EQP-1A does indeed provide highly musical results,
even with extreme settings, just like the original Pultec model is reputed to do. It seems to me to be one of those
processors that has the potential to make just about anything passed through it sound better. That may be especially
true when the source material has originated in the digital realm.
Classic T-RackS Equalizer
The classic T-RackS Equalizer is not new, though it has been
enhanced for T-RackS 3. It is an analog-modeled, six-band
parametric equalizer. While it was designed for the mastering
environment, it also works nicely at the track level, and IK provides
a number of presets geared toward its use on individual tracks.
Starting at the left of the module's interface, you will find the by now familiar L/R and M/S mode and channel
selection controls. While these are familiar based on their having been covered above for the Linear Phase EQ and
the Vintage Equalizer EQP-1A, they are new to the T-RackS Equalizer.
Moving to the right, the top portion of the screen is dedicated to providing a graphic view of the EQ curve in use by
the module. While the graphic view is not new, the ability to manipulate gain and frequency settings directly from
the graph is new in T-RackS 3. Below the graph are the standard knob-based controls for the six filters included in
this equalizer. All filter bands can be enabled and disabled via a toggle button just under the main knob control for
each band. The outermost bands provide high-pass and low-pass filters, which have neither Q nor gain controls.
Thus, the top, and only, knob control for those bands is simply a cutoff frequency control. The top knobs for all
other filter bands are gain knobs supplying ±15 dB of gain. The next outermost bands are low- and high-end
shelving filters, and provide a corner frequency control in addition to their gain/cut knobs. The two innermost bands
are standard peaking filters, which provide center frequency and Q controls in addition to their gain knobs. Unlike
the Linear Phase EQ, where any filter band can be set to any frequency, the classic T-RackS Equalizer's bands have
frequency ranges that are limited to subsets of the overall range according to their left-to-right (corresponding to
Originally published on CakewalkNet.com, March 6, 2009.
Page 7
low-to-high frequency) order in the module's interface. While this may not provide quite as much flexibility, this, in
conjunction with the fixed functions of the various bands, does tend to make keeping track of which band is doing
what more intuitive. Over on the far right-hand side of the module is an output level control that provides ±18 dB of
gain.
The classic T-RackS Equalizer sits in territory somewhere between the Linear Phase EQ and the Vintage Equalizer
EQP-1A. It is not as transparent as the Linear Phase EQ, but has much more detailed control over the EQ curve than
does the EQP-1A. Having used the earlier version of the T-RackS EQ plug-in, I have found it to be a nice, analogflavored EQ for use at the track level. In fact, it has frequently found its way onto my lead vocal tracks, where I find
it to enhance the frequency oriented processing in much the same way a mild diffusion filter can enhance a portrait - i.e. by ever-so slightly softening the edges of the part.
Opto-Compressor
T-RackS 3's new Opto-Compressor is based on analog modeling of
high-end optical compressors. Optical compressors have special
characteristics due to the inherent physics of the way their
components work. These include source-dependent time lags in the
attack and release times that yield musically pleasing results. While
the Opto-Compressor imparts an analog flavor, it is also the leastcolored compressor available in the T-RackS 3 Deluxe suite of processors.
Starting on the left-hand side of the module's interface you will find the familiar mode switch for linked or unlinked
L/R or M/S operation. To the right of that along the top of the interface are four knobs. An input level knob provides
±24 dB of gain. The compression ratio knob allows setting the ratio from 1:0, or no compression, to 30:1, which is,
for most practical purposes, limiting. An attack knob ranging from 0 to 50 ms follows, then a release knob ranging
from 30 ms to 5 seconds. Below the attack and release knobs is a large Compression knob, which sets the amount of
compression applied to the signal from no compression to full compression.
Next up to the right are analog-style VU meters. These are triple duty meters that can measure gain reduction (the
default) or the input levels to or output levels from the module. The output level knob, which is located in the lower
right-hand corner of the module, provides ±24 dB of gain.
I have to say that this is a really nice compressor. While it has an analog flavor, it is also very transparent when set
appropriately. At first I found it a bit disconcerting that there was no traditional threshold setting since pretty much
all the compressors I regularly use have those. However, as I used it more, I started feeling this design difference
became a benefit, forcing me to use my ears, rather than my eyes and some calculations. Also, when I revisited a
few of the compressors I've used more regularly, which do have threshold controls, I found myself having to do
more work to figure out the settings to use, as the T-RackS Opto-Compressor ultimately feels easier to use for
getting desirable results.
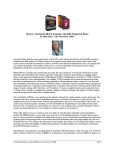
Vintage Compressor Model 670
T-RackS 3 Deluxe's Vintage Compressor Model 670 models the
venerable Fairchild 670 Limiting Amplifier, which could function
as either a compressor or limiter, depending on settings. That unit is
sometimes called the "holy grail" of compressors due to its rarity,
its expense on the vintage equipment market, and the difficulty in
maintaining it. Thankfully IK's recreation of this unit in T-RackS 3
Deluxe can be found at many music stores, won't set you back
anywhere near as much, and has no transformers or tubes to go bad. Let's take a look at IK's model.
Originally published on CakewalkNet.com, March 6, 2009.
Page 8
If you noted the key common point for all the modules we've covered to this point, one thing you'll notice quickly
when looking at the controls for the Model 670 is it doesn't have the standard L/R and M/S mode controls we've
seen on other units. It does do mid/side processing, but the controls not only look different, but they are also labeled
differently. Where we've thus far seen "M/S", the Model 670 uses "Lat/Vert" for "Lateral/Vertical", with Lat, quite
unintuitively in my opinion (but, hey, they're being true to the original hardware labels and people pay big bucks for
that hardware), being Mid, and Vert being Side. The mode switch, labeled AGC (Automatic Gain Control) here, is a
three position toggle with Left/Right, Link, and Lat/Vert positions. Where the modules we've discussed thus far use
a channel selection switch to allow other controls to do double duty, the Model 670 has separate controls for left and
right and/or lateral and vertical. When Link mode is engaged, some of the controls will also be linked in their
motion, while others still offer independent operation.
Just below the mode selection switch are the DC Threshold switches for Left/Lat and Right/Vert. DC threshold? It
turns out this is actually the control for the knee of the compressor/limiter. Fully counter-clockwise is the softest
knee, and fully clockwise is the hardest knee. To the right of the AGC control and DC Threshold controls are the
Left/Lat and Right/Vert Time Constant switches. These switches, which are tied together in Link mode, set the
attack and release time combinations of the compressor. The first four positions, which go from fastest to slowest,
use fixed release times, while positions 5 and six use two program-dependent release times. Next up to the right are
the Input Gain knobs for Left/Lat and Right/Vert. These knobs are not linked in Link mode. Just to the right of the
Input Gain knobs are the Treshold knobs, which are linked in Link mode. Further to the right are a pair of triple duty
analog-style VU meters (with input, output, and gain reduction modes as on the Opto-Compressor), and an output
level adjustment knob with a ±15 dB range.
The Vintage Compressor Model 670 is one of those modules that impart some color just by being in the signal
chain. It can impart a little color or a lot of color, depending on its settings. What I particularly like about this
compressor is the way it can glue a mix together while enhancing the detail that comes through from the individual
elements. That almost feels like a contradiction, but maybe that is the "magic" I've heard mentioned in many
descriptions of the Fairchild 670. (IK also provides a preset called "1dB 670 Magic".) I find this compressor to be
especially nice on acoustic instruments. I tried it on a bluegrass-style piece, and it did indeed work magic. It can also
be quite useful on individual instruments or vocals. I tried one of the vocal presets on the lead vocal for a quick
piano/vocal work demo, and it was just what the doctor ordered.
Classic T-RackS Compressor
The classic T-RackS Compressor emulates classic high-end tube
compressors used in mastering. While it does not provide mid/side
processing like the other modules we've covered thus far, it does
bring a few extra tricks along with its classic compressor functions.
Starting off in the upper left-hand corner of the module is a
Sidechain HPF (high-pass filter) control. As the word "sidechain" implies, this filter doesn't act directly on the
processed sound, but rather filters what is fed to the compressor's detection circuitry. Its range is 32 Hz to 218 Hz,
and the idea is to control the amount of influence lows and low-mids have on the compressor's action. For example,
this can help prevent or reduce the pumping effect that occurs when a bass part is exerting too much influence on the
compressor's action. This is a new feature in T-RackS 3.
Next up to the right are standard attack time (12 ms to 82 ms) and release time (29 ms to 1.4 seconds) controls, with
a ratio control (1.5:1 to 4.68:1) underneath the attack control. A large Input Drive knob (±15 dB) sits to the right of
the ratio control. The T-RackS compressor doesn't have a threshold control, so the amount of compression is
determined by the strength of the input signal. Above and slightly to the right of the Input Drive knob is the Stereo
Enhancement knob, which provides ±5 dB of stereo width enhancement. Negative values lower the apparent width,
while positive values increase the width. Further to the right still are an analog-style VU meter that measures gain
reduction and an output level knob with a ±18 dB range.
Originally published on CakewalkNet.com, March 6, 2009.
Page 9
Like the Vintage Compressor Model 670, the classic T-RackS Compressor provides color in addition to doing its
dynamics processing job. That color is different than that of the Model 670. While I tend to prefer the Model 670 for
color and the Opto-Compressor for more transparent uses, it's always nice to have additional flavors.
Classic T-RackS Multiband Limiter
The classic T-RackS Multiband Limiter is a three-band peak limiter
with a decidedly analog flavor. It sports eight new knobs compared
to the version of this module in T-RackS 2.0. All of these new
controls serve one key purpose, though -- they make the individual
bands of this module configurable. Each band has a ±12 dB
threshold control and a ±12 dB level control. The other two controls
set the crossover frequencies between the three bands, with a range
of 30 Hz to 1.9 kHz for the divider between the low and mid bands and a range of 1 kHz to 20.4 kHz between the
mid and high bands. If you don't need all three bands, you can effectively configure the module to have a lesser
number of bands by setting the low-mid crossover to 30 Hz and/or the mid-high crossover to 20.4 kHz.
To the right of the band configuration controls are the Release Time (80 ms to 1.5 seconds), Overload (±5.3 dB),
and Input Drive (-9 dB to 16 dB) controls. The Input Drive control drives more signal through the input to the
module. Because there is a fixed threshold at which limiting is engaged, it also controls the relative number of peaks
that will be limited. The Overload knob controls the way peaks are limited. At lower levels, there will be more
frequent "pure" gain reduction, whereas at higher levels there will be more frequent clipping. To put it another way,
it is, in essence, a knee control with a softer knee at lower values and a harder knee at higher values. The Multiband
Limiter is rounded out by an analog style VU meter that displays average gain reduction across the three bands and
an output level knob with a range of ±18 dB.
Now that its bands are configurable, the classic T-RackS Multiband Limiter lends itself to a variety of special
applications, like de-essing, in addition to just helping you make things louder by separately processing three bands
of the frequency spectrum. For those who just want the older function, simply resetting the unit to default values,
then adjusting the Release Time, Overload, and Input Drive knobs, and possibly also the output level will suffice.
This makes for a nice tradeoff between simplicity and flexibility.
Brickwall Limiter
T-RackS 3 Deluxe introduces a new intelligent, multi-algorithm
Brickwall Limiter. This module is intended as the last module in TRackS chain, and can be used for increasing the apparent loudness
of the signal while ensuring the end result does not go beyond 0
dBFS.
Starting at the left of the module's interface, we see a control for linked stereo operation or for separately setting
controls for the left and right channels. When using separate controls, the relevant knobs will be used to adjust
whichever channel is currently selected.
Most of the remaining controls will look familiar to those readers who are familiar with loudness maximizers. There
are gain reduction and output level LEDs, an Input level knob with a range of ±15 dB, an Attack Time knob with a
range of 0.05 ms to 10 ms, a Release Time knob with a range of 0.1 ms to 1 second, and an Output Ceiling knob
with a range from -15 dB to 0 dB. All of these knobs are subject to separate left/right control, if that is engaged.
The remaining control, which is not subject to separate left/right control, is the Style control, which sits at the top
center of the module's interface. This control selects the module's limiting algorithm from choices including Clean,
four Advanced styles, 3 Saturation styles, and Clipping. Clean is the most transparent algorithm, while Clipping
simply does hard clipping at 0 dBFS (or whatever level is set on the Output Ceiling knob). The three Saturation
Originally published on CakewalkNet.com, March 6, 2009.
Page 10
styles use various saturation algorithms to gradually taper off the signal prior to the point at which it would clip. The
four Advanced styles use a blend of saturation and digital limiting. Note that only Clean and the four Advanced
styles will show any gain reduction on the Gain Reduction meter.
At various times in the past, I've been known to set up shootouts between different loudness maximizers, to see
which sounds best on a particular recording. One of the cool things about the T-RackS Brickwall Limiter is that its
nine styles of brickwall limiting are similar in practice to being able to set up such a shootout between nine different
maximizers by changing the value of a single control. Of course, if you've got other loudness maximizer modules,
you may still find other flavors to try outside of this module, but, for those who don't, it is nice having multiple
flavors within a single module.
One thing worth noting here is that, while the standalone version of T-RackS 3 includes optional dithering, the plugin version does not. This is no big deal if you like the dithering provided by your DAW. For example, SONAR
Producer Edition's POW-R 3 dithering is top-flight stuff. However, dithering and noise shaping are frequently found
in loudness maximizer modules, and can thus be one of the aspects of a particular model that contributes to
subjective preferences for one model or another.
Classic T-RackS Soft-Clipper
The classic T-RackS Soft-Clipper provides another end-of-chain
loudness maximizing option geared primarily toward analog-style
saturation. It enhances the clipper function of T-RackS 2.0 by
providing separate left/right controls (i.e. via the same linked
operation or left/right select buttons as used in other modules such
as the Brickwall Limiter) instead of a left/right balance control and
by providing gain reduction and output level meters. The output
level meters are particularly interesting as they start from the outside and "rise" (i.e. in level) toward the common
center of the vertically oriented meter.
Beyond the meters and linked/left/right buttons, there are three knob controls. A Gain knob provides ±15 dB of
input gain to drive the saturation and clipping. A Slope control provides continuously variable control of the knee of
the clipper from soft saturation starting at -12 dB to hard clipping at 0 dB. An Output level knob provides control
over the output level from -60 dB to 6 dB. There is also a Saturation indicator light, which lights when the signal is
saturating, and left and right overload lights to show when the signal has exceeded 0 dBFS, meaning it is time to
turn the Output level knob down.
It's interesting that the Brickwall Limiter and the Soft-Clipper have similar functions, both providing saturation and
clipping, but yet have some decidedly different design choices. While the Brickwall Limiter gives a choice of
multiple algorithms but does not provide continuous control of those algorithms, the Soft-Clipper picks one
algorithm but provides continuous control over it. The output level metering is also quite different, and the LEDstyle indicators for saturation and channel-level clipping on the Soft-Clipper also provide a bit of extra information.
I find it somewhat curious that IK didn't simply incorporate the continuous saturation slope control and extra
indicators in the Brickwall Limiter, then choose whether they preferred the more standard output level meter or the
outside-to-center style meter and go with that. Of course, the Soft-Clipper is the only clipper choice in the Standard
version of T-RackS 3, so there is the additional model to keep separate for packaging purposes. Nevertheless, it
seems like the extra functionality in the Soft-Clipper could also have been useful in the context of the Brickwall
Limiter.
Metering
Without minimizing all the excellent new processing modules and enhancements to existing modules, I think it is
fair to say the most immediately apparent area of enhancement in T-RackS 3 is its metering. T-RackS 2 provided
multi-segment LED-style output level meters and analog-style VU meters in each of the dynamics modules, but that
Originally published on CakewalkNet.com, March 6, 2009.
Page 11
was really it for visual feedback on the audio results. (Note that there was also an EQ curve display, but that was
based on EQ settings, not on the frequency spectrum of the actual audio being processed.) T-RackS 3 starts by
enhancing the output level peak meters, then delivers a host of new meters to let you view what you are hearing
from several different angles. Let's take a look.
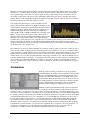
The peak meters, which provide separate meters for the left and
right channels, include both instantaneous audio peak monitoring
and temporary peak hold metering. New to T-RackS 3 are over
indicators for each channel to show when the output level has
exceeded 0 dBFS. Another new feature is the ability to configure
the peak meters' display to show any of three different audio scales.
The default scale, which will generally be most useful for normal
mastering purposes, shows -60 dB to 0 dB, with a zoom such that the upper half of the meters displays the -8 dB to 0
dB range, thus making it easier to keep an eye on available headroom. Other options include -90 dB to 0 dB (with a
zoom from -30 dB upward) for monitoring the full range of the signal and -50 dB to +5 dB (with a zoom from -10
dB up) for looking into what is going on when overs occur.
Just below the peak meters are perceived loudness and RMS ("root mean square" or average audio power) meters.
Both of these combine left and right channels on a single meter. RMS meters are fairly common -- for example,
SONAR's meters can be configured to display RMS instead of, or in addition to, peaks. The perceived loudness
meters, however, while not unique to T-RackS 3, are fairly uncommon, and highly useful. Where the RMS uses a
flat frequency response in its measurements, the perceived loudness meter combines averaging and frequency
weighting to display the "sense of loudness" a listener would get from the audio signal. IK adds to this by providing
27 "loudness suggestions" based on common musical genres. For any given loudness suggestion, a green area and a
red area will appear underneath the perceived loudness meter. The idea is that the green area represents where most
loud areas within that genre should be peaking, while the red area represents where the most extreme loud passages
should peak for that genre. I have to say I found some of the loudness suggestions curious. For example, the
loudness suggestion for hip-hop/rap was considerably lower than that for pop rock. The one for hip-hop/rap felt
fairly reasonable to me, while the one for pop rock resulted in your basic square wave masters that are a common
result of the so-called "loudness wars" that plague modern recordings. That made me wonder what recordings were
used for determining these suggestions, and whether those recordings were representative of good taste in mastering
or just the current state of the industry, or perhaps even just some arbitrary pick from a particular set of recordings.
Of course, this is also highly subjective. The bottom line is, this perceived loudness meter is quite valuable. The
notion of the loudness suggestions also seems quite valuable, though your mileage may vary on the usefulness of the
specific suggestions for your musical genre.
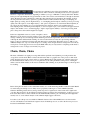
To the right of the peak, perceived loudness, and RMS meters are two meters aimed at
monitoring stereo field information. A phase scope is up on top, with a phase correlation
meter underneath.
With the phase scope, either dots or lines are displayed on an X/Y scope. Signals present
on only one channel of the stereo spectrum would display as 45-degree tilted lines, with
left tilting downwards (i.e. from left to right) and right tilting upwards. A mono signal
would appear as a vertical line, while a signal that is 180 degrees out of phase would
show up as a horizontal line. Besides being able to configure whether lines or dots are
used for the display, you can also configure how long the readings stay on the scope.
Values range from "persistent" (i.e. the values stay on the scope indefinitely) to
"lightning" (i.e. the values are extremely momentary). You can also configure whether
the readings are normalized (i.e. so even low level signals show up as full scale readings) or not. I might have
preferred if there were an option for displaying persistent values and displaying momentary values at the same time,
for example using fainter readings for the persistent values and brighter values for the momentary readings ala the
phase scopes in iZotope Ozone 3 or PSP StereoAnalyser. However, the different speeds do at least provide some
options, and using a slow speed is a reasonable compromise for the lack of this capability.
Originally published on CakewalkNet.com, March 6, 2009.
Page 12
The phase correlation meter shows the phase correlation between the left and right channels of the stereo signal on a
scale from -1 to +1. When signals are in phase, the meter should be reading a value between 0 and 1, with a fully
mono signal showing +1 and a fully out of phase signal showing -1. This reading can give an indication of how
successfully a signal can be collapsed to mono, with higher numbers being more mono-compatible and negative
numbers likely to yields significantly weaker mono signals because their being out of phase results in one channel's
subtracting level from the other when collapsed to mono.
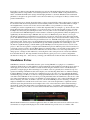
To the right of the phase meters is a 1/6-octave FFT spectrum
analyzer. The spectrum analyzer is also highly configurable to suit
user preferences and analysis of specific issues. The meter displays
multiple bar graphs by default, but it can also be configured to be a
segmented line graph. The audio level range is configurable to
either -90 dB to 0 dB or -60 dB to 0 dB. The bars can display peak,
RMS, or average values. (If average is selected, there will be a
delay in getting to an initial reading, after which the display should
stabilize to give a fairly steady reading of the signal's frequency
spectrum curve.) A tilt value can be set to make the curve rise with frequency. Readings can be taken from either the
left plus right signals (the default) or from either individual channel. Peak mode fall time for the bars and the
resolution of the analyzer can also be configured, and peak hold indicators can be enabled or disabled. The analyzer
can be turned off to save on CPU cycles.
The combination of meters provided by T-RackS 3 is extremely useful for getting a visual sense of what is going on
with your audio. While one might argue that mastering should be done primarily by ear, those of us with less-thangolden ears and/or less-than-optimal acoustical environments often need the sanity check that meters provide to help
augment what we are hearing and provide some clues to what we may not be hearing. I also find the perceived
loudness meter to be a very nice, and fairly unusual, touch to help get a handle on one of the more difficult areas of
mastering multiple tracks for an album -- i.e. keeping the perceived loudness of tracks relatively consistent when the
types of tracks vary significantly. While there are plenty of other options out there for metering that is useful in
mastering, T-RackS 3 goes a step beyond most solutions by putting all of the most useful visual indicators together
on one screen.
Automation
With up to twelve modules potentially in use at any given time,
each with multiple automatable controls, T-RackS could potentially
have an overwhelming number of automatable parameters. Add to
that the notion that neither T-RackS nor your DAW software can
predict which T-RackS module will be in use at any given time, no
less which parameters a given user will want to automate, and this
creates a dilemma. How can T-RackS provide for automatable
parameters without making for a highly messy situation?
T-RackS 3 addresses this dilemma through a decided compromise,
but a compromise that seems reasonable given the considerations mentioned and the practical nature of what users
are likely to want to do. It presents a list of up to sixteen automation parameters to your DAW, while letting you tie
each of those sixteen parameters to a specified control of a specified module and slot in your T-RackS configuration.
For example, perhaps you might want to tie the first six automatable parameters to the gain controls for the six bands
of the Linear Phase EQ in Slot 1A of your configuration so you can make EQ level adjustments over the course of
the song. When setting up the parameters, you would first select Slot 1A, then the Linear Phase EQ, and then the
specific band of Gain you want to tie to a given automatable parameter. After selecting the band of gain and the
parameter it will be assigned to, you simply click the Add button in the automation assignment screen to make the
assignment. If you made a mistake, you can remove the assignment. If you assigned it to the wrong parameter, you
can also move assignments up or down within the automatable parameter list. Once you've made all your
assignments, you simply say OK to the automation assignment screen and you're in business.
Originally published on CakewalkNet.com, March 6, 2009.
Page 13
It probably goes without saying that this scheme has pros and cons. The main benefit is that it keeps automation
manageable, whereas a huge number of automatable parameters can overwhelm a DAW on the performance front
and/or overwhelm the DAW user in trying to find the right parameters to automate. Whether sixteen automatable
parameters is enough for any given situation could come down either way, but I suspect it is likely to suffice in most
practical circumstances.
There are three key areas, though, where this scheme could prove unwieldy. First, there is the necessity of setting up
the automation links between real parameters and automatable parameters visible to the DAW. While it is simple
and straightforward, it doesn't come for free, and does take awhile to set up each time you want to change
something. Second, the assignments are slot- and module-dependent. Thus, for example to go back to the case of the
Linear Phase EQ gain parameter automation, you would not be able to use the same automation setup to automate
that EQ in slot 1A if you'd placed the EQ in slot 1B or 2A or any other slot. Nor would that setup work for you if
you'd used the Classic T-RackS EQ in Slot 1A and wanted to automate its gain parameters. Third, and perhaps most
significantly, the Automation setup is T-RackS-wide, not tied to a T-RackS-level preset. Thus, if you set up an
automation configuration for a particular preset you will use over and over and save the preset, then create another
preset, with different modules in spaces you'd automated in the earlier preset, and create automation settings for that,
your automation assignments from the first preset will have been lost. SONAR's VST plug-in support does provide a
workaround for this, because it does save the T-RackS-wide parameters, including automation mappings, in its VST
plug-in-level presets. I would expect other DAWs may provide similar capabilities. It is worth noting, too, that
automation assignment changes you make within a given SONAR project will be preserved across sessions of the
project, so this concern is specific to using the same T-RackS-level preset in different projects. The bottom line is it
would seem a lot more logical to me if T-Racks directly provided the ability to save automation setups with its own
presets. Their being tied to slots and modules within those slots means a whole lot of extra setup each time you
change presets or change modules within slots, and saving these values at the preset level could at least minimize
that somewhat. However, this setup shouldn't adversely affect any given project once you have configured the
automation for that project -- unless, that is, you change your mind later about what modules will be in which slots.
Standalone Extras
SONAR users, and users of other DAWs, have the option of using T-RackS 3 as a plug-in or as a standalone
application. Unlike in the case with standalone software instruments, where DAW users will almost always prefer to
use the plug-in version, there are a number of situations where using the standalone version of T-RackS may be
preferable to using the plug-in. Since mastering is, for a number of reasons, generally best considered as a process
separate from mixing, if T-RackS modules will comprise your total mastering chain, there is no inherent advantage
in using T-RackS as a plug-in over using it as a standalone processor. Of course, if you are combining the mixing
and mastering stages, it is likely to be easiest to simply put T-RackS at the end of your SONAR signal chain and be
done with it. Since T-RackS can also be used for processing individual tracks and submix buses, there are also other
cases where it will make the most sense to use T-RackS as a plug-in. However, once you have individual audio mix
files for mastering, the verdict on whether to start one or more new SONAR projects for mastering, or whether to
simply use T-RackS in its standalone form, will come down to your needs and preferences. A particular scenario
where I'd expect using the standalone version might be the course of least resistance would be when mastering a
whole bunch of audio files that are likely to need identical processing -- for example, perhaps instrumental cue
mixes in a similar style. Let's take a look at the additional facilities the standalone version of T-RackS brings to the
table.
When T-RackS is launched as a standalone application, there is an additional screen area down at the bottom of the
user interface as compared with the plug-in version. This additional area provides access to a number of file
Originally published on CakewalkNet.com, March 6, 2009.
Page 14
handling functions, as well as a few audio processing functions that would normally be handled by the DAW when
using T-RackS as a plug-in.
Over in the bottom left-hand corner are the audio file handling functions. These include a file list and buttons to add
("Load") and remove files from the list. T-RackS 3 allows loading WAV, AIFF, CAF, SD2, and MP3 files. Once
you've added your files to the file list, clicking on any file within the list selects that file for processing and loads it
into the audio wave window that consumes the right-hand side of the pane.
The audio wave window allows setting heads and tails trimming points, fade regions (i.e. the end of a fade-in and
the beginning of a fade-out), and the type of fade curve to be applied. There are four types of fade-in curves and
three types of fade-out curves available. Zoom capabilities, provided by small plus and minus signs in the lower lefthand corner of the audio window, help in zeroing in on trim and fade points. There is also a looping capability, with
draggable start and stop points, to make it easy to repeatedly loop over any desired section of audio while trying to
determine trim and fade points or adjusting processing settings.
While the standalone version of T-RackS 3 does not provide continuous automation, it does provide a snapshot
facility via the audio window. You can take up to nine snapshots of various states of the T-RackS module
configurations and settings, then switch among them instantaneously on playback. These instantaneous switches can
go beyond just automatic parameters. For example, the actual modules in the chain could be different in different
snapshots. The time for starting each snapshot can then be adjusted by dragging the marker associated with the
snapshot around the audio window. Snapshots can also be copied if, for example, you would like to apply the same
snapshot to every chorus in a song while using other snapshots for the remaining song sections. In this case, you
would copy the snapshot you are using for the chorus, and just drag the new copy to the second chorus, then repeat
the process again if there is a third chorus. Of course, you do need to beware of the potential for making extreme
changes in audio processing if two consecutive snapshots have very different settings.
At the bottom left of the audio window is the transport, with stop and play buttons, a time counter, and the loop
enable button. To the right of those controls, as of T-RackS 3.0.1, there is an ARC button to enable integration with
IK's ARC (Advanced Room Correction) System. If ARC is installed and enabled, T-RackS' output will be processed
by the ARC system to correct for room deficiencies for more accurate monitoring (assuming, of course, the ARC
system has been configured properly for your room and setup). If the ARC system is not installed, this button will
simply bring you to the IK web page for information on ARC.
Once you have everything the way you want it, it is time to render your files. This is done via a Process button in the
lower right-hand corner of the screen. This will bring up a dialog box to allow you to select the output format
(WAV, AIFF, or CAF), whether to only process the currently selected file or all files in the list, and some file nameoriented information. In the case of processing just the current file, the file name information would be the location
and name of the file itself. If you were processing all files, then it would be the directory for the files and an
extension for T-RackS to append to the mix file's name to get the master file. Note that options such as bit-depth for
the mix and whether dithering is on or off are not supplied here. Rather, they are specified in the properties of the TRackS project. Speaking of which...
Besides the audio file handling controls we've covered to this point, the standalone version of T-RackS adds some
T-RackS project-handling capabilities and audio hardware interface settings. These are mostly what you'd expect -i.e. the ability to load and save projects and select audio drivers and control some important settings such as buffer
size. One area that warrants special consideration, though, is setting up the T-RackS project properties. These
involve choosing the audio format (WAV, AIFF, CAF), resolution (16-bit, 24-bit, 32-bit integer, 32-bit float, 64-bit
float), sample rate (44.1 kHz, 48 kHz, 88.2 kHz, 96 kHz, 176.4 kHz, 192 kHz), whether dithering is on or off, and
whether or not to link specific audio files to the audio processor chain such that when different files are loaded the
chain of processors gets switched. With the exception of the file/processing chain linking option, these settings
apply to the target master file, not the files you are loading, which can be in any supported input format. T-RackS
deals with the details of handling multiple input file formats so you don't need to worry about it.
Originally published on CakewalkNet.com, March 6, 2009.
Page 15
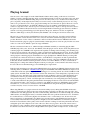
Playing Around
Over the course of the roughly 7½ weeks I had T-RackS 3 Deluxe while working on this review, I used it in a
number of contexts, including mastering and processing individual tracks. For the most part, things went well, and I
have really enjoyed the T-RackS metering and processors. It's always risky to try to deduce from a relatively short
period, especially one interrupted by the holiday season and a variety of other unrelated projects, how one's longterm use of a product will evolve once it gets past the learning curve and "honeymoon" phases. However, I do feel
it's safe to say that I am likely to use T-RackS 3 Deluxe processors in a number of individual track processing
scenarios as I get more used to how those processors behave and how they compare to other processors I've used to
this point. I also think it's likely I will at least consider using T-RackS on mastering projects. However, whether it
will win out for any given mastering project will depend on the project, and there is at least one significant
limitation, which I'll get to shortly, that I feel may hurt T-RackS' odds of being chosen in more critical cases.
The net is my overall experience with T-RackS has been quite positive. However, I would be remiss if I did not
mention a number of issues I ran into in the course of my use of both the standalone and plug-in versions of the
product. The nature of some of these is such that it is hard to tell where the line between T-RackS itself and the
interaction between a plug-in, a plug-in's system demands, and the plug-in host comes into play. In other cases, there
seem to be some clear, if difficult to pin down, bugs in T-RackS.
The first consideration I came across, which I feel impacts T-RackS suitability as a mastering plug-in within
SONAR (and possibly some, but not all, other DAWs) is that the plug-in version only has 32-bit data paths between
it and the plug-in host. SONAR's audio engine has the capability of running at 64-bit floating point, and many plugins have now been updated to take advantage of that at both the track and mastering plug-in levels. It seems a shame
to have all the extra resolution saved up through the entire mix cycle, then immediately lop off 32 bits of resolution
when going into a mastering plug-in, incidentally before it gets upsampled for T-RackS' internal processing. This
consideration also affects the decision as to whether to use T-RackS as a component in an audio signal chain that
includes other processors that have 64-bit data paths. It is not, however, a big issue if T-RackS is the first processor
in line after an audio track that is starting at 16-bits or 24-bits of resolution. Rather, it is only a concern if the TRackS plug-in is coming after additional, higher resolution processing has occurred, which would almost always be
the case at the end-of-chain mastering spot in a SONAR project's signal chain.
In my first real mastering project after getting T-RackS I held a shootout between T-RackS 3 Deluxe and my typical
mastering chain (a combination of PSP MasterPack plug-ins and SONAR's Linear Phase Multiband Compressor, all
of which have 64-bit data paths throughout). The mastering process was being carried out at 64-bit, 96 kHz for a CD
quality (16-bit, 44.1 kHz) result. My old solution was the clear winner due to better transparency, especially in areas
relating to the stereo field and front-to-back soundstage perception. While it is always possible that learning curve
considerations came into play with T-RackS, I have also seen similar results in the past when comparing results
using a 32-bit data path (or a 64-bit overall data path, but constrained by a few strategically-placed 32-bit plug-ins)
to results with a full 64-bit data path up until the final downsampling and bit rate conversion. Not all current DAWs
support 64-bit data paths, so this won't be a concern for some DAW users. However, SONAR has supported these
for awhile now, so it is at least a consideration for those SONAR users using 64-bit data paths, which I'd guess
would be a majority of users of recent versions of SONAR.
When using T-RackS 3 as a plug-in at the track-level in 44.1 kHz projects (running with SONAR's 64-bit audio
engine), I occasionally encountered some issues with softsynths not playing notes that they were supposed to play.
Sometimes this was during playback only and not when rendering. Other times it was when rendering only at certain
ASIO latencies, and changing the latency could affect whether there were problems in the render or not. Sometimes
the workaround was to set the latency higher, and sometimes it was to set the latency lower. In other words, the
behavior appeared to be unpredictable. Note that the issue was the presence of the T-RackS plug-in in the project,
not necessarily in the track that was being affected. I might also note that T-RackS has a lower latency setting
intended for issues like this, where quality of the result is reduced in exchange for real-time performance. However,
setting that option did not help in at least some of the cases. I have not yet gotten to the bottom of these issues to
know if there is a bug somewhere, if there are tuning parameters that can be set for more consistent results, or what
the ultimate cause and resolution may be. I might add that it isn't purely a CPU consumption issue, as CPU usage
Originally published on CakewalkNet.com, March 6, 2009.
Page 16
could be low, with very little going on, in the face of these issues, and the difference in whether things worked
properly or not was if T-RackS was inserted and active. This is not to say there is necessarily a bug in T-RackS -e.g. it could be a problem in SONAR 8.0.2's plug-in latency compensation or some other performance- and/or
rendering-oriented aspect of SONAR. However, it decidedly did present a practical problem in actual use of TRackS within SONAR for some of my projects. Ultimately, when I found a combination that worked, I just had to
freeze the relevant tracks to capture the results to audio while the going was good.
Speaking of using T-RackS as a plug-in at the track level, I would really have liked to have had the possibility of
using T-RackS' individual processing modules directly as separate plug-ins, rather than having to insert the full TRackS plug-in, then insert a single processing module in that. For example, there are certainly times where I would
only want to use the Vintage Compressor Model 670 or Vintage Equalizer EQP-1A in a chain with processors from
other vendors. Or perhaps I'd like to use both of those modules with another non-IK module in between them. In
such cases having to have the whole T-RackS module, including all those meters, is cumbersome, not to mention
likely a fair amount of extra CPU overhead. Additionally, looking quickly at a plug-in chain that has an entry
labeled "T-RackS 3", when all that is included in it is the Opto-Compressor, for example, is not as helpful as looking
at that same plug-in chain and seeing "Opto-Compressor" (or "T-RackS Opto-Compressor"). This is especially true
if there are multiple instances of T-RackS within that chain (e.g. separated by a third party plug-in). I admit to being
spoiled by the old T-RackS EQ, which was indeed available as a separate processor and became a frequently used
plug-in in my track-level signal chains. Besides wanting the audio modules available as separate plug-ins, I'd also
love to have the meter section available as a separate plug-in for those cases where it might be nice to use those
while not using the rest of T-RackS. It isn't just the extra CPU overhead I'd be concerned about in that case, but also
the extra screen real estate. (This is also true when wanting to use just individual processing modules, where I might
not want the meters.)
Finally, while attempting to use the standalone version of T-RackS 3 Deluxe, I ran into a recurring problem where
processing my files resulted in master WAV files that were the right length, but contained total silence (or, in one
case, an initial burst of noise followed by total silence). I reported this problem to IK's technical support, including
providing step-by-step details of what I did, including noting times when the same steps yielded different results. It
is the kind of issue that seems to recur frequently, but which is difficult, if not impossible, to replicate with one
simple recipe that always fails in the same way. In particular, the issue seemed to center around making name
changes in the relevant files. For example, after doing a "Save As" with the T-RackS project (e.g. to be able to return
to past settings if the new one didn't work out), I would run the "Process" command to render the audio file then
change the name of the rendered file (i.e. so as to not overwrite the results of an earlier render) before letting it
render. Sometimes I'd get the proper result, and other times I'd get the silent WAV file treatment. When the render
wasn't going to work properly, it became evident right away, because the graph indicating the status of the rendering
operation would move very slowly compared to when it was going to work properly. Unfortunately, if my
interactions with IK's technical support on this matter were representative, I would have to consider their support to
be a decided weakness. First, it took more than a day and a half for them to get back to me at all (i.e. beyond the
instant automated response to indicate the receipt of my support query). When they did respond, the response
seemed to have ignored important details of my original problem report, rather putting up a red herring related to
one of those details that should have been answered by my initial report. (In particular, the response keyed in on my
mix file's having been a 64-bit, 96 kHz file, rather than 16-bit, 44.1 kHz like the intended master format. It
suggested I, "try to process the file at the same bit/etc that you bounced it at and let me know." This is after my
original problem report had indicated that my first attempt at mastering the same mix file had succeeded, and it was
only after changing some processing settings and renaming the project and master file and render file that the
problems started. I eventually did recreate the problem using a 44.1 kHz mix, too, just to ensure that consideration
could be taken totally off the table, even if it never should have been on the table in the first place.) The net is that,
after several correspondences elapsed over the period of a week, I still don't know, one way or another, if IK has
logged this problem as a bug or been able to recreate it on their end (or even tried to do so, for that matter).
Meanwhile, the problem has been a serious hindrance to my use of the standalone version of T-RackS 3, because my
attempts at file rendering tend to result in silent WAV files on the order of a quarter of the time. (IK responds that
there are thousands of T-RackS 3 standalone users that are not getting silence when they process.)
Originally published on CakewalkNet.com, March 6, 2009.
Page 17
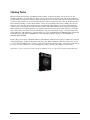
Closing Notes
The net is I have mixed feelings on T-RackS 3 Deluxe. On the one hand, I absolutely love the processors and
metering capabilities, and would like to be able to use those more extensively in my work, both for mastering and
for track-level processing. I also anticipate I will use the product more over time, both as product bugs get fixed and
as I come to grips with how to work around the bugs and/or other issues that don't get sorted out. On the other hand,
I have ended up needing to work around a number of issues in several distinct areas. I'm not talking about obscure
things that only come into play a small percentage of the time, but rather things I've encountered quite frequently
over the course of using the product. The exposure I've had to IK's support thus far also doesn't give me the warm
fuzzies that they even recognize that there is an actual problem in the area I'd raised to them. (I have not raised the
other issues to IK as yet, because I can't document them to the point of having any recipe, or even knowing if they
are truly IK issues, Cakewalk issues, or in between the two.) I also do think having the T-RackS plug-in support full
64-bit data paths is important for SONAR users, and is especially limiting in the area of using T-RackS for
mastering within SONAR.
I believe the positive aspects of T-RackS 3 Deluxe will ultimately outbalance the negatives, but there are a boatload
of mastering plug-ins out there in the market at all price points. When significant workflow problems arise, it is all
too easy to find something that also sounds good but doesn't have the same hassle factor. I sincerely hope IK will get
those sorts of issues worked out so users can simply enjoy what is otherwise an excellent set of processors.
*Rick Paul is a singer-songwriter living in Southern California. You can contact him at http://www.RickPaul.info.
Originally published on CakewalkNet.com, March 6, 2009.
Page 18