1
Operation/Reference Guide
IS-SPX-1000
IS-SPX-1300
Inspired Signage XPress Players
Inspired Signage
L a s t R e v is e d : 8 / 2 8 / 2 0 1 3
AMX Limited Warranty and Disclaimer
This Limited Warranty and Disclaimer extends only to products purchased directly from AMX or an AMX Authorized Partner which
include AMX Dealers, Distributors, VIP’s or other AMX authorized entity.
AMX warrants its products to be free of defects in material and workmanship under normal use for three (3) years from the date of
purchase, with the following exceptions:
•
Electroluminescent and LCD Control Panels are warranted for three (3) years, except for the display and touch overlay components are warranted for a period of one (1) year.
•
Disk drive mechanisms, pan/tilt heads, power supplies, and MX Series products are warranted for a period of one (1) year.
•
AMX lighting products are guaranteed to switch on and off any load that is properly connected to our lighting products, as long
as the AMX lighting products are under warranty. AMX also guarantees the control of dimmable loads that are properly connected to our lighting products. The dimming performance or quality there of is not guaranteed, impart due to the random combinations of dimmers, lamps and ballasts or transformers.
•
AMX software is warranted for a period of ninety (90) days.
•
Batteries and incandescent lamps are not covered under the warranty.
•
AMX AutoPatch Epica, Modula, Modula Series4, Modula CatPro Series and 8Y-3000 product models will be free of defects in
materials and manufacture at the time of sale and will remain in good working order for a period of three (3) years following the
date of the original sales invoice from AMX. The three-year warranty period will be extended to the life of the product (Limited
Lifetime Warranty) if the warranty card is filled out by the dealer and/or end user and returned to AMX so that AMX receives it
within thirty (30) days of the installation of equipment but no later than six (6) months from original AMX sales invoice date. The
life of the product extends until five (5) years after AMX ceases manufacturing the product model. The Limited Lifetime Warranty
applies to products in their original installation only. If a product is moved to a different installation, the Limited Lifetime Warranty
will no longer apply, and the product warranty will instead be the three (3) year Limited Warranty.
All products returned to AMX require a Return Material Authorization (RMA) number. The RMA number is obtained from the AMX
RMA Department. The RMA number must be clearly marked on the outside of each box. The RMA is valid for a 30-day period. After
the 30-day period the RMA will be cancelled. Any shipments received not consistent with the RMA, or after the RMA is cancelled, will
be refused. AMX is not responsible for products returned without a valid RMA number.
AMX is not liable for any damages caused by its products or for the failure of its products to perform. This includes any lost profits, lost
savings, incidental damages, or consequential damages. AMX is not liable for any claim made by a third party or by an AMX Authorized Partner for a third party.
This Limited Warranty does not apply to (a) any AMX product that has been modified, altered or repaired by an unauthorized agent or
improperly transported, stored, installed, used, or maintained; (b) damage caused by acts of nature, including flood, erosion, or earthquake; (c) damage caused by a sustained low or high voltage situation or by a low or high voltage disturbance, including brownouts,
sags, spikes, or power outages; or (d) damage caused by war, vandalism, theft, depletion, or obsolescence.
This limitation of liability applies whether damages are sought, or a claim is made, under this warranty or as a tort claim (including
negligence and strict product liability), a contract claim, or any other claim. This limitation of liability cannot be waived or amended by
any person. This limitation of liability will be effective even if AMX or an authorized representative of AMX has been advised of the
possibility of any such damages. This limitation of liability, however, will not apply to claims for personal injury.
Some states do not allow a limitation of how long an implied warranty last. Some states do not allow the limitation or exclusion of incidental or consequential damages for consumer products. In such states, the limitation or exclusion of the Limited Warranty may not
apply. This Limited Warranty gives the owner specific legal rights. The owner may also have other rights that vary from state to state.
The owner is advised to consult applicable state laws for full determination of rights.
EXCEPT AS EXPRESSLY SET FORTH IN THIS WARRANTY, AMX MAKES NO OTHER WARRANTIES, EXPRESSED OR
IMPLIED, INCLUDING ANY IMPLIED WARRANTIES OF MERCHANTABILITY OR FITNESS FOR A PARTICULAR PURPOSE. AMX
EXPRESSLY DISCLAIMS ALL WARRANTIES NOT STATED IN THIS LIMITED WARRANTY. ANY IMPLIED WARRANTIES THAT
MAY BE IMPOSED BY LAW ARE LIMITED TO THE TERMS OF THIS LIMITED WARRANTY. EXCEPT AS OTHERWISE LIMITED
BY APPLICABLE LAW, AMX RESERVES THE RIGHT TO MODIFY OR DISCONTINUE DESIGNS, SPECIFICATIONS, WARRANTIES, PRICES, AND POLICIES WITHOUT NOTICE.
Table of Contents
Table of Contents
IS-SPX-1000/1300 Inspired Signage XPress Players ...........................................1
Overview .................................................................................................................. 1
IS-SPX-1000 ............................................................................................................. 1
IS-SPX-1000 Specifications ............................................................................................. 1
IS-SPX-1300.............................................................................................................. 3
IS-SPX-1300 Specifications ............................................................................................. 3
Remote Monitoring .................................................................................................. 4
Storage..................................................................................................................... 4
Configuration ........................................................................................................... 4
Connectivity ............................................................................................................. 4
Programming............................................................................................................ 5
Supported Video File Types ..................................................................................... 5
Standard and Pro Licenses ....................................................................................... 5
Formats, Codecs and Encoding Parameters ............................................................. 6
File Formats .................................................................................................................... 6
Audio file formats..................................................................................................................... 6
Video file formats ..................................................................................................................... 6
Codecs ............................................................................................................................ 6
Audio codecs............................................................................................................................ 6
Video codecs ............................................................................................................................ 6
Unsupported ................................................................................................................... 7
Audio codecs............................................................................................................................ 7
Video codecs ............................................................................................................................ 7
IS-SPX Player Profiles and Levels..................................................................................... 7
Recommended Maximum Resolution .............................................................................. 7
Recommended Bit Rate................................................................................................... 7
Other Notes ................................................................................................................................ 8
Installation ..........................................................................................................9
Overview .................................................................................................................. 9
Powering up the IS-SPX Player................................................................................. 9
Resetting the IS-SPX Player to Factory Default Settings ........................................ 10
Updating Firmware ................................................................................................ 10
Automatic Update ......................................................................................................... 11
Getting Connected................................................................................................. 11
Accessing and Changing the IS-SPX Player IP Address .......................................... 11
Troubleshooting ..................................................................................................... 12
Configuring a PC Network Connection ......................................................................... 12
Installing the IS-SPX-MNT Mount Adapter ............................................................. 14
Installing the NXA-AVB Breakout Box Mounting Bracket ...................................... 14
IS-SPX-1000 & IS-SPX-1300 Inspired Signage XPress Players
i
Table of Contents
Web-Based Configuration Pages ......................................................................15
Overview ................................................................................................................ 15
Navigation Bar ........................................................................................................ 15
Information ............................................................................................................. 16
Status ............................................................................................................................ 16
Snapshot ....................................................................................................................... 17
Display Info ................................................................................................................... 17
Storage.......................................................................................................................... 18
Logs............................................................................................................................... 19
Administration ........................................................................................................ 20
Display Settings - Basic.................................................................................................. 20
Display Settings - Advanced.......................................................................................... 21
Network Settings - Basic ............................................................................................... 23
Automatic DHCP Configuration ................................................................................................ 23
Fixed IP Configuration .............................................................................................................. 24
Network Settings - Advanced ....................................................................................... 24
Media Sources - Basic.................................................................................................... 25
Using a USB drive with the IS-SPX Player ................................................................................. 26
Media Sources - Advanced ............................................................................................ 27
Configuring Network Credentials For Remote Servers............................................................. 27
Security ......................................................................................................................... 28
Controlling User Rights and Permissions .................................................................................. 28
Date/Time ..................................................................................................................... 29
RS232/USB IO ............................................................................................................... 30
Uploading Protocol Files........................................................................................................... 30
Pull Mode ...................................................................................................................... 31
Accessing a Remote iCalendar File on an IS-SPX Player ........................................................... 31
Firmware Update .......................................................................................................... 32
Maintenance - Basic....................................................................................................... 33
Maintenance - Advanced ............................................................................................... 33
Appendix: Encoding Guides .............................................................................35
Encoder Tools ......................................................................................................... 35
FFMpeg ......................................................................................................................... 35
VLC................................................................................................................................ 35
WinMEnc ....................................................................................................................... 35
Encoding SD video.................................................................................................. 35
Encoding Into MOV Format Using FFMpeg .................................................................. 35
Encoding Into MP4 Format Using FFMpeg ................................................................... 35
Transcoding Into MP4 Format Using FFMpeg ............................................................... 35
Encoding Into MOV Format Using WinMEnc................................................................. 36
ii
IS-SPX-1000 & IS-SPX-1300 Inspired Signage XPress Players
IS-SPX-1000/1300 Inspired Signage XPress Players
IS-SPX-1000/1300 Inspired Signage XPress
Players
Overview
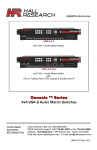
The IS-SPX-1000 (FG1231-01) and IS-SPX-1300 (FG1231-11) Inspired Signage Xpress Players offer a simple way to
deliver digital signage solutions. The rich set of functionalities offered by the SPX Players simplifies the
implementation, management and maintenance of a range of audio/visual communication solutions. The SPX Players
are designed to satisfy the reliability needs of nonstop 24/7 service and minimize maintenance costs. SPX Players
contain no moving parts and are engineered to be used wherever digital signage displays are utilized.
Whether integrated behind displays, beneath a technical floor, or in a custom enclosure, SPX Players are ready to deliver
with a small form factor and a low power draw. The USB interface can be used to extend the internal storage through
memory sticks or hard drives. The same interface can support external devices such as touch screen controllers or
keyboards.
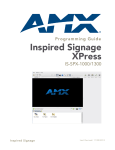
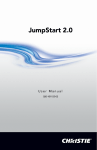
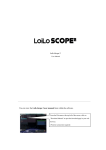
IS-SPX-1000
RS232 Interface
Status LED
Ethernet RJ45
Reset
USB 2.0 Connector
Analog Video Out (VGA)
5V-DC Input
Digital Video Out (HDMI)
Analog Audio Out
FIG. 1 IS-SPX-1000 IS-SPX Inspired Signage Xpress Player
IS-SPX-1000 Specifications
IS-SPX-1000 Specifications
Dimensions (HWD):
1.0” x 6.27” x 3.24” (25.4mm x 158.75mm x 82.80mm)
Weight:
0.60 lbs (272.16 g).
Enclosure:
Metal with black matte finish.
Power Supply:
• 5V DC, typ. 0.4A
• 2 watts
Power Supply Input:
100-240V 50-60 Hz, max input current 0.6A.
Real time clock:
Min. accuracy 1 minute/month free running, battery backed.
Storage:
• Internal storage: 4GB solid state.
• External storage: Flash drives and hard disks via USB 2.0 port.
Supported Video File Types:
Supported video codecs:
Up to SD resolution: MPEG-4 ASP, MPEG-2, MPEG-1, H.264, MJPEG, Microsoft VC-1
(Windows Media Video 9)
Supported audio codecs:
MPEG audio layer 1/2/3 (MP3), ITU G.711, G.722, PCM, Microsoft WMA, Real Audio
Media container formats:
AVI, WMV/WMA, VOB, AIFF, OGG, WAV
IS-SPX-1000 & IS-SPX-1300 Inspired Signage XPress Players
1
IS-SPX-1000/1300 Inspired Signage XPress Players
IS-SPX-1000 Specifications (Cont.)
Supported Video File Types (Cont.):
Streaming media protocol: MMS, RTSP, RTP, SDP, HTTP; Uni- & multicast
Front Panel Components:
• Ethernet RJ45
Ethernet 10/100 Mbit/s (RJ-45), IEEE 802.3u, 802.3x.
• USB 2.0 Connector
Used with Flash drives and hard disks for additional external storage; interactivity events
via touch screen, keyboard and mouse.
• Status LED
LED displays status of device:
• Green LED flashing once per second (regular operation)
• Green LED flashing 4 times per second (recovery mode)
• Green LED on and flashing occasionally (booting up)
• Orange LED blinks steadily (Zeroconf link-local IP address is assigned to device)
• LED alternates between red and orange (failure)
• Reset
Reset button for rebooting device.
• RS232 Interface
RS232, up to 115200 bauds, mini-jack 3.5mm.
Rear Panel Components:
• DC Power Input
5V DC, typ. 0.4A (2W)
• HDMI
HDMI (incl. digital audio), DVI via adapter.
• Analog Audio Out
Line level, stereo, mini-jack 3.5mm.
• Analog Video Out
VGA (DB15 HD connector).
Digital Display Compatibility:
• Aspect ratio
• 16:9, 16:10, 4:3 (horizontal & vertical)
• Maximum resolution
• 1280x720 (16:9), 1024x640 (16:10), 1024x768 (4:3)
• Video output
• 720p (HD-Ready), 576p, 480p, VGA; 50 or 60 fps
• Video connectors
• HDMI (incl. digital audio), DVI via adapter. VGA (DB15 HD connector). Simultaneous
use of HDMI and VGA possible.
Certifications:
• FCC
• CE
• RoHS
Operating Temperature:
HDMI: 32ºF to 104ºF (0ºC to 40ºC); 10% to 90% relative humidity
VGA: 32ºF to 104ºF (0ºC to 40ºC); 10% to 90% relative humidity
Storage Temperature:
-13ºF to 113ºF (-25ºC to 45ºC); 10% to 90% relative humidity
Included Accessories
• Power Source (3A-161WP05)
Other AMX Equipment
• NXA-AVB Breakout Box Mounting Kit (KA-2250-40)
• IS-SPX-MNT Mount adapter (FG1231-71)
• AMX Inspired Signage Xpress Standard License (FG1231-20)
• AMX Inspired Signage Xpress Pro License (FG1231-21)
2
IS-SPX-1000 & IS-SPX-1300 Inspired Signage XPress Players
IS-SPX-1000/1300 Inspired Signage XPress Players
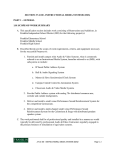
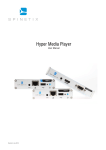
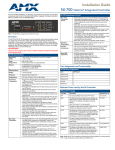
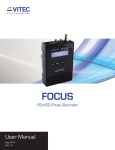
IS-SPX-1300
The IS-SPX-1300 Inspired Signage Xpress Player (FG1231-11) offers the same functionality as the IS-SPX-1000, but
offers a different set of supported video and audio codecs, and media container formats (see Specifications tables).
RS232 Interface
Status LED
Ethernet RJ45
5V-DC Input
Reset
USB 2.0 Connector
Analog Video Out (VGA)
Digital Video Out (HDMI)
Analog Audio Out
FIG. 2 IS-SPX-1300 IS-SPX Inspired Signage Xpress Player
IS-SPX-1300 Specifications
IS-SPX-1300 Specifications
Dimensions (HWD):
1.0” x 6.27” x 3.24” (25.4mm x 159.26mm x 82.30mm).
Weight:
0.80 lbs (362.88 g).
Enclosure:
Metal with black matte finish.
Power Supply:
• 5V DC, typ. 0.6A / 3 watts
Power Supply Input:
• 100-240V 50-60 Hz
Real time clock:
• Min. accuracy 1 minute/month free running, battery backed.
Storage:
• Internal storage: 4GB solid state.
• External storage: Flash drives and hard disks via USB 2.0 port.
Supported Video File Types:
Supported video codecs:
• Up to 720p resolution: MPEG-4 part 2 (ASP), MPEG-2
• Up to SD resolution: MPEG-1, H.264, MJPEG, Microsoft VC-1 (Windows Media Video
9)
Supported audio codecs:
MPEG audio layer 1/2/3 (MP3), ITU G.711, G.726, PCM, Microsoft WMA, AAC
Media container formats:
AVI, WMV/WMA, VOB, AIFF, WAV, MP4, MOV (Quicktime)
Streaming media protocol: MMS, RTSP, RTP, SDP, HTTP; Uni- & multicast
Front Panel Components:
• Ethernet RJ45:
Ethernet 10/100 Mbit/s (RJ-45), IEEE 802.3u, 802.3x.
• USB 2.0 Connector:
Used with Flash drives and hard disks for additional external storage; interactivity events
via touch screen, keyboard and mouse.
• Status LED:
LED displays status of device:
• Green LED flashing once per second (regular operation)
• Green LED flashing 4 times per second (recovery mode)
• Green LED on and flashing occasionally (booting up)
• Orange LED blinks steadily (Zeroconf link-local IP address is assigned to device)
• LED alternates between red and orange (failure)
• Reset:
Reset button for rebooting device.
IS-SPX-1000 & IS-SPX-1300 Inspired Signage XPress Players
3
IS-SPX-1000/1300 Inspired Signage XPress Players
IS-SPX-1300 Specifications (Cont.)
Rear Panel Components:
• DC Power Input:
5V DC, typ. 0.6A (3W).
• HDMI:
HDMI (incl. digital audio), DVI via adapter.
• Analog Audio Out:
Line level, stereo, mini-jack 3.5mm
• Analog Video Out:
VGA (DB15 HD connector).
• RS232 Interface:
RS232, up to 115200 baud, mini-jack 3.5mm.
Digital Display Compatibility
• Aspect ratio:
• 16:9, 16:10, 4:3 (horizontal & vertical)
• Max resolution:
• 1280x720 (16:9), 1024x640 (16:10), 1024x768 (4:3)
• Video output:
• 720p (HD-Ready), 576p, 480p, VGA; 50 or 60 fps
• Video connectors:
• HDMI (incl. digital audio), DVI via adapter. VGA (DB15 HD connector). Simultaneous
use of HDMI and VGA possible.
• 1080p: 24/25 Hz
Certifications:
• FCC
• CE
• RoHS
Operating Temperature:
• HDMI: 32ºF to 104ºF (0ºC to 40ºC); 10% to 90% RH
• VGA: 32ºF to 104ºF (0ºC to 40ºC); 10% to 90% RH
Storage Temperature:
-13ºF to 113ºF (-25ºC to 45ºC); 10% to 90% RH
Included Accessories
Power Source (3A-161WP05)
Other AMX Equipment:
• AC-SMB Surface Mount Bracket Accessory (FG525)
• IS-SPX-MNT Mount adapter (FG1231-71)
• IS-SPX-SERIAL Inspired XPress Serial Cable (FG1231-60)
Remote Monitoring
IS-SPX Players implement an intuitive on-board web interface. By connecting to the IP address of a unit with any web
browser, the user can monitor the status of the unit and even configure specific parameters. To support the management
of a large distributed network of IS-SPX devices, native support for the SNMP protocol is provided. Through this
standard protocol, the devices can publish all their vital parameters, including storage level and CPU status. Via this
protocol, the IS-SPX Players can interface with any SNMP network management tool. These tools can provide graphical
frameworks for remote monitoring the status of an individual IS-SPX unit or a complex network of units.
Storage
IS-SPX Players come with 2 gigabytes of internal memory, but this may be expanded by connecting to external hard
drives, thumb drives, or other storage options via the USB port on the front of the device. The USB port also allows
connection to external control devices such as touch panels.
Configuration
IS-SPX Players are configured via an intuitive web interface that can be accessed through any web browser. This
interface allows the configuration of display modes, network settings, time zone settings, firmware updates and other
operational parameters. For more information, refer to the Web-Based Configuration Pages on page 13.
Connectivity
IS-SPX Players connect to displays through on-board HDMI and VGA connectors. Through the HDMI output, it is
possible to support DVI displays via an adapter cable, but in this case the digital audio is lost. Both connectors are
simultaneously active so that two displays can be supported without the need of additional splitters or distribution
amplifiers. Where analog audio is needed an analog audio connector is provided.
IS-SPX Players are high-definition ready devices: they can render content on digital displays with resolution up to
1280x720 at 60Hz (720p resolution). The maximum resolution supported by IS-SPX Players is 1920x1080 for semi
static images.
4
IS-SPX-1000 & IS-SPX-1300 Inspired Signage XPress Players
IS-SPX-1000/1300 Inspired Signage XPress Players
IS-SPX Players connect to the network through a standard RJ-45 connector. Each device has a unique MAC address that
allows to identify the unit and thus the associated display.
IS-SPX Players support 10/100BASE-T Ethernet via a standard RJ-45 connector. Each unit has a unique MAC address
and supports all the required protocols to connect to network file systems and retrieve media elements. These include:
Ethernet 10/100 Mbit/s,
IPv4, DHCP or fixed address
HTTP configuration server, password protected
HTTP client for web content retrieval
WebDAV server, password protected
SNMPv1/v2c,
NTP
IS-SPX Players support USB2.0 Hi-Speed with a bandwidth up to 10 Mbyte/second.
Programming
Information on creating content for the IS-SPX Players using the AMX Inspired Signage XPress software is available in
the AMX Inspired Signage XPress Programming Guide, available from www.amx.com.
Supported Video File Types
IS-SPX Players can play video files as indicated in the Specifications tables if they were created with supported codecs
and are within the video size specifications.
If your IS-SPX Player is not successfully importing an SD video of the supported file type, it was likely created with an
unsupported codec or the file size is too large. If this is the case, try to convert the video to a supported codec, using one
of the many available tools for video conversion. The best target format is the MPEG4 codec in the mov or avi file
format.
Standard and Pro Licenses
The software for the IS-SPX Player comes in two packages, depending upon the number of software licenses to be used.
The Standard License (FG1231-20) includes one device and one single-node, multi-user license for the accompanying
software. The Pro License (FG1231-21) includes ten devices and one single-node, multi-user license for the software.
Both the Standard and the Pro Licenses only apply to one computer installation of the
software at a time. If the software is installed on a second computer, a new license
must be purchased for that computer.
IS-SPX-1000 & IS-SPX-1300 Inspired Signage XPress Players
5
IS-SPX-1000/1300 Inspired Signage XPress Players
Formats, Codecs and Encoding Parameters
To test if a video is compatible with the HMP, drag and drop it into a project in HMD
with the appropriate HMP target set. HMD will either import the video or report why it
is not compatible.
File Formats
The officially supported multimedia file formats across all devices are:
File Formats
Audio file formats
AIFF, MP3, M4A (or MP4), WAV and WMA.
Video file formats
AVI, ASF, MOV, MP4, VOB and WMV.
Notes:
When using Fusion, some of these formats are not supported and cannot be uploaded as Fusion content (for
instance, audio files are not supported).
VOB files must not be encrypted. Also, VOB files containing AC3 audio must have the audio trans-coded into
a suitable format like AAC, or have the audio track removed.
M4V is an Apple proprietary format which is unsupported, but for non-DRM-protected M4V and M4P files,
often the file can be renamed to .MP4 and work correctly.
Codecs
The degree of support of the video codecs offered by each type of HMP is further detailed below:
Codecs
Audio codecs
• AAC - up to 6 channels input; the following AAC profiles are supported: (MPEG-2 Part 7) Low
Complexity Profile, (MPEG-4 Part 3) AAC Profile and High-Efficiency AAC Profile version 1
(HE-AAC v1).
Note: HE-AAC v1 requires firmware 2.2.5 or later. HE-AAC v2 is not supported.
• MPEG-1/2 Layer III (MP3) - the previous versions: MPEG-1/2 Audio Layer II (MP2) and MPEG-1
Audio Layer I (MP1) are supported as well
• Linear PCM (LPCM)
• ITU-T G.711 and G.726
• Windows Media Audio (WMA)
Video codecs
• H.264 (H.264/MPEG-4 Part 10 or AVC)
• MPEG-4 (Part 2) or MPEG-4 Visual
• MPEG-2 and MPEG-1
• Windows Media Video 9 (WMV3) - Simple and Main profiles, Low and Medium levels;
Not supported: Main Profile @ High Level (MP@HL) and the Advanced Profile (WVC1 / VC-1
Advanced Profile).
• Motion JPEG (MJPEG) - interlacing is not supported and for QuickTime formats only MJPEG-A is
supported (MJPEG-B is not supported).
6
IS-SPX-1000 & IS-SPX-1300 Inspired Signage XPress Players
IS-SPX-1000/1300 Inspired Signage XPress Players
Unsupported
This list is not exhaustive and any codec that is not written above, should be considered as part of this list:
Unsupported
Audio codecs
• 24-bit PCM audio
• AC3
• MPEG-4 SLS (HD-AAC)
• Raw AAC files (use AAC within an MP4 or M4A file instead)
• RealAudio
Video codecs
• Flash video - it's not possible to display flash videos (from sharing websites like YouTube),
however you might be able to download those videos (as mp4, avi or another supported format)
using browser plugins or 3rd party applications.
• Windows Media Video 8 (WMV2)
• Lossless codecs / Uncompressed video (Quicktime Animation, RLE, DIB BMP, RGB)
• RealVideo, Cook
• Interchange formats such as OMF / MXF
• MxPEG (proprietary, used by some low-power cameras)
IS-SPX Player Profiles and Levels
MPEG-4 (Part 2): Simple and Advanced Simple ( SP/ASP ) up to level 5 (reference: MPEG-4 levels) -
resolution up to 720p for HMP130 and SD for HMP100.
MPEG-2: Main profile and Main level (MP@ML) (reference: MPEG-2 profiles and levels) - resolution up to
720p for HMP130 and SD for HMP100.
H.264: (aka MPEG4 Part 10) Constrained Baseline or Main profile up to level 3 (reference: H264 levels) -
resolution up to SD.
MJPEG - resolution up to SD.
Windows Media Video 9 (WMV3): Simple and Main profiles, Low and Medium levels - resolution up to
SD.
Notes:
MPEG-4 is the most optimized codec to use on IS-SPX Players.
Please see Appendix: Encoding Guides on page 35 if you need to convert your video to be supported.
Recommended Maximum Resolution
The maximum resolution values below are recommended, based on square-pixel aspect ration for common usage.
If your video is above these values, you might need to re-encode your video.
For advanced users, the actual maximum resolutions (including non-square PAR) can be deducted from the
codec specification / constraints.
Recommended Maximum Resolution
Codec
H.264@L3
MPEG4 ASP@L5 MPEG4 ASP@L5+ MPEG2 MP@ML MPEG2 MP@ML+
FPS
25 fps
25/30 fps
Aspect Ratio - 16/9
832x468 768x432 832x468
1280x720
Aspect Ratio - 4/3
736x552 672x504 736x552
960x720
IS-SPX Player
IS-SPX-1000/1300
IS-SPX-1300
IS-SPX-1000
30 fps
IS-SPX-1000
25 fps
25 fps
30 fps
25 fps
704x396
704x396
1280x720
720x540
672x504
960x720
IS-SPX-1300
Recommended Bit Rate
The values below are recommended for optimal usage. The maximum bit-rate can be deducted from the codec
specification / constraints.
Recommended Bit Rate
H.264
MPEG4
MPEG2
SD
2.5 Mbps (0.24 bpp)
3 Mbps (0.29 bpp)
720p
4.5 Mbps (0.2 bpp)
6.5 Mbps (0.29 bpp)
9 Mbps (0.4 bpp)
1080p
8 Mbps (0.16 bpp)
-
16 Mbps (0.32 bpp)
IS-SPX-1000 & IS-SPX-1300 Inspired Signage XPress Players
5 Mbps (0.5 bpp)
7
IS-SPX-1000/1300 Inspired Signage XPress Players
Other Notes
Video transparency is not supported.
The specified video standards (e.g. 720p) are performance guides based on standard aspect ratio pixel
equivalents; i.e. higher resolutions that 1280x720 could be displayed if the dimensions are adjusted
proportionally.
Interlaced video: IS-SPX Players have a built-in de-interlacing filter for MPEG2 and H264 videos.
Bitrate limitations are defined in Levels (up to 11mbps).
8
IS-SPX-1000 & IS-SPX-1300 Inspired Signage XPress Players
Installation
Installation
Overview
The installation of an IS-SPX Player starts by plugging in two cables: the power cable and the video cable (HDMI and/or
VGA) to the display. As soon as it is connected to the power line, the device will boot in a few seconds and automatically
select the resolution supported by the associated digital display. Content rendering will begin in less than 1 minute.
When connected to a local network through the RJ45 connector, the IS-SPX Player supports both DHCP for automatic
configuration of the network and manual configuration by specifying a static IP address and network properties. A hook
and loop strip can be used to secure the IS-SPX Player to any desired position on a wall or behind a display. The unit can
be easily located near the display, as it does not put off significant heat nor does it contain any moving mechanical parts.
In order to facilitate the best transmission of data, including EDID information,
standard pinouts for VGA cables should be used.
When installing the IS-SPX Player , be careful to avoid any water or high humidity
exposure.
Once installed, getting started with the IS-SPX Player is a matter of a few simple steps. The following sections show how
to connect one or more units to a network and how to publish content from the XPRESS software to specific displays.
Powering up the IS-SPX Player
1. Check your digital display. The IS-SPX Player can drive a digital display through HDMI or VGA connections.
Make sure that your display supports at least one of the two.
2. Get the correct video cable for the display. Older displays may require a VGA cable.
3. Connect the IS-SPX Player to the display. Simply plug the HDMI or the VGA cable between the corresponding
video connector on the IS-SPX Player and the corresponding video input connector of your display.
4. Power up the display. Make sure to select the right video input.
5. Power up the IIS-SPX Player. Use the cables and the power converter provided in the IS-SPX Player package. Plug
the power converter on one side to a 110-220V outlet and on the other to the back panel DC jack. Shortly after
power up, the screen displays the AMX splash screen.
The first time the IS-SPX Player boots, the automatic configuration procedure takes about 2 minutes. The process will be
reduced to less than 50 seconds when you reboot the IS-SPX Player again. During this booting process, the front panel
LED shows green and red activity.
At the end of the boot process, the screen will start displaying the animated AMX logo. This is the default content. At
this time, the green LED blinks regularly on and off every second to indicate that the IS-SPX Player is in operating
normally.
If your system does not behave as described above make sure that the digital displays are functional and that the right
input has been selected (some displays have multiple inputs and you may need to manually select the right one). Also
check that the reset push button is not being pressed by some other system component. If the set-up appears correct, try
to power cycling the IS-SPX Player unit by unplugging and plugging the power.
IS-SPX-1000 & IS-SPX-1300 Inspired Signage XPress Players
9
Installation
Resetting the IS-SPX Player to Factory Default Settings
The following procedure will delete all previously saved content and configurations on
the IS-SPX Player.
To reinitialize the IS-SPX Player to its factory default settings:
1. Unplug the IS-SPX Player from the power.
2. Push the reset button and keep it pressed.
3. Power up the IS-SPX Player.
4. Wait with the reset button pressed for at least 8 seconds.
5. Release the reset button.
6. The IS-SPX Player will now boot in the factory default mode.
Updating Firmware
To check if a new version of the firmware is available for your IS-SPX Player:
1. With your preferred web browser, connect to the HTTP server of your unit by entering the IS-SPX Player’s IP
address into the browser.
2. Click on Firmware Update under the Administration menu on your left.
3. Check that the field Server URI is equal to:
IS-SPX-1000: "http://webservices.amx.com/Inspired Signage/IS-SPX-1000/updates/".
IS-SPX-1300: "http://webservices.amx.com/Inspired Signage/IS-SPX-1300/updates/".
If this is not the case, click the Reset to Default button.
4. In the section Manual Update, select the update source "From server" and click the Check for Update button.
A new page will open. At the end of the check, the page reports the current update status of your IS-SPX Player:
Three cases are possible:
No updates are available.
Updates are ready to install. See the Firmware Update section on page 32 to learn how to proceed with the
update.
The update failed.
The most probable source of this error is that your IS-SPX Player couldn't contact the update server. It is recommended
to check your internet connection and your network configuration. Make sure that a Gateway and a DNS server are
configured.
If the IS-SPX Player is not connected to the internet, you need to contact AMX Technical Support to check which update
procedure is best suited to your configuration. Please specify in your message if your IS-SPX Player(s) are in a location
where you can easily plug an USB key or if they have local network connectivity.
Fatal Error: If the update process reports a fatal error, please contact AMX Technical
Support to find how to restore the firmware of your IS-SPX Player.
If the check for updates procedure reported that updates are available for your IS-SPX Player, click the Update Now
button to start the update process.
Do not power down the device at any time during the update process.
The IS-SPX Player will restart automatically once the update process is over. It is possible that the web page displays a
time-out error during the update. However, this has no influence on the update process itself. At the end of this process,
refresh your web browser to display the new firmware version under the Current Versions section.
If you click the Check for Update button again, the page will report that no updates are available.
10
IS-SPX-1000 & IS-SPX-1300 Inspired Signage XPress Players
Installation
It is possible that the IS-SPX Player performed only a partial update of the firmware. In this case, the firmware will need
to be updated a second time.
Automatic Update
If your IS-SPX Player is configured to use automatic update and has direct access to the Internet, it will update its
firmware automatically as soon as a firmware update is available. The update will take place at 3:00 AM and will not
modify the content played by the IS-SPX Player. This update will also not affect the device’s display and networks
settings.
To enable the automatic update feature:
1. Check the Enable automatic updates check box.
2. Select the update time.
3. Press Apply to validate your changes.
Getting Connected
The IS-SPX Player has a special procedure for connection for the first time to a PC using the RJ-45 Ethernet interface.
This step is required to remote publish content on an IS-SPX Player. This procedure requires an IS-SPX Player and one
of the following configurations:
PC with RJ-45 10/100/1000 Ethernet interface and an Ethernet cable.
PC with RJ-45 10/100 Ethernet interface and an Ethernet crossover cable.
PC with RJ-45 10/100 Ethernet interface, a switch and 2 Ethernet cables.
This procedure applies only if you have not modified the default network configuration
of the IS-SPX Player. See the Resetting the IS-SPX Player to Factory Default
Settings on page 10 to make sure that your IS-SPX Player is in the default network
configuration.
To make a remote connection for the first time:
1. Connect the PC, through the switch if using one in the particular configuration, to the IS-SPX Player following one
of the above schemes.
2. Power up the PC (and switch, if applicable).
3. Power up the IS-SPX Player.
Note that the IS-SPX Player does not need to be connected to a display. Allow about
one minute to the IS-SPX Player to boot up, with the green light blinking once per
second.
4. Make sure that the IS-SPX Player has completed the booting phase: allow about 1 minute from the start of the
powerup. If the device is connected to a display, you should see the default animated logo.
5. Check that the LED is blinking green once per second.
6. Open a web browser and enter the IP address of the IS-SPX Player in the location bar at the top to open the WebBased Configuration Pages (for more information, please refer to the Web-Based Configuration Pages on page 13).
Accessing and Changing the IS-SPX Player IP Address
The IS-SPX Player automatically uses DHCP to assign an IP address to the device when first configured, but this may be
changed to a preassigned IP address. To access the IP address for the IS-SPX Player:
1. In a Zero-Configuration-enabled application, such as NetLinx Studio or in a ZeroConfiguration-enabled browser,
look for the entry for the IS-SPX Player and its assigned serial number. (This serial number may be found on the
underside of the device.)
2. Click on the entry to open the device’s Web-Based Configuration Pages. (For more information, please refer to the
Web-Based Configuration Pages on page 13.)
3. In the Status page of the Information section, the IP address is displayed below the serial number and firmware
version.
IS-SPX-1000 & IS-SPX-1300 Inspired Signage XPress Players
11
Installation
To change the IP address of the IS-SPX Player:
1. From the Web-Based Configuration Pages, click the Network Settings listing in the Administration menu.
2. In the Basic tab of the Network Settings page, click the Static radio button to switch the settings from DHCP to
Static.
3. In the fields below the Static radio button, enter the desired IP address in the Address field.
4. Add the subnet mask, gateway, and DNS information into the appropriate fields and press Apply.
If the IS-SPX Player is accidentally configured with an incorrect IP address, you need
to reset the unit to its factory default and restart the configuration procedure.
Troubleshooting
If you are unable to connect to your IS-SPX Player, check the following items:
1. Double check that you have correctly entered the correct IP address in your web browser.
2. Check the LED on your device. If the LED is blinking from orange to red once per second: the IP address of your
device has already been assigned on the network. Check your network configuration and make sure that it is not
taken by another device. If the LED is blinking fast (several times per second) from green to red, the device is in
recovery mode. In this case, unplug the device, power it up again, and wait about 1 minute. If the IS-SPX Player
remains in recovery mode, contact AMX Technical Support.
3. If the device has already been configured and does not have a default IP address, it may be returned to its factory
default. Note that all the content stored on the device will be deleted. For more information, refer to the Resetting
the IS-SPX Player to Factory Default Settings section on page 10.
4. Double-check the connectivity of cables, connectors, and switches in your setup.
5. Check the network configuration of your PC.
6. Verify that the web browser does not have a proxy configured.
Configuring a PC Network Connection
To configure the network connection of your PC via Windows XP Professional in order to connect to an IS-SPX Player
in its default configuration:
1. Open the Control Panel (Start>Control Panel) and then double click Network Connections (FIG. 3).
FIG. 3 Windows XP Professional Control Panel
2. Select the local connection corresponding to the RJ-45 Ethernet connection used for the IS-SPX Player. Right-click
on the icon and choose Properties (FIG. 4).
12
IS-SPX-1000 & IS-SPX-1300 Inspired Signage XPress Players
Installation
FIG. 4 Local Area Connection Properties
3. Select Internet Protocol (TCP/IP) from the list and press the Properties button to open the Internet Protocol (TCP/
IP) Properties tab (FIG. 5).
FIG. 5 Internet Protocol (TCP/IP Properties)
4. Configure the Protocol properties and click OK.
IS-SPX-1000 & IS-SPX-1300 Inspired Signage XPress Players
13
Installation
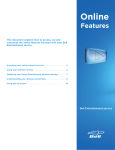
Installing the IS-SPX-MNT Mount Adapter
The optional IS-SPX-MNT Mount Adapter Kit (FG1231-17) is intended to allow attachment of the IS-SPX Player to
Vesa display wall mounts, thereby keeping it within easy reach for firmware uploads and other basic maintenance.
IS-SPX Player
IS-SPX-MNT Mount Adapter
Pan head screws
Mounting holes
FIG. 6 Installation of the IS-SPX-MNT Mount Adapter (62-1231-03)
To install the IS-SPX-MNT Mount Adapter:
1. Select the side of the IS-SPX Player to which the adapter is to be installed. The IS-SPX-MNT may be installed to
either side of the device.
2. Using the supplied pan-head screws, attach the IS-SPX-MNT to the side of the IS-SPX Player.
3. Use the appropriate mounting holes to attach the assembly to the display wall mount.
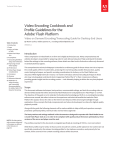
Installing the NXA-AVB Breakout Box Mounting Bracket
The optional NXA-AVB Breakout Box Mounting Bracket Kit (FG1231-17) is intended to allow attachment of the ISSPX Player to solid surfaces such as desk tops, thereby keeping it within easy reach for firmware uploads and other basic
maintenance.
IS-SPX Player
Mounting Bracket
Pan Head Screws
Mounting holes
FIG. 7 Installation of the NXA-AVB Breakout Box Mounting Bracket (62-1231-03)
To install the NXA-AVB Breakout Box Mounting Bracket:
1. Select the side of the IS-SPX Player to which the adapter is to be installed. The mounting bracket may be installed
to either side of the device.
2. Using the supplied pan-head screws, attach the mounting bracket to the side of the device.
3. Use the mounting holes to attach the assembly to a fixed surface.
14
IS-SPX-1000 & IS-SPX-1300 Inspired Signage XPress Players
Web-Based Configuration Pages
Web-Based Configuration Pages
Overview
To access the IS-SPX Player’s Web-Based Configuration pages, enter the IP address of the IS-SPX Player into your web
browser. This advertisement may be viewed with any Zeroconf-enabled browser, such as NetLinx Studio, or via the
Bonjour plug-in for Internet Explorer and Safari.
Bonjour, Bonjour for Windows, the Bonjour logo, and the Bonjour symbol are
copyright 2010 Apple, and are used under license.
The "Software copyrights and licenses" text at the bottom of each page is an active
link to the Copyrights and Licenses page. This page contains all of the copyrights
reserved on the IS-SPX Player, as well as all software licenses used by the device.
Navigation Bar
FIG. 8 IS-SPX Player Web-Based Configuration Page navigation bar
The navigation bar (FIG. 8) appears on the left side of each Configuration page. Each page may be accessed from any
other page. The Serial Number for the device always appears at the bottom of the navigation bar.
Navigation Bar
Information:
This section contains the links for all of the Information pages. These pages are generally read-only.
Administration:
This section contains the links for all of the Administration pages. These pages generally may be
modified or edited.
Serial Number:
This number is the IS-SPX-1000’s unique serial number.
IS-SPX-1000 & IS-SPX-1300 Inspired Signage XPress Players
15
Web-Based Configuration Pages
Information
The Information pages contain all of the basic schematics of the IS-SPX Player. This information cannot be edited.
Status
FIG. 9 Information - Status page
The Status page lists the current basic information on the IS-SPX-1000, including the latest firmware version.
Information - Status Page
16
Serial Number:
This number is the serial number of the device. The revision number lists the daughter-board and
motherboard type used in the device.
Firmware:
This number lists the current firmware version loaded on the device.
MAC:
This number is the device’s MAC address number.
Device name:
This number is the individual device name, used for multi-device applications. This number generally is
the same as the Serial Number.
Multiscreen ID:
This number is the ID number for the device when used for multiscreen applications. This number
generally is the same as the Serial Number.
IS-SPX-1000 & IS-SPX-1300 Inspired Signage XPress Players
Web-Based Configuration Pages
Snapshot
FIG. 10 Information - Snapshot page
The Snapshot page gives a snapshot view of the latest information being displayed by the IS-SPX Player.
Information - Snapshot page
Refresh Now:
This button refreshes the view currently displayed by the device.
Display Info
FIG. 11 Information - Display Info page
The Display Info page lists information on the IS-SPX Player’s current display settings and the current HDMI and VGA
settings.
IS-SPX-1000 & IS-SPX-1300 Inspired Signage XPress Players
17
Web-Based Configuration Pages
Information - Display Info page
Display Settings: This section shows the current settings for the display being used, with specifications for resolution,
vertical refresh, and the aspect ratio.
HDMI Output:
This section shows details on the current HDMI output from the IS-SPX-1000, including display size,
aspect ratio, and support of underscan.
VGA Output:
This section shows details on the current VGA output from the IS-SPX-1000, including the display
device’s information, display size, aspect ratio, and underscan support.
Storage
FIG. 12 Information - Storage page
The Storage page displays all current file storage information on the IIS-SPX Player, including its integral storage,
storage devices currently connected to the device (such as USB thumb drives or portable hard drives), and access
information for reaching the integral storage.
Information - Storage page
System:
This section displays the statistics for the storage space used for device system operation,
including available (free) drive space, used space, and the total space on the drive.
Local Storage on
Internal Storage:
This section displays the integral storage statistics for all storage not used directly by the device.
This includes free space, used space, and total space in the IS-SPX Player’s integral storage.
Local Storage Access: This section displays a URL for the Local Storage Access directory server address. Click this link
to view the directory hierarchy.
18
IS-SPX-1000 & IS-SPX-1300 Inspired Signage XPress Players
Web-Based Configuration Pages
Logs
FIG. 13 Information - Logs page
The Logs page contains all current logs of IS-SPX Player use, in both text (.log) and zipped (.log.gz) formats. Click on a
particular log to access it.
Information - Logs page
Accounting Logs: This section catalogs one current total accounting log and up to seven zipped logs.
Current Logs:
This section catalogs all of the separate sections of the current accounting log.
Backup Logs:
This section catalogs up to seven zipped backups of the current logs.
IS-SPX-1000 & IS-SPX-1300 Inspired Signage XPress Players
19
Web-Based Configuration Pages
Administration
The Administration pages allow you to change the IS-SPX Player’s operational parameters through a Web-based
interface. Many of the pages allow changes to both basic and advanced features and specifications.
Display Settings - Basic
FIG. 14 Administration - Display Settings - Basic page
The Basic tab of the Display Settings page allows changes to the presentation on the chosen output display for the ISSPX Player.
Administration - Display Settings - Basic page
Display Settings:
TV Screen
Select between ED (480 pixels) or HD (720 pixels).
Computer Monitor:
Select between VGA (640 x 480 pixels), SVGA (800 x 600 pixels), or XGA (1024 x 768
pixels).
Wide Computer Monitor:
Select between WVGA (768 x 480 pixels) or WSVGA (1024 x 640 pixels).
Enable audio output:
Click this checkbox to allow audio output through the display.
Force aspect ratio to:
Click this checkbox to force the screen aspect ratio to 4:3, 16:9, or 16:10. The screen on
the Display Settings page will change to illustrate each ratio.
Screen orientation:
Use this dropdown menu to choose between screen orientations: Horizontal, Rotate 90
Right, Rotate 90 Left, Rotate 180, Flip Vertical, or Flip Horizontal. The screen on the
Display Settings page will change to illustrate each setting.
Overscan percentage:
Use this dropdown menu to select an overscan percentage on the screen between zero
and 5. The default is 3.
Power mode for VGA output: Use this dropdown menu to select whether the power mode for VGA output will be
Automatic, Always On, or Always Off.
Apply:
20
Press this button to apply and save all changes.
IS-SPX-1000 & IS-SPX-1300 Inspired Signage XPress Players
Web-Based Configuration Pages
Display Settings - Advanced
FIG. 15 Administration - Display Settings - Advanced page
While the Basic tab allows some changes to the chosen display, the Advanced tab of the Display Settings page allows
more fine-tuning of the display output.
The Display Settings functions may be modified manually, or they may be set to the video display’s defaults. Press the
Check button for the device to scan the current video display. The page will now display a new entry above the Display
Settings section, reading Selected Display Settings. The display settings may still be changed from the defaults at any
time. Click Apply to make the existing display settings the default, or Cancel to return to the existing settings.
IS-SPX-1000 & IS-SPX-1300 Inspired Signage XPress Players
21
Web-Based Configuration Pages
Administration - Display Settings - Advanced page
Display Settings:
Resolution:
This dropdown menu controls the screen resolution on the display. Choose a specific
resolution or between VGA, ED, or HD.
Default aspect ratio:
This dropdown menu controls the default aspect ratio on the display. Choose between
4:3, 16:9, or 16:10.
Force standard video modes:
Click this box to force the display into a standard video presentation mode.
Restrict video mode to:
This dropdown menu controls the ability to restrict the video mode to htmi, vesa, or gtf,
or a combination of two of these.
Power mode for VGA output:
In this dropdown menu, select between Automatic, Always Off, and Always On.
HDMI supports underscan:
Click this box if the HDMI display supports underscan.
Overscan percentage:
This dropdown menu allows a selection of the overscan percentage, ranging from
zero to 5.
Force vertical refresh:
This dropdown menu controls the vertical refresh range in hertz: 24, 25, 30, 50, and
60.
Screen orientation
This dropdown menu controls the screen orientation of the display.
Enable audio output:
If the display has audio capability, click this box to enable audio output through the
IS-SPX Player
Interactivity Settings:
Enable events:
Click this box to allow programmed events to be displayed.
Maximum rendering latency:
This dropdown menu controls the maximum rendering latency of the display in
milliseconds. Select between 250, 500, 1000, and 1500 milliseconds
Note: increasing the rendering latency number will slow the rendering in the case of
an event.
Reduce latency to 60ms when To speed performance, click this box to reduce the rendering latency to 60
events are received:
milliseconds when events are to be received by the display.
Touchscreen Calibration:
Start Calibration Procedure:
If the IS-SPX Player is connected to a touchscreen, the touchscreen display may be
calibrated from this interface.
• Use the text fields to enter manual coordinates, if necessary.
• Press the Apply button to save any manual changes.
Note: Pressing this Apply button will not affect any other changes made on this page.
• Press the Return to Default button to return the calibration settings to the factory
defaults.
• If the device is connected to a touch screen, press the Start Calibration
Procedure button and follow the instructions on the touch screen.
Splash Screen Configuration:
To choose a new splash screen file, press the Browse... button to find and select the
file and then press Apply to save it to the IS-SPX Player. A thumbnail of the new
splash screen file will appear to the right of the Browse... button.
You may choose to change the boot, shutdown, and firmware upgrade splash
screens. If a new file is not selected, then the current default file will remain in use.
Press the Reset to Default button to return all three settings to the originally loaded
default files.
Note: The Apply button at the bottom of this section will not affect any other changes
made on this page.
22
IS-SPX-1000 & IS-SPX-1300 Inspired Signage XPress Players
Web-Based Configuration Pages
Network Settings - Basic
FIG. 16 Administration - Network Settings - Basic page
Although the IS-SPX Player may be used on its own with a display and power source, it may also be installed as part of
a network. The Network Settings page allows configuration with direct or remote networks.
Administration - Network Settings - Basic page
Identification:
Device name:
This field displays the name assigned to the device in the network. To change the Device Name,
enter a new name in the field and press the Apply button. The default is the device’s Serial Number.
Multiscreen ID:
This field displays the device’s Multiscreen ID. To change the Multiscreen ID, enter a new ID name or
number in the field and press the Apply button. The default is the device’s Serial Number.
Network Settings:
Use this
interface for the
network:
Use this dropdown menu to choose between Ethernet or a 3G Modem.
DHCP:
Click this button to use the DHCP protocol. If selected, all of the fields below the button are grayed
out.
Static:
Click this button to use the Static protocol. If selected, all of the fields below the button are enabled,
and the appropriate network information must be entered.
Address:
Enter the IP address for the network server.
Netmask:
Enter the Subnet Mask address.
Gateway:
Enter the Gateway address.
DNS Server 1-3: In these fields, enter the address of the primary DNS server and any secondary servers, if available.
DNS Suffix:
Enter the DNS suffix for the network.
Automatic DHCP Configuration
To manually configure an IS-SPX Player to connect to a specific network using DHCP for the attribution of network
addresses:
1. On the Network Settings page under the Basic tab, check the DHCP radio button.
2. Validate the new network configuration by pushing the Update button.
3. Re-enter the device’s IP address to verify that the configuration is complete.
IS-SPX-1000 & IS-SPX-1300 Inspired Signage XPress Players
23
Web-Based Configuration Pages
If the IS-SPX Player has been configured to use DHCP but the DHCP server cannot
be contacted by the device, you need to reinitialize the unit to its factory default and
restart the configuration procedure.
Fixed IP Configuration
To manually configure an IS-SPX Player to connect to a specific network with a fixed IP address:
1. Get the information on the network to be reached. This includes a range of free IP addresses that can be allocated to
the IS-SPX Player without network conflicts and the correct subnet mask.
2. On the Network Settings page under the Basic tab, check the Static radio button. This enables the Static Network
Settings fields.
3. Enter a static IP address in the range of the free IP addresses of your network.
4. Make sure that the subnet mask corresponds to your network configuration.
5. Enter the other network parameters if known.
6. Press the Apply button to validate the changes.
If the IS-SPX Player has been configured with an incorrect IP address, you need to
reinitialize the unit to its factory default and restart the configuration procedure.
Network Settings - Advanced
FIG. 17 Administration - Network Settings - Advanced page
The Advanced tab on the Network Settings page includes additional options for accessing networks and proxy servers
and changing SNMP settings.
24
IS-SPX-1000 & IS-SPX-1300 Inspired Signage XPress Players
Web-Based Configuration Pages
Administration - Network Settings - Advanced page
Network API:
Enable API server using port:
Click to change the port for the API server. Click Apply to save any changes.
Proxy Settings:
Enter the server IP address, port number, username and password for the
selected proxy server. Click Apply to save changes.
Bypass proxy server for local addresses: Click to access local addresses directly without going through the proxy
server.
SNMP Settings:
Read only community:
Enter the name of the server’s folder.
Media Sources - Basic
FIG. 18 Administration - Media Sources - Basic page
The Basic tab of the Media Sources page contains options for expanding the integral storage built into the IS-SPX Player.
These sources include USB thumb drives, portable hard drives, or storage on a remote network.
Administration - Media Sources - Basic page
Media Sources:
Primary source:
In the dropdown menu, select between Local Storage and Network Project. If Network
Project is selected, enter the URL for the project folder.
Click Apply to save all changes to this section.
Fallback source:
In the dropdown menu, select between Local Storage and Network Project. If Network
Project is selected, enter the URL for the project folder.
Local source set to:
Currently displays the default local storage source location. If the USB storage device
option has not been enabled, the location will be set to "IS-SPX-1000 Local Storage" or
"IS-SPX-1300 Local Storage".
Click Apply to save all changes to this section.
Click Apply to save all changes to this section.
Set Local Storage to USB
storage device when available:
If a USB storage device is connected to the IS-SPX Player, click this box to choose that
device as the default storage option.
Click Apply to save all changes to this section.
Detected USB storage devices: This section displays all USB storage devices currently connected to the IS-SPX-1000.
If any devices have been connected since the page was last refreshed, click the Reload
button to rescan for them.
IS-SPX-1000 & IS-SPX-1300 Inspired Signage XPress Players
25
Web-Based Configuration Pages
If your network storage path has any spaces in the path, these must be replaced with
the characters "%20" or the IS-SPX-1000 cannot find the media source.
Using a USB drive with the IS-SPX Player
To configure a USB drive as a storage source for the IS-SPX Player:
1.
On the Media Sources page in the Basic tab, make sure that the Primary source dropdown menu is set to Local
Storage.
2. Click the Set Local Storage to USB storage device when available check box.
3. Press Apply to save your changes.
4. Insert your USB storage into the USB connector on the front of the IS-SPX Player. Wait for a few seconds and then
press the Reload button at the bottom of the Media Sources page.
5. The page should indicate that the local storage is currently set to USB Storage.
By default, USB storage device are formatted using FAT file systems. This has the advantage that the USB storage is
readable both by the IS-SPX Player and any PC. However, any such USB device can only be used in read-only mode by
the IS-SPX Player.
If you need to use the USB storage permanently, the drive must be formatted by the device so it may be able to write new
information on it. To format the USB device:
1. Plug your USB storage device to the IS-SPX Player.
2. Press the Format Now button.
If you choose to format the USB storage device, all content currently on it will be
erased.
After formatting, the USB storage device will no longer be recognized by Windows
PCs.
3. When the formatting is over, unplug the USB storage device from the IS-SPX Player.
4. If you are using a USB storage device in write mode, it is recommended to press the Disconnect button before
removing the device from the IS-SPX Player.
26
IS-SPX-1000 & IS-SPX-1300 Inspired Signage XPress Players
Web-Based Configuration Pages
Media Sources - Advanced
FIG. 19 Administration - Media Sources - Advanced page
In some cases, a project may require storage access to multiple sources. Use the Advanced tab on the Media Sources
page to select those sources and save usernames and passwords for easy access.
Administration - Media Sources - Advanced page
Network credentials: In each row, enter the Server URI, the username, the password, and the particular realm to be
accessed.
To add additional sources, click the Add Server Row button to start a new row.
Click Apply to save all changes.
Configuring Network Credentials For Remote Servers
To configure network credentials to allow the IS-SPX Player to access a remote server:
1. On the Media Sources page in the Advanced tab, enter the server’s URI path in the Server URI field.
2. Enter the server’s Username, Password, and Realm into the corresponding fields.
3. If you need to add multiple servers, or if you need to specify multiple Username and Password for the same server
but for different realms, press the Add Server Row button to open a new row of fields.
4. When finished, press the Apply button to save your changes.
If your network storage path has any spaces in the path, these must be replaced with
the characters "%20" or the IS-SPX Player cannot find the media source.
IS-SPX-1000 & IS-SPX-1300 Inspired Signage XPress Players
27
Web-Based Configuration Pages
Security
FIG. 20 Administration - Security page
Use the Security page to control administrative, content, and monitoring access to the IS-SPX Player.
Administration - Security page
Administrative Server:
Controls access to all sections of the HTTP administration server.
Content Server:
Controls access to all content displayed by the IS-SPX-1000.
Monitoring:
Controls access to the Logs and Snapshot pages.
Controlling User Rights and Permissions
1. On the Security page, choose whether you want to configure access for the Administration Server, the Content
Server, or the page Monitoring section.
Always having a password for the Administrative Server section is highly
recommended. By default, no password is set and the administrative area is not
protected, and any previously saved passwords will be removed if the device is
returned to its factory defaults.
2.
Enter a password in the Password text field and confirm it in the second field.
3. Press Apply to save your changes.
Because the Apply button needs to be pressed for each password you want to
change, only one password may be changed at a time.
28
IS-SPX-1000 & IS-SPX-1300 Inspired Signage XPress Players
Web-Based Configuration Pages
Date/Time
FIG. 21 Administration - Date/Time page
Use the Date/Time page to update or change the current time registered by the IS-SPX Player, and to synchronize with
outside servers.
Administration - Date/Time page
Current settings:
This section displays the current date, time, and time zone registered with the IS-SPX Player.
Change time zone:
Use the dropdown menus to select the country and the closest city to the IS-SPX Player
installation site.
Click Apply to save all changes.
Change time:
The time registered with the IS-SPX-1000 may be changed manually, or it may be
synchronized with an NTP server. Click either button to choose the preferred option and click
Reply to save all changes in this section.
Manual Time Settings: Use the dropdown menus to select the time and the date to be saved on the IS-SPX-1000.
NTP Server:
Enter a URI for each of the servers to be accessed. Up to five servers may be added. Click the
Monitor Only box to the right of each server field if you wish only for those servers to be
monitored and not accessed.
Pause device at
startup to wait for
NTP servers by:
Use the dropdown menu to select the delay time in seconds: 0, 90, 120, and 150.
NTP Statistics:
This section logs all contact with the NTP servers currently being accessed or monitored, if this
option has been chosen. Click the Refresh button to update the statistics.
IS-SPX-1000 & IS-SPX-1300 Inspired Signage XPress Players
29
Web-Based Configuration Pages
RS232/USB IO
FIG. 22 Administration - RS232/USB IO page
Use the RS232/USB IO page to change the parameters of the IS-SPX Player’s RS232 port. This may be used to control
both when information is transmitted to the display and when the display itself is turned on and off.
Administration - RS232/USB IO page
Settings:
Protocols:
Use this dropdown menu to select the particular serial port protocol to be used. Click Apply to
save all changes.
Note: The default is "Disabled". If this is chosen, all fields below are grayed out.
Control monitor power: Click this box to enable or disable the Turn monitor ON and Turn monitor OFF fields.
Turn monitor ON:
Select the time (in 24-hour military time) for the monitor to turn on.
Turn monitor OFF:
Select the time (in 24-hour military time) for the monitor to turn off.
Modify COM port
settings:
Click this box to enable or disable the Baud rate, Data bits, Parity, and Stop bits fields.
Baud rate:
Use this dropdown menu to select the preferred baud rate. The default rate is 9600.
Data bits:
Use this dropdown menu to select the preferred data bit rate: 7 or 8.
Parity:
Use this dropdown menu to select the preferred parity: none, even, or odd.
Stop bits:
Upload Protocol File:
Use this dropdown menu to select the preferred stop bit rate: 0 or 1.
To upload a new protocol to the IS-SPX-1000 to augment the ones already used by the ISSPX Player, use this field to browse a computer or network for the appropriate file.
Uploading Protocol Files
To add to the existing serial port protocols, new protocol files for displays may be uploaded to the IS-SPX-1000. To do
so, either enter the URL for the file in the Upload Protocol File: field or click the Browse button to locate it.
30
IS-SPX-1000 & IS-SPX-1300 Inspired Signage XPress Players
Web-Based Configuration Pages
Pull Mode
FIG. 23 Administration - Pull Mode page
From the Pull Mode page, the IS-SPX Player may be configured to pull project files, logs, and iCalendar files from
remote sources.
Administration - Pull Mode page
Content Pull Scheduling:
Determine the type and source of content pulled to the IS-SPX-1000 by selecting
between "Disabled," "Manual Settings," "From Uploaded iCalendar File," and "From
Remote iCalendar File."
Disabled:
When choosing this option, all other fields on this page are grayed out.
Manual Settings:
This option allows manual control of uploads to and from the IS-SPX Player.
Click Apply to save all changes.
Automatically upload project Click this box to enable automatic project uploads from a particular source to the
to the IS-SPX-1000:
IS-SPX Player. Enter the project’s URL in the Project Source field and the time of day for
the upload, in military time, in the Time dropdown menus.
Note: The time of day may only be set in five-minute increments.
Automatically upload logs
from the IS-SPX-1000:
Click this box to enable automatic log uploads to a particular source from the
IS-SPX Player. Enter the receiving folder’s URL in the Log Destination field and the time
of day for the upload, in military time, in the Time dropdown menus. Choose between
having all logs uploaded to the remote site, or only accounting logs.
Note: The time of day may only be set in five-minute increments.
From uploaded
iCalendar file (ics):
Click this box to enable scheduling from an iCalendar schedule file (".ics") on a PC or
USB storage device physically connected to the IS-SPX Player. Press the Browse button
to search for the file.
From remote
iCalendar file (ics)
Click this box to enable scheduling from an iCalendar schedule file (".ics") on a remote
network. Enter the URL for the file in the Schedule URI field.
Accessing a Remote iCalendar File on an IS-SPX Player
Multiple IS-SPX Players may access the same iCalendar schedule file, so long as you have the serial number for the
device storing the file. For more information on generating and editing iCalendar files, please refer to the Inspired
Signage XPress Programming Guide, available at www.amx.com.
1. From the Pull Content Scheduling page, click the From remote iCalendar file (ics) button.
2. In the Schedule URI field, enter the URL for the file’s folder.
IS-SPX-1000 & IS-SPX-1300 Inspired Signage XPress Players
31
Web-Based Configuration Pages
3. At the end of the URL, add "[serial]" to the end, with "serial" replaced with the hosting IS-SPX Player’s serial
number.
4. Press Apply to save changes.
Firmware Update
FIG. 24 Administration - Firmware Update page
The Firmware Update page displays the currently loaded firmware and updater tool, as well as offers options on when
and how firmware updates will be made.
Administration - Firmware Update page
Current Versions:
This section lists the currently loaded firmware version, including the build number, and the
current version of the firmware updater.
Automatic Update:
In this field, enter the URL of the folder where firmware updates are stored on a remote
server. Click Apply to save all changes, or click Return to Default to return the device to
the factory default update location.
Enable automatic updates: Click this box to enable the Update time dropdown menu.
Update time:
This dropdown menu allows selection of a particular firmware update time.
Note: The update time may be set by hour, not by minute.
Manual update:
From the dropdown menu, select whether to make a manual update from a server or from
a USB device.
Click the Check for Updates button to view new updates on the server or USB device
since the last scheduled or manual update.
Updater info:
32
This section includes the current status of the updater and the latest update log.
IS-SPX-1000 & IS-SPX-1300 Inspired Signage XPress Players
Web-Based Configuration Pages
Maintenance - Basic
FIG. 25 Administration - Maintenance - Basic page
The Basic tab of the Maintenance page contains basic maintenance functions for the IS-SPX Player that require human
assistance.
Administration - Maintenance - Basic page
System Restart:
Click this button to restart the IS-SPX Player
Restore Default Content: Click this button to wipe all current content from the IS-SPX Player and replace it with the
original factory default content.
Reporting:
Click this button to gather a report on IS-SPX Player activity for AMX Technical Support.
Maintenance - Advanced
FIG. 26 Administration - Maintenance - Advanced page
The Advanced tab on the Maintenance page contains more features for IS-SPX Player maintenance, including the ability
to put the device into diagnostic and installation modes to assist with troubleshooting and firmware updates.
IS-SPX-1000 & IS-SPX-1300 Inspired Signage XPress Players
33
Web-Based Configuration Pages
Administration - Maintenance - Advanced page
Diagnostic Mode Restart: Click this button to restart the IS-SPX-1000 in Diagnostic Mode. This facilitates recovery of
downloaded files and settings that might otherwise be lost.
Installation Mode:
Click this button to prevent the IS-SPX-1000 from automatically rebooting after changes to the
Administration pages. The administrator must manually restart the device (see the
Maintenance - Basic on page 33) before any changes are saved.
Extended Reporting:
Click this button to get an more detailed Technical Support report (see the Maintenance Basic on page 33) to assist with AMX troubleshooting.
Note: Generation of this report may take up to five minutes.
Remote Support:
Click this button to open Remote Support Services with AMX Technical Support.
Note: if this is clicked accidentally, click the Stop Support button to end the connection.
Clear Data:
Click the Clear All Logs, Clear Cache, or Clear Clock Calibration buttons to wipe all
currently saved information on the IS-SPX-1000.
Note: Clicking any of these buttons automatically restarts the IS-SPX-1000.
34
IS-SPX-1000 & IS-SPX-1300 Inspired Signage XPress Players
Appendix: Encoding Guides
Appendix: Encoding Guides
Encoder Tools
FFMpeg
FFmpeg is a complete, cross-platform solution to record, convert and stream audio and video. Download the windows
version here.
VLC
VLC is a free and open source cross-platform Multimedia Player, Media Converter and Streamer. Download here.
WinMEnc
WinMEnc is a free front-end for encoder. Download here.
Encoding SD video
The recommended format for SD video that will be played across all HMP devices is
MPEG2.
Encoding Into MOV Format Using FFMpeg
To encode a window media video into a 720p (or 1080p) mpeg-4 video (mov format), you can use something like this:
ffmpeg -i video.wmv -vcodec libxvid -s hd720 -r:v 25 -b:v 6500k -bf 1 -acodec libmp3lame -b:a 128k -t
120 video.mov
where:
vcodec libxvid selects mpeg-4 as video format;
s hd720 reduces the size (if needed) to 720p; (use -s hd1080 for 1080p)
r:v 25 selects 25 fps;
b:v 6500k selects 6.5Mbits as target bitrate;
bf 1 sets one B-frame to improve the coding efficiency;
acodec libmp3lame select mp3 as audio format;
b:a 128k selects 128kb for the audio bitrate;
-t 120 stops writing the output after 120 seconds.
Encoding Into MP4 Format Using FFMpeg
ffmpeg -i video_1080p.mp4 -s 832x468 -b:v 2500k -vcodec libx264 -vprofile main -acodec libvo_aacenc b:a 128k video.mp4
This will:
Select h.264 as video format using -vcodec libx264
Reduce the size (if needed) to 832x468 using -s 832x468
Select 2.5Mbits as target bitrate using -b:v 2500k
Select AAC as audio format: -acodec libvo_aacenc
Target 128kb for the audio bitrate: -b:a 128k
Transcoding Into MP4 Format Using FFMpeg
If you need to change the format / container of the file without any encodings, use something like these:
ffmpeg.exe -i inputfile -acodec copy -vcodec copy outputfile.mp4
ffmpeg.exe -i inputfile -codec: copy outputfile.mp4
This will simply copy the audio and video streams (#1) or all the streams (#2) into an mp4 format.
IS-SPX-1000 & IS-SPX-1300 Inspired Signage XPress Players
35
Appendix: Encoding Guides
Encoding Into MOV Format Using WinMEnc
To encode a file using preset settings:
1. Download the following preset and save it into the "profile" folder below the folder containing WinMEnc.exe:
6MB MPEG-2, 16x9, MP3 audio
File: Profile-720w 16x9 6MB MPG2 MP3.7z
2. Open WinMEnc.exe and select the profile from the dropdown menu (FIG. 27):
FIG. 27 WinMEnc.exe - Selecting a Profile
3. Drag and drop the file(s) you wish to encode into the first tab (FIG. 28):
FIG. 28 WinMEnc.exe - Add File(s) to Encode
4. Select an output folder and click OK (FIG. 29):
36
IS-SPX-1000 & IS-SPX-1300 Inspired Signage XPress Players
Appendix: Encoding Guides
FIG. 29 WinMEnc.exe - Select an Output Folder
5. Press Encode
IS-SPX-1000 & IS-SPX-1300 Inspired Signage XPress Players
37
In the ever-changing AV industry, continual education is key to success. AMX University is
dedicated to ensuring that you have the opportunity to gather the information and
experience you need to deliver strong AMX solutions. Plus, AMX courses also help you
earn CEDIA, NSCA, InfoComm, and AMX continuing education units (CEUs).
8/13
©2013
Visit AMX University online for 24/7/365 access to:
- Schedules and registration for any AMX University course
- Travel and hotel information
- Your individual certification requirements and progress
AMX. All rights reserved. AMX and the AMX logo are registered trademarks of AMX. AMX reserves the right to alter specifications without notice at any time.
Increase Your Revenue
through education + knowledge
3000 RESEARCH DRIVE, RICHARDSON, TX 75082 USA • 800.222.0193 • 469.624.8000 • 469-624-7153 fax • 800.932.6993 technical support • www.amx.com