1
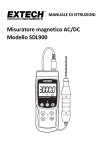
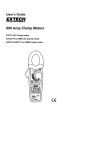
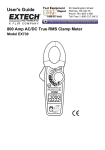
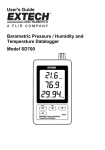
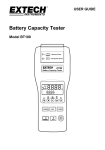
USER GUIDE AC/DC Magnetic Meter Model SDL900 EXTECH INSTRUMENTS Introduction Thank you for selecting the Extech Instruments Model SDL900. This device is shipped fully tested and calibrated and, with proper use, will provide years of reliable service. Please visit our website (www.extech.com) to check for the latest version of this User Guide, Product Updates, and Customer Support. Features Wide range of applications for industrial, mechanical, material, electrical, laboratory, and field use DC and AC magnetic field measurements North and South pole indicator Automatic temperature compensation Zero button for DC magnetic function Separate probe for convenient remote measurements RS232/USB computer interface Microprocessor circuit assures maximum accuracy and provides advanced functions Heavy duty and compact housing with hard carrying case Auto power off feature saves battery life Real time SD memory card Datalogger Built‐in clock and calendar Manual datalogger Easy‐to‐read LCD display with green backlight Data hold and MIN‐MAX Recording features 2 SDL900‐en‐GB_V1.4 5/15 EXTECH INSTRUMENTS Meter Description 1. 2. 3. 4. 5. 6. 7. 8. 9. 10. 11. 12. 13. Probe 1. 2. 3. 4. Probe Connection LCD Display HOLD Button POWER Button SET Button RANGE / Up Arrow Button FUNCTION / Down Arrow Button ENTER / LOG Button MAX / MIN Button RS‐232 Output Terminal (Side) Reset Button (Side) DC 9V Power Adapter Input Socket (Side) Tilt stand and Battery compartment (Back) 1 2 3 9 4 5 6 7 8 10 11 12 13 1 Probe Sensing Head Probe Handle Probe Plug Probe Head Cover 4 2 3 3 SDL900‐en‐GB_V1.4 5/15 EXTECH INSTRUMENTS Operation AC/DC Magnetic Field Measurement Switch the meter ON by pressing and holding the POWER button for at least two seconds. Press and hold the FUNCTION button to select either DC or AC magnetic field measurement. Press and hold the RANGE button until the desired range (1 or 2) is selected. Select the desired unit of measure (mT or G). For DC magnetic field measurements, the display will show either the N or S indicator. For the North Pole, the N indicator will be shown. Similarly, for the South Pole, the S indicator will be shown. For AC magnetic field measurements, the display will show the AC indicator. The display will not show the N or S indicator. Contact and press the testing material to the probe head (see Fig 1). The display will show the magnetic field value along with the measurement unit (mT or G). Figure 1 Note: When the meter is powered ON, the display may show a non‐zero value; this is because of environmental interference. Before taking a measurement, set the probe at the optimum position. To Zero the display, press and hold the ▲ and ▼ buttons until the display shows the “0” value and the display flashes the ZERO indicator. The meter is now zeroed. Data Hold During the measurements, press the HOLD button to freeze a displayed reading. The measured value will be held and the LCD will display the HOLD symbol. Press the HOLD button again to release the data hold function. 4 SDL900‐en‐GB_V1.4 5/15 EXTECH INSTRUMENTS Data Record (Maximum and Minimum Reading) Press the REC button to start the data record function. The LCD will display a REC symbol. Press the REC button again, and the REC MAX symbol along with the maximum reading value will be displayed. Press the REC button again to display the minimum value. The LCD will also show the REC MIN symbols. To exit this mode, press and hold the REC button for two seconds. The meter will return to the normal operating mode. Note: When making DC magnetic field measurements in the RECORD mode, the meter cannot be changed from North pole to South pole, or vice versa. Set Mode Press and hold the SET button for two seconds to enter the Set Mode. Momentarily pressing the SET button will cycle throughout the seven functions. They are (in order): DATE………Set clock (Year/Month/Date, Hour/Minute/Second) SP‐T……….Set sampling time (from 0 ~ 3600 seconds) POFF………Auto power OFF management BEEP……...Set beeper ON/OFF DEC………..Set SD card Decimal character (comma for metric or decimal for imperial) SD‐F……….Format the SD memory card UNIT……….Select the magnetic field units (mT: milli Tesla or G: Gauss) Note: Press and hold the SET button for two seconds when in the Set Mode to exit. Set the Clock Time and Date When the LCD displays DATE, press the ENTER button. Use the ▲ and ▼ buttons to adjust the value (starting with the current YEAR). After the desired value is set, press the ENTER button to step to the next item. After all six parameters are set, press the ENTER button to save the settings. Note: The SDL900 internal battery allows the internal clock to run precisely, even after it is switched OFF (as long as the battery is fresh). Set Sampling Time When the LCD displays SP‐T, press the ENTER button. Use the ▲ and ▼ buttons to adjust the sampling time (rate of datalogging) to 0, 1, 2, 5, 10, 30, 60, 120, 300, 600, 1800, or 3600 seconds. After the desired sampling time is selected, press the ENTER button to save the setting. 5 SDL900‐en‐GB_V1.4 5/15 EXTECH INSTRUMENTS Auto Power OFF Management When the LCD displays POFF, press the ENTER button. Use the ▲ and ▼ buttons to select YES or NO. Selecting YES enables the Auto Power OFF management. Selecting NO disables the Auto Power OFF management. Press the ENTER button to save the setting. Set Beeper ON/OFF When the LCD displays BEEP, press the ENTER button. Use the ▲ and ▼ buttons to select either YES or NO. Selecting YES enables the audible beeper. Selecting NO disables the audible beeper. Press the ENTER button to save the setting. Decimal Point/Comma Selection When the LCD displays DEC, press the ENTER button. The numerical structure for the decimal point is “.”, as used in the United States. In other countries, the decimal function is represented by the “,” comma symbol. Use the ▲ and ▼ buttons to select USA or EURO. Selecting USA enables the decimal point format. Selecting EURO enables the comma format. Press the ENTER button to save the setting. SD Memory Card Format When the LCD displays SD‐F, press the ENTER button. Use the ▲ and ▼ buttons to select YES or NO. Selecting YES allows the SD card to be formatted. Selecting NO skips the formatting utility. If YES is selected, press the ENTER button to confirm that the SD memory card will be formatted. Confirming will clear all of the existing SD card data and the formatting utility will run. Selecting Units of Magnetic Field When the LCD displays UNIT, press the ENTER button. Use the ▲ and ▼ buttons to select mT or G. If mT is selected, the magnetic field units will be set to milli‐Tesla. If G is selected, the magnetic field units will be set to Gauss. Press the ENTER button to save the setting. 6 SDL900‐en‐GB_V1.4 5/15 EXTECH INSTRUMENTS Datalogger Mode Preparation for the Datalogger Function Insert the SD card into the SD card socket. If the SD card has never been used with the SDL900, please format it (see the section titled “SD Memory Card Format” in the Set Mode above). Note: It is strongly recommended that memory cards be formatted by the SDL900. If the SD card has problems use a computer to reformat the SD card and try again. If this is the first time the meter is being used, set the Date and Time (see the section “Set the Clock Time and Date” in the Set Mode above). Automatic Datalogging 1. Select the sampling time (rate) as described in the Set Mode section above to a value other than zero. 2. Press and hold the LOG button for 2 seconds. The meter will flash the DATALOGGER icon at the selected sampling rate, indicating that readings are now being automatically recorded to the SD card. 3. If a card is not inserted or if the card is defective, the meter will display ‘EMPTY’ and exit the DATALOGGER mode. In this case, switch the meter OFF and try again with a valid SD card. 4. Pause the datalogger by pressing the LOG button momentarily. The DATALOGGER icon will stop flashing and the sample rate will display for a short time. To resume logging simply press the LOG button again. 5. To terminate the datalogging session press and hold the LOG button for at least 2 seconds. 6. When an SD card is used for the first time a folder is created on the card and named MGA01. Up to 99 spreadsheet documents (each with 30,000 readings) can be stored in this folder. 7. When datalogging begins, a new spreadsheet document named MGA01001.xls is created on the SD card in the MGA01 folder. The data recorded will be placed in the MGA01001.xls document until 30,000 readings are reached. 8. If the measurement session exceeds 30,000 readings, a new document will be created (MGA01002.xls) where another 30,000 readings can be stored. This method continues for up to 99 documents, after which another folder is created (MGA02) where another 99 spreadsheet documents can be stored. This process continues in this same fashion with folders MGA03 through MGA10 (last allowable folder). 7 SDL900‐en‐GB_V1.4 5/15 EXTECH INSTRUMENTS Manual Datalogging In the manual mode the user presses the LOG button to manually log a reading to the SD card. For Manual Datalogging, the sampling rate must be first set to ‘0’ seconds as described in the Set Mode section above. Press and hold the LOG button for at least 2 seconds and the DATALOGGER icon will appear on the LCD; the lower portion of the display will show p‐n (n = memory location number 1‐99). Momentarily press the LOG button to store a reading. The DATALOGGER icon will flash each time a data point is stored. Use the ▲ and ▼ buttons to select one of the 99 data memory positions in which to record. To exit the manual datalogging mode, press and hold the LOG button for at least 2 seconds. The DATALOGGER icon will switch off. Spreadsheet data example RS‐232/USB PC Interface For streaming of data to a PC via the RS232 Output jack, the optional 407001‐USB kit (RS232 to USB cable and driver CD) along with the 407001 software (available free at www.extech.com/instruments) are required. AC Power Adaptor This meter is normally powered by six (6) 1.5V ‘AA’ batteries. An optional 9V power adaptor is available. When the adaptor is used, the meter is permanently powered and the power button will be disabled. 8 SDL900‐en‐GB_V1.4 5/15 EXTECH INSTRUMENTS Battery Replacement When the low battery icon appears on the LCD, the batteries must be replaced. Several hours of accurate readings are still possible in this condition; however batteries should be replaced as soon as possible: Remove the two (2) Phillips screws from the rear of the meter (directly above the top of the tilt stand). Remove and safely place the battery compartment and screws where they will not be damaged or lost. Replace the six (6) 1.5V ‘AA’ batteries observing polarity. Replace the battery compartment cover with the two (2) Phillips screws. Note: The meter can also be powered by a DC 9V Power Adapter. The meter will be permanently powered ON when the DC adapter is used as the power supply (the power button function is disabled). All EU users are legally bound by the battery ordinance to return all used batteries to collection points in the community or wherever batteries / accumulators are sold! Disposal in the household garbage is prohibited! 9 SDL900‐en‐GB_V1.4 5/15 EXTECH INSTRUMENTS Specifications Circuit Custom one‐chip of microprocessor LSI circuit Display (LCD) Size 52 x 30mm (2.04 x 1.18 in.) Measurement Unit mT Milli Tesla G Gauss Measurement Range, DC mT G Measurement Range, AC mT G Range 1 300.00 mT x 0.01 mT Range 2 3,000.0 mT x 0.1 mT Range 1 3,000.0 G x 0.1 G Range 2 30,000 G x 1 G Range 1 150.00 mT x 0.01 mT Range 2 1,500.0 mT x 0.1 mT Range 1 1,500.0 G x 0.1 G Range 2 15,000 G x 1 G Accuracy DC ± (5% rdg. + 10 dgt.) (at 23 ±5°C) AC ± (5% rdg. + 20 dgt.) Frequency Response AC Measurement: 50 Hz / 60 Hz Sensor Hall Sensor Datalogger Sampling Time and Setting Range Auto 1 second to 3600 seconds (with the sampling rate set to ‘1’ second some data points could be lost) Manual Push data logger button to save data (set to ‘0’ seconds) Data error number ≤ 0.1 % no. of total saved data typically Field Direction Uniaxial Display Sampling Time Approx. 1 second Operating Temperature 0 to 50°C (32 to 122 °F) Operating Humidity Less than 85% R.H. Data Output RS 232/USB PC serial interface Power Supply 6 x Alkaline or Heavy duty 1.5 V AA batteries 10 SDL900‐en‐GB_V1.4 5/15 EXTECH INSTRUMENTS DC 9V adapter input (optional) Power Current Normal Operation (SD card not saving data and backlight OFF): Approx. 13 mA DC When SD card is saving data and the backlight is OFF: Approx. 35 mA DC. *If the backlight is on, the power consumption increases by approximately 3 mA. Weight (meter and probe) 303g (10.7 oz.) Dimensions Main Instrument: 182 x 73 x 47.5 mm (7.1 x 2.9 x 1.9”) Probe: 195 x 25 x 19 mm (7.68 x 0.98 x 0.75 in.) Copyright © 2015 FLIR Systems, Inc. All rights reserved including the right of reproduction in whole or in part in any form www.extech.com 11 SDL900‐en‐GB_V1.4 5/15