1
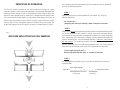
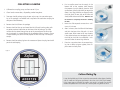
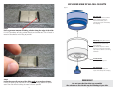
Bioaerosol Sampling Cassette For the collection of viable and non-viable airborne particles Laboratory & User Manual 5350 SW 1st Lane, Ocala, FL 34474 • www.zefon.com Phone: 800-282-0073 • 352-854-8080 • Fax: Fax: 352-854-7480 © Copyright 2000 Zefon International, Inc. Via-Cell, Air-O-Cell, and BioPump are registered trademarks of Zefon International. LA03023 Rev 3 Ordering Information INTRODUCTION The Via-Cell sampler is a unique, multi-purpose particle collection device designed for the collection of both viable and non-viable bioaerosols. Using a proprietary water soluble collection media along with special environmental controls, the Via-Cell sampler is capable of collecting particles, maintaining the viability of spores during transport to the laboratory. The particles can then be analyzed using one or more analytical methods. APPLICATIONS • Indoor Air Quality • Clean Room Monitoring • Allergy Testing • Hospital Infection Control • Flood Restoration Field Equipment Product Number Description VIA010 Via-Cell Cassettes, 10/pk AOCCAL Via-Cell In-Line Calibration Adapter AOC-WS10 Via-Cell® Inner Wall Sampling Adapter Z-LITE-IAQ Zefon Z-Lite IAQ Pump ZBP-200 Zefon Bio-Pump® ZBP-311 Zefon Bio-Pump® Via-Cell/Air-O-Cell® CSI Bubble Tube APB-803300 mini-Buck IAQ Calibrator DCL-H Bios DryCal® DC-Lite Calibrator ZBP-305 Via-Cell/Air-O-Cell® CSI Flow Indicator VIA-CELL ADVANTAGES Laboratory Equipment • Preloaded, sterile and ready for use. • Disposable, no equipment to clean between samples. • • Product Number Description Eliminates cross contamination concerns. ZA0046 Cassette Opener Includes tamperproof safety seal to prevent sample contamination after collection. ZA0050 Particle Spreader, “T” shaped, sterile ZA0051 Syringe, sterile, 3cc Each slide inside the sampler is marked with a unique serial number to ensure accurate sample traceability. ZA0052 Alcohol wipes, 200/bx ZA0054 Forceps, self closing, each Shelf life of 1 year from date of manufacture is 4 times longer than most sampling methods using culture plates. ZA0055 Water, sterile, 100cc, screw cap container ZA0056 Via-Cell Linking Solution • Allows multiple types of analysis to be performed from a single collected sample. ZA0058 Via-Cell Blue Stain • Samples do not require refrigeration, only room temperature storage and transportation. • Small, compact size. No heavy or bulky equipment is required. • Can be used with virtually any kind of sampling pump capable of pulling a 15 lpm (vacuum) air flow, including battery powered pumps such as the Zefon Bio-Pump® or Bio-Pump® Plus. • • 2 ANALYSIS OPTIONS Mold Spore Example Calculation Microscope field diameter at (900X) Number of traverses Sample volume (15 lpm @10 minutes) Mold spore counts 14.4mm _________ 0.240 x 10 x 1 _______ x 0.15 = = = = 0.240 mm 10 (15 / 1000) x 10 = 0.150m3 50 14.4 50 = _____ x 50 0.36 Particle Type Counting Recommendation Pollen — Entire trace or 100 grains (whichever comes first) should be examined at a minimum magnification of 200X. Identification and speciation should be performed at minimum magnification of 400X. A minimum of 15% of the entire trace should be examined o r a m i n i m u m o f 10 0 m o l d s p o re s c o u n te d (whichever comes first) . Identification and speciation should be per formed at minimum magnification of 400X. Fibers — Other Aerosols — The Via-Cell sampler is the perfect tool for collecting viable organisms and culturing them on agar media plates. PCR Analysis: The Via-Cell utilizes a water soluable collection media which is ideal for PCR and other chemical types of analysis. Direct Microscopy: Samples collected using the Via-Cell sampler may be “pre screened” using direct microscopy methods which allows the analyst to decide if additional analysis techniques are needed. = 2000 ct/m3 MICROSCOPIC COUNTING RECOMMENDATIONS Mold Spores — Culturable Sampling: Via-Cell sample Make decision on analysis type Culture the sample Direct microscopy screening The entire trace or 100 fibers, (whichever comes first) should be examined at a minimum magnification of 200X. Is further analysis necessary? Skin cell fragments, combustion emissions, insect parts —A minimum of 10% of the entire trace should be examined or a minimum of 100 particles counted (whichever comes first). Yes Culture the sample on agar media Process using PCR or other chemical means 3 Process using standard direct microscopy PRINCIPLES OF OPERATION The Via-Cell sampler operates on the well established principle of inertial impaction. Particles in the air stream are accelerated as they approach the tapered inlet opening and drawn through a small slit aimed directly at a glass slide. This glass slide contains a water soluable sampling media which is designed to hold particles intact and maintain viability for later analysis. As the particles come through the slit, the air velocity forces the particles to impact into the sampling media, while the air stream makes a sharp 90o turn and proceeds around the slide and out of the cassette. The air flow path through the Via-Cell sampling cassette is illustrated below in Figure 1. The calculation of particle concentration per cubic meter of air can be performed by using the following equations: STEP 1 Determine the actual air volume collected in cubic meters (m3) using the following calculation: Air volume (m3) = (Sampling rate (liters per minute) / 1000) x Number of minutes STEP 2 Figure 1 AIR FLOW PATH OF THE VIA-CELL SAMPLER Determine the length of sample trace counted based on the microscope field of view and number of fields of view counted. It will be necessary to accurately calibrate and measure the diameter of the microscope field of view using a stage micrometer slide. Remember, each microscope is different, and each different combination of ocular and objective lens must be calibrated separately. Stated lens magnifications are rarely precise. The microscopist should then record the number of complete traverses examined across the width of the deposition trace and use the formula given below to calculate the actual length of the deposition trace examined. Trace Length Counted (mm2) = Microscope field diameter (mm) x number of traverses STEP 3 The concentrations of particles (cts/m3) can then be determined by using the equation below. 1 Trace length (14.4mm) Cts / m3 = _______________ x ___________ x # of particle counts Air Volume(m3) Total length of trace counted (From Step 2) 4 (From Step 1) 21 OPERATIONAL PERFORMANCE Estimation of Collected Particle Load The Via-Cell Sampler particle deposition area is approximately 0.9 mm wide by 14.4mm long yielding an approximate area of 12.96 mm2. The width of the deposition trace may vary slightly in particle density from the middle to outer edges of deposition. For this reason, using the deposition trace area is not recommended for direct calculation of particle concentrations. The recommended procedure for calculating particle concentrations is based on using the Via-Cell Sampler trace length and microscope field diameter. One field of view counted is defined as the calibrated diameter of the microscope field of view (in mm) covering one cross-sectional pass or “traverse” across the sample deposition trace. A typical sample preparation and microscopic counting procedure is illustrated in Figure 5. Figure 5 ILLUSTRATION OF THE Via-Cell COUNTING PROCEDURE ® Microscope slide The Via-Cell sampler has been evaluated in commercial and university laboratories to determine the collection efficiency and operational aspects of the collector. With impactor-type samplers, the most common measure of efficiency is defined by it’s “cut-point” curve. The cut-point (also referred to as the “D-50” point) is defined by the particle size at which 50% of the particles are collected and 50% pass through the sampler at a pre-determined flow rate. The ‘cut point’ for the Via-Cell Sampler has been determined to be 1.56 microns at a flow rate of 15 LPM. This cut point is ideal for fungal analysis because particles smaller than this are not of interest, and may even create enough background debris to obscure adequate viewing of the sample and compromising reliable analysis. Figure 2 P 100 90 1.664µm at 97.8% 80 1.604µm at 77.1% Collection Efficiency, % Direct microscopy enables the analyst to estimate the concentration of particles in the sampled area. Counting and quantification of the collected particles accomplish this. This estimation is conducted by counting calibrated cross-sections of the deposited sample trace. The number and type of particles estimated per cubic meter of air is calculated based on the a) length of the deposition trace, b) length of trace actually examined, c) volume of air collected, and d) number of particles counted. W = 0.077 cm S/W = 0.50 Re = 2,310 Dp = 1.56 Pm 50 GSD = 1.05 70 60 50 1.553µm at 45.1% 40 30 1.508µm at 26.4% 20 Via-Cell slide 10 Analysis starts at 1st traverse - completes and moves to 2nd traverse 1.398µm at 7.1% 0 1 Aerodynamic Particle Diameter, Pm 10 Sample particulate The graph above displays the collection efficiency of the Via-Cell sampler when used at a flow rate of 15LPM. Samplers that are designed properly will exhibit upper and lower curve limits that are very sharp and in an ideal situation, a sampler will reach 100% efficiency almost immediately after the cut-point. The Via-Cell demonstrates a remarkably sharp curve that is superior to many other devices on the market today. 20 5 RECOMMENDED FIELD SAMPLING PROCEDURES The Via-Cell sampler is designed to efficiently collect bioaerosol particles while also providing safe transport to the laboratory. The results achieved when using the sampler requires proper use, including pump calibration and handling techniques. Therefore familiarization with the Via-Cell Sampler collection procedure is recommended prior to use. Required Sampling Equipment * Via-Cell Sampling Cassettes * Sampling pump capable of pulling 15LPM * Tubing to attach cassette to pump, if required (1/4” ID or 1/2” ID) * Pump calibration device Handling the Via-Cell Sampler: The Via-Cell Sampler is sterile and ready-to-use when received. It is very important not to contaminate the inner-surface of the cassette through careless handling, or insertion of anything into the cassette through the inlet or outlet port. While the collection may render the sampler not sterile due to the collected particles, the person doing the collection should not introduce spurious materials into the collection that could alter the outcome. Preparation is now complete Slides take several minutes to clear. Here is an example of a before and after look at the slide. Your slide should exhibit clarity similar to the top example. Handling Tips and Considerations 1. Always store Via-Cell cassettes in climate controlled areas with a room temperature between 50 - 80 degrees F. Direct Microscopy Preparation Application Notes: 2. The Via-Cell sampler does not require refrigeration during storage or during shipment to the analysis laboratory. 1. Always sterilize a cover glass to place over the collection if you intend to later culture the sample. 3. Prolonged exposure to high temperatures (e.g. as that in the trunk of a car or hot warehouse) may alter the performance of the product. 2. Sterilization is not necessary if you do not intend to culture the sample. 3. 4. Use of the Via-Cell sampler in extreme environmental conditions (i.e. very hot or cold weather) may affect the collection performance. Use of any type of stain or solvent should only be used if you do not intend to culture the sample. Some stains may not clear the Via-Cell slide adequately. If this happens, contact Zefon and we can provide guidance or sell a stain that will clear adequately. 4. If using immersion oil, apply it carefully. If immersion oil makes contact with the Via-Cell adhesive, it will probably result in killing any viable particles. 5. Always rinse the cover glass with about 1/4cc water into the cassette trough to collect any particles that have adhered to it. 5. Always ship Via-Cell samples to the laboratory so that the laboratory receives the samples within 24 hours after collection. The laboratory should process the samples within 24 hours of receipt. 6 19 EXPLODED VIEW OF VIA-CELL CASSETTE Figure 3 Blue Inlet Cap Controls environmental conditions during storage and transport. Remove immediately prior to sampling and replace immediately after sampling. Step 2 Place a generous amount of linking solution along the edge of the slide. DO NOT place drops of linking solution directly on the trace area. This will result in excessive disturbance and shifting of particles. Main Body (clear plastic section) This section holds the collection media and is the section used during sampling. Note: Plastic may have an amber tint. This is considered normal and caused by the radiation used during sterilization. Cassette Outlet Connect pump tubing here. Blue Outlet Plug Remove during sampling and replace immediately after sampling. Step 3 Lower the cover slip on top of the slide gently at an angle as shown. Placing the cover slip on the slide this way allows the linking solution to spread across the slide while disturbing the trace as little as possible. 18 WARNING! Do not open the blue inlet cap assembly! The substances used inside may be irritating to your skin. 7 SAMPLE PREPARATION - CALIBRATION DIRECT MICROSCOPY SLIDE PREPARATION The Via-Cell sampler requires the sampling pump to be calibrated at a flow rate of 15 liters per minute to ensure proper collection. Ideally, calibration should be checked prior to and after each collection and as a minimum once per day. It is strongly recommended that a primary standard device such as a soap bubble meter/tube or other NIST certifiable device be be used to calibrate the sampling pump. Secondary calibration devices such as a rotameter may be used if it is calibrated against a primary standard. For use when standard direct microscopy is required and the sample may later be cultured. Below are examples of typical devices that can be used for calibration: Zefon Bio-Pump® Primary Calibrators Secondary Calibrators Zefon Via-Cell /Air-O-Cell CSI Bubble Tube Zefon Via-Cell /Air-O-Cell CSI Flowmeter (#ZBP-305) A NOTE ABOUT LINKING SOLUTION The use and application of linking solution is an important step when examining Via-Cell slides under direct microscopy and/or when viability of particles needs to be preserved. The adhesive on the Via-Cell slide has a frosty appearance in its natural form. This needs to be cleared before use in direct microscopy. Use of linking solution solves this. The linking solution works by partially dissolving the adhesive. Therefore it is necessary to place enough solution onto the slide that will allow the cover slip to carry the solution completely under the cover slip. Otherwise blotchy, non-clarified areas may be seen under the cover slip. miniBuck IAQ Calibrator High Volume Pumps (includes AC powered rotary vane, diaphragm and linear pumps) Primary Calibrators Secondary Calibrators Gilian Gilibrator Electronic Bubble Meter Rotameter flow meters Step 1 Place the Via-Cell slide onto the microscope slide media side up. IMPORTANT: Do not permanently mount sample to microscope slide. This preserves the ability to culture the sample. miniBuck IAQ Electronic Calibrator Via-Cell® slide with media facing up Bios DryCal® Electronic Calibrator Please note that some pumps, including the battery powered Zefon Bio-Pump®, will only work with specific calibration devices. Please reference the operation manual for your pump to determine if special calibration devices are needed. Sterile Microscope Slide IMPORTANT! Application of the linking solution must be done very carefully and in a specific manner to avoid disturbing the collected sample trace. Please follow the directions regarding proper application of linking solution precisely. 8 17 DIRECT MICROSCOPY PROCEDURES Typical Bio-Pump® Calibration Setup General This procedure will enable the analyst to overview the particles on the slide and then determine the next course of action to take (e.g. culture the sample). If culturing the sample after microscopic analysis is a possibility, it is important to aseptically handle the slide with sterile instruments to maintain sterility of both the slide and the inside of the cassette. Analysis of the collected sample should be performed by those experienced in particle identification. Required Supplies -Standard 1 x 3 microscope slide -Microscope -Stain or linking solution (see stain notice below) -Self-closing forceps -Controlled environmental chamber -Zefon Via-Cell Sterile Microscopy Linking Solution -Cover Glass Sample Preparation 1. Prepare a standard microscope slide by ‘sterilizing’ with alcohol. 2. Record the Via-Cell sampler serial number onto the lab worksheet. 3. Cut the adhesive label around the Via-Cell cassette. 4. Aseptically open the cassette in the environmental chamber taking care not to touch the inner surfaces of the cassette. 5. Remove the slide using forceps (tips ‘sterilized’ with alcohol) and place onto the sterilized microscope slide with the media side up (when the media is facing up, you can read the printing on the slide). DO NOT place the Via-Cell slide face down onto the microscope slide as transfer of the adhesive and/or particles may occur. 6. Place the slide under the microscope for examination. Be careful not to contaminate the slide. NOTICE Stains such as LactoPhenol Cotton Blue or Saffron Red contain solvents that will destroy the ability for spores to grow. DO NOT use any type of stain if you plan to culture the sample after examination 16 Via-Cell®/Air-O-Cell® CSI Flowmeter mini-BUCK IAQ Calibrator Via-Cell®/Air-O-Cell® CSI Bubble Tube The Via-Cell flowmeter used with the Zefon Bio-Pump® has the in-line resistance of a sampler built into the calibration scale. When using the mini-BUCK or Via-Cell/ Air-O-Cell CSI bubble tube, actual samplers are used in-line during calibration. For complete calibration instructions, please refer to the instructions included with your pump or calibration device. Typical High Volume Pump Calibration Setup Direct Connection to Rotameter Flowmeter Direct Connection to Electronic Calibrator In-Line Connection to Electronic Calibrator The Via-Cell sampling cassette does not produce significantly measurable backpressure and does not impede the performance of most high volume rotary vane, diaphragm or linear pumps. Therfore the calibration device may optionally be connected directly to the pump (without a Via-Cell sampling cassette in line) to calibrate the pump flow rate. When choosing to calibrate with a sampler in-line, it is recommended that one sampler is retained as a permanent calibration cassette and used for this purpose each time. 9 COLLECTING A SAMPLE 1. Calibrate the sampling pump to a flow rate of 15 lpm. 2. Clean hands or wear clean, disposable, powder free gloves. 3. Tear open the foil package using the tear strip on top. Use care when opening as this package is re-sealable and is required to be used after sampling for transport to the laboratory. 4. Remove the Via-Cell from the package. 5. Remove the blue inlet cap and record the Via-Cell serial number, along with any other pertinent information on the front of the foil package. The serial number can be viewed through the top of the cassette once the blue inlet cap is removed. It is printed directly on the collection slide as shown in Figure 4. After recording the serial number, replace the blue inlet cap until ready to sample. 6. Remove the blue outlet plug from the cassette and place the plug into the foil pouch for safe keeping. 4. Put 2cc sterile water into the trough in the bottom half of the cassette. After cleaning the tweezers tip with alcohol, place the slide upside down (media side down) on top of the water. If any large bubbles are trapped under the slide, gently lift one side of the slide and slowly lower to remove bubbles. NOTE: Be sure the alcohol has completely dried before handling the slide. 5. Leave the slide exposed to water for a minimum of 5 minutes 6. After 5 minutes, raise the slide with the forceps and flush the face of the slide with 1/4 cc of sterile water. Allow water to fall into cassette. If the adhesive does not completely wash off the slide, let the slide sit an additional 5 minutes to dissolve the remaining adhesive. 7. Draw the suspension from the cassette housing into a sterile syringe or pipette, then dispense onto a culture plate. Figure 4 Culture Plating Tip It may be desirable to split the suspension onto several culture plates. Particles such as molds and funguses germinate in less than 100% RH (liquid water). Using more water to dissolve the media may result in a longer time for the water to evaporate from the surface of a culture plate and growth to occur. 10 15 SAMPLE PREPARATION FOR CULTURING OR PCR ABOUT THE FOIL PACKAGING It is important to retain the resealable foil package for transportation of the cassette to the laboratory. This package along with the blue inlet and outlet caps combine to control the environmental conditions inside the cassette after sample collection. This is critical in maintaining the viability of the particles if culture analysis is required. The included safety seal label is used to ensure your collected sample remains uncontaminated until it reaches the laboratory. The Via-Cell sampler can be prepared for culturing, PCR and other analysis by suspending the particles in sterile water, then dispensing the suspended particles onto agar plates or other media. Required Supplies CAUTION -Syringe - 3cc sterile, or sterile pipettes -Sterile water -Culture plates with appropriate agar -Sterile particle spreaders -Self-closing tweezers -Controlled environmental chamber The interior of the Via-Cell sampler is sterile. Care needs to be taken when handling the product with the plugs removed so that the sampling port and outlet port do not become contaminated with materials that may alter the collection or analysis of the sample (e.g. introduce materials not normally collected in the air stream). 1. Verify that the plug and cap are installed in the cassette. Record the sampler serial number onto the lab worksheet. The serial number is printed directly on the slide, not on the outside of the cassette. 2. Clean the outer surface of the sampler to remove any excess dirt. Cut the protective tape. Open the cassette in the controlled environmental chamber, keeping the slide in position as shown below. Be careful not to get pieces of tape inside the sterile cassette. 3. The collection slide will be facing media-side down toward the V shaped inlet sampling port. When you can read the word “ZEFON” on the collection slide, the media will be facing you. Collection Slide Media side faces the slit opening (the media is facing down in this picture) Trough in bottom half of cassette 14 7. Connect the Via-Cell sampler to the pump and position the cassette in the desired location. The Via-Cell sampler is capable of operating in any vertical or horizontal orientation and in confined spaces such as ducts, plenums or wall cavities. 8. Remove the large blue inlet cap from the cassette and place into the foil package for safekeeping. 9. Turn on the pump and run for the desired amount of time. Reference the chart on page 12 for assistance in determining the correct sampling time. 10. When the sampling period is completed replace the blue plug in the outlet and the blue cap over the inlet. Handle these items by the outer finger grips. The plugs will prevent contamination of the interior of the cassette during transport, and ensure proper environmental conditions of the collected sample. 11. Place the Via-Cell sampler into the special foil bag and zip it closed. Apply the red safety seal label over the top of the foil bag opening. This will ensure the integrity of your sample until it reaches the laboratory. Note the sample time and other important sampling information. Send the cassette to the analysis laboratory to arrive within 24 hours after the sample was collected. Refrigeration of the collected sample is not required during transport. 11 L0304210 Rev Rev 2 SAMPLING TIME RECOMMENDATIONS LABORATORY ANALYSIS STRATEGIES The Via-Cell sampler collection period is dependent upon the density of the particulate in the environment. When sampling in a dusty environment, the particles can overlay each other on the slide causing difficulties in direct microscopy analysis. In addition particles will not adhere to the adhesive media if the adhesive is already covered by particles. The Via-Cell sampler is unique in that the particulate collected may be analyzed using one or more analytical methods such as culturing, microscopy, PCR (polymerase chain reaction), or other types of analysis. Because the media on the Via-Cell slide is water soluble, and the lower half of the sampling cassette has a built-in trough, the sample collection may be suspended in water directly in the cassette without additional glassware. This suspension can then be transferred and used in any number of analytical methods that can use this suspension. The following chart suggests typical sampling times to attain a particle deposition on the slide in which the edges of the trace are sharply defined and the particles dispersed properly to enable good microscopic evaluation. Longer/shorter collection times may be required. Each situation must be evaluated according to specific conditions and the Via-Cell sampler sampling time must be adjusted to meet those conditions. RECOMMENDED SAMPLING TIMES Environmental Dust Conditions Sampling Time • Clean office environment or outdoors (no visible dust) 10 minutes • Indoor environment, high activity 5 minutes • Indoor environment, evidence of drywall renovation or industrial dust 1 minute CONTROL SAMPLE RECOMMENDATIONS NOTE Aseptic (sterile) handling procedures must be employed by laboratory personnel to prevent the introduction contamination that could affect analysis. The collected sample must be processed in the laboratory in a timely manner. Experimentally it has been shown that collected mold particles (for example, Cladosporium cladosporioide) can maintain viability inside the Via-Cell up to 5 days after collection. However, the best viability and resulting growth was achieved within 3 days. After 3 days, some diminished viability will occur. For this reason it is recommended that the collected sample reach the laboratory within 24 hours after collection and that the sample should be processed by the laboratory within 24 hours after receipt. Processing may include screening, creation of the suspension and culture. If analysis as PCR is done, the collection can remain on the collection slide much longer as viability of the particles is not a factor. Please note that if culturing of the collection is anticipated, staining of the collection will not be possible for prescreening the particles with direct microscopy since stain kills the viable particles. If PCR analysis is anticipated, staining may be possible; it will be up to the user to determine the suitability of the stain and possible interference with the analysis. Using one or more of the following control sample recommendations is considered a good sampling practice that will help provide some basic guidelines to interpreting results: 1. Collection of an outdoor sample may help to determine the amplification of indoor particles. 2. Collection of a sample in a ‘non-suspected’ area may assist with the comparison of results. This can also sometimes be used in place of an outdoor sample when conditions outside are not favorable for sampling, such as on a rainy day. 3. Field blanks are a recommended sampling procedure. 12 NOTICE Each Via-Cell sampler should have a plug installed into the outlet port of the cassette as well as the cap over the inlet port when received by the laboratory. These are necessary to seal the cassette to control the environmental conditions as well as prevent contamination during shipment. The outlet plug will seal the bottom of the cassette so water can be added to dissolve the media and suspend the particles. If the user did not re-install the plugs after collection, the ability of the mold particles to be grown may be compromised. 13 SAMPLING TIME RECOMMENDATIONS LABORATORY ANALYSIS STRATEGIES The Via-Cell sampler collection period is dependent upon the density of the particulate in the environment. When sampling in a dusty environment, the particles can overlay each other on the slide causing difficulties in direct microscopy analysis. In addition particles will not adhere to the adhesive media if the adhesive is already covered by particles. The Via-Cell sampler is unique in that the particulate collected may be analyzed using one or more analytical methods such as culturing, microscopy, PCR (polymerase chain reaction), or other types of analysis. Because the media on the Via-Cell slide is water soluble, and the lower half of the sampling cassette has a built-in trough, the sample collection may be suspended in water directly in the cassette without additional glassware. This suspension can then be transferred and used in any number of analytical methods that can use this suspension. The following chart suggests typical sampling times to attain a particle deposition on the slide in which the edges of the trace are sharply defined and the particles dispersed properly to enable good microscopic evaluation. Longer/shorter collection times may be required. Each situation must be evaluated according to specific conditions and the Via-Cell sampler sampling time must be adjusted to meet those conditions. RECOMMENDED SAMPLING TIMES Environmental Dust Conditions Sampling Time • Clean office environment or outdoors (no visible dust) 10 minutes • Indoor environment, high activity 5 minutes • Indoor environment, evidence of drywall renovation or industrial dust 1 minute CONTROL SAMPLE RECOMMENDATIONS NOTE Aseptic (sterile) handling procedures must be employed by laboratory personnel to prevent the introduction contamination that could affect analysis. The collected sample must be processed in the laboratory in a timely manner. Experimentally it has been shown that collected mold particles (for example, Cladosporium cladosporioide) can maintain viability inside the Via-Cell up to 5 days after collection. However, the best viability and resulting growth was achieved within 3 days. After 3 days, some diminished viability will occur. For this reason it is recommended that the collected sample reach the laboratory within 24 hours after collection and that the sample should be processed by the laboratory within 24 hours after receipt. Processing may include screening, creation of the suspension and culture. If analysis as PCR is done, the collection can remain on the collection slide much longer as viability of the particles is not a factor. Please note that if culturing of the collection is anticipated, staining of the collection will not be possible for prescreening the particles with direct microscopy since stain kills the viable particles. If PCR analysis is anticipated, staining may be possible; it will be up to the user to determine the suitability of the stain and possible interference with the analysis. Using one or more of the following control sample recommendations is considered a good sampling practice that will help provide some basic guidelines to interpreting results: 1. Collection of an outdoor sample may help to determine the amplification of indoor particles. 2. Collection of a sample in a ‘non-suspected’ area may assist with the comparison of results. This can also sometimes be used in place of an outdoor sample when conditions outside are not favorable for sampling, such as on a rainy day. 3. Field blanks are a recommended sampling procedure. 12 NOTICE Each Via-Cell sampler should have a plug installed into the outlet port of the cassette as well as the cap over the inlet port when received by the laboratory. These are necessary to seal the cassette to control the environmental conditions as well as prevent contamination during shipment. The outlet plug will seal the bottom of the cassette so water can be added to dissolve the media and suspend the particles. If the user did not re-install the plugs after collection, the ability of the mold particles to be grown may be compromised. 13 SAMPLE PREPARATION FOR CULTURING OR PCR ABOUT THE FOIL PACKAGING It is important to retain the resealable foil package for transportation of the cassette to the laboratory. This package along with the blue inlet and outlet caps combine to control the environmental conditions inside the cassette after sample collection. This is critical in maintaining the viability of the particles if culture analysis is required. The included safety seal label is used to ensure your collected sample remains uncontaminated until it reaches the laboratory. The Via-Cell sampler can be prepared for culturing, PCR and other analysis by suspending the particles in sterile water, then dispensing the suspended particles onto agar plates or other media. Required Supplies CAUTION -Syringe - 3cc sterile, or sterile pipettes -Sterile water -Culture plates with appropriate agar -Sterile particle spreaders -Self-closing tweezers -Controlled environmental chamber The interior of the Via-Cell sampler is sterile. Care needs to be taken when handling the product with the plugs removed so that the sampling port and outlet port do not become contaminated with materials that may alter the collection or analysis of the sample (e.g. introduce materials not normally collected in the air stream). 1. Verify that the plug and cap are installed in the cassette. Record the sampler serial number onto the lab worksheet. The serial number is printed directly on the slide, not on the outside of the cassette. 2. Clean the outer surface of the sampler to remove any excess dirt. Cut the protective tape. Open the cassette in the controlled environmental chamber, keeping the slide in position as shown below. Be careful not to get pieces of tape inside the sterile cassette. 3. The collection slide will be facing media-side down toward the V shaped inlet sampling port. When you can read the word “ZEFON” on the collection slide, the media will be facing you. Collection Slide Media side faces the slit opening (the media is facing down in this picture) Trough in bottom half of cassette 14 7. Connect the Via-Cell sampler to the pump and position the cassette in the desired location. The Via-Cell sampler is capable of operating in any vertical or horizontal orientation and in confined spaces such as ducts, plenums or wall cavities. 8. Remove the large blue inlet cap from the cassette and place into the foil package for safekeeping. 9. Turn on the pump and run for the desired amount of time. Reference the chart on page 12 for assistance in determining the correct sampling time. 10. When the sampling period is completed replace the blue plug in the outlet and the blue cap over the inlet. Handle these items by the outer finger grips. The plugs will prevent contamination of the interior of the cassette during transport, and ensure proper environmental conditions of the collected sample. 11. Place the Via-Cell sampler into the special foil bag and zip it closed. Apply the red safety seal label over the top of the foil bag opening. This will ensure the integrity of your sample until it reaches the laboratory. Note the sample time and other important sampling information. Send the cassette to the analysis laboratory to arrive within 24 hours after the sample was collected. Refrigeration of the collected sample is not required during transport. 11 L0304210 Rev Rev 2 COLLECTING A SAMPLE 1. Calibrate the sampling pump to a flow rate of 15 lpm. 2. Clean hands or wear clean, disposable, powder free gloves. 3. Tear open the foil package using the tear strip on top. Use care when opening as this package is re-sealable and is required to be used after sampling for transport to the laboratory. 4. Remove the Via-Cell from the package. 5. Remove the blue inlet cap and record the Via-Cell serial number, along with any other pertinent information on the front of the foil package. The serial number can be viewed through the top of the cassette once the blue inlet cap is removed. It is printed directly on the collection slide as shown in Figure 4. After recording the serial number, replace the blue inlet cap until ready to sample. 6. Remove the blue outlet plug from the cassette and place the plug into the foil pouch for safe keeping. 4. Put 2cc sterile water into the trough in the bottom half of the cassette. After cleaning the tweezers tip with alcohol, place the slide upside down (media side down) on top of the water. If any large bubbles are trapped under the slide, gently lift one side of the slide and slowly lower to remove bubbles. NOTE: Be sure the alcohol has completely dried before handling the slide. 5. Leave the slide exposed to water for a minimum of 5 minutes 6. After 5 minutes, raise the slide with the forceps and flush the face of the slide with 1/4 cc of sterile water. Allow water to fall into cassette. If the adhesive does not completely wash off the slide, let the slide sit an additional 5 minutes to dissolve the remaining adhesive. 7. Draw the suspension from the cassette housing into a sterile syringe or pipette, then dispense onto a culture plate. Figure 4 Culture Plating Tip It may be desirable to split the suspension onto several culture plates. Particles such as molds and funguses germinate in less than 100% RH (liquid water). Using more water to dissolve the media may result in a longer time for the water to evaporate from the surface of a culture plate and growth to occur. 10 15 DIRECT MICROSCOPY PROCEDURES Typical Bio-Pump® Calibration Setup General This procedure will enable the analyst to overview the particles on the slide and then determine the next course of action to take (e.g. culture the sample). If culturing the sample after microscopic analysis is a possibility, it is important to aseptically handle the slide with sterile instruments to maintain sterility of both the slide and the inside of the cassette. Analysis of the collected sample should be performed by those experienced in particle identification. Required Supplies -Standard 1 x 3 microscope slide -Microscope -Stain or linking solution (see stain notice below) -Self-closing forceps -Controlled environmental chamber -Zefon Via-Cell Sterile Microscopy Linking Solution -Cover Glass Sample Preparation 1. Prepare a standard microscope slide by ‘sterilizing’ with alcohol. 2. Record the Via-Cell sampler serial number onto the lab worksheet. 3. Cut the adhesive label around the Via-Cell cassette. 4. Aseptically open the cassette in the environmental chamber taking care not to touch the inner surfaces of the cassette. 5. Remove the slide using forceps (tips ‘sterilized’ with alcohol) and place onto the sterilized microscope slide with the media side up (when the media is facing up, you can read the printing on the slide). DO NOT place the Via-Cell slide face down onto the microscope slide as transfer of the adhesive and/or particles may occur. 6. Place the slide under the microscope for examination. Be careful not to contaminate the slide. NOTICE Stains such as LactoPhenol Cotton Blue or Saffron Red contain solvents that will destroy the ability for spores to grow. DO NOT use any type of stain if you plan to culture the sample after examination 16 Via-Cell®/Air-O-Cell® CSI Flowmeter mini-BUCK IAQ Calibrator Via-Cell®/Air-O-Cell® CSI Bubble Tube The Via-Cell flowmeter used with the Zefon Bio-Pump® has the in-line resistance of a sampler built into the calibration scale. When using the mini-BUCK or Via-Cell/ Air-O-Cell CSI bubble tube, actual samplers are used in-line during calibration. For complete calibration instructions, please refer to the instructions included with your pump or calibration device. Typical High Volume Pump Calibration Setup Direct Connection to Rotameter Flowmeter Direct Connection to Electronic Calibrator In-Line Connection to Electronic Calibrator The Via-Cell sampling cassette does not produce significantly measurable backpressure and does not impede the performance of most high volume rotary vane, diaphragm or linear pumps. Therfore the calibration device may optionally be connected directly to the pump (without a Via-Cell sampling cassette in line) to calibrate the pump flow rate. When choosing to calibrate with a sampler in-line, it is recommended that one sampler is retained as a permanent calibration cassette and used for this purpose each time. 9 SAMPLE PREPARATION - CALIBRATION DIRECT MICROSCOPY SLIDE PREPARATION The Via-Cell sampler requires the sampling pump to be calibrated at a flow rate of 15 liters per minute to ensure proper collection. Ideally, calibration should be checked prior to and after each collection and as a minimum once per day. It is strongly recommended that a primary standard device such as a soap bubble meter/tube or other NIST certifiable device be be used to calibrate the sampling pump. Secondary calibration devices such as a rotameter may be used if it is calibrated against a primary standard. For use when standard direct microscopy is required and the sample may later be cultured. Below are examples of typical devices that can be used for calibration: Zefon Bio-Pump® Primary Calibrators Secondary Calibrators Zefon Via-Cell /Air-O-Cell CSI Bubble Tube Zefon Via-Cell /Air-O-Cell CSI Flowmeter (#ZBP-305) A NOTE ABOUT LINKING SOLUTION The use and application of linking solution is an important step when examining Via-Cell slides under direct microscopy and/or when viability of particles needs to be preserved. The adhesive on the Via-Cell slide has a frosty appearance in its natural form. This needs to be cleared before use in direct microscopy. Use of linking solution solves this. The linking solution works by partially dissolving the adhesive. Therefore it is necessary to place enough solution onto the slide that will allow the cover slip to carry the solution completely under the cover slip. Otherwise blotchy, non-clarified areas may be seen under the cover slip. miniBuck IAQ Calibrator High Volume Pumps (includes AC powered rotary vane, diaphragm and linear pumps) Primary Calibrators Secondary Calibrators Gilian Gilibrator Electronic Bubble Meter Rotameter flow meters Step 1 Place the Via-Cell slide onto the microscope slide media side up. IMPORTANT: Do not permanently mount sample to microscope slide. This preserves the ability to culture the sample. miniBuck IAQ Electronic Calibrator Via-Cell® slide with media facing up Bios DryCal® Electronic Calibrator Please note that some pumps, including the battery powered Zefon Bio-Pump®, will only work with specific calibration devices. Please reference the operation manual for your pump to determine if special calibration devices are needed. Sterile Microscope Slide IMPORTANT! Application of the linking solution must be done very carefully and in a specific manner to avoid disturbing the collected sample trace. Please follow the directions regarding proper application of linking solution precisely. 8 17 EXPLODED VIEW OF VIA-CELL CASSETTE Figure 3 Blue Inlet Cap Controls environmental conditions during storage and transport. Remove immediately prior to sampling and replace immediately after sampling. Step 2 Place a generous amount of linking solution along the edge of the slide. DO NOT place drops of linking solution directly on the trace area. This will result in excessive disturbance and shifting of particles. Main Body (clear plastic section) This section holds the collection media and is the section used during sampling. Note: Plastic may have an amber tint. This is considered normal and caused by the radiation used during sterilization. Cassette Outlet Connect pump tubing here. Blue Outlet Plug Remove during sampling and replace immediately after sampling. Step 3 Lower the cover slip on top of the slide gently at an angle as shown. Placing the cover slip on the slide this way allows the linking solution to spread across the slide while disturbing the trace as little as possible. 18 WARNING! Do not open the blue inlet cap assembly! The substances used inside may be irritating to your skin. 7 RECOMMENDED FIELD SAMPLING PROCEDURES The Via-Cell sampler is designed to efficiently collect bioaerosol particles while also providing safe transport to the laboratory. The results achieved when using the sampler requires proper use, including pump calibration and handling techniques. Therefore familiarization with the Via-Cell Sampler collection procedure is recommended prior to use. Required Sampling Equipment * Via-Cell Sampling Cassettes * Sampling pump capable of pulling 15LPM * Tubing to attach cassette to pump, if required (1/4” ID or 1/2” ID) * Pump calibration device Handling the Via-Cell Sampler: The Via-Cell Sampler is sterile and ready-to-use when received. It is very important not to contaminate the inner-surface of the cassette through careless handling, or insertion of anything into the cassette through the inlet or outlet port. While the collection may render the sampler not sterile due to the collected particles, the person doing the collection should not introduce spurious materials into the collection that could alter the outcome. Preparation is now complete Slides take several minutes to clear. Here is an example of a before and after look at the slide. Your slide should exhibit clarity similar to the top example. Handling Tips and Considerations 1. Always store Via-Cell cassettes in climate controlled areas with a room temperature between 50 - 80 degrees F. Direct Microscopy Preparation Application Notes: 2. The Via-Cell sampler does not require refrigeration during storage or during shipment to the analysis laboratory. 1. Always sterilize a cover glass to place over the collection if you intend to later culture the sample. 3. Prolonged exposure to high temperatures (e.g. as that in the trunk of a car or hot warehouse) may alter the performance of the product. 2. Sterilization is not necessary if you do not intend to culture the sample. 3. 4. Use of the Via-Cell sampler in extreme environmental conditions (i.e. very hot or cold weather) may affect the collection performance. Use of any type of stain or solvent should only be used if you do not intend to culture the sample. Some stains may not clear the Via-Cell slide adequately. If this happens, contact Zefon and we can provide guidance or sell a stain that will clear adequately. 4. If using immersion oil, apply it carefully. If immersion oil makes contact with the Via-Cell adhesive, it will probably result in killing any viable particles. 5. Always rinse the cover glass with about 1/4cc water into the cassette trough to collect any particles that have adhered to it. 5. Always ship Via-Cell samples to the laboratory so that the laboratory receives the samples within 24 hours after collection. The laboratory should process the samples within 24 hours of receipt. 6 19 OPERATIONAL PERFORMANCE Estimation of Collected Particle Load The Via-Cell Sampler particle deposition area is approximately 0.9 mm wide by 14.4mm long yielding an approximate area of 12.96 mm2. The width of the deposition trace may vary slightly in particle density from the middle to outer edges of deposition. For this reason, using the deposition trace area is not recommended for direct calculation of particle concentrations. The recommended procedure for calculating particle concentrations is based on using the Via-Cell Sampler trace length and microscope field diameter. One field of view counted is defined as the calibrated diameter of the microscope field of view (in mm) covering one cross-sectional pass or “traverse” across the sample deposition trace. A typical sample preparation and microscopic counting procedure is illustrated in Figure 5. Figure 5 ILLUSTRATION OF THE Via-Cell COUNTING PROCEDURE ® Microscope slide The Via-Cell sampler has been evaluated in commercial and university laboratories to determine the collection efficiency and operational aspects of the collector. With impactor-type samplers, the most common measure of efficiency is defined by it’s “cut-point” curve. The cut-point (also referred to as the “D-50” point) is defined by the particle size at which 50% of the particles are collected and 50% pass through the sampler at a pre-determined flow rate. The ‘cut point’ for the Via-Cell Sampler has been determined to be 1.56 microns at a flow rate of 15 LPM. This cut point is ideal for fungal analysis because particles smaller than this are not of interest, and may even create enough background debris to obscure adequate viewing of the sample and compromising reliable analysis. Figure 2 P 100 90 1.664µm at 97.8% 80 1.604µm at 77.1% Collection Efficiency, % Direct microscopy enables the analyst to estimate the concentration of particles in the sampled area. Counting and quantification of the collected particles accomplish this. This estimation is conducted by counting calibrated cross-sections of the deposited sample trace. The number and type of particles estimated per cubic meter of air is calculated based on the a) length of the deposition trace, b) length of trace actually examined, c) volume of air collected, and d) number of particles counted. W = 0.077 cm S/W = 0.50 Re = 2,310 Dp = 1.56 Pm 50 GSD = 1.05 70 60 50 1.553µm at 45.1% 40 30 1.508µm at 26.4% 20 Via-Cell slide 10 Analysis starts at 1st traverse - completes and moves to 2nd traverse 1.398µm at 7.1% 0 1 Aerodynamic Particle Diameter, Pm 10 Sample particulate The graph above displays the collection efficiency of the Via-Cell sampler when used at a flow rate of 15LPM. Samplers that are designed properly will exhibit upper and lower curve limits that are very sharp and in an ideal situation, a sampler will reach 100% efficiency almost immediately after the cut-point. The Via-Cell demonstrates a remarkably sharp curve that is superior to many other devices on the market today. 20 5 PRINCIPLES OF OPERATION The Via-Cell sampler operates on the well established principle of inertial impaction. Particles in the air stream are accelerated as they approach the tapered inlet opening and drawn through a small slit aimed directly at a glass slide. This glass slide contains a water soluable sampling media which is designed to hold particles intact and maintain viability for later analysis. As the particles come through the slit, the air velocity forces the particles to impact into the sampling media, while the air stream makes a sharp 90o turn and proceeds around the slide and out of the cassette. The air flow path through the Via-Cell sampling cassette is illustrated below in Figure 1. The calculation of particle concentration per cubic meter of air can be performed by using the following equations: STEP 1 Determine the actual air volume collected in cubic meters (m3) using the following calculation: Air volume (m3) = (Sampling rate (liters per minute) / 1000) x Number of minutes STEP 2 Figure 1 AIR FLOW PATH OF THE VIA-CELL SAMPLER Determine the length of sample trace counted based on the microscope field of view and number of fields of view counted. It will be necessary to accurately calibrate and measure the diameter of the microscope field of view using a stage micrometer slide. Remember, each microscope is different, and each different combination of ocular and objective lens must be calibrated separately. Stated lens magnifications are rarely precise. The microscopist should then record the number of complete traverses examined across the width of the deposition trace and use the formula given below to calculate the actual length of the deposition trace examined. Trace Length Counted (mm2) = Microscope field diameter (mm) x number of traverses STEP 3 The concentrations of particles (cts/m3) can then be determined by using the equation below. 1 Trace length (14.4mm) Cts / m3 = _______________ x ___________ x # of particle counts Air Volume(m3) Total length of trace counted (From Step 2) 4 (From Step 1) 21 ANALYSIS OPTIONS Mold Spore Example Calculation Microscope field diameter at (900X) Number of traverses Sample volume (15 lpm @10 minutes) Mold spore counts 14.4mm _________ 0.240 x 10 x 1 _______ x 0.15 = = = = 0.240 mm 10 (15 / 1000) x 10 = 0.150m3 50 14.4 50 = _____ x 50 0.36 Particle Type Counting Recommendation Pollen — Entire trace or 100 grains (whichever comes first) should be examined at a minimum magnification of 200X. Identification and speciation should be performed at minimum magnification of 400X. A minimum of 15% of the entire trace should be examined o r a m i n i m u m o f 10 0 m o l d s p o re s c o u n te d (whichever comes first) . Identification and speciation should be per formed at minimum magnification of 400X. Fibers — Other Aerosols — The Via-Cell sampler is the perfect tool for collecting viable organisms and culturing them on agar media plates. PCR Analysis: The Via-Cell utilizes a water soluable collection media which is ideal for PCR and other chemical types of analysis. Direct Microscopy: Samples collected using the Via-Cell sampler may be “pre screened” using direct microscopy methods which allows the analyst to decide if additional analysis techniques are needed. = 2000 ct/m3 MICROSCOPIC COUNTING RECOMMENDATIONS Mold Spores — Culturable Sampling: Via-Cell sample Make decision on analysis type Culture the sample Direct microscopy screening The entire trace or 100 fibers, (whichever comes first) should be examined at a minimum magnification of 200X. Is further analysis necessary? Skin cell fragments, combustion emissions, insect parts —A minimum of 10% of the entire trace should be examined or a minimum of 100 particles counted (whichever comes first). Yes Culture the sample on agar media Process using PCR or other chemical means 3 Process using standard direct microscopy Ordering Information INTRODUCTION The Via-Cell sampler is a unique, multi-purpose particle collection device designed for the collection of both viable and non-viable bioaerosols. Using a proprietary water soluble collection media along with special environmental controls, the Via-Cell sampler is capable of collecting particles, maintaining the viability of spores during transport to the laboratory. The particles can then be analyzed using one or more analytical methods. APPLICATIONS • Indoor Air Quality • Clean Room Monitoring • Allergy Testing • Hospital Infection Control • Flood Restoration Field Equipment Product Number Description VIA010 Via-Cell Cassettes, 10/pk AOCCAL Via-Cell In-Line Calibration Adapter AOC-WS10 Via-Cell® Inner Wall Sampling Adapter Z-LITE-IAQ Zefon Z-Lite IAQ Pump ZBP-200 Zefon Bio-Pump® ZBP-311 Zefon Bio-Pump® Via-Cell/Air-O-Cell® CSI Bubble Tube APB-803300 mini-Buck IAQ Calibrator DCL-H Bios DryCal® DC-Lite Calibrator ZBP-305 Via-Cell/Air-O-Cell® CSI Flow Indicator VIA-CELL ADVANTAGES Laboratory Equipment • Preloaded, sterile and ready for use. • Disposable, no equipment to clean between samples. • • Product Number Description Eliminates cross contamination concerns. ZA0046 Cassette Opener Includes tamperproof safety seal to prevent sample contamination after collection. ZA0050 Particle Spreader, “T” shaped, sterile ZA0051 Syringe, sterile, 3cc Each slide inside the sampler is marked with a unique serial number to ensure accurate sample traceability. ZA0052 Alcohol wipes, 200/bx ZA0054 Forceps, self closing, each Shelf life of 1 year from date of manufacture is 4 times longer than most sampling methods using culture plates. ZA0055 Water, sterile, 100cc, screw cap container ZA0056 Via-Cell Linking Solution • Allows multiple types of analysis to be performed from a single collected sample. ZA0058 Via-Cell Blue Stain • Samples do not require refrigeration, only room temperature storage and transportation. • Small, compact size. No heavy or bulky equipment is required. • Can be used with virtually any kind of sampling pump capable of pulling a 15 lpm (vacuum) air flow, including battery powered pumps such as the Zefon Bio-Pump® or Bio-Pump® Plus. • • 2 Bioaerosol Sampling Cassette For the collection of viable and non-viable airborne particles Laboratory & User Manual 5350 SW 1st Lane, Ocala, FL 34474 • www.zefon.com Phone: 800-282-0073 • 352-854-8080 • Fax: Fax: 352-854-7480 © Copyright 2000 Zefon International, Inc. Via-Cell, Air-O-Cell, and BioPump are registered trademarks of Zefon International. LA03023 Rev 3